
43-EL Vario - Lawn mower SABO - Free user manual and instructions
Find the device manual for free 43-EL Vario SABO in PDF.


| Product type | Electric corded lawn mower |
| Brand | SABO |
| Model | 43-EL Vario |
| Cutting width | 43 cm |
| Power | 1200 W |
| Power supply | Electric 230 V / 50 Hz |
| Cutting height | 20 – 70 mm, central adjustment |
| Grass catcher | 50 L |
| Drive type | Variable rear wheel drive (Vario) |
| Handle | Foldable, ergonomic |
| Starting | Electric (button) |
| Weight | 12.5 kg |
| Dimensions (L × W × H) | 140 × 43 × 100 cm |
| Noise level | ~ 85 dB(A) |
| Maintenance | Clean after use, sharpen blade regularly |
| Safety | Blade brake, safety switch, protective housing |
| Spare parts | Blade, belt, wheels, catcher |
| Repairability | Repairability index: 7.5/10 (estimate) |
Frequently Asked Questions - 43-EL Vario SABO
User questions about 43-EL Vario SABO
0 question about this device. Answer the ones you know or ask your own.
Ask a new question about this device
Download the instructions for your Lawn mower in PDF format for free! Find your manual 43-EL Vario - SABO and take your electronic device back in hand. On this page are published all the documents necessary for the use of your device. 43-EL Vario by SABO.
USER MANUAL 43-EL Vario SABO
A1 | E1 | B1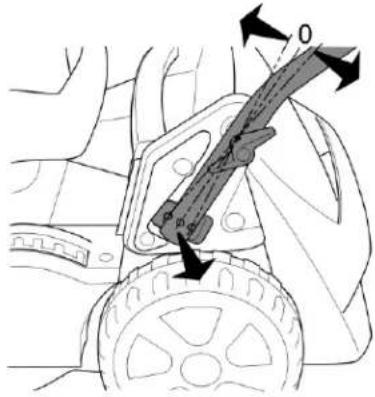 |
B2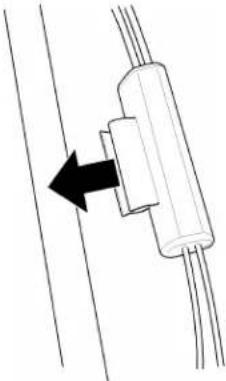 | R1 | S1 |
I | C2 | D2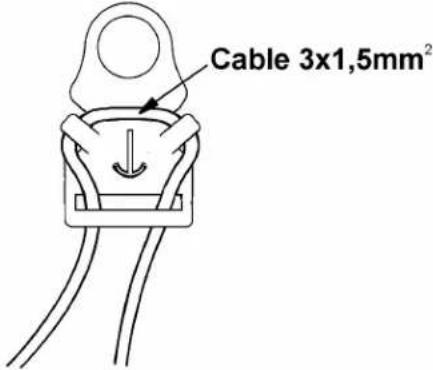 |
A2 | F | G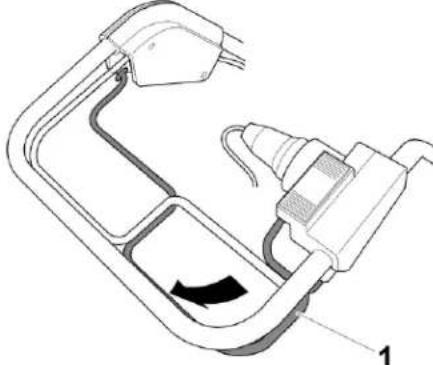 |
E2 | H | J |
K | L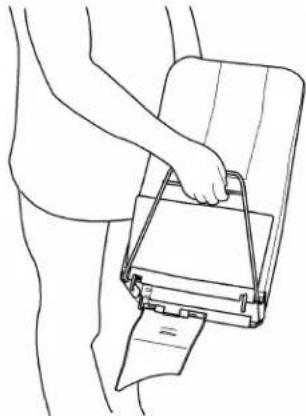 | M |
U2 | O | N |
Q | R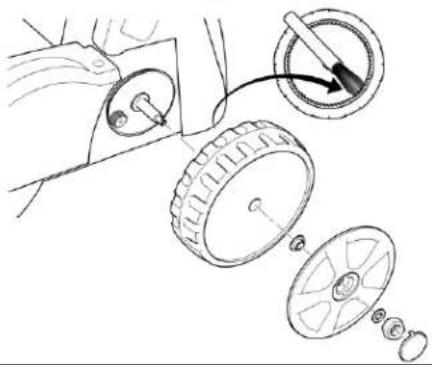 |
| DeutschOriginalbetriebsanleitung |  — — |
| FrançaisMode d'emploi d'origine |  — — |
| EnglishOriginal Instructions |  — — |
| NederlandsOriginele gebruiksaanwijzing |  |
| EspañolManual del operador original |  |
| ItalianoManuale d'uso originale |  — — |
1 Einführung......2
2 Explanation of the rating plate affixed to the machine....2
3 Explanation of the pictograms 2
4 Explanation of the symbols....2
5 Proper use....3
6 General Safety Guidelines for the hand-held rotary lawnmower (electric) .....3
General safety instructions....3
Preparatory measures ....3
Handling....4
Maintenance and storage....5
7 Description of components....5
8 Preparation....5
Opening out the handle (Illustration A1 + E1 + B1 + B2)....6
Attaching the grass collector to the mower (Illustration R1 + S1) .....6
Adjusting the cutting height (Illustration I)....6
9 Before using the lawnmower for the first time....6
10 Starting the machine 6
Attaching the connecting cable (Illustration C2)....6
Attaching the connecting cable to the strain relief fitting (Illustration D2)....6
Starting the motor (Illustration A2)....6
11 Switching off the Motor (Illustration F) 7
12 Emergency stopping....7
13 Movement drive....7
Operating the rear wheel drive (Illustration G + E2)....7
Adjusting the speed (Illustration H)....7
14 Grass collector 7
Operation with grass collector 7
Turbo signal (shows when the grass collector is full) (Illustration J + K) .....7
Emptying the grass collector (Illustration L)....7
Operation without grass collector ....7
15 Mowing....7
Mowing on slopes....7
Handling the cable during use....7
Checking operating safety....7
Time restrictions....8
Tips on caring for your lawn....8
Mowing (Illustration M)....8
Mulching 8
Converting the machine to rear ejection (Illustration U2 + S1) 8
16 Service intervals....8
17 Care and servicing of your lawnmower 8
Cleaning (Illustration O) 8
Storage 9
Collapsing the handle (Illustration A1) 9
Transporting and securing the equipment (Illustration N)....9
Maintenance of the blade....9
Sharpening and balancing the blade (Illustration Q)....9
Replacing the blade....9
Servicing the front wheels....9
Servicing the rear wheel drive (Illustration R)....9
Servicing the drive....9
Changing the drive V-belt....9
18 Troubleshooting....9
19 Technical data ....10
Motor 10
Mower....10
Sound power level 10
Sound pressure level 10
Vibrations 10
20 Original spare parts 10
Declaration of Conformity.....see the back, after the last language
1 INTRODUCTION
Dear Garden Lover,
Where pride in a trim lawn is coupled with a love of gardening, gardeners really appreciate good gardening equipment. You have made an excellent choice in purchasing your new lawn mower. It combines the power of a major traditional brand with the innovations of modern high-tech. You will feel this when you are working with it and be very pleased with the wonderful result.
Yet before you start work on your lawn, here is some important information that you should always observe.
Before you start your mower for the first time, read this operation manual through carefully to familiarise yourself with the correct operation and maintenance of the machine and to avoid injury or damage to your lawn mower.
Use the lawn mower carefully. The pictograms on the equipment draw your attention to the most important precautionary measures.
The safety instructions in this operating manual are marked with symbols.
The meaning of the pictograms and symbols is explained in the following chapters.
The terms "left" and "right" always refer to the left and right-hand side of the equipment seen in the direction of movement.
Your mower will work reliably when the technical instructions are followed exactly. We would like to point out that any damage to the mower caused by operator faults is not covered by warranty / guarantee obligations.
We hope you enjoy cultivating your lawn.
2 EXPLANATION OF THE RATING PLATE AFFIXED TO THE MACHINE

1 Model
2 Protection type
3 Connection voltage
4 Product identification number
5 Network frequency
6 Power
7 Weight
8 Tested safety (depending on model)
9 Motor speed
10 Electrical appliances should not be disposed of with household waste. Equipment, accessories and packaging must be disposed of in an environmentally friendly way
11 Year of manufacture
12 CE conformity symbol
13 Hand-guided lawn-mower
14 Guaranteed sound power level
15 Serial number
3 EXPLANATION OF THE PICTOGRAMS
Read and follow the operator's manual and safety instructions!
Risk caused by thrown elements when the motor is running – Observe the safety distance / Keep all persons outside the danger area!

Keep supply flexible cord away from cutting blades.

Caution, sharp cutting blades. Keep hands and feet away from the blades! - Switch the motor off and remove the plug from mains before performing any cleaning and maintenance work or if cord is damaged.

Motor STOP

Switch the drive on
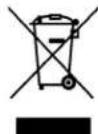
Electrical appliances must not be disposed of as household waste. Send equipment, accessories and packaging for environmental recycling.
4 EXPLANATION OF THE SYMBOLS

WARNING
Always read and follow the operating instructions and general safety regulations carefully. Keep the operating instructions for reference purposes. Proper use also includes adherence to the operation, maintenance and service conditions prescribed by the manufacturer.

WARNING
Keep all persons outside the danger area!
Contact with the rotating blade can cause severe injury.
Objects ejected at high speed can cause severe injury.
You must never mow the lawn if there are other persons nearby, especially children or animals.

WARNING
Electric shock can lead to serious injuries.
The electrical equipment must not be modified.
Check the connection cable for signs of damage and ageing before you start a new mowing job. Make sure the cable can move freely, do not kink, chafe or squash it.
Damaged connection cables must be replaced.
Do not spray the device off with water. The electrical system could become damaged.
Always have an authorised professional workshop replace, regrind and balance the blade, since an insulation protection test always has to be carried out after repairs or maintenance work on insulation parts (e.g. blade screw) in accordance with the applicable standard DIN EN 60335.

WARNING
Watch out for sharp blades! Contact with the rotating blade can cause severe foot injuries.
Only start the engine when standing behind the mower.
Ensure that your feet do not get under the housing.

WARNING
Watch out for sharp blades! Contact with the rotating blade can cause severe hand and foot injuries.
When the engine is running, always observe the safety distance to the machine which is maintained by the handlebar.
Ensure that your hands and feet do not get under the housing.

WARNING
Objects thrown upwards can cause serious injuries.
Before mowing areas covered in leaves in particular, remove all stones, sticks, wires, toys and other objects from the lawn.
Never use the equipment with the protective devices damaged or missing.
| Missing or damaged safety and protective devices are a safety hazard for both you and other people.Before initial operation, check that the cutting blade screw is fastened, then examine the cutter bar for a tight fit, wear and damage every time you intend to use the mower. Have an authorised workshop replace a worn or damaged blade. Have an authorised workshop tighten the cutting blade screw. | |
 | WARNINGElectric shock can lead to serious injuries.Keep the connection cable away from the cutting blade.When starting the mower make sure the connection cable is not near the housing.Do not mow over the connection cable.In the event of damage, switch the mower off and wait for the blade to come to a standstill, remove the plug from the mains immediately. Do not touch the connection cable before it has been disconnected from the mains supply. Damaged connection cables must be replaced. |
 | WARNINGElectric shock can lead to serious injuries.Never move over live wires when the cutting tool is switched on.Before and during the mowing process, check the area for live wires and remove them if possible.If a live wire is damaged, switch off the equipment and disconnect the wire from the supply grid. |
 | CAUTIONIf the mains plug is not disconnected from the mains during work on the equipment, the motor may start up and this can result in serious injuries.Switch the motor off and disconnect the mains plug before carrying out any maintenance and repair work. When servicing the cutter blades note that they can be moved even when the voltage source is switched off.Consult the operating instructions for respective cleaning or maintenance instructions.Insufficient equipment maintenance will lead to safety-related faults. |
 | WARNINGContact with the rotating blade can cause severe hand and foot injury. Objects ejected at high speeds can cause severe injury.Switch the motor off and wait until the blade comes to stop:- if the mower has to be lifted or tilted, e.g. in order to transport it;- when moving off the lawn onto paths or roads;- if the machine is left unattended for any time;- before adjusting the cutting height;- before removing the collector bag;- before the mulch stopper is removed. |
 | CAUTIONContact with the sharp edges of the blade and other sharp edges of the machine can cause severe injury.Protective gloves must be worn at all times during maintenance and cleaning work. |
5 PROPER USE
- The equipment is exclusively designed for mowing grass and lawn areas within the context of gardening and landscape care ("Proper use"). Any use going beyond this is considered not proper; the manufacturer is not liable for any damage resulting from such use, the risk is borne by the user alone. Proper use also includes adherence to the operation, maintenance and service conditions prescribed by the manufacturer.
- Special care is required during use in public areas, parks, sports facilities, on roads and in agricultural and forestry operations.
- The mower must not be used in particular for trimming bushes, hedges and shrubs, for cutting twining plants or greenery on roofs and in flower baskets or boxes, for extraction or blowing on pavements.
- The use of any additional equipment and attachments not approved by the manufacturer is prohibited. If such additional equipment and attachments are used, the CE conformity and guarantee are considered null and void. Unauthorised modifications to this lawn mower exclude the manufacturer from liability for any damage resulting from these modifications.
6 GENERAL SAFETY GUIDELINES FOR THE HAND-HELD ROTARY LAWNMOWER (ELECTRIC)
General safety instructions

Always read the operating instructions carefully for your own protection and to guarantee perfect function. Familiarise yourself with the operating elements and correct machine operation. Keep the operating instructions for reference purposes.
- Remember that the machine operator or user is responsible for accidents with other persons or their property.
• These operating instructions belong to the machine and must be handed over to the new owner in the event of the machine being sold. - Never allow children and persons under 16 years of age or other persons not familiar with the operating instructions to use the machine. Local regulations can specify the minimum age of the user.
- Explain the potential hazards and how to avoid accidents to all those who are to use the equipment. This equipment may only be used, serviced and repaired by persons who are familiar with it and have been informed about the hazards.
- This equipment is not intended to be used by persons with limited physical, sensory or mental aptitude or lack of experience and/or knowledge unless they are supervised by a person responsible for their safety and have received instructions from this person as to how the equipment is used. This supervisor must decide in advance whether the person with limited physical, sensory or mental aptitude is suitable for this task.

Never use the mower while persons, particularly children, or animals are nearby.
- Keep your machine safely! Unused equipment should be kept in dry, closed rooms inaccessible to children.
• Machine safety and protective devices must not be manipulated or disabled. - The laying of cables must not be manipulated, e.g. by removing cable clamps or attaching additional cable ties! The cables must lie against the outside of the bar in such a way that they are neither crushed nor overstretched when the bar is folded. A damaged cable may result in a technical defect of the equipment.
Preparatory measures
- When mowing, you must always wear a strong, closed, non-slip pair of shoes or safety shoes and long trousers. Avoid wearing loose clothing or clothing with cords or belts hanging down. Do not mow whilst you are barefooted or wearing sandals. Wear protective goggles to protect your eyes.
- Loud noises can lead to hearing impairments. Wear ear protection.

Before and during mowing, check the whole area the equipment is being used on and remove all stones, sticks, wires, toys and other objects which can be caught and catapulted out.

Before and during the mowing process, check the area for live wires and remove them if possible.
Never move over live wires when the cutting tool is switched on. Risk of electric shock! If a live wire is damaged, switch off the equipment and disconnect the wire from the supply grid.
- If you also use a mowing robot for lawn care, the following safety instructions must be heeded with regard to the working area of the mowing robot:
– Before mowing on these areas, always check the range of the boundary wire. - If the wires are laid in the ground they must be checked, no wires may be visible, with particular attention necessary at the charging station.
- If the boundary wires are laid above ground they should be routed tight directly on the ground and not lie loose in the grass. The wires must be sufficiently fixed using boundary staples, see the operating manual.
- The boundary staples must not project, if this is the case push them firmly in place.
- Remove any residual wires before starting to mow.
In the cases described above, there is a risk of the wire being pulled in and wound up by the tool; this can lead to serious injury. - Low-hanging branches and similar obstacles can injure the operator or interfere with the mowing operation. Before mowing, identify potential obstacles such as low-hanging branches, and trim back or remove those obstacles.
EN
- In order to guarantee the proper and safe operation of garden equipment, a connection cable of the minimum quality H05 RN-F (alternatively H05 VV-F) in accordance with DIN/VDE 0282/4 with a cross-section of 3 × 1.5 ~mm^2 and a connection plug made of or covered with rubber in accordance with DIN/VDE 0620-2-1 are required. Connection must be to a CEE 7/4 socket 230 V AC.
- When a childproof cable is used, care must be taken that the fuse works perfectly (smoothly) as otherwise the device connection plug could become damaged.
- The plug must be fitted with a 16 amp slow fuse.
- We recommend that a residual current operated device with a maximum breaking current of maximum 30 mA or equivalent safety equipment be used.

The electrical equipment must not be modified. The connection cable must be checked for signs of damage and ageing before every new mowing job and may only be used in a perfect condition.
- If the unit is to be operated via a generator, an authorised specialist workshop should first be consulted with regard to a suitable generator.
- Before use, always carry out a visual inspection to see whether the cutting tool, attachment screws and the complete cutting unit are worn or damaged. To avoid unbalance, worn or damaged blades and attachment screws must be replaced by an authorised workshop.
- The condition of the pictograms must be checked every time the device is used. Worn or damaged pictograms must be replaced.
Handling
- The machine must not be operated in potentially explosive surroundings.

The connecting cable must kept away from the cutting tool. Whilst you are mowing the lawn, do not drive over the connecting cable with the machine; when guiding the connecting cable, always make sure that you are keeping a safe distance.

If the connection cable is damaged, switch the equipment off and wait for the blade to come to a standstill. Disconnect the mains plug immediately. Do not touch the connection cable before it has been disconnected from the mains supply. Damaged connection cables must be replaced. Make sure the cable can move freely, do not kink, chafe or squash it.
- Do not mow in bad weather when lightning could strike.
- Do not wear radio or music headphones. Safe service and operation requires your full attention.
- Only mow during daylight or if the lighting is good. Always push the machine at walking pace.
- Please adjust the driving speed depending on the person and the terrain. Increase speed gradually until you have reached a suitable driving speed, switch the motor drive off if necessary.
- Use care when approaching blind corners, shrubs, trees, or other obstacles that may obscure vision.
- Do not move too closely to holes, trenches and banks. The equipment can suddenly topple over when a wheel suddenly gives way over the edge of a trench or a bank or when an edge suddenly yields.
- Please be careful when mowing underneath playground equipment (e.g. swings). The equipment could get into an unsafe position. This may result in risk of injury.
- Do not operate the equipment when you are sick, tired or under the influence of alcohol, medicine or drugs.
- Avoid using the machine if possible on wet grass, in order to avoid the danger of slipping.
- Always make sure that you are standing securely whilst mowing slopes. Always mow at right angles to the slope, never mow straight up or down. Please be especially careful when you change direction when mowing on a slope.
- Do not mow excessively steep slopes! Mowing slopes always means additional risks. Your lawnmower is powerful enough to mow on slopes with a gradient of up to 58% (30° angle). For safety reasons, however, we urgently recommend you do not exploit this theoretical performance potential. Always make sure you have a firm stance. Manually guided lawnmowers should never be used for slopes with a gradient in excess of 26% (15° angle of slope). Stability may be lost.
- Please be especially careful when turning the machine or pulling it towards yourself.
- If you walk backwards whilst using the machine, you can easily stumble so this should be avoided. Avoid unnatural body positions. Ensure that you are standing securely and keep your balance at all times.
-
Always observe the safety distance to the machine which is maintained by the handlebar.
-
In order to avoid the machine slipping when being carried, always hold the machine by the grip devices provided (carrying handle, housing, handlebar ends or transverse bar of the lower handlebar section). Do not grasp the machine by the ejection flap!
- Note the weight of the machine before lifting or carrying it (see technical data). Lifting heavy weights can lead to health problems.
- Never lift or carry the machine when the engine is running.
- Never use the machine with safety and protective devices damaged or missing. Missing or damaged safety and protective devices are a safety hazard for both you and other people.
Safety equipment includes (see chapter Component description):

- Motor stop safety control bar (3) The lawn mower is equipped with a motor stop device. During operation and in the event of a hazard, the electric motor is switched off by releasing the motor stop bar. The electric motor and the blade must come to a standstill within 3 seconds. After release, the bar must always return to the position shown in the "component description" diagram. If this is not the case, it must be checked immediately by an authorised workshop. Risk of injury! If the blade run-on time is longer, stop using the equipment and take it to an authorised workshop.
Measuring run-on time
After the electric motor has been started, the blade rotates and a wind-like noise can be heard.
The run-on time corresponds to the duration of the wind-like noise after the electric motor has been switched off, it can be measured using a stopwatch.
The function of the safety control bar must never be put out of operation.
It is important to make sure that the safety control bar functions correctly. If this is not the case, have it repaired by an authorised specialist workshop.
Protective equipment includes (see chapter Component description):

- Housing, grass collecting bag, ejection flap (9) The protective devices protect the user against objects being ejected at high speed. The machine must not be operated with a damaged housing or without a properly fitted collecting bag or ejection flap on the housing.

- Housing This protection unit protects against injuries through contact with the rotating cutting blade bar. The equipment must not be operated with a damaged housing. Please make sure that hands and feet are not placed underneath the housing.

- Cover hose at upper part of bar (12), engine hood (5) and engine bracket (7), switch-plug combination with cable (1, 14), connection cable, cutting blade screw This protection unit protects against injuries through contact with electrical power carrying parts. The electrical equipment must not be modified. Damaged connection cables must be replaced. Please use a connection cable with a minimum quality of H05 RN-F (alternatively H05 VV-F) in accordance with DIN/VDE 0282/4. In accordance with the existing standard DIN EN 60335, an insulation protection test must be made after repair and maintenance work at insulation parts.
The safety devices must not be modified.
- Start or operate the starter switch with great care and according to the manufacturer's instructions.
- During the starting process, do not switch on the drive if available.

When you start the machine, make sure that your feet are at a sufficiently safe distance away from the cutting blades.

When the engine is started, the machine must not be tilted on end, if necessary it must be tilted by pressing the guide bar down so that the cutting tool is pointing in the direction away from the user, but only as far as absolutely necessary. For as long as the equipment has not been
lowered to the ground again, both your hands must be on the top part of the bar.
Do not start the engine when persons or animals are standing in front of the mower.
When using equipment with a side ejector, do not start the engine when you are standing in front of the ejector channel or other people/animals are located in the ejection area.

Never put your hands or feet near or under revolving parts. Always make sure that your hands or feet do not get under the housing. Always maintain a safe distance from the ejector opening.

Stop the engine by releasing the motor stop bar, pull the plug, make sure that all moving parts have come to a complete standstill:
- if you intend to leave the machine;
- before inspecting the connection cable;
– before you inspect, clean or carry out work on the machine;
– before unblocking jams or removing blockages in the ejection channel; - if a foreign body has been encountered;
-
when the machine starts to vibrate strangely.
-
If a foreign object has been encountered or if the machine becomes blocked, e.g. by driving onto an obstacle, a specialist dealer must check whether parts of the machine have been damaged or deformed. Any necessary repairs must also be carried out by an authorized specialist workshop.
- If the machine starts to vibrate unusually heavily or to make unusual noises, please have it checked immediately by an authorised workshop. Heavy vibrations on your hands can damage your health. Please contact an authorised workshop immediately if heavy vibrations occur.
• WARNING
The noise and vibration levels shown in these operating instructions are the maximum levels for use of the machine.
The use of an unbalanced cutting element, the excessive speed of movement, or the absence of maintenance have a significant influence on noise emissions and vibrations. Consequently, it is necessary to take preventive steps to eliminate possible damage due to high levels of noise and stress from vibration. Maintain the machine well, wear ear protection devices, and take breaks while working.
Adhere to the maintenance work listed in this operating manual and have the equipment checked and serviced regularly by an authorised workshop.

Switch the engine off by releasing the motor stop bar, make sure that all moving parts have come to a complete standstill,
- if you have to lift or tilt the mower e.g. for transport purposes;
- when you need to transport the machine to and from the area to be mowed
- when driving off the lawn;
- if you have to leave the machine for a short time;
- when you wish to adjust the cutting height;
– before you remove the grass collecting bag.
– before you remove the mulching plug;
Maintenance and storage
• Insufficient equipment maintenance will lead to safety-related faults.
- Ensure that all screws have been tightened securely and that the machine is in a safe working condition.

The ejection flap must only be opened and the grass collector or mulch stopper removed when the engine is turned off.

Before you start mowing, always check the grass collecting equipment for wear or loss of functionality.

Before you start mowing, always check the condition and firm attachment of the cutting blade. The blade attachment screw must always be tightened by an authorised workshop since an insulation protection test always has to be carried out after repairs or maintenance work on insulation parts (e.g. blade screw) in accordance with the applicable standard DIN EN 60335. A worn or damaged blade must always be replaced.
Always have the replacement, sharpening or balancing of the blade carried out by an authorised workshop, since according to the applicable standard DIN EN 60335, an insulation test must always be carried out following repairs or maintenance work to insulating components (e.g. blade screws).
- For reasons of safety, always replace worn or damaged parts.

Protective gloves must be worn at all times during maintenance and cleaning work.
- When handling operating fluids, such as lubricants, suitable protective equipment (e.g. suitable protective gloves) must be worn. The data sheets of the operating fluids must be observed.

Maintenance and cleaning work may only be carried out with the motor switched off and mains plug disconnected. When servicing the cutter blades note that they can be moved even when the voltage source is switched off. Regular maintenance is essential for safety and top performance.

Do not clean the machine with running water or pressure cleaners. This could damage the electrical system.
For reasons of warranty and safety, only genuine spare parts may be used. Non-equivalent spare parts can damage the machine and are a safety hazard.
- Notes for Switzerland: Electric appliances must only be operated if a residual current operated device with a maximum breaking current of 30 mA is also integrated into the circuit.
- Notes for Austria: The socket coupler of the connecting cable must be splashproof.
7 DESCRIPTION OF COMPONENTS
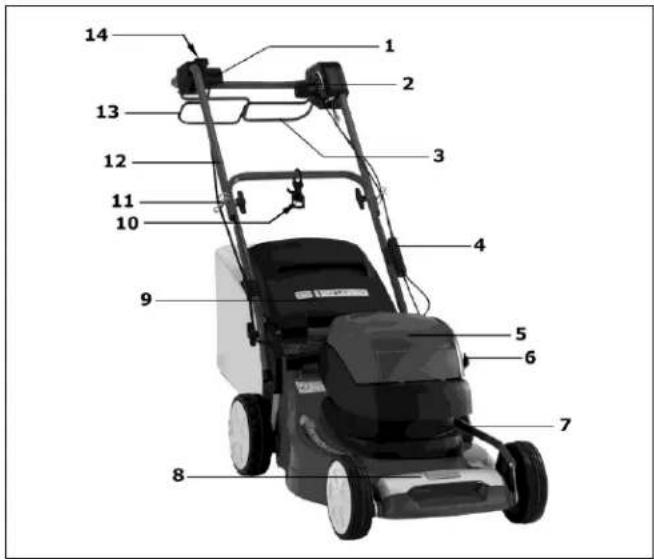
1 Electric cable connection plug
2 Vario actuation
3 Actuation bar for motor (safety control bar)
4 Bridge
5 Electric motor hood
6 Cutting height setting
7 Motor bracket
8 Carrying handle, front
9 Ejection flap
10 Cable relief for electric cable
11 Cable guide
12 Casing on the upper part of the bar
13 Drive control bar
14 Locking button (red)
8 PREPARATION
The following unit parts are included in the package for mower assembly:
- Mower with pre-assembled guide bar
- Grass catch, collecting bag frame
• Tool bag containing the following:
Operator's manual with Declaration of Conformity
– Warranty conditions (depending on model)
- Diverse attachment parts.
Should a part be missing, please contact your professional dealership.
Opening out the handle (Illustration A1 + E1 + B1 + B2)
IMPORTANT
Make sure that the cables are not pinched, squeezed, twisted or overstretched when the handlebars are folded apart or collapsed! Always run the cables along the outside of the bar connection. A damaged cable may result in a technical defect of the equipment.
– Pull on the handlebar which is collapsed in a Z-shape upwards into place A1.
- When the top and bottom parts of the handlebar are on the same level, firmly tighten the wing nuts by hand E1.
- On the lower part of the handlebar, push the ends as far apart as necessary for the locking cams facing the inside to lock into the respective bore holes B1. Three different handlebar heights can be set.
- Tighten the wing nuts on both sides by hand B1.
- Insert the cables into the cable guide on both sides. This prevents the cables being jammed when the handlebar is folded down E1.
- On the left-hand side (in direction of travel) press the bridge onto the lower bar B2.
CAUTION
When you activate the bar height adjustment, when loosening the wing nuts B1 used to secure the bar bottom to the housing (only loosen sufficiently to ensure that the bar can be moved freely) and snapping the locking cams out of the drilled holes in the housing, it is possible that unintentional upsetting of the bar may occur. In addition, this may result in crushed areas between the bar bottom and the housing. This may result in a risk of injury!
Attaching the grass collector to the mower (Illustration R1 + S1)
WARNING
When operating the equipment with a collecting bag, the bag must be completely assembled and in technically perfect condition.
- Insert the collection bag frame with the bar first into the grass catch. Align the upper seams of the grass catch on the bar.
- Press the holding profile onto the frame of the collection bag frame R1.
- Open the ejection flap of the mower upwards.
- Lift the grass collection bag on the carrier bar, insert the chute (1) R1 on the collection bag opening into the ejection flap and hang the grass collection bag with the two side hooks to the top of the mower housing S1.
– Fold the ejection flap onto the grass collection bag.
Adjusting the cutting height (Illustration I)

Safety instruction! See table for explanation of symbols page 3
You can set the desired cutting height with the adjustment lever (1) on the left of the mower.
– Pull the lever out of the catch and latch again after a lateral move into the desired position.
– The marking on the left of the housing indicates the cutting height.
IMPORTANT
Mowing at the lowest cutting height should only be carried out on level and plane lawns!
Please note that the lower cutting height settings may only be used for optimum conditions. If you select cutting height that is too low, the turf may be damaged and under certain circumstances even destroyed.
Besides the cutting height, the driving speed also influences the cutting pattern and collection result. Adapt the cutting height and driving speed to the grass height to be cut, the motor drive may not need to be switched on.
9 BEFORE USING THE LAWNMOWER FOR THE FIRST TIME

Safety instruction! See table for explanation of symbols page 3
Check all screw connections for a tight fit. Tighten the screws if necessary. Attachment of the cutter bar must be checked in particular (refer here to the chapter "Cutter bar care").
The blade attachment screw must always be tightened by an authorised workshop since an insulation protection test always has to be carried out after repairs or maintenance work on insulation parts (e.g. blade screw) in accordance with the applicable standard DIN EN 60335.
The lawn mower is equipped with a motor stop device.
Before using the equipment for the first time, make sure that the motor stop safety control bar is working perfectly. When the control bar is released, the motor and cutter bar must come to a standstill within three seconds.
After release, the bar must always return to the position shown in the "component description" diagram.
If this is not the case, it must be checked immediately by an authorised workshop.
Risk of injury!
If the blade run-on time is longer, stop using the equipment and take it to an authorised workshop.
Measuring run-on time
After the electric motor has been started, the blade rotates and a wind-like noise can be heard.
The run-on time corresponds to the duration of the wind-like noise after the electric motor has been switched off, it can be measured using a stopwatch.
Machine safety and protective devices must not be manipulated or disabled!
Make sure that all protective devices have been attached properly and are not damaged.
10 STARTING THE MACHINE

Safety instruction! See table for explanation of symbols page 3
IMPORTANT
If the unit is to be operated via a generator, an authorised specialist workshop should first be consulted with regard to a suitable generator.
Attaching the connecting cable (Illustration C2)
NOTE
In order to guarantee the proper and safe operation of the garden equipment, a connection cable of the minimum quality H05 RN-F (alternatively H05 VV-F) in accordance with DIN/VDE 0282/4 with a cross-section of 3 x 1.5 mm² and a connection plug made of or covered with rubber in accordance with DIN/VDE 0620-2-1 are required. Connection must be to a CEE 7/4 socket 230 V AC, slow-blow 16 A fuse.
When a childproof cable is used, care must be taken that the fuse works perfectly (smoothly) as otherwise the device connection plug could become damaged.
- Plug the cable into the switch/plug combination on the upper handle.
- Only then should the connecting cable be connected to the mains.
- When removing the cable always disconnect the cable plug from the mains first.
Attaching the connecting cable to the strain relief fitting (Illustration D2)
ATTENTION
The unit may not be used without the cable relief in order to prevent damages to the switch/plug combination and to the cable. The cable must be hung in the cable relief on the unit to ensure that it is fixed safely. This prevents the cable socket from being pulled off the unit. Moreover, the cable aligns itself automatically on the other side when cornering.
- Form a semi-circular loop in the cable, keep a distance of approx. 80 cm from the connection cable coupling.
- Insert the cable from the bottom into the cable relief and loop it around the fastening post.
- Hold the cable by both ends and pull it firmly into the cable relief.
Starting the motor (Illustration A2)
Only start the engine when you are standing behind the mower.
Always place the mower on a level area which is not covered with high grass (if the grass is too high it will block the cutter bar start-up and make starting the mower more difficult). When the engine is started, the machine must not be tilted on end, if necessary it must be tilted by pressing the guide bar down so that the cutting tool is pointing in the direction away from the user, but only as far as absolutely necessary. As long as the mower has not been lowered to the ground again, both your hands must be on the top part of the bar.
- To switch on the motor, first press and hold the red button (1).
- With the other hand, pull the red safety grip (2) on the upper handlebar section. The grip must be held in this position during operation.
- The red button can then be released.
IMPORTANT
If the motor does not start 5 seconds after the unit is started, then
- Let go of the switch holder
- Pull the plug!
- Check the power cable
- Check the power supply at the building (fuse)
- Check the unit for blockages in the mowing chamber
6 Get it checked by an authorised specialist workshop.
ATTENTION
When starting the motor, only the red safety grip may be used. The drive may only be switched on using the black drive switch operating lever once the motor is running. If the black operating lever is applied first, the drive is switched on at the same time leading to excess load on the motor.
11 SWITCHING OFF THE MOTOR (ILLUSTRATION F)
- Release the black drive switch operating lever (1) - mower comes to a standstill.
- Release the red safety grip (2) - motor switches off.
The automatic blade brake stops the blade within 3 seconds.
12 EMERGENCY STOPPING
Release the safety grip and the drive switch bar.
- The mower will stop.
- The blade will stop.
- The motor will stop.
NOTE
Before every mowing job, make sure that the safety control bar for the motor brake and the motor drive control bar are working perfectly:
- when the safety control bar is released, the motor and cutter bar must come to a standstill within three seconds.
- when the motor drive control bar is released, the machine must come to a standstill immediately.
If this is not the case, please consult your nearest authorised workshop.
13 MOVEMENT DRIVE
Operating the rear wheel drive (Illustration G + E2)
IMPORTANT
The rear wheel drive may only be adjusted when the engine is running in order to avoid damage!
The rear wheel drive is switched on and off by means of the black drive control handle (1) on the top guide bar when the motor is running G :
- Pull and hold the drive control handle = mower moves
- Release the drive control handle = mower stops (0-position).
The holding of the drive control handle (1) automatically holds the red switch holder for the motor (2) in the operating position E2.
The drive control handle must always be pulled firmly up against the top bar. Improper activation will cause wear on the gearbox. The increased resistance of the bar in the starting position is deliberate to make accidental operation more difficult.
NOTE
The rear wheels click when the mower is pushed forwards.
Adjusting the speed (Illustration H)
IMPORTANT
The speed may only be adjusted when the engine is running in order to avoid damage!
The driving speed is set using the rotary knob mounted on the left.
- The knob can be turned in both directions for speed adjustment, so that the required driving speed can be set. The arrow on the knob indicates the driving speed.
- Position "Hare" = fast (max. speed)
- Position "Tortoise" = slow (min. speed)
NOTE
Mowing at high speed leads to poor cutting pattern or collection result. Always adapt the speed to the prevailing conditions. For longer grass sections, a slower driving speed should be selected.
14 GRASS COLLECTOR


Safety instruction!
See table for explanation of symbols page 3
Operation with grass collector
WARNING
When operating the equipment with a collecting bag, the bag must be completely assembled and in technically perfect condition.
IMPORTANT
Make sure that the chute (1) R1 is not bent when handling the collector.
While mowing, ensure that the collector is emptied in good time. The turbo signal on the collector will indicate when the collector should be emptied.
Turbo signal (shows when the grass collector is full) (Illustration J + K)
There is an indicator on the top of the collector that shows whether the collector is empty or full:
The collector indicator inflates if the collector is empty and during the mowing J .
- If the collector is full, the indicator collapses; once this happens, stop mowing immediately and empty the collector K .
IMPORTANT
If the fabric of the grass collector is very dirty the turbo indicator will not inflate – in this case, clean the fabric immediately. The grass collector will only collect grass perfectly if it is permeable to air.
IMPORTANT
Do not clean the grass collector with hot water!
Emptying the grass collector (Illustration L)
- Switch off engine.
- Lift ejection flap.
- Unhinge the full grass collector from the mower at the carrying strap – the ejection flap closes automatically.
- Empty the collector thoroughly whilst holding it by the carrying strap and the moulded handle on the bottom.
Operation without grass collector
WARNING
When mowing without grass collector the ejection flap on the mower housing must always be closed (flap down).
15 MOWING

Safety instruction! See table for explanation of symbols
Mowing on slopes
NOTE
The mower can be used on banks and slopes with a gradient of up to 58% (30° angle).
For safety reasons, however, we urgently recommend you do not exploit this theoretical performance potential. Always make sure you have a firm stance. Manually guided lawnmowers should never be used for slopes with a gradient in excess of 26% (15° angle of slope). Stability may be lost.
Handling the cable during use
Prepare the cable in such a way that the machine can pull it behind easily over the lawn area already mown. When the mower is turned, the cable relief automatically places the cable on the other side of the handle bar.
Make sure that the cable is kept away from the cutting tools and does not form any loops.
Examine the mains connection cable before any mowing for signs of damage and only use it if it is in perfect condition.
Checking operating safety
The lawnmower is equipped with a motor stop device.
Before every mowing job, make sure that the motor stop safety control bar is working perfectly. When the control bar is released, the motor and cutter bar must come to a
EN
standstill within three seconds.
After release, the bar must always return to the position shown in the "component description" diagram.
If this is not the case, it must be checked immediately by an authorised workshop.
Risk of injury!
If the blade run-on time is longer, stop using the equipment and take it to an authorised workshop.
Measuring run-on time
After the electric motor has been started, the blade rotates and a wind-like noise can be heard.
The run-on time corresponds to the duration of the wind-like noise after the electric motor has been switched off, it can be measured using a stopwatch.
Machine safety and protective devices must not be manipulated or disabled.
The perfect function of the motor drive control bar must also be checked before every mowing job. When the motor drive control bar is released, the machine must come to a standstill immediately. If this is not the case, it must be checked immediately by an authorised workshop.
Make sure that all protective devices have been attached properly and are not damaged.
Check the upper part of the bar (insulation) for damage. If the casing should be damaged, contact the nearest authorised workshop without delay, since otherwise injuries (electric shock) can occur through touching the live parts.
To avoid risk, check the condition and firm attachment of the blade before every mowing job. The blade attachment screw must always be tightened by an authorised workshop since an insulation protection test always has to be carried out after repairs and maintenance work on insulation parts (e.g. blade screw) in accordance with the applicable standard DIN EN 60335. A worn or damaged blade must always be replaced. (refer here to the chapter "Cutter blade care")
In addition, check the fan, blade coupling and fan housing every 10 operating hours for wear and a tight fit. Also check equipment screws and nuts for a firm fit and tighten if necessary.
If the mower mechanism becomes blocked e.g. by colliding with an obstacle, have an authorised workshop check whether any parts of the mower are damaged or deformed. Always have any necessary repairs done by an authorised workshop too.
If the machine starts to vibrate unusually heavily or to make unusual noises, please have it checked immediately by an authorised workshop.
Time restrictions
In Germany, the set hours for operating lawnmowers are regulated in the "32nd Ordinance implementing the Federal Emissions Protection Act (32nd BlmSch-V)". In addition, there may be regional restrictions (e.g. to protect midday peace), which can be issued by the respective local authority.
Tips on caring for your lawn
Mowing (Illustration M)
WARNING
Remove any objects (stones, wood, branches, etc.) from the lawn before each cut; but still watch out for objects lying around during the mowing process.
Ask your dealer about lawn care instructions. Information and instructions about mowing can also be found on the manufacturer website.
Mulching
Your lawn mower can also be equipped with a mulching kit. The respective conversion kit to a mulching system is available as an accessory from professional dealerships (see genuine spare parts and accessories for the conversion kit order no.).
The mulching kit also includes tips and information about mulching. You will also find information about mulching on the manufacturer website.
WARNING
Always have an authorised workshop convert the mower into a mulching system, since an insulation protection test always has to be carried out after repairs or maintenance work on insulation parts (e.g. blade screw) in accordance with the applicable standard DIN EN 60335.
In addition, a wrongly assembled cutting blade coupling can allow the cutter bar to become loose, which can lead to serious injuries.
If the grass should happen to be too high for mulching, the mulching mower can be converted for mowing with a grass collecting bag in no time.
Converting the machine to rear ejection (Illustration U2 + S1)
- Stop the engine.
- Lift the ejection flap.
- Remove the mulching plug from the channel U2.
– Hook the grass collecting bag in the bracket provided on the mower housing S1.
The mulching blade system does not have to be converted! The capacity of the collecting bag can be reduced under difficult mowing conditions (e.g. wet grass). For the equipment to be used as a mulching machine again, the mulching plug must be installed again. To do this, remove the grass collecting bag, insert the mulching plug into the ejector channel and close the ejector flap. Clean the ejector channel first.
16 SERVICE INTERVALS
IMPORTANT
Avoid damage! Under extreme or unusual conditions, shorter servicing intervals than the ones specified below may be necessary. If you establish any problems, please contact an authorised workshop.
Carry out routine servicing on the machine in line with the following servicing intervals. Work must be carried out at the following servicing intervals in addition to the maintenance work listed in these operating instructions.
Before initial use
- Check all screw connections for a tight fit.
- Check the cutting blade screw and have an authorised workshop tighten it if necessary.
- Check whether the safety control bar for the engine brake is working perfectly.
- Check that all protective devices have been attached properly and are not damaged.
Before every operation
- Check the lawn area and remove any objects.
- Check the area of the boundary wires (if an automatic mower is being used for lawn care).
- Check the condition and firm fit of the blade, if necessary have an authorised workshop tighten the blade screw.
- Check whether the safety control bar for the engine brake is working perfectly.
- Check that all protective devices have been attached properly and are not damaged.
- Check grass collecting equipment for wear or loss of functionality.
- Check the upper part of the bar (insulation) for damage.
- Check the connection cable for damage and ageing.
Every 10 operating hours
- Check all screw connections for a tight fit.
- Check the fan, blade coupling and fan housing regularly for wear and a tight fit.
After every operation
- Clean the mower.
- Check the blade for damage and wear.
Every 15-20 operating hours or annually
- Lubricate the wheel bearings.
During annual servicing
- Clean the gearbox and the area under the belt cover.
- Check the drive throttle cable and adjust it if necessary.
17 CARE AND SERVICING OF YOUR LAWNMOWER
Regular care is the best way to guarantee a long service life and problem-free operation. Insufficient equipment maintenance will lead to safety-related faults!
Only use original spare parts because only those guarantee safety and quality!
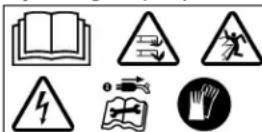
Safety instruction! See table for explanation of symbols page 3
Cleaning (Illustration O)
Remove dirt and grass residue immediately after finishing mowing. Place the mower on its side and use a brush or cloth to clean.
ATTENTION
Do not put your fingers into the openings of the fan housing and hold onto the fan. If the blade bar is rotated during cleaning, there is a risk that your fingers may become caught between the fan and the fan housing!
IMPORTANT
Never spray the mower with water. This may damage the electrical systems.
Storage
Always keep the machine in a clean condition in a closed, dry room out of reach of children. Always allow the engine to cool down before you store the machine in a closed room.
Collapsing the handle (Illustration A1)
IMPORTANT
Make sure that the cables are not pinched, squeezed, twisted or overstretched when the handlebars are folded apart or collapsed! Always run the cables along the outside of the bar connection. A damaged cable may result in a technical defect of the equipment.
- To save storage space or for transportation, loosen the four wing nuts such that the guide bar can be folded together without resistance in Z-shape above the engine A1. The locking cams on the bottom bar end must snap out of the holes on the housing.
- Do not kink nor squeeze the cables.
CAUTION
When folding the bar for transport and storage purposes, when loosening the wing nuts and snapping the locking cams from the drilled holes in the housing, it is possible that unintentional upsetting of the bar may occur. In addition, this may result in crushed areas between the top and bottom part of the bar as well as the housing. This may result in a risk of injury!
Transporting and securing the equipment (Illustration N)
- If the equipment has to be carried, do not hold the ejection flap! Hold the carrying handle at the front and at the back (see Figure N). Please take the weight of the machine into consideration before lifting it (see Technical Data). Lifting large weights can result in health problems. We recommend that two people should always lift or carry the equipment.
- Transport the unit upright on all 4 wheels to avoid damage to the equipment and personal injury.
- Park the means of transport on level ground so that the equipment cannot roll away before it is secured.
- Remove the collecting bag and secure it separately during transport.
- Secure the equipment with approved load-securing devices (e.g. tie-down straps with clamping elements) on or inside the vehicle. Tie-down straps are belt bands made of synthetic fibres. Every tie-down strap is marked with a label. The label contains important details for application. The information on this label must be heeded when using the tie-down strap.
- For loaded goods that can roll, we recommend using direct strapping with four lashing straps. Secure the wheels of the equipment in such a way that it does not move during transportation.
NOTE
Do not tighten the belts too firmly. Fixing the equipment too firmly can cause damage.
Maintenance of the blade
A sharp blade guarantees optimum cutting performance. Before you start mowing, always check the condition and firm attachment of the cutting blade. The blade attachment screw must always be tightened by an authorised workshop since an insulation protection test always has to be carried out after repairs or maintenance work on insulation parts (e.g. blade screw) in accordance with the applicable standard DIN EN 60335. A worn or damaged blade must always be replaced.
Sharpening and balancing the blade (Illustration Q)
WARNING
The sharpening and balancing of the blade should be carried out only by an authorized specialist workshop, since according to the applicable standard DIN EN 60335, an insulation test must always be carried out following repairs or maintenance work to insulating components (e.g. blade screws).
An improperly sharpened or unbalanced blade can cause severe vibrations, and damage the lawnmower.
The cutting edges of the cutting blade may be grinded only until the respective value (see illustration Q) or the marking (1) on the cutting blade (ring) has been reached. Attention! Observe the grinding angle of 30^ .
Your professional workshop can check this value - (grinding limit) for you!
WARNING
A blade by which the wear limit (marking) has been exceeded can break off and spin away; this can cause severe injuries.
Replacing the blade
WARNING
The cutter bar must always be replaced by an authorised workshop since an insulation protection test always has to be carried out after repairs and maintenance work on insulation parts (e.g. blade screw) in accordance with the applicable standard DIN EN 60335.
In addition, a wrongly assembled cutting blade coupling can allow the cutter bar to become loose, which can lead to serious injuries.
- Only use genuine cutter bars for replacement. Non-equivalent spare parts can damage the machine and are a safety hazard.
- Replacement cutting tool must be marked permanently with the name and/or company logo of the manufacturer or supplier and the part number.
Servicing the front wheels
Lubricate the wheel bearings once a year or every 15-20 operating hours.
- Remove the covers in the middle of the wheel caps.
- Use a socket wrench to loosen the hexagon nut, remove the washer, pull the wheels off the wheel axle together with the wheel cap and collar washer. Remove the wheel cap from the wheel.
- After the bearings have been lubricated using the roller bearing grease (e.g. "KAJO-Langzeitfett LZR 2"), push the wheels back on. First insert the collar washer into the wheel, set the wheel cap in place and press until you hear it click. Set the washer in place, fix using the hexagon nut and tighten to such an extent that the wheels can just about turn easily but without play. Replace the covers in the middle of the wheel caps.
Servicing the rear wheel drive (Illustration R)
Lubricate the wheel bearings once a year or every 15-20 operating hours.
- Remove the wheel cap cover on both sides.
- Use a socket wrench to loosen the hexagon nut, remove the washer, pull the drive wheels off the wheel axle together with the wheel cap and collar washer.
- Remove the wheel cover, pay attention to the thrust washer.
- Remove any soiling from the wheel cover, the free-wheeling pinion on the gear shaft and the gear rim on the inside of the wheel.
NOTE
Do not remove the free wheel pinion from the gear shaft!
- Lubricate the bearings using the roller bearing grease "KAJO-Longlife grease LZR 2". Do not lubricate the free-wheeling pinion and gear rim in the wheel!
- Set the wheel cover in place and push the start-up disc onto the wheel axle. When putting the drive wheel in place make sure the pinion and gear rim interlock, turn the wheel on the axle slightly to achieve this if necessary.
- If the wheel cap has loosened from the wheel, insert the collar washer into the wheel first as shown in Figure R, set the wheel cap in place and press until you hear it click. Set the washer in place, fix using the hexagon nut and tighten to such an extent that the wheels can just about turn easily but without play. Replace the wheel cap covers.
Servicing the drive
- It is absolutely essential that the Bowden cable runs easily for switching on and off, so that the control drive works perfectly.
- The Bowden traction mechanism has been set ready for operation at the works and requires no adjustment.
Changing the drive V-belt
The drive V-belt must be replaced by a specialist workshop.
18 TROUBLESHOOTING
| Fault | Possible cause | Remedy |
| If the motor does not start 5 seconds after the unit is started | No power supply. | Connect the plug C2. Check the fuse. |
| Power cable damaged. | Get it checked by an authorised workshop. | |
| Cutting height has been set too low (grass is too high and blocks the starting of the motor). | Set a higher cutting height 1. Machine tilts when starting it. | |
| Too much grass waste in the housing. | Clean the cutting chamber of grass, ensure that the gap between fan and housing is kept clean (pull the plug first!). | |
| Get it checked by an authorised workshop. | ||
| Extreme vibration | Have it checked by an authorized dealer | |
| Mower does not work | Pull drive control bar not pulled. | Pull drive control bar G. |
| Have it checked by an authorised workshop. | ||
| Drive speed cannot be regulated | Have it checked by an authorized dealer | |
| Cut not clean, lawn turns yellow | Cutting blade blunt. | Have it sharpened and balanced by an authorised workshop Q. |
| Cutting height too low. | Set higher cutting height I. | |
| Mowing speed too high. | Adapt mowing speed, switch motor drive off if necessary. | |
| Insufficient overlap between mowing lanes. | If grass is long, the mowing lanes may need to overlap further. | |
| Lawn matted. | A perceptible improvement can be achieved by using a scarifier. | |
| Ejector blocked | Turbo signal ignored J + K. | Empty the collecting bag L. |
| Cutting height too low with grass too high. | Set higher cutting height I. | |
| Mowing speed too high. | Adapt mowing speed, switch motor drive off if necessary. | |
| Grass is damp. | Allow the lawn to dry. | |
| The mulched grass does not look good: clumps, excessive cut material, coarse cut | Cutting blade blunt. | Have it sharpened and balanced by an authorised workshop. |
| Mulching rule ignored (cut max. 1/3 of grass height; the grass height to be cut must be less than 10 cm) | Set higher cutting height I. Convert mower to rear ejection U2 + S1 and mow lawn with high cutting height first. | |
| Driving speed too high. | Adapt driving speed, switch motor drive off if necessary. | |
| Grass accumulation under the mower blade. | Set higher cutting height I. | |
| Insufficient overlap between mowing lanes. | If grass is long, the mowing lanes may need to overlap further. | |
| Grass is damp. | Set higher cutting height I. Allow the lawn to dry. |
Repairs to electrical machines must always be performed only by qualified electricians. Please do not repair them yourself.
In the case of faults and defects which have not been listed here, please contact the nearest authorized dealer. This applies in particular to appliances with electrical motors, as when these are repaired they must always undergo an insulation protection test.
Your authorized dealer will also help you if you do not wish to perform any of the maintenance work described here yourself.
19 TECHNICAL DATA
Motor
| Motor | Alternating current motor |
| Connection voltage | 230 V |
| Power | 1700 W |
| Motor speed | 3000 min^-1 |
Mower
| Housing | Die-cast aluminium |
| Cutting width | 430 mm |
| Cutting heights | Central, (15), 25, 30, 40, 45, 55, 60, 70, 80 mm |
| Adjustable-height handlebar | 3-way |
| Grass collector capacity | 65 litres |
| Speed | 2,4 – 3,6 km/h |
| Weight | 35 kg |
| Length | 1565 mm |
| Width | 500 mm |
| Height | 1025 mm |
| Wheels front / rear | 180 mm / 200 mm |
| Bearing front | Cup-and-cone bearing |
| Bearing rear | Cup-and-cone bearing |
Sound power level
| Guaranteed sound power level; measured according to 2000/14/EC | L_era = 96 dB(A) |
Sound pressure level
| Emission sound pressure level at operator's workplace; measured according to EN60335-2-77 | L_pA = 82 dB(A) |
| Measuring inaccuracy; according to ISO 4871 | 1.5 dB |
Vibrations
| Vibrations on the lawnmower's handlebar; measured according to EN60335-2-77 | a_hw = 2.5 m/s^2 |
| Measuring inaccuracy; according EN12096 | 1.3 m/s^2 |
20 ORIGINAL SPARE PARTS
| Conversion kit for mulching system | BSA632 |
| Roller bearing grease | SAA11300 |
| Cutter bar | For safety reasons, the cutter bar must always be replaced by an authorised workshop.This workshop has the respective spare part numbers for the cutter bar available. |
1 Inleiding....2
Name and address of the person in the community authorized to compile the technical construction file:
- INTRODUCTION
- Dear Garden Lover,
- EXPLANATION OF THE RATING PLATE AFFIXED TO THE MACHINE
- EXPLANATION OF THE PICTOGRAMS
- EXPLANATION OF THE SYMBOLS
- WARNING
- PROPER USE
- GENERAL SAFETY GUIDELINES FOR THE HAND-HELD ROTARY LAWNMOWER (ELECTRIC)
- General safety instructions
- Preparatory measures
- EN
- Handling
- Safety equipment includes (see chapter Component description):
- Measuring run-on time
- Protective equipment includes (see chapter Component description):
- The safety devices must not be modified.
- • WARNING
- Maintenance and storage
- For reasons of warranty and safety, only genuine spare parts may be used. Non-equivalent spare parts can damage the machine and are a safety hazard.
- DESCRIPTION OF COMPONENTS
- PREPARATION
- Opening out the handle (Illustration A1 + E1 + B1 + B2)
- IMPORTANT
- CAUTION
- Attaching the grass collector to the mower (Illustration R1 + S1)
- Adjusting the cutting height (Illustration I)
- BEFORE USING THE LAWNMOWER FOR THE FIRST TIME
- Risk of injury!
- STARTING THE MACHINE
- Attaching the connecting cable (Illustration C2)
- NOTE
- Attaching the connecting cable to the strain relief fitting (Illustration D2)
- ATTENTION
- Starting the motor (Illustration A2)
- SWITCHING OFF THE MOTOR (ILLUSTRATION F)
- EMERGENCY STOPPING
- MOVEMENT DRIVE
- Operating the rear wheel drive (Illustration G + E2)
- Adjusting the speed (Illustration H)
- GRASS COLLECTOR
- Operation with grass collector
- Turbo signal (shows when the grass collector is full) (Illustration J + K)
- Emptying the grass collector (Illustration L)
- Operation without grass collector
- MOWING
- Mowing on slopes
- Handling the cable during use
- Checking operating safety
- Time restrictions
- Tips on caring for your lawn
- Mowing (Illustration M)
- Mulching
- Converting the machine to rear ejection (Illustration U2 + S1)
- SERVICE INTERVALS
- Before initial use
- Before every operation
- Every 10 operating hours
- After every operation
- Every 15-20 operating hours or annually
- During annual servicing
- CARE AND SERVICING OF YOUR LAWNMOWER
- Cleaning (Illustration O)
- Storage
- Collapsing the handle (Illustration A1)
- Transporting and securing the equipment (Illustration N)
- Maintenance of the blade
- Sharpening and balancing the blade (Illustration Q)
- Replacing the blade
- Servicing the front wheels
- Servicing the rear wheel drive (Illustration R)
- Do not remove the free wheel pinion from the gear shaft!
- Servicing the drive
- Changing the drive V-belt
- TECHNICAL DATA
Brand : SABO
Model : 43-EL Vario
Category : Lawn mower