
FBM 190 A1 - Lawn mower FLORABEST - Free user manual and instructions
Find the device manual for free FBM 190 A1 FLORABEST in PDF.


| Product Type | Lawn Mower |
| Brand | Florabest |
| Model | FBM 190 A1 |
| Power Source | Petrol (4-stroke) |
| Engine Displacement | 190 cc |
| Cutting Width | 46 cm |
| Cutting Height Adjustment | Central, 6 positions (25-75 mm) |
| Grass Collection Box Capacity | 50 L |
| Drive Type | Push (manually propelled) |
| Weight | 30 kg |
| Dimensions (L x W x H) | 140 x 50 x 100 cm |
| Noise Level | 96 dB |
| Vibration Level | 10 m/s² |
| Fuel Tank Capacity | 0.8 L |
| Oil Capacity | 0.5 L |
| Starter Type | Recoil |
| Mulching Function | Yes |
| Side Discharge | Yes |
| Rear Collection | Yes |
| Wheel Diameter (Front/Rear) | 18 cm / 22 cm |
| Handle Type | Ergonomic, foldable |
| Safety Features | Engine brake, safety blade stop |
Frequently Asked Questions - FBM 190 A1 FLORABEST
User questions about FBM 190 A1 FLORABEST
0 question about this device. Answer the ones you know or ask your own.
Ask a new question about this device
Download the instructions for your Lawn mower in PDF format for free! Find your manual FBM 190 A1 - FLORABEST and take your electronic device back in hand. On this page are published all the documents necessary for the use of your device. FBM 190 A1 by FLORABEST.
USER MANUAL FBM 190 A1 FLORABEST
Translation of original operation manual

ES
Before reading, unfold the page containing the illustrations and familiarise yourself with all functions of the device.
DE AT CH
GB / MT Translation of original operation manual Page 59
Grizzly Service-Center 99

natural_image
Simple line drawing of a mechanical device with a stop symbol and arrow, no text or labels present.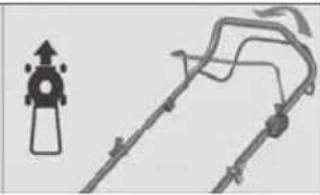
natural_image
Diagram of a mechanical device with a top view and a separate schematic symbol (no text or labels)Grizzly Service-Center 99

natural_image
Simple line drawing of a laboratory apparatus with a stopper and tubing (no text or symbols)Arrestare
l'apparecchio:
natural_image
Simple line drawing of a mechanical device with a bracket and a vertical component (no text or symbols)Azionamento
ruote acceso: Tirare la staffa di azi- onamento
Volume serbatoio benzina 1,0 l
Grizzly Seervice-Center .....99

natural_image
Simple laboratory apparatus diagram with a stopper and tubing (no text or symbols)
natural_image
Diagram of a mechanical device with a vertical arrow and a separate schematic symbol (no text or labels)Symbols and icons ....60
Symbols on the device ....60
Symbols in the manual .....61
Safety Instructions ....61
Intended Use ....63
General Description ......64
Summary 64
Functional Description ......64
Safety Equipment 64
Delivery Contents ......64
Initial Operation 65
Installing the Handle Bar ......65
Installing the Drinks Holder ....65
Installing the Starter Cord ....65
Installing the Grass Collection Box ...65
Installing the Mulch Kit ....66
Installing the Side Ejection Channel ... 66
Filling with Engine Oil and Checking the Oil Level 66
Filling with Petrol 66
Operation 67
Starting and Stopping the Engine .....67
Mowing 67
Working Instructions ......67
General Working Instructions ......67
Setting the Cutting Height ......68
Emptying the Grass Collection Box ..68
Mowing with the Mulch Kit ....68
Tool Compartment ......68
Cleaning and Maintenance ....68
Cleaning and General Maintenance Work 69
Replacing the Air Filter 69
Maintaining the Spark Plug ....69
Changing the Engine Oil 70
Sharpening / Changing the Blades ...70
Adjusting the Carburettor ....70
Storage 70
General Storage Instructions .....70
Storage During Longer Breaks from Operation ....71
Disposal/Environmental Protection ...71
Technical Specifications ....72
Replacement parts ....72
Guarantee 73
Maintenance Intervals ....74
Table of Maintenance Intervals .....74
Troubleshooting ....75
EC Declaration of Conformity .....96
Exploded Drawing 97
Grizzly Service-Center 99

Before initial use, please read these operating instructions and the Briggs & Stratton instruction manual carefully in order to avoid incorrect handling. Keep the instructions in a safe place and pass them on to any subsequent user, so the information is available at all times.
Symbols and icons
Symbols on the device

tion!
Read the instruction manual.

Risk of injury from parts being flung out.
bystanders away from the equipment.

Risk of injury from sharp blades. feet and hands away.

Caution – toxic fumes! t operate the equipment in enclosed areas.

Caution – petrol is flammable! t smoke and keep away from heat sources.

Caution – risk of injury!
ntenance work,
switch off the engine and take out the spark plug connector.

Caution – hot surfaces! ning.

Caution – risk of injury! and ear protection.

Danger!
Keep hands and feet away.

Information of the acoustic power level L_wa in dB.
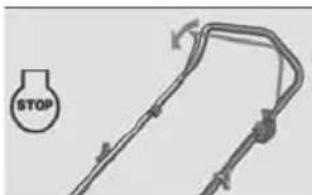
Symbols on the handle bar:
natural_image
Simple line drawing of a laboratory apparatus with a stop symbol (no text or labels)
natural_image
Diagram showing a device with an upward arrow and a schematic of its components (no text or labels)Stop the equipment: Release the safety catch
Wheel drive on: Pull up the drive catch
Symbols on the filler cap:

Note on the petrol filler

Caution! Before starting, check the oil level.
Symbols on the oil filler cap:

Note on the oil filler
Symbols on the throttle:

Fast position
bw position
Symbols on the Tank:


Attention!
Read the instruction manual.

Caution – petrol is flammable! the engine to cool for at least 2 min. before refuelling.

Caution – toxic CO fumes! Do not operate the equipment in enclosed areas.
Symbols in the manual

Warning symbols with information on damage and injury prevention.

Instruction symbols (the instruction is explained at the place of the exclamation mark) with information on preventing damage.

Help symbols with information on improving tool handling.
Safety Instructions
This section deals with the basic safety procedures when working with the equipment.

WARNING! Read all of the safety instructions and directions. Failure to observe the safety instructions and directions may result in electric shock, fire and/or serious injury.
Instructions:
- The device must not be used by people (including children) with limited physical, sensory or mental faculties or who lack the necessary experience and/or knowledge - other than they are supervised by a person responsible for safety or are being instructed to operate the appliance by such a person.
• Children must be supervised in order to ensure that they do not play with the equipment.
- Read the operating instructions carefully. Familiarise yourself with the controls and with the correct use of the equipment.
- Do not allow children or other people
who are unfamiliar with the operating instructions to use the equipment. Local regulations may set a minimum age for the user.
- Do not mow whilst people – especially children – or animals are nearby. If distracted, you may lose control of the equipment.
- The operator or user is responsible for accidents or damage to other persons or their property.
- Observe noise control and local regulations.
Preparatory Measures:
- When mowing, always wear sturdy shoes and long trousers. Do not mow barefoot or in light sandals. Loose clothing, jewellery or long hair can become caught in moving parts. Wearing suitable clothing reduces the risk of injury.
- Check the area on which the equipment is to be used and remove all objects (stones, sticks, wires) that could be caught and flung out.
-
Warning: Petrol is highly flammable. Fire or explosions can result in serious burns:
-
Keep petrol only in containers intended for this purpose;
- Only refuel outdoors and do not smoke whilst refuelling;
- Fill with petrol before starting the engine. Do not open the filler cap or refill with petrol whilst the engine is running or the equipment is hot:
- If petrol is spilled, do not attempt to start the engine. Instead, remove the equipment from the surface on which the petrol has been spilled. Avoid any ignition attempt until the petrol fumes have evaporated;
GB MT
- For reasons of safety, replace petrol and other filler caps in the event of damage.
- Replace defective silencers.
- Before use, always carry out a visual inspection to check whether the cutting tools, mounting bolts and entire cutting unit are worn or damaged. To avoid imbalance, only replace worn or damaged tools and bolts in sets.
• Take care with equipment that has several cutting tools, as the movement of one blade may result in rotation of other blades. - Use only replacement parts and accessories supplied and recommended by the manufacturer. The use of parts from other manufacturers may result in injuries and will result in immediate invalidation of the guarantee.
Handling:
- Do not run the combustion engine in enclosed spaces, in which dangerous carbon monoxide can collect.
- Mow only in daylight or with good artificial lighting. An unlit working area can result in accidents.
- If possible, avoid using the equipment on wet grass.
-
Always ensure a safe stance, particularly on slopes. This will give you better control of the equipment in unexpected situations.
-
Always work across the slope, never upwards or downwards.
- Take particular care when changing the direction of travel on the slope.
- Do not mow on excessively steep slopes.
- Run the equipment only at walking speed.
• Take particular care when turning the
equipment around or pulling it towards you.
- Stop the cutting tool if the equipment has to be tipped up for transportation over a surface other than grass and when moving the equipment from and to the surface to be mown.
- Do not use the equipment with damaged safety equipment or guards or with no safety equipment attached, e.g. impact protection and/or grass catchers. This ensures that the equipment remains safe.
- Do not change the engine regulator setting and do not over-rev it. This may damage the equipment.
- Before starting, the engine, disengage all cutting tools and drives.
- Start or operate the start switch with care and in accordance with the manufacturer's instructions. Ensure sufficient space between feet and the cutting tool. Risk of injury.
- When starting or activating the engine, do not tip the equipment unless the equipment has to be lifted for this procedure. In this case, tip the equipment only as far as is absolutely necessary and lift only the side that is away from the user.
- Do not start the engine when standing in front of the ejection channel.
- Switch on the engine in accordance with the instructions and only if your feet are a safe distance away from the cutting tools.
- Do not place hands or feet under rotating parts. Always keep away from the ejection opening. A moment of carelessness when using the equipment may result in serious injury.
- Do not leave or carry the equipment when the engine is running.
- Switch off the engine, take out the spark plug connector and ensure that all moving parts are still:
- Before releasing blockages or removing obstructions in the ejection channel;
- Before checking, cleaning or working on the equipment;
- If a foreign body is struck. Look for damage to the equipment and carry out the necessary repairs before re-starting and working with the equipment;
-
If the equipment starts to vibrate unusually strongly, an immediate check is required.
-
Switch off the engine
- When leaving the equipment;
- Before refuelling;
- Close the throttle valve when stopping the engine.
- Do not leave the equipment unattended in the workplace.
- Do not work with equipment that is damaged or incomplete or has been converted without the approval of the manufacturer.
Using machines for applications other than those intended may result in dangerous situations.
Maintenance and Storage:
- Ensure that all nuts, bolts and screws are tightened firmly and the equipment is in safe working condition. Many accidents are caused by poorly maintained equipment.
- Do not keep the equipment with petrol in the tank inside a building in which petrol fumes could potentially come into contact with open fire or sparks.
- Allow the engine to cool before plac- ing the equipment in enclosed spaces.
Risk of fire.
• To avoid the risk of fire, keep the engine, exhaust and area around the fuel tank free of grass, leaves or leaking grease (oil).
- Check the grass catcher regularly for wear or loss of function.
- For reasons of safety, replace worn or damaged parts. Replace defective silencers.
- If the fuel tank is to be drained, do this outdoors.
- Handle your equipment with care.
Keep the tools sharp and clean to enable you to work better and more safely.
Follow the maintenance directions.
- Do not attempt to repair the equipment yourself unless you are trained to do so. Any work not specified in these instructions is to be carried out only by customer service centres authorised by us.
- Keep the equipment in a dry place and out of reach of children. Machines are dangerous if used by inexperienced people.
Intended Use
The equipment is intended only for mowing lawns and grass areas up to 1800 m² in domestic use.
Any use other than specifically permitted in these instructions may result in damage to the equipment and represent a serious risk to the user.
The equipment is intended for use by adults. Children or other people who are unfamiliar with the operating instructions must not use the equipment.
The operator or user is responsible for accidents or damage to other persons or their property.
General Description

The illustration of the principal functioning parts can be found on the front and back foldout pages.
Summary

1 Drive catch
2 Upper handle bar
3 Safety catch
4 Bowden cables
5 Lower handle bar
6 2 cable clamps
7 Rear impact protection
8 Oil filler cap with dipstick (no illustration)
9 Filler cap
10 Engine cover (finger protection)
11 Exhaust guard
12 Spark plug connector + spark plug
13 2 front wheels
14 Air filter
15 Air filter cover
16 Side ejection with side impact protection
17 Sheet steel housing
18 Lever for cutting height adjustment
19 2 rear wheels
20 Grass collection box
21 2 quick-release levers for fixing the bar
22 Starter cord guide
23 Starter handle with starter cord
24 Drinks holder
25 Tool compartment
26 Throttle
27 Mulch kit
28 Side ejection channel
Functional Description
The equipment is driven by a powerful four-stroke engine (Briggs & Stratton 675 series). The ready start system with temperature controlled automatic choke, the ball bearing mounted wheels, the rear wheel drive and the blade braking function make the equipment easier to operate. The equipment is fitted with a high quality sheet steel housing and collapsible handle bar. There are three modes of operation available to the user: mowing with the grass collection box, mulch mowing or mowing with side grass ejection.
Safety Equipment

3 Safety catch
The equipment stops when the safety catch is released.
7/16 Rear and side impact protection
protect the operator from parts that are flung out and from accidentally touching the blades when mowing with no grass collection box.
11 Exhaust guard
prevents hands or combustible materials from coming into contact with a hot exhaust.
Delivery Contents
Carefully unpack the appliance and check that it is complete:
- Petrol lawn mower (pre-assembled)
- Collapsed handle bar
- Grass collection box
- Mulch kit
-
Side ejection channel
-
Drinks holder
- 2 cable clamps
- Assembly accessories for fixing the bar (to the bar holder)
- Spark plug socket
- Operating instructions
- Briggs & Stratton operating instructions
Initial Operation

Caution! Risk of injury from rotating blades. Carry out work on the equipment only when the blade is switched off and stationary.

Observe the Briggs & Stratton instruction manual supplied.
Before starting the equipment, you must
- Install the handle bar
- Install the grass collection box / mulch kit / side ejection channel as required
- Install the starter cord
- Fill with engine oil
- Fill with petrol
Installing the Handle Bar

Caution! When installing the handle bar, ensure that the Bowden cables (A 4) are not squashed.

-
Unscrew the star knob (29) and bar fixing screw and washer from the bar holder (30).
-
Screw the lower handle bar (5) onto the bar holder (30).

-
Unfold the upper handle bar (2) (small image).
-
Push the quick-release lever
(21) towards the upper bar (2).
- Fix the Bowden cables (4) to the bar using the two cable clamps (6).
Installing the Drinks Holder

Insert the drinks holder (24) into the mounting from above. The drinks holder clicks into place.
Installing the Starter Cord

-
Pull the safety catch (3) towards the handle bar (2) and hold it.
-
Slowly pull the starter cord on the starter handle (23) towards the bar and hook the starter cord into the starter cord guide (22).
-
Release the safety catch (3).
Installing the Grass Collection Box

Caution: Do not operate the equipment with the grass collection box or impact protection installed incompletely. Risk of injury!

The mulch kit and side ejection channel must be removed before using the grass collection box (see G, I).

Fixing the Grass Collection Box onto the Equipment:
- Lift the rear impact protection (7).
- Hook the grass collection box (20) into the mounting provided for this (31) on the rear of the
GBMT
equipment.
- Release the impact protection (7). It holds the grass collection box in position.
Dismantling the Grass Collection Box:
- Lift the impact protection (7) and remove the grass collection box (20).
Installing the Mulch Kit

Before using the mulch kit, the side ejection channel must be removed (see H)

Fixing the Mulch Kit:
-
Remove the grass collection box (F 20) if it is installed.
-
Lift the impact protection (7).
-
Insert the mulch kit (27). The red safety button (32) clicks into place.
Removing the Mulch Kit:
-
Lift the impact protection (7).
-
Press the red safety button (32) downwards and remove the mulch kit (27).
Installing the Side Ejection Channel
The side ejection channel installed for using side grass ejection lines up the grass clippings on the side.

Before using side grass ejection, the mulch kit must be installed and the grass collection box removed (see G).

-
Install the mulch kit (27) (see G).
-
Lift the side impact protection (16).
-
Hook in the side ejection channel (28) and release the side impact protection (16). It holds the side ejection channel in position.
Filling with Engine Oil and Checking the Oil Level

Place the equipment on a level base.

-
Unscrew the oil filler cap and dipstick (8) and pour oil into the tank. The oil tank holds 590 ml oil. Use brand oil (e.g. SAE 30).
-
To check the oil level, wipe the dipstick (8) on a clean cloth and replace it in the tank until it stops.
-
After pulling it out, read off the oil level on the dipstick. The oil level should be in the marked area between the minimum and maximum marks.
-
Wipe off any spilt oil and close the oil filler cap (8).


Check the oil level every time before mowing and add oil when the lower marking point is reached.
Filling with Petrol

Warning! Petrol is flammable and hazardous to health:
- Keep petrol in containers intended for this purpose;
- Only refuel outdoors and never with the engine running or when the machine is hot;
-
Open the filler cap carefully to allow excess pressure to escape;
-
Do not smoke whilst refuelling;
- Avoid skin contact and inhalation of the fumes;
- Remove spilt petrol;
- Keep petrol away from sparks, open flames and other ignition sources;

- Do not use petrol/oil mixtures;
- Use normal or super unleaded petrol;
- Only use clean, fresh petrol;
-
Do not store petrol for longer than one month, as its quality deteriorates.
-
Unscrew the filler cap (A 9) and pour in the petrol to the lower edge of the filler.
Do not fill the tank entirely, to allow the petrol room to expand.
- Wipe away petrol residues around the filler cap and close the filler cap.
Operation

Observe the noise protection and local regulations.
Starting and Stopping the Engine

Warning! Petrol is flammable. Start the engine at least 3 m away from the filling location.

Check the petrol and oil levels regularly (see "initial operation") and refill in time.

Start the equipment on a sturdy, level base, if possible not in long grass. Ensure that the cutting tool
is touching neither objects nor the ground.

Start the Engine:
- Place the throttle (26) in position
- Pull the safety catch (3) towards the handle bar and hold it.
- Pull the starter cord (23) and the engine starts.
Stopping the Engine:
- Release the safety catch (3), the engine stops and the blade is slowed.
Mowing

-
Start the engine (see above).
-
Wheel drive on: pull the drive catch (1) towards the handle bar. The mower moves forwards.
- Wheel drive off: release the drive catch (1). The equipment stops.

For short breaks and to reduce noise, place the throttle (26) in position .
Working Instructions
General Working Instructions
- As far as possible, mow the lawn when it is dry in order to protect the turf.
- Set the cutting height such that the equipment is not overloaded.
- Run the equipment at walking speed in lines that are as straight as possible. For uninterrupted mowing, the lines should always overlap by a few centimetres.
- Do not move backwards.
GBMT
- On slopes, always work across the slope.
- If the blade comes into contact with a foreign body, switch off the engine immediately. Wait until the blade is stationary and check the equipment for damage. Restart work only if the equipment is undamaged.
- Switch off the equipment during longer breaks and for transportation and wait until the blade is stationary.
- Clean the equipment after each use, as described in the “cleaning and maintenance” chapter.
Setting the Cutting Height
The equipment has 7 positions for setting the cutting height (30-70 mm):

-
Pull the lever (18) outwards and push it to the desired position 1-7 (33).
-
Push the lever (18) back in.
The correct cutting height is around 30 – 45 mm for an ornamental lawn and around 40 – 65 mm for a utility lawn.

Select a greater cutting height for the first cut of the season.
Emptying the Grass Collection Box

Through the observation window fitted in the rear impact protection (A 7), you will see when the grass collection box is full.

-
Stop the engine and wait until the blade is stationary.
-
Lift the rear impact protection
(7) and remove the grass collection box (20).
- Empty (see "disposal / environmental protection" chapter) and reassemble the grass collection box (20).
Mowing with the Mulch Kit
When mulch mowing, the grass is cut, chaffed and spread on the lawn all in one go. The cut grass serves as a natural fertiliser.
Tips for Mulch Mowing:
- Cut the grass back by 2 cm from a grass height of 4-6 cm.
- Use sharp cutting blades.
- Do not mow wet grass.
Tool Compartment
To open the tool compartment (25) push the red locking button upwards and the compartment can be opened.
Cleaning and Maintenance

Have any repair and maintenance work not described in these instructions carried out by a specialist workshop. Use only original Grizzly replacement parts. Risk of accidents!
Carry out maintenance and cleaning work strictly with the engine switched off and spark plug connectors removed. Risk of injury!
Allow the equipment to cool before any maintenance and cleaning work. Elements of the engine are hot. Risk of burning!

Wear gloves when handling the blade.

For cleaning and maintenance work, also observe the Briggs & Stratton instruction manual supplied.

We recommend contacting an authorised Briggs & Stratton dealer for maintenance work on the engine.
Cleaning and General Maintenance Work

Tip the Equipment:
To clean the underside of the equipment, tip the equipment backwards on the upper handle bar (2).
To prevent the equipment from tipping back,
- remove the grass collection box (F 20) if it is installed,
- adjust the cutting height to position 7 (33) and
- set the upper handle bar (2) to around 5° in the direction of the equipment (see "installing the handle bar").
Do not squash the Bowden cables (4) when doing this.

Risk of injury if the equipment tips back.

To prevent operating fluids from leaking out, do not lie the equipment on its side.
• Always keep the equipment clean. To clean, use a toothbrush or cloth but no corrosive cleaning agents or solvents.
Do not use water to clean the engine as it could contaminate the fuel system.
• After mowing, remove plant remains
that are stuck to the equipment by using a piece of wood or plastic. Clean the vent holes, ejection hole and blade area especially. Do not use hard or pointed objects, which could damage the equipment.
- Oil the wheels from time to time.
- Before each use, check the lawnmower for obvious defects such as loose, worn or damaged parts. Check that all nuts bolts and screws are sitting firmly.
- Check covers and guards for damage and that they are sitting correctly. Replace if necessary.
Replacing the Air Filter

Do not operate the equipment without the air filter otherwise dust and dirt will get into the engine and result in damage to the machine.

-
Loosen the screw on the air filter cover (15) and flip open the cover.
-
Remove the air filter (14).
- Replace the air filter with a new filter (see "replacement parts").
- To install, insert the new air filter (14) in the air filter cover (15) (see arrow ↓ on the air filter).
- Flip the air filter cover closed and screw it back together.
Maintaining the Spark Plug

A worn spark plug or a spark gap that is too large will result in a reduction of engine performance.

- Disconnect the spark plug connector (12) from the spark plug by simultaneously pulling and
turning.
- Unscrew the spark plug anti-clockwise using the enclosed spark plug socket.
- Check the spark gap using a feeler gauge (available from specialist shops). The spark gap must be at least 0.76 mm.
- If necessary, adjust the gap by carefully bending the ground electrode on the spark plug.
- Clean the spark plug with a wire brush.
- Insert the cleaned and adjusted spark plug or replace a damaged spark plug with a new one (recommended torque 20 Nm) (see "replacement parts").
Changing the Engine Oil

To change the engine oil, tip the equipment backwards on the handle bar (see N). To prevent operating fluids from leaking out, do not lie the equipment on its side.

- Change the engine oil for the first time after around 5 operating hours then every 50 operating hours or annually.
- Change the engine oil when the engine is warm.
- Dispose of the used oil in an ecofriendly manner (see “disposal / environmental protection”).

-
Open the oil drain plug (34) (female square drive) on the bottom of the equipment.
-
Drain the engine oil into a suitable container.
-
Wipe up spilt engine oil and screw back in the oil drain plug (34).
-
Stand the equipment level and refill the engine oil (see "initial operation").
Sharpening / Changing the Blades
- Always have a blunt blade resharpened by a specialist workshop, as an imbalance check can be carried out there.
• Always have a specialist workshop change a damaged or imbalanced blade. Incorrect installation can result in serious injury.
Adjusting the Carburettor
The carburettor has been preset in the factory for optimum performance. If readjustments are required, have the adjustments made by a specialist workshop.
Storage
General Storage Instructions

Do not store the equipment with a full collection box. In hot weather, the grass begins to ferment when heat is generated. Risk of fire.
- Clean and service the equipment before storage.
- Allow the engine to cool before storing the equipment in enclosed areas.
- Use suitable and authorised containers for storing fuel.
- Keep the equipment in a dry place
that is protected from dust and out of reach of children.
- Do not wrap the equipment in nylon bags as damp and mould could form.

For space-saving storage, the upper handle bar (2) can be folded down (see small image). Release the quick-release lever (21) and fold down the handle bar so the equipment takes up less space. The Bowden cables (4) must not be squashed when doing this.
Storage During Longer Breaks from Operation

Non-observance of the storage instructions may cause starting problems or permanent damage as a result of fuel residues in the carburettor.
- Drain the fuel tank in a well-ventilated location. To do this, open the petrol drain screw (P 35) and drain the petrol into a suitable container. Screw back in the petrol drain screw.
- To drain the carburettor, start the engine and allow it to run until it stops because it runs out of fuel.
-
Change the oil (see "changing the engine oil").
• Preserve the engine: -
Unscrew the spark plug (P 12) (see "cleaning and maintenance");
- Pour a tablespoon of engine oil through the spark plug hole into the engine compartment;
- Pull the starter cord (E 23) slowly several times with the safety catch (E 3) pulled in order to distribute the oil inside the engine;
- Screw the spark plug tight.
- Dispose of used oil and petrol residues in an ecofriendly manner (see "disposal / environmental protection").

There is no need to drain the petrol tank if a fuel stabiliser is added to the petrol (see “replacement parts” and Briggs & Stratton instruction manual).
Disposal / Environmental Protection
- Return the tool, accessories and packaging to a recycling centre when you have finished with them.
- Carefully drain the petrol and oil tanks and take your equipment to a recycling centre. The plastic and metal parts that are used can be separated by type and thus recycled.
- Take used oil and petrol residues to a disposal point and do not pour them into the sewer system or down the drain.
- Ask our Service-Center for details.
• Defective units returned to us will be disposed of for free.
- Do not throw cut grass in the dust-bin but rather compost it or spread it under bushes and trees as a mulch layer.
Technical Specifications
Engine ....4-stroke Briggs&Stratton ....675 series
B&S Engine design number ...126T020307B1
Engine size ....190 cm ^4
Blade rotation speed....2800 min ^-1
Blade torque 45 Nm
Wheel drive.... Max. 3.3 km/h
Petrol tank volume 1.0 l
Octane rating 95-98
Engine oil tank volume 0.6 l
Spark plug ....Champion RJ19LM
Cutting circle 510 mm
Cutting height .....7-stage, 30-70 mm
Grass collection box volume......60 l
Weight (inc. collection box) ......35.6 kg
Sound pressure level
(L_pA) 76 dB(A); K = 3.0 dB(A)
Sound power level (LWA)
measured...... 95.5 dB(A); K=2.41 dB(A)
guaranteed 98 dB(A)
Vibration at the handle
(a_n) 4.337 m/s²; K = 1.5 ~m / s^2
The stated vibration emission value was measured in accordance with a standard testing procedure and may be used to compare one power tool to another.
The stated vibration emission value may also be used for a preliminary exposure assessment.

Warning:
ibration emission value may differ during actual use of the power tool from the stated value depending on the manner in which the power tool is used.
Safety precautions aimed at protecting the user should be based on estimated exposure under actual usage conditions (all parts of the operating cycle are to be considered, including, for example, times during which the power tool is turned off and times when the tool is turned on but is running idle).
Noise and vibration values were determined according to the standards and stipulations mentioned in the declaration of conformity.
Technical and optical changes can be carried out in the course of further development without notice. All dimensions, references and information of this instruction manual are therefore without guarantee. Legal claims, which are made on the basis of the instruction manual, cannot thus be considered as valid.
Replacement parts
Replacement parts can be ordered directly from our service centre. Please indicate the machine type and the number of the spare part with your order.
Replacement blade....91097511
Blade screw 91090597
Grass collection box .....91097576
Air filter 30250010
Spark plug 30220210
B&S fuel stabiliser, 125 ml.....30230028
B&S Engine oil, 600 ml ......30230029
Maintenance set
(air filter, 30 ml fuel stabiliser,
600 ml engine oil, spark plug) .....30270000
Replacement parts and accessories for the engine (e.g. air filters and spark plugs) can also be ordered directly from Briggs & Stratton.
If further spare parts should be necessary, please find the part number on the exploded drawing.
Guarantee
- The guarantee period for this equipment is 3 years from the date of purchase and it is applicable only for the initial buyer.
- Please note any different guarantee conditions for the motor and read the enclosed operating instructions from motor manufacturer “Briggs & Stratton” carefully. This guarantee does not affect your legal guarantee rights. The responsible “Briggs & Stratton” service is responsible for motor problems on your lawn mower in accordance with the enclosed dealer list. Should another problem occur, please contact our central service points (see page 99 for tel. no., fax no., e-mail address).
• The guarantee does not include:
- Damage caused by natural wear, overloading or improper use.
- Equipment employed for commercial use.
- Damages arising as the result of non-compliance with the operating instructions or if the cleaning intervals have not been observed.
- Equipment on which technical interventions have been undertaken.
- The following parts are subject to normal wear and therefore not covered by the guarantee: cutter, spark plugs, air filter, starter cord.
- Please do not send equipment to our service points without prior agreement by telephone, as you could otherwise incur costs for non-acceptance.
- The repair or replacement of the equipment will neither result in extension of the guarantee period nor the commencement of a new guarantee
period for the equipment or any replacement parts installed as a result of this work. This also applies if on-site service is used.
• Defective units returned to us will be disposed of for free.
Maintenance Intervals
Regularly carry out the maintenance work listed in the “maintenance intervals” table. Regular maintenance prolongs the life of the equipment. It also gives optimum cutting performance and avoids accidents.
Table of Maintenance Intervals
| Maintenance Work(See “cleaning and maintenance”) | Before | After | After 1^st 5 Hrs. | After8 Hrs. | After50 Hrs. | Annual |
| Work | ||||||
| Check and tighten screws,nuts and bolts | √ | |||||
| Check the engine oil level /petrol level and refill with engine oil / petrol if required | √ | √ | ||||
| Clean operating elements /the area around the silencer | √ | √ | ||||
| Clean the finger protectionb | √ | |||||
| Change the engine oil | √√ | √ | ||||
| Replace the air filtera | √ | |||||
| Clean/adjust the spark plugReplace the spark plug | √ | √ | ||||
| Check the silencer and spark catcherb | √ | √ | ||||
| Clean the air cooling systema,b | √ | |||||
^a Clean more often if there is a high level of dust or heavy dirt
^b See Briggs & Stratton instruction manual
Troubleshooting
| Problem Possible | Cause Fault Correction | |
| Engine does not start | Too little petrol in the tank Fill with petrol | |
| Incorrect starting sequence | Follow the instructions for starting the engine (see "operation") | |
| Spark plug connector (P 12) not put on correctly Sooted spark plug | Attach the spark plug connector Clean, adjust or replace the spark plug (see "cleaning and maintenance") | |
| Incorrectly adjusted carburettor mix | Have the carburettor adjusted by a specialist workshop | |
| Engine starts but equipment does not run at full power | Dirty air filter (O 14) | Replace the air filter (see "cleaning and maintenance") |
| Incorrectly adjusted carburettor mix | Have the carburettor adjusted by a specialist workshop | |
| Throttle (A 26) not in the correct position | Throttle in position (see "operation") | |
| Engine splutters, stops | Incorrectly adjusted carburettor mix | Have the carburettor adjusted by a specialist workshop |
| Sooted spark plug (P 12) | Clean, adjust or replace the spark plugs (see "cleaning and maintenance") | |
| Engine overheats | Ventilation slot blocked Clean the ventilation slot | |
| Incorrect spark plug (P 12) | Change the spark plug | |
| Too little engine oil in the engine | Fill with engine oil (see "initial operation") | |
| Drive does not switch on | Bowden cables (A 4) misadjusted | Have adjustment carried out by a specialist workshop |
| Output unsatisfactory or engine labouring | Grass too short or too long | Change the cutting height (see "setting the cutting height") |
| Blade blunt | Have the blade sharpened or replaced by a specialist workshop | |
| Blade blocked with grass, grass collection box full, ejection channel blocked | Remove the grass (see "cleaning and maintenance") | |
| Blade does not turn | Blade blocked with grass Remove the grass | |
| Blade not installed correctly | Have the blade installed by a specialist workshop | |
| Abnormal noises, rattling or vibrations | Blade not installed correctly | Have the blade installed by a specialist workshop |
| Blade damaged | ||
Inhalt
Grizzly Service-Center 99

natural_image
Simple line drawing of a laboratory apparatus with a stop symbol (no text or labels)natural_image
Simple line drawing of a mechanical device with a top-left arrow and a separate schematic symbol (no text or labels)Grizzly Service-Center

Grizzly Service Malta
e-mail: service@grizzly.biz
Fax: 0049 6078 780670

Alfacomer-Equipamentos
Agrícolas e Industriais, Lda.
Oxford Street Industrial Park
Vulcan Road
Bilston, West Midlands WV14 7LF
Tel.: 0870 787 6177
Fax: 0870 7876168
e-mail: grizzly@deslimited.com

natural_image
Simple white outline of a seven-pointed star on a solid green background (no text or symbols)



- ES
- DE AT CH
- Symbols and icons
- Symbols on the device
- Symbols on the handle bar:
- Symbols on the filler cap:
- Symbols on the oil filler cap:
- Symbols on the throttle:
- Symbols on the Tank:
- Symbols in the manual
- Safety Instructions
- Instructions:
- Preparatory Measures:
- GB MT
- Handling:
- Maintenance and Storage:
- Intended Use
- General Description
- Summary
- Functional Description
- Safety Equipment
- Safety catch
- 7/16 Rear and side impact protection
- Exhaust guard
- Delivery Contents
- Initial Operation
- Installing the Handle Bar
- Installing the Drinks Holder
- Installing the Starter Cord
- Installing the Grass Collection Box
- GBMT
- Dismantling the Grass Collection Box:
- Installing the Mulch Kit
- Fixing the Mulch Kit:
- Removing the Mulch Kit:
- Installing the Side Ejection Channel
- Filling with Engine Oil and Checking the Oil Level
- Filling with Petrol
- Warning! Petrol is flammable and hazardous to health:
- Operation
- Starting and Stopping the Engine
- Start the Engine:
- Stopping the Engine:
- Mowing
- Working Instructions
- General Working Instructions
- Setting the Cutting Height
- Emptying the Grass Collection Box
- Mowing with the Mulch Kit
- Tips for Mulch Mowing:
- Tool Compartment
- Cleaning and Maintenance
- Cleaning and General Maintenance Work
- Tip the Equipment:
- Risk of injury if the equipment tips back.
- Replacing the Air Filter
- Maintaining the Spark Plug
- Changing the Engine Oil
- Sharpening / Changing the Blades
- Adjusting the Carburettor
- Storage
- General Storage Instructions
- Storage During Longer Breaks from Operation
- Disposal / Environmental Protection
- Technical Specifications
- Warning:
- Replacement parts
- Guarantee
- Maintenance Intervals
- Troubleshooting
- Inhalt
- Grizzly Service-Center
- Grizzly Service Malta
- Alfacomer-Equipamentos
Brand : FLORABEST
Model : FBM 190 A1
Category : Lawn mower