
KF-4310 - Baby products TRISTAR - Free user manual and instructions
Find the device manual for free KF-4310 TRISTAR in PDF.


| Product Type | Bottle warmer and baby food warmer |
| Brand | TriStar |
| Model | KF-4310 |
| Category | Baby products |
| Dimensions (L x W x H) | Approximately 20 x 15 x 18 cm |
| Weight | Approximately 0.6 kg |
| Power supply | 220-240 V ~ 50/60 Hz |
| Power | 200 W |
| Capacity | 1 bottle or 1 jar |
| Main functions | Heats bottles, baby jars, keeps warm |
| Temperature | Steam or water bath heating, thermostatic control |
| Material | Heat-resistant plastic (ABS) |
| Safety | Automatic shut-off in case of overheating or lack of water |
| Maintenance and cleaning | Clean with a damp cloth; descale regularly |
| Spare parts and repairability | Parts available on request; repairable by a professional |
| Package contents | 1 bottle warmer, 1 lid, user manual |
| Color | White and gray |
| Warranty | 2 years |
Frequently Asked Questions - KF-4310 TRISTAR
User questions about KF-4310 TRISTAR
0 question about this device. Answer the ones you know or ask your own.
Ask a new question about this device
Download the instructions for your Baby products in PDF format for free! Find your manual KF-4310 - TRISTAR and take your electronic device back in hand. On this page are published all the documents necessary for the use of your device. KF-4310 by TRISTAR.
USER MANUAL KF-4310 TRISTAR
natural_image
Exterior view of a modern kitchen blender with a side dish and control panel (no visible text or symbols)USER GUIDE / HANDLEIDING / MANUEL D'UTILISATEUR BEDIENUNGSANLEITUNG / MANUAL DE USUARIO MANUAL DO UTILIZADOR / MANUALE D'USO BRUKSANVISNING/ UŽÍVATEL'SKÝ MANUÁL INSTRUKCJA OBSŁUGI/ UŽIVATELSKÁ PŘÍRUČKA
V.2.0-06/12
CE

UK The features described in this manual are published with reservation to modifications.
NL De in deze handleiding beschreven mogelijkheden worden gepubliceerd onder voorbehoud van wijzigingen.
FR Les possibilités décrites dans ce manuel sont publiées sous réserve de modifications.
DE Die in dieser Bedienungsanleitung beschriebenen Leistungsmerkmale werden unter dem Vorbehalt von Änderungen veröffentlicht.
ES Las características descritas en este manual pueden ser objeto de futuras modificaciones.
PT As características descritas neste manual são publicadas sob reserva de modificação.
IT Le caratteristiche descritte nel presente manuale vengono pubblicate con riserva di modifica.
SE Funktionerna i denna bruksanvisning publiceras med reservation för ändringar.
PL Właściwości opisane w niniejszej instrukcji obsługi są publikowane z zatrzeżeniem prawa wprowadzenia zmian.
SK Vlastnosti popísané v tejto príručke sú publikované s vyhradeným právom na zmenu.
CZ Možnost úpravy funkcí popsaných v této příručce vyhrazena.
1 Intended Purpose
The Baby Blend & Cook is a wonderful product to prepare your baby food. It combines 4 functions; defrosting, steam cooking, mixing and heating
2 Safety advice
2.1 General
- Always read the safety instructions carefully and keep this user guide for future reference.
- Follow the basic safety precautions for all electronic equipment when using this product.
- This product is not a toy. Don't let children play with it.
- Close supervision is necessary when the unit is used with children around.
- It is not intended for use by infirm persons without supervision.
- Do not leave the product unattended when plugged in. Unplug the product immediately from the main power after use.
- The device is only for private use and is not intended for medical or commercial purposes.
- This unit is not waterproof. Don't expose this product to rain or moisture.
- Make sure that the appliance is not too close to heat sources such as ovens, radiators or direct sunlight.
2.2 Electric shock
- Before connecting the appliance to the mains power supply, check that the voltage indicated on the rating label (underneath the base) corresponds to the local mains voltage.
- Do not operate this product when the cord or plug is damaged.
- Do not use the product if it is not working properly, dropped or damaged.
- Repairs to electrical appliances must only be carried out by qualified persons. Incorrect repairs can lead to considerable danger for the user. In the event of repairs, please contact our customer service or an authorized dealer.
- Don't disassemble this product. It doesn't contain parts that can be repaired by the user.
- Do not connect other attachments than the one supplied with the product.
- Do not drop or insert object into any opening.
- Do not place the basic unit in a damp room and at a distance of less than 1.5m away from a water source.
- Don't disassemble this product. It doesn't contain parts that can be repaired by the user.
- Never use the appliance during a thunderstorm.
2.3 Baby Blend & Cook precautions
2.3.1 General
- Always check the consistency of the baby food. Make sure there are no chunks in the food.
- Operate on a dry level surface. Sinks, drain boards or uneven surfaces must be avoided. Never use the steamer without water in it.
- Do not immerse the base, cord, or plug in water or any other liquid.
- Do not let the mains cable hang over the edge of a table or counter.
- Do not place the appliance on a hot surface or in a heated oven.
- For hygienic reasons, you should change the water every time you used the appliance.
- Food should not be heated for too long.
- This appliance is intended for processing small quantities of food for immediate consumption. It is not intended to process large quantities of food at one time.
- Avoid running the motor continuously for periods over 30 seconds.
- Ensure the bowl and lid are fitted correctly before starting appliance.
- Do not exceed the maximum level indicated on the tank.
- When you steam ingredients, make sure that you do not overfill the steam basket.
- When you blend liquids, do not exceed the maximum level indicated on the bowl.
- Always make sure that the lid has cooled down after steaming before you open it to add more ingredients for blending if necessary.
- Never connect this appliance to a timer switch or remote control system in order to avoid a hazardous situation.
- When the steaming process has finished (maximum 20 minutes) wait for the appliance to cool down for a few minutes, turn the control switch to the "reset" position before starting a new steaming process.
2.3.2 Burn injuries
- Test food on the back of your hand before serving to ensure it is at a safe temperature for your baby.
- Caution should be taken when handling this appliance as some surfaces may be hot during and immediately after boiling. Severe burns may result from misuse.
- Extreme caution is necessary when moving any appliance containing hot water. Wait until the appliance has switched off automatically, or switch it off manually before moving it.
- Do not move the base when it contains hot water.
- Do not directly touch food inside the steamer.
- This appliance generates heat and escaping steam during use. Proper precautions must be taken to prevent the risk of burns, fires or other damage to persons or property.
- Do not operate under or near flammable materials, such as curtains, drapes or any other combustible materials.
- Always unplug the appliance and let it cool down before you clean it.
- Never use the bowl or any other part of the appliance in a microwave, as they are not suitable for this use.
- Never sterilise the bowl or any other part of the appliance in a steriliser or in a microwave,
2.3.3 Cutting injuries
- Keep hands and utensils away from cutting blade while chopping food to reduce the risk of injury to persons or damage to the appliance. A plastic or wooden scraper may be used but only when the blender is not running.
- Never attach the chopping blade without the bowl in place.
- Motor and blender attachment must stop completely before removing lid.
- Do not touch the blades when removing food from the bowl or when removing the blades for cleaning as they are sharp.
- Do not touch the blades, especially when the appliance is plugged in. The blades are very sharp.
- If the blades get stuck, unplug the appliance before you remove the ingredients blocking the blades.
3 Product description
| Base station (see cover) Control switch | |
| 1. Steam basket2. Blender lid3. Blender bowl handle4. Blender bowl5. Blade6. Base7. Power indicator8. Control switch9. Water tank10. Steam basket handle11. Steam basket12. Steam basket lid | a. Resetb. Steamc. Offd. Blend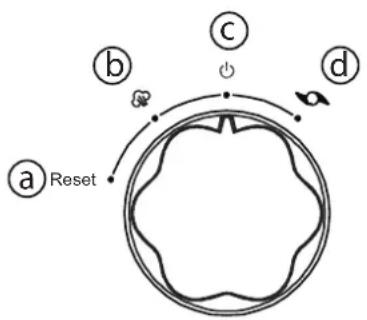 |
4 Before starting
4.1 Unpacking
Carefully unpack the unit and remove all packaging materials. Remove the power plug cover from pins. Clean all parts except the main unit (see Cleaning and Maintenance), rinse and dry them thoroughly, taking care to handle the blending blades carefully.
4.2 Assembly
Steamer Basket Handle
Place the handle in the upward position and slide it upwards to secure to the steamer basket.
Remove the handle from the steam basket in the inverse direction.
Steamer Basket
Place the steamer basket onto the water tank. Make sure the triangle icon on the basket is aligned to the "unlock" position on the base.
Turn the handle clockwise to the "lock" position.
Remove the steamer basket in the inverse direction.

natural_image
Simple line drawing of a computer monitor and its mug, no text or symbols present
natural_image
Line drawing of a mechanical device with a handle and side panel (no text or symbols)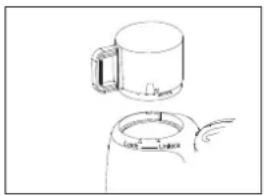
natural_image
Line drawing of a mug and its lid (no text or symbols)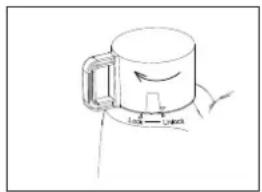
natural_image
Simple line drawing of a mug with a handle and a curved arrow indicating rotation (no text or symbols)Blades
!!! The blades are very sharp, be careful when handling.
Place the searing ring on the bottom of the blade.
Using your hand, hold the top of the blade and place it through the hole on the bottom of the bowl.
Turn the bowl over with its opening downward, place the blade retention nut on the blade's other end and twist it anticlockwise until it locks into position.
Remove the blade in the inverse direction.

natural_image
Simple line drawing of a propeller with an attached spring and upward arrow (no text or symbols)
natural_image
Line drawing of a coffee maker with a lid and handle, showing mechanical components (no text or symbols)
natural_image
Simple line drawing of a cylindrical device with a knob and arrow indicating rotation (no text or symbols)Blender Lid
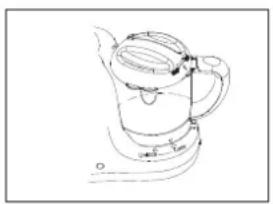
Place the lid on the bowl as the below drawing, turn it anticlockwise until it locks into position.
Remove the blender lid in the inverse direction.
Warning: This unit has an interlocking system. The unit will not operate unless the lid has been fitted correctly. Do not attempt to start the unit without the lid being correctly placed and locked into position.
natural_image
Line drawing of a kettle with handle and base, no text or symbols present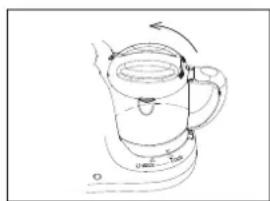
natural_image
Line drawing of a kettle with a handle and curved arrow indicating rotation (no text or symbols)Blender Bowl
Place the blending bowl over the centre post in the base.
Make sure the triangle icon on the blending bowl is aligned to the "unlock" position on the base. Turn the handle anticlockwise to the "lock" position.
Remove the blender bowl in the inverse direction.

natural_image
Line drawing of a cup pouring liquid from a bottle onto a surface with a small knob (no text or symbols)
natural_image
Line drawing of a kettle with a handle and a dial, no text or symbols present5 Operation
This appliance is intended for steaming fresh solid ingredients and then blending them to obtain baby food. Normally you would first steam the ingredients and then blend them. However, you can also use the appliance for steaming or blending only. When you use the appliance for blending only, skip the sections 'Filling the tank with water' and "Steaming" and only follow the instructions in section "Blending".
Note: After blending, never steam already blended food.
Never steam the same batch of ingredients for longer than 20 minutes or more than once.
WARNING
• Always check the temperature of the baby food before you feed your baby.
• Always make sure that the lid has cooled down after steaming before you open it to add more ingredients for blending.
- Empty the water tank before you refill it to start a new steaming process.
- Do not exceed the maximum level indicated on the blender bowl when blending food.
- Do not exceed the maximum level indicated on the blender bowl when blending liquids.
5.1 Steaming
5.1.1 Filling the tank with water
Remove the steamer basket 11om the tank . F9 with water, ensuring the maximum level is not exceeded.
Note: It is advisable not to use mineral water, as the minerals contained in this type of water cause scale to build up inside the tank.
Note: Do not place anything other than water in the water tank.
5.1.2 Steaming
- Position the unit on a flat surface.
- Insert the power cord into a standard domestic power outlet and switch on.
- Remove the steamer basket from the water tank. Fill with water, ensuring the maximum level is not exceeded.
- Place the steamer basket on the water tank and to the "lock" position.
- Cut solid ingredients into small pieces (cubes not bigger than 2-3cm).
- Place the ingredients in the steamer basket. 11
- Place the lid on one steamer basket.
- Turn the control switch to 8e steaming position. The steaming indicator will light up to indicate that the appliance is steaming.
- When the food has steamed, turn the control switch to 8 e "off" position. Wait 2 minutes before removing the lid 12 ensure no more steam releases from the steam outlet.
- Test the food to make sure it is at a safe temperature for your baby.
Note: Do not process a large quantity of solid ingredients at the same time. Process these ingredients in a series of small batches instead.
5.2 Auto Cut-Out Reset
This appliance is equipped with an overheat protection. It will cut off the power automatically if the water is heating dry. The steam indicator will go out at the same time.
To start your next steaming process, wait for the appliance to cool down and turn the control switch ⑧ the reset position a Reset
5.3 Ingredients and their steaming time
All food has to be cut in small cubes, no bigger than 2-3cm.
| Type of food Ingredients Approximate | steaming time | |
| Fruit Apple, Orange, Peach | Pears, Pear, Plum 10 minutes | |
| Pineapple | 15 minutes | |
| Vegetables Asparagus 10 | minutes | |
| Sweet potato, Spinach, Tomato, Pumpkin, Pepper, Onion, Carrot, Zucchini, Asparagus, Celera, Cauliflower, Fennel | 15 minutes | |
| Potato, Peas, Broccoli, French beans 20 minutes | ||
| Meat Chicken, beef, Lamb | Pork... 20 minutes | |
| Fish | Salmon, Sole, Cod, Trout,... | 15 minutes |
Refer to below table for water guidelines for steaming.
| Water capacity | Steam time |
| 25 ml | 3 minutes |
| 50 ml | 6 minutes |
| 75 ml | 10 minutes |
| 100 ml | 13 minutes |
| 125 ml | 16 minutes |
| 150 ml | 20 minutes |
5.4 Blending
This appliance is intended for pureeing steamed and cooked ingredients for baby food and blending fluids and fruits for baby drinks.
This appliance is not intended for chopping hard ingredients such as ice or sugar cubes.
| WARNING |
| This appliance is equipped with a built-in safety lock. This appliance only functions if you have correctly assembled the lid.Do not let the appliance blend for more than 30 seconds at a time. If you have not finished blending after 30 seconds, switch off the appliance and wait 2 minutes before continuing. If the appliance becomes hot, let it cool down for a few minutes before continuing. |
Note
If the ingredients stick to the wall of the bowl after blending, switch off the appliance and loosen them with a spatula or add liquid.
Make sure that the blended baby food is at the right consistency (e.g. no lumps) before serving.
If the baby food is still too solid add liquid (e.g. water) until the baby food is soft and smooth.
- Place the blender bowl with 4 the blade installed on the base and turn to the "lock" position.
- Put the steamed food or fruit into the bowl. If 4 necessary, add additional ingredients for blending (e.g. water or oil).
- Place the lid on 2 he blending bowl and turn to the "lock" position.
- Turn the control switch to 8e blending position. Hold the switch in this position until the food is properly blended.
- When you have finished blending, simply release the control switch. T8 switch automatically returns to the off position
- Unplug the appliance.
- Remove the blended food from the bowl. If necessary, use a spatula. Make sure that the baby food is at a safe temperature for your baby.
6 Technical data
| Power supplyRated powerTemperature | 100-240 V/AC/50 HzHeater: 350WChopper: 115WMaximum 100°C (+/- 5°C) |
7 Cleaning
- Clean the appliance after every use.
- Never use bleach or chemical sterilising solutions/tablets in the appliance.
- Never use scouring pads, abrasive cleaning agents to clean the appliance.
- Unplug the appliance and remove the lid from the steamer basket and blender bowl.
- Remove the steamer basket and blender bowl from the main unit.
- Remove the blade from the blender bowl.
- Clean the blade under the tap thoroughly, immediately after use. Make sure you also rinse the searing rubber ring.
- Handle the blade very carefully. The cutting edges are very sharp.
- Clean the other parts that have come into contact with food in hot water with some washing-up liquid immediately after use.
- To clean the water tank, fill it with warm, soapy water, then rinse thoroughly. Wipe dry with a soft cloth.
- If necessary, clean the main unit with a moist cloth.
WARNING
- Never immerse the main unit, cord and plug into any liquids.
8 Descaling The Water tank
- Mineral deposits (usually white in color) may form on the inner surfaces of the tank and can cause damage to the unit.
- Descaling is recommended every four weeks to ensure the appliance works effectively. To reduce scale build-up, it is helpful to use pre-boiled or filtered water in the appliance. To descale the appliance, follow the descaling instructions below.
- Make sure the appliance is switched off.
- Add one sachet of citric acid (10g) to 150ml of warm water.
- Fill the tank with the solution of citric acid (or vinegar) and water.
- Turn the control dial to steaming position. The indicator light will turn orange to indicate that the appliance is steaming.
- Switch off the appliance after 5-6 min of steaming and unplug it.
- Pour the used solution of citric acid (or vinegar) and water out of the tank.
- Rinse the water tank and the bowl thoroughly with fresh water several times.
- Fill the tank with 150ml water and let the appliance complete a steaming process of 20 minutes with the empty bowl before you use the appliance with food again.
Note: You can also use a solution of 100ml water and 50ml white vinegar (8% acetic acid).
9 Storage
- Empty the water tank before you store the appliance.
- Make sure all parts are clean and dry before you store the appliance.
- Store the appliance with the blade unit in the bowl to prevent damage.
10 Topcom warranty
10.1 Warranty period
The Topcom units have a 24-month warranty period. The warranty period starts on the day the new unit is purchased. Consumables or defects causing a negligible effect on operation or value of the equipment are not covered.
The warranty has to be proven by presentation of the original purchase receipt, on which the date of purchase and the unit-model are indicated.
10.2 Warranty exclusions
Damage or defects caused by incorrect treatment or operation and damage resulting from use of non-original parts or accessories not recommended by Topcom are not covered by the warranty.
The warranty does not cover damage caused by outside factors, such as lightning, water and fire, nor any damage caused during transportation.
No warranty can be claimed if the serial number on the units has been changed, removed or rendered illegible.
1 Beoogd Gebruik
natural_image
Technical line drawing showing a door opening and a mug with a handle, both without any text or symbols.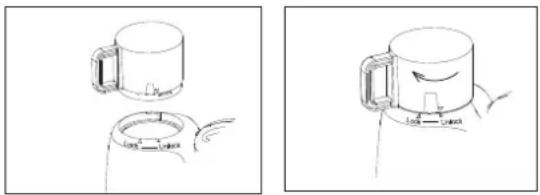
natural_image
Two-step line drawings of a cup device, showing top and side views with no text or symbols
natural_image
Technical line drawings of a propeller and a coffee mug with arrows indicating assembly (no text or symbols)
natural_image
Simple line drawing of a cylindrical object with a circular top and arrow indicating rotation (no text or symbols)Deksel Mengkom
natural_image
Two line drawings of a kettle with rotating arms and base, shown from different angles (no text or symbols)Mengkom
natural_image
Two line drawings of a cup on a tray, showing motion and movement patterns (no text or symbols)5 Werking
natural_image
Diagram of a computer monitor and its external mug, showing no text or symbols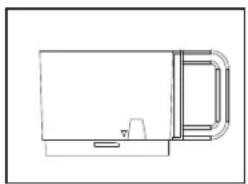
natural_image
Line drawing of a mechanical device with a handle and side panel (no text or symbols)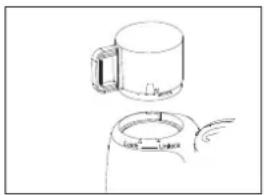
natural_image
Line drawing of two views of a mug, one upright and one tilted (no text or symbols)
natural_image
Simple line drawing of a mug with a handle and a curved arrow indicating rotation (no text or symbols)
natural_image
Simple line drawing of a propeller with an attached cylinder and upward arrow (no text or symbols)
natural_image
Line drawing of a coffee maker with a handle and spout, showing no text or symbols
natural_image
Simple line drawing of a cylindrical object with a central knob and an arrow indicating rotation (no text or symbols)Couvercle du mixeur
natural_image
Line drawing of a kettle with handle and base, no text or symbols present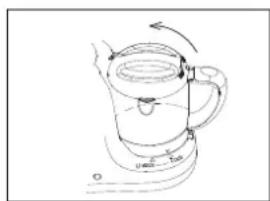
natural_image
Line drawing of a kettle with a handle and curved arrow indicating rotation (no text or symbols)Bol du mixeur
natural_image
Simple line drawing of a cup with a handle and small circular elements, no text or symbols present.
natural_image
Line drawing of a kitchen pot with a handle and side arm, no text or symbols present5 Fonctionnement
natural_image
Diagram of a computer monitor and its external mouse, showing internal components and directional arrow (no text or symbols)
natural_image
Line drawing of a mechanical component or housing with no visible text, numbers, or symbolsGareinsatz
natural_image
Line drawing of two identical containers with handles, one cylindrical and one cylindrical, shown without any text or symbols.
natural_image
Simple line drawing of a mug with handle and side arm, no text or symbols presentMesser
natural_image
Simple line drawing of a propeller with an attached cylindrical component (no text or symbols)
natural_image
Line drawing of a coffee maker with a handle and spout, showing mechanical components (no text or symbols)
natural_image
Simple line drawing of a cylindrical device with a knob and arrow indicating rotation (no text or symbols)Mixerdeckel
natural_image
Line drawing of a kettle with handle and base, no text or symbols present
natural_image
Line drawing of a kettle on a stovetop with a rotating handle (no text or symbols)Mixerbehälter
natural_image
Line drawing of a hand pouring liquid into a cup on a surface with a small inset showing a circular object (no text or symbols)
natural_image
Line drawing of a kettle with a handle and a small knob beside it (no text or symbols)4 Bedienung
natural_image
Simple line drawing of a computer monitor and its mug, no text or symbols present
natural_image
Line drawing of a mechanical component or housing with a handle and side panel (no text or symbols)natural_image
Line drawing of a mug and its lid (no text or symbols)
natural_image
Simple line drawing of a mug with handle and side arm, no text or symbols presentCuchillas
natural_image
Simple line drawing of a propeller with an attached cylindrical component (no text or symbols)
natural_image
Line drawing of a coffee maker with a handle and spout, showing mechanical components (no text or symbols)
natural_image
Simple line drawing of a cylindrical device with a knob and arrow indicating rotation (no text or symbols)Tapa de la batidora
natural_image
Line drawing of a kettle with handle and spout (no text or symbols)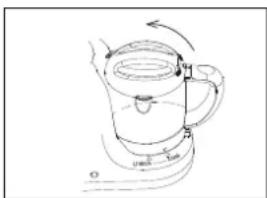
natural_image
Line drawing of a kettle on a stovetop with a rotating handle (no text or symbols)Recipiente de la batidora
natural_image
Simple line drawing of a cup with an arm and a small object nearby (no text or symbols)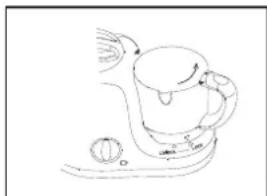
natural_image
Simple line drawing of a steaming cup with a handle and a small knob beside it (no text or symbols)5 Funcionamiento
natural_image
Technical line drawing showing a door opening and a mug with a handle, both without any text or symbols.Cesto de vapor
natural_image
Two-step line drawing showing a cup being placed on a lid, with the other showing a rotating handle (no text or symbols)Lâminas
natural_image
Technical line drawings of a propeller and a coffee maker with arrows indicating assembly (no text or symbols)
natural_image
Simple line drawing of a cylindrical object with a knob and arrow indicating rotation (no text or symbols)natural_image
Two line drawings of a kettle with rotating arms and base, shown from different angles (no text or symbols)Taça da misturadora
natural_image
Two line drawings of a cup with handles and a small knob, no text or symbols present5 Funcionamento
natural_image
Diagram of a computer monitor and its external mouse, showing internal components and directional arrow (no text or symbols)
natural_image
Line drawing of a mechanical component or housing with a handle and side profile (no text or symbols)natural_image
Line drawing of two identical containers, one cylindrical and one cylindrical, with no text or symbols present.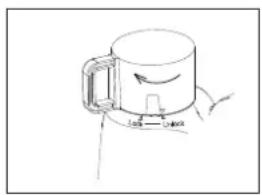
natural_image
Simple line drawing of a mug with handle and side arm, no text or symbols presentLame
natural_image
Simple line drawing of a propeller with an attached cylindrical component (no text or symbols)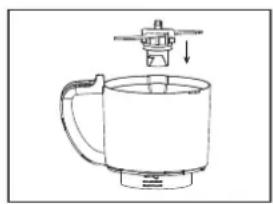
natural_image
Line drawing of a coffee maker with a handle and spout, showing mechanical components (no text or symbols)
natural_image
Simple line drawing of a cylindrical device with a knob and arrow indicating rotation (no text or symbols)natural_image
Line drawing of a kitchen pot with handle and side arm (no text or symbols)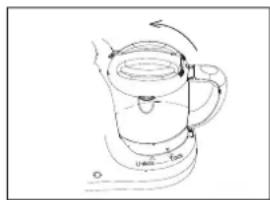
natural_image
Line drawing of a kettle on a stovetop with a rotating arrow indicating motion (no text or symbols)natural_image
Line drawing of a kitchen sink with a handle and a small knob, no text or symbols present
natural_image
Line drawing of a steaming cup with a handle and a small knob, no text or symbols present5 Operazione
natural_image
Simple line drawing of a computer monitor and its mug, no text or symbols present
natural_image
Line drawing of a mechanical component or housing with no visible text, numbers, or symbolsÅngkorg
natural_image
Line drawing of a mug and its lid (no text or symbols)
natural_image
Simple line drawing of a mug with a handle and a curved arrow indicating rotation (no text or symbols)Blad
natural_image
Simple line drawing of a propeller with an attached cylindrical component and an upward arrow (no text or symbols)
natural_image
Line drawing of a coffee maker with a handle and spout, showing mechanical components (no text or symbols)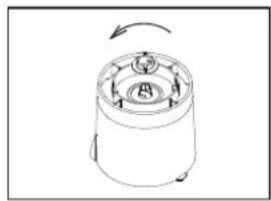
natural_image
Simple line drawing of a cylindrical object with a knob and arrow indicating rotation (no text or symbols)Mixerlock
natural_image
Line drawing of a kettle with handle and base, no text or symbols present
natural_image
Line drawing of a kettle with a curved arrow indicating rotation (no text or symbols)Mixerskål
natural_image
Simple line drawing of a cup on a surface with a handle and small circular object nearby (no text or symbols)
natural_image
Line drawing of a kettle with a handle and control knob, no text or symbols present5 Drift
natural_image
Technical line drawings of two mechanical components with directional arrows indicating movement (no text or symbols)
natural_image
Two line drawings showing a cup being held, with one being open and the other showing a handle (no text or symbols)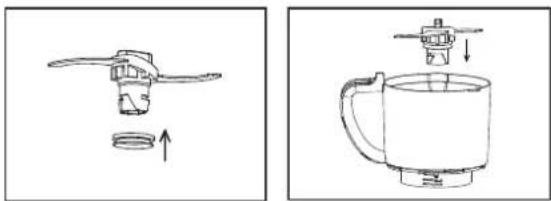
natural_image
Technical line drawings of a propeller and a blender with directional arrows indicating assembly (no text or symbols)
natural_image
Simple line drawing of a cylindrical device with a knob and arrow indicating rotation (no text or symbols)Pokrywka miksera
natural_image
Line drawings of a kettle with adjustment arrows indicating rotation (no text or symbols)
natural_image
Two line drawings of a coffee cup with handles and legs, no text or symbols present5 Działanie
natural_image
Technical line drawings of two mechanical components, one with a left-angle view and the other showing a side profile (no text or symbols)
natural_image
Two-step line drawing showing a cup being placed on top and bottom, with a hand holding the cup's handle (no text or symbols)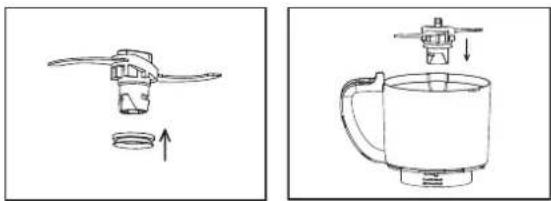
natural_image
Technical line drawings of a propeller and a coffee mug with arrows indicating assembly (no text or symbols)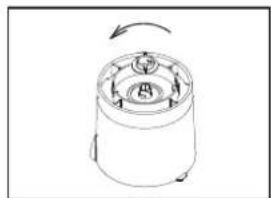
natural_image
Simple line drawing of a cylindrical object with a circular top and arrow indicating rotation (no text or symbols)
natural_image
Line drawings of a kettle and its base with a curved arrow indicating rotation (no text or symbols)
natural_image
Two line drawings of a cup with steam rising, placed on a surface with small objects nearby (no text or symbols)5 Prevádzka
natural_image
Simple line drawing of a computer monitor and its mug, no text or symbols present
natural_image
Line drawing of a microwave oven with handle and side panel (no text or symbols)Košík na napařování
natural_image
Line drawing of a mug and its lid (no text or symbols)
natural_image
Simple line drawing of a mug with a handle and a curved arrow indicating rotation (no text or symbols)Nože
natural_image
Simple line drawing of a propeller with a handle and a separate circular component (no text or symbols)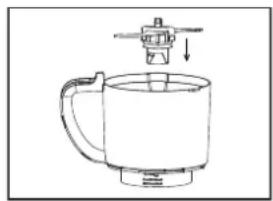
natural_image
Line drawing of a kitchen mixer with a handle and lid, showing no text or symbols
natural_image
Simple line drawing of a cylindrical device with a knob and arrow indicating rotation (no text or symbols)Víko mixéru
natural_image
Line drawing of a kettle with handle and base, no text or symbols present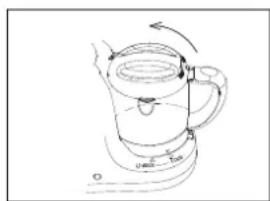
natural_image
Line drawing of a kettle with a handle and curved arrow indicating rotation (no text or symbols)Mísa mixéru
natural_image
Line drawing of a cup with steam rising, connected to a fan and a small circular object (no text or symbols)
natural_image
Line drawing of a kettle with a handle and a dial, no text or symbols present5 Činnost
- Intended Purpose
- Safety advice
- General
- Electric shock
- Baby Blend & Cook precautions
- General
- Burn injuries
- Cutting injuries
- Product description
- Before starting
- Unpacking
- Assembly
- Steamer Basket Handle
- Steamer Basket
- Blades
- !!! The blades are very sharp, be careful when handling.
- Blender Lid
- Blender Bowl
- Operation
- WARNING
- Steaming
- Filling the tank with water
- Steaming
- Auto Cut-Out Reset
- Ingredients and their steaming time
- Blending
- Note
- Technical data
- Cleaning
- Descaling The Water tank
- Storage
- Topcom warranty
- Warranty period
- Warranty exclusions
- Beoogd Gebruik
- Deksel Mengkom
- Mengkom
- Werking
- Couvercle du mixeur
- Bol du mixeur
- Fonctionnement
- Gareinsatz
- Messer
- Mixerdeckel
- Mixerbehälter
- Bedienung
- Cuchillas
- Tapa de la batidora
- Recipiente de la batidora
- Funcionamiento
- Cesto de vapor
- Lâminas
- Taça da misturadora
- Funcionamento
- Lame
- Operazione
- Ångkorg
- Blad
- Mixerlock
- Mixerskål
- Drift
- Pokrywka miksera
- Działanie
- Prevádzka
- Košík na napařování
- Nože
- Víko mixéru
- Mísa mixéru
- Činnost
Brand : TRISTAR
Model : KF-4310
Category : Baby products