Evolution Espresso - Coffee machine GAGGIA - Free user manual and instructions
Find the device manual for free Evolution Espresso GAGGIA in PDF.

User questions about Evolution Espresso GAGGIA
0 question about this device. Answer the ones you know or ask your own.
Ask a new question about this device
Download the instructions for your Coffee machine in PDF format for free! Find your manual Evolution Espresso - GAGGIA and take your electronic device back in hand. On this page are published all the documents necessary for the use of your device. Evolution Espresso by GAGGIA.
USER MANUAL Evolution Espresso GAGGIA
natural_image
Exterior view of a Gaggia Espresso Evolution saucer device (no visible text or symbols on the device body)EG2115 (SIN045) EG2111 (SIN045) EG2111 (SIN045)
ESPRESSO EVOLUTION
natural_image
Exterior view of a black Gaggia coffee maker with three control buttons (no visible text or symbols on the device body)ESPRESSO DE LUXE
natural_image
Exterior view of a black Gaggia coffee maker with control buttons and speaker grille (no readable text beyond branding)ESPRESSO STYLE
text_image
QR code image containing encoded data, no visible human-readable text
text_image
QR code image containing encoded data, no visible human-readable text
text_image
QR code image containing encoded data, no visible human-readable texttext_image
Technical diagram showing exploded view of kitchen appliance parts with numbered labelsIntroduzione
natural_image
3D rendering of a cylindrical mechanical component with concentric rings (no text or symbols)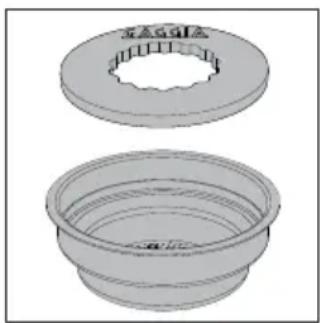
natural_image
Two technical illustrations of a mechanical component with flanges and concentric rings (no text or symbols)natural_image
Diagram of a mechanical or architectural component with an arrow indicating direction, no visible text or symbolsPrima installazione
natural_image
Technical line drawing of a mechanical device with a cylindrical component and piping (no text or symbols)natural_image
Technical line drawing of a mechanical device with a cylindrical component and piping (no text or symbols)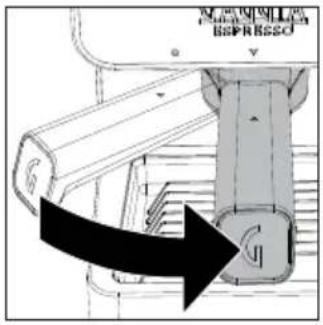
text_image
MILKOMILL ISPRISSOnatural_image
Technical line drawing of a mechanical device with a cylindrical component and control panel (no text or symbols)natural_image
Technical line drawing of a mechanical device with a lever and base (no text or symbols)natural_image
Mechanical assembly diagram showing a shaft and housing with a downward arrow indicating motion (no text or symbols)natural_image
Technical diagram of a mechanical device with circular components and directional arrows indicating movement (no text or symbols)text_image
Technical diagram showing two steps of a mechanical component with arrows indicating process direction and assembly details.Con caffè in cialde
text_image
Diagram showing three buttons with icons: power, switch, and flame, connected by a finger to the right button.natural_image
Hand pressing a button with three icons: coffee cup, mouse, and hand (no text or symbols)natural_image
Diagram of a mechanical device with a bucket and lever, showing directional arrows (no text or symbols)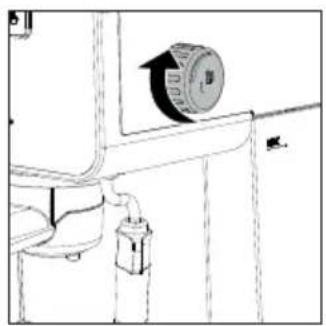
natural_image
Technical line drawing of a mechanical component with a circular component and pipe fitting (no text or symbols)natural_image
Line drawing of a coffee maker machine with a cup and tray (no text or symbols)natural_image
Diagram of a mechanical device with a downward arrow indicating force or direction (no text or symbols present)natural_image
Technical diagram of a mechanical assembly with a black arrow indicating direction (no text or symbols present)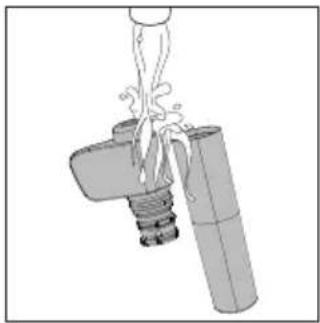
natural_image
Diagram of a mechanical device with a lever and cylindrical component, no text or symbols present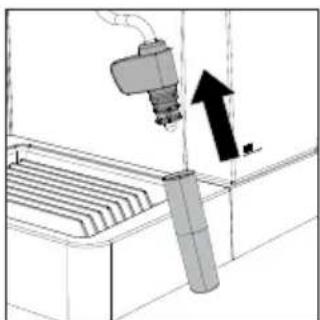
natural_image
Diagram of a robotic arm operating a control panel with an arrow indicating motion (no text or symbols present)Settimanalmente:
natural_image
Illustration of a hand washing a bowl with liquid, no text or symbols present
natural_image
Illustration of a squid with tentacles and a circular object on top (no text or symbols)natural_image
Technical diagram of a mechanical device with labeled components and directional arrows (no readable text or symbols)text_image
Diagram showing a container with liquid being poured into a bottle labeled 'TDP' with arrows indicating flow direction.natural_image
Technical diagram of a structural support frame with no visible text or symbolsnatural_image
Technical line drawing of a mechanical device with a cylindrical component and control panel (no text or symbols)natural_image
Diagram of a cylindrical device with a piping system, mounted on a base platform (no text or symbols visible)text_image
Diagram showing three icons: a power button, a device with a flame, and a flame symbol, each pointing at its finger.text_image
GAGGIA Organic Cream Product: 100 gm Product name: GAGGIA Product type: organic Product quality: 90% Product size: 50 px Product type: organic Product size: 50 px Product size: 50 px Product size: 50 px Product size: 50 px Product size: 50 px Product size: 50 px Product size: 50 px Product size: 50 px Product size: 50 px Product size: 50 px Product size: 50 px Product size: 50 px Product size: 50 px Product size: 1.00 gm 2.00 gm 3.00 gm 4.00 gm 5.00 gm 6.00 gm 7.00 gm 8.00 gm 9.00 gm 10.00 gmImportant safety information
This machine is equipped with safety features. Nevertheless, read and follow the safety instructions carefully and only use the machine as described in these instructions, to avoid accidental injury or damage due to improper use of the machine. Keep this safety booklet for future reference.
Warning
General
- Check if the voltage indicated on the machine corresponds to the local mains voltage before you connect the appliance.
- Connect the machine to an earthed wall socket.
- Do not let the power cord hang over the edge of a table or worktop and do not let it touch hot surfaces.
- To avoid the danger of electric shock, never immerse the machine, mains plug or power cord in water or any other liquid.
- Do not pour liquids on the power cord connector.
- To avoid the danger of burns, keep body parts away from hot water jets produced by the machine.
- Do not touch hot surfaces. Use handles and knobs.
-
Switch off the machine with the main switch located on the back (if present) and remove the mains plug from the wall socket:
-
If a malfunction occurs.
- If you are not going to use the appliance for a long time.
-
Before you clean the machine.
-
Pull at the plug, not at the power cord.
- Do not touch the mains plug with wet hands.
- Do not use the machine if the mains plug, the power cord or the machine itself is damaged.
- Do not make any modifications to the machine or its power cord.
- Only have repairs carried out by a service center authorized by Gaggia to avoid a hazard.
- The machine should not be used by children younger than 8 years old.
- This machine can be used by children aged from 8 years and above and by persons with reduced physical, sensory or mental capabilities or lack of experience and knowledge if they have been given supervision or instruction concerning use of the machine in a safe way and if they understand the hazards involved.
- Cleaning and user maintenance shall not be made by children unless they are older than 8 and supervised.
- Keep the machine and its cord out of the reach of children aged less than 8 years.
- Children should be supervised to ensure that they do not play with the machine.
- Be careful when you dispense hot water. Dispensing may be preceded by small jets of hot water. Wait until the end of the dispensing cycle before you remove the hot water dispensing spout.
Caution
General
- This machine is intended for normal household use only. It is not intended for use in environments such as staff kitchens of shops, offices, farms or other work environments.
- Always put the machine on a flat and stable surface. Keep it in upright position, also during transport.
- Do not place the machine on a hotplate or directly next to a hot oven, heater or similar source of heat.
- Only put ground coffee in the filter holder. Putting coffee beans, instant coffee, unroasted coffee beans, barley coffee or any other substance in the filter holder may cause damage to the machine. In this case repair is not covered by warranty.
- Let the machine cool down before you insert or remove any parts. The heating surfaces may retain residual heat after use.
- Never touch the water drain hose (if any) when using the machine, since it could be hot. Let it cool down first.
- Never fill the water tank with warm, hot or sparkling water, as this may cause damage to the water tank and the machine.
- Never use souring pads, abrasive cleaning agents or aggressive liquids such as petrol or acetone to clean the machine. Simply use a soft cloth dampened with water.
- Descale your machine regularly. Not doing this will make your appliance stop working properly. In this case repair is not covered by your warranty.
- Do not keep the machine at temperatures below 0^ C/ 32^ F. Water left in the heating system may freeze and cause damage.
- Do not leave water in the water tank when you are not going to use the machine for a long period of time. The water can become contaminated. Use fresh water every time you use the machine.
- Never use any accessories or parts from other manufacturers or that Gaggia does not specifically recommend. If you use such accessories or parts, your warranty becomes invalid.
- Regular cleaning and maintenance prolongs the lifetime of your machine and ensures optimum quality and taste of your coffee.
- The machine is exposed continuously to moisture, coffee and scale. Therefore it is very important to regularly clean and maintain the machine as described in the user manual and shown on the website. If you do not perform these cleaning and maintenance procedures, your machine eventually may stop working. In this case repair is not covered by warranty.
- Do not clean the filter holder in the dishwasher and do not use washing-up liquid or a cleaning agent to clean it. This may cause the filter holder to malfunction and may have a negative effect on the coffee taste.
- Do not dry the brew group with a cloth to prevent fibers from collecting inside the brew group.
- Never drink the solution dispensed during the descaling process.
- Do not remove the filter holder while brewing coffee. Hot water drips may spill out during the warm-up phase of the brew group.
- The machine shall not be placed in a cabinet when in use.
Machines with classic milk frother
Warning
- To avoid the danger of burns, be aware that dispensing may be preceded by small jets of hot water.
- Never touch the classic milk frother with bare hands, as it may become very hot. Use the appropriate protective handle only.
Caution
- After frothing milk, quickly clean the classic milk frother by dispensing a small quantity of hot water into a container. Then remove the external part of the classic milk frother and wash it with lukewarm water.
Electromagnetic fields (EMF)
This machine complies with all applicable standards and regulations regarding exposure to electromagnetic fields.
Recycling
- This symbol means that this product shall not be disposed of with normal household waste (2012/19/UE).
- Follow your country's rules for the separate collection of electrical and electronic products. Correct disposal helps prevent negative consequences for the environment and human health.
LED indicators
| Legend | ||||
 |  |  |  | |
| White | White | Orange | Orange | Off |
| Steady | Flashing | Steady | Flashing | |
LED indicator Message LED indicator Message
 |  |  | Machine ON Steam ready to use |  |  |  |
 |  |  | Descaling needed Steam heating ( |  | [AYSZ] |  |
 |  |  | Descaling reset Cooling down stea |  |  |  |
 |  |  | Machine ready to use Alarm “Clos |  |  |  |
 |  |  | Coffee/hot water heating up |
LED indicator Message
| Successful MEMO activation and storage sequence | |||
| Successful MEMO disabling sequence |
Espresso Style Espresso De Luxe Espresso Evolution

text_image
QR code image containing encoded data, no visible human-readable text
text_image
QR code image containing encoded data, no visible human-readable text
text_image
QR code image containing encoded data, no visible human-readable textCongratulations on your purchase of Gaggia Espresso!
Preparing a perfect espresso is a fine art that requires a bit of patience, some precision and a good dose of practice. This Gaggia espresso machine is the first step into becoming a barista at home, for those who aren't experts but would like to enjoy a good espresso by learning the barista rituals made of small gestures in an easy way.
This user manual provides all the information needed to install, use, clean and descale your machine. Before using it for the first time, read the safety section carefully and keep it for future reference.
Contents
LED indicators 28
Machine overview 31
Dishwasher safe components 31
Introduction 32
Filters supplied 32
2-Cup Crema Perfetta filter 32
1-Cup Crema Perfetta filter and single-dose pod + "Pod System" 32
First installation 33
Circuit priming 33
How to insert and remove the filter holder 34
Upon machine first operation or after a period of inactivity of more than 2 wks 34
Preparing a coffee 35
With pre-ground coffee 35
Using coffee pods 36
Memo function 36
How to save your espresso 36
How to disable the Memo function 37
Frothing milk to prepare a cappuccino 37
How to lower the boiler temperature 38
Hot water dispensing 39
Energy saving 39
Cleaning and maintenance 39
Cleaning the Pannarello 39
Cleaning the filter holder, filters and the "Pod System" 40
Cleaning the screen 41
Cleaning the grid and drip tray 41
Cleaning the water tank 42
Descaling 42
Troubleshooting 44
GAGGIA accessories 45
Technical specifications 46
Machine overview
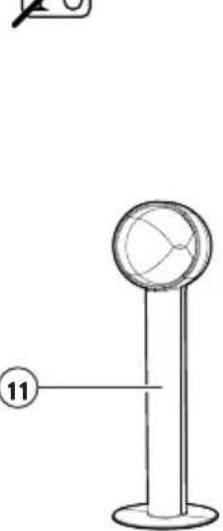
| 1 ON/OFF button 11 Coffee scoop/tamper spoon | ||
| 2 COFFEE button | 12 | 2 cups "Crema perfetta" filter |
| 3 STEAM button | 13 | 1 cup "Crema perfetta" filter/single dose pod |
| 4 Stainless steel cup plateEspresso De Luxe ed Espresso Evolution | 14 Pod System | |
| 5 Steam/hot water knob 15 Classic Pannarello lower part | ||
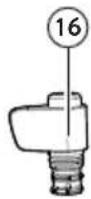
| 6 Water tank silicon hoses 16 Classic Pannarello upper part | ||
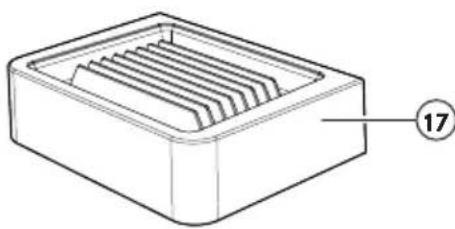
| 7 Steam/hot water tube 17 Drip tray | ||
| 8 Classic Pannarello 18 | Drip tray gridEspresso De Luxe ed Espresso Evolution | |
| 9 Water tank 19 Filter holder | ||
| 10 Power cord 20 Brew group | ||
Dishwasher safe components
 |  |  |
 |  | |
| 15 | 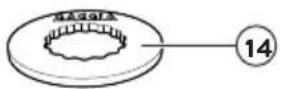 | |
| AW45 |
Introduction
A perfect espresso with the distinctive crema on top depends on many factors including:
- the type of coffee used. There are different qualities of coffee available on the market, but the best beans for a good espresso are the darker roasts which release a richer aroma and a more intense flavour.
- the coarseness of the pre-ground coffee. Make sure you purchase the desired blend with a grind setting that is suitable for use with espresso machines. You can also freshly grind right before you brew using a Gaggia brand coffee grinder.
- the amount. Using just the right dose of pre-ground coffee is key to avoiding watery coffee (not enough coffee) or one that is too bitter with a burnt taste (too much coffee).
- the pressure applied to compress the coffee grounds. Be sure to tamp the coffee evenly and smoothly. Keep the surface parallel to the filter holder rim so as to avoid gaps where the water can seep through without evenly wetting the whole pod, thus only partially extracting the coffee aromas.
- pre-brewing. The machine uses factory set pre-brewing that favours the best possible extraction of coffee aromas. Hot water soaks the puck for a few seconds before brewing.
• temperature. Which is kept constant to ensure the best extraction every time.
Filters supplied
2-Cup Crema Perfetta filter
The Two Cup Crema Perfetta filter is already fitted to the filter holder and allows even beginners to prepare an excellent espresso with crema.

natural_image
3D rendering of a cylindrical mechanical component with concentric rings (no text or symbols)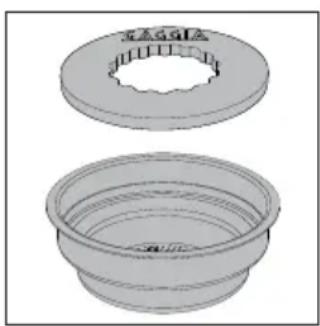
natural_image
3D rendered mechanical parts showing two views: top view with a circular flange and inner ring, bottom view with concentric rings (no text or symbols)1-Cup Crema Perfetta filter and single-dose pod + "Pod System"
This filter can be used to brew 1 cup of espresso with pre-ground coffee or by using a single-dose pod with our exclusive "Pod system"
natural_image
Diagram of a mechanical or architectural component with an arrow indicating direction, no visible text or symbolsFirst installation
1 Remove the water tank (9), rinse it and fill it with cold water up to the MAX level.
2 Insert the power cord plug into a wall socket with suitable power voltage.
3 Press the on/off button (1), which will start flashing.
4 Place a container under the Pannarello (8), turn the steam/hot water knob (5) counter clockwise and dispense hot water until all three on/off (1), coffee (2) and steam (3) buttons flash simultaneously, signalling for you to turn the knob off again.
5 The on/off button will come on steady and the coffee button (2) will start flashing, turning steady once the factory set temperature is reached.
Circuit priming
The circuit must be primed upon machine first operation or when the water tank is empty:
1 Fill the water tank with cold water up to the MAX level.
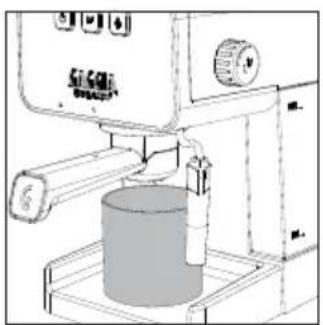
2 Place a container under the Pannarello
natural_image
Technical line drawing of a mechanical device with a cylindrical component and control panel (no text or symbols)3 Turn the steam/hot water knob counter clockwise and dispense water from the Pannarello (8) until a steady jet comes out.
4 To finish dispensing, turn the steam/hot water knob clockwise and empty the container.
Note: the machine does not signal a shortage of water in the tank; if the pump is very noisy, refill the tank and prime the circuit.
natural_image
Technical line drawing of a mechanical device with a cylindrical component and control panel (no text or symbols)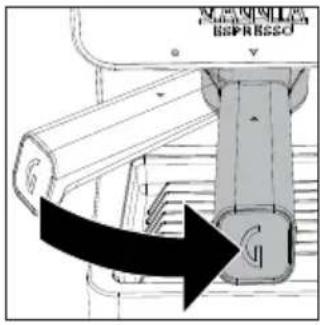
text_image
MENIPELLA BAPRASSOHow to insert and remove the filter holder
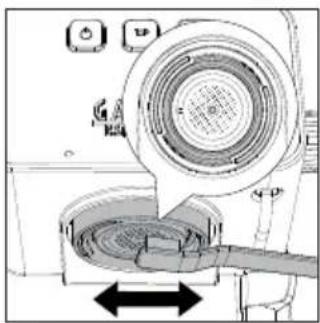
Insert the filter holder (19) into the brew group from below, aligning the triangle ▲ on the filter holder handle with the icon ● on the housing, turning from left to right until the triangle on the handle ▲ is aligned with that on the housing ▼ slightly shifted rightwards.
Turn the filter holder in the opposite direction, from right to left, to remove it.
Upon machine first operation or after a period of inactivity of more than 2 weeks
Note: water dispensed during this process must be thrown away and is not suitable for food use. If the container fills up during the cycle, stop dispensing water and empty the container before resuming the operation.
1 Remove the drip tray (17) and place a container underneath the Pannarello (8).
2 Remove the water tank (9), rinse it and fill it with cold water up to the MAX level.
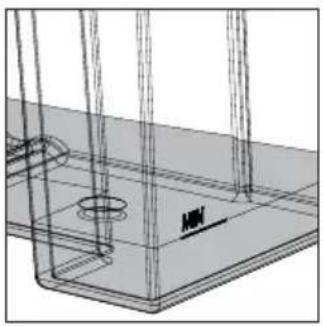
3 Turn the steam/hot water knob (5) counter clockwise and dispense hot water from the Pannarello until the MIN level of the water tank is reached.
4 Turn the steam/hot water knob clockwise to finish dispensing.
5 Fill the water tank up to the MAX level again.
6 Put the filter holder (19) into the brew group (20) by turning it from left to right as described in the relevant chapter.
7 Place a suitable container under the filter holder.
natural_image
Technical line drawing of a mechanical device with a cylindrical component and control panel (no text or symbols)8 Press the coffee button (2) and dispense water until the MIN level of the water tank is reached.
9 Press the coffee button again to finish dispensing and then empty the container.
10 Put the drip tray back in place (17).
11 Remove the filter holder by turning it from right to left and rinse it with running water.
12 Fill the water tank up to the MAX level.
13 The machine is now ready for use.
Preparing a coffee
With pre-ground coffee
The filter holder fits a filter for 1 (13) or 2 cups (12).
You need to preheat the filter holder before brewing the first coffee:
natural_image
Technical line drawing of a mechanical device with a lever and base component (no text or symbols)1 Insert the filter holder (19) with the filter for 1 or 2 cups into the brew group (20).
2 Place a cup beneath the filter holder and press the coffee button (2) when it is on steady to dispense a cup of water (about 150ml).
3 Remove the filter holder and wipe away any traces of water.
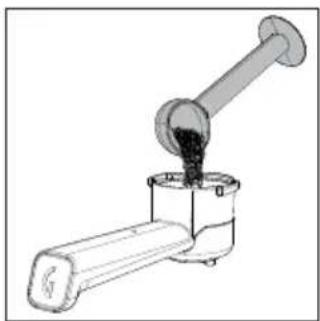
4 Fill the filter holder with 1 measuring scoop of pre-ground coffee for a single shot or with 2 level measuring scoops for a double shot, then lightly tap the filter holder to even out the coffee ground powder.
natural_image
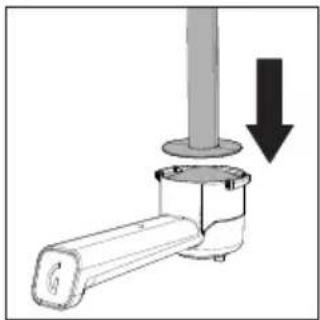
Diagram of a mechanical assembly with a cylindrical component and a base, showing a downward arrow indicating motion (no text or symbols present)5 Tamp the coffee using the Tamper supplied. Tamping should be evenly distributed and the coffee surface perfectly smooth without ridges, running parallel to the filter holder rim.
Note: the size and shape of the tamper has been specifically designed to get the best results with both 1 and 2 cup filters
natural_image
Technical diagram of a mechanical device with circular components and directional arrows indicating motion (no text or symbols)6 Wipe any exceeding ground coffee from the filter holder rim.
7 Insert the filter holder correctly (as described in the relevant Chapter).
8 Place 1 or 2 cups under the filter holder.
9 Wait for the coffee button to come on steady before pressing it to start brewing.
10 Once you have the desired quantity, press the coffee button again to stop brewing.
11 When brewing is over, remove the filter holder and empty the puck from the filter, as well as any residue from both gasket and screen.
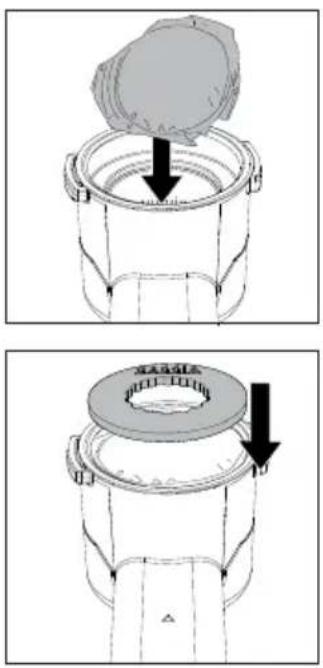
Using coffee pods
1 Use the special pod filter (13) to prepare your coffee.
2 Place the pod into the filter and make sure that the paper of the pod does not stick out of the filter holder.
3 Place the "Pod System" (14) on to the pod.
4 Follow the same instructions for preparing coffee using pre-ground coffee from point 7.
Note: wait about 10 seconds before removing the filter holder. Remove it slowly and carefully by turning it leftwards. When using pre-ground coffee, be careful not to scald yourself with any water left on top of the coffee puck.
Note: if a small quantity of water remains in the filter holder, this is considered absolutely normal and is due to the filter holder features.
Note: some water will continue dripping once the filter holder has been removed. This is due to the water pressure in the system.
Memo function
This function allows you to save the brewing time of your coffee. Each time you press the coffee button, the machine will brew the coffee amount for the previously set time.
How to save your espresso
1 Prepare the coffee as described in the chapter "Preparing coffee using pre-ground coffee".
2 Hold the coffee button when it comes on steady. The machine will go into MEMO mode after a few seconds and begin brewing.
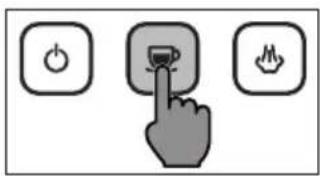
text_image
Diagram showing three labeled buttons: power, switch, and flame, with a hand pressing a button.3 Once you have reached the desired quantity, release the coffee button, all the buttons will go off and then the on/off (1), coffee (2) and steam (3) buttons will light up twice in a row to confirm that your beverage has been saved.
4 Each time you press the coffee button, the machine will brew the coffee amount for the set time.
5 You can edit the brewing time by repeating the above procedure which will overwrite the previously stored time
How to disable the Memo function
Disabling the memo function means that each time you press the coffee button to begin brewing a coffee, you will also need to press it again to end brewing.
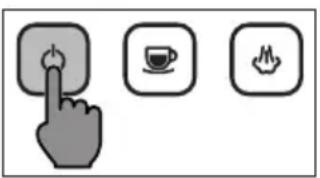
natural_image
Three icons: a hand pressing a button, a coffee cup, and a mouse on a plain background (no text or symbols)1 Hold the on/off button for some seconds. All buttons will switch off after a few seconds; then, the steam (3), coffee (2) and on/off (1) buttons will all light up twice in a row to confirm that the memo function has been disabled.
Frothing milk to prepare a cappuccino —
To ensure a perfect result, we recommend using cold whole milk (at about 5^ C) with a protein content of at least 3% and a fat content of at least 3.5%. The proteins will make the air be incorporated into the froth, while the fats will make it thick and firm. Good results can also be obtained using semi-skimmed cow's milk, some types of lactose-free milk, soy, almond as well as with oat beverages.
Warning: dispensing may be preceded by small jets of hot water. The dispensing tube may reach high temperatures: Never touch it with bare hands
Warning: before and after dispensing some jets of hot water and/or steam may come out from the brew group. Keep the filter holder inserted to avoid scalds and remove it only after exiting the steam function and bringing down the temperature
1 Press the steam button (3), the coffee button will go out and the steam button will start flashing.
2 The machine is ready to dispense steam once the steam button comes on steady.
3 Before you start frothing the milk, purge the steam tube by turning the steam/hot water knob for a few seconds until only steam comes out, and then turn it off again.
4 Fill a jug with cold milk about 1/3 full.
5 Put the Pannarello into the milk.
6 Turn the steam/hot water knob counter clockwise as far as it goes to start frothing the milk.

natural_image
Diagram of a mechanical setup with a container and lever, showing an upward arrow indicating motion (no text or symbols present)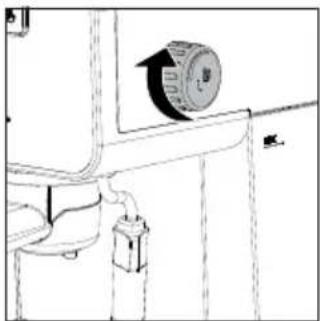
natural_image
Pure mechanical diagram showing a valve or pump assembly with no text, numbers, or symbols7 Froth the milk by gently swirling the jug and moving it up and down.
8 Once you have the desired froth, turn the steam/hot water knob clockwise to stop frothing.
9 Once you have finished frothing, lightly tap the jug on a worktop and let it rest for about 30 seconds. This makes the milk smoother.
10 Press the steam button to exit this function.
11 Both the steam button and coffee button will flash simultaneously to indicate that the temperature is too high to brew a coffee.
12 Clean the circuit by turning the steam/hot water knob counter clockwise for a few moments to remove any milk residue and turn it off again.
Follow the instructions in the relevant section to bring the boiler temperature down faster.
How to lower the boiler temperature
1 Place a container or a large cup under the Pannarello.
2 Turn the steam/hot water knob counter clockwise and dispense hot water until all three on/off, coffee and steam buttons flash simultaneously, signalling for you to turn the knob off again.
3 Turn the knob clockwise and the coffee button will come on steady.
4 The machine is now ready to brew coffee.
Hot water dispensing
Warning: dispensing may be preceded by small jets of hot water. The dispensing tube may reach high temperatures: Never touch it with bare hands.
natural_image
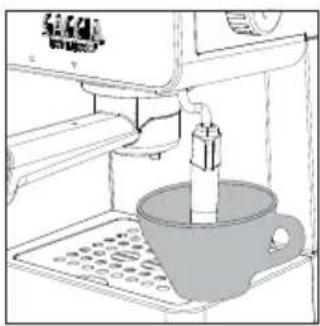
Line drawing of a coffee maker machine with a cup and tray (no text or symbols)1 Place a tea cup or glass under the Pannarello.
2 Turn the steam/hot water knob counter clockwise as far as it goes to start dispensing hot water from the Pannarello.
3 Once you have the desired quantity, turn the steam/hot water knob off by turning it clockwise.
Energy saving
The machine is equipped with an auto power-off function for energy saving.
To restart the machine, just press the on/off button; it will come on steady and the coffee button will start flashing until the set temperature is reached.
Cleaning and maintenance
Regular cleaning and maintenance keep the machine in perfect conditions and ensure perfect coffee flavour, a constant coffee flow and excellent milk froth for a long period of time.
Cleaning the Pannarello
Daily:
1 Remove the lower part of the Pannarello (15), rinse it with running water and put it back on.
natural_image
Diagram of a robotic arm operating a control panel with a downward arrow indicating motion (no text or symbols present)2 Turn the steam/hot water knob counter clockwise for a few moments to remove any milk residue and turn it off again.
natural_image
Diagram of a mechanical device with a downward arrow indicating motion or force, no text or symbols present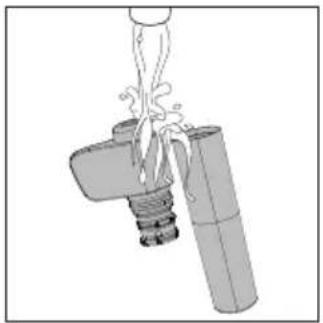
natural_image
Diagram of a mechanical device with a lever and cylindrical shaft, showing fluid flow or force direction (no text or symbols)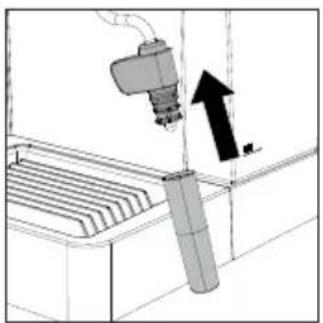
natural_image
Diagram of a robotic arm operating a control panel with an upward arrow indicating motion (no text or symbols present)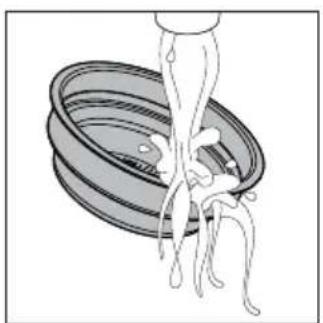
natural_image
Illustration of a hand washing a bowl with chopsticks (no text or symbols)
text_image
收入承诺Weekly:
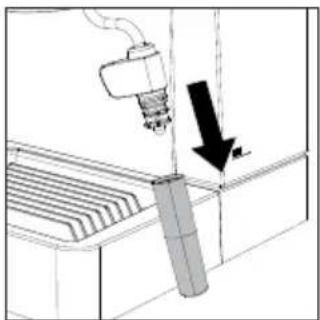
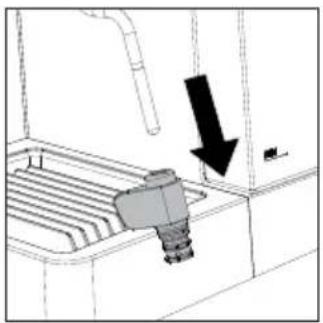
1 Remove the lower part of the Pannarello (15) and slide off the upper part (16).
2 Rinse with running water
3 Clean the steam tube using a damp cloth.
4 Refit the upper and lower part of the Pannarello to the steam tube.
Cleaning the filter holder, filters and the "Pod System"
Filters should be kept clean to guarantee perfect results.
Daily:
1 Remove the filter from the filter holder and wash them both with warm water.
2 Wash the "Pod System" with warm water too if it has been used.
text_image
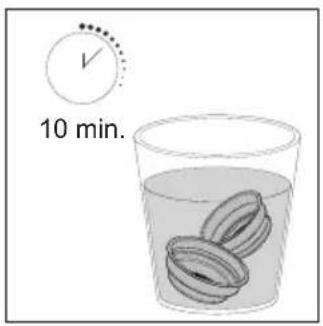
10 min.3 If you notice a malfunction when brewing coffee, steep the filters in boiling water for 10 minutes and then rinse them with running water.
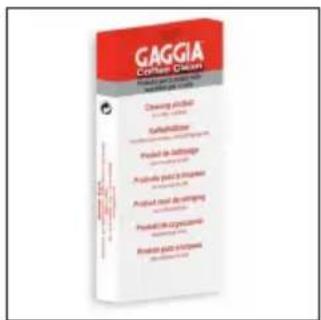
text_image
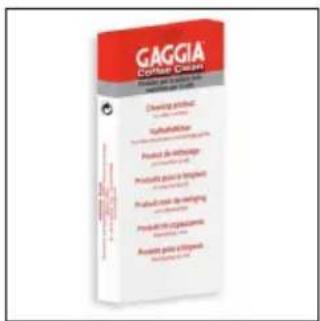
GAGGIA COATED CREAM Produced by: Gaggia Coated Coated Cream Clearing mixture 100 gm TofuDDOT Product de thermologie 200 gm Produkte plus 100 gm Produkt plus 50 gm Produkt plus 100 gm Product plus 100 gm Assists plus 100 gm4 To clean the filters more thoroughly, we recommend using the GAGGIA cleaning tablets specifically designed to keep your machine in perfect working order.
Warning: the filter must only be removed when the filter holder has cooled down completely to avoid scalds
Cleaning the screen
After each coffee brew:
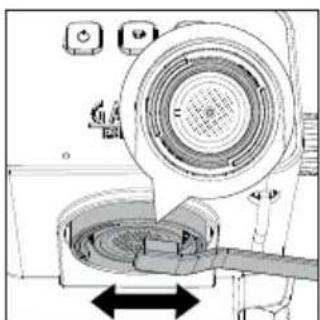
1 Remove the filter holder from the unit by turning it from right to left.
2 Brush away any coffee puck residue from both gasket and screen.
natural_image
Diagram of a washing machine with a circular dial and mesh chamber, showing no text or symbols3 Clean with hot water by pressing the coffee button and dispensing one cup of water.
Cleaning the grid and drip tray
Remove the drip tray (17) and grid if present (18) and wash them with running water. Do not use abrasive products.

text_image
GAGGIA Chelodactylum Chemical name: Chelodactylum Use: 100 gm Methanobenzene (methane) Benzofuran-2,4-dione Benzofuran-2,4-dione Benzofuran-2,4-dione Benzofuran-2,4-dione Benzofuran-2,4-dione Benzofuran-2,4-dione Benzofuran-2,4-dione Benzofuran-2,4-dione Benzofuran-2,4-dione Benzofuran-2,4-dione Chemical name: Chelodactylum Chemical name: Chelodactylum Use: 100 gm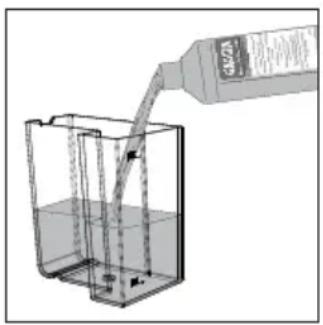
natural_image
Illustration of a bottle pouring liquid into a container with arrows indicating flow direction (no text or symbols)Cleaning the water tank
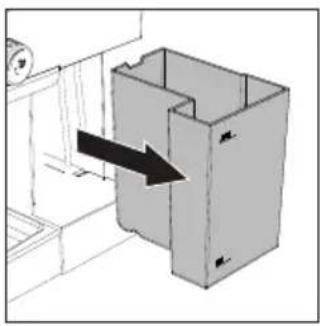
1 Remove the water tank (9) and wash it with running water.
2 When reinserting the tank, make sure that the silicon hoses (6) are inside the tank and that they are neither twisted nor blocked.
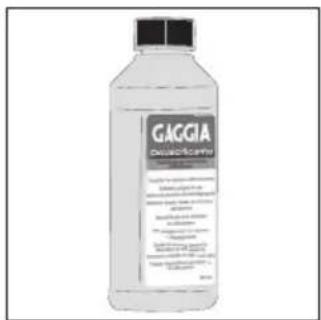
Descaling
When the on/off button turns orange, it is time to descale the machine. Use only the Gaggia descaling solution designed to guarantee high quality performance of the machine. The use of different products could damage the machine and leave residues in the water. Failure to descale the machine will void the warranty.
1 Disable the MEMO function if present and remove the filter holder from the brew group (20).
2 Remove and empty the water tank.
3 Pour HALF the content of the Gaggia concentrated descaling solution into the water tank and then fill it with water up to the MAX level.
4 Remove the Pannarello (8) if fitted on the steam tube.
5 Turn the machine on by pressing the on/off button.
6 Press the coffee button and dispense 1 cup of water (about 150ml) from the brew group.
7 Turn the steam/hot water knob and dispense 1 cup of water (about 150ml) from the steam tube as well.
8 Turn the machine off by pressing the on/off button.
9 Let the descaler sit for about 15-20 minutes with the machine off.
10 Turn the machine back on by pressing the on/off button.
11 Dispense 1 cup of water (about 150ml) from the brew group and another cup of water (about 150ml) from the steam tube as well.
12 Next, turn the machine off by pressing the on/off button and leave it switched off for 3 minutes.
natural_image
Technical line drawing of a structural support frame with mounting holes and a central component (no text or symbols)13 Repeat the steps from point 10 until the MIN level in the water tank has been reached.
natural_image
Technical line drawing of a 3D printing machine with a cylindrical component mounted on a base (no text or symbols visible)14 Rinse the tank with fresh water and fill it up to the MAX level.
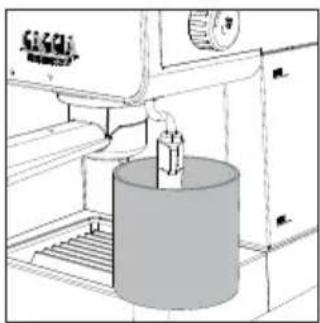
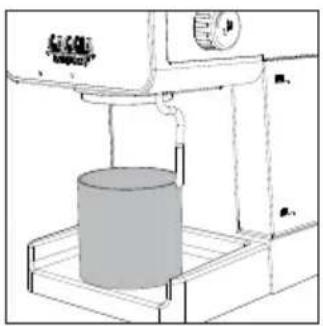
15 Place a large container under the brew group.
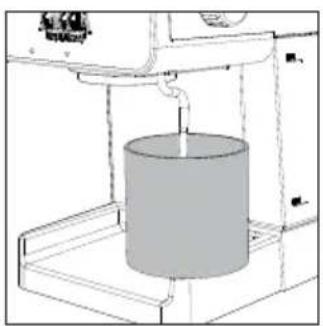
natural_image
Diagram of a cylindrical device with a piping bag inserted, mounted on a platform (no text or symbols visible)16 Turn the machine on by pressing the on/off button.
17 Press the coffee button and dispense water from the brew group until dispensing automatically stops about halfway down the water tank.
18 Place a large container under the steam tube.

text_image
Diagram showing three buttons with icons: power button, battery, and flame, each pointing at a button.19 Turn the steam/hot water knob counter clockwise and dispense any water left in the tank until the MIN level is reached.
20 To stop dispensing, turn the steam/hot water knob off by turning it clockwise.
21 Fill the tank up to the MAX level and dispense all the water from the brew group until the MIN level is reached.
22 Repeat the operation dispensing a full tank from the steam tube as well.
23 The descaling cycle is now complete.
24 Insert the filter holder into the brew group after rinsing it with running water and refit the Pannarello.
25 Hold the coffee and steam buttons for about 5 seconds; the on/off button will flash for a moment and then machine is ready to brew coffee again once the orange LED is reset.
Note: if necessary, prime the circuit as described in the relevant section.
Troubleshooting
This chapter outlines the most common problems you may encounter while using the machine. If you are unable to solve the problem using the information provided below, visit the FAQ sections on www.gaggia.com or www.gaggia.it or contact either the Customer Service Centre or the local distributors in your country.
Problem Cause Solution
| The machine does not turn on. | The machine is not connected to the electric network. | Connect the machine to the electric network. |
| The pump is very noisy. | There is no water in the water tank. Fill the water tank and prime the circuit as described in the relevant chapter. | |
| The milk does not froth. | The type of milk used is not suitable for foaming. | The amount and the quality of froth vary depending on the type of milk (Chapter "Frothing milk to prepare a cappuccino"). |
| The Pannarello is dirty. Clean Pannarello (Chapter "Cleaning the Pannarello"). | ||
| There is no water in the water tank. Fill the water tank and prime the circuit as described in the relevant chapter. | ||
| No coffee is brewed after pressing the coffee button. | The filter holder is clogged. Press the coffee button again. Turn the machine off and let it cool down (approx. 1 hour). Then remove and wash the filter holder thoroughly. If the problem persists, contact the service centre. | |
| Coffee is too cold. The filter holder is not inserted for preheating. | Preheat the filter holder (Chapter "Preparing a coffee"). | |
| The cups are cold. Preheat the cups with hot water. | ||
| The coffee is brewed too fast, crema does not form. | There is too little coffee in the filter holder. | Add coffee. |
| The grind is too coarse. Use a different blend. | ||
| Coffee has not been tamped or tamped too lightly. | Tamp a bit harder with the supplied tamper paying attention to avoid possible gaps. | |
| The coffee or the coffee pod is not fresh. | Use a different blend or coffee pod. | |
| Coffee does not come out or drips only. | There is no water in the water tank. | Fill the water tank and prime the circuit as described in the relevant chapter. |
| The grind is too fine. Use a different blend. | ||
| Coffee has been tamped too hard in the filter holder. | Tamp the coffee more lightly. | |
| There is too much coffee in the filter holder. | Reduce the quantity of coffee in the filter holder. | |
| The machine has limescale build-up. | Descale the machine as described in the relevant Chapter. | |
| The filter in the filter holder is clogged. | Clean the filter (Chapter "Cleaning the filter holder, filters and the "Pod System"). | |
Problem Cause Solution
| Coffee flows out of the rim. | The filter holder is not correctly inserted in the brew group. | Insert the filter holder as described in the relevant chapter. |
| The upper rim of the filter holder is dirty. | Clean the rim of the filter holder. | |
| There is too much coffee in the filter holder. | Reduce the quantity of coffee using the measuring scoop. | |
| The screen gasket is dirty. Clean the screen gasket as described in the relevant Chapter. | ||
GAGGIA accessories
Coffee and machine accessories can be ordered in the authorised centres in Italy or dealers in your country.
text_image
GAGGIA Decalitica coliDescaler
text_image
GAGGIA Consumer Dispers Product: Consumer Dispers Quality: 100% Product: Product Quality: 100% Product: Product Quality: 100%Coffee oil remover pads

text_image
GAGGIA PELAND GAGGIA PELAND GAGGIA PELAND MENNESO PESSED MENNESO GAGGIA PELAND GAGGIA PELAND GAGGIA PELAND GAGGIA PELANDCoffee range - available in beans and powder: 100% Arabica / Intense / Decaffeinated
Technical specifications
| Nominal voltage - Power rating - Power supply | See the data plate inside the water tank compartment |
| Machine body material Thermoplastic | |
| Dimensions 255 x 199 x 303 mm | |
| Weight 3,7 kg | |
| Power cord length 900 mm | |
| Control panel Frontal | |
| Cup size | Up to 76 mm with drip tray inserted, 102 mm without it |
| Water tank 1,2 liters - Removable | |
| Pump pressure 15 bar | |
| Boiler Stainless steel boiler | |
| Safety devices Thermal fuse |
GAGGIA S.p.A. reserves the right to make any necessary modification.
text_image
6420010000629 COD.- Rev.01- 13/07/25GAGGIA S.p.A.
Sede Amministrativa/Administrative Office
Via Torretta, 240