HTS3366 - Home Theater System PHILIPS - Free user manual and instructions
Find the device manual for free HTS3366 PHILIPS in PDF.

User questions about HTS3366 PHILIPS
0 question about this device. Answer the ones you know or ask your own.
Ask a new question about this device
Download the instructions for your Home Theater System in PDF format for free! Find your manual HTS3366 - PHILIPS and take your electronic device back in hand. On this page are published all the documents necessary for the use of your device. HTS3366 by PHILIPS.
USER MANUAL HTS3366 PHILIPS
Register your product and get support at www.philips.com/welcome

natural_image
Product photo of a black Sonyi 3.0 video streaming device with speakers and speakers (no visible text or symbols)| EN DVD Home Theatre System 5 | ||
| ZH_CN | DVD 家庭影院系统 | 49 |
| ZH_TW | DVD 家庭劇院系統 | 93 |
| MS_MY | Sistem Teater Rumah DVD | 137 |
PHILIPS
| 部件名称Name of the Parts | 有毒有害物质或元素Hazardous/Toxic Substance | |||||
| 铅(Pb, Lead) | 汞(Hg, Mercury) | 镉(Cd, Cadmium) | 六价铬(Chromium 6+) | 多溴联苯(PBB) | 多溴二苯醚(PBDE) | |
| Housing外壳 | O | O | O | O | O | |
| DVD loader DVD 光盒 | X | O | O | O | O | |
| Subwoofer超重低音箱 | X | O | O | O | O | |
| Loudspeakers喇叭单元 | O | O | O | O | O | |
| PWBs电路板组件 | X | O | O | O | O | |
| Accessories (Remote control & cables)附件(遥控器,电源线,连接线) | X | O | O | O | O | |
| Batteries in Remote Control (ZnC)遥控器电池 | X | O | O | O | O | |
○:表示该毒有害物质在该部件所有均质材料中的含量均在SJ/T11363-2006标准规定的限量要求以下。O: Indicates that this toxic or hazardous substance contained in all of the homogeneous materials for this part is below the limit requirement in SJ/T11363-2006.
×:表示该毒有害物质至少在该部件的某均质材料中的含量超出SJ/T11363 - 2006 标准规定的限量要求。X: Indicates that this toxic or hazardous substance contained in at least one of the homogeneous materials used for this part is above the limit requirement in SJ/T11363 - 2006.

环使用期限 Environmental Protection Use Period
This logo refers to the period (10 years) during which the toxic or hazardous substances or elements contained in electronic information products will not leak or mutate so that the use of these [substances or elements] will not result in any severe environmental pollution, any bodily injury or damage to any assets.
电池标识 Battery labeling logo

环使用期限 Environmental Protection Use Period
This logo refers to the period (5 years) during which the toxic or hazardous substances or elements contained in the battery will not leak or mutate so that the use of these [substances or elements] will not result in any severe environmental pollution, any bodily injury or damage to any assets.
DOLBY DIGITAL PROLOGIC II
Manufactured under license from Dolby Laboratories. Dolby, Pro Logic and the double-D symbol are trademarks of Dolby Laboratories.

dts Digital Surround
Manufactured under license under U.S. Patent #’s: 5,451,942; 5,956,674; 5,974,380; 5,978,762; 6,487,535 & other U.S. and worldwide patents issued & pending. DTS and DTS Digital Surround are registered trademarks and the DTS logos and Symbol are trademarks of DTS, Inc. © 1996-2007 DTS, Inc. All Rights Reserved.

DIVX® ULTRA
DivX, DivX Ultra Certified, and associated logos are trademarks of DivX, Inc. and are used under license.
Official DivX® Ultra Certified product.
Plays all versions of DivX® video (including DivX® 6) with enhanced playback of DivX® media files and the DivX® Media Format.

Windows Media and the Windows logo are trademarks, or registered trademarks of Microsoft Corporation in the United States and/or other countries.

text_image
LASER RADIATION DO NOT VIEW DIRECTLY WITH OPTICAL INSTRUMENTS CLASS 1M LASER PRODUCTHDMI ^TM HIGH-DENISON MULTIMEDIA INTERSPACE
HDMI, and HDMI logo and High-Definition Multimedia Interface are trademarks or registered trademarks of HDMI licensing LLC.

The USB-IF Logos are trademarks of Universal Serial Bus Implementers Forum, Inc.

ENERGY STAR and the ENERGY STAR mark are registered U.S. marks
'CONSUMERS SHOULD NOTE THAT NOT ALL HIGH DEFINITION TELEVISION SETS ARE FULLY COMPATIBLE WITH THIS PRODUCT AND MAY CAUSE ARTIFACTS TO BE DISPLAYED IN THE PICTURE. IN CASE OF 525 OR 625 PROGRESSIVE SCAN PICTURE PROBLEMS, IT IS RECOMMENDED THAT THE USER SWITCH THE CONNECTION TO THE 'STANDARD DEFINITION' OUTPUT. IF THERE ARE QUESTIONS REGARDING OUR TV SET COMPATIBILITY WITH THIS MODEL 525p AND 625p DVD PLAYER, PLEASE CONTACT OUR CUSTOMER SERVICE CENTER.'
LASER
- Type
Semiconductor laser GaAlAs
• Wave length 645 - 660 nm (DVD) 770 - 800 nm (CD)
• Output Power 6 mW (DVD) 7 mW (VCD/CD) Beam divergence 60 degrees
4 EN
Contents
1 Important 6
Safety and important notice 6
2 Your product 7
Features highlight 7
Product overview 8
3 Connect 11
Place the unit 11
Connect video cables 12
Connect speaker cables to speakers 14
Connect speaker to speaker stand 14
Connect speakers and subwoofer 14
Connect radio antenna 15
Connect other devices 15
Connect to power outlet 17
4 Get started 18
Prepare the remote control 18
Find the correct viewing channel 19
Select menu display language 19
Turn on Progressive Scan 20
Change speakers settings 21
Activate EasyLink control 22
Select a play source 23
5 Play 24
Play from disc 24
Play video 25
Play music 28
Play photo 29
Play from USB device 31
Play from portable media player 31
Play from radio 32
6 Adjust sound 34
Control the volume 34
Select surround sound 34
Select a preset sound effect 34
Adjust microphone volume level 35
Turn off vocal (cancel voice) 35
Microphone settings 35
7 Adjust settings 36
General setup 36
Audio setup 37
Video setup 39
Preferences 41
8 Additional information 44
Upgrade software 44
Care 44
Specifications 45
9 Troubleshooting 46
10 Glossary 48
11 Language code 181
1 Important
Safety and important notice

Warning!
Risk of fire or electric shock!
- Ensure that air can circulate freely through the ventilation holes on this unit. Allow at least 5\~10 cm clearance around the unit.
- Never expose this unit to direct sunlight, naked flames or heat.
• Never place this unit on other electrical equipment. - Keep away from this unit during lightning storms.
- Never remove the casing of this unit. Please leave all maintenance work to qualified personnel.
- Keep this unit away from water, moisture and liquid-filled objects.

Caution!
- Remove batteries if they are exhausted or if the remote control is not to be used for a long time.
- Do not mix batteries (old and new or carbon and alkaline, etc.).
- Batteries contain chemical substances, they should be disposed of properly.
• Visible and invisible laser radiation when open. Avoid exposure to beam. - Ensure that the power outlet is always within reach. If abnormal situations occur, fully disconnect power (unplug power cord from the power outlet).
Recycle notice


This electronic equipment contains a large number of materials that can be recycled or reused if disassembled by a specialised company. If you are disposing of an old machine, please take it to a recycling centre. Please observe the local regulations regarding disposal of packaging materials, exhausted batteries and old equipment.
Copyright notice

Be responsible Respect copyrights
This product incorporates copyright protection technology that is protected by method claims of certain U.S. patents and other intellectual property rights owned by Macrovision Corporation and other rights owners. Use of this copyright protection technology must be authorised by Macrovision Corporation, and is intended for home and other limited viewing uses only unless otherwise authorised by Macrovision Corporation. Reverse engineering or disassembly is prohibited.
2 Your product
Congratulations on your purchase, and welcome to Philips! To fully benefit from the support that Philips offers, register your product at www.philips.com/welcome.
This DVD Home Theatre is designed to complement your home perfectly. Enjoy the DVD Home Theatre with multi-channel surround sound and excellent picture quality.
Features highlight
Video upscaling to 1080p
You can now watch the DVDs in the highest picture quality available for your HDTV. This DVD Home Theatre offers full high-definition video playback up to 1080p resolution for an amazing viewing experience. A highly detailed picture and increased sharpness delivers a more true-to-life picture.
EasyLink
EasyLink uses the HDMI CEC (Consumer Electronics Control) industry standard protocol to share functionality with all HDMI CEC compliant devices over HDMI. It enables the connected devices to control each other with a single remote control.

Note
- Philips does not guarantee 100% interoperability with all HDMI CEC devices.
Listen to rich uncompressed multi-channel surround sound
This DVD Home Theatre supports 5.1 channels of uncompressed audio, which realises real-to-life sound and makes you feel that you are really there.
USB direct and MP3 link
Simply plug your USB device into the USB socket to play your MP3/WMA/JPEG/DivX fi les; or plug your portable media player to the MP3 LINK socket to enjoy the music play in superb sound quality.
Sync the audio output with the video play
This DVD Home Theatre provides you the feature of delaying the audio output if the video signals that go directly to the TV is slower than the audio streams.
Region codes
DVD movies are usually not released at the same time in all regions of the world, thus all DVD players are programmed to a specific region code.
Countries DVD region code
| Asia Pacific, Taiwan, Korea | ALL | 3 |
| Australia, New Zealand | ALL | 4 |
| China | ALL | 6 |
Product overview
Remote control
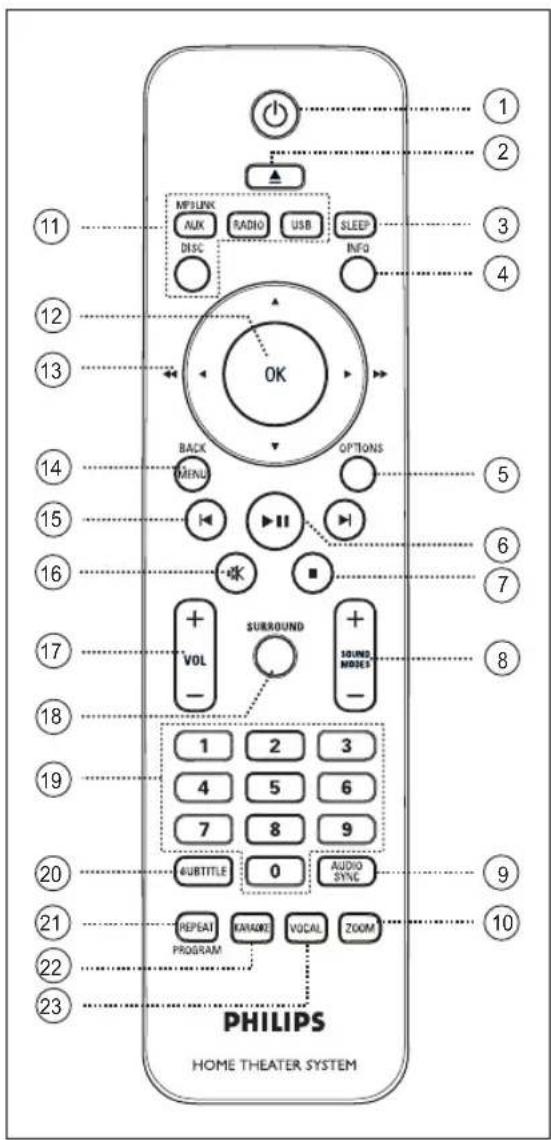
text_image
1 2 3 4 11 MP3LINK AUX RADIO USB SLEEP DISC INFO OK BACK MENU OPTIONS 5 15 16 17 SURROUND VOL + - 1 2 3 4 5 6 7 8 9 SUBTITLE 0 AUDIO SYNE. 20 21 22 23 REPEAT KAVAGE VOCAL ZOOM PROGRAM PHILIPS HOME THEATER SYSTEM①
- Turn on this unit or turn off to standby mode.
② ▲ (Open/Close)
- Open or close the disc compartment.
③ SLEEP
- Select a preset timer to turn off this unit to standby mode.
④ INFO
• Display the current status or disc information.
• Display photo files in 12 thumbnails view.
⑤ OPTIONS
- Access or exit Options menu (this menu provides various setting options).
⑥ ▶ II (Play/Pause)
• Start or pause disc play.
• RADIO: start auto radio installation (only available for first time setup).
⑦ ■ (Stop)
- Stop disc play.
- RADIO: erase the current preset radio station.
⑧ SOUND MODES + -
- Select a predefined sound effect.
⑨ AUDIO SYNC
- Select an audio language/channel.
- Press and hold to access audio sync setting. Then press VOL + - to set the audio delay time.
⑩ ZOOM
- Zoom in or out the picture on the TV.
⑪ Source buttons
• DISC: switch to DISC mode.
• USB: switch to USB mode.
• RADIO: switch to FM or AM/MW band.
- AUX /MP3 LINK: switch to AUX1, AUX2, DI (DIGITAL IN) or MP3 LINK that corresponds to the socket you used to connect the external device.
⑫ OK
- Confirm an entry or selection.
⑬ Cursor buttons (▲▼◀▶)
- Navigate through the on-screen menu.
- Press left or right for fast forward and backward search.
- RADIO: press up or down to tune the radio frequency.
- RADIO: press left or right to start auto search.
⑭ MENU / BACK
• Return to the previous display menu.
• For DVD, go to title menu.
- For VCD version 2.0 or SVCD with PBC turned on: return to the menu during playback.
⑮ ◀/ ▶ (Previous/Next)
- Skip to the previous or next title/chapter/track.
• RADIO: select a preset radio station.
⑯ (Mute)
- Mute or restore the volume.
⑰ VOL + -
- Adjust the volume level.
⑱ SURROUND
- Switch audio output to multi-channel surround, stereo or party mode.
⑲ Numeric buttons
• Enter a preset number or item to play.
⑳ SUBTITLE
- Select DVD or DivX subtitle language.
②1 REPEAT / PROGRAM
- Select various repeat or shuffl e modes; turns off repeat or shuffl e mode.
- RADIO: press this button to start manual radio preset.
• RADIO: press and hold this button to start automatic radio preset.
⑳ KARAOKE
- Access or exit microphone setting menu.
②3 VOCAL
- Change the audio channel of a karaoke disc.
Main unit
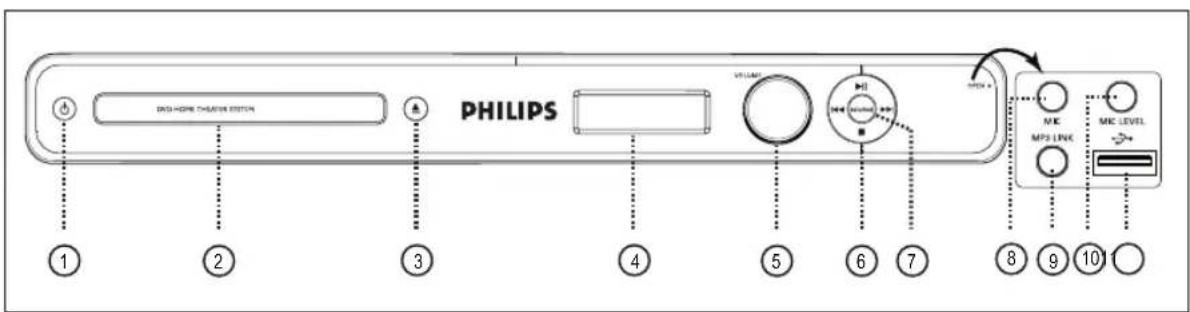
text_image
PHILIPS DVD HOME CHATER STATION VILLIANT MIC MP3 LINK MIC LEVEL 1 2 3 4 5 6 7 8 9 10①
- Turn on this unit or turn off to standby mode.
② Disc compartment
③ ▲ (Open/Close)
- Open or close the disc compartment.
④ Display panel
⑤ VOLUME
- Adjust the volume level.
⑥ ▶ (Play/Pause)
- Start or pause disc play.
- RADIO: start auto radio installation (only available for first time setup).
(Stop)
- Stop disc play.
- RADIO: erase the current preset radio station.
/
- Skip to the previous or next title/chapter/track.
- Press and hold for fast backward or forward search.
• RADIO: select a preset radio station.
⑦ SOURCE
- Select a play media: DISC, FM, AM/MW, AUX1, AUX2, DI (DIGITAL IN) or MP3 LINK.

Note
- The following sockets are under the flap at the right corner of the main unit (OPEN ▶).
⑧ MIC socket
• To connect microphone.
⑨ MP3 LINK socket
• To connect portable audio player.
⑩ MIC LEVEL
- Switch to microphone mode. Then adjust the volume control to set the microphone volume level.
⑪ USB socket
• To connect USB flash drive, USB memory reader or digital camera.
3 Connect
This section describes the basic connections required for this DVD Home Theatre unit before it can be used.
Basic connections:
- Place the unit
- Connect video cables
- Connect speaker cables to speakers
- Connect speaker to speaker stand (for tallboy speakers)
- Connect speakers and subwoofer
- Connect radio antennas
- Connect to power outlet
Optional connections:
- Connect other devices
- Connect audio from TV
- Connect audio from cable box/recorder/game console
- Connect portable media player
- Connect USB device

Note
• Refer to the type plate at the rear or bottom of the product for identification and supply ratings.
- Before you make or change any connections, ensure that all the devices are disconnected from the power outlet.
Place the unit
• Never place this unit in an enclosed cabinet.
• Install this unit near the AC outlet where the AC power plug can be easily reached.
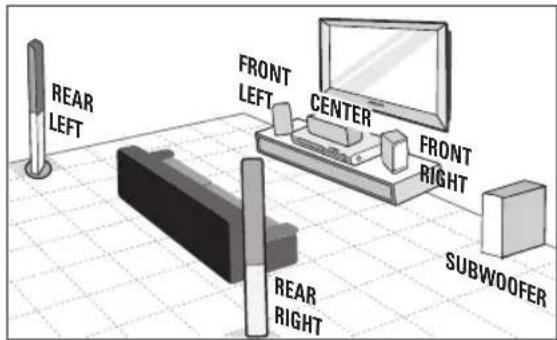
text_image
REAR LEFT FRONT LEFT CENTER FRONT RIGHT REAR RIGHT SUBWOOFER1 Place this DVD Home Theatre unit near to the TV.
2 Place the speakers system as per the diagram shown above.
• Find the most suitable placement for the speakers based on your room layout and set up to ensure optimum sound performance.
3 Place the subwoofer at the corner of the room or at least one metre away from the TV.

Note
- Rear speakers are labelled as REAR LEFT and REAR RIGHT.
- Front speakers are labelled as FRONT LEFT and FRONT RIGHT.
- To avoid magnetic interference or unwanted noise, never place the speakers too close to the TV or any radiation devices.
Connect video cables
This section describes how to connect this DVD Home Theatre unit to your TV so to enable viewing of disc play.
Select the best video connection that your TV can support.
- Option 1: Connect to HDMI socket (for a HDMI, DVI or HDCP-compliant TV).
- Option 2: Connect to component video socket (for a standard TV or Progressive Scan TV).
- Option 3: Connect to S-Video socket (for a standard TV).
- Option 4: Connect to Video (CVBS) socket (for a standard TV).

Note
You must connect this unit directly to a TV.
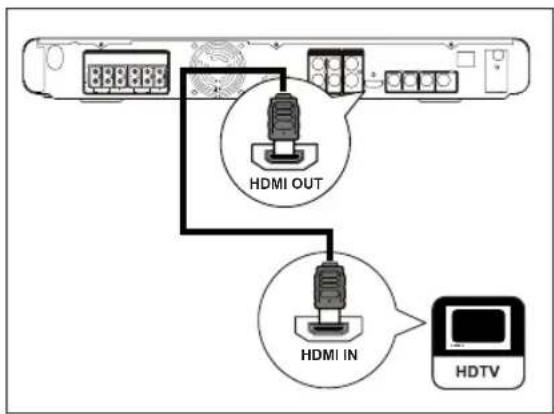
Option 1: Connect to HDMI socket
flowchart
graph TD
    A["Server"] --> B["HDMI OUT"]
    B --> C["HDMI IN"]
    C --> D["HDTV"]
1 Connect a HDMI cable (not supplied) from the HDMI OUT on this unit to the HDMI IN socket on your TV.

Note
- The HDMI connector is only compatible with HDMI compliant TVs and DVI-TVs.

Tips
- To optimise the video output, see chapter 'Adjust settings' > [Video Setup] > [HDMI Setup] for details.
- This unit is HDMI CEC compatible. It enables connected TV/device to control each other over HDMI, see chapter 'Activate EasyLink control' for details.
- Use a HDMI/DVI adaptor in case your TV has only a DVI connection. An extra audio connection is needed to complete this connection.
• To route the audio from your TV to this DVD Home Theatre unit, connect an audio cable from the audio input on this unit to the audio output on your TV.
• This type of connections provide best picture quality.
Option 2: Connect to component video socket
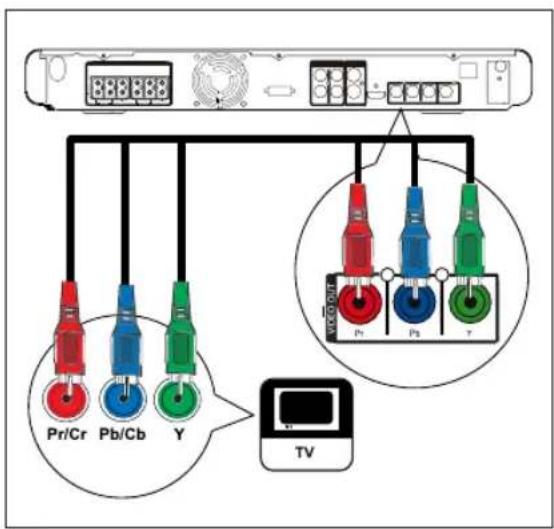
text_image
888888 Pr/Cr Pb/Cb Y TV W/WR OUTPUT P+ Pb T12 EN
1 Connect the component video cables (not supplied) from the Y PB PR sockets on this unit to the component video input sockets on your TV.
- If a progressive scan TV is used, you may turn on the progressive scan mode (see chapter 'Turn on Progressive Scan' for details).

Tips
- The component video input socket on your TV may be labelled as Y Pb/Cb Pr/Cr or YUV.
- This type of connections provide good picture quality.
Option 3: Connect to S-Video socket

text_image
S-VIDEO S-VIDEO IN TV1 Connect a S-video cable (not supplied) from the VIDEO OUT-S-VIDEO socket on this unit to the S-Video input socket on your TV.

Tips
- The component video input socket on your TV may be labelled as Y/C or S-VHS.
- This type of connections provide standard picture quality.
Option 4: Connect to Video (CVBS) socket
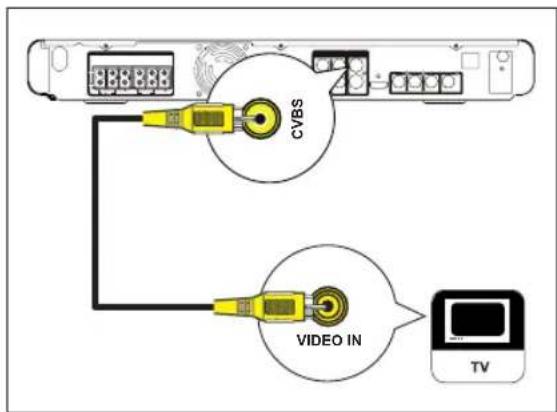
text_image
CVBS VIDEO IN TV1 Connect a composite video cable (yellow-supplied) from the VIDEO OUT-CVBS socket on this unit to the video input socket on your TV.

Tips
- The video input socket on your TV may be labelled as A/V IN, VIDEO IN, COMPOSITE or BASEBAND.
- This type of connections provide standard picture quality.
Connect speaker cables to speakers

natural_image
Technical line drawing of a mechanical component with clamping tool and housing (no text or symbols)1 Connect the speaker cables to the matching colour sockets on the speakers (or speaker stands).
Connect speaker to speaker stand
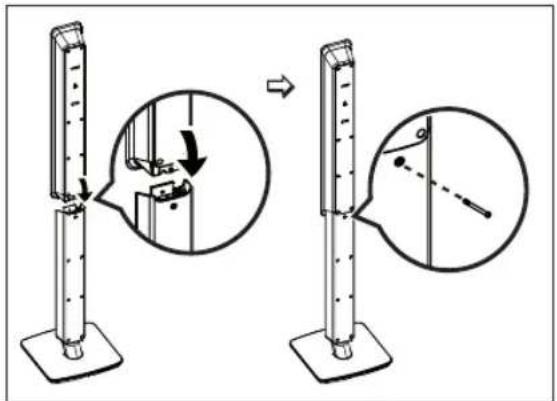
text_image
Diagram illustrating a measurement setup with labeled parts and magnified views showing step-by-step changes.1 Attach the speakers to the speaker stands and secure the position with screws.
Connect speakers and subwoofer
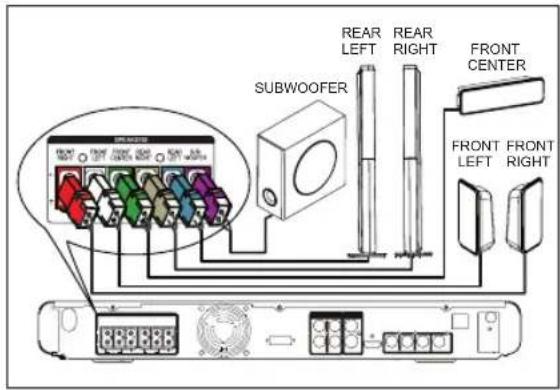
text_image
SUBWOOFER REAR LEFT REAR RIGHT FRONT CENTER FRONT LEFT FRONT RIGHT1 Connect the speakers and subwoofer to the matching sockets on this unit.

Note
- Ensure that the colours of the plugs and sockets are matched.
14 EN
Connect radio antenna
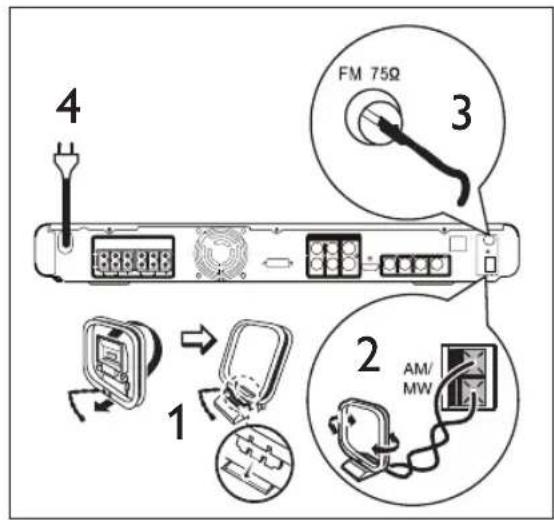
text_image
4 FM 75Ω 3 1 2 AM/ MW
Note
- AM/MW loop antenna connection is only available for China region only.
1 Stand the AM/MW loop antenna (supplied) upright to fi x its claw into the slot.
2 Connect the AM/MW loop antenna to the AM/MW socket. Then place it on a shelf, or attach it to a stand or wall.
3 Connect the FM antenna (supplied) to the FM75Ω socket on this unit (for some models, this cable has been connected). Extend the FM antenna and fi x its ends to the wall.
4 Connect the power cord when all the required connections are done and you are ready to enjoy this DVD Home Theatre unit.

Note
- Before connect to power outlet, ensure that the voltage selector (at the rear of this unit) is set to the local power line voltage.
Connect other devices
This section describes how you can route the sound from other devices to this DVD Home Theatre unit in order to enjoy sound output or audio play with multi-channel surround capabilities.
Connect audio from TV

text_image
AUX 1 AUDIO OUT TV1 Connect an audio cable (not supplied) from the AUDIO IN-AUX1 sockets on this unit to the AUDIO OUT sockets on your TV.

Note
- To listen to the audio output from this connection, press AUX / MP3 LINK repeatedly until 'AUX1' is displayed on the display panel.
EN 15
Connect audio from cable box/ recorder/game console
You can choose to connect to analogue or digital socket depending on the device capabilities.
Connect to analogue sockets

text_image
AUX 2 AUDIO OUT1 Connect an audio cable (not supplied) from the AUDIO IN-AUX2 sockets on this unit to the AUDIO OUT sockets on the device.

Note
- To listen to the audio output from this connection, press AUX / MP3 LINK repeatedly until 'AUX2' is displayed on the display panel.
Connect to digital socket

text_image
COAXIAL COAXIAL OUT DIGITAL OUT1 Connect a coaxial cable (not supplied) from the DIGITAL IN-COAXIAL socket on this unit to the COAXIAL/DIGITAL OUT socket on the device.

Note
- To listen to the audio output from this connection, press AUX / MP3 LINK repeatedly until 'DI' is displayed on the display panel.
Connect portable media player
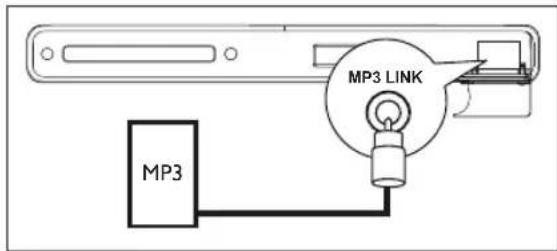
text_image
MP3 LINK MP31 Connect a 3.5mm stereo audio cable (not supplied) from the MP3 LINK socket on this unit to the phone socket on your portable media player (such as MP3 player).

Note
- To listen to the audio output from this connection, press AUX / MP3 LINK repeatedly until 'MP3 LINK' is displayed on the display panel.
Connect USB device

natural_image
Illustration of a hand inserting a USB into a device (no text or symbols visible)1 Connect the USB device to USB socket on this unit.

Note
- This DVD Home Theatre unit can only play/view MP3, WMA, DivX (Ultra) or JPEG files that are stored on such devices.
- To listen to the audio output from this connection, press USB.
Connect to power outlet

Note
- Before connect to power outlet, ensure that the voltage selector (at the rear of this unit) is set to the local power line voltage.
1 Connect the power cord from the DVD Home Theatre unit and other devices to the power outlets when all the required connections are done.
4 Get started
Prepare the remote control
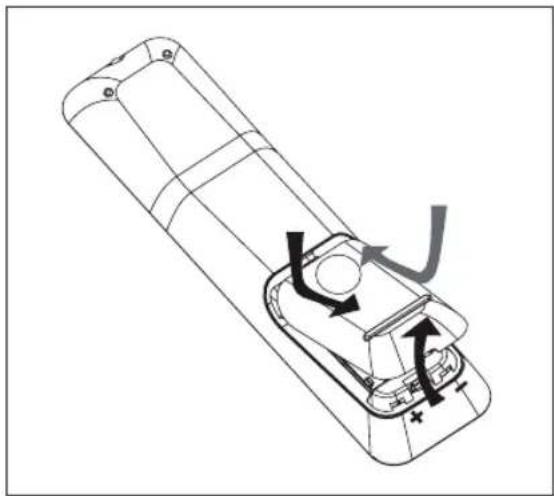
natural_image
Technical line drawing of a remote control casing with directional arrows indicating movement (no text or symbols)1 Push to open the battery compartment cover.
2 Insert two batteries type R03 or AAA. Match the indications (+ -) inside the battery compartment.
3 Close the cover.

Note
- If you are not going to use the remote control for a long time, remove the batteries.
Control a play source
1 Select the source you wish to control by pressing the DISC, USB, RADIO or AUX / MP3 LINK button.
2 Then select the desired function (for example ◀, ▶).
Navigate through the menu
1 Point the remote control directly at the remote sensor on this unit and select the desired function.
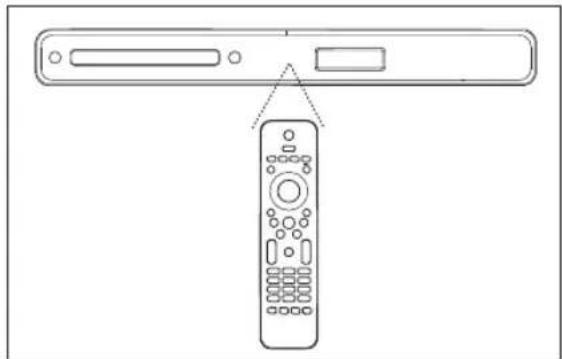
natural_image
Diagram showing a remote control with an arrow pointing to the right panel (no text or symbols present)2 Use the following buttons on the remote control to navigate through the on-screen menus.
| Button Action | |
| ▲▼ | Move up or down. |
| Move left or right. | |
| Confim a selection. | |
| Key in numbers. | |
Find the correct viewing channel
1 Press ⏻ to turn on the DVD Home Theatre unit.
2 Press DISC to switch to disc mode
3 Turn on the TV and switch it to the correct video-in channel.
- You may go to the lowest channel on your TV, then press the Channel Down button on your TVs remote control until you see the Video In channel.
- You may press → button repeatedly on your TVs remote control.
• Usually this channel is between the lowest and highest channels and may be called FRONT, A/V IN, VIDEO, etc..

Tips
• Refer to your TVs user manual on how to select the correct input on your TV.
Select menu display language

Note
- You can skip this setting if this unit is connected to a HDMI CEC compliant TV. It switches automatically to the same OSD menu language as per your TV setting.
1 Press DISC.
2 Press OPTIONS.
→ [ General Setup ] menu is displayed.
3 Press ▶.
4 Press ▲▼ to select [ OSD Language ] in the menu, then press ▶.

text_image
General Setup Disc Lock Auto Display Dim English OSD Language 中文 Screen Saver 繁體 中文 Sleep Melayu DivX(R) VOD Code Rусский 'ไทย- The language options are different depending on your country or region. It may not correspond to the illustration shown here.
5 Press ▲▼ to select a language, then press OK.

Tips
- To set the default language for DVD audio and disc menu, see chapter 'Adjust settings' - [ Preferences ] for details.
EN 19
Turn on Progressive Scan
When you connect a TV with the component video connection (see chapter 'Connect video cables - Option 2: Connect to component video socket' for details), you can set the progressive scan output if your TV supports progressive scan.
1 Turn on the TV to the correct viewing channel for this unit.
2 Press DISC.
3 Press OPTIONS.
4 Press ▼ to select [Video Setup] in the menu, then press ▶.
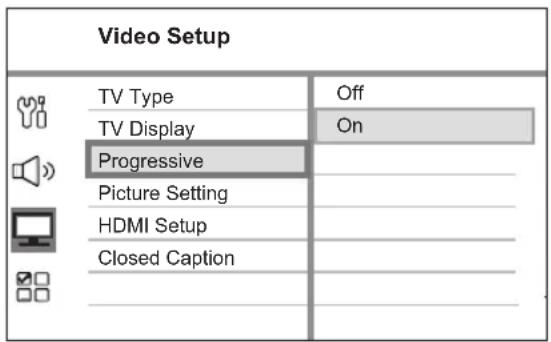
text_image
Video Setup TV Type Off TV Display On Progressive Picture Setting HDMI Setup Closed Caption5 Select [ Progressive ] > [ On ], then press OK.
A warning message is displayed.
6 To proceed, select [OK] in the menu and press OK.
→ The progressive setup is complete.

Note
- If a blank/distorted screen is displayed, wait for 15 seconds for the auto recover.
- If no picture displayed, turn off the progressive scan mode as follows:
1) Press ▲ to open the disc compartment.
2) Press
3) Press AUDIO SYNC.
7 To exit the menu, press OPTIONS.
8 You can now turn on the progressive scan mode on your TV (see the TV user manual).

Note
- There are some progressive scan TVs that are not fully compatible with this unit, resulting in an unnatural picture when playing back a DVD VIDEO disc in the progressive scan mode. In such case, turn off the progressive scan feature on both this unit and your TV.
Change speakers settings
Ideally the distance between listening position and all the speakers should be the same. If not, change the speaker settings based on their distance from the listening position in order to obtain the best possible surround sound.
1 Press DISC.
2 Press OPTIONS.
3 Press ▼ to select [Audio Setup] in the menu, then press ▶.
| Audio Setup | |
| Speakers Volume | |
| Speakers Delay | |
| HDMI Audio | |
| CD Upsampling | |
| Audio Sync | |
- You cannot access speaker setup options if this Home Theatre unit is not in a complete stop mode. In such case, press ■ twice.
To adjust the speakers volume level
4 Select [Speakers Volume] in the menu, then press ▶.
| Speakers Level Setup | |
| Front Left | 0dB |
| Front Right | 0dB |
| Center | 0dB |
| Subwoofer | 0dB |
| Rear Left | 0dB |
| Rear Right | 0dB |
5 Press ◀▶ to adjust the volume level, then press OK.
→ The test tone is emitted from the speaker which you are adjusting.
- Repeat the above setting for other speakers until all the speakers output level sounds equally balance.
To set the output delay time (centre and rear speakers only)
6 Select [Speakers Delay] in the menu, then press ▶.
| Speakers Distance Setup | |
| Center | 0ms |
| Rear Left | 0ms |
| Rear Right | 0ms |
7 Press ◀▶ to set the delay time, then press OK.
- Repeat the above setting for other speakers until the sound output from different speakers reach the listening position at the same time.

Tips
- Set longer delay time if the centre or rear speakers are closer to the listening position than the front speakers.
- 1ms setting for every 30cm distance between the speaker and the listening position.
8 To exit the menu, press OPTIONS.
Activate EasyLink control
This feature is only applicable if this unit is connected to HDMI CEC compliant TV/device. It enables all the linked devices response or react to certain commands simultaneously with one touch control.
1 Turn on the HDMI CEC operations on your TV and other connected devices. See TVs/devices manual for details.
2 You can now enjoy the EasyLink controls.
One touch play [ Auto Wake-up TV ]
When you press PLAY to turn on this unit and start disc play (if a video disc is found in the disc compartment), it turns on your TV automatically and switches to the correct viewing channel.
One touch power off [ System Standby ]
This unit responses to standby command from other HDMI CEC compliant TV/ devices. For example, if you turn off the TV, this unit automatically turns off to standby even during playback.
• To power off using this unit's remote control, you have to press and hold ⏻.
One touch audio input switching [ System Audio Control ]
This unit is able to render the audio signals from the active source. It switches automatically to the corresponding audio input and output the sound from its speakers system.
- Before you can enjoy this function, you have to map the audio inputs to the connected devices.
- You can use any HDMI CEC TV/device remote control to adjust the volume.
![PHILIPS HTS3366 - One touch audio input switching [ System Audio Control ] - 1](/content/2026/06/1244380/images/d14a883e02633df0a480c335a88a5e7d6caa77dc9428fbef8f3c203e065b3b3d.jpg)
Note
• To enable one touch play function, a video disc must be placed in the disc compartment before operation.
• Philips does not guarantee 100% interoperability with all HDMI CEC compliant devices.
Map the audio inputs to the connected devices
1 Press DISC.
2 Press OPTIONS.
3 Press ▼ to select [Video Setup] in the menu, then press ▶.
4 Select [ HDMI Setup ] > [ EasyLink ], then press OK.
| EasyLink | |
| Auto Wake-up TV | |
| System Standby | |
| System Audio Control | |
| HDMI Input Mapping | |
• [Auto Wake-up TV] and [System Standby] functions are turned on by default in the factory.
5 Select [ System Audio Control ] > [ On ], then press OK.
6 Select [ HDMI Input Mapping ], then press OK.
7 Select [OK] in the menu, then press OK to start scanning of devices.
Once complete, audio input mapping menu is displayed.
8 Select an input to map (e.g. AUX1, AUX2), then press ▶.
22 EN
9 Select the correct device that connected to this audio input, then press OK.
- Repeat steps 8\~9 to map other connected devices.
10 To exit the menu, press OPTIONS.
Select a play source
On the main unit
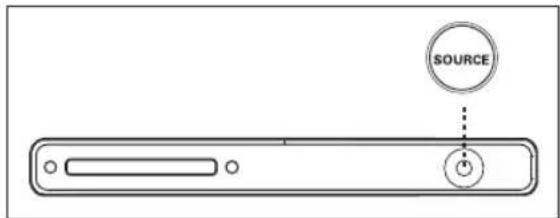
text_image
SOURCE1 Press SOURCE button repeatedly to select: DISC > FM > AM/MW > AUX1 > AUX2 > DI (DIGITAL IN) > MP3 LINK > DISC ...
On the remote control

text_image
MP100 MAX MAX USB USB2 +- Press DISC to switch to DISC mode.
- Press USB to switch to USB mode.
- Press RADIO to switch to FM or AM/MW band.
- Press AUX / MP3 LINK repeatedly to listen to the audio output from the external device.
Display Device connected to
AUX1 AUDIO IN-AUX1 sockets.
AUX2 AUDIO IN-AUX2 sockets.
DI DIGITAL IN-COAXIAL
socket.
MP3 LINK MP3 LINK socket.
EN 23
5 Play
Play from disc
playable discs
 | DVD Video• Region 3 (Asia Pacific, Taiwan, Korea)• Region 4 (Australia, New Zealand)• Region 6 (China) |
 | DVD±RW(DVD Rewritable) |
 | DVD±R(DVD Recordable) |
 | DVD+R DL (DVD+R Double Layer) |
 | CD-RW (CD-Rewritable)MP3/WMA/JPEG/DivX• |
 | CD-R (CD-Recordable)MP3/WMA/JPEG/DivX• |
 | Audio CD(Compact Disc Digital Audio) |
 | Video CDFormats 1.0, 1.1, 2.0• |
 | Super Video CD |

Note
• DVDs and DVD players are designed with regional restrictions. Before playing a disc, ensure the disc is for the same region zone as your player (indicated on its rear).
Play a disc

Caution!
- Never place any objects other than discs into the disc compartment.
- Never look into the laser beam inside the Home Theatre unit.
1 Press ▲ to open the disc compartment.
2 Insert a disc with its label facing up.
- For double-sided disc, load the side to play faces up.
3 Press ▲ to close the disc compartment and start disc play.
• To view disc play, turn on the TV to the correct viewing channel for this DVD Home Theatre unit.
4 To stop disc play, press ■.

Tips
- If the password entry menu is displayed, you have to key in the 6-digit password before it can be played.
- Screen saver displays automatically if the disc play is stopped for about 5 minutes. To wake up from screen saver, press DISC.
- This unit automatically switches to standby mode if you do not press any buttons within 15 minutes after a disc has stopped playing.
Play video

Note
- For video disc, playback always resumes from the point where it was last stopped. To start playback from the beginning, press ◀ while the message 'Playback from the beginning, press ◀ key' is displayed.
Control a title
1 Play a title.
2 Use the remote control to control the title.
Button Action
| Pause/ resume play. | |
| Stop play. | |
| Jump to the next title/chapter. | |
| Return to the beginning of the current title/chapter or jump to the previous title/chapter. | |
| Search backward/ forward.To change search speed, press this button repeatedly. | |
| ▲▼ | Slow motion reverse/ forward play.To change play speed, press this button repeatedly.For VCD, only forward play is possible. |
Change video play
1 Play a title.
2 Use the remote control to change the video play.
Button Action
| AUDIO SYNC | Change audio language.Only applicable to discswith multiple audiolanguage or channel. |
| SUBTITLE | Change subtitle language.Only applicable to discswith multiple subtitelanguage. |
| REPEATPROGRAM | Toggle through various repeat/shuffl e play mode; or turn offrepeat mode (RPT OFF').Repeat options varydepending on the disc type.For VCDs, repeat play isonly possible if the PBCmode is turned off. |
| ZOOM | Zoom in/out.To pan through the zoomedimage, press the cursorbuttons. |
| INFO | Display current play status.You can change the videoplay options here withoutinterrupting disc play. |
Access DVD menu
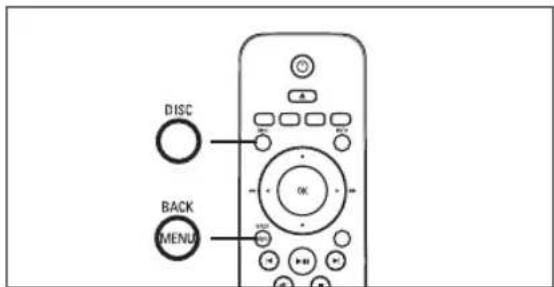
text_image
DISC BACK MENU1 Press DISC to access disc main menu.
2 Select a play option, then press OK.
• In some menus, press number buttons to input your selection.
• To return to the title menu during playback, press MENU.
Access VCD menu or preview menu
The PBC (Playback Control) for VCD is turned on by default in the factory. When you load in a VCD, the contents menu is displayed.
1 Press ▲▼ to select a play option, then press OK to start play.
- If PBC is off, it skips the menu and start play from the first title.
- During playback, you can press MENU to return to the menu (if the PBC mode is on).
2 To preview the contents of the disc, press DISC.
• To exit the menu, press DISC.
Select Digest Type:
Track Digest
Disc Interval
Track Interval
[Track Digest]
It plays the first few seconds of each track in a disc.
[Disc Interval]
It divides the total disc time by six and plays the first few seconds of these intervals.
[Track Interval]
It divides the current track by six and plays the first few seconds of these intervals.
• This option is not available in stop mode.
3 Select a preview play option, then press OK.
![PHILIPS HTS3366 - [Track Interval] - 1](/content/2026/06/1244380/images/66b5db5b0eebe7c00cb428340c2e1bc247a0271fa5187a2b83acc2072a97c3b5.jpg)
Tips
- The default setting for PBC is on. To change the default setting, see chapter 'Adjust settings' - [Preferences] > [PBC] for details.
EN
Sync audio output with video play
If the video play is slower than the audio output (sound does not match with the pictures), you can delay the audio output to match the video.
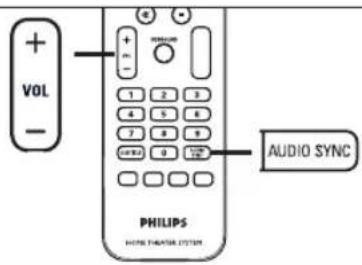
text_image
+ VOL - 1 2 3 4 5 6 7 8 9 PANER 0 12 AUDIO SYNC PHILIPS HOME THEATER SYSTEM1 Press and hold AUDIO SYNC until 'AUDIO SYNC XXX' is displayed.
• 'XXX' denotes the delay time.
2 Within five seconds, press VOL + - to set the delay time for audio output.

Note
- If the volume control is not used within five seconds, it resumes normal volume control function.
Quick skip play to a specific time

1 During playback, press INFO.
→ The disc status menu is displayed.
2 Select the current elapsed playing time in the menu, then press OK.
• [TT Time] (title time)
• [CH Time] (chapter time)
• [Disc Time] (disc time)
• [Track Time] (track time)
3 Press the number buttons to change the time where you want to skip to, then press OK.
Repeat play a specific section
1 During playback, press INFO.
→ The disc status menu is displayed.
2 Select [ Repeat ] in the menu, then press ▶.
3 Move to [ A-B ] in the menu, then press OK to set the start point.
4 Press OK again to set the end point.
→ Repeat play starts.
5 To cancel repeat play, select [ Repeat Off ] and press OK.

Note
- The marked section for repeat play is only possible within a track/title.
View DVD play from different camera angles
1 During playback, press INFO.
The disc status menu is displayed.
2 Select [ Angle ] in the menu, then press OK.
3 Press the number buttons to select an angle, then press OK.

Note
- Only applicable to discs contain sequences recorded from different camera angles.
EN 27
Play DivX® video
DivX video is a digital media format that retains high quality despite a high rate of compression. This unit is DivX® Certifi ed so that you can enjoy DivX video.
1 Insert a disc or USB that contains the DivX videos.
2 Press DISC or USB.
A contents menu is displayed.
3 Select a title to play, then press ▶II.
4 Use the remote control to control the title.
| Button Action | |
| SUBTITLE | Change subtitle language. |
| AUDIO SYNC | Change audio language/track. |
| Stop play.For DivX Ultra video, press this button again to display the contents menu. | |
| INFO | Display DivX Ultra video information. |

- Only those DivX videos that were rented or purchased using the DivX registration code of this unit can be played (see chapter 'Adjust settings' > [General Setup] > [DivX(R) VOD Code] for details).
- If the subtitle does not appear correctly, change the subtitle language (see chapter 'Adjust settings' - [ Preferences ] > [ DivX Subtitle ] for details).
- The subtitle can only be displayed up to an average of 45 characters.
- This unit can play DivX video files that are up to 4GB in size.
Play music

Note
- For some commercial audio disc, playback may resume from the point where it was last stopped. To start play from first track, press ◀.
Control a track
1 Play a track.
2 Use the remote control to control the track.
| Button Action | |
| Pause/ resume play. | |
| Stop play. | |
| Jump to the next track. | |
| Return to the beginning of the current track or jump to the previous track. | |
| Direct input the track number. | |
| Search backward/ forward.To change search speed, press this button repeatedly. | |
| Toggle through various repeat/ shuffl e play mode; or turn off repeat mode.Repeat options vary depending on the disc type. | |
Play MP3/WMA music
MP3/WMA is a type of highly compressed audio file (files with .mp3 or .wma extensions).
1 Insert a disc or USB that contains the MP3/WMA music.
2 Press DISC or USB.
→ A contents menu is displayed.
3 Select a folder, then press OK.
4 Select a track to play, then press ▶II.
- To return to the main menu, press ▲ until 'Previous' folder is selected, then press OK.

Note
- For CDs recorded in multiple sessions, only the first session is played.
- This unit does not support MP3PRO audio format.
- If any special characters are present in the MP3 track name (ID3) or album name, it might not be displayed correctly on the screen because these characters are not supported.
• Some WMA is protected by Digital Rights Management (DRM), it cannot be played on this unit. - Folders/fi les exceed the supported limit of this unit will not be displayed or played.

Tips
- To display the data disc contents without folders, see chapter 'Adjust settings' - [ Preferences ] > [ MP3/JPEG Nav ] for details.
Play photo
Play photos as slideshow
This unit can play JPEG photos (fi les with .jpeg or .jpg extensions).
1 Insert a disc or USB that contains the JPEG photos.
2 Press DISC or USB.
For a Kodak disc, the slideshow begins automatically.
For a JPEG disc, the photo menu is displayed.
3 Select the folder/album you want to play.
• To preview the photos in the folder/album, press INFO.
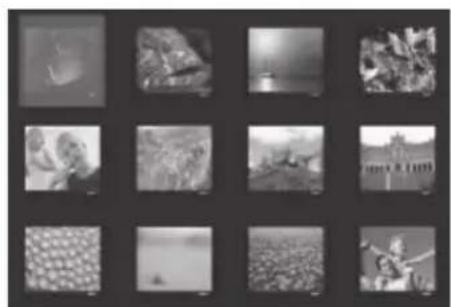
natural_image
Grid of 12 grayscale images showing various scenes including landscapes, nature, and urban development (no text or symbols visible)▶ ◀ ▶
• To go to previous or next screen display, press ◀ / ▶.
• To select a photo, press the cursor buttons.
• To display the selected photo only, press OK.
4 Press ▶II to start slideshow play.
• To return to the menu, press MENU.

Note
- It may require longer time to display the disc content on the TV due to the large number of songs/photos compiled onto one disc.
- If the JPEG photo is not recorded with an 'exif' type file, the actual thumbnail picture will not be shown on the display. It will be replaced with a 'blue mountain' thumbnail picture.
- This unit can only display digital camera pictures according to the JPEG-EXIF format, typically used by almost all digital cameras. It cannot display Motion JPEG and pictures in formats other than JPEG, or sound clips associated with pictures.
- Folders/fi les exceed the supported limit of this unit will not be displayed or played.
Control photo play
1 Play photo slideshow.
2 Use the remote control to control the photo.
| Button Action | |
| ◀ | Skip to the previous photo. |
| ▶ | Skip to the next photo. |
| ▲ | Rotate the photo clockwise. |
| ▼ | Rotate the photo anti-clockwise. |
| ZOOM | Zoom in/ out.• Play will pause while in zoom mode. |
| ◎ | Stop play. |
Play musical slideshow
Play MP3/WMA music fi les and JPEG photo fi les simultaneously to create musical slideshow. The MP3/WMA and JPEG fi les must be stored on the same disc or USB device.
1 Play MP3/WMA music.
2 While music play, navigate to the photo folder/album and press ▶II to start slideshow play.
→ Slideshow begins and continues till the end of the photo folder or album.
Audio continues to play till the end of the disc.
• To return to the menu, press MENU.
3 To stop slideshow play, press ■.
4 To stop music play, press ■ again.
Play from USB device
This unit can only play/view MP3, WMA, DivX (Ultra) or JPEG fi les that are stored on such devices.
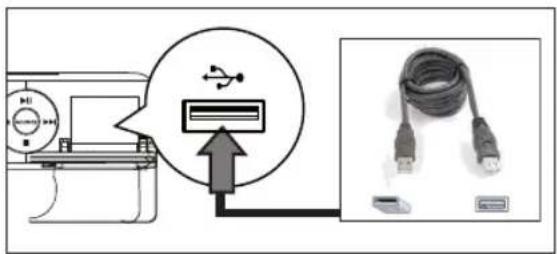
text_image
Diagram showing USB cable installation process with connector and cable connection details1 Connect a digital camera that comply with the PTP standard, USB flash drive, or USB memory card reader to the USB socket on this unit.
2 Press USB.
→ A contents menu is displayed.
3 Select a file to play, then press ▶II.
• For more information, see chapters 'Play music, Play photo, Play video' for details.
4 To stop play, press ■ or remove the USB device.

Tips
- If the device does not fit into the USB socket, connect it through a USB extension cable.
- If a multiple USB card reader is used, only one of the connected USB drive contents can be accessed.
- If a USB HDD is used, ensure that an auxiliary power cord connected to the USB HDD for proper operations.
- Digital cameras that use PTP protocol or require additional programme installation when connected to a PC are not supported.
Play from portable media player
Simply connect your portable media player (e.g. MP3 player) to this unit to enjoy superb sound quality from your music collections.
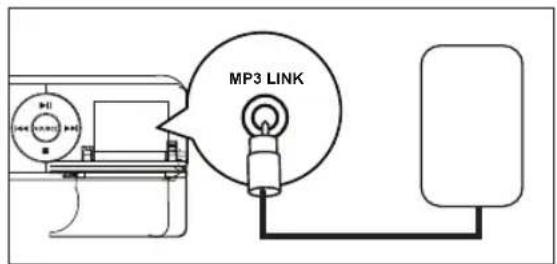
text_image
MP3 LINK1 Connect a 3.5mm stereo audio cable (not supplied) from the MP3 LINK socket on this unit to the 'headphone' socket on your portable media player.
2 Press AUX / MP3 LINK repeatedly until 'MP3 LINK' is displayed.
3 Start play on your portable media player.
• See chapter 'Adjust Sound' to enhance the audio output.
4 To stop play, press STOP button on your portable media player.

Note
• Control playback is only possible on your portable media player.
- Stop play on the portable media player before you switch to other play media/source.
Play from radio
Check if the FM antenna has been connected to this DVD Home Theatre unit. If not, connect the supplied FM antenna to the FM 75 Ω socket and fi x its ends to the wall.

Note
- For China region only, if you want to receive AM/MW radio band, connect the AM/MW loop antenna (supplied) to the AM/MW sockets on this DVD Home Theatre unit.

Tips
- For better FM stereo reception, connect an external FM antenna (not supplied).
- Position the antenna as far away as possible from your TV, VCR or other radiation source to prevent interference.
First time tuning
The first time when you access 'RADIO' mode, follow the instructions to install the radio stations.
1 Press RADIO.
→ 'AUTO INSTALL ... PRESS PLAY' is displayed.
2 Press ▶II.
→ The unit starts searching from FM band followed by the AM/MW band.
All the available radio stations with strong signal will be stored.
Once complete, it tunes to the first preset radio station.
• To stop auto tuning, press ■.

Note
- This Home Theatre unit can store up to a maximum of 40 radio stations (and 20 radio stations from AM/MW band).
- If auto installation is not activated or less than 5 radio stations are stored, 'AUTO INSTALL' will be displayed again the next time you turn on to radio mode.
Listen to radio
1 Press RADIO repeatedly to select 'FM' or 'AM/MW' band.
2 Use the remote control to control the radio.
Button Action
| Select a preset radio station. | |
| Tune the radio frequency backward/ forward. | |
| Press and hold this button to delete the preset station from the preset list.The preset number for other radio stations remain unchanged |
32 EN
Reinstall all the radio stations
1 Press RADIO repeatedly to select 'FM' or 'AM/MW' band.
2 Press and hold PROGRAM until 'START' is displayed.
All previously stored radio stations will be replaced.

Note
- If no stereo signal is detected or less than 5 (fi ve) stations are detected during radio installation, 'CHECK ANTENNA' is displayed.
Search and store radio stations individually
1 Press RADIO repeatedly to select 'FM' or 'AM/MW' band.
2 Press ◀◀▶▶.
→ 'SEARCH' is displayed until a radio station is detected.
3 Repeat step 2 until you tune to the radio station you wish to store.
- To fi netune the radio frequency, press ▲▼.
4 Press PROGRAM.
- If no action is carried out within 20 seconds after the above step, it exits the preset mode.
5 Press ◀▶ (or the number buttons) to select a preset number to store.
6 Press PROGRAM to confirm.
Change tuning grid
In some countries, the frequency step between adjacent channels in FM band is 50 kHz or 100 kHz. (AM/MW is 9 kHz).

Note
• This feature only applicable for certain region.
- Change tuning grid erases all preset radio stations.
1 Press RADIO repeatedly to select 'FM' or 'AM/MW' band.
2 Press ■.
3 Press and hold ▶II until 'GRID 9' or 'GRID 10' is displayed.
- 'GRID 9' for 50 kHz and 'GRID 10' for 100 kHz.
6 Adjust sound
Control the volume
1 Press VOL + - to increase or decrease the volume level.
• To mute the volume, press ✉.
- To restore the volume, press ✗ again or press the volume button.
Select surround sound

text_image
SURROUND PHILIPS1 Press SURROUND repeatedly to select a best surround output that available on the disc.
| Options Descriptions | |
| PARTY | Ideal for party music. It enhanced the stereo channel output by duplicating the sound output to the centre and rear speakers. |
| MULTI CHANNEL | Multi-channel surround output: DTS (Digital Theatre Systems), Dolby Digital, and Dolby Pro Logic II. |
| STEREO | Stereo sound. |
Select a preset sound effect

text_image
PHILIPS SOUND MODES —1 Press SOUND MODES + - repeatedly to select a sound effect that most suits the video or music you play.
| Video / Music | Descriptions |
| CONCERT / CLASSIC | Flat and pure sound mode. Ideal for listening to classical music and watching live concert DVDs. |
| DRAMA / LOUNGE | Moderate sound mode suitable for lounge music and watching dramas. |
| ACTION / ROCK | Enhanced low and high range for great sounding movie effects and atmosphere. Great for action movies and rock/pop music. |
| GAMING / SPORTS | Moderate mid range and surround effects for clear vocals and the atmosphere of a live sports venue, also ideal video gaming. |
| NIGHT | Dynamically controlled sound mode suitable for watching movies at night or for non-intrusive background music. |
34 EN
Adjust microphone volume level

text_image
MIC MIC LEVEL1 Connect a microphone (not supplied) to MIC socket on this unit.
2 Turn on the microphone output. See chapter 'Microphone settings' for details.
3 Press MIC LEVEL.
→ 'LEVEL XX' is displayed.
4 Adjust the volume control (or press VOL + - repeatedly) to set the level for microphone volume.
- Sing or speak through the microphone to find your desired volume level.

Note
- If the volume control is not used within 10 seconds, it resumes normal volume control function.
Turn off vocal (cancel voice)
1 Press VOCAL repeatedly until 'VOICE CANCEL' is displayed.

Note
- You cannot cancel the voice output from MP3, JPEG or SACD discs.
Microphone settings
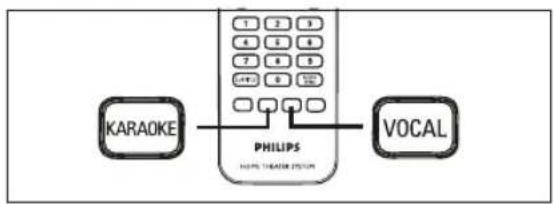
flowchart
graph LR
    A["KARAOKE"] --> B["PHILIPS"]
    B --> C["VOCAL"]
    style A fill:#f9f,stroke:#333
    style C fill:#bbf,stroke:#333
1 Turn on the TV to the correct viewing channel for this unit.
2 Press KARAOKE.
→ [Microphone Setup] menu is displayed.
3 Select an option and change the setting, then press OK.
[ Mic ]
Turn on or off microphone output.
• [On] – turn on microphone.
• [Off] – turn off microphone.
[ Mic Volume ]
Press ▲▼ to set the default microphone volume level.
[ Echo Level ]
Press ▲▼ to set the echo level.
[Key]
Press ▲▼ to set the pitch level that matches your voice.
[ Score ]
Select karaoke rating score level.
• [Off] – no score rating display.
• [Basic] – basic rating.
• [Intermediate] – intermediate rating.
• [Advance] – advance rating.
4 To exit the menu, press KARAOKE.
7 Adjust settings
This section describes the various setting options of this unit.
| Symbol Options | |
| [GABA] | [ General Setup ] |
 | [ Audio Setup ] |
| [C3TG] | [ Video Setup ] |
 | [ Preferences ] |
General setup
1 Press OPTIONS.
→ [ General Setup ] menu is displayed.
2 Press ▶.
3 Select an option, then press OK.
| General Setup | |
| Disc Lock | |
| Display Dim | |
| OSD Language | |
| Screen Saver | |
| Sleep | |
| DivX(R) VOD Code | |
• See the explanations of the above options in the following pages.
4 Select a setting, then press OK.
- To return to the previous menu, press BACK.
• To exit the menu, press OPTIONS.
[ Disc Lock ]
Set play restriction for a specific discs. Before you start, place the disc in the disc compartment (maximum 40 discs can be locked).
- [Lock] – restrict access to the current disc. The next time you want to play this disc or unlock it, you need to enter the password.
- [Unlock] – all discs can be played.
![PHILIPS HTS3366 - [ Disc Lock ] - 1](/content/2026/06/1244380/images/38e10bea1301b620eb2083f293ed88ffac6c6bb6f188de1bf331f6f03459d799.jpg)
Tips
- To set or change your password, go to [Preferences] > [Password].
[ Display Dim ]
Change the brightness level of the display panel to suit the lighting in your room.
- [100%] – normal brightness.
• [70%] – medium brightness.
• [40%] – dimmest display. The LEDs and display icons will not be shown.
[ OSD Language ]
Select the default on-screen menu language.
[ Screen Saver ]
Turn off or on the screen saver mode. It helps to protect the TV screen from being damage due to over exposure to a static image for too long.
- [On] – set the screen saver to appear after 5 minutes of inactivity (for example, in pause or stop mode).
• [Off] – disable screen saver mode.
[ Sleep ]
Switch to standby automatically after the preset time.
• [Off] – disable sleep mode.
• [15, 30, 45, 60 mins] – select the count down time before it switches to standby.
![PHILIPS HTS3366 - [ Sleep ] - 1](/content/2026/06/1244380/images/2f691f57acbe5711a5891a0e1c63327a757e153e6be52a7177887c8dac94e1bc.jpg)
Tips
- You can directly access to sleep timer function by pressing SLEEP repeatedly on the remote control until the count down time is displayed on the display panel.
[ DivX(R) VOD Code ]
Display the DivX® registration code.
![PHILIPS HTS3366 - [ DivX(R) VOD Code ] - 1](/content/2026/06/1244380/images/a790767d3ef1ba202dc22a8745ae0a0a5b02517a2fa79247d5dccdecd160ca28.jpg)
Tips
- Enter this unit's DivX registration code when you rent or purchase video from www.divx.com/vod. The DivX videos rented or purchased through the DivX® VOD (Video On Demand) service can be played only on the device to which it is registered.
Audio setup
1 Press OPTIONS.
→ [ General Setup ] menu is displayed.
2 Press ▼ to select [Audio Setup], then press ▶.
3 Select an option, then press OK.
| Audio Setup | ||
| Created | Speakers Volume | |
| Speakers Delay | ||
| Created | HDMI Audio | |
| CD Upsampling | ||
| Created | Audio Sync | |
| Created | ||
• See the explanations of the above options in the following pages.
4 Select a setting, then press OK.
• To return to the previous menu, press BACK.
• To exit the menu, press OPTIONS.
EN 37
[Speakers Volume]
When all the speakers are not placed in an equal distance from the listening position, change the volume level of the speakers so that those placed closer to the listening position will not sound too loud.
- To start, press OK.
- Select a speaker in the menu, then press ◀▶ to adjust the volume level.
- Press OK to confirm and exit.
![PHILIPS HTS3366 - [Speakers Volume] - 1](/content/2026/06/1244380/images/df3f4da1335cd8b1c7abf2b2dd3f6b548d95b8a8d0b063104973e4334f250df3.jpg)
Tips
- The test tone is emitted from the speaker while adjusting volume level.
[Speakers Delay]
When the centre or rear speakers are placed closer to the listening position than the front speakers, set the delay time for these speakers so that the sound output from all speakers reach the listening position at the same time.
- To start, press OK.
- Select a speaker in the menu, then press ◀▶ to set the delay time.
- Press OK to confirm and exit.
![PHILIPS HTS3366 - [Speakers Delay] - 1](/content/2026/06/1244380/images/e01f9ad19a66b76c622c0533fbddf4110ea390591aea8a909e6ae81f6fae1c1d.jpg)
Tips
- 1ms setting for every 30cm distance between the speaker and the listening position.
[ HDMI Audio ]
When you connect this unit and TV with HDMI cable, select the audio output setting for this connection.
- [All] – the sound is output through both your TV and this speakers system. If the audio format on the disc is not supported, it will be downmix to two-channel sound (linear-PCM).
• [Off] – disable audio output from your TV. The sound is only output through this speakers system.
[ CD Upsampling ]
Convert the music CD to a higher sampling rate using sophisticated digital signal processing for better sound quality.
• [Off] – turn off CD-upsampling.
- [88.2 kHz (X2)] – convert the sampling rate of the CDs twice as high as the original rate.
![PHILIPS HTS3366 - [ CD Upsampling ] - 1](/content/2026/06/1244380/images/29836c161377413373e5bf6ac02edb9720de6027aad8593e5a374e1a8159854d.jpg)
Note
- When you press SURROUND to switch to multi-channel mode, it automatically turns off the CD-upsampling feature.
[ Audio Sync ]
Set the default delay time for audio output when you play a video disc.
- To start, press OK.
- Select a speaker delay in the menu, then press ◀▶ to set the delay time.
- Press OK to confirm and exit.
EN
Video setup
1 Press OPTIONS.
→ [ General Setup ] menu is displayed.
2 Press ▼ to select [Video Setup], then press ▶.
3 Select an option, then press OK.
| Video Setup | |
| TV Type | |
| TV Display | |
| Progressive | |
| Picture Settings | |
| HDMI Setup | |
| Closed Caption | |
• See the explanations of the above options in the following pages.
4 Select a setting, then press OK.
• To return to the previous menu, press BACK.
• To exit the menu, press OPTIONS.
[ TV Type ]
Change this setting only if the video does not appear correctly. By default, this setting matches the most common setting for TVs in your country.
• [PAL] – for PAL-system TV.
• [NTSC] – for NTSC-system TV.
• [Multi] – for TV that is compatible with both PAL and NTSC.
[ TV Display ]
Select the screen format according to how you want the picture to appear on your TV.
![PHILIPS HTS3366 - [ TV Display ] - 1](/content/2026/06/1244380/images/ae001fb5b4b301a3a244027843a8e6f003a0d85030fc916b1b57d5f1154f92b1.jpg)
text_image
4:3 PanScan (PS) 4:3 LetterBox (LB) 16:9 (Widescreen)- [4:3 Pan Scan] – for standard TV, a full-height screen display with the sides trimmed.
- [4:3 Letter Box] – for standard TV, a 'wide-screen' display with black bars on the top and bottom.
• [16:9 Wide Screen] – for wide-screen TV (frame ratio 16:9).
[Progressive]
If your TV can support progressive signals, you can activate the progressive scan mode of this unit.
• [On] – turn on progressive scan mode.
• [Off] – disable progressive scan mode.
![PHILIPS HTS3366 - [Progressive] - 1](/content/2026/06/1244380/images/36e32e507fbef21eafe1302339e35e6d8f044b7b72385f59fd2772a97b67736b.jpg)
Tips
• See chapter 'Get Started - Tum on Progressive Scan' for detailed information.
EN 39
[ Picture Setting ]
Select a predefined set of picture colour settings or customise your personal setting.
• [Standard] – original colour setting.
• [Bright] – vibrant colour setting.
• [Soft] – warm colour setting.
- [Personal] – customise the colour setting. Set the level of brightness, contrast, tint and colour saturation in the menu, then press OK.
[ HDMI Setup ]
When you connect this unit and TV with HDMI cable, select the best HDMI setup that your TV can support.
- [Wide Screen Format] – define the wide screen format for disc play.
Options Descriptions
| [ Superwide ] Centre position of the screen is stretched less than the side. This setting is only applicable if the video resolution is set to 720p or 1080i/p. | |
| [ 4:3 Pillar Box ] | No stretching of the picture. Black bars is displayed on both sides of the screen. |
| [ Off ] Picture will be displayed according to the format of the disc. | |
![PHILIPS HTS3366 - [ HDMI Setup ] - 1](/content/2026/06/1244380/images/7e58154b4f9f4d3806df8bb05914002ee8312a8f2b0890f4e437278b91c29cc4.jpg)
Note
- This setting is only available if you have set the [TV Display] setting to [16:9 Wide Screen].
- [HDMI Video] – select a video resolution that is compatible with your TV display capability.
Options Descriptions
| [ Auto ] It detects and selects the best supported video resolution automatically. | |
| [ 480p, 576p, 720p, 1080i, 1080p ] | Select a video resolution that best supported by your TV. See your TVs manual for details. |

Note
- If the setting is not compatible with your TV, a blank screen appears. Wait for 15 seconds for auto recover or switch to its default mode as follows:
1) Press ▲. 2) Press ◀. 3) Press ZOOM.
- [EasyLink] – enable all the HDMI CEC compliant TV/device response or react to certain commands simultaneously with one touch control.
Options Descriptions
| [ Auto Wakeup TV ] | It wake-ups your TV automatically when you press PLAY to power up this unit and start disc play (if a video disc is found in the disc compartment).To disable this feature, select [ Off ]. |
| [ System Standby ] | Respond to standby command from other HDMI CEC compliant TV/devices.To disable this feature, select [ Decline ]. |
| [System Audio Control] | Enable auto switching of audio input to the active device and output the sound from its speakers system.To enable this feature, select [On]. Then proceed to [HDMI Input Mapping] to scan and map all the connected devices. |
| [ HDMI Input Mapping ] | Map the audio input to the connected TV/ devices correctly to enable automatic switching of input source.1. Press OK to start scanning of devices.2. Select the audio input to map (e.g. AUX1, AUX2), then press ▶.3. Select the correct device that connected to this audio input, then press OK. |

Note
- Your TV and other connected devices must be compliant with HDMI CEC.
- You must turn on the HDMI CEC operations on your TV/devices before you can enjoy the EasyLink controls. See your TVs/devices manual for details.
- Philips does not guarantee 100% interoperability with all HDMI CEC compliant devices.
[ Closed Caption ]
Turn on or off display captions.
- [On] – show the sound effects in subtitle. Only applicable to disc with Closed Caption information included and your TV supports this feature.
• [Off] – disable closed caption.
Preferences
1 Press OPTIONS.
→ [ General Setup ] menu is displayed.
2 Press ▼ to select [ Preferences ], then press ▶.
3 Select an option, then press OK.
| Preferences | |
| Audio | |
| Subtitle | |
| Disc Menu | |
| Parental | |
| PBC | |
| MP3/JPEG Nav | |
| Password | |
| DivX Subtitle | |
• See the explanations of the above options in the following pages.
4 Select a setting, then press OK.
- To return to the previous menu, press BACK.
• To exit the menu, press OPTIONS.
[ Audio ]
Select the default audio language for DVDs.
[ Subtitle ]
Select the default subtitle language for DVDs.
[Disc Menu]
Select the menu language for DVDs.
![PHILIPS HTS3366 - [Disc Menu] - 1](/content/2026/06/1244380/images/c1c3d2f8035c9c2d7af044eff55950ee6abc838e54dbe1fa78bcf4ed333d2bbc.jpg)
Note
- If the language you have set is not available on the disc, the disc uses its own default language.
- For some DVDs, the subtitle/audio language can only be changed from the disc menu.
- To select the languages that are not listed in the menu, select [Others]. Then check the Language Code list at the back of this user manual and key in the respective 4-digit language code.
[Parental]
Restrict access to DVDs that are unsuitable for your children. These type of DVDs must be recorded with ratings.
- To start, press OK.
- Select a rating level in the menu, then press OK.
- Press the number buttons to key in your 6-digit password.
![PHILIPS HTS3366 - [Parental] - 1](/content/2026/06/1244380/images/ce23eca54cee43a7ac8ca314cb7791a2fa59bfe06400c7e9885e3d7743c309d9.jpg)
Note
- Rated DVDs above the level you set in [Parental] require a password to be played.
- The ratings are country-dependent. To allow all discs to play, select '8'.
- Some DVDs have ratings printed on them but are not recorded with ratings. This function has no effect on such DVDs.

Tips
• To set or change your password, go to [Preferences] > [Password].
[PBC]
For VCDs/SVCDs recorded with PBC (playback control), you can access the disc content through an interactive menu.
- [On] – an index menu is displayed when you load a disc for play.
• [Off] – skip the menu and start play from the first title.
[ MP3/JPEG Nav ]
Turn off or on MP3/WMA folder display when you play a media that contains MP3/WMA files.
- [ Without Menu ] – display all the files.
- [With Menu] – display the folders of MP3/WMA fi les.
[Password]
Follow the instructions on the TV to set or change the password for locked discs and play restricted DVDs.
Change Password
Old Password
New Password
Confirm PWD
- Press the number buttons to key in '136900' or your last set 6-digit password at [Old Password] field.
- Key in the new password at [ New Password ] fi eld.
- Key in the new password again at [Confirm PWD] field.
- Press OK to exit the menu.

Note
- If you forget your 6-digit password, key in '136900' before you set a new password.
EN
[ DivX Subtitle ]
Select a character set that supports the DivX subtitle.
| [ Standard ] English, Irish, Danish,Estonian, Finnish, French,German, Italian, Portuguese,Luxembourgish, Norwegian(Bokmål and Nynorsk),Spanish, Swedish, Turkish | |
| [ CentralEurope ] | Polish, Czech, Slovak,Albanian, Hungarian,Slovene, Croatian, Serbian(Latin script), Romanian |
| [ Cyrillic ] Belarusian, Bulgarian,Ukrainian, Macedonian,Russian, Serbian | |
| [ Greek ] Greek | |
| [ Hebrew ] Hebrew | |
| [ Chinese(Simp) ] | Simplifi ed Chinese |
| [ Korean ] Korean | |
![PHILIPS HTS3366 - [ DivX Subtitle ] - 1](/content/2026/06/1244380/images/959abf48d1410983f39f24c0e2beb3cb73bc52854fee3da3dbbb53dcd173e38e.jpg)
Note
- Ensure that the subtitle file has the exact same file name as the movie file. If for example the filename of the movie is 'Movie.avi', then you will need to name the text file 'Movie.sub' or 'Movie.srt'.
[Default]
Reset all the settings of this unit to factory default, except for [Disc Lock],
[ Password ] and [ Parental ] settings.
[Version info]
Display the software version of this unit.
![PHILIPS HTS3366 - [Version info] - 1](/content/2026/06/1244380/images/329d94d830e3b97c7d2e0d1f9cf9e9e5182a0e0896169c35aaed708fade9483d.jpg)
Tips
- This information is required when you want to find out if a newest software version is available at the Philips website that you may download and install on this unit.
8 Additional information
Upgrade software
Philips provides software upgrades to ensure that this unit is compatible with the newest formats.
To check the updates, compare the current software version of this unit with the latest software version available at the Philips website.
1 Press OPTIONS.
| Preferences | ||
| Disc Menu | ||
| Parental | ||
| PBC | ||
| MP3/JPEG Nav | ||
| Password | ||
| DivX Subtitle | ||
| Default | ||
| Version Info | ||
2 Select [ Preferences ] > [ Version Info ], then press OK.
3 Write down the version number, then press OPTIONS to exit the menu.
4 Go to www.philips.com/support to check the latest software version available for this unit.
5 If the latest software version is higher than the software version of this unit, download it and store onto a CD-R or USB flash drive
6 Insert the CD-R or USB flash drive to this unit.
7 Press DISC or USB, then follow the instruction on the TV to confirm upgrade operation.

Note
- Do not remove the CD-R or USB when software upgrade is in progress.
8 Once software upgrade is complete, it turns off to standby mode automatically.

Note
• We recommend that you disconnect the power cord for a few seconds and connect again to reboot the system.
Care
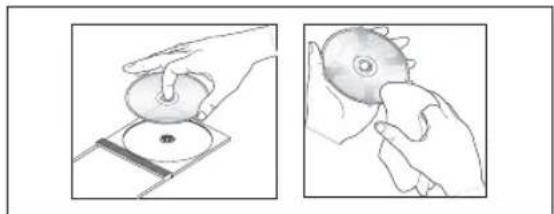
Clean discs

Caution!
- Never use solvents such as benzene, thinner, cleaners available commercially, or anti-static sprays intended for discs.
Wipe the disc with a micro fi bre cleaning cloth from the centre to the edge in a straight line movement.
natural_image
Two-step illustration showing hands using a disc to press or restore a circular object, no text or symbols present.44 EN
Specifications

Note
- Specification and design are subject to change without notice.
Accessories supplied
- Quick Start Guide
• Composite video cable (yellow)
• Remote control and batteries - Subwoofer
• 1 centre, 2 front and 2 rear speakers - Speaker cables
- Power cable
- FM wire antenna
• AM loop antenna (for China region only)
• 2 screws (for tallboy speakers)
Amplifi er
• Total output power (Home Theatre mode): 600W
• Frequency response: 180 Hz\~18 kHz / ±3dB
• Signal-to-noise ratio: > 60 dB (A-weighted)
- Input sensitivity
- AUX: 400 mV
• MP3 LINK: 400 mV
Disc
• Laser Type: Semiconductor
• Disc diameter: 12cm / 8cm
• Video decoding: MPEG1/ MPEG2 / DivX / DivX Ultra
• Video DAC: 12 bits
• Signal system: PAL / NTSC
• Video S/N: 56 dB
• Audio DAC: 24 bits / 96 kHz
- Frequency response: 4 Hz - 20 kHz (44.1 kHz)
4 Hz - 22 kHz (48 kHz)
4 Hz - 44 kHz (96 kHz)
- PCM: IEC 60958
• Dolby Digital, DTS: IEC60958, IEC61937
Radio
• Tuning range: FM 87.5-108 MHz (50/100 kHz), AM/MW 531-1602 kHz (9 kHz)
• 26 dB quieting sensitivity: FM 22 dBf, MW 5000uV/m
• IF rejection ratio: FM 60 dB, MW 24dB
• Signal-to-noise ratio: FM 50 dB
• AM Suppression Ratio: FM 30dB
• Harmonic distortion: FM 3%, MW 5%
• Frequency response: FM 180 Hz\~10 kHz / ±6dB
• Stereo separation: FM 26 dB (1 kHz)
• Stereo Threshold: FM 29 dB
USB
• Compatibility: Hi-Speed USB (2.0)
• Class support: UMS (USB Mass Storage Class), MTP (Media Transfer Protocol)
Main unit
• Power supply:
• 110-127 V / 220-240 V, \~50-60 Hz switchable
• 220-240V / 50 Hz (for China region only)
• Power consumption: 100W
• Dimensions (WxHxD): 435 × 58 × 360 (mm)
• Weight: 3.7 kg
Speakers
• System: full range satellite
- Speaker impedance: 6 ohm (centre), 3 ohm (Front/Rear)
- Speaker drivers:
- Centre: 2x 2.5" woofer + 1 x 2" tweeter
- Front/Rear: 3" full range
• Frequency response: 150 Hz - 20 kHz
- Dimensions (WxHxD):
• Centre: 440 x 105 x 75 (mm)
• Front: 103 × 203 × 71 (mm)
• Rear: 262 × 1199 × 264 (mm)
• Weight:
- Centre: 1.39 kg
- Front: 0.45 kg
- Rear: 3.53 kg
Subwoofer
- Impedance: 6 ohm
• Speaker drivers: 165 mm (6.5") woofer
• Frequency response: 40 Hz - 150 Hz
• Dimensions (WxHxD): 163 × 363 × 369 (mm) - Weight: 5.08 kg
9 Troubleshooting

Warning!
- Risk of electric shock. Never remove the casing of this unit.
To keep the warranty valid, never try to repair the system yourself.
If you encounter problems when using this unit, check the following points before requesting service. If the problem remains unsolved, register your product and get support at www.philips.com/welcome.
Main unit
The buttons on this unit do not work.
- Disconnect this unit from the power outlet for a few minutes, then connect again.
Picture
No picture. Refer to your TVs manual for correct video input channel
selection. Change the TV channel until you see the DVD screen.
- Press DISC.
-
If this happens when you turn on the progressive scan setting or change the TV type setting, you have to switch to its default mode:
-
Press ▲ to open the disc compartment.
- Press ◀.
- Press AUDIO SYNC (for progressive scan) or SUBTITLE (for TV Type).
No picture on HDMI connection.
- Check if the HDMI cable is faulty. Replace a new HDMI cable.
-
If this happens when you change the HDMI video resolution, you have to switch to its default mode:
-
Press ▲ to open the disc compartment.
- Press ◀.
- Press ZOOM.
Sound
No sound. Ensure that the audio cables are connected and press the correct input source (for example, AUX /MP3 LINK, USB) to select the device you want to play.
No sound on HDMI connection.
- You may not hear any sound from the HDMI output if the connected device is non-HDCP compliant or only DVI-compatible.
No sound from TV programme.
- Connect an audio cable from the AUDIO input on this unit to the AUDIO output on your TV. Then press AUX /MP3 LINK repeatedly to select the corresponding audio input source.
Play
DivX video fi les cannot be played.
- Ensure that the DivX fi le is encoded according to the 'Home Theatre Profi le' with the DivX encoder.
- Ensure that the DivX video file is complete.
The aspect ratio of the screen is not aligned with the TV display setting.
The aspect ratio is fixed on the DVD.
DivX subtitle are not displayed correctly.
- Ensure that the subtitle file name is the same as the movie file name.
- Select the correct character set.
-
Press OPTIONS.
-
Press ▶, then select [ DivX Subtitle ] in the menu.
-
Select the character set that supports the subtitle.
The contents of the USB flash drive cannot be read.
• The USB flash drive format is not compatible with this unit.
- Drive is formatted with different fi le system which is not supported by this unit (e.g. NTFS).
10 Glossary
Aspect ratio
Aspect ratio refers to the length to height ratio of TV screens. The ratio of a standard TV is 4:3, while the ratio of a high-definition or wide TV is 16:9. The letter box allows you to enjoy a picture with a wider perspective on a standard 4:3 screen.
DivX
The DivX code is a patent-pending, MPEG-4 based video compression technology, developed by DivX Networks, Inc., that can shrink digital video to sizes small enough to be transported over the internet, while maintaining high visual quality.
Dolby Digital
A surround sound system developed by Dolby Laboratories containing up to six channels of digital audio (front left and right, surround left and right, centre and subwoofer).
HDMI
High-Definition Multimedia Interface (HDMI) is a high-speed digital interface that can transmit uncompressed high definition video and digital multichannel audio. It delivers high quality picture and sound quality, completely free from noise. HDMI is fully backward-compatible with DVI.
As required by the HDMI standard, connecting to HDMI or DVI products without HDCP (High-bandwidth Digital Content Protection) will result in no Video or Audio output.
HDCP
High-bandwidth Digital Content Protection is a specification that provides a secure transmission of digital contents between different devices (to prevent unauthorised copyright).
JPEG
A very common digital still picture format. A still-picture data compression system proposed by the Joint Photographic Expert Group, which features small decrease in image quality in spite of its high compression ratio. Files are recognised by their file extension 'JPG or JPEG'.
MP3
A fi le format with a sound data compression system. 'MP3' is the abbreviation of Motion Picture Experts Group 1 (or MPEG-1) Audio Layer3. By using the MP3 format, one CD-R or CD-RW can contain about 10 times more data than a regular CD. Files are recognised by their fi le extension '.MP3'.
MPEG
Motion Picture Experts Group. A collection of compression systems for digital audio and video.
PBC
Playback Control. A system of navigating a Video CD/Super VCD through on-screen menus recorded onto the disc. You can enjoy interactive playback and searching.
PCM
Pulse Code Modulation. A digital audio encoding system.
Progressive Scan
The progressive scan displays twice the number of frames per seconds than ordinary TV system. It offers higher picture resolution and quality.
WMA
Windows Media™ Audio. Refers to an audio compression technology developed by Microsoft Corporation. WMA data can be encoded by using Windows Media Player version 9 or Windows Media Player for Windows XP. Files are recognised by their file extension 'WMA'.