Cafitesse 60 - Coffee machine Douwe Egberts - Free user manual and instructions
Find the device manual for free Cafitesse 60 Douwe Egberts in PDF.

User questions about Cafitesse 60 Douwe Egberts
0 question about this device. Answer the ones you know or ask your own.
Ask a new question about this device
Download the instructions for your Coffee machine in PDF format for free! Find your manual Cafitesse 60 - Douwe Egberts and take your electronic device back in hand. On this page are published all the documents necessary for the use of your device. Cafitesse 60 by Douwe Egberts.
USER MANUAL Cafitesse 60 Douwe Egberts
text_image
DOUWE EGBERTS MARCILLA MAISON DU CAFE A Sarfee CompanyCafi tesse 60
natural_image
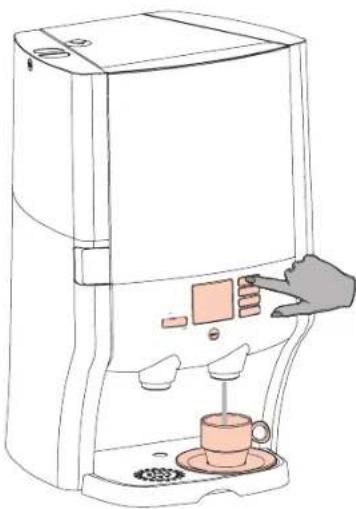
Exterior view of a Douwe Egberis coffee maker with digital display and coffee cup (no visible text or symbols)Gebruiksaanwijzing
Mode d'emploi
Bedienungsanleitung
Operator manual
Article no. 700.403.422-B
Serial number: ____
Registration number: ____
Safety instructions 2
Description of the dispenser "CAFITESSE 60" 4
Display pictograms.... 5
Operating panel (tapping beverages) 6
Programming buttons....6
Operation of the dispenser....7
Switching on the dispenser 7
Switching off the dispenser 7
Filling the water tank 8
Placing/replace ingredient pack 9
Dispensing a cup of drink 10
Dispensing a pot of drink 11
Dispensing hot water 12
Moving the dispenser with water tank.... 13
Preparation.... 13
Moving the dispenser 14
Access to the operator menu.... 15
Counter readings consumptions.... 16
CLEANING - Manual, daily cleaning procedure 18
CLEANING - Automatic, periodic cleaning procedure.... 20
Cleaning program.... 20
Start the cleaning program.... 21
Changing the settings.... 24
Clock setting: set date and time 24
Language setting 26
Switching text on or off....27
"Almost empty" Warning 28
Volume setting 29
Strength setting 30
Descaling the dispenser.... 31
Start descaling program (Optional) 32
Putting the dispenser into service after storage / Storing the dispenser 35
Display messages and troubleshooting 36
Display messages and troubleshooting when using model with removable watertank 39
Quick reference 40
Serve a drink and hot water 40
Daily cleaning 41
Periodic cleaning 42
Specifications 43
Subject Index 44
Introduction
This manual contains the instructions and explanation of the operation and maintenance of the "CAFITESSE 60" dispenser.
The dispenser is a machine for preparing warm drinks and hot water by the cup or pot.
There are 2 models:
- one model with a fixed water connection (C61) ^* /**
- one model with a removable water tank (C60)*.
The dispenser cooling compartment has room for two ingredient packs. The right-hand ingredient pack always contains coffee.
Depending on the ingredients that you put there, the dispenser can dispense coffee, decaffeinated coffee, or coffee with milk drinks such as cappuccino.
The dispenser is easy to operate. All aspects of the design are oriented towards ease of use. Cleaning the dispenser is simple and requires very little time.
Follow the instructions for operation and maintenance in this manual so that the dispenser works well.
*) Optional: a cold water system can be connected to the machine.
**) Optional: an extra tap water system can be mounted in the machine.

Caution!
- Read the safety instructions carefully.
- Do you have any questions? Ask your Cafitesse system supplier.
The manufacturer and DECS International are not liable for any damage and/or injury if the dispenser is not operated and maintained in accordance with these instructions.
© Decs Int. - 2006
We reserve the right to change the design and specifications.
natural_image
Line drawing of a coffee maker with a hand inserting a coffee into the cup (no text or symbols)Safety instructions
Operation
Installation, programming and setting up should be done by a service technician or other authorized person. For safety reasons, never remove the housing.
Do not use the "CAFITESSE 60" dispenser for any other purpose than the purpose for which it was intended. The dispenser is intended for indoor use only, at an ambient temperature of between min. +1 °C (33.8 °F) and max. +32 °C (89.6 °F).
Do not position the dispenser too close to a drain (damp) or cooking equipment (heat). Ensure that the dispenser is not stored in places where the surrounding temperature is lower than +1 °C (33.8 °F). If the dispenser is nevertheless frozen, disconnect the power and the water supply and call the service technician.
Warning

The liquids that are dispensed by the dispenser are hot. To prevent burns to the hands and other parts of the body, they should be kept away from the beverage outlet after pressing a selection button.
Do not leave children unattended near the dispenser.
Turn the dispenser off at the power switch when it will not be used for an extended period (for example, at night or at the weekend). Unplug the power cord only if there is a malfunction. When the power cord is not plugged in to a power outlet, the cooling system does not operate and the ingredients will not be cooled. In this case, place the ingredient packs in the refrigerator.
For hygienic and functional reasons, clean the dispenser daily in accordance with the manual cleaning procedure and use the automatic cleaning procedure for periodic cleaning; see the description in this manual.
Always observe basic hygiene. Use only food-grade cleaning agents for the coffee dispenser. Clean the dispenser parts with a clean, damp cloth. Do not spray or splash the equipment with water and never submerge it in water.
Make sure that there is suffi cient space around the dispenser for ventilation and keep the front and back accessible for repair purposes. The dispenser may tilt a maximum of 5^ .
Read the instructions in the appropriate chapter first (see the table of contents) before moving the dispenser.
The capacity of the drip tray is limited to approx. 1000 ml (1 decanter). You must empty the drip tray regularly. Also empty the drip tray if coffee, a drink or water has been dispensed without there being a cup or decanter in position.
For dispensers with a fixed water connection:
Connect the equipment to a manually operated tap. Use the connecting hose supplied.
Warning:

Never connect the dispenser to a source that supplies polluted or biologically contaminated water. If a water filter is included, it is exclusively intended for the elimination of undesired flavours and aromatic substances (such as chlorine).
For dispensers without a fixed connection:
Warning:

Use only fresh, clean drinking water to (re)fill the water tank. For the best water quality, you should fill the cold water tank with fresh tap water each morning.
Storing the ingredient packs
Ensure that the dispenser cooling compartment is properly closed at all times. If it is not, the quality of the coffee or drink can degrade.
Store defrosted coffee and ingredient pack in the refrigerator only at a temperature of 6 °C (42.8 °F).
Always check the expiration date on the coffee or ingredient pack ("use by") and use the coffee or ingredient pack that has been in storage the longest. Write the placement date on the pack before you place the pack in the dispenser.
Do not refreeze the coffee or ingredient packs again after they have thawed out. This will have a detrimental effect on the quality and the taste.
Electricity
Warning:
Ensure that the power cord and the dispenser are never submerged in water or any other liquid.

Warning:
Never insert the power cord plug into the power outlet (or remove it) if either the plug or the power outlet is wet or has been touched with wet hands.

Warning:
Never switch on a dispenser if the power cord or power plug is damaged. The power cord may only be replaced by a service technician or other authorized personnel.

Warning:
Never connect the dispenser to a power outlet with characteristics other than those indicated on the label.

Warning:
Because of the risk of fire and electric shock only replace the power cord with an original power cord as provided by the equipment manufacturer. As the part number of the power cord may differ per country, contact your Cafi tesse system supplier for the correct part or part number.
Connect the dispenser to a grounded circuit only. The dispenser must be connected to an electrical circuit with an extra protection or preferably a circuit with a ground leak switch.
When the dispenser is moved, ensure that the capacity of the electrical installation is not exceeded when the plug is inserted in the power outlet at the new location.
Description of the dispenser "CAFITESSE 60"

text_image
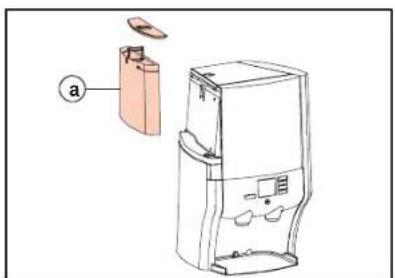
gfedbac k l m n h o j iFig. 1 Important parts
a. Removable water tank*
b. Cover, water tank*
c. Descaling opening
d. Door
e Cooling compartment
f. Ingredient packs
g. Cleaning sticker
h. Trough
i. Drip grid
j. Drip tray
k. Operating panel
1. Beverage outlet
m. Hot water outlet**
n. Display
o. Power switch (touch control)
*) Only on model with removable water tank.
**) Optional for the Cafi tesse 61
Also cold water outlet if connected to a cold or extra tap water system.
text_image
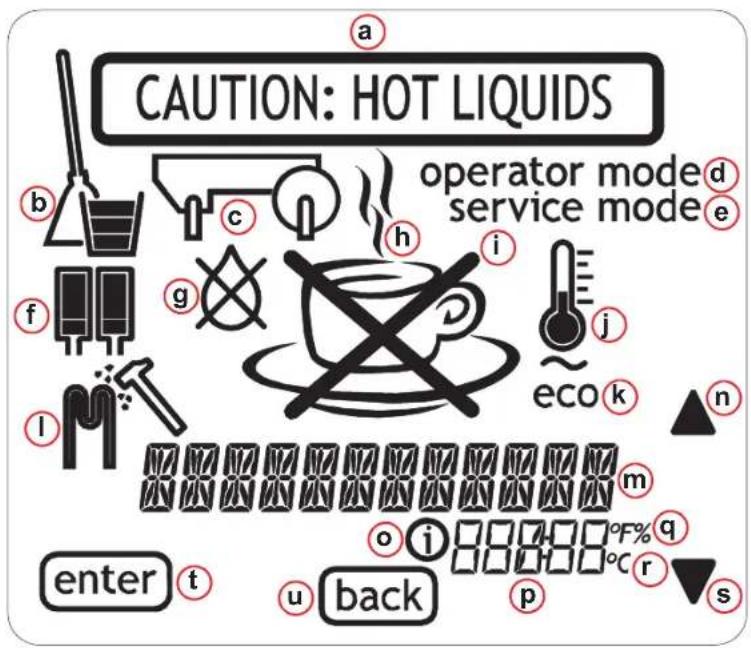
CAUTION: HOT LIQUIDS operator mode d service mode e eco k enter t back p s o i °F% q r n e g h i b c d e f lDisplay pictograms
a. Caution, hot drink is dosed
b. Cleaning
c. Trough
d. Operator mode
e. Service mode
f. Ingredient packs, left and right
g. No water
h. Steaming cup, select drink
i. Crossed out cup, you can't select a drink
j. Thermometer, boiler temperature
k. Eco (energy saving mode)
I. Descaling pictogram, descaling program
m. Text
n. Scroll button (navigation/selection)
o. Info
p. Numeric specification
q. Degrees Fahrenheit/percentage
r. Degrees Celsius
s. Scroll button (navigate/selection)
t. Enter button (back/confirm)
u. Back button (back/cancel)
Operating panel (tapping beverages) Programming buttons

flowchart
graph TD
    d1[" Cold water "] --> e["SELECT COPY"]
    d2[" Hot water "] --> e
    e --> a["Output"]
    STOP["STOP"] --> c["Control c"]
    STOP --> b["Control b"]
Fig. 2 Operating panel (tapping beverages)
a. Selection buttons*
b. Display
c. Stop button
d. Hot water button*
d1. Cold water button**
*) The stop button and the upper selection button pressed together give access to operator menu.
**) Optional:
If the machine is connected to a cold water or tap water system.

flowchart
graph TD
    A["operator mode"] --> B["counter"]
    B --> C["STOP"]
    D["hot water"] --> E["d"]
    F["Counter Read"] --> G["enter"]
    F --> H["back"]
    I["a"] --> J["b"]
    K["c"] --> L["STOP"]
Fig. 3 Programming buttons
a. Scroll button (navigation/selection)
b. Scroll button (navigation/selection)
c. Back button (back/cancel)
d. Enter button (back/confirm)

natural_image
Diagram of a microwave oven with a hand inserting a plug into the air outlet (no text or symbols present)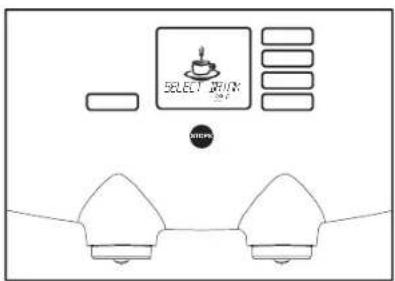
text_image
SELECT KEY SELECT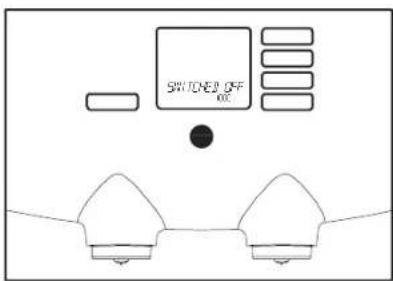
text_image
SWITCHED OFF ONFig. 4 Plug + switch Fig. 5 Dispenser ready for use Fig. 6 Dispenser switched off
Operation of the dispenser

Caution!
- Never remove the plug power outlet to turn the dispenser off!
- The cooling system can without power, allowing the quality of the ingredients to degrade.
Switching on the dispenser
- Insert the plug into the power outlet.
- Press the power switch (fi g. 4).
The water in the boiler is heated.
- A flashing thermometer shows in the display and the message "PLEASE WAIT".
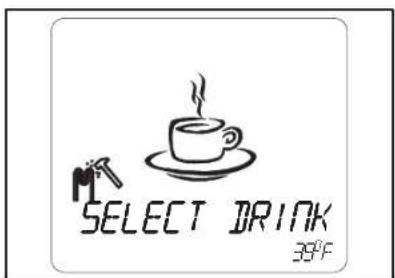
- When the water has reached the set temperature, a coffee cup shows in the display with the message "SELECT DRINK" (fi g. 5).
The dispenser is now ready for use.
Switching off the dispenser
- Press the power switch (fi g. 4).
• The boiler is now switched off.
• The cooling system remains in operation.
- The display shows the message: "SWITCHED OFF" (fi g. 6).
The cooling system is only switched off when the plug is removed from the power outlet.

text_image
NO WATERFig. 7 Filling the water tank Fig. 8 Water tank model
text_image
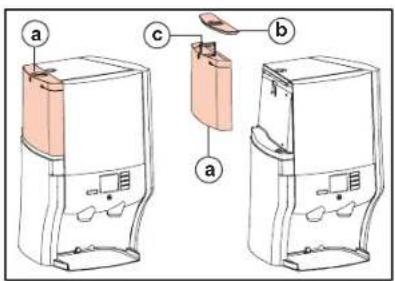
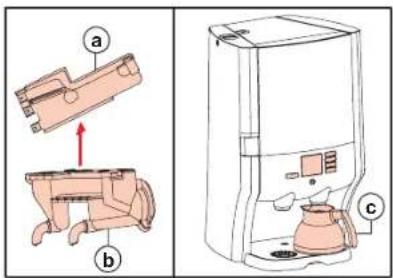
Diagram of a hand-operated device with labeled parts (a, b, c) showing internal components and assembly steps.Filling the water tank
The model without a fixed water connection is equipped with a removable water tank.
When the "NO WATER" symbol (fi g. 7) shows in the display, the water tank (fi g. 8 a) must be filled:
- Remove the lid (fi g. 8 b).
-
Lift the water tank by the mounting from the dispenser (fi g. 8 c).
-
Empty the water tank, rinse it and fill it with clean, fresh drinking water to the "max." mark.
- You should fill the water tank with fresh water each day to maintain the best water quality.
- Replace the water tank and lid.
The dispenser is now ready for use.

text_image
a SELECT IR'INK b SELECT IR'INK c SELECT IR'INK d e(= optional) f (= optional) SELECT IR'INK SELECT IR'INK SELECT IR'INK
natural_image
Technical line drawing of a mechanical device with internal components and mounting base (no text or symbols)
text_image
Caution! Check the use-by date. Check the pack is fully defrosted.Fig. 9 Indication in the display Fig. 10 Replace ingredient packs Fig. 11 Pay attention to the use-by date!
Placing/replace ingredient pack
The dispenser shows a symbol in the display when an ingredient pack is empty. Place/replace the pack when the "pack empty" symbol (fi g. 9 b, c or d) shows in the display. (See also § "Display messages and troubleshooting" for more information).
Optional:
The dispenser shows a symbol (fi g. 9 e or f) in the display when an ingredient pack is almost empty and the "ALMOST EMPTY" warning is set, see fi g. 66. Place a new pack in the refrigerator to defrost, when the "ALMOST EMPTY" symbol shows. So the pack will be ready for exchange, when it is completely empty.
If the AED is active the dispenser asks, during placing the ingredient packs, if it is a new pack, and (optional) if it is a small one.
-
Open the cooling compartment door.
-
Lift the empty pack out of the dispenser (fi g. 10)
- Be careful of splashes, drops can come out of the dispensing spout.
-
Throw away the empty pack.
-
Clean the interior of the cooling compartment with a clean, damp cloth.
-
Always check the use-by date on the new pack.
- Never use a pack whose use-by date has expired.
- Always use the pack that has been in storage the longest.
- Follow the instructions on the pack.
a. Shake the pack at least 10 times.
b. Check whether the pack is fully defrosted.
c. Fold open the dispensing spout.
- Place the new ingredient pack in the cooling compartment. Ensure that the dispensing spout is properly positioned through the hole in the cooling compartment!
- When the "ALMOST EMPTY" warning is set the display shows: "NEW PACK"?
-
Do nothing if the former pack is replaced, e.g. during cleaning.
-
Press the enter button to confirm if a new pack is placed.
- When also the option "small pack" is set, the display shows: "SMALL PACK"?
-
Do nothing if a large pack is placed.
-
Press the enter button to confirm if a small pack is placed.
-
Close the cooling compartment door.
natural_image
Line drawing of a modern water dispenser with control panel and coffee cup (no text or symbols)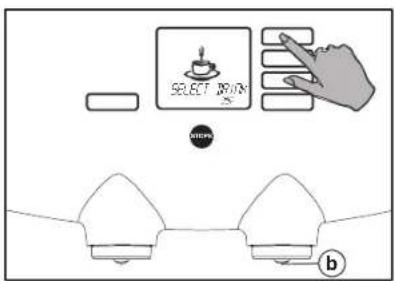
text_image
SELECT BUTTON B BUTTER
text_image
SELECT KEYFig. 12 Place a cup under the outlet Fig. 13 Select the desired drink Fig. 14 Stop button
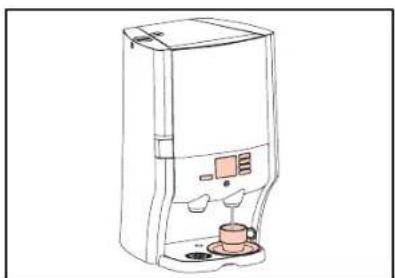
Dispensing a cup of drink
- Place a cup on the drip grid under the right-hand outlet (fi g.12).

Caution!
- Avoid burns!
- Use the dispenser on trough has been installed correctly. When the dispenser is used without the trough, the hot water can splash around.
- Press one of the right-hand selection buttons (fi g. 13). (Not on the pot button, if present).
- Now the dispenser dispenses the drink from the right-hand outlet (fi g. 13 b) and stops automatically after one cup has been dispensed.
- Press the stop button (fi g. 14) to stop dispensing earlier, for example if you want the cup to be less full.
- The stop button can be pressed at any time to stop dispensing (fi g. 14).
If the selection button has been programmed for continuous dispensing:
(Please note, this option doesn't function with mixed drinks, e.g. cappuccino.)
-
Keep the selection button pressed until you have obtained the desired quantity of drink.
-
Release the button when you have obtained the desired quantity.
The supplier can change this setting on request.
natural_image
Line drawing of a coffee maker with a glass stand and coffee cup (no text or symbols)
text_image
SELECT DRIVER BY BSPN b)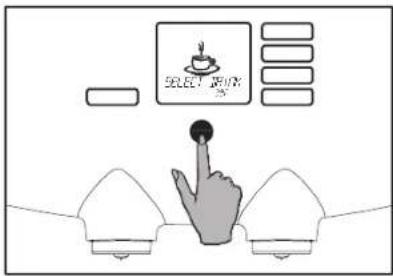
text_image
SELECT KEYFig. 15 Place a pot under the outlet Fig. 16 Select the pot button Fig. 17 Stop button
Dispensing a pot of drink
- Place a pot under the right-hand outlet (fi g. 15).
- Use only the accompanying 0.9 liter coffee pot (1 pot is supplied with the dispenser).
- Press the selection button for a pot of drink (fi g. 16).
- Now the dispenser dispenses the drink from the right-hand outlet (fi g. 16 b) and stops automatically after one pot has been dispensed.
- Press the stop button to stop dispensing earlier, for example if you want the pot to be less full (fi g. 17).
- The stop button can be pressed at any time to stop dispensing (fi g. 17).
The supplier can change the standard pot setting on request.

Caution!
- Liquids from the dispenser are hot.
Avoid burns!
natural_image
Line drawing of a coffee water dispenser with a cup on the front panel (no text or symbols)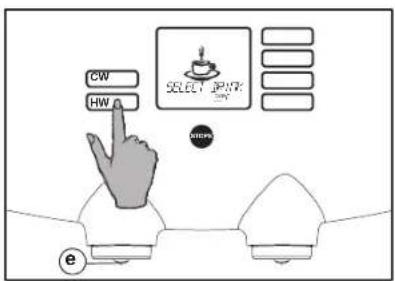
text_image
CW HW SELECT START e
text_image
SELECT KEY OKFig. 18 Hot water outlet Fig. 19 Hot water button/Cold water button* Fig. 20 Stop button
Dispensing hot water\*
- Place a cup on the drip grid under the left-hand (hot water) outlet (fi g. 18).

Caution!
Avoid burns!
Liquids from the dispenser are hot. Press the stop button (fi g. 20) to stop dispensing earlier, for example if you want the cup to be less full.
*) Optional:
If the machine is connected to a cold water or extra tap water system, cold water can be dispensed likewise by pushing the cold water button.
- Press the selection button for hot water (fi g. 19).
- Now the dispenser dispenses hot water from the left-hand outlet (fi g. 19 e) and stops automatically after one cup has been dispensed.
Press the stop button (fi g. 20) to stop dispensing earlier, for example if you want the cup to be less full.
- The stop button can be pressed at any time to stop dispensing (fi g. 20).
If the selection button has been programmed for continuous dispensing:**
-
Keep the selection button pressed until the desired quantity of hot water has been dispensed (fi g. 19).
-
Release the button when you have obtained the desired quantity.
The supplier can change this setting on request.
**) Continuous dispensing is not possible with the cold water option, it is only possible with tap water.
text_image
Diagram of a smart water heater with labeled component 'a' and internal structure
text_image
90°C/194°F a b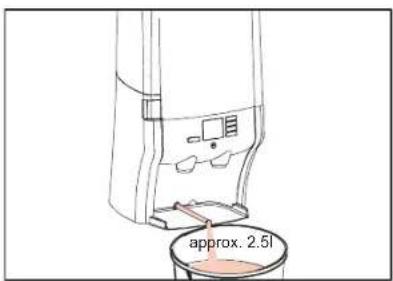
text_image
approx. 2.5lFig. 21 Water tank Fig. 22 Drain hose Fig. 23 Draining
Moving the dispenser with water tank

Caution!
- You may only move when you have disconnected the power cord from the power supply.
- The boiler contains ho can come out of the dispenser when you tilt it, lift it up or move it.
- The drained water can be hot Wear protective gloves. 5.
- Contact the service provider moving the model with a fixed water connection!
Preparation
- Switch the dispenser off.
- Remove the plug from the power outlet.
- Remove the ingredient packs from the dispenser and place them in the refrigerator.
- Remove and empty the water tank (fig. 21 a).
- Using the drain hose, drain all the water from the dispenser (fi g. 22 a):
a. Remove the drip tray with grid.
b. Pull the drain hose approx. 12 in. (30 cm) out of the rear wall (fi g. 22 a).
c. Slide the unit to the edge of the surface on which it is positioned.
d. Place a container with a capacity of at least 2.5 liter under the drain hose (fi g. 23).
e. Remove the cap (fi g. 22 b) from the drain hose and allow the water to flow into the container (fi g. 23).
f. Replace the cap on the drain hose and push the hose all the way back.
- Clean the dispenser with a clean, damp cloth; especially around the left and right-hand outlets.
The dispenser can now be moved.

natural_image
Line drawing of a multi-tiered industrial machine with wheels and a control panel (no text or symbols)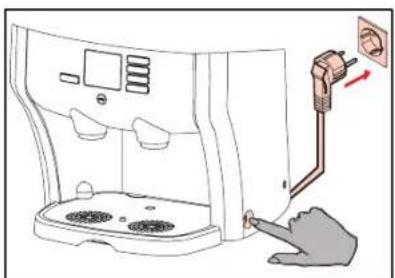
natural_image
Line drawing of a microwave oven with a hand inserting a plug into the air outlet (no text or symbols)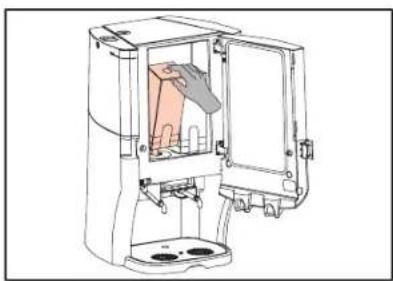
natural_image
Technical line drawing of a mechanical device with internal components and mounting base (no text or symbols)Fig. 24 Moving on a serving trolley Fig. 25 Plug + switch Fig. 26 Place ingredient packs

Caution!
- You may only move the dispenser when you have disconnected the power cord from the power supply.
- Always use a serving trolley or something similar to move the dispenser (26.5 kg).
Move the trolley carefully to avoid sudden movements, bumps or shocks that might risk the dispenser to tilt or fall from the trolley. - Never use the dispense trolley as a mobile station to dispense hot drinks.
When installing the dispenser on a smooth, new location, ensure the placement horizontal and stable surface that can complies with the safety instructions support the weight of the dispenser on page 2. (26.5 kg). Make sure that there is sufficient space around the dispenser for ventilation. Position the drip tray and grid in front of the unit. Insert the plug into the power outlet (fi g. 25). not overload the local electrical installation. Switch the dispenser on at the power switch (fi g. 25).
The Ground Truth image displays a single, solid horizontal line. According to Rule 2 (UNDERSCORE & LINE RULES), if the GT contains lines used for stylistic emphasis or as background elements (like ruled paper), the OCR result must ignore them. The line in the GT is clearly a stylistic/background line, not a placeholder for text. Therefore, the OCR should not have output any underscores. Outputting `____` constitutes an error under Rule 2, as it hallucinates placeholder symbols where none are semantically intended. Hence, the OCR result is inconsistent with the Ground Truth.
Moving the dispenser
n.a server
1. Lift the dispenser carefully onto a serving
trolley or something similar to move the
dispenser.
2. Keep the dispenser upright and do not shake it while moving it.
text_image
SELECT START OK
flowchart
graph TD
    d --> Counter["Counter"]
    Counter --> a["a"]
    Counter --> b["b"]
    Counter --> step["STEP"]
    step --> c["c"]
    c --> Output1["Output 1"]
    style Counter fill:#f9f,stroke:#333
    style Step fill:#ccf,stroke:#333
    style Output1 fill:#cfc,stroke:#333
Fig. 27 Access to the operator menu Fig. 28 Program buttons
Access to the operator menu
The dispenser has an operator menu in which you can perform a number of special tasks:
- Counter readings
- Cleaning (automatic, periodic cleaning procedure)
-
Changing the settings such as:
-
clock setting (date and time)
- language (in display)
- text (on or off)
- almost empty (AED on/AED off)
- adjust volume (volume per cup) (optional)
- adjust strength (optional)
• Descaling (optional)
• Service mode (optional, only for service)
The operator menu leads you through the programming step by step. The display shows a message and/or instruction to tell you what actions must/can be performed.
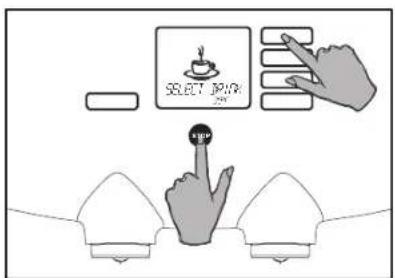
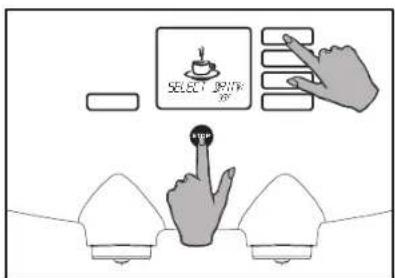
To activate the operator menu:
- Keep the stop button pressed;
- Now press the topmost selection button too (fi g. 27);
- Keep both buttons pressed until "OPERATOR MODE" appears at the top right-hand of the display;
- Release the buttons.
In the operator menu, the selection buttons become programming buttons (fi g. 28).
- Enter button (fig. 28 d), to confirm your selections.
- Scroll buttons (fig. 28 a and b) (navigation/selection), to page through the menu and select options.
- Stop button (back) (fig. 28 c), to cancel your changes and go back one level in the menu and to exit the operator mode.
text_image
SELECT OUTPUT OK
text_image
COUNTER PER STOP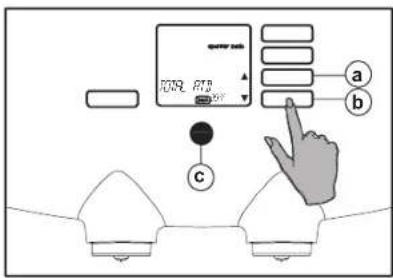
text_image
PAY 2019. BTR a b cFig. 29 Access to the operator menu Fig. 30 "COUNTER READ" selection menu Fig. 31 Total counter
Counter readings consumptions\*
In the operator menu, from the "COUNTER READ" selection menu, you can read out various counters. Some of those counters can also be reset.
ONLY READING OUT:
- "TOTAL RTD" (Ready To Drink): Total volume in liters of all consumptions (coffee and hot water);
- "TOTAL CON L": Total amount of liters ingredient from the left ingredient pack;
- "TOTAL CON R": Total amount of liters ingredient from the right ingredient pack.
*) Optional If the machine is connected to a cold water or extra tap water system, cold water consumptions can be read out/resetted too.
READING OUT AND RESETTING:
- "TOTAL FILTER": Total amount of liters water passed through the water filter (option);
- "BUTTON 1 (2, 3 or 4) POR": Amount of consumptions (portions) measured by selection button 1, 2, 3 or 4.
- "BUTTON 1 (2, 3 or 4) RTD": Total volume in liters of all consumptions measured by selection button 1, 2, 3 or 4.
- "HOTWATER POR": Amount of consumptions measured by the hot water button;
- "HOTWATER RTD": Total volume in liters of consumptions measured by the hot water button;
- "C.WATER POR":* Amount of consumptions measured by the cold water button;
- "C.WATER RTD":* Total volume in liters of consumptions measured by the cold water button.
READING OUT AND RESETTING THE COUNTERS:
- Activate the operator menu (fi g. 29), see also § "Access to the operator menu" (fi g. 27).
- The display shows: operator mode "COUNTER READ", scroll arrows enter and back (fig. 28).
- Press the enter button (fi g. 30 d). The display shows the total counter "TOTAL RTD" (fi g. 31).

text_image
d 1079L 637.5 a b STOP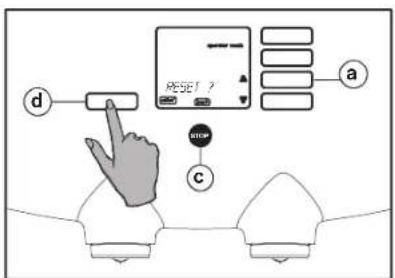
text_image
d RESET ? a c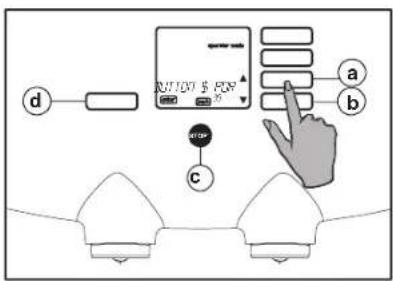
text_image
RUTTER $ PAY a b cFig. 32 Selection/reading out counter Fig. 33 Resetting counter Fig. 34 Counter button 1 POR(tions)
- Press the scroll button (fi g. 32 b). The display shows the total counter for the left ingredient: "TOTAL CON L".
- Press the scroll button ▼ (fi g. 32 b) again. The display shows the total counter for the right ingredient: "TOTAL CON R".
- Press the scroll button (fi g. 32 b) again. The display shows the total counter for the water fi iter (optional!) "TOTAL FILTER".
- Reset the counter, for instance when a new water filter is installed.
- Press the enter button (fi g. 32 d) to reset the counter. The display shows: "RESET ?" (fi g. 33).
-
Press the stop button (fig. 33 c) if the counter must not be reset.
-
Press the enter button (fig. 33 d) if the counter must be reset.
- The display shows the selection menu again, where you can select various counters.
- Use with the scroll buttons (fi g. 34 a or b) the counter of the desired selection button.
- "BUTTON 1 (2, 3 or 4) POR or RTD";
- "HOTWATER POR or RTD";
- "C.WATER POR or RTD".*
- Press the enter button (fi g. 33 d) to reset the counter of the concerning selection button.
- The display shows: "RESET ?".
-
Press the stop button if the counter must not be reset.
-
Press the enter button if the counter must be reset.
- The display shows the selection menu again, where you can select various counters.
- Repeat the previous procedure for the remaining counters.
- Press the stop button (fig. 31 c) twice to end the programming.
natural_image
Line drawing of a microwave oven with labeled component (a), no text or symbols present
natural_image
Line drawing of a hand cleaning a pink object inside a transparent cylindrical container (no text or symbols)
text_image
Diagram showing a hand pressing down on a device with labeled parts (b, c, d) and directional arrows indicating movement.Fig. 35 Power switch Fig. 37 Drip tray + beverage of Fig. 36 Cleaning the dispenser
CLEANING – Manual, daily cleaning procedure
The exterior of the dispenser must be cleaned daily to guarantee proper and reliable operation.

Caution!
drip tray can contain liquid.
The drip tray, grid and trough may be cleaned in a dishwasher.
- Switch the dispenser off by putting the power switch in the off position (fi g. 35 a). The display shows: "OFF".
- Clean the exterior of the dispenser with a clean damp cloth, possibly using a non abrasive and non aggressive cleaning agent (fi g. 36).
-
Remove the drip tray (fi g. 37 c).
-
Remove the grid, empty the drip tray if necessary and clean them both (fi g. 37 d and c).
- Clean the beverage outlets with a clean, damp cloth (fi g. 37 b).
- Replace the drip tray and grid in the dispenser.

text_image
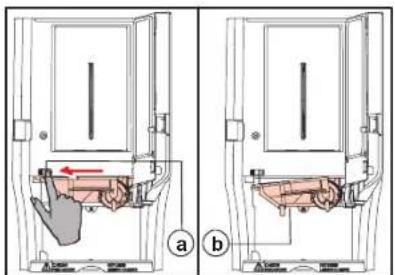
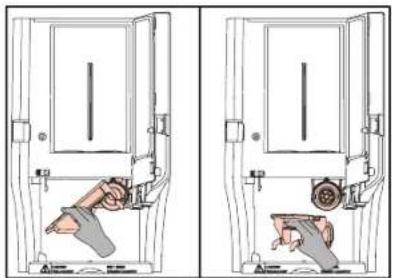
Technical diagram showing two views (a and b) of a toilet with labeled components and directional arrows indicating movement or flow.Fig. 38 Releasing trough Fig. 39 Remove trough Fig. 40 Trough cover / Placing pot
natural_image
Technical line drawing of a mechanical device with two views (top and side), showing internal components without any text or symbols.Fig. 40 Trough cover / Placing pot

text_image
Diagram showing a kitchen appliance with labeled parts (a, b, c) and a separate view of the device.- Place a pot under the right-hand outlet (fi g. 40 c).
- Switch the dispenser on by putting the power switch in the on position (fi g. 35 a)
-
Check the operation of the dispenser by pressing each selection button once.
The dispenser is now ready for use. -
Open the door.
- Remove the trough: release the trough by moving the red slide (fi g. 38 a) to the left. The trough (fi g. 38 b) comes free at the left.
-
Rotate this part further downwards, until you can pull the complete trough out of the right-hand mounting towards you (fi g. 39).
-
Clean the trough. Remove the cover from the trough (fi g. 40 a and b). The trough may be cleaned in a dishwasher.
- Replace the cover on the trough.
- Replace the trough in the reverse order.
- Push the trough upwards as far as possible until it "clicks". (The flashing of the trough in the display stops).
text_image
CLEAN
text_image
a SELECT DRINK 30°F b SELECT DRINK 30°F c SELECT DRINK 30°F d CLEAN
natural_image
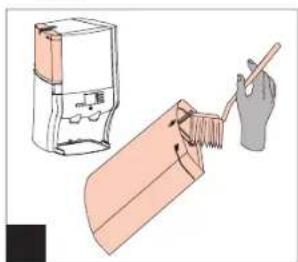
Illustration of a hand using a tool to clean or brush the surface of a rectangular object (no text or symbols present)Fig. 41 Tap blocking for cleaning Fig. 42 Cleaning program messages Fig. 43 Cleaning the removable water tank
CLEANING – Automatic, periodic cleaning procedure
Cleaning program
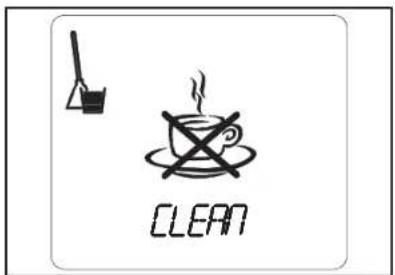
The dispenser is equipped with an automatic cleaning program. A message shows in the display when the dispenser must be cleaned.
The cleaning frequency depends on the ingredients and the associated program settings.
A bucket is shown in the display that gets fuller with each passing hour (fi g. 42 a to c). This bucket indicates that the dispenser must be cleaned with the automatic cleaning program.
After the first message (fig. 42 a) you have to clean the dispenser within four hours.
Four hours after the first message the dispenser is deactivated (fi g. 41) and the cleaning program must be started.
Of course you can always clean the dispenser in between, without the cleaning message showing.
Cleaning the model with a removable water tank:
First clean the water tank before starting the automatic cleaning program.
- Clean the inside of the water tank with a brush (fi g. 43) and a food-grade cleaning agent (e.g. Cleaner).
- Rinse the water tank with clean water.
- Refi ll the water tank (ensure that the water does not go above the max. level) and place it back in the dispenser.
text_image
Diagram showing hand typing on a keyboard with 'OK' button and mouse pointer, alongside a control panel with checkmark and 'START' icons.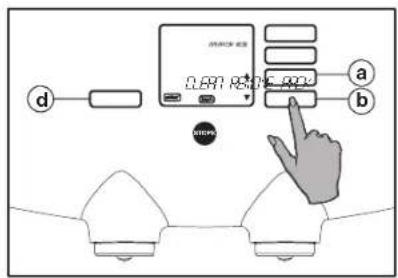
text_image
MATCH 4.0 a b 0.6m x 1.0m x 2.0m x ###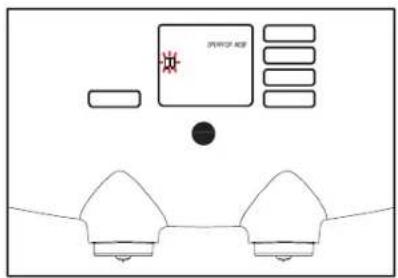
text_image
SPRING AEE #Fig. 44 Access to the operator menu Fig. 45 Cleaning program Fig. 46 Remove pack
Start the cleaning program
- Activate the operator menu whenever the cleaning message shows in the display (fi g. 44).
- The display shows: operator mode, "COUNTER READ", scroll arrows, enter and back (fi g. 28).
-
Press the scroll button ▼(fi g. 45 b).
-
The selection menu in the display shows: "CLEAN" (fi g. 45).
-
Press the enter button (fi g. 45 d).
- The display shows: "START CLEAN".
-
Press the enter button once again (fi g. 45 d). The cleaning program now starts.
-
Now follow the instructions on the display:
- The display shows: "REMOVE PACK" + - (fi g. 46).
-
Open the door and remove the ingredient packs. The flashing packs disappear from the display.
-
The display shows: "CLEAN INSIDE".
natural_image
Diagram of a hand cleaning a device with a cloth, labeled (b), showing no text or symbols beyond the label.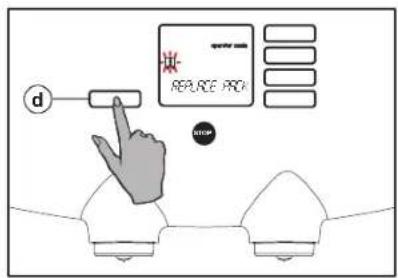
text_image
d REPLACE PACK STOP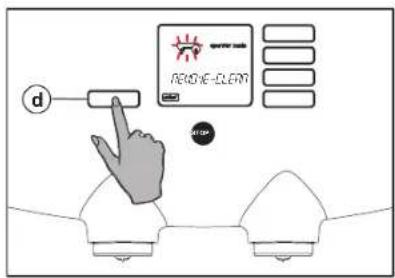
text_image
d REMOVE-CLEAMFig. 47 Clean the round openings Fig. 48 Replace pack Fig. 49 Remove trough
- Clean the interior of the cooling compartment with a clean damp cloth (fi g. 47).
-
Clean the openings in the floor of the cooling compartment with clean warm water using the special brush supplied (fi g. 47 b).
-
Press the enter button (fi g. 48 d). The display shows: "REPLACE PACK" + -U-.
-
Replace both ingredient packs in the correct position. The fl ashing stops. (When using just one ingredient pack, the fl ashing stops approx. 5 seconds after replacement. Then the program continues.)
-
The display now shows: "REMOVE-CLEAN" + (fi g. 49)
text_image
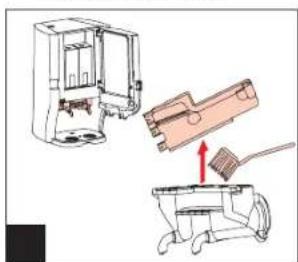
Technical diagram showing a door valve mechanism with labeled parts and directional arrows, likely illustrating a valve assembly or fluid flow system.Fig. 50 Releasing trough Fig. 51 Remove trough Fig. 52 Trough cover / Placing pot
natural_image
Technical line drawing of a mechanical device with two views (top and side), showing internal components without any text or symbols.- Push the trough upwards as far as possible until it "clicks". The flashing of the trough in the display stops.
- The display shows: "PLACE RIGHT" + U. Press the enter button (fi g. 48 d).
- Position an empty pot (fi g. 52 c) underneath the right-hand outlet.
- Press the enter button (fi g. 48 d). The display shows: "PUSH * FLUSH".
- Press the enter button (fi g. 48 d). The display shows: "FLUSH" and a flashing "CAUTION: HOT LIQUIDS". The rinsing water flows into the pot.
- Then empty the pot.
- The display shows: "PLACE LEFT" + Ⓥ
- Position an empty pot (fi g. 52 c) underneath the left-hand outlet.
text_image
Diagram showing a kitchen appliance with labeled parts (a, b, c) and a separate view of the device.- Press the enter button (fi g. 48 d). The display shows: "PUSH * FLUSH".
- Press the enter button (fi g. 48 d). The display shows: "FLUSH" and a flashing "CAUTION: HOT LIQUIDS". The rinsing water flows into the pot.
- Then empty the pot.
- The display shows: "SELECT DRINK" + 📋
- Check the dispenser operation by selecting one or more products.
The dispenser is now clean and ready for use once more.
*) Optional
Points 26. till 30. only appear in the display and have to be executed if a cold water/extra tap water system is installed and activated.

text_image
CLOCK SET a b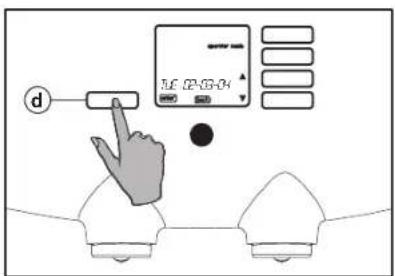
text_image
d UE 02:03:04
text_image
DATE SET a b cFig. 53 Selection menu "clock set" Fig. 54 Day, date and time display Fig. 55 Setting the date
Changing the settings
Besides the "COUNTER READ", "CLEANING" and "DESCALING", there are six other settings. The following six settings can be changed:
- "CLOCK SET": set date and time;
- "LANGUAGE": set the language;
- "TEXT": text display on or off;
- "ALMOST EMPTY": switch "ALMOST EMPTY" warning on or off;
- "ADJ VOLUME": adjust volume per cup (optional);
- "ADJ STRENGTH": adjust strength per cup (optional);
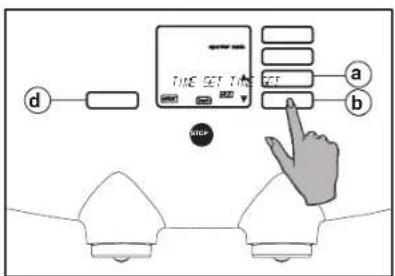
Clock setting: set date and time
In the operator menu, from the selection menu "CLOCK SET", you can set the "DATE" with day name/day/month/year and the "TIME". (The time must be adjusted, for example, at the start and end of daylight saving).
- Activate the operator menu, see also § "Access to the operator menu" (fi g. 27).
- The display shows: operator mode, "COUNTER READ", scroll arrows ♦, enter and back (fi g. 28).
-
Use the scroll buttons (fi g. 53 a or b) until the option "CLOCK SET" shows in the display.
-
Press the enter button (fi g. 54 d). The display shows the day, date and time set.
- Use the scroll buttons until the option "DATE SET" appears in the display (fi g. 55 a or b).
- Press the enter button (fi g. 55 d). The display shows: "DAYNAME".
- Press the enter button again (fi g. 55 d).
- Select with the scroll buttons (fi g. 55 a or b) the correct day (Monday to Sunday).
- Press the enter button (fig. 55 d) to confirm the setting. The display shows: "DAYNAME" again.

text_image
d TATE SET a b ATMPFig. 56 Selecting the time setting
text_image
TIME GET TIME a bFig. 57 Time setting

text_image
Diagram showing a hand interacting with a device labeled 'd' and connected to a control panel with 'STOP' button, alongside two identical devices.Fig. 58 Confirming the time setting
- You can now do 2 things:
- Press the stop button 3x (fig. 55 c) to stop programming or:
- Use the scroll buttons (fi g. 55 a or b) to select the options "DAY, MONTH or YEAR", if these must be changed too.
- Press the enter button (fi g. 55 d) and use the scroll buttons ♦ (fi g. 55 a or b) to change the day (1-31), the month (1-12) or the year.
-
Press the enter button (fig. 55 d) to confirm the setting.
-
Now press the stop button 1x (fi g. 55 c) if you also want to change the "TIME" or 3x to stop programming.
- After pressing the stop button 1x, the display shows: "DATE SET" (fi g. 55 c).
-
With the scroll buttons , select the option "TIME SET", (fi g. 56 a or b).
-
Press the enter button (fi g. 57 d) and change the time with the scroll buttons (fi g. 57 a or b).
- Press the enter button (fig. 58 d) to confirm the setting.
- Press the stop button 2x (fi g. 58 c) to end the programming.
text_image
SELECTörink OK
text_image
LANGUAGE a b
text_image
970/91 a b cFig. 59 Access to the operator menu Fig. 60 "LANGUAGE" selection menu Fig. 61 Selecting the language
Language setting
You want to change the display language. In the operator menu, from the "LANGUAGE" selection menu (fi g. 60), you can choose which languages is to show in the display:
- Activate the operator menu (fi g. 59), see also § "Access to the operator menu" (fi g. 27).
- The display shows: operator mode, "COUNTER READ", scroll arrows ♦, enter and back (fi g. 28).
-
Use the scroll buttons until the option "LANGUAGE" appears in the display (fi g. 60 a or b).
-
Press the enter button (fi g. 61 d). The display shows the language selected.
- With the scroll buttons select the desired language (fi g. 61 a or b).
- Press the enter button (fig. 61 d) to confirm the setting.
- Then press the stop button (fi g. 61 c) to end the programming.
text_image
SELECT Drink OK
text_image
T-7 a b
text_image
d a b cFig. 62 Access the operator menu Fig. 63 "TEXT" selection menu Fig. 64 Selecting "TEXT ON or OFF"
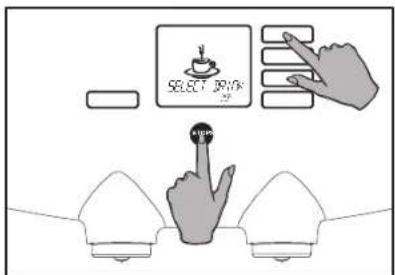
Switching text on or off
You do/don't want to see the display text.
In the operator menu, from the "TEXT" selection menu (fi g. 63), you can choose whether the text "SELECT DRINK" should show in the display or not before a drink is selected.
- Activate the operator menu (fi g. 62), see also § "Access the operator menu" (fi g. 27).
- The display shows: operator mode, "COUNTER READ", scroll arrows ♦ enter and back (fi g. 28).
-
Use the scroll buttons until the option "TEXT" appears in the display (fi g. 63 a or b).
-
Press the enter button (fi g. 64 d). The display shows the option selected.
- With the scroll buttons choose "TEXT ON" or "TEXT OFF" (fi g. 64 a or b).
- Press the enter button (fig. 64 d) to confirm the setting.
- Then press the stop button (fi g. 64 c) to end the programming.

text_image
SELECT OUTPUT OK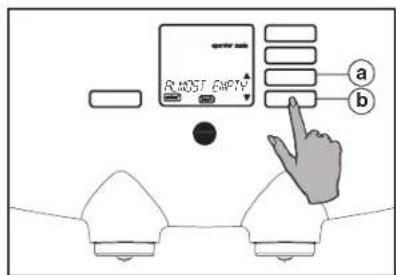
text_image
MOST EMPTY a b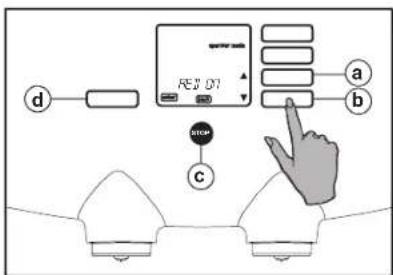
text_image
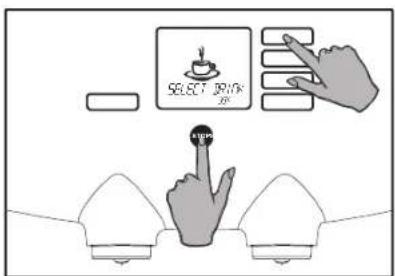
REQ 01 a b cFig. 65 Access to the operator menu Fig. 66 "ALMOST EMPTY" selection menu Fig. 67 Selecting "AED ON" or "AED OFF"
"Almost empty" Detection

In the operator menu, from the "ALMOST EMPTY" selection menu (fi g. 66), you can set the "ALMOST EMPTY" detection.
This signal indicates that an ingredient pack is almost empty, so you can thaw out in time a new pack.
The dispenser then shows a symbol in the display when an ingredient pack is "almost empty." Place a new pack in the refrigerator to defrost, when this symbol is shown. So the pack will be ready for exchange, when it is completely empty.
- Activate the operator menu.
- Use the scroll buttons until the option "ALMOST EMPTY" appears in the display (fi g. 66 a or b).
- Press the enter button (fi g. 67 d). The display shows the option selected (fi g. 67).
- With the scroll buttons choose "AED ON" or "AED OFF" (fi g. 67 a or b) [AED = Almost Empty Detection].
- Press the enter button (fig. 67 d) to confirm the setting.
- Then press the stop button (fi g. 67 c) to end the programming.
ATTENTION!
Only when the "ALMOST EMPTY" detection is set the question if it is a new pack appears in the display, while placing an ingredient pack.
-
Press the enter button to confirm if a new pack is placed.
-
Do nothing if the former pack is replaced. The question disappears automatically from the display.
If also the option "SMALL PACK" is set, the question if it is a small pack appears in the display too, after the confirmation of a new pack.
-
Press the enter button if a small pack is placed.
-
Do nothing if a large pack is placed. The question automatically disappears from the display.

text_image
SELECT OUTPUT OK
text_image
a b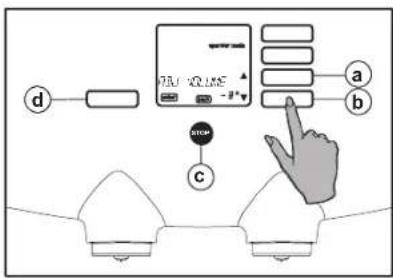
text_image
7.5V 20.15E -3.4 a b cFig. 68 Access the operator menu Fig. 69 Selection menu "ADJ VOLUME" Fig. 70 Set +/- number %
Volume setting (optional)
You want to adjust the volume, for instance for an other coffee or tea set.
In the operator menu, from the "ADJ VOLUME" selection menu, you can adjust the volume per cup by increasing or decreasing the quantity of water by a maximum of 10%, in steps of 1%.

Caution!
The volume adjustment concerns (Fig. 70). drinks and the hot water.
- Activate the operator menu (fi g. 68), see also § "Access the operator menu" (fi g. 27).
- The display shows: operator mode, "COUNTER READ", scroll arrows ♦, enter and back (fi g. 28).
- Use the scroll buttons (fi g. 69 a or b) until the option "ADJ VOLUME" shows in the display.
-
Press the enter button (fi g. 70 d). The display shows the number of percent that is ncerse (fi g. 70).
-
With the scroll buttons ♦(fi g. 70 a or b), select the desired volume adjustment.
- Press the enter button (fig. 70 d) to confirm the setting.
- Then press the stop button (fi g. 70 c) to end the programming.
- Check the quantity by dispensing a cup of drink.

text_image
SELECT PRINT +0%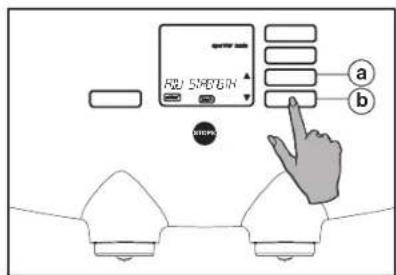
text_image
ADD SMOB a b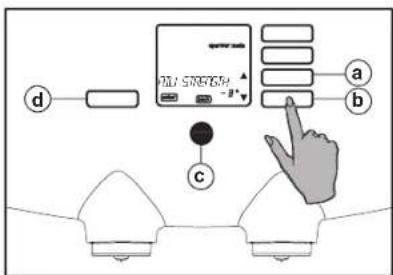
text_image
d 701-5789764 -3° a b cFig. 71 Access the operator menu Fig. 72 Selection menu "SET STRENGTH" Fig. 73 Set +/- number %
Strength setting (optional)
You want a stronger or just a milder taste. In the operator menu, from the "ADJ STRENGTH" selection menu, you can adjust the strength of a cup by increasing or decreasing the quantity of ingredients with maximum 10%, in steps of 1%.
- Activate the operator menu (fi g. 71), see also § "Access the operator menu" (fi g. 27).
- The display shows: operator mode, "COUNTER READ", scroll arrows ♦ enter and back (fi g. 28).
- Use the scroll buttons (fi g. 72 a or b) until the option "ADJ STRENGTH" shows in the display.
-
Press the enter button (fi g. 73 d). ns all The display shows the number of percent that is set (fi g. 73).
-
With the scroll buttons ♦(fi g. 73 a or b), select the desired strength adjustment.
- Press the enter button (fig. 73 d) to confirm the setting.
- Then press the stop button (fig. 73 c) to end the programming.
- Check the strength by dispensing and taste a cup of drink.

Caution!
drinks.
The strength adjustment concerns all The display shows the number of percent that is set (fi g. 73).
text_image
SELECT DRINK 30°F
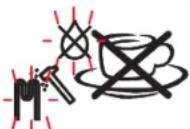
flowchart
graph TD
    A["DESCALER"] --> B["User icon +"]
    A --> C["Mask icon +"]
    A --> D["Hand gesture +"]
    A --> E["Cross icon +"]
Fig. 74 Descaling warning Fig. 75 Safety precautions
Descaling the dispenser
During use, scale deposits occur in the dispenser. The unit is equipped with a descaling warning system. This is activated after a specific number of liters of water have passed through the unit.
When the descaling symbol (fi g. 74) is displayed this program must start shortly afterwards. Otherwise the dispenser will be deactivated after some time.
The descaling procedure lasts approx. 45 minutes.

Caution!
- Descale the dispenser as soon as possible, when the descaling pictogram is displayed.
Before descaling the dispenser, read the operator manual and the recommendations on the sachet of the descaling agent. - Use only descaling agents suitable for the coffee dispenser.
- Always wear suitable face protection and protective gloves when using the cleaning agent and/or descaling agent. Wash your hands after using these agents.

text_image
SELECT WITH a c
text_image
d JESOPPLE a b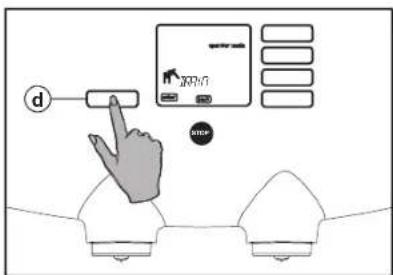
text_image
d JN10 STOPFig. 76 Access to the operator menu Fig. 77 Scrolling in the selection menu Fig. 78 Starting the descaling program
Start descaling program (Optional)
For a explanation of the terms in the display and the associated buttons, see also § "Access to the operator menu" (fi g. 27).
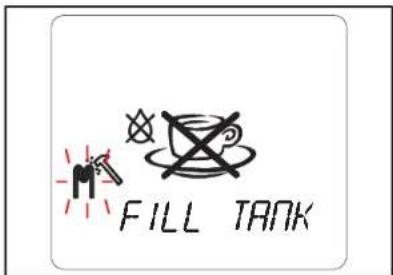
For the model without a fixed water connection the removable water tank must be filled a number of times during the descaling process. Fill the tank when the "FILL TANK" symbol (fi g. 84) shows in the display.
During descaling, if the bucket is in danger of overflowing, the program can be interrupted by pressing the stop button (fi g. 76 c). The bucket can then be emptied. Press the stop button again to continue.
The program can not be aborted while it is running and must thus be run to completion.
- Wear suitable face protection and protective gloves.
- Activate the operator menu (fi g. 76), see also § "Access the operator menu" (fi g. 27).
-
The display shows: operator mode, "COUNTER READ", scroll arrows ♦, enter and back.
-
Use the scroll buttons until the option "DESCALE" appears in the display (fi g. 77 a or b).
- Press the enter button (fi g. 78 d). The display shows: "ARE YOU SURE?".
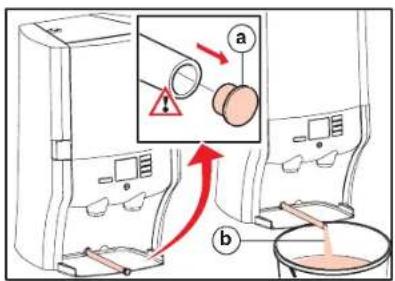
- Press the enter button again (fi g. 78 d). The display shows: "DRAIN" + 📋 (fi g. 78).
- Remove the drip tray.
- Slide the dispenser forwards slightly and place a bucket with a capacity of at least 12 liters/3.17 gallons underneath.
text_image
Diagram illustrating a chemical reaction or filtration process with labeled components and directional arrows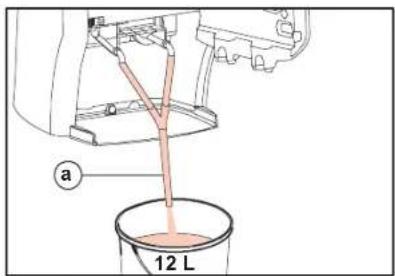
text_image
a 12 L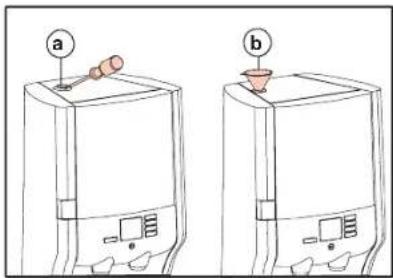
text_image
Diagram showing two devices labeled a and b with a sensor or probe inserted, likely illustrating a device's internal structure or testing setup.Fig. 79 Draining Fig. 80 Hose set on beverage outlets Fig. 81 Cap/funnel in descaling opening
- Pull the drain hose approx. 12 inch (30 cm) out of the rear wall and put the end in the bucket (fi g. 79).

Caution!
hose is hot!
- Remove the cap from the drain hose and allow the hot water to flow into the bucket (fi g. 79 a and b).
- Refi t the cap on the drain hose when no more water comes out of the hose (approx. 2.5 liter).
- After draining, empty the bucket!
- Press the enter button (fi g. 78 d). The display shows:

- Remove the ingredient packs and place them in a refrigerator temporarily.
- With the model with removable water tank, the display shows: "EMPTY TANK".
- Empty the water tank and press the The water coming out of the drain enter button (fi g. 78 d).
-
The display shows: "PLACE HOSE".
-
Slide the hose set supplied onto both beverage outlets (fi g. 80 a).
-
Put the end of the hose in the bucket.
-
Press the enter button (fi g. 78 d). The display shows: "0.5 L RENEGIT".
-
Dissolve 100 g Renegite in 0.5 liter warm water (40 °C / 104 °F).
- With the model with a removable water tank:
- Carefully pour the descaling solution into the water tank and continue from step 24.
-
Using an adaptor, remove the cap from the descaling opening (fi g. 81 a).
-
Place the funnel supplied in the opening (fi g. 81 b).
-
Pour the descaling solution through the funnel into the filler opening.
-
Remove the funnel and refi t the cap to the descaling opening.
-
Press the enter button (fi g. 78 d). The display shows: "PLEASE WAIT" +
-
The descaling program starts!
-
The dispenser is descaled automatically. The rinsing water now flows through the hose set into the bucket (approx. 12 l).

natural_image
Line drawing of a coffee maker with a glass stand and coffee cup (no text or symbols)Fig. 82 Place a pot under the outlet
text_image
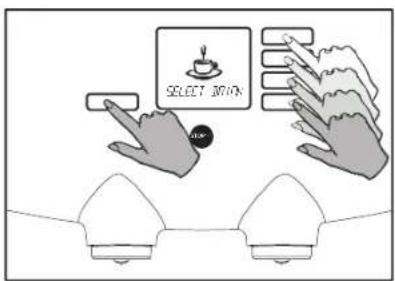
SELECT NOWFig. 83 Check the operation
text_image
FILL TANKFig. 84 Water tank empty, fill the tank

Caution!
Press the stop button (fi g. bucket is in danger of overfl owing!
- Empty the bucket.
Press the stop button again continue the descaling program.
• With the model with a removable water tank:
- When the "FILL TANK" symbol (fig. 84) shows in the display for the first time, fl ush the water tank thoroughly with warm water to remove all the descaling residue.
- Fill the tank with clean water.
Thereafter, fill the tank whenever the "FILL TANK" symbol shows in the display.
- When the descaling program has 76 d) if the completed, the display shows: "DRAIN".
- Empty the bucket.
- Remove the cap from the drain hose and allow the water to flow into the bucket (fi g. 79).
- Refi t the cap on the drain hose when no more water comes out of the hose (approx. 2.5 l).
- Push the drain hose back into the rear wall.
- Press the enter button (fi g. 78 d). The display shows:
"REPLACE PACK"

- Place the ingredient packs back in the cooling compartment, the display shows a cup.
- Press the enter button again (fi g. 78 d). The display fi rst shows: "PLEASE WAIT" and after that
- The boiler will be filled with water. If the water reaches the right temperature the thermometer will disappear from the display and will show "SELECT DRINK".
- Place a pot under the outlet (fi g. 82).
- Check the operation of the dispenser by pressing a selection button once and the hot water button once (fi g. 83).
The dispenser is now ready for use again.
natural_image
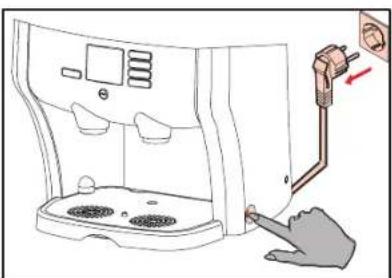
Illustration of a hand inserting a plug into a device with a red arrow indicating insertion (no text or symbols present)Fig. 85 Switching the dispenser off/on
natural_image
Technical line drawing of a mechanical device with internal components and mounting base (no text or symbols)Fig. 86 Removing/replacing ingredient pack

text_image
Caution! Check the use-by date. Check the pack is fully defrosted.Fig. 87 Pay attention to the use-by date
Putting the dispenser into service after storage / Storing the dispenser
Carry out the following steps when you want to put the dispenser back into service after an extended period:
- Ensure that the ingredient packs are ready in the cooling compartment.
- Carry out the manual and automatic cleaning procedures, see § Cleaning (fi g. 29).
- Any ingredient packs that were removed earlier can be used again, provided that the use-by date has not expired. Check the use-by date.
- Place a pot under the outlet and check the operation of the dispenser by dispensing hot water and each drink once.
Carry out the following steps when you do not want to use the dispenser or want to put it in storage for an extended period:
- Carry out the manual and automatic cleaning procedures, see § Cleaning (fi g. 35).
- Remove the ingredient packs (fi g. 86).
- Check the use-by dates of the ingredient packs before storing them in a refrigerator (fi g. 87).
-
Drain all the water out of the dispenser with the drain hose, see the section "Draining the dispenser" (fi g. 22)
-
Switch the dispenser off and pull the plug out of the power outlet (fi g. 85).
- Leave the door slightly open.
Display messages and troubleshooting
| Display message Meaning Cause Action | ||||
 | The icon "replace right-hand ingredient pack (coffee)" shows in the display. | The right-hand ingredient pack is:empty;incorrectly fitted;or not present. | Replace the empty ingredient pack.Check that the ingredient pack is correctly positioned and reposition it again according to the instructions on the ingredient pack. | |
 | The icon "replace left-hand ingredient pack" shows in the display. | The left-hand ingredient pack is:empty;incorrectly fitted;or not present. | Replace the empty ingredient pack.Check that the pack is correctly positioned and reposition it again according to the instructions on the ingredient pack. | |
 | The icon "replace left and right-hand ingredient pack" shows in the display. | The left and right-hand ingredient pack is:empty;incorrectly fitted;or not present. | Replace the empty ingredient packs.Check that the ingredient packs are correctly positioned and reposition them again according to the instructions on the coffee pack. | |
 | Optional:The icon "right-hand (coffee) ingredient pack almost empty" shows in the display. | The right-hand (coffee) pack is almost empty. | Place a new pack in the refrigerator to defrost. | |
 | Optional:The icon "left-hand ingredient pack almost empty" shows in the display. | The left-hand ingredient pack is almost empty. | Place a new pack in the refrigerator to defrost. | |
| Display message Meaning Cause Action | |||
 Pt Pt | A fl ashing thermometer shows in the display.When a selection button is pressed, the text “PLEASE WAIT” is also shown. | The water in the boiler is not yet at the correct temperature. | The dispenser is deactivated until the temperature has reached the value set. |
 50° 50° | A temperature value (°C of °F) shows in the display. | The temperature in the cooling compartment can not be maintained at 2 - 5 °C or 35.6 - 41 °F. | Check that the cooling compartment door is properly closed.Check whether the temperature of the coffee pack is considerably higher than 2 - 5 °C or 35.6 - 41 °F (also check that the pack is not frozen).Place a properly precooled coffee pack in the cooling compartment.Check whether there is clearance for ventilation at the rear side of the dispenser.Remove the fi lter grid at the back of the dispenser and clean the fi lter if it is dirty.Give the dispenser time to cool, the signal disappears then automatically. |
 | The icon “OUT OF ORDER” with info no. 20 shows in the display. | The water supply is blocked or the tap is not open. | Check the water supply and then press the power switch twice to reset the dispenser.Contact the service provider if the signal does not disappear. |
 TROUGH ERROR TROUGH ERROR | The icon “TROUGH ERROR” shows in the display. | The trough is not present or is not properly latched. | Position the trough and lock it. Press the trough upward until it clicks in position. |
 OUT OF ORDER 43 OUT OF ORDER 43 | The icon “OUT OF ORDER” with an info number shows in the display. | A specific failure has occurred. Contact the service provider.Report the info number of the failure. | |
 | The icon “CLEAN” shows in the display. | The dispenser must be cleaned.Read the section “CLEANING - Automatic, periodic cleaning procedure” for details. | Carry out the automatic, periodic cleaning procedure. |
| SWITCHED OFF 1000 | All dispenser functions except the cooling, are "SWITCHED OFF". | All dispenser functions, except the cooling, are switched off. | Switch the dispenser on at the power switch. |
| The display is off. The power supply has been interrupted. | Check the supply plug.Check the power supply (earth leak switch or fuse). | ||
Display messages and troubleshooting when using model with removable water tank
| Display message Meaning Cause Action | |||
 NO WATER NO WATER | The icon “NO WATER” shows in the display. | The water tank contains too little or no water, is incorrectly positioned or not present. | Fill the water tank with fresh water.Check that the water tank is correctly positioned |
 FILL TANK FILL TANK | The icon “FILL TANK” shows in the display. | The water tank contains too little or no water, is incorrectly positioned or not present. | Fill the water tank with fresh water.Check that the water tank is correctly positioned. |
Quick reference
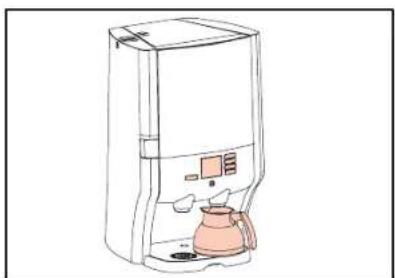
Serve a drink and hot water

text_image
① Only with removable water tank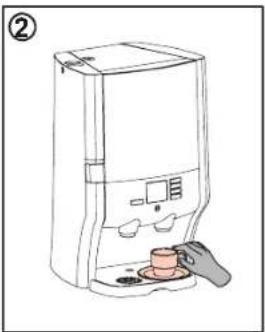
natural_image
Line drawing of a hand holding a small object near a digital water dispenser (no text or symbols)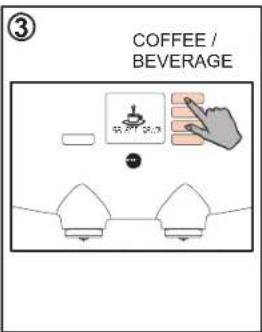
text_image
③ COFFEE / BEVERAGE
natural_image
Line drawing of a modern water dispenser with a coffee cup and control panel (no text or symbols)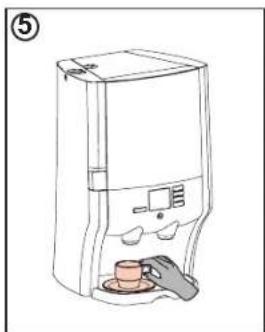
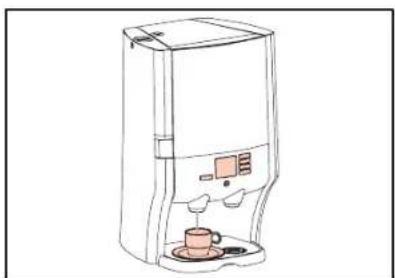
natural_image
Line drawing of a modern coffee maker with a coffee cup and control panel (no text or symbols)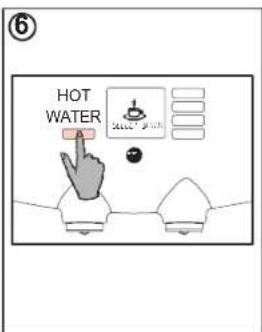
text_image
HOT WATER
natural_image
Line drawing of a coffee maker with a cup and two cups, no text or symbols presentDaily cleaning
natural_image
Line drawing of a microwave oven with a hand pointing to the lid (no text or symbols)Safety
- Switch the dispenser OFF.

natural_image
Illustration of a kitchen appliance with a brush and bowl, showing a kitchen setup (no text or symbols)Clean the components
- Remove the drip tray.
- Clean the drip tray.
- Replace the drip tray.

natural_image
Technical illustration of a mechanical device with exploded view and assembled view (no text or symbols)- Open the door and remove the trough (see 5, periodic cleaning)
- Remove the trough cover.
- Clean both parts
- Replace the clean trough.

natural_image
Simple line drawing of a cleaning or cleaning device with a pink cloth and a gray tool, no text or symbols present.Take into use
- Clean the exterior with a clean damp cloth
- Switch the dispenser ON.
Periodic cleaning
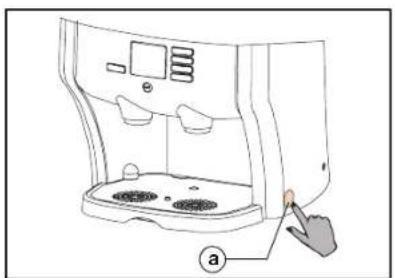
text_image
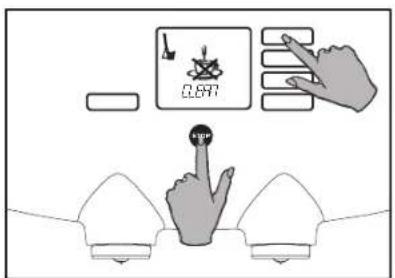
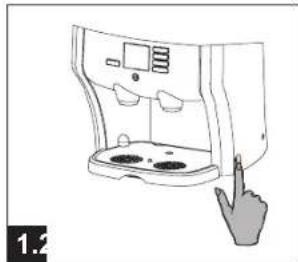
SELECT DRIVE a 1.2Access the menu
- Keep the stop button pressed.
- Press the selection button (a) until OPERATOR MODE appears in the display.

text_image
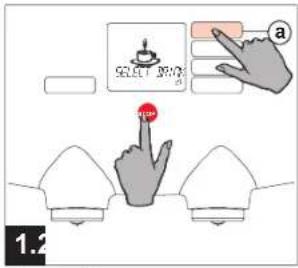
Diagram showing a device interface with labeled components and a hand pointing to a button, likely illustrating a measurement or control system.Start cleaning
- Press (b) until CLEAN appears in the display.
- Press (c) enter 2x, follow the instructions in the display.

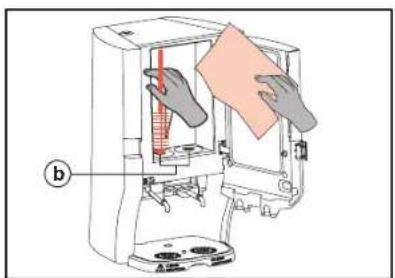
natural_image
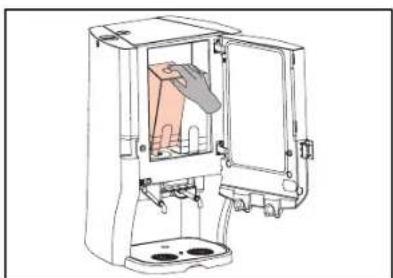
Technical line drawing of a mechanical device with internal components and a hand holding a red rod (no text or symbols)Cooling compartment
- Open the door.
- Remove the ingredient packs.
- Clean the openings with water and a brush.
natural_image
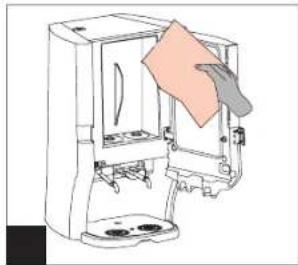
Line drawing of a kitchen appliance with a hand cleaning the interior (no text or symbols)Cooling compartment
- Clean the interior with a clean damp cloth.
- Press the enter button (c).
- Replace both packs.

text_image
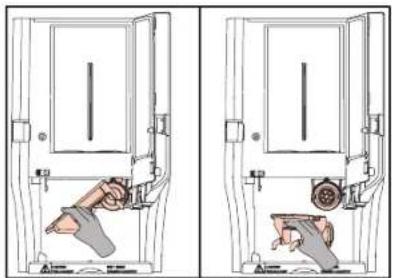
5.65.6
Remove the trough
- Move the red slide to the left.
- Rotate the trough downward and take it out the dispenser.
natural_image
Diagram showing a device with internal components and a brush applying material to a small mechanical component (no text or symbols present)Clean the trough
- Remove the trough cover.
- Clean both parts.
- Replace the clean trough.
natural_image
Illustration of a hand holding a brush next to a cleaning tool, with no visible text or symbols.Water tank (option)
- Rinse the water tank.
- Clean the interior of the water tank.
- Replace the water tank.

text_image
Caution! Rinsing water is hot!Flushing
- Position a pot underneath the right-hand outlet.
- Press (c) enter 2x.
● The dispenser is ready for use.
Specifications
| Dispenser Dimensions (H) 675 mm / 26 | 6 inch x (W) 420 mm / 16.5 inch x | (D) 400 mm / 15.7 inch |
| Weight | Weight empty: 26.5 kg, filled with water and 2 packs: 31.5 kg / 33.5 kg (with separate water tank) | |
| Dispensing points Dispensing Hot water | (left), coffee and/or other drinks (e.g. cappuccino) (right) | |
| Cup capacity | Adjustable 40 - 999 ml / 1.2 - 30.4 fl oz (factory setting = 1.25 ml / 3.75 fl oz) | |
| Cup dispensing time 9 - 10 seconds | (125 ml / 3.75 fl oz) | |
| Decanter capacity | Adjustable 40 - 999 ml / 1.2 - 30.4 fl oz (factory setting = 900 ml / 30.4 fl oz) | |
| Decanter dispensing time ± 45 seconds | ||
| Time interval between two decanters | 120 sec. (230 V) / 188 sec. (120 V) / 228 sec. (110 V) | |
| Maximum cup/decanter height 132 mm / 5.20 inch | ||
| Power supply 120 – 230 V 50 / 60 Hz | ||
| Power consumption (fixed) 2.1 kW – 230 V / 1.7 kW – 120 V | ||
| Capacity | 160 cups per hour at 230 V (± 20 liter p/h)116 cups per hour at 120 V (± 14.5 liter p/h)100 cups per hour at 100 V (± 12.5 liter p/h) | |
| Environment | Temperature | 1 °C – 32 °C (34 °F – 90°F) for both operation and storage |
| Humidity | Up to 80% RH | |
| Cooling compartment | Capacity | 2x 1.25 liter / 43/2 fl oz |
| Temperature | 2 °C – 5 °C (35.6 °F – 41 °F) | |
| International boiler | Capacity | 2.25 liter / 76.1 fl oz |
| Temperature range | Adjustable between 83 °C – 97 °C (181.4 – 206.6 °F) | |
| Cold water supply | Removable cold water tank, capacity 2.9 liter / 98.1 fl oz or a fixed water connection | |
| Standard accessories | Insulated 900 ml / 30.4 fl oz coffee decanter (extra decanters can be supplied) | |
Subject Index
A
AED, 28
Almost Empty setting, 28
Almost Empty Detection, 28
B
Beverage outlets, 18
Bucket, 32
C
Capacity, 43
Cleaner, 20
Cleaning, 18
Cleaning frequency, 20
Cleaning program, 20-23
Clock setting, 24
Coffee, 36, 43
Coffee pot, 11
Continuous dispensing, 10, 12
Cooling compartment, 9, 43
Cooling system, 7
Counter readings, 16
D
Daily cleaning, 18-19
Date, 24
Decaffeinated coffee, 1
Descaling, 31
Descaling opening, 33
Descaling program, 32
Descaling warning, 31
Dimensions, 43
Dishwasher, 19, 23
Dispensing, 10-12
Dispensing spout, 9
Display messages, 36-39
Display pictograms, 5
Drain hose, 13
Draining, 13, 33
Drinking water, 3, 8
Drip tray, 2, 18
E
Electricity, 3
Expiration date, 3
F
Failures, 37-38
Filling, 8
Funnel, 33
H
Hot water, 12
Humidity, 43
1
Important parts, 4
Ingredient packs, 1, 3, 4
L
Language setting, 26
M
Milk, 1
Moving, 13-14
0
Operating panel, 6
Operation, 2
Operator menu, 15
P
Periodic cleaning, 20-23
Pot button, 11
Power supply, 43
Programming, 15
Programming buttons, 6
R
Refrigerator, 2, 3
Renegite, 33
Replace, 9
s
Safety instructions, 2-3
Specifications, 43
Storage, 35
Strength setting, 30
Surrounding temperature, 2
Switch on, 7
Switching off, 7
T
Tap, 3
Taste, 30
Text setting, 27
Time, 24
Troubleshooting, 36-39
Trough, 4, 19, 23, 38
U
Use, 7-12
Use-by date, 9
V
Ventilation, 2
Volume setting, 29
W
Water filter, 3
Weight, 43