
DV 7120 - Tumble dryer BEKO - Free user manual and instructions
Find the device manual for free DV 7120 BEKO in PDF.


| Product Type | Tumble Dryer |
| Brand | Beko |
| Model | DV 7120 |
| Drying Type | Vented |
| Height (adjustable) | 85.0 cm |
| Width | 59.5 cm |
| Depth | 54 cm |
| Capacity (max.) | 7 kg |
| Net Weight | 31 kg |
| Voltage | 220-240 V ~ 50 Hz |
| Fuse Protection | 16 A |
| Drying Programs | Cottons, Synthetics, Mini, Shirts, Jeans, Delicates, Freshen Up, Timer (10/20/40/60 min) |
| Anti-creasing Function | Yes (2 hours) |
| Child-proof Lock | Yes |
| Filter Cleaning Warning | Yes |
| Cancel Audio Warning | Yes |
| Lint Filter | Clean after each cycle |
| Humidity Sensor | Yes (clean 4 times/year with vinegar) |
| Adjustable Feet | Yes (front feet) |
| Under Counter Installation | Yes (with special part no. 2959700100) |
| Mounting Over Washing Machine | Yes (with bracket part no. 2962800100/2962800200) |
| Recommended Spin Speed | 1200-1000 rpm for cottons |
Frequently Asked Questions - DV 7120 BEKO
User questions about DV 7120 BEKO
0 question about this device. Answer the ones you know or ask your own.
Ask a new question about this device
Download the instructions for your Tumble dryer in PDF format for free! Find your manual DV 7120 - BEKO and take your electronic device back in hand. On this page are published all the documents necessary for the use of your device. DV 7120 by BEKO.
USER MANUAL DV 7120 BEKO
natural_image
Simple geometric diagram with a circle inside a rectangle, no text or symbols present2960310368_BG/090914.0925
natural_image
Hand holding a cylindrical mechanical component with an arrow pointing to it (no text or symbols visible)
natural_image
Line drawing of a hand holding a car, showing the wheel and seat area (no text or symbols)


natural_image
Pure mechanical diagram showing a circular component and zigzag lines without any text, numbers, or symbolsnatural_image
Diagram showing a mechanical setup with a rotating component and curved lines, no text or symbols present.natural_image
Illustration of a washing machine with a bucket being inserted, showing internal components (no text or symbols)natural_image
Line drawing of two fingers interacting with a lock icon (no text or symbols)natural_image
Line drawing of a hand using a tool to clean or install a car tire (no text or symbols)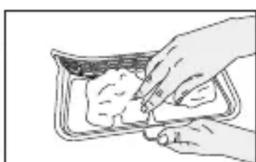
natural_image
Line drawing of a hand placing food into a container (no text or symbols)natural_image
Line drawing of a hand cleaning a microwave oven with a grater (no text or symbols)natural_image
Hand holding a cylindrical mechanical component with an arrow indicating direction (no text or symbols)
natural_image
Line drawing of a hand holding a car interior with a curved arrow indicating motion (no text or symbols)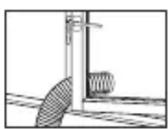


natural_image
Pure mechanical diagram showing a circular component with arrows indicating motion, no text or symbols presentnatural_image
Diagram of a mechanical assembly with rotating components and directional arrows (no text or symbols)- Otpustite nožicu rukom.
- Podešavajte nogu dok vaš proizvod ne bude stajao ravno i čvrsto na podu.
i Ne koristite bilo kakve alate da biste otpustili prilagodljive noge, inače se one mogu oštetiti.
Nikada ne prilagođavajte prilagodljive noge s njihovih kućišta.
i Možete nabaviti 2 plastična dijela iz ovlaštenog servisa s brojem artikla 2951620100. To će spriječiti da se vaš stroj kliže kad se nalazi na mokrim i klizavim površinama. Možete postaviti spomenute dijelove na prednje podesive nožice tako da ih postavite i pritisnete dok ne sjednu na prednje nožice.
Elektroinstalacija
natural_image
Illustration of a washing machine with a basket containing various household items, no text or symbols present.⚠ Pridržavajte se informacija iz "Tablice za izbor programa". Uvijek uključujte program u skladu s maksimalnim kapacitetom punjenja.
i Ne preporučuje se dodavanje rublja u uređaj
natural_image
Line drawing of two fingers interacting with a lock, no text or symbols presentnatural_image
Four-step line drawings showing hand tool application on a device, including top-down view and close-up of tool path (no text or symbols)Slika 1

natural_image
Illustration showing two steps: adding a fan to a cooking pot and adding food into a container (no text or symbols present)Slika 2
Za čišćenje filtra:
- Skinite poklopac
2.a) Ako se filtar poklopca može otvoriti kako je prikazano na Slici 1, izvadite filtar tako da ga povučete gore i otvorite filtar.
2.b) Ako je filtar poklopca uređaja onakav kako je prikazano na Slici 2, uklonite filtar tako da ga povučete gore. - Očistite nakupine, vlakna i ostatke pamuka na filtru i u kućištu filtra rukom ili mekom krpom.
- Zatvorite filtar i stavite ga nazad na mjesto.
Do začepljenja može doći na površini filtra nakon nekog vremena uporabe vašeg stroja; ukoliko se to još dogodi, operite filtar vodom i osušite ga prije ponovne uporabe.
Senzor (modeli sa senzorom)
natural_image
Illustration of a hand inserting a fan into a washing machine (no text or symbols visible)- Otvorite vrata za punjenje sušilice.
- Pustite da se uređaj ohladi ako je sušeno u njemu.
- Obrišite metalne senzore mekom krpom natopljenom octom i osušite ih.
i Čistite metalne senzore 4 puta godišnje.
⚠ Nikada ne koristite otapala, sredstva za čišćenje ili slične tvari kod čišćenja, jer ti materijali mogu uzrokovati požar i eksploziju!
Read this manual prior to initial operation of the product!
Dear Customer,
We hope that your product, which has been manufactured in modern facilities and passed through a strict quality control procedure, will give you very good results.
We advise you to read through this manual carefully before using your product and keep it for future reference.
This User Manual will
- Help you use your machine in a fast and safe way.
- Read the User Manual before installing and starting your product.
- In particular, follow the instructions related to safety.
- Keep this User Manual within easy reach for future reference.
- Please read all additional documents supplied with your product.
Remember that this User Manual is also applicable for several other models.
Explanation of symbols
Throughout this User Manual the following symbols are used:

Important safety information. Warning for hazardous situations with regard to life and property.
Caution; Warning for supply voltage.


Caution; Warning for fire hazard.

Caution; Warning for hot surfaces.

Read the instructions.

Useful information. Important information or useful hints about usage.
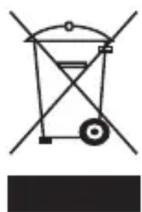
This appliance's packaging material is recyclable. Help recycle it and protect the environment by dropping it off in the municipal receptacles provided for this purpose. Your appliance also contains a great amount of recyclable material. It is marked with this label to indicate the used appliances that should not be mixed with other waste. This way, the appliance recycling organised by your manufacturer will be done under the best possible conditions, in compliance with European Directive 2002/96/EC on Waste Electrical and Electronic Equipment. Contact your town hall or your retailer for the used appliance collection points closest to your home. We thank you doing your part to protect the environment.
1 Important safety information
This section includes safety information that will help protection from risks of personal injuries or materialistic damages. Failure to follow these instructions shall cause any warranty and reliability commitment to become void.
General safety
- Never place the machine on a carpet-covered floor, otherwise, lack of airflow beneath the machine may cause electrical parts to overheat. This will cause problems with your machine.
- If the power cable or mains plug is damaged, you must call Authorised Service Agent for repair.
- The product should not be plugged in during installation, maintenance and repair works. Such works should always be made by the technical service. Manufacturer shall not be held responsible for damages arising from processes carried out by unauthorised persons.
- Connect the product to a grounded outlet protected by a fuse of suitable capacity as stated in the technical specifications table.
- Operate your product at temperatures between +5°C and +35°C.
- Do not use electrical devices in the product.
- Do not connect the air exit of the product to the chimney holes which are used for the exhaust fumes of the devices operating with gas or other types of fuel.
- You must provide enough ventilation in order to prevent gases exiting from devices operating with other types of fuels including the naked flame from accumulating in the room due to the back fire effect.
- Always clean the lint filter before or after each loading.
- Never operate your dryer without the lint filter installed.
- Do not allow fibre, dust and dirt accumulation around the exhaust exit and at adjacent areas.
- Power cable plug must be within easy reach after installation.
- Do not use extension cords, multi-plugs or adaptors to connect the dryer to power supply in order to decrease the risk of electric shock.
- Do not make any changes on the plug supplied with the product. If it is not compatible with the socket, have a qualified electrician change the socket with a suitable one.
- Items cleaned or washed with gasoil/fuel oil, dry-laundry solvents and other combustible or explosive materials as
well as the items that are contaminated or spotted with such materials should not be dried in the product since they emit flammable or explosive vapor.
- Do not dry items cleaned with industrial chemicals in the dryer.
- Do not dry unwashed items in the dryer.
- Items soiled with cooking oils, acetone, alcohol, fuel oil, kerosene, stain remover, turpentine, paraffin and paraffin removers must be washed in hot water with plenty of detergent before being dried in the dryer.
- Garments or pillows bolstered with rubber foam (latex foam), shower bonnets, water resistant textiles, materials with rubber reinforcement and rubber foam pads should not be dried in the dryer.
- Do not use fabric softeners and anti-static products unless they are recommended by the manufacturers of the fabric softener or the product.
- This product must be grounded. Grounding installation decreases the risk of electric shock by opening a path with low resistance for the electricity flow in case of a malfunction or failure. Power cable of this product is equipped with a conductor and a grounding plug that allows for grounding the product. This plug must be installed appropriately and inserted into a socket which is grounded in accordance with the local laws and regulations.
- Do not install the product behind a door with a lock, sliding door or a door that has a hinge against the hinge of the dryer.
- Do not install or leave this product in places where it will be exposed to outdoor conditions.
- Do not tamper with the controls.
- Do not perform any repair or part replacing procedures on the product even if you know or have the ability to perform unless it is clearly suggested in the operating instructions or the published service manual.
- Inside and exhaust duct of the product must be cleaned by the qualified service personnel periodically.
- Wrong connection of grounding conductor of the product can cause electric shock. If you have any suspect about the grounding connection, have it checked by a qualified electrician, service representative or service personnel.
- Do not reach into the machine when the drum is spinning.
- Unplug the machine when it is not in use.
- Never wash down the appliance with
water! There is the risk of electric shock! Always disconnect by unplugging from the mains before cleaning.
- Never touch the plug with wet hands. Never unplug by pulling on the cable, always pull out by grabbing the plug only. Do not operate the machine if the power cable or plug is damaged!
- Never attempt to repair the machine yourself, otherwise, you will be putting your life and others' lives in danger.
- For malfunctions that cannot be solved by following the information given in the safety instructions:
Turn off the machine, turn off and contact an authorised service agent.
- Do not stop the dryer before the drying cycle comes to an end unless you will remove all laundry from the dryer fast in order to lay them and dissipate the heat.
- Remove the door of the drying compartment before decommissioning or disposing of the product.
- The final step of the drying cycle (cool-down cycle) occurs without applying heat to ensure that the items are left at a temperature that will not damage them.
- Fabric softeners or similar products should be used as specified by the fabric softener instructions.
- Underwear that contains metal reinforcements should not be placed in a dryer. Damage to the dryer can result if metal reinforcements come loose during drying.
- Check all garments for forgotten lighters, coins, metal pieces, needles, etc. before loading.
- At times when your dryer is not in use or after the laundry is taken out following the completion of drying process, turn off by using the On/Off button. In cases when the On/Off button is on (while the dryer is energized), keep the door of the dryer closed.
Intended use
- This product has been designed for domestic use. It should not be used for other purposes.
- Use the product only for drying laundry that are marked accordingly.
- Dry only those articles in your product that are stated in this manual.
- This product is not intended to be used by persons with physical, sensory or mental disorders or unlearned or inexperienced people (including children) unless they are attended by a person who will be responsible for their safety or who will instruct them accordingly for use of the product.
Children's safety
- Electrical appliances are dangerous for the children. Keep children away from the machine when it is operating. Do not let them tamper with the machine.
- Packaging materials are dangerous to children. Keep the packaging materials out of reach of children or dispose them by classifying according to waste directives.
- Do not allow children sit/climb on or enter in the product.
- Children should be supervised to ensure that they do not play with the product.
- Close the loading door when you leave the area where the product is located.
2
Installation
Refer to the nearest Authorised Service Agent for installation of your product.
i Preparation of location and electrical installation for the product is under customer's responsibility.
Installation and electrical connections must be carried out by a qualified personnel.
⚠️Prior to installation, visually check if the product has any defects on it. If so, do not have it installed. Damaged products will cause risks for your safety.
Appropriate installation location
- Install the product in an environment which has no risk of freezing and is in a stable and level position.
- Operate your product in a well ventilated, dust-free environment.
- Do not block the air ducts in front of and under the product with materials such as long pile rugs and wooden bands.
- Do not place your product on a long pile rug or on similar surfaces.
- Do not install the product behind a door with a lock, sliding door or a hinged door which can strike the product.
- Once the product is installed, it should stay at the same place where its connections have been made. When installing the product, make sure that the rear wall of it does not touch anywhere (tap, socket, etc.) and also pay attention to install the product at a place where it will stay permanently.
Do not place the product on top of the power cable.
- Keep at least 1.5 cm distance to walls of other furniture.
Under counter installation
- A special part (Part no: 295 970 0100) replacing the top trim must be provided and installed by the Authorised Service Agent in order to use the machine under a counter or in a cupboard. It should never be operated without the top trim.
- Leave at least 3 cm of space between the side and rear walls of the product and the walls of the counter/cupboard when installing your product under a counter or in a cupboard.
Mounting over a washing machine
- A fitting device should be used between the two machines when installing above a washing machine. The bracket (Part no. 296 280 0100 white/296 280 0200 grey) must be installed by the Authorised Service Agent.
- Place the product on a firm floor. If it will be placed on top of a washing machine, the
approximate weight of both machines may reach 180 kg when they are full. Therefore, the floor must be capable of carrying the load on it!
Ventilation hose and connection (for products equipped with an outlet vent)
Ventilation hose allows exhaust air from inside the machine
Vented dryer has 1 air outlet.
Stainless sheet metal or aluminum pipes can be used instead of a hose. The pipe diameter should be minimum 10 cm.
Maximum hose and pipe lengths are given in the table below.
| Hose Pipe | ||
| Maximum length 4 m 5 m | ||
| 1 elbow 45° -1.0 m -0 | 3 m | |
| 1 elbow 90° -1.8 m -0 | 6 m | |
| 1 elbow 90° short -2.7 m | ||
| 1 wall passage -2.0 m | -2.0 m | |
i Each elbow and other passages should be subtracted from the maximum length stated above.
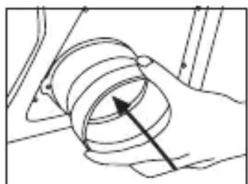
To connect a ventilation hose;
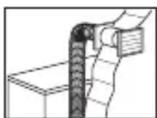
- Connect the air outlet hose to the hose spacer piece by turning it counterclockwise.
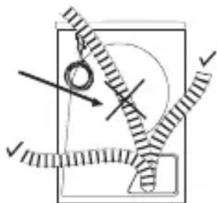
- Make the hose passages as shown below.
i Exhaust of humid air from the dryer into the room is inconvenient. It may damage the walls and furniture in the room.
The ventilation hose can be routed outdoors via a window or it can be connected to the air outlet in the bathroom.
Air outlet hose must be routed directly to the outdoors. There must be a limited number of elbows as not to hinder ventilation.
To prevent water accumulation in the hose, make sure that it is not folded on the floor.
natural_image
Hand holding a cylindrical mechanical component with an arrow indicating direction (no text or symbols)
natural_image
Diagram of a hand holding a car with a curved arrow indicating motion or force (no text or symbols)
natural_image
Pure mechanical diagram showing a circular component with arrows indicating direction, no text or symbols presentThe ventilation hose should not be
connected to the chimney of a stove or a fireplace.
Do not operate your product at the same time with heaters such as a coal or gas stove. Airflow may cause the chimney to flare up.
Adjusting feet
In order to ensure that your product operates more silently and vibration-free, it must stand level and balanced on its feet. Front feet of your product can be adjusted. Balance the machine by adjusting the feet.

natural_image
Simple line drawing of a mechanical component with rotational arrows indicating motion (no text or symbols)- Loosen the feet by hand.
- Adjust the feet until the product stands level and firmly on the floor.
Do not use any tools to loosen the adjustable feet, otherwise, they can be damaged.
i Never remove the adjustable feet from their housings.
You may supply 2 plastic pieces from an Authorized Service with 2951620100 part number. These parts prevent your machine from slipping when the machine locates on wet and slippery surfaces. You may assemble mentioned parts to the front adjustable feet by fitting and pressing them to snap into ground of feet.
Electrical connection
Connect the machine to a grounded outlet protected by a fuse of suitable capacity as stated in the technical specifications table. Our company shall not be liable for any damages that will arise when the machine is used on a circuit without grounding.
- Connection must comply with national regulations.
- If the current value of the fuse or breaker in the house is less than 16 Amps, have a qualified electrician install a 16 Amp fuse.
- Power cable plug must be within easy reach after installation.
- The voltage and allowed fuse or breaker protection are specified in the “Technical Specifications” section.
- The specified voltage must be equal to your mains voltage.
- Do not make connections via extension cables or multi-plugs.
- The main fuse and switches must have a contact distance of minimum 3 mm.
△ Damaged power cable must only be replaced by a qualified electrician.
⚠️If the product is faulty, it must not be operated unless it is repaired! There is the risk of electric shock!
First use
- To have the product ready for operation before calling the authorised service agent, make sure that its location and power supply installations are appropriate. If they are not, call a qualified electrician to have any necessary arrangements carried out.
- Make sure that the power connections of the product are in accordance with the instructions given in relevant chapters of this manual.
Disposing of packaging material
Packaging materials are dangerous to children. Keep packaging materials in a safe place out of reach of children. Packaging materials of your product are manufactured from recyclable materials. Sort and dispose of them in accordance with recycled waste instructions. Do not dispose of them with normal domestic waste.
Transportation of the machine
- Unplug the machine from the mains.
- Remove the water drain (if any) and chimney connections.
- Drain water remained in the machine completely before transportation.
Disposing of the old machine
Dispose of your old machine in an environmentally friendly manner. Refer to your local dealer or solid waste collection centre in your area to learn how to dispose of your machine.
Before disposing of your old machine, cut off the power cable plug and make the loading door lock unusable to avoid dangerous conditions to children.
Technical Specifications
EN
| Height (adjustable) 85.0 cm | |
| Width 59.5 cm | |
| Depth 54 cm | |
| Capacity (max.) 7 kg | |
| Weight (net) 31 kg | |
| Voltage | See type labelRated power input |
| Model code |
Type label is located behind the loading door.
3 Initial preparations for drying
Things to be done for energy saving:
- Make sure that you operate the product at its full capacity but pay attention to not exceeding it.
- Spin your laundry at the highest speed possible when washing them. Thus, the drying time is shortened and energy consumption is decreased.
- Pay attention to dry same types of laundry together.
- Follow the instructions in the user manual for programme selection.
- Make sure that sufficient clearance is provided at the front and rear side of the dryer for air circulation. Do not block the grill at the front side of the product.
- Do not open the door of the machine during drying unless necessary. If you must certainly open the door, pay attention not to keep it open for a long time.
- Do not add new (wet) laundry during drying.
- Lint and fibres released from the laundry to the air during the drying cycle are collected in the “Lint Filter”. Make sure that you clean the filters before or after each drying.
- In models with condenser, make sure that you clean the condenser regularly at least once every month or after every 30 drying cycles.
- In vented models, follow the chimney connection rules in the user manual and pay attention to the chimney cleaning.
- Ventilate the room, where the dryer is located, well during drying.
- “For power saving in models with lamps, at times when your dryer is not in use, keep the door closed if the On/Off button is pressed (if the dryer is energized).”
Laundry suitable for drying in the machine
i Always follow the suggestions on the laundry labels. Dry only the laundry having a label stating that they are suitable for drying in a dryer and make sure that you select the appropriate programme.

Laundry unsuitable for drying in the machine
- Laundry items with metal attachments such as belt buckles and metal buttons can damage your dryer.
- Do not dry items such as woollens, silk garments and nylon stockings, delicate embroidered fabrics, laundry with metal accessories and items such as sleeping bags in the dryer.
- Laundry made of delicate and valuable fabrics as well as lace curtains can be creased. Do not dry them in the dryer!
- Do not dry items made of hermetic fibres such as pillows and quilts in the dryer.
- Laundry made of foam or rubber will be deformed.
- Do not dry laundry containing rubber in the dryer.
- Do not dry laundry exposed to petroleum, oil, combustible or explosive agents in the dryer even if they are washed beforehand.
- Overly wet laundry or laundry with dripping water must not be put into the dryer.
- Items cleaned or washed with gasoil/fuel oil, dry-laundry solvents and other combustible or explosive materials as well as the items that are contaminated or spotted with such materials should not be dried in the product since they emit flammable or explosive vapor.
- Do not dry items cleaned with industrial chemicals in the dryer.
- Do not dry your unwashed laundry in the dryer.
- Items soiled with cooking oils, acetone,
alcohol, fuel oil, kerosene, stain remover, turpentine, paraffin and paraffin removers must be washed in hot water with plenty of detergent before being dried in the dryer.
- Garments or pillows bolstered with rubber foam (latex foam), shower bonnets, water resistant textiles, materials with rubber reinforcement and rubber foam pads should not be dried in the dryer.
- Do not use fabric softeners and anti-static products unless they are recommended by the manufacturers of the fabric softener or the product.
- Do not dry the underwear reinforced with metal parts in the dryer. If these metal reinforcements loosen and break during drying, they will damage your dryer.
Preparing laundry for drying
- Check all laundry items before loading them into the product to make sure that there are no lighters, coins, metal items, needles and etc. in their pockets or on any part of them.
- Fabric softeners and similar products must be used in accordance with the instructions of the manufacturer of the relevant products.
- All laundry must be spun at the highest spin speed that your washing machine allows for the laundry type.
- Laundry may be tangled after washing. Separate your laundry before placing them into your dryer.
- Sort your laundry according to their types and thicknesses. Dry the same type of laundry together. E.g.: fine kitchen towels and table cloths dry faster than the thick bath towels.
Correct load capacity

natural_image
Illustration of a microwave oven with a basket containing various household items (no text or symbols)⚠️Consider the information in the “Programme Selection Table”. Always start the programme in accordance with the maximum load capacity.
i Adding laundry to the machine more than the level shown in the figure is not recommended. Drying performance will degrade when the machine is overloaded. Furthermore, your dryer and your laundry can be damaged.
Place your laundry into the drum loosely so that they will not get tangled.
Large pieces (E.g.: bed sheets, quilt covers, large tablecloths) may bunch-up. Stop the dryer 1-2 times during drying process to separate bunched-up laundry.
Following weights are given as examples.
| Home articles | Approximate weights (g) |
| Cotton quit covers (double) 1500 | |
| Cotton quit covers (single) 1000 | |
| Bed sheets (double) 500 | |
| Bed sheets (single) 350 | |
| Large tablecloths 700 | |
| Small tablecloths 250 | |
| Tea napkins 100 | |
| Bath towels 700 | |
| Hand towels 350 | |
| Garments | Approximate weights (g) |
| Blouses 150 | |
| Cotton shirts 300 | |
| Shirts | 200 |
| Cotton dresses | 500 |
| Dresses | 350 |
| Jeans | 700 |
| Handkerchiefs (10 pieces) | 100 |
| T-Shirts | 125 |
Loading
- Open the loading door.
- Place laundry items loosely into the dryer.
- Push the loading door to close. Ensure that no items are caught in the door.
4 Selecting a Programme and Operating Your Machine
Control panel

1. Filter cleaning warning light
Warning light turns on when the filter is full.
2. Program follow-up indicator
Used to follow-up the progress of the current programme.
3. Cancel audio warning
Used to cancel the audio warning given at the end of the programme.
4. On/Off button
Used to turn on and off the machine.
5. Programme selection knob
Used to select a programme.
6. Start/Pause/Cancel button
Used to start, pause or cancel the programme.

Preparing the machine
- Plug in your machine.
- Place the laundry in the machine.
- Press the "On/Off" button.
i Pressing the “On/Off” button does not necessarily mean that the programme has started. Press “Start/Pause/Cancel” button of the machine to start the programme.
Programme selection
Decide the appropriate programme from the table below which includes drying temperatures in degrees. Select the desired programme with the programme selection button.
| Extra dry | Dry at high temperature only for cotton laundry. Thick and multi layered laundry (E.g.: towels, linens, jeans) are dried in a way that they do not require ironing before placing in the wardrobe. |
| Cupboard dry | Normal laundry (E.g.: tablecloths, underwear) are dried in a way that they do not require ironing before placing in the drawers. |
| Cupboard dry Plus | Normal laundry (E.g.: tablecloths, underwear) are dried in a way that they do not require ironing before placing in the drawers, but more than those in the ready to wearoption. |
| Iron Dry | Normal laundry (E.g., Shirts, dresses) are dried ready to be ironed. |
For further program details, see, “Program Selection Table”
Main programmes
Depending on the type of laundry, the following main programmes are available:
•Cottons
You can dry your durable laundry with this programme. Dries at high temperature. It is recommended to use for your cotton items (such as bed sheets, quilt cover, underclothing, etc.).
•Synthetics
You can dry your less durable laundry with this programme. It dries at a lower temperature compared to the cottons programme. It is recommended for your synthetic laundry (such as shirts, blouses, synthetic/cotton blended laundry, etc.).
Do not dry curtains and lace in your machine.
- Anti-creasing
A 2-hour anti creasing programme to prevent laundry from creasing will be activated if you do not take the laundry out after the programme is over. This programme rotates the laundry in 10-minute intervals to prevent creasing.
Special programmes
For special cases, there are also extra programmes available:
i Additional programmes may differ according to the model of your machine.
•Mini
You can use this programme to dry the cottons that are spun at high speeds in your washing machine. It can dry your 1,2 kg Cotton laundry
(3 Shirts / 3 T-Shirts) within 30 minutes.
In order to obtain better results from the dryer programs, your laundry must be washed with suitable program and spun at the recommended spin speeds in your washing machine.
•Shirts
Dries the shirts in a more sensitive way so that they are less creased and ironed easily.
i Shirts may contain little amount of dampness at the and of the program. It is advised not to leave the shirts in the dryer.
•Jeans
You can use this program to dry the jeans that are spun at high speeds in your washing machine.
i Review the relevant part of the program table.
•Delicates
You can dry at a lower temperature your very delicate laundry (silk blouses, fine underwear, etc.) that are suitable for drying or laundry which is advised to be hand-washed.
i It is recommended to use a cloth bag to avoid certain delicate garments and laundry from getting creased or damaged. Take your garments immediately out of the dryer and hang them after the programme ends in order to prevent them being creased.
- Freshen Up
Only ventilation is performed for 10 minutes without blowing hot air. You can air your clothes that have been kept at closed environments for a long time thanks to this program to deodorize unpleasant odors.
- Timer programmes
You can select one of the 10 min., 20 min., 40 min. and 60 min. timer programmes to achieve the desired final drying level at low temperatures. Programme dries at the selected time regardless of the drying temperature.
Program selection and consumption table
| EN | |||||
| Programs | Capacity (kg) | Spin speed in washing machine (rpm) | Approximate amount of remaining humidity | Drying time (minutes) | |
| Cottons / Coloreds | |||||
 | Cupboard Dry | 7 | 1200-1000 % 60 130 | ||
| 900-800 % 70 150 | |||||
| 3.5 | 1200-1000 % 60 75 | ||||
| 900-800 % 70 90 | |||||
 | Cupboard Dry Plus | 7 | 1200-1000 % 60 140 | ||
| 900-800 % 70 160 | |||||
| 3.5 | 1200-1000 % 60 85 | ||||
| 900-800 % 70 100 | |||||
 | Iron Dry | 7 | 1200-1000 % 60 100 | ||
| 900-800 % 70 115 | |||||
| 3.5 | 1200-1000 % 60 60 | ||||
| 900-800 % 70 75 | |||||
| Mini 1.2 1200-1000 %50 30 | |||||
| Shirt 1.5 1000-800 %50 49 | |||||
| Jeans 4 1200-1000 %50 100 | |||||
| Synthetics | |||||
 | Cupboard Dry | 3.5 | 800 % 40 55 | ||
| 600 % 50 70 | |||||
| 1.75 | 800 % 40 35 | ||||
| 600 % 50 45 | |||||
| Delicates | |||||
 | Cupboard Dry | 1.5 | 600 % 50 40 | ||
| Energy consumption values | |||||
| Programs | Capacity (kg) | Spin speed in washing machine (rpm) | Approximate amount of remaining humidity | Energy consumption value kWh | |
| Cottons linen Ready to wear* | 7 | 1000 | % 60 | 4.2 | |
| Cottons Ready to iron | 7 | 1000 | % 60 3.1 | ||
| Synthetics Ready to wear | 3.5 | 800 % 40 1.6 | |||
* : Energy Label standard program (EN 61121:2012) All values given in the table have been fixed according to EN 61121:2012 Standard. These values may deviate from the table according to the laundry type, laundry spin speed, environmental conditions and voltage fluctuations.
Auxiliary function
Cancel audio warning
Your dryer will give an audio warning when the programme comes to an end. If you do not want to hear the audio warning, press “Cancel Audio Warning” button. The relevant light will turn on when this button is pressed and an audio warning will not be given when the programme comes to an end.
i You can select this function either before or after the programme starts.
Warning indicators
i Warning indicators may differ according to the model of your dryer.
Filter cleaning
A warning light will turn on to remind filter cleaning after the programme finishes.
If the filter cleaning warning light lights up continuously, please refer to, “Suggested solutions for problems”.
Starting the programme
-
Press "Start/Pause/Cancel" button to start the programme.
-
Light of the "Start/Pause/Cancel" button will turn on to indicate that the programme has started.
Progress of program
Progress of a running program is shown through the program follow-up indicator. At the beginning of every program step, the relevant indicator LED will light up and light of the completed step will turn off.
"Drying":
Drying level will be illuminated during the whole drying process until the drying degree reaches “iron dry”.
"Iron Dry":
Starts to illuminate when the drying degree reaches “iron dry” step and remains illuminated until the next step.
"Ready to wear":
Starts to illuminate when the drying degree reaches “Ready to wear” step and remains illuminated until the next step.
"Final / Anti-creasing":
Illuminates when the program comes to an end and anti-reasing function is activated.

If more than one LED light up or flash concurrently, it means there is malfunctioning or a failure (please see, Solution suggestions for problems).
Changing the programme after it has started
You can use this feature to dry your clothes under higher or lower temperatures after your dryer has started.
For example;
- Press and hold the "Start/Pause/Cancel"
button for about 3 seconds to “Cancel” the programme in order to select “Extra Dry” programme instead of “Iron Dry” programme.
-
Select the "Extra Dry" programme by rotating the programme selection button.
-
Press "Start/Pause/Cancel" button to start the programme.
i Press “Start/Pause/Cancel” button for 3 seconds to cancel the programme or turn the programme selection knob in any direction to end the programme while the machine is running. Water tank and filter cleaning warning lights turn on to warn the user when the programme is cancelled by pressing the “Start/Pause/Cancel” button for 3 seconds. However, the warning lights do not turn on when the programme is cancelled by turning the programme selection knob. Only the drying light turns on and the machine remains in hold until a new programme is selected and the “Start/Pause/Cancel” button is pressed. Child-proof lock of the machine should not be active in order to perform these two operations. If the child-proof lock is active, deactivate it before performing these operations.
Adding/removing laundry in standby mode In order to add or remove laundry after the programme starts:
-
Press the “Start/Pause/Cancel” button to switch the dryer to “Pause” mode. Drying process will stop.
-
Open the door at "Pause" position and close it again after adding or taking out laundry.
-
Press "Start/Pause/Cancel" button to start the programme.
i Any laundry added after the drying process has started may cause the dried clothes in the machine intermingle with wet clothes and the result will be wet laundry after the drying process is over.
i Laundry may be added or taken out as much as desired during a drying process, but this process will extend the programme duration and increase energy consumption since the drying will be interrupted continuously. Therefore, it is recommended to add laundry before the drying programme has started.
Child-proof lock
There is a child-proof lock to prevent any programme interruption due to the pressing of button while the programme is running. The loading door and all buttons except the “On/Off” button on the control panel are deactivated when the child-proof lock is active.
Press the “Start/Pause/Cancel” and “Cancel
audio warning" buttons simultaneously for 3 seconds to activate the child-press lock.
To start a new programme after the programme is over or to interrupt the programme, the child-proof lock should be deactivated. Press the same buttons for 3 sec. again to deactivate the child-proof lock.
i Child-proof lock is deactivated when the machine is restarted by pressing the On/Off button.

natural_image
Line drawing of two fingers interacting with a lock, no text or symbols presenti Press the relevant buttons for 3 seconds to activate the child-proof lock. A long beep will be heard and the child-proof lock will be activated. A double beep will be heard if you press any button or turn the programme selection knob while the child-proof lock is active. Press the buttons for 3 seconds to deactivate the child-proof lock. Single beep will be heard and child-proof lock will be deactivated.
A double beep will be heard if you turn the programme selection knob when the machine is running and the child-proof lock is active. If you deactivate the child-proof lock without returning the program selection knob to its previous position, the programme will be terminated since the position of the programme selection knob is changed. The drying light turns on and the machine remains on hold until a new programme is selected and the “Start/Pause/Cancel” button is pressed.
Ending the programme through canceling
To cancel any selected program; Press “Start/Pause/Cancel” button for about 3 seconds. The “Filter cleaning”, “Water tank” and “End/Anti-creasing” warning lights will turn on at the end of this period for reminding purposes. If you change the position of programme selection knob while your machine is running, then the machine stops, and the current programme is cancelled.
As the inside of the machine will be excessively hot when you cancel the program while the machine is running, activate the ventilation program to cool it
down.
End of programme
The “End/Anti-creasing”, “Filter cleaning” and “Water tank” warning lights on the programme follow up indicator will turn on when the programme comes to an end. The door can be opened and the machine becomes ready for a second cycle.
Press "On/Off" button to turn off the dryer.
i Final step of the drying cycle (cooling step) is performed without heat application in order to keep the items at a temperature that would not harm them.
i A 2-hour anti creasing programme to prevent laundry from creasing will be activated if you do not take the laundry out after the programme has come to an end.
If you will not take the laundry out immediately, do not stop the dryer before the drying process is complete.
i Clean the filter after each drying (please see, Filter cleaning).
i Drain the water tank after each drying (please see, Water tank)
5 Maintenance and cleaning
Cover filter
Lint and fibres released from the laundry to the air during the drying cycle are collected in the “Cover Filter”.
i Such fibre and lint are generally formed during wearing and washing.
i Always clean the filter after each drying process.
i You can clean the filter and filter area by vacuum cleaner.
natural_image
Four-panel line drawing showing hands using a tool to adjust or install a component, with no visible text or symbols.Figure 1

natural_image
Illustration showing a kitchen appliance being cleaned with food using a tool, alongside a hand placing food into a container (no text or symbols present)Figure 2
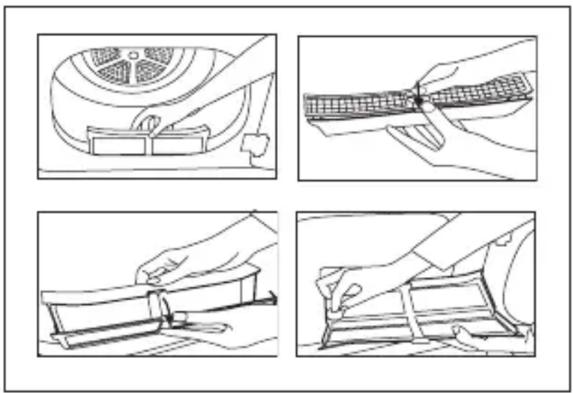
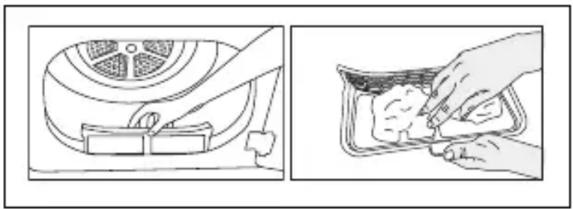
To clean the filter:
- Take out the cover.
2.a) If the product's cover filter can be opened as shown in Figure 1, remove the filter by pulling it up and open the filter.
2.b) If the product's cover filter is as shown in Figure 2, remove the filter by pulling it up. - Clean lint, fibre, and cotton raveling on the filter and in the filter housing by hand or with a soft piece of cloth.
- Close the filter and place it back into its seat.
Clogging may arise on the filter surface after using your machine for some time; if this occurs, wash the filter with water and dry it before using again.
Sensor (models with a sensor)
There are humidity sensors in your dryer that detect whether the laundry is dry or not.

natural_image
Illustration of a hand inserting a plastic into a washing machine (no text or symbols visible)To clean the sensor:
- Open the loading door of the dryer.
- Allow the machine to cool down if drying has been carried out.
- Wipe the metal sensors with a soft cloth, dampened with vinegar and dry them.
i Clean metal sensors 4 times a year.
⚠️Never use solvents, cleaning agents or similar substances when cleaning since these materials can cause fire and explosion!
6 Solution suggestions for problems
| Drying process takes too much time |
| Meshes of the filter may be clogged. Wash with water. |
| Laundry come out wet at the end of drying. |
| Meshes of the filter may be clogged. Wash with water.Excessive laundry might have been loaded in. Do not overload the machine. |
| Machine does not switch on or the program does not start. Machine is not activated when set. |
| It might have not been plugged in. Make sure that the machine is plugged in.The loading door may be ajar. Make sure that the loading door is properly closed.Program might have not been set or the «Start/Pause/Cancel» button might have not been pressed. Make sure that the program has been set and it is not in “Pause” mode.«Childproof lock» might have been activated. Deactivate the childproof lock.The condenser cover on the models with a condenser might not be closed securely. Make sure that the condenser cover and the red lock is closed securely. |
| Program has been interrupted without any cause. |
| The loading door may be ajar. Make sure that the loading door is properly closed.Electricity may be cut off. Press «Start/Pause/Cancel» button to start the program.The condenser cover on the models with a condenser might not be closed securely. Make sure that the condenser cover and the red lock is closed securely. |
| Laundry has shrunk, become felted or deteriorated. |
| A program suitable for the laundry type might have not been used. Dry only the laundry which is suitable for drying in your machine after checking the labels on your clothes.Select a program with suitable low temperature for the laundry type to dry your clothes. |
| Drum lightning does not come on. (for models equipped with a lamp) |
| The machine might have not been started by using the On/Off button. Make sure that the machine is On.Bulb may have blown. Call the authorized service to replace the bulb.The condenser cover on the models with a condenser might not be closed securely. Make sure that the condenser cover and the red lock is closed securely. |
| 2 beeps heard when the buttons are pressed or the program selection knob is turned. |
| Childproof lock» might have been activated. Deactivate the childproof lock.Program selection knob might be turned to an undefined position. Select one of the defined programs. |
| “Filter cleaning” light is flashing. |
| Filter might have not been cleaned. Clean the cover filter. |
| “Final / Anti-creasing” LED is on. |
| Program has come to an end. Turn off the machine and take out the laundry. |
| 3 beeps are heard when you press the Start/Pause/Cancel button |
| The loading door may be ajar. Make sure that the machine is plugged in.Make sure that the condenser cover and the red lock is closed securely. |
| Also for products equipped with a condenser: |
| “Water tank” warning LED is flashing. |
| Water may be full.Drain the water in the water tank. |

Call an authorised service agent if the problem persists.
natural_image
Diagram of a mechanical or electrical component with a rotating knob and curved lines, no text or symbols present.natural_image
Illustration of a washing machine with clothes being poured into a basket (no text or symbols)natural_image
Line drawing of two fingers pressing down at a lock, no text or symbols presentnatural_image
Four-step line drawings showing hand tool application on a device, including disc opening and cutting (no text or symbols)Figur 1

natural_image
Illustration showing a kitchen appliance being cleaned with food using a hand (no text or symbols present)Figur 2
natural_image
Line drawing of a hand inserting a component into a washing machine (no text or symbols)natural_image
Hand holding a cylindrical mechanical component with an arrow indicating direction (no text or symbols)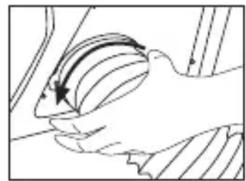
natural_image
Diagram of a hand holding a car with an arrow indicating direction (no text or symbols present)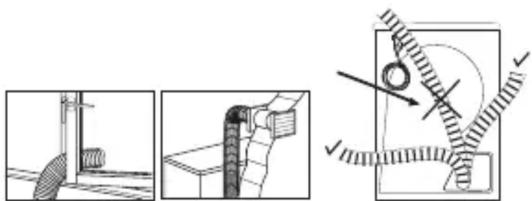
Jalkojen säätäminen
natural_image
Diagram of a mechanical assembly with rotating components and directional arrows (no text or symbols)natural_image
Illustration of a washing machine with hands cleaning a basket filled with laundry items (no text or symbols)natural_image
Line drawing of two fingers interacting with a lock, no text or symbols presentnatural_image
Four-step line drawings showing a kitchen appliance being handled, with no text or symbols present.Kuva 1
natural_image
Illustration showing a cooking process: adding a pan to a microwave oven and adding food to a container (no text or symbols)Kuva 2
natural_image
Line drawing of a hand cleaning a washing machine with a brush (no text or symbols)- Elektroinstalacija
- Senzor (modeli sa senzorom)
- Read this manual prior to initial operation of the product!
- This User Manual will
- Explanation of symbols
- Important safety information
- General safety
- Intended use
- Children's safety
- 2
- Installation
- Appropriate installation location
- Under counter installation
- Mounting over a washing machine
- Ventilation hose and connection (for products equipped with an outlet vent)
- Adjusting feet
- Electrical connection
- First use
- Disposing of packaging material
- Transportation of the machine
- Disposing of the old machine
- Technical Specifications
- Initial preparations for drying
- Things to be done for energy saving:
- Laundry suitable for drying in the machine
- Laundry unsuitable for drying in the machine
- Preparing laundry for drying
- Loading
- Selecting a Programme and Operating Your Machine
- Filter cleaning warning light
- Program follow-up indicator
- Cancel audio warning
- On/Off button
- Programme selection knob
- Start/Pause/Cancel button
- Preparing the machine
- Programme selection
- Main programmes
- •Cottons
- •Synthetics
- - Anti-creasing
- Special programmes
- •Mini
- •Shirts
- •Jeans
- •Delicates
- - Freshen Up
- - Timer programmes
- Auxiliary function
- Cancel audio warning
- Warning indicators
- Filter cleaning
- Starting the programme
- Progress of program
- "Drying":
- "Iron Dry":
- "Ready to wear":
- "Final / Anti-creasing":
- Changing the programme after it has started
- Adding/removing laundry in standby mode In order to add or remove laundry after the programme starts:
- Child-proof lock
- Ending the programme through canceling
- End of programme
- Maintenance and cleaning
- Cover filter
- Sensor (models with a sensor)
- Solution suggestions for problems
- Jalkojen säätäminen
- Kuva 2
Brand : BEKO
Model : DV 7120
Category : Tumble dryer