DEH-P80RS - Receiver PIONEER - Free user manual and instructions
Find the device manual for free DEH-P80RS PIONEER in PDF.

User questions about DEH-P80RS PIONEER
0 question about this device. Answer the ones you know or ask your own.
Ask a new question about this device
Download the instructions for your Receiver in PDF format for free! Find your manual DEH-P80RS - PIONEER and take your electronic device back in hand. On this page are published all the documents necessary for the use of your device. DEH-P80RS by PIONEER.
USER MANUAL DEH-P80RS PIONEER
Multi-CDcontrolHighpowerCD/MP3/WMA/AAC playerwithFM/AMtuner
ReproductordeCD/MP3/WMA/AACdealtapotencia consintonizadordeFM/AMYcontroldeCDmúltiple
DEH-P80RS
ThankyouforbuyingthisPioneerproduct.
Pleasereadthroughtheseoperatinginstructionsssoyouwillknowhowtooperate yourmodelproperly.Afteryouhavefinishedreadingtheinstructions,keepthismanualinasafeplaceforfuturereference.
01 BeforeYouStart
Aboutthisunit5
Aboutthismanual5
Features5
AboutWMA6
AboutAAC6
Protectingyourunitfromtheft6
-Removingthefrontpanel7
-Attachingthefrontpanel7
Resettingthemicroprocessor7
SwitchingtheDSPsettingmode7
Aboutthedemomode8
-Reversemode8
-Featuredemomode8
Useandcareoftheremotecontrol8
-Installingthebattery8
-Usingtheremotecontrol9
-FUNCTIONbuttonandAUDIO button9
02 What'sWhat
Headunit11
Remotecontrol11
03 BasicOperations
Turningtheuniton13
Selectingasource13
Loadingadisc13
Adjustingthevolume14
Turningtheunitoff14
04 Tuner
Listeningtotheradio15
Introductionofadvancedtuner operation16
Storingbroadcastfrequencies16
Storingthestrongestbroadcast frequencies16
Selectingstationsfromthepresetchannel list17
Tuninginstrongsignals17
05 Built-inCDPlayer
PlayingaCD18
Selectingatrackdirectly18
Introduction of advanced built-in CD player operation 19
Repeatingplay19
Playingtracksinrandomorder19
ScanningtracksofaCD20
PausingCDplayback20
Selectingthesearchmethod20
Searching every 10 tracks in the current disc20
Usingdisctitlefunctions21
-Enteringdisctitles21
-Displayingdisctitles22
UsingCDTEXTfunctions22
-DisplayingtextinformationonCDTEXT discs22
-Scrollingtextinformationinthe display22
-Selectingtracksfromthetracktitle list22
06 MP3/WMA/AAC/WAVPlayer
PlayingMP3/WMA/AAC/WAVfiles23
Selectingatrackdirectlyinthecurrent folder24
Introduction of advanced built-in CD player (MP3/WMA/AAC/WAV) operation 25
Repeatingplay25
Playingtracksinrandomorder25
Scanningfoldersandtracks26
PausingMP3/WMA/AAC/WAVplayback26
Selectingthesearchmethod26
Searching every 10 tracks in the current folder 26
DisplayingtextinformationonMP3/WMA/AAC/WAVdisc27
-WhenplayingbackanMP3/WMA/AAC disc27
-WhenplayingbackaWAVdisc27
Scrollingtextinformationinthedisplay27
Selectingtracksfromthefilenamelist28
07 Multi-CDPlayer
PlayingaCD29
Selectingatrackdirectly29
50-discmulti-CDplayer30
Introductionofadvancedmulti-CDplayer operation30
Repeatingplay31
Playingtracksinrandomorder31
ScanningCDsandtracks31
PausingCDplayback32
UsingITSplaylists32
-CreatingaplaylistwithITS programming32
-PlaybackfromyourITSplaylist32
-ErasingatrackfromyourITS playlist33
-ErasingaCDfromyourITSplaylist33
Usingdisctitlefunctions33
-Enteringdisctitles33
-Displayingdisctitles34
-Selectingdiscsfromthedisctitle list34
UsingCDTEXTfunctions34
-DisplayingtextinformationonCDTEXT discs35
-Scrollingtextinformationinthe display35
-Selectingtracksfromthetracktitle list35
08 PlayingsongsoniPod
ListeningtosongsonyouriPod36
Browsingforasong36
-Searchingforasong36
-Selectingaplaylist37
DisplayingtextinformationoniPod37
IntroductionofadvancediPodadapter operation38
Repeatingplay38
Playingsongsinarandomorder (shuffle)38
Pausingasong39
09 TVtuner
Watchingthetelevision40
IntroductionofadvancedTVtuner operation41
Storingbroadcaststations41
Storingthestrongestbroadcaststations sequentially41
Selectingstations from the preset channel list42
10 DVDPlayer
Playingadisc43
Selectingadisc43
Selectingafolder43
IntroductionofadvancedDVDplayer operation44
Repeatingplay44
Pausingdiscplayback45
Playingtracksinrandomorder45
ScanningtracksofaCD/MP3/WMA45
UsingITSplaylistdisctitlefunctions45
Usingdisctitlefunctions45
-Enteringdisctitles46
11 AudioAdjustments
Operationmodes47
-Operationmodemarks47
3-waynetworkmode NW 47
-Adjustingtheaudioeasily47
-Adjustingtheaudiofinely47
Standardmode STD 47
-Adjustingtheaudioeasily47
-Adjustingtheaudiofinely47
Extrafunctions48
Introductionofaudioadjustments48
Switchingleftandrightchannel49
Usingthepositionselector50
Usingbalanceadjustment NW 50
Usingbalanceadjustment STD 50
Usingthetimealignment50 -Adjustingthetimealignment51
Aboutthenetworkfunction NW 51
-Adjustableparameters52
-Pointsconcerningnetwork adjustments52
-Mutingthespeakerunit(filter)53
-Adjustingnetwork53
Usingsubwooferoutput STO 54
-Usingsubwooferoutput54
-Adjustingsubwoofersettings55
-Adjustinglowpassfilterattenuation slope55
Usingthehighpassfilter STD 55
-Mutingthespeakerunits(filters)55
-Settingthehighpassfilterforfront speakers56
-Settingthehighpassfilterforrear speakers56
UsingBBEsound57
UsingBMXandcompression57
Usingtheauto-equalizer57
Recallingequalizercurves58
Adjustingequalizercurves58
Adjusting16-bandgraphicequalizer58
Adjustingloudness59
Adjustingsourcelevels59
AutoTAandEQ(auto-timealignment and auto-equalizing)59
-BeforeoperatingtheautoTAandEQ function60
-CarryingoutautoTAandEQ61
12 InitialSettings
Adjustinginitialsettings63
Selectingthedisplaylanguage63
Settingtheclock63
SettingtheFMtuningstep64
SettingtheAMtuningstep64
Switchingthewarningtone64
Switchingthefaceautoopen64
Switchingtheauxiliarysetting65
Switchingthedimmersetting65
Adjustingthebrightness65
Correctingdistortedsound65
Resettingtheaudiofunctions66
Switchingthesoundmuting/attenuation66
Settingtheinternalpoweramplifier66
Switchingthefeaturedemo66
Switchingthereversemode67
SwitchingtheEverScroll67
13 OtherFunctions
Turningtheclockdisplayonoroff68
UsingtheAUXsource68
-AboutAUX1andAUX268
-SelectingAUXasthesource68
-SettingtheAUXtitle68
Usingdifferententertainmentdisplays69
UsingthePGMbutton70
AdditionalInformation
Understandingbuilt-inCDplayererror messages71
UnderstandingautoTAandEQerror messages71
CDplayerandcare72
CD-R/CD-RWdiscs72
MP3, WMA, AACandWAVfiles73
-MP3additionalinformation73
-WMAadditionalinformation74
-AACadditionalinformation74
-WAVadditionalinformation74
AboutfoldersandMP3/WMA/AAC/WAV files74
Terms76
Specifications78
Aboutthisunit

CAUTION
- Donotallowthisunittocomeintocontact withliquids. Electricalshockcouldresult. Also, thisunitdamage, smoke, and overheat could result from contact with liquids.
- Keep this manual handy as a reference for operating procedures and precautions.
•Alwayskeepthevolumelowenoughsothat youcanhearsoundsfromoutsidethevehicle. - Protect this unit from moisture.
- If the battery is disconnected, discharged, the preset memory will be erased and must be reprogrammed.
- If this unit does not operate properly, contact your dealer or nearest authorized Pioneer Service Station.
Aboutthismanual
Thisunitfeaturesanumberofsophisticated functionsensuringsuperiorreceptionandoperation. All the functions have been designed for the easiest possible use, but many are not self-explanatory. This operation manual will help you benefit fully from this unit's potential and to maximize your listening enjoyment. Were recommend that you familiarize yourself with the functions and their operation by reading through the manual before you begin using this unit. It is especially important that you read and observe WARNINGS and CAUTIONsin this manual.
Features
CD playback
MusicCD/CD-R/CD-RWplaybackispossible.
MP3fileplayback
Youcan playback MP3 files recorded on CD-ROM/CD-R/CD-RW (ISO9660 Level 1/Level 2 standard recordings).
• Supplyofthisproductonlyconveysalicenseforprivate,non-commercialuseand doesnotconveyalicensenorimplyany righttousethisproductinanycommercial (i.e.revenue-generating)realtimebroadcasting(terrestrial,satellite,cableand/or anyothermedia),broadcasting/streaming viainternet,intranetsand/orothernetworksorinotherelectroniccontentdistributionsystems,suchaspay-audioor audio-on-demandapplications.Anindependentlicenseforsuchuseisrequired. Fordetails,pleasevisit http://www.mp3licensing.com.
WMAfile playback
Youcan playbackWMAfilesrecordedonCD-ROM/CD-R/CD-RW(ISO9660Level1/Level2 standardrecordings).
AACfile playback
Youcan playback AAC files recorded on CD-ROM/CD-R/CD-RW (ISO9660 Level 1/Level 2 standard recordings).
WAVfileplayback
Youcan playback WAVfilesrecorded on CD-ROM/CD-R/CD-RW (Linear PCM (LPCM) / MS ADPCM recordings).
Highqualitysound
ThisunitfeatureshighperformanceDSPsystemtooutputtheclearandrealisticsound.
MultipleIP-BUScontrol
ThisunitcancontrolanyPioneersourceunit withIP-BUS,suchasMulti-CDplayer,DVD playerandTVtuner.
- SomePioneersourceunitsmaynotbefully controlledwiththisunit.Formoredetails, pleaseconsultyournearestdealer.
iPodcompatibility
WhenyouusethisunitwithaPioneeriPod adapter(CD-IB100),youcancontrolaniPod withDockConnector.
- iPodisatrademarkofAppleComputer, Inc., registeredintheU.S.andother countries.
AboutWMA

TheWindowsMedia™logoprintedonthebox indicatesthatthisunitcanplaybackWMA data.
WMAisshortforWindowsMediaAudioand referstoanaudiocompressiontechnology thatisdevelopedbyMicrosoftCorporation. WMAdatacanbeencodedbyusingWindows MediaPlayerversion7orlater. WindowsMediaandtheWindowslogoaretrademarksorregisteredtrademarksofMicrosoft CorporationintheUnitedStatesand/orother countries.

Notes
- Thisunitmaynotoperatecorrectlydepending ontheapplicationusedtoencodeWMAfiles.
- DependingontheversionofWindowsMedia PlayerusedtoencodeWMAfiles,album namesandothertextinformationmaynotbe correctlydisplayed.
AboutAAC
AACisshortforAdvancedAudioCodingand referstoanaudiocompressiontechnology standardusedwithMPEG2andMPEG4. Several applicationscanbeusedtoencode AACfiles,butfileformatsandextensionsdifferdependingontheapplicationwhichis usedtoencode.
ThisunitplaysbackAACfilesencoded by iTunes® version4.8andearlier.
iTunes® isattrademarkofAppleComputer, Inc., registeredintheU.S.andother countries.
Protectingyourunitfrom theft
Thefrontpanelcanbedetachedfromthe headunitandstoredintheprovidedprotective casetopreventtheft.
- If the front panel is not detached from the head unit within five seconds, fast turning off the ignition, awarning on new will sound and the front panel will open.
- Youcanturnoffthewarningtone.See Switchingthewarningtoneonpage64.
- Youcanturnoffthefaceautoopen.See Switchingthefaceautoopenonpage64.

Important
- Neveruseforceorgripthedisplayandthe buttonstootightlywhenremovingorattaching.
- Avoid subjecting the front panel to excessive shocks.
- Keepthefrontpaneloutofdirectsunlightand hightemperatures.
BeforeYouStart
- Afewsecondsafterturningtheignition switchtoonoroff,thefrontpanelautomaticallymoves.Whenthishappens,yourfingers maybejammedinthepanel,sokeep yourhandsawayfromit.
- When removing the front panel, besureto hold the corrugated release button on therear of the front panel while pulling.
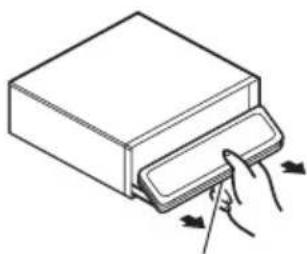
Removingthefrontpanel
1PressEJECTtoopenthefrontpanel.
Ifadischasbeeninsertedtothisunit,pressingandholdingEJECTenabletoopenthe frontpanelwithoutejectingadisc.

natural_image
Simple line drawing of a rectangular box with a separate side clip (no text or symbols)2Pressthereleasebutton,slideandremovethefrontpaneltowardyou.
Takecarenottogripittootightlyortodrop thefrontpanelandprotectitfromcontact withwaterorotherfluidstopreventpermanentdamage.
natural_image
Line drawing of a hand inserting a card into a box (no text or symbols)Releasebutton
3Putthefrontpanelintoprovidedprotectivecaseforsafekeeping.
Attachingthefrontpanel
1 Makesuretheinnercoverisclosed.
2Replacethefrontpanelbyclippingit intoplace.

natural_image
Line drawing of a device with a hand inserting a card into a box (no text or symbols)
Resettingthemicroprocessor
Themicroprocessormustberesetunderthe followingconditions:
- Priortousingthisunitforthefirsttime afterinstallation
- Iftheunitfailstooperateproperly
- Whenstrangeorincorrectmessagesappearonthedisplay
- PressRESETwithapentiporother pointedinstrument.

natural_image
Close-up of a device panel with a pen tip inserted, showing no visible text or symbolsRESETbutton

SwitchingtheDSPsetting mode
Thisunitfeaturestwooperationmodes:the3-waynetworkmode(NW)andthestandard mode(STD).Youcanswitchbetweenmodes asdesired.Initially,theDSPsettingissetto thestandardmode(STD).
- Afterswitching, resetthemicroprocessor.

WARNING
Donotusetheunitinstandardmodewhena speakersystemfor3-waynetworkmodeisconnectedtothisunit.Thismaycausedamageto thespeakers.
- Useathinstandardtipscrewdriverto switchtheDSPswitchonthesideofthis unit.

text_image
NW STD
Note
Evenwhenthebatteryisdisconnectedorthemicroprocessorisreset,thisunit'saudiosettingremainsinthememoryforatleastoneday.Ifyouwanttoresettheaudiosetting,refertoResettingtheaudiofunctionsonpage66.
Aboutthedemomode
Thisunitfeaturestwodemonstrationmodes. Oneisthereversemode, theotheristhefeatureddemomode.

Important
Theredlead(ACC)ofthisunitshouldbeconnectedtoaterminalcoupledwithignitionswitch on/offoperations.Ifthisisnotdone,thevehicle batterymaybedrained.
Reversemode
If you donot perform an operation within about 30 seconds, screen indications start to reverse, and then continue reversing every 10 seconds. Pressing BAND when powerto this unit is turned off while the ignitions switch is set to ACC or ON cancel there reverse mode.
PressBANDagaintostartthereversemode.
- Youcanalsoperformthesameoperation fromSwitchingthereversemodeonInitial Settings.Formoredetails,seeSwitching thereversemodeonpage67.
Featuredemomode
The feature demo automatically starts when powerto this unit is turned off while the ignition switch it's set to ACCorON. Pressing
DISPLAY during featuredemooperation cancel the featuredemomode. Press DISPLAY againtostart the featuredemomode. Remember that if the featuredemo continues operating when the care engine is turned off, it may drain battery power.
- Youcanalsoperformthesameoperation fromSwitchingthefeaturedemoonInitial Settings.Formoredetails,seeSwitching thefeaturedemoonpage66.
Useandcareoftheremote control
Installingthebattery
Slidethetrayoutonthebackoftheremote controlandinsertthebatterywiththeplus(+) andminus(-)polespointingintheproperdi-rection.
- When using for the first time, pull out the film protruding from the tray.
BeforeYouStart

natural_image
Diagram showing two steps of a device being inserted into a housing, with no visible text or symbols.
WARNING
Keepthebatteryoutofthereachofchildren. Shouldthebatterybeswallowed,immediately consultadoctor.

CAUTION
• UseonlyoneCR2025(3V) lithium battery.
- Removethebatteryiftheremotecontrolisnot usedforamonthorlonger.
- Donotrecharge, disassemble, heatordispose of the battery infire.
- Donothandlethebatterywithmetallictools.
- Donotstorethebatterywithmetallicmaterials.
- Intheeventofbatteryleakage, wipetheremotecontrolcompletelycleanandinstalla newbattery.
- Whendisposingofusedbatteries,please complywithgovernmentalregulationsorenvironmentalpublicinstitutions'rulesthat applyinyourcountry/area.
Usingtheremotecontrol
Pointtheremotecontrolinthedirectionofthe frontpaneltooperate.
- Theremotecontrolmaynotfunctionproperlyindirectsunlight.

Important
- Donotstoretheremotecontrolinhighttemperaturesordirectsunlight.
- Donotlettheremotecontrolfallontothe floor,whereitmaybecomejammedunderthe brakeoracceleratorpedal.
FUNCTIONbuttonandAUDIObutton
Youcanalsoselectthedesiredmodeby
FUNCTIONbuttonandAUDIObuttononthe remotecontrol. ButoperationofFUNCTION buttonandAUDIObuttonontheremotecon- troldiffersfromtheoperationof
MULTI-CONTROL on the head unit. When operating theremote control, switch through the modes as described below to select themode.
FUNCTIONbuttonoperation
- PressFUNCTIONtoselectthedesired mode(e.g.,built-inCDplayer).
PressFUNCTIONrepeatedlytoswitchbetweenthefollowingmodes:
Playmode(repeatplay)—Randommode (randomplay)—Scanmode(scanplay)—
Pause(pause)—Searchmode(searchmethod)—TitleInput"A"(disctitleinput)

Note
RefertoIntroductionofadvancedbuilt-inCD playeroperationonpage19.
AUDIObuttonoperation
- PressAUDIOtoselectthedesired mode.
PressAUDIO repeatedlytoswitchbetween the following modes:
Standardmode
STD
F/B (balance adjustment)—POSI (position selector)—TA1 (time alignment setting)—TA2 (timealignmentadjusting)—LOUD(loudness)—EQ 1 (graphic equalizer)—EQ 2 (16-band graphicequalizer)—SW1(subwooferon/off)—SW 2 (subwoofer cut-off frequency)—SW 3 (subwoofer slope)—F.HPF 1 (front high pass filter slope)—F.HPF 2 (front high pass filter cut-off frequency)—R.HPF1(rearhighpassfilterslope)—R.HPF2(rearhighpassfiltercut-off frequency)—BBE (BBE)—BMX (BMX and compression)—A.EQ (auto-equalizer on/off)—SLA(sourceleveladjustment)

Note
RefertoIntroductionofaudioadjustmentson page48.
text_image
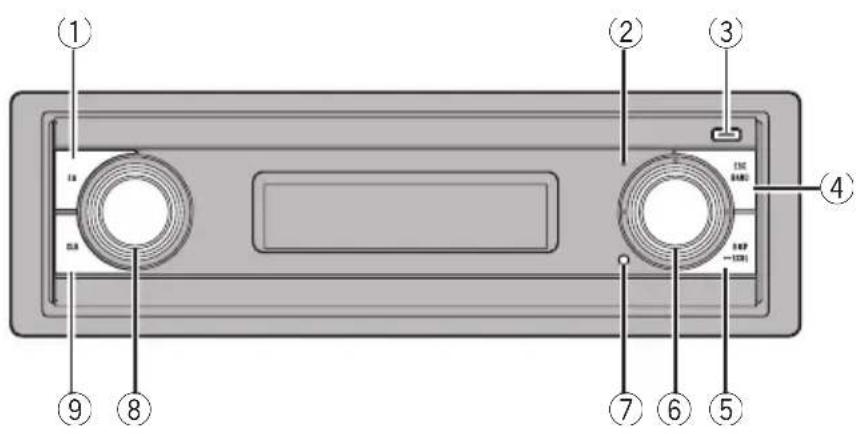
Diagram of a device rear panel with numbered components and labeled parts in ChineseHeadunit
①EQbutton
Presstoselectvariousequalizercurves.
②Displayoffindicator
Lightsupwhenthedisplayisturnedoff.
③EJECTbutton
PresstoejectaCDfromyourbuilt-inCD player.
Pressandholdtoopenorclosethefront panel.
④BANDbutton
PresstoselectamongthreeFMbandsand oneAMbandandtocancelthecontrol modeoffunctions.
⑤DISPLAYbutton
Presstoselectdifferentdisplays.
⑥ MULTI-CONTROL
Movetoperformmanualseektuning, fast forward, reverse and track search controls. Alsoused for controlling functions.
Turntodisplaythedisctitlelist,tracktitle list,folderlist,filelistorpresetchannellist dependingonthesource.
⑦RESETbutton
Presstoresetthemicroprocessor.
⑧SOURCEbutton, VOLUME
Thisunitisturnedonbyselectingasource. Presstocyclethroughalltheavailable sources.
Rotateittoincreaseordecreasethevolume.
⑨CLOCKbutton
Presstochangetotheclockdisplay.
Remotecontrol
Operationisthesameaswhenusingthebuttonsontheheadunit.
⑨VOLUMEbuttons
Presstoincreaseordecreasethevolume.
⑩FUNCTIONbutton
Presstoselectfunctions.
⑪Joystick
Movetoperformmanualseektuning, fast forward, reverse and track search controls. Alsoused for controlling functions.
Presstodisplaythedisctitlelist,tracktitle list,folderlist,filelistorpresetchannellist accordingtothesource.

text_image
⑨ ③ ⑩ BAND FUNC SRC AUDIO ATT ENT DISP PGM 1 2 3 DIRECT 4 5 6 CLEAR 7 8 9 0 ⑯ ⑰ ⑱ ⑲ ⑳ ⑮ ⑯ ⑰ ⑭ ⑰ ⑬ ⑯ ⑭ ⑭ ⑭ ⑭ ⑭ ⑭ ⑭ ⑭ ⑭⑫DIRECTbutton
Presstodirectlyselectthedesiredtrack.
⑬CLEARbutton
Presstocanceltheinputnumberwhen0-9 areused.
⑭0-9buttons
Presstodirectlyselectthedesiredtrack, presettuningordisc. Buttons1-6canoperatethepresettingforthetunerordisc numbersearchforthemulti-CDplayer.
⑮PGMbutton
Presstoooperatethepreprogrammedfunctionsforeachsource.(RefertoUsingthePGMbuttononpage70.)
⑯ATTbutton
Presstoquicklylowerthevolumelevel,by about90%.Pressoncemoretoreturntothe originalvolumelevel.
⑰ENTERTAINMENTbutton
Presstochangetotheentertainmentdisplay.
⑱AUDIObutton
Presstoselectvarioussoundqualitycontrols.
BasicOperations
Turningtheuniton
●PressSOURCEtoturntheuniton.
Whenyouselectasource,theunitisturned on.
Selectingasource
Youcanselectasourceyouwanttolistento. Toswitchtothebuilt-inCDplayer,loadadisc intheunit(refertopage18).
●PressSOURCEtoselectasource.
PressSOURCErepeatedlytoswitchbetween thefollowingsources:
Tuner—Television—DVDplayer/Multi-DVDplayer—Built-inCDplayer—Multi-CD player—iPod—External unit 1—Externalunit2—AUX1—AUX2

Notes
- In the following cases, the soundsource will not change:
—When there is noun it corresponding to the selected source connected to this unit.
—Whenthereisnodiscintheunit.
—WhenthereisnodiscintheDVDplayer.
—Whenthereisnomagazineinthemulti-CDplayer.
—Whenthereisnomagazineinthemulti-DVDplayer.
—WhentheAUX(auxiliaryinput)issettooff (refertopage65).
- ExternalunitreferstoaPioneerproduct(such asoneavailableinthefuture)that,although incompatibleasasource,enablescontrolof basicfunctionsbythisunit.Twoexternalunits canbecontrolledbythisunit.Whentwoexternalunitsareconnected,theallocationof themtoexternalunit1orexternalunit2is automaticallysetbythisunit.
- When this unit's blue/white lead is connected to the vehicle's auto-antennarelaycontrol
terminal,thevehicle'santennaextendswhen thisunit'ssourceisturnedon.Toretractthe antenna,turnthesourceoff.
Loadingadisc
1PressEJECTtoopenthefrontpanel.
CDloadingslotappears.
■AfteraCDhasbeeninserted, pressSOURCE toselectthebuilt-inCDplayer.
2InsertaCDintotheCDloadingslot.
Frontpanelisclosedautomatically,andplay-backwillstart.

text_image
CDloadingslot■YoucanejectaCDbypassingEJECT.

Notes
• The built-in CD player play onestandard, 12-cmor8-cmCDatatime. Donot use an adapter when playing 8-cmCDs.
- DonotinsertanythingotherthanaCDinto theCDloadingslot.
- Thereissometimesadelaybetweenstarting upCD playbackandthesoundbeingissued. Whenbeingread, Formatread is displayed.
- If you cannot insert adisc completely or if after you insert adiscthedis does not play, check that the label side of the disc is up. Press EJECT to eject the disc, and check the disc for damage before inserting it again.
- When the CD loadingorejectingfunction does not operate properly, you can reject the CD bypassing and holding EJECT while opening the front panel.
- IfanerrormessagesuchasERROR-11isdisplayed,refertoUnderstandingbuilt-inCD playererrormessagesonpage71.
Adjustingthevolume
●UseVOLUMEtoadjustthesoundlevel.
Withtheheadunit, rotateVOLUMEtoin-creaseordecreasethevolume. Withtheremotecontrol, pressVOLUMEtoin-creaseordecreasethevolume.
Turningtheunitoff
- PressSOURCEandholduntiltheunit turnsoff.
Tuner
Listeningtotheradio
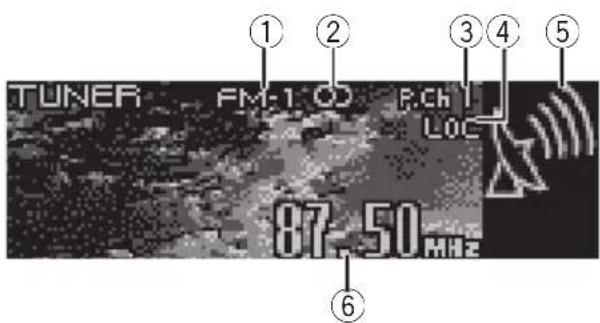
text_image
TUNER FM-1 CD P.Cch I LOC 87.50 MHz ① ② ③ ④ ⑤ ⑥These are the basic steps necessary to operate theradio. More advanced tuner operation is explained starting on then next page.

Important
If you are using this unit in North, Central or South America, reset the AMtuning step (see Setting the AMtuning step on page 64).
①Bandindicator
Showswhichbandtheradioistunedto,AM orFM.
②Stereo(○)indicator
Showswhentheselectedfrequencyis beingbroadcastinstereo.
③Presetnumberindicator
Showswhichpresethasbeenselected.
④LOCindicator
Showswhenlocalseektuningison.
⑤Signallevelindicator
Showstheradiowavestrength.
⑥Frequencyindicator
Showsthefrequencytowhichthetuneris tuned.
1PressSOURCEtoselectthetuner.
PressSOURCEuntilyouseeTunerdisplayed.
2PressBANDtoselectaband.
PressBANDuntilthedesiredband(FM-1, FM-2, FM-3forFMorAM)isdisplayed.
3Toperformmanualtuning, push MULTI-CONTROLleftorright.
The frequencies move up on down step by step.
4Toperformseektuning, pushandhold MULTI-CONTROLleftorrightforaboutone secondandrelease.
Thetunerwillscanthefrequenciesuntila broadcaststrongenoughforgoodreceptionis found.
■Youcancancelseektuningbypushing
MULTI-CONTROLleftorright.
■ If you push and hold MULTI-CONTROL left or rightyoucanskipstations.Seektuningstartsas soonasyoureleaseMULTI-CONTROL.
Introductionofadvanced tuneroperation

text_image
Local Level 2 ①①Functiondisplay
Showsthefunctionstatus.
1PressMULTI-CONTROLtodisplaythe mainmenu.
FUNCTION, AUDIO and ENTERTAINMENT appearonthedisplay.
2UseMULTI-CONTROLtoselect FUNCTION.
Turntochangethemenuoption;presstose-lect.
Thefunctionnameappearsonthedisplay.
3TurnMULTI-CONTROLtoselectthe function.
TurnMULTI-CONTROLclockwisetoswitchbetweenthefunctionsinthefollowingorder:
BSM(beststationsmemory)—Local(local seektuning)
■Youcanalsoswitchbetweenthefunctionsin reverseorderbyturningMULTI-CONTROLcounterclockwise.
■Toreturntothefrequencydisplay,press BAND.

Note
If you donotoperatethe function within about 30 seconds, the display is automatically returned to the frequency display.
Storingbroadcastfrequencies
Youcaneasilystoreuptosixbroadcastfrequenciesforlaterrecall.
1Whenyoufindastationthatyouwant tostoreinmemory,turnMULTI-CONTROL toswitchtothepresetchannellistmode.
2UseMULTI-CONTROLtostorethese- lectedstationinmemory.
Turntochangethepresetnumber;pressand holdtostore.
Thenumberyouhaveselectedwillflashinthe presetnumberlistandthenremainlit.These-lectedradiostationfrequencyhasbeenstored inmemory.
■If you donotoperatethelist within about 30 seconds, the preset channel list mode is canceled automatically.

Notes
- Programservicenameisnotdisplayedunlesstheradioreceivesthefrequency.
- Upto18FMstations, sixforeachofthethree FMbands, and sixAMstations can be restored in memory.
- Youcanalsostoreabroadcastfrequencyin memorypressing1–6ontheremotecontrol.
Storingthestrongest broadcastfrequencies
BSM(beststationsmemory)letsyouautomaticallystorethesixstrongestbroadcastfrequenciesunderpresettingbuttons1–6.
Oncestoredyoucantuneintothosefrequencieswiththetouchofbutton.
1UseMULTI-CONTROLtoselectBSM.
Searching is displayed. While Searching is displayed, the six strongest broadcast frequencies will best be reduced under preset tuning numbers 1–6 in the order of their signal strength. When finished, the preset channel lists appears.
■Tocancelthestorageprocess,press MULTI-CONTROL.
3UseMULTI-CONTROLtoselectthedesiredstation.
Turntochangethestation;presstoselect.
■Youcanalsochangethestationbypushing MULTI-CONTROLupordown.
■Ifyoudonotoperatethelistwithinabout30 seconds,thepresetchannellistmodeiscanceledautomatically.

Note
StoringbroadcastfrequencieswithBSMmayreplacebroadcastfrequenciesyouhavesaved usingbuttons1-6.
Selectingstations from the preset channellist
Thepresetchannellistletsyouseethelistof presetstationsandselectoneofthemtoreceive.
1TurnMULTI-CONTROLtoswitchtothe presetchannellistmode.
■Youcanalsoperformthisoperationbypressingjoystickontheremotecontrol.
2UseMULTI-CONTROLtoselectthedesiredstation.
Turntochangethestation;presstoselect.
■Youcanalsochangethestationbypushing MULTI-CONTROLupordown.
■ If you donotoperatethelist within about 30 seconds, the preset channel list mode is canceled automatically.

Notes
- Youcanalsorecallstationsassignedtopreset tuningnumbersbypushingMULTI-CONTROL upordownduringthechanneldisplay.
- Youcanalsorecallstationsassignedtopreset tuningnumbers1–6bypassingoneofthe presettuningbuttons1–6ontheremotecontrol.
Tuninginstrongsignals
Localseektuningletsyoutuneinonlythose radiostationswithsufficientlystrongsignals forgoodreception.
1UseMULTI-CONTROLtoselectLocal. Localappearsinthedisplay.
2PressMULTI-CONTROLtoturnlocal seektuningon.
Localseeksensitivity(e.g.,Level2)appearsin thedisplay.
■Toturnlocalseektuningoff,press MULTI-CONTROLagain.
3PushMULTI-CONTROLleftorrightto setthesensitivity.
TherearefourlevelsofsensitivityforFMand twolevelsforAM:
FM: Level 1—Level 2—Level 3—Level 4
AM: Level1—Level2
TheLevel4settingallowsreceptionofonly thestrongeststations,whilelowersettingslet youreceiveprogressivelyweakerstations.

PlayingaCD
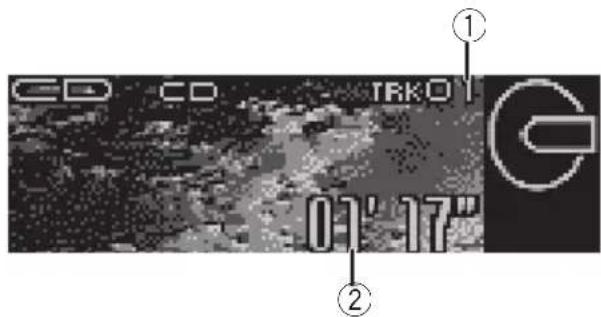
text_image
CD CD TRK01 01' 17" ① ②These are the basic steps necessary to play a CD with your built-in CD player. More advanced CD operation is explained starting on then next page.
①Tracknumberindicator
Showsthetrackcurrentlyplaying.
②Playtimeindicator
Showstheelapsedplayingtimeofthecurrenttrack.
1PressSOURCEtoselectthebuilt-inCD player.
PressSOURCEuntilyouseeCompactDisc displayed.
■ Ifnodiscisloadedintheunit, you cannot selectCompactDisc(built-inCDplayer).Inserta discintheunit.(Refertopage13.)
2Toperformfastforwardorreverse, pushandholdMULTI-CONTROLleftor right.
■ If you select Rough search, pushing and holding MULTI-CONTROL left or right enables you to search every 10 tracks in the current disc. (Refer to Selecting these search method on page 20.)
3Toskipbackorforwardtoanother track, pushMULTI-CONTROLleftorright.
PushingMULTI-CONTROLrightskipstothe startofthenexttrack.Pushing
MULTI-CONTROLleftonceskipstothestart
of the current track. Pushing again will skipto the previous track.

Note
WhenaCDTEXTdiscisinserted,thedisctitle automaticallybeginstoscrollinthedisplay. WhenEverScrollissettoONattheinitialsetting, thedisctitlescrollscontinuously.RefertoSwitchingtheEverScrollonpage67.
Selectingatrackdirectly
When using theremote control, you can select a track directly by entering the desired track number.
1PressDIRECT.
Tracknumberinputdisplayappears.
2Press0-9buttonstoenterthedesired tracknumber.
■Youcancanceltheinputnumberbypassing CLEAR.
3PressDIRECT.
Thetrackofenterednumberwillplay.

Note
Afterenteringthenumberinputmode, if you do not perform an operation within about eight seconds, themode is automatically canceled.
Introductionofadvanced built-inCDplayeroperation
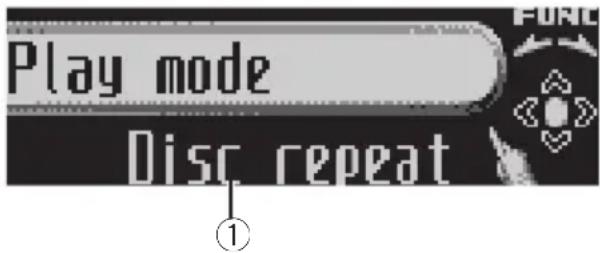
text_image
Play mode Disc repeat①Functiondisplay
Showsthefunctionstatus.
1PressMULTI-CONTROLtodisplaythe mainmenu.
FUNCTION, AUDIO and ENTERTAINMENT
appearonthedisplay.
2UseMULTI-CONTROLtoselect FUNCTION.
Turntochangethemenuoption;presstose-lect.
Thefunctionnameappearsonthedisplay.
3TurnMULTI-CONTROLtoselectthe function.
TurnMULTI-CONTROLclockwisetoswitchbetweenthefunctionsinthefollowingorder:
Playmode(repeatplay)—Randommode(randomplay)—Scanmode(scanplay)—
Pause(pause)—Searchmode(searchmethod)—TitleInput"A"(disctitleinput)
■Youcanalsoswitchbetweenthefunctionsin reverseorderbyturningMULTI-CONTROLcounterclockwise.
■ To return to the playback display, press BAND.

Notes
- If you donotoperatethe function within about 30 seconds, the display is automatically returned to the playback display.
- TitleInput"A"(disctitleinput)functionis notcanceledautomatically.
Repeatingplay
There are two repeat play ranges for the built-in CD player: Discrepeat (discrepeat) and Trackrepeat (one-trackrepeat).
1UseMULTI-CONTROLtoselect Playmode.
Playmodeappearsinthedisplay.
2PressMULTI-CONTROLtoselecttherepeatrange.
PressMULTI-CONTROLrepeatedlyuntilthe desiredrepeatrangeappearsinthedisplay.
- Disc repeat – Repeat the current disc
- Track repeat – Repeat just the current track

Note
If you perform track search forward/reversed during Track repeat, therepeat play range changesto Discrepeat.
Playingtracksinrandomorder
Randomplayletsyouplaybacktracksonthe CDinarandomorder.
1UseMULTI-CONTROLtoselect Randommode.
Randommodeappearsinthedisplay.
2PressMULTI-CONTROLtoturnrandom playon.
Trackswillplayinarandomorder.
■Toturnrandomplayoff, press
MULTI-CONTROLagain.
ScanningtracksofaCD
Scanplayletsyouhearthefirst10secondsof eachtrackontheCD.
1UseMULTI-CONTROLtoselect Scanmode.
Scanmodeappearsinthedisplay.
2PressMULTI-CONTROLtoturnscanplay on.
The first 10 second so each track is played.
3Whenyoufindthedesiredtrackpress MULTI-CONTROLtoturnscanplayoff.
Thetrackwillcontinuetoplay.
■ If the display has automatically returned to the playback display, select Scanmode again by using MULTI-CONTROL.

Note
AfterscanningofaCDisfinished,normalplay-backofthetrackswillbeginagain.
PausingCD playback
Pauselet syoutemporarilystopplayback of the CD.
1UseMULTI-CONTROLtoselectPause.
Pauseappearsinthedisplay.
2PressMULTI-CONTROLtoturnpause on.
Playbackofthecurrenttrackpauses.
■Toturnpauseoff,pressMULTI-CONTROL again.
Selectingthesearchmethod
Youcanswitchthesearchmethodbetween fastforward/reverseandsearchingevery10 tracks.
1UseMULTI-CONTROLtoselect Searchmode.
Searchmodeappearsinthedisplay.
2PressMULTI-CONTROLtoselectthe searchmethod.
Press MULTI-CONTROL until the desired search method appears in the display.
- FF/REV—Fastforwardandreverse
- Roughsearch—Searchingevery10 tracks
Searching every 10 tracks in the current disc
Ifadisccontainsover10tracks,youcan searchevery10tracks.Whenadisccontains manytracks,youcanroughlysearchforthe trackyouwanttoplay.
1SelectthesearchmethodRoughsearch.
RefertoSelectingthesearchmethodonthis page.
2PushandholdMULTI-CONTROLleftor righttosearchevery10tracksonadisc.
■Ifadisccontainslessthan10tracks,pushing andholdingMULTI-CONTROLrightrecallsthe lasttrackofthedisc.Also,iftheremainingnumberoftracksaftersearchingevery10tracksis lessthan10,pushingandholding
MULTI-CONTROL rightrecallsthelasttrackof thedisc.
Built-inCDPlayer
■Ifadisccontainslessthan10tracks,pushing andholdingMULTI-CONTROLleftrecallsthefirst trackofthedisc.Also,iftheremainingnumberof tracksaftersearchingevery10tracksislessthan 10,pushingandholdingMULTI-CONTROLleftrecallsthefirsttrackofthedisc.
Usingdistitlefunctions
YoucaninputCDtitlesanddisplaythetitle. ThenexttimeyouinsertaCDforwhichyou haveenteredatitle, thetitleofthatCDwillbe displayed.
Usethedisctitleinputfeaturetostoreupto 48CDtitlesintheunit.Eachtitlecanbeupto 10characterslong.
- WhenplayingaCDTEXTdisc,youcannot switchtodisctitleinputdisplay.Thedisc titlewillhavealreadybeenrecordedona CDTEXTdisc.
Enteringdisctitles
Youcandisplaythetextinformationofany discthathashadadisctitleentered.
1PlaytheCDthatyouwanttoentera titlefor.
2UseMULTI-CONTROLtoselect TitleInput"A".
TitleInput"A"appearsinthedisplay.
3PressDISPLAYtoselectthedesired charactertype.
PressDISPLAYrepeatedlytoswitchbetween the followingcharacter types: Alphabet(uppercase),numbersandsymbols—Alphabet(lowercase)—Europeanletters, such as those with accents (e.g. á, à, ä, ç)—Numbersandsymbols
4PushMULTI-CONTROLupordownto selectaletterofthealphabet.
EachtimeMULTI-CONTROL is pushedup, lettersofthealphabetaredisplayedin ABC...X Y Z order, numbersandsymbolsin123...@ # < order. Each time MULTI-CONTROL is pushdown, lettersaredisplayedinZYX... C B A order.

text_image
TitleInput "A"5PushMULTI-CONTROLrighttomove thecursortothenextcharacterposition.
Whentheletteryouwantisdisplayed, push MULTI-CONTROL righttomovethecursorto thenextpositionandthenselectthenextletter.PushMULTI-CONTROL lefttomovebackwardsinthedisplay.
6Movethecursortothelastpositionby pushingMULTI-CONTROLrightafterenteringthetitle.
When you push MULTI-CONTROL rightone more time, the entered title is stored in memory.
7PressBANDtoreturntothe playback display.

Notes
- Titlesremaininmemory,evenafterthedisc hasbeenremovedfromtheunit,andarere-calledwhenthediscisreinserted.
• Afterdatafor48discshasbeenstoredin memory, dataforanewdiscwilloverwritethe oldestone. - If you connect amulti-CD player, you can input disctitles for up to 100 discs.
- Whenamulti-CDplayerthatdoesnotsupport disctitlefunctionsisconnected,youcannot enterdisctitlesinthisunit.
Displayingdisctitles
Youcandisplaythetextinformationofany discthathashadadisctitleentered.
- PressDISPLAY.
PressDISPLAY repeatedlytoswitchbetween the followingsettings:
Playtime— Ⓧ:disctitleandplaytime
UsingCDTEXTfunctions
Somediscshavecertaininformationencoded onthediscduringmanufacture.Thesediscs maycontainsuchinformationastheCDtitle, tracktitle,artist'snameand playbacktime andarecalledCDTEXTdiscs.OnlythesesespeciallyencodedCDTEXTdiscssupportthe functionslistedbelow.
Displayingtextinformationon CDTEXTdiscs
Youcandisplaythetextinformationofany discthathashadadisctitleentered.
- PressDISPLAY.
PressDISPLAY repeatedlytoswitchbetween thefollowingsettings:
Playtime— ☉:disctitleandplaytime—: discartistnameandplaytime— 🍒:tracktitle andplaytime— 🍒:trackartistnameandplay time— ⚫:disctitleand:dispartistname — 🍒:tracktitleand:trackartistname
■Ifspecificinformationhasnotbeenrecorded onaCDTEXTdisc, titleornameisnotdisplayed.
Scrollingtextinformationin thedisplay
Thisunitcandisplaythefirst14lettersofdisc title,discartistname,tracktitleandtrackartistname.Whenthetextinformationislonger than14letters,youcanscrollthetextinformationasfollows.
- PressDISPLAYandholduntilthetext informationbeginstoscrollthroughthe display.

Note
When EverScrollissettoONattheinitialsetting, CDtextinformationscrollscontinuouslyinthe display. If you want to display the first 14 characters of text information temporarily and scroll from the beginning, press and hold DISPLAY. Referto Switching the Ever Scroll on page 67.
Selectingtracksfromthetrack titlelist
Tracktitlelistletsyouseethelistoftracktitles onaCDTEXTdiscandselectoneofthemto playback.
1TurnMULTI-CONTROLtoswitchtothe tracktitlelistmode.
■Youcanalsoperformthisoperationbypressingjoystickontheremotecontrol.
2UseMULTI-CONTROLtoselectthedesiredtracktitle.
Turntochangethetracktitle;presstoplay.
■Youcanalsochangethetracktitlebypushing MULTI-CONTROLupordown.
■Ifyoudonotoperatethelistwithinabout30 seconds,thetracktitlelistmodeiscanceled automatically.
MP3/WMA/AAC/WAVPlayer
PlayingMP3/WMA/AAC/WAVfiles
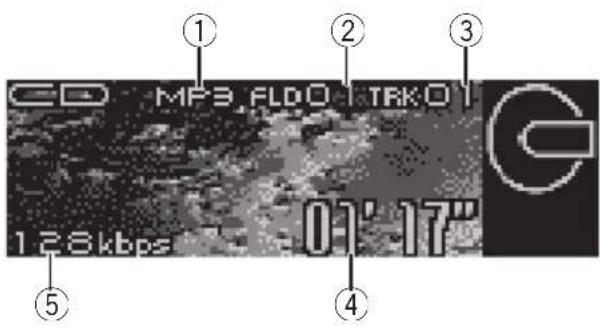
text_image
CD MF3,FLDO TRK01 128kbps -01' 17" ① ② ③ ④ ⑤These are the basic steps necessary to play an MP3/WMA/AAC/WAV with your built-in CD player. More advanced MP3/WMA/AAC/WAV operation is explained starting on page 25.
①MP3/WMA/AAC/WAVindicator
Showsthetypeoffilecurrentlyplaying.
②Foldernumberindicator
Showsthenumberoffoldercurrentlyplaying.
③Tracknumberindicator
Showsthetrack(file)currentlyplaying.
④Playtimeindicator
Showstheelapsedplayingtimeofthecurrenttrack(file).
⑤Bitrate/samplingfrequencyindicator
Showsthebitrateorsamplingfrequencyof thecurrenttrack(file).
- WhenplayingbackMP3filesrecorded asVBR(variablebitrate)files,thebit ratevalueisnotdisplayedevenafter switchingtobitrate.(VBRwillbedisplayed.)
- WhenplayingbackWMAfilesrecorded asVBR(variablebitrate)files,theaveragebitratevalueisdisplayed.
- Youcanonly playback WAV files in the frequencies 16, 22.05, 24, 32, 44.1 and 48 kHz (LPCM), or 22.05 and 44.1 kHz (MS ADPCM). Thesampling frequency shown in the display may be rounded.
1PressSOURCEtoselectthebuilt-inCD player.
PressSOURCEuntilyouseeCompactDisc displayed.
■ Ifnodiscisloadedintheunit, you cannot selectCompactDisc(built-inCDplayer).Inserta discintheunit.(Refertopage13.)
2PushMULTI-CONTROLupordownto selectafolder.
■Youcannotselectafolderthatdoesnothave anMP3/WMA/AAC/WAVfilerecordedinit.
■Toreturntofolder01(ROOT),pressandhold BAND. However,iffolder01(ROOT)containsno files, playbackcommenceswithfolder02.
3Toperformfastforwardorreverse, pushandholdMULTI-CONTROLleftor right.
■ If you select Roughsearch, pushing and holding MULTI-CONTROL left or right enables you to search every 10 tracks in the current folder. (Refer to Selecting these search method on page 26.)
4 Toskipbackorforwardtoanother track, push MULTI-CONTROLleftorright.
Pushing MULTI-CONTROL rightskipstothe startofthenexttrack.Pushing MULTI-CONTROL leftonceskipstothestart of the current track.Pushing again will skipto the previous track.

Notes
- WhenplayingdiscswithMP3/WMA/AAC/WAVfilesandaudiodata(CD-DA)suchas CD-EXTRAandMIXED-MODECDs,bothtypes canbeplayedonlybyswitchingmodebetweenMP3/WMA/AAC/WAVandCD-DAwith BAND.
- If you have switched between playback of MP3/WMA/AAC/WAVfiles and audiodata (CD-DA), playback starts at the first track on the disc.
- The built-in CD player can playback an MP3/WMA/AAC/WAV filerecorded on CD-ROM. (Refertopage 73 for file that can be played back.)
- Playbackiscarriedoutinorderoffilenumber. Foldersareskippediftheycontainnofiles.(If folder01(ROOT)containsnofiles, playback commenceswithfolder02.)
- WhenplayingbackfilesrecordedasVBR (variablebitrate)files,theplaytimewillnotbe correctlydisplaydiffastforwardorreverse operationsareused.
- Thereisnosoundonfastforwardorreverse.
- Whenthedisplaysettingisswitchedtothe textinformationbypassingDISPLAY, folder nameandfilenameautomaticallybeginto scrollinthedisplay.WhenEverScrollissettoONattheinitialsetting, folderandfilename scrollcontinuously.AboutEverScroll, referto SwitchingtheEverScrollonpage67.
Selectingatrackdirectlyin thecurrentfolder
When using theremote control, you can select a track directly by entering the desired track number.
1PressDIRECT.
Tracknumberinputdisplayappears.
2Press0-9buttonstoenterthedesired tracknumber.
■Youcancanceltheinputnumberbypassing CLEAR.
3PressDIRECT.
Thetrackofenterednumberwillplay.

Note
Afterenteringthenumberinputmode, if you do not perform an operation within about eight seconds, themodeis automatically canceled.
MP3/WMA/AAC/WAVPlayer
Introductionofadvanced built-inCDplayer(MP3/WMA/AAC/WAV)operation
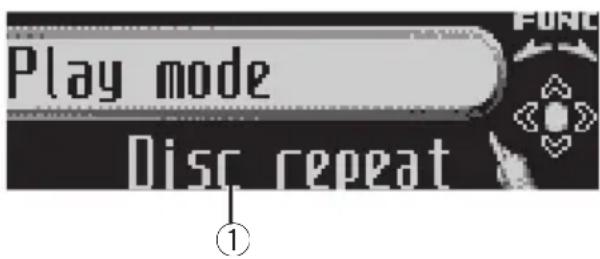
text_image
Play mode Disc repeat①Functiondisplay
Showsthefunctionstatus.
1PressMULTI-CONTROLtodisplaythe mainmenu.
FUNCTION.AUDIOandENTERTAINMENT
appearonthedisplay.
2UseMULTI-CONTROLtoselect FUNCTION.
Turntochangethemenuoption:presstose-lect.
Thefunctionnameappearsonthedisplay.
3TurnMULTI-CONTROLtoselectthe function.
TurnMULTI-CONTROLclockwisetoswitchbetweenthefunctionsinthefollowingorder:
Playmode(repeatplay)—Randommode(randomplay)—Scanmode(scanplay)—
Pause(pause)—Searchmode(searchmethod)
■Youcanalsoswitchbetweenthefunctionsin reverseorderbyturningMULTI-CONTROLcounterclockwise.
■ To return to the playback display, press BAND.

Note
If you donotoperatethe function within about 30 seconds, the display is automatically returned to the playback display.
Repeatingplay
ForMP3/WMA/AAC/WAV playback, there are three repeat play ranges: Folder repeat (folder repeat), Track repeat (one-track repeat) and Discrepeat (repeat all tracks).
1UseMULTI-CONTROLtoselect Playmode.
Playmodeappearsinthedisplay.
2PressMULTI-CONTROLtoselectthere- peatrange.
PressMULTI-CONTROLrepeatedlyuntilthe desiredrepeatrangeappearsinthedisplay.
- Folder repeat – Repeat the current folder
- Track repeat – Repeat just the current track
- Discrepeat–Repeatalltracks

Notes
- If you select another folder during repeat play, therepeat play range changesto Discrepeat.
- If you perform track search or fast forward/ reversed during Track repeat, therepeat play range changesto Folder repeat.
- When Folderrepeat is selected, it is not possible to playback as subfolder of that folder.

Playingtracksinrandomorder
Randomplayletsyouplaybacktracksina randomorderwithintherepeatrange, FolderrepeatandDiscrepeat.
1Selecttherepeatrange.
RefertoRepeatingplayonthispage.
2UseMULTI-CONTROLtoselect Randommode.
Randommodeappearsinthedisplay.
3PressMULTI-CONTROLtoturnrandom playon.
Trackswillplayinarandomorderwithinthe previouslyselectedFolderrepeater
Discrepeatranges.
■Toturnrandomplayoff, press
MULTI-CONTROLagain.
Scanningfoldersandtracks
WhileyouareusingFolderrepeat,thebegin- ningofeachtrackintheselectedfolderplays forabout10seconds.Whenyouareusing
Discrepeat, the beginning of the first track of each folder is played for about 10 seconds.
1Selecttherepeatrange.
RefertoRepeatingplayonthepreviouspage.
2UseMULTI-CONTROLtoselect Scanmode.
Scanmodeappearsinthedisplay.
3PressMULTI-CONTROLtoturnscanplay on.
The first 10 second so each track of the current folder (or the first track of each folder) is played.
4Whenyoufindthedesiredtrack(or folder)pressMULTI-CONTROLtoturnscan playoff.
Thetrack(orfolder)willcontinuetoplay.
■ Ifthedisplayhasautomaticallyreturned to the playbackdisplay, select Scanmode again by using MULTI-CONTROL.

Note
Aftertrackorfolderscanningisfinished, normal playbackofthetrackswillbeginagain.
PausingMP3/WMA/AAC/WAV playback
Pauselet syoutemporarilystopplayback of theMP3/WMA/AAC/WAV.
1UseMULTI-CONTROLtoselectPause. Pauseappearsinthedisplay.
2PressMULTI-CONTROLtoturnpause on.
Playbackofthecurrenttrackpauses.
■Toturnpauseoff,pressMULTI-CONTROL again.
Selectingthesearchmethod
Youcanswitchthesearchmethodbetween fastforward/reverseandsearchingevery10 tracks.
1UseMULTI-CONTROLtoselect Searchmode.
Searchmodeappearsinthedisplay.
2PressMULTI-CONTROLtoselectthe searchmethod.
Press MULTI-CONTROL until the desired search method appears in the display.
- FF/REV—Fastforwardandreverse
- Roughsearch—Searchingevery10 tracks
Searching every 10 tracks in the current folder
If the current folder contains over 10 tracks, you can search every 10 tracks. When one folder contains a lot of tracks, you can roughly search forth the track you want to play.
MP3/WMA/AAC/WAVPlayer
1SelectthesearchmethodRoughsearch.
RefertoSelectingthesearchmethodonthe previouspage.
2PushandholdMULTI-CONTROLleftor righttosearchevery10tracksinthecurrentfolder.
■Ifthecurrentfoldercontainslessthan10 tracks,pushingandholdingMULTI-CONTROL rightrecallsthelasttrackofthefolder.Also,ifthe remainingnumberoftracksaftersearchingevery 10tracksislessthan10,pushingandholding MULTI-CONTROLrightrecallsthelasttrackof thefolder.
■If the current folder contains less than 10 tracks, pushing and holding MULTI-CONTROL left recall the first track of the folder. Also, if the remaining number of tracks after searching every 10 tracks is less than 10, pushing and holding MULTI-CONTROL left recall the first track of the folder.
Displayingtextinformation onMP3/WMA/AAC/WAVdisc
TextinformationrecordedonanMP3/WMA/AAC/WAVdisccanbedisplayed.
WhenplayingbackanMP3/WMA/AACdisc
- PressDISPLAY.
PressDISPLAYrepeatedlytoswitchbetween the followingsettings:
Playtime—:foldernameandplaytime—:filenameandplaytime—:foldername and :filename—:artistnameand:albumtitle—:artistnameand:tracktitle—:commentandplaytime
■Ifspecificinformationhasnotbeenrecorded onanMP3/WMA/AACdisc, titleornameisnot displayed.
- DependingontheversionofiTunes ^ usedto writeMP3filesontoadisc,commentinformation maynotbecorrectlydisplayed. - DependingontheversionofWindowsMedia PlayerusedtoencodeWMAfiles,albumnames andothertextinformationmaynotbecorrectly displayed.
WhenplayingbackaWAVdisc
- PressDISPLAY.
PressDISPLAYrepeatedlytoswitchbetween thefollowingsettings:
Playtime—☐:foldernameandplaytime—☐:filenameandplaytime—:foldername and ☐:filename ☐
Scrollingtextinformation inthedisplay
Thisunitcandisplaythefirst14lettersonlyof foldername, filename, tracktitle, artistname, albumtitleandcomment. Whentherecorded informationislongerthan14letters, youcan scrollthetexttotheleftsothattherestofthe textinformationcanbeseen.
- PressDISPLAYandholduntilthetext informationbeginstoscrollthroughthe display.
Thetextinformationscrolls.

Notes
- UnlikeMP3, WMA and AAC file format, WAV files display only the folder name and the file name.
- When EverScrollissettoONattheinitialsetting, CDtextinformationscrollscontinuously inthedisplay. If you want to display the first 14 characters of text information temporarily and scroll from the beginning, press and hold DISPLAY. Referto Switching the Ever Scroll on page 67.
Selectingtracksfromthe filenamelist
Filenamelistletsyouseethelistoffilenames (orfoldernames) and select one of them to playback.
1TurnMULTI-CONTROLtoswitchtothe filenamelistmode.
■Youcanalsoperformthisoperationbypassingjoystickontheremotecontrol.
2UseMULTI-CONTROLtoselectthedesiredfilename(orfoldername).
Turntochangethenameoffileorfolder; presstoplay; pushrighttoseealistofthe files(orfolders) intheselectedfolder.
■Youcanalsochangethenameoffileorfolder bypushingMULTI-CONTROLupordown.
■Toreturntothepreviouslist(thefolderone levelhigher),pushMULTI-CONTROLleft.
■ Ifthefolder/filenumberismorethan100, last 2-digitofthefolder/filenumberisdisplayed.
■Numberofthefolders/filesinthecurrentlyselectedfolderwillbeindicatedontherightsideofthedisplay.
■Ifyoudonotoperatethelistwithinabout30 seconds,thefilenamelistmodeiscanceled automatically.
Multi-CDPlayer
PlayingaCD
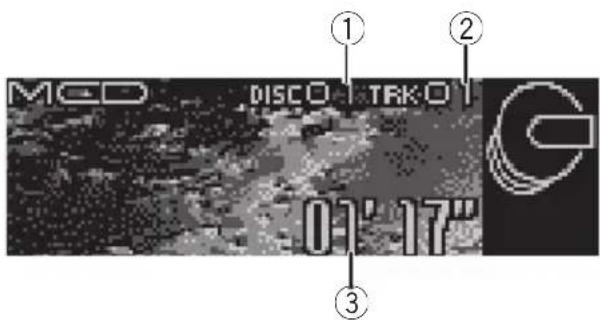
text_image
MCD DISCO TRK:01 01' 17" ① ② ③Youcanusethisunittocontrolamulti-CD player, which is sold separately. These are the basic steps necessary to play a CD with your multi-CD player. More advanced CD operation is explained starting on then next page.
①Discnumberindicator
Showsthedisccurrentlyplaying.
②Tracknumberindicator
Showsthetrackcurrentlyplaying.
③Playtimeindicator
Showstheelapsedplayingtimeofthecurrenttrack.
1PressSOURCEtoselectthemulti-CD player.
PressSOURCEuntilyouseeMulti-CDdis-played.
2PushMULTI-CONTROLupordownto selectadiscyouwanttolistento.
- You can also select a disc by using 1–6 buttonsontheremotecontrol.
- Fordiscs1to6, pressthecorresponding buttonnumber.
- Fordiscs7to12, pressandholdthecorrespondingnumbers, suchas1fordisc7, untilthediscnumberappearsinthedisplay.
3Toperformfastforwardorreverse, pushandholdMULTI-CONTROLleftor right.
4 Toskipbackorforwardtoanother track, push MULTI-CONTROLleftorright.
PushingMULTI-CONTROLrightskipstothe startofthenexttrack.Pushing
MULTI-CONTROL leftonceskipstothestart of the current track. Pushing again will skipto the previous track.

Notes
- Whenthemulti-CDplayerperformsthepreparatoryoperations, Ready is displayed.
- IfanerrormessagesuchasERROR-11isdisplayed, refertothemulti-CDplayerowner's manual.
- If there are an odiscsin themulti-CD player magazine, NoDisc is displayed.
- WhenyouselectaCDTEXTdisconaCDTEXT compatible multi-CDplayer,thediscandtrack titles automatically begintoscrollinthedis- play.EverScrollfunctionisONattheinitial setting,thediscandtracktitlesscrollcontinu- ously.AboutEverScroll,refertoSwitchingthe EverScrollonpage67.
Selectingatrackdirectly
When using theremote control, you can select a track directly by entering the desired track number.
1PressDIRECT.
Tracknumberinputdisplayappears.
2Press0-9buttonstoenterthedesired tracknumber.
■Youcancanceltheinputnumberbypassing CLEAR.
3PressDIRECT.
Thetrackofenterednumberwillplay.

Note
Afterenteringthenumberinputmode, if you do not perform an operation within about eight seconds, themode is automatically canceled.
50-discmulti-CDplayer
Onlythosefunctionsdescribedinthismanual aresupportedby50-discmulti-CDplayers. Thisunitisnotdesignedtooperatedisctitle listfunctionswitha50-discmulti-CDplayer. Aboutthedisctitlelistfunctions,pleaserefer toSelectingdiscsfromthedisctitleliston page34.
Introductionofadvanced multi-CDplayeroperation

text_image
Play mode M-CD repeat①Functiondisplay
Showsthefunctionstatus.
1PressMULTI-CONTROLtodisplaythe mainmenu. FUNCTION, AUDIOandENTERTAINMENT appearonthedisplay.
2UseMULTI-CONTROLtoselect FUNCTION.
Turntochangethemenuoption;presstoselect. Thefunctionnameappearsonthedisplay.
3TurnMULTI-CONTROLtoselectthe function.
TurnMULTI-CONTROLclockwisetoswitchbetweenthefunctionsinthefollowingorder: Playmode(repeatplay)—Randommode(randomplay)—Scanmode(scanplay)—Pause (pause)—ITS play mode (ITS play)—ITSmemo(ITSprogramming)—TitleInput"A"(discitleinput)
■Youcanalsoswitchbetweenthefunctionsin reverseorderbyturningMULTI-CONTROLcounterclockwise.
■ To return to the playback display, press BAND.

Notes
- WhenplayingaCDTEXTdisconaCDTEXT compatiblemulti-CDplayer,youcannot switchtodisctitleinput.Thedisctitlewill havealreadybeenrecordedonaCDTEXT disc.
- If you donotoperatethe function within about 30 seconds, the display is automatically returned to the playback display.
Repeatingplay
There are three repeaters play ranges for the multi-CD player: M-CD repeat (multi-CD player repeat), Track repeat (one-track repeat) and Discrepeat (discrepeat).
1UseMULTI-CONTROLtoselect Playmode.
Playmodeappearsinthedisplay.
2PressMULTI-CONTROLtoselecttherepeatrange.
Press MULTI-CONTROL repeatedly until the desired repeat range appears in the display.
- M-CD repeat – Repeat all discs in the multi-CDplayer
- Track repeat – Repeat just the current track
• Disc repeat – Repeat the current disc

Notes
- If you select other discsduring repeat play, therepeat play range changesto M-CDrepeat.
- If you perform track search or fast forward/reversed during Trackrepeat, therepeat play range changesto Discrepeat.
Playingtracksinrandomorder
Randomplayletsyouplaybacktracksinrandomorderwithintherepeatrange, M-CDrepeatandDiscrepeat.
1Selecttherepeatrange.
RefertoRepeatingplayonthispage.
2UseMULTI-CONTROLtoselect Randommode.
Randommodeappearsinthedisplay.
3PressMULTI-CONTROLtoturnrandom playon.
Trackswillplayinarandomorderwithinthe previouslyselectedM-CDrepeater Discrepeatranges.
■Toturnrandomplayoff, press
MULTI-CONTROLagain.
ScanningCDsandtracks
WhileyouareusingDiscrepeat,thebeginningofeachtrackontheselecteddiscplaysforabout10seconds.WhenyouareusingM-CDrepeat,thebeginningofthefirsttrackofeachdiscisplayedforabout10seconds.
1Selecttherepeatrange.
RefertoRepeatingplayonthispage.
2UseMULTI-CONTROLtoselect Scanmode.
Scanmodeappearsinthedisplay.
3PressMULTI-CONTROLtoturnscanplay on.
The first 10 second so each track of the current disc (orthefirst track of each disc) is played.
4Whenyoufindthedesiredtrack(or disc)pressMULTI-CONTROLtoturnscan playoff.
Thetrack(ordisc)willcontinuetoplay.
■ Ifthedisplayhasautomaticallyreturned to the playbackdisplay, select Scanmode again by using MULTI-CONTROL.

Note
Aftertrackordiscscanningisfinished, normal playbackofthetrackswillbeginagain.
PausingCD playback
Pauselet syoutemporarilystopplayback of the CD.
1UseMULTI-CONTROLtoselectPause. Pauseappearsinthedisplay.
2PressMULTI-CONTROLtoturnpause on.
Playbackofthecurrenttrackpauses.
■Toturnpauseoff,pressMULTI-CONTROL again.
UsingITSplaylists
ITS(instanttrackselection)letsyoumakea playlistoffavoritetracksfromthoseinthe multi-CDplayermagazine.Afteryouhave addedyourfavoritetrackstotheplaylistyou canturnonITSplayandplayjustthoseselections.
CreatingaplaylistwithITS programming
YoucanuseITStoenterandplaybackupto 99tracksperdiscfromupto100discs(with thedisctitles).(Withmulti-CDplayerssoldbeforetheCDX-P1250andCDX-P650,upto24 trackscanbestoredintheplaylist.)
1PlayaCDthatyouwanttoprogram.
Push MULTI-CONTROLupordowntoselect theCD.
2UseMULTI-CONTROLtoselect ITSmemo.
ITSmemoappearsinthedisplay.
3Selectthedesiredtrackbypushing MULTI-CONTROLleftorright.
4PushMULTI-CONTROLuptostorethe currentlyplayingtrackintheplaylist.
Memorycomplete is displayed and the currently playing selection is added to your playlist.
5PressBANDtoreturntothe playback display.

Note
Afterdatafor100discshasbeenstoredinmemory, dataforanewdiscwilloverwritetheoldest one.
PlaybackfromyourITSplaylist
ITSplayletsyoulistentothetracksthatyou haveenteredintoyourITSplaylist.Whenyou turnonITSplay,tracksfromyourITSplaylist inthemulti-CDplayerwillbegintoplay.
1Selecttherepeatrange.
RefertoRepeatingplayonthepreviouspage.
2UseMULTI-CONTROLtoselect ITSplaymode.
ITSplaymodeappearsinthedisplay.
3PressMULTI-CONTROLtoturnITSplay on.
ITSplaymodeappearsinthedisplay.Play-backbeginsofthosetracksfromyourplaylist withinthepreviouslyselectedM-CDrepeater Discrepeatranges.
Multi-CDPlayer
■IfnotracksinthecurrentrangeareprogrammedforITSplay,thenITSemptyisdisplayed.
■ToturnITSplayoff,pressMULTI-CONTROL again.
ErasingatrackfromyourITS playlist
YoucandeleteatrackfromyourITSplaylistif ITSplayison. IfITSplayisalreadyon,skiptostep2.IfITS playisnotalreadyon,useMULTI-CONTROL.
1PlaytheCDwiththetrackyouwantto deletefromyourITSplaylist,andturnITS playon.
RefertoPlaybackfromyourITSplaylistonthe previouspage.
2UseMULTI-CONTROLtoselect ITSmemo.
ITSmemoappearsinthedisplay.
3Selectthedesiredtrackbypushing MULTI-CONTROLleftorright.
4PushMULTI-CONTROLdowntoerase thetrackfromyourITSplaylist.
The currently playing selection is erased from your ITS playlist and playback of then next track from your ITS playlist begins.
■ If there are not tracks from your playlist in the current range, ITSempty is displayed and normal play resumes.
5PressBANDtoreturntothe playback display.
ErasingaCDfromyourITSplaylist
YoucandeletealltracksofaCDfromyourITS playlistifITSplayisoff.
1PlaytheCDthatyouwanttodelete.
Push MULTI-CONTROLupordowntoselect theCD.
2UseMULTI-CONTROLtoselect ITSmemo.
ITSmemoappearsinthedisplay.
3PushMULTI-CONTROLdowntoerase alltracksonthecurrentlyplayingCDfrom yourITSplaylist.
AlltracksonthecurrentlyplayingCDare erasedfromyourplaylist and Memorydeleted is displayed.
4PressBANDtoreturntothe playback display.
Usingdistitlefunctions
YoucaninputCDtitlesanddisplaythetitles. Thenyoucaneasilysearchforandplayade-sireddisc.
Enteringdisctitles
Usethedisctitleinputfeaturetostoreupto 100CDtitles(withITSplaylist)intothemulti-CDplayer.Eachtitlecanbeupto10characterslong.
1PlaytheCDthatyouwanttoentera titlefor.
Push MULTI-CONTROLupordowntoselect theCD.
2UseMULTI-CONTROLtoselect TitleInput"A".
TitleInput"A"appearsinthedisplay.
3PressDISPLAYtoselectthedesired charactertype.
PressDISPLAY repeatedlytoswitchbetween the followingcharacter types:
Alphabet(uppercase), numbersandsymbols —Alphabet(lowercase)—Europeanletters, such as those with accents (e.g. á, à, ä, ç)—Numbersandsymbols
4PushMULTI-CONTROLupordownto selectaletterofthealphabet.
EachtimeMULTI-CONTROLispushedup,lettersofthealphabetaredisplayedinABC...X Y Z order,numbersandsymbolsin123...@
< order. Each time MULTI-CONTROL is
pusheddown,lettersaredisplayedinZYX... C B A order.

text_image
TitleInput "A"5PushMULTI-CONTROLrighttomove thecursortothenextcharacterposition.
Whentheletteryouwantisdisplayed, push MULTI-CONTROL righttomovethecursorto thenextpositionandthenselectthenextletter.PushMULTI-CONTROL lefttomovebackwardsinthedisplay.
6Movethecursortothelastpositionby pushingMULTI-CONTROLrightafterenteringthetitle.
When you push MULTI-CONTROL rightone more time, the entered title is stored in memory.
7PressBANDtoreturntothe playback display.

Notes
- Titlesremaininmemory,evenafterthedisc hasbeenremovedfromthemagazine,and arerecalledwhenthediscisreinserted.
• Afterdatafor100discshasbeenstored in memory, dataforanewdiscwilloverwritethe oldestone.
Displayingdisctitles
Youcandisplaythetextinformationofany discthathashadadisctitleentered.
●PressDISPLAY.
PressDISPLAYrepeatedlytoswitchbetween thefollowingsettings:
Playtime— Ⓧ:disctitleandplaytime
Selectingdiscsfromthedisc titlelist
Disctitlelistletsyouseethelistofdisctitles that have been entered into themulti-CD player and select one of them to playback.
1TurnMULTI-CONTROLtoswitchtothe disctitlelistmode.
■Youcanalsoperformthisoperationbypressingjoystickontheremotecontrol.
2UseMULTI-CONTROLtoselectthedesireddisctitle.
Turntochangethedisctitle;presstoplay.
■Youcanalsochangethedisctitlebypushing
MULTI-CONTROLupordown.
■ Ifnotitlehasbeenenteredforadisc,
NoD. Title will be displayed.
■NoDiscisdisplayednexttothediscnumber whenthereisnodiscinthemagazine.
UsingCDTEXTfunctions
YoucanusethesefunctionsonlywithaCD TEXTcompatiblemulti-CDplayer.
Somediscshavecertaininformationencoded onthediscduringmanufacture.Thesediscs maycontainsuchinformationastheCDtitle, tracktitle,artist'snameand playbacktime andarecalledCDTEXTdiscs.OnlythesesespeciallyencodedCDTEXTdiscssupportthe functionslistedbelow.
Displayingtextinformationon CDTEXTdiscs
●PressDISPLAY.
PressDISPLAYrepeatedlytoswitchbetween thefollowingsettings:
Playtime— ☑:disctitleandplaytime—: discartistnameandplaytime— ☑:tracktitle andplaytime— ☑:trackartistnameandplay time— ☑:disctitleand:discartistname — ☑:tracktitleand:trackartistname
■ If specific information has not been recorded on a CDTEXTdisc, title or name is not displayed.
Scrollingtextinformationin thedisplay
Thisunitcandisplaythefirst14lettersofdisc title, discartistname, tracktitle and trackartistname. Whenthetextinformationislonger than14letters, youcanscrollthetextinformationasfollows.
- PressDISPLAYandholduntilthetext informationbeginstoscrollthroughthe display.

Note
When Ever ScrollissettoONattheinitialsetting, CDtextinformationscrollscontinuouslyinthe display. If you want to display the first 14 characters of text information temporarily and scroll from the beginning, press and hold DISPLAY. Referto Switching the Ever Scroll on page 67.
Selectingtracksfromthetrack titlelist
Tracktitlelistletsyouseethelistoftracktitles onaCDTEXTdiscandselectoneofthemto playback.
1TurnMULTI-CONTROLtoswitchtothe disctitlelistmode.
■Youcanalsoperformthisoperationbypressingjoystickontheremotecontrol.
■ If you want to display the track title list of the currently playing disc, push MULTI-CONTROL right.
2UseMULTI-CONTROLtoselectthedesireddisctitleofCDTEXT.
Turntochangethedisctitle;presstoplay.
■Youcanalsochangethedisctitlebypushing
MULTI-CONTROLupordown.
■ If not title has been entered for adisc,
NoD.Titlewillbedisplayed.
■NoDiscisdisplayednexttothediscnumber whenthereisnodiscinthemagazine.
3PushMULTI-CONTROLrighttoswitch tothetracktitlelist.
■ Push MULTI-CONTROL left to return to the disctitlelist.
4UseMULTI-CONTROLtoselectthedesiredtracktitle.
Turntochangethetracktitle;presstoplay.
■Youcanalsochangethetracktitlebypushing
MULTI-CONTROLupordown.
Listeningtosongsonyour iPod
text_image
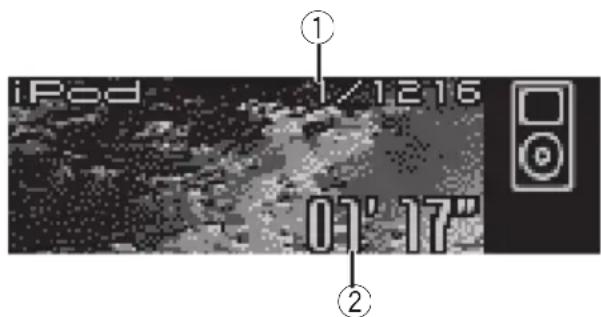
iPod 1/1216 01' 17" ① ②YoucanusethisunittocontrolaniPodadapter, whichissoldseparately.
These are the basic steps necessary to operate aniPodadapter. More advancediPodadapter operation is explained starting on introduction of advancediPodadapter operation on page 38.
①Songnumberindicator
Showsthenumberofsongplayedinthese- lectedlist.
②Playtimeindicator
Showstheelapsedplayingtimeofthecurrentsong.
1PressSOURCEtoselecttheiPod.
PressSOURCEuntilyouseeiPoddisplayed.
2Toperformfastforwardorreverse, pushandholdMULTI-CONTROLleftor right.
3 Toskipbackorforwardtoanother song, push MULTI-CONTROLleftorright.
PushingMULTI-CONTROLrightskipstothe startofthenextsong.Pushing
MULTI-CONTROL leftonceskipstothestart of thecurrentsong. Pushingagainwillskipto theprevious song.
Browsingforasong
TheoperationofthisunittocontrolaniPodis designedtobeasclosetotheoperationofthe iPodaspossibleforeasyoperationandsong search.
1TurnMULTI-CONTROLtoswitchtothe topmenuofthelistsearch.
■Youcanalsoperformthisoperationbypressingjoystickontheremotecontrol.
2UseMULTI-CONTROLtoselectacategory.
Turntochangethecategory;presstoselect.
Playlists (playlists)—Artists (artists)—
Albums (albums)—Songs (songs)—Genres (genres)
Listfromtheselectedcategoryisdisplayed.
■Youcanstart playback throughout these selected category bypassing and holding MULTI-CONTROL.
■Youcanalsochangethecategorybypushing MULTI-CONTROLupordown.
■Youcanalsoselectthecategorybypushing MULTI-CONTROLright.
■Toreturntothepreviouslist,push
MULTI-CONTROLleft.
■Togotothetopmenuofthelistsearch, push andhold MULTI-CONTROLleft.
■Ifyoudonotoperatethelistwithinabout30 seconds,thelistsearchiscancelledautomatically.
Searchingforasong
1TurnMULTI-CONTROLtoswitchtothe topmenuofthelistsearch.
■Youcanalsoperformthisoperationbypressingjoystickontheremotecontrol.
2UseMULTI-CONTROLtoselectaGenres, Artists,AlbumsorSongsfromamongthe categories.
Turntochangethecategory;presstoselect.
PlayingsongsoniPod
Listfromtheselectedcategoryisdisplayed.
3UseMULTI-CONTROLtoselectasong, album, artistorgenre.
Turntochangetheitem;presstoselect.
Listfromtheselecteditemisdisplayed.
■IfyouselectSongs(songs), playbackstartsinstantlyfromtheselectedone.
4Repeatstep3tofindasongyouwant tolistento.
Selectingaplaylist
YoucanselectaplaylistfromyouriPodplaylist.
1TurnMULTI-CONTROLtoswitchtothe topmenuofthelistsearch.
■Youcanalsoperformthisoperationbypassingjoystickontheremotecontrol.
2UseMULTI-CONTROLtoselecta Playlistsfromamongthecategories.
Turntochangethecategory;presstoselect. ListfromPlaylists(playlists)isdisplayed.
3UseMULTI-CONTROLtoselectaplaylist.
Turntochangetheplaylist; presstoselect. Songlistfromtheselectedplaylistisdisplayed.
■Youcanstart playback throughout these selected playlist bypassing and holding MULTI-CONTROL.
4UseMULTI-CONTROLtoselectasong fromtheselectedplaylist.
Turntochangethesong;presstoplay.
■ Ifnosongshavebeenstoredinplaylist, STOP isdisplayedandplaybackstops.
Displayingtext informationoniPod
TextinformationrecordedontheiPodcanbe displayed.
- PressDISPLAY.
PressDISPLAYrepeatedlytoswitchbetween thefollowingsettings:
Playtime— 📋:albumtitleandplaytime—: songtitleandplaytime— 🌐:artistnameand playtime— 🌒:artistnameand:albumtitle — ⏱:songtitleand:albumtitle
■ If the characters recorded on the Podarenot compatible with this unit, those characters will not be displayed.

Notes
- Youcanscrolltotheleftthetextinformation bypassingandholdingDISPLAY.
- When EverScrollissettoONattheinitialsetting,textinformationscrollscontinuouslyin thedisplay.Ifyouwanttodisplaythefirst14 charactersoftextinformationtemporarilyand scrollfromthebeginning,pressandhold DISPLAY.RefertoSwitchingtheEverScrollon page67.
Introductionofadvanced iPodadapteroperation
text_image
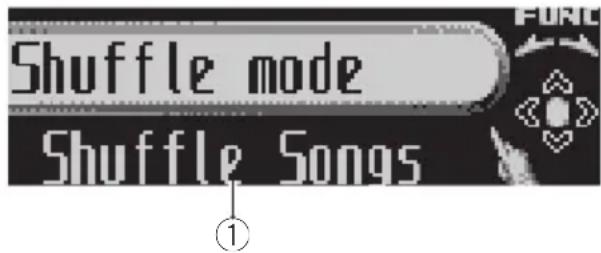
Shuffle mode Shuffle Songs①Functiondisplay
Showsthefunctionstatus.
1PressMULTI-CONTROLtodisplaythe mainmenu.
FUNCTION, AUDIO and ENTERTAINMENT appearonthedisplay.
2UseMULTI-CONTROLtoselect FUNCTION.
Turntochangethemenuoption;presstose-lect.
Thefunctionnameappearsonthedisplay.
3TurnMULTI-CONTROLtoselectthe function.
TurnMULTI-CONTROLclockwisetoswitchbetweenthefunctionsinthefollowingorder:
Play mode (repeat play)—Shuffle mode (randomplay)—Pause(pause)
■Youcanalsoswitchbetweenthefunctionsin reverseorderbyturningMULTI-CONTROLcounterclockwise.
■ To return to the playback display, press BAND.

Note
If you donotoperatethe function within about 30 seconds, the display is automatically returned to the playback display.
Repeatingplay
For playback of the song son thei Pod, there are two repeat play ranges: Repeat One (repeat onesong) and Repeat All (repeat all songs in thelist).
- While Play mode is set to Repeat One, you cannot select the othersongs.
1UseMULTI-CONTROLtoselect Playmode.
Playmodeappearsinthedisplay.
2PressMULTI-CONTROLtoselecttherepeatrange.
Press MULTI-CONTROL repeatedly until the desired repeat range appears in the display.
- Repeat One – Repeat just the current song
- Repeat All – Repeat all songs in the selectedlist
Playingsongsinarandom order(shuffle)
For playbackofthesongsontheiPod, there are tworandomplaymethods: ShuffleSongs (playbacksongsinarandomorder) and ShuffleAlbums (playbackalbumsinaran-domorder).
1UseMULTI-CONTROLtoselect Shufflemode.
Shufflemodeappearsinthedisplay.
2PressMULTI-CONTROLtoselectyourfavoritesetting.
PressMULTI-CONTROL repeatedly until the desired setting appears in the display.
- Shuffle Songs – Play back songs in a random order within these selected list
- Shuffle Albums – Select an album randomly, and then playback all the songs init inorder
- Shuffle OFF – Cancel the random play
PlayingsongsoniPod
Pausingasong
Pauselet syoutemporarilystopplaybackofa song.
1UseMULTI-CONTROLtoselectPause.
Pauseappearsinthedisplay.
2PressMULTI-CONTROLtoturnpause on.
Playbackofthecurrentsongpauses.
■Toturnpauseoff,pressMULTI-CONTROL again.
Watchingthetelevision

text_image
TV TV-1 PCh Channel 2 ① ② ③YoucanusethisunittocontrolaTVtuner, whichissoldseparately.
Fordetailsconcerningoperation, refertothe TVtuner'soperationmanual. ThissectionprovidesinformationonTVoperationswiththis unitwhichdiffersfromthatdescribedinthe TVtuner'soperationmanual.
①Bandindicator
ShowswhichbandtheTVtuneristunedto.
②Presetnumberindicator
Showswhichpresethasbeenselected.
③Channelindicator
ShowswhichchanneltheTVtuneristuned.
1PressSOURCEtoselecttheTV.
PressSOURCEuntilyouseeTelevisiondis- played.
2PressBANDtoselectaband.
PressBANDuntilthedesiredbandisdis- played, TV-1orTV-2.
3Toperformmanualtuning, push MULTI-CONTROLleftorright.
Thechannelsmoveupordownstepbystep.
4Toperformseektuning, pushandhold MULTI-CONTROL leftor right for about one second and release.
Thetunerwillscanthechannelsuntilabroadcaststrongenoughforgoodreceptionis found.
■Youcancancelseektuningbypushing
MULTI-CONTROLleftorright.
■ If you push and hold MULTI-CONTROL left or right, you can skip broadcasting channels. Seek tuning starts a ssoon as you are lease
MULTI-CONTROL.
Introductionofadvanced TVtuneroperation

text_image
BSSM Stored in band1 ①①Functiondisplay
FUNCTION, AUDIO and ENTERTAINMENT
appearonthedisplay.
2UseMULTI-CONTROLtoselect FUNCTION.
BSSMappearsonthedisplay.
■ To return to the channel display, press BAND.

Note
If you donotoperatethe function within about 30 seconds, the display is automatically returned to the channel display.
Storingbroadcaststations
Youcaneasilystoreupto12broadcaststationsforlaterrecall.
1Whenyoufindastationthatyouwant tostoreinmemory,turnMULTI-CONTROL toswitchtothepresetchannellistmode.
2UseMULTI-CONTROLtostorethese- lectedstationinmemory.
Turntochangethepresetnumber;pressand holdtostore.
The preset number you have selected will flash and then remain lit. These selected station has been stored in memory.
■ If you donotoperatethelist within about 30 seconds, the preset channel list mode is canceled automatically.

Notes
- Upto24stations, 12foreachoftwoTVbands, canbestoredinmemory.
- Youcanalsostorestationsassignedtopreset tuningnumbers1–6bypassingandholding oneofthepresettuningbuttons1–6ontheremotecontrol.
Storingthestrongest broadcaststations sequentially
1UseMULTI-CONTROLandselect FUNCTIONtodisplayBSSM.
2PressMULTI-CONTROLtoturnBSSM on.
Searchingisdisplayed.WhileSearchingis displayed,the12strongestbroadcaststations willbestoredinorderfromthelowestchannel up.Whenfinished,thepresetchannellistappears.
■Tocancelthestorageprocess,press MULTI-CONTROL.
3UseMULTI-CONTROLtoselectthedesiredstation.
Turntochangethestation;presstoselect.
■Youcanalsochangetestationbypushing MULTI-CONTROLupordown.
■ If you donotoperatethelist within about 30 seconds, the preset channel list mode is canceled automatically.

Note
Storingbroadcaststations with BSSM may replace broadcast stations you have saved using
P01—P12.
Selectingstations from the presetchannellist
Thepresetchannellistletsyouseethelistof presetstationsandselectoneofthemtoreceive.
1TurnMULTI-CONTROLtoswitchtothe presetchannellistmode.
■Youcanalsoperformthisoperationbypressingjoystickontheremotecontrol.
2UseMULTI-CONTROLtoselectthedesiredstation.
Turntochangethestation;presstoselect.
■Youcanalsochangethestationbypushing
MULTI-CONTROLupordown.
■Ifyoudonotoperatethelistwithinabout30 seconds,thepresetchannellistmodeiscanceledautomatically.

Notes
- Youcanalsorecallstationsassignedtopreset tuningnumbersbypushingMULTI-CONTROL upordownduringthechanneldisplay.
- Youcanalsorecallstationsassignedtopreset tuningnumbers1–6bypassingoneofthe presettuningbuttons1–6ontheremotecontrol.
DVDPlayer
Playingadisc

text_image
DVD DV1-vd TO1 e01 01' 17" ① ② ③ ④ DVD ⑤YoucanusethisunittocontrolaDVDplayeror multi-DVDplayer,whichissoldseparately. Fordetailsconcerningoperation,refertothe DVDplayer'sormulti-DVDplayer'soperation manual.Thissectionprovidesinformationon DVDoperationswiththisunitwhichdiffers fromthatdescribedintheDVDplayer'sor multi-DVDplayer'soperationmanual. Thesearethebasicstepsnecessarytoplaya DVDvideowithyourDVDplayer.MoreadvancedDVDvideooperationisexplainedstart-ingonthenextpage.
①DVD-V/VCD/CD/MP3/WMAindicator
Showsthetypeofdisccurrentlyplaying.
②Discnumberindicator
Showsthediscnumbercurrentlyplaying whenusingamulti-DVDplayer.
③Title/Foldernumberindicator
Showsthetitle(whenplayingDVDvideo)or folder(whenplayingMP3orWMA)ofthe selectioncurrentlyplaying.
④Chapter/tracknumberindicator
Showsthechapter(whenplayingDVD video)ortrack(whenplayingvideoCD,CD, MP3orWMA)currentlyplaying.
⑤Playtimeindicator
Showstheelapsedplayingtimeofthecurrenttrack.
1PressSOURCEtoselecttheDVDplayer/multi-DVDplayer. PressSOURCEuntilyouseeDVDdisplayed.
2Toperformfastforwardorreverse, pushandholdMULTI-CONTROLleftor right.
3Toskipbackorforwardtoanother chapter/track, pushMULTI-CONTROLleftor right.
Selectingadisc
- Youcanoperatethisfunctiononlywhena multi-DVDplayerisconnectedtothisunit.
●PushMULTI-CONTROLupordownto selectthedesireddisc.
Selectingafolder
- Youcanoperatethisfunctiononlywhena DVDplayerwhichiscorrespondingto MP3/WMAplaybackisconnectedtothis unit.
●PushMULTI-CONTROLupordownto selectafolder.
Introductionofadvanced DVDplayeroperation

text_image
Play mode Disc repeat①Functiondisplay
FUNCTION, AUDIO and ENTERTAINMENT appearonthedisplay.
2UseMULTI-CONTROLtoselect FUNCTION.
Turntochangethemenuoption;presstose-lect.
Thefunctionnameappearsonthedisplay.
3TurnMULTI-CONTROLtoselectthe function.
TurnMULTI-CONTROLclockwisetoswitchbetweenthefunctionsinthefollowingorder:
DuringDVDvideoorVideoCD playback
Playmode(repeatplay)—Pause(pause)
DuringCD playback
Playmode(repeatplay)—Randommode
(randomplay)—Scanmode(scanplay)—
Pause (pause)—ITS play mode (ITS play)—
ITS memo (ITS input)—TitleInput "A" (disc titleinput)
DuringMP3/WMA playback
Playmode(repeatplay)—Randommode
(randomplay)—Scanmode(scanplay)—
Pause(pause)
■Youcanalsoswitchbetweenthefunctionsin reverseorderbyturningMULTI-CONTROLcounterclockwise.
■ To return to the playback display, press BAND.

Note
When using this unit with multi-DVD player, you can switch to ITS play mode, ITS memo and disctitleinput.
Repeatingplay
- DuringPBCplaybackofVideoCDs, this function cannot beoperated.
1UseMULTI-CONTROLtoselect Playmode.
Playmodeappearsinthedisplay.
2PressMULTI-CONTROLtoselecttherepeatrange.
DuringDVDvideoplayback
PressMULTI-CONTROLrepeatedlyuntilthe desiredrepeatrangeappearsinthedisplay.
- Disc repeat – Repeat the current disc
- Chapter repeat – Repeat just the current chapter
• Title repeat – Repeat just the current title
DuringVideoCDorCD playback
PressMULTI-CONTROL repeatedly until the desired repeat range appears in the display.
- Disc repeat – Repeat the current disc
- Track repeat – Repeat just the current track
DuringMP3/WMAplayback
Press MULTI-CONTROL repeatedly until the desired repeat range appears in the display.
- Disc repeat – Repeat the current disc
- Folder repeat – Repeat the current folder
- Track repeat – Repeat just the current track

Notes
- If you select other discsduring repeat play, therepeat play range changesto Discrepeat.
DVDPlayer
- DuringvideoCDorCD playback, if you perform track search forward/ reversed during Track repeat, therepeat play range changesto Discrepeat.
- DuringMP3/WMA playback, if you select another folder during repeat play, therepeat play range changesto Discrepeat.
- DuringMP3/WMA playback, if you perform tracksearchor fast forward/reversed during Trackrepeat, therepeat play range changes to Folder repeat.
Pausingdiscplayback
1UseMULTI-CONTROLtoselectPause.
Pauseappearsinthedisplay.
2PressMULTI-CONTROLtoturnpause on.
Playbackofthecurrenttrackpauses.
■Toturnpauseoff,pressMULTI-CONTROL again.
Playingtracksinrandomorder
- YoucanoperatethisfunctionduringCD/MP3/WMA playback.
1UseMULTI-CONTROLtoselect Randommode.
Randommodeappearsinthedisplay.
2PressMULTI-CONTROLtoturnrandom playon.
Trackswillplayinarandomorder.
■Toturnrandomplayoff, press
MULTI-CONTROLagain.
ScanningtracksofaCD/MP3/WMA
- YoucanoperatethisfunctionduringCD/MP3/WMA playback.
1UseMULTI-CONTROLtoselect Scanmode.
Scanmodeappearsinthedisplay.
2PressMULTI-CONTROLtoturnscanplay on.
The first 10 second so each track is played.
3Whenyoufindthedesiredtrackpress MULTI-CONTROLtoturnscanplayoff.
Thetrackwillcontinuetoplay.
■ If the display has automatically returned to the playback display, select Scanmode again by using MULTI-CONTROL.
UsingITSplaylistanddisc titlefunctions
- Youcanoperatethesefunctionsonlywhen amulti-DVDplayerisconnectedtothis unit.
- ThisfunctiondiffersslightlyfromITSplay-backwithamulti-CDplayer.Withmulti-DVDplayer,ITSplaybackappliesonlytothe CDplaying.Fordetails,refertoUsingITSplaylistsonpage32.
Usingdistitlefunctions
YoucaninputCDtitlesanddisplaythetitles. Thenyoucaneasilysearchforandplayade-sireddisc.
- YoucanoperatethisfunctionduringCD playback.
Enteringdisctitles
DisctitleinputletsyouinputCDtitlesupto10 letterslongintotheDVDplayer.Fordetails concerningoperation,refertoEnteringdisctitlesonpage33.
- Youcanoperatethisfunctiononlywhena DVDplayerisconnectedtothisunit.
- WhenplayingaCDTEXTdisconaCDTEXT compatibleDVDplayer,youcannotswitch todisctitleinput.ThedisctitlewillhavealreadybeenrecordedonaCDTEXTdisc.

AudioAdjustments
Operationmodes
Thisunitfeaturestwooperationmodes:the3-waynetworkmode(NW)andthestandard mode(STD).Youcanswitchbetweenmodes asdesired.Initially,theDSPsettingissetto thestandardmode(STD).(RefertoSwitching theDSPsettingmodeonpage7.)
- The3-waynetworkmode(NW)letsyoucreatea3-waymulti-amp, multi-speakersystemwithseparatespeakersfor reproductionofhigh,middleandlowfrequencies(bands),eachdrivenbyadedicatedpoweramp.The3-waynetworkmode providesnetworkandtimealignmentfunctions,twofunctionsessentialforamulti-amp, multi-speakersystem,toenableprecisecontroloversettingsforeachfrequencyrange.
- Thestandardmode(STD)letsyoucreatea 4-speakersystemwithfrontandrearspeakers,ora6-speakersystemwithfrontand rearspeakersandsubwoofers.

Important
Evenwhenthebatteryisdisconnectedorthemicroprocessorisreset,thisunit'saudiosettingremainsinthememoryforatleastoneday.Ifyouwanttoresettheaudiosetting,refertoResettingtheaudiofunctionsonpage66.
Operationmodemarks
Thismanualusesthefollowingmarkstomake thedescriptionclear.
NW : This mark indicates a function only in NW mode or an operation in NW mode.
STD: This mark indicates a function available only in STD mode or an operation in STD mode.
- The functions and operations which donot carry either mark are commonly used in the NWandSTD modes.
3-waynetworkmode
NW
Adjustingtheaudioeasily
Bycarryingoutthefollowingsettings/adjustmentsintheordershown,youcancreateafinely-tunedsoundfieldeffortlessly.
①Usingthepositionselector(POSI)
②AutoTAandEQ(auto-timealignmentandauto-equalizing)
③Usingbalanceadjustment NW (BAL)
④Recallingequalizercurves
Adjustingtheaudiofinely
Bycarryingoutthefollowingsettings/adjustmentsintheordershown,youcancreateafinely-tunedsoundfieldeffortlessly.
① Adjusting the time alignment (Low-Lch)
② Adjusting network (NW 1, NW 2, NW 3, NW4)
③Adjustingequalizercurves(EQ1)
④ Adjusting 16-band graphic equalizer (EQ 2)
Standardmode
STD
Adjustingtheaudioeasily
The following functions let you easily adjust your audiosystem to match the car interior acoustic characteristics, which vary depending on the type of car.
①Usingthepositionselector(POSI)
②AutoTAandEQ(auto-timealignmentandauto-equalizing)
③Usingbalanceadjustment STD (F/B)
④Recallingequalizercurves
Adjustingtheaudiofinely
Bycarryingoutthefollowingsettings/adjustmentsintheordershown,youcancreateafinely-tunedsoundfieldeffortlessly.
①Usingsubwooferoutput(SW1)
AudioAdjustments
②Adjustingsubwoofersettings(SW2)
③Adjustinglowpassfilterattenuationslope (SW3)
④Settingthehighpassfilterforfrontspeakers (F.HPF 1, F.HPF 2)
⑤Settingthehighpassfilterforrearspeakers (R.HPF1,R.HPF2)
⑥Adjustingequalizercurves(EQ1)
⑦ Adjusting 16-band graphic equalizer (EQ 2)
Extrafunctions
Thesefunctionsarehelpfulinadjustingthe soundtosuityoursystemoryourpersonal preferences.
• UsingBBEsound(BBE)
-Adjustingloudness(LOUD)
- Adjusting source levels (SLA)
• UsingBMXandcompression(BMX)
Introductionofaudio adjustments

text_image
Front01 L/R 00 ①①Audiodisplay Showstheaudioadjustmentstatus.
1PressMULTI-CONTROLtodisplaythe mainmenu. FUNCTION, AUDIOandENTERTAINMENT appearonthedisplay.
2UseMULTI-CONTROLtoselectAUDIO. Turntochangethemenuoption;presstose- lect. Theaudiofunctionnameappearsonthedis play.
3TurnMULTI-CONTROLtoselectthe audiofunction. TurnMULTI-CONTROLClockwisetoswitchbetweentheaudiofunctionsinthefollowing order:
NW
BAL(balanceadjustment)—NW1(network adjustment1)—NW2(networkadjustment2)—NW3(network adjustment 3)—NW4(networkadjustment4)—POSI(positionselector)—TA1(time alignment setting)—TA2(time alignmentadjusting)—LOUD(loudness)—EQ 1(graphic equalizer)—EQ 2(16-band graphic equalizer)—BBE(BBE)—BMX(BMX and compression)—A.EQ(auto-equalizer on/off)—SLA(sourceleveladjustment)
STD
AudioAdjustments
F/B (balance adjustment)—POSI (position selector)—TA1 (time alignment setting)—TA2 (timealignmentadjusting)—LOUD(loudness)—EQ 1 (graphic equalizer)—EQ 2 (16-band graphicequalizer)—SW1(subwooferon/off)—SW 2 (subwoofer cut-off frequency)—SW 3 (subwoofer slope)—F.HPF 1 (front high pass filter slope)—F.HPF 2 (front high pass filter cut-offfrequency)—R.HPF1(rearhighpassfilterslope)—R.HPF2(rearhighpassfiltercut-off frequency)—BBE (BBE)—BMX (BMX and compression)—A.EQ (auto-equalizer on/off)—SLA(sourceleveladjustment)
■Youcanalsoswitchbetweentheaudiofunctionsinreverseorderbyturning MULTI-CONTROLcounterclockwise.
■Whentuner, televisionor AUXisselectedasa source, you cannot select BMX.
■ WhenselectingtheFMtunerasthesource, youcannotswitchtoSLA.
■ Whenselectingasourceotherthanbuilt-in CDplayer, multi-CDplayer, DVDplayer/multi-DVD playeroriPod, youcannotselectBMX.
■ When selecting TA OFF in TA1, you cannot switch to TA2.
- You can select SW 2 and SW 3 only when subwooferoutputoutputisturnedoninSW1.
■Toreturntothedisplayofeachsource,press BAND.

Notes
- If you donotoperatetheaudiofunction within about 30 seconds, the display is automatically returned to the source displayed.
- EQ 2 (16-band graphic equalizer), TA2 (time alignmentadjusting), NW1(networkadjustment1), NW2(networkadjustment2), NW3(networkadjustment3) and NW4(network adjustment4) functions are not canceled automatically.
Switchingleftandright channel
You can adjust following functions for left and right channel independently or commonly.
3-waynetworkmode
NW
- Adjusting network (NW 1, NW 2, NW 3)
- Adjusting 16-band graphic equalizer (EQ 2)
Standardmode STD
- Adjustingsubwoofersettings(SW2)
-Adjustinglowpassfilterattenuationslope (SW3) - Settingthehighpassfilterforfrontspeakers (F.HPF 1, F.HPF 2)
- Settingthehighpassfilterforrearspeakers (R.HPF1, R.HPF2)
- Adjusting 16-band graphic equalizer (EQ 2)
1UseMULTI-CONTROLtoselectthe audiofunctiondescribedabove.
2PressMULTI-CONTROLandholdto switchbetweenleft/rightindependent modeandleft/rightcommonmode.
EachpressingandholdingMULTI-CONTROL selectsleft/rightindependentmodeandleft/rightcommonmode.
3PressMULTI-CONTROLtoselectleft channelorrightchannelwhenleft/rightin-dependentmodehasbeenselected.
EachpressingMULTI-CONTROLselectsleft channelandrightchannel.
4Adjustthesefunctionsasdesired.

Using the position selector
Onewaytoassureamorenaturalsoundisto clearlypositionthestereoimage,puttingyou rightinthecenterofthesoundfield.Thepositionselectorfunctionletsyouautomatically adjustthespeakers'outputlevelsandinserts adelaytimetomatchthenumberandpositionofoccupiedseats.
1UseMULTI-CONTROLtoselectPOSI.
POSIappearsinthedisplay.
2PushMULTI-CONTROLleft,right,upor downtoselectalisteningposition.
DirectionDisplayPosition
| LeftFrontLeftFrontseatleft |
RightFrontRightFrontseatright
| UpFrontFrontseats |
DownAllAllseats
STD
■ Tocanceltheselectedlisteningposition,push
MULTI-CONTROLinthesamedirectionagain.

Usingbalanceadjustment
NW
You can select abalancesetting that provides an ideallistening environmentally occupied seats.
1UseMULTI-CONTROLtoselectBAL.
BALappearsinthedisplay.
2PushMULTI-CONTROLleftorrightto adjustleft/rightspeakerbalance.
EachtimeMULTI-CONTROL is pushed left for right, the left/right speaker balance is moved forward to the left or right.
Left25toRight25isdisplayedastheleft/rightspeakerbalancemovesfromleftto right.
Usingbalanceadjustment
STD
Youcanselectafader/balancesettingthat providesanideallisteningenvironmentinall occupiedseats.
1UseMULTI-CONTROLtoselectF/B.
F/Bappearsinthedisplay.
2PushMULTI-CONTROLupordownto adjustfront/rearspeakerbalance.
EachtimeMULTI-CONTROL is pushed up or down, the front/rearspeaker balance moves toward the front or rear.
Front25toRear25isdisplayedasthefront/ rearspeakerbalancemovesfromfronttorear.
■ F/R 00 is the proper setting when only two speakers are used.
3PushMULTI-CONTROLleftorrightto adjustleft/rightspeakerbalance.
EachtimeMULTI-CONTROL is pushed left for right, the left/right speaker balance is moved forward to the left.
Left25toRight25isdisplayedastheleft/rightspeakerbalancemovesfromleftto right.
Usingthetimealignment
Thetimealignmentletsyouadjustthedistancebetweeneachspeakerandthelistening position.
1UseMULTI-CONTROLtoselectTA1.
TA1 appearsinthedisplay.
2PushMULTI-CONTROLleftorrightto selectthetimealignment.
EachtimeMULTI-CONTROL is pushed left for right, time alignment is selected in the following order:
AudioAdjustments
Initial (initial)—Custom (custom)—Auto TA (auto-timealignment)—TAOFF(off)
- Initialisthefactorysuppliedtimealignment.
- Customisanadjustedtimealignmentthat youcancreateforyourself.
- AutoTAisthetimealignmentcreatedby autoTAandEQ.(RefertoAutoTAandEQ (auto-timealignmentandauto-equalizing) onpage59.)
■PleasesetAutoTAappears. This indicates that you cannot select AutoTA if a autoTA and EQ has not been carried out.
Adjustingthetimealignment
You can adjust the distance between each speaker and these selected position.
- Anadjustedtimealignmentismemorized inCustom.
1UseMULTI-CONTROLtoselectTA1.
TA1appearsinthedisplay.
2PressMULTI-CONTROLtoselectaunit ofdistance.
Each press of MULTI-CONTROL select the unit of distance in the following order: (cm)(centimeter)—(inch)(inch)
3UseMULTI-CONTROLtoselectTA2.
TA2appearsinthedisplay.
- Can'tAdjustTA.SetPOSFL/FRappears when neither FrontLeft nor FrontRight is selected in the position selectormode (POSI).
- When selecting TA OFF in TA1, you cannot switchtoTA2.
4PushMULTI-CONTROLleftorrightto selectthespeakertobeadjusted.
EachtimeMULTI-CONTROL is pushed left for right, the speaker is selected in the following order:
NW
Hi L (high-range left)—Hi R (high-range right)—Mid L (middle-range left)—Mid R (middle-range right)—Low L (low-range left)—Low R (low-rangeright)
STD
Front L (front left)—Front R (front right)—Rear R (rear right)—Rear L (rear left)—SubW.L(subwooferleft)—SubW.R(subwoo-ferright)
■YoucannotselectSubW.LandSubW.R whenthesubwooferoutputisoff.
5PushMULTI-CONTROLupordownto adjustthedistancebetweentheselected speakerandthelisteningposition.
EachtimeMULTI-CONTROL is pushed up down, the distance increases or decreases.
400.0cm to 0.0cm is displayed asthedral distance is increased or decreased, if you have selected centimeters (cm).
160inch to 0inch is displayed as the distance is increased or decreased, if you have selected inches (inch).
■Youcanadjustthedistancefortheother speakersinthesameway.
6PressBANDtocancelthetimealignmentmode.
Aboutthenetwork function NW
Thenetworkfunctionletsyoudividetheaudio signalintodifferentfrequencybands,and thenreproduceeachofthemthroughseparatespeakerunits.
Youcanthenmakepreciseadjustmentstothe reproducedfrequencyband(withalow-pass filterorhigh-passfilter),level,phaseandother parameterstomatchthecharacteristicsof eachspeakerunit.
Adjustableparameters
Thenetworkfunctionenablesadjustmentof thefollowingparameters.Makeadjustments inlinewiththereproducedfrequencyband andcharacteristicsofeachconnectedspeaker unit.
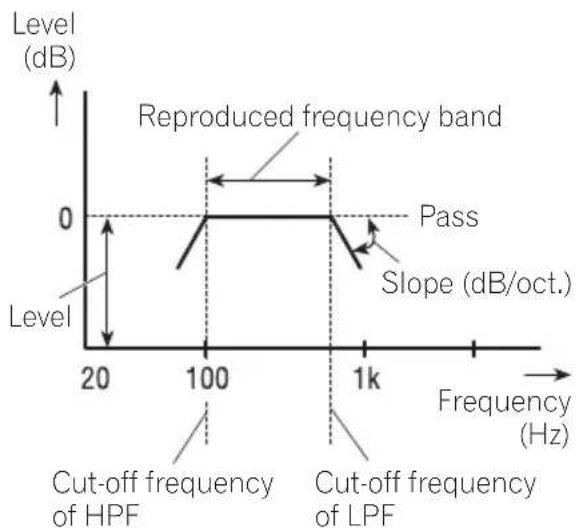
line
| Frequency (Hz) | Level (dB) | | -------------- | ---------- | | 20 | 0 | | 100 | 0 | | 1k | 0 |Reproducedfrequencyband
AdjustingtheHPF(high-passfilter)orLPF(low-passfilter)cut-offfrequencyletsyousetthereproducedfrequencybandforeachspeakerunit.
- TheHPFcutsfrequencies(low)below the setfrequency,lettinghighfrequencies through.
• The LPFcutsfrequencies(high)above the setfrequency, lettinglowfrequencies through.
Level
The difference in reproduced levels between speaker units can be corrected.
Slope
AdjustingtheHPF/LPFslope(filterattenuation slope)letsyouadjustthecontinuityofsound betweenspeakerunits.
- Theslopeindicatesthenumberofdecibels (dB)thesignalisattenuatedwhenthefrequencyisoneoctavehigher(lower)(Unit: dB/oct.).Thesteepertheslope,themore thesignalisattenuated.
Phase
Youcanswitchphase(normal, reverse) for each speaker unit's input signal. When the continuity of soundbetweenspeakers is im-precise, try switching phase. This may improve the continuity of soundbetweenspeakers.
Pointsconcerningnetwork adjustments
Cut-offfrequencyadjustment
- Withthelow-rangespeakerinstalledinthe reartray, ifyousetLowLPFcut-offfrequencyhigh, basssoundisseparatedso thatitappearstocomefromtherear. You are recommended to set LowLPF cut-off frequencyto100Hz or lower.
- Themaximuminputpowersettingformiddle-andhigh-rangespeakersisusually lowerthanthatforlow-rangespeakers. RememberthatifMidHPForHighHPFcut-offfrequencyissetlowerthanrequired, strongbasssignalinputmaydamagethe speaker.
Leveladjustment
The basic frequencies of manymusical instruments are in them middlerange. First perform middle-range level adjustment, followed by high-range and then low-range level adjustment in that order.
AudioAdjustments
Slopeadjustment
- If you set as small absolute value for the slope (for agentleslope), interference between adjacent speaker units can easily result in degraded frequency response.
- If you set a large absolute value for the slope (for a steep slope), continuity of sound between speakers, units is degraded, and sounds appear to be separated.
- If you set the 0dB/oct. (Pass), the audiosignal bypass the filter, so the filter does not have an effect.
Phaseadjustment
Whenthecross-overpointvalueforfilterson bothsidesissetto-12dB/oct., thephaseis reversed 180degreesatthefiltercut-offfrequency. In this case, reversing the phaseassuresimproved sound continuity.

text_image
0 dB Normal phase Reverse phase -3 dB Crossover point -12 dB/oct.Mutingthespeakerunit(filter)
You can mute each speaker unit (filter). When as speaker unit (filter) is muted, nos sounds is outputted from that speaker.
- If you mutethes elected speaker unit (filter), MUTEblinks and no adjustments are possible.
- Evenifanyspeakerunit(filter)ismuted, youcanadjusttheparametersforother speakerunits(filters).
1UseMULTI-CONTROLtoselectNW1.
NW1appearsinthedisplay.
2PushMULTI-CONTROLleftorrightto selectthespeakerunit(filter)tobeadjusted.
EachtimeMULTI-CONTROL is pushed left for right, the speaker unit (filter) is selected in the following order:
LowLPF(low-rangespeakerLPF)—MidHPF (middle-rangespeakerHPF)—MidLPF(middle-rangespeakerLPF)—HighHPF(high-range speakerHPF)
3PushandholdMULTI-CONTROLdown tomutetheselectedspeakerunit(filter).
MUTEblinksinthedisplay.
■Tocancelthemuting, push MULTI-CONTROL up.
Adjustingnetwork
1UseMULTI-CONTROLtoselectNW1. NW1appearsinthedisplay.
2PushMULTI-CONTROLleftorrightto selectthespeakerunit(filter)tobeadjusted.
EachtimeMULTI-CONTROL is pushed left for right, the speaker unit (filter) is selected in the following order:
LowLPF(low-rangespeakerLPF)—MidHPF (middle-rangespeakerHPF)—MidLPF(middle-rangespeakerLPF)—HighHPF(high-range speakerHPF)
3TurnMULTI-CONTROLtoselectNW2.
NW2appearsinthedisplay.
4PushMULTI-CONTROLleftorrightto selectthecut-offfrequency(crossoverfrequency)oftheselectedspeakerunit(filter).
EachtimeMULTI-CONTROL is pushed left for right, cut-off frequencies (crossover frequencies) are selected in the following order:
EachtimeMULTI-CONTROL is pushed up down, the level of these selected speaker unit (filter) increases or decreases.
±0dB to -24dB is displayed as the level is increased or decreased.
+6dB to -24dB is displayed as the level is increased or decreased, only if you have selected LowLPF.
6TurnMULTI-CONTROLtoselectNW3. NW3appearsinthedisplay.
7PushMULTI-CONTROLleftorrightto selecttheslopeoftheselectedspeaker unit(filter).
EachtimeMULTI-CONTROL is pushed left for right, slopes are selected in the following order:
Low LPF: -36—-30—-24—-18—-12 (dB/oct.)
Mid HPF: -24—-18—-12—-6—Pass (0) (dB/oct.)
Mid LPF: -24—-18—-12—-6—Pass (0) (dB/oct.)
HighHPF: -24—-18—-12—-6 (dB/oct.)
8PushMULTI-CONTROLupordownto switch the phase of these selected speaker unit (filter).
Push MULTI-CONTROLupselectsnormal phaseandNORappearsinthedisplay.Push MULTI-CONTROLdownselectsreversephase andREVappearsinthedisplay.
■Youcanadjusttheparametersforother speakerunits(filters)inthesameway.
9TurnMULTI-CONTROLtoselectNW4. NW4appearsinthedisplay.
10PushMULTI-CONTROLleftorrightto selectstereoormonaural.
Push MULTI-CONTROL left to select monaural and MONO appears in the display. Push MULTI-CONTROL right to select stereo and Stereo appears in the display.
■Youcanoperatethisprocedureonlywhen LowLPFisselected.
11PressBANDtocancelthenetworkadjustmentmode.
Usingsubwooferoutput Usingsubwooferoutput
STD
Thisunitisequippedwithasubwooferoutput whichcanbeturnedonoroff.Whenasub-wooferisconnectedtothisunit,turnthesub-wooferoutputon.
Thesubwooferoutputphasecanbeswitched betweennormalandreverse.
1UseMULTI-CONTROLtoselectSW1. SW1appearsinthedisplay.
2PressMULTI-CONTROLtoturnsubwooferoutputon.
ONappearsinthedisplay.Subwooferoutput isnowon.
■Toturnsubwooferoutputoff, press MULTI-CONTROLagain.
AudioAdjustments
3PushMULTI-CONTROLleftorrightto selectstereoormonaural.
Push MULTI-CONTROL left to select monaural and MONO appears in the display. Push MULTI-CONTROL right to select stereo and Stereo appears in the display.
Adjustingsubwoofersettings
Whenthesubwooferoutputison,youcanadjustthecut-offfrequencyandtheoutputlevelofthesubwoofer.
1UseMULTI-CONTROLtoselectSW2.
SW2appearsinthedisplay.
■Whenthesubwooferoutputison,youcanselectSW2.
2PushMULTI-CONTROLleftorrightto selectcut-offfrequency.
EachtimeMULTI-CONTROL is pushed left for right, cut-off frequencies are selected in the following order:
Only frequencies lower than those in these selected range are outputted from the subwoofer.
3PushMULTI-CONTROLupordownto adjusttheoutputlevelofthesubwoofer.
EachtimeMULTI-CONTROL is pushed up or down, subwoofer level increases or decreases. +6 to -24 is displayed as the level is increased or decreased.
Adjustinglowpassfilter attenuationslope
Whenthesubwooferoutputison,youcanadjustthecontinuityofsoundbetweenspeaker units.
1UseMULTI-CONTROLtoselectSW3.
SW3appearsinthedisplay.
■Whenthesubwooferoutputison,youcanselectSW3.
2PushMULTI-CONTROLupordownto selectthephaseofsubwooferoutput.
Push MULTI-CONTROLuptoselectnormal phaseandNORappearsinthedisplay.Push MULTI-CONTROLdowntoselectreverse phaseandREVappearsinthedisplay.
3PushMULTI-CONTROLleftorrightto selectslope.
EachtimeMULTI-CONTROL is pushed left for right, slopes are selected in the following order:
-18—-12—-6 (dB/oct.)

Note
Whenslopeofsubwooferandhighpassfilterare
-12dB, and samecut-off frequency, the phase is reversed 180 degrees at the cut-off frequency. In this case, reversing the phase assures improved sound continuity.
Usingthehighpassfilter
STD
When you donotwantlowsounds from the subwoofer output frequency rangetoplay from the frontorrearspeakers, turn on the HPF (high pass filter). Only frequencies higher than those in these selected range are outputted from the frontorrearspeakers.
Mutingthespeakerunits(filters)
Youcanmutefrontandrearspeakerunits(filters)separately. Whenspeakerunits(filters) aremuted, nosoundisoutputtedfromthose speakers.
- Evenifthespeakerunit(filter)ismuted, youcanadjustthemutedspeakerunits(filters).However, muteisautomatically canceledwhenthelevelisadjusted.
1UseMULTI-CONTROLtoselectF.HPF1 (orR.HPF1).
F.HPF1(orR.HPF1)appearsinthedisplay.
2PushandholdMULTI-CONTROLdown tomutetheselectedspeakerunit(filter). MUTEisdisplayed.
■Tocancelthemuting, push MULTI-CONTROL up.
Settingthehighpassfilterfor frontspeakers
1UseMULTI-CONTROLtoselectF.HPF1.
F.HPF1appearsinthedisplay.
2PushMULTI-CONTROLleftorrightto selectslope.
EachtimeMULTI-CONTROLispushedleftor right, slopesareselectedinthefollowing order:
-12—-6—Pass (0) (dB/oct.)
■ If you set the slope to dB/oct. (Pass), the audiosignal bypass the filter, so the filter does not have an effect.
3TurnMULTI-CONTROLtoselectF.HPF2.
F.HPF2appearsinthedisplay.
4PushMULTI-CONTROLleftorrightto selectcut-offfrequency.
EachtimeMULTI-CONTROL is pushed left for right, cut-off frequencies are selected in the following order:
Only frequencies higher than those in these selected range are output from the fronts speakers.
5PushMULTI-CONTROLupordownto adjusttheoutputlevelofthefrontspeakers.
EachtimeMULTI-CONTROL is pushed up down, the level of the front speakers increases or decreases. ±0 to -24 is displayed as the level is increased or decreased.
Settingthehighpassfilterfor rearspeakers
1UseMULTI-CONTROLtoselectR.HPF1. R.HPF1appearsinthedisplay.
2PushMULTI-CONTROLleftorrightto selectslope.
EachtimeMULTI-CONTROLispushedleftor right, slopesareselectedinthefollowing order:
-12—-6—Pass (0) (dB/oct.)
■Ifyousettheslopeto0dB/oct.(Pass),the audiosignalbypassesthefilter,sothefilterdoes nothaveaneffect.
3TurnMULTI-CONTROLtoselectR.HPF2. R.HPF2appearsinthedisplay.
4PushMULTI-CONTROLleftorrightto selectcut-offfrequency.
EachtimeMULTI-CONTROL is pushed left for right, cut-off frequencies are selected in the following order:
Only frequencies higher than those in these selected range are output from therearspeakers.
5PushMULTI-CONTROLupordownto adjusttheoutputleveloftherearspeakers.
EachtimeMULTI-CONTROLispushedupor down, the leveloftherearspeakersincreases or decreases. ±0 to -24 is displayed as the levelisincreasedordecreased.
AudioAdjustments
UsingBBEsound
WithBBE, playbackveryclosetotheoriginal soundcanbeobtainedbycorrectionwitha combinationofphasecompensationand high-rangeboostforthedelayofthehigh-frequencycomponentsandtheamplitudedeviationoccurringduringplayback.Thisfunction makesitpossibletoreproducethedynamic soundfieldasifyouarelisteningtoaliveperformance.
WithBBEsoundprocessingtechnology,you canadjustthelevelofBBE.
1UseMULTI-CONTROLtoselectBBE.
BBEappearsinthedisplay.
2PressMULTI-CONTROLtoturnBBEon.
■ToturnBBEoff, press MULTI-CONTROL again.
3PushMULTI-CONTROLupordownto adjustthelevelofBBE.
EachtimeMULTI-CONTROLispushedupor down, the level of BBE increases or decreases.
+4 to -4 is displayed as the level is increased or decreased.

Note
ManufacturedunderlicensefromBBESound, Inc. ThemarkBBEisattrademarkofBBESound, Inc.
UsingBMXandcompression
UsingtheBMXandCOMP(compression) functionsletyouadjustthesoundplayback qualityofthisunit.Eachofthefunctionshasa two-stepadjustment.BMXcontrolssoundreverberationstogiveplaybackafullersound. Listentoeachoftheeffectsasyouselect throughthemandusetheonethatbestenhancestheplaybackofthetrackorCDthat
youarelisteningto.TheCOMPfunctionbalancetheoutputoflouderandsoftersoundsathighervolumes.
1UseMULTI-CONTROLtoselectBMX.
BMXappearsinthedisplay.
2PressMULTI-CONTROLtoturnBMXon.
■ToturnBMXoff,pressMULTI-CONTROL again.
3PushMULTI-CONTROLleftorrightto selectthedesiredsetting.
EachtimeMULTI-CONTROL is pushed left for right, settings are selected in the following order:
COMP 1—COMP 2—BMX 1—BMX 2
Usingtheauto-equalizer
Theauto-equalizeristheequalizercurvecreatedbyautoTAandEQ(refertoAutoTAandEQ(auto-timealignmentandauto-equalizing) onpage59).
Youcanturntheauto-equalizeronoroff.
1UseMULTI-CONTROLtoselectA.EQ.
A.EQappearsinthedisplay.
■IfautoTAandEQhasnotbeencarriedout,
PleasesetAutoEQappears. This indicates that you cannot turn this function on.
2PressMULTI-CONTROLtoturntheauto-equalizeron.
AutoEQONappearsinthedisplay.
■Toturnauto-equalizeroff, press
MULTI-CONTROLagain.
Recallingequalizercurves
Theequalizerletsyouadjusttheequalization to matchcarinterioracoustic characteristics as desired.
Therearesevenstoredequalizercurveswhich youcaneasilyrecallatanytime.Hereisalist oftheequalizercurves:
DisplayEqualizercurve
| PowerfulPowerful |
| NaturalNatural |
| VocalVocal |
| FlatFlat |
| Custom1Custom1 |
| Custom2Custom2 |
| SuperBassSuperbass |
- Custom1 and Custom2 are adjusted equalizer curve that you create. Adjustments can be made with a 16-band graphic equalizer.
- When Flatisselectednosupplementor correctionismadetothesound. This is useful to check the effect of the equalizer curves by switching alternatively between Flat and a set equalizer curve.
- PressEQtoselecttheequalizer.
PressEQ repeatedlyytoswitchbetweenthefollowingequalizers:
Super Bass—Powerful—Natural—Vocal—Flat—Custom1—Custom2
Adjustingequalizercurves
Thefactorysuppliedequalizercurves, with the exception of Flat, can be adjusted to a finedegree (nuance control).
1UseMULTI-CONTROLtoselectEQ1.
EQ1appearsinthedisplay.
2PushMULTI-CONTROLleftorrightto selectanequalizercurve.
3PushMULTI-CONTROLupordownto adjusttheequalizercurve.
Eachtime MULTI-CONTROL is pushed up down, the equalizer curve increases or decreases respectively.
+6 to -6 is displayed as the equalizer curve is increased or decreased.
■ The actual range of the adjustments are different depending on which equalizer curve is selected.
■ Theequalizercurvewithallfrequenciessetto 0cannotbeadjusted.
Adjusting16-bandgraphic equalizer
For Custom 1 and Custom 2 equalizer curves, you can adjust the level of each band.
- AseparateCustom1curvecanbecreated foreachsource.(Thebuilt-inCDplayerand themulti-CDplayeraresettothesame equalizeradjustmentsettingautomatically.)Ifyoumakeadjustmentswhena curveotherthanCustom2isselected,the equalizercurvesettingswillbememorized inCustom1.
- ACustom2curvecanbecreatedcommon toallsources.Ifyoumakeadjustments whentheCustom2curveisselected,the Custom2curvewillbeupdated.
1Recalltheequalizercurve youwantto adjust.
SeeRecallingequalizercurvesonthispage.
2UseMULTI-CONTROLtoselectEQ2.
EQ2appearsinthedisplay.
AudioAdjustments
3PushMULTI-CONTROLleftorrightto selecttheequalizerbandtoadjust.
EachtimeMULTI-CONTROL is pushed left for right, equalizer bands are selected in the following order:
Eachtime MULTI-CONTROL is pushed up down, the level of the equalization band increases or decreases.
+6 to -6 is displayed as the level is increased or decreased.
■Youcanthenselectanotherbandandadjust thelevel.
5PressBANDtocancelthe16-bandgraphicequalizeradjustment.
Adjustingloudness
Loudnesscompensatesfordeficienciesinthe low-andhigh-soundrangesatlowvolume.
1UseMULTI-CONTROLtoselectLOUD. LOUDappearsinthedisplay.
2PressMULTI-CONTROLtoturnloudness on.
■Toturnloudnessoff,pressMULTI-CONTROL again.
Adjustingsourcelevels
SLA(sourceleveladjustment) lets you adjust the volume level of each source to prevent radical changes in volumewhenswitching between sources.
- SettingsarebasedontheFMtunervolume level,whichremainsunchanged.
1 ComparetheFMtunervolumelevel with the level of the source you wish to adjust.
2UseMULTI-CONTROLtoselectSLA.
SLAappearsinthedisplay.
3PushMULTI-CONTROLupordownto adjustthesourcevolume.
EachtimeMULTI-CONTROL is pushed up or down, source volume increases or decreases.
SLA +4 to SLA -4 is displayed as the source volume is increased or decreased.

Notes
•TheAMtunervolumelevelcanalsobead-justedwithsourceleveladjustments.
- Thebuilt-inCDplayerandthemulti-CDplayer aresettothesamesourceleveladjustment volumeautomatically.
- Externalunit1andexternalunit2aresetto thesamesourceleveladjustmentvolume automatically.
AutoTAandEQ(auto-time alignmentandauto-equalizing)
Theauto-timealignmentisautomaticallyadjustedforthedistancebetweeneachspeaker andthelisteningposition.
Theauto-equalizerautomaticallymeasures thecarinterioracousticcharacteristics,and thencreatestheauto-equalizercurvebased onthatinformation.

WARNING
Topreventaccidents, nevercarryoutautoTA and EQwhiledriving. Whenthisfunctionmeasures thecarinterioracousticcharacteristicstocreate anauto-equalizercurve, aloudmeasurement tone(noise) maybeoutputtedfromthespeakers.

CAUTION
- CarryingoutautoTAandEQunderthefollowingconditionsmaydamagethespeakers.Be suretochecktheconditionsthoroughlybeforecarryingoutautoTAandEQ.
—Whenspeakersareincorrectlyconnected. (e.g.,Whenarearspeakerisconnectedto asubwooferoutput.)
—Whenaspeakerisconnectedtoapower ampdeliveringoutputhigherthanthe speaker'smaximuminputpowercapability. - Ifthemicrophoneisplacedinanunsuitable positionthemeasurementtonemaybecome loudandmeasurementmaytakealongtime, resultinginadrainonbatterypower.Besure toplacethemicrophoneinthespecifiedlocation.
BeforeoperatingtheautoTA andEQfunction
- CarryoutautoTAandEQinasquieta placeaspossible,withthecarengine and airconditioningswitchedoff.Alsocut powertocarphonesorportabletelephones inthecar,orremovethemfromthecarbeforecarryingoutautoTAandEQ.Sounds otherthanthemeasurementtone(surroundingsounds,enginesound,telephonesringingetc.)maypreventcorrect measurementofthecarinterioracoustic characteristics.
- BesuretocarryoutautoTAandEQusing thesuppliedmicrophone.Usinganother microphonemaypreventmeasurement,or
resultinincorrectmeasurementofthecar interioracousticcharacteristics.
- Whenfrontspeakerisnotconnected,auto TAandEQcannotbecarriedout.
- When muting the frontspeaker units, auto TA and EQ cannot be carried out. (Referto page55.)
- Whenthisunitisconnectedtoapower ampwithinputlevelcontrol,autoTAand EQmaynotbepossibleifyoulowerpower ampinputlevel.Setthepoweramp'sinput leveltothestandardposition.
- Whenthisunitisconnectedtoapower ampwithanLPF,turnofftheLPFonthe powerampbeforecarryingoutautoTAand EQ.Inaddition,thecut-offfrequencyfor built-inLPFofanactivesubwoofershould besettothehighestfrequency.
- Thetimealignmentvaluecalculated by autoTAandEQmaydifferfromtheactual distanceinthefollowingcircumstances. However,thedistancehasbeencalculated bycomputertobetheoptimumdelayto giveaccurateresultsforthecircumstances,sopleasecontinuetousethis value.
—When thereflected sound within a vehicle is strong and delays occur.
—Whendelaysoccurforlowsoundsdue totheinfluenceoftheLPFonactive subwoofersorexternalamps.
• AutoTAandEQchangestheaudiosettings asbelow:
—Thefader/balancesettingsreturntothe centerposition.(Refertopage50.)
—Thegraphicequalizercurveswitchesto Flat.(Refertopage58.)
—Whenasubwooferisconnectedtothis unit,itwillbeadjustedautomatically to bothsubwooferoutputandhighpassfiltersettingforrearspeaker.
- If you carry out a auto TA and EQ when an previous setting of this already exists, the setting will bere placed.
AudioAdjustments
- Whenconnectingtweeters, please confirm thetweeter'susablefrequencyrange. Whenyousetthecut-offfrequency, set higherthanthelowestusablefrequencyof thetweeter.
- AutoTAuseshigherrangethan10kHzfor measurement.Therefore,usingthetweeter thatcannotreproduce10kHzfrequency rangemaydamagethetweeter.WhenAuto TA&EQisoperated,besuretosettheap-propriatecut-offfrequency.Also,usethe tweeterthatcanreproduce10kHzatthe lowestusablefrequency.
CarryingoutautoTAandEQ
1Stopthecarinaplacethatisasquiet aspossible,closealldoors,windowsand thesunroof,andthenturntheengineoff.
■Iftheengineisleftrunning,enginenoisemay preventcorrectautoTAandEQ.
2Fixthesuppliedmicrophoneinthecenteroftheheadrestofthedriver'sseat, facingforward,usingthebelt(sold separately).

natural_image
Diagram of a car interior showing steering wheel, steering wheel, and cable (no text or labels)■TheautoTAandEQmaydifferdependingon whereyouplacethemicrophone.lfdesired,place themicrophoneonthefrontpassengerseatto carryoutautoTAandEQ.
3TurntheignitionswitchtoONorACC.
■ If the car's air conditioner or heater is turned on, turnitoff. Noise from the fan in the air condi-
tionerorheatermaypreventcorrectautoTAand EQ.
■PressSOURCEtoturnthesourceonifthis unitisturnedoff.
4Selectthepositionfortheseaton whichthemicrophoneisplaced.
RefertoUsingthepositionselectoronpage 50.
■ Ifnopositionisselectedbeforeyoustartauto TAandEQ, FrontLeftisselectedautomatically.
5PressSOURCEandholduntiltheunit turnsoff.
6PressandholdEQtoentertheautoTA and EQmeasurementmode.
Thefrontpanelopensautomatically.
7Plugthemicrophoneintothemicrophoneinputjackonthisunit.
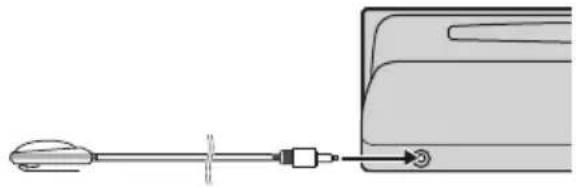
natural_image
Diagram showing a tool interacting with a device, no text or symbols present8PressMULTI-CONTROLtostarttheauto TAandEQ.
9Getoutofthecarandclosethedoor within 10secondswhenthe 10-second count-downstarts.
Themeasurementtone(noise)isoutputted fromthespeakers, andautoTAandEQbegins.
■Whenallspeakersareconnected,autoTA and EQiscompletedinaboutsixminutes.
10WhenautoTAandEQiscompleted, Completeisdisplayed.
When correct measurement of car interior acoustic characteristics is not possible, an errormessage is displayed. (Referto Understanding auto TA and EQerrormessages on page 71.)
11PressBANDtocanceltheautoTAandEQmode.
12Storethemicrophonecarefullyinthe glovecompartment.
Storethemicrophonecarefullyintheglove compartmentoranyothersafeplace.Ifthe microphoneissubjectedtodirectsunlightfor anextendedperiod,hightemperaturesmay causeddistortion,colorchangeormalfunction.

Note
MakesureyouhavedisconnectedthemicrophonebeforepressingEJECTtoopenorclosethe panel(analertsoundsifthemicisstillconnected).
Adjustinginitialsettings

text_image
Language select EnglishUsingtheinitialsettings,youcancustomize varioussystemsettingstoachieveoptimalperformancefromthisunit.
①Functiondisplay
Showsthefunctionstatus.
1PressSOURCEandholduntiltheunit turnsoff.
2PressMULTI-CONTROLandholduntil Languageselectappearsinthedisplay.
3TurnMULTI-CONTROLtoselectoneof theinitialsettings.
TurnMULTI-CONTROLclockwisetoswitchbetweenthefunctionsinthefollowingorder: Languageselect(languageselection)—Clock (clock)—FM step (FM tuning step)—AM step (AMtuningstep)—Warningtone(warning tone)—Face auto open (face auto open)—AUX1(auxiliaryinput1)—AUX2(auxiliary input 2)—Dimmer (dimmer)—Brightness (brightness)—Digital ATT (digital attenuator)—Audio Reset (audio reset)—Mute (sound muting/attenuation)—InternalAMP(power ampsetting)—Demonstration(featuredemo)—Reverse mode (reverse mode)—Ever-scroll (everscroll)
Usethefollowinginstructionstooperateeach particularsetting.
■Youcanalsoswitchbetweenthefunctionsin reverseorderbyturningMULTI-CONTROLcounterclockwise.
■Tocancelinitialsettings,pressBAND.
Selectingthedisplaylanguage
Foryourconvenience, this unitequips multiple languagedisplay. You can select the language best suited to your first language.
1UseMULTI-CONTROLtoselect Languageselect.
Languageselectappearsinthedisplay.
2PressMULTI-CONTROLtoselectthelanguage.
EachpressofMULTI-CONTROLselectslanguagesinthefollowingorder:
text_image
Clock 12:00 PM3PushMULTI-CONTROLupordownto settheclock.
Pushing MULTI-CONTROL upwill increase theselectedhourorminute. Pushing MULTI-CONTROL downwill decrease these-lectedhourorminute.

Notes
- You can match the clock to times signal by pressing MULTI-CONTROL.
— If the minute is 00 to 29, the minutes are roundeddown.(e.g.,10:18becomes 10:00.) — If the minute is 30 to 59, the minutes are roundedup.(e.g.,10:36becomes11:00.)
- Evenwhenthesourcesareoff, theclockdisplayappearsonthedisplay. PressingCLOCK whenthesourcesandfeaturedemoareoff, turnstheclockdisplayonoroff.
SettingtheFMtuningstep
TheFMtuningstepemployedbyseektuning canbeswitchedbetween100kHz, thepreset step, and 50kHz.
1UseMULTI-CONTROLtoselectFMstep. FMstepappearsinthedisplay.
2PressMULTI-CONTROLtoselecttheFM tuningstep.
PressingMULTI-CONTROL repeatedly will switch the FM tuning step between 50kHz and 100kHz. These selected FM tuning step will appear in the display.

Note
Ifseektuningisperformedin50kHzsteps,stationsmaybetunedinimprecisely.Tuneinthestationswithmanualtuningoruseseektuning again.
SettingtheAMtuningstep
TheAMtuningstepcanbeswitchedbetween 9kHz, thepresetstep, and 10kHz. When usingthetunerinNorth, CentralorSouth America, resetthetuningstepfrom9kHz(531
-1602kHzallowable)to10kHz(530-1640kHzallowable).
1UseMULTI-CONTROLtoselectAMstep. AMstepappearsinthedisplay.
2PressMULTI-CONTROLtoselecttheAM tuningstep.
PressingMULTI-CONTROLrepeatedlywill switchtheAMtuningstepbetween9kHzand 10kHz.TheselectedAMtuningstepwillappearinthedisplay.
Switchingthewarningtone
Ifthefrontpanelisnotdetachedfromthe headunitwithinfoursecondsofturningoff theignition,awarningtonewillsound.You canturnoffthewarningtone.
1UseMULTI-CONTROLtoselect Warningtone.
Warningtoneappearsinthedisplay.
2PressMULTI-CONTROLtoturnwarning toneon.
ONappearsinthedisplay.
■Toturnwarningtoneoff,press MULTI-CONTROLagain.
Switchingthefaceautoopen
Fortheftprotection, thefrontpanelopens automatically and easily detaches. Faceauto openisonasadefault.
1UseMULTI-CONTROLtoselect Faceautoopen.
Faceautoopenappearsinthedisplay.
2PressMULTI-CONTROLtoturntheface autoopenon.
ONappearsinthedisplay.
InitialSettings
■Toturnthefaceautoopenoff, press
MULTI-CONTROLagain.
Switchingtheauxiliarysetting
Auxiliary equipments connected to this unit can be activated individually. Set each AUX source to ON when using. About connecting or using auxiliary equipments, referto Using the AUX source on page 68.
1UseMULTI-CONTROLtoselectAUX1/AUX2.
AUX1/AUX2appearsinthedisplay.
2PressMULTI-CONTROLtoturnAUX1/AUX2on.
ONappearsinthedisplay.
■ToturnAUXoff,pressMULTI-CONTROL again.
Switchingthedimmersetting
Topreventthedisplayfrombeingtoobrightat night,thedisplayisautomaticallydimmed whenthecar'sheadlightsareturnedon.You canturnthedimmeronoroff.
1UseMULTI-CONTROLtoselectDimmer. Dimmerappearsinthedisplay.
2PressMULTI-CONTROLtoturndimmer on.
ONappearsinthedisplay.
■Toturndimmeroff,pressMULTI-CONTROL again.
Adjustingthebrightness
Youcanadjustthedisplaybrightness.Initially thismodeissetto12.
1UseMULTI-CONTROLtoselect Brightness.
Brightnessappearsinthedisplay.
2PushMULTI-CONTROLleftorrightto adjustthebrightnesslevel.
EachtimeMULTI-CONTROL is pushed left for right, brightness level increases or decreases. 00 to 15 is displayed at the level is increased or decreased.
■Whendimmerisfunctioning,thebrightness levelcanbeadjusted00to10.
Correctingdistortedsound
WhenlisteningtoaCDorothersourceon whichtherecordinglevelishigh, settingthe equalizercurveleveltohighmayresultindistortion. Youcanswitchthedigitalattenuator tolowtoreducedistortion.
- Soundqualityisbetteratthehighsetting sothissettingisusuallyused.
1UseMULTI-CONTROLtoselect DigitalATT.
DigitalATTappearsinthedisplay.
2PressMULTI-CONTROLtoselectthedigitalattenuatorlevel.
PressingMULTI-CONTROLrepeatedlywill switchbetweenHigh(high)andLow(low) andthatstatuswillbedisplayed.
Resettingtheaudiofunctions
Youcanresetallaudiofunctions.
1UseMULTI-CONTROLtoselect AudioReset.
ResetOK!appearsinthedisplay.
2PressMULTI-CONTROL.
DoesitRESET?appearsinthedisplay.
3PushMULTI-CONTROLright.
Areyousure?appearsinthedisplay.
4PressMULTI-CONTROLtoresetaudio functions.
Completeappearsinthedisplayandaudio functionsarereset.
■Tocancelthisfunctionontheway, press
BAND.
Switchingthesound muting/attenuation
Soundfromthissystemismutedorattenuatedautomaticallywhenthesignalfromthe equipmentwithmutefunctionisreceived.
- Thesoundismutedorattenuated, MUTE or ATTaredisplayedandnoaudioadjustmentispossible.
- Soundfromthissystemreturnstonormal whenthemutingorattenuationiscanceled.
1UseMULTI-CONTROLtoselectMute.
Muteappearsinthedisplay.
2PressMULTI-CONTROLtoselectthedesiredsetting.
PressMULTI-CONTROLrepeatedlytoswitch between the following settings:
- 10dBATT-Attenuation
- 20dB ATT – Attenuation (20dB ATT has a strongereffect than 10dBATT)
- TELmute-Muting

Settingtheinternalpower amplifier
Thisunitfeatureshighpoweramplifier. However, inparticularsystem, externalamplifiers are used instead of internalamplifier. If you use externalamplifiers in order to establish a multi-ampsystem, and don't use internalamplifier, it is recommended to turn off the internalamplifier. Turning off internalamplifier reduces the noisethat comes from the behavior of internalamplifier and fan.
1UseMULTI-CONTROLtoselect InternalAMP.
InternalAMPappearsinthedisplay.
2PressMULTI-CONTROLtoturntheinternalpoweramplifieron.
ONappearsinthedisplay.
■Toturntheinternalpoweramplifieroff,press
MULTI-CONTROLagain.
Switchingthefeaturedemo
Thefeaturedemoautomaticallystartswhen powertothisunitisturnedoffwhiletheignitionswitchissettoACCorON.
1UseMULTI-CONTROLtoselect Demonstration.
Demonstrationappearsinthedisplay.
2PressMULTI-CONTROLtoturnthefea- turedemoon.
ONappearsinthedisplay.
InitialSettings
■Toturnthefeatureddemooff, press MULTI-CONTROLagain.

Notes
- Remember that if the featured demo continues operating when the care engine is turned off, it may drain battery power.
- Youcanalsoturnonorofffeaturedemoby pressingDISPLAYwhilethisunitisturnedoff. Formoredetails,seeFeaturedemomodeon page8.
Switchingthereversemode
If you donot perform an operation within about 30 seconds, screen indications start to reverse, and then continue reversing every 10 seconds.
1UseMULTI-CONTROLtoselect Reversemode.
Reversemodeappearsinthedisplay.
2PressMULTI-CONTROLtoturnthere- versemodeon.
ONappearsinthedisplay.
■Toturnthereversemodeoff, press MULTI-CONTROLagain.

Note
YoucanalsoturnonoroffreversemodebypressingBANDwhilethisunitisturnedoff.Formore details,seeReversemodeonpage8.
SwitchingtheEverScroll
When Ever ScrollissettoON, textinformation recorded on CDoriPodscrolls continuously in the display. SettoOFFify you prefer the information to scroll just once.
1UseMULTI-CONTROLtoselect Ever-scroll.
Ever-scrollappearsinthedisplay.
2PressMULTI-CONTROLtoturntheEver Scrollon.
ONappearsinthedisplay.
■ToturntheEverScrolloff, press MULTI-CONTROLagain.
Turningtheclockdisplay onoroff
Youcanturntheclockdisplayonoroff.
- PressCLOCKtoturntheclockdisplay onoroff.
Each press of CLOCK turnsthe clock display onoroff.

Note
Evenwhenthesourcesareoff, theclockdisplay appearsonthedisplay. PressingCLOCKwhen thesourcesandfeaturedemoareoff, turnsthe clockdisplayonoroff.
UsingtheAUXsource
This unit can control two auxiliary equipment such as VCR or portable devices (sold separately). When connected, auxiliary equipments are automatically readinas AUX sources and assigned to AUX1 or AUX2. The relationship between AUX1 and AUX2 sources is explained below.
AboutAUX1andAUX2
Youhavetwomethodstoconnectauxiliary equipmentstothisunit.
AUX1source:
When connecting auxiliary equipment using a 2.5mm stereoplugcable
1PressandholdEJECTtoopenthefront panel.
AUX1inputjackappears.
2Insertthe2.5mmstereopluginthe AUX1inputjackonthisunit.
The allocation of this auxiliary equipment is automatically set to AUX1.
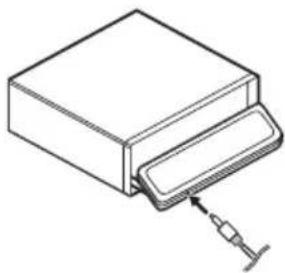
natural_image
Line drawing of a mechanical component with a syringe inserted (no text or symbols)AUX2source:
When connecting auxiliary equipment using an IP-BUS-RCA Interconnector(sold separately)
●UseanIP-BUS-RCAInterconnectorsuch astheCD-RB20/CD-RB10(soldseparetely) toconnectthisunittoauxiliaryequipment featuringRCAoutput.
Formoredetails, refertotheIP-BUS-RCAInterconnectorowner'smanual.
The allocation of this auxiliary equipment is automatically set to AUX2.
■Youcanonlymakethistypeofconnectionif theauxiliaryequipmenthasRCAoutputs.
SelectingAUXasthesource
●PressSOURCEtoselectAUXasthe source.
PressSOURCEuntilAUXappearsinthedisplay.
■Iftheauxiliarysettingisnotturnedon,AUX cannotbeselected.Formoredetails,seeSwitchingtheauxiliarysettingonpage65.
SettingtheAUXtitle
ThetitledisplayedforeachAUX1orAUX2 sourcecanbechanged.
OtherFunctions
1 After you have selected AUX as the source, use MULTI-CONTROL and select FUNCTION to display Title Input "A".
2PressDISPLAYtoselectthedesired charactertype.
PressDISPLAYrepeatedlytoswitchbetween the following characteristics: Alphabet(uppercase),numbersandsymbols —Alphabet(lowercase)—Europeanletters, such as those with accents (e.g. á, à, ä, ç)—Numbersandsymbols
3PushMULTI-CONTROLupordownto selectaletterofthealphabet.
EachtimeMULTI-CONTROL is pushed up, letters of the alphabet are displayed in ABC...X Y Z order, numbers and symbols in 123...@ # < order. Each time MULTI-CONTROL is pushdown, letters are displayed in ZYX... C B A order.

text_image
TitleInput "A" [OUXT]4PushMULTI-CONTROLrighttomove thecursortothenextcharacterposition.
When the lettery you want is displayed, push MULTI-CONTROL right to mov the cursor to then next position and then select then next letter. Push MULTI-CONTROL left to move backwards in the display.
5Movethecursortothelastpositionby pushingMULTI-CONTROLrightafterenteringthetitle.
When you push MULTI-CONTROL rightone more time, the entered title is stored in memory.
6PressBANDtoreturntothe playback display.
Usingdifferent entertainmentdisplays
Youcanenjoyentertainmentdisplayswhilelisteningtoeachsoundsource.
1PressMULTI-CONTROLtodisplaythe mainmenu.
FUNCTION, AUDIO and ENTERTAINMENT appear on the display.
2UseMULTI-CONTROLtoselect ENTERTAINMENT.
Turntochangethemenuoption;presstose-lect.
3UseMULTI-CONTROLtochangethedis- play.
Turntochangethemenuoption;presstose-lect.
ENT.OFF(entertainmentoff)—BGV-1(backgroundvisual1)—BGV-2(backgroundvisual2)—BGV-3 (background visual 3)—BGV-4 (backgroundvisual4)—BGP-1(background picture 1)—BGP-2 (background picture 2)—BGP-3(backgroundpicture3)—BGP-4(backgroundpicture4)—SPECTRUMANALYZER-1 (spectrumanalyzer1)—
SPECTRUMANALYZER-2(spectrumanalyzer 2)—LEVELMETER(levelmeter)— LEVELINDICATOR(levelindicator)— BATTERYVOLTAGE(voltageindicator)— ENTCLOCK(entertainmentclock)—MOVIE (moviescreen)—DISPLAYOFF(displayoff)
■Voltageindicatormaydifferfromtheactual voltagelevel.
■SelectingDISPLAYOFFreducesthenoise that comes from display. While the display indicator is turning off, display off indicator lights up.
■Youcanalsoswitchbetweenhedisplaysin reverseorderbyturningMULTI-CONTROLcounterclockwise.
■Youcanalsoswitchbetweenhedisplayby pressingENTERTAINMENTontheremotecontrol.
■ To return to the playback display, press BAND.
4UseMULTI-CONTROLtoselectthedisplayform.
PushMULTI-CONTROLupordowntoselect themenuoption;presstoselect.
DisplayForm1—DisplayForm2— DisplayForm3
■Displayformcanbechangedwhenentertainment off (ENT. OFF), background visual (BGV-1, BGV-2, BGV-3, BGV-4) or background picture (BGP-1, BGP-2, BGP-3, BGP-4) is selected.
- If Display Form 2 is selected in the following sources, playtime and title information are not displayed simultaneously.
• Built-inCDPlayer
- Multi-CDPlayer
• DVDplayer/multi-DVDplayer
• iPod
■ If Display Form 3 is selected in the following sources, displayinformationcannotbechanged.
•Tuner
• Built-inCDPlayer
- Multi-CDPlayer
• DVDplayer/multi-DVDplayer
- iPod
UsingthePGMbutton
Youcanoperatethepreprogrammedfunctions foreachsourcebyusingPGMontheremote control.
- PressPGMtoturnpauseonwhenselectingthefollowingsources:
- CD-Built-inCDplayer
- Multi-CD-Multi-CDplayer
- iPod-iPod
•DVD-DVDplayer/multi-DVDplayer
■Toturnpauseoff, pressPGMagain.
- PressPGMandholdtoturnBSMon whenselectingtunerasthesource. PressPGMandholduntiltheBSMturnson.
■Tocancelthestorageprocess,pressPGM again. - PressPGMandholdtoturnBSSMon whenselectingtelevisionasthesource. PressPGMandholduntiltheBSSMturnson.
■Tocancelthestorageprocess,pressPGM again.
AdditionalInformation
Understandingbuilt-inCD playererrormessages
Whenyoucontactyourdealeroryournearest PioneerServiceCenter,besuretorecordthe errormessage.
MessageCauseAction
| ERROR-11,12,17,30 | DirtydiscCleandisc. | |
| ERROR-11,12,17,30 | ScratcheddiscReplacedisc. | |
| ERROR-10,11,12,15,17,30,A0 | Electricalormechanical | TurntheignitionONandOFF,or switchtoaddiffer-entsource,then backtotheCD player. |
| ERROR-15Theinserteddisc doesnotcontain anydata | Replacedisc. | |
| ERROR-23TheCDformat cannotbeplayed back | Replacedisc. | |
| NoAudioTheinserteddisc doesnotcontain anyfilesthatcan beplayedback | Replacedisc. | |
| TRKSKIPPEDTheinserteddisc containsWMA filesthatarepro-tectedbyDRM | Replacedisc. | |
| PROTECT | Allthefileson theinserteddisc aresecuredby DRM | Replacedisc. |

UnderstandingautoTAand EQerrormessages
When correct measurement of car interior acoustic characteristics is not possible using the auto TA and EQ, an error message may appear on the display. If an error message appears
pears, referto the table below to see what the problem is and the suggested method of correcting the problem. After checking, try again.
MessageCauseAction
| ERR:MICcheck | Microphoneis notconnected. | Plugthesupplied microphonese-curelyintothe jack. |
| ERR:Front Speaker,ERR: Front-Lch, ERR:Front-Rch, ERR:Rear-Lch, ERR:Rear-Rch, ERR:SubW-Lch,ERR: SubW-Rch, ERR:SubWoo-fer | Themicrophone cannotpickup themeasuring toneofaspeaker. | • Confirmthatthe speakersarecon- nectedcorrectly.• Cancelmuting thefrontspeaker units.• Correcttheinput levelsettingofthe powerampcon- nectedtothe speakers.• Setthemicro- phonecorrectly. |
| ERR:Outside Noise | Thesurrounding noiselevelistoo high. | • Stopyourcarin aplacethatisas quietaspossible, andswitchoffthe engine,aircondi- tionerorheater.• Setthemicro- phonecorrectly. |

AdditionalInformation
CDplayerandcare
- UseonlyCDsthathaveeitherofthettwo CompactDiscDigitalAudiomarksas shownbelow.


- Useonlynormal, roundCDs. If you insertir-regular, non-round, shapedCDstheymay jamintheCDplayerornotplayproperly.


- CheckallCDsforcracks,scratchesor warpingbeforeplaying.CDsthathave cracks,scratchesorarewarpedmaynot playproperly.Donotusesuchdiscs.
- Avoidtouchingtherecorded(non-printed) surfacewhenhandlingthedisc.
- Storediscsintheircaseswhennotinuse.
- Keepdiscsoutofdirectsunlightanddo notexposethediscstohightemperatures.
- Donotattachlabels, writeonorapplychemicalstothesurfaceofthediscs.
- TocleanaCD, wipethediscwithasoft clothoutwardfromthecenter.

natural_image
Illustration of a hand holding a circular object with a pointer, no text or symbols present- If the heater is used in cold weather, moisture may form components inside the CD player. Condensation may cause the CD playertomalfunction. If youth think that condensation is a problem turn off the CD
playerforanhourorsotoallowittodry outandwipeanydampdiscswithasoft clothtoremovethemoisture.
• RoadshocksmayinterruptCD playback.

CD-R/CD-RWdiscs
- When CD-R/CD-RWdiscsareused, play-backispossibleonlyfordiscswhichhave beenfinalized.
- ItmaynotbepossibletopplaybackCD-R/CD-RWdiscsrecordedonamusicCDrecorderorapersonalcomputerbecauseof disccharacteristics,scratchesordirton thedisc,ordirt,condensation,etc.,onthe lensofthisunit.
- Playbackofdiscsrecordedonapersonal computermaynotbepossible,depending ontheapplicationsettingsandtheenvironment.Pleaserecordwiththecorrectformat.(Fordetails,contactthemanufacturer oftheapplication.)
- PlaybackofCD-R/CD-RWdiscsmaybe-comeimpossibleincaseofdirectexposure tosunlight,hightemperatures,orthesto-rageconditionsinthevehicle.
- Titlesandothertextinformationrecorded onaCD-R/CD-RWdiscmaynotbedisplayedbythisunit(inthecaseofaudio data(CD-DA)).
- Read the precautions with CD-R/CD-RW discs before using them.
AdditionalInformation
MP3, WMA, AACandWAVfiles
- MP3isshortforMPEGAudioLayer3and referstoanaudiocompressiontechnology standard.
- WMA is short for Windows Media™ Audio andreferstoanaudiocompressiontechnology that is developed by Microsoft Corporation. WMAdatacanbeencoded by using WindowsMediaPlayerversion7 or later.
- AACisshortforAdvancedAudioCoding andreferstoanaudiocompressiontechnologystandard.
- WAVisshortforwaveform.Itisastandard audiofileformatforWindows ®.
- ThisunitmaynotoperatecorrectlydependingontheapplicationusedtoencodeWMAfiles.
- DependingontheversionofWindows MediaPlayerusedtoencodeWMAfiles, albumnamesandothertextinformation maynotbecorrectlydisplayed.
- Theremaybeaslightdelaywhenstarting playbackofWMA/AACfilesencodedwith imagedata.
- ThisunitallowsplaybackofMP3/WMA/AAC/WAVfilesonCD-ROM,CD-RandCD-RWdiscs.Discrecordingscompatiblewith level1andlevel2ofISO9660andwiththe RomeoandJolietfilesystemcanbeplayed back.
- Itispossibletoplaybackmulti-session compatiblerecordeddiscs.
- MP3/WMA/AAC/WAVfilesarenotcompatiblewithpacketwritedatatransfer.
- Themaximumnumberofcharacterswhich canbedisplayedforafilename,including theextension(.mp3,.wma,.m4aor.wav),is 64,fromthefirstcharacter.
- Themaximumnumberofcharacterswhich canbedisplayedforafoldernameis64.
-
Incaseoffilesrecordedaccordingtothe Romeofilesystem,onlythefirst64characterscanbedisplayed.
-
WhenplayingdiscswithMP3/WMA/AAC/WAVfilesandaudiodata(CD-DA)suchas CD-EXTRAandMIXED-MODECDs,both typescanbeplayedonlybyswitching modebetweenMP3/WMA/AAC/WAVand CD-DA.
- The folder selection sequence for playback and other operations becomes the rewriting sequence used by the writing software. For this reason, the expected sequence at the time of playback may not coincide with the actual playback sequence. However, there also is some writing software which permits setting of the playback order.
- SomeaudioCDscontaintracksthatmerge intooneanotherwithoutapause.When thesediscsareconvertedtoMP3/WMA/AAC/WAVfilesandburnedtoaCD-R/CD-RW/CD-ROM,thefileswillbeplayedback onthisplayerwithashortpausebetween eachone,regardlessofthelengthofthe pausebetweentracksontheoriginalaudio CD.

Important
- WhennaminganMP3/WMA/AAC/WAVfile, addthecorrespondingfilenameextension (.mp3,.wma,.m4aor.wav).
- Thisunitplaysbackfileswiththefilenameextension(.mp3,.wma,m4aor.wav)asanMP3/WMA/AAC/WAVfile.Topreventnoiseand malfunctions,donotusetheseextensionsfor filesotherthanMP3/WMA/AAC/WAVfiles.
MP3additionalinformation
- FilesarecompatiblewiththeID3TagVer. 1.0,1.1,2.2,2.3and2.4formatsfordisplay ofalbum(discitle),track(tracktitle),artist (trackartist)andcomments.Ver.2.xofID3 TagisgivenprioritywhenbothVer.1.xand Ver.2.xexist.
AdditionalInformation
- Theemphasisfunctionisvalidonlywhen MP3filesof32,44.1and48kHzfrequenciesareplayedback.(16,22.05,24,32, 44.1,48kHzsamplingfrequenciescanbe playedback.)
- Thereisnom3uplaylistcompatibility.
- ThereisnocompatibilitywiththeMP3i (MP3interactive)ormp3PROformats.
- ThesoundqualityofMP3filesgenerallybecomesbetterwithanincreasedbitrate. Thisunitcanplayrecordingswithbitrates from8kbpsto320kbps, butinordertobe abletoenjoysoundofacertainquality, we recommendusingonlydiscsrecordedwith abitrateofatleast128kbps.
WMAadditionalinformation
- ThisunitplaysbackWMAfilesencoded by WindowsMediaPlayerversion7,7.1,8,9 and10.
- Youcanonly playbackWMAfilesinthefrequencies32,44.1 and 48kHz.
- ThesoundqualityofWMAfilesgenerally becomesbetterwithanincreasedbitrate. Thisunitcanplayrecordingswithbitrates from48kbpsto320kbps(CBR)orfrom48 kbpsto384kbps(VBR),butinordertobe abletoenjoysoundofacertainquality,we recommendusingdiscsrecordedwith a higherbitrate.
- This unit doesn't support the following formats.
—WindowsMediaAudio9Professional (5.1ch)
—WindowsMediaAudio9Lossless
—WindowsMediaAudio9Voice
AACadditionalinformation
- ThisunitplaysbackAACfilesencoded by iTunes® version4.8andearlier.
- ThisunitplaysbackAACfilesinthesamplingfrequencies11.025,16,22.05,24,32,44.1and48kHz.
- ThesoundqualityofAACfilesgenerallybecomesbetterwithanincreasedtransmissionrate.Thisunitcanplayrecordings withtransmissionratesfrom16kbpsto 320kbps,butinordertobeabletoenjoy soundofacertainquality,werecommend usingdiscsrecordedwithahighertransmissionrate.
- This unit doesn't support the following formats. —AppleLossless
WAVadditionalinformation
- ThisunitplaysbackWAVfilesencoded in LinearPCM(LPCM)formatorMSADPCM format.
- Youcanonly playback WAV files in the frequencies 16, 22.05, 24, 32, 44.1 and 48 kHz (LPCM), or 22.05 and 44.1 kHz (MS ADPCM). Thesampling frequency shown in the display may be rounded.
- ThesoundqualityofWAVfilesgenerallybecomesbetterwithalargernumberofquantizationbits.Thisunitcanplayrecordings with8and16(LPCM)or4(MSADPCM) quantizationbits,butinordertobeableto enjoysoundofacertainquality,werecommendusingdiscsrecordedwiththelarger numberofquantizationbits.
AboutfoldersandMP3/WMA/AAC/WAVfiles
- AnoutlineofaCD-ROMwithMP3/WMA/AAC/WAVfilesonitisshownbelow.Sub-foldersareshownasfoldersinthefolder currentlyselected.
AdditionalInformation

flowchart
graph TD
    A["01 (ROOT)"] --> B["02"]
    B --> C["001.mp3 (001.wma, 001.m4a, 001.wav)"]
    B --> D["010.mp3 (010.wma, 010.m4a, 010.wav)"]
    B --> E["03"]
    E --> F["011.mp3 (011.wma, 011.m4a, 011.wav)"]
    E --> G["020.mp3 (020.wma, 020.m4a, 020.wav)"]
    E --> H["04"]
    H --> I["021.mp3 (021.wma, 021.m4a, 021.wav)"]
    H --> J["030.mp3 (030.wma, 030.m4a, 030.wav)"]
    A --> K["05"]
    K --> L["①"]
    K --> M["②"]
    K --> N["③"]
①Firstlevel
②Secondlevel
③Thirdlevel

Notes
- Thisunitassignsfoldernumbers.Theuser cannotassignfoldernumbers.
- Itisnotpossibletocheckfoldersthatdonot includeMP3/WMA/AAC/WAVfiles.(These folderswillbeskippedwithoutdisplayingthe foldernumber.)
- MP3/WMA/AAC/WAVfilesinupto8tiersof folderscanbeplayedback. However, there is adelayinthestartofplaybackondiscswith numerousstiers. For this reason were com-
mendcreatingdiscswithnomorethan2 tiers.
- Itispossibletoplaybackupto99folderson onedisc.
AdditionalInformation
Terms
AAC
AACisshortforAdvancedAudioCodingand referstoanaudiocompressiontechnology standardusedwithMPEG2andMPEG4.
Bitrate
Thisexpressesdatavolumepersecond,orbps(bitspersecond)units.Thehighertherate,themoreinformationisavailabletoreproducethesound.Usingthesameencodingmethod(suchasMP3),thehighertherate,thebetterthesound.
ID3tag
Thisisamethodofembeddingtrack-related informationinanMP3file. Thisembeddedinformationcanincludethetracktitle, theartist'sname, thealbumtitle, themusicgenre, theyearofproduction, commentsandother data. Thecontentscanbefreelyedited using softwarewithID3Tageditingfunctions. Althoughthetagsarerestrictedastothenumberofcharacters, theinformationcanbe viewedwhentetrackisplayedback.
ISO9660format
ThisistheinternationalstandardfortheformatlogicofCD-ROMfoldersandfiles.Forthe ISO9660format,thereareregulationsforthe followingtwolevels.
Level1:
Thefilenameisin8.3format(thenameconsistsofupto8characters,half-byteEnglish capitallettersandhalf-bytenumeralsandthe " _ "sign,withafile-extensionofthreecharacters).
Level2:
Thefilenamecanhaveupto31characters(includingtheseparationmark"."andafileextension).Eachfoldercontainslessthan8 hierarchies.
Extendedformats
Joliet:
Filenamescanhaveupto64characters.
Romeo:
Filenamescanhaveupto128characters.
LinearPCM(LPCM)/Pulsecode modulation
Thisstandsforlinearpulsecodemodulation, whichisthesignalrecordingsystemusedfor musicCDsandDVDs.
m3u
Playlistscreatedusingthe"WINAMP"softwarehaveaplaylistfileextension(.m3u).
MP3
MP3isshortforMPEGAudioLayer3.Itisan audiocompressionstandardsetbyaworking group(MPEG)oftheISO(InternationalStandardsOrganization).MP3isabletocompress audiodatatoabout1/10ththelevelofaconventionaldisc.
MSADPCM
ThisstandsforMicrosoftadaptivedifferential pulsecodemodulation,whichisthesignalrecordingsystemusedforthemultimediasoftwareofMicrosoftCorporation.
Multi-session
Multi-sessionisarecordingmethodthatal- lowsadditionaldatatoberecordedlater. WhenrecordingdataonaCD-ROM,CD-Ror CD-RW,etc.,alldatafrombeginningtoendis treatedasasingleunitorsession.Multi-ses-sionisamethodofrecordingmorethan2ses-sionsononedisc.
AdditionalInformation
Numberofquantizationbits
Thenumberofquantizationbitsisonefactor intheoverallsoundquality;thehigherthe "bit-depth",thebetterthesoundquality.However,increasingthebit-depthalsoincreases theamountofdataandthereforestorage spacerequired.
Packetwrite
Thisisageneraltermforamethodofwriting onCD-R,etc.,atthetimerequiredforafile, justasisdonewithfilesonfloppyorhard discs.
VBR
VBRisshortforvariablebitrate.Generally speakingCBR(constantbitrate)ismore widelyused.Butbyflexiblyadjustingthebit rateaccordingtotheneedsofaudiocompression,itispossibletoachievecompression-prioritysoundquality.
WAV
WAVisshortforwaveform.Itisastandard audiofileformatforWindows ^® .
WMA
WMAisshortforWindowsMedia™Audio andreferstoanaudiocompressiontechnologythatisdevelopedbyMicrosoftCorporation.WMAdatacanbeencodedbyusing WindowsMediaPlayerversion7orlater. WindowsMediaandtheWindowslogoaretrademarksorregisteredtrademarksofMicrosoft CorporationintheUnitedStatesand/orother countries.
AdditionalInformation
Specifications
General
Ratedpowersource.....14.4VDC
Groundingsystem......Negativetype
Max.currentconsumption
10.0A
Dimensions(W×H×D):
DIN
Chassis....178×50×159mm
Nose....188×58×30mm
D
Chassis....178×50×164mm
Nose....170×45×25mm
Weight....1.6kg
Audio/DSP
Maximumpoweroutput.....50W×4
Continuouspoweroutput...22W×4(50Hzto15000
Hz,5%THD,4Ωload,both
channelsdriven)
Load impedance ....4 Ω (4 Ω to 8 Ω allowable)
Preoutmaxoutputlevel/outputimpedance
5.0V/100Ω
Loudnesscontour.....+10dB(100Hz),+6.5dB
(10kHz)(volume:-30dB)
Equalizer(Left/Rightindependent16-BandGraphic
Equalizer):
Frequency....20/31.5/50/80/125/200/315/
500/800/1.25k/2k/3.15k/5k/
8k/12.5k/20kHz
Equalizationrange.....±12dB(2dBstep)
Autoequalizer:
(Front&rear&subwoofer/High&mid&low)
Frequency.....20/31.5/50/80/125/200/315/
500/800/1.25k/2k/3.15k/5k/
8k/12.5k/20kHz
Equalizationrange.....+6to-12dB(2dBstep)
Network(standardmode):
HPF(Front/rear):
Frequency.....50/63/80/100/125/160/200
Hz
Slope 0 (Pass)/-6/-12 dB/oct
Gain....0to-24dB/Mute(1dB
step)
Subwoofer(stereo/mono):
Frequency.....50/63/80/100/125/160/200
Hz
Slope ...... -6/-12/-18 dB/oct
Gain....+6to-24dB/Mute(1dB
step)
Phase......Normal/Reverse
Network(3-waynetworkmode):
HighHPF:
Frequency.....1.25/1.6/2/2.5/3.15/4/5/6.3/8/
10/12.5kHz
Slope ...... -6/-12/-18/-24 dB/oct
Gain....0to-24dB/Mute(1dB
step)
Phase......Normal/Reverse
MidHPF/LPF:
Frequency(LPF)...1.25/1.6/2/2.5/3.15/4/5/6.3/8/
10/12.5kHz
Frequency(HPF)
25/31.5/40/50/63/80/100/125/
160/200/250Hz
Slope (LPF) ...... 0 (Pass)/-6/-12/-18/-24 dB/
oct
Slope (HPF) ...... 0 (Pass)/-6/-12/-18/-24 dB/
oct
Gain....0to-24dB/Mute(1dB
step)
Phase......Normal/Reverse
LowLPF(stereo/mono):
Frequency.....25/31.5/40/50/63/80/100/125/
160/200/250Hz
Slope ......-12/-18/-24/-30/-36 dB/oct
Gain....+6to-24dB/Mute(1dB
step)
Phase......Normal/Reverse
CDplayer
System....Compactdiscaudiosystem
Usablediscs....Compactdisc
Signalformat:
Samplingfrequency.....44.1kHz
Numberofquantizationbits
16;linear
Frequency characteristics...5Hz to 20000 Hz (±1dB)
Signal-to-noiseratio.....105dB(1kHz)(IHF-Anet-
work)
Dynamicrange.....100dB(1kHz)
Numberofchannels......2(stereo)
MP3decodingformat......MPEG-1&2AudioLayer3
WMAdecodingformat......Ver.7,7.1,8,9,10(2ch
audio)
(WindowsMediaPlayer)
AACdecodingformat......MPEG-4AAC(iTunes ^® en-
codedonly)
WAVsignalformat....LinearPCM&MSADPCM
AdditionalInformation
FMtuner
Frequencyrange.....87.5MHzto108.0MHz
Usable sensitivity ....8 dBf (0.7 V/75 , mono, S/N:30dB)
50 dB quieting sensitivity ..... 10 dBf (0.9 μV/75 Ω, mono)
Signal-to-noiseratio....75dB(IHF-Anetwork)
Distortion....0.3%(at65dBf,1kHz,
stereo)
0.05%(at65dBf,1kHz,
mono)
Frequencyresponse....30Hzto15000Hz(±3dB)
Stereoseparation....45dB(at65dBf,1kHz)
AMtuner
Frequencyrange.....531kHzto1602kHz(9kHz)
530kHzto1640kHz(10
kHz)
Usablesensitivity.....18μV(S/N:20dB)
Signal-to-noiseratio......67dB(IHF-Anetwork)
Infraredremotecontrol
Wavelength....940nm±50nm
Output.....typ;12mw/srperInfrared
LED

Note
Specificationsandthedesignaresubjecttopos-
siblemodificationswithoutnoticeduetoim-
provements.
natural_image
Simple line drawing of a rectangular box with a separate side tab (no text or symbols)natural_image
Line drawing of a hand pressing down on a rectangular object with arrows indicating motion (no text or symbols)Botóndeliberación
natural_image
Line drawing of a device with a hand inserting a card into a folder (no text or symbols)
text_image
Diagram showing a device panel with labeled ports and a pen tip pointing to a component, likely illustrating a test or calibration process.BotónRESET
Cambiodelmododeajuste delDSP
natural_image
Diagram showing a device being locked in a case, with an arrow indicating the process (no text or symbols present)ADVERTENCIA
text_image
Local Level 2 ①■Paradesactivarlapausa,vuelvaapulsar
MULTI-CONTROL.
text_image
TitleInput "A"■Paradesactivarlapausa,vuelvaapulsar
MULTI-CONTROL.
ReproductordeMP3/WMA/AAC/WAV
text_image
Play mode M-CD repeat■Paradesactivarlapausa,vuelvaapulsar
MULTI-CONTROL.
text_image
TitleInput "A"■Paradesactivarlapausa,vuelvaapulsar
MULTI-CONTROL.
Usodeltelevisor
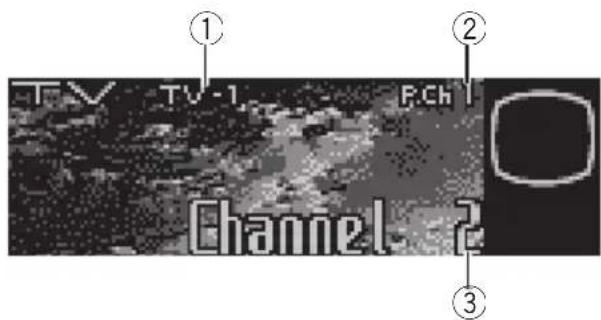
text_image
TV TV-1 PCh Channel 2 ① ② ③text_image
BSSM Stored in band1 ①■Paradesactivarlapausa,vuelvaapulsar
MULTI-CONTROL.
natural_image
Diagram of a car interior showing a steering wheel, dashboard, and cable with a curved arrow indicating motion (no text or symbols)natural_image
Diagram showing a tool interacting with a device, no text or symbols present8PulseMULTI-CONTROLparacomenzar losajustesTAyEQautomáticos.
text_image
Language select Englishtext_image
Clock 12:00 PMnatural_image
Line drawing of a box with an arrow pointing to a syringe (no text or symbols)FuenteAUX2:
text_image
TitleInput "A" [ AUX ]natural_image
Illustration of a hand holding a circular object with a pointer, no text or symbols present25/31,5/40/50/63/80/100/125/160/200/250Hz
Pendiente (LPF) .... 0 (Pass)/-6/-12/-18/-24 dB/ oct
Pendiente (HPF) ... 0 (Pass)/-6/-12/-18/-24 dB/ oct
PIONEERELECTRONICSAUSTRALIAPTY.LTD.
178-184BoundaryRoad, Braeside, Victoria3195, Australia
TEL:(03)9586-6300
PIONEERELECTRONICSOFCANADA, INC.
300AllstateParkway, Markham, OntarioL3ROP2, Canada
TEL:1-877-283-5901
PIONEERELECTRONICSDEMEXICO,S.A.deC.V.
Blvd.ManuelAvilaCamacho13810piso
Col.LomasdeChapultepec,Mexico,D.F.11000
TEL:55-9178-4270
先鋒股份有限公司
總公司:台北市中山北路二段44號13樓
電話:(02)2521-3588
先鋒電子(香港)有限公司
香港九龍尖沙咀海港城世界商業中心
9樓901-6室
電話:(0852)2848-6488
PublishedbyPioneerCorporation.
Copyright©2005byPioneerCorporation.
Allrightsreserved.
PublicadoporPioneerCorporation.
Copyright©2005porPioneer
Corporation.Todoslosderechos
reservados.