Udden CG3 - Cooker IKEA - Free user manual and instructions
Find the device manual for free Udden CG3 IKEA in PDF.

User questions about Udden CG3 IKEA
0 question about this device. Answer the ones you know or ask your own.
Ask a new question about this device
Download the instructions for your Cooker in PDF format for free! Find your manual Udden CG3 - IKEA and take your electronic device back in hand. On this page are published all the documents necessary for the use of your device. Udden CG3 by IKEA.
USER MANUAL Udden CG3 IKEA
Safety information 4
Product description 6
Installation 7
Electrical connection 8
Oven 9
Before first use 9
Daily use 9
Cooking tables 10
Care and cleaning 11
Technical data 13
Hob 14
Daily use 14
Helpful hints and tips 14
Care and cleaning 14
What to do if... 15
Technical data 15
Cabinet structure 16
Care and cleaning 16
Environment concerns 16
IKEA GUARANTEE 17
Subject to change without notice
Safety information
For your safety and correct operation of the appliance, read this manual carefully before installation and use. Always keep these instructions with the appliance even if you move or sell it. Users must fully know the operation and safety features of the appliance.
Correct use
- Do not leave the appliance unattended during operation.
- The appliance is designed exclusively for domestic use.
- The appliance must not be used as a work surface or as a storage surface.
- Do not place or store flammable liquids, highly inflammable materials or fusible objects (e.g. plastic film, plastic, aluminium) in or near the appliance.
- Watch out when connecting electric appliances to sockets nearby. Do not allow connecting leads to come into contact with or to catch beneath the hot oven door.
- Do not keep moist dishes and food in the oven after finishing the cooking as the moist can damage the enamel or get into the units.
- Do not do repairs yourself to prevent injury and damage to the appliance. Always contact your local Service Centre.
- Do not use harsh abrasive or sharp metal scrappers to clean the oven door glass since they can scratch the surface, which may result in shattering of the glass.
(i) Note on enamel coating
Changes in the colour of the oven enamel coating as a result of use do not affect the appliance suitability for normal and correct use. They therefore do not constitute a defect in the sense of the warranty law.
Child safety
- Only adults can use this appliance. Children must get supervision to make sure that they do not play with the appliance.
- Keep all packaging away from children. There is a risk of suffocation.
- Keep children away from the appliance when it is on.
Warning!
This Appliance has a mechanical child lock to safely protect the oven door opening. Be sure to use this safety device to avoid small children and pets unintentionally access to the door cavity.
Warning! If the surface is cracked, switch off the appliance to avoid the possibility of electric shock.
ENGLISH
General safety
- This appliance is not intended for use by persons (including children) with reduced physical, sensory or mental capabilities, or lack of experience and knowledge, unless they have been given supervision or instruction concerning use of the appliance by a person responsible for their safety.
- Risk of burns! The interior of the oven becomes hot during use.
• Always stand back from the appliance when opening the oven door during cooking or at the end of it to allow any build up of steam or heat to release.
Installation
- Make sure that the appliance is not damaged because of transport. Do not connect a damaged appliance. If necessary, contact the supplier.
- Only an authorized service engineer can install, connect or repair this appliance. Use only original spare parts.
• Built-in appliances can only be used after they are built into suitable built-in units and work surfaces that meet standards. - Do not change the specifications or modify this product. Risk of injury and damage to the appliance.

Warning! Carefully obey the instructions for electrical connections.
Safety during use
- Remove all packaging, stickers and film from the appliance before the first use.
- Warning! Fire hazard! Overheated fats and oils can ignite very quickly.
- Switch the cooking zones off after each use.
- Risk of burns! Do not place objects made of cuttery or saucepan lids on the cooking surface, as they can get hot.
Warning! The ventilation gap of 5 mm between the worktop and front of the unit underneath it must not be covered. For all safety distances between hob and cabinets refer to the Assembly Instruction.
Warning! Users with implanted pacemakers should keep their upper body at least 30 cm from induction cooking zones that are switched on.
How to avoid damage to the appliance
- The glass ceramic can be damaged by objects falling onto it, or knocked by the cookware.
- Cookware made of cast iron, cast aluminum or with damaged bottoms can scratch the glass ceramic if slid on the surface.
- To avoid damaging cookware and glass ceramics, do not allow saucepans or frying pans to boil dry.
- Do not use the cooking zones with empty cookware or without cookware.
- Never line any part of the appliance with aluminium foil. Never place plastic or any other material which may melt in or on the appliance.
Product description
Hob - general overview
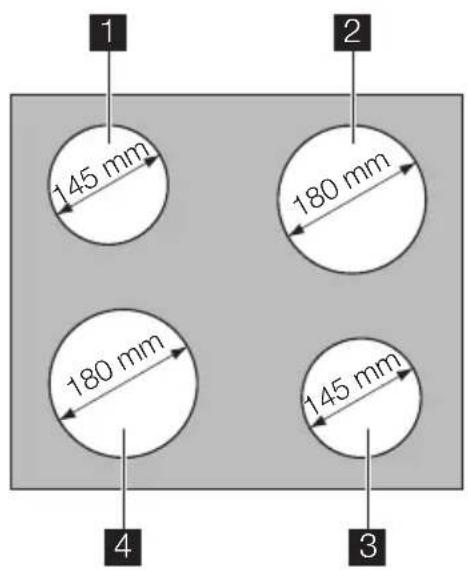
text_image
1 145 mm 2 180 mm 180 mm 4 145 mm 31 Single cooking zone 1200W
2 Single cooking zone 1800W
3 Single cooking zone 1200W
4 Single cooking zone 1800W
Warning! Risk of burns from residual heat. After being switched off, the cooking zones need some time to cool down.
Oven -general overview

text_image
1 2 3 4 5 6 7 8 91 Temperature control knob
2 Temperature indicator
3 Control knob for the oven functions
4 Control knobs for cooking zones
5 Control panel
6 Air vents for cooling fan
7 Heating element
8 Oven lamp
9 Rating plate
ENGLISH
Cabinet structure- general overview

text_image
Technical diagram of a cabinet with numbered components for identification1 Splashback
2Side panels
3 Metal structure
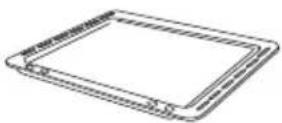
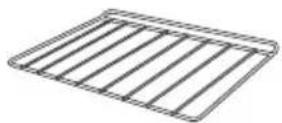
Oven accessories
Baking tray
Grid

1x

1x
Installation

Caution! Refer to the assembly instructions for the installation.

Warning! Only a qualified and
competent person must do the installation of the appliance. If you do not contact qualified or competent person, the guarantee becomes invalid if there is damage.
-
Before you built in the appliance to the kitchen cabinet make sure that the recess dimensions are suitable.
• Make sure that there is anti-shock protection for the installation. -
According to the regulations of force, all parts which ensure the anti-shock protection must be fixed in such a way that they cannot be undone without tools.
- The appliance can be placed with its back and one side close to the higher appliances or walls. The other side must be placed close to the furniture with the same height.
- The built-in unit must meet the stability requirements of DIN 68930.
• Built-in ovens and built-in cooking surfaces are fitted with special connection systems. For safety reasons, you must only combine appliances from the same manufacturer.
If the range is placed on a base, measures have to be taken to prevent the appliance slipping from the base.
Electrical connection
⚠ Warning! Only a qualified electrician and competent person must do the electrical installation.
- The manufacturer is not responsible if you do not follow these safety precautions.
- Ground the appliance according to safety precautions.
- Make sure that the rated voltage and type of power on the rating plate agree with the voltage and the power of the local power supply.
- This appliance is supplied without a plug and a connection cable.
The following cable types are suitable for use as mains cables, taking into account the respective rated cross-section required: H07RN-F, H05RN-F, H05RR-F, H05VVF, H05V2V2-F (T90), H05BB-F. - The yellow-green earth wire should be 2-3 cm longer than all other cables.
-
The cable which is used to connect the oven to the electrical supply must have a minimum size of 4,0mm^2 .
-
Any electrical component must be installed or replaced by the After Sales Service technician or qualified service personnel.
- Always use a correctly installed shockproof socket.
- Do not use multi-way plugs, connectors and extension cables. There is a risk of fire.
- Make sure that the mains plug is accessible after installation.
- Do not pull the mains cable to disconnect the appliance. Always pull the mains plug.
- Connect the appliance to the mains using a device that allows to disconnect the appliance from the mains at all poles with a contact opening width of at least 3 mm, eg. automatic line protecting cut-out, earth leakage trips or fuse.

This appliance complies with the E.E.C. Directives.
Oven
Before first use
Remove all packaging, both inside and outside the oven, before using the appliance. Do not remove the rating plate.
Initial cleaning
Clean the appliance before first use. Clean the accessories and the oven interior with a soft cloth with warm water and soap.
After that preheat the oven up without food.
Preheating
Turn the oven function control knob to ☐ and run the oven for 45 minutes at maximum temperature, to burn off any residue from the cavity surface. Accessories can become hotter than in normal use. During this period an odour can be emitted. This is normal. Make sure the room is well ventilated.
Daily use
Switching the appliance on
Set the oven function and the temperature.
Setting the oven function
Turn the control knob for oven functions (refer to "Product description").
Setting the temperature
Turn the temperature control knob (refer to "Product description"). You can set the temperature between 50 °C and 250 °C.
Switching the appliance off
Turn the temperature and oven functions control knobs to the off position.
Oven function control knob
| Symbol Function | |
| [057T] | Off position |
 | Oven lamp - lights up without any cooking function. |
 | Bottom heating element - heats only from the bottom of the oven. To bake cakes with crispy or crusty bases. |
 | Conventional cooking - heats both from the top and bottom element. To bake and roast on one oven level. |
 | Top heating element - heats only from the top of the oven. To finish cooked dishes. |
Temperature indicator
The temperature indicator (refer to "Product description") comes on when the oven heats up. It goes off when the oven reaches the correct temperature. It then cycles on and off to show the temperature adjusts.
Safety thermostat
To prevent dangerous overheating (through incorrect use of the appliance or defective components), the oven is fitted with a safety thermostat, which interrupts the power supply. The oven switches back on again automatically, when the temperature drops.
ENGLISH
Should the safety thermostat fail to work, do not attempt to fix it yourself. Please contact After Sales Service.
The cooling fan
The oven is provided with a cooling fan (not visible), meant to keep the front panel, the knobs and the oven door handle cool. The cooling fan switches on automatically when the oven is activated. Warm air is blown out through the aperture near the oven door handle. The fan switches off when, after cooking, the oven function control knob is set to Off position 0.
Warning! Always cook with the oven door closed. Be careful when opening the drop down oven door. Do not allow it to fall open - support the door using the door handle, until it is fully open.
Warning! Do not line the oven with aluminium foil and do not place a roasting pan or baking tray on the floor. Build-up heat can damage the oven enamel.
Mechanical child lock
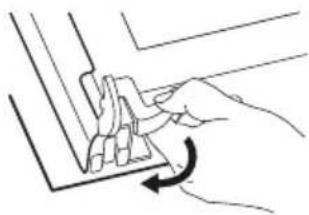
The appliance is delivered with fixed and activated child lock. It is situated just below the oven control panel on the right side.

text_image
Diagram showing a hand inserting a device into a cabinet, with an upward arrow indicating direction.To open the oven door with the child lock inserted, pull the child lock handle up as shown in the picture.
Close the oven door without pulling the child lock.

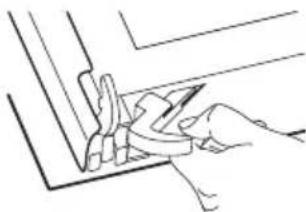
natural_image
Diagram of a mechanical device inside a housing, showing internal components and a circular inset view (no text or symbols)To remove the child lock open the oven door and unscrew it using the torx key included in the oven fitting bag.
Cooking tables
| Weight (kg) | Food Oven | Function | Level Oven | temperature (°C) | Cooking Time (min) |
| 1 | P o | ☐r | 2k 180 110- | 730 l a | m b |
| 1 | V e | ☐a | 2l 190 70-1 | 00 B e a f | |
| 1,2 Chicken/Rabbit | ☐ | 2 190 70-80 | |||
| 1,5 Duck | ☐ | 1 160 120- | 150 | ||
| 3 Goose | ☐ | 1 160 150- | 200 | ||
| 4 | T u | ☐r | k 180 210- | 240 y | |
| 1 | F i | ☐s | 2 190 30-40 | ||
| 1 Stuffed | Pep-peroni Toma-tos/Roasted Potatos | (Y2DH) | 2 190 50-70 | ||
| Instant | (AZD6) | 2 160 45-55 | |||
| 1 | P i | (Z2TS) | 2 160 80-100 | ||
| Biscuits | (EC2A) | 3 140 25-35 | |||
| 2 Lasagne | (A456) | 2 180 45-60 | |||
| 1 White Bread | (XY74) | 2 190 50-60 | |||
| 1 Pizza | (AC67) | 1 190 25-35 | |||
Care and cleaning
Warning! Switch the appliance off and let it cool down before you clean it.
Warning! For safety reasons, do not clean the appliance with steam blasters or high-pressure cleaners.
Warning! Keep the appliance clean at all times. A build-up of fats or other foodstuffs can cause a fire, especially in the dripping pan.
Outside of the appliance
- Clean the front of the appliance with a soft cloth and warm water with soap.
- For metal fronts, use normal cleaning agents.
- Do not use scouring agents and abrasive sponges.
Oven interior
- Turn the oven lamp on before cleaning.
- Clean the oven with a soft cloth with warm water and soap and leave it to dry.
Accessories
Clean all slide-in units with a soft cloth with warm water and soap (shelf, baking tray, shelf support rails etc.) after each use and dry well. Soak briefly to make them easier to clean.
Cleaning the oven door
The oven door has two panels of glass installed one behind the other. To make the cleaning easier remove the oven door and the internal panel of glass.
Warning! The oven door can close if you try to remove the internal panel of glass when the door is still assembled.
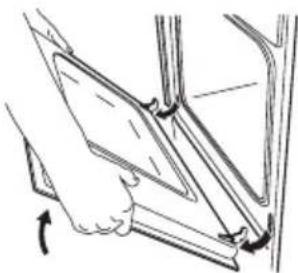
Removing the oven door and the glass panel
1
2

natural_image
Technical diagram of a mechanical clamp or bracket assembly with an arrow indicating a specific component (no text or symbols present)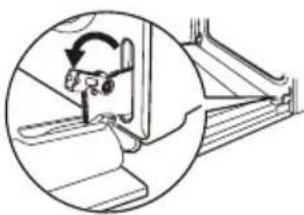
natural_image
Technical diagram showing a mechanical assembly with a circular inset view of a component (no text or symbols)Open the door fully Lift and turn the lev- and hold the two ers on the two hinges. door hinges.
ENGLISH
3
natural_image
Illustration of a hand holding a tablet or tablet device, with arrows indicating rotation (no text or symbols)4
natural_image
Simple line drawing of a rectangular frame with two circular buttons at the bottom (no text or symbols)Close the oven door to the first opening position (approx. 45°). Then pull forward and remove it from its seat.
Place the door on a stable surface protected by a soft cloth.
5
natural_image
Hand holding a tool with a curved arrow indicating rotation (no text or symbols)6
natural_image
Line drawing of a hand using a tool to cut or mark a corner detail (no text or symbols)Release the locking system to remove the internal panel of glass.
7
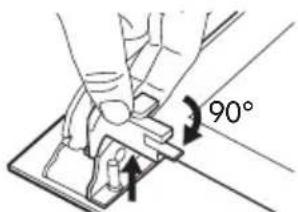
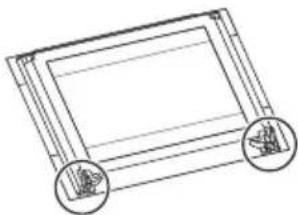
text_image
90°8
natural_image
Pure diagram of a rectangular frame with two arrows labeled 1 and 2, no text or symbols present.Turn 2 fasteners by 90° and remove them from their seats.
Carefully lift and remove the panel of glass.
Clean the glass panel with water and soap. Dry it carefully.
Inserting the door and the glass panel
When the cleaning procedure is completed, insert the glass panel and the oven door. To do so, follow the steps in reverse.
The inner glass panel must be assembled keeping the decorative frame (screen-printing) turned towards outside of the oven. To double check you did the above operation in a proper way simply pass your fingers on the inner glass surface. If the panel of glass is assembled correctly you should not feel any roughness.
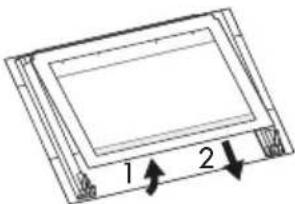
Insert the internal panel of glass into the right seats as shown below.

natural_image
Technical line drawing of a mechanical assembly with two circular insets showing close-up views of components (no text or symbols)Changing the oven lamp and cleaning the glass cover
Warning! Before you change the oven lamp (refer to "Product description"), switch off the appliance and disconnect it from the electrical supply.

natural_image
Diagram of a mechanical assembly with two components and directional arrows indicating motion (no text or symbols)-
Turn the glass cover anti - clockwise and remove it. Clean the glass cover.
-
If necessary, replace the old oven lamp with a 15/25 watt, 230V (50Hz), 300 °C heat resistant oven lamp (Connection type: E14).
-
Refit the glass cover.
Technical data
| Dimensions (internal) Width | HeightDepth | 405335410 |
| Usable volumes 56 l | ||
| Area of largest baking sheet (net surface) | 130 cm^2 | |
| Bottom heating element 1000 W | ||
| Top heating element 800 W | ||
| Full oven (Top + Bottom) 1800 W | ||
| Oven lamp 25 W | ||
| Cooling fan 25 W | ||
| Oven total rating ^1) | 1850 W | |
| Max power (Oven + Hob) 7850 W | ||
| Number of functions 3 | ||
| Energy consumption 0,79 kWh | ||
| Energy Consumption with a standard load and bottom heating | 0,79 kWh | |
1) Information on the electrical connection, voltage and overall power is given on the rating plate (refer to "Product description").
Hob
Daily use
Using the hob
You operate the appliance with the combination appliance's ring switches. To switch on the cooking zone and set the power turn the control knob between 1 and 9.
To switch off the cooking zone turn the control knob to position 0.
When a cooking zone is switched on, it may hum briefly. This is a characteristic of all ceramic glass cooking zones and does not impair either the function or the life of the appliance.
Helpful hints and tips
Information on acrylamides
Important! According to the latest scientific knowledge, intensive browning of food, especially in products containing starch, can constitute a health risk due to acrylamides. Therefore, we recommend cooking at the lowest possible temperatures and not browning foods too much.
Energy saving
If possible, always place lids on the pans.
Place cookware on the cooking zone before you switch it on.
The bottom of the cookware should be as thick and flat as possible.
- Switch cooking zones off before the end of the cooking time, to take advantage of residual heat
- Bottom of pans and cooking zones should be the same size.
Care and cleaning

Warning! Sharp objects and abrasive cleaning agents will damage the
appliance. Clean the appliance and remove the residues with water and washing up liquid after each use. Remove also the remnants of the cleaning agents!
Cleaning the ceramic hob

Scratches or dark stains on the glass ceramic that cannot be removed do not afthe functioning of the appliance.
Removing the residues and stubborn residues:
- Food containing sugar, plastics, tin foil residues should be removed at once using a scraper. Place a scraper on the glass ceramic surface at an angle and remove residues by sliding the blade over the surface. Wipe the appliance with a damp cloth and a little washing up liquid. Finally, rub the appliance dry using a clean cloth.
The scraper is available in the Service Centre or in the authorized spare parts shops. - Limescale rings, water rings, fat splashes, shiny metallic discolorations should be removed after the appliance has cooled down using cleaner for glass ceramic or stainless steel.
What to do if...
| Problem Possible | cause Solution | |
| The oven does not operate | The required setting have not been set | Check if cooking function and temperature are selected |
| The oven does not operate | The appliance is not correctly connected or/and the mains supply to the oven is not on | Check if the appliance is correctly connected and the mains supply to the oven is on |
| The oven temperature does not come on | The required setting have not been set | Select the cooking function and temperature |
| The oven lamp is not working | The oven lamp is faulty Replace the oven lamp | the oven lamp |
| Steam and condensation settle on the food and in the oven cavity | Dishes have been left in the oven for to long | Do not leave the dishes standing in the oven for longer than 15-20 minutes after the cooking process ends |
| The cooking zones are not functioning | The heat setting is not set Set the | heat setting |
| The cooking zones are not functioning | The fuse has tripped Check the fuse. If the fuses trip a number of times, please call an authorised electrician | |
If there is a fault, first try to find a solution to the problem yourself. If you cannot find a solution to the problem yourself, contact your dealer or the After Sales Service.
If you operated the appliance wrongly, or the installation was not carried out by a registered engineer, the visit from the After Sales Service technician or dealer may not take place free of charge, even during the warranty period.
Technical data
Rating Plate
Made in Germany© Inter IKEA Systems B.V. 1999 PQM 21552 PQM 21552 |  | Model UDDEN CG3 Typ 55 CAD 02 ZO 6,0kW PNC 949 593 072 S NO 12345678 220V-240V AC 50 Hz     DGT 230 V 419000759 DGT 230 V 419000759 | 6,0kW |
 | |||
The graphic above represents rating plate of the appliance (without serial number which is generated dynamically during the production process), which is located at its underneath surface of the casing.
Dear Customer, please apply here aside the sticker you can find in the dedicate plastic bag inserted inside the hob packaging. This will allow us to assist you better, by identifying precisely your hob, in case you will need in future our assistance. Thank you for your help!
Cabinet structure
Important! The structure has to be mounted according the Assembly Instructions booklet.
Care and cleaning
Cleaning cabinet structure
- Panels in particleboard, melamine foil: Wipe clean with a cloth damped in water or a non-abrasive detergent. Wipe dry with a clean cloth.
-
Structure in Powder coated carbon steel: Wipe clean with a cloth damped in water or a non-abrasive detergent. Wipe dry with a clean cloth.
-
Splashback in stainless steel: Always wipe and rub the surface along the steel grain when cleaning.
Important!
Do not use scouring-powder, steel wool, hard or sharp tools which can scratch the stainless steel surface.
Environment concerns
The symbol ☒ on the product or on its packaging indicates that this product may not be treated as household waste. Instead it should be taken to the appropriate collection point for the recycling of electrical and electronic equipment. By ensuring this product is disposed of correctly, you will help prevent potential negative consequences for the environment and human health, which could otherwise be caused by inappropriate waste handling of this product. For more detailed information about recycling of this product, please contact your local council, your household waste disposal service or the shop where you purchased the product.
Packaging materials
The materials with the symbol 📋 are recyclable. Dispose the packaging in a suitable collection containers to recycle it.
Before disposal of appliance
Warning! Do these steps to dispose the appliance:
- Pull the mains plug out of the mains socket.
- Cut off the mains cable and discard it.
- Discard the door catch. This prevents the children to close themselves inside the appliance. Risk of suffocation.
IKEA GUARANTEE
How long is the IKEA guarantee valid?
This guarantee is valid for five (5) years from the original date of purchase of Your appliance at IKEA, unless the appliance is named LAGAN in which case two (2) years of guarantee apply. The original sales receipt is required as proof of purchase. If service work is carried out under guarantee, this will not extend the guarantee period for the appliance,
Which appliances are not covered by the IKEA five (5) years guarantee?
The range of appliances named LAGAN and all appliances purchased in IKEA before 1st of August 2007
Who will execute the service?
IKEA service provider will provide the service through its own service operations or authorized service partner network.
What does this guarantee cover?
The guarantee covers faults of the appliance, which have been caused by faulty construction or material faults from the date of purchase from IKEA. This guarantee applies to domestic use only. The exceptions are specified under the headline “What is not covered under this guarantee?” Within the guarantee period, the costs to remedy the fault e.g. repairs, parts, labour and travel will be covered, provided that the appliance is accessible for repair without special expenditure. On these conditions the EU guidelines (Nr. 99/44/EG) and the respective local regulations are applicable. Replaced parts become the property of IKEA.
What will IKEA do to correct the problem?
IKEA appointed service provider will examine the product and decide, at its sole discretion, if it is covered under this guarantee. If considered covered, IKEA service provider or its authorized service partner through its own service operations, will then, at its sole discretion, either repair the defective product or replace it with the same or a comparable product.
What is not covered under this guarantee?
• Normal wear and tear.
- Deliberate or negligent damage, damage caused by failure to observe operating instructions, incorrect installation or by connection to the wrong voltage, damage caused by chemical or electro-chemical reaction, rust, corrosion or water damage including but not limited to damage caused by excessive lime in the water supply, damage caused by abnormal environmental conditions.
- Consumable parts including batteries and lamps.
• Non-functional and decorative parts which do not affect normal use of the appliance, including any scratches and possible color differences. - Accidental damage caused by foreign objects or substances and cleaning or unblocking of filters, drainage systems or soap drawers.
- Damage to the following parts: ceramic glass, accessories, crockery and cutlery baskets, feed and drainage pipes, seals, lamps and lamp covers, screens, knobs, casings and parts of casings. Unless such damages can be proved to have been caused by production faults.
- Cases where no fault could be found during a technician's visit.
- Repairs not carried out by our appointed service providers and/or an authorized service contractual partner or where non-original parts have been used.
• Repairs caused by installation which is faulty or not according to specification. - The use of the appliance in a non-domestic environment i.e. professional use.
- Transportation damages. If a customer transports the product to their home or other address, IKEA is not liable for any damage that may occur during transport. However, if IKEA delivers the product to the customer's delivery address, then damage to the product that occurs during this delivery will be covered by this guarantee.
ENGLISH
- Cost for carrying out the initial installation of the IKEA appliance. However, service provider or its authorized service partner repairs or replaces the appliance under the terms of this guarantee, the service provider or its authorized service partner will re-install the repaired appliance or install the replacement, if necessary.
This restriction do not apply to fault-free work carried out by a qualified specialist using our original parts in order to adapt the appliance to the technical safety specifications of another EU country.
How country law applies
The IKEA guarantee gives You specific legal rights, which covers or exceed local demands. However these conditions do not limit in any way consumer rights described in the local legislation
Area of validity
For appliances which are purchased in one EU country and taken to another EU country, the services will be provided in the framework of the guarantee conditions normal in the new country. An obligation to carry out services in the framework of the guarantee exists only if the appliance complies and is installed in accordance with:
- the technical specifications of the country in which the guarantee claim is made;
- the Assembly Instructions and User Manual Safety Information;
The dedicated After Sales Service for IKEA appliances:
Please do not hesitate to contact IKEA After Sales Service to:
- make a service request under this guarantee;
- ask for clarification on installation of the IKEA appliance in the dedicated IKEA kitchen furniture. The service won't provide clarifications related to:
– the overall IKEA kitchen installation;
- connections to electricity (if machine if an Ikenas without plug and cable), to water and to gas since they have to be executed by an authorized service engineer.
- ask for clarification on user manual contents and specifications of the IKEA appliance.
To ensure that we provide you with the best assistance, please read carefully the Assembly Instructions and/or the User Manual section of this booklet before contacting us.
How to reach us if You need our service

Please refer to the last page of this manual for the full list of IKEA appointed contacts and relative national phone numbers.
Important! In order to provide You with a quicker service, we recommend that You use the specific phone numbers listed at the end of this manual. Always refer to the numbers listed in the booklet of the specific appliance You need an assistance for. Before calling us, assure that You have to hand the IKEA article number (8 digit code) for the appliance of which you need our assistance.
Important! SAVE THE SALES RECEIPT! It is Your proof of purchase and required for the guarantee to apply. Note that the receipt reports also the IKEA article name and number (8 digit code) for each of the appliances you have purchased.
Do You need extra help?
For any additional questions not related to After Sales of your appliances, please contact our nearest IKEA store call centre. We recommend you read the appliance documentation carefully before contacting us.
Inhalt
text_image
Technical diagram of a cabinet with numbered parts labeled 1, 2, and 3text_image
Diagram showing a hand inserting a device into a cabinet, with an upward arrow indicating direction.natural_image
Diagram of a mechanical device inside a housing, showing internal components and a circular inset view (no text or symbols)natural_image
Technical diagram showing a mechanical clamp or bracket assembly with an arrow indicating force direction (no text or symbols present)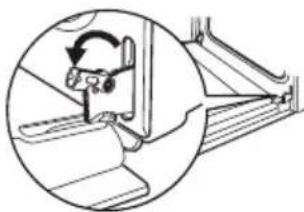
natural_image
Technical diagram showing a mechanical assembly with an arrow indicating direction (no text or symbols present)natural_image
Line drawing of a hand inserting a tablet into a vehicle compartment, showing mechanical components and motion arrows (no text or symbols)
natural_image
Simple line drawing of a framed picture frame with two circular buttons at the bottom (no text or symbols)natural_image
Hand holding a mechanical component with an arrow indicating rotation (no text or symbols)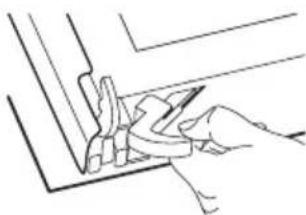
natural_image
Line drawing of a hand holding a tool near a corner panel (no text or symbols)natural_image
Diagram of a rectangular frame with two labeled arrows pointing to its sides (no text or symbols present)natural_image
Technical line drawing of a mechanical assembly with two views of a frame (no text or symbols)natural_image
Diagram of a mechanical assembly with two components and directional arrows indicating motion (no text or symbols)text_image
Technical diagram of a cabinet with numbered parts labeled 1, 2, and 3Plateau multi-usages Grille
1x
1x
Installation
text_image
Diagram showing a hand inserting a device into a drawer with an upward arrow, labeled with 'I' and 'II'natural_image
Diagram of a refrigerator interior showing the door, refrigerator, and window with a circular inset view of the refrigerator (no text or symbols)natural_image
Technical diagram showing a mechanical component with an arrow indicating direction (no text or symbols present)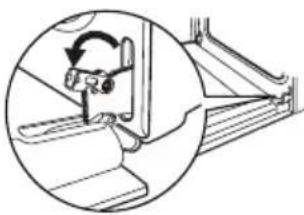
natural_image
Technical line drawing of a mechanical assembly with a circular inset showing a rotating component (no text or symbols)natural_image
Line drawing of a hand inserting a tablet into a vehicle compartment (no text or symbols)
natural_image
Simple line drawing of a framed picture frame with two circular buttons at the bottom (no text or symbols)natural_image
Hand holding a mechanical component with an arrow indicating rotation (no text or symbols)
natural_image
Line drawing of a hand holding a tool near a corner (no text or symbols)natural_image
Simple line drawing of a rectangular frame with two arrows pointing to its sides (no text or symbols)natural_image
Technical line drawing of a mechanical assembly with two circular insets showing close-up views of components (no text or symbols)natural_image
Diagram showing two mechanical components with curved arrows indicating motion or force, no text or symbols present.⚠ GARANTIE IKEA - FRANCE
CONTRAT DE GARANTIE ET DE SERVICE APRES-VENTE IKEA
text_image
Technical diagram of a cabinet with numbered parts labeled 1, 2, and 3natural_image
Illustration of a hand inserting a device into a drawer with an upward arrow (no text or symbols)natural_image
Diagram of a refrigerator interior showing the door, seatbelt, and window (no text or symbols)natural_image
Technical diagram of a mechanical assembly with an arrow indicating a component (no text or symbols present)2

natural_image
Technical diagram showing a mechanical assembly with a circular inset view of a component being inserted (no text or symbols present)natural_image
Line drawing of a hand holding a tablet or tablet device, with no visible text or symbols4

natural_image
Simple line drawing of a rectangular frame with two circular buttons at the bottom (no text or symbols)natural_image
Hand holding a small object with an arrow indicating rotation (no text or symbols)6
