Coffee Vito - Coffee machine Schaerer - Free user manual and instructions
Find the device manual for free Coffee Vito Schaerer in PDF.

User questions about Coffee Vito Schaerer
0 question about this device. Answer the ones you know or ask your own.
Ask a new question about this device
Download the instructions for your Coffee machine in PDF format for free! Find your manual Coffee Vito - Schaerer and take your electronic device back in hand. On this page are published all the documents necessary for the use of your device. Coffee Vito by Schaerer.
USER MANUAL Coffee Vito Schaerer
Schaerer Coffee Vito
Operating instructions
V03 / 07.2011

natural_image
Modern coffee maker with red control panel and digital display (no visible text or symbols)1 Topping- / Choc-Container
2 Control panel (Details see below)
3 Touchscreen
4 Frontcover left
5 Hot water outlet
Steam outlet (optional)
6 Height-adjustable Combi Spout
7 Removable drip tray with drip tray grid
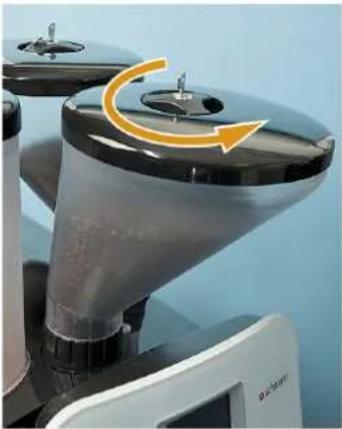
8 Bean hopper with cover (lockable)
9 Tablet and coffee powder insert (not displayed)
10 Water tank intern
11 ON/OFF button
12 Steam button
13 Hot water button
14 Touchscreen
15 6 (programmable)
16 Labeling for beverage buttons
Download: www.schaerer.com/download

text_image
Labeled diagram of a coffee maker with numbered parts for identification and assembly reference.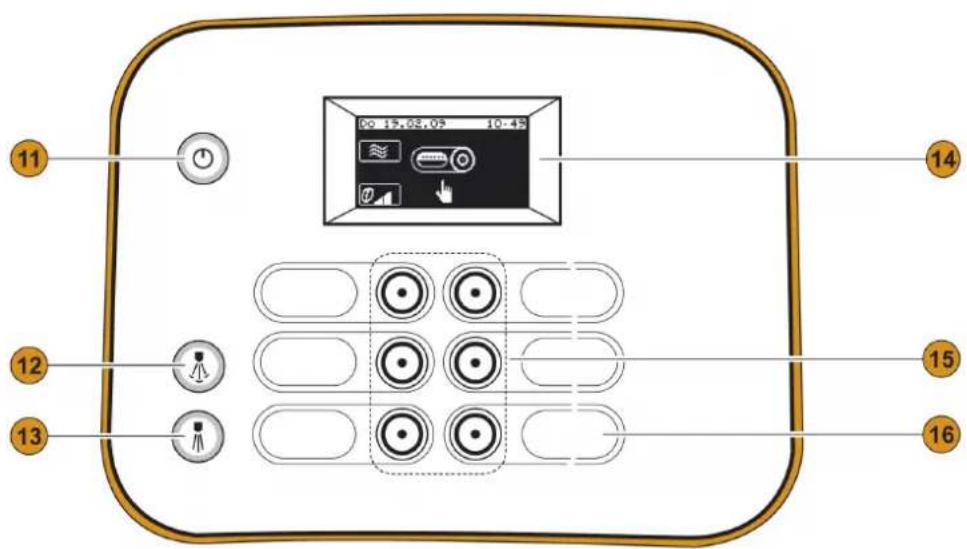
text_image
11 12 13 14 00 15.02.09 10:49 15 16Schaerer Coffee Vito
Operating instructions
V03 / 07.2011
Published by
Schaerer Ltd., P.O. Box, Allmendweg 8, CH-4528 Zuchwil
Edition
Version 03 | 07.2011
Software
V 3.19.1
Concept and editorial department
Schaerer Ltd., P.O. Box, Allmendweg 8, CH-4528 Zuchwil
Copyright by ©
Schaerer Ltd., P.O. Box, Allmendweg 8, CH-4528 Zuchwil
This document is copyrighted. All rights are reserved. The reproduction, distribution, transmission via electronic systems or translation of this document in another language is not permitted without the written consent of Schaerer Ltd. This applies to the entire document, as well as to individual excerpts thereof. The contents of the document are based on the most current data available at the time of printing. Schaerer Ldt. reserves the right to make changes at any time without further notice. All pictures, illustrations and display messages in this manual serve only as examples. Due to the wide variety of possible options, a particular machine may differ from the devices depicted here. Schaerer AG is only liable for the contents of the original German document.
Table of contents
Welcome 6
Welcome 6
Signs and symbols 6
Product description 7
Intended use 7
Beverage types and output 7
Models 7
Scope of delivery and accessories....7
Options and optional accessories 8
Technical data 9
Serial plate 10
Declaration of conformity 11
Manufacturer's address 11
Applied standards 11
Installation and commissioning.... 13
Setting up the coffee machine 13
Location 13
Ambient conditions 13
Power supply 13
Conditions....13
Power requirements 14
Water connection/draining 14
Conditions....14
Power requirements 14
Changeover between mains water supply and drinking water
tank 15
Installation 15
Unpacking the machine 15
Install a mains water supply 15
Installing a waste water outlet. 16
Connecting the milk supply....16
Button labelling....17
Commissioning program 17
Deinstallation and disposal 21
Operation 22
Check before switching on 22
Filling and connecting 22
Coffee beans 22
Water 22
Milk 23
Machine powder 24
Switching on....25
Main touch screen window....26
Dispensing 27
Preheating cups 27
Adjusting outlets 27
Coffee beverages 28
Beverages with ground coffee 28
Hot water 28
Milk beverages 29
Hot milk. 29
Milk foam....29
Steam....30
Dispensing options 30
Double beverage....30
Emptying. 30
Grounds container....30
Under-counter grounds disposal ....31
Drip tray....31
Transport conditions ....31
Display messages/instructions .....31
Switching off 34
End of operation 34
Lengthy downtimes (more than 1 week) .....34
Cleaning 35
Cleaning intervals....35
Mandatory cleaning .36
Cleaning options....36
Warm rinsing 36
Mixer rinsing .....36
Milk foamer cleaning by means of "Plug & Clean" .....36
Daily cleaning 38
Daily cleaning card 38
Side cooling unit ....40
Internal drinking water tank 40
Weekly cleaning 41
Weekly Cleaning Reference Card. 41
Bean hopper....42
Powder container 42
Optional accessories .....43
Cup warmer....43
Cup & Cool 43
Thawing cooling Unit....43
HACCP Cleaning Concept 44
Cleaning regulations ....44
Cleaning schedule....44
Cleaning products....46
Cleaning tablet 46
Milkpure. 46
Descaler 46
Service and maintenance 47
Maintenance 47
Adjusting the grinding fineness. 47
Decalcification 48
Decalcification message ....48
Decalcification preparation .....48
Start decalcification program....48
Water filter (Option) 51
Installing the water filter for the internal drinking water tank 51
Changing the water filter for the internal drinking water tank 52
External water filter 52
Programming....53
Navigation.....53
Overview....53
"Milk and foam" menu. 53
Topping quality/foam quality .....54
Recipes and beverage buttons ....57
Boiler temperature....59
Reset....59
Time and date ....59
Language .59
Contrast. 60
Calcium filter 60
Water hardness .60
Warm-up rinsing .60
Operating option 60
Lighting 62
Intro 62
"PIN entry" menu 63
"Access control" menu .....63
"Account" menu 64
Troubleshooting....65
Faults with display message....65
Fault messages with fault code .....66
Faults without display message .....68
Water quality 70
Water values....70
Determining the water hardness....70
Filter technology ....71
Safety notes....72
User at risk!....72
Risk from cleaning products ....73
Application....73
Storage....73
Disposal....73
Emergency information ....73
Risk of damage to the machine .....74
Hygiene guidelines (HACCP)....74
Water....74
Coffee 75
Milk 75
Machine powder 75
Liability....76
Operator responsibilities .....76
Warranty and liability 76
Welcome
Welcome
This coffee machine is part of the next generation of fully automatic coffee machines. Our company's core competence as well as decades of experience flowed into designing this equipment.
These operating instructions provide information about the product, its operation and how to clean the coffee machine. If the coffee machine is not used according to the instructions, we shall not be held liable for any damages. However, these operating instructions cannot take every conceivable application into account. For further information, please contact our customer service.
The performance of the coffee machine depends on its correct operation and the maintenance. Carefully read the operating instructions before using the machine for the first time, and keep the instructions in an easily accessible place.
We hope you enjoy using your new coffee machine!
Signs and symbols

See also "Safety notes".
The following signs and symbols are used in these operating instructions to point out sources of danger and special features:
DANGER! Risk of electrocution!

An imminently dangerous situation that may result in death or serious injury from electric shock. The measures described to prevent this danger must be adhered to.
CAUTION! User at risk!

A generally dangerous situation that may result in injury. The measures described to prevent this danger must be adhered to.
CAUTION! Risk of machine damage!

A situation that may result in damage to the machine. The measures described to prevent this danger must be adhered to.
CAUTION! Hot fluid!

A dangerous situation that may result in scalding injuries. The danger arises at the dispensing locations. In the following description, this danger is only indicated by the symbol. The measures described to prevent this danger must be adhered to.
CAUTION! Hot steam!

A dangerous situation that may result in scalding injuries. The danger arises at the dispensing locations. In the following description, this danger is only indicated by the symbol. The measures described to prevent this danger must be adhered to.
CAUTION! Hot surface!

A dangerous situation that may result in burn injuries. The danger arises at the dispensing locations and cup warmer locations (option). In the following description, this danger is only indicated by the symbol. The measures described to prevent this danger must be adhered to.
CAUTION! Risk of trapping fingers!

A dangerous situation that may result in crushing injuries. In the following description, this danger is only indicated by the symbol. The measures described to prevent this danger must be adhered to.
Product description
Intended use
The Schaerer Coffee Vito has been designed to dispense diverse variants of coffee beverages, milk beverages or powdered beverages (toppings & chocolate) into cups or pots. In addition the unit can dispense steam for heating up milk or hot water. This unit is designed for industrial and commercial use. The unit may be placed in self-service areas if attended to by trained personnel.

Use of this equipment is subject to the "General Terms and Conditions" of Schaerer AG and these operating instructions. In legal terms, any other use is not an intended use. The manufacturer accepts no liability for damage resulting from unintended use.
CAUTION! Risk of machine damage!

Improper handling of the coffee machine can result in damage.
Under no circumstances may the coffee machine be used to heat up or dispense any other liquids than coffee, powder beverages, hot water (beverages, cleaning) or milk (cooled, pasteurized, homogenized, UHT).
Beverage types and output
Depending on the machine model and options, the following beverages can be prepared (beverage output) is specified in cups per hour):
| Espresso 50-60 ml ± 100 cups | |
| Coffee 120 ml ± 100 cups | |
| Cappuccino (180) ml ± 60 cups | |
| Latte macchiato 200 ml ± 40 cups | |
| Hot milk 180 ml ± 60 cups | |
| Moccaccino (cup at rate of 180 ml) ± 60 cups | |
| Hot chocolate (cup at rate of 180 ml) ± 60 cups | |
| Hot water 8 l |
Additionally available beverages:
- Ristretto
- Moccachino
• Caffeine-free beverages
Models
The following versions are available:
• Schaerer Coffee Vito Fresh Milk
• Schaerer Coffee Vito Powdered Milk
Scope of delivery and accessories
| Quantity Designation Article number | |
| Documentation | |
| 1 Operating instructions (EN) 022000 | |
| 1 Daily Cleaning Reference Card (EN) 022020 | |
| Quantity | Designation | Article number |
| 1 Weekly Cleaning Reference Card (EN) 022040 | ||
| 1 Delivery Quality Form - | ||
| Cleaning / Accessories cleaning | ||
| ** Decalcifier | Schaerer AG - | |
| 100 Cleaning | tablets 065221 | |
| * "Milkpure" cleaner 071530 | ||
| 2 Brushes? (two different sizes) | 3315219000?3303500000 | |
| 2 Cleaning brush 067409 | ||
| 1 Carbonate hardness test 067720 | ||
| Accessories general | ||
| 1 Complete spare foamer head (upper and lower part) 3322598000 | ||
| 1 Multi-tool 071261 | ||
| 1 Labels | 3323153000 | |
| 1 Measuring spoon for ground coffee | 3307424000 | |
| 1 Right-hand front cover | 060692 | |
| 1 Water tank compl. with cover | 060704 | |
| * Nozzle set | 071246 | |
| * Milk hose 0.7 m | 061108 | |
| * Mixer hose 0.21 m | 0000480064 | |
| * Discharge hose, 1.5 m | 0000480042 | |
| * Elbow | 3321658000 | |
| * Fixed water hose | 3322921000 | |
| * Choco outlet | 3322962000 | |
| 1 Grease for sealing rings | 33.2179.9000 | |
| 2 Membrane pockets for button labelling | 060613 | |
| 1 Outlet sticker | 071718 | |
| Special accessories | ||
| * Optional cover for drinking water tank | 060689 | |
| * Closed drip tray with float | 060702 | |
| * Water filter (if tank or Aquaflex) | 071398 | |
| ** Lid drinking water tank | 060706 | |
(1) * Depending on machine version.
(2) ** Please contact your local sales partner or our customer service!
Options and optional accessories
| Example | Option | Description |
 | Aquaflex | For changing over from mains water supply to an internal drinking water tank or vice versa. |
| Under-counter grounds disposal cutout | The grounds container and the bottom of the coffee machine have a cutout that is continued through the counter. The coffee grounds are collected in a large container underneath the counter. | |
| Example Option Description | ||
 Example "My Fridge? Example "My Fridge? | Side cooling unit Cooling unit for machines with Milk Smart. | Milk capacity: 2- - 8 l, depending on the variant |
 | Cup & Cool Cup warmer with a cooling unit for machines with Milk Smart. The milk temperature and the cup heating are regulable.Milk capacity: 4 lCup capacity: max. 60 | |
 | Cup warmer For preheating several different cups. The cup heating is regulable.Cup capacity: ca. 70 - 100 | |
 | Integrated cooling unit Integrated cooling unit, directly in the machine. For the preparation and keeping-cool of milk beverages. This option is also suitable, if there is little space on or under the counter. | |
 | Plug & Clean Integrated cleaning unit, directly in the machine. For automatic cleaning of the milk hose and milk foamer. | |

For detailed information, please contact your local distributor.
Technical data
| Rated wattage*: 2000 - 2200 W 10 - 16 A |
| Mains power supply*: 220 - 240 V CA 50/60 Hz |
| Operating temperature*: Steam boiler ** Hot water boiler ** | |
| Minimum (Tmin.) 10°C 10°C | |
| Maximum (Tmax.) 192°C 192°C |
| Overpressure: Steam boiler ** Hot water boiler | ** | |
| Working overpressure 2.5 bar | 2.5 bar | |
| Permissible working overpressure (pmax.) | 12 bar | 12 bar |
| Test overpressure | 24 bar | 24 bar |
| Filling quantities | Steam boiler ** |
| Drinking water tank | 4.5 l |
| Coffee bean hopper | ca. 1100 g each |
| Grounds container | 15 – 20 coffee grounds cakes |
| Powder system Choco | Choco 1x1000 g / Twin Choco 2 x 500 g |
| External dimensions: | |
| Width | 329 mm |
| Height | 836 |
| Depth | 583 mm |
| Empty weight: | 36 kg |
| Continuous sound pressure level | <70 dB (A) |
| Power cable length | 1.0 m |
We reserve the right to make technical changes.
* For special equipment, see serial plate. The values specified here apply to the basic equipment.
** Depending on machine configuration and model.
*** The sound pressure level balance A Lpa (slow) and Lpa (impulse) at the operators' workplace is less than 70 dB (A) in each operating mode.
Serial plate
The is located behind the drip tray on the left-hand side.
In the event of a fault or warranty case, please quote the data on the serial plate.
+ schaerer
Designation
Manufacturer
Typ (SAG)
Serial No.
Nominal pressure
main pressure
Electrical Ratings
Fuse on-site
mains connection plan

coffee machine
Declaration of conformity
Manufacturer's address
| Manufacturer Responsible for documentation | |
| Schaerer AGP.O.BoxAllmendweg 8CH-4528 Zuchwil, SwitzerlandTel. +41 (0) 32 681 62 00F +41 (0)32 681 64 04info@schaerer.comwww.schaerer.com | Schaerer AGHans-Ulrich HostettlerP.O.BoxAllmendweg 8CH-4528 Zuchwil, Switzerland |
Applied standards
The aforementioned manufacturer declares herewith that this machine complies with all relevant stipulations of the specified directives. In case of any modifications of the units that have not been approved by Schaerer, this declaration is rendered invalid. The following harmonised standards have been applied. A quality management system certified by Bureau Veritas, in accordance with SN EN ISO 9001: 2008, has been used to ensure the proper adherence to the requirements.
| Machinery Directive 2006/42/EC EMC Directive 2004/108/EC | |
| EN 60335-1 :2002 /+, A14EN 60335-1 /A1:2004EN 60335-1 /A2:2006EN 60335-1 /A11:2004EN 60335-1 /A12:2006EN 60335-1 /A13:2008EN 60335-1 /A14EN 60335-2-24:2003EN 60335-2-24:2003/A1EN 60335-2-24:2003/A2EN 60335-2-24:2003/A11EN 60335-2-24:2010EN 60335-2-75:2004EN 60335-2-75 /+A1:2005EN 60335-2-75 /+A2:2008EN 60335-2-75 /+A11:2006EN 60335-2-75 /+A12EN 62233:2008-04 | EN 61000-3-2:2006EN 61000-3-3:1995EN 61000-3-3:1995 /A2:2005EN 61000-6-2:2005EN 61000-6-3:2007 |
| International (CB) |
| • IEC 60335-1 Ed 4.2:2006 |
| • IEC 60335-2-14 Ed 5.1:2008 |
| • IEC 60335-2-15 Ed 4.1:2000 |
| • IEC 60335-2-15 Ed 5.2:2008 |
| • IEC 60335-2-24 Ed 6:2002/2006 |
| • IEC 60335-2-24 Ed 6:2002/2006 /+A1 |
| • IEC 60335-2-24 Ed 6:2002/2006 /+A2 |
| • IEC 60335-2-75 Ed 2.2:2009 |
| • IEC 62233 Ed1:2005 |
| • IEC 60335-1-Ed5:2010-05 |
| • IEC 60335-2-24 Ed 7:2010 |
China (CCC):
• GB4706.19-2008
• GB4706.1-2005
• GB4706.13-2008
Installation and commissioning
Setting up the coffee machine
Location
CAUTION! Risk of machine damage!

The location where the coffee machine is set up must meet the conditions specified below. If these conditions are not ensured, the coffee machine may become damaged. The following conditions absolutely must be met:
- The installation surface must be stable and level so that is does not become deformed under the weight of the coffee machine.
- Do not set up the coffee machine on hot surfaces or close to ovens.
- Set up the coffee machine in such a way that it can be monitored by trained personnel at any time.
- Route the necessary supply connections to within 1 m of the machine location according to the on-site installation plans.
- Maintain the following clearances for maintenance work and operation:
- Allow enough space above the machine to refill beans.
- Leave ± 35 cm clearance on the left-hand side.
- Leave min. 15 cm clearance from the rear side of the machine to the wall (air circulation).
- Comply with all applicable local kitchen regulations.
Ambient conditions
CAUTION! Risk of machine damage!

The location where the coffee machine is set up must provide the ambient conditions specified below. If these conditions are not ensured, the coffee machine may become damaged.
The following conditions absolutely must be met:
- Ambient temperature of +10 °C to +40 °C (50 °F to 104 °F)
• Relative humidity of max. 80 % RH - The coffee machine is designed for indoor use only. Do not use in the open and never expose to the weather (rain, snow, subzero temperatures).
If the coffee machine was exposed to subzero temperatures:
▶ Contact customer service before commissioning.
Power supply
Conditions
The electrical power supply must be connected in accordance with the applicable regulations (VDE 0100) and the regulations of the country of installation. Type of power cable at least H 07 RN-F. The voltage specified on the serial plate must match the supply voltage at the installation location.
DANGER! Risk of electrocution!

Danger of electric shock!
The following instructions absolutely must be complied with:
- The phase must be fused at the ampere value specified on the serial plate.
- It must be possible to disconnect the device from the mains power supply at all poles.
- Never operate a device with a damaged power cord. Have a defective power cord or plug replaced immediately by a qualified service technician.
- Schaerer AG recommends against using an extension cable. If, despite this, an extension cable is used (minimum cross-section: 1.5 ~mm^2 ), observe the manufacturer data for the
cable (operating instructions) and the locally applicable regulations.
- Route the power cord in such a way that it does not present a tripping hazard. Do not pull the cord over corners or sharp edges, pinch it between objects or allow it to hang loosely in the open. Do not position the cord over hot objects, and protect the cord from exposure to oil and aggressive cleaning products.
- Never lift or pull the device by the power cord. Never pull the plug out of the socket by its cord. Never touch the power cord or plug with wet hands. Never insert a wet plug into a power socket.
Power requirements
| Mains Power requirements | Fuse protection (site face) | Connecting cable conductor cross-section | ||||
| 1L, N, PE: 2 | 20 – 240 V CA | 50/60 | Hz 2000 – | 2200 W 10 – 16 A | 3 x 1.0 mm^2 | |
| 1L, N, PE: 1 | 00 – 120 V CA | 50/60 | Hz 1800 – | 2100 W 20 A 3 x | 14AWG | |
| 2L, PE: | 200 – 220 V | CA | 50/60 Hz | 1700 – 1900 W | 2x15 A | 3 x 1 mm^2 |
| 2L, PE: | 200 – 220 V | CA | 50/60 Hz | 2600 – 3200 W | 2x15 A | 3 x 1.5 mm^2 |
Water connection/draining
Conditions
The machine can suffer damage due to bad material and wrong water values. It is imperative that the following points are complied with:

- The water must be free of contaminants and the chlorine content must not exceed 100 mg per litre.
- Do not connect the machine to pure reverse osmosis water or other aggressive types of water.
- The carbonate hardness must not exceed 5 – 6°dKH (German carbonate hardness) or 8 – 10°fKH (French carbonate hardness) and the total hardness value must always be greater than the carbonate hardness.
- The minimum carbonate hardness is 4^ or 7^ . The pH value must be between 6.5 and 7
- Always use the new hose set (fresh water/waste water hose) provided with the machine.
The water supply connection must be made in accordance with the applicable requirements and the regulations of the respective country. If the machine is connected to a newly installed water pipe, the pipe and infeed hose must be rinsed well to ensure that no dirt gets into the machine.
The coffee machine must be connected to an installed drinking water line with a shut-off valve. Installation takes place via the installed pressure hose and the 3/8"-threaded union piece onto the pressure reducer that is mounted on the water tap (set to 0.3 MPa (3 bar)).
If the machine is connected to a drain, the included temperature-resistant drain hose must be connected to the drip tray and the siphon. It must be firmly attached to the drain and slanted at a downward angle (so that the water can flow downward).
Power requirements
| Water pressure | Recommended: | 0.1- 0.3 MPa (1-3 bar) |
| Maximum: | 0.3 MPa (3 bar) |
| Water inlet temperature | Minimum: | 10°C |
| Maximum: | 35°C |
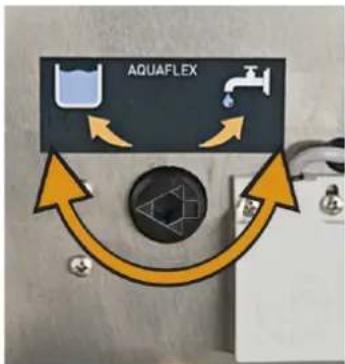
Changeover between mains water supply and drinking water tank
Changeover from mains water supply to drinking water tank and vice versa is possible with the optional facility "Aquaflex" (e.g. for the purpose of decalcification).
text_image
AQUAFLEXThe adjusting screw is located behind the drinking water tank.
Option 1: Changeover from mains water supply to drinking water tank.
▶ Close the main water valve on the water supply line and, if necessary, detach the hose.
▶ Remove the right-hand front cover.
▶ Turn the rotary switch anticlockwise with the multi-tool.
☑ The arrow on the rotary switch now points to the tank symbol.
▶ Fill and insert the drinking water tank.
Option 2: Changeover from drinking water tank to mains water supply
▶ Remove and empty the drinking water tank.
▶ Turn the rotary switch clockwise with the multi-tool.
☑ The "arrow" on the rotary switch now points to the water tap symbol.
▶ Attach the right-hand front cover.
▶ Fit the hose for the water supply to the machine and water supply line.
▶ Open the main water valve on the water supply line.
Installation
Unpacking the machine

Read the "Setting up the coffee machine" and "Power supply" chapters carefully before installing.
▶ Unpack the machine.
▶ Check the remaining package contents for accessories.
▶ Remove the accessories supplied in the grounds container and water tank.
▶ Keep the original packaging in case the equipment needs to be sent back.
natural_image
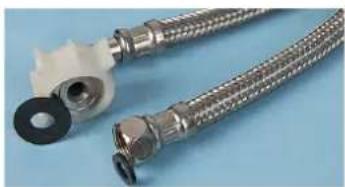
Close-up of two metallic flexible hoses with black and white connectors, placed on a plain blue background (no text or symbols visible)Install a mains water supply
▶ Insert the seals carefully (attached to the hose).
It is imperative that you check the connections for seal tightness.
▶ Attach the hose to the connector on the back of the machine and to the on-site angle valve (3/8").
▶ Open the main water valve.

natural_image
Close-up of a coffee maker with a hand pressing a tray, showing mechanical components and a yellow arrow indicating motion (no text or symbols on the device itself)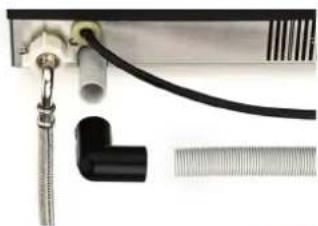
natural_image
Close-up of a medical or laboratory setup with tubing, a black L-shaped component, and a metallic connector (no visible text or symbols)
Installing a waste water outlet
Option 1: Inserting a drip tray without an opening
▶ Insert the drip tray.
Option 2: Drip tray with opening
▶ Insert the drip tray.
▶ Fit the waste water connection (see below)
Option 3: Waste water connection
▶ Push the hose with the elbow onto the end of the hose on the rear side of the machine.
▶ Connect the discharge hose to the waste water system.
▶ Make sure that the hose does not sag (shorten it if necessary!).
With the option "Aquaflex" a selection can be made from the above mentioned options.

natural_image
Person using a self-service cream machine to clean or prepare it, with no visible text or symbols.
text_image
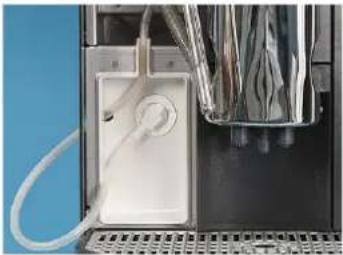
Diagram showing three labeled hands pointing to a mechanical component with arrows indicating direction or movement.Connecting the milk supply
▶ Push the beverage outlet to its highest position.
▶ Press the release on the rear side of the beverage outlet and pull the foamer head downwards.
▶ Conduct the milk hose through the opening (arrow) and fit it onto the foamer head (see illustration).
▶ From below insert the foamer head upwards again into the beverage outlet guide until it engages.
Option 1: External cooling units
▶ Conduct the milk hose through the bottom openings (see illustration). If the beverage outlet is misadjusted, make sure that the milk hose is not kinked.
▶ Select the desired milk nozzle (included in the scope of supply) and insert it at the end of the hose that is located on the outside.
☑ The milk connection is ready for external milk cooling units.
Option 2: Internal cooling unit

natural_image
Industrial machine with attached piping and a grid of plastic waste bins (no text or symbols visible)
▶ Select the desired milk nozzle (included in the scope of supply) and insert it at the end of the hose that is located on the outside.
▶ Insert the milk hose into the guide (arrow) and connect the end of the hose to the milk container.
☑ The milk connection is ready for the internal milk cooling unit.
The milk nozzles included in the scope of supply (1 mm - 1.7 mm) have an influence on the milk temperature. Milk foam that is too cold requires a smaller nozzle diameter. Milk foam that is too hot requires a larger nozzle diameter.
Button labelling

text_image
Photo showing a hand pressing a button on a coffee machine, with a close-up of the device's tip labeled 'Honey Stewelade' and a yellow arrow indicating action.
▶ Switch off the coffee machine to avoid accidentally dispensing a beverage.
Remove the cover at the bottom of the user panel. Push to the left the lug on the right-hand side and at the same time pull down the cover.
▶ Pull out the existing button label downwards by the protruding lug.
▶ Download a new button labelling template (MS Excel list).
▶ Define the desired beverage assignment with the aid of the template.
▶ Print the template (printer setting A4).
▶ Cut out the label sheet.
▶ Insert the button label into the plastic sleeve provided for this purpose (see illustration) and slide it back behind the front pane.
The label templates can be downloaded from www.schaerer.com free of charge.
Commissioning program
When the coffee machine is started for the first time, the commissioning program is executed automatically. It goes through the initial settings step by step. A detailed description of all steps follows.
▶ Press the button.
☑ The coffee machine switches on and the commissioning program begins.
▶ Follow the instructions on the touch screen.
| Display/ display text | Parameter description | Setting range | Notes |
 | The greeting text before the commissioning program begins. | - The presetting is "English". | |
 | Hint that the ensuing instructions should be followed. | - The presetting is "English". | |
 | Hint that this display comprises a "touch screen" function.► Touch the "Continue" field on the display. | "Continue" The presetting is "English". | |
 | Button functions:Navigation buttons within the commissioning programme► Confirm by touchingOK► Touch to go back a step► Touch to go to information | - The presetting is "English". | |
 | "Is the language setting correct?"Option 1: "NO"► Select the button "NO".☑ Leads to choice of languages.Option 2: "YES"► Select "YES".☑ The next commissioning step appears. | "YES/NO" The presetting is "English".In this step the display alternates between "English" and "German". | |
 | Language selection:► Use the arrow button to navigate to the desired language.► Touch the field with the desired language.☑ The next commissioning step appears. | German, English, Italian, French, Dutch, Spanish, Danish, Estonian, Finnish, Norwegian, Polish, Romanian, Russian, Swedish, Turkish, Greek, Hungarian, Lithuanian, Latvian | The pre-installed language packages (max. 6 Sprachen) are compiled customer-specifically. |
 | Decalcification filter/water filter:Option 1: "YES"► Connect the decalcification filter in the water tank in accordance with the operating instructions and fill the water tank.► Touch "Continue".☑ The next commissioning step "Water hardness" appears. | "YES/NO""Continue""Exit" | The setting water hardness can also be performed at la-ter stage in the menu "Set-tings".See "Service and mainte-nance" - "Water filter". |
 | |||
 | Option 2: "NO"☑ The next commissioning step "Water hardness" ap-pears.Option 3: "Exit"☑ Skips the setting "Water hardness". | ||
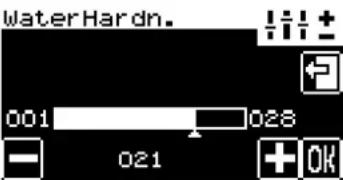 | Water hardness:► With the buttonsame water hardness that has been determined.► Confirm the setting withOK► Confirm the water hardness with "Continue" or touch "Back" to re-peat the setting.☑ The next commissioning step appears. | 1–28 hardness degree stages"Continue" | The water hardness is specified in "German car-bonate hardness"dKH.See "Water quality". |
 | |||
  | Water supply connection:Option 4: Drinking water tank► Fill the drinking water tank.► Confirm having filled the tank withOK.☑ The next commissioning step appearsOption 5: Mains water supply► Change over "Aquaflex" from "water tank" to "mains water supply" with the multi-tool.► Confirm by touchingOK☑ The next commissioning step appears.Information about the system filling and heating-up phase:☑ The system is filled and heated up.▶ Touch "Continue".☑ The next commissioning step appears. | - The water supply connec-tion with the optional device "Aquaflex" makes it pos-sible to change over from drinking water tank to mains water supply.See "Aquaflex changeo-ver"."Continue" During the heating-up phase the thermostat symbol flashes.The heating-up phase takes ca. 5 minutes to reach working temperature. | |
 | |||
 | Filling the containers:Fill with milk.▶ Connect/fill with milk.▶ Confirm by touchingOK☑ The next commissioning step appears. | - Optionally various milk systems are possible.See "Operation" - "Filling and connecting" - "Milk" | |
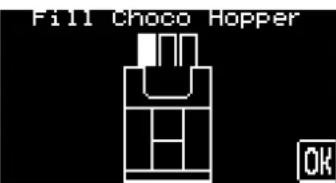 | Fill with choco powder.▶ Fill with choco powder▶ Confirm by touchingOK☑ The next commissioning step appears. | - Optionally, various powdersystems are possible.See "Operation" - "Filling and connecting" - "Machine powder" | |
 | Fill with espresso beans.▶ Pour the espresso beans into the right-hand bean hopper.▶ Confirm by touchingOK☑ The next commissioning step appears. | - The right-hand bean hopper is reserved for espresso. | |
 | Fill with coffee beans.▶ Pour the coffee beans into the left-hand or middle bean hopper.▶ Confirm by touchingOK☑ The next commissioning step appears. | - The left-hand or middle | bean hopper is reserved for coffee beans. |
 | Information about the second beverage button level | - Optionally the buttons have double assignments. The possible button selection is "top" or "bottom". | |
 | Selection of the beverage button level:▶ Change to 2nd level [IMAGE]☑ The level changes. The new level [IMAGE] is | "Top" level[IMAGE]Bottom" level[IMAGE]displayed. | See "Operation - Operating options" to deactivate this function. |
 | Cup fill volumeOption 1: "NO"☑ The commissioning program is completed. The coffee machine is now ready to use.Option 2: "YES"▶ Select the button "YES".▶ Select the beverage button (pay attention to the level selected).▶ Perform the setting with the [+] / [−] buttons.▶ Check the fill volume as required with the button [E5]▶ Confirm the setting with "OK".▶ Repeat the procedure with the other buttons.☑ Operational readiness of the coffee machine is displayed. | 50% - 150% The cup fill volume can also be set at a later time.See "Programming" - "Settings menu"The display switches over automatically to operational readiness. | |
 | |||
 |
Deinstallation and disposal

The coffee machine must be disposed of correctly in conformity with local and legal regulations.
▶ Contact service partner.
Operation
Check before switching on
▶ Before switching on the coffee machine, check whether the following conditions are fulfilled.
Conditions for switching on the coffee machine:
- The fresh water supply is open or the water tank is filled.
- The waste water hose (optional) has been laid correctly.
- The coffee bean hopper(s) is/are filled and the locking mechanism is open.
• The powder container(s) is/are filled.
• The coffee grounds container is empty and inserted correctly. - The coffee machine is connected to the mains power supply.
Filling and connecting
Coffee beans
CAUTION! User at risk!

Danger of injury from the rotating grinding discs in the grinder. Never reach into the bean hopper while the coffee machine is switched on.
CAUTION! Risk of machine damage!

Filling foreign bodies into the hopper can lead to clogging or destruction of the grinder. Never fill anything other than beans into the bean hopper.
natural_image
Close-up of a microscope objective lens with an orange arrow indicating rotational motion (no text or symbols visible)▶ Turn the turn-lock fastener in the bean hopper lid anticlockwise.
☑ The locking device opens.
▶ Remove the lid.
▶ Pour in coffee beans (max. 1100 g per bean hopper).
▶ Reattach the lid and turn the turn-lock fastener clockwise in the bean hopper lid.
Water
Option: Internal drinking water tank
▶ Remove the drinking water tank daily and rinse out thoroughly with fresh water.
▶ Fill the drinking water tank with fresh drinking water before using it.
▶ Reinsert the drinking water tank.
Option 1: Mains water supply

See also "Installation and commissioning" - "Changeover from mains water supply to drinking water tank"
▶ Connect to the water mains the hose for the supply of water to the coffee machine.
▶ Open the water valve on the water supply line.
Milk
Option 1: Milk Smart

No more than 40 cm should be between the milk package and the beverage outlet.
▶ Have fresh, pre-cooled milk (3 – 5°C) ready.
▶ Hang the hose or hoses into the milk.
☑ The hose end must be in contact with the container floor.

See also "Safety notes" - "Hygiene" - "Milk".
Option 2: Additional cooling unit
▶ Open the door.
▶ Remove and rinse the milk container.
▶ Fill in fresh, pre-cooled milk (3 – 5°C).
▶ Place the milk container into the cooling unit.
▶ Hang the hose or hoses into the container.
☑ The hose end must be in contact with the container floor.
▶ Close the door.
Option 3: Internal cooling unit
▶ Remove the left-hand door or cover.
▶ Remove and rinse the milk container.
▶ Fill in fresh, pre-cooled milk (3 – 5°C).
▶ Place the milk container into the cooling unit.
▶ Hang the hose or hoses into the container.
☑ The hose end must be in contact with the container floor.
natural_image
Interior view of a laboratory or industrial equipment unit with metal components and tubing (no visible text or symbols)
See "Installation and commissioning" - "Connecting the milk supply" for further specifications on milk nozzles.
▶ Close the door or cover.
Option 4: Cup & Cool
▶ Open the door.
▶ Pull the milk hose adapter out of the lid.
natural_image
Interior view of a refrigerator with open door, white appliance, and multiple cups on top (no visible text or symbols)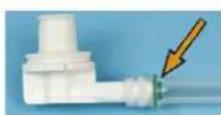
▶ Push on the desired milk nozzle (1 mm - 1.7 mm), if not already available, between the hose and the adapter.
▶ Remove and rinse the milk container.
▶ Fill in fresh, pre-cooled milk (3 – 5°C).
▶ Place the milk container back in the cooling unit.
▶ Push the hose adapter back into the lid.
▶ Close the door.
natural_image
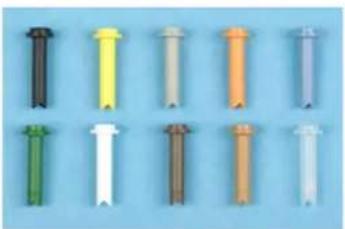
Row of ten colored plastic or plastic components on a blue background (no text or symbols)
The milk nozzles included in the scope of supply (1 mm - 1.7 mm) have an influence on the milk temperature. Milk foam that is too cold requires a smaller nozzle diameter. Milk foam that is too hot requires a larger nozzle diameter.
Machine powder
CAUTION! User at risk!

Danger of injury on the rotating dosing augers! Never reach into the powder container while the device is switched on.
CAUTION! Risk of machine damage!

Danger of blockage through filling with unallowed powder! Never fill anything other than powder for automatic operation into the powder container.
Option 1: Choco
▶ Pour in the desired choco powder.
Option 2: Topping
▶ Pour in the desired milk powder.
Option 3: Choco topping
The powder container for chocolate topping is divided in the middle and has two compartments for one type of milk powder and one type of chocolate powder.

The feed screws for chocolate powder and milk powder are of different sizes. Label the two container compartments from the outset so that no mixups can occur when the powder is topped up.
▶ Fill compartment 1 with the desired milk powder.
▶ Fill compartment 2 with the desired chocolate powder.
Option 4: Twin Topping
The powder container for Twin Topping is divided in the middle and has two compartments for two different types of milk powder.
Pour the desired milk powders into compartments 1 and 2.
Option 5: Twin Choco
The powder container for Twin Choco is divided in the middle and has two compartments for two different types of choco powder.
Pour the desired choco powder into compartments 1 and 2.
Switching on

text_image
Mi 16.03.11 14:18"Ready for operation" display with "2nd level" option
text_image
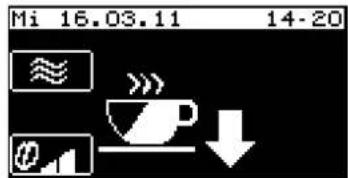
Mi 16.03.11 14-20 ≈ @ →"Ready for operation" display without "2nd level" option

▶ Keep the button pressed for 5 seconds.
☑ The coffee machine switches on and heats up.
☑ The "Ready for operation" main window appears as soon as the coffee machine is ready to dispense a beverage.
☑ The beverage buttons are lit.
See also "Programming" - "Settings" - "Operating options".
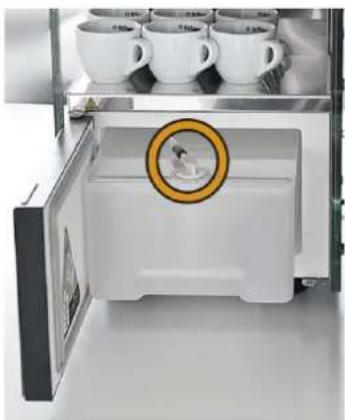
Option 1: Cup warmer
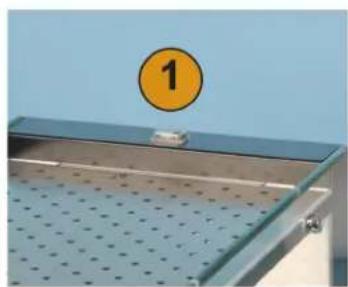
natural_image
Metal perforated tray with a circular orange badge labeled '1' against a blue background (no text or symbols on the tray itself)▶ Switch on the cup warmer unit via the main switch (1).
☑ The switch lights up.
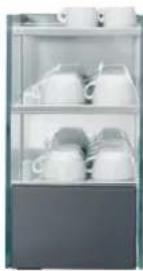
Option 2: Cup & Cool
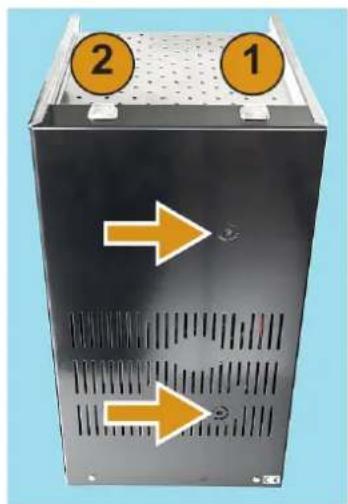
natural_image
Black industrial machine casing with two orange circular indicators labeled 1 and 2, showing ventilation slots and directional arrows (no text or symbols on main body)▶ Switch on the cup warmer unit via the main switch (1).
☑ The switch lights up.
▶ Switch on the cooling unit via the main switch (2).
☑ The switch lights up.

A detailed description of the setting of thermostats (see arrow) is included in the separate operating instructions for the "Cup warmer and Cup & Cool".
Option 3: Additional cooling unit
▶ Connect the additional cooling unit to the line supply.
▶ Set the rocker switch on the rear of the additional cooling unit to "COLD".
☑ The additional cooling unit switches on.

See "Operation" - "Fill and connect" - "Milk" - "Option: additional cooling unit".
Main touch screen window
text_image
User interface toolbar with icons for scroll, button, and finger pointing to a deviceVisible and hidden symbols are displayed in the main window. The menus, information and functions behind these are described as follows:
| Symbol Description | |
Shift field Level 1 active Level 1 active | Each beverage button has two levels and can therefore be assigned two beverages. In order to do so, this function must be activated in the programming.Level 1 is always active by default.► Touch the shift field.☑ The 2nd level is active.► Touch the shift field again.☑ The 1st level is active again.See also "Programming" - "Menu, Settings" - "Operating options" to deactivate/activate this function. |
 Level 2 active Level 2 active | |
Warm rinse field | By touching the field coffee system can be rinsed with warm water after a longish stoppage (recommended from 30 min upwards). In the process the brewing unit and piping are warmed up, which guarantees an optimal coffee temperature.► Touch the feed.☑ Warm rinsing starts.See also "Programming" - "Settings" - "Operating options" to deactivate/activate this function. |
Barista field weak (- 15%) weak (- 15%) | The Barista field can be used to adjust the strength of the dispensed beverage for one brewing. After beverage dispensing the Barista field returns to the standard setting "medium".► Touch the feed several times until the desired strength is achieved.► Press the required beverage button.☑ The beverage button flashes while the machine is dispensing the beverage.☑ The beverage name and the dispensing progress appear on the display. |
 normal normal | |
 strong (+15%) strong (+15%) | |
Information The | information field is a hidden field.► Touch the right-hand third of the touch screen.☑ The hidden fields and menuable (see illustration). ► Touch the field.☑ The "Information" menu appears.See also "Programming" - "Settings" - "Operating options" for further options for this function. ► Touch the field.☑ The "Information" menu appears.See also "Programming" - "Settings" - "Operating options" for further options for this function. |
 | |
| MENU The fieldMENUE | MENU is a hidden field.▶ Touch the right-hand third of the touch screen.☑ The hidden fields Information and MENU become visible (see illustration on the left).▶ Touch the MENUE☑ The main menu appears.See also "Programming" - "Menu, Settings" - "Operating options" for further options for this function. |
Dispensing
Preheating cups
Option 1: Cup warmer
Hot surfaces can cause burns.
Do not touch the cup storage surface.
CAUTION!
Hot surface!

▶ Place cups on the heated storage surfaces.
▶ Regulate the temperature as required on the rear side of the cup warmer.
☑ The cups are prewarmed.
Option 2: Cup & Cool
CAUTION!
Hot surface!

Hot surfaces can cause burns.
Do not touch the cup storage surface.
natural_image
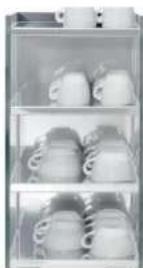
Interior view of a glass appliance with multiple white ceramic mugs (no visible text or labels)▶ Place cups on the heated storage surfaces.
▶ Regulate the temperature as required on the rear side of the "Cup & Cool".
☑ The cups are prewarmed.
Adjusting outlets

Adjustable height = 70 - 180 mm.
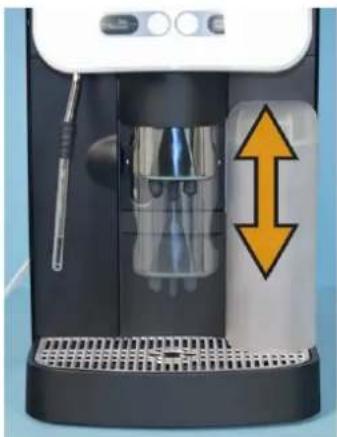
natural_image
Exterior view of a modern coffee machine with a double-headed arrow indicating compression or clearance (no text or symbols visible)▶ Place a cup under the beverage outlet.
▶ Grasp the beverage outlet from the front and slide it into the correct position (see figure).
▶ Remove the cup after the beverage has been dispensed.
Coffee beverages

CAUTION! Hot fluid!

Lit beverage buttons signal that the respective beverage is ready for dispensing.
▶ Place a cup under the beverage outlet.
▶ Slide the beverage outlet to the desired position.
▶ Press the required beverage button.
☑ The beverage button flashes while the machine is dispensing the beverage.
☑ The beverage name and the dispensing progress are shown on the display.
☑ Premature stopping of the dispensing process is not possible.
▶ Remove the cup after the beverage has been dispensed.
Beverages with ground coffee

The inlet for ground coffee is located between the bean hoppers.
CAUTION! Risk of machine damage!

Incorrect use may damage the machine.
Never put anything into the inlet other than ground coffee or cleaning tablets.
▶ Open the manual inlet.
☑ The display messages "Insert ground coffee" and "Close manual inlet" appear.
If the manual slot remains open for a lengthy period, the message "Manual slot time limit exceeded" and the procedure is aborted.


natural_image
Close-up of a mechanical device with two transparent containers and a black plastic holder, showing internal components and a yellow arrow pointing to a drop (no text or symbols visible)▶ Fill ground coffee (max. 15 g).
▶ Close the manual inlet lid.
☑ The display request "Select coffee beverage" appears.
▶ Press the required beverage button.
☑ The beverage button flashes while the machine is dispensing the beverage.
☑ The beverage name and the dispensing progress appear on the display.
☑ Premature stopping of the dispensing process is not possible.
▶ Remove the cup after the beverage has been dispensed.
Hot water
▶ Place a cup under the hot water outlet.
Three different dosing variants are available for dispensing hot water:
CAUTION! Hot fluid!

Option 1: Dosed
▶ Press the hot water button
☑ The set quantity is dispensed.
☑ Dispensing cannot be interrupted.
Option 2: Freeflow
▶ Press and hold the hot water button
☑ Dispensing continues as long as the button is kept pressed.
Option 3: Start/stop
▶ Press the hot water button
▶ If desired, end the dispensing process by pressing the beverage button again.

The dosing variant can only be set by the service technician.
Milk beverages
The dispensing process for milk beverages that contain multiple ingredients (coffee, chocolate, etc.) and are stored on a beverage button is identical to the dispensing of coffee beverages.

See "Operation" - "Dispensing" - "Coffee beverages".
Hot milk
▶ Place a cup under the beverage outlet.
To dispense hot milk, three different dosing variants are available:
CAUTION! Hot fluid!

Option 1: Dosed
▶ Press the [ Hot milk] button.
☑ The set quantity is dispensed.
☑ Dispensing cannot be interrupted.
Option 2: Freeflow
▶ Press and hold the [Hot milk] button.
☑ Dispensing continues as long as the button is kept pressed.
Option 3: Start/stop
▶ Press the [ Hot milk] button.
☑ The set quantity is dispensed.
▶ If desired, end the dispensing process by pressing the beverage button again.

The dosing variant can only be set by the service technician.
Milk foam
▶ Place a cup under the beverage outlet.
To dispense milk foam, three different dosing variants are available:
CAUTION! Hot fluid!

Option 1: Dosed
▶ Press the [ Milk foam ] button.
☑ The set quantity is dispensed.
☑ Dispensing cannot be interrupted.
Option 2: Freeflow
▶ Press and hold the [Milk foam] button.
☑ Dispensing continues as long as the button is kept pressed.
Option 3: Start/stop
▶ Press the [ Milk foam ] button.
☑ The set quantity is dispensed.
▶ If desired, end the dispensing process by pressing the beverage button again.

The dosing variant can only be set by the service technician.
Steam
▶ Place a cup under the steam wand.
To dispense steam, three different dosing variants are available:
CAUTION! Hot steam!

Option 1: Dosed
▶ Press the steam button.
☑ The set quantity is dispensed.
☑ Dispensing cannot be interrupted.
Option 2: Freeflow
▶ Press and hold the steam button.
√ Dispensing continues as long as the button is kept pressed.
Option 3: Start/stop
▶ Press the steam button.
☑ The set quantity is dispensed.
▶ If desired, end the dispensing process by pressing the 📁 beverage button again.

The dosing variant can only be set by the service technician.
Dispensing options
Double beverage
The "Two beverages" dispensing option can be used to dispense two beverages at the same time. The following beverages can be programmed:
• 2 cappuccinos
• 2 café crèmes
• 2 mugs of café crème
- 2 espressos
• 2 mugs of milk coffee

See also "Main window touch screen" and/or "Programming" - "Settings" - "Recipes and beverage buttons" for assignment of the beverage buttons and setting the dosage.
▶ Place two cups under the beverage outlet.
▶ Press the desired beverage button.
☑ The beverage button flashes while the machine is dispensing the beverage.
☑ The beverage name and the dispensing progress appear on the display.
Emptying
Grounds container
The cakes of coffee grounds ejected out of the brewing unit are collected in the grounds container. This holds the coffee grounds from approx.?40 brewings.

text_image
Ground container really emptied? Please confirm No YesA message appears on the display when the grounds container is full. Beverage dispensing is disabled until the grounds container is emptied and reinserted.
▶ Slide the beverage outlet to the highest position.
▶ Take out the grounds container.
▶ Empty the grounds container and reinstall it.
☑ The message shown here appears on the display.
▶ Acknowledge the display message accordingly.
☑ If acknowledged with "Yes": beverages can be dispensed again.
☑ If "No" is touched: Dispensing of beverages continues to be blocked.
If the request is accidentally confirmed with "No" after the grounds container is emptied, the display instruction to empty the container persists. The grounds container must be removed and inserted again, and the instruction then reappears.

Under-counter grounds disposal
The cakes of coffee grounds ejected out of the brewing unit pass via the under-counter grounds disposal cutout into the grounds container underneath.
▶ Open the counter door and remove the under-counter grounds container.
▶ Empty the under-counter grounds container.
▶ Put the under-counter grounds container back in place and close the counter door.

If the container is full, no prompt to empty it will appear on the machine's display. The under-counter grounds container should therefore be checked at regular intervals.
Drip tray
The drip tray must be emptied when the floater appears, but at least once a day.
CAUTION! Risk of trapping fingers!

▶ Carefully pull out the drip tray.
▶ Empty the drip tray and reinsert it.
▶ Check that it is seated correctly; an improperly inserted drip tray can result in water leaks.
Transport conditions
▶ Before moving the coffee machine, disconnect the drinking water supply, the power supply and the dirty water outlet.
Before moving the coffee machine, check the floor for obstacles and uneven areas.
CAUTION! Risk of machine damage!

Improper transport of the machine may result in machine damage. Adhere to the following instructions when moving machines on a cart:
- For safety reasons, the cart must be pulled and not pushed when moving the coffee machine.
- Only pull on the cart and never on the machine.
- The cart is not intended for transporting cargo.

The manufacturer cannot be held liable for any damage resulting from unintended use of the cart or from failure to follow the operating instructions.
Display messages/instructions
The machine shows display messages when intervention by the user or a service technician is necessary in order to be able to assure continued operational readiness of the machine.
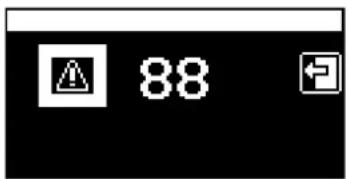
text_image
88There are two different categories of display messages:
- Prompt / request
- Error message
If one of these display messages is pending on the machine:
Option 1: It will appear directly.
Option 2: The field 🔍 appears with an error code.
If an error code is displayed, a fault is pending.
▶ Comply with the displayed request to look in the operating instructions.
Some error messages have the same display messages as prompts/requests.
▶ First of all, always perform the corresponding prompt/request action as described in the following table.
If the error message persists despite this, a fault is pending.

See "Troubleshooting" - "Fault with display message".
| Display message Cause What to do | ||
Reheating The water in the boilers is not warm enough.  The machine reheats it.Beverages cannot be dispensed. The machine reheats it.Beverages cannot be dispensed. | This display message is only an indication. The message disappears as soon as the boiler has reached working temperature. | |
Fill with beans The bean hopper on the left is empty.  Beverages cannot be dispensed.If the machine has two bean hoppers, the one that is empty flashes in the error message. Beverages cannot be dispensed.If the machine has two bean hoppers, the one that is empty flashes in the error message. | ▶ Fill with beans. | |
Fill the topping container The powder container is empty.  It is not possible to procure beverages with top-ping or choco powder. It is not possible to procure beverages with top-ping or choco powder. | ▶ Fill with powder. | |
Fill the water tank. The drinking water tank is empty.  Only on machines with a drinking water tank or Aquaflex! Only on machines with a drinking water tank or Aquaflex! | ▶ Rinse out and fill up the drinking water tank. | |
Manual inlet closed? The manual inlet is open.  The dispensing of a beverage with ground coffee has been aborted. See chapter "Dispensing" - "Beverages with ground coffee". The dispensing of a beverage with ground coffee has been aborted. See chapter "Dispensing" - "Beverages with ground coffee". | ▶ Close the manual inlet. | |
Open the stopcock! The main  | water supply valve is closed.Only on machines with mains water supply or Aquaflex! | ► Open the main water valve. |
Empty the grounds container! | The grounds container is full.Beverages cannot be dispensed. | ► Pull out the grounds container, empty it and push it back in.☑ A query appears on the display.► Confirm with [Yes]. |
Please clean soon Please clean now | Daily cleaning is due.If the message "Please clean soon" appears, beverages can continue to be obtained. If the message "Please clean now" appears, beverage dispensing is disabled until the cleaning has been performed. | ► Perform the daily cleaning routine."Cleaning" - "Daily cleaning". |
Please decalcify! Descaling of  | the machine is due.The decalcification must take place within a week. Beverage dispensing is disabled after expiry of this time period. | ► Carry out the decalcification program."Service and maintenance" - "Descaling". |
Change the calcium filter The  | calcium filter in the drinking water tank must be replaced.Only on machines with a drinking water tank or Aquaflex!The message appears once daily. If the filter is not changed within a week, though, the message then appears after each brewing cycle. | ► Replace the filter in the drinking water tank."Service and maintenance" - "Filter replacement" |
Rinse the filter The calcium filter  | ter in the drinking water tank must be replaced.Only on machines with a drinking water tank or Aquaflex!The message appears once daily. If the filter is not changed within a week, though, the message then appears after each brewing cycle. | ► Replace the filter in the drinking water tank."Service and maintenance" - "Filter replacement" |
Change the calcium filter The  | calcium filter in the drinking water tank must be replaced.Only on machines with mains water supply or Aquaflex!The message appears once daily. If the filter is not changed within a week, though, the message then appears after each brewing cycle. | ► Replace the filter on the mains water supply.See operating instructions for the calcium filter. |
Service maintenance | A service is due. | ► Please contact your service partner. |
Switching off
End of operation

"Cleaning"
▶ Perform the daily cleaning routine.
▶ Press the button.
☑ The machine switches off.
Option 1: Mains water supply and drinking water tank
▶ Close the main water valve of the mains water supply.
Option 2: Drinking water tank
▶ Empty the drinking water container, clean it and reinsert it.
Option 3: Aquaflex
▶ Perform and complete the steps described for options 1 and 2.
▶ Pull out the power plug.

Failure to do so will result in a loss of warranty coverage in the event of damages.
Lengthy downtimes (more than 1 week)

During extended downtimes, such as during holidays, the machine must be taken out of operation.
▶ Perform all steps described in the chapter entitled "End of operation".
If the machine will be exposed to subzero temperatures, the boilers must be emptied first.
▶ Please contact your service partner.
CAUTION! Risk of machine damage!

The boilers can be destroyed by freezing water as it expands. In rooms where the temperature can fall below zero, the boilers must be emptied.

When taking the device back into service, run the daily cleaning first.
Cleaning
Cleaning intervals
| Cleaning intervals | |||||
| Daily | Weekly | When switching on | When switching off | As instructed | |
| Coffee machine | |||||
| x x | Cleaning | program | |||
| x Foamer cleaning (optional) | |||||
| x Outlet mixing cup rinsing (optional) | |||||
| x Outlet mixing cup cleaning (optional) | |||||
| x Under-counter grounds disposal (optional) | |||||
| x x Grounds container | |||||
| x | D r i | ||||
| x External surface of machine | |||||
| x Internal drinking water tank | |||||
| x Bean hopper | |||||
| x Powder container | |||||
| x Brewing unit | |||||
| x Brewing chamber | |||||
| Optional accessories/options | |||||
| x Cleaning of the milk container | |||||
| x Cleaning of interior of cooling unit | |||||
| x Cleaning of interior of the side cooling unit | |||||
| x Defrosting of cooling unit | |||||
| x Cleaning of the outer surfaces of the side cooling unit | |||||
| x External surfaces of the Cup & Cool | |||||
| x External surfaces of the cup warmer | |||||
Legend
Daily: At least once a day or more often if necessary.
Weekly: At least once a week or more often if necessary.
When switching on: Automatically when the coffee machine is switched on.
When switching off: Automatically when the coffee machine is switched off.
As instructed: An instruction appears on the display.

For a better overview of the cleaning steps that are required or that have already been performed, use the cleaning schedule in this chapter.
Mandatory cleaning
If a pending cleaning procedure is not performed although it is requested on the display, mandatory cleaning will set in (if programmed) after a certain time. When mandatory cleaning sets in, dispensing of beverages is blocked.
Beverages cannot be dispensed again until after the machine has been cleaned.

Mandatory cleaning and the period that elapses before it sets in can only be programmed by the service technician.
Cleaning options
Warm rinsing

"Warm rinsing" can be activated via a button on the display.

See "Operation" - "Main window" and in "Programming" - "Settings menu" - "Operating options" to deactivate this function.
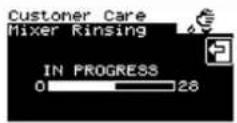
Mixer rinsing

If milk or powder beverages have been dispensed, mixer rinsing is performed automatically during the cleaning program. However, it can be performed separately.

See daily cleaning card "Cleaning program"- "Care" - "Mixer rinsing"
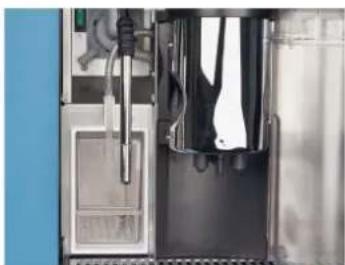
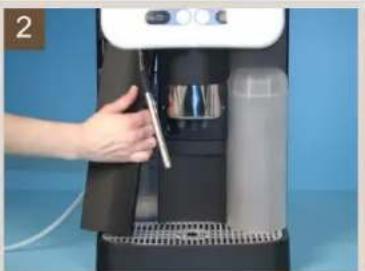
Milk foamer cleaning by means of "Plug & Clean"
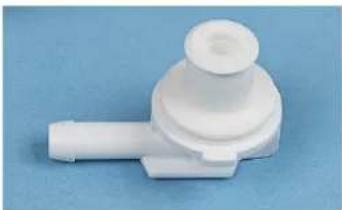
natural_image
White plastic mechanical component with a cylindrical top and protruding shaft, set against a blue background (no text or symbols visible)Remove the milk hose adapter from the milk container by turning it anticlockwise by a quarter of a turn.

natural_image
Close-up of a hand pressing down on a black industrial machine with a metallic handle (no visible text or symbols)Remove the front panelling on the front left-hand side of the machine.

natural_image
Close-up of a mechanical device with a yellow arrow pointing to a component, no visible text or symbolsIn accordance with the request in the cleaning program push the milk hose adapter into the "Plug & Clean" device on the coffee machine with a quarter of a turn in clockwise direction.
▶ Follow the instructions on the display.

See "Daily cleaning".
Daily cleaning
Daily cleaning card
Daily cleaning
Schaerer Coffee Vito

schaerer

CAUTION! User at risk!

CAUTION! Risk of machine damage!

See also "Safety instructions" and "Cleaning" in the operating instructions.
There is a risk of scalding in the beverage, hot water and steam dispensing area. During dispensing or cleaning, never reach under the dispensing areas.
The touch screen can suffer damage from improper handling. Never press the touch screen using force, strong pressure or pointed objects. Do not use abrasive cleaning products. Never spray glass cleaning products directly onto the touch screen.
Preparations
A
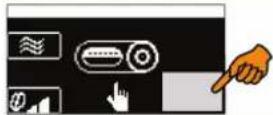
text_image
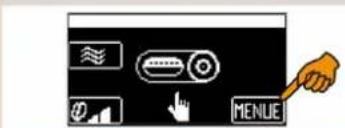
Control panel interface with icons for mode, function, and menu buttons, featuring a hand pointing to the 'MENU' button.▶ Press the area on the touch screen.
MENUE
B
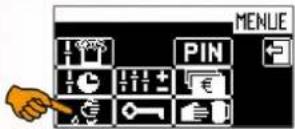
▶ Press [cleaning symbol].
☑The "Care" menu appears with all available programmes.

natural_image
Two identical coffee machines with glassware and a pitcher, no visible text or symbols.Option 1: Without waste water tank
▶ Place a container under the outlet (ca. 1 l).
Option 2: With waste water tank
▶ Push the outlet to the lowest position.
Daily cleaning program
1


text_image
Cleaning prog. SwitchingOff No SwitchingOff▶ Select [cleaning program].
▶ Select whether the machine should switch off after cleaning or not.
Option 1: Without milk
▶ Continue with step 7.
Option 2: With powder system
▶ Continue with step 6.
Option 3: With fresh milk
▶ Continue with step 2.
2

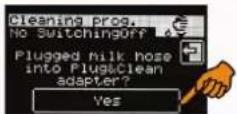

▶ Follow the instructions on the touch screen.
Option 1: Plug & Clean
▶ Push the milk hose adapter into the "Plug&Clean" device.
▶ S
▶ Continue with step 7.
3

▶ Put 25 ml of cleaning product (Milk-pure) and 500 ml of cold water into a cleaning container.
▶ Immerse the milk intake hose with the nozzle in the container.
S YES
☑Cleaning starts.
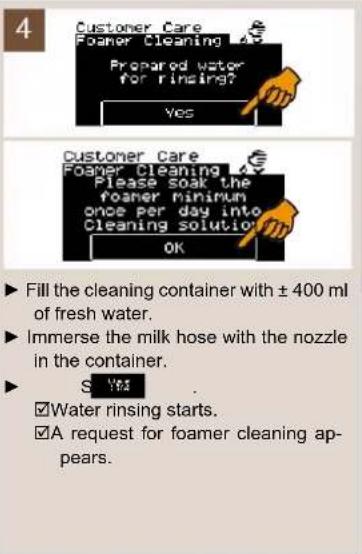
▶ Fill the cleaning container with ± 400 ml of fresh water.
▶ Immerse the milk hose with the nozzle in the container.
Water rinsin
☑A request for foamer cleaning appears.
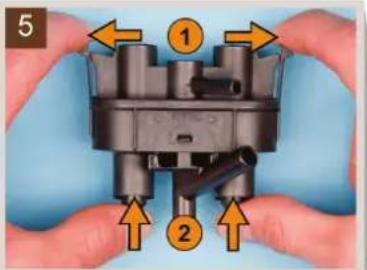
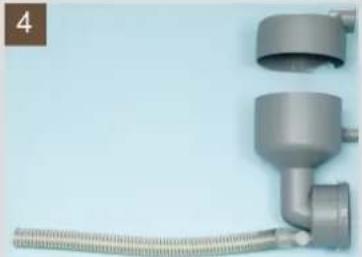
text_image
5 ① ②▶ Demount the foamer head parts.
▶ Lay the parts and the milk hose for ± 30 min in a solution of 500 ml of hot water and 25 ml of cleaning product (Milkpure).
▶ Clean all the parts in lukewarm running water.
▶ Refit the foamer head parts.
▶ Fit the foamer head to the outfeed so that it makes a "clicking" sound.
Se OK
6
Option 1: With powder system
☑Mixer rinsing starts automatically.
▶ Then continue with step 7.
Option 2: With fresh milk
▶ Continue with step 7.
Outer surfaces and containers Separate programmes
7

text_image
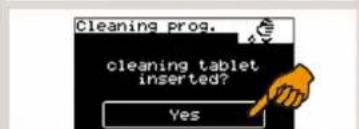
Cleaning prog. cleaning tablet inserted? YesStart
▶ Follow the instructions on the touch screen.
▶ Insert a cleaner tablet.
9 Yes
☑Cleaning starts
☑The cleaning program is completed and is automatically terminated.
natural_image
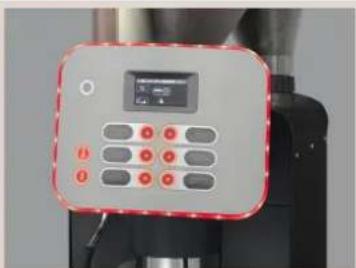
Close-up of a control panel with a digital display and multiple buttons (no visible text or symbols)▶ Wipe down the outer surfaces of the machine with a damp paper towel. Depending on the option available, perform the following actions:
▶ Rinse out the drinking water tank with fresh water.
▶ Thoroughly rinse out the milk container with fresh water.
▶ Thoroughly clean the waste water tank and/or drip tray with a domestic cleaning product.
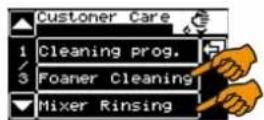
Foamer cleaning and mixer rinsing can be performed separately.
Option 1: Foamer cleaning
▶ Press [Foamer cleaning] in the "Care" menu.
☑Foamer cleaning starts.
Option 2: Mixer rinsing
▶ Press [Mixer rinsing] in the "Care" menu.

☑Mixer rinsing starts.
CAUTION!
User at risk!

Improper handling of beans, water, milk, powder or other coffee ingredients can lead to health problems!
Observe all hygiene regulations according to HACCP.

See also "Safety instructions" - "HACCP hygiene regulations" in the operating instructions.
Interne Kühleinheit
CAUTION!
User at risk!

CAUTION! User at risk!

Side cooling unit
There is a risk of contamination of the milk and cooling unit due to milk deposits and bacteria.
Clean the cooling unit daily.
▶ Take the milk out of the cooling unit.
▶ Thoroughly clean the interior of the cooling unit with water and a household cleaning product.
▶ Place the milk back into the cooling unit.
CAUTION! User at risk!

Internal drinking water tank
There is a danger of contamination of the drinking water tank due to deposits and bacteria.
Rinse the drinking water tank daily; do not use cleaning products.
▶ Thoroughly rinse the drinking water tank with fresh water several times.
▶ Dry with a clean cloth.
Weekly cleaning
Weekly Cleaning Reference Card
Weekly cleaning
Schaerer Coffee Vito

schaerer

CAUTION!
User at risk!

See also "Safety instructions" and "Cleaning" in the operating instructions.
It is dangerous to reach into the machine.
Before any manual cleaning, switch off the machine and disconnect it from the mains supply.
CAUTION!
Risk of machine damage!

Carry out weekly cleaning at least once weekly!
The weekly cleaning is additional to the daily cleaning and is not a substitute for it.
Outlet mixing cup (optional)

text_image
1 schaerer Sachan Sachan Sachan Sachan Sachan Sachan Sachan Sachan Sachan Sachan Sachan Sachan Sachan Sachan Sachan Sachan Sachan Sachan Sachan Sachan Sachan Sachan Sachan Sachan Sachan Sachana Sachana Sachana Sachana Sachana Sachana Sachana Sachana Sachana Sachana Sachana Sachana Sachana Sachana Sachana Sachana Sachana Sachana Sachana Sachana Sachana Sachana Sachana SachanaThis cleaning is only necessary on machines with an optional "powder system".
▶ Switch off the machine with the button.
▶ Disconnect the power plug.
natural_image
Hand operating a modern water dispenser with a tool, no visible text or symbols▶ Remove the left-hand cover.
▶ Pull the hose (that leads from the mixer to the beverage outlet) off the beverage outlet.

natural_image
Close-up of a mechanical component with a coiled tube and red connector, no visible text or symbols▶ Turn the bayonet fastening handle anticlockwise.
☑The outlet mixing cup is released from the locking device.
▶ Take out the outlet mixing cup complete with hose.
The mixer's impeller is now visible.
▶ Clean the impeller with a cloth.
natural_image
Close-up of a metallic pipe fitting with coiled tubing against a light blue background (no text or symbols visible)▶ Pull off the hose and disassemble the outlet mixing cup.
▶ Clean both parts of the outlet mixing cup and the hose under running water.

▶ Reassemble the outlet mixing cup again. Turn all the openings in the same direction.
▶ Insert the outlet mixing cup again in the reverse order.
▶ Push the mixer hose complete with the spiral guide back onto the beverage outlet.
▶ Reinsert the left-hand cover.
Brewing unit

natural_image
Hand inserting a device into a machine (no visible text or symbols)▶ Switch off the machine with the button.
▶ Disconnect the power plug
▶ Push the beverage outlet to its highest position.
▶ Take out the grounds container.
▶ Pull out the drip tray.
Option 1: With drinking water tank
▶ Take out the drinking water tank.
▶ Pull out the drip tray.
natural_image
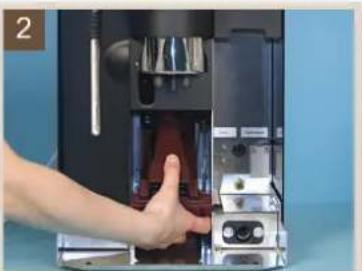
Hand inserting a red liquid into a black industrial machine (no visible text or symbols)▶ Hold the brewing unit from below and pull the slider to the front.
☑The brewing unit is released.
▶ Tip the brewing unit vertically downwards and pull it out to the front.

natural_image
Close-up of a mechanical component with a hand holding a tool, showing a highlighted circular section (no text or symbols visible)▶ Turn the spindle of the brewing unit anticlockwise with the multi-tool until the scraper (A) is in the front ejection position.
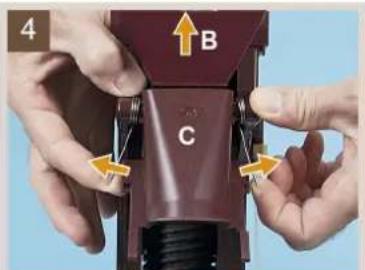
text_image
4 B C▶ Push both springs outwards over the edge, thereby releasing them.
▶ Pull out funnel (B) in the direction of the arrow.
▶ Hinge the insertion chute (C) upwards out of the way.
▶ Remove any ground coffee residue with a dry brush.
▶ Clean the brewing unit in warm running water.

natural_image
Close-up of a vintage mechanical device with a circular component and a yellow arrow pointing to it (no visible text or symbols)▶ Clean the brewing screen in running water.
▶ Allow the brewing unit to dry fully.
▶ Remove any ground coffee residue from the area of the drip tray pocket.
▶ Reinsert the dried brewing unit in the reverse order.
It may be necessary to readjust the brewer spindle position a little with the multi-tool.
Bean hopper
Old bean grease in the bean hopper can have a negative impact on the coffee quality.
Danger of injury from rotating grinding discs in the grinder.
Never reach into the bean hopper while the coffee machine is switched on.
▶ Wipe the inside of the bean hopper with a moist cloth.
▶ Dry with a clean cloth.
Powder container
Never clean the product hoppers in a dishwasher. The hoppers can get damaged. Clean the hoppers only with a damp cloth.
CAUTION!
User at risk!

CAUTION!
Risk of machine damage!

natural_image
Close-up of hands using a kitchen tool to press or install a plastic bag (no visible text or symbols)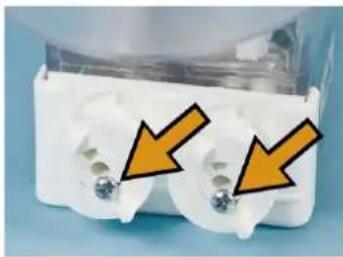
natural_image
Close-up of white plastic electrical connectors with two gold contacts and orange arrows pointing to them (no text or symbols visible)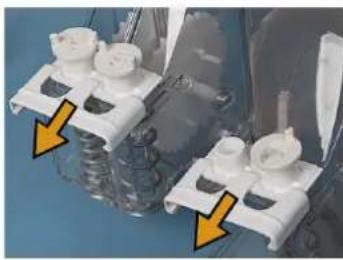
natural_image
Close-up of mechanical components with yellow arrows pointing to features (no visible text or symbols)
natural_image
Exploded view of a mechanical assembly with two numbered components (1 and 2), no visible text or symbols.
▶ Switch off the coffee machine using the button and pull out the power plug.
▶ Release the powder container by pressing the button and lift it out.
▶ Empty the powder container.
▶ Loosen the securing screw(s) and pull out the drive wheel(s).
▶ Pull out the slider.
▶ Take out the dosing screw(s) and thoroughly clean the component parts.
▶ Thoroughly clean the powder container with a damp cloth.
▶ Let the parts dry fully.
▶ Reassemble the dosing screws in the reverse order.
▶ Screw the securing screw(s) back onto the drive wheel(s).
▶ Reinsert the powder container by pressing the release button.
If using a twin topping container, i.e. with special compartments divided in the centre, for two different products, e.g. milk powder and choco powder, different dosing screws are used. Use dosing screw (1) for choc powder. Use dosing screw (2) for milk powder. It is best to label the powder container from the very beginning.
Optional accessories
Cup warmer

The cleaning for the cup warmer is described in the separate operating instructions "Cup warmer/ Cup & Cool".
Cup & Cool

The cleaning procedure for Cup & Cool is described in the separate operating instructions "Cup Warmer / Cup & Cool".
Thawing cooling Unit
Option 1: Cup & Cool

Defrosting of the cooling unit is described in the separate operating instructions "Cup warmer/Cup & Cool".
CAUTION! Risk of machine damage!

Option 2: Defrosting the additional cooling unit
The surface of the cooling unit's interior may get damaged. Never remove the ice layer with pointed or sharp objects; always let it defrost.
▶ Switch off the additional cooling unit or pull out the mains plug.
▶ Open the front door and leave it open.
▶ Wipe up the condensation water incurred with an absorbent cloth.
▶ Repeat the procedure until the ice layer has melted completely.
▶ Close the front door and switch the device on again or reinsert the mains plug.
HACCP Cleaning Concept
Cleaning regulations
When installed, maintained, cared for and cleaned properly, Schaerer AG coffee machines fulfil HACCP regulations.
CAUTION! Risk of machine damage!

If the coffee machine is not cared for and cleaned properly, the dispensing of milk beverages will become a health hazard in terms of food hygiene. Note and adhere to the following instructions:
- Wear safety gloves during cleaning.
- Wash your hands thoroughly before and after cleaning.
- Clean the coffee machine daily after beverage dispensing has ended.
- Clean the milk container every time before filling and after you have finished dispensing beverages for the day.
- Never put cleaning products in the milk container.
- Never put cleaning products in the drinking water tank (internal/external).
- Never mix cleaning products.
- Store cleaning products separately from coffee, milk and coffee machine powder.
- Do not use any abrasive products, brushes or cleaning tools made of metal.
- Do not touch parts that come into contact with beverages after cleaning.
- Read and follow the dosing and safety instructions specified on the cleaning product.
- For daily and weekly cleaning, proceed as described in the operating instructions and on the cleaning cards.

For a better overview of the cleaning steps that are required or that have already been performed, use the cleaning schedule in this chapter.
Cleaning schedule

"Cleaning" regarding the use of cleaning products.
▶ Copy the HACCP Cleaning Concept and store/post it in the vicinity of the machine.
▶ Record each cleaning with the time and a signature.
Year:
| □ January | □ February | □ March | □ April | □ May | □ June |
| □ July | □ August | □ September | □ October | □ November | □ December |
| Date | Machine cleanings (time and signature): | Signature | ||||
| Perform daily! | Perform weekly! | |||||
| Daily machine cleaning | Milk container (option) | Cleaning of cooler (option) | Weekly machine cleaning | Defrosting of cooler (option) | ||
| 1. | ||||||
| 2. | ||||||
| 3. | ||||||
| 4. | ||||||
| 5. | ||||||
| 6. | ||||||
| 7. | ||||||
| 8. | ||||||
| 9. | ||||||
| 10. | ||||||
| 11. | ||||||
| 12. | ||||||
| 13. | ||||||
| 14. | ||||||
| 15. | ||||||
| 16. | ||||||
| 17. | ||||||
| 18. | ||||||
| 19. | ||||||
| 20. | ||||||
| 21. | ||||||
| 22. | ||||||
| 23. | ||||||
| 24. | ||||||
| 25. | ||||||
| 26. | ||||||
| 27. | ||||||
| 28. | ||||||
| 29. | ||||||
| 30. | ||||||
| 31. | ||||||
Cleaning products
CAUTION! Risk of machine damage!

Use of incorrect cleaning products can damage the machine.
Use only cleaning products for daily and weekly cleaning that are recommended by Schaerer AG.
| Daily cleaning Weekly cleaning | |
| Schaerer cleaning tablets - | |
| Milkpure milk system liquid cleaner - |
Cleaning tablet

Before using the cleaning tablet, carefully read the information on the packaging and the "HEALTH & SAFETY DATA SHEET". If a HEALTH & SAFETY DATA SHEET is not present, please request it from the sales partner.
| Information | |
| Application Daily cleaning of the coffee system | |
| Purpose of cleaning Removal of grease residue in the coffee system | |
| Application interval 7 times a week | |
| State and odour See the "HEALTH & SAFETY DATA SHEET". |
Milkpure

Before using the cleaning product, carefully read the information on the packaging and the "HEALTH & SAFETY DATA SHEET". If a HEALTH & SAFETY DATA SHEET is not present, please request it from the sales partner.
| Information | |
| Application Daily cleaning of the milk system | |
| Purpose of cleaning | Removal of lime scale deposits and milk stone from the milk system and steam nozzle. |
| Application interval Once daily | |
| State and odour See the "HEALTH & SAFETY DATA SHEET". | |
Descaler

Before using the descaler, carefully read the information on the packaging and the "HEALTH & SAFETY DATA SHEET". If a HEALTH & SAFETY DATA SHEET is not present, please request it from the sales partner.
| Information | |
| Application Boiler and pipe system decalcification | |
| Purpose of cleaning Removal of lime scale deposits in the coffee machine | |
| Application interval As instructed by the coffee machine | |
| State and odour See the "HEALTH & SAFETY DATA SHEET". |
Service and maintenance
Maintenance
The coffee machine does not require regular maintenance. The maintenance schedule depends on multiple factors, especially the degree to which the machine is used.
When maintenance is due, the machine indicates this on the display. The machine can continue to be operated normally.
▶ Notify your service partner that maintenance is due.
CAUTION!
Risk of machine damage!

Failure to perform a required maintenance in due time may lead to wear and reliable operation is no longer assured.
Inform the service partner as soon as possible after the maintenance message appears.
Adjusting the grinding fineness
The grind level is influenced by the wear to the grinding disc. To ensure constant grinding quality, the grind level must be readjusted as required.
CAUTION!
User at risk!

There is a danger of injury on the inside of the grinders.
Never reach into the grinders.

natural_image
Hand operating a cylindrical device with two conical flasks against a blue background (no visible text or symbols)CAUTION!
Risk of machine damage!

▶ Lock the bean hopper by turning the closure.
▶ Remove the bean hopper.
▶ Remove the blind plug.
☑ Access to the adjusting screws is free.
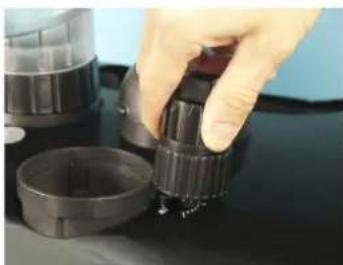
natural_image
Close-up of a hand adjusting a black cylindrical component on a dark surface, with no visible text or symbols.CAUTION!
Risk of machine damage!

Adjusting the grind level when the grinder is stationary can cause damage. Always run the grinder while adjusting.
▶ Press the beverage button (coffee beverage without milk) and wait until the grinder has started up.
▶ Push the multi-tool well into the opening of the adjusting screw, hold it tightly and alter the grind level as desired.
As an orientation aid there is a scale next to the adjusting screw: grind level 0 (clockwise) = coarsest grinding. Grind level 20 (anticlockwise) = finest grinding.
▶ Replace the bean hopper.
▶ Open the locking mechanism by turning the closure.
▶ Refit the blind plug.
▶ Perform a reference grind.

See "Programming" - "Powder weighing".
Decalcification
Decalcification message
When the machine needs to be decalcified, a corresponding request appears on the display.
The decalcification interval depends on the following factors:
- Water hardness
- Water flow rate
- Use of a water filter
CAUTION! User at risk!

CAUTION! Risk of machine damage!

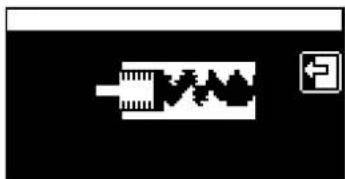
natural_image
Pure electrical circuit lines without any symbols1st display request

natural_image
Pure electrical circuit lines without any symbols2nd display request
Danger of poisoning from ingesting or inhaling the decalcifier.
Do not drink or inhale the decalcifier or the rinse water output during the decalcification process.
Household decalcifiers can destroy the coffee machine.
For decalcification, use Schaerer decalcifiers only. Liability cannot be accepted for damage resulting from the use of other decalcifiers.
Option 1: Resetting the decalcification request
When the 1st display decalcification request appears, decalcification must be performed within a week. The first display request can be overridden during that week.
▶ Touch the Field.
☑ The "Ready for operation" window appears and the machine is ready for use again.
Option 2: Forced decalcification
If no decalcification has been performed within a week of the first display request appearing, beverage dispensing is disabled. The 2nd display request cannot be reset.
Decalcification preparation
The following utensils have to be provided for the decalcification process:
Option 1: With drip tray
• 2 bottles of Schaerer liquid decalcifier (0.75 dl each).
- 5 I collecting containers.
- Drinking water tank
- Sufficient drinking water for rinsing.
- The multi-tool and a screwdriver (size 3) for changing over from mains water supply to drinking water tank (optional).
Option 2: With waste water outlet
• 2 bottles of Schaerer liquid decalcifier (0.75 dl each).
- Drinking water tank
- Sufficient drinking water for rinsing.
- The multi-tool and a screwdriver (size 3) for changing over from mains water supply to drinking water tank (optional).
Start decalcification program

Total amount of time that decalcification takes ca. 80 min
The decalcification process consists of four stages:
• Cooling down of the machine, the "cooling down routine" (ca. 5-10 min).
• The decalcification system (ca. 36 min).
- 3-fold system rinsing (ca. 8 min per rinse cycle).
- Making ready for operation (ca. 5 min).
The display provides guidance through the entire decalcification process.

text_image
MENU
text_image
Customer Care 2 descaling 3 Filter change Filter rinsing
text_image
descaling Start cool down routine? No Yes
text_image
descaling Tank with desca- ling solution in place? Continue▶ Select the menu "Care".
▶ Select the field "Decalcification"
▶ Execute the optional display request for machines with a mains water supply. See option "With water filter".
▶ Confirm the display request "Start decalcification" by pressing "Continue".
☑ The decalcification process cannot be interrupted.
- Decalcification stage "cooling down routine"
Once the machine is at working temperature, the "cooling down routine" has to be started with [YES].
▶ Touch the field [YES].
☑ The cooling down routine starts.
☑ The display request "Fill water tank to max." appears.
▶ Field "No"
☑ Leads to the next decalcification stage.
▶ Fill and insert the water tank. Confirm the ensuing display requests with [Continue].
☑ The display request "Place container under outlets" appears.
Place the previously provided 5 l container under the outlets and confirm the display request (in the case of machines with a waste water outlet (optional), confirm the display request).
☑ The "cooling down routine" starts (ca. 5-10 min).
☑ A display request to empty the container and drip tray appears.
▶ Empty the container and drip tray and place them under the outlets again.
- Decalcification stage "decalcification"
▶ Execute the optional display request for machines with an internal water filter. See option "With water filter".
▶ Fill the internal drinking water tank with the correct mixture ratio of Schaerer liquid decalcifier and water and then insert it.
Prepare a decalcification solution with a mixture ratio of 1 to 1.5:
- Put 2 bottles of liquid decalcifier (2 x 0.75 l) = 1.5 l in the drinking water tank.
- Fill an empty liquid decalcifier bottle (0.75 l) with water 3 times and add the content to the drinking water tank = 2.25 l
▶ Insert the drinking water tank with the decalcification solution.
▶ Continue the decalcification process by pressing the field "Continue".
▶ Execute and confirm the display request to "Place container under outlets".
☑ The decalcification process begins.
☑ After decalcification the request appears to rinse out the drinking water tank and drain the collecting container and drip tray.
3-fold system rinsing

text_image
descaling Fill the tank with fresh water to the max. level Continue▶ Rinse the drinking water tank with water, fill it and reinsert it.
▶ Empty the collecting container and drip tray and place them back under the outlets.
▶ Continue the decalcification process by pressing the field "Continue".
☑ Rinsing starts and is then repeated with 2 further identical rinsing procedures.
▶ Empty the collecting container and drip tray after the 3rd system rinsing cycle and then put them back under the outlets.
▶ Fill and insert the drinking water tank.
▶ Continue the decalcification process by pressing the field [Continue].
4. Make ready for operation.
▶ Execute the optional display request for machines with an internal water filter. See option "With water filter".
▶ Continue the decalcification process by pressing the field "Continue".

text_image
descaling Please replace descaling filter ContinuePrompt occurs only with an internal water filter (optional)


text_image
descaling descaling info finished! correctly! ContinueThere is a danger of scalding in the dispensing area. The machine heats up automatically, so do not reach under the dispensing areas.
▶ Confirm the display message "Caution, the machine is heating up!" by pressing the field "Continue".
☑ The machine heats up automatically.
☑ The display message "Decalcification completed correctly" appears.
▶ Confirm the display message by pressing the field [Continue].
☑ The machine heats up and starts "warm rinsing".
☑ The machine blows off steam out of the steam outlet.
▶ Switch over again, if the machine has an optional mains water supply. See below "Option: with mains water supply"
☑ The decalcification process is completed and the machine is ready for operation.

text_image
descaling Remove descaling filter from tank ContinuePrompt occurs only with an internal water filter (optional)


natural_image
Simple line drawing of a container with handle and side panels, no text or symbols presentDisplay message, if with "mains water supply" (optional)

Option 1: With water filter
If an optional internal water filter is being used in the drinking water tank, the display request "Remove calcium filter from tank" appears after the cooling down routine".
▶ Remove the water filter (optional) from the drinking water tank before the decalcifier is poured in.
▶ Then continue the decalcification process by pressing the button "Continue".
▶ Follow the ensuing display requests, see decalcification process.
▶ Reinsert the water filter at the end of the decalcification process.
See "Service and maintenance" - "Water filter (optional)" - "Changing the water filter for the internal drinking water tank".
Option 2: With mains water supply
If a mains water supply connection is available, the display request "Change Aquaflex" appears after starting the decalcification process.
▶ Close the main water valve of the mains water supply.
▶ Remove the right-hand front cover.
▶ Change over from mains water supply to "drinking water tank".
See "Installation and commissioning" - "Changeover from mains water supply to drinking water tank"

natural_image
Close-up of a metallic pipe fitting with red and gold components, showing a curved arrow indicating direction (no text or symbols)▶ Open the sealing plug on the water tank coupling by turning it anticlockwise with a flat-tip screwdriver (size 3) and remove the plug.
▶ Follow the ensuing display requests, see decalcification process.
Water filter (Option)
Installing the water filter for the internal drinking water tank

The supplied water filter is only suitable for installation in the machine's internal drinking water tank.
Prior to installation of the supplied water filter in the internal drinking water tank, a water test must be performed to determine whether use of the water filter is necessary. In addition the water value must be entered when the machine is first put into service.

See "Determining the water hardness" in this chapter.

natural_image
Close-up of a hand holding two transparent plastic clips (no text or symbols visible)▶ Remove the water outlet screen installed in the water tank.
▶ Open the water filter box.
☑ The water filter adapter is located at the top, and the separately packaged filter cartridge is found beneath it.
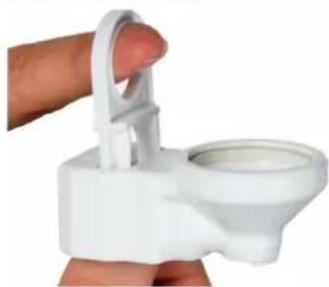
natural_image
Close-up of a white plastic toilet stand with a handle and lid, held by a finger (no text or symbols visible)▶ Pull up the locking mechanism on the adapter.

natural_image
Close-up of a hand inserting a white plastic clip into a small container (no text or symbols visible)▶ Attach the adapter to the water outlet connector and push down the locking mechanism.
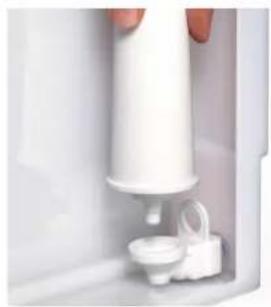
natural_image
Close-up of a white hand holding a cylindrical device with a small inset component (no visible text or symbols)▶ Unpack the filter cartridge and mount it on the adapter.
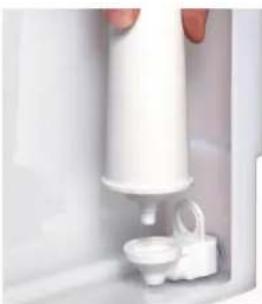
natural_image
Close-up of a white hand holding a small white object, possibly a container or pump, with no visible text or symbols.Changing the water filter for the internal drinking water tank
When the filter needs to be changed, a corresponding prompt appears on the display.
▶ Take the drinking water tank out of the machine.
▶ Take the old filter cartridge out of the adapter.
▶ Unpack the new filter cartridge and mount it on the adapter.
▶ Slide the drinking water tank back into the machine.

The replacement cartridges can be ordered from Schaerer AG as a 6-piece set (order number: 071397).
External water filter

The external water filter must be replaced by an authorised service partner/service technician after the programmed number of litres is reached.
Programming
Navigation
| Symbol Description | |
| Start | Starts a program or a function |
| Continue | Confirms a step and continues to the next step |
| Yes | Confirms a query |
| No | Answers a query in the negative |
| ▲/▼ | Skips a page up or down in the menu |
| +/— | Increases or reduces the respective setting |
| OK | Saves settings, confirms a query |
| F | Quits a menu or message |
| C | Clears or resets |
Overview
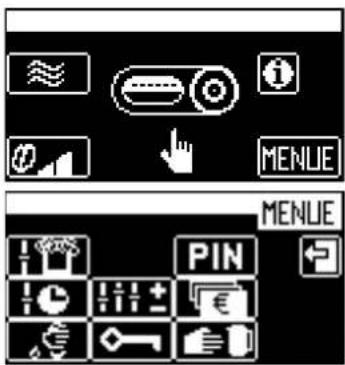
text_image
Screenshot of a software interface showing navigation controls and buttons, including 'MENLIE' and 'PIN'
In the main window touch the hidden field "Menu".
☑ The "Selection menu" is displayed.
The selection menu includes the following submenus (from top left to bottom right):
- Milk and foam
- Timer program
- Care
- Settings
• PIN entry - Access control
- Payment system
- Manual removal (only valid for operation with a payment system).
The submenus are described below in this chapter.
"Milk and foam" menu
▶ Touch the 🎨 in the "Selection menu".
☑ The "Milk and foam" menu is displayed.
The menu contains the following subitems:
- Topping quality or foam quality
- Macchiato pause
Topping quality/foam quality
Coffee machines with a powder system have the parameter "Topping quality", and coffee machines with fresh milk have the parameter "Foam quality".
| Display/ display text | Parameter description Setting range Notes | ||
| Topping quality Setting of the milk powder intensity.► Touch the [Topping quality] field in the menu "Milk&foam".☑ The window "Topping quality" appears.► Set it by touching and . ►Confirm by touching OK☑ The new settings are active. | 20 - 100 Reducing the value = lighter flavourIncreasing the value = more intensive flavour | ||
| Foam quality Setting of the milk foam quality.► Touch the [Foam quality] field in the menu "Milk&foam".☑ The window "Foam quality" appears.► Set it by touching and . ►Confirm by touching OK☑ The new settings are active. | 40 - 99 Reducing the value = finer foam poresIncreasing the value = coarser foam pores | ||
Macchiato pause
| Display/ display text | Parameter description Setting range Notes | ||
| Macchiato pause | By means of this parameter the pause time between the milk and milk foam dispensing for a latte macchiato can be shortened or lengthened.► Touch the [Macchiato pause] field in the menu "Milk&foam".☑ The window "Macchiato pause" appears.► Set by touching and ▶ Confirm by touching OK☑ The new settings are active. | 1 - 20 | The quality of a latte macchiato generally improves when the pause is extended. |
"Timer program"
In the "Timer program" menu, the switch-on and switch-off times can be programmed.
▶ Touch the icon in the "Selection menu".
☑ The "Timer program" menu is displayed.
The menu contains the following subitems:
- Timer status
- Timer setting
- Timer overview
- Clear timer
- Timer info
Timer status
| Display/ display text | Parameter description Setting range Notes | ||
| Timer status In this | menu the timer function can be activated and deactivated.► Touch the [Timer status] field in the "Timer program" menu.☑ A query window appears and the new timer status is displayed.► Confirm by touchingOK☑ The new settings are active. | On/Off When the timer is activated, the timer symbol ☑ a small clock, appears in the main window. | |
Timer setting
| Display/ display text Parameter | description Setting | range | Notes |
Timer setting The switching on and  | nd off times can be set in this menu.► Touch the [Set timer] field in the "Timer program" menu.► Touch the [Operating time] field.☑ The "Operating time" window appears. | DayHoursMinutesActionProgram | When the timer is activated, the timer symbol, a small clock, appears in the main window. |
| Day (set day, 1=Monday ... 7=Sunday)► Set by touchingand . | 1 to 7 Individual days (Mon, Tues, ...) | ||
| 1 – 5 Monday – Friday | |||
| 1 – 7 Monday – Sunday | |||
| hrs and mins (set time)► Set by touchingand . | hrs: 01 – 00 mins: 00 – 59 | - | |
| Action (set action)► Set by touchingand . | O = OffI = On | - | |
| Prg (set program)If the day, time and action have been set and acknowledged by OKe program number is automatically increased.► Confirm by touchingOK☑ The new settings are active.To change programs that have already been produced:► Navigate to the desired program number by touching + and -.► Perform the changes as described above. | 1 – 16 | Touching the field deletes the settings of the current program.By touching the fieldoithe timer overview can be opened directly. | |
Timer overview
| Display/ display text | Parameter description | Setting range | Notes |
Timer overview | The switching on and off times can be set in this menu.► Touch the [Timer overview] field in the "Timer program" menu.► Touch the [Operating time] field.☑ The "Timer overview" window appears. | - | The timer times are shown in a days/hours diagram. |
Clear timer
| Display/ display text Parameter description Setting | range | Notes |
| Clear timer In this menu the timer times can be cleared.► Touch the [Clear timer] field in the "Timer program" menu.☑ The "Clear timer" window appears.► Select the desired day or option.☑ A query window appears.► Confirm the query with OK☑ The timer is cleared. | Days:Monday to SundayOptions: working days, whole week | This procedure cannot be undone! |
Timer info
| Display/ display text Parameter description Setting | range | Notes |
| Timer info The "Timer info" menu contains information on:• Timer status• Next pending timer program▶ Touch the [Timer info] field in the "Timer program" menu.☑ The "Timer info" window appears. | - | - |
"Care" menu
In the "Care" menu, the programs for cleaning, decalcification and filter rinsing can be started and a filter change and the customer care procedure can be confirmed.
▶ Touch the "e" in the "Selection menu".
☑ The "Care" menu is displayed.
The menu contains the following subitems:
- Cleaning program
- Foamer cleaning
- Mixer rinse
- Decalcification
- Filter change (if the filter is activated in the menu "Settings")
- Rinse filter (if the filter is activated in the menu "Settings")
- Customer care

See "Cleaning" for the menus: cleaning program, foamer cleaning and mixer rinsing.

See "Service and maintenance" for the menus: filter change, rinse filter and customer care.
"Settings" menu
▶ Touch the line in the "Selection menu".
☑ The "Settings" menu is displayed.
The menu contains the following subitems:
- Recipes/buttons
- Boiler temperature
- Reset
- Time/date
- Language
- Contrast
- Calcium filter
- Water hardness
- Warm-up rinsing
- Operating option
- Lighting
- l n t r o
Recipes and beverage buttons
▶ Touch the [Recipes/buttons] field in the "Settings" menu.
☑ The "Recipes/buttons" menu is displayed.
The menu contains the following subitems:
- Filling quantities
- Change recipes
- Button assignment
- Weigh powder
| Display/ display text | Parameter description | Setting range | Notes |
Filling quantities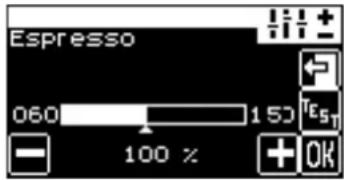 Example espresso Example espresso | In this menu the total volume of a drink can be altered as a percentage. The individual components of the beverages are adapted automatically to the new filling quantities.► Touch the [Filling quantities] field.☑ The "Select beverage" window appears.► Press the required beverage button.☑ The "Filling quantity" window shown here appears.► Set the filling quantity by touching and a random number of times.A test dispensing cycle can be triggered by touching ☑ Confirm by touching OK☑ The new settings are active. | Dependent on the basic setting of each beverage | - |
Change recipes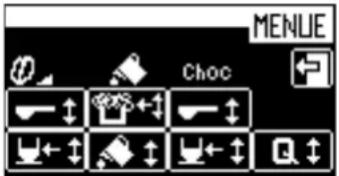  | Press the [Change recipes] field.The "Select beverage" window appears.Press the required beverage button.The "Change recipes" window shown here appears.The window shows all parameters that are settable for the selected beverage.Key to the symbols:Powder volumeWater volumeFoam volumeMilk volumeSelect the desired parameter and set it in the window that appears by touching and a random number of times.Confirm by touchingOKThe new settings are active. | Dependent on the components of a beverage | Quality:The five available quality levels influence the brewing. The higher the quality level, the more intensive is the release of the coffee's flavouring agents. |
| Button assignment Each beverage | button can be assigned a beverage.Touch the [Button assignment] field.The "Select beverage" window appears.Press the required beverage button.The "Button assignment" window appears.Touch the desired beverage that is to be assigned to the selected button.Option 1: Machine with 1 grinderThe beverage is assigned to the beverage button.Option 2: Machine with 2 grindersThe query "Select portioner" appears.Select the right-hand or left-hand grinder.The beverage is assigned to the beverage button. | All programmed beverages | With the "2nd level" option, two beverages can be assigned to each beverage button. |
| Weigh powder This function can | be used to adjust the quantity of the coffee powder of a beverage.Empty the grounds container.Touch the [Weigh powder] field.The "Select beverage" window appears.Press the required beverage button.The window "Weigh powder" appears.Touch the field.The coffee powder is output directly into the grounds container.Weigh the output coffee powder.Set the coffee powder quantity withandConfirm by touchingOKThe new settings are active. | Dependent on the basic setting of each beverage | - |
Boiler temperature
| Display/ display text Parameter | description Setting | range | Notes |
| Boiler temperature | ▸ Touch the [Boiler temperature] field in the "Settings" menu.☑ The "Boiler temperature setting" window appears.▸ Set the desired boiler temperature by touching ☐ a ☐.▸ Confirm by touching OK☑ The new settings are active. | 91 – 99°C – |
Reset
| Display/ display text Parameter | description Setting | range | Notes |
| Reset When a reset is performed | the software is restarted.► Touch the [Reset] field in the "Settings" menu.☑ The "Service routine reset" window appears.► Confirm by touchingOK☑ The new settings are active. | - Compulsory | cleaning and decalcification can not be reset by means of the reset function. |
Time and date
| Display/ display text Parameter | description Setting | range | Notes |
| Time/date In this menu the date, | weekday and time can be set.▸ Touch the [Time/Date] field in the "Settings" menu.☑ The "Time/date" window appears.▸ The date, weekday or time is set by touching + and ▼▶ Confirm by touching OK☑ The new settings are active. | Infinite calendars | - |
Language
| Display/ display text Parameter | description Setting | range | Notes |
| Language All provided languages | can be set in this menu.► Touch the [Language] field in the "Settings" menu.☑ The window "Language" appears with all the available languages.► Select the desired language by touching the respective field.☑ The selected language is active. | All provided languages | Further languages can be provided in the "Language" menu by a service technician. |
Contrast
| Display/ display text Parameter | description Setting | range | Notes |
| Contrast In this menu the display | contrast can be set.► Touch the [Contrast] field in the "Settings" menu.☑ The "Contrast setting" window appears► Adjust the contrast by touching and . ►Confirm by touching OK☑ The new settings are active. | 0 – 100 – |
Calcium filter
| Display/ display text Parameter | description Setting | range | Notes |
| Calcium filter By means of this parameter the use of a calcium filter can be set. ▶ Touch the [Calcium filter] field in the "Settings" menu. ☑ The setting switches between "Yes" and "No" each time the field is touched. See also "Water quality" - "Connect filter" | Yes/No The use of a calcium filter extends the interval to the next decalcification and protects the machine against calcium deposits. | ||
Water hardness
| Display/ display text Parameter | description Setting | range | Notes |
| Water hardness In this menu the water hardness can be entered. ▶ Touch the [Water hardness] field in the "Settings" menu. ☑ The "Water hardness setting" window appears. ▶ Determine the water hardness See "Water quality" - "Determine water hardness". ▶ By touching and . — ▶ Confirm by touching OK ☑ The new settings are active. | 1 – 28 The German carbonate hardness °dKH applies. | ||
Warm-up rinsing
| Display/ display text Parameter | description Setting | range | Notes |
| Warm-up rinsing | By means of this parameter the warm-up rinsing can be switched on and off.► Touch the [Warm-up rinsing] field in the "Settings" menu.☑ The setting switches between "active" and "inactive" each time the field is touched. | active / inactive | If warm-up rinsing is "active", after heating up the brewing unit is rinsed with hot water and is warmed up in the process. |
Operating option
▶ Touch the [Operating options] field in the "Settings" menu.
☑ The "Operating options" menu is displayed.
The menu contains the following subitems:
- Warm rinse field
- Barista field
- 2nd level
- ON/OFF button (button)
- Menu field
| Display / display text Parameter description Setting | range | Notes | |
Warm rinse field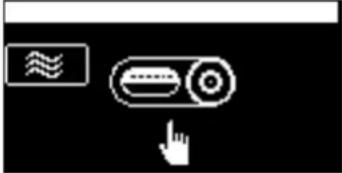 Main window with warm rinse field activated. Main window with warm rinse field activated. | By means of this parameter the warm rinse field can be switched on and off in the main window.► Touch the [Warm rinse] field.☑ The setting switches between "active" and "inactive" each time the field is pressed.See also "Operation" - "Main touch screen window" for a detailed description. | active / inactive | For self-service mode it is recommended that this function is deactivated. Otherwise the operator could trigger a warm rinse by mistake. |
Barista field Main window with Barista field activated. Main window with Barista field activated. | By means of this parameter the warm rinse field can be switched on and off in the main window.► Touch the [Barista] field.☑ The setting switches between "active" and "inactive" each time the field is pressed.See also "Operation" - "Main touch screen window" for a detailed description. | active / inactive | For self-service mode it is recommended that this function is deactivated. The operator does not open up the function, if it is used only once. |
2nd level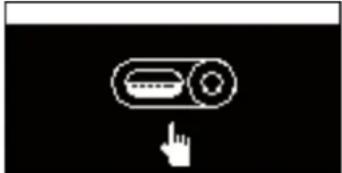 Main window with 2nd level activated. Main window with 2nd level activated.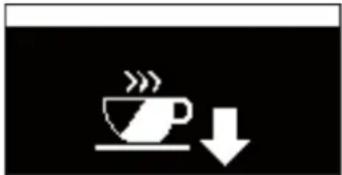 Main window with 2nd level deactivated. Main window with 2nd level deactivated. | By means of this parameter the 2nd level can be switched on and off in the main window.► Press field [2nd level].☑ The setting switches between "active" and "inactive" each time the field is pressed.See also "Operation" - "Main touch screen window" for a detailed description. | active / inactive | - |
ON/OFF button Input window PIN with the variant "via PIN" activated. Input window PIN with the variant "via PIN" activated. | The switching on and off of the machine can be controlled by means of this parameter. For direct switching on and off the machine can be switched on and off as usual. With the function "via PIN" the machine can be switched on and off only with input of the PIN.► Touch the [ON/OFF button] field.☑ Each time the field is pressed the setting changes between "direct" and "via PIN".The "Cleaning" level PIN is polled.See "Programming" - "Menu, PIN access control". | direct / via PIN | For self-service mode it is recommended that the function "via PIN" is deactivated. Switching off by mistake is therefore excluded. |
| Display / display text Parameter | Description Setting | range | Notes |
Menu field Visible "Hidden fields" on the right-hand third of the touch screen. Visible "Hidden fields" on the right-hand third of the touch screen. | The behaviour of the hidden fields MENU and Information can be set by means of this parameter. With the setting "immediate" the hidden fields appear directly when the right-hand third of the touch screen is pressed. With the setting "delayed" the hidden fields do not appear until they are double pressed or given a sustained press.Touch the [Menu] field.The setting switches between "immediate" and "delayed" each time the field is pressed.See also "Operation" - "Main touch screen window" for a detailed description. | immediate / delayed | - |
Lighting
| Display/ display text Parameter | description Setting | range | Notes |
| Lighting By means of this parameter | a colour can be selected for lighting the control panel. ▶ Touch the [Lighting] field. ☑ The lighting colour alters each time the field is touched. | In this order: light blue, orange, royal blue, yellow-green, light violet, turquoise, green, blue, violet, rose pink, orange-yellow, pink, light green, light red, Off, running light, freeze | To select an individual colour, allow the running light to run and touch the [Lighting] field again for the desired colour. The current colour is selected. |
Intro
| Display/ display text Parameter | description Setting | range | Notes |
| Intro By means of this parameter | eter the machine's commissioning program machine can be restarted.► Touch the [Intro] field in the "Settings" menu.☑ The commissioning program starts.See "Installation and commissioning" - "Commissioning program" | - | - |
"PIN entry" menu
| Display/ display text Parameter | description Setting | range | Notes |
| PIN entry Individual levels or functions can be protected with a PIN (Personal Identification Number). For access to a PIN-secured level the corresponding "PIN" must be entered in the PIN entry window. ▶ Touch the [IMAGE] in the selection menu. ☑ The window "PIN" appears. ▶ Enter the necessary 4-digit PIN. ▶ Confirm by touching OK ☑ If the entry is valid, the level or function is now enabled.See "Programming" - "Menu, Access control". | 0 – 9 Switching | on and off of the machine can be protected by means of a "PIN".See "Programming" - "Settings" - "Operating options".After 3 attempts at entering a "PIN" the entry window is temporarily disabled (ca. 45. sec). |
"Access control" menu
| Display/ display text Parameter | description Setting | range | Notes |
Access control In the "Access control"  | control PIN" menu 3 individual levels can be protected at a time with a PIN (Personal Identification Number). The levels authorise access to various menu items. ▶ Touch the PIN in the selection menu. | Levels: accounting, setting, cleaning. | Switching on and off of the machine can also be protected by means of a PIN. See "Programming" - "Settings" - "Operating options". |
"Accounting" level  | Selection menu with level "Accounting" protected, the menu options: access control PIN, accounting, manual removal are not visible. | - | The levels are hierarchically structured. Access to the highest level automatically also includes access to the other two lower levels. |
"Settings" level  | Selection menu with level "Settings" protected, the menu options: access control PIN, accounting, manual removal are not visible. | - | |
"Cleaning" level.  | Selection menu with level "Cleaning" protected, the menu options: access control PIN, accounting, manual removal and cleaning are not visible. | - | |
Define / delete PIN ▶ Select desired level. | ☑ The window "PIN entry" appears.Defining a PIN:▶ Enter desired 4-digit PIN.▶ Confirm by touchingOK☑ The level is now protected by the entered PIN.Deleting a PIN:▶ Touch the field.☑ The PIN is deleted. | 0-9 |
"Account" menu
| Display/ display text Parameter | description Setting | range | Notes |
Accounting "Counter" menu "Counter" menu | The counter status for each beverage is displayed in the "Accounting" menu.► Touch the in the selection menu.☑ The "Accounting" window appears.► Touch the [Counter] field.☑ The "Counter" menu appears, all beverages with their counter status being displayed here.► Select the desired beverage. | All programmed beverages | - |
| Deleting all counters:► In the "Counter" menu touch the field.☑ The window "delete all counters" appears.► Confirm again by touching [C]☑ All counters are deleted.Clearing individual counters:► In the "Counter" menu touch the desired counter.☑ The query "Delete counter?" appears.► Confirm by touching [C]☑ The selected counter is deleted. | - | - |
Troubleshooting
Faults with display message
The coffee machine is equipped with a diagnosis program. When outside intervention is necessary, a corresponding display message appears. There are two different types of display messages.
- Prompts
- error messages
Pending prompts or error messages are displayed with:
Option 1: Direct messages
The prompt or error message is indicated directly on the display.
Option 2: Indication is via the warning symbol in the main window
▶ Touch the field
☑ The prompt or error message is displayed.
Fundamental procedure for pending faults.
▶ Switch the coffee machine off and, after several seconds, on again.
▶ Repeat the procedure that triggered the fault.
☑ In many cases the fault is then eliminated.
A repeat error message persists.
▶ Search for the displayed fault text or fault code in the fault list shown below and proceed as instructed.
☑ In many cases the fault can be eliminated.
If the error message persists despite this.
▶ Contact your service partner and specify the fault code or fault text.
Some messages cause individual functions to be disabled. Disabled functions are recognizable by the fact that the beverage buttons are no longer illuminated.
Fault messages with a request are shown symbolically on the display with the machine element affected.
| Display message Cause What to do | ||
Fill with beans The coffee beans  _ _ | ns are not sliding down in the hopper.If the machine has two bean hoppers, the one that is empty flashes in the error message. | ► Stir the coffee beans in the bean hopper using a large spoon.► Confirm the display message with OK |
| The monitor sensor is faulty.If the machine has two bean hoppers, the one that is empty flashes in the error message. | ► Contact service partner. | |
Fault on the brew unit  _ _ | The brewing screen is clogged. | ► Clean the brewing screen.See "Cleaning" - "Weekly cleaning". |
Empty the grounds container! | The last emptying has not been confirmed. | ► Pull out the grounds container again, wait for a short time and reinsert it.☑ A confirmation query appears on the display.► Confirm the display query with [Yes]. |
| Grounds container missing! The grounds container has not been correctly inserted. | ► Check the grounds container for correct seating. | |
 | The monitor sensor is faulty. ► Contact service partner. | |
The grounds chute is missing! | The grounds container has not been correctly inserted.Only on machines with an under-counter grounds container! | ► Check the grounds container for correct seating. |
| The monitor sensor is faulty.Only on machines with an under-counter grounds container! | ► Contact service partner. | |
Manual inlet closed? | The monitor sensor is faulty. | ► Contact service partner. |
Fault messages with fault code
Possible error messages, with a fault code, are shown in the illustration on the left.

text_image
88| Code | Designation | Cause and effect | What to do | |
| 6 The brewing unit is blocked. | The brewing screen is clogged. ▶ Clean the | brewing screen.See "Cleaning" - "Weekly cleaning". | ||
| 26 | Right mill blocked | The grinding fineness setting is too fine.The fine dust contaminates the mill too quickly. | ▶ Set the grind level to one level coarser.See "Service and maintenance" - "Finer setting of grind level". | |
| The grinder is blocked. | ▶ Contact your service partner. | |||
| 36 | Left mill blocked | The grinding fineness setting is too fine.The fine dust contaminates the mill too quickly. | ▶ Set the grind level to one level coarser.See "Service and maintenance" - "Finer setting of grind level". | |
| The grinder is blocked. | ▶ Contact your service partner. | |||
| 88 Boiler | temperature too high | The water supply is interrupted.Dispensing of beverages is blocked. | Option 1: With drinking water tankCheck that the drinking water tank is filled and installed correctly.Option 2: With mains water supplyCheck whether the main water valve is open. | |
| The brew unit is blocked.Dispensing of beverages is blocked. | Clean the brew unit.See "Cleaning" - "Weekly cleaning". | |||
| The machine is overheated.Dispensing of beverages is blocked. | Switch off the coffee machine and let it cool.Switch the coffee machine back on.If not rectified, contact your service partner. | |||
| 89 Boiler | heating time fault | Fault while heating ▶ Switch the machine off and back on. | ||
| 161 Brew | water fault • The water supply is interrupted.Dispensing of beverages is blocked. | Option 1: With drinking water tankCheck that the drinking water tank is filled and installed correctly.Option 2: With mains water supplyCheck whether the main water valve is open.Option 3: AquaflexCheck whether the changeover from mains water supply and drinking water tank is correctly set.See "Installation and commissioning" - "Changeover from mains water supply to drinking water tank" | ||
| The brew unit is blocked.Dispensing of beverages is blocked. | Clean the brew unit.See "Cleaning" - "Weekly cleaning". | |||
| The grinding fineness setting is too fine.The fine dust contaminates the mill too quickly. | Set the grinding fineness one level coarser.See "Service and maintenance" - "Finer setting of grind level". | |||
| The highest quality level can lead to a brew water fault. | Set the quality lower.See "Programming" - "Settings" menu - "Recipes and beverage buttons". | |||
| 163 Warm | rinse water fault • The water supply is interrupted.Dispensing of beverages is blocked. | Option 1: With drinking water tankCheck that the drinking water tank is filled and installed correctly.Option 2: With mains water supplyCheck whether the main water valve is open. | ||
| The brew unit is blocked.Dispensing of beverages is blocked. | ||||
| 186 Steam | boiler level • The level in the steam boiler has not been reached within 30 sec.The steam feed valve is defective. | Switch the coffee machine off and back on.If not rectified, contact your service partner. | ||
| 188 Steam boiler temperature too high | The steam wand or beverage outlet is clogged.Dispensing of beverages is blocked. | Check and clean the steam wand and/or beverage outlet.See "Cleaning". | ||
| The machine is overheated.Dispensing of beverages is blocked. | Switch off the coffee machine and let it cool.Switch the coffee machine back on.If not rectified, contact your service partner. | |||
| 189 Steam boiler heating time fault | Fault while heating. | Switch the coffee machine off and back on.If not rectified, contact your service partner. | ||
Faults without display message
| Fault description Cause and effect What to do | ||
| No hot water dispensing; water in grounds container.Coffee dispensing not possible. | Hot water outlet clogged.Hot water dispensing valve defective. | Clean the hot water outlet.If not rectified, contact your service partner. |
| No choco dispensing; water in grounds container.Coffee dispensing not possible. | Outlet mixing cup is clogged up.Beverage outlet is clogged up.Choco dispensing valve defective. | Do not use choco dispensing any longer.Contact service partner. |
| Dosing screw blocked, only water is being dispensed. | Dosing screw is clogged up.Outlet mixing cup is clogged up. | Clean the dosing screw.See "Cleaning" - "Powder container".Empty the powder.Turn the screw by hand until all powder has been removed.Rinse with water, if necessary.Let it dry fully. |
| Coffee dispensing left/right are different. | Beverage outlet is clogged up. | Clean the beverage outlet.See "Cleaning". |
| No milk foam, no milk dispensing, although there is milk in the milk container. | Milk hose kinked or squeezed.Milk nozzle is clogged up.Cooling unit (internal/external) iced up. | Lay the milk hose correctly.Clean the milk nozzle.See "Cleaning".Defrost the cooling unit.See "Cleaning" - "Optional accessories" - "De-frost cooling unit". |
| Milk foam is not correct, temperature is too cold | Wrong milk nozzle.Beverage outlet is clogged up. | Change the milk nozzle (green nozzle = cooled milk / white nozzle = non-cooled milk).Clean the beverage outlet.See "Cleaning" or cleaning card. |
| Internal/external cooling unit is not cooling. | Cooling unit is not switched on.Cooling unit is defective. | Switch on the cooling unit.If not rectified, contact your service partner. |
| Fault description Cause and effect What to do | ||
| Pump runs permanently, water in the grounds container. | PC board defective.Electrical problem between the pump and the PCB. | Switch the machine off and back on.Disconnect the machine from the mains power supply and reconnect it.If not rectified, contact your service partner. |
| Choco/topping container cannot be inserted. | Position of the dosing screw is wrong | Manually turn the dosing screw drive slightly clockwise. |
Water quality
A cup of coffee consists of 99 percent water. Therefore, the water has a significant effect on the coffee's taste. To obtain an excellent cup of coffee, you need excellent water.
The water is important not only to the taste of the coffee but also to the coffee machine itself. Poor water quality can lead to permanent machine damage.
Therefore, close attention needs to be paid to the water quality in order to obtain high quality coffee and protect the coffee machine.
Water values
CAUTION! Risk of machine damage!

Poor water values can lead to machine damage.
It is imperative that the specified values be complied with. Otherwise, Schaerer AG shall not accept liability.
The following water values are a precondition for the correct operation of the coffee machine:
- 4 – 6°dKH (German carbonate hardness)
- 7 – 8°dGH (German total hardness)
• pH value 6.5 – 7 (pH-neutral)
• Chlorine content max. 100 mg per litre
Water is referred to as hard or soft depending on its composition. The hardness of water is referred to as its total hardness.
The total hardness is differentiated into carbonate hardness (temporary hardness) and non-carbonate hardness (permanent hardness). In terms of the water hardness, the concentration of bicarbonate anions (HCO3-) is of special significance. The concentration of bicarbonate ions or the equivalent quantity of alkaline earth metal ions is referred to as carbonate hardness.
International conversion table (factors apply to total hardness and carbonate hardness)
| Unit | ° dH | ° eH | ° fH | ppm | mmol/l | |
| German hardness 1°dH 1 | 1.253 1.78 | 17.8 0.1783 | ||||
| English hardness 1°eH 0.798 | 1 1.43 1 | 4.3 0.142 | ||||
| French hardness 1°fH 0.560 | 0.702 1 | 0 | 0.1 | |||
| Part(s) per million (USA) | 1 ppm | 0.056 | 0.07 | 0.1 | 1 | 0.01 |
| Millimole per litre | 1 mmol/l | 5.6 | 7.02 | 10 | 100 | 1 |

bar
| Category | Value | | --------- | ----- | | sauer | 0 | | neutral | 7 | | basisch | 14 |pH scale
If the water values do not correspond to the above-mentioned specifications, the water must be prepared accordingly (decalcification/enrichment with minerals).

The service partner can provide detailed information on filter options and versions and can install this equipment at your location.
Determining the water hardness
A water hardness test must be performed to determine whether a water filter is needed. If the water values are poor, trouble-free operation of the machine cannot be ensured.
The water values must also be entered when the machine is taken into service and can be readily adjusted in the machine menu. On the basis of the entered values, the machine calculates the time to the next filter change (if a filter is in use) and the time to the next decalcification routine.
▶ Check whether a house filter system is already connected upstream from the machine.
In most water, the carbonate hardness is markedly lower than the total hardness. This is a good indicator for determining whether the water is straight from the mains or if it first passed through a house filter system.


text_image
Carbonathartetest Carbonate Hardness Test ① 1 s ② 1 min ③ ④ (1°RH = 1.853°EH = 1.78°H) α schaerer www.schaerer.comOption 1: Requesting information from the drinking water supplier
▶ Ask the local drinking water supplier for information on the water hardness (total hardness) of the drinking water.
Option 2: Performing a test
▶ Determine the water hardness using the test strips included in the scope of delivery.
▶ Dip the test strip into the tap water for ca. 1 sec.
▶ Remove the test strip and wait for ca. 1 min.
☑ The test strips changes colour.
▶ Compare the water analysis result with the "Total hardness" table in the "Water values" chapter.
▶ Install a water filter if the test result is poor.

See "Filter equipment" in this chapter or, for machines that are operated with drinking water, see the chapter entitled "Service and maintenance" - "Installing a water filter for the internal drinking water tank".
Filter technology
To protect the coffee machines and the coffee quality against hard or soft water, filters are used. Filters are essential for the care and maintenance of the machine, not to mention for hygiene, and for the best quality of coffee.
Even when using a filter, it is still necessary to measure the water values once a year. Water is a living element and therefore changes frequently.

The service partner can provide detailed information on filter options and versions and can install this equipment at your location.
Safety notes
Maximum safety is one of Schaerer AG's most important product features. The effectiveness of the safety devices is guaranteed only if the following instructions are observed to prevent injuries and health hazards:
- Read the User Manual carefully before using the device.
- Do not touch hot machine parts.
- Do not use the coffee machine if it is not working properly or is damaged.
- Under no circumstances may the installed safety devices be modified.
User at risk!
DANGER! Risk of electrocution!

Improper handling of electrical devices can result in electric shock. The following instructions absolutely must be complied with:
• Work on electrical systems may only be performed by skilled electricians.
- The device must be connected to a fused electrical network (we recommend passing the connection through a fault current circuit breaker).
- All relevant guidelines on low voltage and/or country-specific or local safety regulations and laws must be observed.
- The connection must be properly earthed and protected from electric shock.
- The voltage must correspond to the data on the device's serial plate.
- Never touch energised parts.
- Before carrying out service work, always switch off the main switch and/or disconnect the device from the power supply system.
- The power cable may only be replaced by qualified service technicians.
CAUTION! User at risk!

Improper handling of the coffee machine can lead to light injuries. The following instructions absolutely must be complied with:
- This device is not intended to be operated by persons (including children) with limited physical, sensory or mental capabilities or a lack of experience and/or knowledge unless they are supervised by a person responsible for their safety or obtain instructions from this person on how to operate the device.
- Supervise children to ensure that they do not play with the device.
- The coffee machine must be installed so that there are no impediments to care and maintenance.
- In both self-service and full-service applications, trained personnel must supervise the machine in order to ensure that the care instructions are observed and the personnel is available for questions regarding use.
- Fill the bean hopper with beans only, the powder container with coffee machine powder only and the manual inlet with ground coffee only (or cleaning tablets during cleaning).
CAUTION! Hot fluid!

There is a risk of scalding in the dispensing area of beverages, hot water and steam. During dispensing or cleaning, never reach under the dispensing positions.
CAUTION! Hot surface!

The dispensing positions and the brewing unit may be hot. Do not touch any part of the dispensing equipment except the grips provided for this purpose. Only clean the brewing unit when the coffee machine has cooled down.
CAUTION! Risk of trapping fingers!

There is a risk of trapping fingers or hands when handling moving components. While the coffee machine is switched on, never reach into the bean or powder containers or into the opening of the brewing unit.
Risk from cleaning products
Application
CAUTION! User at risk!

Danger of poisoning from swallowing cleaning products. The following instructions absolutely must be complied with:
- Store cleaning products away from children and unauthorised persons.
- Do not swallow the cleaning products.
- Never mix cleaning products with other chemicals or acids.
- Never put cleaning products in the milk container.
- Never put cleaning products in the drinking water tank (internal/external).
- Only use the cleaning and decalcification products for their intended purpose (see labels).
- Do not eat or drink while handling cleaning products.
- Ensure that the area is well-ventilated when handling cleaning products.
- Wear safety gloves when handling cleaning products.
- Wash your hands thoroughly after handling cleaning products.

Before using the cleaning products, carefully read the information on the packaging and the "HEALTH & SAFETY DATA SHEET". If not available, the HEALTH & SAFETY DATA SHEET can be obtained from the sales partner (see the cleaning product packaging).
Storage
The following instructions absolutely must be complied with:
- Store them in a place that is inaccessible to children and unauthorised persons.
- Protect cleaning products from heat, light and moisture.
- Store them in a separate location from acids.
- Store them in the original packaging only.
- Store cleaning products for daily and weekly use separately.
- Do not store them together with foodstuffs or other edibles.
Disposal
If recycling is not possible, cleaning products and their containers must be disposed of according to the information on the "HEALTH & SAFETY DATA SHEET", all well as all local rules and regulations.
Emergency information
Obtain the phone number of the emergency information service (toxicology information centre) from the cleaning product manufacturer (see cleaning product label). If your country does not have this type of institution, note the following table:
| Swiss Toxicology Information Centre | |
| International calls: +41 44 251 51 51 | |
| Call from Switzerland 145 | |
| Internet www.toxi.ch | |

See "HEALTH & SAFETY DATA SHEET".
Important for the physician to know:
If possible, show the information on the packaging or the "HEALTH & SAFETY DATA SHEET" to the treating physician.
Risk of damage to the machine
CAUTION! Risk of machine damage!

Improper handling of the coffee machine can lead to damage or contamination. The following instructions absolutely must be complied with:
- For water with a carbonate hardness above 5°dKH, install a calcium filter, as otherwise the coffee machine can be damaged due to calcification.
- For insurance law reasons, always ensure that after closing for the day, the main water valve (coffee machine with mains water supply) is closed and the electrical main switch is switched off or the mains plug is unplugged.
- All relevant guidelines on low voltage and/or country-specific or local safety regulations and laws must be observed.
- Do not operate the device if the water supply is blocked. Otherwise, the boilers will not be refilled and the pump will run dry.
- To prevent water damage in case of hose breakage, Schaerer AG recommend routing the water supply connection via a water stop valve (at the installation site).
• After extended downtime (e.g. holiday), the coffee machine must be cleaned before it is put back into operation. - Protect the coffee machine from weather (frost, humidity etc.).
- Faults may be remedied by a qualified service technician only.
- Only use Schaerer AG original spare parts.
- Report any noticeable damage or leaks immediately to an authorised service partner and have any faulty parts replaced and/or repaired.
- Never spray the device with water or clean it with a steam cleaner.
- When using caramelised coffee (flavoured coffee), clean the brewing unit twice daily.
- Fill the bean hopper with beans only, the powder container with coffee machine powder only and the manual inlet with ground coffee only (or cleaning tablets during cleaning).
- If the coffee machine and/or accessories are transported at temperatures below 10^ , the coffee machine and/or accessories must be stored for three hours at room temperature before the coffee machine and/or accessories are connected to the mains and switched on. Failure to observe this precaution can result in a danger of short-circuit or damage to electrical components.
- Always use the new hose set (drinking water/dirty water hose) provided with the machine. Never use old hose sets.
Hygiene guidelines (HACCP)
Water
CAUTION! User at risk!

Improper handling of water can lead to health problems. The following instructions absolutely must be complied with:
• The water must be uncontaminated.
- Do not connect the machine to pure reverse osmosis water or other aggressive types of water.
- The carbonate hardness must not exceed 4 - 6^ (German carbonate hardness) or 7- 10^ (French carbonate hardness).
- The total hardness must always be higher than the carbonate hardness.
• The minimum carbonate hardness is 4^ dKH or 7^ fKH.
• Maximum chlorine content of 100 mg per litre.
• pH value between 6.5 – 7 (pH neutral).
Machines with drinking water tank (internal & external)
- Fill the drinking water tank daily with fresh water.
- Rinse the drinking water tank thoroughly before filling.
Coffee
CAUTION!
User at risk!

Improper handling of coffee can lead to health problems.
The following instructions absolutely must be complied with:
- Check the packaging for damage before opening.
- Do not add more beans than will be needed for one day.
- Close the bean hopper lid immediately after filling.
- Store coffee in a cool, dry and dark location.
- Store coffee separately from cleaning products.
- Use the oldest products first ("first-in-first-out" principle).
- Use before the expiry date.
- Always reclose packages after opening to ensure that the contents remain fresh and are protected from contamination.
Milk
CAUTION!
User at risk!

Improper handling of milk can lead to health problems.
The following instructions absolutely must be complied with:
- Do not use unpasteurised or raw milk.
• Only use pasteurised milk or milk heated at ultra-high temperatures. - Only use homogenised milk.
- Use pre-cooled milk at a temperature between 3-5°C.
- Use milk directly from the original packaging.
- Never refill milk. Always clean the container thoroughly before filling.
- Check the packaging for damage before opening.
- Do not add more milk than will be needed for one day.
- Close the milk container lid and cooling unit (internal/external) immediately after filling.
- Store milk in a cool, dry (max. 7°C) and dark location.
- Store milk separately from cleaning products.
- Use the oldest products first ("first-in-first-out" principle).
- Use before the expiry date.
- Always reclose packages after opening to ensure that the contents remain fresh and are protected from contamination.
Machine powder
CAUTION!
User at risk!

The improper handling of vending machine powder can lead to health complaints!
The following instructions absolutely must be complied with:
- Check the packaging for damage before opening.
- Do not add more vending machine powder than is required for one day.
- Close the powder container lid immediately after filling.
- Store vending machine powder in a dry, cool and dark place.
- Store vending machine powder separately from cleaning products.
- Use the oldest products first ("first-in-first-out" principle).
- Use before the expiry date.
- Always reclose packages after opening to ensure that the contents remain fresh and are protected from contamination.
Liability
Operator responsibilities
The operator must ensure that the machine undergoes regular maintenance and that the safety devices are checked regularly by a Schaerer AG service partner, a representative thereof, or other authorised persons.
Complaints about material defects must be reported to Schaerer AG in writing within 30 days! For hidden defects, this period is extended to 12 months from the date of installation (work report, handover report), but no longer than 18 months after the product leaves the factory in Zuchwil.
Safety-relevant parts such as safety valves, safety thermostats, boilers etc. must not be repaired in any circumstances. They must always be replaced!
The following intervals apply:
- Safety valves: every 12 months.
- Boilers (steam boilers, flow heaters) every 72 months.
These measures are performed by a Schaerer AG service technician or your service partner as part of the maintenance routine.
Warranty and liability
No responsibility will be taken for warranty or liability claims in the event of personal injury or material damage as a result of one or more of the following causes:
• Non-intended use of the machine.
- Improper installation, commissioning, operation, cleaning and maintenance of the device and the associated optional devices.
- Failure to observe maintenance intervals.
- Operating the unit with defective safety devices or safety and protective equipment that is not properly installed or is not functional.
- Failure to observe the safety notes in the operating instructions pertaining to storage, installation, commissioning, operation and maintenance of the machine.
- Operating the device when it is not in perfect condition.
• Repairs carried out improperly.
- Use of spare parts that are not original Schaerer AG spare parts.
- Use of cleaning products that are not recommended by Schaerer AG.
- Catastrophic incidents due to foreign objects, accident, vandalism or force majeure.
- Penetrating the device with any type of object or opening the housing.
The manufacturer only accepts liability or honours warranty claims provided that all specified maintenance and service intervals have been kept and that only original spare parts supplied by the manufacturer or by a supplier authorised by the manufacturer have been used.

The "General Terms and Conditions" of Schaerer AG apply.