370Z Roadster (2012) - Car NISSAN - Free user manual and instructions
Find the device manual for free 370Z Roadster (2012) NISSAN in PDF.

User questions about 370Z Roadster (2012) NISSAN
0 question about this device. Answer the ones you know or ask your own.
Ask a new question about this device
Download the instructions for your Car in PDF format for free! Find your manual 370Z Roadster (2012) - NISSAN and take your electronic device back in hand. On this page are published all the documents necessary for the use of your device. 370Z Roadster (2012) by NISSAN.
USER MANUAL 370Z Roadster (2012) NISSAN
For your safety, read carefully and keep in this vehicle.
Foreword
WelcometothegrowingfamilyofnewNISSAN owners. This vehicle is delivered to you with confidence. It was produced using the latest techniques and strict quality control.
This manual was prepared to help you understand the operation and maintenance of your vehicles that you may enjoy many miles of driving pleasure. Please read through this manual before operating your vehicle.
AseparateWarrantyInformationBooklet explainsdetailsaboutthewarrantiescoveringyourvehicle.TheNISSANService andMaintenanceGuideexplainsdetails aboutmaintainingandservicingyourvehicle.Additionally,aseparateCustomer Care/LemonLawBooklet(U.S.only)will explainhowtoresolveanyconcernsyou mayhavewithyourvehicle,aswellas clarifyyourrightsundryourstate'slemon law.
Inadditiontofactoryinstalledoptions,your vehiclemayalsobeequippedwithadditional accessoriesinstalledbyNISSANorbyyour NISSANdealerpriortodelivery.Itisimportant thatyoufamiliarizeyourselfwithalldisclosures, warnings,cautionsandinstructionsconcerning properuseofsuchaccessoriespriortooperatingthevehicleand/oraccessory.SeeaNISSAN dealerfordetails concerning theparticular accessories with which your vehicle is equipped.
YourNISSANdealerknowsyourvehiclebest. When you require any service or have any questions, wewillbegladtoassistyouwiththe extensiveresourcesavailabletous.
READFIRST—THENDRIVESAFELY
Beforedrivingyourvehicle,readyourOwner's Manualcarefully.Thiswillensurefamiliaritywith controlsandmaintenancerequirements,assistingyouinthesafeoperationofyourvehicle.

WARNING
IMPORTANT SAFETY INFORMATION REMINDERS FOR SAFETY!
Followtheseimportantdrivingrulesto helpensureasafeandcomfortabletrip foryouandyourpassengers!
- NEVERdriveundertheinfluenceof alcoholordrugs.
- ALWAYSobservepostspeedlimits andneverdrivetoo fastfor conditions.
- ALWAYSgiveyourfullattentionto drivingandavoidusing vehicle featuresortakingotheractionsthat
coulddistractyou.
- ALWAYSuseyourseatbeltsand appropriatechildrestraintsystems.
- ALWAYSprovideinformationabout the properuse ofvehicle safety features toallooccupants ofthe vehicle.
- ALWAYSreviewthisOwner'sManualforimportantsafetyinformation.
MODIFICATION OF YOUR VEHICLE
This vehicle should not be modified. Modification could affect its performance, safetyordurability, and may even violate governmental regulations. In addition, damageor performance problems resulting from modification will not be recovered under the NISSAN warranties.
WHENREADINGTHEMANUAL
Thismanualincludesinformationforall optionsavailableonththismodel.Therefore, youmayfindsomeinformationthatdoes notapplytoyourvehicle.
Allinformation, specifications and illustrations in this manual are those ineffect at the time of
printing.NISSANreservestherighttochange specificationsordesignatanytimewithout notice.
IMPORTANTINFORMATIONABOUT THISMANUAL
Youwillseevarioussymbolsinthismanual.They areusedinthefollowingways:

WARNING
Thisisusedtoindicatethepresenceof ahazardthatcouldcausedeathor seriouspersonalinjury.Toavoidor reducetherisk,theproceduresmust befollowedprecisely.

CAUTION
Thisisusedtoindicatethepresenceof ahazardthatcouldcauseminoror moderatepersonalinjuryordamageto yourvehicle.Toavoidorreducetherisk, theproceduresmustbefollowedcarefully.

natural_image
Abstract geometric shape resembling an 'X' with diagonal lines, no text or symbols presentIf you seethesymbol above, it means "Donot do this" or "Donotletthis happen".


If you see easymbols similartothose above in an illustration, it means the arrowpoint to the front of the vehicle.


Arrowsinanillustrationthataresimilartothose aboveindicatemovementoration.


Arrowsinanillustrationthataresimilartothose abovecallattentiontoanitemintheillustration. CALIFORNIAPROPOSITION65 WARNING

WARNING
EngineExhaust, some of its constituents, and certain vehicle components containoremit chemicals known to the State of Californiatocause cancer and birth defects or other reproductive harm. In addition, certain fluids contained in vehicles and certain products of component wear containoremit chemicals known to the State of Californiatocause cancer and birth defects or other reproductive harm.
CALIFORNIAPERCHLORATEADVI- SORY
Somevehicleparts,suchaslithiumbatteries,maycontainperchloratematerial. The following advisory is provided: "PerchlorateMaterial-specialhandlingmay apply, See www.dtsc.ca.gov/hazardouswaste/perchlorate."
Bluetooth®
Bluetooth ^® isatrademarkowned byBluetoothSIG,Inc.andlicensedtoVisteonCorporation andClarionCo.,Ltd.
gracenote
Gracenote® isaregisteredtrademarkofGracenote,Inc.The Gracenotelogoandlogotype, andthe"PoweredbyGracenote" logoaretrademarksofGracenote.
((×))
XMRadio ^® requiresasubscription,soldseparately.Itisnot availableinAlaska,Hawaiior Guam.Formoreinformation,visit www.xmradio.com.
Both NISSAN and your NISSAN dealer are dedicated to serving all your automotive needs. Your satisfaction with your vehicle and your NISSAN dealer are our primary concerns. Your NISSAN dealer is always available to assist you with all your automobile sales and service needs.
However, if there is something that your NISSAN dealer cannot assist you with or you would like to provide NISSAN directly with comments or questions, please contact the NISSAN Consumer Affairs Department using our toll-free number:
ForU.S.customers
1-800-NISSAN-1
(1-800-647-7261)
ForCanadiancustomers
1-800-387-0122
The Consumer Affairs Department will ask for the following information:
-Yourname,address,andtelephonenumber
- Vehicleidentificationnumber(attached to the top of the instrument panel on the driver's side)
- Dateofpurchase
- Currentodometerreading
-YourNISSANdealer'sname
-Yourcommentsorquestions OR
YoucanwritetoNISSANwiththeinformationon theleftat:
ForU.S.customers
NissanNorthAmerica, Inc.
ConsumerAffairsDepartment
P.O.Box685003
Franklin,TN37068-5003
orviae-mailat:
nnaconsumeraffairs@nissan-usa.com
ForCanadiancustomers
ForCanadiancustomers
NissanCanadaInc.
5290OrbitorDrive
Mississauga,OntarioL4W4Z5
orviae-mailat:
information.centre@nissancanada.
com
If you prefer, visit us at:
www.nissanusa.com(forU.S.customers)or
www.nissan.ca(forCanadiancustomers)
WeappreciateyourinterestinNISSANand
thankyouforbuyingaqualityNISSANvehicle.
Tableof Contents
| Illustratedtableofcontents | 0 |
| Safety—Seats,seatbeltsandsupplemental restraintsystem | 1 |
| Instrumentsandcontrols | 2 |
| Pre-drivingchecksandadjustments | 3 |
| Centerdisplay,heater,airconditioner,audio,phone andvoicerecognitionsystems | 4 |
| Startinganddriving | 5 |
| Incaseofemergency | 6 |
| Appearanceandcare | 7 |
| Maintenanceanddo-it-yourself | 8 |
| Technicalandconsumerinformation | 9 |
| Index | 10 |
0Illustratedtableofcontents
Seats,seatbeltsandSupplementalRestraint
System(SRS)....0-2
Coupemodels....0-2
Roadstermodels....0-3
Exteriorfront....0-4
Exteriorrear....0-5
Coupemodels....0-5
Roadstermodels....0-6
Exterior(NISMOmodels)....0-7
Passengercompartment....0-8
Coupemodels....0-8
Roadstermodels....0-9
Cockpit....0-10
Instrumentpanel....0-11
Metersandgauges....0-12
Enginecompartment....0-13
VQ37VHRenginemodel....0-13
Warningandindicatorlights....0-14
SEATS,SEATBELTSAND SUPPLEMENTALRESTRAINT SYSTEM(SRS)

text_image
1 2 3 4 5 6 7 8 SSI0648- Frontseats(P.1-2)
COUPEMODELS
- Seatbelts(Page1-9)
-Seatbeltswithpretensioners(P.1-39)
2.Headrestraints(P.1-5)
3. Frontseat-mountedside-impactsupplemental airbags(P.1-28)
4. Roof-mounted curtainside-impactsupplemental
airbags(P.1-28)
- Supplementalfront-impactairbags(P.1-28)
- Childrestraintanchorpoint(fortoptetherstrap childrestraint)(P.1-19)
- Occupantclassificationsensor(patternsensor) (P.1-33)
0-2 Illustratedtableofcontents
text_image
1 2 3 4 5 6 7 SSI0649ROADSTERMODELS
- Seatbelts(P.1-9)
—Seatbeltswithpretensioners(P.1-39)
2.Headrestraints(P.1-5) -
Frontseat-mountedside-impactsupplemental airbags(P.1-28)
-
Door-mounted curtains inside-impacts supplemental airbags (P.1-28)
- Supplementalfront-impactairbags(P.1-28)
- Occupantclassificationsensor(patternsensor) (P.1-33)
7.Frontseats(P.1-2)
Illustratedtableofcontents0-3
EXTERIORFRONT
text_image
1 2 3 4 5 6 7 8 9 SSI0594—TirePressureMonitoringSystem(TPMS)
(P.2-12,P.5-3)
9.Doors
-Keys(P.3-2)
—Doorlocks(P.3-4)
—IntelligentKeysystem(P.3-6)
—Remotekeylessentrysystem(P.3-13)
1.Hood(P.3-16)
2.Headlightandturnsignal
—Operation(P.2-31)
—Bulbreplacement(P.8-27)
3.Windshieldwiperandwasher
-Operation(P.2-29)
—Maintenance(P.8-20)
0-4 Illustratedtableofcontents
4.Powerwindows(P.2-44)
- Outsidemirrors(P.3-38)
6.Recoveryhook(P.6-21)
- Licenseplateinstallation(P.9-14)
8.Tires
—Wheelsandtires(P.8-31,P.9-9)
—Flattire(P.6-2)
EXTERIORREAR

text_image
1 2 3 4 5 6 7 8 SSI08118.Fuel-fillerdoor
-Operation(P.3-34)
—Fuelrecommendation(P.9-4)
COUPEMODELS
- High-mounted stoplight(bulbreplacement) (P.8-27)
- Rearwindowdefroster(P.2-31)
3.Satelliteantenna(ifsoequipped)(P.4-31) - Rearviewcamera(ifsoequipped)(P.4-18)
5.Rearhatch
—IntelligentKeysystem(P.3-6)
—Remotekeylessentrysystem(P.3-13)
—Rearhatchopenerswitch(P.3-16)
6.Rearfoglight(ifsoequipped)(P.2-35)
- Rearcombinationlight(bulbreplacement) (P.8-27)
Illustratedtableofcontents0-5

text_image
1 2 3 4 5 6 7 8 9 10 SSI0812ROADSTERMODELS
- Trunklid(P.3-18)
—IntelligentKeysystem(P.3-6)
—Remotekeylessentrysystem(P.3-13)
—Rearhatchreleaseswitch(P.3-16)
—Trunklidreleaseswitch(P.3-18)
- High-mounted stoplight(bulbreplacement) (P.8-28)
3.Antenna(P.4-31) -
Rearwindowdefroster(P.2-31)
5.Softtop(P.3-21)
6.Interiortrunklidrelease(P.3-19) -
Rearviewcamera(ifsoequipped)(P.4-18)
- Rearfoglight(ifsoequipped)(P.2-35)
- Rearcombinationlight(bulbreplacement) (P.8-28)
10.Fuel —Fuel-fillerdoor(P.3-34) —Fuelrecommendation(P.9-4)
0-6Illustratedtableofcontents
EXTERIOR(NISMOmodels)
text_image
1 2 3 4 5 6 SSI0585ForNISMOmodels,thevehiclepartslisted belowrequirespecialcareorcautionfor treating.Refertotheadditionalinformationin eachsection.
- Performancedampers(P.5-30)
- Frontbumperwithanaerodynamicsplitter (P.3-32, P.6-20)
3.Sidesillextensions(P.3-32)
4.Rearspoiler(P.3-17,P.7-3)
5.Exhaustpipes(P.3-32,P.6-20) - Rearbumper with anaerodynamic diffuser (P.3-32, P.6-20)
Illustratedtableofcontents0-7
PASSENGERCOMPARTMENT

text_image
1 2 3 4 5 6 7 8 9 SSI0650COUPEMODELS
1.Cargocover(ifsoequipped)(P.2-43)
2.Secondaryrearhatchrelease(P.3-18)
3.Powerwindows(P.2-44)
—Outsidemirrorremotecontrolswitch (P.3-38)
4.Sunvisors(P.3-36)
5.Maplight(P.2-46)
- Insiderearviewmirror
-Operation(P.3-37)
—HomeLink ^® (ifsoequipped)(P.2-49)
- Rearparcelbox(P.2-42)
0-8Illustratedtableofcontents
- Consolebox
—Poweroutlet(P.2-39)
-USBmemoryoperation(ifsoequipped)
(P.4-59)
- i P 0 playeroperation(ifsoequipped)
(P.4-68)
9.Frontcupholders(P.2-40)

text_image
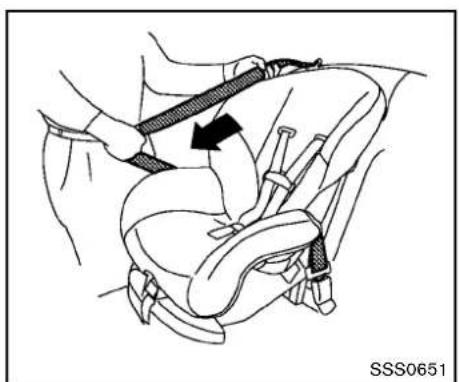
1 2 3 4 5 6 7 SSI0651ROADSTERMODELS
- Powerwindows(P.2-44)
—Outsidemirrorremotecontrolswitch (P.3-38)
2.Sunvisors(P.3-36)
-
Maplight(P.2-46)
-
Insiderearviewmirror
—Operation(P.3-37)
—HomeLink ^® (ifsoequipped)(P.2-49)
5.Rearparcelbox(P.2-42)
—Secondarytrunklidrelease(P.3-20)
- Consolebox
—Poweroutlet(P.2-39)
-USBmemoryoperation(ifsoequipped)
(P.4-59)
- i P 8 playeroperation(ifsoequipped)
(P.4-68)
7.Frontcupholders(P.2-40)
COCKPIT

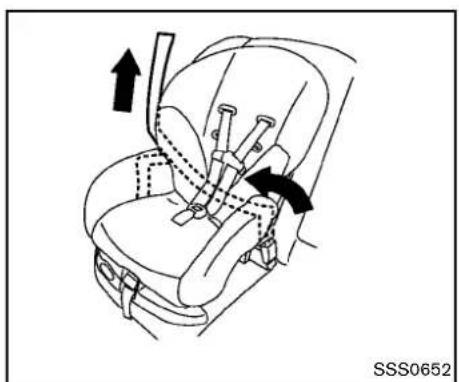
text_image
1 2 3 4 5 6 7 8 9 10 11 12 13 14 SSI0652- VehicleDynamicControl(VDC)OFFswitch (P.5-28)
- Headlight, foglight and turn signals switch (P.2-31)
3.MetersandGauges(combimeter)(P.2-5)
4.Triplemeter(P.2-8)
5.Windshieldwiperandwasherswitch(P.2-29)
6.Hoodreleasehandle(P.3-16)
7.IntelligentKeyport(P.5-10)
8.Paddleshifter(ifsoequipped)(P.5-14)
9.Steering-wheel-mountedcontrols(leftside)
—Menucontrolswitchortuningswitch (P.4-77)
—BACKswitch(P.4-77)
0-10 Illustratedtableofcontents
—Phoneswitch(ifsoequipped)(P.4-81, P.4-91)
—Volumecontrolswitches(P.4-77)
—Sourceselectswitch(P.4-77)
10.Tiltsteeringlever(P.3-36)
11.Steeringwheel
—Horn(P.2-36)
—Driversupplementalairbag(P.1-28)
-
Steering-wheel-mounted controls(rightside) —Cruise control switches(P.5-21)
-
Selectorleverforautomatictransmission (P.5-12)/Shiftleverformanualtransmission (P.5-16)
14.Parkingbrake(P.5-20)
INSTRUMENTPANEL

text_image
1 2 3 4 5 6 7 8 9 8 10 11 12 13 14 SSI0653-
Ventilator(P.4-24)
-
Centerdisplayandmulti-functioncontrolpanel (ifsoequipped)(P.4-3)orInstrumentpocket(if soequipped)(P.2-40)
—Navigationsystem*(ifsoequipped)
—Vehicleinformationandsettingbuttons(ifso equipped)(P.4-7)
—Bluetooth ^® Hands-FreePhoneSystem(ifso equipped)(P.4-81,P.4-91,P.4-103)
3.Frontpassengerairbagstatuslight(P.1-33)
4.Frontpassengersupplementalairbag(P.1-28)
5.Fuseboxcover(P.8-22)
6.Push-buttonignitionswitch(P.5-8)
7.Hazardwarningflasherswitch(P.2-35)
8.Seatheaterswitch(ifsoequipped)(P.2-36)or Climatecontrolledseatswitch(ifsoequipped) (P.2-38)
-
Softtopoperatingswitch(forRoadstermodels) (P.3-21)
-
SynchroRevMatchmode(S-MODE) switch (ifsoequipped)(P.5-17)
11.Heaterandairconditioner(P.4-24) —Rearwindowdefrosterswitch(P.2-31)
12.Audiosystem(P.4-31)
13.Poweroutlet(P.2-39)
14.Glovebox(P.2-41)
*:RefertotheseparateNavigationSystem Owner'sManual.
METERSANDGAUGES

text_image
1 2 3 4 5 6 7 8 9 10 11 SSI0509- ENTER/NEXTswitch(P.2-22)
2.Fuelgauge(P.2-7)
3.Warning/Indicatorlights(P.2-9)
4.Tachometer(P.2-6)
5.Speedometer(P.2-6)
6.Instrumentbrightnesscontrolswitch(P.2-34) - Vehicle information display(P.2-17)
0-12 Illustratedtableofcontents
- Enginecoolanttemperaturegauge(P.2-7)
- Transmission position indicator (ifsoequipped) (P.2-16)
—SynchroRevMatchmode(S-MODE)indicator(ifsoequipped)(P.5-17)
text_image
12 13 14 SSI052110.Odometer/Twintripodometercontrolknob (P.2-6)
11.Odometer/Twintripodometer(P.2-6)
12.Engineoiltemperaturegauge(P.2-8)
13.Voltmeter(P.2-8)
14. Clock(P.2-8, P.2-25)
ENGINECOMPARTMENT
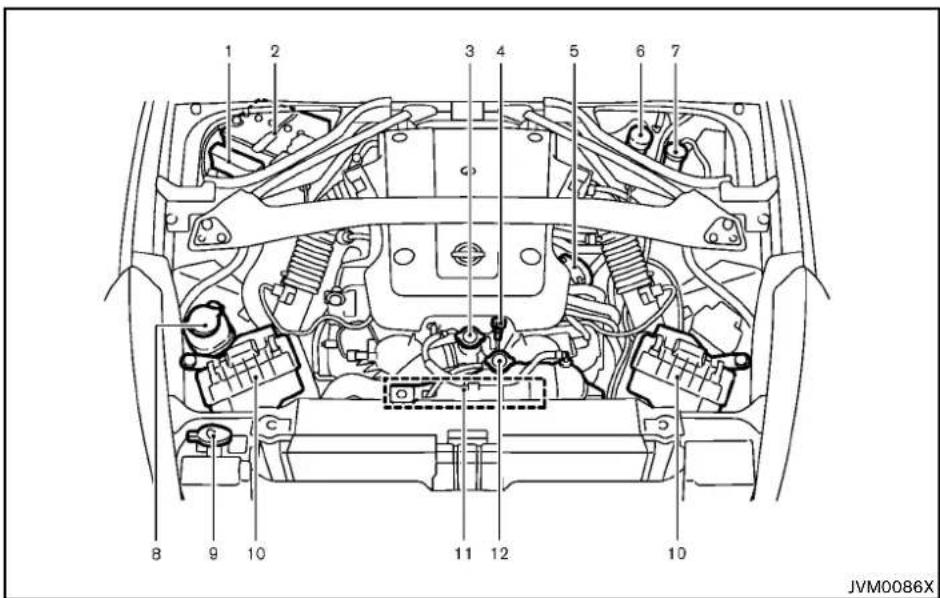
text_image
1 2 3 4 5 6 7 8 9 10 11 12 10 JVM0086X- Enginecoolantreservoir(P.8-9)
VQ37VHRENGINEMODEL
1.Fuse/fusiblelinkholder(P.8-22)
2.Battery(P.8-16)
3.Radiatorfillercap(P.8-9)
4. Engineoildipstick(P.8-11)
5.Engineoilfillercap(P.8-11)
6.Brakefluidreservoir(P.8-14)
- Clutchfluidreservoir(ManualTransmission models)(P.8-14)
8.Powersteeringfluidreservoir(P.8-13) - Windowwasherfluidreservoir(P.8-15)
10.Aircleaner(P.8-19)
11.Drivebeltlocation(P.8-18)
Illustratedtableofcontents0-13
WARNING AND INDICATOR LIGHTS
| Warning light | NamePage | ||
 | Anti-lockBrakingSystem (ABS)warninglight | 2-10 | |
 | |||
 | AutomaticTransmission(AT) checkwarninglight | 2-10 | |
 | Brakewarninglight2-10 | ||
 | |||
 | Chargewarninglight2-11 | ||
 | Engineoilpressurewarning light | 2-11 | |
 | IntelligentKeysystemwarning light | 2-11 | |
 | Lowtirepressurewarninglight2-12 | ||
 | Masterwarninglight2-13 | ||
 | Seatbeltwarninglight2-13 | ||
 | Supplementalairbagwarning light | 2-13 | |
 | VehicleDynamicControl(VDC) warninglight | 2-14 | |
| Indicator light | NamePage | |
| CRUISE | Cruiseindicatorlight2-14 | |
| OFF | Frontpassengerairbagstatus light | 2-14 |
| Highbeamindicatorlight2-14 | ||
| EDGE | Lowbeamindicatorlights2-14 | |
| SERVICE ENGINE SOON | MalfunctionIndicatorLight (MIL) | 2-14 |
| Rearfoglightindicatorlight*2-15 | ||
| Securityindicatorlight | 2-15 | |
| Softtopindicatorlight(Road-stermodels) | 2-15 | |
| SynchroRevMatchmode(S-MODE)indicator* | 2-16 | |
| N/IM | Transmissionpositionindicator light* | 2-16 |
| Turnsignal/hazardindicator lights | 2-16 | |
| VehicleDynamicControl(VDC) offindicatorlight | 2-16 |
*: ifsoequipped
1 Safety—Seats,seatbeltsandsupplemental restraintsystem
Seats....1-2
Frontseats....1-2
Headrestraints....1-5
Seatbelts....1-9
Precautionsonseatbeltusage....1-9
Pregnantwomen....1-11
Injuredpersons....1-11
Three-pointtypeseatbelt....1-11
Seatbeltextenders....1-14
Seatbeltmaintenance....1-14
Childsafety....1-15
Infants....1-15
Smallchildren(forCoupemodels)....1-15
Largerchildren....1-16
ForRoadstermodels....1-17
Childrestraints....1-18
Precautionsonchildrestraints....1-18
Toptetherstrapchildrestraint
(forCoupemodels)....1-19
Forward-facingchildrestraintinstallationusingthe
seatbelts(forCoupemodels)....1-20
Installingtoptetherstrap(forCoupemodels)......1-24
Boosterseats....1-24
Supplementalrestraintsystem....1-28
Precautionsonsupplementalrestraintsystem.....1-28
NISSANAdvancedAirBagSystem
(frontseats)....1-33
Frontseat-mountedside-impactandroof/
door-mountedcurtainside-impactsupplementalair
bagsystems....1-38
Seatbeltswithpretensioners(frontseats)....1-39
Supplementalairbagwarninglabels....1-40
Supplementalairbagwarninglight....1-41
Repairandreplacementprocedure....1-41
SEATS
natural_image
Line drawing of a person sitting in a car, showing seatbelt and dashboard (no text or symbols)
natural_image
Diagram showing car seatbelt and car interior with cross-shaped safety bands (no text or symbols)
WARNING
- Donotrideinamovingvehicle whenteseatbackisreclined.This canbedangerous.Theshoulderbelt willnotbeagainstyourbody.Inan accident,youcouldbethrownintoit andreiveneckorotherserious injuries.Youcouldalsoslideunder thelapbeltandreceiveserious internalinjuries.
- Forthemosteeffectiveprotection whenthevehicleisinmotion,the seatshouldbeupright.Alwayssit
wellbackintheseatwithbothfeet onthefloorandadjusttheseatbelt properly.See"Precautionsonseat beltusage"(P.1-9).
- Afteradjustment, gentlyrockinthe seattomakesureitissecurely locked.
- Donotleavechildrenunattended insidethevehicle.Theycouldunknowinglyactivateswitchesorcontrols.Unattendedchildrencould becomeinvolvedinseriousaccidents.
•Theseatbackshouldnotbereclined anymorethanneededforcomfort. Seatbeltsaremosteffectivewhen thepassengersitswellback and straightupintheseat.Iftheseat-backisreclined,theriskofsliding underthelap belt andbeinginjured isincreased.

CAUTION
- When adjusting these at positions, besurenotto contact anymoving parts to avoid possible injuries and/ordamages.
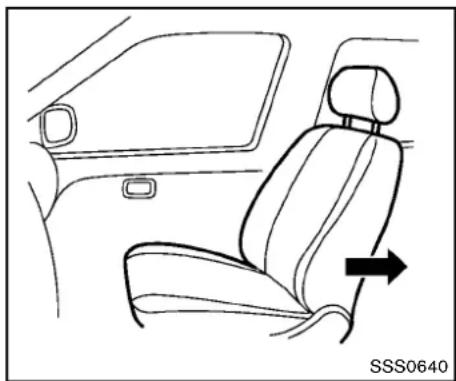
FRONTSEATS
Frontpowerseatadjustment
Operatingtips:
- Thepowerseatmotorhasanauto-reset overloadprotectioncircuit. If themotor stops during operation, wait 30 seconds, then reactivatetheswitch.
- Donotoperatethepowerseatswitchfora longperiodoftimewhentheengineisoff. Thiswilldischargethebattery.
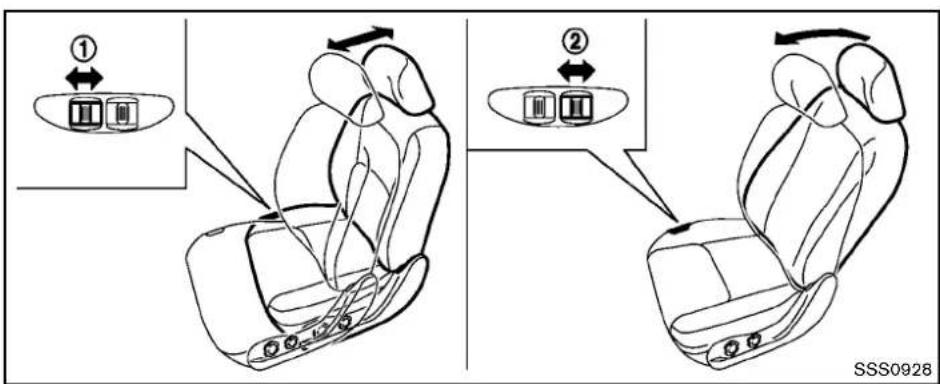
text_image
① ② SSS0928Forwardandbackward:
Movingtheswitch ① forwardorbackwardwill slidetheseatforwardorbackwardtothe desiredposition.
stoppedandthetransmissionisintheP(Park) positionorN(Neutral)positionwiththeparking brakefullyapplied.
Reclining:
Movethereclineswitch ② backwarduntilthe desiredangleisobtained.Tobringtheseatback forwardagain,movetheswitch ② forward.
Therecliningfeatureallowsadjustmentofthe seatbackforoccupantsofdifferen sizesfor addedcomfortandtohelpobtainproperseat beltfit.(See"Precautionsonseatbeltusage" (P.1-9).)Theseatbackmayalsobereclinedto allowoccupantstorestwhenthevehicleis
Safety—Seats,seatbeltsandsupplementalrestraintsystem1-3

text_image
Diagram showing two car seatbelt seat configurations with directional arrows indicating movement or force, labeled ① and ②.Frontmanualseatadjustment
Forwardandbackward:
Pulltheleverup ① whileyouslidetheseat forwardorbackwardtothedesiredposition. Releasethelevertolocktheseatinposition.
(P.1-9). Theseatbackmayalsobereclined to allow occupant storestwhenthevehicleis stopped and the transmission is in the P(Park) position or N(Neutral) position with the parking brakefully applied.
Reclining:
Toreclinetheseatback,pulltheleverup ② and leanback.Tobringtheseatbackforwardagain, pulltheleverandmoveyourbodyforward.The seatbackwillmoveforward.
Therecliningfeatureallowsadjustmentofthe seatbackforoccupantsofdifferentsizesfor addedcomfortandtohelpobtainproperseat beltfit.See"Precautionsonseatbeltusage"
1-4 Safety—Seats, seat belts and supplemental restraintsystem
natural_image
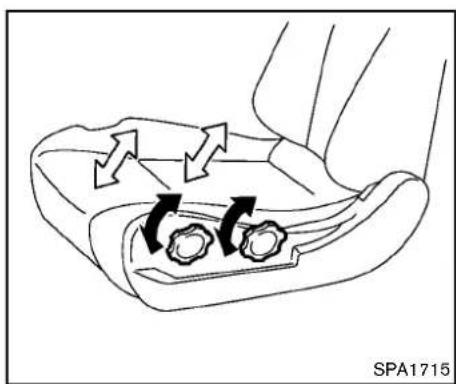
Diagram of a car seatbelt mechanism with directional arrows indicating movement (no text or symbols)Seatlifter(ifsoequipped)
Turneitherdialtoadjusttheangleandheightof theseatcushiontothedesiredposition.
text_image
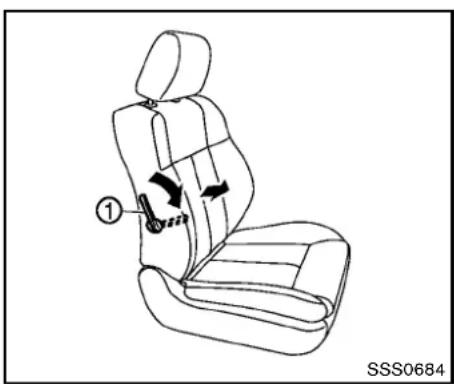
① SSS0684Lumbarsupport(ifsoequipped)
Thelumbarsupportfeatureprovideslowerback supporttothedriver.
Movethelever ① upordowntoadjustthe seatbacklumbararea.
HEADRESTRAINTS

WARNING
Headrestraintssupplementtheother vehiclesafetysystems.Theymayprovideadditionalprotectionagainstinjury incertainrearendcollisions.Adjustthe headrestraintsproperly,asspecified in thissection.Checktheadjustmentafter someoneelseusestheseat.Donot attachanythingtotheheadrestraint stalksorremovetheheadrestraint.Do notusetheseatiftheheadrestraint hasbeenremoved.Iftheheadrestraint wasremoved,reinstallandproperly adjusttheheadrestraintbeforean occupantusestheseatingposition. Failuretofollowtheseinstructions canreducetheeffectivenessofthe headrestraints.Thismayincreasethe riskofseriousinjuryordeathina collision.
natural_image
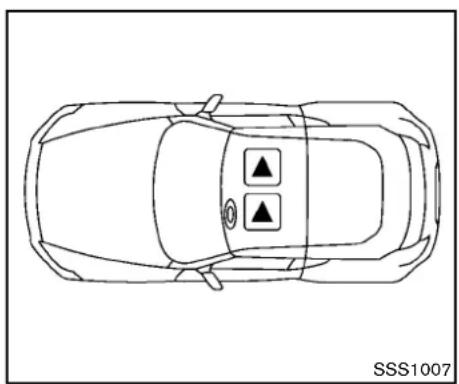
Top-down line drawing of a car with two circular indicators on the roof (no text or symbols)The illustrations show these seating positions equipped with headrestraints. The headrestraints are adjustable.
▲ Indicate theseating position is equipped with a head restraint.

text_image
1 2 3 4 SSS0992Components
1.Headrestraint
2. Adjustment notches
3.Lockknob
4.Stalks
natural_image
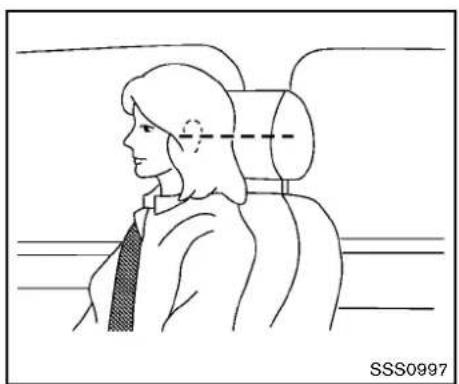
Side profile illustration of a person seated in a car seat, viewed from the side (no text or symbols)Adjustment
Adjusttheheadrestraintsothecenterislevel withthecenterofyourears.
natural_image
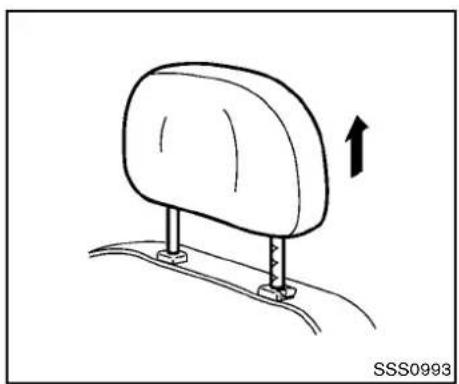
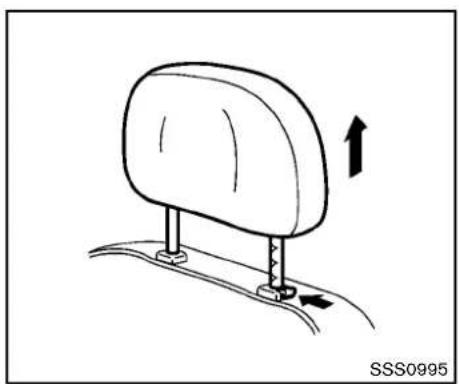
Diagram of a car seat with an arrow indicating upward motion, no text or symbols presentToraisetheheadrestraint, pullitup.
1-6 Safety—Seats, seatbeltsandsupplementalrestraintsystem
natural_image
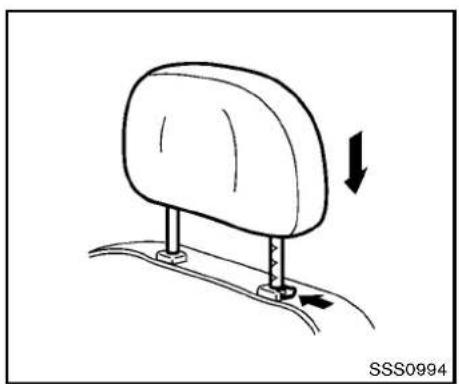
Diagram of a car seatbelt mechanism with directional arrows indicating movement (no text or symbols)Tolower, pushandholdthelockknobandpush theheadrestraintdown.
natural_image
Diagram of a car seatbelt mechanism with directional arrows indicating movement (no text or symbols)Removal
Use the following procedure to remove the adjustable head restraints.
- Pulltheheadrestraintuptothehighest position.
- Pushandholdthelockknob.
- Removetheheadrestraintfromtheseat.
- Storetheheadrestraintproperlyinasecure placesotisnotlooseinthevehicle.
- Installandproperlyadjusttheheadrestraint beforeanoccupantusetheseatingposition.

CAUTION
Modelswithclimatecontrolledseats aredesignedsothattheheadrestraint cannotberemoved.Theheadrestraint maybedamagediftheheadrestraintis forciblypulledout.

text_image
① ② SSS0996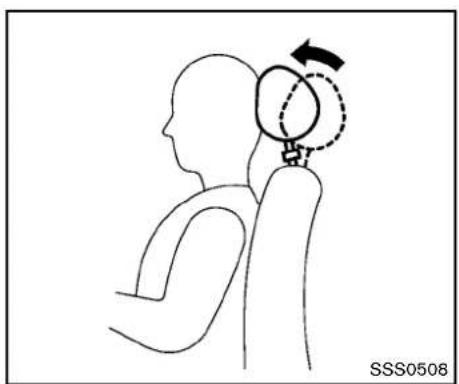
natural_image
Line drawing of a human head in profile with a globe and directional arrow indicating rotation (no text or symbols)Install
- Aligntheheadrestraintstalkswiththeholes intheseat.Makesurethattheheadrestraint isfacingthecorrectdirection.Thestalkwith theadjustmentnotches ① mustbeinstalledintheholewiththelockknob ②
- Pushandholdthelockknobandpushthe headrestraintdown.
- Properly adjust the head restraint before an occupant use these seating position.
The Active Head Restraint moves forward utilizing the force that these seat back receives from the occupant in a rear-end collision. The movement of the head restrain help support the occupant's head by reducing its backward movement and helping absorb some of the force that may lead to whiplash-type injuries.
ActiveHeadRestraintsareeffectiveforcollisionsatlowtomediumspeedsinwhichitissaid thatwhiplashinjuryoccursmost.
ActiveHeadRestraintsoperateonlyincertain rear-endcollisions.Afterthecollision,thehead restraintsreturntotheiroriginalposition.
AdjusttheActiveHeadRestraintsproperly as describedearlierinthissection.
1-8 Safety—Seats, seatbeltsandsupplementalrestraintsystem
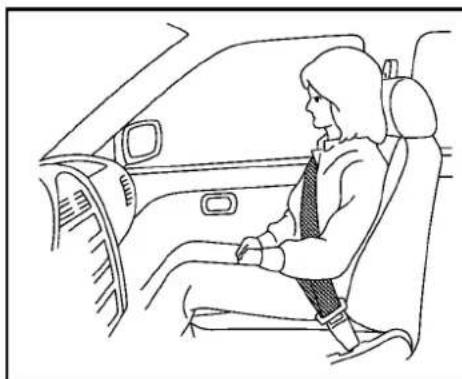
SEATBELTS
PRECAUTIONSONSEATBELT USAGE
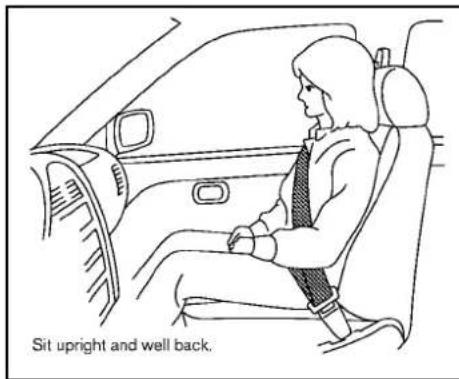
If you are wearing your seat belt properly adjusted, and you are sitting upright and well back your seat with both feet on the floor, your chances of being injured or killed in an accident and or these severity of injury may be greatly reduced. NISSAN strongly encourages you and alfo your passenger to buckle up every time you drive, even if your seating position includes a supplemental airbag.
MostU.S.statesandCanadianprovinces orterritoriesspecifythatseatbeltsbe wornatalltimeswhenvehicleisbeing driven.
natural_image
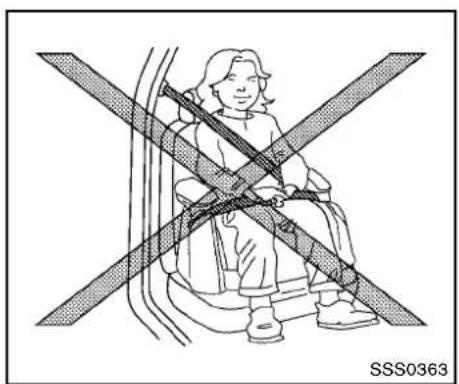
Line drawing of a person seated in a car, wearing a tie and seatbelt (no text or symbols)
natural_image
Diagram of a person sitting in a car with a cross-shaped object on the seat, showing no text or symbols.Safety—Seats, seatbeltsandsupplementalrestraintsystem 1-9
natural_image
Diagram of car seatbelt and passenger seatbelt crossed in a cross-section (no text or symbols)
natural_image
Line drawing of a person sitting in a car with a cross-shaped seatbelt (no text or symbols)
WARNING
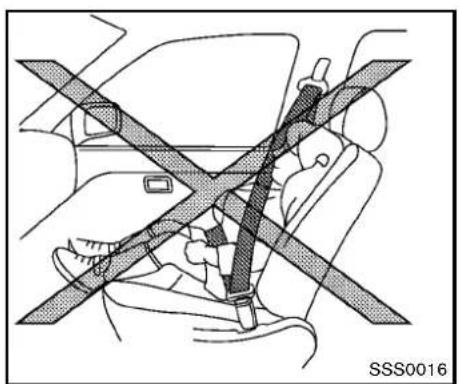
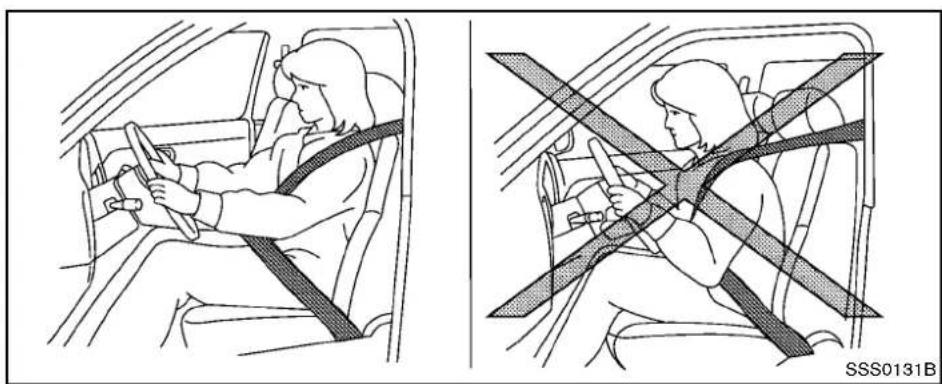
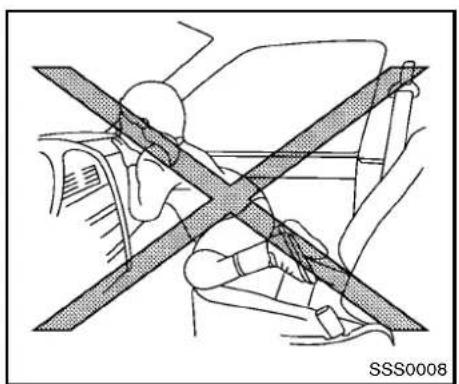
- Everypersonwhodrivesorridesin thisvehicleshoulduseaseatbeltat alltimes.
•Theseatbeltshouldbeproperly adjustedtoasnugfit.Failureretodo somayreducetheeffectiveness of theentirerestraintsystemandin- creasethechanceorseverity of injuryinanaccident.Seriousinjury ordeathcanoccuriftheseatbeltis notwornproperly.
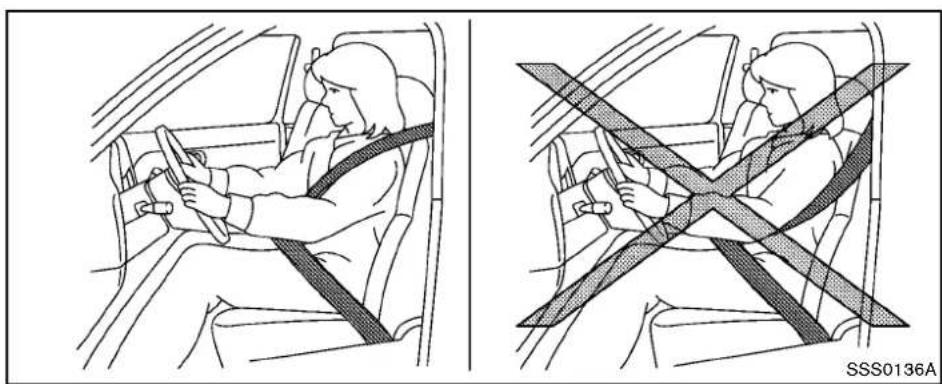
●Alwaysroutetheshoulderbeltover yourshoulder and across your chest. Neverputthebeltbehind yourback, under your armor across yourneck. The belt should be away from your face and neck, but not falling off your shoulder. - Positionthelapbeltaslowand snugaspossibleAROUNDTHE HIPS,NOTTHEWAIST.Alapbelt worntoohighcouldincreasethe riskofinternalinjuriesinanaccident.
- Besuretheseatbelttongueis securelyfastenedtotheproper
buckle.
- Donotweartheseatbeltinsideout ortwisted.Doingsomayreduceits effectiveness.
- Donotallowmorethanoneperson tousethesameseatbelt.
●Nevercarrymorepeopleinthe vehiclethanthereareseatbelts. - If theseatbeltwarninglightglows continuouslywhiletheignitionis turnedONwithalldoorsclosedand allseatbeltsfastened,itmayindicateamalfunctioninthesystem. Havethesystem checked by a NISSANdealer.
- Nochangesshouldbemadetothe seatbeltsystem. Forexample, do notmodifytheseatbelt, addmaterialorinstalldevicesthatmay changetheseatbeltroutingortension.Doingsomayaffectthe operationoftheseatbeltsystem. Modifyingortamperingwiththe seatbeltsystemmayresultin seriouspersonalinjury.
•Onceaseatbeltpretensionerhas activated, it cannot be used and must bereplaced together with the
retractor.SeeaNISSANdealer.
-Removalandinstallationofthe pretensionersystemcomponents shouldbedonebyaNISSANdealer.
- Allseatbeltassemblies, including retractors and attaching hardware, should be inspected after an oscillation by a NISSAN dealer. NISSAN recommend that all seat belt assemblies in used during a collision be replaced unless the collision was minor and the belt shown on damage and continued to operate properly.
Seatbeltassembliesnotinuse duringacollisionsshouldalsobe inspected andreplacedifeither damageorimproperoperationis noted.
- Allchildrestraintsandattaching hardwareshouldbeinspectedafter anycollision.Alwaysfollowthe restraintmanufacturer'sinspection instructionsandreplacementrecommendations.Thechildrestraints shouldbereplacediftheyare damaged.
PREGNANTWOMEN
NISSANrecommendsthatpregnantwomenuse seatbelts. Theseatbeltshouldbewornsnug, andalwayspositionthelapbeltaslowas possiblearoundthehips, notthewaist, and placetheshoulderbeltoveryourshoulderand acrossyourchest. Neverunthelap/shoulder beltoveryourabdominalarea. Contactyour doctorforspecificrecommendations.
INJUREDPERSONS
NISSANrecommendsthatinjuredpersonsuse seatbelts,dependingontheinjury.Checkwith yourdoctorforspecificrecommendations. THREE-POINTTYPESEATBELT

WARNING
- Everypersonwhodrivesorridesin thisvehicleshoulduseaseatbeltat alltimes.
- Donotrideinamovingvehicle whentheseatbackisreclined.This canbedangerous.Theshoulderbelt willnotbeagainstyourbody.Inan accident,youcouldbethrownintoit andreceiveneckorotherserious injuries.Youcouldalsoslideunder thelapbeltandreceiveserious
internalinjuries.
- Forthemosteeffectiveprotection whenthevehicleisinmotion,the seatshouldbeupright.Alwayssit wellbackintheseatwithbothfeet onthefloorandadjusttheseatbelt properly.
- Donotallowchildrentoplaywith theseatbelts.MostseatingpositionsareequippedwithAutomatic LockingRetractor(ALR)modeseat belts.Iftheseatbeltbecomes wrappedarounddachild'sneckwith theALRmodeactivated,thechild canbeseriouslyinjuredorkilledif theseatbeltretractsandbecomes tight.Thiscanoccurevenifthe vehicleisparked.Unbuckletheseat belttoreleasethechild.Iftheseat beltcannotbeunbuckledoris alreadyunbuckled,releasethechild bycuttingtheseatbeltwith a suitabletool(suchasaknifeor scissors)toreleasetheseatbelt.
natural_image
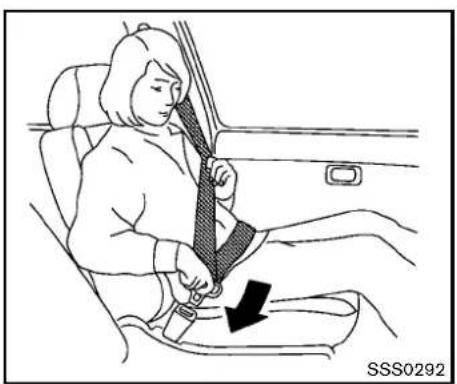
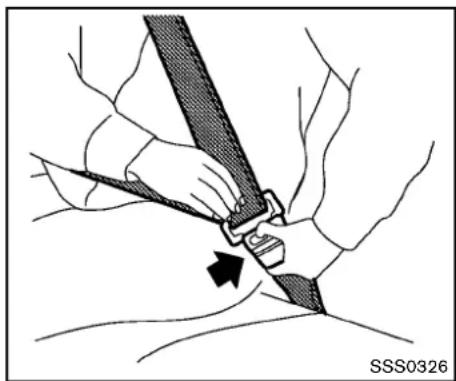
Illustration of a person sitting in a car seatbelt, showing the seatbelt being adjusted for a black arrow (no text or symbols present)Fasteningtheseatbelts
- Adjusttheseat.(See "Seats" (P.1-2).)
-
Slowlypulltheseatbeltoutoftheretractor andinsertthetongueintothebuckleuntil youhearandfeelthelatchengage.
-
Theretractorisdesignedtolock duringasuddenstoporonimpact. Aslowpullingmotionpermitsthe belttomove,andallowsyousome freedomofmovementintheseat.
- If these seat belt cannot be pulled from its fully retracted position, firmly pull the belt and release it. Then smoothly pull the belt out of the retractor.
1-12 Safety—Seats, seatbeltsandsupplementalrestraintsystem
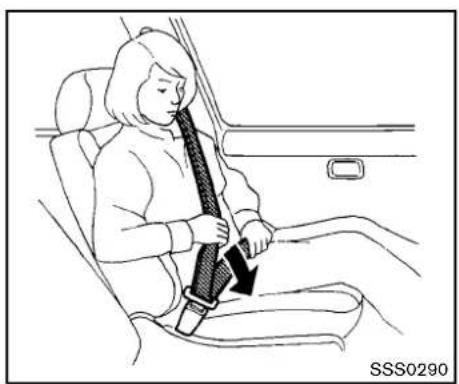
natural_image
Line drawing of a person sitting in a car seatbelt, showing the seatbelt being lifted (no text or symbols present)- Positionthelapbeltportionlowandsnug onthehipsasshown.
- Pull the shoulder belt portion toward the retractortotakeup extraslack. Besure the shoulder belt is routed to over your shoulder and across your chest.
Thethree-pointtypeseatbeltshavetwomodes ofoperation:
• EmergencyLockingRetractor(ELR)
• AutomaticLockingRetractor(ALR)
TheEmergencyLockingRetractor(ELR)mode allowstheseatbelttoextendandretractto allowthedriverandpassengerssomefreedom ofmovementintheseat.TheELRlockstheseat
beltwhenthevehicleslowsdownrapidlyor duringimpacts.
TheAutomaticLockingRetractor(ALR)mode (childrestraintmode)lockstheseatbeltfor childrestraintinstallation.
Pulltheseatbeltoutuntilisfullyextendedto activatetheALRmode.Detachtheseatbelt tonguefromthebuckleandretracttheseatbelt completelytocanceltheALRmodeandrevert backtotheELRmode.
When the ALRmode is activated these at belt cannot be extended again until these at belt tongue is detached from the buckle and fully retracted. For additional information, see "Child restraints" (P.1-18).
The ALR modes should be used only for child restraint installation. During normal seat belt use by an occupant, the ALR modes should not be activated. If it is activated in may cause uncomfortable seat beltension.

WARNING
When fastening the seat belts, be certain that seat backs are completely secured in the latched position. If they are not completely secured, passengers
maybeinjuredinanaccidentorsudden stop.
natural_image
Medical illustration showing a hand securing a seatbelt with a black arrow indicating the point of attack (no text or symbols present)restrictfurtherbeltmovement. Iftheretractordoesnotlockduringthischeckor ifyouhaveanyquestionaboutseatbelt operation,seeaNISSANdealer.
Unfasteningtheseatbelts
Tounfastentheseatbelt, pushthebuttononthe buckle. Theseatbeltautomaticallyretracts.
Checkingseatbeltoperation
Seatbeltretractorsaredesignedtolockseat beltmovementbytwoseparatemethods:
- Whenthebeltispulledquicklyfromthe retractor.
- Whenthevehicleslowsdownrapidly.
To increase your confidence in these seat belts, check the operation as follows: - Grasptheshoulderbeltandpullforward quickly. Theretractorshouldlockand

natural_image
Mechanical diagram showing a belt buckle assembly with a directional arrow (no text or symbols)Shoulderbeltarm(forCoupemodels)
Beforefasteningtheseatbelt, pulltheshoulder beltarmforwarduntilclicksatthedetent position.
Pullingthearmforwardwillallowaneasyaccess tothebelt.
SEATBELTEXTENDERS
If, because of body size or driving position, it is not possible to properly fit the lap-shoulder belt and fastenit, an extender that is compatible with the installed seat belts is available that can be purchased. The extender adds approximately 8 in (200mm) of length and maybe used for either the driver or front passenger seating position.
SeeaNISSANdealerforassistancewith purchasinganextenderifanextenderis required.

WARNING
- OnlyNISSANseatbeltextenders, madebythesamecompanywhich madetheoriginalequipmentseat belts,shouldbeusedwiththe NISSANseatbelts.
- Adultsandchildrenwhocanusethe standardseatbeltshouldnotusean extender.Suchunnecessaryuse couldresultinseriouspersonal injuryintheeventofanaccident.
- Neveruseseatbeltextendersto installchildrestraints.Ifthechild restraintisnotsecuredproperly,the childcouldbeseriouslyinjuredina collisionorasuddenstop.
SEATBELTMAINTENANCE
- Tocleantheseatbeltwebbings,applya mildsoapsolutionoranysolution recommendedforcleaningupholsteryorcarpets. Then,wipewithaclothandallowtheseat beltstodryintheshade.Donotallowthe seatbeltstoretractuntiltheyarecompletely
dry.
- lfdirtbuildsupintheshoulderbelt guideoftheseatbeltanchors,theseat beltsmayretractslowly.Wipetheshoulder beltguidewithaclean,drycloth.
- Periodicallychecktoseethattheseat beltandthemetalcomponentssuchas buckles,tongues, retractors,flexiblewires andanchors workproperly.Ifloose parts, deterioration,cutsorotherdamageonthe webbingisfound,theentireseatbelt assemblyshouldbereplaced.
CHILDSAFETY

WARNING
Donotallowchildrentoplaywiththe seatbelts.Mostseatingpositionsare equippedwithAutomaticLockingRetractor(ALR)modeseatbelts.Ifthe seatbeltbecomeswrappedarounda child'sneckwiththeALRmodeactivated,thechildcanbeseriouslyinjured orkillediftheseatbeltretractsand becomestight.Thiscanoccurevenif thevehicleisparked.Unbuckletheseat beltoreleasethechild.Iftheseatbelt cannotbeunbuckledorisalready unbuckled,releasethechildbycutting theseatbeltwithasuitabletool(such asaknifeorscissors)toreleasethe seatbelt.
Childrenneedadultstohelpprotectthem. Theyneedtobeproperlyrestrained.
Inadditiontothegeneralinformationinthis manual, childsafetyinformationisavailablefrom manyothersources, includingdoctors, teachers, governmenttrafficsafetyoffices, andcommunity organizations. Everychilddisdifferent, sobesure tolearnthebestwaytotransportyourchild.
Therearethreebasictypesofchildrestraint
systems:
●Rear-facingchildrestraint
●Front-facingchildrestraint
- Boosterseat
The proper restraint depends on the child's size. Generally, infants (upto about 1 year and less than 20 lb (9 kg)) should be placed in rear-facing child restraints. Front-facing child restraints are available for children who outgrow rear-facing child restraints and are at least 1 year old. Booster seats are used to help position vehicle lap/shoulder beltonachild whocanno longer use a front-facing child restraint.

WARNING
Infantsandchildrenneedspecialpro-tection.Thevehicle'sseatbeltsmaynot fithemproperly.Theshoulderbeltmay cometooclosetothefaceorneck.The lapbeltmaynotfitovertheirsmallhip bones.Inanaccident,animproperly fittingseatbeltcouldcauseseriousor fatalinjury.Alwaysuseappropriate childrestraints.
AllU.S. states and Canadian provinces or territories require the use of approved child restraints for infants and small children. (See
"Childrestraints"(P.1-18).)
Also, there are other types of child restraints available for larger children for additional protection.
INFANTS
Infantsuptoatleast1yearoldshouldbeplaced inarear-facingchildrestraint.NISSANrecommendsthatinfantsbeplacedinchildrestraints thatcomplywithFederalMotorVehicleSafety StandardsorCanadianMotorVehicleSafety Standards.Youshouldchooseachildrestraint thatfitsyourvehicleandalwaysfollowthe manufacturer'sinstructionsforinstallationand use.
SMALLCHILDREN(forCoupemodels)
Childrenthatareover1yearoldandweighat least20lb(9kg)shouldremaininear-facing childrestraintsalongaspossibleuptothe heightorweightlimitofthechildrestraint. Forward-facingchildrestraintsareavailablefor childrenwhooutgrowrear-facingchildrestraints andareatleast1yearold. Refertothe manufacturer'sinstructionsforminimumand maximumweightandheightrecommendations. NISSANrecommendsthatsmallchildrenbe placedinchildrestraintthatcomplywith FederalMotorVehicleSafetyStandardsor CanadianMotorVehicleSafetyStandards.You shouldchooseachildrestrainthatfitsyour
vehicleandalwaysfollowthemanufacturer's instructionsforinstallationanduse.
LARGERCHILDREN
Childrenwhoaretoolargeforchildrestraints shouldbeseatedandrestrainedbytheseat beltswhichareprovided.Theseatbeltmaynot fitproperlyifthechildislessthan4ft9in(142.5 cm)tallandweighsbetween40lb(18kg)and 80lb(36kg).Aboosterseatshouldbeusedto obtainproperseatbeltfit.
NISSANrecommendsthatachildbeplacedina commerciallyavailableboosterseatifthe shoulderbeltinthechild'sseatingpositionfits closetothefaceorneckorifthelapportionof theseatbeltgoesacrosstheabdomen.The boosterseatshouldraisethechildsothatthe shoulderbeltisproperlypositionedacrossthe top,middleportionoftheshoulderandthelap beltislowonthehips.Aboosterseatcanonly beusedinseatingpositionsthathaveathree-pointtypeseatbelt.Theboosterseatshouldfit thevehicleseatandhavealabelcertifyingthatit complieswithFederalMotorVehicleSafety StandardsorCanadianMotorVehicleSafety Standards.Oncethechildhasgrownsothe shoulderbeltisnolongeronorneartheface andneck,usetheshoulderbeltwithoutthe boosterseat.

WARNING
Neverletachildstandorkneelonany seatanddonotallowachildinthe cargoareaswhilethevehicleismoving. Thechildcouldbeseriouslyinjuredor killedinanaccidentorsuddenstop.
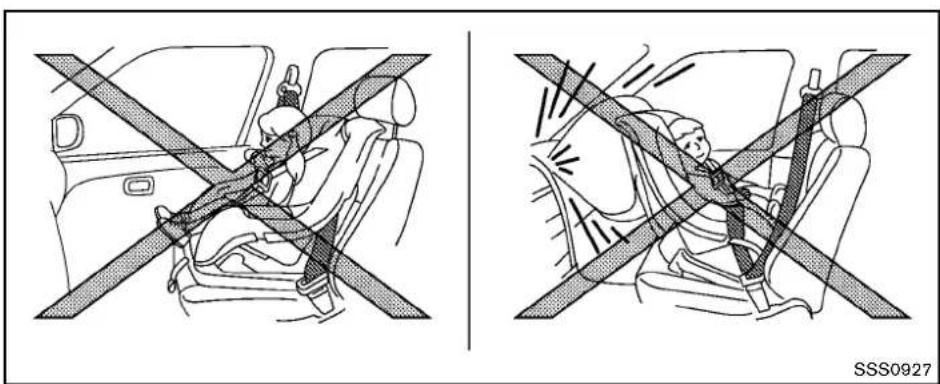
SSS0927
FORROADSTERMODELS

WARNING
- Donotletinfantsandsmallchildren rideinRoadstermodels.
•Roadstermodelsarenotdesigned toaccommodateRear-facingchild restraintsorFront-facingchildrestraints. - If you let infants small children ride in Roadster models, they may be killed or seriously injured a crash.
There are three basic types of child restraint systems:
- Rear-facingchildrestraint(shouldnotbe installedinRoadstermodels)
- Front-facingchildrestraint(shouldnotbe installedinRoadstermodels)
- Boosterseat(onlychildrenlargeenoughfor boosterseatscanrideinRoadstermodels)

WARNING
- Neverletaninfantorasmallchild whorequirestheuseofarearor front-facingchildrestraintridein
thisvehicle.Donotattempttohold achildinyourlaporarms.
- Roadstermodelsdonothavean anchorforatoptetherstraprequiredformostchildrestraints. Neverletchildrenwhorequirethe useofrearorfront-facingchild restraintsrideinthisvehicle.
•Largerchildrenneedspecialprotection.Thevehicle'sseatbeltsmay notfitthemproperly.Theshoulder beltmaycometooclosetotheface orneck.Thelapbeltmaynotfitover theirsmallhipbones.Inanaccident,animproperlyfittingseatbelt couldcauseseriousorfatalinjury. Alwaysuseappropriatechildrestraints.
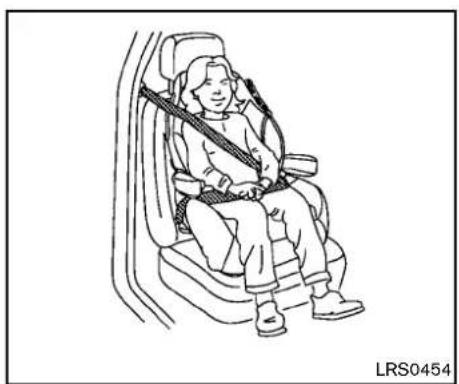
CHILDRESTRAINTS

natural_image
Diagram showing a family wearing a car seatbelt with crossed safety stripes (no text or symbols)
natural_image
Diagram of a person seated in a car with a seatbelt, showing no text or symbols on the diagram itself.PRECAUTIONSONCHILDRESTRAINTS

WARNING
- Failuretofollowthewarningsand instructionsforproperuseandin-stallationofchildrestraintscould resultinseriousinjuryordeathofachildorotherpassengersinasuddenstoporcollision:
—Thechildrestraintmustbeused andinstalledproperly.Always followallofthechildrestraint manufacturer'sinstructionsfor installationanduse.
—Infants and children should never beheldon anyone's lap. Even the strongest adult cannot resist the forces of a collision.
—Donotputaseatbeltaround bothachildandanotherpassenger.
—NISSANrecommendsthatall childrestraintsbeinstalledin therearseat.Studieshowthat childrenaresaferwhenproperly restrainedintherearseatthan
inthefrontseat.Ifyoumust installa forward-facing child restraintinthefrontseat,see "Forward-facingchildrestraint installationusingtheseatbelts (forCoupemodels)"(P.1-20).
—EvenwiththeNISSANAdvanced AirBagSystem,neverinstalla rear-facingchildrestraintinthe frontseat.Aninflatingairbag couldseriouslyinjureorkilla child.
—Besuretopurchaseachild restraintthatwillfitthechild andvehicle.Some child restraintsmaynotfitproperly in yourvehicle.
—Childrestraintanchorpointsare designed to withstandloads from childrestraintsthatare properlyfitted.
—Neverusetheanchorpointsfor adultseatbeltsorharnesses.
—Achild restraintwith atop tether strapshouldnotbeusedinthe frontpassengerseat.
—Keepseatbacksasuprightas possibleafterfittingthechild restraint.
—Infantsandchildrenshouldalwaysbeplacedinanappropriatechildrestraintwhileinthe vehicle.

CAUTION
Achildrestraintinaclosedvehiclecan becomeveryhot.Checktheseating surfaceandbucklesbeforeplacinga childinthechildrestraint.
Ingeneral, childrestraintsaredesignedtobe installedwiththelapportionofalap/shoulder seatbelt.
Several manufacturers offer childrestraints for children of various sizes. Whenselecting any childrestraint, keep the following points in mind:
- Chooseonlya restraintwithalabelcertifying thatitcomplieswithFederalMotorVehicle SafetyStandard213orCanadianMotor VehicleSafetyStandard213.
- Checkthechildrestraintinyourvehicleto besureitiscompatiblewiththevehicle's
seatandseatbeltsystem.
- If the child restraint is compatible with your vehicle, place your child in the child restraint and check the various adjustment stobe sure the child restraint is compatible with your child. Choose a child restraint that is designed for your child's height and weight. Always follow all recommended procedures.
Thepassengerseatisnotsuitableforusewitha rear-facingchildrestraintforinfants.Therefore, infantsshouldnotbetransportedinthisvehicle.
AllU.S. states and Canadian provinces or territories require that infants and small children berestrained in an approved child restraint at all times while the vehicle is being operated. Canadian law requires the toptether strapon front-facing child restraint stobesecured to the designated anchor point on the vehicle.
TOPTETHERSTRAPCHILDRESTRAINT(forCoupemodels)
If the manufacturer of your child restraint require the use of a toptether strap, it must be secured to an anchor point.

WARNING
- Ifthecargocover(ifsoequipped) contactsthetoptetherstrapwhenit isattachedtothetoptetheranchor, removethecargocoverfromthe vehicleorsecureitonthecargo floorbelowitsattachmentlocation. Ifthecargocoverisnotremoved, it maydamagethetoptetherstrap duringacollision.Achildcouldbe seriouslyinjuredorkilledinacollisionifthechildrestraintptother strapisdamaged.
- Donotallowcargotocontactthe toptetherstrapwhenitisattached tothetoptetheranchor.Properly securethecargosoitdoesnot contactthetoptetherstrap.Cargo thatisnotproperlysecuredorthat contactsthetoptetherstrapmay damagethetoptetherstrapduring acollision.Yourchildcouldbe
seriouslyinjuredorkilledinacoll- sionifthechildrestrainttoptether strapisdamaged.

text_image
SSS0929Toptetheranchorpointlocation Theanchorpointislocatedonthefloorofthe cargoarea.

natural_image
Diagram of a person wearing a seatbelt inside a vehicle, with no visible text or symbolsFORWARD-FACINGCHILDRESTRAINTINSTALLATIONUSINGTHE SEATBELTS(forCoupemodels)

WARNING
Thethree-pointseatbeltwithAutomaticLockingRetractor(ALR)mustbe usedwheninstallingachildrestraint. FailuretousetheALRmodewillresult inthechildrestraintnotbeingproperly secured. Therestraintcouldtipoveror belooseandcauseinjurytoachildina suddenstoporcollision. Also, itcan changetheoperationofthefront
1-20 Safety—Seats, seat belts and supplemental restraintsystem
passengerairbag.See“Frontpassengerairbagandstatuslight”(P.1-35).

natural_image
Line drawing of a car interior showing seat, rearview, and side door (no text or symbols)Front-facing(frontpassengerseat)—step1
RefertoallWarningsandCautionsinthe"Child safety"and"Childrestraints"sectionsbefore installingachildrestraint.
Followthesestepstoinstallafront-facingchild restraintusingthevehicleseatbeltinthefront passengerseat:
-
If you must install a child restraint in the front seat, it should be placed in front-facing direction only. Move the seat to there are most position. Child restraints for infants must be used in therear-facing direction and therefore must not be used in this vehicle.
-
Position the child restraint on these seat.
Always follow the child restraint manufacturer's instructions.
Thebackofthechildrestraintshouldbe securedagainsttheseatback.
Ifnecessary, adjustorremovethehead restraint to obtain the correct child restraint fit. If the head restraint is removed, store it in a secure place. Besuretore install the head restraint when the child restraint is removed. See "Head restraints" (P.1-5) for head restraint adjustment, removal and installation information.
If these seating position does not have an adjustable head restraint and it is interfering with the proper child restraint fit, try another seating position or different child restraint.
natural_image
Diagram of a car seatbelt buckle being adjusted, showing hand positioning and motion arrows (no text or symbols)Front-facing—step3
3. Routetheseatbelttonguethroughthechild restraintandinsertitintothebuckleuntilyou hearandfeelthelatchengage.Besureto followthechildrestraintmanufacturer's instructionsforbeltrouting.
natural_image
Medical illustration of a car seatbelt buckle assembly (no text or symbols)Front-facing—step4
4. Pull the shoulder belt until the belt is fully extended. At this time, these belt retractor is in the Automatic Locking Retractor (ALR) mode (child restraint mode). It revert to Emergency Locking Retractor (ELR) mode when these belt is fully retracted.
natural_image
Line drawing of a car seatbelt with arrows indicating movement or force (no text or symbols)Front-facing—step5
5. Allow these seat belt to retract. Pull upon the shoulder belt to remove any slack in the belt.
1-22 Safety—Seats, seatbeltsandsupplementalrestraintsystem

natural_image
Mechanical diagram showing a car seatbelt with two black arrows indicating clockwise motion (no text or symbols)Front-facing—step6
- Remove any additional slack from these seat belt; press downward and rear forward firmly in the center of the child restraint with your kneetocompress the vehicle seat cushion and seat back while pulling up on these seat belt.
- If the child restraint is equipped with atop tether strap, routethetoptether strap and secure the tether strap to the ether anchor point. (See "Toptetherstrap child restraint (for Coup emodels)" (P.1-19).)

natural_image
Line drawing of a car seatbelt with hands adjusting the seat (no text or symbols)Front-facing—step8
- After attaching the child restraint, test it before you placethe childinit. Pushit from sidetosidewhileholding these at near the seat belt path. The child restraint should not movemore than 1 inch (25mm) from sideto side. Try to get forward and check to see if the belthold stherestraint in place. If the restraint is not secure, you may need to try a different child restraint. Not all child restraints fit in all types of vehicles.
-
Check that the retractor is in the ALR mode by trying topull more seat belt out of the retractor. If you cannot pull anymore belt webbing out of the retractor, ther etractor is in the ALR mode.
-
Checktomakesurethechildrestraintis properlysecuredpriortoeachuse.Ifthe seatbeltisnotlocked,repeatsteps3 through9.
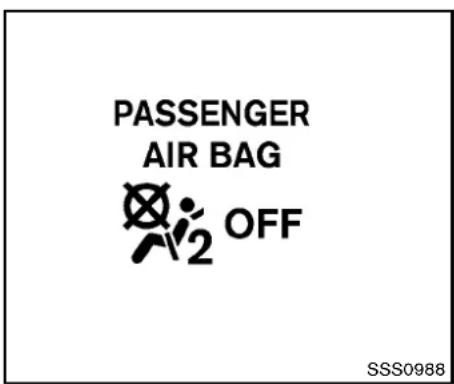
text_image
PASSENGER AIR BAG OFF SSS0988Front-facing—step11
- If the child restraint is installed in the front passenger seat, push theignitions switch to the ON position. The front passenger air bag status light should illuminate. If this light is not illuminated, see "Front passenger air bag and status light" (P. 1-35). Have the system checked by a NISSAN dealer.
Afterthechildrestraintisremovedandtheseat beltisfullyretracted,theALRmode(child restraintmode)iscanceled.
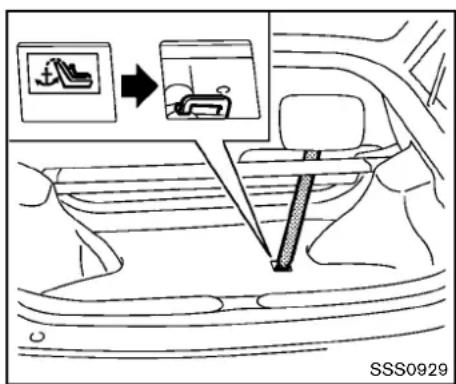
text_image
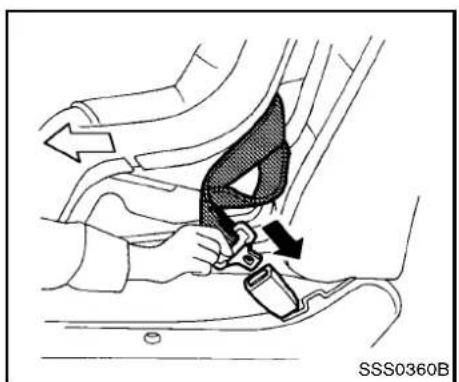
SSS0929INSTALLINGTOPTETHERSTRAP(for Coupemodels)
First, secure the child restraint with these at belt.
- Flipdown the flap marked with a label as shown in the illustration.
-
Positionthetoptetherstrapoverthetopof theseatbackandsecureittothetether anchorbracketthatprovidesthestraightest installation.
-
Tightenthestrapaccordingtothemanufac-turer'sinstructionstoremoveanyslack.
If you have any questions when installing a toptetherstrapchild restraint, consult your NISSAN dealer for details.
BOOSTERSEATS
Precautionsonboosterseats

WARNING
Ifaboosterseatandseatbeltarenot usedproperly,theriskofachildbeing injuredinasuddenstoporcollision greatlyincreases:
- Makesuretheshoulderportionof thebeltisawayfromthechild'sface andneckandthelapportionofthe beltdoesnotcrossthestomach.
- Makesuretheshoulderbeltisnot behindthechildorunderthechild's arm.
- Aboosterseatmustonlybeinstalledinaseatingpositionthathas alap/shoulderbelt.
1-24 Safety—Seats, seat belts and supplemental restraintsystem
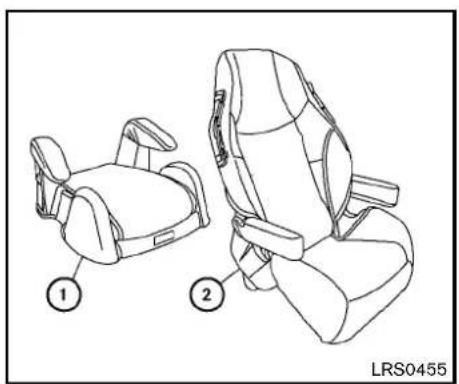
natural_image
Line drawing of two car seat compartments with labeled parts (1 and 2), no text or symbols present.Boosterseatsofvarioussizesareofferedby severalmanufacturers.Whenselectingany boosterseat,keepthefollowingpointsinmind:
- Chooseonlyaboosterseatwithalabel certifyingthatitcomplieswithFederalMotor VehicleSafetyStandard213orCanadian MotorVehicleSafetyStandard213.
natural_image
Illustration of a person sitting in a seat with two crossed safety stripes (no text or symbols)- Checktheboosterseatinyourvehicletobe sureitiscompatiblewiththevehicle'sseat andseatbeltsystem.
- Makesurethechild'sheadwillbeproperly supportedbytheboosterseatorvehicle seat.Theseatbackmustbeatorabovethe centerofthechild'sears.Forexample,ifa lowbackboosterseat ① ischosen,the vehicleseatbackmustbeatorabovethe centerofthechild'sears.Iftheseatbackis lowerthanthecenterofthechild'sears,a highbackboosterseat ② shouldbeused.
natural_image
Line drawing of a person seated in a car seat, holding a long object (no text or symbols)- If the booster seat is compatible with your vehicle, place your child in the booster seat and check the various adjustments to be sure the booster seat is compatible with your child.
Always follow all recommended procedures. All U.S. states and Canadian provinces or territories require that infants and small children berestrained in an approved child restraint at all times while the vehicle is being operated.
The instructions in this section apply to booster seat installation in the front passenger seat.
Boosterseatinstallation

CAUTION
Donotusethelap/shoulderbeltAutomaticLockingRetractormodewhen usingaboosterseatwiththeseatbelts.
RefertoallWarningsandCautionsinthe"Child safety", "Childrestraints" and "Boosterseats" sectionsearlierinthissectionbeforeinstallinga childrestraint.
natural_image
Line drawing of a car interior showing seat, dashboard, and side panel (no text or symbols)Followthesestepstoinstallaboosterseatinthe frontpassengerseat:
- If you must install a booster seat in the front seat, adjust these back so that it is upright and then movethese at to therearmost position. Donot move the seat with the booster seat attached to it.
- Position the booster seat on these seat. Only place it in a front-facing direction. Always follow the booster seat manufacturer's instructions.

natural_image
Line drawing of a person seated in a car seat, wearing a seatbelt and holding a belt (no text or symbols)-
The booster seat should be positioned on the vehicle seat so that it is stable. If necessary, adjust or remove the head restraint to obtain the correct booster seat fit. If the head restraint is removed, store it in a secure place. Besuretore install the head restraint when the booster seat is removed. See "Head restraints" (P. 1-5) for head restraint adjustment, removal and installation information. If these seating position does not have an adjustable head restraint anditis interfering with the proper booster seat fit, try another seating position or different booster seat.
-
Positionthelapportionoftheseatbeltlow andsnugonthechild'ships.Besureto followtheboosterseatmanufacturer's instructionsforadjustingthebeltrouting.
- Pulltheshoulderbeltportionoftheseatbelt towardtheretractortotakeupextraslack. Besuretheshoulderbeltispositioned acrossthetop,middleportionofthechild's shoulder.Besuretofollowtheboosterseat manufacturer'sinstructionsforadjustingthe beltrouting.
- Followthewarnings, cautions and instructions for properly fastening a seat belt shown in the "Three-point type seat belt" (P.1-11).
PASSENGER AIR BAG

OFF
SSS0988
- If the booster seat is installed in the front passenger seat, push the ignition switch to the ON position. The front passenger airbag status light may may not illuminate depending on the size of the child and the type of booster seat used. (See "Front passenger airbag and status light" (P.1-35).)
SUPPLEMENTALRESTRAINT SYSTEM
PRECAUTIONSONSUPPLEMENTAL RESTRAINTSYSTEM
This Supplemental Restraint System (SRS) section contains important information concerning the driver and passenger front impact supplemental air bags (NISSAN Advanced Air Bag System), front seat-mounted side-impact supplemental air bag system, roof-mounted (Coupemodels) or door-mounted (Roadster models) curtainside-impactsupplemental air bag and seat belt with pretensioners.
Supplementalfront-impactairbagsystem:
TheNISSANAdvancedAirBagSystemcan helpcushiontheimpactforcetothehead and chestofthedriverandfrontpassengerincertain frontalcollisions.
Frontseat-mountedside-impactsupplementalairbagsystem: This system can help cushion the impact for cet the chest and pelvis area of the driver and front passenger uncertain side impact collisions. The front seatside-impacts supplemental air bags are designed to inflate on the sidewalk where the vehicle is impacted.
Roof-mountedcurtainside-impactsupplementalairbagsystem(forCoupemodels):
Thissystemcanhelpcushiontheimpactforce totheheadofthedriverandfrontpassengerin certainsideimpactcollisions.Thecurtainair bagsaredesignedtoinflateonthesidewhere
thevehicleisimpacted.
Door-mountedcurtainside-impactsupplementalairbagsystem(forRoadstermodels):Thissystemcanhelpcushiontheimpactforcetotheheadsofthedriverandfrontpassengerincertainsideimpactcollisions. Thecurtainairbagsaredesignedtoinflateonthesidewherethevehicleisimpacted.
Thesesupplementalrestraintsystemsaredesignedtosupplementthecrashprotection providedbythedriverandpassengerseatbelts andarenotasubstituteforthem.Seatbelts shouldalwaysbecorrectly wornandthe occupantseatedasuitabledistanceawayfrom thesteeringwheel,instrumentpanelandoor finishers.(See"Seatbelts"(P.1-9)forinstructionsandprecautionsonseatbeltusage.)
Thesupplementalairbagsoperateonly whentheignitionswitchisintheON position.
AfterpushingtheignitionswitchtotheON position,thesupplementalairbagwarning lightilluminates.Thesupplementalairbag warninglightwillturnoffafterabout7 secondsifthesystemsareoperational.

natural_image
Line drawing of a person seated in a car, wearing a seatbelt and jacket (no text or symbols)
natural_image
Diagram of a person sitting on a car under a full-body safety harness (no text or symbols present)
WARNING
- Thefrontairbagsordinarilywillnot inflateintheeventofasideimpact, rearimpact, rollover, orlowerseverityfrontalcollision. Alwayswear yourseatbeltstohelpreducethe riskorseverityofinjuryinvarious kindsofaccidents.
- Thefrontpassengerairbagwillnot inflateifthepassengerairbag statuslightislitorifthefront passengerseatisunoccupied.See "Frontpassengerairbagandstatus light"(P.1-35).
•Theseatbeltsandthefrontairbags aremosteffectivewhenyouare sittingwellbackanduprightinthe seatwithbothfeetonthefloor.The frontairbagsinflatewithgreat force.EvenwiththeNISSANAdvancedAirBagSystem,ifyouare unrestrained,leaningforward,sittingsidewaysoroutofpositionin anyway,youareatgreaterriskof injuryordeathinacrash.Youmay alsoreceiveseriousorfatalinjuries fromthesupplementalfrontairbag ifyouareupagainstitwhenit
Safety—Seats, seatbeltsandsupplementalrestraintsystem 1-29
inflates.Alwayssitbackagainstthe seatbackandasfar-awayaspracticalfromthesteeringwheelor instrumentpanel.Alwaysusethe seatbelts.
- Thedriverandfrontpassengerseat beltbucklesareequipped with sensorsthatdetectiftheseatbelts arefastened.TheAdvancedAirBag Systemmonitorstheseverityofa collisionandseatbeltusagethen inflatestheairbags.Failureto properlywearseatbeltscanincreasetheriskorseverityofinjury inanaccident.
- The front passenger seat is equipped with an occupant classification sensor (pattern sensor) that turns the front passenger airbag OFFundersome conditions. This sensor is only used in this seat. Failure to be properly seated and wearing these seat belt can increase the risk severity of injury in an accident. See "Front passenger air bag and status light" (P.1-35).
- Keephandsontheoutsideofthe steeringwheel.Placingtheminside thesteeringwheelrimcouldin-
creasetheriskofinjuryifthe supplementalfrontairbaginflates.

natural_image
Diagram of a person wearing a seatbelt and using a steering wheel, with no visible text or symbols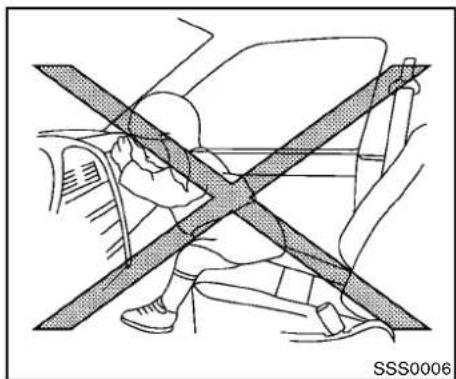
natural_image
Diagram of a car interior showing a person sitting on the back with a diagonal line crossing through the seat area (no text or symbols)1-30 Safety—Seats, seat belts and supplemental restraintsystem
natural_image
Diagram showing a car's seatbelt crossed over the wheel, no text or symbols present
natural_image
Diagram of a car interior showing two people seated with a cross-shaped barrier (no text or symbols)
natural_image
Diagram of a car seatbelt with diagonal crossed lines indicating no movement or safety, showing no text or symbols.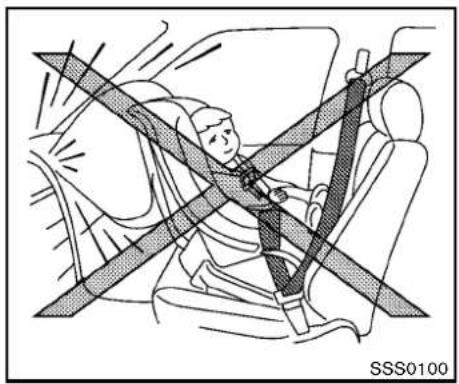
natural_image
Diagram of a person wearing a seatbelt and headboard, showing no text or symbols on the diagram itself.
WARNING
●Neverletchildrenrideunrestrained orextendtheirhandsorfaceoutof thewindow.Donotattempttohold theminyourlaporarms.Some examplesofdangerousridingpositionsareshownintheillustrations.
- Childrenmaybeseverelyinjuredor killedwhenthefrontairbags,side airbagsorcurtainairbagsinflateif theyarenotproperlyrestrained.
- EvenwiththeNISSANAdvancedAir BagSystem,neverinstallarear-facingchildrestraintinthefront seat.Aninflatingfrontairbagcould seriouslyinjureorkillyourchild. See"Childrestraints"(P.1-18)for details.

natural_image
Diagram showing a person seated in a car with two crossed safety lines, no text or symbols present.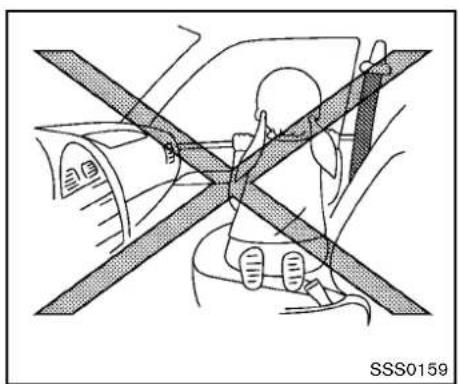
natural_image
Diagram of a car interior showing a person seated under a vehicle with a cross-shaped barrier (no text or symbols)
natural_image
Illustration of a person sitting in a car seat with a cross-shaped band indicating seatbelt, no text or symbols present.
WARNING
Frontseat-mountedside-impactsup- plementalairbagsandroof-mounted (Coupe models)ordoor-mounted (Roadstermodels)curtainside-impact supplementalairbags:
- Thefrontseat-mountedside-impact airbagsandroof-mounted(Coupe models)ordoor-mounted(Roadster models)curtainairbagsordinarily willnotinflateintheeventofa frontalimpact,rearimpact,rollover orlowerseveritysidecollision.Al-
wayswearyourseatbeltstohelp reducetheriskorseverityofinjury invariouskindsofaccidents.
•Theseatbelts,sideairbagsand curtainairbagsaremosteffective whenyouaresittingwellback and uprightintheseat.Thesideairbag andcurtainairbaginflatewithgreat force.Donotallowanyonetoplace theirhand,legorfaceneartheside airbagonthesideoftheseatback ofthefrontseatorneartheside roofrails(Coupemodels)/doortrim (Roadstermodels).Do notallow anyonesittinginthefrontseatsto extendtheirhandoutofthewindow orlean against the door.Some examplesofdangerousridingpositionsare shownin theprevious illustrations.
- Donotuseseatcoversonthefront seatbacks. They may interferewith supplementalsideairbaginflation.

text_image
Technical diagram of a car interior with numbered components for identificationSSS1012
1.Crashzonesensor
2. Supplementalfrontairbagmodules(NISSAN AdvancedAirBags)
3.Roof-mountedcurtainside-impactsupplemental airbags(forCoupemodels)
4. Roof-mounted curtains inside-impacts supplemental airbaginflators (for Coupemodels)
- Door-mounted curtains inside-impacts supplemental airbaginflators (for Roadster models)
- Door-mounted curtains inside-impacts supplemental airbags (for Roadster models)
- Frontseat-mountedside-impactsupplemental airbags
-
Occupantclassificationsensor(patternsensor)
-
Occupantclassificationsystemcontrolunit
10.AirbagControlUnit(ACU)
11.Satellitesensors
12.Seatbeltwithpretensioner
NISSANADVANCEDAIRBAGSYS-TEM(frontseats)
ThisvehicleisequippedwiththeNISSAN AdvancedAirBagSystemforthedriverand frontpassengerseats.Thissystemisdesigned tomeetcertificationrequirementsunderU.S. regulations.ItisalsopermittedinCanada.
However,alloftheinformation,cautions andwarningsinthismanualstillapplyand mustbefollowed.
The drivers supplemental front-impact air bag is located in the center of the steering wheel. The front passengers supplemental front-impact air bag is mounted in the instrument panel above the glove box. The front air bags are designed to inflate in higher severity frontal collisions, although they may inflate if the forces in another type of collision are similar to those of a higher severity frontal impact. They may not inflate in certain frontal collisions. Vehicled damage (or lack of it) is not always an indication of proper front air bag operation.
TheNISSANAdvancedAirBagSystemhas dualstageairbaginflators.Thesystemmonitors informationfromthecrashzonesensor,theAir
bagControlUnit(ACU),seatbeltbuckle switchesandtheoccupantclassificationsensor (patternsensor).Inflatoroperationisbasedon theseverityofacollisionandseatbeltusagefor thedriver.Forthefrontpassenger,theoccupant classificationsensorisalsomonitored. Based oninformationfromthesensors,onlyonefront airbagmayinflateinacrash,dependingonthe crashseverityandwhetherthefrontoccupants arebeltedorunbelted.Additionally,thefront passengerairbagmaybeautomaticallyturned OFFundersomeconditions,dependingonthe informationprovidedbytheoccupantclassificationsensor.IfthefrontpassengerairbagisOFF, thepassengerairbagstatuslightwillbe illuminated(iftheseatisunoccupied,thelight willnotbeilluminated,buttheairbagwillbeoff). (See“Frontpassengerairbagandstatuslight” (P.1-35)forfurtherdetails.)Onefrontairbag inflatingdoesnotindicateimproperperformance ofthesystem.
If you have any questions about your airbag system, contact a NISSAN dealer. If you are considering modification of your vehicle duetoa disability, you may also contact a NISSAN dealer. Contact information is contained in the front of this Owner's Manual.
Whenafrontairbaginflates,afairlyloudnoise maybeheard,followedbyreleaseofsmoke. Thissmokeisnotharmfulanddoesnotindicate
afire. Careshouldbetakennottoinhaleit, asit maycauseirritationandchoking. Thosewitha historyofabreathingconditionsshouldgetfresh airpromptly.
Frontairbags, alongwiththeuseofseatbelts, helptocushiontheimpactforceonthehead andchestofthefrontoccupants. Theycanhelp savelivesandreduceseriousinjuries. However, aninflatingfrontairbagmaycausefacial abrasionsorotherinjuries.Frontairbagsdo notproviderestrainttothelowerbody.
EvenwithNISSANadvancedairbags,seat beltsshouldbecorrectlywornandthedriver andpassengerseateduprightasfaraspractical awayfromthesteeringwheelorinstrument panel.Thefrontairbagsinflatequicklyinorder tohelpprotectthefrontoccupants.Becauseof this,theforceofthefrontairbaginflatingcan increasetheriskofinjuryiftheoccupantistoo closeto,orisagainst,theairbagmoduloleduring inflation.
Thefrontairbagsdeflatequicklyafteracollision.
Thesupplementalfrontairbagsoperate onlywhentheignitionswitchisintheON position.
AfterpushingtheignitionswitchtotheON position,thesupplementalairbagwarning lightilluminates.Thesupplementalairbag warninglightwillturnoffafterabout7
secondsifthesystemisoperational.
PASSENGER AIR BAG

OFF
SSS0988
Frontpassengerairbagstatuslight
Frontpassengerairbagandstatuslight

WARNING
Thefrontpassengerairbagisdesigned toautomaticallyturnOFFundersome conditions.Readthissectioncarefully tolearnhowitoperates.Properuseof theseat,seatbeltandchildrestraintsis necessaryformosteeffectiveprotection. Failuretofollowwallinstructionsinthis manualconcerningtheuseofseats, seatbeltsandchildrestraintscan increasetheriskorseverityofinjuryin
anaccident.
Statuslight:
Thefrontpassengerairbagstatuslight is located on the instrument panel. After the ignitions switch this placed in the ON position, the frontpassenger air bag status light illuminates for about 7 seconds and then turn so for illuminates depending on the front passenger seat occupied status. The light operates as follows:
- Unoccupiedpassengerseat:The OFF is OFFandthefrontpassengerairbagisOFF andwillnotinflateinacrash.
- Passengerseatoccupiedbyasmalladult, childorchildrestraintasoutlinedinthis section:The 20 off illuminatestoindicate that thefrontpassengerairbagisOFFandwill notinflateinacrash.
- Occupiedpassengerseatandthepassengermeetstheconditionsoutlinedinthis section:Thelight B_2 off isOFFtoindicate thatthefrontpassengerairbagisoperational.
Frontpassengerairbag:
Thefrontpassengerairbagisdesignedto automaticallyturnOFFwhenthevehicleis operatedundersomeconditionsasdescribed
belowaspermittedbyU.S.regulations.Ifthe frontpassengerairbagisOFF,itwillnotinflate inacrash.Thedriverairbagandotherairbags inyourvehiclearenotpartofthissystem.
The purpose of the regulationistohelpreduce theriskofinjuryordeathfromaninflatingairbag to certain front passenger seat occupants, such as children, by requiring the airbag to be automatically turned OFF.
Theoccupantclassificationsensor(pattern sensor)isinthefrontpassengerseatcushion andisdesignedtodetectanoccupantand objectsontheseat. Forexample,ifachildisin thefrontpassengerseat,theAdvancedAirBag Systemisdesignedtoturnthepassengerair bagOFFinaccordancewiththeregulations. Also,ifachildrestraintofthetypesspecified in theregulationsisontheseat,theoccupant classificationsensorcandetectitandcausethe airbagtoturnOFF.
Frontpassengerseatadultoccupantswhoare properlyseatedandusingtheseatbeltas outlinedinthismanualshouldnotcausethe passengerairbagtobeautomaticallyturned OFF.ForsmalladultsitmaybeturnedOFF, however,iftheoccupantdoesnotsitintheseat properly(forexample,bynotsittingupright,by sittingonanedgeoftheseat,orbyotherwise beingoutofposition),thiscouldcausethe
sensoroturntheairbagOFF.Alwaysbesure tobeseatedandwearingtheseatbeltproperly forthemosteffectiveprotectionbytheseatbelt andsupplementalairbag.
The occupant classifications sensor is designed to operate as described abovetoturn the front passenger air bag OFF for specified child restraints. Failing to properly secure child restrains and tous the ALR mode (child restraint mode) may allow therestraint to tip or move in an accident or sudden stop. This can also result in the passenger air bag inflating a crash instead of being OFF. (See "Child restraints" (P. 1-18) for proper use and installation.)
If the front passenger seat is not occupied, the passenger air bag is designed not to inflate a crash. However, heavy objects placed on the seat could result in air bag inflation, because of the object being detected by the occupant classification sensor. Other conditions could also result in air bag inflation, such as fachildis standing on these at, orftwo children are on the seat, contrary to the instructions in this manual. Always be sure that you and all vehicle occupants are seated and restrained properly. Using the passenger air bag status light, you can monitor when the front passenger air bag is automatically turned OFF with these at occupied. Thelightwillnotilluminatewhenthefront passengerseatisunoccupied.
Ifanadultoccupantisintheseatbutthe passengerairbagstatuslightisilluminated (indicatingthattheairbagisOFF),itcouldbe thatthepersonisasmalladult,orisnotsitting ontheseatproperly.
Ifachildrestraint must be used in the front seat, the passenger air bag status light may may not be illuminated, depending on the size of the child and the type of child restraint being used. If the passenger air bag status light is not illuminated (indicating that the air bag might inflate in a crash), it could be that the child restraint or seat belt is not being used properly. Makes sure that the child restraint is installed properly, these at belt is used properly and the occupant is positioned properly. If the passenger air bag status light is still not illuminated, try adifferent child restraint.
If the passenger air bag status light will not illuminate event though you believe that the child restraint, these at belts and the occupant are properly positioned, the system may be sensing an unoccupied seat (in which case the air bag is OFF). Your NISSAN dealer can check that the system is OFF by using as special tool. However, until you have confirmed with your dealer that your air bag is working properly, donot transport achildinthisvehicle.
TheNISSANAdvancedAirBagSystemand passengerairbagstatuslightwilltakeafew secondstoregisterachangeinthepassenger seatstatus.However,iftheseatbecomes unoccupied,theairbagstatuslightwillremain off.
Ifamalfunctionoccursinthefrontpassengerair bagsystem,thesupplementalairbagwarning light 🔍 ,locatedinthemeterandgaugesarea willblink.HavethesystemcheckedbyaNISSANdealer.
Othersupplementalfront-impactairbag precautions

WARNING
- Donotplaceanyobjectsonthe steeringwheelpadorontheinstrumentpanel. Also, donotplaceany objectsbetweenanyoccupantand thesteeringwheelorinstrument panel. Suchobjectsmaybecome dangerousprojectilesandcause injuryifthefrontairbaginflates.
- Donotplaceobjectswithsharp edgesontheseat.Also,donot placeheavyobjectsontheseatthat
willleavepermanentimpressionsin theseat.Suchobjectscandamage theseatoroccupantclassification sensor(patternsensor).Thiscan affecttheoperationoftheairbag systemandresultinseriouspersonalinjury.
- Donotusewateroracidiccleaners (hotsteamcleaners)ontheseat. Thiscandamagetheseatoroccupantclassificationsensor.Thiscan alsoaffecttheoperationoftheair bagsystemandresultinserious personalinjury.
- Immediatelyafterinflation,several frontairbagsystemcomponents willbehot.Donottouchthem;you mayseverelyburnyourself.
• Nounauthorizedchangesshouldbe madetoanycomponentsorwiring oftheairbagsystem. Thisisto preventaccidentalinflationofthe supplementalairbagordamageto thesupplementalairbagsystem. - Donotmakeunauthorizedchanges toyourvehicle'selectricalsystem, suspensionsystemorfrontend structure. This could affect proper operation of the frontair bagsys
tem.
•Tamperingwiththefrontairbag systemmayresultinseriouspersonal injury. Tampering includes changestothesteeringwheel and the instrument panel assembly by placing material over the steering wheelpad and above the instrument panel or by installing additional trim material around the airbag system.
- Removingormodifyingthefront passenger seat may affect the functionoftheairbagsystemandresult in serious personalinjury.
- Modifyingortamperingwiththe frontpassengerseatmayresultin seriouspersonalinjury.Forexample,donotchangethefrontseatsby placingmaterialontheseatcushion orbyinstallingadditionaltrimmaterial,suchasseatcovers,onthe seatthatisnotspecificallydesigned toassureproperairbagoperation. Additionally,donotstowanyobjectsunderthefrontpassengerseat ortheseatkushionandseatback. Such objectsmayinterfere withthe properoperationoftheoccupant classification sensor.
- Nounauthorizedchangesshouldbe madetoanycomponentsorwiring oftheseatbeltsystem.Thismay affectthefrontairbagsystem. Tamperingwiththeseatbeltsystem mayresultinseriouspersonalinjury.
- Workonandaroundthefrontair bagsystemshouldbedonebyaNISSANdealer.InstallationofelectricalequipmentshouldalsobedonebyaNISSANdealer.The SupplementalRestraintSystem (SRS)wiringharnesses*shouldnot bemodifiedordisconnected.Unauthorizedelectricaltestequipment andprobingdevicesshouldnotbe used onthe air bagsystem.
- Acrackedwindshieldshould be replaced immediately by a qualified repair facility. Acrackedwindshield could affect the function of the supplemental air bag system.
* TheSRSwiringharnessconnectorsare yellowandorangefor easyidentification.
Whensellingyourvehicle, werequestthatyou inform thebuyeraboutthefrontairbagsystem and guide the buyer to the appropriate sections
inthisOwner'sManual.

natural_image
Line drawing of a car seat assembly with shaded seating areas (no text or symbols)FRONTSEAT-MOUNTEDSIDE-IMPACTANDROOF/DOOR-MOUNTED CURTAINSIDE-IMPACTSUPPLEMENTALAIRBAGSYSTEMS
Thesideairbagsarelocatedintheoutsideof theseatbackofthefrontseats.Thecurtainair bagsarelocatedinthesideroofrails(Coupe)or uppersideofthedoortrim(Roadster).These systemsaredesignedtomeetvoluntaryguidelinestohelpreducetheriskofinjurytoout-of-positionoccupants.However,allofthe information,cautionsandwarningsinthis manualstillapplyandmustbefollowed.
Thesideairbagsandcurtainairbagsare designedtoinflateinhigherseverityside
collisions, although they may inflate if the forces in another type of collisionaresimilar to those of a higher severity side impact. They are designed to inflate on the sides when the vehicle is impacted. They may not inflate in certain side collisions on the sides when the vehicle is impacted.
Vehicledamage(orlackofit)isnotalwaysan indicationofpropersupplementalsideairbag andcurtainairbagoperation.
Whensideairbagsandcurtainairbagsinflate,a fairlyloudnoisemaybeheard,followedby releaseofsmoke.Thissmokeisnotharmfuland doesnotindicateafire.Careshouldbetaken nottoinhaleit,asitmaycauseirritationand choking.Thosewithahistoryofabreathing conditionsshouldgetfreshairpromptly.
Sideairbags, alongwiththeuseofseatbelts, helptocushiontheimpactforceonthechest andpelvisofthefrontoccupants. Curtainair bagshelptocushiontheimpactforceto the headofoccupants. Theycanhelpsavelivesand reduceseriousinjuries. However, aninflating sideairbagsandcurtainairbagsmaycause abrasionsorotherinjuries. Sideairbagsand curtainairbagsdonotproviderestrainttothe lowerbody.
Theseatbeltsshouldbecorrectlywornandthe driverandpassengerseateduprightasfaras
1-38 Safety—Seats, seat belts and supplemental restraintsystem
practicalawayfromthesideairbag,andseated asfarawayaspracticalfromthedoorfinishers andsideroofrails.Thesideairbagsandcurtain airbagsinflatequicklyinordertohelpprotect theout-of-positionoccupants.Becauseofthis, theforceofthesideairbagsandcurtainair bagsinflatingcanincreasetheriskofinjuryifthe occupantistoocloseto,orisagainst,theseair bagmodulesduringinflation.Thesideairbags andcurtainairbagswilldeflatequicklyafterthe collisionisover.
Thesideairbagsandcurtainairbagsoperate onlywhentheignitionswitchisintheON position.
AfterpushingtheignitionswitchtotheON position,thesupplementalairbagwarning lightilluminates.Theairbagwarninglight willturnoffafterabout7secondsifthe systemsareoperational.

WARNING
- Donotplaceanyobjectsnearthe seatbackofthefrontseats.Also,do notplaceanyobjects(anumbrella, bag,etc.)betweenthefrontdoor finisherandthefrontseat.Such objectsmaybecomedangerous projectilesandcauseinjuryifaside
airbaginflates.
- Rightafterinflation,severalsideair bagsandcurtainairbagsystem componentswillbehot.Donot touchthem;youmayseverelyburn yourself.
- Nounauthorizedchangesshouldbe madetoanycomponentsorwiring ofsideairbagandcurtainairbag systems. Thisistopreventaccidentalinflationofthesideairbagandcurtainairbagordamagetosideairbagandcurtainairbagsystems.
- Donotmakeunauthorizedchanges toyourvehicle'selectricalsystem, suspensionsystemorsidepanel. This could affect properoperation of the sideairbag and curtain air bagsystems.
- Tamperingwiththeairbagsystem mayresultinseriouspersonalinjury.Forexample,do not changethe frontseatsbyplacingmaterialnear theseatbackorbyinstallingadditionaltrimmaterial,suchasseat covers,aroundthesideairbags.
- Work around and on the side air bag andcurtainairbagsystemsshould
bedonebyaNISSANdealer.Installationofelectricalequipment shouldalsobedonebyaNISSAN dealer.TheSRSwiringharnesses* shouldnotbemodifiedordisconnected.Unauthorizedelectricaltest equipment and probing devices shouldnotbeusedontheside-impactairbagsystem.
* TheSRSwiringharnessconnectorsare yellowandorangeforeasyidentification.
Whensellingyourvehicle, werequestthatyou informthebuyeraboutthesideairbagand curtainairbagsystemsandguidethebuyerto the appropriatesectionsinthisOwner'sManual.
SEATBELTSWITHPRETENSIONERS (frontseats)

WARNING
- Thepretensioners cannot bereused after activation. They must be placed together with theretractor and buckleasaunit.
- If the vehicle becomes involved in a collision but a pretensioner is not activated, besureto havethe pre-tensionersystem checked and, if
necessary, replacedbyaNISSAN dealer.
- Nounauthorizedchangesshouldbe madetoanycomponentsorwiring ofthepretensionersystem. This is topreventdamagetooraccidental activation of thepretensioners. Tamperingwiththepretensioner systemmayresultinseriouspersonalinjury.
•WorkaroundandonthepretensionersystemshouldbedonebyaNISSANdealer.Installationofelectricalequipments should also be donebyaNISSANdealer.Unauthorizedelectricaltestequipment and probing devices should not be used on the pretensionersystem. - If you need to dispose of the pretensionerorscrapthevehicle, contactaNISSANdealer.Correct pretensionerdisposalprocedures aresetforthintheappropriate NISSANServiceManual.Incorrect disposalprocedurescouldcause personalinjury.
Thepretensionersystemmayactivatewiththe supplementalairbagsystemincertaintypesof
collisions.Workingwiththeseatbeltretractor,it helpstightentheseatbeltwhenthevehicle becomesinvolvedincertaintypesofcollisions, helpingtorestrainfrontseatoccupants.
Thepretensionerisencasedwiththeseatbelt retractor. Theseseatbeltsareusedthesame wayasconventionalseatbelts.
Whenapretensionerseatbeltactivates, smoke isreleasedandaloudnoisemaybeheard. The smokeisnotharmful, anditdoesnotindicatea fire. Careshouldbetakennottoinhaleitasit maycauseirritationandchoking. Thosewitha historyofabreathingconditionsshouldgetfresh airpromptly.
Afterpretensioneractivation, loadlimitersallow theseatbelttoreleasewebbing(ifnecessary)to reduceforcesagainstthechest.
Thesupplementalairbagwarninglight used to indicate malfunctions in the pretensioner system. (See "Supplementalairbagwarning light" (P.1-41) formoredetails.) If the supplemental airbag warning light indicates there is a malfunction, has the system checked by a NISSAN dealer.
Whensellingyourvehicle, werequestthatyou informthebuyerabouttheseatbeltpretensionersandguidethebuyertotheappropriate sectionsinthisOwner'sManual.

natural_image
Interior view of a car showing the dashboard and seatbelt mechanism (no text or symbols)SUPPLEMENTAL AIRBAG WARNING LABELS
Warninglabelsaboutthesupplementalfront-impactairbagareplacedinthevehicleas shownintheillustration.
①\$RSairbag
Thewarninglabelsarelocatedonthesurfaceof thesunvisors.

natural_image
Abstract black-and-white icon of a stylized human figure in motion, possibly climbing or reaching (no text or symbols)SPA1097
SUPPLEMENTAL AIRBAG WARNING LIGHT
Thesupplementalairbagwarninglight,displaying intheinstrumentpanel,monitorsthe circuitsofthesupplementalfront-impactairbag, frontseat-mountedside-impactsupplemental airbag,roof-mounted(Coupemodels)ordoor-mounted(Roadstermodels)curtainside-impact supplementalairbag,andseatbeltpretensioner systems.Themonitoredcircuitsincludetheair bagsystems,pretensionersandallrelated wiring.
WhentheignitionswitchisintheONposition, thesupplementalairbagwarninglightilluminatesforabout7secondsandthenturnsoff.
Thismeansthesystemisoperational.
Ifanyofthefollowingconditionsoccur, thefront airbag, sideairbag, curtainairbag and pretensionersystemsneedservicing:
- Thesupplementalairbagwarninglight remainsonapproximately7secondsafter theignitionswitchispushedtotheON position.
- Thesupplementalairbagwarninglight flashes intermittently.
- Thesupplementalairbagwarninglightdoes notcomeonatall.
Undertheseconditions,thefrontairbag,sideair bag,curtainairbagorpretensionersystemsmay notoperateproperly.Theymustbecheckedand repaired.Takeyourvehicletothenearest NISSANdealer.

WARNING
If the supplemental airbag warning lightison, it could mean that the front airbag, side airbag, curtain airbag and/or pretensioners system will not operate in an accident. To help avoid injury to yourself for others, have your vehicle checked by a NISSAN dealer as soon as possible.
REPAIRANDREPLACEMENTPROCEDURE
Thefrontairbags,sideairbags,curtainairbags andpretensionersaredesignedtoactivateona one-time-onlybasis.Asareminder,unlessitis damaged,thesupplementalairbagwarninglight willremainilluminatedafterinflationhasoccurred.RepairandreplacementofthesesystemsshouldbedoneonlybyaNISSANdealer.
When maintenance work is required on the vehicle, the front air bags, side air bags, curtain air bags, pretensioners and related parts should be pointed out to the person conducting the maintenance. Theignitions switch should always be in the LOCK position when working under the hoodor insidethe vehicle.

WARNING
- Onceafrontairbag,sideairbag,or curtainairbaghasinflated,theair bagmodulewillnotfunctionagain andmustbereplaced.Additionally, theactivatedpretensionermust alsobereplaced.Theairbagmoduleandpretensionersystemshould bereplacedbyaNISSANdealer. Theairbagmoduleandpretensionersystemcannotberepaired.
Safety—Seats, seatbeltsandsupplementalrestraintsystem 1-41
- Thefrontairbag, sideairbag and curtainairbagsystems and the pretensionersystem should be inspected by a NISSAN dealer if there is any damage to the frontor side portion of the vehicle.
- If you need to dispose of the supplemental airbag or pretensionersystems or scrap the vehicle, contact a NISSAN dealer. Correct supplemental airbag and seat belt pretensionersystem disposals procedures are set forth in the appropriate NISSAN Service Manual. Incorrect disposals procedures could cause personal injury.
2Instrumentsandcontrols
Cockpit....2-3
Instrumentpanel....2-4
Metersandgauges....2-5
Speedometerandodometer....2-6
Tachometer....2-6
Enginecoolanttemperaturegauge....2-7
Fuelgauge....2-7
Triplemeter....2-8
Warning/indicatorlightsandaudiblereminders....2-9
Checkingbulbs....2-10
Warninglights....2-10
Indicatorlights....2-14
Audiblereminders....2-16
Vehicleinformationdisplay....2-17
Operationalindicators....2-18
Warningsandalerts....2-20
Maintenanceindicators....2-21
Tripcomputer....2-22
Securitysystems....2-27
VehicleSecuritySystem....2-27
NISSANVehicleImmobilizerSystem....2-28
Windshieldwiperandwasherswitch....2-29
Rearwindowdefrosterswitch....2-31
Headlightandturnsignalswitch....2-31
Xenonheadlights....2-31
Headlightswitch....2-32
Turnsignalswitch....2-35
Foglightswitch(ifsoequipped)....2-35
Hazardwarningflasherswitch....2-35
Horn....2-36
Heatedseats(ifsoequipped)....2-36
Climatecontrolledseats(ifsoequipped)......2-38
VehicleDynamicControl(VDC)OFFswitch....2-39
Poweroutlet....2-39
Storage....2-40
Instrumentpocket(exceptfornavigationsystem equippedmodels)....2-40
Cupholders....2-40
Glovebox....2-41
Consolebox....2-42
Rearparcelbox....2-42
Cargocover(ifsoequipped)....2-43
Windows....2-44
Powerwindows....2-44
Interiorlights....2-46
Maplights....2-46
Interiorlightcontrolswitch....2-47
Vanitymirrorlights....2-48
Cargoareacourtesylight(Roadstermodels)......2-48
Cargolight(Coupemodels)....2-48
Trunklight(Roadstermodels)....2-49
HomeLink® UniversalTransceiver(ifsoequipped)......2-49
ProgrammingHomeLink ^® 2-50
ProgrammingHomeLink ^® for
Canadiancustomers....2-51
OperatingtheHomeLink ^®
UniversalTransceiver....2-51
Programmingtrouble-diagnosis....2-51
Clearingtheprogrammedinformation....2-52
ReprogrammingasingleHomeLink ^® button......2-52
Ifyourvehicleisstolen....2-52
COCKPIT

text_image
1 2 3 4 5 6 7 8 9 10 11 12 13 14 SSI0652- VehicleDynamicControl(VDC)OFFswitch (P.5-28)
- Headlight, foglight and turn signals switch (P.2-31)
3.MetersandGauges(combimeter)(P.2-5)
4.Triplemeter(P.2-8)
5.Windshieldwiperandwasherswitch(P.2-29)
6.Hoodreleasehandle(P.3-16)
7.IntelligentKeyport(P.5-10)
8.Paddleshifter(ifsoequipped)(P.5-14)
9.Steering-wheel-mountedcontrols(leftside)
—Menucontrolswitchortuningswitch (P.4-77)
—BACKswitch(P.4-77)
—Phoneswitch(ifsoequipped)(P.4-81)
—Volumecontrolswitches(P.4-77)
—Sourceselectswitch(P.4-77)
10.Tiltsteeringlever(P.3-36)
11.Steeringwheel
—Horn(P.2-36)
—Driversupplementalairbag(P.1-28)
12.Steering-wheel-mountedcontrols(rightside)
—Cruisecontrolswitches(P.5-21)
13. Selectorleverforautomatictransmission
(P.5-12)/Shiftleverformanualtransmission (P.5-16)
14.Parkingbrake(P.5-20)
INSTRUMENTPANEL
text_image
1 2 3 4 5 6 7 8 9 8 10 11 12 13 14 SSI0653- Ventilator(P.4-24)
- Centerdisplayandmulti-functioncontrolpanel (ifsoequipped)(P.4-3)orInstrumentpocket(if soequipped)(P.2-40) —Navigationsystem*(ifsoequipped) —Vehicleinformationandsettingbuttons(ifso equipped)(P.4-7)
—Bluetooth ^® Hands-FreePhoneSystem(ifso equipped)(P.4-81,P.4-103)
3.Frontpassengerairbagstatuslight(P.1-33)
4.Frontpassengersupplementalairbag(P.1-28)
5.Fuseboxcover(P.8-22)
6.Push-buttonignitionswitch(P.5-8)
7.Hazardwarningflasherswitch(P.2-35)
8.Seatheaterswitch(ifsoequipped)(P.2-36)or Climatecontrolledseatswitch(ifsoequipped) (P.2-38)
9. Softtopoperatingswitch(forRoadstermodels) (P.3-21)
10. SynchroRevMatchmode(S-MODE) switch (ifsoequipped)(P.5-17)
11.Heaterandairconditioner(P.4-24)
—Rearwindowdefrosterswitch(P.2-31)
12.Audiosystem(P.4-31)
13.Poweroutlet(P.2-39)
14.Glovebox(P.2-41)
*:RefertotheseparateNavigationSystem Owner'sManual.
2-4 Instrumentsandcontrols
METERSANDGAUGES

text_image
1 2 3 4 5 6 7 8 9 10 11 SSI0509- ENTER/NEXTswitch(P.2-22)
2.Fuelgauge(P.2-7)
3.Warning/Indicatorlights(P.2-9)
4.Tachometer(P.2-6)
5.Speedometer(P.2-6)
6.Instrumentbrightnesscontrolswitch(P.2-34) -
Vehicleinformationdisplay(P.2-17)
-
Enginecoolanttemperaturegauge(P.2-7)
- Transmission position indicator(ifsoequipped) (P.2-16)
—SynchroRevMatchmode(S-MODE)indicator(ifsoequipped)(P.5-17)

text_image
12 13 14 SSI052110.Odometer/Twintripodometercontrolknob (P.2-6)
11.Odometer/Twintripodometer(P.2-6)
12.Engineoiltemperaturegauge(P.2-8)
13.Voltmeter(P.2-8)
14. Clock(P.2-8, P.2-25)
text_image
150 00 ① ② ③ SIC3973SPEEDOMETERANDODOMETER
Speedometer
Thespeedometer indicates vehiclespeed in miles per hour (MPH) and kilometers per hour (km/h).
Odometer/twintripodometer
Theodometer ① andtwintripodometer ② aredisplayedwhentheignitionswitchisinthe ONposition.
Theodometerrecordsthetotaldistancethe vehiclehasbeendriven.
Thetwintripodometerrecordsthedistanceof individualtrips.
Changingthedisplay:
Pushing the TRIPA/BRESETknob ③
changesthedisplayasfollows:
TRIPA→TRIPB→TRIPA
Resettingthetripodometer:
PushingtheTRIPA/BRESETknob ③ formore than1 secondresetsthetripodometertozero.

text_image
① SIC3974TACHOMETER
Thetachometerindicatesenginespeedin revolutionsperminute(RPM).Donotrevthe engineintotheredzone ①.

CAUTION
Whenenginespeedapproachesthered zone, shifttoahighergearorreduce enginespeed. Operatingtheenginein theredzonemaycauseseriousengine damage.
text_image
C H ① SIC3975Thegaugeindicate the engine coolant temperature.
Theenginecoolanttemperatureiswithinthe normalrangewhenthegaugepointswithinthe zone ① shownintheillustration.
The enginecoolanttemperaturevarieswiththe outsideairtemperatureanddrivingconditions.

CAUTION
If the gauge indicates engine coolant temperature near the hot (H) end of the
normalrange, reduce vehicles speed to decrease temperature. If gauge is over then normal range, stop the vehicle as soon as safely possible. If the engine is overheated, continued operation of the vehicle may seriously damage the engine. See "If your vehicle overheats" (P.6-16) for immediate action required.

text_image
E F SIC3976FUELGAUGE
The gauge indicates the approximate fuel level in the tank.
Thegaugemaymoveslightlyduringbraking, turning,acceleration,orgoingupordownhills.
Refillthefueltankbeforethegauge registers“E”(Empty).
Thelowfuelwarning 📄 appearsonthevehicle informationdisplaywhentheamountoffuelin thetankisgettinglow.Refuelassoonasitis convenient,preferablybeforethegaugereaches "E".Therewillbeasmallreserveoffuelinthe tankwhenthefuelgaugereaches"E".
The ▶ indicate sthat the fuel - filler door is
Instrumentsandcontrols2-7
locatedonthepassenger'ssideofthevehicle.

CAUTION
- If the vehiclerunsoutoffuel, the SERVICE ENGINE malfunctionindicatorlight(MIL) may come on. Refuelassoon as possible. After afewdriving trips, the SERVICE ENGINE light should turn off. If the light remain on after afewdriving trips, havethe vehicle inspected by a NISSAN dealer.
- For additional information, see "MalfunctionIndicatorLight(MIL)" (P.2-14).
text_image
① ② ③ SIC4003Triplemeter
- Engineoiltemperaturegauge
2.Voltmeter - Clock
TRIPLEMETER
Engineoiltemperaturegauge Iftheengineoiltemperaturegauge ① indicates more than 280°F (140°C) while driving, reduce the enginespeed(RPM) and drive at aslowspeed.
Whentheengineoiltemperatureishigh, theengineprotectionmode,whichhelps reduce the chance of engine damage, couldactivateandautomaticallydecrease enginepower.Drivingwhiletheengineoil
temperatureishhighmayresultinengine damage.
Voltmeter
WhentheignitionswitchisturnedtotheON position,thevoltmeter ② indicatesthebattery voltage.Whentheengineisrunning,itindicates thegeneratorvoltage.
Whilecrankingtheengine,thevoltsdropbelow the normal range. If the needle is not in the normalrange(11to15volts)whiletheengineis running,itmayindicatethatthechargingsystem isnotfunctioningproperly. Havethesystem checkedbyaNISSANdealer.
Clock
Ifnecessary,adjusttheclock ③ onthesetting screenofthevehicleinformationdisplay.(See "CLOCK"(P.2-25).)
If the powers supply is disconnected, the clock will not indicate the correct time. Readjust the time.
WARNING/INDICATORLIGHTSAND AUDIBLEREMINDERS
text_image
ABS Anti-lockBrakingSystem(ABS)warning light MasterwarninglightRearfoglightindicatorlight* SeatbeltwarninglightandchimeSecurityindicatorlight* Soft top indicator light (Roadster models) AT CHECK Automatic transmission check warning light* Supplemental air bag warning light VehicleDynamicControl(VDC)warning light S BRAKE Brakewarninglight CRUISE CruiseindicatorlightTransmissionpositionindicat N/1 M ChargewarninglightFrontpassengerairbagstatus Signal/hazardindicatorlights VehicleDynamicControl(VDC)offindicator light EngineoilpressurewarninglightHighbeamindicatorlight IntelligentKeysystemwarninglightLowbeamindicatorlight*:ifsoequipped LowtirepressurewarninglightMalfunctionIndicator(MIL)CHECKINGBULBS
Withalldoorsclosed,applytheparkingbrake andpushtheignitionswitchtotheONposition withoutstartingtheengine.Thefollowinglights willcomeon(ifsoequipped):


The following lights come on briefly and thengo off (if so equipped):


Ifanylightdoesnotcomeon, itmayindicatea burned-outbulboranopencircuitinthe electricalsystem.Havethesystemcheckedby aNISSANdealer.
Someindicatorsandwarningsarealsodis- playedonthevehicleinformationdisplay.(See "Vehicleinformationdisplay"(P.2-17).)
WARNINGLIGHTS
ABS or Anti-lockBrakingSystem (ABS)warninglight
WhentheignitionswitchisintheONposition, theAnti-lockBrakingSystem(ABS)warning light illuminates and then turns off. This indicates theABSisoperational.
If the ABS warning light illuminates while the engineisrunning,orwhiledriving,itmay indicate the ABS is not functioning properly. HavethesystemcheckedbyaNISSANdealer.
If an ABS malfunction occurs, the anti-lock function is turned off. The brake system then operates normally, but without anti-lock assistance.(See "Brakesystem"(P.5-25).)
AT CHECK Automatictransmissioncheck warninglight(ifsoequipped)
WhentheignitionswitchispushedtotheON position,thelightcomesonfor2seconds.Ifthe lightcomesonatanyothertime,itmayindicate the transmissionisnot functioningproperly. HaveyourNISSANdealercheckandrepair thetransmission.


Brakewarninglight
Thislightfunctions for both theparkingbrake and thefootbrakesystems.
Parkingbrakeindicator:
When the ignition switch is in the ON position, the light comes on when the parking brake is applied.
Lowbrakefluidwarninglight:
WhentheignitionswitchisintheONposition, thelightwarnsofalowbrakefluidlevel.Ifthe lightcomesonwhiletheengineisrunningwith theparkingbrakenotapplied,stopthevehicle andperformthefollowing:
- Checkthebrakefluidlevel.Addbrakefluid asnecessary.(See"Brakeandclutchfluid"(P.8-14).)
- If the brake fluid level is correct, have the warning system checked by a NISSAN dealer.
Anti-lockBrakingSystem(ABS)warning indicator:
When the parking brake is released and the brake fluid level is sufficient, if both the brake warninglightandtheAnti-lockBrakingSystem (ABS) warning light illuminate, it may indicate the ABS is not functioning properly. Have the brakesystemchecked,andifnecessaryre-
paired,byaNISSANdealerpromptly.(See "Anti-lockBrakingSystem(ABS)warninglight" (P.2-10).)

WARNING
-Yourbrakesystemmaynotbe workingproperlyifthewarninglight ison.Drivingcouldbedangerous.If youjudgeittobesafe,drivecarefullytothenearestservicestation forrepairs.Otherwise,haveyour vehicletowedbecausedrivingit couldbedangerous.
- Pressingthebrakepedalwiththe enginestoppedand/orlowbrake fluidlevelmayincreaseyourstoppingdistanceandbrakingwillrequiregreaterpedaleffortaswellas pedaltravel.
- If the brake fluid level is below the minimum or MIN mark on the brake fluid reservoir, donot drive until the brakes system has been checked at NISSAN dealer.
Chargewarninglight
Ifthelightcomesonwhiletheengineisrunning, itmayindcatethechargingsystemisnot functioningproperly.Turntheengineoffand checkthealternatorbelt.Ifthebeltisloose, broken,missingorifthelightremainson,seea NISSANdealerimmediately.

CAUTION
Donotcontinuedrivingifthealternator beltisloose,brokenormissing.
Engineoilpressurewarninglight Thislightwarnsoflowengineoilpressure.Ifthe lightflickersorcomesonduringnormaldriving, pullofftheroadinasafearea,stoptheengine immediatelyandcallaNISSANdealerorother authorizedrepairshop.
Theengineoilpressurewarninglightis notdesignedtoindicatealowoillevel. Usethedipsticktochecktheoillevel.(See "Engineoil"(P.8-11).)

CAUTION
Runningtheenginewiththeengineoil pressurewarninglightoncouldcause seriousdamagetotheenginealmost immediately.Suchdamageisnotcoveredbywarranty.Turnofftheengineas soonasitissafetodoso.
KEY IntelligentKeysystemwarninglight AftertheignitionswitchispushedtotheON position, this light comes on for about 2 seconds andthenturnsoff.
Thislightwarnsofamalfunctionwiththe IntelligentKeysystem.
Ifthelightcomesonwhiletheengineis stopped, it maybe impossible to start the engine. Ifthelightcomesonwhiletheengine is running, you can drive the vehicle. However in these cases, contact a NISSAN dealer for repair as soon as possible.
Lowtirepressurewarninglight YourvehicleisequippedwithaTirePressure MonitoringSystem(TPMS)thatmonitorsthetire pressureofalltiresexceptthespare.
Thelowtirepressurewarninglightwarnsoflow tirepressureorindicatesthattheTPMSisnot functioningproperly.
AftertheignitionswitchispushedON,thislight illuminatesforabout1secondandturnsoff.
Lowtirepressurewarning:
If the vehicle is being driven with low tire pressure, the warning light will illuminate.
Whenthelowtirepressurewarninglight illuminates,youshouldstopandadjustthetire pressuretotherecommendedCOLDtire pressureshownontheTireandLoading Informationlabel.Thelowtirepressurewarning lightdoesnotautomaticallyturnoffwhenhetire pressureisadjusted.Afterthetireisinflatedto therecommendedpressure,thevehiclemustbe drivenatspeedsabove16MPH(25km/h)to activatetheTPMSandturnoffthelowtire pressurewarninglight.Useatirepressure gaugetocheckthetirepressure.
For additional information, see "TirePressure MonitoringSystem(TPMS)" (P.5-3) and "Tire PressureMonitoringSystem(TPMS)" (P.6-2).
TPMSmalfunction:
If the TPMS is not functioning properly, the low tire pressure warning light will flash for approximately 1 minute when the ignition switch is pushed ON. The light will remain on after the 1 minute. Havethesystem checked by a NISSAN dealer.
Foradditionalinformation,see"TirePressure MonitoringSystem(TPMS)("P.5-3).

WARNING
- Ifthelightdoesnotilluminatewith theignitionswitchpushedON,have thevehiclecheckedbyaNISSAN dealerassoonaspossible.
- Ifthelightilluminateswhiledriving, avoidsuddensteeringmaneuversor abruptbraking, reducevehicle speed,pullofftheroadtoasafe locationandstopthevehicleas soonaspossible.Drivingwithunder-inflatedtiresmaypermanently damagethetiresandincreasethe likelihoodoftirefailure.Serious vehicledamagecouldoccurand mayleadtoanaccidentandcould resultinseriouspersonalinjury. Checkthetirepressureforallfour
tires.Adjustthetirepressuretothe recommended COLD tire pressure shownontheTireandLoading Information label to turn the low tirepressurewarninglightOFF.If thelightstillilluminateswhiledrivingafteradjustingthetirepressure, atiremaybeflat.Ifyouhaveaflat tire,replaceitwithasparetireas soonaspossible.
- Whenasparetireismountedora wheelisreplaced, the TPMS will not function and the low tire pressure warning light will flash for approximately 1 minute. The light will remain on after the 1 minute. Contact your NISSAN dealer as soon as possible for tire replacement and/or system resetting.
- ReplacingtireswiththosenotoriginallyspecifiedbyNISSANcould affecttheproperoperationofthe TPMS.

CAUTION
•TheTPMSisnotasubstituteforthe regulartirepressurecheck.Besure tocheckthetirepressureregularly.
- If the vehicle is being driven at speed so flessthan 16MPH (25 km/h), the TPMS may not operate correctly.
- Besuretoinstallthespecifiedsize oftirestothefourwheelscorrectly.

Masterwarninglight
WhentheignitionswitchisintheONposition, themasterwarninglightilluminatesifanyofthe followingaredisplayedonthevehicleinformationdisplay:
- Nokeywarning
●Lowfuelwarning
●Lowwasherfluidwarning
●Parkingbrakereleasewarning
●Door/rearhatchopenwarning - Loosefuelcapwarning
See "Vehicleinformationdisplay" (P.2-17).

Seatbeltwarninglightandchime
Thelightandchimeremindyoutofastenseat belts. Thelightilluminateswhenevertheignition switchispushedtotheONposition, andwill remainilluminateduntilthedriver'sseatbeltis fastened. Atthesametime, thechimewillsound forabout6secondsunlessthedriver'sseatbelt issecurelyfastened.
Theseatbeltwarninglightforthefront passengerwillilluminateiftheseatbeltisnot fastenedwhenthefrontpassenger'sseatis occupied.For5secondsaftertheignition switchisintheONposition,thesystemdoes notactivatethewarninglightforthefront passenger.
See "Seatbelts" (P.1-9) for precaution on seat belt usage.

Supplementalairbagwarninglight
AfterpushingtheignitionswitchtotheON position,thesupplementalairbagwarninglight willilluminate.Theairbagwarninglightwillturn offafterabout7secondsifthefrontairbag,side airbagandcurtainairbagsystemsand/or pretensionersystemareoperational.
Ifanyofthefollowingconditionsoccur,thefront airbag,sideairbagandcurtainairbagsystems and/orpretensionersystemneedservicing,and yourvehiclemustbetakentoyournearest
NISSANdealer.
- Thesupplementalairbagwarninglight remainsonafterapproximately7seconds.
●Thesupplementalairbagwarninglight flashes intermittently. - Thesupplementalairbagwarninglightdoes notcomeonatall.
Unless checked and repaired, the Supplemental Restraint Systems and orthepretensioner seat belt may not function properly.
For additional information, see "Supplemental restraintsystem" (P.1-28).

WARNING
If the supplemental airbag warning lightison, it could mean that the front airbag, side airbag and curtain airbag systems and/or pretension system will not operate in an accident. To help avoid injury to yourself for others, have your vehicle checked by a dealer as soon as possible.
VehicleDynamicControl(VDC) warninglight
ThelightwillblinkwhentheVDCsystemorthe tractioncontrolsystemisoperating,thusalerting thedriverthatthevehicleisnearingitstraction limits.Theroadsurfacemaybeslippery.
Whenthevehicledynamiccontrolwarninglight illuminateswhenthevehicledynamiccontrol systemisturnedon, thislightalertsthedriverto thefactthatthevehicledynamiccontrol system'sfail-safemodeisoperating,forexample thevehicledynamiccontrolsystemmaynotbe functioningproperly.Havethesystemchecked byaNISSANdealer.Ifamalfunctionoccursin thesystem,thevehicledynamiccontrolsystem functionwillbecanceledbutthevehicleisstill driveable.Foradditionalinformation,see"VehicleDynamicControl(VDC)system"(P.5-28)of thismanual.
INDICATORLIGHTS
CRUISE Cruiseindicatorlight
Cruisemainswitchindicator:
Thislightilluminateswhenthecruisecontrol mainswitchispushed.Thelightturnsoffwhen themainswitchispushedagain.Whenthe cruisemainswitchindicatorlightilluminates,the cruisecontrolsystemisoperational.(See "Cruisecontrol"(P.5-21).)
Cruisemalfunction:
If the cruise indicator light blinks while the engine is running, it may indicate the cruise control system is not functioning properly. Have the system checked by a NISSAN dealer. (See "Cruisecontrol" (P.5-21).)
OFF Frontpassengerairbagstatuslight
Thefrontpassengerairbagstatuslight(), locatedonthecenteroftheinstrumentpanel, willbelitandthepassengerfrontairbagwillbe OFFdependingonhowthefrontpassenger seatisbeingused.
Forfrontpassengerairbagstatuslightoperation, see "NISSANAdvancedAirBagSystem (frontseats)"(P.1-33) of this manual.
Highbeamindicatorlight
Thislightcomesonwhentheheadlighthigh beamisonandgoesoutwhenthelowbeamis selected.
EDGE Lowbeamindicatorlight
Thelightilluminateswhentheheadlight switch is turnedtothe position.
SERVICE ENGINE SOON MalfunctionIndicatorLight(MIL)
Ifthemalfunctionindicatorlightcomeson steadyorblinkswhiletheengineisrunning, it may indicate apotentiallemissioncontrolmal-function.
Themalfunction indicatorlightmayalsocome on steadyifthefuel-fillercapislooseormissing,or ifthevehiclerunsoutoffuel.Checktomake surethefuel-fillercapisinstalledandclosed tightly,andthatthevehiclehasatleast3US gallons(14liters)offuelinthefueltank.
Afterafewdrivingtrips, the SERVICE ENGINE light should turnoffifnootherpotentialemissioncontrol systemmalfunctionexists.
If this indicator light remains on for 20 seconds and then blinks for 10 seconds when the engine is not running, it indicates that the vehicle is not ready for an emission control system inspection/maintenance test. (See "Readiness for Inspection/Maintenance (I/M) test" (P.9-23).)
Operation:
Themalfunctionindicatorlightwillcomeonin oneoftwoways:
- Malfunctionindicatorlightonsteady—An emissioncontrolsystemmalfunctionhas beendetected. Checkthefuel-fillercapif theLOOSEFUELCAPwarningappearsin thevehicleinformationdisplay.Ifthefuel-fillercapislooseormissing,tightenorinstall thecapandcontinuetodrivethevehicle.
The SERVICE lightshouldturnoffafterafew drivingtrips.Ifthe SERVICE lightdoesnotturnoff afterafewdrivingtrips,havethevehicle inspectedbyaNISSANdealer.Youdonot needtohaveyourvehicletowedtothe dealer.
- Malfunctionindicatorlightblinking—An enginemisfirehasbeendetectedwhichmay damagetheemissioncontrolsystem.
Toreduceoravoidemissioncontrolsystem damage:
—Donotdriveatspeedsabove45MPH (72km/h).
—Avoidhardaccelerationordeceleration.
—Avoidsteepuphillgrades.
—If possible, reduce the amount of cargo being hauledortowed.
Themalfunctionindicatorlightmaystop blinkingandremainon.
HavethevehicleinspectedbyaNISSAN dealer.Youdonotneedtohaveyourvehicle towedtothedealer.

CAUTION
Continuedvehicleoperationwithout havingtheemissioncontrolsystem checkedandrepairedasnecessary couldleadtopoordriveability,reduced fueleconomy,andpossibledamageto theemissioncontrolsystem.
Rearfoglightindicatorlight(ifso equipped)
Therearfoglightindicatorlightilluminateswhen therearfoglightison.(See“Foglightswitch”(P.2-35).)
Securityindicatorlight
Thelightblinkswhentheignitionswitchisinthe ACC,OFFForLOCKposition.Thisfunction indicatethesecuritysystemequippedonthe vehicleisoperational.
If these security system is misfunctioning, this light will remain on while the signitions switch in the ON position. For additional information, see "Security systems" (P.2-27).

Softtopindicatorlight(Roadster ls)
Thislightilluminateswhenthesofttopisbeing operatedoritisstoppedbeforereachingafull open/closestate.Whenthetopisfullyopened orclosed,thelightwillturnoff.
Thelightblinkswhilethesofttopisnotfully openedorclosedunderthefollowingconditions:
- Whenthevehicleisdriven.
- Whentheselectorleverorshiftleverisin theR(Reverse)position.
Besuretofullyopenorclosethesofttopwhen drivingthevehicle.
Thesofttopcanbemovedwiththesofttop operatingswitchonlyunderallofthefollowing conditions:
- Whenthevehicleisstopped.
- WhentheignitionswitchisON.
- Whenthetrunkisclosed.
- Whentheselectorleverorshiftleverisina positionotherthantheR(Reverse)position.

CAUTION
Operatethesofttopwiththeengine runningtopreventadischargedbattery.
Whenthesofttopisoperating,ifanyofthe aboveconditionsarediscontinuedoranyofthe followingconditionsaremet,thetopwillstop operating.
- Whentheselectorleverorshiftleverisin theR(Reverse)position.
- Whenthevehiclemovesataspeedof3 MPH(5km/h)ormore.
- Whenthebatteryvoltageisextremelylow.
- When the temperature of the soft top system becomes extremely high.
Releasetheoperatingswitch,andpushitagain undertheaboveconditionsuntilthetopisfully openedorclosed.Thesofttopindicatorlightwill turnoffwhenthetopoperationiscompletely finished.
If the soft top indicator light illuminates with the ignitions switch ON, it may indicate the electric soft top control unit is not functioning properly. Have your vehicle checked by a NISSAN dealer as soon as possible.
Formoredetailsabouttheelectricsofttop operation,see“Softtop(Roadstermodels)”(P.3-21).
5 SynchroRevMatchmode(S-MODE)indicator(ifsoequipped)
This indicator will illuminate when the SynchroRevMatchmode(S-MODE)isactivated.(See "SynchroRevMatchmode(S-MODE)(ifsoequippedforManualTransmission models")(P.5-17).)
N/I ^M Transmissionpositionindicator(if soequipped)
WhentheignitionswitchispushedtotheON position, theindicatorshowsthetransmission position.
ForATmodels:
In the manual shift mode, when the transmission does not shift to these selected gearduetothe transmission protection mode, the AT position indicator light will blink and abuzzer will sound.
(See "Drivingthevehicle" (P.5-12).)
Turnsignal/hazardindicatorlights
Thelightflasheswhenthe turnsignalswitch leverorhazardswitchisturnedon.
OFF VehicleDynamicControl(VDC)off indicatorlight
Thelightcomesonwhenthevehicledynamic controloffswitchispushedtoOFF.This indicates that the vehicledynamiccontrol systemandtraction controlsystemarenot operating.
AUDIBLEREMINDERS
Keyreminderchime
A chime will sound if the driver side door is openedwhiletheignitionswitchispushedto the ACC position or pushed to the OFF or LOCK position with the Intelligent Key left in the IntelligentKeyport.Makesuretheignition switchispushedtotheOFFposition,andtake theIntelligentKeywith youwhenleaving the vehicle.
Lightreminderchime
Achimewillsoundwhenthedriversidedooris openedwiththelightswitchinthe or position and the ignition switch in the ACC, OFF orLOCKposition.
Turn the light switch off when you leave the vehicle.
VEHICLEINFORMATIONDISPLAY
Parkingbrakereminderchime
Achimewillsoundifthevehiclespeedisabove 4MPH(7km/h)withtheparkingbrakeapplied. Stopthevehicleandreleasetheparkingbrake.
Brakepadwearwarning
Thediscbrakepadshaveaudiblewearwarnings. Whenabrakepadrequiresreplacement, it willmakeahighpitchedscrapingsoundwhen thevehicleisinmotion. Thisscrapingsoundwill firstoccuronlywhenthebrakepedalis depressed. Aftermorewearofthebrakepad thesoundwillalwaysbeheardevenifthebrake pedalisnotdepressed. Havethebrakes checkedassoonaspossibleifthewarning soundisheard.
text_image
E F ① C H SIC3977The vehicle information display warnings and information.
① displaysthe

text_image
BRAKE 1 2 3 NO KEY 4 SHIFT 5 6 PUSH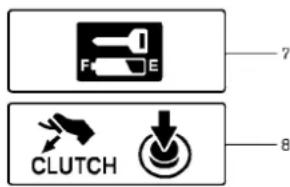
text_image
F E CLUTCH 7 8JVI0351X
OPERATIONALINDICATORS
- Enginestartoperationindicator (Automatictransmissionmodels)
This indicator appears when these selector leveris in the P(Park) position.
This indicator mean that the engine will start by
pushingtheignitionswitchwiththebrakepedal depressed.
2-18 Instrumentsandcontrols
2.Keyinsertionindicator
This indicator appears when the key need to be inserted into the key port. (Forexample, the Intelligent Key battery is discharged.)
If this indicator appears, insert the key into the key port in the correct direction. (See "Push-buttonignitions switch" (P.5-8).)
- Intelligent Keyremoval indicator
This indicator appears when the driver's door is opened with the ignition switch in the OFF for LOCK position and the Intelligent Key placed in the key port. A key reminder chime also sounds.
If this indicator appears, removeth Intelligent Key from the key port and take it with you when leaving the vehicle.
- NOKEY warning
This warning appears neither of the following conditions.
NoIntelligentKeyinsidethevehicle:
The warning appears when the door is closed with the Intelligent Keyleft outside the vehicle and the ignition switch in the ACC or ON position. Makes sure that the Intelligent Key is inside the vehicle.
UnregisteredIntelligentKey:
Thewarningappearswhentheignitionswitchis
pushedfromtheLOCKpositionandthe IntelligentKeycannotberecognizedbythe system.Youcannotstarttheenginewithan unregisteredkey.UsetheregisteredIntelligent Key.
See "IntelligentKeysystem" (P.3-6) form more details.
5.SHIFT"P" warning(Automatic Transmission models)
This warning appears when the ignitions switch is pushed to stop the engine with these selector lever in any position except the P(Park) position.
If this warning appears, movetheselector lever to the P(Park) position or push the ignition switch to the ON position.
Aninsidewarningchimewillalsosound.(See "IntelligentKeysystem"(P.3-6).)
- "PUSH" warning(Automatic Transmission models)
This warningappearswhenthesectorleveris movedtotheP(Park)positionwiththeignition switchintheACCpositionaftertheSHIFT"P" warningappears.
TopushtheignitionswitchtotheOFFposition, performthefollowingprocedure:
SHIFT“P”warning→(Movetheselector leverto“P”)→PUSHwarning→(Pushthe
ignitionswitch→ignitionswitchpositionis turnedtoON)→PUSHwarning→(Pushthe ignitionswitch→ignitionswitchpositionis turnedtoOFF)
- Intelligent Key battery discharge indicator
This indicator appears when the Intelligent Key battery is running out of power.
If this indicator appears, replace the battery with anewone. (See "Intelligent Key battery replacement" (P.8-25).)
- Enginestartoperationindicator (ManualTransmissionmodels)
This indicatormeansthattheenginewillstartby pushingtheignitionswitchwiththeclutchpedal depressed.
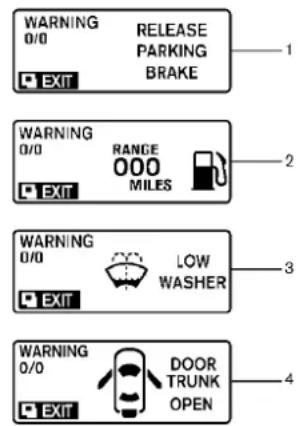
text_image
WARNING 0/0 RELEASE PARKING BRAKE EXIT WARNING 0/0 RANGE 000 MILES EXIT WARNING 0/0 LOW WASHER EXIT WARNING 0/0 DOOR TRUNK OPEN EXIT
text_image
WARNING 0/0 LOOSE FUEL CAP EXIT RESET 5 6 7 8 ALERT EXIT 0.0 H 1 2 3 4 5 6 7 8 ALERT -00 °F EXIT LOW OUTSIDE TEMP S-MODE WARNING 0/0 EXITSIC4677
inthetankwhenthefuelgaugereaches theempty(E)position.
3.Lowwasherfluidwarning
This warning appears when the washertank fluid is atalow level. Add washer fluid as necessary. (See "Windowwasherfluid" (P.8-15).)
- Door/rearhatch/trunkopenwarning (ignitionswitchisintheONposition)
This warning appears if any of the doors and/or therear hatch/trunk are open or not closed securely. The vehicle icon indicates which door is open on the display.
- Loosefuelcapwarning
This warning appears when the fuel-fillercapis not tightened correctly after the vehicle has been refueled. (See "Fuel-fillercap" (P.3-34).)
- "TIMER" indicator
This indicator appears when the set "TIMER" indicator activates. You can set the time for up to 6 hours. (See "Tripcomputer" (P.2-22).)
WARNINGSANDALERTS
- Parkingbrakereleasewarning
This warning appears when the vehicles speed is above 4 MPH (7 km/h) and the parking brake is applied.
2.Lowfuelwarning
This warning appears when the fuel level in the tank is getting low. Refuel as soon as it is convenient, preferably before the fuel gauge reach the empty (E) position.
Thereisasmallreserveoffuelremaining
2-20Instrumentsandcontrols
7.Lowoutsidetemperaturewarning
This warning appears if the outside temperature is below 37^ F ( 3^ C). The warning can be set not to be displayed. (See "Tripcomputer" (P.2-22).)
- SynchroRevMatchmode(S-MODE) warning
This warning appears if a system malfunction occurs. When the warning appears, the S-MODE function will not operate, but the manual transmission will operate normally and driving can be continued. Havethesystem checked by a NISSAN dealer.
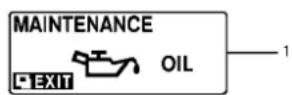
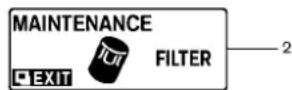


MAINTENANCEINDICATORS
- Engineoilreplacementindicator
This indicator appears when the sometime comes for changing the engine oil. You can set or reset the distance for changing the engine oil. (See "Tripcomputer" (P.2-22).)
- Oilfilterreplacementindicator
This indicator appears when the sometime comes for replacing the oil filter. You can set or reset the distance for replacing the oil filter. (See "Trip computer" (P.2-22).)
- Tirereplacement indicator
This indicator appears when the sometime comes for replacing tires. You can set or reset the distance for replacing tires. (See "Tripcomputer" (P.2-22).)
4."OTHER"indicator
This indicator appears when these time comes for replacing item so other than the engine oil, oil filter and tires. You can set or reset the distance for replacing the items. (See "Tripcomputer" (P.2-22).)
Modelswithnavigationsystem:
Moremaintenanceremindersarealsoavailable onthecenterdisplay.(See"HowtouseINFO button"(P.4-8).)
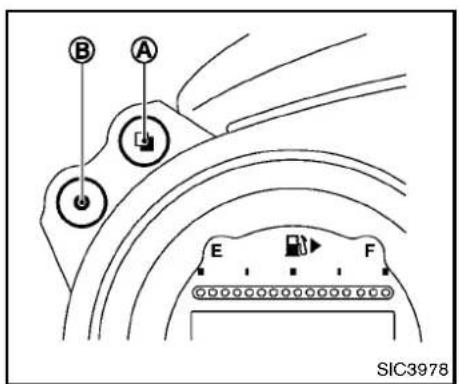
text_image
B A E F SIC3978tripodometer→Distancetoempty→Outside airtemperature→Setting→Warningcheck
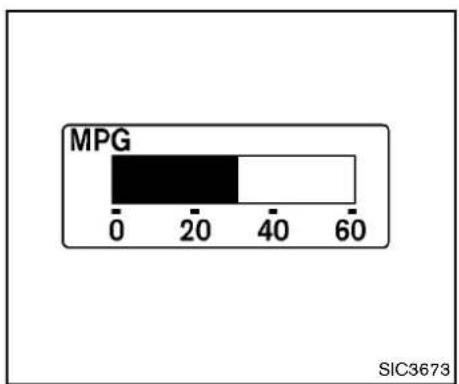
bar
| MPG Range | Value | | --------- | ----- | | 0-20 | 20 | | 20-40 | 40 | | 40-60 | 60 |TRIPCOMPUTER
Switchesforthetripcomputerarelocated on the left side of the combination meter panel. To operate the trip computer, push the switches as shown above.


ENTERswitch

NEXTswitch
WhentheignitionswitchispushedtotheON position,modesofthetripcomputercanbe selectedbypushingthe □ switch (A)
Eachtimethe □ switch Ⓐ ispushed,the displaywillchangeasfollows:
Currentfuelconsumption→Averagefuel consumptionandspeed→Elapsedtimeand
2-22 Instrumentsandcontrols
Currentfuelconsumption(MPGorl (liter)/100km)
The current fuel consumption modes show the current fuel consumption.
MPG 000.0 MPH 000.0
SIC3674
Averagefuelconsumption(MPGorl (liter)/100km)andspeed(MPHorkm/h)
Fuelconsumption:
Theaveragefuelconsumptionmodeshowsthe averagefuelconsumptionsincethelastreset. Resettingisdonebypushingthe ● switch (B) forlongerthan1 second.(Theaveragespeedis alsoresetatthesametime.)
Thedisplayisupdatedevery30seconds.At aboutthefirst1/3mile(500m)afterareset,the displayshows“——”.
Speed:
Theaveragespeedmodeshowstheaverage vehiclespeedsincethelastreset. Resettingis
donebypushingthe ● switch Ⓑ forlonger than1 second.(Theaveragefuelconsumptionis alsoresetatthesametime.)
Thedisplayisupdatedevery30seconds.The first30secondsafterareset,thedisplayshows “——”.
TIME 00:00 MILES000.0
SIC4226
Elapsed time and tripodometer (MILES orkm)
Elapsedtime:
Theelapsedtimemodeshowsthetimesince thelastreset. Thedisplayedtimecanbereset bypushingthe ● switch (8) forlongerthan1 second.(Thetripodometerisalsoresetatthe sametime.)
Tripodometer:
The tripodometer modes show the total distance vehicle has been drivens in the last reset. Resetting is done by pushing the switch ⑧ for longer than 1 second. (The elapsed time is also set at the same time.)

Instrumentsandcontrols2-23
RANGE 0000 MILES
SIC3676
Distancetoempty(MILESorkm)
Thedistancetoempty(dte)modeprovidesyou withanestimationofthedistancethatcanbe drivenbeforerefueling. Thedteisconstantly beingcalculated, basedontheamountoffuelin thefueltankandtheactualfuelconsumption.
Thedisplayisupdatedevery30seconds.
Thedtemodeincludesalowrangewarning feature.Ifthefuellevelislow,thewarningis displayedonthescreen.
Whenthefuelleveldropsevenlower,thedte displaywillchangeto“——”.
- If the amount off fuel added small, the display just before the ignition switch is
2-24 Instrumentsandcontrols
pushedtotheOFFpositionmaycontinueto bedisplayed.
- Whendrivinguphillorroundingcurves, the fuelinthetankshifts, whichmaymomentarilychangethedisplay.
OUTSIDE TEMP
ICY 37°F
SIC4037
Outside air temperature (°F or °C)
The outside air temperature is displayed in °C for ^ C in the range of -22 to 131°F (-30 to 55°C).
The outside air temperature mode includes a low temperature warning feature. If the outside air temperature is below 37^ F ( 3^ C), the warning "ICY" is displayed on the screen.
Theoutsidetemperaturesensorislocatedin frontoftheradiator. Thesensormaybeaffected by road or engine heat, wind directions and otherdrivingconditions. Thedisplaymaydiffer from the actual outside temperature or the temperaturedisplayedonvarioussignsorbill- boards.
text_image
SETTING > CLOCK > SKIP > MAINTENANCE > ALERT > OPTIONS ENTER ● NEXT SIC3992Setting
Settingcannotbemadewhiledriving.A message"Settingcanonlybeoperated whenstopped"isalsodisplayedonthe vehicleinformationdisplay.
The □ switch Ⓐ andswitch Ⓑ are usedinthesettingmodetoselectanddecidea menu.
SKIP:
Pushthe ☐ switch Ⓐ tomovetothewarning checkmode.
Pushthe ● switch Ⓑ toselectothermenus.
ALERT:
Alertmenucanbesettonotifythefollowing items.
•UPSHIFT
Selectthissubmenutosettheenginespeed (RPM)oftheupshiftindicator.See"Upshift indicator"(P.5-19)(MTmodels)or"Manual shiftmode"(P.5-14)(ATmodels).
•TIMER
Selectthissubmenutospecifywhenthe "TIMER" indicatoractivates.
•ICY
Select this submenutodisplaythelow outsidetemperaturewarning.
Toreturntothetoppageofthesettingmode, select"BACK".
CLOCK:
Clockadjustmentcanbesetonthismenu.
- SETTING
Adjustthetime(hourandminute)ofthe clockonthetriplemeter.
- RESET
Selectthissubmenutosetthetimequickly tothepreviousornexthour.
MAINTENANCE:
Themaintenanceintervalsofthefollowingitems canbesetorresetforthereminders.
•OIL
Selectthissubmenutosetorresetthe distanceforchangingtheengineoil.
•FILTER
Select this submenutosetorreset the distance for replacing the oil filter.
•TIRE
Selectthissubmenutosetorresetthe distanceforreplacingtires.
•OTHER
Selectthissubmenuandsetorresetthe distanceforreplacingitemsotherthanthe engineoil,oilfilterandtires.
Toreturntothetoppageofthesettingmode, select"BACK".
OPTIONS:
The 3 option menus can be set to your preference.
•LANGUAGE
SelectthissubmenutochooseEnglishor Frenchfordisplay.
•UNIT
Selectthissubmenutochoosetheunitfrom USorMETRIC.
•EFFECTS
Selectthismenutosetthedialeffects describedbelowtoonoroff.
—The indicator needlessweep in the meters when the engine is started. Toreturntothetoppage of these setting mode, select "BACK".
text_image
WARNING X 1 > SKIP > DETAIL ENTER ● NEXT SIC3993DETAIL:
Thisitemisavailableonlywhenawarningis displayed.
Selectthismenutoseethedetailsofwarnings.
Warningcheck
Toseeifthereareanyofthefollowingwarnings andcorrespondingdetails,selectthismenu.
- Nokeywarning
●Lowfuelwarning
●Lowwasherfluidwarning
●Parkingbrakereleasewarning
●Door/rearhatchopenwarning - Loosefuelcapwarning
SKIP:
Pushthe ☐ switch Ⓐ tomovetothewarning checkmode.
Pushthe ● switch Ⓑ toselectothermenus.
2-26 Instrumentsandcontrols
SECURITYSYSTEMS
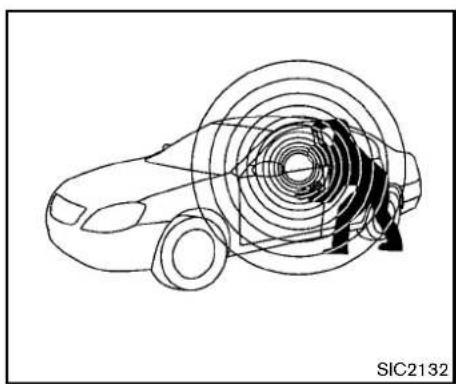
natural_image
Diagram of a car with concentric circular patterns and directional arrows, no readable text or symbols presentYourvehiclehastwotypesofsecuritysystems, asfollows:
●Vehiclesecuritysystem
•NISSANVehicleImmobilizerSystem
Theseurityconditionwillbeshownbythe securityindicatorlight.
VEHICLESECURITYSYSTEM
The vehicle security system provides visual and audio alarmsignals if someone open the doors, hood rear hatch when the system is armed. It is not, however, amotion detection types system that activates when vehicle is moved or when a vibration occurs.
Thesystemhelpsdetervehicletheftbutcannot preventit,norcanitpreventthetheftofinterior orexteriorvehiclecomponentsinallsituations. Alwayssecureyourvehicleevenifparkingfora briefperiod.NeverleaveyourIntelligentKey(s) inthevehicle,andalwayslockitwhenun-attended.Beawareofyoursurroundings,and parkinsecure,well-litareaswheneverpossible.
Manydevicesofferingadditionalprotection, suchascomponentlocks,identificationmarkers, andtrackingsystems,areavailableatauto supplystoresandspecialtyshops.Your NISSANdealermayalsooffersuchequipment. Checkwithyourinsurancecompanytoseef youmaybeeligiblefordiscountsforvarious theftprotectionfeatures.
natural_image
Simple line drawing of a car silhouette with a key inserted into the center (no text or symbols)SIC2045
Howtoarmthevehiclesecuritysystem
1.Closeallwindows.
Thesystemcanbearmedevenifthe windowsareopen.
-
Push the ignitions switch to the OFF position.
-
RemovethelIntelligentKeyfromthevehicle.
-
Closealldoors, hoodandrearhatch/trunk. Lockalldoorsandtrunk(Roadstermodels). ThedoorscanbelockedwiththeIntelligent Key, doorhandlerequestswitch, power doorlockswitchormechanicalkey.
-
Confirm that these security indicator light comes on. These security indicator light stays on for about 30 seconds. The vehicle
Instrumentsandcontrols
securitysystemisnowpre-armed. After about 30 secondsthevehiclesecurity systemautomaticallyshifts into the armed phase. Theseuritylightbeginstoflash once every approximately 3 seconds. If, during this 30-second pre-arm time period, the door is unlocked, or the ignition switch is pushed to ACCorON, the system will not arm.
Evenwhenthedriverand/orpassengers areinthevehicle,thesystemwillactivate withalldoors,hoodandrearhatchlocked withtheignitionswitchintheLOCK position.Whenpushingtheignitionswitch totheACCorONposition,thesystemwill bereleased.
Vehiclesecuritysystemactivation Thevehiclesecuritysystemwillgivethefollowingalarm:
●Theheadlightsblinkandthehornsounds intermittently.
- Thealarmautomaticallyturnsoffafter approximately1 minute. However, thealarm reactivatesifthevehicleistamperedwith again.
Thealarmisactivatedby:
- Unlockingthedoororopeningtherear hatchwithoutusingthebuttononthe
2-28 Instrumentsandcontrols
IntelligentKey, thedoorhandlerequest switchorthemechanicalkey. (Evenifthe doorisopenedbyreleasingthedoorinside lockknob, thealarmwillactivate.)
- Openingthehood.
Howtostopanactivatedalarm
Thealarmwillstopbyunlockingadoorby pushingtheunlockbuttonontheIntelligentKey, thedoorhandlerequestswitchorusingthe mechanicalkey.Thealarmwillnotstopifthe ignitionswitchispushedtotheACCorON position.
If the system does not operate as described above, have it checked by a NISSAN dealer.
NISSANVEHICLEIMMOBILIZERSYSTEM
TheNISSANVehicleImmobilizerSystemwillnot allowtheenginetostartwithouttheuseofthe registeredIntelligentKey.Neverleavethese keysinthevehicle.
ForUSA:
ThisdevicecomplieswithPart15ofthe FCCRules.Operationissubjecttothe followingtwoconditions:
(1) This device may not cause harmful interference, and (2) this device must
acceptanyinterferencereceived,including interferencethatmaycauseundesired operation.
Note: Changesormodificationsnotexpresslyapprovedbythepartyresponsible forcompliancecouldvoid theuser's authoritytooperatetheequipment.
ForCanada:
This device complies with RSS-210 of Industry Canada. Operation is subject to the following two conditions:
(1) this device may not cause interference, and (2) this device must accept any interference, including interference that may cause undesired operation of the device.

natural_image
Simple line drawing of a car silhouette with a key on the roof (no text or symbols)SIC2045
Securityindicatorlight
Theseurityindicatorlightislocatedonthe meterpanel.Itindicatesthestatusofthe NISSANVehicleImmobilizerSystem.
Thelightblinksaftertheignitionswitchisinthe LOCK,ACCorOFFposition.Thisfunction indicatethesecuritysystemsequippedonthe vehicleareoperational.
If the NISSAN Vehicle Immobilizer System is malfunctioning, this light will remain on while the ignition switch is in the ON position.
Ifthelightstillremainsonand/orthe enginewillnotstart,seeaNISSANdealer forNISSANVehicleImmobilizerSystem
serviceassoonaspossible.Pleasebring allIntelligentKeysthatyouhavewhen visitingaNISSANdealerforservice.
- Donotoperatethewashercontinuouslyformorethan30seconds.
- Donotoperatethewasherifthe reservoirtankisempty.
- Donotfillthewindowwasher reservoirtankwithwasherfluid concentratesatfullstrength.Some methylalcoholbasedwasherfluid concentratesmaypermanentlystain thegrilleifspilledwhilefillingthe windowwasherreservoirtank.
- Pre-mixwasherfluidconcentrates withwatertothemanufacturer's recommendedlevelsbeforepouring thefluidintothewindowwasher
Instrumentsandcontrols2-29
reservoirtank.Donotusethe windowwasherreservoirtankto mixthewasherfluidconcentrate andwater.
text_image
MIST OFF INT LO H1 FRONT INT TIME A B ④ ⑤ ① ② ③ SIC3787andoff, see "HowtouseSETTINGbutton" (P.4-11).
② Low—continuouslowspeedoperation
③ High—continuoushighspeedoperation
Pushtheleverup ④ tohaveonesweep operationofthewiper.
Pullthelevertowardyou ⑤ tooperatethe washer.Thenthewiperwillalsooperateseveral times.
Thewindshieldwiperandwasheroperates whentheignitionswitchisintheONposition. Pushtheleverdowntooperatethewiperatthe followingspeed:
① Intermittent—intermittentoperationcanbe adjusted by turning the knob toward (Slower) or Ⓑ (Faster).
When the speed sensing wiper interval function (formodels with navigation system) is turned on, the intermittent operationspeed varies in accordance with the vehiclespeed. (Forexample, when the vehiclespeed is high, the intermittent operationspeed will be faster.)
Modelswithnavigationsystem:
Notethathefunctionissettodisabledasthe
factorydefaultsetting.Toturnthisfunctionon
REARWINDOWDEFROSTER
SWITCH
text_image
PUSH AUTO ① ② SIC3980TypeA

text_image
SIC3979TypeB
Todefog/defrosttherearwindowglassand outsidemirrors,starttheengineandpushthe switch ① on.Theindicatorlight ② willcome on.Pushtheswitchagaintoturnthedefroster off.
Itwillautomaticallyturnoffinapproximately15 minutes.

CAUTION
- Whencleaningtheinnersideofthe rearwindow, be careful not to scratchordamagetherearwindow defroster.
- Donotusetherearwindowdefrosterswitchwhilethesofttopisbeing operatedorfullyopened.Theheat maydamagethetopmaterialand/orcomponents(forRoadstermodels).
HEADLIGHT ANDTURN SIGNAL SWITCH
XENONHEADLIGHTS

WARNING

HIGHVOLTAGE
- When xenonheadlights are on, they produce a high voltage. Top prevent an electric shock, never attempt to modify or disassemble. Always have your xenonhead lights replaced a NISSAN dealer.
- Xenonheadlightsprovideconsiderablymorelightthanconventional headlights.Iftheyarenotcorrectly aimed,theymighttemporarilyblind anoncomingdriverorthedriver aheadofyouandcauseaserious accident.Ifheadlightsarenotaimed correctly, immediatelytake your vehicletoaNISSANdealerandhave theheadlights adjustedcorrectly.
When thexenonheadlightisinitiallyturnedon, itsbrightnessorcolorvariesslightly. However, the color and brightness will soon stabilize.
- Thelifeofxenonheadlightswillbe shortenedbyfrequenton-offoperation.Itisgenerallydesirablenottoturn
offtheheadlightsforshortintervals (forexample,whenthevehiclestopsat atrafficsignal).
- Ifthexenonheadlightbulbiscloseto burningout, thebrightnesswilldrasticallydecrease, the lightwill start blinking, or the color of the light will be comereddish. Ifoneormoreofthe abovesignsappear, contactaNISSAN dealer.
text_image
ED DE ① OFF AUTO OFF ON ② SIC3994HEADLIGHTSWITCH
Lighting
① Turntheswitchtotheposition:
Thefrontpark,sidemarker,tail,licenseplateand
instrumentlightswillcomeon.
② Turntheswitchtotheposition: Headlightswillcomeonandalltheotherlights remainon.
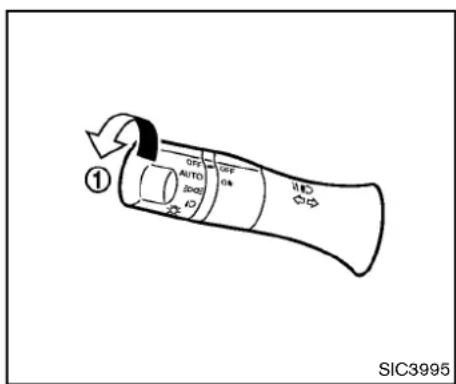
text_image
OFF AUTO SIC3995 1 OFF AUTO SIC3995Autolightsystem
Theautolightsystemallowstheheadlightstobe setsotheyturnonandoffautomatically.
Tosettheautolightsystem:
- Makesuretheheadlightswitchisinthe AUTOposition ①.
- PushtheignitionswitchtotheONposition.
- The autolightsystem automatically turnsthe headlightson and off.
Toturntheautolightsystemoff,turntheswitch totheOFF, or position.
Theautolightsystemcanturnontheheadlights automaticallywhenitisdarkandturnoffthe
headlightswhenitislight.
If theignitionswitch is pushed to the OFF position and one of the doors is opened and this condition is continued, the headlights remain on for 5 minutes.
Automaticheadlightsoffdelay:
Youcankeeptheheadlightsonforupto180 secondsafteryoupushtheignitionswitchto OFFandopenanydoorthencloseallthedoors.
You can adjust the period of the automatic headlight soff delay from 0 seconds (OFF) to
180seconds.Thefactorydefaultsettingis45 seconds.
Modelswithnavigationsystem:
Forautomaticheadlightsoffdelaysetting, see "LightOffDelay"(P.4-15).
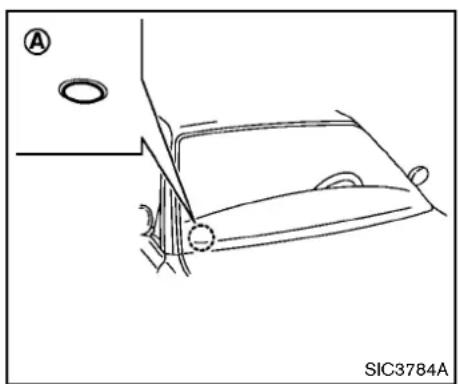
natural_image
Line drawing of a car interior showing dashboard and seat area (no text or symbols)Besurenottoputanythingontopofthe photosensor locatedonthetopofthe instrumentpanel.Thephotosensorcontrolstheautolight;ifitiscovered,the photosensorreactsasifitisdarkandthe headlightswillilluminate.
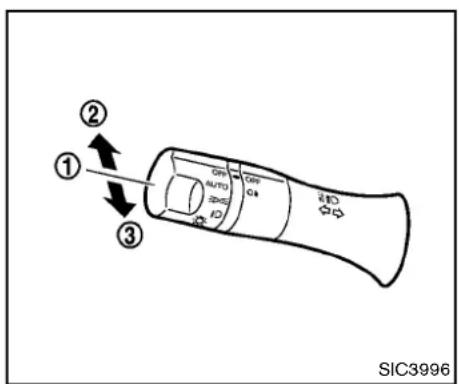
text_image
① ② ③ SIC3996Headlightbeamselect
① Toselectthelowbeam, puttheleverin the neutralpositionasshown.
② Toselectthehighbeam, pushtheleverforward while the switch is in the position. Pull it back to select the low beam.
③ Pullingthelevertowardyouwillflashthe headlighthighbeamevenwhentheheadlight switchisintheOFFposition.
Batterysaversystem
Achimewillsoundwhenthedriversidedooris openedwiththelightswitchinthe or positionandtheignitionswitchintheACC,OFF orLOCKposition.
Whentheheadlightswitchisinthe positionwhiletheignitionswitchisintheON position,thelightswillautomaticallyturnoff5 minutesaftertheignitionswitchhasbeen pushedtotheOFFposition.
Whentheheadlightswitchremainsinthe orpositionafterthelightsautomaticallyturn off,thelightswillturnonwhentheignition switchispushedtotheONposition.

CAUTION
- Whenyouturnontheheadlight switchagainafterthelightsautomaticallyturnoff,thelightswillnot turnoffautomatically.Besureto turnthelightswitchtotheOFF positionwhenyouleavethevehicle forextendedperiodsoftime,otherwisethebatterywillbedischarged.
- Neverleavethelightswitchon whentheengineisnotrunningfor extendedperiodsoftimevenifthe
headlightsturnoffautomatically.
Daytimerunninglightsystem(Canada only)
Thedaytimerunninglightsautomaticallyilluminatewhentheengineisstartedwiththeparkingbrakereleased. ThedaytimerunninglightsoperatewiththeheadlightswitchintheOFF positionorinthe position.Turn the head-lightswitchtothe positionforfullilluminationwhendrivingatnight.
If the parking brake is applied before the engine is started, the day timer running lights donot illuminate. The day timer running lightsilluminate on the parking brake is released. The daytime running light will remain on until the ignition switch is pushed to the OFF position.

WARNING
Itisnecessaryatdusktoturnonyour headlights.Failureretodosocouldcause anaccidentinjuring yourself and others.

text_image
A B SIC3981Instrumentbrightnesscontrol
The instrument brightness control operates when the headlight control switch is in the DQ , or AUTO position (with the autolights activated).
Pushtheupper Ⓐ orlower Ⓑ switchto brightenordimtheinstrumentpanellightswhen drivingatnight.
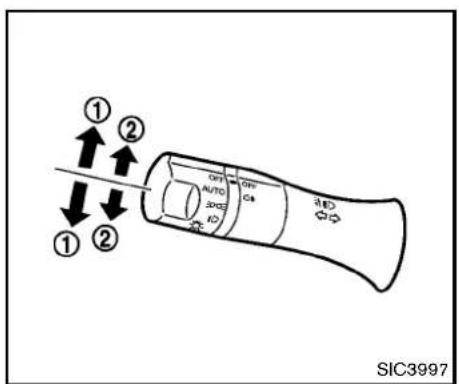
text_image
① ② ① ② OFF AUTO 3002 ID OFF C4 ① SIC3997TURNSIGNALSWITCH
①Turnsignal
Movetheleverupordowntosignaltheturning direction. Whentethurniscompleted, theturn signalscancelautomatically.
②Lanechangesignal
Toindicatealanechange, movetheleverupor downtothepointwherelightsbeginflashing.
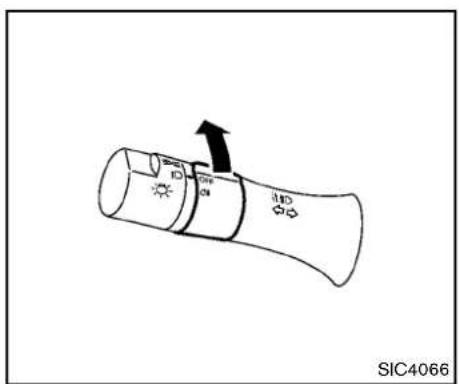
text_image
SIC4066FOGLIGHT SWITCH(ifsoequipped)
Toturnontherearfoglight,turntheheadlight switchtothe ☐ position,thenturnthefoglight switchtothe ☐ position.
TheswitchreturnstotheOFFpositionautomatically,andtherearfoglightwillilluminate.
Makesuretheindicatorlightontheinstrument panelilluminates.
Toturnofftherearfoglight,turnthefoglight switchtothe Ⓠ positionagain.
Makesuretheindicatorlightontheinstrument panelturnsoff.
natural_image
Simple geometric diagram showing a triangle with an arrow pointing downward (no text or symbols)Pushtheswitchontowarnotherdriverswhen youmuststoporparkunderemergencyconditions.Allturnsignallightswillflash.

WARNING
- Ifstoppingforanemergency, be suretomovethevehiclewelloffthe road.
- Donotusethehazardwarning flasherswhilemovingonthehighwayunlessunusualcircumstances forceyoutodrivesoslowlythat yourvehiclemightbecomeahazard toothertraffic.
Instrumentsandcontrols2-35
HORNHEATEDSEATS(ifsoequipped)
-Turnsignalsdonotworkwhenthe hazardwarningflasherlightsare on.
Theflashercanbeactuatedwiththeignition switchinanyposition.
Somestatelawsmayprohibittheuseof thehazardwarningflasherswitchwhile driving.
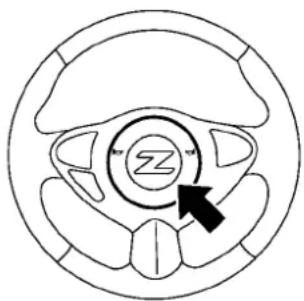
natural_image
Circular diagram with a central circular element and an arrow pointing to it, no text or symbols present.SIC3982
Tosoundthehorn, pushthecenterpadarea of thesteeringwheel.

WARNING
Donotdisassemblethehorn.Doingso could affect proper operation of the supplemental front airbagsystem. Tampering with the supplemental front airbagsystem may result in serious personal injury.

WARNING
Donotuseorallowoccupantstouse theseatheaterifyouortheoccupants cannotmonitorelevatedseattemperaturesorhaveaninabilitytofeelpainin thosebodypartsincontactwiththe seat.Useoftheseatheaterbysuch peoplecouldresultinseriousinjury.

CAUTION
- The battery could rundown if the seatheater is operated while the engine is not running.
- Donotusetheseatheaterfor extendedperiodsorwhennoone isusingtheseat.
- Donotputanythingontheseat whichinsulatesheat,suchasa blanket,cushion,seatcover,etc. Otherwise,theseatmaybecome overheated.
- Donotplaceanythinghardorheavy ontheseatorpierceitwithapinor similarobject.Thismayresultin
damagetotheheater.
- Anyliquidspilledontheheatedseat shouldberemovedimmediately withadrycloth.
- Whencleaningtheseat,neveruse gasoline,thinner,oranysimilar materials.
- Ifanyabnormalitiesarefoundorthe heatedseatdoesnotoperate,turn theswitchoffandhavethesystem checkedbyaNISSANdealer.
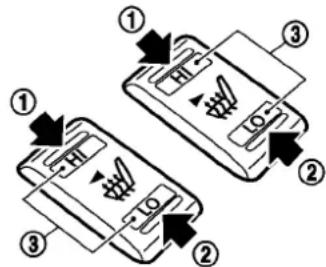
text_image
Diagram showing two smartphone screens with labeled parts and directional arrows indicating movement or function.SIC2770
Thefrontseatsarewarmedbybuilt-inheaters. Theswitcheslocatedonthecenterconsolecan beoperatedindependentlyofeachother.
- Starttheengine.
-
Select the desired heat range.
-
Forhighheat, pushtheHIsideofthe switch ①.
- Forlowheat, pushtheLOsideofthe switch ②.
-
Theindicatorlight ③ willilluminate whentheheaterison.
-
Toturnofftheheater, returntheswitch to the level position. Makesure that the indicator light turn soff.
Theheateriscontrolledbyathermostat, automaticallyturningtheheateronandoff. Theindicatorlightwillremainonaslongas theswitchison.
Whenthevehicle'sinterioriswarmed,or beforeyouleavethevehicle,besuretoturn offtheswitch.
CLIMATECONTROLLEDSEATS(if soequipped)
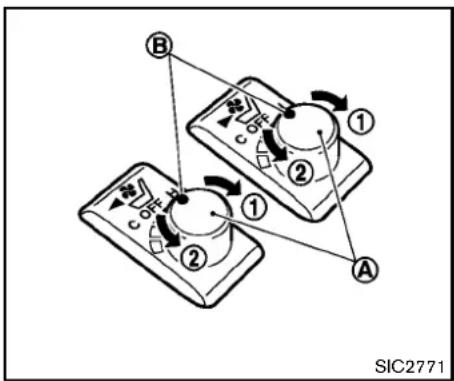
text_image
B ① ② ① ② A SIC2771The climate controlled seat warmsuporcools down the front seats by blowing warm or cool air from the surface of these at. Theswitches located on the center console can be operated independently of each other.
Thesurfacetemperatureoftheclimatecontrolledseatsisautomaticallycontrolledatan optimumtemperature. However, adjust the temperature using the control knob if these seats are too hot or cold.
- Starttheengine.
2.Turnthecontrolknob ① totheheatside ② .Theindicator light ③ onthecontrolknobwillilluminate.
- Adjust the desired amount of the air using the control knob ①.
- Whenthevehicle'sinterioriswarmedor cooled, and/or before you leave the vehicle, besuretoturnthe control knob to the OFF position (center). The indicator light ⑧ on the control knob goes off at the OFF position. To check the air filter for the climate controlled seat, contact a NISSAN dealer.

CAUTION
- Donotplaceobjectsinfrontofthe intakeinletslocatedbehindand underthefrontseat.Doingsocould causeimproperoperationorinterruptionoftheoperation.
•The battery could rundown if the climate controlled seat is operated while the engine is not running. - Donotusetheclimatecontrolled seatforextendedperiodsorwhen nooneisusingtheseat.
- Donotputanythingontheseat whichinsulatesheat,suchasa blanket,cushion,seatcover,etc. Otherwise,theseatmaybecome
overheated.
- Donotplaceanythinghardorheavy ontheseatorpierceitwithapinor similarobject. This may result in damagetheclimatecontrolled seat.
- Anyliquidspilledontheseatshould beremovedimmediatelywithadry cloth.
- Theclimatecontrolledseathasair filters.Donotoperatetheclimate controlledseatwithouttheairfilters.Thismayresultindamageto thesystem.
- Whencleaningtheseat,neveruse gasoline,thinner,oranysimilar materials.
- Ifanymalfunctionsarefoundorthe climatecontrolledseatdoesnot operate,turntheswitchoffand havethe systemchecked bya NISSANdealer.
VEHICLEDYNAMICCONTROL(VDC) OFFSWITCH
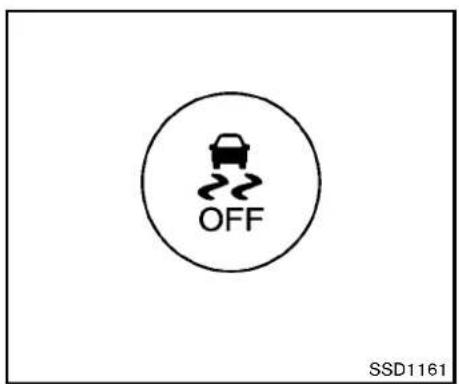
text_image
OFF SSD1161The vehicles should be driven with the Vehicle DynamicControl(VDC) system on most driving conditions.
Ifthevehicleisstuckinmudorsnow,theVDC systemreducetheengineoutputtoreduce wheelspin.Theenginespeedwillbereduced eveniftheacceleratorisdepressedtothefloor. Ifmaximumenginepowerisneededtofreea stuckvehicle,turntheVDCsystemoff.
ToturnofftheVDCsystem,pushtheVDCOFF switch.The indicatorwillilluminate.
PushtheVDCOFFswitchagainorrestartthe enginetoturnonthesystem.(See"Vehicle DynamicControl(VDC)system"(P.5-28).)
POWEROUTLET
natural_image
Diagram of a car interior showing a directional arrow indicating rotation or movement (no text or symbols present)Centerconsole
natural_image
Line drawing of a car door handle with a black arrow indicating a movement or force (no text or symbols)Lowerglovebox
Thepoweroutletislocatedinthecenterconsole andonthelowerglovebox.

CAUTION
•Theoutletandplugmaybehot duringorimmediatelyafteruse.
- Donotusewithaccessoriesthat exceeda12volt,120W(10A)power draw.Donotusedoubleadaptersor morethanoneelectricalaccessory.
- Usepoweroutletwiththeengine runningtoavoiddischargingthe vehiclebattery.
- Avoidusingpoweroutletwhenthe airconditioner,headlightsorrear windowdefrosterison.
- Thispoweroutletisnot designed forusewithacigarettelighterunit.
- Pushthepluginasfarasitwillgo. Ifgoodcontactisnotmade,theplug may overheator theinternal temperaturefusemayblow.
- Beforeinsertingordisconnectinga plug, besure theelectricalaccessorybeingusedisturnedOFF.
STORAGE
- Whennotinuse, besuretoclose thecap. Donotallowwaterto contacttheoutlet.

text_image
SIC3987INSTRUMENTPOCKET(exceptfornavigationsystemequippedmodels)
Toopentheliid, pushtheknobup ①.
Toclose, pushtheliddown.

WARNING
Keep the pocket lid closed while driving to help prevent injury in an accident or sudden stop.
CUPHOLDERS

CAUTION
- Avoid abrupt starting and braking when the cupholder is being used to prevent spilling the drink. If the liquidishot, it can scald you or your passenger.
- Useonlysoftcupsinthecupholder. Hardobjectscaninjureyouinan accident.
natural_image
Diagram showing a hand using tweezers to adjust a circular component with a magnified inset (no text or symbols)Acupholderislocatedonthecenterconsole.
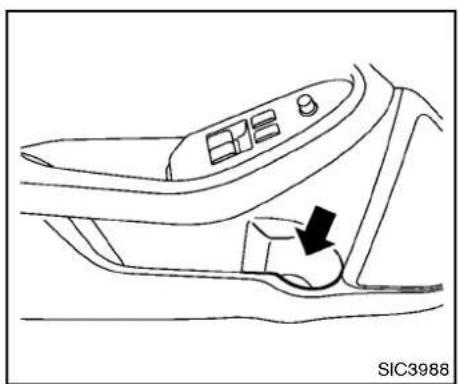
natural_image
Line drawing of a car interior showing the dashboard and seat area with a black arrow indicating a specific component (no text or symbols present)Softbottleholder
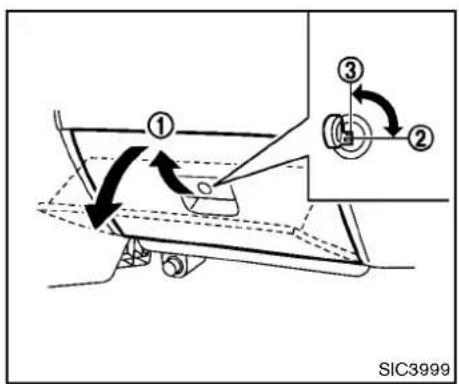
text_image
① ③ ② SIC3999GLOVEBOX

CAUTION
- Donotusebottleholderforany otherobjectsthatcouldbethrown aboutinthevehicleandpossibly injurepeopleduringsuddenbraking oranaccident.
- Donotusebottleholderforopen liquidcontainers.

WARNING
Keepgloveboxlidclosedwhiledriving tohelppreventinjuryinanaccidentora suddenstop.
Toopentheglovebox, pullthehandle ①.
Toclose, pushthelidin until the locklatches.
Tolock ② /unlock ③ theglovebox, usethe mechanicalkey. Forthemechanicalkeyusage, see "Keys" (P.3-2).
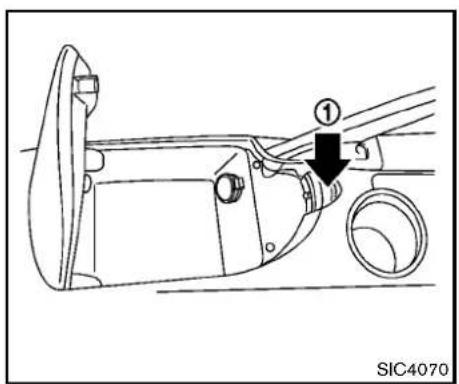
text_image
① SIC4070CONSOLEBOX
Toopentheconsolebox, pushthebutton and pullupthelid.
Toclose, pushtheliddownuntillatched.

text_image
① ② ③ ④ SIC3989REARPARCELBOX
Therearparcelboxislocatedbehindtheright-sideseat.
Toopentherearparcelbox, pulltheupperpart ofthelidtoposition ① or ②.
Toremovetherearparcelbox,pulthelidto position ③ withagreaterforceuntil unlatches.Andthen,pulltherearparcelboxto direction ④.
Toinstall, makesurethetwohingesoftherear parcelboxengagedwiththeholders, then performthestepsaboveinthereverseorder.

WARNING
Keeptherearparcelboxlidclosed whiledrivingtohelppreventinjuryinan accidentorasuddenstop.

text_image
① SIC4026CARGOCOVER(ifsoequipped)
Thecargocoverkeepsthecontentsinthecargo areahiddenfromtheoutside.
Tousethecargocover, pullitoutandhangboth sidesonthehooks ① locatedontheinsideof therearhatch.
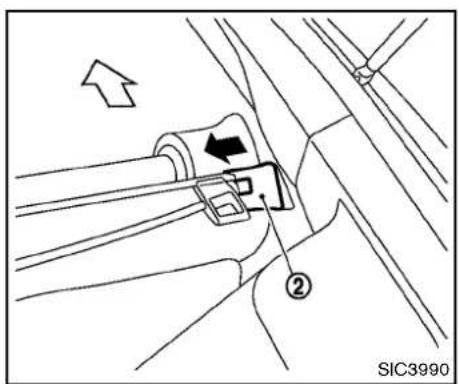
text_image
SIC3990Toremovethecargocoverunit,stowthecover andpulltheholder ② totheoppositeside.

WARNING
- Neverputanythingonthecargo cover,nomatterhowsmall.Any objectonitcouldcauseaninjury inanaccidentorsuddenstop.
- Donotleavethecargocoverinthe vehiclewithitdisengagedfromthe holder.
•Properlysecureallcargowithropes orstrapstohelppreventitfrom
slidingorshifting.Donotplace cargohigherthantheseatbacks.In asuddenstoporcollision,unsecuredcargocouldcausepersonal injury.
- Yourchildcouldbeseriouslyinjured orkilledinacollisionifthechild restrainttoptetherstrapisdamaged.
—Ifthecargocovercontactsthe toptetherstrapwhenitisattachedtothetoptetheranchor, removethecargocoverfromthe vehicleorsecureitonthecargo floorbelowitsattachmentlocation.Ifthecargocoverisnot removed,itmaydamagethetop tetherstrapduringacollision.
—Donotallowcargotocontact thetoptetherstrapwhenitis attachedtothetoptetheranchor.Properlysecurethecargo soitdoesnotcontactthetop tetherstrap.Cargothatisnot properlysecuredorthatcontactsthetoptetherstrapmay damagethetoptetherstrap duringacollision.
WINDOWS
POWERWINDOWS

WARNING
- Makesurethatallpassengershave theirhands,etc.insidethevehicle whileitisinmotionandbefore closingthewindows.Usethewindowlockswitchtopreventunexpecteduseofthepowerwindows.
- Donotleavechildrenunattended insidethevehicle.Theycouldunknowinglyactivateswitchesorcontrolsandbecometrappedinthe window.Unattendedchildrencould becomeinvolvedinseriousaccidents.
The powerwindowsoperatewhentheignition switchisintheONpositionorforabout45 secondsaftertheignitionswitchispushed to theOFFposition.Ifthedriver'sorfront passenger'sdoorisopenedduringthisperiod ofabout45seconds,powertothewindows is canceled.
The power windows switches will be deactivated during soft top operation (Roadster models).
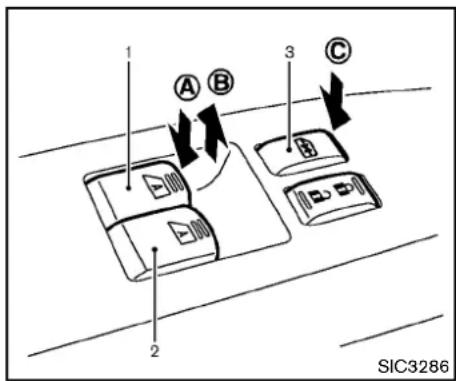
text_image
1 A B 3 C 2 SIC3286- Driversidewindow
2.Frontpassengersidewindow - Windowlockbutton
Mainpowerwindowswitch(driver's side)
To open or close the window, push down Ⓐ or pullup Ⓑ theswitchandholdit. Themain switch(driversideswitches)willopenorclose allthewindows.
Lockingpassengers'window
Whenthelock button © ispushedin, onlythe driversidewindowcanbeopenedorclosed. Pushitinagaintocancel.
2-44 Instrumentsandcontrols

natural_image
Diagram of a car interior showing two directional buttons and arrows indicating movement (no text or symbols)Passengersidepowerwindowswitch Thepassengersideswitchwillopenorclose onlythecorrespondingwindow.Toopenor closethewindow,pushdownorpullupthe switchandholdit.
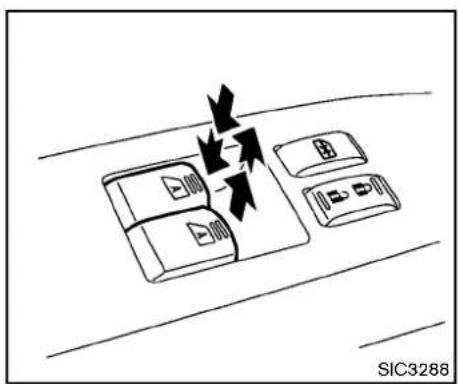
text_image
SIC3288Automaticoperation
Tofullyopenorclosethewindow, completely pushdownorpulluptheswitchandreleaseit; it neednotbeheld. Thewindowwillautomatically openorclosealltheway. Tostopthewindow, justpushorlifttheswitchintheopposite direction.
Alightpushorpullontheswitchwillcausethe windowtoopenorcloseuntiltheswitchis released.
Autoreversefunction

WARNING
Therearesomesmalldistancesimmediatelybeforetheclosedpositionwhich cannotbedetected.Makesurethatall passengershavetheirhands,etc.,insidethevehiclebeforeclosingthe window.
If the control unit detect something caught in the window as it is closing, the window will be immediately lowered.
The autoreverse function can be activated when the window is closed by automatic operation when the ignition switch is in the ON position or for 45 seconds after the ignition switch is pushed to the OFF position.
Dependingontheenvironmentordriving conditions,theautoreversefunctionmay beactivatedifanimpactorloadsimilarto somethingbeingcaughtinthewindow occurs.
Automaticwindowlowering(Roadster models)
Whenthesofttopoperatingswitchispressed, thepowerwindowswillautomaticallybeloweredcompletely. Thewindowsdonotrise automaticallyafterthesofttopopen/close operationiscompleted. Usethepowerwindow switchestoraisethem.
Automaticadjustingfunction

CAUTION
When the battery cable is removed from the battery terminal, donot close either of the front doors. The automatic window adjusting function will not work and the sideroof panel may be damaged.
The power window has an automatic adjusting function. Whentedoor is being opened, the window is automatically lowered slightly to avoid contact between the window and the sideroof panel. Whentedoor is closed, the window is automatically raised slightly.
While the automatic adjusting function does not work, the window will be controlled as follows:
- Whenthedoorisopened, the window lowers for approximately 2 seconds.
- Whilethedoorisopen,thewindowcannot beraised.
Ifthewindowsdonotcloseautomatically Ifthepowerwindowautomaticfunction(closing only)doesnotoperateproperly,performthe followingproceduretoinitializethepower windowsystem.
- PushtheignitionswitchtotheONposition.
- Closethedoorandsofttop(Roadster models).
- Openthewindowcompletelybyoperating thepowerwindowswitch.
- Pull the power window switch and hold to closet the window, and then hold the switch more than 3 seconds after the window is closed completely.
- Releasethepowerwindows switch. Operate the window by the automatic function to confirm the initialization is complete.
- Performsteps2 through 5 above for other windows.
If the power window automatic function does not operate properly after performing the procedure above, have your vehicle checked by a NISSAN dealer.
INTERIORLIGHTS
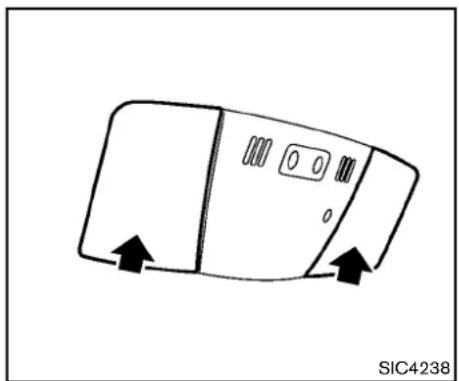
natural_image
Simple line drawing of a device with directional arrows indicating movement (no text or symbols)MAPLIGHTS
Pushthebuttonasillustratedtoturnthelighton oroff.
text_image
① ② ③ ON DOOR OFF ON DOOR OFF 0 0 SIC4239INTERIORLIGHTCONTROL SWITCH
Theinteriorlightcontrolswitchhasthree positions:ON,DOORandOFF.
ONposition
WhentheswitchisintheONposition ① the maplightswillilluminate.
DOORposition
WhentheswitchisintheDOORposition ②, themaplightswillilluminateunderthefollowing conditions:
-ignitionswitchisswitchedtotheOFFor LOCKposition
—remainonforabout15seconds.
- doorsareunlockedbypushingtheUN-LOCKbuttononthelIntelligentKeyordoor
handlerequestswitchwiththeignition
switchintheLOCKposition
—remainonforabout15seconds.
-anydoorisopenedandthenclosedwiththe ignitionswitchintheLOCKposition —remainonforabout15seconds.
●anydoorisopenedwiththeignitionswitch intheACCorONposition —remainonwhilethedoorisopened. Whenthedoorisclosed,thelightsgo off.
Thelightswill alsoturnoff after 15 minutes whenthelights remain illuminated after the ignition switch has been pushed to the OFF for LOCK position to prevent the battery from becoming discharged.
Modelswithnavigationsystem:
Whentheautointeriorilluminationissettothe OFFposition(see"Vehicleinformationand settings(modelswithnavigationsystem")(P.4-7)),thelightswillilluminateunderthefollowing condition:
●anydoorisopenedwiththeignitionswitch inanyposition
—remainonwhilethedoorisopened. Whenthedoorisclosed,thelightsgo off.
OFFposition
WhentheswitchisintheOFFposition ③, the lightswillnotilluminate, regardless of the condition.

CAUTION
Donotuseforextendedperiodsoftime withtheenginestopped.Thiscould resultinadischargedbattery.
VANITYMIRRORLIGHTS

natural_image
Diagram of a car door handle with directional arrows indicating movement (no text or symbols)Thelightonthevanitymirrorwillturnonwhen thecoveronthevanitymirrorisopened.
Whenthecoverisclosed, the light will turn off.
Thelightswillalsoturnoffafter15 minuteswhenthelightsremainilluminatedtopreventthebatteryfrombecomingdischarged.
CARGOAREACOURTESYLIGHT (Roadstermodels)
Thelightilluminatessimultaneouslywiththemap light.See"Interiorlights"(P.2-46).
CARGOLIGHT(Coupemodels)
Thelightilluminateswhentherearhatchis opened. Whentherearhatchisclosed, thelight willturnoff.
Thelightwillalsoturnoffafter15minutes whenthelightremainsilluminatedafter theignitionswitchhasbeenpushedtothe OFForLOCKpositiontopreventthe batteryfrombecomingdischarged.
TRUNKLIGHT(Roadstermodels)
Thelightilluminateswhentetrunklidis opened. Whentetrunklidisclosed, thelight turnsoff.
HomeLink® UNIVERSAL TRANSCEIVER(ifsoequipped)
HomeLink ^® UniversalTransceiverprovides a convenient way to consolidate the function of up to three individual hand-held transmitters into one built-in device.
HomeLink ^® UniversalTransceiver:
- WilloperatemostRadioFrequency(RF) devicesuchasgaragedoors,gates,home andofficelighting,entrydoorlocksand securitysystems.
- lspoweredbyyourvehicle'sbattery.No separatebatteriesarerequired.Ifthe vehicle'sbatteryisdischargedorisdisconnected,HomeLink® willretainallprogramming.
OnceHomeLink ^® UniversalTransceiveris programmed, retain the original transmitter for future programming procedures (Example: new vehicle purchases). Upon sale of the vehicle, the programmed HomeLink ^® UniversalTransceiver buttons should be erased for security purposes. For additional information, see “ProgrammingHomeLink” (P.2-50).

WARNING
- DonotuseHomeLink® Universal Transceiverwithanygaragedoor openerthatlackssafetystopand
reversefeaturesasrequiredby federalsafetystandards.(These standardsbecameeffective for openermodelsmanufacturedafter April1,1982.)Agaragedooropener whichcannotdetectan objectinthe pathofaclosinggaragedoorand thenautomaticallystop and reverse, doesnot meetcurrentfederal safety standards.Usingagaragedoor openerwithoutthesefeaturesincreasestheriskofseriousinjuryor death.
- During programming procedure, yourgaragedoorsecuritygate mayopenorclose.Makesurethat peopleandobjectsareclearofthe garagedoor,gate,etc.thatyouare programming.
-Yourvehicle'sengineshouldbe turned off while programming HomeLink® UniversalTransceiver.
PROGRAMMINGHomeLink®
ToprogramyourHomeLink ^® Transceiverto operateagaragedoor, gate, oentrydoor opener, homeorofficelighting, youneedtobe atthesamelocationasthedevice. Note: Garagedooropeners(manufacturedafter 1996) have "rollingcodeprotection". Toprogramagaragedooropenerequipped with "rollingcodeprotection"; youwillneedtouse aladdertogetuptothegaragedooropener motortobeabletoaccessthe "smartorlearn" programbutton.

-
Tobegin, pushandholdthe2outer HomeLink® buttons (toclearthememory) until the indicator light Ⓐ blinks (after 20 seconds). Release both buttons.
-
Position the end of the hand-held transmitter 1 to 3 in (20 to 70 mm) away from the HomeLink ^® surface.
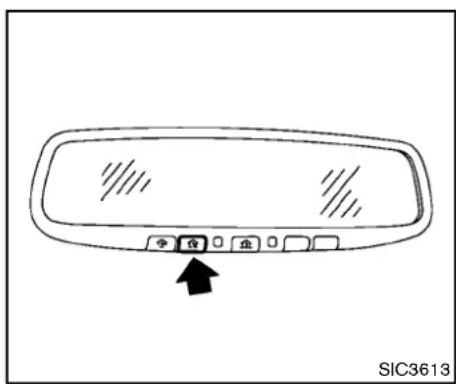
text_image
SIC3613- Using both hands, simultaneously push and hold both the Home Link ^® button you want to program and the hand-held transmitter button.
DONOT releasethebuttonsuntilstep4has beencompleted.
4.Holddownbothbuttonsuntiltheindicator lightonHomeLink® flashes,changingfroma "slowblink"toa"rapidblink".Thiscould takeupto90seconds.Whentheindicator light blinks rapidly, both buttons may be released.Therapidlyflashinglightindicates successfulprogramming.Toactivatethe garagedoororotherprogrammeddevice, pushandholdtheprogrammedHomeLink®
button-releasingwhenthedevicebeginsto activate.
-
If the indicator lighton HomeLink ^ blinks rapidly for two seconds and then turn solid, HomeLink ^ has picked up a "rollingcode" garagedoor openersignal. You will need to proceed with the next step to train HomeLink ^ , completing the programming may require a ladder and another person for convenience.
-
Pushandreleasetheprogrambutton locatedonthegaragedooropener'smotor toactivatethe"trainingmode".Thisbuttonis usuallylocatedneartheantennawirethat hangsdownfromthemotor.lfthewire originatesfromunderalightlens,youwill needtoremovethelenstoaccessthe trainingbutton.
NOTE: Onceyouhavepushedandreleased thetrainingbuttononthegaragedoor opener'smotorandthe"traininglight" islit,youhave30secondsinwhichto performstep7.Forconvenience,use thehelpofasecondpersontoassist whenperformingthisstep.
- Quickly(within30secondsofpushingand releasingthegaragedooropenertraining button)andfirmlypushandreleasethe
HomeLink® buttonyouhavejustprogrammed.PushandreleasetheHomeLink buttonuptothreetimestocompletethe training.
- YourHomeLink ^® buttonshouldnowbe programmed.Toprogramtheremaining HomeLink ^® buttonsforadditionaldooror gateopeners,followsteps2through8only.
NOTE:
Donotrepeatstep1unlessyouwantto "clear" all previously programmed HomeLink® buttons.
If you have any questions or are having difficulty programming your HomeLink ^ buttons, please referto the Home Link ^ website at: www.homelink.com or call 1-800-355-3515.
PROGRAMMINGHomeLink ^® FORCANADIANCUSTOMERS
Prior to 1992, D.O.C.regulations required hand-held transmitter stostop transmitting after 2 seconds. Toprogram your hand-held transmitterto HomeLink ^ , continuetopushandhold the HomeLink ^ button (notesteps2 through 4 under "ProgrammingHomeLink ^ ") while you push andre-push ("cycle") your hand-held transmitter every 2 seconds until the indicator lightflashes rapidly (indicating successful programming).
NOTE:
If programmingagaragedooropener,etc., itisadvisedtounplugthedeviceduring the "cycling"processtopreventpossible damagetothegaragedooropenercomponents.
OPERATINGTHEHomeLink ^® UNIVERSALTRANSCEIVER
HomeLink® UniversalTransceiver(onceprogrammed)maynowbeusedtoactivatethe garagedoor,etc.Tooperate,simplypushthe appropriateprogrammedHomeLink® Universal Transceiverbutton.Theredindicatorlightwill illuminatewhilethesignalisbeingtransmitted.
PROGRAMMINGTROUBLE-DIAGNO- SIS
IfHomeLink ^® does not quickly learn the hand-held transmitter information:
- replacethehand-heldtransmitterbatteries withnewbatteries.
- positionthehand-heldtransmitterwithits battery area facing away from the HomeLink® surface.
- pushandholdboththeHomeLink ^® and hand-heldtransmitterbuttonswithoutinterruption.
- positionthehand-heldtransmitter2to5in (50to127mm)awayfromtheHomeLink
surface.Holdthetransmitterinthatposition forupto15seconds.IfHomeLink ^® isnot programmedwithinthattime,tryholdingthe transmitterinanotherposition-keepingthe indicatorlightinviewatalltimes.
If you continuetohaveprogrammingdifficulties, please contact the NISSANConsumerAffairs Department. The phonenumbers are located in the Foreword of this Owner's Manual.
CLEARINGTHEPROGRAMMEDINFORMATION
Individualbuttonscannotbecleared,however to clearallprogramming,pushandholdthetwo outsidebuttonsandreleasewhentheindicator lightbeginstoflash(inapproximately 20 seconds).
REPROGRAMMINGASINGLE HomeLink® BUTTON
ToreprogramaHomeLink ^® UniversalTransceiverbutton,completethefollowing.
1.PushandholdthedesiredHomeLink button.Donotreleasethebuttonuntilstep 4hasbeencompleted.
- Whentheindicatorlightbeginstoflash slowly(after20seconds), positionthe hand-heldtransmitter2to5in(50to127 mm)awayfromtheHomeLink ^® surface.
3.Pushandholdthehand-heldtransmitter button. 4.TheHomeLink ^® indicatorlightwillflash,first slowlyandthenrapidly.Whentheindicator lightbeginstoflashrapidly,releaseboth buttons.
TheHomeLink ^® UniversalTransceiverbutton hasnowbeenreprogrammed. Thenewdevice canbeactivatedbypushingtheHomeLink ^® button that was just programmed. This procedure will not affectanyotherprogrammed HomeLink ^® buttons.
IFYOURVEHICLEISSTOLEN
Ifyourvehicleisstolen,youshouldchangethe codesofany non-rollingcodedevice thathas beenprogrammedintoHomeLink ^® .Consultthe Owner'sManualofeachdeviceorcallthe manufacturerordealerofthosedeVICESfor additionalinformation.
Whenyourvehicle is recovered, you will needtoreprogramtheHomeLink ^® UniversalTransceiverwithyour newtransmitter information.
FCCNotice:
ForUSA:
Thisdevicecomplieswith Part15ofthe FCCRules.Operationissubjecttothe followingtwoconditions:
(1) This devicem may not cause harmful interference, and (2) this device must accept any interferencereceived, including interference that may cause undesired operation.
Note: Changesormodificationsnotexpresslyapprovedbythepartyresponsible forcompliancecould voidtheuser's authoritytooperatetheequipment.
ForCanada:
This device complies with RSS-210 of Industry Canada. Operation is subject to the following two conditions:
(1) this device may not cause interference, and (2) this device must accept any interference, including interference that may cause undesired operation of the device.
3Pre-drivingchecksandadjustments
Keys....3-2
IntelligentKey....3-2
Valethand-off....3-3
Doors....3-4
Lockingwithmechanicalkey....3-4
Opening and closing windows with the mechanical key....3-4
Lockingwithinsidelockknob....3-5
Lockingwithpowerdoorlockswitch....3-5
Automaticdoorlocks....3-5
IntelligentKeysystem....3-6
IntelligentKeyoperatingrange....3-8
Doorlocks/unlocksprecaution....3-8
IntelligentKeyoperation....3-9
Batterysaversystem....3-11
Warningsignals....3-11
Troubleshootingguide....3-12
Remotekeylessentrysystem....3-13
Howtouseremotekeylessentrysystem....3-13
Hood....3-16
Rearhatch(Coupemodels)....3-16
Rearhatchopenerswitch....3-17
Secondaryrearhatchrelease....3-18
Trunklid(Roadstermodels)....3-18
Trunklidopenerswitch....3-19
Trunkreleasepowercancelswitch....3-19
Interiortrunklidrelease....3-19
Secondarytrunklidrelease....3-20
Softtop(Roadstermodels)....3-21
Beforeoperatingthetop....3-21
Whenoperatingthetop....3-23
Openingthetop....3-25
Closingthetop....3-25
OpeningthetopusingtheIntelligentKey......3-26
Troubleshootingguide....3-27
Ifthetopdoesnotopenorcloseeelectrically......3-28
Careofthesofttopandthevehiclebody....3-32
Front, side and rear unique parts (NISMO models).....3-32
Fuel-fillerdoor....3-34
Openingthefuel-fillerdoor....3-34
Fuel-fillercap....3-34
Tiltsteering....3-36
Manualoperation....3-36
Sunvisors....3-36
Mirrors....3-37
Insidemirror....3-37
Outsidemirrors....3-38
Vanitymirror....3-39
KEYS
Akeynumberplateissuppliedwithyourkeys. Recordthekeynumberandkeepitinasafe place(suchasyourwallet),notinthevehicle.If youloseyourkeys,seeaNISSANdealerfor duplicatesbyusingthekeynumber.NISSAN doesnotrecordanykeynumberssoitisvery importanttokeeptrackofyourkeynumberplate.
Akeynumberisonlynecessarywhenyouhave lostallkeysanddonothaveonetoduplicate from.Ifyoustillhaveakey,thiskeycanbe duplicatedbyaNISSANdealer.

text_image
1 2 3 xxxxx SPA2406- IntelligentKeys(2sets)
- Mechanicalkeys(insidetheKeys)(2sets)
3.Keynumberplate(1 set)
INTELLIGENTKEY
Yourvehiclecanonlybedrivenwiththe IntelligentKeyswhichareregisteredtoyour vehicle'sIntelligentKeysystemcomponentsand NISSAN Vehicle Immobilizer System components.Asmanyas4IntelligentKeyscanbe registeredandusedwithonevehicle.Thenew keysmustberegisteredbyaNISSANdealer priortousewiththelIntelligentKeysystemand NISSAN VehicleImmobilizer Systemofyour vehicle.Sincetheregistrationprocessrequires erasingallmemoryinthelIntelligentKeycompo-
nentswhenregisteringnewkeys,besuretotake allIntelligentKeysthatyouhavetotheNISSAN dealer.
ItispossiblethattheIntelligentKeyfunctions becomecanceled.ContactaNISSANdealer.

CAUTION
- BesuretocarrytheIntelligentKey withyouwhendriving.TheIntelligentKeyisaprecisiondevicewith a built-intransmitter.Toavoiddamagingit,pleasenotethefollowing.
—The Intelligent Key is water resistant; however, wetting may damage the Intelligent Key. If the Intelligent Key gets wet, immediately wipe until it is completely dry.
—Donotbend, droporstrikeit againstanotherobject.
-If the outside temperature is below 14^(-10^) degrees, the battery of the Intelligent Key may not function properly.
—DonotplacethelIntelligentKey foranextendedperiodina placewhere temperatures ex-
ceed140°F(60°C).
—Donotchangeormodifythe IntelligentKey.
—Donotuseamagnetkeyholder.
—DonotplacetheIntelligentKey nearanelectricappliancesuch asatelevisionset, personal computerorcellularphone.
—DonotallowtheIntelligentKey tocomeintocontactwithwater orsaltwater, and donotwash it in a washing machine. This could affect the system function.
- IfanIntelligentKeyislostorstolen, NISSANrecommendserasingtheID codeofthatIntelligentKey.Thiswill preventtheIntelligentKeyfrom unauthorizedsetounlockthe vehicle.Forinformationregarding theerasingprocedure,pleasecontactaNISSANdealer.
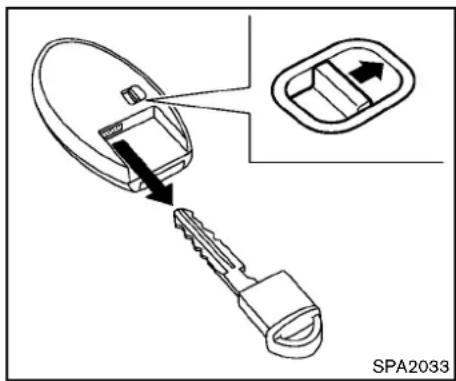
text_image
SPA2033Mechanicalkey
Toremovethemechanicalkey, releasethelock knobatthebackofthelIntelligentKey.
Toinstallthemechanicalkey, firmly insert it into the Intelligent Key until the lock knob return to the lock position.
Usethemechanicalkeytolockorunlockthe doors, and glovebox.
See "Doors"(P.3-4) and "Storage"(P.2-40).

CAUTION
AlwayscarrythemechanicalkeyinstalledintheKey.
VALETHAND-OFF
When you havetoleaveakeywithavalet, give them the Intelligent Key itself and keep the mechanical key with you to protect your belongings.
Topreventthegloveboxfrombeingopened duringvalethand-off, followtheprocedures below.
- Pushthetrunkreleasepowercancelswitch totheOFFside(Roadstermodels).
- Remove the mechanical key from the IntelligentKey.
- Lockthegloveboxwiththemechanicalkey.
- HandthelIntelligentKeytothevalet, keeping themechanicalkeyinyourpocketorbagfor insertionintothelIntelligentKeywhenyou retrieveyourvehicle.
See"Storage"(P.2-40).
DOORS

WARNING
●Alwayshavethedoorslockedwhile driving. Alongwiththeuseofseat belts, thisprovidesgreatersafety in theeventofanaccidentbyhelping to prevent persons from being thrownfromthevehicle. Thisalso helpskeepchildrenandothersfrom unintentionallyopeningthedoors, andwillhelpkeepoutintruders.
- Beforeopeninganydoor,always lookforandavoidoncomingtraffic.
- Donotleavechildrenunattended insidethevehicle.Theycouldunknowinglyactivateswitchesorcontrols.Unattendedchildrencould becomeinvolvedinseriousaccidents.

text_image
① ② ③ ④ SPA2565LOCKINGWITHMECHANICALKEY
Thepowerdoorlocksystemallowsyoutolock orunlockalldoorssimultaneouslyusingthe mechanicalkey.
●Turningthedriver'sdoorkeycylindertothe frontofthevehicle ① willlockalldoors.
- Turningthedriver'sdoorkeycylinderonctotherearofthevehicle ② willunlockthedriver'sdoor. Afterreturningthekeytotheneutralposition ③, turningittotherearagainwithin60secondswillunlockalldoors.
- Youcanswitchthelocksystemtothemode thatallowsyoutoopenallthedoorwhen thekeyisturnedonce.(See "Howtouse
SETTINGbutton"(P.4-11).) OPENINGANDCLOSINGWINDOWS WITHTHEMECHANICALKEY
The driver's door key operational also allows you to open and closet the window that is equipped with the automatic open/close function. (See "Powerwindows" (P.2-44).)
Toopenthewindow,turnthedriver'sdoorkey cylindertotherearofthevehicleforlonger than1second. Thedoorisunlockedandthe windowkeepsopeningwhileturningthekey.
Thisfunctioncanalsobeperformedbypushing andholdingtheUNLOCKbuttononthe IntelligentKey.(See"Remotekeylessentry system"(P.3-13).)
Toclosethewindow,turnthedriver'sdoorkey cylindertothefrontofthevehicleforlonger than1second. Thedoorislockedandthe windowkeepsclosingwhileturningthekey.
3-4 Pre-driving checks and adjustments
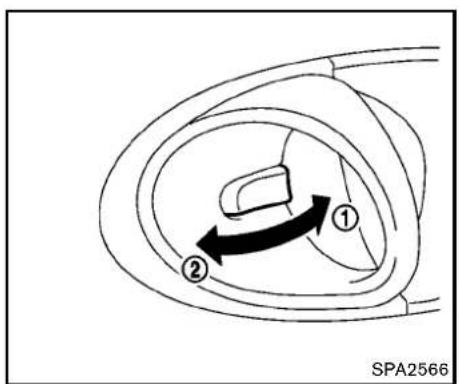
text_image
① ② SPA2566LOCKINGWITHINSIDELOCKKNOB
Tolockthedoorindividually, movetheinside lockknobtothelockposition ① thenclosethe door.
Tounlock, movetheinsidelockknobtothe unlockposition ②.
WhenlockingthedoorwithoutanIntelligentKey,besurenottoleavethelIntelligentKeyinsidethevehicle.
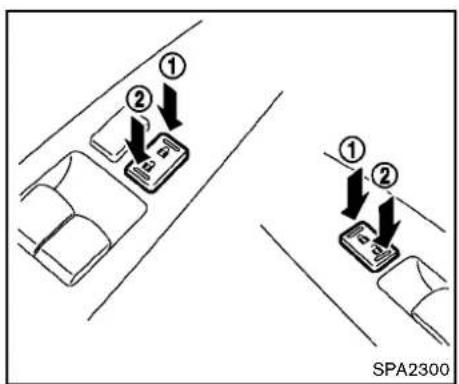
text_image
① ② ① ② SPA2300LOCKINGWITHPOWERDOORLOCK SWITCH
Operating the power door lock switch will lock or unlock all the doors and trunk lid. The switches are located on the driver's sand front passenger's door arm rests.
Tolockthedoorsandtrunklid, pushthepower doorlockswitchtothelockposition ① withthe driver'sorfrontpassenger'sdooropen, then closethedoorandtrunklid.
Whenlockingthedoorthisway,becertain nottoleavethelIntelligentKeyinsidethe vehicle.
Tounlockthedoors, thefuel-fillerdoorandthe
trunk, pushthepowerdoorlockswitchtothe unlockposition ②.
Lockoutprotection
Whenthepowerdoorlockswitch(driverorfront passenger)ismovedtothelockpositionwith theIntelligentKeyintheportandanydooropen, alldoorsandthetrunklidwilllockandunlock automatically.WiththeIntelligentKeyleftinthe vehicle(notinthelIntelligentKeyport)andany dooropen,alldoorsandthetrunklidwillunlock automaticallyandachimewillsoundafterthe doorand/orthetrunklidareclosed.
ThesefunctionshelptopreventtheIntelligent Keyfrombeingaccidentallylockedinsidethe vehicle.
AUTOMATICDOORLOCKS
●Alldoorslockautomaticallywhenthevehicle speedreaches15MPH(24km/h).
- Alldoorsunlockautomaticallywhenthe ignitionswitchisplacedintheOFFposition.
The automatic unlock function can be deactivated or activated. To deactivate or activatethe automatic door unlock system, perform the following procedure:
- Closealldoors.
- PlacetheignitionswitchintheONposition.
INTELLIGENTKEYSYSTEM
- Within 20 second of performing Step 2, push and hold the power door lock switch to the 🔒 position (UNLOCK) form more than 5 seconds.
- When activated, the hazard indicator will flash twice. Whendeactivated, the hazard indicator will flash once.
- Theignitionswitchmustbeplacedinthe OFFandONpositionagainbetweeneach settingchange.
Whentheautomaticdoorunlocksystemis deactivated, the doorsdonotunlockwhen the ignitionswitchisplacedintheOFFposition. To unlockthedoormanually, usetheinsidelock knoborthepowerdoorlockswitch(driver'sor frontpassenger'sside).

WARNING
•Radiowavescouldadverselyaffect electricmedicalequipment. Those whoseapacemakershouldcontacttheelectricmedicalequipment manufacturerforthepossibleinfluencesbeforeuse.
•The IntelligentKeytransmitsradio waves when the buttons are pushed. The FAAadvisesthatthe radiowavesmayaffectaircraftnavigation and communicationsystems. Do not operate the IntelligentKeywhileonanairplane. Make sure the buttons are not operated unintentionallywhenthe unitisstoredduringaflight.
The Intelligent Keysystemcanoperate all the door and rear hatch/trunk lid locks using the remote controller function or pushing there-quest switch on the vehicle without taking the key out from a pocket or purse. The operating environment and/or conditions may affect the Intelligent Keysystem operation.
Besuretoreadthefollowingbeforeusingthe IntelligentKeysystem.

CAUTION
- BesuretocarrytheIntelligentKey withyouwhenoperatingthevehicle.
- NeverleavetheIntelligentKeyin the vehicle when you leave the vehicle.
The Intelligent Keyisalways communicating with the vehicle as it receives radio waves. The Intelligent Keysystem transmits weak radio waves. Environmental conditions may interfere with the operation of the Intelligent Keysystem under the following operating conditions.
- When operating near a location where strongradiowavesaretransmitted, such asaTVtower,powerstationandbroadcastingstation.
- Wheninpossessionofwirelessequipment, suchasacellulartelephone,transceiver, andCBradio.
- WhentheIntelligentKeyisincontactwithor coveredbymetallicmaterials.
- Whenanytypeofradiowaveremotecontrol isusednearby.
- When the Intelligent Key is placed near an electric appliance such as a personal
3-6 Pre-driving checks and adjustments
computer.
- Whenthevehicleisparkednearaparking meter.
Insuchcases, correct the operating conditions before using the Intelligent Key function or use themechanical key.
Although the life of the battery varies depending on the operating conditions, the battery's life is approximately 2 years. If the battery is discharged, replace it with anewone.
WhentheIntelligentKeybatteryisalmost discharged,inserttheIntelligentKeyintothe IntelligentKeyporttostarttheengine.Replace thedischargedbatterywithanewoneassoon aspossible.Formoredetails,see"Push-button ignitionswitch"(P.5-8).
SincethelIntelligentKeyiscontinuouslyreceivingradiowaves,ifthekeyisleftnerequipment whichtransmitsstrongradiowaves,suchas signalsfromaTVandpersonalcomputer,the batterylifemaybecomeshorter.
Forinformationregardingreplacementofa battery,see"IntelligentKeybatteryreplacement" (P.8-25).
Asmanyas4IntelligentKeyscanberegistered andusedwithonevehicle.Forinformationabout thepurchaseanduseofadditionalIntelligent Keys,contactaNISSANdealer.

CAUTION
- DonotallowtheIntelligentKey, whichcontainselectricalcomponents,tocomeintocontactwithwaterorsaltwater.Thiscouldaffect thesystemfunction.
•DonotdroptheIntelligentKey.
- DonotstrikethIntelligentKey sharplyagainstanotherobject.
- DonotchangeormodifytheIntelligentKey.
- WettingmaydamagetheIntelligent Key.IftheIntelligentKeygetswet, immediatelywipeuntilitiscompletelydry.
- If the outside temperature is below 14^ (-10^) , the battery of the Intelligent Keymay not function properly.
- DonotplacetheIntelligentKeyfor anextendedperiodin an areawhere temperaturesexceed140 °F(60 °C).
- DonotattachtheIntelligentKey withakeyholderthatcontainsa magnet.
- Do not placethe Intelligent Keynear equipment that produces amagnetic field, such as a TV, audio equipment, personal computer or cellular phone.
IfanIntelligentKeyislostorstolen,NISSAN recommendserasingthe IDcode ofthat IntelligentKey fromthe vehicle.Thismayprevent theunauthorizeduseoftheIntelligentKeyto operathevehicle.Forinformationregarding theerasingprocedure,contactaNISSANdealer.
The Intelligent Key function can be disabled. For information about disabling the Intelligent Key function, contact a NISSAN dealer.

natural_image
Top-down line drawing of a car with two wheels and a numbered annotation (1) indicating a specific point or location, no text or symbols present.The Intelligent Key functions can only be used when the Intelligent Key is within the specified operating range from therequest switch ①.
WhenthelIntelligentKeybatteryisdischargedor strongradiowavesarepresentneartheoperat-
3-8 Pre-driving checks and adjustments
inglocation, the Intelligent Keysystem's operating range becomes narrower, and the Intelligent Keymay not function properly.
Theoperatingrangeiswithin31.50in(80cm) fromeachrequestswitch ①.
IfthelIntelligentKeyistoooclosetothedoor glass,handleorrearbumpertherequest switchesmaynotfunction.
WhenthelIntelligentKeyiswithintheoperating range,itispossibleforanyonewhodesnot carrythelIntelligentKeytopushtherequest switchtolock/unlockthedoorsincludingthe rearhatch/trunklid.

natural_image
Diagram of a hand holding a device with two crossed bands, no text or symbols presentDOORLOCKS/UNLOCKSPRECAUTION
- Donotpushthedoorhandlerequestswitch withthelIntelligentKeyheldinyourhandas illustrated. Theclosedistancetothedoor handlewillcausethelIntelligentKeysystem tohavedifficultyrecognizingthatthelIntelligentKeyisoutsidethevehicle.
●Afterlockingwiththedoorhandlerequest switch,verifythedoorsaresecurelylocked bytestingthem. -
TopreventthelIntelligentKeyfrombeingleft insidethevehicle,makesureyoucarrythe keywithyouandthenlockthedoors.
-
Donotpullthedoorhandlebeforepushing thedoorhandlerequestswitch. Thedoor willbeunlockedbutwillnotopen. Release thedoorhandleonceandpullitagainto openthedoor.
- Modelswithnavigationsystem: ThelIntelligentKeysystem(opening/closing doorswiththedoorhandlerequestswitch) canbesettoremaininactive.(See"Vehicle informationandsettings(modelswithnavigationsystem")(P.4-7).)
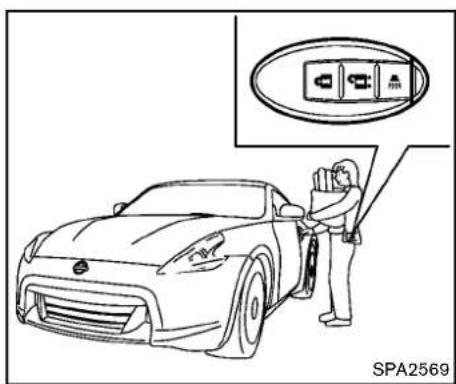
text_image
SPA2569Coupemodels
Youcanlockorunlockthedoorswithouttaking thekeyoutfromyourpocketorbag.
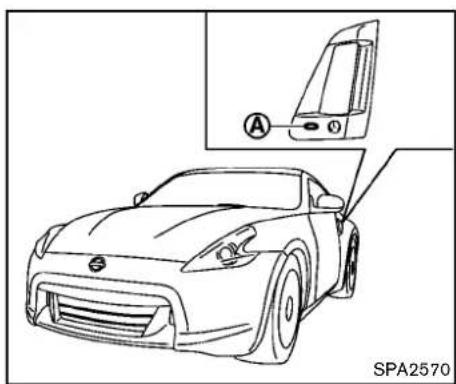
natural_image
Line drawing of a sports car front view with a close-up inset showing the dashboard and side panel (no text or symbols)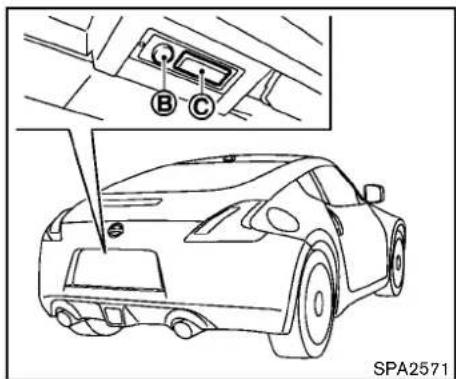
text_image
A B C SPA2571Coupemodels
Pre-drivingchecksandadjustments3-9

text_image
A B C SPA2680Roadstermodels
When you carry the Intelligent Key with you, you can lock or unlock all doors and there are hatch/ trunk lid bypassing the door handle request switch (driver's or front passenger's) ① or the rear hatch/trunk request switch ② within the range of operation.
Whenyoulockorunlockthedoorsandtherear hatch/trunklid,thehazardindicatorwillflashand thehorn(ortheoutsidechime)willsoundasa confirmation.Fordetails,see"Settinghazard indicatorandhornmode"(P.3-14).
Lockingdoors, rearhatch/trunklidand fuel-fillerdoor
-
PushtheignitionswitchtotheOFFposition andmakesureyoucarrytheIntelligentKey withyou.*1
-
Closeallthedoorsandtherearhatch/trunk lid.*2
-
Pushthedoorhandlerequestswitch(driver'sorfrontpassenger's)ortherearhatch/trunkrequestswitchwhilecarryingtheIntelligentKeywithyou.*3
-
Allthedoors, rearhatch/trunklidandfuel- fillerdoorwilllock.
-
The hazard indicator flashest twice and the outside chimesound twice.
*1: Doorsandtherearhatch/trunklidwilllockwith theIntelligentKeywhiletheignitionswitchisin theACCorONposition.
*2: Doorsandtherearhatch/trunklidwillnotlock withtheIntelligentKeywhileanydoorortherear hatch/trunklidisopen.
*3: Doors and the rear hatch/trunk lid will not lock by pushingthedoorhandlerequestswitchorthe rearhatch/trunkrequestswitchwiththeIntelligentKeyinsidethevehicle. However, when an IntelligentKeyisinsidethevehicle, doors and therearhatch/trunk lidcanbe locked with another registered IntelligentKey.
Unlockingdoors, rearhatch/ trunklidand fuel-fillerdoor
- Pushthedoorhandlerequestswitch(driver'sorfrontpassenger's)ortherearhatch/trunkrequestswitchoncewhilecarryingthe IntelligentKeywithyou.
- The hazard indicator flashes once and outside chimes sounds once. The corresponding door and the fuel-filler door or the rear hatch/trunk lid will unlock.
3.Pushthedoorhandlerequestswitchorthe rearhatch/trunkrequestswitchagainwithin 60seconds. - The hazard indicator flashes once and outside chimes sounds once again. All the doors and there are hatch/trunk lid will unlock.
Alldoors, therearhatch/trunklidandthefuel- fillerdoorwillbelockedautomaticallyunlessone ofthefollowingoperationsisperformedwithin1 minuteafterpushingtherequestswitchwhile thedoorsarelocked.
- Openinganydoorand/ortherearhatch/trunklid
- Pushingtheignitionswitch
- InsertingtheIntelligentKeyintotheIntelligentKeyport.
During this 1 - minutetime period, if the UNLOCK
buttononthelIntelligentKeyispushed,all
3-10 Pre-driving checks and adjustments
doorswillbelockedautomaticallyafteranother 1 minute.
Openingrearhatch/trunklid
To open only therear hatch/trunklid, perform the following procedure.
- CarrytheIntelligentKey.
- Pushtherearhatch/trunklidopenerswitch ⓒ.
- Therearhatch/trunklidwillopen.
Lockoutprotection:
TopreventtheIntelligentKeyfrombeing accidentallylockedinthetrunk,lockoutprotectionisequippedwiththeIntelligentKeysystem.
WhenthetrunklidisclosedwiththeIntelligent Keyinsidethetrunk,theoutsidebuzzerwill soundandalldoorsandtherearhatch/trunklid willunlock.
BATTERYSAVERSYSTEM
When all the following conditions are met for 60 minutes, the battery saversystem will cutoff the powersupply to prevent battery discharge.
●TheignitionswitchisintheACCposition, and
●Alldoorsareclosed, and
- TheselectorleverisintheP(Park)position (AutomaticTransmissionmodels).
WARNINGSIGNALS
Tohelppreventthevehiclefrommoving unexpectedlybyerroneousoperationofthe IntelligentKeylistedonthefollowingchartor tohelppreventthevehiclefrombeingstolen, chimeorbeepsoundsinsideandoutsidethe vehicle and a warning displays in the vehicle informationdisplay.
Whenachimeorbeepsoundsorthewarning displays,besuretocheckthevehicleand IntelligentKey.
See "Troubleshootingguide"(P.3-12) and "Vehicleinformationdisplay"(P.2-17).
TROUBLESHOOTINGGUIDE
| SymptomPossiblecauseActiontotake | |||
| Whenpushingtheignitionswitch tostoptheengine | TheSHIFTPwarningappearsonthedisplay andtheinsidewarningchimesoundscontinuously(AutomaticTransmissionmodels). | TheselectorleverisnotintheP(Park) position. | ShifttheselectorlevertotheP(Park) position. |
| Whenopeningthedriver'sdoor togetoutofthevehicle | Theinsidewarningchimesoundscontinuously. | TheignitionswitchisintheACC position. | PushtheignitionswitchtotheOFFposition. |
| ThelntelligentKeyisinthelIntelligent Keyport. | RemovethelIntelligentKeyfromthelIntelligentKeyport. | ||
| Whenclosingthedooraftergettingoutofthevehicle | TheNOKEYwarningappearsonthedisplay, theoutsidechimesounds3timesandthe insidewarningchimesoundsforapproximately afewseconds. | TheignitionswitchisintheACCorON position. | PushtheignitionswitchtotheOFFposition. |
| TheSHIFTPwarningappearsonthedisplay andtheoutsidechimesoundscontinuously (AutomaticTransmissionmodels). | TheignitionswitchisintheACCorOFF positionandtheselectorleverisnotin theP(Park)position. | MovetheselectorlevertotheP(Park) positionandpushtheignitionswitchtothe OFFposition. | |
| Whenclosingthedoorwiththe insidelockknobturnedtoLOCK | Theoutsidechimesoundsforafewseconds andallthedoorsunlock. | ThelntelligentKeyisinsidethevehicle andcargo/trunkroomarea. | CarrythelIntelligentKeywithyou. |
| Whenpushingthedoorhandle requestswitchtolockthedoor | Theoutsidechimesoundsforafewseconds. | ThelntelligentKeyisinsidethevehicle andcargo/trunkroomarea. | CarrythelIntelligentKeywithyou. |
| Adoorisnotclosedsecurely.Closethedoorsecurely. | |||
| Whenclosingthetrunklid (Roadstermodels) | Theoutsidechimesoundsforafewseconds andalldoorsunlock. | ThelntelligentKeyisinsidethetrunk.CarrythelIntelligentKeywithyou. | |
| Whenshiftingtheselectorlever totheP(Park)position | Theinsidewarningchimesoundscontinuously.The | gnitionswitchisintheONposition. | TheignitionswitchisintheOFFposition. |
REMOTEKEYLESSENTRYSYSTEM

WARNING
The Intelligent Key transmits radio waves when the buttons are pushed. The FAA advises that other radiowaves may affect aircraft navigation and communications systems. Donot operate the Intelligent Key while on an airplane. Makes sure the buttons are not operated unintentionally when the unit is stored during a flight.
Itispossibletolock/unlockalldoors,fuel-filler door,activatethepanicalarmandopenthe windowsbypushingthebuttonsontheIntelligentKeyfromoutsidethevehicle.
Beforelockingthedoors, makesurethe IntelligentKeyisnotleftinthevehicle.
TheLOCK/UNLOCKbuttononthelntelligent Keycanoperateatadistanceofapproximately 33ft(10m)fromthevehicle.(Theeffective distancedependsupontheconditionsaround thevehicle.)
Asmanyas4IntelligentKeyscanbeusedwith onevehicle.Forinformationconcerningthe purchaseanduseofadditionalIntelligentKeys, contactaNISSANdealer.
ThelockandunlockbuttonsontheIntelligent Keywillnotoperatewhen:
- thedistancebetweentheIntelligentKeyand thevehicleisover33ft(10m).
●theIntelligentKeybatteryisdischarged. Afterlockingwiththeremotekeylessentry function,pullthedoorhandletomakesurethe doorsaresecurelylocked.
TheLOCK/UNLOCKoperatingrangevaries dependingontheenvironment.Tosecurely operatethelockandunlockbuttons,approach thevehicletoabout3ft(1m)fromthedoor.

flowchart
graph TD
    A["Lock Icon"] --> B["Lock Icon"]
    C["Plug Icon"] --> D["Plug Icon"]
    style A fill:#f9f,stroke:#333
    style B fill:#ccf,stroke:#333
    style C fill:#cfc,stroke:#333
    style D fill:#fcc,stroke:#333
SPA2252B
- LOCKbutton
2.UNLOCKbutton
3.PANICbutton


HOWTOUSEREMOTEKEYLESS ENTRYSYSTEM
Whenyoulockorunlockthedoorsandrear hatch/trunklid,thehazard indicator willflashand thehorn(ortheoutsidechime)willsoundasa confirmation.Fordetails,see"Settinghazard indicatorandhornmode"(P.3-14).
Lockingdoors, rearhatch/trunklidand fuel-fillerdoor
- PushtheignitionswitchtotheOFFposition andmakesureyoucarrytheIntelligentKey withyou.*
- Close all the doors and there are hatch/trunk lid.
- Push the LOCK Intelligent Key. button ① on the
- Allthedoors, therearhatch/trunklidand fuel-fillerdoorwilllock.
- The hazard indicator flashestwice and the hornchirpsonce.
*:Doorsandtherearhatch/trunklidwilllockwith theIntelligentKeywhiletheignitionswitchisin theACCorONposition.
Unlockingdoors, rearhatch/trunklidand fuel-fillerdoor
- Push the UNLOCK button Intelligent Keyonce. ② on the
- The hazard indicator flashes once. The driver's door and fuel - filler door will unlock.
- Push the UNLOCK button on the Intelligent Key again within 60 seconds.
- The hazard indicator flashes once again. All the doors and therear hatch/trunklid will unlock.
3-14 Pre-driving checks and adjustments
Alldoorsandtherearhatch/trunklidwillbe lockedautomaticallyunlessoneofthefollowing operationsisperformedwithin1 minuteafter pushingtheUNLOCK 🔒 buttononthe IntelligentKeywhilethedoorsarelocked.If duringthis1-minutetimeperiod,theUNLOCK 🔒 buttononthelIntelligentKeyispushed,all doorsandtherearhatch/trunklidwillbelocked automaticallyafteranother1 minute.
- Openinganydoor
- Pushingtheignitionswitch
- InsertingtheIntelligentKeyintotheIntelligentKeyport
Openingwindows
The UNLOCK button operational so allows you to open a window that is equipped with the automatic open/close function. (See "Power windows" (P.2-44).)
Toopenthewindow, pushthedoor UNLOCK button ② onthelIntelligent Key for about 3 seconds after the door is unlocked.
Tostopopening, releasethe UNLOCK button.
Windowcannotbeclosedusingthelntelligent Key.
Thedoorwindowcanbeopenedorclosedby turningthemetalkeyinadoorlock.(See "Doors"(P.3-4).)
Usingpanicalarm
If you are necessary your vehicle and feel threatened, you may activate the alarm to call attention as follows:
1.PushthePANIC ➕ button ③ ontheKey formorethan1second.
2. The theft warning alarm and headlight will stay on for 25 seconds.
3. Thepanicalarmstopswhen:
- lthasrunfor25seconds,or
- AnyofthebuttonsonthelIntelligentKey arepushed.(Note: Panicbuttonshould bepushedformorethan1 second.)
Settinghazardindicatorandhornmode Thisvehicleissetinhazardindicatorandhorn modewhenyoufirstreceivethevehicle.
Inhazardindicatorandhornmode,whenthe LOCK 🔒 button ① ispushed,thehazard indicator flashes twice and the horn chirps once. WhentheUNLOCK 🔒 button ② ispushed, thehazardindicatorflashesonce.
Ifhornsarenotnecessary, thesystemcanbe switched to the hazard indicator mode.
Inhazardindicatormode,whentheLOCK buttonispushed,thehazardindicatorflashes twice.WhentheUNLOCK buttonis pushed,neitherthehazardindicatornorthe
hornoperates.Hazardindicatorandhornmode:
| DOORLOCKDOORUN | LOCK | |
| IntelligentKeysystem(Usingdoorhandleorrearhatch/trunkrequestswitch) | HAZARD-twiceOUTSIDECHIME-twice | HAZARD-onceOUTSIDECHIME-once |
| Remotekeylessentrysystem(Using 📄 orbutton) | HAZARD-twiceHORN-once | HAZARD-onceHORN-none |
Hazardindicatormode:
| DOORLOCKDOORUN | LOCK | |
| IntelligentKeysystem(Usingdoorhandleorrearhatch/trunkrequestswitch) | HAZARD-twiceOUTSIDECHIME-none | HAZARD-noneOUTSIDECHIME-none |
| Remotekeylessentrysystem(Using 📄 orbution) | HAZARD-twiceHORN-none | HAZARD-noneHORN-none |
Switchingprocedure:
Toswitchthehazardindicatorandhorn(chime) operation,pushtheLOCK ① andUN- LOCK ② buttononthelIntelligentKey simultaneouslyformorethan2seconds.
- Whenthehazardindicatormodeisset, the hazardindicatorflashes3times.
- Whenthehazardindicatorandhornmodeis set, thehazardindicatorflashesonce and thehornchirpsonce.
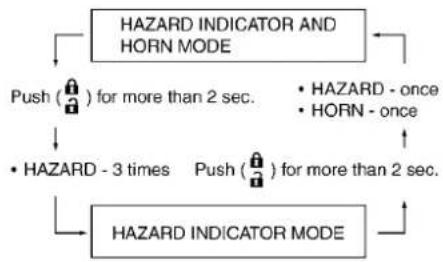
flowchart
graph TD
    A["HAZARD INDICATOR AND HORN MODE"] --> B["Push (🔒) for more than 2 sec."]
    A --> C["• HAZARD - once"]
    A --> D["• HORN - once"]
    A --> E["• HAZARD - 3 times"]
    A --> F["Push (🔒) for more than 2 sec."]
    A --> G["HAZARD INDICATOR MODE"]
    G --> H["End"]
Pre-drivingchecksandadjustments3-15
HOOD
text_image
Technical diagram showing car head assembly and safety instructions with numbered annotations- Pull the hood lock release handle located below the instrument panel; the hood will thens spring ups slightly.
- Pullthelever ② upatthefrontofthehood withyourfingertipsandraisethehood.
3.Holdtheinsulator ③ ofthesupportrod andinsertitsendintotheslot ④ onthe frontedgeofthehood. - When closing the hood, store the support rod to its original position, then slowly close the hood and makes sure it locks in place.

WARNING
- Makesurethehoodiscompletely closedandlatchedbeforedriving. Failuretodosocouldcausethe hoodtoflyopenandresultinan accident.
- If you se esteamorsmokecoming from the engine compartment, to avoid injury donotopenthehood.

WARNING
Donotdrivewiththerearhatchopen. Thiscouldallowdangerousexhaust gasestobedrawnintothevehicle. See"Exhaustgas(carbonmonoxide)" (P.5-2)ofthismanual.
3-16 Pre-driving checks and adjustments
natural_image
Line drawing of a car front view with an inset showing a component labeled 'SPA2573' (no text or symbols on the car itself)REARHATCHOPENERSWITCH
Therearhatchcanbeopenedbypushingthe rearhatchopenerswitchwhentheIntelligent Keyiswithintheoperatingrangeoftherear hatchlock/unlockfunctionregardlessofthe insidelockknobposition.(See "IntelligentKey system"(P.3-6).)
Toclosetherearhatch, pushitdownsecurely.
text_image
A B SPA2646NISMOmodels

CAUTION
Donotusetherearspoiler ○ A toopen orclosetherearhatch.Doingsomay
damagetherearspoiler.
Alwaysholdarea Ⓑ toopenorclosetherear hatch.
Pre-drivingchecksandadjustments3-17
text_image
① SPA2580SECONDARYREARHATCHRELEASE
Thesecondaryrearhatchreleasemechanism allowsopeningtherearhatchintheeventof dischargedbatteryoremergency.
Thereleasehandleislocatedunderthecargo roomfloor.Toopentherearhatchfromthe passengercompartment,performthefollowing procedure.
- Removethecargofloormat.
- Findtherearhatchreleasehandle shownintheillustration.
-
Freethereleasehandlethatisfixedwith velcro.
3-18 Pre-driving checks and adjustments -
Firmlypullthereleasehandleuntiltherear hatchreleases.
TRUNKLID(Roadstermodels)

WARNING
- Donotdrivewiththetrunklidopen. This could allow dangerous exhaust gas estobedrawn into the vehicle. See "Exhaustgas(carbonmonoxide)" (P.5-2) of this manual.
- Closelysupervisechildrenwhen theyarearoundcarstoprevent themfrom playing and becoming lockedinthe trunk wheretheycould beseriouslyinjured.Keepthecar locked,withthetrunkclosed,when notinuse, andpreventchildren's accesstolntelligentKeys.
natural_image
Line drawing of a car front view with an inset showing a component labeled 'SPA2692' (no text or symbols on the car itself)TRUNKLIDOPENERSWITCH
The trunklid can be opened by pushing the trunk lid openers switch when the Intelligent Key is within the operating range of the trunklock/unlock function regardless of the insidelock knob position. (See "Intelligent Keysystem" (P.3-6).)

text_image
OFF ON A B SPA2681TRUNKRELEASEPOWERCANCEL SWITCH
Whentheswitchlocatedinsidethegloveboxis intheOFFposition Ⓐ, thepowertothetrunk lidwillbecanceledandthetrunklidcannotbe openedbythetrunklidopenerotrunkrequest switch.
Whenyouhavetoleavethevehiclewithavalet andwanttokeepyourbelongingssafeinthe gloveboxandthetrunk,pushthisswitchtoOFF andlockthegloveboxwiththemechanicalkey. ThenleavethevehicleandthelIntelligentKey withthevaletandkeepthemechanicalkeywith you.
See "Keys" (P.3-2).
Toconnectthepowertothetrunklid, push the switch to the ON ⑧ position.
INTERIORTRUNKLIDRELEASE

WARNING
Closelysupervisechildrenwhenthey arearoundcarstopreventthemfrom playingandbecominglockedinthe trunkwheretheycouldbeseriously injured.Keepthecarlocked,withthe trunklidsecurelylatched,whennotin use,andpreventchildren'saccessto IntelligentKeys.
Theinteriortrunklidreleasemechanismallows openingofthetrunklidintheeventthatpeople becomelockedinsidethetrunk.
text_image
SPA2682Releasinginsidethetrunk
Toopenthetrunklidfromtheinside,pullthe releasehandle ① untilthelockreleasesand pushuponthetrunklid.Thereleaseleveris madeofamaterialthatglowsinthedarkaftera briefexposuretoambientlight.
Thehandle Ⓐ islocatedinsidethetrunk compartmentasillustrated.
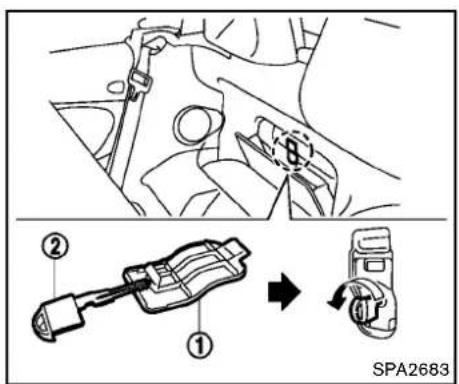
text_image
Technical diagram showing mechanical assembly steps with labeled components and a directional arrow indicating rotation or movement.SECONDARYTRUNKLIDRELEASE
Thesecondarytrunklidreleasemechanism allowsopeningthetrunklidintheeventof dischargedbatteryoremergency.
- Opentherearparcelbox.
2.Removethecap ① withasuitabletool ②. - Insert the key into the key cylinder and turn it counterclockwise. The trunk lid will open.
3-20 Pre-driving checks and adjustments
SOFTTOP(Roadstermodels)

text_image
1 2 3 4 5 6 7 SPA2685Interior/exteriorview
- Softtopindicatorlight(onthecombination meter)
2.Softtopoperatingswitch
3.Toplockhole
4.Softtop
5.Topstoragelid
6.Trunklid
7.Rearwindow
Thesofttopofthisvehicleiselectrically operated. You can fully open or closet the top only by pressing the operating switch located on the center console.
Thesofttopoperatingswitchmustbeoperated
underallofthefollowingconditions:
- Whentetrunkisclosed.
- Whenthevehicleisstopped.
- Whentheengineisrunning.
- WhentheignitionswitchisintheON position.
- Whentheselectorleverorshiftleverisina positionotherthantheR(Reverse)position.

CAUTION
Alwayskeeptheengine runningwhile operating the soft top. Thetopwill also
operatewhentheignitionswitchisin theONposition,butruntheengineto preventadischargedbattery.
Besuretofollowtheoperatinginstructions,and allthewarningsandcautionsinthissection. Improperoperationofthetopcouldcause asystemmalfunction,damage,ordeteriorationofthetopmaterialandrelated parts.

WARNING
•Parkthevehicleinasafeandlevel placeandapplytheparkingbrake.
- Makesuretheareaisclearof obstaclesandthereisenoughclearanceoverthetop(forexample,ina garageoracoveredarea).More thanapproximately6.6ft(2m)from thegroundisrequiredtoopenor closethetopsafely.Otherwise,the topmaydamageanyobjectsabove itwhilemoving.Thetopoperating systemcouldalsobedamaged.
- Donotoperatethetopinastrong wind.Itcouldbeblownbythewind, strikingsomeoneordamagethe
Pre-drivingchecksandadjustments
top.
- Donotallowanyonetostandupor extendanyportionoftheirbodyout oftheopeningwhilethevehicleisin motionorwhilethetopisbeing operated.
•Inanaccidentyoucouldbethrown fromthevehiclewithanopentop. Alwaysuseseatbeltsandproper childrestraints.

CAUTION
- Donotoperatethetopwhen the temperature is below 32°F (0°C). This may result in damageto the top material or operatingsystem.
-Removewaterdrops, snow, iceor sandfromthetop, and drythe surface of the top completely before opening it. - Donotopenthetopwhenitiswet ordamp. This may cause interior water damage, stains or mildewon the top material.
- Besuretoturnofftherearwindow defrosterswitch.Neverturniton
3-22Pre-drivingchecksandadjustments
whilethetopisbeingoperatedor fullyopened.Theheatmaydamage thetopmaterial.

natural_image
Technical diagram showing a hand holding a tool intersecting a mechanical component (no text or symbols present)
CAUTION
- Donotplaceanyobjectsbetween thetopclothand thestructure. Doingsocouldinterferewithtop operationandcausedamagetothe topoperatingsystemortheobjects.
-
Donotplaceanythingonthetop andthestoragelid. Evensmall itemsmayinterferewiththetop operationandcouldcausedamage tothetoporthevehiclebody.
-
Donotplaceanythinginthetop storagearea.Thetopwillnotfit thereproperly,andthiscoulddamagethetopand/orthevehicle body.
- Donotsitorplaceexcessiveweight onthetopandthestoragelid, especiallywhenthetopisbeing operated.Thetopmaybedamaged.
- Donotdrivethevehiclewiththetop partiallyopened.Alwaysmakesure thetopiseitherfullyopenedor closedbeforedriving.
- Secureitemssothattheycannotbe blownfromthevehiclewhiledriving withthetopopen.
- Donotoperatethetopmanually exceptforemergencycases.Manual operationmaydamagethetop.
- Besuretofullyopenorfullyclose thetop.Donotreleasetheswitch halfwaythroughtheroofopening orclosingprocess.Ifthetopisonly partiallyopened,significantdamagetothetopcouldoccur.
Makesurethetrunklidissecurelyclosedbefore operatingthetop.
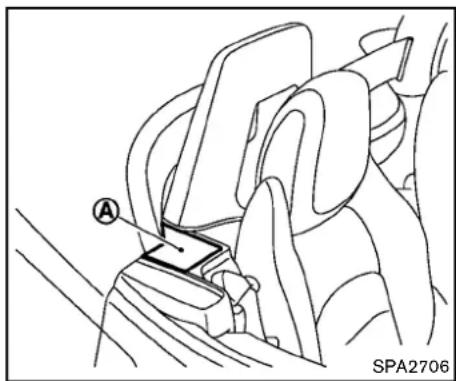
natural_image
Technical line drawing of a car seatbelt assembly (no text or symbols)WHENOPERATINGTHETOP

WARNING
Keephandsandotherpartsofthebody awayfrommovingpartssuchasthe top,storagelid,sideflap Ⓐ andpower windows.

CAUTION
Keepallpartsofthetoplinkageclearof obstructions, orthetoplatchmaynot
besecurelylocked.
NOTE:
•Incaseoflowbatteryorlowtemperature,thetopmaytemporarilylstop movingduringtheoperation.Thisfunctionstoprotectthetopcontrolmechanism,anditisnotamalfunction.
- Ifthetopisopenedandclosedrepeatedlyinashortperiodoftimeorthetop operationisstoppedwhileopeningor closing,thetopoperationmaybe automaticallystoppedtoprotectthe system.Waitforapproximately5minutesbeforeoperatingthetopagain.
Pre-drivingchecksandadjustments3-23
natural_image
Silhouette of a car with two blades, no text or symbols presentSofttopindicatorlight
Thesofttopindicatorlightintheinstrument panelshowstheconditionsoftopoperation. Thelightilluminateswhenthesofttopisbeing operatedorifitisstoppedbeforereachingthe fullyopenedorclosedposition.Whenthetopis fullyopenedorclosed,thelightwillturnoff.
Thelightblinkswhilethesofttopisnotfully openedorclosedunderthefollowingconditions:
- Whenthevehicleisdriven.
- Whentheselectorleverorshiftleverisin theR(Reverse)position.
Besuretofullyopenorclosethesofttopwhen
3-24 Pre-driving checks and adjustments
drivingthevehicle.
Whenthesofttopisoperating, and any of the following conditions occur, the top will stop operating.
- Whentheselectorleverorshiftleverisin theR(Reverse)position.
- Whenthevehiclemovesataspeedof3 MPH(5km/h)ormore.
- Whenthebatteryvoltageisextremelylow.
- Whenthetemperatureofthesofttop systembecomesextremelyhigh.
Releasethesofttopoperatingswitch, and push theswitchagaintomovethetoptothefully openedorclosedposition. Thesofttopindicator lightwillturnoffwhenthetopoperationis completelyfinished.
If the soft top indicator light illuminates with the ignitions switch ON (whether the top is operated or not, and when the top is engaged), it may indicate the top operating system is not functioning properly. Have your vehicle checked by a NISSAN dealer as soon as possible.
Automaticwindowlowering
Whenthesofttopoperatingswitchispressed, thepowerwindowswillautomaticallybeloweredcompletely. Thewindowsdo not rise automaticallyafterthetopoperationiscompleted. Usethepowerwindowswitchestoraise them.
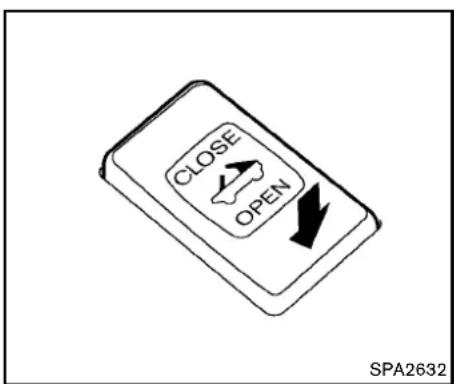
text_image
CLOSE OPEN SPA2632NOTE:
If you releasetheswitchandpressit again while the top is being opened, the top will slightly moveto the closing direction, then start moving to the opening direction again. The top is designed to move in this way. It is not a malfunction.
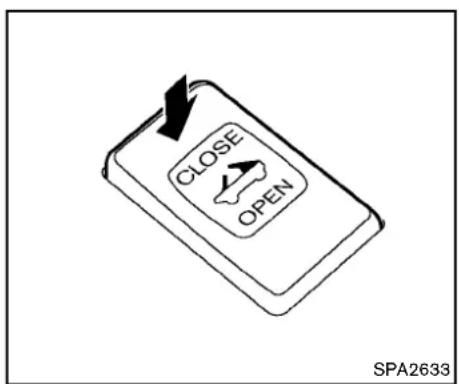
text_image
CLOSE OPEN SPA2633OPENINGTHETOP
-
Starttheengine.
2.PushOPENonthesofttopoperatingswitch andholdituntilthetopisfullyopened. -
Thesofttopindicatorlightwillilluminate whilethetopisinmotion.(Inabout20 seconds,theopeningmovementwill finishandtheindicatorlightturnsoff.)
-
Windowswillautomaticallybefully opened.
-
Releasetheswitchwhenthetopisfully opened.(Theindicatorlightturnsoff.)
CLOSINGTHETOP
-
Starttheengine.
2.PushCLOSEonthesofttopoperating switchandholdituntilthetopisfullyclosed. -
Thesofttopindicatorlightwillilluminate whilethetopisinmotion.(Inabout20 seconds,theclosingmovementwill finish.)
-
Windowswillautomaticallybefully opened.
-
Releasetheswitchwhenthetopisfully closed.(Theindicatorlightwillturnoff.)
Pre-drivingchecksandadjustments3-25
OPENINGTHETOPUSINGTHEIN-TELLIGENTKEY
Thesofttopcanbeopenedusingtherequest switch.

natural_image
Line drawing of a sports car front view with a side-view inset showing the dashboard and dashboard (no text or symbols)Openingthesofttop
PushtheignitionswitchtotheOFFpositionand makesuretocarrythelIntelligentKeywithyou.
Pushthedoorhandlerequestswitch(driver'sor passenger's) Ⓐ andholdituntilthesofttopis fullyopen.
TROUBLESHOOTINGGUIDE
If the soft top stops halfway during operation or does not operate normally, follow the procedures shown in the following table. If the procedures in the following table do not solve symptoms, immediately contact a NISSAN dealer for the inspection.
| SymptomBeepPossiblecausePossiblesolution | |||
| TheOPENsideofthesofttopoperating switchispushed,butthesofttopdoesnot operate. | Soundstwice | TheOPENsideofthesofttopoperatingswitchis pushedwhilethesofttopisfullyopen,orthe CLOSEsideofthesofttopoperatingswitchis pushedwhilethesofttopisfullyclosed. | PushtheCLOSEsideofthesofttopoperating switchwhenthesofttopisfullyopen.Pushthe OPENsideofthesofttopoperatingswitchwhenthe softtopisfullyclosed. |
| Soundstwice | Theselectorlever(automatictransmissionmodels only)ortheshiftlever(manualtransmissionmodels only)isintheR(Reverse)position. | Shifttheselectorlever(automatictransmission modelsonly)totheP(Park)orN(Neutral)position,or shifttheshiftlever(manualtransmissionmodelsonly) totheN(Neutral)position,andthenoperatethesoft top. | |
| SoundstwiceThe trunklidisopened.Fullyclosethetrunklid. | |||
| DoesnotsoundThe batteryvoltageislow.Starttheengineagainandoperatethesofttop. | |||
| DoesnotsoundThe operationstopstoprotectthesystem.Waitforapproximately5minutes. | |||
| Thesofttopstopshalfwayduringoperation. | Soundstwice | Objectsaretrappedinthemovingstructureofthe softtop. | Checkthatanobjectisnottrappedinsidetherear parcelshelf,sideflapandsofttop.Afterthecheck, turntheignitionswitchtotheOFFposition,startthe engineagainandthenoperatethesofttop. |
| SoundstwiceThe batteryvoltageislow.Starttheengineagainandoperatethesofttop. | |||
| Whenthevehicleisbeingdriven,thebeep sounds. | Soundscontinuously | Thesofttopispartiallyopened. | Immediatelyparkthevehicleinasafelocationand fullyopenorfullyclosethesofttop. |
IFTHETOPDOESNOTOPENOR CLOSEELECTRICALLY
If you cannot operate the soft top with the operating switch, first check whether all the following operating conditions are met.
- vehicleisstopped
- ignitionswitchisON(Runtheenginewhen operatingthetop.)
- thetrunkisclosed
- theselectorleverorshiftleverisinaposition otherthantheR(Reverse)position
Ifthetopstilldoesnotmoveundertheabove conditionsorhasanysystemmalfunction,seea NISSANdealerassoonaspossible.Whenyou mustclosethetopbyyourself,intheeventof emergencyorwhenanimmediatedealerservice isnotavailable,closethetopmanuallyaccordingtotheproceduresshowninthissection.
When closing the soft top manually:
- Movethevehicletoasafeplace,awayfrom traffic.
- Twopeopleshouldperformthisprocedure, assomeofthetoppartsareextremely heavy.
Thetopcannotbeopenedmanually.

WARNING
- Donotdrivewiththetoppartially opened.
- Ifthetopcannotbeoperatedproperly,seeaNISSANdealerassoon aspossibletohaveyourvehicle checked.

CAUTION
Thestoragelidisextremelyheavy.The storagelidshouldbemanuallyopened orclosedbytwopeople.
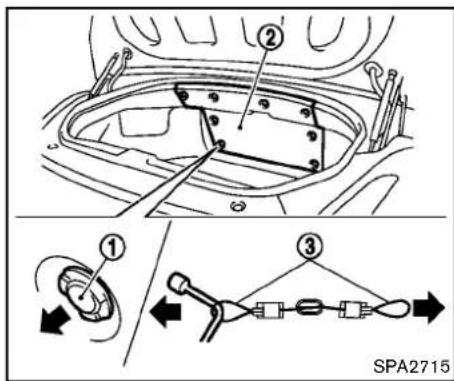
text_image
Technical diagram showing vehicle component assembly with numbered parts and a schematic diagram of the assembly process.- Openthetrunklid. In the event of a discharged battery, these secondary trunk releas mechanism should be operated. (See "Secondary trunk lid release" (P.3-20).)
- Openthetopstoragelid a. Removetheboard ② insideofthetrunk byremovingtheclips ①. b. Pull the lock release cables (right and left) ③ as illustrated, then close the trunklid.
NOTE: Useaclothorothertooltoprotectyour handswhenpullingonthelockrelease
3-28Pre-drivingchecksandadjustments
cables ③.
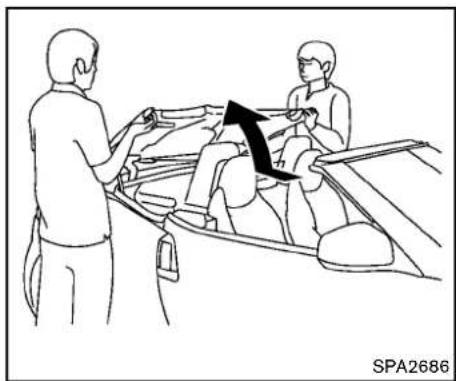
natural_image
Line drawing showing two people interacting with a vehicle, one holding a car, with an arrow indicating direction (no text or symbols)c.Pullupthestoragelidfromtheleftand rightsideofthevehiclebyhand.

natural_image
Line drawing of a car interior with people interacting near the window (no text or symbols)3.Closethesofttop.
a. Pullupthetopsimultaneously from the rightandleftside of the vehicle while holding the storagelid.

CAUTION
Makesuretoclosethetrunklidbefore openingthestoragelid. Thestoragelid maycontactthetrunklidanddamageit.
Pre-drivingchecksandadjustments3-29

text_image
A SPA2704b. Whenthereartop ① is pulled up from the storage area, one person must hold the storage lid and another person must pull up the soft top.
c.Pullupthetopusingbothhands,holding thereartop Ⓐ asillustrated.
3-30 Pre-driving checks and adjustments
CAUTION
Makesuretoholdthereartop ○ A to avoidthefrontandrearpartsseparating. Otherwisethetopmaybedamaged.
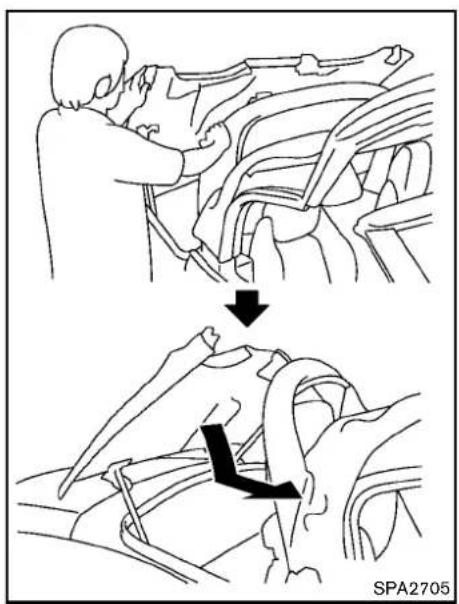
text_image
SPA2705d. Pulldownandslidethestoragelidto closewhileholdingtherearsofttopfrom therightandleftsideofthevehicle.

CAUTION
Makesuretoclosethestoragelid completely. Thestoragelidmaycontact thesofttopanddamageit.
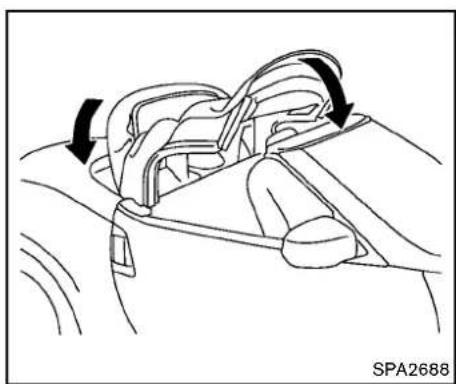
natural_image
Line drawing of a car interior showing steering wheel and dashboard (no text or symbols)e. Closethefrontandrearpartsofthesoft topatthesametimeasillustrated.
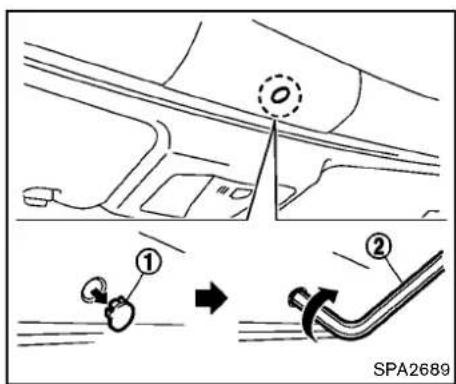
text_image
① ② SPA2689- Lockthefrontpartofthesofttop.
a.Removethecap
① asillustrated.
b.Insertasuitabletool
② (locatedinthe
trunk)intotheholeandturnclockwise.

CAUTION
- Afterclosingthetopmanually, have thesystemcheckedand/orrepaired byaNISSANdealerassoonas possible.
- Avoidleavingthevehicleoutsidefor longperiodsordrivingathigh speeds.Therearofthetopisnot
Pre-drivingchecksandadjustments3-31
lockedcompletely, and this may allow wind and a rainto get into your vehicle.
CAREOFTHESOFTTOPANDTHE VEHICLEBODY
TouseyourRoadstersafelyandcomfortably, youneedtoobserveallthewarningsand cautionsshowninthepreviouspages. Also, to maintainagoodappearanceofthesofttopand thevehiclebody,youneedtocareforthemby cleaningand/orwashingproperly.

CAUTION
- Donotuseanautomaticcarwashor ahigh-pressurecarwashtoclean yourvehicle. Thetopmaybedamaged and water may leak into the inside of the vehicle.
- Storethevehiclewiththetopclosed ifitisnottobeusedforlong periods. Keepingthetopstowed forlongperiodsmaycausewrinkles onthesurfaceofthetop.
See "Cleaningexterior"(P.7-2)fordetailed instructions.
3-32Pre-drivingchecksandadjustments
- Aprotective cleartapeis applied to the top storagelidpainted surface where the soft top contact sthesurface. Whenthetopis fully closed, the apemay transmits some light, visible from the inside of the vehicle. This does not affect the water and air tightness of theseal.
•Theinnersurfaceofthetrunkandtop storagelidsmayshowafibrous,ormarbled pattern.Thisisthenormalappearanceofthe materialusedintheseparts.
FRONT, SIDEANDREARUNIQUE
PARTS(NISMOmodels)

natural_image
Three line drawings of a car accident showing damage and collision (no text or symbols)TheNISMOmodelshavethefollowingunique partsonthefront,sideandrearofthevehicle.
●Frontbumperwithanaerodynamicsplitter
- Sidesillextensions
●Rearbumperwithanaerodynamicdiffuser
•Large-diameterexhaustpipes
These parts are closetothegroundandmaybe damaged if they contact object such as curbs, parking blocks, etc.

CAUTION
Reducevehiclespeedtodecrease the possibility of damaging these parts when:
-drivingonbumpyorruttedroads
-enteringorexitingparkinggarages anddriveways
- drivingoverspeedbumps
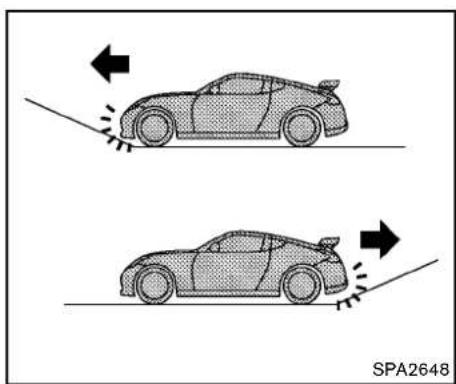
natural_image
Two cartoon-style cars on a track with directional arrows indicating motion (no text or symbols)
natural_image
Diagram of a hand using a tool to tie or grip a cable, with no visible text or symbols
CAUTION
The approach and departure angles are small. Reduce vehicles speed when the vehicle approaches or leaves a steep hill. Otherwise, the front bumper with anaerodynamics splitter, rear bumper with anaerodynamic diffuser and ex-haust pipes may contact three roads surface and bedamaged.

CAUTION
Donotsteponthefrontbumperwithan aerodynamicsplitter.Doingsocould damageit.
FUEL-FILLERDOOR

natural_image
Diagram showing a circular object with an arrow pointing inward, surrounded by curved lines and a label 'SPA2581' at the bottom right (no readable text or symbols on the diagram itself)OPENINGTHEFUEL-FILLERDOOR
Toopenthefuel-fillerdoor, unlock the fuel-filler door by using one of the following operations, then push the left side of the door.
- Pushthedoorhandlerequestswitchwith theIntelligentKeycarriedwithyou.
- PushtheUNLOCKbuttonontheIntelligent Key.
- Insertthemechanicalkeyintothedoorlock cylinderandturnittotherearofthevehicle.
- Pushthepowerdoorlockswitchtothe UNLOCKposition.
Tolock, closethefuel-fillerdoorsecurely and lockalldoorsbyoperatingthedoorhandle
3-34Pre-drivingchecksandadjustments
requestswitch, theLOCKbuttononthe IntelligentKey, themechanicalkeyorthepower doorlockswitch.
FUEL-FILLERCAP

WARNING
- Gasolineisextremelyflammable andhighlyexplosiveundercertain conditions. Youcouldbeburnedor seriouslyinjuredifitismisusedor mishandled.Alwaysstopengine anddonotsmokeorallowopen flamesorsparksnearthevehicle whenrefueling.
- Donotattempttotopoffthefuel tankafterthefuelpumpnozzle shutsoffautomatically.Continued refuelingmaycausefueloverflow, resultinginfuelsprayandpossibly afire.
- Useonlyanoriginalequipmenttype fuel-fillercapasareplacement.It hasabuilt-insafetyvalveneeded forproperoperationofthefuel systemandemissioncontrolsystem.Anincorrectcapcanresultina seriousmalfunctionandpossible injury.Itcouldalsocausethemal-
functionindicatorlighttocomeon.
- Neverpourfuelintothethrottle bodytoattempttostartyourvehicle.
- Donotfillaportablefuelcontainer inthevehicleortrailer.Staticelectricitycancauseanexplosionof flammableliquid,vapororgasin anyvehicleortrailer.Toreducethe riskofseriousinjuryordeathwhen fillingportablefuelcontainers:
—Alwaysplacethecontaineron thegroundwhenfilling.
—Donotuseelectronicdevices whenfilling.
—Keepthepumpnozzleincontact withthecontainerwhileyouare fillingit.
—Useonlyapprovedportablefuel containersforflammableliquid.

CAUTION
- Iffuelisspilledonthevehiclebody, flushitawaywithwatertoavoid paintdamage.
- Insertthecapstraightintothefuel-fillertube, thentightenuntilthe fuel-fillercapclicks. Failuretotightenthefuel-fillercapproperlymay causethe malfunctionindicator light(MIL)toilluminate. If the lightilluminatesbecausethefuel-fillercapislooseormissing, tighten orinstallthecapandcontinueto drivethevehicle. The SERVICE ENGINE SOON light shouldturnoffafterafewdriving trips. If the SERVICE ENGINE SOON lightdoesnotturn offafterafewdrivingtrips, havethe vehicleinspectedbyaNISSANdealer.
•TheLOOSEFUELCAPwarningwill appearifthefuel-fillercapisnot properlytightened.Itmaytakeafew drivingtripsforthemessagetobe displayed.Failureretotightenthe fuel-fillercapproperlyafterthe LOOSEFUELCAPwarningappears maycausethe SERVICE MALFUNCTION IndicatorLight(MIL)toilluminate.

natural_image
Technical diagram of a mechanical assembly with labeled components and motion indicators (no readable text or symbols)Toremovethefuel-fillercap:
-
Turnthefuel-fillercapcounterclockwiseto remove.
-
Putthefuel-fillercaponthecapholderon thehook Ⓐ whilerefueling.
Toinstallthefuel-fillercap:
-
Insert the fuel-fillercap straight into the fuel-fillertube.
-
Turnthefuel-fillercapclockwiseuntila singleclickisheard.

text_image
A WARNING 0/0 LOOSE FUEL CAP EXIT RESET SPA2810LOOSEFUELCAPwarning
TheLOOSEFUELCAPwarningappearsonthe vehicleinformationdisplaywhenthefuel-filler capisnottightenedcorrectlyafterthevehicle hasbeenrefueled.Itmaytakeafewdrivingtrips forthemessagetobedisplayed.
Toturnoffthewarning, perform the following steps:
-
Remove and install the fuel-fillercapassoon as possible. (See "Fuel-fillercap" (P.3-34).)
-
Tightenthefuel-fillercapuntilitclicks.
3.Pushthe ● switch Ⓐ forabout1 secondtoturnofftheLOOSEFUELCAP warningaftertighteningthefuelcap.
Pre-drivingchecksandadjustments
TILTSTEERING

WARNING
- Donotadjustthesteeringwheel whiledriving.Youcouldlosecontrol ofyourvehicleandcauseanaccident.
- Donotadjustthesteeringwheel anyclosertoyouthanisnecessary forpropersteeringoperationand comfort. Thedriver'sairbaginflates withgreatforce. If you are unrestrained, leaning forward, sittingsidewaysoroutofpositioninanyway, you are at greater risk of injury or death in acrash. You may also receive serious or fatal injuries from the air bag if you are up again it when it inflates. Always sit back against theseatback and as far away as practical from theesteering wheel. Always usetheseatbelts.
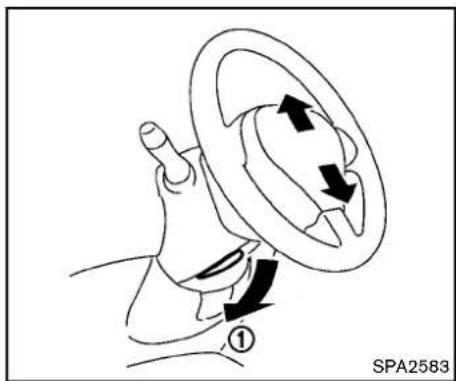
text_image
① SPA2583MANUALOPERATION
Tiltoperation
Pushthelocklever ① downandadjustthe steeringwheelupordowntothedesired position.
Pullthelockleverupsecurelytolockthe steeringwheelinplace.
SUNVISORS
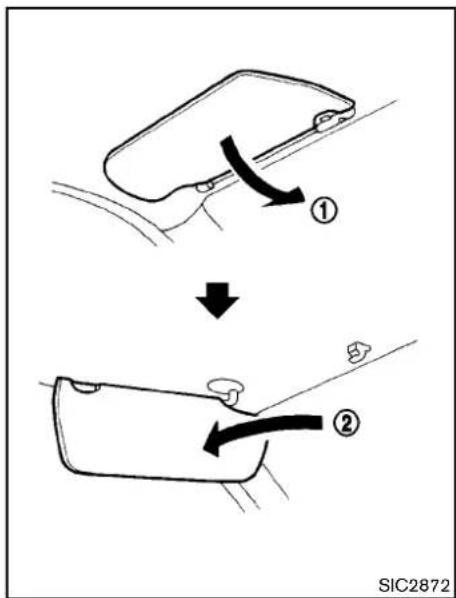
text_image
① ↓ ② SIC2872- Toblockoutglarefromthefront, swing downthemainsunvisor ①.
- To block glare from the side, remove the mainsunvisorfromthecentermountand swingittotheside ②.
MIRRORS
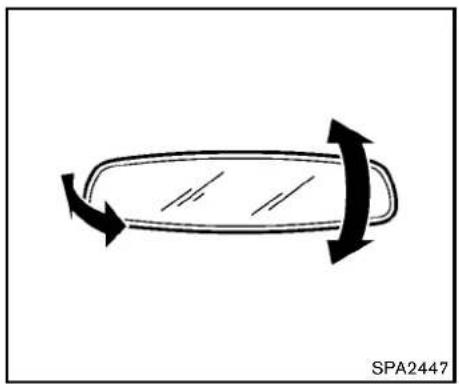
natural_image
Diagram of a car wheel with bidirectional arrows indicating clockwise motion (no text or symbols)INSIDEMIRROR
Adjusttheheightandtheangleoftheinside mirrortothedesiredposition.
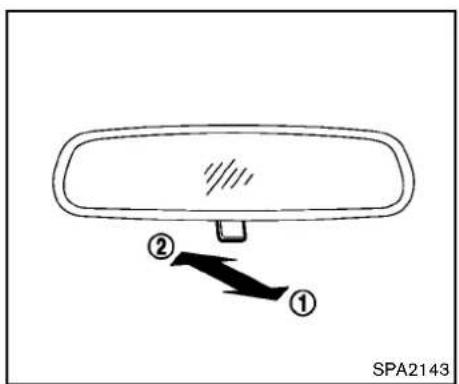
text_image
① ② SPA2143Manualanti-glaretype
Thenightposition ① willreduceglarefromthe headlightsofvehiclesbehindyouatnight.
Usethedayposition ② whendrivingindaylight hours.

WARNING
Usethenightpositiononlywhennecessary, because it reduces rearview clarity.
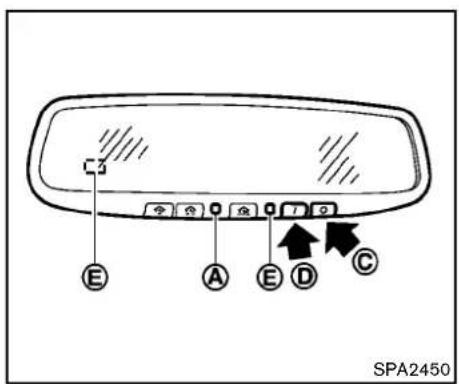
text_image
C E A E D C SPA2450Automaticanti-glaretype
The insidemirror is designed so that it automatically changes reflection according to the intensity of the headlight so the following vehicle.
The anti-glaresystem will be automatically turned on when the ignition switch is pushed to the ON position.
Whentheanti-glaresystemisturnedon, the indicatorlight Ⓐ willilluminateandexcessive glarefromtheheadlightsofthevehiclebehind youwillbereduced.
Pushthe“○”switch ⓒ tomaketheinside rearviewmirroroperatenormally.Theindicator
Pre-drivingchecksandadjustments3-37
lightwillturnoff.Pushthe"l"switch thesystemon.
Donotallowanyobjecttocoverthe sensors Ⓔ orapplyglasscleaneron them.Doingsowillreducethesensitivity ofthesensor,resultinginimproperoperation.
FortheHomeLink ^® UniversalTransceiveroperation, see "HomeLink ^® UniversalTransceiver" (P.2-49).
OUTSIDEMIRRORS

WARNING
Objectsviewedintheoutsidemirroron thepassengersidearecloserthanthey appear.Becarefulwhenmovingtothe right.Usingonlythismirrorcouldcause anaccident.Usetheinsidemirroror glanceoveryourshouldertoproperly judgedistanceootherobjects.

text_image
① ② SPA2319Adjustingoutsidemirrors
The outside mirror control switch is located on the armrest.
The outside mirror will operate only when the ignitions switch this in the ACCorON position.
Turntheswitchrightorlefttoselecttherightor leftsidemirror ①, thenadjustusingthecontrol switch ②.
Defrostingoutsidemirrors
Theoutsidemirrorswillbeheatedwhentherear windowdefrosterswitchisoperated.

natural_image
Diagram of a car wheel with an arrow indicating motion, no text or symbols presentFoldableoutsidemirrors
Foldtheoutsidemirrorbypushingittowardthe rearofthevehicle.
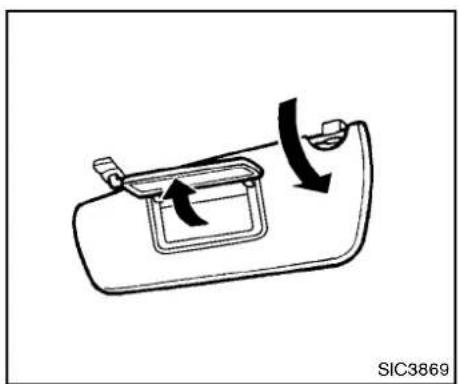
natural_image
Diagram of a car door handle with directional arrows indicating movement (no text or symbols)VANITYMIRROR
Tousethefrontvanitymirror,pulldownthesun visorandpullupthecover.
MEMO
3-40 Pre-driving checks and adjustments
4Centerdisplay, heater, airconditioner, audio, phone and voicerecognitionsystems
Safetynote....4-3
Centermulti-functioncontrolpanel(modelswith
navigationsystem)....4-3
Howtousemulti-functioncontroller....4-4
Howtousetouchscreen....4-4
Menuoptions....4-6
Howtoselectmenusonthescreen....4-7
Vehicleinformationandsettings(modelswith
navigationsystem)....4-7
HowtouseSTATUSbutton....4-7
Howtousebrightnesscontrolanddisplay
ON/OFFbutton....4-7
HowtouseINFObutton....4-8
HowtouseSETTINGbutton....4-11
RearViewmonitor(modelswithnavigationsystem).....4-18
Howtoreaddisplayedlines....4-18
Howtoparkwithpredictedcourselines....4-19
Differencebetweenpredictedand
actualdistances....4-20
Howtoadjustscreen....4-23
Operatingtips....4-23
Ventilators....4-24
Centerventilators....4-24
Sideventilators....4-24
Heaterandairconditioner....4-24
Automaticairconditioner(TypeA)....4-25
Automaticairconditioner(TypeB)....4-28
Operatingtips....4-30
In-cabinmicrofilter....4-30
Servicingairconditioner....4-30
Audiosystem....4-31
Audiooperationprecautions....4-31
FM-AMradiowithCompactDisc(CD)player.....4-43
FM-AM-SATradiowithCompactDisc(CD)
changer(modelswithoutnavigationsystem)......4-47
FM-AM-SATradiowithCompactDisc(CD)player
(modelswithnavigationsystem)......4-52
DVD(DigitalVersatileDisc)playeroperation
(modelswithnavigationsystem)......4-56
USBmemoryoperation(modelswith
navigationsystem)......4-59
Bluetooth ^® streamingaudio(modelswith
navigationsystem)....4-63
iPod ^® playeroperation(modelswith
navigationsystem)......4-68
MusicBox ^® (ifsoequipped)......4-69
Auxiliaryinputjacks(modelswith
navigationsystem)....4-75
CD/DVD/USBmemorycareandcleaning....4-76
Steering-wheel-mountedcontrolsforaudio....4-77
Antenna....4-79
CarphoneorCBradio....4-80
Bluetooth ^® hands-freephonesystem(modelswith
navigationsystem)....4-81
Regulatoryinformation....4-82
Voicecommands....4-82
Controlbuttons....4-83
Connectingprocedure....4-83
Phoneselection....4-84
Vehiclephonebook....4-84
Makingacall....4-86
Receivingacall....4-87
Duringacall....4-88
Phonesetting....4-89
Troubleshootingguide....4-90
Bluetooth ^® hands-freephonesystem(modelswithout
navigationsystem)(ifsoequipped)......4-91
Regulatoryinformation....4-92
Usingthesystem....4-93
Listofvoicecommands....4-97
SpeakerAdaptation(SA)mode....4-100
Troubleshootingguide....4-102
NISSANVoiceRecognitionSystem(modelswith
navigationsystem)....4-103
NISSANvoicerecognitionStandardMode......4-103
Usingthesystem....4-106
NISSANvoicerecognitionAlternate
CommandMode....4-114
Usingthesystem....4-123
Troubleshootingguide....4-128
SAFETYNOTE

WARNING
- Donotdisassembleormodifythis system.Ifyoudo,itmayresultin accidents,fire,orelectricshock.
- Donotusethissystemifyounotice anyabnormality,suchasafrozen screenorlackofsound.Continued useofthesystemmayresultin accident,fireorelectricshock.
•Incaseyounoticeanyforeign objectinthesystemhardware,spill liquidonit,ornoticsmokeorsmell comingfromit,stopusing the systemimmediatelyandcontact yournearestNISSANdealer.Ignoringsuchconditionsmayleadto accidents,fire,orelectricshock.
•Parkthevehicleinasafelocation andapplytheparkingbraketoview theimagesonthefrontcenterdisplayscreen.
Donotattempttooperatethesystemin extremetemperatureconditions[below -4°F (-20°C) and above 158°F (70°C)]. Operatingthissystemunderthesecondi- tionsmayresultinsystemmalfunctions.
CENTERMULTI-FUNCTION CONTROL PANEL (modelswith navigation system)

text_image
1 STATUS DEST ROUTE ZOOM OUT ZOOM IN MAP ENTER 5 PHONE + INFO SETTING - BACK VOICE 7 8 9 10 11 SAA22731."STATUS"statusdisplaybutton(P.4-7)
2,3,7,8,9.
Fornavigationsystemcontrolbuttons(Referto theseparateNavigationSystemOwner'sManual.)
4.Multi-functioncontroller(P.4-4)
5."PHONE"Bluetooth® Hands-FreePhoneSystembutton(P.4-81)
6. OFF"brightnesscontrolanddisplayON/OFFbutton(P.4-7)
10. "INFO" vehicle and navigation information button (P.4-8)
11."SETTING"button(P.4-11)
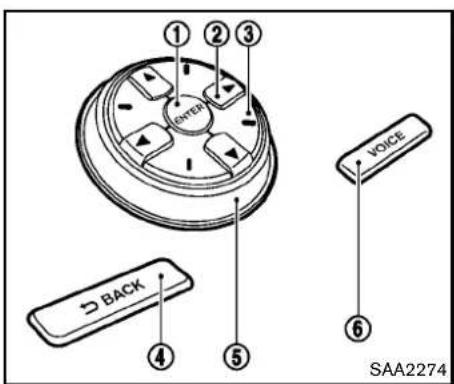
text_image
① ② ③ ONEX VOLUME BACK ④ ⑤ VOICE ⑥ SAA2274Chooseanitemonthedisplayusingthemain directionalbuttons ② (oradditionaldirectional buttons ③ withnavigationsystem)orcenter dial ⑤ ,andpushtheENTERbutton ① for operation.
PushtheBACKbutton ④ toreturnthedisplay tothepreviousscreenordeletecharacters. PushingBACKmayormaynotsavethesettings dependingonthemenu.
FortheVOICEbutton ⑥ functions, refertothe separateNavigationSystemOwner's Manual.
HOWTOUSETOUCHSCREEN

CAUTION
•Theglassscreenontheliquid crystaldisplaymaybreakifitishit withahardorsharpobject.Ifthe glassscreenbreaks,donottouchit. Doingsocouldresultinaninjury.
- Tocleanthedisplay,useasoft,dry cloth.Ifadditionalcleaningisnecessary,useasmallamountof neutraldetergentwithasoftcloth. Neverusearoughcloth,alcohol, benzine,thinneroranykindof solventorpapertowelwithachemicalcleaningagent.Theywill scratchordeterioratethepanel.
- Donotsplashanyliquidsuchas waterorcarfragranceonthedisplay.Contactwithliquidwillcause thesystemtomalfunction.
Toensuresafedriving, somefunctions cannot beoperatedwhiledriving.
Theon-screenfunctionsthatarenotavailable whiledrivingwillbe"grayedout"ormuted.
Parkthevehicleinasafelocationandthen
operatethenavigationsystem.

WARNING
•ALWAYSgiveyourfullattentionto driving.
- Avoidusingvehiclefeaturesthat could distract you. If distracted, you could lose control of your vehicle and cause an accident.
4-4 Centerdisplay, heater, airconditioner, audio, phone and voicerecognition systems

flowchart
graph TD
    A["Navigation"] --> B["Audio"]
    B --> C["Phone"]
    C --> D["Bluetooth"]
    E["Volume & Beeps"] --> F["Display"]
    F --> G["Clock"]
    G --> H["Others"]
    I["②"] --> J["BACKS"]
Touchscreenoperation
Withthissystem,thesameoperationsasthose forthemulti-functioncontrollerarepossible usingthetouchscreenoperation.
Selectingtheitem:
Touchanitemtoselectit.Toselectthe"Audio" settings,touchthe"Audio"area ① onthe screen.
TouchtheBACK ② buttonotreturntothe previousscreen.
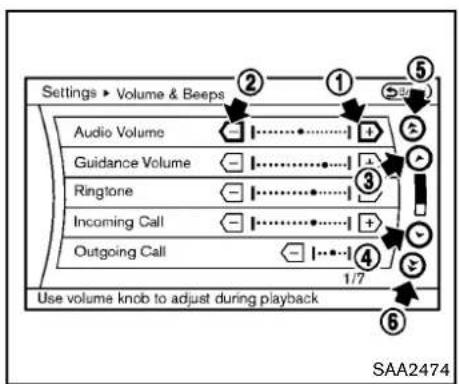
text_image
Settings ▶ Volume & Beeps Audio Volume Guidance Volume Ringtone Incoming Call Outgoing Call Use volume knob to adjust during playback 1/7 SAA2474Adjustinganitem:
Touchthe+ ① or- ② buttontoadjustthe settings.
Touchthe Ⓧ ③ or ⏰ ④ buttonomove tothepreviousornnextitem.
Touchthe ⑤ or ⑥ buttonomove tothepreviousornextpage.

text_image
Phone ▶ Phonebook 1 2 3 4 5 6 7 8 9 0 A B C D E F G H I J K L M N O ① Q R S T U V W X Y Z ' - & _ Delete Symbols Space Lowercase OK SAA2475Inputtingcharacters:
Touchtheletterornumber ①.
Therearesomeoptionsavailablewheninputting characters.
•Uppercase:
Showsuppercasecharacters.
•Lowercase:
Showslowercasecharacters.
Symbols:
Showssymbolssuchasthequestionmark (?).
•Space:
Insertsaspace.
- Delete:
Deletesthelastcharacterthathasbeen inputwithonetouch.Pushandholdthe buttontodeleteallofthecharacters.
•OK:
Completescharacterinputs.
Touchscreenmaintenance
If you clean the displays screen, use adry, soft cloth. If additional cleaning is necessary, use a small amount of neutral detergent with as soft cloth. Neverspray the screen with water or detergent. Dampenthe cloth first, and then wipe the screen.
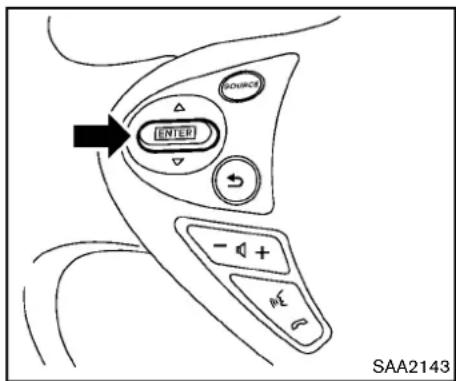
text_image
INTED SOURCE - + - SAA2143MENUOPTIONS
Thestartmenucanbedisplayedusingthemenu controlswitchonthesteering-wheel-mounted controls.
- While the MAP or STATUS screen is displayed, push and hold themenu control switch until the "Menu Options" screen appears.
- Highlightthepreferreditembytiltingthe menucontrolswitchupordown,andthen pushthemenucontrolswitchtoselectit.

text_image
Menu Options BACK Destination Route Info Settings 1/4 SAA2476Availableitems
Destination/Route:
Theseitemsareforthenavigationsystem.See theseseparateNavigationSystemOwner'sManualfordetails.
Info:
Displaytheinformationscreen.ltisthesame screenthatappearswhenyoupushthelINFO button.
Settings:
Displaysthesettingsscreen.Itisthesame screenthatappears whenyoupush the SETTINGbutton.
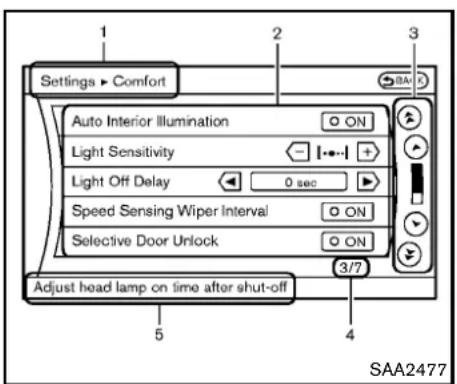
text_image
Settings > Comfort Auto Interior Illumination Light Sensitivity Light Off Delay 0 sec Speed Sensing Wiper Interval ON Selective Door Unlock ON Adjust head lamp on time after shut-off 3/7 5 4 SAA2477Vehiclefunctionsareviewedonthedisplay screeninmenus.Toselecteachkeyitem, highlightthepreferreditemusingthemulti-functioncontrollerandpushtheENTERbutton.
Wheneveramenuselectionismadeormenu itemishhighlighted, differentareaasonthescreen provideyouwithimportantinformation.Seethe followingfordetails.
1. Header:
Showsthepathusedtogettothecurrent screen.(i.e.pushSETTINGbutton> choose"Comfort"menuitem.)
2.MenuSelections:
Showstheoptionstochoosewithinthat menuscreen.
3.UP/DOWNMovementindicator:
Showsthatthemulti-functioncontrollermay beusedtomoveUP/DOWNonthescreen andselectmoreoptions.
4. Menultems Counter:
Showsthetotalnumberofitemslisted acrossallpagesforthecurrentmenu(i.e. 3/7).
5. Footer/InformationLine:
Provides more information (if available) about themenuselection currently highlighted. (i.e. Adjustheadlampontime after shut-off.)
VEHICLEINFORMATION AND SETTINGS(modelswithnavigation system)
HOWTOUSESTATUSBUTTON
Todisplaythestatusoftheaudio,airconditioner system,fuelconsumptionandnavigationsystem,pushtheSTATUSbutton.Thefollowing informationwillappearwhentheSTATUSbutton ispushedrepeatedly.
AudioandAirconditionersystem→Audioandfueleconomy→AudioandNavigationsystem
HOWTOUSEBRIGHTNESSCONTROLANDDISPLAY/OFFBUTTON
Pushthe" ✦/OFF"buttontoswitchthedisplay brightnessstothedaytimemodeorthenighttime mode, andtoadjustthedisplaybrightness using themulti-functioncontrollerwhiletheindicatoris displayedatthebottomofthescreen.
Thedisplaybrightnesscanalsobeadjusted usingthebrightnessUPbutton(+)orbrightnessDOWNbutton(-).
Pushandholdthe" OFF"buttonformore than2secondstoturnthedisplayoff.Pushthe buttonagaintoturnthedisplayon.
HOWTOUSEINFOBUTTON
Thedisplayscreenshowsvehicleandnavigation informationforyourconvenience.
Theinformationshownonthescreenshouldbe aguidetodeterminetheconditionofthevehicle.
Seethefollowingfordetails.
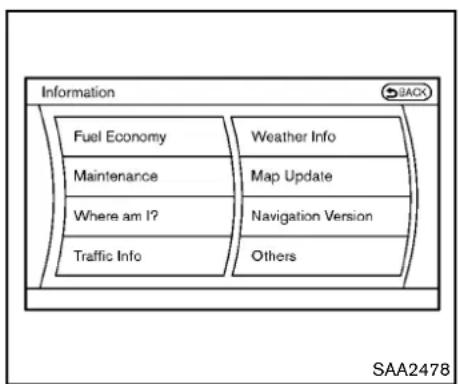
flowchart
graph TD
    A["Fuel Economy"] --> B["Maintenance"]
    B --> C["Where am I?"]
    C --> D["Traffic Info"]
    E["Weather Info"] --> F["Map Update"]
    F --> G["Navigation Version"]
    G --> H["Others"]
-NavigationVersion
*WhentheignitionswitchisintheONposition, the"NavigationVersion"keyisdisplayedafter selectingthe"Others"key.
Vehicleinformationdisplay
- PushtheINFObuttononthecontrolpanel.
- SelectanitemfromtheINFOmenu.
- Afterviewing or adjusting the information on the following screens, push the BACK button to return to the INFO menu.
SeetheseparateNavigationSystemOwner's
Manualforthefollowingitems:
- Whereaml?
- TrafficInfo
-WeatherInfo
-MapUpdate
4-8 Centerdisplay, heater, airconditioner, audio, phone and voicerecognitionsystems
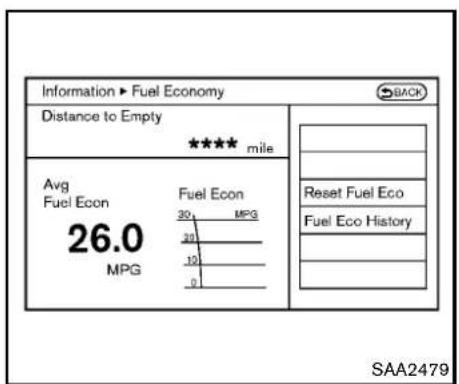
text_image
Information ► Fuel Economy Distance to Empty **** mile Avg Fuel Econ 26.0 MPG Fuel Econ 30 MPG 20 10 0 Reset Fuel Eco Fuel Eco History SAA2479FuelEconomyinformation
Thedistancetoempty,averagefueleconomy andcurrentfueleconomywillbedisplayedfor reference.
Toresettheaveragefueleconomy(AvgFuel Econ),selectthe"ResetFuelEco"key.
If the "FuelEcoHistory" key is selected, the average fuel consumption history will be displayed graph formal on with the average for the previous Reset-to-Reset period.
The unit can be converted between "US" and "Metric". (See "HowtouseSETTINGbutton" (P.4-11).)
Thefueleconomyinformationmaydifferfromthe informationdisplayedonthevehicleinformation display. Thisisduetothetimingdifferencein updatingtheinformationanddoesnotindicatea malfunction.
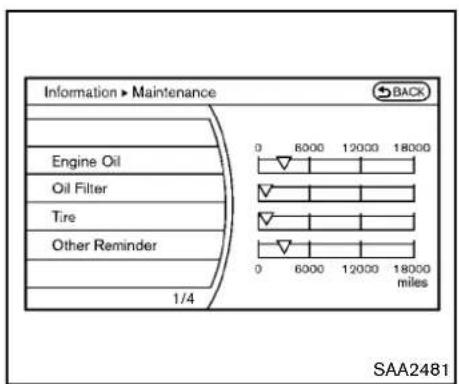
text_image
Information > Maintenance BACK Engine Oil Oil Filter Tire Other Reminder 0 6000 12000 18000 0 6000 12000 18000 miles SAA2481Maintenanceinformation
Themaintenanceintervalscanbedisplayedfor theengineoil,oilfilter,tireandotherreminders.
Tosetamaintenanceinterval,selectapreferred itemfromthelist.
Youcanalsosettodisplayamessagetoremind youthatthemaintenanceneedstobeperformed.
The following examples show to set the engine oil maintenance information. Use the same step to set the other maintenance information.
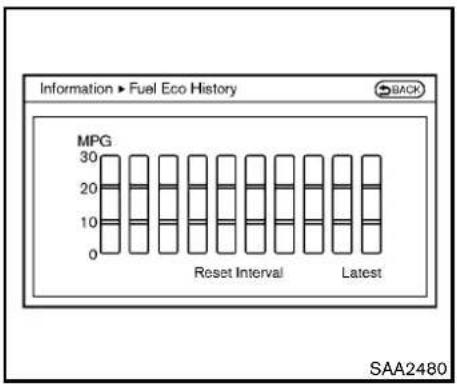
bar
Information ► Fuel Eco History | Category | Value | |---|---| | Reset Interval | 30 | | Latest | 30 | SAA2480
text_image
Information ► Engine Oil BACK Interval - 3000 miles + Reminder ON Reset Distance 1/3 0 6000 12000 18000 0 6000 12000 18000 miles SAA2482- Settheinterval(mileage)ofthemaintenance schedule. Todeterminethercommended maintenanceinterval, refertoyour "NISSAN ServiceandMaintenanceGuide".
- Todisplaythereminderautomaticallywhen thedesireddistanceisreached,selectthe "Reminder"key.
- Resetthedrivingdistancetothenew maintenanceschedule.
- Toreturntothepreviousscreen, pushthe BACKbutton.
The unit can be converted between "US" and "Metric". (See "HowtouseSETTINGbutton" (P.4-11).)
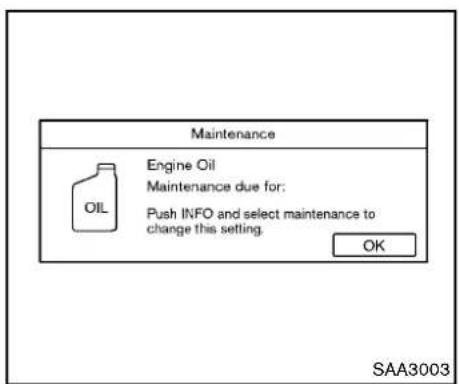
text_image
Maintenance Engine Oil Maintenance due for: Push INFO and select maintenance to change this setting. OK SAA3003Example
TheReminderwillbeautomaticallydisplayed whenthespecifieddistancehasbeendriven andeverytimetheignitionswitchispushed to theACCorONposition.Thereminderwillnot appearwhiledriving.
Selectthe"OK"keytohidethereminderforthe restofthecurrentdrive.
Tostophereminderfromappearing,perform oneofthefollowingactions:
- Selectthe"ResetDistance".
- Deactivatethe"Reminder".
- Increase the "Interval" distancetobemore than the current distance being tracked.
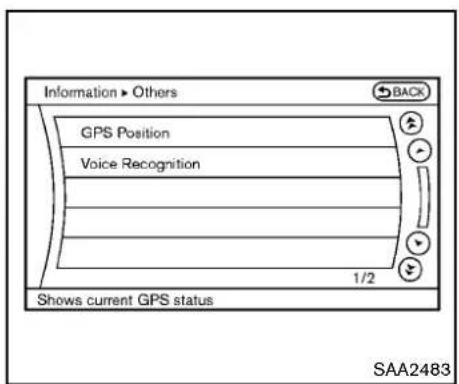
text_image
Information > Others GPS Position Voice Recognition 1/2 Shows current GPS status SAA2483Othersinformation
The Others information display will appear when pushing the INFO button and selecting the "Others" key.
GPSPosition:
Forthedetailsofthisitem,seetheseparate NavigationSystemOwner'sManual.
VoiceRecognition:
Forthedetailsofthisitem,see“NISSANVoice RecognitionSystem (modelswithnavigation system)”(P.4-103).
4-10 Centerdisplay, heater, airconditioner, audio, phone and voicerecognitionsystems

text_image
Settings Navigation Audio Phone Bluetooth Volume & Beeps Display Clock Others SAA2484HOWTOUSESETTINGBUTTON
Thedisplayasillustratedwillappearwhenthe SETTINGbuttonispushed.
Fornavigationsettings, refertotheseparate NavigationSystemOwner's Manual.
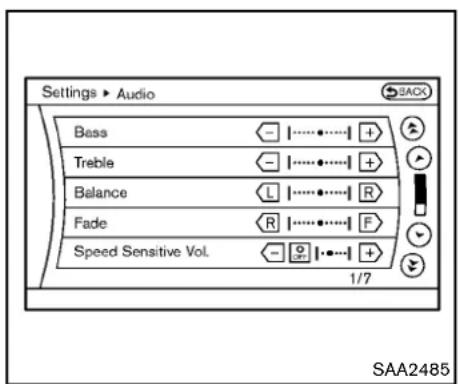
text_image
Settings ▶ Audio Bass Treble Balance Fade Speed Sensitive Vol. 1/7 SAA2485Example
Audiosettings
Thedisplayasillustratedwillappearwhen pushingtheSETTINGbuttonandselectingthe "Audio"key.
Bass/Treble/Balance/Fade:
Toadjustthespeakertonequalityandsound balance,selectthe"Bass", "Treble", "Balance" or "Fade" keyandadjustitwiththemulti-functioncontroller.
Theseitemscanalsobeadjustedbypushing andturningtheAUDIOknob.
SpeedSensitiveVol.:
The audiosystem's volume is increased with the vehiclespeed. Select the "SpeedSensitiveVol." and adjust the effect level with them multi-function controller. The SpeedSensitiveVolume function is turned off when the level is set to "OFF". Increasing the value will cause the volume to increase faster with vehiclespeed.
DivX® RegistrationCode:
Theregistrationcodeforadevicethatisusedto downloadDivX ^® fileswillbedisplayedonthe screen.IfadiscisloadedoraUSBmemoryis connectedtotheaudiosystem,thisfunctionwill notbeactivated.
DisplayAlbumCoverArt:
WhenthisitemisturnedtoON,thealbumcover imageisdisplayedwhenplayingiPod ^ orMP3 musicfilesthroughaCD,DVDorUSBmemory. Whentheimageisnotproperlyembeddedin thefileordevice,theimagewillnotbe displayed.
Phonesettings
Fordetailsofthe"Phone"settings,see"Bluetooth® hands-freephonesystem(modelswith navigationsystem")(P.4-81).
Bluetooth ^® settings
Fordetailsofthe"Bluetooth"settings,see "Bluetooth® hands-freephonesystem(models withnavigationsystem)("P.4-81)or"Bluetooth streamingaudio(modelswithnavigationsystem)("P.4-63).
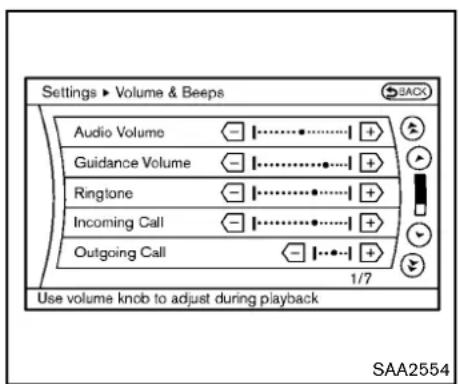
text_image
Settings ▶ Volume & Beeps Audio Volume Guidance Volume Ringtone Incoming Call Outgoing Call 1/7 Use volume knob to adjust during playback SAA2554Example
VolumeandBeepssettings
Thedisplayasillustratedwillappearwhen pushingtheSETTINGbutton,selectingthe"Volume&Beeps"key.
AudioVolume:
To increase or decrease the audio volume, select the "Audio Volume" and adjust it with them multi-function controller. You can also adjust the audio volume by turning the VOLUME control knob.
GuidanceVolume:
Toadjusttheguidancevoicevolumelouderor softer,selectthe"GuidanceVolume"andadjust
itwiththemulti-functioncontroller.
Youcanalsoadjusttheguidancevoicevolume byturningtheVOLUMEcontrolknobwhilevoice guidanceisbeingannounced.
Ringtone/IncomingCall/OutgoingCall:
Forthedetailsoftheseitems,see"Bluetooth hands-freephonesystem(modelswithnavigationsystem)("P.4-81).
SwitchBeeps:
WhenthisitemisturnedtoON,youwillheara beepsoundwhenyouuseabutton.
GuidanceVoice:
WhenthisitemisturnedtoON,youwillhear voiceguidanceinthenavigationoperationorin otheroperations.
NOTE:
Whenthevoiceguidanceisbeingannouncedduringaudioplayback,turning thevolumeknobdoesnotadjustthemusic level;itadjuststheguidancevolumelevel. Ifvoiceguidanceisnotbeingheard, pleasechecktheGuidanceVolumelevel.
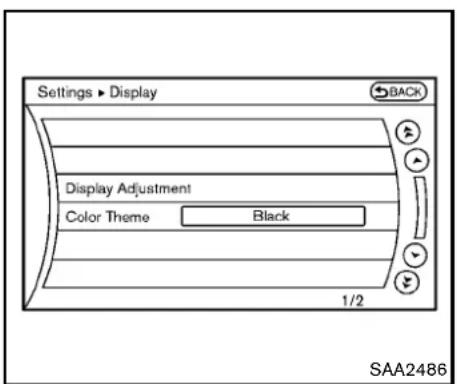
text_image
Settings ▶ Display BACK Display Adjustment Color Theme Black 1/2 SAA2486Displaysettings
Thedisplayasillustratedwillappearwhen pushingtheSETTINGbuttonandselectingthe "Display"key.
DisplayAdjustment:
Toadjustthedisplaysettings,selectthe"DisplayAdjustment"key.Thefollowingsettingsare available.
- Display
Toturnoffthescreen, pushtheENTERbutton andturnthe"Display"indicatoroff. The other methodistopushandholdthe" OFF" buttonformorethan2seconds.
Whenanymodebuttonispushedwiththe
screenoff, the screenturnson for further operation. Thescreenwillturnoff automatically 5 seconds after the operation is finished.
Toturnonthescreen,setthisitemtotheON position,orpushandholdthe" OFF" button.
- Brightness/Contrast/BackgroundColor Toadjustthebrightnessandcontrastofthe screen,selectthe"Brightness"or"Contrast" key.
Then, you can adjust the brightness and contrast using them multi-function controller.
Forinformationonthe"BackgroundColor"key, refertotheseparateNavigationSystemOwner'sManual.
ForRoadstermodels:
Dependingonthedriver'sseatposition,the displaycouldbehardtoread.Adjustthe brightnessandcontrastofthedisplayonthe settingscreen.
ColorTheme:
Choosethemecolorofthemenuscreen from "Black", "Blue" or "Red".

text_image
Settings ▶ Clock ON-screen Clock ON Clock Format (24h) ON Offset (hour) 0 hr Offset (min) 0 min Daylight Savings Time ON Time Zone Eastern 1/6 SAA2487Clocksettings
Thedisplayasillustratedwillappearwhen pushingtheSETTINGbuttonandselectingthe "Clock"key.
Theclocksettingsdisplaycannotbeoperated whiledriving. Stopthevehicleinasafeplace andapplytheparkingbrakebeforesettingthe clock.
On-screenClock:
WhenthisitemisturnedtoON,aclockis alwaysdisplayedintheupperrightcornerofthe screen.
Thisclockwillindicatethetimealmostexactly becauseitisalwaysadjustedbytheGPS
Centerdisplay, heater, airconditioner, audio, phone and voicerecognition systems 4-13
system.
ClockFormat(24h):
WhenthisitemisturnedtoON,the24-hour clockisdisplayed.Whenthisitemisnotturned toON,the12-hourclockisdisplayed.
Offset(hour)/(min):
Adjust the time by increasing or decreasing per hour or per minute.
DaylightSavingTime:
TurnthisitemtoONfordaylightsavingtime application.
TimeZone:
Choosethetimezonefromthefollowing
•Pacific
●Mountain
•Central
- Eastern
- Atlantic
●Newfoundland
•Hawaii
•Alaska
text_image
Settings ▶ Others BACK Comfort Language & Units Voice Recognition Image Viewer 1/4 Adjust comfort & convenience settings SAA2489Otherssettings
The Otherssettingsdisplaywillappearwhen pushingtheSETTINGbuttonandselectingthe "Others"key.
The following items are available:
- Comfort
●Language&Units
●VoiceRecognition
-ImageViewer

text_image
Settings ▶ Comfort Auto Interior Illumination ○ ON Light Sensitivity ← |•••| + Light Off Delay 180 sec Speed Sensing Wiper Interval ○ ON Selective Door Unlock ○ ON 1/7 Cabin lighting when unlocking doors SAA2488Example
Comfortsettings
Thedisplayasillustratedwillappearwhen pushingtheSETTINGbuttonandselectingthe "Others"key,andthenselectingthe"Comfort" key.Thiskeydoesnotappearonthedisplayuntil theignitionswitchispushedtotheONposition.
AutoInteriorIllumination:
WhenthisitemisturnedtoON,theinterior lightswillilluminateifanydoorisunlocked.
LightSensitivity:
Adjust the sensitivity of the automatic headlights higher(right) or lower(left).
LightOffDelay:
Choosethedurationoftheautomaticheadlight offtimerfrom0,30,45,60,90,120,150and 180secondperiods.
SpeedSensingWiperInterval:
WhenthisitemisturnedtoON,thewiper intervalisadjustedautomaticallyaccording to thevehiclespeed.
SelectiveDoorUnlock:
WhenthisitemisturnedtoON,onlythedriver's doorisunlockedfirstafterthedoorunlock operation.Whenthedorhandlerequestswitch onthedriver'sorfrontpassenger'ssidedooris pushedtobeunlocked,onlythecorresponding doorisunlockedfirst.Allthedoorscanbe unlockedifthedoorunlockoperationisperformedagainwithin60seconds.
WhenthisitemisturnedtoOFF, allthedoors will be unlocked after the door unlock operation is performed once.
IntelligentKeyLock/Unlock:
WhenthisitemisturnedtoON,doorlock/unlockfunctionbypushingthedoorhandlerequestswitchwillbeactivated.
ReturnAllSettingstoDefault:
Selectthisitemandthenselect"YES"toreturn allsettingstothedefault.
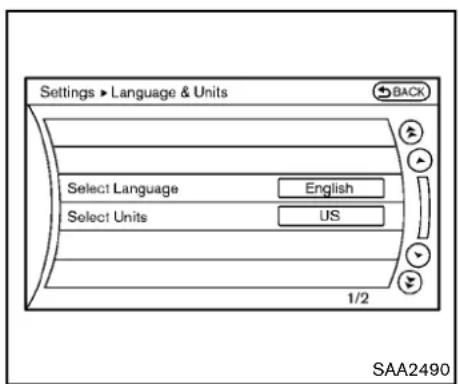
text_image
Settings ► Language & Units BACK Select Language English Select Units US 1/2 SAA2490Language&Unitssettings
TheLanguage&Unitssettingsdisplaywill appearwhenpushingtheSETTINGbutton, selectingthe"Others"key,andthenselecting the"Language&Units"key.
SelectLanguage:
Selectthe"SelectLanguage"key.Choose "English", "Franc,ais"or"Espan \~ol"foryour favoritedisplayappearance.
If you select the "Franc, ais" key, the French language will be displayed, so please use the French Owner's Manual. To obtain a French Owner's Manual, see "Owner's Manual/Service Manual order information" (P.9-24).
SelectUnits:
Selectthe"SelectUnits"key.Choose"US"(Mile, °F,MPG)or"Metric"(km, °C,L/100km) foryourfavoritedisplayappearance.
VoiceRecognitionsettings
Fordetailsaboutthe"VoiceRecognition" settings,see"NISSANVoiceRecognitionSystem(modelswithnavigationsystem)("P.4-103).
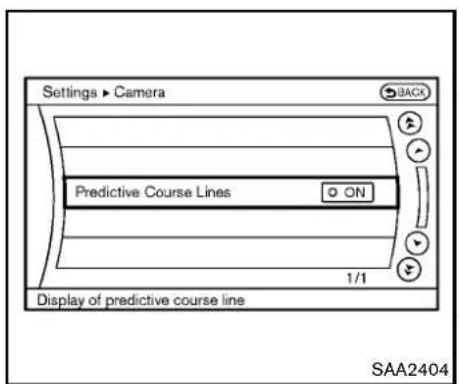
text_image
Settings ► Camera Predictive Course Lines ON 1/1 Display of predictive course line SAA2404CAMERAsettings
The "CAMERA" screenwillappearwhenselectingthe "Camera" key.
Fordetailsaboutthecamerasystemoperation, see "RearViewmonitor(modelswithnavigation system)"(P.4-18).
PredictiveCourseLines:
WhenthisitemisturnedON, thepredicted courelineswillbedisplayedonthemonitor whentheselector/shiftleverisintheR (Reverse)position.

text_image
Settings • Image Viewer 1 Image_1.jpg 2 Image_2.jpg 3 Image_3.jpg 4 Image_4.jpg 5 Image_5.jpg 6 Image_6.jpg 1/8 BACK Full Screen Display SAA2491ImageViewer
The imagefilesintheUSBmemorywillbe displayed. TodisplaythelmageViewer, pushthe SETTINGbutton, selectthe "Other" key and thenselectthe "ImageViewer" key. The image of theselectedfile is displayed on the rights side of the screen.
When anumberoffolders are included in the USB memory, select a folder from the list to display the file list.
Imageswillnotbeshownonthedisplaywhile thevehicleisinanydrivepositiontoreduce driverdistraction.Toviewimages,stopthe vehicleinasafelocationandapplytheparking
brake.
4-16 Centerdisplay, heater, airconditioner, audio, phone and voicerecognitionsystems

text_image
BACK ▶ ■ → ← Settings SAA2492FullScreenDisplay:
Thefullscreendisplaywillappearwhenselectingthe"FullScreenDisplay"key.
TooperatethelmageViewerortochangethe settings,selectthedesiredkeyusingthemultifunctioncontroller.
• ▶ (Start)
Selectthe" "keytostartplayingthe slideshow.
- (Stop)
Selectthe" ■ "keytostoptheslideshow.
• 📄 (Next)
Selectthe" 🔍 "keytodisplaythenextfile.
• Ⓦ (Previous)
Selectthe" "keytodisplaytheprevious file.
SettingthelmageViewer:
TheImageViewersettingdisplaywillappear whenselectingthe"Settings"keyonthefull screendisplay. Thefollowingsettingsare availableforthefullscreendisplay.
- SlideshowSpeed
Selectthe"SlideshowSpeed"key.Fromthe followingdisplay,selectthechangingtime from5,10,30,60secondsor"NoAuto Change".
- SlideshowOrder
Selectthe"SlideshowOrder"key.Fromthe followingdisplay,select"Random"or"Order List".For"OrderList",theimageorderisthe orderofthefilesasstoredontheUSB memory.
Operatingtips:
- Onlyfilesthatmeetthefollowingconditions willbedisplayed.
—Imagetype:JPEG
—FileExtensions:*.jpg,*jpeg
—MaximumResolution:2048 × 1536 pixels
—MaximumSize:2-MB
—Colors:32768(15-bit)
—MaximumFileNamelengths:253-Bytes
—MaximumFolders:500
—MaximumImagesperFolder:1024
- Ifanelectronic device(suchasadigital camera) is directly connected to the vehicle using a USB cable, no image will be displayed on the screen.
- If the filename is too long, some filenames may not be entirely displayed.
- Whenthetotalnumberofcharactersinthe filenameexceeds100orif1 filenameina directoryexceeds100characters,allfiles willshowashortened8-characterversion. Theimagewillstillbedisplayedwhen selected.
REARVIEWMONITOR(modelswith navigationsystem)
Whentheselector/shiftleverisshiftedintotheR (Reverse)position,themonitordisplayshows viewtotherearofthevehicle.
Thesystemisdesignedasanaidtothedriverin detectinglargestationaryobjectstohelpavoid damagingthevehicle. Thesystemwillnotdetect smallobjectsbelowthebumperandmaynot detectobjectsclosetothebumperoronthe ground.

WARNING
- Therearviewcameraisaconveniencebutilitisnotasubstitutefor properbackingup.Alwaysturnand checkthatitissafetodosobefore backingup.Alwaysbackupslowly.
- ObjectsviewedintheRearView Monitordifferfromactualdistance becauseawide-anglelensisused. ObjectsintheRearViewMonitor willappearvisuallyoppositelike onesviewedintheinsideandoutsidemirrors.
- Makesurethatthetrunkissecurely closedwhenbackingup.
•Underneaththebumperandthe cornerareasofthebumpercannot beviewedontheRearViewmonitor
becauseofitsmonitoringrange limitation.
- Donotputanythingontherearview camera.Therearviewcamerais installedabovethelicenseplate.
- When washing the vehicle with high-pressure water, besurenotto sprayitaround the camera. Otherwise, water may enter the camera unit causing water condensation on the lens, malfunction, fireor an electric shock.
- Donotstrikethecamera.Itisa precisioninstrument. Otherwise, it may malfunctionorcausedamage resultinginafireoranelectric shock.

CAUTION
Thereisaplasticcoveroverthecamera. Donotscratchthecoverwhencleaning dirtorsnowfromthecover.
text_image
①②③④ ⑤ ⑥ A SAA1896HOWTOREADDISPLAYEDLINES
Guidinglineswhichindicatethevehiclewidth anddistancestoobjectswithreferencetothe bumperline Ⓐ aredisplayedonthemonitor.
Distanceguidelines:
Indicated distances from the bumper.
●Redline ①:approx.1.5ft(0.5m)
●Yellowline ②:approx.3ft(1m)
●Greenline ③:approx.7ft(2m)
●Greenline ④:approx.10ft(3m)
Vehiclewidthguidelines ⑤ :
Indicatethevehiclewidthwhenbackingup.
Predictedcourselines ⑥ :
Indicatethepredictedcoursewhenbackingup. Thepredictedcourselineswillbedisplayedon themonitorwhentheselector/shiftleverisinthe R(Reverse)positionandthesteeringwheelis turned. Thepredictedcourselineswillmove dependingonhowmuchthesteeringwheelis turnedandwillnotbedisplayedwhilethe steeringwheelisintheneutralposition.
HOWTOPARKWITHPREDICTED COURSELINES

WARNING
- Alwaysturnandcheckthatitissafe toparkyourcarbeforebackingup. Alwaysbackupslowly.
- Usethedisplayedlinesasareference. Thelinesarehighlyaffected bythenumberofoccupants, fuel level, vehicleposition, roadconditionandroadgrade.
- Ifthetiresarereplacedwithdiffer-entsizedtires, thepredictedcourse linemaynotbedisplayedcorrectly.
- Onasnow-coveredorslipperyroad, theremaybeadifferencebetween thepredictedcourselineandthe
actualcourseline.
- If predicted courselines are displayed incorrectly, drivethe vehicle on a straight road for 110yd (100m) at as speed of above 20MPH (30 km/h).
- The displayed lines will appear slightly off to other right because the rearview camera is not installed in therearcenter of the vehicle.
- Thedistanceguidelineandthe vehiclewidthguidelineshouldbe usedasareferenceonlywhenthe vehicleisonalevelpavedsurface. Thedistanceviewedonthemonitor isforreferenceonlyandmaybe differentthantheactualdistance betweenthevehicleanddisplayed objects.
- Whenbackingupthevehicleupa hill,objectsviewedinthemonitor arefurtherthantheyappear.When backingupthevehicledownahill, objectsviewedinthemonitorare closerthantheyappear.Use the insidemirrororglanceoveryour shouldertoproperlyjudgedistancetootherobjects.
The vehicle width and predicted course lines are wider than the actual width and course.
natural_image
Diagram showing a car under two different scenarios: top-down view of a curved road with a traffic light source, bottom-down view of a single car on a ramp, both without any text or symbols.- Visually check that the parking space is safe before parking your vehicle.
- Therearviewofthevehicleisdisplayedon thescreen Ⓐ asillustratedwhenthe selector/shiftleverismovedtotheR (Reverse)position.

text_image
B C D B C SAA1898- Slowly backup the vehicle adjusting the steering wheel so that the predicted course lines ⑧ enter the parkingspace ⑨.
-
Maneuverthesteeringwheeltomakethe vehiclewidthguidelines ⑭ paralleltothe parkingspace ⑤ whilereferringtothe predictedcourselines.
-
Whenthevehicleisparkedinthespace completely, movetheselector/shiftleverto theP(Park)positionandapplytheparking brake.
DIFFERENCEBETWEENPREDICTED ANDACTUALDISTANCES
The distance guideline and the vehicle width guidelines should be used as reference only when the vehicle is on a level, paved surface. The distance viewed on the monitor is for reference only and may be different from the actual distance between the vehicle and displayed objects.
4-20 Centerdisplay, heater, airconditioner, audio, phone and voicerecognitionsystems

text_image
A B SAA1899Backinguponasteepuphill
Whenbackingupthevehicleupahill,the distanceguidelinesandthevehiclewidthguide linesareshowncloserthantheactualdistance.
Forexample, the display shows 3ft (1.0m) to the place Ⓐ, but the actual 3ft (1.0m)
distanceonthehillistheplace Ⓑ .Notethat
anyobjectonthehillisfurtherthanitappearson themonitor.

text_image
A B SAA1900Backinguponasteepdownhill
Whenbackingupthevehicledownahill,the distanceguidelinesandthevehiclewidthguide linesareshownfurtherthantheactualdistance.
Forexample, the display shows 3ft(1.0m) to the place Ⓐ, but the actual 3ft(1.0m)
distanceonthehillistheplace Ⓑ .Notethat
Centerdisplay, heater, airconditioner, audio, phone and voicerecognitionsystems 4-21
anyobjectonthehilliscloserthanitappearson themonitor.
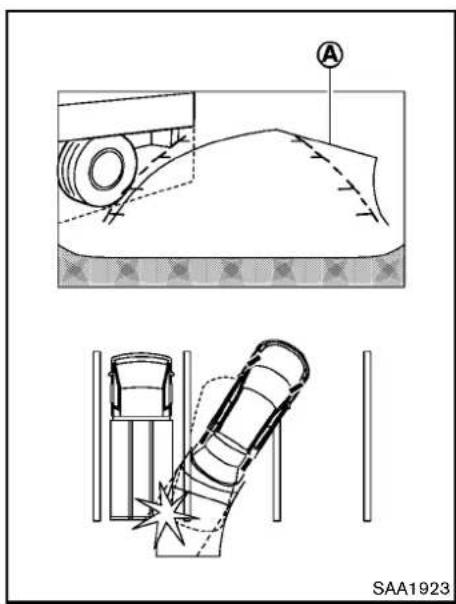
text_image
A SAA1923Backingupnearaprojectingobject
Thepredictedcourselines ① donottouchthe objectinthedisplay. However, the vehicle may hit the object if project so over the actual backing up course.
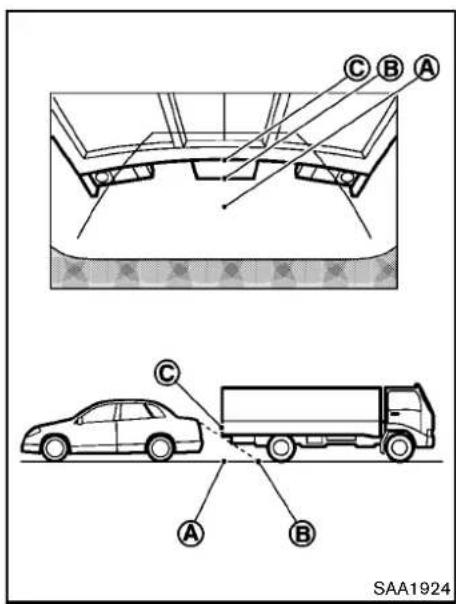
text_image
C B A C A B SAA1924Backingupbehindaprojectingobject
Theposition Ⓐ is shown further than the position Ⓑ in the display. However, the position Ⓐ is actually at the same distance astheposition Ⓐ . The vehicle may hit the object when backing up to the position the object project so over the actual backing up
4-22 Centerdisplay, heater, airconditioner, audio, phone and voicerecognitionsystems
course.
HOWTOADJUSTSCREEN
ToadjusttheDisplayON/OFF,Brightness,Tint,Color,ContrastandBlackLeveloftheRearView monitor,pushtheSETTINGbuttonwiththe RearViewmonitoron,selectthe"Display"keyon thescreenandselecttheitemkeyandadjust thelevelusingthemulti-functioncontroller.
DonotadjusttheBrightness, Tint, Color, ContrastandBlackLeveloftheRearView monitorwhilethevehicleismoving. Makesure theparkingbrakeisfirmlyappliedandthe engineisnotrunning.
Thedisplayofthepredictedcourselinescanbe settoONorOFF.Fordetails,see"CAMERA settings"(P.4-16).
OPERATINGTIPS
- Whentheselector/shiftleverisshifted to the R(Reverse) position, themonitorscreen automaticallychangestothe RearView monitormode.
-
It may take sometime until the Rear View monitor is displayed after the selector or shift lever has been shifted to R from another position or another position from "R". Objects may be distorted momentarily until the Rear View monitors screen is displayed completely.
-
Whenthetemperatureisextremelyhighor low,thescreenmaynotclearlydisplay objects. Thisisnotamalfunction.
- When strong light directly enter the camera, objects may not be displayed clearly. This is not a malfunction.
- Verticallinesmaybeseeninobjectsonthe screen. Thisisduetostrongreflectedlight fromthebumper. Thisisnotamalfunction.
- Thescreenmayflickerunderfluorescent light. This is not a malfunction.
- ThecolorsofobjectsontheRearView monitormaydiffersomewhatfromthoseof theactualobject.
- Objectsonthemonitormaynotbeclearina darkplaceor atnight. This isnota malfunction.
- Ifdirt, rainorsnowattachestothecamera, theRearViewmonitormaynotclearlydisplay objects.Cleanthecamera.
- Donotusealcohol, benzineorthinnerto cleanthecamera. This will cause discoloration. Tocleanthecamera, wipewithacloth dampened with diluted mild cleaning agent and then wipewithadrycloth.
- Donotdamagethecameraasthemonitor screenmaybeadverselyaffected.
- Donotusewaxonthecamerawindow. Wipeoffany waxwith acleancloth
dampenedwithmilddetergentdilutedwith water.
VENTILATORSHEATERANDAIRCONDITIONER
natural_image
Diagram of a rectangular object with internal arrows and a central circle, no readable text or symbols present.CENTERVENTILATORS
Openorclose, and adjust the airflow direction of ventilators.

text_image
SAA2288SIDEVENTILATORS
Openorclose, and adjust the airflow direction of ventilators as illustrated.

WARNING
•The airconditioner cooling function operates only when the engine is running.
- Donotleavechildrenoradultswho wouldnormallyrequirethesupport ofothersaloneinyourvehicle.Pets shouldnotbeleftaloneeither.On hot,sunnydays,temperaturesina closedvehiclecouldquicklybecome highenoughtocausesevereor possiblyfatalinjuriestopeopleor animals.
- Donotusetherecirculationmode forlongperiodsasitmaycausethe interiorairtobecomestaleandthe windowstofogup.
Starttheengineandoperatetheheaterandair conditionersystem.
4-24 Centerdisplay, heater, airconditioner, audio, phone and voicerecognitionsystems
text_image
Status ► Audio OFF 75°F AUTO SAA2493Forthemodelswithnavigationsystem, pushthe "STATUS" button to display the heater and air conditioner status screen. (See "Howtouse STATUSbutton" (P.4-7).)
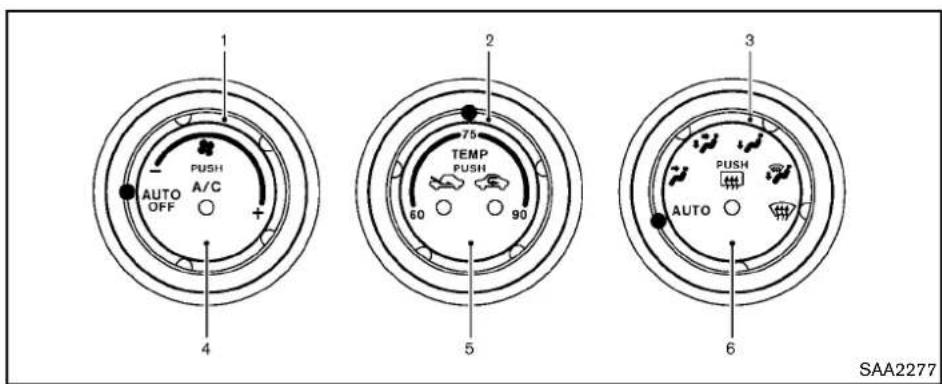
text_image
1 PUSH A/C AUTO OFF + 4 2 75 TEMP PUSH 60 90 5 3 PUSH AUTO 6 SAA22771."fanscedcontroldial
- Temperaturecontroldial*
*Thedisplayofdegrees:
"60-75-90"isusedfor°F(US).
"18-25-32" is used for C(Canada).
3.Airflowcontroldial
4."A/C"airconditionerbutton
5.Intakeaircontrolbutton("
"airrecirculation)
"outsideairand
- " rearwindowdefrosterbutton(See"Rear windowdefrosterswitch"(P.2-31).)
AUTOMATICAIRCONDITIONER(Type A)
Inyourvehicle,theairconditionersystem isdesignedtoautomaticallyactivatethe coolingfunctionwhenoperatingtheir flowcontroldial,the" "fanspeed controldialorthe" "intakeair controlbutton.(Theindicatorlightonthe "A/C"buttonwillilluminate.)Pushthe "A/C"buttonoffwhenthecoolingfunction isnotnecessary.
Automaticoperation
Cooling and/or dehumidified heating (AUTO):
Thismodemaybeusedallyearround. The systemworksautomaticallytocontroltheinside temperature,airflowdistributionandfanspeed afterthepreferredtemperatureissetmanually.
1.Turnthe "fanspeedcontroldialandair flowcontroldialtothe"AUTO"position.The airconditionerwillautomaticallyturnon. (The"A/C"buttonindicatorlightilluminates.)
- Turnthetemperaturecontroldialtosetthe desiredtemperature.
- Thetemperature can be set within the following range. - For U.S.: 60 to 90 °F (16 to 32 °C) - For Canada: 64 to 90 °F (18 to 32 °C)
- Thetemperatureofthepassengercompartmentwillbemaintainedautomatically.Air flowdistributionandfanspeedarealso controlledautomatically.
Avisiblemistmaybeseencomingfromthe ventilatorsinhot,humidconditionsastheairis cooledrapidly.Thisdoesnotindicateamal-function.
Heating(A/COFF):
Theairconditionerdoesnotactivate.Whenyou needtoheatonly,usethismode.
-
Turnthe" "fanspeedcontroldialandair flowcontroldialtothe"AUTO"position. (Theairconditionerwillturnon.)
-
Push the "A/C" button to turn off the air conditioner. (The "A/C" button indicator light will turn off.)
-
Turnthetemperaturecontroldialtosetthe desiredtemperature.
-
Thetemperatureofthepassengercompartmentwillbemaintainedautomatically.Airflowdistributionandfanspeed arealsocontrolledautomatically.
- Donotsetthetemperaturelowerthanthe outsideairtemperature. Otherwisethe systemmaynotworkproperly.
- Notrecommendedifwindowsfogup.
Dehumidifieddefrostingordefogging:
- Turnthe" "fanspeedcontroldialtothe desiredposition.
2.Turntheairflowcontroldialto the" position. - Turnthetemperaturecontroldialtosetthe desiredtemperature.
- Toquicklyremoveicefromtheoutsideof thewindows,turnthe" "fanspeed controldialtothemaximumposition.
- As soon as possible after the windshield is clean, turn the airflow control dial to
the "AUTO" position to return to the auto mode.
- Whentheairflowcontroldialisturned to the “” or “” position, the air conditioner will automatically be turned onatoutsidetemperatures above 23°F (-5°C) todefogthewindshield, and the air recirculationmode will automatically be turned off.
Outsideairisdrawnintothepassenger compartment toimprovethe defogging performance.
Manualoperation
Fanspeedcontrol:
Turnthe" * "fanspeedcontroldialclockwise (+)orcounterclockwise(-)tomanuallycontrol thefanspeed.
Turnthedialtothe "AUTO" positiontoreturnto automaticcontrolofthefanspeed.
Airrecirculation:
Pushthe" "intakeaircontrolbutton to recirculate interior air inside the vehicle. The indicator light on the " sidewill come on.
Theairrecirculationmodecannotbeactivated when the air conditioner is in the front defrosting mode".
4-26 Centerdisplay, heater, airconditioner, audio, phone and voicerecognitionsystems
Outsideaircirculation:
Pushthe" "intakeaircontrolbutton to drawoutsideairintothepassengercompartment. The indicatorlightonthe" "sidewill comeon.
Automaticintakeaircontrol:
IntheAUTOmode,theintakeairwillbe controlledautomatically.Tomanuallycontrol theintakeair,pushthe" "intakeair controlbutton.Toreturntotheautomaticcontrol mode,pushthe" "intakeaircontrol buttonforapproximately2seconds.Theindicatorlights(bothairrecirculationandoutsideair circulationsides)willflashtwice,andthenthe intakeairwillbecontrolledautomatically.
Airflowcontrol:
Turningtheairflowcontroldialselectstheair outletto:
:Airflowsfromcenterandsideventilators.
:Airflowsfromcenterandsideventilators andfootoutlets.
:Airflowsmainlyfromfootoutlets.
:Airflowsfromdefrosterandfootoutlets.
:Airflowsmainlyfromdefrosteroutlets.
Toturnthesystemoff
Turnthe"farspeedcontroldialtothe
"OFF"position.
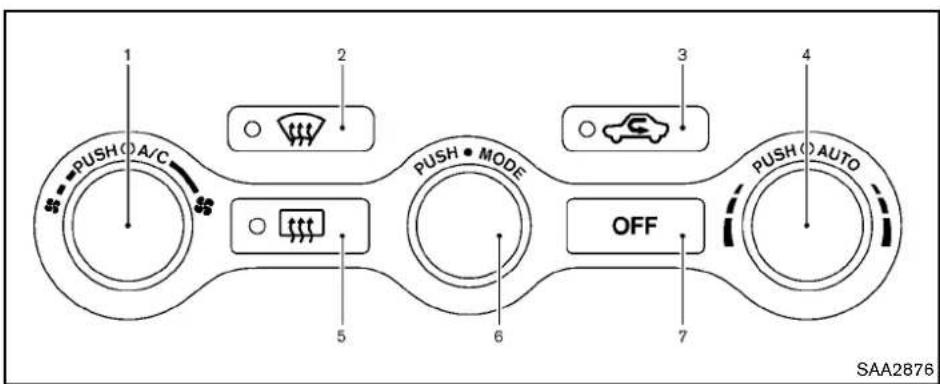
text_image
1 PUSH O A/C 2 3 4 5 6 7 PUSH • MODE OFF PUSH • AUTO SAA2876TypeB
1."A/C"airconditionerON/OFFbutton/"fan speedcontroldial
2. "frontdefrosterbutton
3. "C"intakeaircontrolbutton
4."AUTO"automaticairconditionerONbutton/Temperaturecontroldial
5. " rearwindowdefrosterbutton(See"Rear windowdefrosterswitch"(P.2-31).)
6."MODE"manualairflowcontrolbutton
7."OFF"button
AUTOMATICAIRCONDITIONER(Type B)
Automaticoperation
Cooling and/or dehumidified heating (AUTO):
Thismodemaybeusedallyearround. The systemworksautomaticallytocontroltheinside temperature,airflowdistributionandfanspeed afterthepreferredtemperatureissetmanually.
-
Push the "AUTO" button on. (The indicator on the button will illuminate and AUTO will be displayed.)
-
Turnthetemperaturecontroldialtosetthe desiredtemperature.
- Thetemperaturecanbesetwithinthe followingrange.
—ForU.S.:60to90°F(16to32°C)
—ForCanada:64to90°F(18to32°C)
- Thetemperatureofthepassengercompartmentwillbemaintainedautomatically.Air flowdistributionandfanspeedwillalsobe controlledautomatically.
Avisiblemistmaybeseencomingfromthe ventilatorsinhot,humidconditionsastheairis cooledrapidly.Thisdoesnotindicateamal-function.
Heating(A/COFF):
The air conditioner does not activate in this mode. When you need to eat only, use this mode.
- Push the "AUTO" button on.
- Push the "A/C" button. (The A/C indicator will turn off.)
- Turnthetemperaturecontroldialtosetthe desiredtemperature.
- Thetemperatureofthepassengercompartmentwillbemaintainedautomatically. Air flow distribution and fan speed are also controlledautomatically.
4-28 Centerdisplay, heater, airconditioner, audio, phone and voicerecognition systems
- Donotsetthetemperaturelowerthanthe outsideairtemperature. Otherwisethe systemmaynotworkproperly.
- Notrecommendedifwindowsfogup.
Dehumidifieddefrostingordefogging:
- Pushthe "frontdefrosterbutton.(The indicatorlightonthebuttonwillcomeon.)
- Turnthetemperaturecontroldialtosetthe desiredtemperature.
- To quickly remove ice from the outside of the windows, turn the " fanspeed control dialand set it to them a maximum position.
- As soon as possible after the windshield is clean, push the "AUTO" button to return to the automode.
- Whenthe" "frontdefrosterbuttonis pushed, the airconditioner will automatically be turned on at outsidetemperatures above 23^(-5^) to defog the windshield, and the air recirculatemodewill automatically be turned off. Outside air is drawn into the passenger compartment to improve the defogging performance.
Manualoperation
Fanspeedcontrol:
Turnthe" "fanspeedcontroldialto manuallycontrolthefanspeed.
Pushthe"AUTO"buttontoreturntoautomatic controlofthefanspeed.
Airrecirculation:
Pushthe" "intakeaircontrolbutton to recirculate interior air inside the vehicle. The indicatorlight" "willcomeon.
Theairrecirculationmodecannotbeactivated when the air conditioner is in the front defrosting mode".
Outsideaircirculation:
Pushthe "intakeaircontrolbutton to changetheaircirculationfromtheintakeairto theoutsideair.Theindicatorlight" willturn off.
Automaticairintakecontrol:
IntheAUTOmode,theintakeairwillbe controlledautomatically.Tomanuallycontrol theintakeair,pushthe" "intakeaircontrol button.Toreturntotheautomaticcontrolmode, push the" "intake aircontrolbutton for approximately2seconds.Theindicator lights willflashtwice,andthentheintakeairwillbe controlledautomatically.
Airflowcontrol:
Pushingthe"MODE" manualairflow control buttonselectstheairoutletto:

Airflowsfromcenterandsideventilators.

Airflowsfromcenterandsideventilators andfootoutlets.

Airflowsmainlyfromfootoutlets.

Airflowsfromdefrosterandfootoutlets.
Toturnthesystemoff
Pushthe"OFF"button.

text_image
A SAA2324OPERATINGTIPS
Whentheenginecoolanttemperature and outsideairtemperaturearelow, the airflow from the foot outlets may not operate for a maximum of 150 seconds. This is not a malfunction. After the coolant temperature warmsup, air will flown normally from the foot outlets.
Thesensors and ontheinstrument panelhelpsmaintainaconstanttemperature.Do notputanythingonoraroundthissensor.
IN-CABINMICROFILTER
The airconditioningsystemisequipped with an in-cabin microfilter which collects dirt, pollen, dust, etc. Tomakesure the air conditioner heats, defogs, and ventilates efficiently, replace the filter in accordance with themaintenance schedule in the NISSAN Service and Maintenance Guide. Tore placethe filter, contact a NISSAN dealer.
Thefiltershouldbereplacedifairflowis extremelydecreasedorwhenwindowsfog upeasilywhenoperatingheaterorair conditioningsystem.
SERVICINGAIRCONDITIONER
The airconditioningsysteminyourNISSANis chargedwitharefrigerantdesignedwiththe environmentinmind.Thisrefrigerantwillnot
harmtheearth'sozonelayer. However, specialchargingequipmentandlubricantare requiredwhenservicingyourNISSANairconditioner. Usingimproperrefrigerantsorlubricantswillcauseseveredamagetoyourair conditioningsystem.(See "Capacitiesand recommendedfuel/lubricants"(P.9-2)forair conditioningsystemrefrigerantandlubricant recommendations.)
YourNISSANdealerwillbeabletoserviceyour environmentallyfriendlyairconditioningsystem.

WARNING
Thesystemcontainsrefrigerantunder highpressure.Toavoidpersonalinjury, anyairconditionerservicesshouldbe doneonlybyanexperiencedtechnician withtheproperequipment.

natural_image
Interior view of a car dashboard and steering wheel (no text or symbols visible)4-30 Centerdisplay, heater, airconditioner, audio, phone and voicerecognitionsystems
AUDIOSYSTEM
AUDIOOPERATIONPRECAUTIONS
Radio
PushtheignitionswitchtotheACCorON positionandpushtheradiobandselectbutton toturnotheradio.Ifyoulistentotheradiowith theenginenotrunning,theignitionswitch shouldbepushedtotheACCposition.
Radioreceptionisaffectedbystationsignal strength,distancefromradiotransmitter,buildings,bridges,mountainsandotherexternal influences.Intermittentchangesinreception qualitynormallyarecausedbytheseexternal influences.
Usingacellularphoneinornearthe vehiclemayinfluenceradioreception quality.
Radioreception:
YourNISSANradiosystemisequipped with state-of-the-artelectroniccircuitstoenhance radioreception. These circuits are designed to extend reception range, and toenhance the quality of that reception.
Howevertherearesomegeneralcharacteristics of both FM and AM radiosignal that can affect radioreception quality in an moving vehicle, even when the finest equipment is used. These characteristics are completely normal in given reception area, and donotindicate anymal-
functioninyourNISSANradiosystem.
Receptionconditionswillconstantlychange becauseofvehiclemovement.Buildings,terrain, signaldistanceandinterferencefromother vehiclescanworkagainstidealreception. Describedbelowaresomeofthefactorthat canaffectyourradioreception.
Somecellularphonesorotherdevicesmay causeinterferenceorabuzzingnoisetocome fromtheaudiosystemspeakers.Storingthe deviceinadifferentlocationmayreduceor eliminatethenoise.

text_image
MAXIMUM SIGNAL DISTANCES • FM 25 to 30 miles (40 to 48 km) • AM 60 to 130 miles (97 to 209 km) SAA0306FMradioreception:
Range:FMrangeisnormallylimitedto25to30 miles(40to48km),withmonaural(single channel)FMhavingslightlymorerangethan stereoFM.Externalinfluencesmaysometimes interferewithFMstationreceptionevenifthe FMstationiswithin25miles(40km).The strengthoftheFMsignalisdirectlyrelatedtothe distancebetweenthetransmitterandreceiver. FMsignalsfollowaline-of-sightpath,exhibiting manyofthesamecharacteristicsaslight.For exampletheywillreflectoffobjects.
Fadeanddrift: As your vehicle moves away from astation transmitter, the signals will tend to fade and ordrift.
Centerdisplay, heater, airconditioner, audio, phone and voicerecognitionsystems 4-31
Staticandflutter: Duringsignalinterference from buildings, largehillsorduetoantennaposition, usually in conjunction within increased distance from the station transmitter, staticor flutter can be heard. This can be reduced by lowering the treblesetting to reduce the trebler response.
Multipathreception: Because of the reflective characteristics of FM signals, direct and reflected signals reach there receiver at the same time. The signals may cancel each other, resulting in momentary flutter or loss of sound.
AMradioreception:
AMsignals, because of their low frequency, can bendaround objects and skip along the ground. In addition, the signals can be bounced off the ionosphere and bent back to earth. Because of these characteristics. AMsignals are also subject to interference as they travel from transmittentoreceiver.
Fading: Occurswhilethevehicleispassing throughfreewayunderpassesorinareaswith manytallbuildings.Itcanalsooccurforseveral secondsduringionosphericurbulenceevenin areaswherenoobstaclesexist.
Static: Caused by thunderstorms, electrical powerlines, electricsignsandeventrafficlights.
Satelliteradioreception(ifsoequipped):
Whenthesatelliteradioisusedforthefirsttime orthebatteryhasbeenreplaced,thesatellite radiomaynotworkproperly. Thisisnota malfunction.Waitmorethan10minuteswiththe satelliteradioONandthevehicleoutsideofany metalorlargebuildingforthesatelliteradioto receiveallofthenecessarydata.
ThesatelliteradiomoderequiresanactiveXM SatelliteRadiosubscription.Thesatelliteradiois notavailableinAlaska,HawaiiandGuam.
Thesatelliteradioperformancemaybeaffected ifcargocarriedontheroofblocksthesatellite radiosignal.
If possible, donotputcargonearthesatellite antenna.
Abuildupoficeonthesatelliteradioantenna canaffectsatelliteradioperformance.Remove theicetorestoresatelliteradioreception.
®
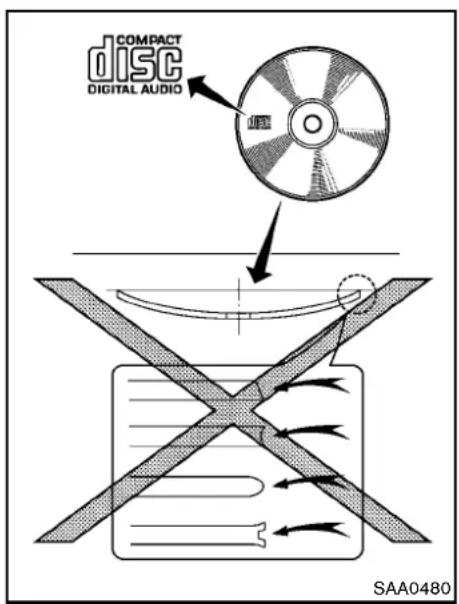
text_image
COMPACT DISC DIGITAL AUDIO SAA0480CompactDisc(CD)player
- DonotforceacompactdiscintotheCD insertslot.ThiscoulddamagetheCDand/orCDchanger/player.
-
Trying to load a CD with the CD door closed could damage the CD and/or CD changer.
-
Duringcoldweatherorrainydays,theplayer maymalfunctionduetothehumidity.Ifthis occurs,removetheCDanddehumidifyor ventilatetheplayercompletely.
●Theplayermayskipwhiledrivingonrough roads. - The CD players sometimes cannot function when the passenger compartment temperature is extremely high. Decreasethetemperature before use.
- Onlyusehighquality4.7in(12cm)round discsthathavethe"COMPACTdiscDIGITALAUDIO"logoonthediscorpackaging.
- DonotexposetheCDtodirectsunlight.
- CDsthatarefpoorquality, dirty, scratched, coveredwithfingerprints, orthathavepin holesmaynotworkproperly.
●ThefollowingCDsmaynotworkproperly:
—Copycontrolcompactdiscs(CCCD)
—Recordablecompactdiscs(CD-R)
—Rewritablecompactdiscs(CD-RW) - DonotusethefollowingCDsastheymay causetheCDplayertomalfunction.
-3.1in(8cm)discs
—CDsthatarenotround
—CDswithapaperlabel
—CDsthatarewarped, scratched, or have abnormaledges
- Thisaudiosystemcanonlyplayprerecorded CDs.Ithasnocapabilitiestorecordorburn CDs.
- If the CD cannot be played, one of the following messages will be displayed. CHECKDISC:
—ConfirmthattheCDisinsertedcorrectly (thelabelsideisfacingup,etc.).
—ConfirmthattheCDisnotbentor warpedanditisfreeofscratches.
PUSHEJECT:
Thisisanerrorduetothetemperatureinside theplayeristoohigh.RemovetheCDby pushingtheEJECTbutton,andafterashort timereinserttheCD.TheCDcanbeplayed whenthetemperatureoftheplayerreturns tonormal.
UNPLAYABLE:
Thefileisunplayableinthisaudiosystem (onlyMP3orWMACD).

text_image
A B LHA0484DVD(DigitalVersatileDisc)player (modelswithnavigationsystem)
- DonotforceacompactdiscintotheCD/DVDinsertslot.ThiscoulddamagetheCD/DVDplayer.
●Duringcoldweatherorrainydays,theplayer maymalfunctionduetohumidity.Ifthis occurs,removetheCD/DVDanddehumidify
Center display, heater, air conditioner, audio, phone and voice recognition systems
orventilatetheplayercompletely.
●Theplayermayskipwhiledrivingonrough roads.
●The CD/DVD players sometimes cannot function when the passenger compartment temperature is extremely high. Decreases the temperature before use.
- Onlyusehighquality4.7in(12cm)round discsthathavethe"COMPACTdiscDIGITALAUDIO"or"DVDVideo"logoonthe discorpackaging.
- DonotexposetheCD/DVDtodirect sunlight.
- CD/DVDsthatareofpoorquality, dirty, scratched, coveredwithfingerprints, orthat havepinholesmaynotworkproperly.
- The following CD/DVDs are not guaranteed to play:
- Copy control compact discs (CCCD)
- Recordable compact discs (CD-R)
- Rewritable compact discs (CD-RW)
- Recordable DVDs (DVD ± R, DVD ± RDL)
- Rewritable DVDs (DVD ± RW, DVD ± RW DL)
- DonotusethefollowingCD/DVDsasthey maycausetheCD/DVDplayertomalfunction.
-3.1in(8cm)discs
—CD/DVDsthatarenotround
—CD/DVDswithapaperlabel
—CD/DVDsthatarewarped, scratched or haveabnormaledges
—Thisaudiosystemcanonlyplaypre-recordedCD/DVDs.Ithasnocapabilities torecordorburnCD/DVDs.
- If the CD/DVD cannot be played, one of the following messages will be displayed.
DiscReadError:
—ConfirmthattheCD/DVDisinserted correctly(thelabelsideisfacingup, etc.).
—ConfirmthattheCD/DVDisnotbentor warpedanditisfreeofscratches.
PleaseEjectDisc:
—This maybe an error dueto the temperature insidethe player being too high. Removethe CD/DVD bypassing the EJECT button, and after a short time reinsert the CD/DVD. The CD/DVD can be played when the temperature of the player returnstonormal. If the error persists, consult your local dealership.
UnplayableFile:
—Thefilemaybecopyprotected.
—ThefileisnotMP3, WMA, AAC, M4Aor DivX® type.
RegionInvalid:
—TheDVDisnotforregion1orallregions. UseDVDswitharegioncode“1”, “ALL” or “1included”foryourDVDentertainmentsystem. (The regioncode ① is displayedasasmallsymbolprintedon thetopoftheDVD ②.)Thisvehicle-installedDVDplayercannotplayDVDs witharegioncodeotherthan“1” or “ALL”.
Copyrightandtrademark:
- ThetechnologyprotectedbytheU.S.patent andotherintellectualpropertyrightsowned byMacrovisionCorporationandotherright holdersisadoptedforthissystem.
- Thiscopyrightprotectedtechnologycannot beusedwithoutapermitfromMacrovision Corporation.Itislimitedtobepersonaluse, etc.,aslongasthepermitfromMacrovision Corporationisnotissued.
- Modifyingordisassemblingisprohibited.
●Dolbydigitalismanufacturedunderlicense from DolbyLaboratories, Inc. - Dolby and the double D mark "DIGITAL" are trademarksofDolbyLaboratories,Inc.
- DTSandDTS2.0"areregistered trademarksofDTS,Inc.
Parentallevel(parentalcontrol):
DVDswiththeparentalcontrolsettingcanbe playedwiththissystem.Pleaseuseyourown judgementtosettheparentalcontrolwiththe system.
Discselection:
The following disc formats can be played with the DVD drive.
•DVD-VIDEO
•VIDEO-CD
- CD-DA(ConventionalCompactDisc)
•DTS-CD
USB(UniversalSerialBus)(modelswith navigationsystem)
This systems supports various USB memory sticks, USB hard drives and iPod ^ players. There are some USB devices which may not be supported with this system.
- MakesurethattheUSBdeviceisconnected correctlyintotheUSBconnector.
-
DonotforcethememorystickorUSBcable intotheUSBconnector. This could damage the connector.
-
Duringcoldweatherorrainydays,theplayer maymalfunctionduetohumidity.Ifthis occurs,removetheUSBdeviceanddehumidifyorventilatetheUSBplayercompletely.
- The USB players sometimes cannot function when the passenger compartment temperature is extremely high. Decreasethetemperature before use.
- DonotleaveUSBmemoryinaplaceprone tostaticelectricityorwheretheairconditionerblowsdirectly.ThedataintheUSB memorymaybedamaged.
- The vehicle is not equipped with a USB memorystick.
- AUSBdevice cannot be formatted with this system. To format a USB device, use a personal computer.
- PartitionedUSBdevicesmaynotbeplayed correctly.
- Somecharactersusedinotherlanguages (Chinese, Japanese, etc.) are not displayed properly on the vehicle centers screen. Using English language characters with a USB device is recommended.
- DonotconnectaUSBdeviceifaconnector or cable is wet. Allow the cable and/or connectorstodrycompletelybeforeconnectingtheUSBdevice.Iftheconnectoris
exposedtofluidsotherthanwater,evaporativeresiduemaycauseashortbetweenthe connectorpins.
- Large video podcast files cause slow responsesinaniPod ^® .Thevehiclecenter displaymaymomentarilyblackout,butitwill soonrecover.
-IfaniPod® automaticallyselectslargevideo podcastfileswhileintheshufflemode,the vehiclecenterdisplay maymomentarily blackout,butitwillsoonrecover.
●Audiobooksmaynotplayinthesameorder astheyappearonaniPod ^® . - AniPodnano ^® (1stGeneration) may remain infastforwardorrewind modeifitis connected during a seek operation. In this case, pleasemanually reset theiPod ^® .
- AniPodnano ^® (2ndGeneration) will continue to fast forward or rewind if it is disconnected during a seek operation.
- Anincorrectsongtitlemayappearwhenthe PlayModeischangedwhileusingtheiPod nano® (2ndGeneration)
iPod ^® isattrademarkofAppleInc., registered in the U.S. and other countries.
CompressedAudioFiles(MP3/WMA/AAC)
Explanationofterms:
- MP3—MP3isshortforMovingPictures ExpertsGroupAudioLayer3.MP3isthe mostwellknowncompresseddigitalaudio fileformat.Thisformatallowsfornear"CD quality"sound,butatafractionofthesize of normalaudiofiles.MP3conversionofan audiotrackcanreducethefilesizeby approximatelya 10:1 ratio(Sampling:44.1 kHz,Bitrate:128kbps)withvirtuallyno perceptiblelossinquality.Thecompression reducescertainpartsofsoundthatseem inaudibletomostpeople.
- WMA—WindowsMediaAudio(WMA)isa compressedaudioformatcreatedbyMicrosoftasanalternativetoMP3.TheWMA codeoffersgreaterfilecompressionthan theMP3codec,enablingstorageofmore digitalaudiotracksinthesameamountof spacewhencomparedtoMP3satthesame levelofquality.
-
AAC/M4A—AdvancedAudioCoding (AAC)isalossyaudiocompressionformat. Audiofilesthathavebeenencodedwith AACaregenerallysmallerinsizeanddeliver ahigherqualityofsoundthanMP3.
-
Bitrate—Bitratedenotesthenumberof bitspersecondusedbyadigitalmusicfile. Thesizeandqualityofacompresseddigital audiofileisdeterminedbythebitrateused whenencodingthefile.
- Samplingfrequency—Samplingfrequency istherateatwhichthesamplesofasignal areconvertedfromanalogtodigital(A/D conversion)persecond.
- Multisession—Multisessionisoneofthe methodsforwritingdatatomedia.Writing dataoncetothemediaiscaledasinglesession,andwritingmorethanonceis calledamultisession.
- ID3/WMATag—TheID3/WMAtagisthe partoftheencodedMP3orWMAfilethat containsinformationaboutthedigitalmusic filesuchassongtitle,artist,albumtitle, encodingbitrate,tracktimeduration,etc. ID3taginformationisdisplayonthe Album/Artist/Tracktitlelineonthedisplay.
*Windows ^® and WindowsMedia ^® areregisteredtrademarksorttrademarksofMicrosoft CorporationintheUnitedStatesofAmerica and/orothercountries.
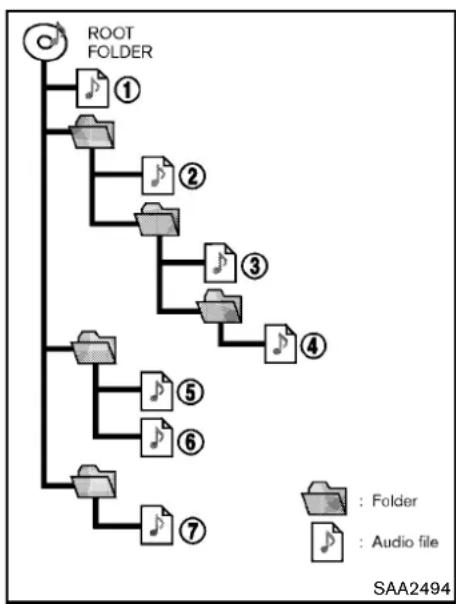
- Thefoldernamesoffoldersnotcontaining compressedaudiofilesarenotshowninthe display.
-
If there is a file in the top level of a disc/USB, "RootFolder" is displayed.
-
The playbackorderistheorderinwhichthe fileswerewrittenbythewritingsoftware,so thefilesmightnotplayinthedesiredorder.
●Music playback order of compressed audio files as illustrated.
Centerdisplay, heater, airconditioner, audio, phone and voicerecognitionsystems 4-37
Specificationchart:
| SupportedmediaCD,CD-R,CD-RW,DVD-ROM*5,DVD± | R*5,DVD±RW*5,DVD±RDL*5,USB2.0 | ||
| Supportedfilesystems | CD,CD-R,CD-RW,DVD-ROM*5,DVD±R*5,DVD±RW*5,DVD±RDL*5:ISO9660LEVEL1,ISO9660 LEVEL2,Romeo,Joliet*ISO9660Level3(packetwriting)isnotsupported.*FilessavedusingtheLiveFileSystemcomponent(onaWindowsVista-basedcomputer)arenotsupported.UDFBridge(UDF1.02+ISO9660),UDF1.5,UDF2.0*VDF1.5/VDF2.0(packetwriting)isnotsupported. | ||
| USBmemory:FAT16,FAT32 | |||
| Supported versions*1 | MP3 | VersionMPEG1AudioLayer3 | |
| Samplingfrequency8kHz-48kHz | |||
| Bitrate8kbps-320kbps,VBR*4 | |||
| WMA*2 | VersionWMA7,WMA8,WMA9 | ||
| Samplingfrequency32kHz-48kHz | |||
| Bitrate32kbps-192kbps,VBR(Ver.9)*4 | |||
| AAC*5 | VersionMPEG-AAC | ||
| Samplingfrequency8kHz-96kHz | |||
| Bitrate16kbps-320kbps,VBR*4 | |||
| Taginformation(SongtitleandArtistname) | ID3tagVER1.0,VER1.1,VER2.2,VER2.3,VER2.4(MP3only) | ||
| WMAtag(WMAonly) | |||
| Folderlevels | Withnavigationsystem:Folderlevels:8,Folders:255(includingrootfolder),Files:512(Max.255filesforonefolder)Withoutnavigationsystem:Folderlevels:8,Foldersandfiles:999(Max.255filesforonefolder) | ||
| Textcharacternumberlimitation | Withnavigationsystem:100charactersWithoutnavigationsystem:64characters | ||
| Displayablecharactercodes*3 | 01:ASCII,02:ISO-8859-1,03:UNICODE(UTF-16BOMBigEndian),04:UNICODE(UTF-16Non-BOMBig Endian),05:UNICODE(UTF-8),06:UNICODE(Non-UTF-16BOMLittleEndian),07:SHIFT-JIS | ||
*1 Filescreatedwithacombinationof48kHzsamplingfrequencyand64kbpsbitratecannotbeplayed.
4-38 Centerdisplay, heater, airconditioner, audio, phone and voicerecognitionsystems
*2ProtectedWMAfiles(DRM)cannotbeplayed.
*3Availablecodesdependonwhatkindofmedia,versionsandinformationaregoingtobedisplayed.
*4WhenVBRfilesareplayed,theplaybacktimemaynotbedisplayedcorrectly.
*5Modelswithnavigationsystem
Centerdisplay, heater, airconditioner, audio, phone and voicerecognitionsystems 4-39
Troubleshootingguide:
| SymptomCauseandCount | intermeasure |
| Cannotplay | CheckifthediscorUSBdevicewasinsertedcorrectly. |
| Checkifthediscisscratchedordirty. | |
| Check if there is condensation inside the player, and if there is, wait until the condensation is gone (about 1 hour) before using the player. | |
| Ifthereisatemperatureincreaseerror,theplayerwillplaycorrectlyafteritreturnstothenormaltemperature. | |
| If there is a mixture of music CD files (CD-DA data) and compressed audio files on a CD, only the music CD files (CD-DA data) will beplayed. | |
| Files with extensions other than ".MP3 (.mp3)", ".WMA (.wma)", ".AAC (.aac)", ".M4A (.m4a)", or ".AA3 (.aa3)" cannot be played. In addition,thecharactercodesandnumberofcharactersforfoldernamesandfilenamesshouldbeincompliancewiththe specifications. | |
| Check if the disc or the file is generated in an irregular format. This may occur depending on the variation or the setting of compressedaudiowritingapplicationsorothertexteditingapplications. | |
| Checkifthefinalizationprocess,suchassessioncloseanddiscclose,isdoneforthedisc. | |
| CheckifthediscorUSBdeviceisprotectedbycopyright. | |
| PoorsoundqualityCheckifthediscisscratchedordirty. | |
| Ittakesarelativelylongtimebefore themusicstartsplaying. | If there are many folder or file levels on the disc or USB device, some time may be required before the music starts playing. |
| Musiccutsofforskips | The writing software and hardware combination might not match, or the writing speed, writing depth, writing width, etc., might not matchthespecifications.Tryusingtheslowestwritingspeed. |
| SkippingwithhighbitratefilesSkippingmayoccurwithlargequantitiesofdata,suchasforhighbitratedata. | |
| Moveimmediatelytothenextsong whenplaying. | If an unsupported compressed audio file has been given a supported extension like .MP3, or when play is prohibited by copyright protection,theplayerwillskiptothenextsong. |
| Thesongsdonot playbackinthe desiredorder. | The playback order is the order in which the files were written by the writing software, so the files might not play in the desired order. |
| Random/ShufflemaybeactiveontheaudiosystemoronaUSBdevice. | |
4-40 Centerdisplay, heater, airconditioner, audio, phone and voicerecognitionsystems
CompressedVideoFiles(modelswith navigationsystem)
Explanationofterms:
- DivX ^ -DivX ^ referstotheDivX ^ codec ownedbyDivX,Inc.usedforalossy compressionofvideobasedonMPEG-4.
●AVI-AVIsstandsforAudioVideoInterleave. Itisastandardfileformatororiginated by MicrosoftCorporation.A".divx"encodedfile canbesavedintothe".avi"fileformat for playbackonthissystemifmeetsthe requirementsstatedinthetableinthis section. However, notallthe".avi"filesare playableonthissystemsincedifferent encodingscanbeusedthantheDivX codec. - ASF-ASFstandsforAdvancedSystems Format.ItisafleformatownedbyMicrosoft Corporation. Note:Only".asf"filesthatmeet therequirementsstatedinthetableinthis sectioncanbeplayed.
- Bitrate—Bitratedenotesthenumberof bitspersecondusedbyadigitalvideofile. Thesizeandqualityofacompresseddigital audiofileisdeterminedbythebitrateused whenencodingthefile.
RequirementforSupportingVideoPlayback:
| MediaCD,CD-R,CD-RW,DVD,DVD±R,DVD±RW,DVD±RWDL,USB2.0Memory | |||
| FileSystemsCD, | CD-R,CD-RW,DVD,DVD±R,DVD±RW,DVD±RWDL | ISO9660LEVEL1,ISO9660LEVEL2,Romeo,Joliet,UDFBridge(UDF1.02+ISO9660),UDF1.5,UDF2.0-ISO9660Level3(packetwriting)isnotsupported.-FilessavedusingtheLiveFileSystemcomponent(onaWindows Vista-basedcomputer)arenotsupported.-VDF1.5/VDF2.0(packetwriting)isnotsupported. | |
| USBMemory | FAT16,FAT32 | ||
| File Types | .divx,.avi | Video Codecs | DivX3, DivX4, DivX5, DivX6 |
| AudioCodecs | MP3,MPEG2.5AudioLayer3,AC3,LPCM | ||
| .asf | VideoCodec | ISO-MPEG4 | |
| AudioCodec | G.726 | ||
| Bit Rates | .divx,.avi | Maximum Average | 4Mbps |
| MaximumPeak | 8Mbps | ||
| Resolution | .divx,.avi | Minimum | 32 × 32 |
| Maximum | 720 × 480 | ||
| .asf | Minimum | 32 × 32 | |
| Maximum | 720 × 576 | ||
Bluetooth® Audioplayer(modelswith navigationsystem)
- SomeBluetooth ^ audiodevicesmaynotbe recognizedbythein-vehicleaudiosystem.
- It is necessary to setup the wireless connection between incompatible Bluetooth® audiodevice and their vehicle Bluetooth® module before using the Blue-
tooth ^® audioplayer.
- Operating procedure of the Bluetooth audioplayer will vary depending on the device. Makes sure it is understood how to operate an audiodevice before using it with this system.
●TheBluetooth ^® audioplayer maybe stoppedunderthefollowingconditions:
Center display, heater, air conditioner, audio, phone and voice recognition systems
—Receivingahands-freecall.
—Checkingtheconnectiontothehands-freephone.
- DonotplaceaBluetooth ^ audiodevicein anareasurroundedbymetalorfaraway fromthein-vehicleBluetooth ^ modulo to preventtonequalitydegradationandwirelessconnectiondisruption.
- Whileanaudiodeviceisconnectedthrough aBluetooth ^ wirelessconnection,thebatterypowerofthedevicemaydischarge quickerthanusual.
- This system supports the Bluetooth ^® Audio Distribution Profile(A2DP, AVRCP).
●WirelessLAN(Wi-Fi)andtheBluetooth® functionssharethesamefrequencyband (2.4GHz).UsingtheBluetooth® andthe wirelessLANfunctionsatthesametimemay slowdownordisconnectthecommunica-tionandcauseundesirednoise.It is recommendedthatyouturnoffthewireless LAN(Wi-Fi)whenusingtheBluetooth® functions.
- Bluetooth ^ isatrademark owned by BluetoothSIG, Inc. and licensed to Clarion Co., Ltd.
Bluetooth
Music Box ^® (if so equipped)
Recording:
- Notethatdatathatislostandnotstoredto theharddriveduetosystemdamage, improperoperationormalfunctionisnot underwarranty.
- Vehicle owners are not permitted to record musicwithoutpermissionoftheownerofthecopyrightexceptforpersonaluse.
- Checkifthemusicisappropriatelyrecorded totheharddriveafterrecordingwhenthe compactdisc cannot bererecorded.
- Somemusic cannot be recorded depending on the discondition duetohigh-speed recording.
- Jumpingsoundsmayberecordedwhena compactdiscisrecordedwhiledrivingon roughroadsandexcessivevibrationoccurs.
- Amarkindicatingjumpingsoundsisdis-playedifjumpingsoundsarerecorded.
- No sounds may be recorded if jumping sounds occurs the discis in poor condition.
- TracksthatincludeSerialCopyManagementSystem(SCMS)arenotrecorded.
- Ifacompactdiscisscratchedordirty, it may not berecorded, jumpingsoundsmayoccur oritmaytakealongtimetorecord.
Automatictitledownload:
- Thetitleinformationthatisautomatically downloadedmaydifferfromtheactualtitle.
- When newly released compact discs are recorded, their title information may not be downloaded.
- Thetitleinformationintheharddrivecanbe updated. (See "Playing recorded songs" (P.4-71).)

text_image
1 2 3 FM-AM CD SEEK 4 5 6 7 AUX MENU TUNE 1 RDM VOL RPT 4 2 PWR 5 3 SCAN AU IN 6 8 9 10 11 12 13 14 SAA27421.FM·AMradiobandselectbutton
2.CDEJECTbutton
3.CDbutton
4. Stationandpresetselectbuttons
5.Audiodisplay
6.AUX(auxiliary)button
7.MENUbutton
8.SEEK/APS(automaticprogramsearch)FF(fast forward)·APSREW(rewind)button
9.RDM(random)button
10.PWR(power)button/VOL(volume)controlknob
11.SCANtuningbutton
12.AUXINjack
13.RPT(repeat)button
14.TUNE/FF·REWbutton
FM-AMRADIOWITHCOMPACTDISC (CD)PLAYER
Foralloperationprecautions, see "Audiooperation precautions" (P.4-31).
Audiomainoperation
Headunit:
Theautoloudnesscircuitenhancesthelowand highfrequencyrangesautomaticallyinboth radioreceptionandCDplayback.
ON-OFF/Volumecontrol:
PlacetheignitionswitchintheACCorON position, and then push the PWRbutton while the system is of to call up themode (radio, CD or AUX) which was playing immediately before the system was turned off. While the system is on, pushing the PWRbutton turns the system off.
TurntheVOLcontrolknobtoadjustthevolume.
MENU MENUbutton:
PushtheMENUbuttontochangetheselecting modeasfollows.

PushtheTUNEororSEEKor▶▶
▶▶ buttontoadjustBass, Treble, Fadeand
Centerdisplay, heater, airconditioner, audio, phone and voicerecognition systems 4-43
Balancetothedesiredlevel.Fadeadjuststhe soundlevelbetweenthefrontandrearspeakers and Balanceadjuststhesoundbetweenthe rightandleftspeakers.
Once you have adjusted the sound quality to the desired level, push the MENU button repeatedly until theradioor CD display reappears (normal mode). Otherwise, theradioor CD display will automatically reappear after approximately 10 seconds.
Clockadjustment:
PushtheMENUbuttonuntiltheCLOCKmode appears. ThenpushtheTUNEorSEEKbutton toselect"CLK-ON" or "CLK-OFF" toturnthe clockonoroff.
"CLK-ON"needstobeselectedbeforeadjustingtheclockdisplay.
- Push the MENU button.
- Push the MENU button again. The clock display start to flash.
- Push the TUNE or SEEK button to adjust the hours.
- Push the MENU button again. Thedisplay will switch to the minute adjustment mode.
-
Push the TUNE or SEEK button to adjust the minutes.
-
Push the MENU button again to exit the clock mode.
Thedisplaywillreturntotheregularclock displayafter5seconds.
Toresettheminutetozero,holldownthe MENUbuttonandthenpushtheTUNEorSEEK button,thetimewillberesetasfollows.
- Incasethedisplayedminuteisintherange of00-29, thehourwillstaythesame and theminutewillberesetto00.
- Incasethedisplayedminuteisintherange of30-59,thehourwillbeadvancedbyone hourandtheminutewillberesetto00.
Forexample, if the MENU and TUNE buttons are pushed while the time is between "8:00" and "8:29", the display will be reset to "8:00". If pushed while the time is between "8:30" and "8:59", the display will be reset to "9:00". At the sametimethedisplay will return to the previous audiomode.
FM-AMradiooperation

Radio(FM/AM)bandselect:
Pushing the radio band select button will changethebandasfollows:
AM→FM1→FM2→AM
Whentheradiobandselectbuttonispushed whiletheignitionswitchisintheACCorON position,theradiowillcomeonatthestationlast played.
Thelaststationplayedwillalsocomeonwhen thePWRbuttonispushedtoON.
Ifanotheraudiosourceisplayingwhetheradio bandselectbuttonispushed,theaudiosource willautomaticallybeturnedoffandthelastradio stationplayedwillcomeon.
Whenthestereobroadcastsignalisweak, the radiowillautomaticallychangefromstereoto monauralreception.

TUNE(Tuning):
PushtheTUNEbutton tuning.
◀◀ or ▶▶ formanual

SEEKtuning:
PushtheSEEKbutton ◀◀ or ▶▶ totunefrom lowtohighorhightolowfrequenciesandto stopatthenextbroadcastingstation.
4-44 Centerdisplay, heater, airconditioner, audio, phone and voicerecognitionsystems
SCAN SCANtuning:
PushtheSCANtuningbuttontotunefromlow tohighfrequenciesandstopsateachbroadcastingstationfor5seconds.Pushingthe buttonagainduringthis5secondsperiodwill stopSCANtuningandtheradiowillremain tunedtothatstation.
If the SCAN tuning button is not pushed within 5 seconds, SCAN tuning movesto then next station.
1 to Stationmemoryoperations:
TwelvestationscanbesetfortheFMband(6 eachforFM1 and FM2)and6stationscanbe setfortheAMband.
- ChoosetheradiobandAM, FM1 or FM2 usingtheradiobandselectbutton.
- TunetothedesiredstationusingtheSEEK, SCANorTUNEbutton.
- Selectthedesiredstationandpushand holdthedesiredstationpresetbuttons1 to 6untilabeepsoundisheard.(Theradio muteswhentheselectbuttonispushed.)
- Thestationindicatorwillthencomeonand thesoundwillresume.Memorizingisnow complete.
- Otherbuttonscanbesetinthesame manner.
If the batterycable is disconnected, or if the fuse blows, theradiomemory will be erased. In that case, reset the desired stations.
CompactDisc(CD)playeroperation PlacetheignitionswitchintheACCorON position,andinserttheCDintotheslotwiththe labelsidefacingup.TheCDwillbeguided automaticallyintotheslotandstartplaying.
Afterloadingthedisc,thenumberoftrackson thediscwillappearonthedisplay.
Iftheradioisalreadyoperating, itwillautomaticallyturnoffandtheCDwillplay. IfthesystemhasbeenturnedoffwhiletheCD wasplaying, pushingthePWRbuttonwillstart theCD.
MP3orWMACDsarenotsupportedwiththis CDplayer.IfanMP3orWMACDisinserted intotheslot,thecounterontheaudiodisplay automaticallyadvanceswithoutsound.However thisisaspecificationoftheCDmechanismand notamalfunction.
Donotuse3.1in(8cm)discs.
CD CDPLAY:
When the CD button is pushed with the system off and the CD loaded, the system will turn on and the CD will start to play.
When the CD button is pushed with the CD loaded and theradioplaying, theradiow will automatically be turned off and the CD will start to play.
← TUNE → FF(FastForward), REW(Rewind):
When the ▶▶ or ◀◀ of the TUNE button is pushed while the CD is being played, the CD will play while fast forwarding or rewinding.
Whenthebuttonisreleased, the CD will return tonormalplayspeed.
SEEK APS(AutomaticProgramSearch)FF, APSREW:
Whenthe ▶▶ oftheSEEKbuttonispushed whiletheCDisbeingplayed,thenextrackor thecurrenttrackontheCD willstarttoplayfrom its beginning. Push several times to skip through tracks. The CD will advance the number of times thebuttonispushed.(Whenthelastrackon the CD is skipped through, the first track will be played.)
Whenthe ◀ buttonis pushed, thetrack being playedreturnstoitsbeginning.Pushseveral timestoskipbackthroughtracks.TheCDwill gobackthenumberoftimesthebuttonis pushed.
RPT RDM REPEAT(RPT)/RANDOM (RDM)play:
WhentheRPTorRDMbuttonispushedwhilea CDisbeingplayed,theplaypatterncanbe changedasfollows:
RPTbutton:
1DiscRepeat(Normalplay)↔1TrackRepeat RDMbutton:
1DiscRepeat(Normalplay) 1DiscRandom Thedisplayshowsthefollowingsymbols:
(Nomark):1DiscRepeat 1:1TrackRepeat RDM:1DiscRandom
CDEJECT:
When the CDEJECT button is pushed with the CD loaded, the CD will be ejected.
WhenthisbuttonispushedwhiletheCDis beingplayed,theCDwillcomeoutandthe systemwillturnoff.
If the CD comes out and is not removed, it will be pulled back into the slot to protect it.
SCAN SCANtuning:
WhentheSCANtuningbuttonispushedwhile
theCDisbeingplayed, thebeginningofallthe tracksoftheCDswillbeplayedfor10seconds insequence.
Pushingthebuttonagainduringthis10second periodwillstopSCANtuning.
If the SCAN tuning button is not pushed within 10 seconds, SCAN tuning continues to remain next CD track.
AUX(Auxiliary)input
AUXINjack:
TheAUXINjackislocatedontheaudiounit. TheAUXINaudioinputjackacceptsany standardanalogaudioinputsuchasfroma portablecassettetape/CDplayer,MP3playeror laptopcomputer.
AUX AUX(Auxiliary)button:
PushtheAUXbuttontoplayacompatible devicewhenitispluggedintotheAUXINjack. WhentheAUXbuttonispushedwithnodevice pluggedintothejack, theaudiosystemdoesnot changetotheAUXmode(theAUXbuttonis invalid).
NISSANstronglyrecommendsusingastereo miniplugcablewhenconnectingyourmusic devicetotheaudiosystem.Musicmaynotplay properlywhenamonauralcableisused.

text_image
1 2 1 2 3 4 5 6 LOAD DISP SEEK TRACK CAT FILE 7 8 9 10 11 12 AUDIO SCAN PUSH ON+OFF RPT RDM FM-AM SAT DISC AUX VOL 13 14 15 16 17 18 19 AUX IN SCRL TUNE CH FOLDER REW SAA22801.CDEJECTbutton
2.DISP(display)button
3.Radiostationpreset/CDselectbuttons
4.Audiodisplay
5.SCRL(scroll)button
6. LOADbutton
7.SEEKtheTRACK,CAT(category)orFILE/APS
(automaticprogramsearch)FF(fastforward)-APSREW(rewind)button
8.MUTEbutton
9.FM-AMbandselectbutton
10.AUDIObutton
11.SAT(satellite)bandselectbutton
12.SCANtuningbutton
13.ON-OFFbutton/VOL(volume)controlknob
14.DISCbutton
15.RPT(repeat)button
16.AUX(auxiliary)button
17.RDM(random)button
18.AUXINjack
19.TUNEtheCH(channel)orFOLDER/FF·REW button
FM-AM-SATRADIOWITHCOMPACT DISC(CD)CHANGER(modelswithout navigationsystem)
Foralloperationprecautions,see"Audiooperationprecautions"(P.4-31).
ThesatelliteradiomoderequiresanactiveXM SatelliteRadiosubscription. Thesatelliteradiois notavailable in Alaska, Hawaii and Guam.
It may takes some time to receive the activation signal letters subscribed to the XMSatellite Radio. After receiving the activations signal, an available channel list will be automatically updated in the radio. For XM, push the ignition switch from LOCK to ACC to update the channel list.
Audiomainoperation
Headunit:
Theautoloudnesscircuitenhancesthelowand highfrequencyrangesautomaticallyinboth radioreceptionandCDplayback.
ON-OFF/Volumecontrol:
PushtheignitionswitchtotheACCorON position, and then push the ON-OFFbutton while the system is so fftocallupthemode (radio, CDorAUX) which was playing immediately before the system wasturned off. While the system is on, pushing the ON-OFF button turns the system off.
TurntheVOLcontrolknobtoadjustthevolume.

MUTEbutton:
Pushthe Ⓞ buttonomutetheaudiosound. Pushthe Ⓞ buttonagaintoreleasethemute.
Adjustingtonequalityandspeakerbalance:
ToadjustBass, Treble, BalanceandFade, push the Audiobutton. Whenthedisplayshowsthe settingyouwanttochange(Bass, Treble, BalanceandFade), pushtheSEEKorTUNE buttonosetthedesiredsetting.
Theseitemscanalsobeadjustedbypushing theAUDIObutton.
- SpeedSensitiveVol. Soundvolumeisincreasedaccordingtothe vehiclespeed.Choosetheeffectlevelfrom "HIGH", "MID", "LOW" or "OFF".
- Beeptuning WhenthisitemisturnedtoON,youwillhear abeepsoundwhenyouuseabutton.
FM-AM-SATradiooperation
FM • AM radio(FM/AM)bandselect:
Pushingtheradiobandselectbuttonwill changethebandasfollows:
AM→FM1→FM2→AM
SAT radio(SAT)bandselect:
Pushingtheradiobandselectbuttonwill changethebandasfollows:
XM1→XM2→XM3→XM1
Whentheradiobandselectbuttonispushed whiletheignitionswitchisintheACCorON position,theradiowillcomeonatthechannel lastplayed.
Thelastchannelplayedwillalsocomeonwhen theON-OFFbuttonispushedtoON.
ThesatelliteradiomoderequiresanactiveXM SatelliteRadiosubscription. Thesatelliteradiois notavailable in Alaska, Hawaii and Guam.
Ifanotheraudiosourceisplayingwhetheradio bandselectbuttonisturnedtoON,theaudio sourcewillautomaticallybeturnedoffandthe lastradiochannelplayedwillcomeon.
Whenthestereobroadcastsignalisweak, the radiowillautomaticallychangefromstereoto monauralreception.
TUNE(Tuning):
-ForAMandFMradio
PushtheTUNEbutton manualtuning.
or for
-ForXMSatelliteRadio
PushtheTUNEbutton ⬆ or ⬇ toseek channelsfromallofthecategorieswhenany CATisnotselected.
SEEktuning/CATEGORY (CAT):
-ForAMandFMradio
PushtheSEEKbutton ☒ or ☒ to tune from low to high or high low frequencies and to stop at then next broadcasting station.
- ForXMSatelliteRadio
PushtheSEEKbutton ☒ or ☒ totune tothefirstchannelofthenextorprevious category.
Duringsatelliteradioreception, the following
4-48 Centerdisplay, heater, airconditioner, audio, phone and voicerecognitionsystems
noticeswillbedisplayedundercertainconditions.
- NOSIGNAL(Nosignalisreceivedwhilethe SATtunerisconnected.)
- OFFAIR(Broadcastingsignedoff)
- CHECKANTENNA(Antennaconnection error)
- LOADING(When the initial setting is performed)
- UPDATING(Whenthesatelliteradiosubscriptionisnotactive)
SCAN SCANtuning:
PushtheSCANtuningbuttontotunefromlow tohighfrequenciesandstopateachbroadcastingstation/channelfor5seconds.Pushing thebuttonagainduringthis5secondsperiod willstopSCANtuningandtheradiowillremain tunedtothatstation/channel.
If the SCAN tuning button is not pushed within 5 seconds, SCAN tuning movesto then next station/channel.
① to ⑥ Stationmemoryoperations:
18 stations/channelscanbesetfortheSAT band(6eachforXM1,XM2andXM3),12can besetfortheFMband(6eachforFM1 and FM2),and6canbesetfortheAMband.
- Choosetheradiobandusingtheradioband selectbutton.
- Tunetothedesiredstation/channelusing theSEEK, SCANorTUNEbutton.
- Pushandholdthedesiredradiostation presetbutton ① to ⑥ untilabeepsound isheard.(Theradiomuteswhentheselect buttonispushed.)
- Thestation indicator will then come on and the sound will resume. Memorizing is now complete.
- Otherbuttonscanbesetinthesame manner.
If the batterycable is disconnected, or if the refuse opens, theradiomemory will be erased. In that case, reset the desired stations.
DISP RADIODISPLAYchange:
WhentheDISPbuttonispushedwhiletheradio isbeingplayed,theaudiodisplaywillchangeas follows:

CompactDisc(CD)changeroperation Push the ignition switch to the ACC or ON position, pushtheLOADbuttonandinsertthe CDintotheslotwiththelabelsidefacingup. TheCDwillbeguidedautomaticallyintotheslot andstartplaying.
AfterloadingtheCD,thenumberoftrackson theCDandtheplaytimewillappearonthe display.
If the radio is already operating, it will automatically turnoff and the CD will play.
If the system has been turned off while the CD was playing, pushing the ON-OFF button will start the CD.
LOAD CDLOAD:
ToinsertaCDintheCDchanger, push the LOADbuttonforlessthan1.5seconds.Select theloadingpositionbypushingtheCDinsert selectbutton ① to ⑥, theninserttheCD.
Toinsert6CDstotheCDchangerin succession, push the LOAD button for more than1.5seconds.
Theinsertedslotnumberswillilluminateonthe display.
DISC
PLAY:
WhentheDISC(CDplay)buttonispushedwith thesystemoffandtheCDloaded,thesystem willturnonandtheCDwillstarttoplay.
WhentheDISCbuttonispushedwiththeCD loadedandtheradioplaying,theradiowill automaticallybeturnedoffandtheCDwillstart toplay.
WhentheDISCbuttonispushedwhileaCDis loadedandamediumisplayedusingthe auxiliaryinputjacks,youcantoggleback and forthbetweenCDandmedium.
DISP
CDDISPLAYinformation:
WhentheDISPbuttonispushedwhiletheCD isbeingplayed,theaudiodisplaywillchangeas follows:
CD:

CDwithMP3orWMA:


FF(FastForward), REW(Re-
CD:
When the button is pushed while the CD is being played, the CD will play while fast forwarding or rewinding. When the button is released, the CD will return on normal play speed.
CDwithMP3orWMA:
When the ▲ or button is pushed for less than 1.5 seconds while the CD is being played, the folders in the CD will change.
When the button is pushed more than 1.5 seconds while the CD is being played, the CD will play while forwarding or rewinding. When the button is released, the CD will return to then normal playspeed.


APS(AutomaticProgram APSREW:
Whenthe buttonispushedwhiletheCDis beingplayed,theprogramnexttothepresent onewillstarttoplayfromitsbeginning.Push severaltimestoskipthroughprograms.TheCD willadvancethenumberoftimesthebuttonis pushed.(WhenthelastprogramontheCDis skippedthrough,thefirstprogramwillbe played.)Whenthe buttonispushed,the
programbeingplayedreturnstoitsbeginning. Pushseveraltimestoskipbackthrough programs.TheCDwillgobackthenumberof timesthebuttonispushed.
CDPLAYselection:
TochangetoanotherCDalreadyloadedintothe player, push the CDplayselect buttons ① to ⑥.
RPT
REPEAT(RPT)play:
WhentheRPTbuttonispushedwhiletheCDis played, the play pattern can be changed as follows:
(CD)

(CDwithMP3orWMA)

4-50 Centerdisplay, heater, airconditioner, audio, phone and voicerecognitionsystems
RDM RANDOM(RDM)play:
WhentheRDMbuttonispushedwhiletheCD isplayed,theplaypatterncanbechangedas follows:
(CD)

(CDwithMP3orWMA)

SCRL Scroll(SCRL)button:
Whenthetitleisdisplayedbutitisalongone, thewholetitleisnotshowninthedisplay. In this case, pushthe SCRL buttonoscrollthetitle. Whenthetitleissrolledtotheendofit, the displaywillstopmovingandreturntothefirst condition.
CDEJECT:
When the CDEJECT button is pushed with the CD loaded, the CD will be ejected.
ToejectthediscsselectedbytheCDselect button,pushtheEJECTbuttonforlessthan1.5 seconds.
Toejectallthediscs, pushtheEJECTbuttonfor morethan1.5seconds.
WhenthisbuttonispushedwhiletheCDis beingplayed,theCDwillcomeoutandthe systemwillturnoff.
If the CD comes out and is not removed, it will be pulled back into the slot to protect it.
AUX(Auxiliary)input
AUXINjack:
TheAUXINjackislocatedontheaudiounit.
The AUXINaudioinputjackacceptsany standardanalogaudioinputsuchasfroma portablecassettetape/CDplayer,MP3playeror laptopcomputer.
AUX AUX(Auxiliary)button:
PushtheAUXbuttontoplayacompatible devicewhenitispluggedintotheAUXINjack. WhentheAUXbuttonispushedwithnodevice pluggedintothejack, theaudiosystemdoesnot changetotheAUXmode(theAUXbuttonis invalid).
NISSANstronglyrecommendsusingastereo miniplugcablewhenconnectingyourmusic devicetotheaudiosystem.Musicmaynotplay properlywhenamonauralcableisused.
Centerdisplay, heater, airconditioner, audio, phone and voicerecognitionsystems 4-51
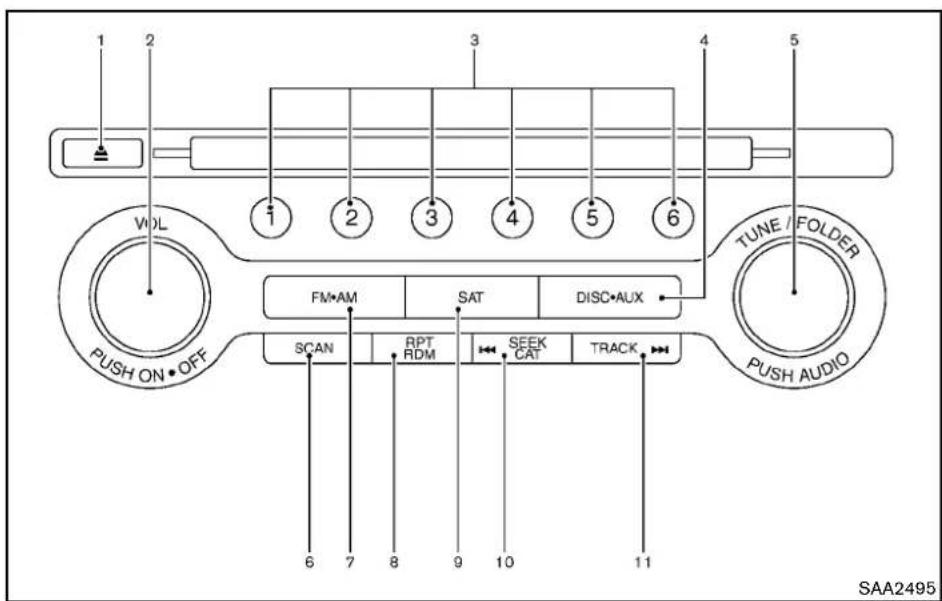
text_image
1 2 3 4 5 6 VOL 1 2 3 4 5 6 TUNE / FOLDER PUSH ON • OFF FM•AM SAT DISC•AUX SCAN RPT RDM SEEK CAT TRACK 6 7 8 9 10 11 SAA2495- DVD-CDEJECTbutton
2.ON-OFFbutton/VOL(volume)controlknob
3.Radiostationpresetselectbuttons
4.DISC·AUX(auxiliary)button - RadioTUNE(tuning)folderselector/AUDIO controlknob
6.RadioSCANtuningbutton
7.FM-AMbandselectbutton
8.CDRPT(repeat)/RDM(random)playbutton
9.SAT(satellite)button
10. RadioCAT(category)/REW(rewind)buttonfor
SEEK/TRACK
11.FF(fastforward)buttonforSEEK/TRACK
4-52 Centerdisplay, heater, airconditioner, audio, phone and voicerecognition systems
FM-AM-SATRADIOWITHCOMPACT DISC(CD)PLAYER(modelswithnavigationsystem)
Foralloperationprecautions, see "Audiooperationprecautions" (P.4-31).
ThesatelliteradiomoderequiresanactiveXM SatelliteRadiosubscription.Thesatelliteradiois notavailableinAlaska,HawaiiandGuam.
It may takes sometime to receive the activation signal afters subscribing the XMSatellite Radio. After receiving the activations signal, an available channellist will be automatically updated in the radio. For XM, push the ignitions switch from LOCK to ACC to updatethe channellist.
Audiomainoperation
Headunit:
The autoloudness circuitenhancesthelowand highfrequencyrangesautomaticallyinboth radioreceptionandCD playback.
ON-OFF/Volumecontrol:
PushtheignitionswitchtotheACCorON position,andthenpushtheON-OFFbutton whilethesystemisofftoturnonthelastaudio source,whichwasplayingimmediatelybefore thesystemwasturnedoff.Whilethesystem is on,pushingtheON-OFFbuttonturnsthesystem off.
TurntheVOLcontrolknobtoadjustthevolume.
Adjustingtonequalityandspeakerbalance:
ToadjustBass, Treble, BalanceandFade, push theAudiocontrolknob. Whenthedisplayshows the setting you want to change (Bass, Treble, BalanceandFade), rotate the Audiocontrol knob to set the desired setting. For the other setting methods, see "HowtouseSETTING button" (P.4-11).
This vehicle hassomesoundeffect functions as follows:
●SpeedSensitiveVol.
Formoredetails,see"HowtouseSETTING button"(P.4-11).
Switchingthedisplay:
PushingtheDISC·AUXbuttonwillswitchthe displaysasfollows:
iPod ^® /USB→CD/DVD→MusicBox ^® (ifso equipped)→Bluetooth ^® Audio→AUX→iPod ^® /USB
FM-AM-SATradiooperation
FM • AM radio(FM/AM)bandselect:
Pushingtheradiobandselectbuttonwill changethebandasfollows:
AM→FM1→FM2→AM
SAT radio(SAT)bandselect:
Pushingtheradiobandselectbuttonwill changethebandasfollows:
XM1→XM2→XM3→XM1
Whentheradiobandselectbuttonispushed whiletheignitionswitchisintheACCorON position,theradiowillcomeonatthechannel lastplayed.
Thelastchannelplayedwillalsocomeonwhen theON-OFFbuttonispushedtoON.
ThesatelliteradioisnotavailableinAlaska, HawaiiandGuam.
Ifanotheraudiosourceisplayingwhetheradio bandselectbuttonisturnedtoON, theaudio sourcewillautomaticallybeturnedoffandthe lastradiochannelplayedwillcomeon.
Whenthestereobroadcastsignalisweak, the radiowillautomaticallychangefromstereoto monauralreception.
TUNE(Tuning):
-ForAMandFMradio
TurntheradioTUNEknobformanualtuning.
●ForXMSatelliteRadio
TurntheradioTUNEknobtoseekchannels fromallofthecategorieswhenanycategory isnotselected.
SEEK CAT TRACK SEEKtuning/CATEGORY
(CAT):
●ForAMandFMradio
PushtheSEEKbutton 🏠◀ SEE OR TAG▶▶ totune fromlowtohighorhightolowfrequencies andtostopatthenextbroadcastingstation.
- ForXMSatelliteRadio
PushtheSEEKbutton 🏠◀ SEE OR 18/03▶▶ totune tothefirstchannelofthenextorprevious category.
Duringsatelliteradioreception, the following notices will be displayed under certain conditions.
●NOSIGNAL(Nosignalisreceivedwhilethe SATtunerisconnected.)
- OFFAIR(Broadcastingsignedoff)
- CHECKANTENNA(Antennaconnection error)
- LOADING(When the initial setting is performed)
- UPDATING(Whenthesatelliteradiosubscriptionisnotactive)
SCAN SCANtuning:
PushtheSCANtuningbuttontotunefromlow tohighfrequenciesandstopateachbroad-castingstation/channelfor5seconds.Pushing thebuttonagainduringthis5secondsperiod willstopSCANtuningandtheradiowillremain tunedtothatstation/channel.
If the SCAN tuning button is not pushed within 5 seconds, SCAN tuning movesto then next station/channel.
① to ⑥ Stationmemoryoperations:
12 stations/channelscanbesetfortheFMband (6eachforFM1 and FM2), 18 for XMradio(6 eachforXM1, XM2 and XM3) and 6 stations canbesetfortheAMband.
-
Choosetheradiobandusingtheradioband selectbutton.
-
Tunetothedesiredstation/channelusing theSEEK/TRACK, SCANbuttonorthe radioTUNEknob.
-
Pushandholdthedesiredstationpreset button ① to ⑥ untiltheradiomutes.
-
Thestationindicatorwillthencomeonand thesoundwillresume.Memorizingisnow complete.
-
Otherbuttonscanbesetinthesame manner.
If the batterycable is disconnected, or if the fuse opens, theradiomemory will be erased. In that case, reset the desired stations/channels.
List(AMandFMradio):
Whenthe"List"keyonthedisplayisselected whiletheFMorAMradioisbeingplayed,the presetstationlistwillbedisplayed.
If1 of the6presetstations listedistouched and held, the current station will bestored as the new preset.
Menu(XMSatelliteRadio):
When the "Menu" keyonthedisplayisselected while the XMSatelliteRadioisbeing played, the menulist will be displayed.
The following items are available.
- PresetList
Displaysthepresetchannellist.If1 ofthe6 presetstationslistedistouchedandheld, thecurrentstationwillbestoredasthenew preset.
- CustomizeChannelList
Selectsspecificchannelstoskipwhileusing theTUNE,SEEK/CATEGORY orMenu-Categoriesfeature.
●FavoriteArtists&Songs
Storesthecurrentartistor song that is being played. Touch the "Alert" key to be reminded when the stored artist songs is playing a station while listening to XM.
- Categories
Selecting a category will go to the first channelinthatcategoryasdefinedbyXM Radio.
- DirectTune
Inputsthechannelnumberbyusinga keypad.
CompactDisc(CD)playeroperation
Pushtheignitionswitchtothe ACCor ON positionandinserttheCompactDisc(CD)into theslotwith thelabelsidefacingup.TheCDwill beguidedautomaticallyintotheslotandstart playing.
AfterloadingtheCD, thenumberoftrackson theCDandtheplaytimewillappearonthe display.
Iftheradioisalready operating, it will automatically turn off and the CD will play.
If the system has been turned off while the CD was playing, pushing the ON-OFF button will start the CD.
Donotuse3.1in(8cm)discs.
4-54 Centerdisplay, heater, airconditioner, audio, phone and voicerecognitionsystems

PLAY:
When the DISC-AUX(CDplay) button is pushed with the system off and the CD loaded, the system will turn on and the CD will start to play.
When the DISC-AUX button is pushed with the CD loaded and theradioplying, theradiow will automatically be turned off and the CD will start to play.
Menu:
When the "Menu" keyonthedisplayisselected while the CDisbeing played, themenuscreen will be displayed. The following menu options are available.
- FolderList(forCDwithcompressedaudio files)
Displaysthefolderlist.
-TrackList
Displaysthetracklist.
-PlayMode
Selectaplaymodefromthefollowingitems.
—Normal
-1 FolderRepeat(forCDwithcompressedaudiofiles)
-1TrackRepeat
-1DiscRandom
-1 FolderRandom(forCDwithcompressedaudiofiles)
- RecordtoMusicBox equipped) (forCD)(ifso
SelecttochoosespecificsongsontheCD torecordtotheMusicBox ^® .
- TitleTextPriority(forCD)
SettheprioritytoCDDB(CompactDisc DataBase)toacquiretrackinformationfrom theGracenoteDatabase,orsetthepriority toCD-TEXTtoacquiretheinformationfrom CDs.
●Automatic Recording(for CD)(if so equipped)
WhenthisitemisturnedtoON,theMusic Box® harddriveautomaticallystartsrecordingwhenaCDisinserted.
- RecordingQuality(forCD)(ifsoequipped) Thelargernumber(132)willincreasethe recordedsoundqualitywhiletakingupmore spaceontheMusicBox ^® leavinglessroom formoresongs.
ForthedetailsofMusicBox ^® ,see“MusicBox ^® ” (P.4-69).
Next/PreviousTrackandFast
Forward/Rewind:
When the button is pushed more than 1.5 seconds while the CD is being played,
theCDwillplaywhilefastforwardingor rewinding. When the button is released, the CDwillreturntonormalplayspeed.
When the or button is pushed for less than 1.5 seconds while the CD is being played, then next track the beginning of the current track on the CD will be played.
Whentherewindbuttonispushedforlessthan 1.5secondswithin3secondsafterthecurrent trackstartsplaying,theprevioustrackwillbe played.

REPEAT(RPT), RANDOM(RDM):
When the RPT button is pushed while the CD is played, the play pattern can be changed as follows:
(CD)

(CDwithcompressedaudiofiles)


CDEJECT:
When the CDEJECT button is pushed with the CDloaded, the CD will beejected.
WhenthisbuttonispushedwhiletheCDis beingplayed,theCDwillbeejected.
If the CD comes out and is not removed, it will be pulled back into the slot to protect it.
DVD(DigitalVersatileDisc)PLAYER OPERATION(modelswithnavigation system)
Precautions
StarttheenginewhenusingtheDVDentertainmentsystem.
Movieswillnotbeshownonthefrontdisplay whilethevehicleisinanydrivepositionto reducedriverdistraction.Audioisavailable whenamovieisplayed.Toviewmoviesinthe frontdisplay,stopthevehicleinasafelocation, movetheselectorlevertotheP(Park)position andapplytheparkingbrake.

WARNING
●The driver must not attempt to operate the DVD system or wear the headphones while the vehicle is in motion so that full attention may begin to vehicle operation.
- Donotattempttomodifythesystem todisplayamovieonthefront screenwhilethevehicleisbeing driven.Doingsomaydistractthe driverandmaycauseacollisionand seriouspersonalinjuryordeath.

CAUTION
- OnlyoperatetheDVDwhilethe vehicleengineisrunning.Operating theDVDforextendedperiodsof timewiththeengineOFFcandis- chargethevehiclebattery.
- Donotallowthesystemtogetwet. Excessivemoisturesuchasspilled liquidsmaycausethesystem to malfunction.
- WhileplayingVIDEO-CDmedia, this DVDplayerdoesnotguarantee completefunctionalityofallVIDEO-CDformats.
Displaysettings
Toadjustthefrontdisplaymode, pushthe SETTINGbuttonwhiletheDVDisbeingplayed, selectthe "Others" keyandthenselectthe "Display" key.
ToadjustthedisplayON/OFF,brightness,tint,colorandcontrast,selectthe"DisplayAdjustment"keyandthenselecteachkey.
Thenyoucanadjusteachitemusingthemmulti-functioncontroller.Afterchangeshavebeen madepushtheBACKbuttontosavethesetting.
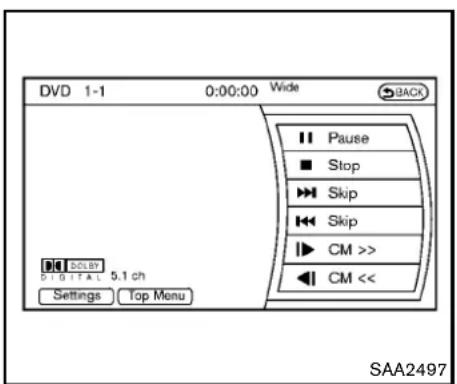
text_image
DVD 1-1 0:00:00 Wide BACK Pause Stop Skip Skip CM >> CM << SAA2497 5.1 ch Settings Top MenuPlayingaDVD
DISC·AUXbutton:
Parkthevehicleinasafelocationforthe frontseatoccupantstoooperatetheDVD drivewhilewatchingtheimages.
PushtheDISC-AUXbuttonontheinstrument panelandturnthedisplaytotheDVDmode.
WhenaDVDisloaded, it will bereplayed automatically.
The operations screen will be turned on when the DISC-AUX button located on the instrument panel is pushed while a DVD is being played, and it will turn off automatically after a period of time. Toturniton again, push the DISC-AUX
buttonagain.
DVDoperationkeys:
WhentheDVDisplayingwithouttheoperation screenbeingshown,youmayusethetouch screentoselectitemsfromthedisplayedvideo. Youmayalsousethemultifunctioncontrollerto selectanitemfromthedisplayedvideo.When theoperationscreenisbeingshown,usethe multifunctioncontrollerortouchscreentoselect anitemfromthedisplayedmenus.
II PAUSE:
Selectthe" "keytopausetheDVD.To resumeplayingtheDVD,usethe"PLAY"key.
PLAY:
Selectthe" ▶ "keytostartplayingtheDVD, forexample,afterpausingtheDVD.
STOP:
Selectthe" ■ "keytostopplayingtheDVD.
/Next/PreviousChapter:
Selectthe" >>" or "keytoskipthe chapter(s)ofthediscforward/backward.The chapterswilladvance/gobackthenumberof timesthiskeyisselected.
CommercialSkip:
ThisfunctionisonlyforDVD-VIDEO,DVD-VR. Selectthe" |►" or "◀| "keytoskipforwardor backwardsbythesetamountasdefinedinthe DVDSettingsmenu.
TopMenu:
Whenthe"TopMenu"keyisselectedinthe screenwhileaDVDisbeingplayed,thetop menuspecifictoeachdiscwillbedisplayed.For details,seetheinstructionsonthedisc.
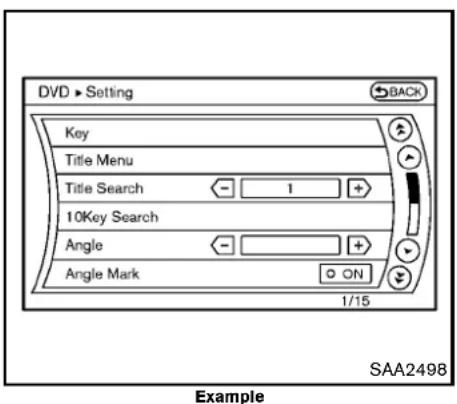
text_image
DVD > Setting BACK Key Title Menu Title Search 1 + 10Key Search Angle Angle Mark ON 1/15 Example SAA2498DVDsettings
Selectthe"Settings"keytoadjustthefollowing settings.
Key(DVD-VIDEO):
KeysfortheDVDmenuoperationaredisplayed.

:MovethecursortoselectaDVDmenu.
Enter:Entertheselectedmenu.
Move: Changethedisplaylocationbymovingthe operationkey.
Back: Return to the previous screen.
◀▶ Hide:Hidetheoperationkey.
TitleMenu(DVD-VIDEO):
Somemenusspecifictoeachdiscwillbe shown. Fordetails, seetheinstructionsonthe disc.
TitleSearch(DVD-VIDEO,DVD-VR):
Thescenewiththespecifiedtitlewillbe displayedeachtimethe“+”sideor“-”sideis selected.
GroupSearch(VIDEOCD):
Asceneinthespecifiedgroupwillbedisplayed eachtimethe“+”sideor“-”sideisselected.
10KeySearch(DVD-VIDEO,VIDEO-CD, CD-DA,DVD-VR):
Selectthe"10KeySearch"keytoopenthe number entry screen. Input the number to be searchedandselectthe"OK" key.Thespecified Title/ChapterorGroup/Trackwillbeplayed.
SelectNo.(VIDEO-CD):
Selectthe"SelectNo."keytoopenthenumber entryscreen.Inputthenumbertobesearched andselectthe "OK"key.Thespecified scene
willbeplayed.
Angle(DVD-VIDEO):
If the DVD contains different angles (such as movingimages), the current image angle can be switched to another one. Select the "Angle" key. The angle will change each time the "+" side or "-" side is selected.
AngleMark(DVD-VIDEO):
Whenthisitemisturnedon, ananglemarkwill be shown on the bottom of the screen if the scenecanbeseenfromadifferentangle.
MenuSkip(DVD-VIDEO):
DVDmenus are automatically configured and the contents will be played directly when the "MenuSkip" keyisturnedon. Notethatsome discsmaynotbeplayeddirectly even if this item isturnedon.
CMSkip(DVD-VIDEO):
Selectthe"CMSkip"key.Choosethesetting timefrom15,30or60secondsbyselectingthe "+"sideor"-"side.
DRC(DynamicRangeCompression)automatically adjusts the soundtrack volume level to maintainamoreevensoundtothespeakers.
DVDLanguage(DVD-VIDEO,VIDEO-CD):
Selectthe“DVDLanguage”keytoopenthe numberentryscreen.Inputthenumbercorrespondingtothepreferredlanguageandselect the“OK”key.TheDVDtopmenulanguagewill bechangedtotheonespecified.
Display:
Toadjusttheimagequalityofthescreen,select thepreferredadjustmentitems.
Audio:
Select the preferred language for audio.
Subtitle(DVD-VIDEO,DVD-VR):
Select the preferred language for subtitles.
DisplayMode(DVD-VIDEO,VIDEO-CD, DVD-VR):
Selectfromthe"Full","Wide","Normal"or"Cinema"modes.
TitleList(DVD-VR):
Selectthepreferredtitlefromthelist.
PlayMode:
Selectthepreferredplaymode.
PG/PLMode(DVD-VR):
Selectthe"PG"or"PL"mode.
natural_image
Line drawing of a car seatbelt switch with a black arrow pointing to the socket (no text or symbols)USBMEMORYOPERATION(models withnavigationsystem)
Audiomainoperation
OpentheconsolelidandconnectaUSB memoryasillustrated. Then, pushtheDISC-AUX buttonrepeatedlytoswitchtotheUSBmemory mode.
If the system has been turned off while the USB memory was playing, pushing the ON-OFF/VOL control knob will start the USB memory.

text_image
USB This USB device contains multisession contents. Please select item to play. Play Movie Contents Play Audio Contents SAA2500Fileselection
When there are both audio and movie files in the USB memory, them do select screen is displayed. Select the preferred content to play.
When there is only one type off file, the audio or movie operations screen is displayed and starts to play.
Ifavideofilerestrictsthenumberofplaybacks,a pop-upscreenwillappeartoconfirmitisokto play.Answeryesornoasrequestedbythe display.

text_image
USB Artist XXXXXXXXXXXXX Album XXXXXXXXXXXXX Track XXXXXXXXXXXXX TUNE●Folder Folder 1 of 3 Track 1 of 61 0:07 Menu SAA2501Audiofileoperation

PLAY:
WhentheDISC·AUXbuttonispushedwiththe systemoffandtheUSBmemoryinserted,the systemwillturnon.
IfanotheraudiosourceisplayingandaUSB memoryisinserted, pushtheDISC-AUXbutton repeatedly until thecenterdisplaychangesto theUSBmemorymode.


Next/PreviousFileandFast
Forward/Rewind:
Whenthe 📂 orbuttonispushedformore
than1.5secondswhileaUSBmemoryisbeing played,theUSBmemorywillplaywhileforwardingorrewinding.Whenthebuttonis released,theUSBmemorywillreturntonormal playspeed.
When the button is pushed for less than 1.5 seconds while the USB memory is being played, then next track the beginning of the current track on the USB memory will be played.
When therewindbutton is pushed for less than 1.5 seconds within 3 seconds after the current track starts playing, the previous track will be played.
Themulti-functioncontrollercanalsobeusedto selecttrackswhentheUSBmemoryisbeing played.
Folderselection:
TochangetoanotherfolderintheUSBmemory, turnthefolderselectororchooseafolder displayedonthescreenusingthemulti-function controller.

REPEAT(RPT), RANDOM(RDM):
WhentheRPTbuttonispushedwhiletheUSB memoryisplayed,theplaypatterncanbe changeasfollows.
Tochangetheplaymode, pushtheRPTbutton
repeatedlyandthemodewillchangeasfollows.
Normal→1FolderRepeat→1TrackRepeat→AllRandom→1FolderRandom→Normal
text_image
USB ► Menu Movie Playback Folder List Track List Play Mode Normal 1/3 SAA2502Menu:
Therearesomeoptionsavailableduringplay-back.Selectoneofthefollowingoptionsthat aredisplayedonthescreenifnecessary.Refer tothefollowinginformationforeachitem.
•MoviePlayback
Switchtothemovie playbackmode. This item is displayed only when a USB memory contains movie files.
- FolderList/TrackList
Displaysthefolderortracklist.The "Movie Playback" keyisalsodisplayedinthislist screen, and enablesswitchingtothemovie playbackmode.
-PlayMode
Select the preferred playmode.

text_image
USB 1 - 1 0:00:00 Wide Back Play Stop Skip Skip Settings List SAA2503Moviefileoperation
Parkthevehicleinasafelocationforthe frontseatoccupantstooperatetheUSB memorywhilewatchingtheimages.
DISC AUX
PLAY:
WhentheDISC-AUXbuttonispushedwiththe systemoffandtheUSBmemoryinserted,the systemwillturnon.
IfanotheraudiosourceisplayingandaUSB memoryisinserted, pushtheDISC·AUXbutton repeatedlyuntilthecenterdisplaychangesto theUSBmemorymode.
Operationkeys:
TooperatetheUSBmemory,selectthedesired keydisplayedontheoperationscreenusingthe multi-functioncontroller.

Pause
Selectthe“ □”keytopausethemoviefile.To resumeplayingthemoviefile,selectthe“ ▶”key.

Play
Selectthe"▶"keytostartplayingamoviefile, forexample,afterpausingamoviefile.

STOP
Selectthe" ■ "keytostopplayingamoviefile.

Skip(Nextchapter)
Selectthe"▶▶1"keytoskipthechapter(s)of thediscforward.Thechapterswilladvancethe numberoftimestheENTERbuttonispushed.

Skip(Previouschapter)
Selectthe“ [◀◀]”keytoskipthecapter(s)of thediscbackward.Thechapterswillgoback thenumberoftimesthe“ [◀◀]”keyisselected.
List:
Selectthe"List"keyonthemoviefileoperation screentodisplaythefilelist.
text_image
USB ▶ Settings Audio File Play Back Play Mode Normal 10Key Search Display DRC 1 + Audio 1/7 SAA2504Example
Settings:
Selectthe"Settings"keytoadjustthefollowing settings.
●AudioFilePlayback
Switchtotheaudioplaybackmode. This item is displayed only when the USB memory contains the audio files.
-PlayMode
Selectthe"Normal"or"1TrackRepeat"play mode.
•10KeySearch
Selectthe"10KeySearch"keytoopenthe numberentryscreen. Inputthenumbertobesearchedandselect
4-62 Centerdisplay, heater, airconditioner, audio, phone and voicerecognitionsystems
the"OK"key.
Thespecifiedfolder/filewillbeplayed.
- Display
Toadjusttheimagequalityofthescreen, selectthepreferredadjustmentitems.
•DRC
DRC(DynamicRangeCompression) automaticallyadjuststhesoundtrackvolume leveltomaintainamoreevensoundtothe speakers.
●Audio
Select the preferred language for audio.
- Subtitle
Select the preferred language for subtitle.
- Display Mode
Selectthe "Normal", "Wide", "Cinema" or "Full" mode.
Bluetooth ^® STREAMINGAUDIO(modelswithnavigationsystem)
YourNISSANisequippedwithBluetooth StreamingAudio.Ifyouhaveacompatible Bluetooth® devicewithstreamingaudio(A2DP profile),youcansetupthewirelessconnection betweenyourBluetooth® deviceandthein-vehicleaudiosystem.Thisconnectionallows youtolistentotheaudiofromtheBluetooth® deviceusingyourvehiclespeakers.Italsomay allowbasiccontrolofthedeviceforplayingand skippingaudiofilesusingtheAVRCPBluetooth® profile.AllBluetooth® Devicesdonot havethesamelevelofcontrolsforAVRCP. PleaseconsultthemanualforyourBluetooth® Deviceformoredetails.
OnceyourBluetooth ^® deviceisconnectedto their-vehicleaudiosystem, itwillautomatically reconnectwheneverthedeviceispresentinthe vehicleandyouselectBluetooth ^® Audiofrom youraudiosystem. Youdonotneedtomanually reconnectforeachusage.
WirelesLAN(Wi-Fi)andtheBluetooth ^ functionssharethesamefrequency band (2.4GHz). UsingtheBluetooth ^ andthewirelessLAN functionsatthesametimemayslowdownor disconnectthecommunicationandcauseundesirednoise.Itisrecommendedthatyouturn ofthewirelessLAN(Wi-Fi)whenusingthe
Bluetooth ^® functions.
Regulatoryinformation
FCC Regulatory information:
- CAUTION: Tomaintaincompliance with FCC's RF exposure guidelines, use only the supplied antenna. Unauthorized antenna, modification, or attachmentscoulddamage the transmitter and may violate FCC regulations.
- Operationissubjecttothefollowingtwo conditions:
1) This device may not cause interference and
2) This device must accept any interference, including interference that may cause undesired operation of the device
IC Regulatory information:
●Operationissubjecttothefollowingtwo conditions:
1) This device may not cause interference, and
2) This device must accept any interference, including interference that may cause undesired operation of the device.
- ThisClassBdigitalapparatusmeetsall requirementsoftheCanadianInterference-CausingEquipmentRegulations.
Bluetoothtrademark:
Bluetooth
Bluetooth® isattrademarkowned byBluetoothSIG,Inc.andlicensedtoClarionCo.,Ltd.
text_image
Settings Navigation Audio Phone Bluetooth Volume & Beeps Display Clock Others Adds or Edits the Bluetooth Phones and Audio Devices SAA2505Connectingprocedure
- Push the SETTING button and select the "Bluetooth" key.

text_image
Settings > Bluetooth Back Bluetooth ON Connect Bluetooth Connected Devices Edit Bluetooth Info Replace Connected Phone 2/5 SAA2506- Selectthe "ConnectBluetooth" key.
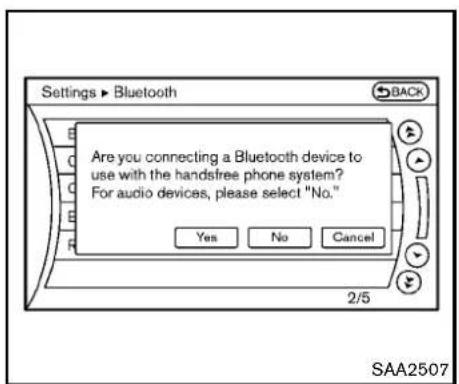
text_image
Settings ▶ Bluetooth Back Are you connecting a Bluetooth device to use with the handfree phone system? For audio devices, please select "No." Yes No Cancel 2/5 SAA25073.Aconfirmationscreenwillbedisplayed.
Select"No".
Note: Selecting "Yes" will only connect the handsfreephone portion of a Bluetooth device.
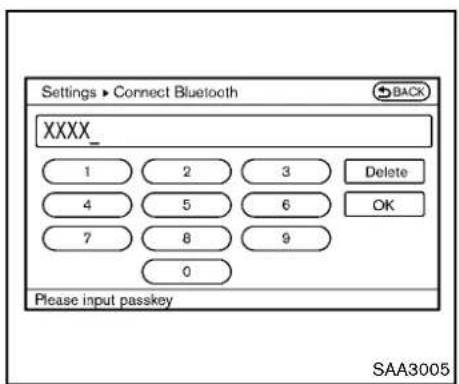
text_image
Settings ▶ Connect Bluetooth XXXX_ 1 2 3 Delete 4 5 6 OK 7 8 9 0 Please input passkey SAA3005- ChooseaPINcodetousewith the compatibleBluetoothaudiodeviceusing thenumberinputscreen.ThePINcodewill needtobeenteredintotheBluetooth audiodeviceafterstep5.Selectthe"OK" key.
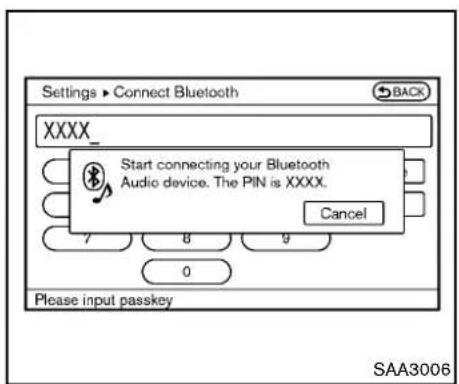
text_image
Settings ▶ Connect Bluetooth XXXX_ Start connecting your Bluetooth Audio device. The PIN is XXXX. Cancel 7 8 9 0 Please input passkey SAA3006- Thestandbymessagescreenwillappear.
OperatethecompatibleBluetooth ^ audio device. For the connecting procedure of the audiodevice, seetheBluetooth ^ audio instructions.
Whentheconnectingiscompleted, the screenwillreturntotheBluetooth ^® setup display.

text_image
Bluetooth Audio Artist XXXXXXXXX Album XXXXXXXXX Track XXXXXXXXX Shuffle OFF Repeat OFF 0:11 Menu ▶ Play ▪ Pause SAA2510Audiomainoperation
PushtheignitionswitchtotheACCorON position.Then,pushtheDISC-AUXbutton repeatedlytoswitchtotheBluetooth ^® audio mode.Ifthesystemhasbeenturnedoffwhile theBluetooth ^® audiodevicewasplaying,pushingtheON-OFF/VOLcontrolknobwillstartthe Bluetooth ^® audiodevice.
Theabilitytopause,changetracks,fastforward,rewind,randomizeandrepeatmusicmaybe differentbetweendevices.Someorallofthese functionsmaynotbesupportedoneachdevice.
TRACK ➕ ➕ BEEK CAT Next/PreviousTrackandFast Forward/Rewind:
Whenthe 🎯 or button is pushed more than 1.5 seconds while a Bluetooth ^ audio file is being played, the Bluetooth ^ audiodevice will play while forwarding or rewinding. Whenthe button is released, the Bluetooth ^ audiodevice will return on normal playspeed.
When the button is pushed for less than 1.5 seconds while a Bluetooth ^ audio file is being played, then next track the beginning of the current track on the Bluetooth ^ audiodevice will be played.
When therewindbutton is pushed for less than 1.5 secondswithin3 secondsafterthecurrent trackstartsplaying, the previous track will be played.
Themulti-functioncontrollercanalsobeusedto selecttrackwhentheBluetooth ^® audioplay modescreenisshownonthedisplay.(“Bluetoothaudio”willbeindicatedontheheaderofthescreen.)
RPT RDM REPEAT(RPT),RANDOM(RDM): Tochangetheplaymode,pushthe RPT button repeatedlyandthemodechangesasfollows. Normal→ShuffleAllTracks→ShuffleGroup →Repeat1Track→RepeatAllTracks→ RepeatGroup→Normal
Operationkeys:
TooperateaBluetooth ^® audiodevice,selecta keydisplayedontheoperationscreenusingthe multi-functioncontroller.
Play
Selectthe"▶"keytostartplayingwhen pausing.Selectthiskeyagaintopausethe audioplay.
II Pause
Selectthe" □ "keytopausetheBluetooth audiodevice.Selectthiskeyagaintoresume playing.
PlayMode:
Theplaymodesettingdisplaywillappearwhen the "Menu" keyisselected.
Choosethepreferredplaymodefromthe followingitems.
•Shuffle
Choose "ShuffleOFF", "ShuffleAllTracks" and "ShuffleGroup".
- Repeat
Choose from "RepeatOFF", "Repeat1 Track", "RepeatAllTracks" and "Repeat Group".

text_image
Settings ▶ Bluetooth Bluetooth ON Connect Bluetooth Connected Devices Edit Bluetooth Info Replace Connected Phone 1/5 SAA2511Bluetooth ^® settings
TosetuptheBluetooth ^ devicesystemtothe preferredsettings, pushtheSETTINGbutton andselectthe"Bluetooth"key.
Bluetooth:
If this setting is turned off, the connection between the Bluetooth ^ devices and their vehicle Bluetooth ^ module will be canceled.
ConnectBluetooth:
ConnectstotheBluetooth ^ device.See"Connectingprocedure"(P.4-64).Upto5devices canberegistered.
ConnectedDevices:
Registereddevicesareshownonthelist.Select aBluetooth ^® devicefromthelist, the following optionswillbeavailable.
-Select
Select"Select"toconnecttheselected device to the vehicle. If there is different device currently connected, these selected device will replace the current device.
•Edit
RenametheselectedBluetooth ^ device usingthekeypaddisplayedonthescreen. (See"Howtousetouchscreen"(P.4-4).)
- Delete
DeletetheselectedBluetooth ^® device.
EditBluetoothInfo:
Changethenamebroadcastedbythissystem overBluetooth ^® .ChangethePINcodethatis enteredwhenconnectingahandsfreedeviceto thissystem.
ReplaceConnectedPhone:
Replace the Bluetooth ^ connection with a connected Bluetooth ^ cellular phone. For details about Hands-Free Phone System, see "Bluetooth ^ hands-free phonesystem (models with navigation system)" (P.4-81).
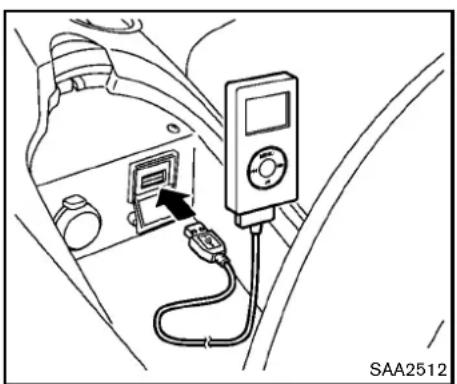
natural_image
Diagram of a car interior showing a switch connected to a digital multimeter (no text or symbols visible)iPod ^® PLAYEROPERATION(models withnavigationsystem)
ConnectingiPod®
OpentheconsolelidandconnecttheiPod cabletotheUSBconnector.Ifcompatible,the batteryoftheiPod ^® ischargedwhilethe connectiontothevehicle.
DependingontheversionoftheiPod ^® , the displayontheiPod ^® showsaNISSANor AccessoryAttachedscreenwhentheconnectioniscompleted. WhentheiPod ^® isconnected tothevehicle, theiPod ^® musiclibrarycanonly beoperatedbythevehicleaudiocontrols.
* i P o ^® disatrademarkofAppleInc., registeredin
theU.S.andothercountries.
Compatibility
The following models are available:
●FifthgenerationiPod ^® (version1.2.3or later)
- iPodClassic ^® (version1.1.1 or later)
- FirstgenerationiPodtouch orlater) ^® (version2.0.0
- SecondgenerationiPodtouch ^ (version 1.2.3orlater)
- FirstgenerationiPodnano ^ (version1.3.1 or later)
- SecondgenerationiPodnano ^ (version 1.1.3orlater)
- ThirdgenerationiPodnano ^ (version1.1or later)
- FourthgenerationiPodnano ^ (version1.0.2 orlater)
MakesurethattheiPod ^® versionisupdated.
Audiomainoperation
PushtheignitionswitchtotheACCorON position.Then,pushthe DISC·AUXbutton repeatedlytoswitchtotheiPod ^® mode.
If the system has been turned off while the Pod was playing, pushing the ON·OFF button will start the Pod ^® .
DISC AUX
DISC-AUXbutton:
WhentheDISC-AUXbuttonispushedwiththe systemoffandtheiPod ^ connected,thesystem willturnon.Ifanotheraudiosourceisplaying andtheiPod ^ isconnected,pushtheDISC-AUX buttonrepeatedly untilthe centerdisplay changestotheiPod ^ mode.
Interface:
TheinterfaceforiPod ^ operationshownonthe vehiclecenterdisplayissimilartotheiPod interface.Usethemulti-functioncontroller and theENTERorBACKbuttontoplaytheiPod withyourfavoritesettings.
The following item scan bechosen from the menulistscreen. For further information about each item, seetheiPod ^® Owner's Manual.
-NowPlaying
- Playlists
4-68 Centerdisplay, heater, airconditioner, audio, phone and voicerecognitionsystems
•Artists
•Albums
•Songs
- Podcasts
-Genres
•Composers
●Audiobooks
- ShuffleSongs
The followingtouch-panelbuttonsshownonthe screenarealsoavailable:
- MENU: returnstothepreviousscreen.
• ▶II :plays/pausesthemusicselected.


Next/PreviousTrackandFast
Forward/Rewind:
Whenthe button is pushed more than 1.5 seconds while the iPod is playing, the iPod will play while fast forwarding or rewing. Whenthe button is released, the iPod will return to then normal plays speed.
When the 🎨 or button is pushed for less than 1.5 seconds while the iPod ® is playing, the next track or the beginning of the current track on the iPod ® will be played.
When therewindbutton is pushed for less than 1.5 seconds within 3 seconds after the current track starts playing, the previous track will be played.
Themulti-functioncontrollercanalsobeusedto selecttrackswhentheiPod ^ isplaying.
RPT RDM REPEAT(RPT), RANDOM(RDM):
WhentheRPTbuttonispushedwhileatrackis beingplayed,theplaypatterncanbechanged asfollows:
flowchart
graph TD
    A["Shuffle Off Repeat Off"] --> B["Shuffle Off Repeat One"]
    B --> C["Shuffle Off Repeat All"]
    C --> D["Shuffle Songs Repeat Off"]
    D --> E["Shuffle Songs Repeat All"]
    E --> F["Shuffle Albums Repeat All"]
    F --> G["Shuffle Albums Repeat Off"]
    G --> A
MusicBox ^® (ifsoequipped)
TheMusicBox ^® canstoresongsfromCDs beingplayed.Thesystemhas9.3GBstorage capacityinmodelswithnavigationsystem.
The following CDscanberecorded in the Music Box ^® audiosystem.
- CDsthatcontainuncompressedaudiofiles
●HybridCompactDiscDigitalAudio(Hybrid CD-DA)specificationinSuperAudioCDs - CompactDiscDigitalAudio(CD-DA)specificationinCD-Extras
- Firstsessionofmultisessiondisc
Extremetemperatureconditions[below -4°F (-20°C) and above 158°F (70°C)] could affect the performance of the hard drive.
NOTE:
If the system need to be replaced due to a malfunction, all stored music data will be erased.
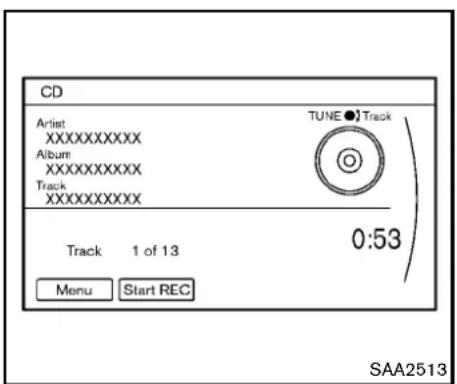
text_image
CD Artist XXXXXXXXX Album XXXXXXXXX Track XXXXXXXXX TUNE ● Track 0:53 Track 1 of 13 Menu Start REC SAA2513RecordingCDs
- OperatetheaudiosystemtoplayaCD. For the detail of playing CDs, see "Compact Disc(CD)playeroperation" (P.4-54).
- Selectthe "StartREC" key.
NOTE:
- Thesystemstartsplayingandrecordingthe1sttrackontheCDwhenthe "StartREC"keyisselected.
- Therecordingprocesscanbestopped atanytime.Alltracksthatwereplayed beforetheCDwasstoppedarestored.
- Individualtrackscanbedeletedfrom theharddriveaftertheCDisrecorded.
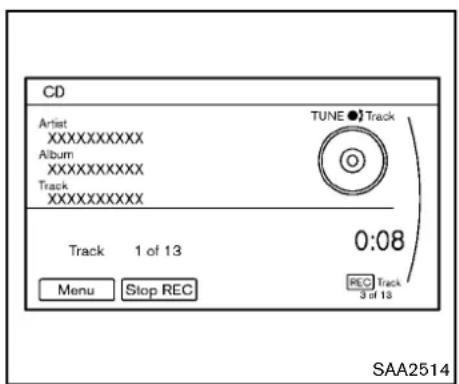
text_image
CD Artist XXXXXXXXX Album XXXXXXXXX Track XXXXXXXXX TUNE ● Track 0:08 Track 1 of 13 Menu Stop REC REC Track 3 of 13 SAA2514If the title information of the track being recorded is stored either in the hard drive or in the CD, the title is automatically displayed on the screen. For title acquisition from the hard drive, music recognition technology and related data are provided by Gracenote ^® .
Ifatrackisnotrecordedsuccessfullydueto skipping sounds, the ⏰ mark is displayed behindthetracknumber.
The "Music Box®" hard drive cannot perform recording under the following conditions.
- Thereisnotenoughspaceintheharddrive
- Thenumberofalbumsreachesthemaximum of500.
- Thenumberoftracksreachesthemaximum of3,000.
Automaticrecording:
If the "AutomaticRecording" functionisturned to ON, recording start when a CD inserted. (See "MusicBox ^® settings" (P.4-73).)
Stoppingrecording:
Tostoptherecording, select the "StopREC" keybutton by touching the screen or using the multi-function controller.
If the CDisejected, the audiosystemisturned off the ignitions switch is pushed to the OFF position, there cording alsostops.
4-70 Centerdisplay, heater, airconditioner, audio, phone and voicerecognitionsystems

text_image
Music Box My Playlists Artist XXXXXXXXXX Album XXXXXXXXXX Track XXXXXXXXXX TUNE ● Track Track 1 of 1 1:31 Menu Tag Track SAA2515Playingrecordedsongs
Selectthe"MusicBox ^® audiosystembyusing oneofthefollowingmethods.
- Pushtheaudiosourceswitchonthe steeringwheelrepeatedlyuntilthecenter displaychangestotheMusicBox ^ mode. (See"Steering-wheel-mountedcontrolsfor audio"(P.4-77).)
- PushtheDISC-AUXbuttonrepeatedlyuntil thecenterdisplaychangestotheMusic Box® mode.
- Givevoicecommands.(See“NISSANVoice RecognitionSystem(modelswithnavigation system”)(P.4-103).)
Stopping playback:
Thesystemstopsplayingwhen:
- anothermode(radio, CD, DVD, USB memory, iPod ^® or AUX) is selected.
2.theaudiosystemisturnedoff.
3.theignitionswitchispushedtotheLOCK position.
TRACK SEEK Next/PreviousTrackandFast Forward/Rewind:
Whenthe 🐎▶ or 🔊◀ buttonispushedformore than1.5secondswhileatrackisbeingplayed, the track will play while fast forwarding or rewinding.Whenthe buttonisreleased, the trackwillreturntothenormalplayspeed.
When the ▶ or ◀ button is pushed for less than 1.5 seconds while at track is being played, then next track or the beginning of the current track will be played.
Whentherewindbuttonispushedforlessthan 1.5secondswithin3secondsafterthecurrent track starts playing, the previous track will be played.
Themulti-functioncontrollercanalsobeusedto selecttrackswhenatrackisbeingplayed.
Playmodeselection:
The TUNE/FOLDER knob will skip from album to
albumunlessitisplaying"AllSongs"fromthe MusicLibrarymenu.Whenplaying"AllSongs", the knob will change the track instead of the album. The upper right corner of the main screen will indicate if the TUNE knob is changing by trackoralbum.
RPT RDM REPEAT(RPT), RANDOM(RDM):
When the RPT·RDM button is pushed while a track is being played, the play pattern can be changed as follows:
(Normal)→1AlbumRepeat→1TrackRepeat →1AlbumRandom→AllRandom→(Normal)
TagTrack:
Select"Tag Track"keyonthe screenwhena trackisbeingplayed.Amenuwillshowthe5 availableplaylists.Selectoneoftheplayliststo addthecurrentsongtothatplaylist.Ifapaylist isnotselectable(textisgrayedout),itmeans thesongalreadyexistsinthatplaylist.
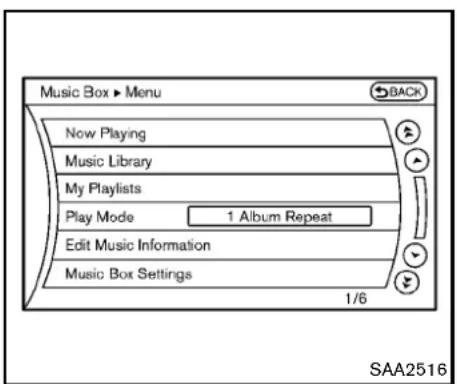
text_image
Music Box ► Menu BACK Now Playing Music Library My Playlists Play Mode 1 Album Repeat Edit Music Information Music Box Settings 1/6 SAA2516Example
Therearesomeoptionsavailablebyselecting the"Menu"keyonthescreenduring playback. Selectoneofthefollowingoptionsthatare displayedonthescreenifnecessary.
NowPlaying:
Displaysatracklisttochooseapreferredtrack for playback.
MusicLibrary:
Therearesomeoptionsavailableduringplay-back.Selectoneofthefollowingoptionsthat aredisplayedonthescreenifnecessary.
•Artists
Playtracksbyanartistwhosemusicis
currentlybeingplayed.Theartistsaresorted inalphabeticalorder.
•Albums
Playtracksineachalbum. The albums are sorted in alphabetical order.
•AllSongs
Playtracksfromallrecordedtracks.The tracksaresortedinalphabeticalorder.
-Genres
Playtracksbyaselectedgenre.
MyPlaylists:
DisplaysthePlaylistandeditsthePlaylistif necessary.
Selectthe"Edit"key.
The following items are available
- AddCurrentSongs
AddacurrenttracktothePlaylist.
- AddSongsbyAlbum
Displaysalistofalbumsinalphabetical order.Selectinganalbumdisplaysallofthe tracksinthealbum.Selecttracksfromthe listtoaddtothePlaylist.
- AddSongsbyArtist
Displaysalistofartistsinalphabeticalorder. Selectinganartistdisplaysallofthetracks bytheartist.Selecttracksfromthelistto addtothePlaylist.
- EditSongsOrder
ReorderthetracksinthePlaylistbyselectingatrackandspecifyingtheorder.
- EditName
EditthenameofthePlaylistusingthekeypaddisplayedonthescreen.(See "Howtousemulti-functioncontroller"(P.4-4).)
- DeleteSongs
Delete tracks in the Playlist by selecting from thedisplayedsonglist.
PlayMode:
Choosethepreferredplaymodefromthe followingitems.
Normal
- 1 AlbumRepeat
-1TrackRepeat
-1 PlaylistRandom
- 1 ArtistRandom
-1AlbumRandom
-1 AllTrackRandom
-1AllRandom
EditMusicInformation:
Displaysthefollowinginformationaboutthe MusicBox ^® harddrivetoeditifnecessary.
4-72 Centerdisplay, heater, airconditioner, audio, phone and voicerecognitionsystems
•EditInformationofCurrentSong
Editthe "Track", "Artist" and "Genre" information of the current track using the keypaddisplayed on the screen. (See "How to set touchscreen" (P.4-4).)
Editthe"Mode"informationbyselecting fromthelist.
•EditInformationbyAlbum
Editthedisplayednameandofaselected albumandthetrackinformationinthealbum.
- UpdateGracenotefromUSBDevice
Updatethein-vehicleGracenoteDatabase usingaUSBmemory.Searchthetitlefroma informationacquiredonthelnternet.Visit www.nissanusa.com/gracenote/fordetails.
•TransferMissingTitlestoUSB
Transfertheinformationofanalbumre-cordedwithouttitlestoaUSBmemory.Visit www.nissanusa.com/gracenote/fordetails.
- UpdateGracenotefromHDD
Searchthetitleusingthedatabaseinthe harddrive.
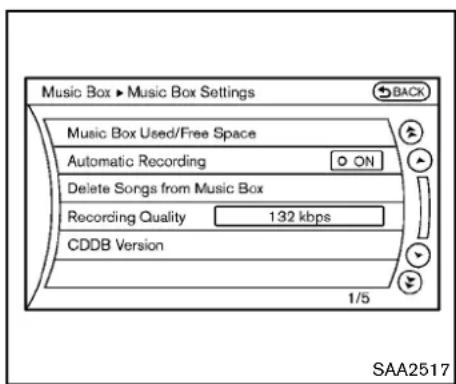
text_image
Music Box ► Music Box Settings BACK Music Box Used/Free Space Automatic Recording ON Delete Songs from Music Box Recording Quality 132 kbps CDDB Version 1/5 SAA2517MusicBox ^® settings
TosettheMusicbox ^® harddrivetoyour preferredsettings,selectthe"Menu"keyduring playback,andthe"MusicBoxSettings"key withthemulti-functioncontroller,andthenpush theENTERbutton.
MusicBox ^® Used/FreeSpace:
Informationabout "SavedAlbum", " SavedTrack" and "RemainingTime" is displayed.
AutomaticRecording:
WhenthisitemisturnedtoON,theMusicBox harddriveautomaticallystartsrecordingwhena CDisinserted.
DeleteSongsfromMusicBox®:
Delete the current song, selected songs or albums by choosing from the list, or all songs / albums in the Music Box ^® .
RecordingQuality:
Settherecordingqualityof105kbpsor132 kbps. Thedefaultissetto105kbps.
CDDBVersion:
Theversionofthebuilt-inGracenoteDatabase isdisplayed.
Gracenote
NOTE:
- The information contained in the GracenoteDatabaseisnotfullyguaranteed.
- TheserviceoftheGracenoteDatabase ontheInternetmaybestoppedwithout priornoticeformaintenance.

End-UserLicenseAgreement
USEOFTHISPRODUCTIMPLIESACCEPTANCEOFTHETERMSBELOW.
Gracenote® MusicID® TermsofUse
This application or device contains software from Gracenote, Inc. of Emeryville, California ("Gracenote"). Thesoftware from Gracenote
(the"GracenoteSoftware")enablethisapplicationtoperformdiscand/orfileidentification andobtainmusic-relatedinformation,including name,artist,track,andtitleinformation("GracenoteData")fromonlineserversorembedded databases(collectively,"GracenoteServers") andtoperformotherfunctions.Youmayuse GracenoteDataonlybymeansoftheintended End-Userfunctionsofthisapplicationordevice. YouagreethatyouwilluseGracenoteData,the GracenoteSoftware,andGracenoteServersfor yourownpersonalnon-commercialuseonly. Youagreenottoassign,copy,transferor transmittheGracenoteSoftwareoranyGracenoteDatatoanythirdparty.YOUAGREENOT TOUSEOREXPLOITGRACENOTEDATA, THEGRACENOTESOFTWARE,ORGRACENOTESERVERS,EXCEPTASEXPRESSLY PERMITTEDHEREIN.
Youagreethatyournon-exclusivelicensetouse theGracenoteData,theGracenoteSoftware, andGracenoteServerswillterminateifyou violatetheserestrictions.Ifyourlicenseterminates,youagreetoceaseanyandalluseofthe GracenoteData,theGracenoteSoftware,and GracenoteServers.Gracenotereservesall rightsinGracenoteData,theGracenoteSoftware,andtheGracenoteServers,includingall ownershiprights.Undernocircumstanceswill Gracenotebecomeliableforanypaymenttoyou foranyinformationthatyouprovide.
YouagreethatGracenote,Inc.mayenforceits rightsunderthisAgreementagainstyoudirectly initsownname.
TheGracenoteserviceusesauniqueidentifier totrackqueriesforstatisticalpurposes.The purposeofarandomlyassignednumericidentifieristoallowtheGracenoteservicetocount querieswithoutknowinganythingaboutwho youare.Formoreinformation,seethewebpage fortheGracenotePrivacyPolicyfortheGracenoteservice.
TheGracenoteSoftwareandeachitemof GracenoteDataarelicensedtoyou"ASIS." Gracenotemakesnorepresentationsorwarranties,expressorimplied,regardingtheaccuracy ofanyGracenoteDatafromintheGracenote Servers.Gracenotereservestherighttodelete datafromtheGracenoteServersortochange datacategoriesforanycausethatGracenote deemssufficient.Nowarrantyismadethatthe GracenoteSoftwareorGracenoteServersare error-freeorthatfunctioningofGracenote SoftwareorGracenoteServerswillbeuninterrupted.Gracenoteisnotobligatedtoprovide youwithnewenhancedoradditionaldatatypes orcategorieisthatGracenotemayprovideinthe futureandisfreetodiscontinueitsservicesat anytime.
GRACENOTEDISCLAIMSALLWARRANTIES EXPRESSORIMPLIED, INCLUDING, BUT NOTLIMITEDTO, IMPLIEDWARRANTIESOF MERCHANTABILITY, FITNESSFORAPARTICULARPURPOSE, TITLE, ANDNON-INFRINGEMENT. GRACENOTE DOES NOT WARRANTTHERESULTSTHATWILLBE OBTAINEDBYYOURUSEOFTHEGRACE-NOTESOFTWAREORANYGRACENOTE SERVER.INNOCASEWILLGRACENOTE BELIABLEFORANYCONSEQUENTIALOR INCIDENTALDAMAGESORFORANYLOST PROFITSORLOSTREVENUES.
Copyright:
Musicrecognitiontechnologyandrelateddata areprovidedbyGracenote ^® . Gracenoteisthe industrystandardinmusicrecognitiontechnologyandrelatedcontentdelivery. Formore information, please visit www.gracenote.com.
CDandmusic-relateddatafromGracenote, Inc., copyright © 2000-2009Gracenote. GracenoteSoftware,copyright © 2000-2009 Gracenote.Thisproductandservicemay practiceoneormoreofthefollowingU.S. Patents: #5,987,525; #6,061,680; #6,154,773, #6,161,132, #6,230,192, #6,230,207,#6,240,459,#6,330,593,and otherpatentsissuedorpending.Someservices suppliedunderlicensefromOpenGlobe,Inc.
4-74 Centerdisplay, heater, airconditioner, audio, phone and voicerecognitionsystems
forU.S.Patent:#6,304,523.
Gracenote and CDDBareregistered trademark of Gracenote. The Gracenotelogo and logotype, and the "Powered by Gracenote" logo are trademark of Gracenote.

natural_image
Line drawing of a car interior showing dashboard, seatbelt, and exhaust pipe (no text or symbols)- Red-rightchannelaudioinput Beforeconnectingadevicetoajack,turnoffthe poweroftheportabledevice.
With a compatible device connected to the jacks, push the DISC-AUX button repeatedly until the display switch the AUX mode. The output from the device will be played through the monitor and audiosystem.
AUXILIARYINPUTJACKS(modelswith navigationsystem)
Theauxiliaryinputjacksarelocatedinthecenter console.NTSC/PALcompatibledevicessuch asvideogames,camcordersandportablevideo playerscanbeconnectedtotheauxiliaryjacks. Compatibleaudiodevices,suchassomeMP3 players,canalsobeconnectedtothesystem throughtheauxiliaryjacks.
Theauxiliaryjacksarecolorcodedforidentificationpurposes.
●Yellow-videoinput
●White-leftchannelaudioinput
Centerdisplay, heater, airconditioner, audio, phone and voicerecognitionsystems 4-75

text_image
AUX ▶ Menu Display Mode Wide Volume Settings High Display 1/3 SAA2496AUXMenu
Whenthe"Menu"keyonthedisplayisselected whileintheAUXmode,themenuscreenwillbe displayed.
DisplayMode:
Choosethedisplaymodefromthefollowing items.
Normal
•Wide
Cinema
VolumeSettings:
Choosethevolumesettingfromthefollowing items.
Low
Medium
●High
Display:
Adjusttheimagequalityofthescreen,selectthe preferredadjustmentitems.
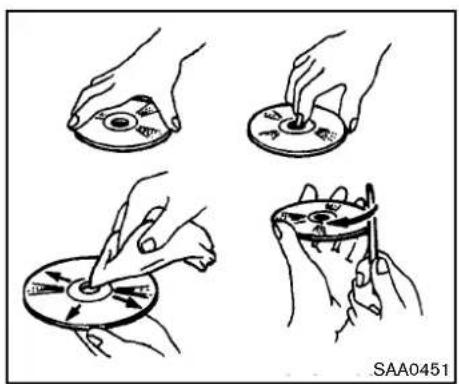
natural_image
Four hand-drawn diagrams showing a disc being cut, with no text or symbols present.CD/DVD/USBMEMORYCAREAND CLEANING
CD/DVD
- HandleaCD/DVDbyitsedges.Nevertouch thesurfaceofthedisc.Donotbendthe disc.
●Alwaysplacethediscsinthestoragecase whentheyarenotbeingused. - Tocleanadisc, wipethesurface from the centertotheouteredge using a clean, soft cloth. Donotwipethediscusing a circular motion.
Donotuseaconventionalrecordcleaneror alcoholintendedforindustrialuse.
4-76 Centerdisplay, heater, airconditioner, audio, phone and voicerecognition systems
- Anewdiscmayberoughontheinnerand outeredges.Removetheroughedgesby rubbingtheinnerandouteredgeswiththe sideofapenorpencilasillustrated.
USBmemory
- NevertouchtheterminalportionoftheUSB memory.
- DonotplaceheavyobjectsontheUSB memory.
- DonotstoretheUSBmemoryinhighly humidlocations.
- DonotexposetheUSBmemorytodirect sunlight.
- DonotspillanyliquidsontheUSBmemory. RefertotheUSBmemoryOwner'sManualfor thedetails.
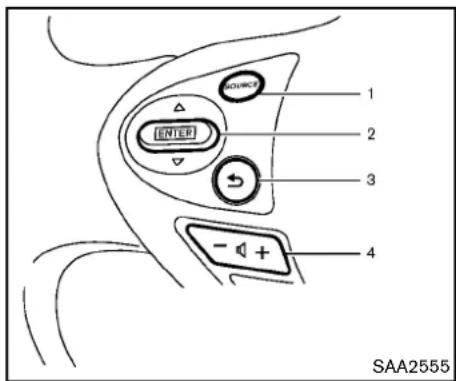
text_image
1 2 3 4 SAA2555Withnavigationsystem

text_image
CONVOC 1 2 - + 4 SAA2556While the display is showing a MAP (navigation system only), STATUS or Audioscreen, til the switch upward downward to select a station, track, CDor folder. Formostudiosources, tilting the switch up/down for more than 1.5 seconds provides different function that tilting up/down for less than 1.5 seconds.
AMandFMradio:
- Tiltingup/downforlessthan1.5seconds willscrollupordownthroughthepreset station.
- Tiltingup/downformorethan1.5seconds willseekupordowntothenextstation.
- Pushingthemenucontrolswitchwillshow thelistofpresetstations.
Centerdisplay, heater, airconditioner, audio, phone and voicerecognitionsystems4-77
XMSatelliteRadio(ifsoequipped):
- Tiltingup/downforless than 1.5 seconds will scrollupordownthrough the preset channel.
- Tiltingup/downformorethan1.5seconds willgotothenextorpreviouscategory.
- Pushingthemenucontrolswitchwillshow theXMMenu.
iPod ^® (modelswithnavigationsystem):
- Tiltingup/downforlessthan1.5seconds willscrollupordownthroughthetrack number.
- Pushingthemenucontrolswitchwillshow theiPodMenu.
CD:
- Tiltingup/downforlessthan1.5seconds willscrollupordownthroughthetrack number.
- Tiltingup/downformorethan 1.5 seconds will scrollupordownthroughthefolder number(ifplayingcompressedaudiofiles).
- Pushingthemenucontrolswitchwillshow theCDMenu.
DVD(modelswithnavigationsystem):
- Tiltingup/downforlessthan1.5seconds willscrollupordownthroughthetrack number.
- Tiltingup/downformorethan1.5seconds willscrollupordownthroughthetitle number.
- Pushingthemenucontrolswitchwillselect anitemfromtheDVDdisplay.
- Whenthetransparentoperationmenuappears,theswitchwillcontrolthemenu.
USB(modelswithnavigationsystem):
- Tiltingup/downforlessthan1.5seconds willscrollupordownthroughthetrack number.
- Tiltingup/downformorethan1.5seconds willscrollupordownthroughthefolder number
- Pushingthemenucontrolswitchwillshow theUSBMenu.
MusicBox ^® (ifsoequipped):
- Tiltingup/downforlessthan1.5seconds willscrollupordownthroughthetrack number.
- Tiltingup/downformorethan 1.5 seconds will scrollupordownthroughthealbum (folder) number(if playing compressed audiofiles).
- Pushingthemenucontrolswitchwillshow theMusicBox ^® Menu.
Bluetooth® Audio(modelswithnavigation system):
- Tiltingup/downforlessthan1.5seconds willscrollupordownthroughthetrack number.
AUX:
- Pushingthemenucontrolswitchwillshow theAUXMenu.
BACKswitch(modelswithnavigationsystem)
Pushthisswitchtogobacktotheprevious screenorcanceltheselectionifitisnot completed.
Volumecontrolswitches
Pushtheupper(+)orlower(-)sideswitchto increaseordecreasethevolume.
Audiosourceswitch
Pushtheaudiosourceswitchtochangethe modeasfollows.
●Modelswithnavigationsystem
AM → FM → SAT → CD/DVD → Music
Box ^® →USB/iPod ^® →Bluetooth ^® Audio→AUX
●Modelswithoutnavigationsystem
AM → FM → CD → AUX → SAT*
*:ifsoequipped
4-78 Centerdisplay, heater, airconditioner, audio, phone and voicerecognitionsystems
Medianotconnected/insertedwillbeskipped.
ANTENNA
Windowantenna(forCoupemodels)
Theantennapatternisprintedinsidetherear window.

CAUTION
- Donotplacemetalizedfilmnearthe rearwindowglassorattachany metalpartstoit.Thismaycause poorreceptionornoise.
- Whencleaningtheinsideoftherear window,becarefulnottoscratchor damagetherearwindowantenna. Lightlywipealongtheantennawith adampenedsoftcloth.

natural_image
Line drawing of a hand holding a pen and a small object, with no text or symbols present.Trunkmountedantenna(forRoadster models)
Removingtheantenna:
Youcanremovetheantennaifnecessary.
Holdthebottomoftheantennaandremoveby turningcounterclockwise.

CAUTION
•Toavoiddamagingordeformingthe antenna,besuretoremovethe antennaunderthefollowingconditions.
Centerdisplay, heater, airconditioner, audio, phone and voicerecognitionsystems 4-79
CARPHONEORCBRADIO
—Thevehicleentersanautomatic carwash.
—Thevehicleentersagaragewith alowceiling.
—Thevehicleiscoveredwithacar cover.
●Alwaysproperlytightentheantenna rodduringinstallation. Otherwise, theantennarodmaybreakduring vehicleoperation.
When installing a car phone or a CB radio in your vehicle, be sure to observe the following cautions, otherwise the new equipment may adversely affect the electronic control modules and electronic control system harness.
WARNING
- Acellularphones should not be used for any purpose while drivings of full attention may begin to live operation. Some jurisdictions prohibit the use of cellular phones while driving.
- If you must make a call while your vehicle is in motion, the hands-free cellular phone operational mode (if so equipped) is highly recommended. Exercise extremecution at all times of full attention maybe giventovehicle operation.
- Ifaconversationinamovingvehicle requiresyoutotakenotes,pulloff theroadtoasafelocationandstop yourvehiclebeforedoingso.
CAUTION
- Keeptheantennaasfarawayas possiblefromtheelectroniccontrol modules.
- Keeptheantennawiremorethan8 in(20cm)awayfromtheelectronic controlsystemharness.Donot routetheantennawirenexttoany harness.
- Adjusttheantennastanding-wave ratioasrecommendedbytheman- facturer.
- Connectthegroundwirefromthe CBradiochassistothebody.
•Fordetails,consultaNISSANdealer.
Bluetooth® HANDS-FREEPHONE SYSTEM(modelswithnavigation system)

WARNING
- Useaphoneafterstoppingyour vehicleinasafelocation.Ifyou havetouseaphonewhiledriving, exerciseextremecautionatall timessofullattentionmaybegiven tovehicleoperation.
- If you find yourself unable to devote full attention to vehicle operation while talking on the phone, pulloff therad to as a location and stop your vehicle before doing so.

CAUTION
To avoid draining the vehicle battery, use a phone after starting the engine.
YourNISSANisequippedwithBluetooth Hands-FreePhoneSystem.Ifyouareanowner ofacompatibleBluetooth enabledcellular phone,youcansetupthewirelessconnection betweenyourcellularphoneandthein-vehicle phonemodule.WithBluetooth wirelesstechnology,youcanmakeorreceiveatelephonecall withyourcellularphoneinyourpocket.
Onceacellular phone is connected to the in-vehicle phonemodule, nophone connecting procedure is required anymore. Your phone is automatically connected with the in-vehicle phonemodule when the ignition switch is pushed to the ON position with the registered cellular phoneturned on and carried in the vehicle.
Youcanregisterupto5differentBluetooth cellularphonesinthein-vehiclephonemodule. However, you cantalkononlyonecellularphone atatime.
TheNISSANVoiceRecognitionsystemsupportsthephonecommands,sodialingaphone numberusingyourvoiceispossible.Formore details,see“NISSANVoiceRecognitionSystem (modelswithnavigationsystem)”(P.4-103).
BeforeusingtheBluetooth ^® Hands-FreePhone System, refertothefollowingnotes.
- WirelessLAN(Wi-Fi)andtheBluetooth® functions share the same frequency band (2.4 GHz). Using the Bluetooth® and the wirelessLANfunctionsatthesametimemay slowdownordisconnectthecommunicationandcauseundesirednoise.It is recommendedthatyouturnoffthewireless LAN(Wi-Fi)whenusingtheBluetooth® functions.
- Setupthewirelessconnectionbetweena compatiblecellularphoneandthein-vehicle phonemodulebeforeusingtheBluetooth Hands-FreePhoneSystem.
- SomeBluetooth ^ enabledcellular phones may not be recognized by their vehicle phonemodule. Please visit www.nissanusa.com/bluetoothforarecommendedphonelist.
- You will not be able to use a hands-free phoneunderthefollowingconditions:
—Yourvehicleisoutsideofthetelephone servicearea.
—Your vehicleisinanareawhereitis difficulttoreceiveradiowaves;suchasin atunnel,inanundergroundparking garage,behindatallbuildingorina mountainousarea.
—Yourcellularphoneislockedinordernot tobedialed.
- Whentheradiowaveconditionisnotideal orambientsoundistooloud, itmaybe difficult to hear the other person's voice during acall.
- Immediately after the ignition switch is pushed to the ON position, it maybe impossible to receive a call for a short period of time.
- Donotplacethecellularphoneinanarea surroundedbymetalorfarawayfromthein-vehiclephonemoduletopreventtonequality degradationandwirelessconnectiondisruption.
- Whileacellularphoneisconnectedthrough theBluetooth ^ wirelessconnection,the batterypowerofthecellularphonemay dischargequickerthanusual.
- If the Bluetooth ^15 Hands-Free Phone System seemstobemalfunctioning, please visit www.nissanusa.com/bluetoothfortrouble-shootinghelp.
- Somecellularphonesorotherdevicesmay causeinterferenceorabuzzingnoiseto comefromtheaudiosystemspeakers. Storingthedeviceinadifferentlocation mayreduceoreliminatethenoise.
- RefertothecellularphoneOwner's Manual regarding the telephone pairing procedure specific to your phone, battery charging, cellular phone antenna, etc.
- Theantennadisplayonthemonitorwillnot coincidewiththeantennadisplayofsome cellularphones.
- Keeptheinteriorofthevehicleasquietas possibletohearthecaller'svoiceclearlyas wellastominimizeitsechoes.
- Ifreceptionbetweencallersisunclear, adjustingtheincomingoroutgoingcall volumemayimprovetheclarity.
REGULATORYINFORMATION
FCCRegulatoryinformation
- CAUTION: Tomaintaincompliance with FCC's RFexposureguidelines, use only the supplied antenna. Unauthorized antenna, modification, or attachment could damage the transmitter and may violate FCC regulations.
- Operationissubjecttothefollowingtwo conditions:
- thisdevicemaynotcauseinterference and
- thisdevicemustacceptanyinterference, includinginterferencethat may causeun-desiredoperationofthedevice
ICRegulatoryinformation
- Operationis subjecttothefollowingtwo conditions: (1) this device may not cause interference, and (2) this device must accept any interference, including interference that may cause undesired operation of the device.
- ThisClassBdigitalapparatusmeetsall requirementsoftheCanadianInterference-CausingEquipmentRegulations.
Bluetoothtrademark:
Bluetooth®
Bluetooth® isattrademarkowned byBluetoothSIG,Inc.,and licensedtoClarionCo.,Ltd.
VOICECOMMANDS
Youcanusevoicecommandstooperatevarious Bluetooth® Hands-FreePhoneSystemfeatures usingtheNISSANVoiceRecognitionsystem.
Formoredetails, see "NISSANVoiceRecognition System (models with navigation system)" (P.4-103).
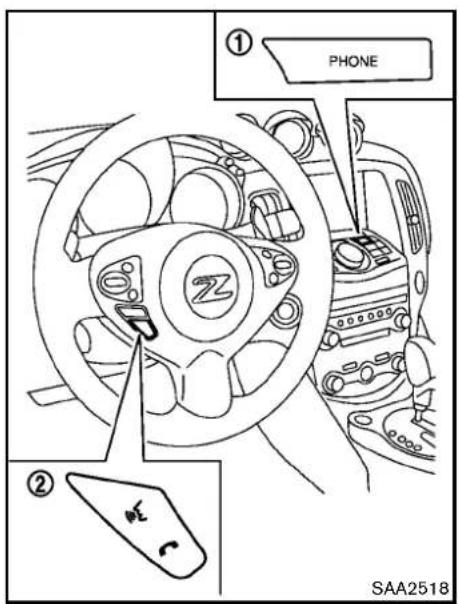
text_image
① PHONE ② SAA2518CONTROLBUTTONS
1)PHONEbutton
2) TALK /PHONESENDbutton
flowchart
graph TD
    A["Vehicle Phonebook"] --> B["Call History"]
    B --> C["Handset Phonebook"]
    C --> D["Dial Number"]
    E["Volume"] --> F["Connect Phone"]
    F --> G["Connected Phone"]
CONNECTINGPROCEDURE
- Push the PHONE button or the button, and select the "Connect Phone" key.
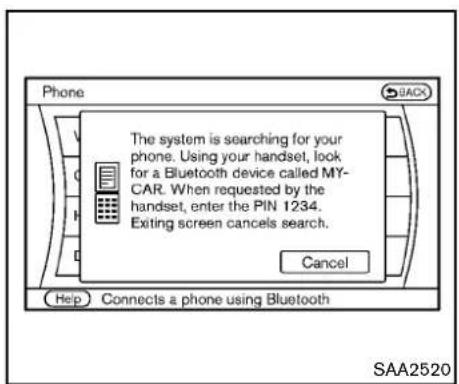
text_image
The system is searching for your phone. Using your handset, lock for a Bluetooth device called MY-CAR. When requested by the handset, enter the PIN 1234. Exiting screen cancels search. Cancel Help Connects a phone using Bluetooth SAA2520- WhenaPINcodeappearonthescreen, operatethecompatibleBluetooth ^ cellular phonetoenterthePINcode.
Theconnectingprocedureofthecellular phonevariesaccordingtoeachcellular phone.SeethecellularphoneOwner's Manualforthedetails.Youcanalsovisit
www.nissanusa.com/bluetooth or call NISSANConsumerAffairsDepartmentfor instructionsonpairingNISSANrecommendedcellularphones.
When the connection process is completed, the screen will return to the Phonemeu display.
PHONESELECTION
Upto5cellularphonescanberegisteredtothe system.Toswitchtoconnectanothercellular phone,pushPHONEbuttonandselectthe "ConnectedPhones"key.Theregisteredcellular phonesareshownonthelist.Ifyouselecta cellularphonethatisdifferentfromtheone currentlyconnected,thenewlyselectedphone willbeconnectedtothesystem.
VEHICLEPHONEBOOK
Thisvehiclehastwophonebooksavailablefor hands-freeuse. Dependingonthephone, the systemmayautomaticallydownloadtheentire cellphone'sphonebookintothe"Handset Phonebook". Forthedetailsaboutdownloading aphonebook, see "Phonesetting"(P.4-89). Ifa phonebookdoesnotautomaticallydownload, thevehiclephonebookmaybesetforupto 1.000entries. Thisphonebookallowsthe recordingofanametospeakwhileusingvoice recognition.

text_image
Settings ► Edit Vehicle Phonebook Add New 1 XXXXXXXXXXXX 2 XXXXXXXXXXXX 1/2 SAA2521- Push the PHONE button and select the "Vehicle Phonebook" key.
- Selectthe "AddNew" keyatthetopofthe screen.
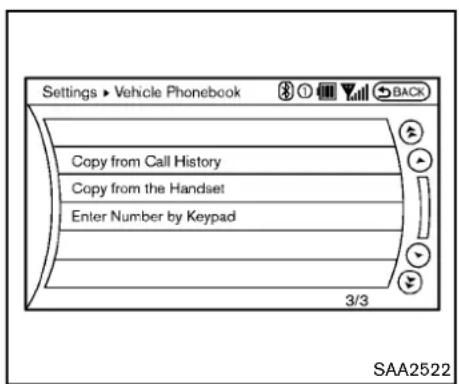
text_image
Settings ► Vehicle Phonebook Copy from Call History Copy from the Handset Enter Number by Keypad 3/3 SAA2522- Choosethemethodforenteringthephone-bookentry.Forthisexample,select"Enter NumberbyKeypad".
4.Inputthenameandphonenumbermanually usingthekeypaddisplayedonthescreen. (See"Howtousetouchscreen"(P.4-4).)

text_image
Settings ► Vehicle Phonebook OK Entry # 1 Name David Number 111-111-1111 Type Voicetag 2/5 SAA2523- Select the "Voicetag" keytorecordaname to speak when using the NISSAN Voice Recognitionsystem.
- Select the "Store" key and prepare to speak the name after the tone.
- Whenthevoicetagissuccessfullysaved, selectthe"OK"keytosavethephonebook entry.
- After the phone book entry is saved, it will show a screen that is ready to call the number. Pressthe BACK button to return to the Vehicle Phonebook.
Therearedifferentmethodstoinputaphone number.Selectoneofthefollowingoptions
insteadof"EnterNumberbyKeypad"instep3.
•CopyfromCallHistory
Thesystemwillshowalistofincoming, outgoingormissedcallsthatweredown-loadedfromtheconnectedcellularphone (dependingonthephone'scompatibility). Selectoneoftheseentriestosaveinthe vehiclephonebook.
•CopyfromtheHandset
Thesystemwillshowtheconnectedcellular phone'sphonebookthatwasdownloaded (dependingon the phone's compatibility). Selectoneoftheseentriestosaveinthe vehiclephonebook.
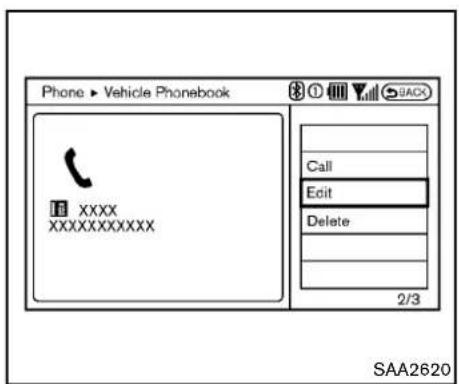
text_image
Phone ▶ Vehicle Phonebook XXXX XXXXXXXXXX Call Edit Delete 2/3 SAA2620EditingtheVehiclePhonebook
- Push the PHONE button and select the "Vehicle Phonebook" key.
- Select the desired entry from the displayed list.
- Selectthe "Edit" key.
- Select the desired item to change.
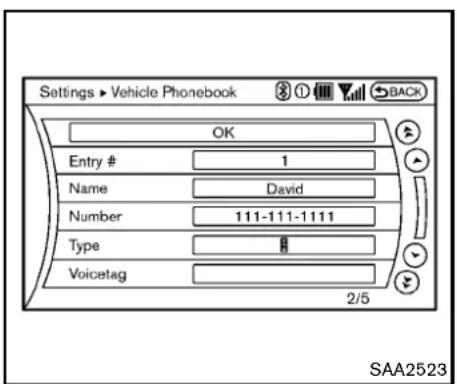
text_image
Settings ► Vehicle Phonebook OK Entry # 1 Name David Number 111-111-1111 Type Voicetag 2/5 SAA2523alloweasydialingusingtheNISSANVoice
Recognitionsystem.(See "NISSANVoice
RecognitionSystem(modelswithnavigation system)"(P.4-103).)
Todeleteanentry,selectthe"Delete"keyat step3.

text_image
Phone Vehicle Phonebook Call History Handset Phonebook Dial Number Volume Connect Phone Connected Phones Help Calls a phonebook entry saved to the vehicle SAA2524The followingeditingitemsareavailable:
-Entry#
Changesthedisplayednumberofthe selectedentry.
Name
Editthenameoftheentryusingthekeypad displayedonthescreen.
●Number
Editthephonenumberusingthekeypad displayedonthescreen.
- Type
Selectaniconfromtheiconlist.
•Voicetag
Confirmandstorethevoicetag.Voicetags
4-86 Centerdisplay, heater, airconditioner, audio, phone and voicerecognitionsystems
MAKINGACALL
Tomakeacall, follow this procedure.
-
Push the PHONE button on the instrument panel or the button on the steering wheel. The "PHONE" screen will appear on the display.
-
Select the "HandsetPhonebook" key on the "PHONE" menu.
-
Select the desired entry from the list.
-
Confirm the correct entry by selecting for the correct number from the list.
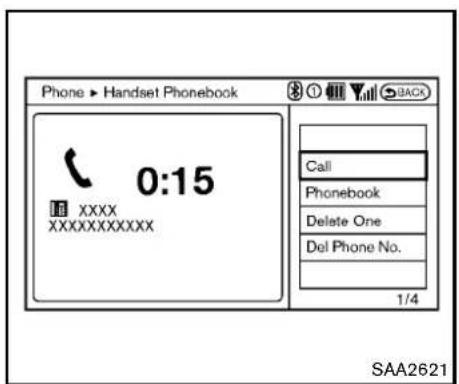
text_image
Phone ▶ Handset Phonebook 0:15 XXXX XXXXXXXXXX Call Phonebook Delete One Del Phone No. 1/4 SAA2621- Selectthe "Call" keytostartdialing the number.
Therearedifferentmethodstomakeacall. Selectoneofthefollowingoptionsinsteadof "HandsetPhonebook"instep2above.
•VehiclePhonebook
SelectanentrystoredintheVehicle's Phonebook.
- CallHistory
Selectanoutgoing, incomingormissedcall downloadedfromyourcellphone(dependingonyourphone'scompatibility).
•DialNumber
Input the phonenumbermanually using the
keypaddisplayedonthescreen.(See "How tousetouchscreen"(P.4-4).)
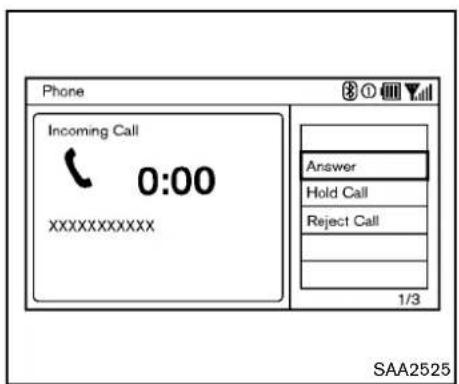
text_image
Phone Incoming Call 0:00 XXXXXXXXXX Answer Hold Call Reject Call 1/3 SAA2525RECEIVINGACALL
Whenyouhearaphonering, the display will changetotheincomingcallmode. Toreceivea call, performoneofthefollowingprocedures listed below.
-
Selectthe"Answer"key.
-
Push the PHONE button on the instrument panel.
3.Pushthe buttononthesteeringwheel.
There are some options available when receiving acall.Selectoneofthefollowingdisplayedon thescreen.
-Answer
Acceptanincomingcalltotalk.
- HoldCall
Putanincomingcallonhold.
-RejectCall
Rejectanincomingcall.
To finish the call, perform one of the following procedures listed below.
- Selectthe"Hangup"key.
- Push the PHONE button on the instrument panel.
- Push the button on the steering wheel.
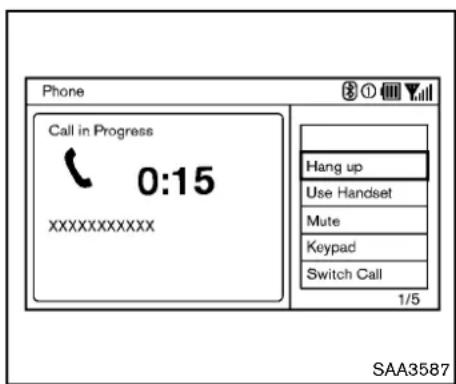
text_image
Phone Call in Progress 0:15 XXXXXXXXXX Hang up Use Handset Mute Keypad Switch Call 1/5 SAA3587DURINGACALL
Therearesomeoptionsavailableduringacall. Selectoneofthefollowingdisplayedonthe screenifnecessary.
●Hangup
Finishthecall.
•UseHandset
Transferthecalltothecellularphone.
•Mute
Muteyourvoicetotheperson.
•Keypad
Usingthetouchtone, senddigitstothe connectedpartyforusingservicessuchas voicemail.
- CancelMute
Thiswillappearafter"Mute"isselected. Mutewillbecanceled.
- SwitchCall\*
Select"SwitchCall"toansweranother incomingcall.Byselecting"Hangup",you canendacallandcanspeaktoacallerwho isonholdagain.
*Thisfunctionmaynotbeusable,dependingonthemodelofphone.
Toadjusttheperson'svoicetobelouderor quieter,pushthevolumecontrolswitch(+or-) onthesteeringwheelorturnthevolumecontrol knobontheinstrumentpanelwhiletalkingon thephone.Thisadjustmentisalsoavailable in theSETTINGmode.
4-88 Centerdisplay, heater, airconditioner, audio, phone and voicerecognitionsystems
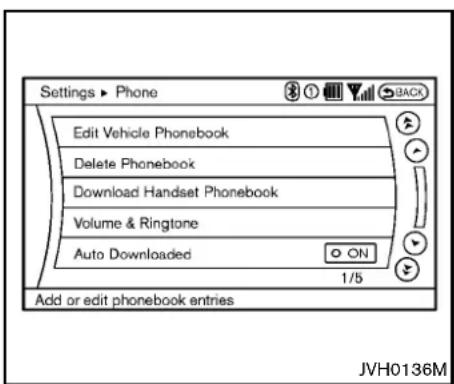
text_image
Settings ▶ Phone Edit Vehicle Phonebook Delete Phonebook Download Handset Phonebook Volume & Ringtone Auto Downloaded ON 1/5 Add or edit phonebook entries JVH0136MPHONESETTING
TosetuptheBluetooth® Hands-FreePhone Systemtoyourpreferredsettings, pushthe SETTINGbuttonontheinstrumentpaneland selectthe"PHONE"key.
EditVehiclePhonebook
Toeditthevehiclephonebook, usethesame procedure as described in "Vehiclephonebook" (P.4-84).
DeletePhonebook
The vehicle phone book entries can be deleted all at the same time or one by one.
DownloadHandsetPhonebook
DownloadthecontactsregisteredinaBluetooth® cellularphone.Availabilityofthisfunction dependsoneachcellularphone.Thememory downloadingprocedurefromthecellularphone alsovariesaccordingtoeachcellularphone. SeecellularphoneOwner'sManualfordetails.
Volume&Ringtone
The following kind of phone volume can be set. Pushing the PHONE button and selecting the "Volume & Ringtone" key can also operate the same settings.
•Ringtone/IncomingCall/OutgoingCall
To increase or decrease the volume, select the "Ringtone", "IncomingCall" or "OutgoingCall" key and adjust it with them multifunction controller.
●AutomaticHold
Whenthisfunctionisactivated,anincoming phonecallisautomaticallyheld.
- VehicleRingtone
Whenthisfunctionisactivated,aspecific ringtonethatisdifferentfromthecellular phonewillsoundwhenreceivingacall.
AutoDownload
Whenthisitemisactivated, thephonebookofa hands-freephoneisautomaticallydownloaded atthesametimethatthehands-freephoneis connected.
Centerdisplay, heater, airconditioner, audio, phone and voicerecognitionsystems 4-89
TROUBLESHOOTINGGUIDE
The system should respond correctly to all voice commands without difficulty. If problems are encountered, try the following solutions. Where the solutions are listed by number, try each solution in turn, starting with number 1, until the problem is resolved.
| SymptomSolution | |
| Systemfailstointerpretthecommand correctly. | 1.Ensurethatthecommandisvalid.(See“NISSANVoiceRecognitionSystem(modelswithnavigationsystem)("P.4-103).) |
| 2.Ensurethatthecommandisspokenafterthetone. | |
| 3.Speakclearlywithoutpausingbetweenwordsandatalevelappropriatetotheambientnoiselevelinthevehicle. | |
| 4.Ensure that the ambient noise level is not excessive (for example, windows open or defroster on). NOTE: If it is too noisy to usethephone,itislikelythatthevoicecommandswillnotberecognized. | |
| 5.Ifmorethanonecommandwassaidatatime,trysayingthecommandsseparately. | |
| Thesystemconsistentlyselectsthe wrongvoicetag. | 1.Ensurethatthevoicetagrequestedmatcheswhatwasoriginallystored.(See“Vehiclephonebook”(P.4-84).) |
| 2.Replaceoneofthenamesbeingconfusedwithanewname. | |
| Thesystemcannotbeoperated. | Closethesofttop(forRoadstermodels). |
Bluetooth® HANDS-FREEPHONE SYSTEM(modelswithout navigationsystem)(ifsoequipped)

WARNING
•Useaphoneafterstoppingyour vehicleinasafelocation.Ifyou havetouseaphonewhiledriving, exerciseextremecautionatall timessofullattentionmaybegiven tovehicleoperation.
- If you find yourself unable to devote full attention to vehicle operation while talking on the phone, pulloff therad to as a location and stop your vehicle before doing so.

CAUTION
To avoid draining the vehicle battery, use a phone after starting the engine.

text_image
1 2 3 4 SAA2528- Volumecontrolswitch=/+
2.PHONESEND button
3.PHONEEND button
- Microphone
YourNISSANisequippedwiththeBluetooth Hands-FreePhoneSystem.Ifyouhavea compatibleBluetooth® enabledcellularphone, youcansetupthewirelessconnectionbetween yourcellularphoneandthein-vehiclephone module.WithBluetooth® wirelesstechnology, youcanmakeorreceiveahands-freetelephone callinyourvehicle.
Once your cellular phone is connected to the in-vehicle phonemodule, no other phone connecting procedure is required. Your phone is
automatically connected with the in-vehicle phonemodule when the ignitions switch this pushed to the ON position with the connected cellular phoneturned on and carried in the vehicle.
Youcanconnectupto5differentBluetooth cellularphonesinthein-vehiclephonemodule. However, you can talk on only one cellular phone atatime.
BeforeusingtheBluetooth ^® Hands-FreePhone System, refertothefollowingnotes.
●WirelesLAN(Wi-Fi)andtheBluetooth® functionssharethesamefrequencyband (2.4GHz).UsingtheBluetooth® andthe wireless LAN functions at the same time may
slowdownordisconnectthecommunicationandcauseundesirednoise.Itis recommendedthatyouturnoffthewireless LAN(Wi-Fi)whenusingtheBluetooth functions.
- Setupthewirelessconnectionbetweena compatiblecellularphoneandthein-vehicle phonemodulebeforeusingtheBluetooth Hands-FreePhoneSystem.
- SomeBluetooth ^ enabledcellularphones may not be recognized by their vehicle phonemodule. Please visit www.nissanusa.com/bluetoothforarecommendedphone listandconnecting.
- Youwillnotbeabletouseahands-free phoneunderthefollowingconditions: -Yourvehicleisoutsideofthetelephone servicearea. -Yourvehicleisinanareawhereitis difficulttoreceiveradiowaves;suchasin atunnel,inanundergroundparking garage,nearatallbuildingorina mountainousarea. -Yourcellularphoneislockedtopreventit frombeingdialed.
- Whentheradiowaveconditionisnotideal orambientsoundistooloud, it maybe difficult to hear the other person's voice during acall.
- Immediatelyaftertheignitionswitchis pushedtotheONposition,itmaybe impossibletoreceiveacallforashort periodoftime.
- Donotplacethecellularphoneinanarea surroundedbymetalorfarawayfromthein-vehiclephonemoduletopreventtonequality degradationandwirelessconnectiondisruption.
- Whileacellularphoneisconnectedthrough theBluetooth® wirelessconnection,the batterypower ofthe cellularphone may discharge quickerthanusual.TheBluetooth® Hands-FreePhoneSystemcannot chargecellularphones.
- IftheBluetooth ^® Hands-FreePhoneSystem seemstobemalfunctioning,see“Troubleshootingguide”laterinthissection.Youcan alsovisitwww.nissanusa.com/bluetoothfortroubleshootinghelp.
- Somecellularphonesorotherdevicesmay causeinterferenceorabuzzingnoiseto comefromtheaudiosystemspeakers. Storingthedeviceinadifferentlocation mayreduceoreliminatethenoise.
-
RefertothecellularphoneOwner's Manual regarding battery charging, cellularphone antenna, etc.
-
Thiswirelesshandsfreecarkitisbasedon Bluetooth® technology,
—Frequency:2402MHz-2480MHz
—OutputPower:4.14dBmE.I.R.P
—Modulation: FHSSGFSK8DPSK,π/4DQPSK
—NumberofChannel:79
—Thiswirelessequipmentcan'tbeused foranyservicesrelatedtosafetybecause thereisthepossibilityofradiointerference.
REGULATORYINFORMATION
FCCRegulatoryinformation
- CAUTION: Tomaintaincompliance with FCC's RF exposure guidelines, use only the supplied antenna. Unauthorized antenna, modification, or attachment should damage the transmitter and may violate FCC regulations.
- Operationissubjecttothefollowingtwo conditions:
- thisdevicemaynotcauseinterference and
- thisdevicemustacceptanyinterference, includinginterferencethatmaycauseundesiredoperationofthedevice
ICRegulatoryinformation
- Operationissubjecttothefollowingtwo conditions:(1)thisdevicemaynotcause interference,and(2)thisdevicemustaccept anyinterference,includinginterferencethat maycauseundesiredoperationofthe device.
- ThisClassBdigitalapparatusmeetsall requirementsoftheCanadianInterference-CausingEquipmentRegulations.
Bluetoothtrademark:
Bluetooth®
Bluetooth® isattrademarkowned byBluetoothSIG,Inc.,and licensedtoVisteonCorporation.
USINGTHESYSTEM
TheNISSANVoiceRecognitionsystemallows hands-freeoperationoftheBluetooth ^® Hands-FreePhoneSystem.
If the vehicle is in motion, some commands may not be available as full attention may begin to vehicle operation.
Initialization
WhentheignitionswitchispushedtotheON position,NISSANVoiceRecognitionisinitialized,whichmaytakeuptooneminute.Ifthe
buttonispushedbeforetheinitialization completes,thesystemwillacceptanycommand.
Operatingtips
TogetthebestperformanceoutoftheNISSAN VoiceRecognitionsystem,observethefollowing:
- Keeptheinteriorofthevehicleasquietas possible. Closethewindowstoeliminate surroundingnoises(trafficnoises,vibration sounds,etc.),whichmaypreventthesystem fromrecognizingvoicecommandscorrectly.
- Waituntilthetonesoundsbeforespeakinga command. Otherwise, the command will not bereceived properly.
-Startspeakingacommandwithin5seconds afterthetonesounds. - Speakinanaturalvoicewithoutpausing betweenwords.
Givingvoicecommand
TooperateNISSANVoiceRecognition, push and release the button located on the steeringwheel. After the tonesounds, speak a command.
The command given is picked up by the microphone, and voice feedback is given when the command is accepted.
- If you need to hear the available commands for the current menu again, say "Help" and the system will repeat them.
- Ifacommandisnotrecognized, thesystem announces, "Commandnotrecognized. Pleasesayagain." Repeat the command in aclearvoice.
- If you want to go back to the previous command, you cansay "Goback" or "Correction" any timethesystem is waiting for a response.
- Youcan cancelacommandwhen the systemiswaitingforaresponsebysaying, "Cancel"or"Quit."Thesystemannounces "Cancel"andendstheVRsession.Youcan alsopushandholdthe buttonfor5 secondsonthesteeringwheelatanytimeto canceltheVRsession.WhenevertheVR session iscancelled,a doublebeep is playedto indicateyouhaveexited the system.
- If you want to adjust the volume of the voice feedback, push the volume control switch (+ or - ) on the steering wheel while being provided with feedback. You can also use the radio volume control knob.
- Inmostcasesyoucaninterruptthevoice feedbacktospeakthenextcommandby pressingthe buttononthesteering wheel.
- Tousethesystemfaster, youmayspeakthe secondlevelcommandswiththemainmenu
commandonthemainmenu. Forexample, pressthe buttonandafterthetonesay, "CallRedial." Note: The combined commandofCalland(aName) cannotbeused.
Howtosaynumbers
NISSANVoiceRecognitionrequiresacertain waytospeaknumbersinvoicecommands. Refertotherulesandexamplesbelow.
- Either"zero"or"oh"canbeusedfor"0". Example:1-800-662-6200
—“Oneeightohohsixsixtwosixtwooh oh”,or
—“Oneeightzerozerosixsixtwosixtwo ohoh”
- Wordscanbeusedforthefirst4digits placesonly. Example:1-800-662-6200
—“Oneeighthundredsixsixtwosixtwooh oh”,
—NOT“Oneeighthundredsixsixtwosixty twohundred, and
—NOT“Oneeightohohsixsixtwosixty twohundred.
- Numberscanbespokeninsmallgroups. Thesystemwillpromptyoutocontinuing enteringdigits, ifdesired. Example: 1-800-662-6200
—“Oneeightzerozero” Thesystemrepeatsthenumbersand promptsyoutoentermore.
—“sixsixtwo” Thesystemrepeatsthenumbersand promptsyoutoentermore.
—“sixtwozerozero”
- Youcansay "Star" for "*" and "Pound" for "#" at any time in any position of the phone number. (Available only when using the "SpecialDialing" command.) Example: 1-555-1212*123
—“Onefivefivefiveonetwoonetwostar onetwothree”
- Say "pound" for "#". Say "star" for "**(availablewhenusingthe"SpecialDialing" commandandthe"Send"commandduring acall).
- Say"plus"for"+" (availableonlywhenusing the"SpecialDialing"command).
- Say"pause"fora2secondpause(available onlywhenstoringaphonebooknumber). See "Makingacallbyenteringaphone number"(P.4-96)and"Listofvoicecommands"(P.4-97)formoreinformation.
NOTE:
Forbestresults, sayphonenumbersas singledigits.
Thevoicecommand"Help"isavailableatany time.Pleasesaythe"Help"commandtoget informationabouthowtousethesystem. INFO
- If you are controlling the telephonesystem by voice command for the first time, then know the appropriate voice command, speak "Help". The system announces the available commands.
- Whenyouspeaknumbers,youcanspeak both"zero"or"oh"for"0".
Manualcommandselection
Commandscanbeselectedmanually. While the commandsaredisplayedonthaudioscreen, selectacommandbyoperatingtheaudiotuning switch, and then push the switch.Oncea command is manually selected, the voice commandfunctioniscancelled. Toreturnto voicecommandmode, push the switch to cancel the current operation, and then perform the first procedure of voice command.

text_image
SAA2557CONTROLBUTTONS
The control buttons for the Bluetooth ^ Hands-Free Phone System are located on the steering wheel.

PHONESEND
Pushthe 📣 buttonontinitiateaVRsessionor answeranincomingcall.
Youcanalsousethe buttononterrupt systemfeedbackandgiveacommandatonce.

PHONEEND
While the voicerecognition system is active, press the button to go back on the step. Press and hold the button for 5 seconds to quit the voicerecognition system at any time.
GETTINGSTARTED
The following procedures will help you get started using the Bluetooth ^ Hands-Free Phone System with NISSAN Voice Recognition. For additional command options, refer to "List of voice commands" (P.4-97).
Choosingalanguage
Youcan interact with the Bluetooth ^ Hands-Free Phone System using English, Spanish or French.
Tochangethelanguage, perform the following.
- Pressandholdthe 5seconds.

buttonformorethan
-
Thesystemannounces: "PressthePHONE SEND( 📞 )buttonforthehands-free phonesystemtoenterthespeakeradaptationmodeorpressthePHONEEND( 📞 ) buttontoselectadifferentlanguage."
-
Pushthe

button.
Forinformationonspeakeradaptation,see "SpeakerAdaptation(SA)mode"(P.4-100).
- Thesystemannounce the current language and gives you the option to change the language to Spanish (in Spanish) or French (in French). Use the following chart to select the language.
NOTE:
Youmustpushthe buttonorthe buttonwithin5secondstochange thelanguage.
| Currentlan-guage | Push (TALK/PHONESEND) toselect | Push (MODE/PHONEEND) toselect |
| English | Spanish | French |
| Spanish | English | French |
| French | English | Spanish |
- If you decide not to change the language, do not press either button. After 5 seconds, the VR session will end, and the language will not be changed.
Connectingprocedure
NOTE:
Theconnectingproceduremustbeperformedwhenthevehicleisstationary.If thevehiclestartsmovingduringtheprocedure,theprocedurewillbecancelled.
Main menu
"Connect Phone" A
"Add Phone" Ⓑ
Initiate from handset ©
Name phone Ⓓ

- Push the button on the steering wheel.
Thesystemannouncestheavailablecom-
mands.
2.Say:"ConnectPhone" Ⓐ .Thesystem acknowledges the command and announce the next set of available commands.
3.Say: "Addphone" ⑧. Thesystemacknowledgesthecommandandasksyoutoinitiate pairingfromthephonehandset ⑨.
Theconnectingprocedureofthecellular phonevariesaccordingtoeachcellular phone.SeethecellularphoneOwner's Manualfordetails.Youcanalsovisitwww.nissanusa.com/bluetoothforinstructionson connectingNISSANrecommendedcellular phones.
When prompted fora Passkeycode, enter "1234" from the handset. The Passkeycode "1234" has been assigned by NISSAN and cannot be changed. - Thesystemasksyoutosayanameforthe phone Ⓓ.
Ifthenameistoolongortooshort,the systemtellsyou,thenpromptsyoufora nameagain.
Also, if more than one phone is connected and then names soundstoom much like an name already used, the system tells you, then
promptsyouforanameagain.
Makingacallbyenteringaphone number
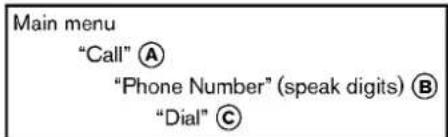
text_image
Main menu "Call" Ⓐ "Phone Number" (speak digits) Ⓑ "Dial" Ⓒ- Push the button on steering wheel. A tonewillsound.
2.Say: "Call" A. Thesystemacknowledges the command and announce the next set of available commands.
3.Say:"PhoneNumber" B. Thesystem acknowledges the command and announce the next set of available commands. Say:"SpecialDialing" todialmorethan 10 digits or any special characters. - Saythenumberyouwishtocallstartingwith the area code in single digit format. If the systemhastroublerecognizingthecorrect phonenumber, tryenteringthenumber in thefollowinggroups:3-digitareacode, 3-digitprefixandthelast4-digits. Forexample, 555-121-3354 canbesaidas "fivefivefive" asthe1stgroup, then "onetwoone" asthe 2ndgroup, and "threethreefivefour" asthe 3rdgroup. Fordialingmorethan10digitsor
anyspecialcharacters, say "SpecialDial-ing". See "How to say numbers" (P.4-94), formoreinformation.
- When you have finished speaking the phone number, the system repeats it back and announce the available commands.
6.Say:"Dial" ©. Thesystemacknowledges the command and make the call.
Foradditionalcommandoptions,see"Listof voicecommands"(P.4-97).
Receivingacall
Whenyouheartheringtone, press the button on the steering wheel.
Oncethecallhasended, press the onthesteeringwheel.

NOTE:
If you donotwishtotakethecall when you heartheringtone, press the button on thesteeringwheeltorejectthecall.
4-96 Centerdisplay, heater, airconditioner, audio, phone and voicerecognitionsystems
LISTOFVOICECOMMANDS
Main menu
"Call"
"Phonebook"
"Recent Calls"
"Connect Phone"
When you push and release the button on the steering wheel, you can choose from the command on the Main Menu. The following pages describe these commands and the commands in each sub-menu.
Remembertowaitforthetonebefore speaking.
Youcansay"Help"tohearthelistofcommands currentlyavailableanytimethesystemiswaiting foraresponse.
Amenuitemcanalsobeselectedbyscrolling thedisplaywiththeSEEKswitchandentering bypassingthe button.
If you want to end an action without completing it, you can say "Cancel" or "Quit" at any time the system is waiting for a response. The system will end the VR session. Whenever the VR session is cancelled, adouble beep is played to indicate you have exited the system.
If you want to go back to the previous command, you can say "Goback" or "Correction" anytime
thesystemiswaitingforaresponse.
Call
Main menu
"Call" or "Call International"
Name (speak name) Ⓐ
Phone Number (speak digits) Ⓑ
"Redial" ©
"Call Back" D
Name(aname) A
If there are entries stored in the phonebook, a number associated with an name and location can be dialed.
See "Phonebook(phoneswithoutautomatic phonebookdownloadfunction)"(P.4-98) to learnhowtostoreentries.
When prompted by the system, say the name of the phone book entry to call. The system acknowledges name.
If there are multiple locations associated with the name, the system mask the userto choose the location.
Oncethenameandlocationareconfirmed,the systembeginsthecall.
PhoneNumber(speakdigits) Ⓑ
When prompted by the system, say then number
tocall.Referto"Makingacallbyenteringa phonenumber"(P.4-96)formoredetails.
"Redial" ©
Use the Redial command to call the last number that was dialed.
Thesystemacknowledgesthecommand, repeatsthenumberandbeginsdialing.
Ifaredialnumberdoesnotexist, thesystem announces, "Thereisnonumbertoredial" and endstheVRsession.
"Callback" D
UsetheCallBackcommandtodialthenumber ofthelastincomingcallwithinthevehicle.
Thesystemacknowledgesthecommand, repeatsthenumberandbeginsdialing.
Ifacallbacknumberdoesnotexist, thesystem announces, "Thereisnonumbertocallback" and ends the VRsession.
SpecialDialing
Todialmorethan10digitsoranyspecial characters,please say "SpecialDialing".When thesystemacknowledgesthecommand,the systemwillpromptyoutospeakthenumber.
Duringacall
During acallthereareseveralcommandoptions available. Push the buttononthesteering wheeltomutethereceivingvoiceandenter
commands.
- "Help"—Thesystemannouncestheavailablecommands.
- "Goback/Correction"—Thesystemannounces"Goback," endstheVRsession and returnstothecall.
- "Cancel/Quit"—Thesystemannounces "Cancel," endstheVRsessionandreturns tothecall.
- "Send/Enter/Call/Dial"—UsetheSend commandtoenternumbers,"*”or“#” duringacall.Forexample, ifyouwere directedtodialanextensionbyanautomatedsystem:
Say: "Sendonetwothreefour." Thesystemacknowledgesthecommand andsendsthetonesassociatedwiththe numbers.ThesystemthenendstheVR sessionandreturnstothecall.Say"star"for "*",say"pound"for"#". - "Transfercall"—Use the Transfer Call command to transfer the call from the Bluetooth® Hands-Free Phone System to the cellular phone when privacy is desired. Thesystem announces, "Transfercall. Call transferred top privacy mode." Thesystem then ends the VR session. Toreconnect acall from the cellular phone to the Bluetooth® Hands-Free Phonesys
tem, pushthe button.
- "Mute"—Use the Mutecommandtomute your voicesotheotherpartycannothearit. Use themutecommandagaintounmute your voice.
NOTE:
Ifacallisendedorthecellularphone networkconnectionislostwhiletheMute featureison,theMutefeaturewillbereset to"off"forthenextcallsotheotherparty canhearyourvoice.
Phonebook(phoneswithoutautomatic phonebookdownloadfunction)
| Main menu |
| "Phonebook" |
| Transfer Entry A |
| Delete Entry B |
| List Names C |
"TransferEntry" Ⓐ
UsetheTransferEntrycommandtostoreanew nameinthesystem.
When prompted by the system, say then a name you would like to give them new entry.
Forexample, say: "Mary."
Ifthenameistoolongortooshort,thesystem tellsyou,thenpromptsyouforanameagain.
Also, if then namesoundstoomuchlikeaname already stored, the system tells you, then prompts you for aname again.
Thesystemwillaskyoutotransferaphone numberstoredinthecellularphone'smemory.
Toenteraphonenumberbyvoicecommand:
Forexample, say: "fivefivefiveonetwoone two." See "Howtosaynumbers" (P.4-94) for more information.
Totransferaphonenumberstoredinthecellular phone'smemory:
Say: "Transferentry." Thesystemacknowledges the command and asks you to initiate the transfer from the phone handset. Then new contact phonenumber will be transferred from the cellular phone via the Bluetooth ^ communication link.
The transfer procedure varies according to each cellular phone. Se the cellular phone Owner's Manual for details. You can also visit www.nissanusa.com/bluetoothforinstructionsontransferring phonenumbers from NISSAN recommended cellular phones.
Thesystemrepeatsthenumberandprompts youforthenextcommand.Whenyouhave finishedenteringnumbersortransferringan entry,choose"Store."
Thesystemconfirmsthename, location and
4-98 Centerdisplay, heater, airconditioner, audio, phone and voicerecognitionsystems
number.
"DeleteEntry" B
UsetheDeleteEntrycommandtodeleteone entryfromthephonebook. After the system acknowledges acommand, say thenameto deleteorsay "ListNames" to choose an entry.
"ListNames" ©
Use the List Names command to hear all the names in the phonebook. Thesystem recites the phonebook entries but does not include the actual phonenumbers. When playback of the list is complete, the system return to themain menu.
Playbackofthelistcanbestoppedatanytime bypushingthe buttononthesteering wheel.ThesystemendstheVRsession.
Phonebook(phoneswithautomatic phonebookdownloadfunction)
NOTE:
Phonebookcommandsarenotavailable whenthevehicleismoving.
Main menu
"List names" Ⓐ
"Record Name" Ⓑ
Forphonesthatsupportautomaticdownloadof thephonebook(PBAPBluetoothprofile),the
"Phonebook" commandisusedtomanage entriestothevehiclephonebook. Youcansay thenameofanentryatthismenutoinitiate dialingofthatentry.
Thephonebookstoresupto1000namesfor eachphonepairedwiththesystem.Eachname canhaveupto4locations/phonenumbers associatedwithit.
Whenaphoneisconnectedtothesystem,the phonebookisautomaticallydownloadedtothe vehicle.Thisfeatureallowsyoutoaccessyour phonebookfromtheBluetooth® systemandcall contactsbyname.Youcanrecordacustom voicetagforcontactnamesthatthesystemhas difficultyrecognizing.Formoreinformationsee "RecordName"inthissection.
NOTE:
Eachphonehasitsownseparatephone-book.YoucannotaccessPhoneA'sphone-bookifyouarecurrentlyconnectedwithPhoneB.
"Listnames" Ⓐ
UsetheListNamescommandtohearallthe namesandlocationsinthephonebook.
Thesystemrecitesthephonebookentriesbut doesnotincludetheactualphonenumbers. Whentheplaybackofthelistiscomplete, the systemgoesbacktothemainmenu.
Youcanstoptheplaybackofthelistatanytime bypassingthe buttononthesteering wheel.ThesystemendstheVRsession.Seethe "RecordName" commandinthissectionfor informationaboutrecordingcustomvoicetags forlistentriesthatthesystemhasdifficulty pronouncing.

"Recordname" B
Thesystemallowsyoutorecordcustomvoice tagsforcontactnamesinthephonebookthat thevehiclehas difficultyrecognizing.This featurecanalsobeusedtorecordvoicetags todirectlydialanentrywithmultiplenumbers. Upto40voicetagscanberecordedtothe system.
RecentCalls
Main menu
"Recent Calls"
"Outgoing" Ⓐ
"Incoming" Ⓑ
"Missed" ©
UsetheRecentCallscommandtoaccess outgoing, incomingormissedcalls.
"Outgoing" Ⓐ
UsetheOutgoingcommandtolisttheoutgoing
callsmadefromthevehicle.
"Incoming" Ⓑ
UsethelIncomingcommandtolisttheincoming callsmadefromthevehicle.
"Missed" ©
UsetheMissedcommandtolistthemissed callsmadetothevehiclethatwerenot answered.
ConnectPhone
NOTE:
AddPhonecommandisnotavailable whenthevehicleismoving.

text_image
Main menu "Connect Phone" "Add Phone" Ⓐ "Select Phone" Ⓑ "Delete Phone" Ⓒ "Turn Bluetooth Off" ⒹUsetheConnectPhonecommandstomanage thephonesconnectingtothevehicleorto enabletheBluetooth ^® functiononthevehicle.
"AddPhone" A
UsetheAddPhonecommandtoaddaphoneto the vehicle. See "Connecting procedure" (P.4-95) form more information.
"SelectPhone" Ⓑ
Use the Select Phone command to select from a list of phones connected to the vehicle. The system will list then names assigned to each phone and then promptly you for the phone you wish to select. Only one phone can be active at time.
"DeletePhone" ©
Use the Delete Phone command to delete a phonethatisconnected to the vehicle. The system will list then names assigned to each phone and then promptly you for the phone you wish to delete. Deleting a phone from the vehicle will also do let that phone book for that phone.
BluetoothOff D
UsetheBluetoothOffcommandtopreventa wirelessconnectiontoyourphone.
- Positionthevehicleinareasonablyquiet outdoorlocation.
- Sitinthedriver'sseatwiththeengine running, theparkingbrakeon, and the transmissioninPark.
- Pressandholdthe buttonformorethan 5seconds.
-
Thesystemannounces: "PressthePHONE SEND( 📞 )buttonforthehands-free phonesystemtoenterthespeakeradaptationmodeorpressthePHONEEND( 📞 ) buttontoselectadifferentlanguage."
-
Pressthe 📋 button.
Forinformationonselectingadifferent language,see"Choosingalanguage"(P.4-95).
4-100 Centerdisplay, heater, airconditioner, audio, phone and voicerecognitionsystems
- If the connected phone is already in use, the system will promptly out to overwrite. Follow the instructions provided by the system.
- When preparation is complete and you are ready to begin, press the button.
- The SAmodewillbeexplained.Followthe instructionsprovidedbythesystem.
- Whentrainingisfinished, thesystemwilltell youanadequatenumberofphraseshave beenrecorded.
- Thesystemwillannouncethatspeaker adaptationhasbeencompletedandthe systemisready.
●The buttonispressedformorethan5 secondsinSAmode.
●ThevehicleisdrivenduringSAmode.
●TheignitionswitchisturnedtotheOFFFor LOCKposition.
During the SA mode, the system instructs you to say the following phrases.
(Thesystemwillpromptyouforeachphrase.) - phonebooktransferentry
-dial30429
TheSAmodewillstopif:
Trainingphrases
- deletecallbacknumber
●Incoming - Transferentry
-8pause932pause7 - deleteallentries
- call72409
- phonebookdeleteentry
- nextentry
- dialstar2170
- yes
•no - select
Missed
-dial85692
- Bluetooth
-Outgoing
•call31902
●97pausepause308
- cancel
- callbacknumber
- callstar2095
- deletephone
-dial83051
- RecordName
-43pause29pause0
TROUBLESHOOTINGGUIDE
The system should respond correctly to all voice commands without difficulty. If problems are encountered, try the following solutions. Where the solutions are listed by number, try each solution in turn, starting with number 1, until the problem is resolved.
| SymptomSolution | |
| Systemfailstointerpretthecommandcorrectly. | 1.Ensurethatthecommandisvalid.See"Listofvoicecommands"(P.4-97). |
| 2.Ensurethatthecommandisspokenafterthetone. | |
| 3.Speakclearlywithoutpausingbetweenwordsandatalevelappropriatetotheambientnoiselevelinthevehicle. | |
| 4.Ensurethattheambientnoiselevelisnotexcessive(forexample,windowsopenordefrosteron).NOTE:Ifitistoo noisytousethephone,itislikelythatthevoicecommandswillnotberecognized. | |
| 5.Ifmorethanonecommandwassaidatatime,trysayingthecommandssseparately. | |
| 6.Ifthesystemconsistentlyfailstorecognizecommands,thevoicetrainingproceduresshouldbecarriedoutto improvetherecognitionresponseforthespeaker.See"SpeakerAdaptation(SA)mode"(P.4-100). | |
| Thesystemconsistentlyselectsthewrongentryfrom thephonebook. | 1.Ensurethatthephonebookentrynamerequestedmatcheswhatwasoriginallystored.Thiscanbeconfirmedby usingthe"ListNames"command.See"Phonebook(phoneswithoutautomaticphonebookdownloadfunction)("P.4-98). |
| 2.Replaceoneofthenamesbeingconfusedwithanewname. |
NISSANVOICERECOGNITION SYSTEM(modelswithnavigation system)
NISSANVoiceRecognitionallowshands-free operationofthePhone,Navigation,Information and Audiosystemsinoneoftwomodes, StandardModeorAlternateCommandMode.
InStandardMode, commandsthatareavailable arealwaysshownonthedisplayandannounced bythesystem.Youcancompleteyourdesired operationbysimplyfollowingthepromptsgiven bythesystem.(See“NISSANvoicerecognition StandardMode”(P.4-103)fordetails.)
Foradvancedoperation,youcanusethe AlternateCommandMode.(See“NISSANvoice recognitionAlternateCommandMode”(P.4-114)fordetails.)Whenthismodeisactive,an expandedlistofcommandscanbespokenafter pushingtheTALK switch,andthevoice commandmenupromptsareturnedoff.Review theexpandedcommandlist,whichisavailable whenthismodeisactive.Notethatinthismode therecognitionsuccessratemaybeaffectedas thenumberofavailablecommandsandtheways ofspeakingeachcommandareincreased.
Toswitchonemodetoanother,seeeachmode descriptionlaterinthissection.
Toimprovetherecognitionsuccessratewhen AlternateCommandModeisactive,tryusingthe SpeakerAdaptationFunctionavailableinthat mode. Otherwise,itisrecommendedthat AlternateCommandModebeturnedoffand
StandardModebeusedforthebestrecognition performance.
Forthevoicecommandsforthenavigation system, refertotheNavigationSystemOwner's Manualofyourvehicle.
ForRoadstermodels:
Thevoicerecognitionsystemcannotbeoperatedwhenthesofttopisnotclosed.
NISSANVOICERECOGNITION STANDARDMODE
The following section is applicable when the Standard Mode is activated.
TheStandardModeenablesyoutocomplete thedesiredoperationbysimplyfollowingthe promptsthatappearonthedisplayandalsoare announcedbythesystem.

text_image
Settings > Others Comfort Language & Units Voice Recognition Image Viewer 3/4 Adjust voice recognition settings SAA2529ActivatingStandardMode
When the Alternate Command Mode is active, perform the following step to switch to the Standard Mode.
- Push the SETTING button on the instrument panel.
- Selectthe "Others" key.
- Selectthe"VoiceRecognition"key.
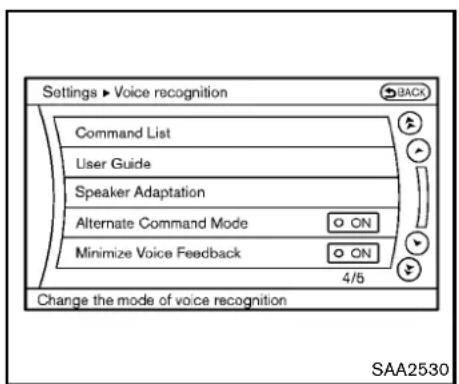
text_image
Settings ▶ Voice recognition BACK Command List User Guide Speaker Adaptation Alternate Command Mode ON Minimize Voice Feedback ON 4/5 Change the mode of voice recognition SAA2530- Selectthe "AlternateCommandMode" key.
- The indicator turn soff and the Standard Mode activates.
Displayinguserguide
IfyouusetheNISSANVoiceRecognition systemforthefirsttimeoryoudonotknow howtooperateit,youcandisplaytheUser Guideforconfirmation.
Youcanconfirmhowtousevoicecommandsby accessingasimplifiedUserGuide,which containsbasicinstructionsandtutorialsfor severalvoicecommands.

text_image
Information ► User Guide Getting Started Let's Practice Using the Address Book Finding a Street Address Placing Calls Help on Speaking 1/6 SAA2531- PushtheINFObuttonontheinstrument panel.
- Selectthe "Others" key.
- Selectthe"VoiceRecognition"key.
- Selectthe"UserGuide"key.
- Selectapreferreditem.
Youcanskipsteps1 and3 aboveifyousay "Help".
Availableitems:
- GettingStarted
Describesthebasicsofhowtooperatethe NISSANVoiceRecognitionsystem.
- Let's Practice
Modethatallowspracticingbyfollowingthe instructionsofthesystemvoice.
●UsingtheAddressBook
Tutorialforenteringadestinationbyusing theAddressBook.
●FindingaStreetAddress(ifsoequipped)
Tutorialforenteringadestinationbystreet address.
- PlacingCalls
Tutorialformakingaphonecallbyvoice commandoperation.
- HelponSpeaking
Displays useful tips of speaking for correct commandrecognitionbythesystem.
NotethattheCommand Listfeature isonly available when Alternate Command Mode is active.

text_image
Information ► User Guide Using Voice Recognition With voice recognition, you can use voice commands to control navigation, audio, phone and other functions. To start the voice recognition system, push the TALK switch on the steering wheel. Then say a command after the tone. TALK switch 1/9 SAA2532GettingStarted
BeforeusingtheNISSANVoiceRecognition systemforthefirsttime,youcanconfirmhowto usecommandsbyviewingtheGettingStarted sectionoftheUserGuide.
- Selectthe"GettingStarted"key.
- You can confirm the page by scrolling the screen using them multi-function controller.
TutorialsontheoperationoftheNISSAN VoiceRecognitionsystem
If you choose "Using the Address Book", "Finding a Street Address" or "Placing Calls", you can view tutorial on how to perform these operations using NISSAN Voice Recognition.
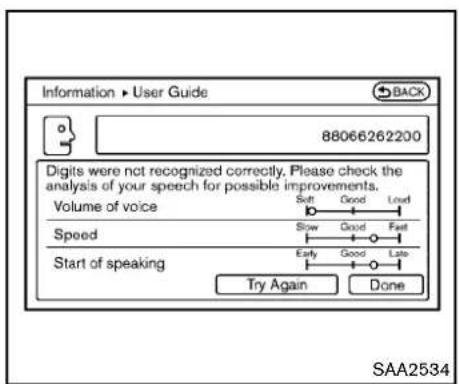
text_image
Information ▶ User Guide 88066262200 Digits were not recognized correctly. Please check the analysis of your speech for possible improvements. Volume of voice Soft Good Lowd Slow Good Fast Speed Early Good Late Start of speaking Try Again Done SAA2534Let'sPractice
ThismodehelpslearnhowtousetheNISSAN VoiceRecognitionsystem.
- Selectthe "Let'sPractice" key.
- Afterthemessagescreenappears, push the TALK switchonthesteeringwheel.
- Speak the displayed number after the time. The evaluations screen will be displayed and the result can be confirmed.
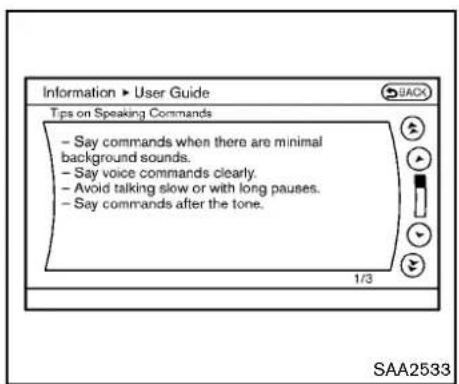
text_image
Information ► User Guide Tips on Speaking Commands - Say commands when there are minimal background sounds. - Say voice commands clearly. - Avoid talking slow or with long pauses. - Say commands after the tone. 1/3 SAA2533Usefultipsforcorrectoperation
Youcandisplayusefulspeakingtipstohelpthe systemrecognizeyourvoicecommandscorrectly.
Select"HelponSpeaking"tostartdisplay.
USINGTHESYSTEM
Initialization
WhentheignitionswitchispushedtotheON position,NISSANVoiceRecognitionisinitialized,whichmaytakeuptooneminute.When completed,thesystemisreadytoacceptvoice commands.IftheTALK switchispushed beforetheinitializationcompletes,thedisplay willshowthemessage:"Systemnotready."ora beepsounds.
Beforestarting
Togetthebestrecognitionperformancefrom NISSANVoiceRecognition,observethefollowing:
- The interior of the vehicles should be as possible. Closethewindowsto eliminate the surrounding noises (traffic noise and vibrations sounds, etc.), which may prevent the system from correctly recognizing the voice commands.
- Waituntilthetonesoundsbeforespeakinga command.
- Speak in a natural conversational voice without pausing between words.
- If the air conditioner is set to "Auto", the fan speed is automatically lowered so that your command scan be recognized more easily.

text_image
SOURCE INTED - + - SAA2167Givingvoicecommands
- PushtheTALK switchlocatedonthe steeringwheel.
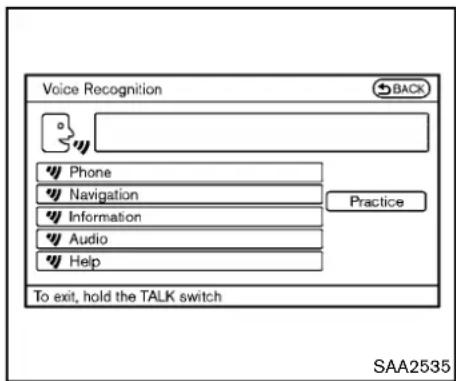
text_image
Voice Recognition BACK Phone Navigation Information Audio Help Practice To exit, hold the TALK switch SAA2535- Alistofcommandsappearsonthescreen, andthesystemannounces, "Wouldyoulike toaccessPhone,Navigation,Information, AudioorHelp?".
- Afterthetonesoundsandtheicononthe screenchangesfrom ☐ to ☐, speak a command.
Selectingthe"Practice"keywillstartthe practicemode.See"Let'sPractice"(P.4-105).
- Continuetofollowthevoicemenuprompts andspeakafterthetonesoundsuntilyour desiredoperationiscompleted.
Selectingthe"Help"keycandisplaythe
4-106 Centerdisplay, heater, airconditioner, audio, phone and voicerecognition systems
detailedinformationoftheeachcommand.
Operatingtips:
●Sayacommandafterthetone.
- Commandsthatareavailablearealways shownonthedisplayandspokenthrough voicemenuprompts.Commandsotherthan thosethataredisplayedarenotaccepted. Pleasefollowthepromptsgivenbythe system.
- If the command is not recognized, the system announces, "Pleasesayagain". Repeat the command in a clear voice.
- PushtheBACKbuttononcetoreturntothe previoussscreen.
- Toexitthevoicerecognitionsystem, push andholdtheTALK switch. Theme-sage, "Voicecanceled" will be announced.
- Toskipthevoiceguidancefunctionandgive thecommandimmediately, press the TALK switch to interrupt the system. Remembertospeak after the tone.
- If you want to adjust the volume of the system feedback, push the volume control buttons [+] or [-] on the steerings switchor use the audiosystem volume knob while the system is making an announcement.
Howtospeaknumbers:
NISSANVoiceRecognitionrequiresacertain waytospeaknumberswhengivingvoice commands.Refertothefollowingexamples.
Generalrule
Onlysingledigits0(zero)to9canbeused.(For example, if you would like to say 500, "five zero zero" can be used, but "five hundred" cannot.)
Examples
●1-800-662-6200
—“Oneeightzerozerosixsixtwosixtwo zerozero”
Improving Recognition of Phonenumbers
Youcanimprovetherecognitionofphone numbersbysayingthephonenumberinthree groupsofnumbers. Forexample,whenyoutryto call800-662-6200,say"eightzerozero"first, andthesystemwillthenaskyouforthenext threedigits.Then,say"sixsixtwo".After recognition,thesystemwillthenaskforthelast fourdigits.Say,"sixtwozerozero".Usingthis methodofphonedigitentrycanimprove recognitionperformance.
Whenspeakingahousenumber,speakthe number"0"as"zero".Iftheletter"o(Oh)"is includedinthehousenumber,itwillnotbe recognizedasthenumber"0(zero)"evenifyou speak"oh"insteadof"zero".Pleasespeak
"zero" forthenumber "0(zero)", "oh" for theletter "o(oh)"
Senddigitsusingdialtone:
- PresstheTALK switchduringaphone call.
- Themenuwillbelaunchedandyouwillbe provided with the following guidance: "Pleasesaythedigitstodial".
- Afterguidance, saythedigitsofthenumber youwanttosend. Afterthis, thedigitsthat have been recognized will bereadout.
- If you press the ENTER button on the steering wheel or on them multi-function controller, these selected digits will be sent.
CommandList
CategoryCommand:
| CommandAction | |
| PhoneOperatesthePhonefunction | |
| NavigationOperatestheNavigationfunction | |
| InformationDisplaysthevehicleInformationfunction | |
| AudioOperatestheAudiofunction. | |
| HelpDisplaysUserGuide |
- PhoneCommand:
| CommandAction | ||
| DialNumberMakesacalltoaspokenphonenumberupto10digits. | ||
| VehiclePhonebookMakesacalltoacontactthatisstoredintheVehiclePhonebook. | ||
| HandsetPhonebookMakesacalltoacontactthatisstoredinthemobilephone. | ||
| Call history | Incoming Calls | Makes a call to the incoming call number. |
| OutgoingCalls | Makesacalltothedialednumber. | |
| MissedCalls | MakesacalltotheMissedcallsnumber. | |
| InternationalCall | Makesaninternationalcallbyallowingmorethan10digitstobespoken. | |
| Change Number | Corrects the recognized phone number (available during phone number entry). | |
●NavigationCommand:
| CommandAction | |
| DestinationHome | SetsaroutetoyourhomethatisstoredintheAddressBook. |
| Address | Searches for a location by the street address specified, and sets a route to the location. |
| Places | Setsaroutetoafacilitynearthecurrentvehiclelocation. |
| AddressBook | SearchesforstoredinformationintheAddressBook. |
4-108 Centerdisplay, heater, airconditioner, audio, phone and voicerecognitionsystems
| CommandAction | |
| PreviousDestinationsSetsaroutetoapreviousdestination. | |
●InformationCommand:
| CommandAction | |
| FuelEconomyDisplaysfueleconomyinformation. | |
| MaintenanceDisplaysmaintenanceinformation. | |
| TrafficInformationTurnsthetrafficinformationsystemONandOFF. | |
| Whereaml?Displaysyourcurrentlocation. | |
●AudioCommand:
| CommandAction | |
| AMTurnstotheAMband,selectingthestationlastplayed. | |
| FMTurnstotheFMband,selectingthestationlastplayed. | |
| XMTurnstotheXMSatelliteband,selectingthechannellastplayed. | |
| MusicBox(ifsoequipped)Turnsonthe"MusicBox"harddriveaudiosystem. | |
| CDStartstoplayaCD. | |
- GeneralCommands
| CommandAction | |
| GobackCorrectsthelastrecognitionresulttoreturnothepreviousscreen | |
| ExitCancelsVoiceRecognition | |
Voicecommandexamples
TousetheNISSANVoiceRecognitionfunction, speakingonecommandissometimesufficient, butatothertimesitisnecessarytospeaktwoor morecommands. Asexamples, someadditional basicoperationsbyvoicecommandsare describedhere.
Fornavigationsystemcommands,seethe separateNavigationSystemOwner'sManual.

text_image
SOURCE INTED - + - WE SAA2167Example1-Placingacalltothephone number800-662-6200:
- Push the TALK steering wheel. switch located on the

text_image
Voice Recognition BACK Phone Navigation Information Audio Help Practice To exit, hold the TALK switch SAA2535- Thesystemannounces, "Wouldyouliketo accessPhone, Navigation, Information, AudioorHelp?"
3.Speak"Phone".
4-110 Centerdisplay, heater, airconditioner, audio, phone and voicerecognitionsystems

text_image
Voice Recognition ▶ Phone Dial Number Vehicle Phonebook Handset Phonebook Call History International Call To exit, hold the TALK switch SAA2536- Speak "DialNumber".
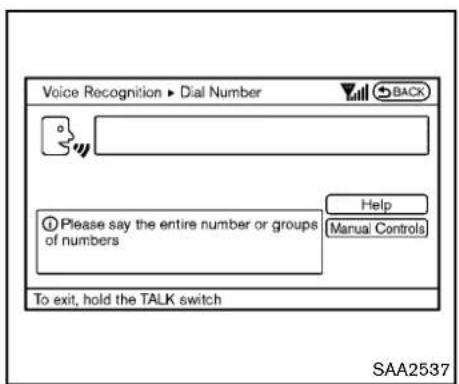
text_image
Voice Recognition ▶ Dial Number BACK Please say the entire number or groups of numbers Help (Manual Controls) To exit, hold the TALK switch SAA25375.Speak"800".
Selecting the "Manual Controls" key switchesthescreentothekeypadtoinput thephonenumbermanually.
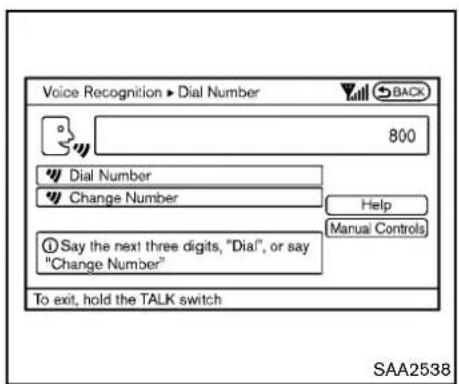
text_image
Voice Recognition ▶ Dial Number 800 Dial Number Change Number Help Manual Controls Say the next three digits, "Dial", or say "Change Number" To exit, hold the TALK switch SAA2538- Thesystemannounces, "Pleasesaythenext threedigitsordial, orsaychangenumber."
7.Speak"662".
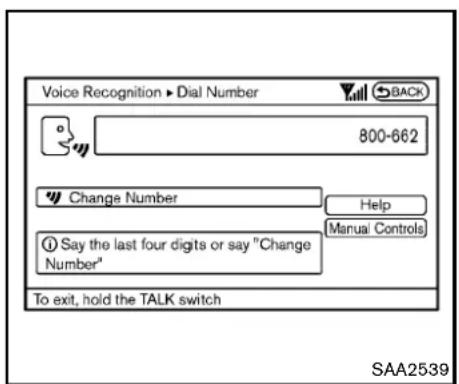
text_image
Voice Recognition ▶ Dial Number 800-662 Change Number Help Manual Controls ① Say the last four digits or say "Change Number" To exit, hold the TALK switch SAA2539- Thesystemannounces, "Pleasesaythelast fourdigits" or saychangenumber.
9.Speak"6 2 0 0".

text_image
Voice Recognition ▶ Dial Number 800-662-6200 Dial Change Number Please say "Dial" or say "Change Number" Help Manual Controls To exit, hold the TALK switch SAA2540- Thesystemannounces, "DialorChange Number?"
11.Speak"Dial". - Thesystemmakesacallto800-662-6200.
Note:
- Youcanalsospeak"800-662-6200"(10 continuousdigits)or"662-6200"(7continuousdigits),iftheareacodeisnot necessary.However,the3-3-4digitgroupingisrecommendedforimprovedrecognition.(See"Howtosaynumbers"(P.4-94).)
- Youcanonlysayaphonenumberusingthe 3-3-4grouping,7digits,and10digitsusing thiscommand.Pleaseusethe"International
Call"commandforallotherformats.
- Ifyousay"ChangeNumber"duringphone numberentry,thesystemwillautomatically request that you repeat the number using the3-3-4format.Inthiscasepleasesaythe areacodefirstandthenfollowtheprompts.
- Donotadda "1"infrontoftheareacode whenspeakingphonenumbers.
- If the system does not recognize your command, please try repeating the command using a natural voice. Speaking too slow to loudly may further decrease recognition performance.
4-112 Centerdisplay, heater, airconditioner, audio, phone and voicerecognitionsystems
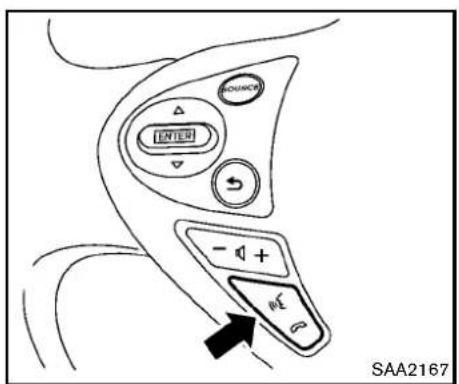
text_image
SAA2167Example2-Placinganinternationalcallto thephonenumber011-81-111-222-3333:
- Push the TALK steering wheel. switch located on the

text_image
Voice Recognition BACK Phone Navigation Information Audio Help Practice To exit, hold the TALK switch SAA2535- Thesystemannounces, "Wouldyouliketo accessPhone, Navigation, Informationor Help?"
3.Speak"Phone".

text_image
Voice Recognition ▶ Phone BACK Dial Number Vehicle Phonebook Handset Phonebook Call History International Call To exit, hold the TALK switch Help SAA2536- Speak "InternationalCall".
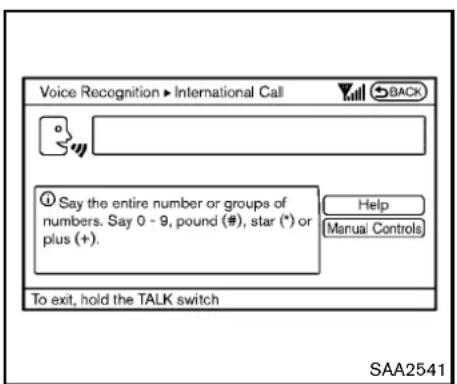
text_image
Voice Recognition ▶ International Call BACK ① Say the entire number or groups of numbers. Say 0 - 9, pound (#), star (*) or plus (+). Help Manual Controls To exit, hold the TALK switch SAA25415.Speak"011811112223333".

text_image
Voice Recognition ▶ International Call 011811112223333 Dial Change Number Please continue, or say "Dial" Help Manual Controls To exit, hold the TALK switch SAA25426.Speak"Dial".
7. Systemmakesacallto011-81-111-222-3333.
Note:
Anydigitinputformatisavailableinthe InternationalNumberinputprocess.
NISSANVOICERECOGNITIONAL-TERNATECOMMANDMODE
The following section is applicable when Alternate Command Mode is activated.
WhenAlternateCommandModeisactivated, anexpandedlistofcommandscanbeusedafter pressingtheTALK switch.Inthismode, availablecommandsarenotfullyshownonthe displayorprompted.Reviewtheexpanded commandlistwhenthismodeisactive.See examplesofAlternateCommandModescreens.
Pleasenotethatinthismodetherecognition successratemaybeaffectedasthenumberof availablecommandsandwaysofspeakingeach commandareincreased.Toimprovetherecognitionsuccessrate,tryusingtheSpeaker AdaptationFunctionavailableinthatmode. (See"Speakeradaptationfunction(forAlternate CommandMode)("P.4-125).)Otherwiseitis recommendedthatAlternateCommandMode beturnedOFFandStandardModebeusedfor thebestrecognitionperformance.
4-114 Centerdisplay, heater, airconditioner, audio, phone and voicerecognitionsystems

text_image
Settings ▶ Others Comfort Language & Units Voice Recognition Image Viewer 3/4 Adjust voice recognition settings SAA2529ActivatingAlternateCommandMode WhentheStandardModeisactive,performthe followingstepstoswitchtotheAlternate CommandMode.
- Push the SETTING button on the instrument panel.
- Highlightthe "Others" key.
- Highlightthe"VoiceRecognition"key.
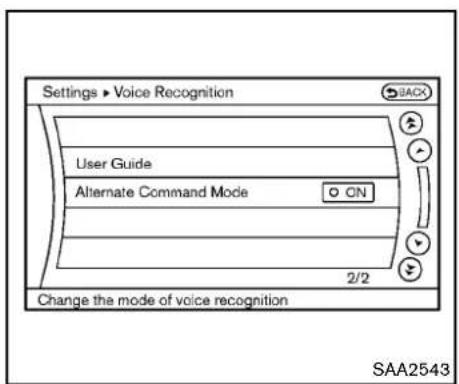
text_image
Settings ▶ Voice Recognition User Guide Alternate Command Mode ON 2/2 Change the mode of voice recognition SAA2543- Highlightthe"AlternateCommandMode" key.
- The confirmation message is displayed on the screen. Push the "OK" keyto activate the AlternateCommandMode.
Displayingcommandlist
If you are controlling the system by voice commands for the first time, order not know the appropriate voice command, perform the following procedure for displaying the voice command list (available only in Alternate Command Mode).

text_image
Information ► Voice Recognition Command List User Guide 1/2 Display the commands of voice recognition SAA2544- PushtheINFObuttonontheinstrument panel.
- Selectthe "Others" key.
- Selectthe"VoiceRecognition"key.
- Selectthe"CommandList"key.
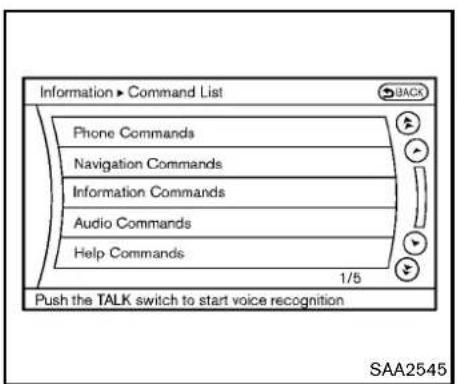
text_image
Information ► Command List Phone Commands Navigation Commands Information Commands Audio Commands Help Commands 1/5 Push the TALK switch to start voice recognition SAA2545- Selectacategoryfromthelist.
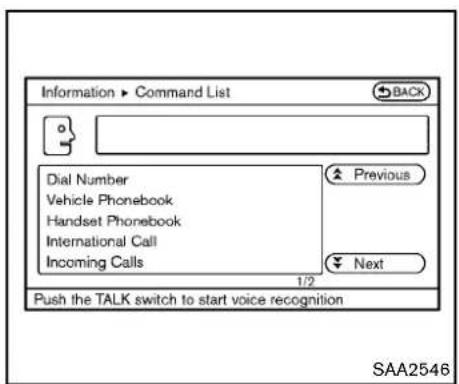
text_image
Information ► Command List BACK Dial Number Vehicle Phonebook Handset Phonebook International Call Incoming Calls Previous Next 1/2 Push the TALK switch to start voice recognition SAA25466.Selectanitem.
7. If necessary, scroll the screen using the multi-function controller to view the entire list.
8.PresstheBACKbuttontoreturntothe previoussscreen.
4-116 Centerdisplay, heater, airconditioner, audio, phone and voicerecognitionsystems
CommandsList
PhoneCommands:
| CommandAction | ||
| DialNumberMakesacalltoaspokenphonenumber. | ||
| VehiclePhonebookMakesacalltoacontactthatisstoredin | heVehiclePhonebook. | |
| HandsetPhonebookMakesacalltoacontactthatisstoredin | themobilephone. | |
| CallHistoryIncomingCalls | Makesacalltotheincomingcall | number. |
| OutgoingCallsMakesacallto | hedialednumber. | |
| MissedCallsMakesacalltothe | Missedcallsnumber. | |
| InternationalCallMakesaninternationalcallbyallowingmd | ethan10digitstobespoken. | |
| Call | Makes a call to a contact that is stored in either Vehicle Phonebook or Handset Phonebook. Please say “Call” followedbyastoredname. | |
| ChangeNumberCorrectstherecognizedphonenumber( | availableduringphonenumberentry). | |
NavigationCommands:
| CommandAction | |
| DestinationHomeSetsaroutetoyourhomethatisstoredintheAddressBook. | |
| AddressSearchesforalocationbythestreetaddressspecified,andsetsaroutetothelocation. | |
| PlacesSetsaroutetoafacilitynearthecurrentvehiclelocation. | |
| AddressBookSearchesforstoredinformationintheAddressBook. | |
| PreviousDestinationsSetsaroutetoapreviousdestination. | |
| PreviousStartPointSetsaroutetoapreviousstartingpoint. | |
| DeleteDestinationDeletesadestination. | |
InformationCommands:
| CommandAction | |
| FuelEconomyDisplaysfueleconomyinformation. | |
| MaintenanceDisplaysmaintenanceinformation. | |
| Whereaml?Displaysyourcurrentlocation. | |
| TrafficInformationTurnsthetrafficinformationsystemONandOFF. | |
| WeatherInformationDisplaysweatherinformation. | |
| WeatherMapDisplaysaweathermap. | |
AudioCommands:
| CommandAction | |
| MusicBox(ifsoequipped)Turnsonthe"MusicBox"harddriveaudiosystem. | |
| CDStartstoplayaCD. | |
| FMTurnstotheFMband,selectingthestationlastplayed. | |
| AMTurnstotheAMband,selectingthestationlastplayed. | |
| XMTurnstotheXMSatelliteRadioband,selectingthechannellastplayed. | |
| USBTurnsontheUSBmemory. | |
| BluetoothAudioTurnsontheBluetooth | ® audioplayer. |
| AUXTurnsontheAUX. | |
HelpCommands:
| CommandAction | ||
| CommandListNavigation | CommandsDisplaysthenavigation | ioncommandlist. |
| PhoneCommandsDisplaysth | ephonecommandlist. | |
| AudioCommandsDisplaysth | baudiocommandlist. | |
| InformationCommandsDisplaystheinformationcommandlist. | ||
| HelpCommandsDisplaysth | helpcommandlist. | |
| UserGuideDisplaystheUserGuide. | ||
| SpeakerAdaptationThesystemcanmemorizethevoiceso | uptothreepersons. | |
GeneralCommands:
| CommandAction | |
| GobackCorrectsthelastrecognitionresulttoreturntothepreviousscreen | |
| ExitCancelsVoiceRecognition | |

text_image
Information ► User Guide Getting Started Let's Practice Using the Address Book Finding a Street Address Placing Calls Help on Speaking 1/8 SAA2547Displayinguserguide
Youcanconfirmhowtousevoicecommandsby accessingasimplifiedUserGuide, which containsbasicinstructionsandtutorialsfor severalvoicecommands.
- PushtheINFObuttonontheinstrument panel.
- Select the "Others" key using them multi-function controller and push the ENTER button.
-
Highlightthe"VoiceRecognition"keyusing themulti-functioncontrollerandpushthe ENTERbutton.
-
Highlightthe "UserGuide" key using the multi-function controller and push the ENTERbutton.
- Highlightanitemusingthemulti-function controllerandpushtheENTERbutton.
Availableitems:
- GettingStarted
Describethebasicsofhowtooperatethe NISSANVoiceRecognitionsystem.
- Let's Practice
Modethatallowspracticingbyfollowingthe instructionsofthesystemvoice.
●UsingtheAddressBook
RefertoNavigationSystemOwner's Manual.
●FindingaStreetAddress(ifsoequipped)
RefertoNavigationSystemOwner's Manual.
- PlacingCalls
Tutorialformakingaphonecallbyvoice commandoperation.
- HelponSpeaking
Displaysusefultipsforhowtocorrectly speakcommandsinorderforthemtobe properlyrecognizedbythesystem.
●VoiceRecognitionSettings
Describestheavailablevoicerecognition
settings.
Tutorialadaptingthesystemtoyourvoice.
USINGTHESYSTEM
Initialization
When the ignition switch is pushed to the ON position,NISSANVoiceRecognitionisinitialized, which may take up to one minute. When completed,thesystemisreadyto acceptvoice commands.IftheTALK switchispushed before the initialization completes the display will showthemessage:"Systemnotready."ora beepsounds.
Before starting
TogetthebestperformancefromNISSAN VoiceRecognition,observethefollowing.
- Keep the interior of the vehicle as quiet as possible. Close the windows to eliminate the surrounding noises(traffic noises, vibration sounds, etc.), which may prevent the system from recognizing the voice command correctly.
- WhentheairconditionerisintheAUTO mode, thefanspeeddecreasesautomaticallyforeasyrecognition.
- Wait until a tone sounds before speaking a command.
- Speakinanaturalvoicewithoutpausing betweenwords.
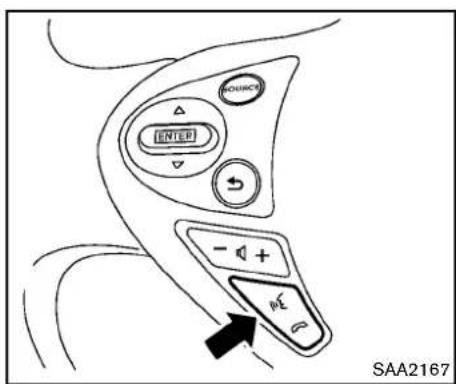
text_image
INTEP - + - SAA2167Givingvoicecommand
- PushandreleasetheTALKswitch locatedonthesteeringwheel.

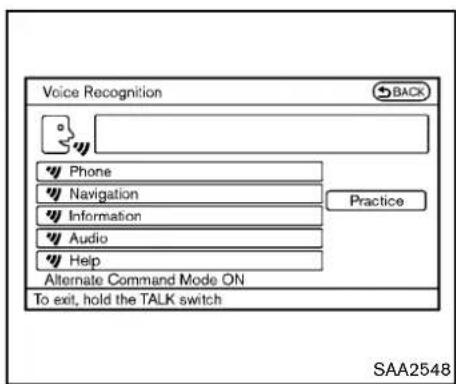
text_image
Voice Recognition BACK Phone Navigation Information Audio Help Alternate Command Mode ON To exit, hold the TALK switch Practice SAA25482.Alistofcommandsappearsonthescreen, andthesystemannounces,"Pleasesaya command".
3. Afterthetonesoundsandtheicononthe screenchangesfrom to, speak command.
Operatingtips:
●Voice commands cannot be accepted when the iconis ☐.
- Thelistdisplayedcanbescrolledbytilting themenucontrolswitchonthesteering wheel.
- If the command is not recognized, the system announces, "Please say again".
4-124 Centerdisplay, heater, airconditioner, audio, phone and voicerecognitionsystems
Repeat the commandinaclearvoice.
- PushtheBACKbuttononcetoreturntothe previoussscreen.
- If you want to cancel the command, push and hold the TALK switch for 1 second. Themessage "Voice canceled" will be announced.
- Toskipthevoiceguidancefunctionandgive thecommandimmediately, press the TALK switch to interrupt the system. Remembertospeak after the tone.
- If you want to adjust the volume of the system feedback, push the volume control switch (+ or -) on the steering wheel or use the audiosystem volume knob while the system is making an announcement.
Howtospeaknumbers:
NISSANVoiceRecognitionrequiresacertain waytospeaknumberswhengivingvoice commands.Refertothefollowingexamples.
Generalrule
Onlysingledigits0(zero)to9canbeused.(For example, if you would like to say 500, "five zero zero" can be used, but "five hundred" cannot.
Phonenumbers
Speakphonenumbersaccordingtothefollowingexamples:
-1-800-662-6200
—“Dialoneeightzerozerosixsixtwosix twozerozero.”
Note1: For the best voice recognition phone dialing results, say phonenumbersassingle digits.
Note2: You cannot say 555-6000 as "five five fivesixthousands".
Note3: Whenspeakingahousenumber, speak thenumber "0" as "zero". If the letter "o(oh)" is included in the house number, it will not be recognized asthenumber "0(zero)" even if you speak "oh" instead of "zero". Please speak "zero" for thenumber "0(zero)", "oh" for the letter "o(oh)".
Senddigitsusingdialtone:
- PresstheTALK switchduringaphone call.
- Themenuwillbelaunchedandyouwillbe provided with the following guidance: "Pleasesaythedigitstodial".
- Afterguidance, saythedigitsofthenumber youwanttosend. Afterthis, thedigitsthat have been recognized will bereadout.
- If you press the ENTER button on the steering wheel or on them multi-function controller, these selected digits will be sent.

text_image
Settings ▶ Voice recognition Command List User Guide Speaker Adaptation Alternate Command Mode ON Minimize Voice Feedback ON 3/5 System learning mode for recognition improvement SAA2549Speakeradaptationfunction(forAlternateCommandMode)
Thevoicerecognitionsystemhasafunctionto learntheuser'svoiceforbettervoicerecognition performance. Thesystemcanmemorizethe voicesofuptothreepersons.
Havingthesystemlearntheuser'svoice:
- Push the SETTING button on the instrument panel and select the "Others" key.
- Selectthe"VoiceRecognition"key.
- Selectthe "SpeakerAdaptation" key.

text_image
Settings ► Speaker Adaptation BACS User 1 None User 2 None User 3 None 1/3 Store, delete, or edit voice data for User 1 SAA2550- Select the user whose voice is memorized by the system.
- Select the "StartSpeakerAdaptationLearning" key.
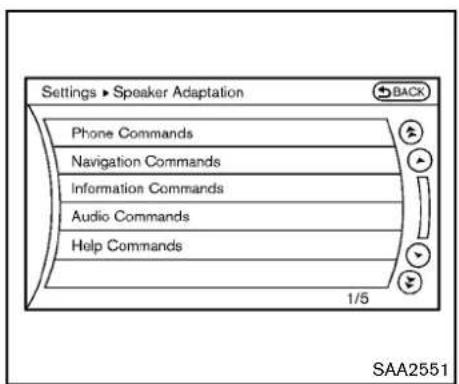
text_image
Settings ► Speaker Adaptation Phone Commands Navigation Commands Information Commands Audio Commands Help Commands 1/5 SAA2551-
Selectacategorytobelearnedbythe systemfromthefollowinglist.
-
PhoneCommands
- NavigationCommands
• InformationCommands - AudioCommands
- HelpCommands
The voice commands in the category are displayed.
- Selectavoicecommandandthenpushthe ENTERbutton.
Thevoicerecognitionsystemstarts.
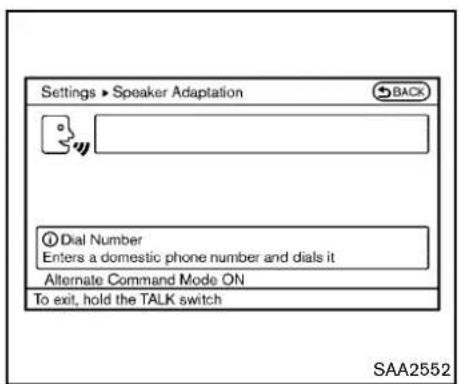
text_image
Settings ► Speaker Adaptation BACK Dial Number Enters a domestic phone number and dials it Alternate Command Mode ON To exit, hold the TALK switch SAA2552- Thesystemrequeststhatyourepeata commandafteratone.
- After the tones sounds and the icon on the screen changes from to, speak the command that the system requested.
- Whenthesystemhasrecognizedthevoice command, thevoiceoftheuserislearned.
Pushthe switchorBACKbuttontoreturn tothepreviousscreen.
If the system has learned the command correctly, the voice command status on the right side of the command turns from "None" to "Stored".
4-126 Centerdisplay, heater, airconditioner, audio, phone and voicerecognitionsystems
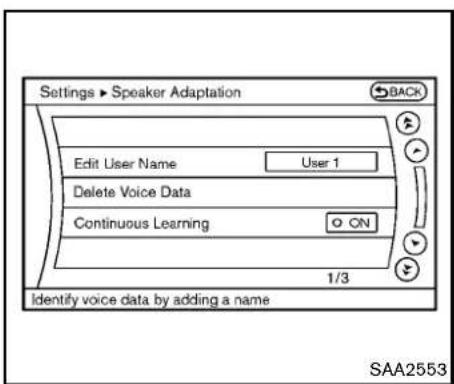
text_image
Settings ► Speaker Adaptation Edit User Name User 1 Delete Voice Data Continuous Learning ON 1/3 Identify voice data by adding a name SAA2553Minimizevoicefeedback(forAlternate CommandMode)
Tominimize the voice feedback from the system, perform the following steps.
- Push the SETTING button on the instrument panel.
- Selectthe "Others" key.
- Selectthe"VoiceRecognition"key.
- Selectthe "MinimizeVoiceFeedback" key.
- ThesettingisturnedtoONandthevoice guidancewillnowbereducedwhenusing theVoiceRecognitionsystem.
SpeakerAdaptationfunctionsettings: EditUserName
Edittheusernameusingthekeypaddisplayed onthescreen.
DeleteVoiceData
Resetstheuser'svoicethatthevoicerecognitionsystemhaslearned.
ContinuousLearning
WhenthisitemisturnedtoON,youcanhave thesystemlearnthevoicecommandsin succession,withoutselectingcommandsone byone.
TROUBLESHOOTINGGUIDE
The system should respond correctly to all voice commands without difficulty. If problems are encountered, follow the solutions given in this guide for the appropriate error.
Where the solutions are listed by number, try each solution in turn, starting with number one, until the problem is resolved.
| Symptom/errormessageSolution | |
| Displays“COMMANDNOTRECOGNIZED”orthe systemfailstointerpretthecommandcorrectly. | 1.Ensurethatthecommandformatisvalid,see“CommandList”(P.4-108). |
| 2.Speakclearlywithoutpausingbetweenwordsandatalevelappropriatetotheambientnoiselevel. | |
| 3.Ensurethattheambientnoiselevelisnotexcessive,forexample,windowsopenordefroston.NOTE:Ifitistoonoisytousethephone,itislikelythatvoicecommandswillnotberecognized. | |
| 4.Ifoptionalwordsofthecommandhavebeenomitted,thenthecommandshouldbetriedwiththeseinplace. | |
| Thesystemconsistentlyselectsthewrongvoicetagin thephonebook. | 1.Ensurethatthevoicetagrequestedmatcheswhatwasoriginallystored.(See“Bluetooth®hands-freephone system(modelswithnavigationsystem)”(P.4-81).) |
| 2.Replaceoneofthevoicetagsbeingconfusedwithadifferentvoicetag. | |
| The system cannot be operated. | 1.Make sure that the soft top (for Roadster models) is usable. If the soft top is not working, contact a NISSAN dealer. |
| 2.Closethesofttop(forRoadstermodels). | |
| 3.Openandclosethesofttop(forRoadstermodels)beforeoperatingthesystem. |
5Startinganddriving
Precautionswhenstartinganddriving....5-2
Exhaustgas(carbonmonoxide)....5-2
Three-waycatalyst....5-3
TirePressureMonitoringSystem(TPMS)....5-3
Avoidingcollisionandrollover....5-6
Off-roadrecovery....5-6
Rapidairpressureloss....5-6
Drinkingalcohol/drugsanddriving....5-7
Push-buttonignitionswitch....5-8
Operatingrangeforenginestartfunction....5-8
Push-buttonignitionswitchoperation....5-9
Push-buttonignitionswitchpositions....5-9
Emergencyengineshutoff....5-10
IntelligentKeybatterydischarge....5-10
Beforestartingtheengine....5-11
Startingtheengine....5-11
Drivingthevehicle....5-12
Automatictransmission....5-12
ManualTransmission....5-16
Parkingbrake....5-20
Cruisecontrol....5-21
Precautionsoncruisecontrol....5-21
Cruisecontroloperations....5-22
Break-inschedule....5-23
Increasingfueleconomy....5-23
Parking/parkingonhills....5-24
Powersteering....5-25
Brakesystem....5-25
Brakingprecautions....5-25
Parkingbrakebreak-in....5-26
Brakeassist....5-26
Brakeassist....5-26
Anti-lockBrakingSystem(ABS)....5-26
VehicleDynamicControl(VDC)system....5-28
Performancedampers(NISMOmodels)....5-30
Coldweatherdriving....5-31
Freeingafrozendoorlock....5-31
Antifreeze....5-31
Battery....5-31
Drainingofcoolantwater....5-31
Tireequipment....5-31
Specialwinterequipment....5-31
Drivingonsnoworice....5-31
Engineblockheater(ifsoequipped)....5-32
PRECAUTIONSWHENSTARTING AND DRIVING

WARNING
- Donotleavechildrenoradultswho wouldnormallyrequirethesupport ofothersaloneinyourvehicle.Pets shouldnotbeleftaloneeither.They couldaccidentallyinjurethemselves orothersthroughinadvertentoperationofthevehicle.Also,onhot, sunnydays,temperaturesina closedvehiclecouldquicklybecome highenoughtocausesevereor possiblyfatalinjuriestopeopleor animals.
•Properlysecureallcargotohelp preventitfromslidingorshifting. Donotplacecargohigherthanthe seatbacks.Inasuddenstopor collision,unsecuredcargocould causepersonalinjury(Coupemodels). - Closelysupervisechildrenwhen theyarearoundcarstoprevent themfromplayingandbecoming lockedinthetrunkwheretheycould beseriouslyinjured.Keepthecar lockedwiththetrunkclosedwhen notinuse,andpreventchildren's
accesstocarkeys(Roadstermodels).
If the engine oil temperature is high, the engine protection mode, which helps reduce the chance of engaged damage, could activate and automatically decrease engine power. Driving while the engine oil temperature is high may result in engine damage.
EXHAUSTGAS(carbonmonoxide)

WARNING
- Donotbreatheexhaustgases;they containcolorlessandodorlesscarbonmonoxide. Carbonmonoxide is dangerous. It can cause unconsciousness or death.
- Ifyoususpectthatexhaustfumes areenteringthevehicle,drivewith allwindowsfullyopen,andhavethe vehicleinspectedimmediately.
- Donotruntheengineinclosed spacessuchasagarage.
- Donotparkthevehiclewiththe engineerunningforanyextended lengthoftime.
- Keeptherearhatch/trunklidclosed whiledriving,otherwiseexhaust gasescouldbedrawnintothe passengercompartment.If you mustdrivewiththerearhatch/trunk lidopen,followtheseprecautions:
1) Openallthewindows.
2) Setthe airrecirculation to off and the fan control to highto circulatetheair.
•The exhaustsystem and body should be inspected by a qualified mechanic whenever:
—Thevehicleisraisedforservice.
—Yoususpectthatexhaustfumes areenteringintothepassenger compartment.
—Younoticeachangeinthe soundoftheexhaustsystem.
—Youhavehadanaccidentinvolvingdamagetotheexhaust system,underbody,orrearof thevehicle.
THREE-WAYCATALYST
Thethree-waycatalystisanemissioncontrol deviceinstalledintheexhaustsystem.Exhaust gasesinthethree-waycatalystareburnedat hightemperaturestohelpreducepollutants.

WARNING
•Theexhaustgasandtheexhaust systemareveryhot.Keeppeople, animalsorflammablematerials awayfromtheexhaustsystemcomponents.
- Donotstoporparkthevehicleover flammablematerialssuchasdry grass,wastepaperorrags.They mayigniteandcauseafire.

CAUTION
- Donotuseleadedgasoline.Depositsfromleadedgasolineseriously reducethethree-waycatalyst'sabilitytohelpreduceexhaustpollutants.
- Keepyourenginetunedup.Mal-functionsintheignition,fuelinjec-
tion,orelectricalsystemscancause overrichfuelflowintothethree-way catalyst,causingittooverheat.Do notkeepdrivingiftheenginemis-fires,orifnoticeablelossofperformanceorotherunusualoperating conditionsaredetected.Havethe vehicleinspectedpromptlybya NISSANdealer.
- Avoiddrivingwithanextremelylow fuellevel.Runningoutoffuelcould causetheenginetomisfire,dama-gingthethree-waycatalyst.
- Donotracetheenginewhilewarm-ingitup.
- Donotpushortowyourvehicletostarttheengine.
TIREPRESSUREMONITORINGSYSTEM(TPMS)
Eachtire, including the spare (if provided), should be checked monthly when cold and inflated to the inflation pressurerecommended by the vehicle manufacturer on the vehicle placardortire inflation pressure label. (If your vehicle hastires of different sizing thanthesize indicated on the vehicle placardortire inflation pressure label, you should determin the proper tire inflation pressure forthosetires.)
Asanadded safety feature, your vehicle has been equipped with a Tire Pressure Monitoring System (TPMS) that illuminates alow tire pressure telltale when one or more of your tires is significantly under inflated. Accordingly, when the low tire pressure telltale illuminates, you should stop and check your tires as soon as possible, and inflate them to the proper pressure. Driving on asignificantly under inflated tire cause the tire to overheat and can lead to tire failure. Under-inflation also reduces fuel efficiency and tire tread life, and may affect the vehicle's handling and stopping ability.
PleasenotethattheTPMSisnotasubstitutefor propertiremaintenance,anditisthedriver's responsibilitytomaintaincorrecttirepressure, evenifunder-inflationhasnotreachedthelevel totriggerilluminationoftheTPMSlowtire
pressuretelltale.
Yourvehiclehasalsobeenequippedwitha TPMSmalfunctionindicatortoindicatewhenthe systemisnotoperatingproperly.TheTPMS malfunctionindicatoriscombinedwiththelow tirepressuretelltale.Whenthesystemdetectsa malfunction,thetelltalewillflashforapproximatelyoneminuteandthenremaincontinuously illuminated. Thissequencewillcontinueupon subsequentvehiclestart-upsaslongasthe malfunctionexists.Whenthemalfunctionindicatorisilluminated,thesystemmaynotbeable todetectorsignallowtirepressureasintended. TPMSmalfunctionsmayoccurforvarietyof reasons,includingtheinstallationofreplacementoralternatetiresorwheelsonthevehicle thatpreventtheTPMSfromfunctioningproperly. AlwayschecktheTPMSmalfunctiontelltale afterreplacingoneormoretiresorwheelson yourvehicletoensurethatthereplacementor alternatetiresandwheelsallowtheTPMSto continuetofunctionproperly.
Additional information
- The TPMS does not monitor the tire pressureofthesparetire.
- The TPMS will activate only when the vehicle is driven at speeds above 16 MPH (25 km/h). Also, this system may not detect as undendropintire pressure (forexamplea
flattirewhiledriving).
●Thelowtirepressurewarninglightdoesnot automaticallyturnoffwhenthetirepressure isadjusted. After the tire is inflated to the recommended pressure, the vehicle must be driven at speeds above 16 MPH (25 km/h) to activate the TPMS and turnoff the low tire pressure warning light. Use a tire pressure gaugeto check the tire pressure.
- Tirepressurerisesandfallsdependingon theheatcausedbythevehicle'soperation andtheoutsidetemperature.Lowoutside temperaturecanlowerthetemperature of theairinsidethetirewhichcancausea lowertireinflationpressure.Thismaycause the low tire pressure warning light to illuminate.lfthewarninglightilluminatesin lowambienttemperature, checkthetire pressureforallfourtires.
For additional information, see "Lowtirepressure warninglight" (P.2-12) and "TirePressure Monitoring System (TPMS)" (P.6-2).

WARNING
- Ifthelowtirepressurewarninglight illuminateswhiledriving,avoidsuddensteeringmaneuversorabrupt braking,reducevehiclespeed,pull
offtheroadtoasafelocationand stopthevehicleassoonaspossible.Drivingwithunder-inflatedtires maypermanentlydamagethetires andincreasethelikelihoodoftire failure. Serious vehicle damage couldoccurand mayleadtoan accidentandcouldresultinserious personalinjury.Checkthetirepressureforallfourtires.Adjustthetire pressuretotherecommendedCOLD tirepressureshownontheTireand LoadingInformationlabeltoturn thelowtirepressurewarninglight OFF.Ifthelight stillilluminates whiledrivingafteradjustingthetire pressure,atiremaybeflat.Ifyou haveaflattire,replaceitwitha spare tireassoonaspossible.(See "Flattire"(P.6-2)forchangingaflat tire.)
- Whenasparetireismountedora wheelisreplaced, the TPMS will not function and the low tire pressure warning light will flash for approximately 1 minute. The light will remain on after 1 minute. Contact your NISSAN dealeras soon as possible for tire replacement and/or system resetting.
5-4 Startinganddriving
- ReplacingtireswiththosenotoriallyspecifiedbyNISSANcould affecttheproperoperationofthe TPMS.
- Donotinjectanytireliquidor aerosoltiresealantintothetires, asthismaycauseamalfunction of the tirepressuresensors(formodelsnotequipped with the emergency tirepuncturerepairkit).
- If you used the Emergency Tire Sealantorepairaminortirepuncture, your NISSAN dealer will also need to replace the TPMS sensor in addition to repairing or replacing the tire (formelsequipped with the emergency tire puncturer repair kit).
•NISSAN recommends using only NISSANG Genuine Emergency Tire Sealant provided with your vehicle. Othertire sealants may damage the valvestemseal which can cause the tire to lose air pressure (formodels equipped with the emergency tire puncturerepair kit).

CAUTION
- TheTPMSmaynotfunctionproperly whentewheelsareequippedwith tirechainsorthewheelsareburied insnow.
- Donotplacemetalizedfilmorany metalparts(antenna,etc.)onthe windows.Thismaycausepoorreceptionofthesignalsfromthetire pressuresensors,andtheTPMSwill notfunctionproperly.
Somedevicesandtransmittersmaytemporarily interferewiththeoperationoftheTPMSand causethelowtirepressurewarninglighttoilluminate.Someexamplesare:
●Facilitiesorelectricdevicesusingsimilar radiofrequenciesarenearthevehicle.
- Ifatransmittersettosimilarfrequenciesis beingusedinornearthevehicle.
- Ifacomputer(orsimilarequipment)oraDC/ACconverterisbeingusedinornearthe vehicle.
FCCNotice:
ForUSA:
ThisdevicecomplieswithPart15ofthe FCCRules.Operationissubjecttothe followingtwoconditions:
(1) This devicem may not cause harmful interference, and (2) this devicem must accept any interferencereceived, including interference that may cause undesired operation.
Note: Changesormodificationsnotexpresslyapprovedbythepartyresponsible forcompliancecould voidtheuser's authoritytooperatetheequipment.
ForCanada:
This device complies with RSS-210 of Industry Canada. Operation is subject to the following two conditions:
(1) this device may not cause interference, and (2) this device must accept any interference, including interference that may cause undesired operation of the device.
AVOIDINGCOLLISIONANDROLL-OVER

WARNING
Failuretooperatethisvehicleinasafe andprudentmannermayresultinloss ofcontroloranaccident.
Bealertanddrivedefensivelyataalltimes.Obey alltrafficregulations.Avoidexcessivespeed, highspeedcornering,orsuddensteering maneuvers,becausethesedrivingpractices couldcauseyoutolosecontrolofyourvehicle.
Aswithanyvehicle, alossofcontrol could result in acollision with other vehicles or objects, or cause the vehicletorollover, particularly if the lossof control causes the vehicletoslidesideways. Beattentive at all times, and avoid driving whentired. Never drive when under the influence of alcohol drugs (including prescription or over-the-counter drugs which may causedrowsiness). Always weary our seat belt as outlined in the "Seat belts" (P.1-9) of this manual, and also instruct your passengerstodoso.
Seatbeltshelpreducetheriskofinjuryin collisionsandrollovers.Inarollovercrash,an unbeltedorimproperlybeltedpersonis
5-6 Starting and driving
significantly more likely to be injured or killed than a person properly wearing a seat belt.
OFF-ROADRECOVERY
While driving, therightside or leftsidewheels may unintentionally leave other roads surface. If this occurs, maintain control of the vehicle by following the procedure below. Pleasenotethat this procedure is only a general guide. The vehicle must bedriven as appropriate based on the conditions of the vehicle, road and traffic.
- Remaincalmanddonotoverreact.
- Donotapplythebrakes.
- Maintainafirmgriponthesteeringwheel withbothhandsandtrytoholdastraight course.
- When appropriate, slowly releasethe acceleratorpedaltogradually slow the vehicle.
- If there is nothing in the way, steer the vehicletofollowtheroadwhilethevehicle speedisreduced.Donotattempttodrive thevehiclebackontotheroadsurfaceuntil vehiclespeedisreduced.
- Whenitissafetodoso, gradually turn the steering wheel until both tires return to the roads surface. When all tires are on the road surface, steer the vehicle to stay in the appropriated driving lane.
- If you decide that it is not safet return the vehicle to other roads surface based on vehicle, road traffic conditions, gradually slow the vehicle to as topinasafe place off the road.
RAPIDAIRPRESSURELOSS
Rapidairpressurelossora"blow-out" can occur if the treispunctured or is damaged due to hitting acurborpothole. Rapidairpressure loscanalsobecased by driving on under-inflated tires.
Rapidairpressurelosscanaffectthehandling andstabilityofthevehicle,especiallyathighway speeds.
Help prevent rapid air pressure loss by maintaining the correct air pressure and visually inspect the tires for wear and damage. See "Wheels and tires" (P.8-31) of this manual.
Ifatirerapidlylosesairpressureor"blows-out" whiledrivingmaintaincontrolofthevehicleby followingtheprocedurebelow.Pleasenotethat this procedure is only a general guide. The vehiclemustbedrivenasappropriatebasedon theconditionsofthevehicle,roadandtraffic.

WARNING
The following actions can increase the chance of losing control of the vehicle if there is a sudden loss of tire air pressure. Losing control of the vehicle may cause a collision and result in personal injury.
•Thevehiclegenerallymovesorpulls inthedirectionoftheflattire.
- Donotrapidlyapplythebrakes.
- Donotrapidlyreleasetheacceleratorpedal.
- Donotrapidlyturnthesteering wheel.
- Remaincalmanddonotoverreact.
- Maintain a firm grip on the steering wheel with both hands and try to hold a straight course.
- When appropriate, slowly releasethe acceleratorpedaltogradually slow the vehicle.
- Graduallysteerthevehicletoasafelocation offtheroadandawayfromtrafficifpossible.
-
Lightly apply the brake pedal to gradually stop the vehicle.
-
Turnonthehazardwarningflashersand eithercontactaroadsideemergencyservice tochangethetireorsee "Changingaflat tire(formodelswithsparetire)"(P.6-3) of thisOwner's Manual.
DRINKINGALCOHOL/DRUGSAND DRIVING

WARNING
Neverdriveundertheinfluence of alcoholordrugs. Alcohol in the bloodstream reduces coordination, delays reaction time and impairs judgement. Driving after drinking alcohol increases the likelihood of being involved in accident injurying yourself and others. Additionally, if you are injured in an accident, alcohol can increase severity of the injury.
NISSANiscommittedtosafedriving. However, youmustchoosenottodriveundertheinfluence ofalcohol.Everyyearthousandsofpeopleare injuredorkilledinalcohol-relatedaccidents. Although the localaws vary on what is consideredtobelegallyintoxicated, the fact is that alcohol affects all peopled differently and most people underestimate the effect of
alcohol.
Remember, drinking and driving don't mix! And that istruefordrugs, too (over-the-counter, prescription, and illegaldrugs). Don't drive if your ability to operate your vehicle is impaired by alcohol, drugs, or some other physical condition.
PUSH-BUTTONIGNITIONSWITCH

WARNING
Donotoperatethepush-buttonignition switchwhiledrivingthevehicleexcept inanemergency.(Theenginewillstop whentheignitionswitchispushed3 consecutivetimesortheignitionswitch ispushedandheldformorethan2 seconds.)Iftheenginestopswhilethe vehicleisbeingdriven,thiscouldlead toacrashandseriousinjury.
Before operating the push-button ignition switch, besuretomovetheselectorlevento the P(Park) position (for automatic transmission model) ortheshiftleverto the N(Neutral) position (form manual transmission model).
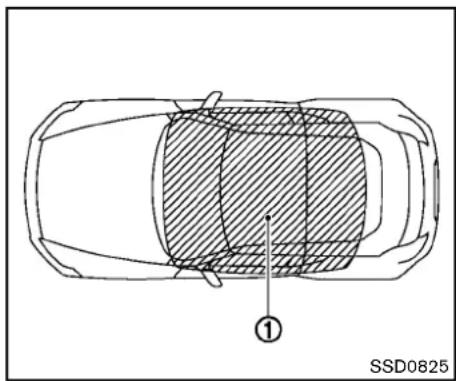
natural_image
Top-down schematic of a car with shaded interior area and labeled point (1), no text or symbols presentWhentheIntelligentKeybatteryisalmost dischargedorstrongradiowavesarepresent neartheoperatinglocation, theIntelligentKey system'soperatingrangebecomesnarrower andmaynotfunctionproperly.
If the Intelligent Key is within the operating range, it is possible for anyone, even someone who does not carry the Intelligent Key, topush the ignition switch to start the engine.
- Thecargo/trunkroomareaisnotincludedin theoperatingrangebuttheIntelligentKey mayfunction.
- If the Intelligent Key is placed on the instrument panel, rear parcel shelf, inside the glovebox door pocket, the Intelligent Key may not function.
- IfthelIntelligentKeyisplacednearthedoor orwindowoutsidethevehicle,thelIntelligent Keymayfunction.
flowchart
graph TD
    A["LOCK"] --> B["ACC"]
    B --> C["ON"]
    D["(OFF)"] --> C
    E["LOCK"] --> F["ACC"]
    F --> G["ON"]
    H["START STOP LINE"] --> I["Arrow pointing inward"]
    style E fill:#f9f,stroke:#333
    style F fill:#f9f,stroke:#333
    style G fill:#f9f,stroke:#333
    style H fill:#ccf,stroke:#333
    style I fill:#ccf,stroke:#333
PUSH-BUTTONIGNITIONSWITCH OPERATION
When the ignitionswitch is pushed without depressing the brake pedal (automatic transmission model) or the clutch pedal (manual transmission model), the ignitionswitch position will change as follows:
- PushcenteroncetochangetoACC.
- PushcentertwotimestochangetoON.
- PushcenterthreetimestochangetoOFF. (Nopositionilluminates.)
- PushcenterfourtimestoreturntoACC.
- OpenorcloseanydoortoreturntoLOCK duringtheOFFposition.
If the battery of the vehicle is discharged, the push-buttonignitions switch cannot be turned from the LOCK position.
Some indicators and warnings for operation are displayed on the vehicle information display. (See "Vehicle information display" (P.2-17).)
Automatictransmissionmodels
Theignitionlockisdesignedsothattheignition switchpositioncannotbeswitchedtoLOCK untiltheselectorleverismovedtotheP(Park) position.
Whentheignitionswitchcannotbepushed towardtheLOCKposition,proceedasfollows:
- MovetheselectorleverintotheP(Park) position.
- PushtheignitionswitchtotheOFFposition. Theignitionswitchpositionindicatorwillnot illuminate.
- Openthedoor. Theignitionswitchwill changetotheLOCKposition.
TheselectorlevercanbemovedfromtheP (Park) position if the ignition switch is in theONpositionandthebrakepedalis depressed.
PUSH-BUTTONIGNITIONSWITCH POSITIONS
LOCK(Normalparkingposition)
The ignition switch can only be locked in this position.
The ignition switch will be unlocked when it is pushed to the ACC position while carrying the Intelligent Key or with the Intelligent Key inserted in the port.
ACC(Accessories)
Thispositionactivateselectricalaccessories suchastheradio,whentheengineisnot running.
ON(Normaloperatingposition)
This position turns on the ignition system and electrical accessories.
OFF
Theenginecanbeturnedoffinthisposition.
Automatictransmissionmodels:Theignition lockisdesignedsothattheignitionswitch cannotbeswitchedtotheLOCKpositionuntil theselectorleverismovedtotheP(Park) position.
EMERGENCYENGINESHUTOFF
Toshutofftheengineinanemergencysituation whiledrivingperformthefollowingprocedure:
●Rapidlypushthepush-buttonignitionswitch 3consecutivetimes,or
- Pushandholdthepush-buttonignition switchformorethan2seconds.

CAUTION
Donotleavethevehiclewiththepush-buttonignitionswitchinACCorON positionswhentheengineisnotrunningforanextendedperiod.Thiscan dischargethebattery.
text_image
A B ① SSD0826INTELLIGENTKEYBATTERYDIS- CHARGE
If the battery of the Intelligent Key is almost discharged, the guidelight ⑧ of the Intelligent Key port ⑨ blinks and the indicator appears on the vehicle information display. (See "Vehicle information display" (P.2-17).)
Inthiscase, inserting the Intelligent Key into the port ① allows you to start the engine. Make sure that the key rings side faces backward as illustrated. Insert the Intelligent Key in the port until its latched and secured.
ToremovetheIntelligentKeyfromtheport,push theignitionswitchtotheOFFpositionandpull theIntelligentKeyoutoftheport.
NOTE:
The Intelligent Keyport does not charge the Intelligent Key battery. If you see the low battery indicator in the vehicle information display, replace the battery as soon as possible. (See "Intelligent Key battery replacement" (P.8-25).)

CAUTION
- Neverplaceanything exceptthe IntelligentKeyin theIntelligent Keyport.Doingsomaycausedamagetotheequipment.
- MakesurethIntelligentKeyisin thecorrectdirectionwheninserting ittothIntelligentKeyport.The enginemaynotstartifitisinthe incorrectdirection.
- RemovetheIntelligentKeyfromthe IntelligentKeyportaftertheignition switchispushedtotheOFFposition.
BEFORE STARTING THE ENGINE
●Makesuretheareaaroundthevehicleis clear.
- Checkfluidlevelssuchasengineoil,coolant,brakefluidandwindowwasherfluidas frequentlyaspossible,oratleastwhenever yourefuel.
- Check that all windows and lights are clean.
- Visuallyinspecttiresfortheirappearance andcondition.Alsochecktiresforproper inflation.
- Lockalldoors.
- Positionseatandadjustheadrestraints.
- Adjustinsideandoutsidemirrors.
- Fastenseatbeltsandaskallpassengersto dolikewise.
- Checktheoperationofwarninglightswhen theignitionswitchispushedtotheON position.(See"Warning/indicatorlightsand audiblereminders"(P.2-9).)
STARTING THE ENGINE
- Apply the parking brake.
- AutomaticTransmission(AT)model:
MovetheselectorlevertotheP(Park)orN(Neutral)position.(Pisrecommended.)
Thestarterisdesignednottooperateunless theselectorleverisineitheroftheabove positions.
ManualTransmission(MT)model:
MovetheshiftlevertotheN(Neutral) position.Depresstheclutchpedalfully to thefloor.
Thestarterisdesignednottooperateunless theclutchpedalisfullydepressed.
The Intelligent Key must be carried when operating the ignitions switch.
- Push the ignitions switch to the ON position. Depressthe brake pedal (AT model) or the clutch pedal (MT model) and push the ignitions switch to start the engine.
Tostarttheengineimmediately, pushand releasetheignitionswitchwhiledepressing thebrakepedalwiththeignitionswitchin anyposition.
- Iftheengineisveryhardtostart in extremelycoldweatherorwhenrestarting,depresstheacceleratorpedalalittle (approximately1/3tothefloor)andwhile holding,cranktheengine.Releasethe
acceleratorpedalwhentheenginestarts.
- Iftheengineisveryhardtostartbecause it isflooded, depressthe accelerator pedalallthewaytothefloorandholdit. PushtheignitionswitchtotheON positionto startcrankingtheengine. After5or 6 seconds,stopcrankingby pushingtheignitionswitchtoOFF.After crankingtheengine,releasetheacceleratorpedal.Cranktheenginewithyour footofftheacceleratorpedalby depressingthebrakepedalandpushing thepush-buttonignitionswitchtostart theengine.If theenginestarts, butfails torun,repeattheaboveprocedure.

CAUTION
Do not operate the starter for more than15secondsatatime.Iftheengine doesnotstart,pushtheignitionswitch to OFF and wait 10 seconds before crankingagain, otherwisethe starter couldbedamaged.
4.Warm-up
Allowtheenginetoidleforatleast30 secondsafterstarting.Do notracethe enginewhilewarmingitup.Driveat
Startinganddriving
DRIVINGTHEVEHICLE
moderatespeedforashortdistancefirst, especiallyincoldweather.Incoldweather, keeptheengine running for a minimum of 2-3 minutes before shutting it off.Starting and stopping the engine over a short period of timemaymak the vehicle more difficult to start.
When racing the engine upto 4,500rpmor more undernoload condition, the engine will enter the fuel cut mode.
- Tostoptheengine, shifttheselectorleverto theP(Park)position(ATmodel)ormovethe shiftlevertotheN(Neutral)position(MT model), and pushtheignitionswitchtothe OFF position.
AUTOMATICTRANSMISSION
7speedautomatictransmission
The automatic transmission in your vehicle is electronically controlled by transmission control module to produce maximum efficiency and smooth operation.
Shownonthefollowingpagesaretherecommendedoperatingproceduresforthistransmission.Followtheseproceduresformaximum vehicleperformanceanddrivingenjoyment.
Startingthevehicle
Afterstartingtheengine,fullydepressthefoot brakepedalandpushtheselectorleverbutton beforeshiftingtheselectorlevertotheR (Reverse),N(Neutral),D(Drive)orManualshift modeposition.Besurethevehicleisfully stoppedbeforeattemptingtoshifttheselector lever.
This automatic transmission model is designed so that the foot brake pedal must be depressed before shifting from P(Park) to any drive position while the ignition switch position is ON.
Theselectorlevercannotbemovedoutof theP(Park)positionandintoanyofthe othergearpositionsiftheignitionswitch ispushedtotheLOCK,OFForACC
position.
-
Keep the foot brake pedal depressed and push these selector lever button to shift into a driving gear.
-
Releasetheparkingbrakeandfootbrake, thengraduallystartthevehicleinmotion.

WARNING
- Donotdepress theaccelerator pedalwhileshiftingfromP(Park) orN(Neutral)toR(Reverse)D (Drive),ormanualshiftmode.Alwaysdepressthebrakepedaluntil shiftingiscompleted.Failuretodosocouldcauseyoutolosecontrol andhaveanaccident.
- Coldengineidlespeedishigh,so usecautionwhenshiftingintoa forwardorreversegearbeforethe enginehaswarmedup.
- Never shift to P (Park) or R (Reverse)whilevehicleismovingforward.NevershifttoP(Park)orD(Drive)whilevehicleismovingrearward.Failuretodosocouldcauseyouto losecontroland havean accident.

CAUTION
- Whenstoppingthevehicleonan uphillgrade, donotholdthevehicle bydepressingtheacceleratorpedal. Thefootbrakeshouldbeusedfor thispurpose.
- Donotdownshiftabruptlyonslipperyroads. This may cause all loss of control.
flowchart
graph TD
    A["Motor"] --> B["Drive"]
    B --> C["Motor Shift"]
    C --> D["Motor Control"]
    D --> E["Motor Pulling"]
    style A fill:#f9f,stroke:#333
    style B fill:#ccf,stroke:#333
    style C fill:#cfc,stroke:#333
    style D fill:#fcc,stroke:#333
    style E fill:#ffc,stroke:#333
Selectorlever
Tomovetheselectorlever,

Pushthebuttonwhiledepressingthe brakepedal.

Pushthebutton.

Justmovetheselectorlever.
Shifting
Afterstartingtheengine,fullydepressthebrake pedalandshifttheselectorleverfromP(Park) toR(Reverse),N(Neutral),D(Drive)orManual shiftmodeposition.
PushthebuttontoshiftintoP(Park)orR (Reverse).Allotherpositionscanbeselected withoutpushingthebutton.

WARNING
Apply the parking brake if these selector leverisin any position while the engine is not running. Failure to dosocould causethe vehicletomove unexpectedly or roll away and result in serious personal injury or property damage.

CAUTION
Makesurethevehicleiscompletely stoppedandthetransmissionisinthe P(Park)position.
P(Park)position:
Usethisselectorpositionwhenthevehicleis parkedorwhenstartingtheengine.Makesure thevehicleiscompletelystopped.Thebrake pedalmustbedepressedandtheselector leverbuttonpushedintomovetheselectorleverfromtheN(Neutral)positionor anydrivepositiontotheP(Park)position. Applytheparkingbrake.Whenparkingonahill, applytheparkingbrakefirst,thenmovethe selectorlevertotheP(Park)position.

CAUTION
Use this position only when the vehicle is completely stopped.
R(Reverse):
Use this position to backup. Always besure the vehicle is completely stopped before selecting the R (Reverse) position. The brake pedal must be depressed and these selector lever button pushed into movetheselector lever from the P (Park) position, the N (Neutral) position or any drive position to the R (Reverse) position.
N(Neutral):
Neitherforwardnorreversegearisengaged. Theenginecanbestartedinthisposition.You mayshifttotheN(Neutral)positionandrestarta stalledenginewhilethevehicleismoving.
D(Drive):
Usethispositionforallnormalforwarddriving.
text_image
B A SSD0828Paddleshifter
Manualshiftmode
Whentheselectorleverisinthemanualshift gate, the transmission is ready for the manual shift mode. Shiftrangescanbeselected manually by moving theselector lever up or down, or pulling the right-side or left-side paddleshifter.
Whenshiftingup, movetheselectorlevertothe +(up)sideorpulltheright-sidepaddleshifter (+) Ⓐ .Thetransmissionshiftstothehigher range.
Whenshiftingdown, movetheselectorleverto the-(down)sideorpulltheleft-sidepaddle shifter(-) Ⓑ .Thetransmissionshiftstothe
lowerrange.
Whencancelingthemanualshiftmode, return theselectorlevertotheD(Drive)position. The transmissionreturnstothenormaldrivingmode.
When you pull the paddleshifter while in the D (Drive) position, the transmission will shift to the upper or lower ran get temporarily. The transmission will automatically return to the D (Drive) position after a short period of time. If you want to return to the D (Drive) position manually, pull and hold the paddleshifter for about 1.5 seconds.
Inthemanualshiftmode, theshiftrangeis displayedonthetransmissionpositionindicator inthemeter.
Shiftrangesupordownonebyoneasfollows:
$$ 1 ^ {M} \stackrel {{\rightarrow}} {{\leftarrow}} 2 ^ {M} \stackrel {{\rightarrow}} {{\leftarrow}} 3 ^ {M} \stackrel {{\rightarrow}} {{\leftarrow}} 4 ^ {M} \stackrel {{\rightarrow}} {{\leftarrow}} 5 ^ {M} \stackrel {{\rightarrow}} {{\leftarrow}} 6 ^ {M} \stackrel {{\rightarrow}} {{\leftarrow}} 7 ^ {M} $$
7^M (7th):
Use this position for all normal forward driving at highways speeds.
6^M (6th)and 5^M (5th):
Usethesepositionswhendrivinguplong slopes,orforenginebrakingwhendrivingdown longslopes.
4^M (4th), 3^M (3rd) and 2^M (2nd):
Usethesepositionsforhillclimbingorengine brakingondownhillgrades.
1^M (1st):
Use this position when climbing steep hills slowly or drivings slowly through deep snow, or for maximum engine braking on steep downhill grades.
- Remembernottodriveathighspeedsfor extendedperiodsoftimeinlowerthan7th gear. Thisreducesfueleconomy.
- Movingtheselectorleverrapidlytothesame sidetwicewillshifttherangesinsuccession.
•Inthemanualshiftmode, the transmission may not shift to these selected gear. This helps maintain driving performance and reduce the chance of vehicle damage or loss of control.
Whenthissituationoccurs, the Automatic Transmission(AT)positionindicatorlight(on the vehicle information display)willblink and the buzzerwill sound.
•Inthemanualshiftmode, the transmission automatically shifts downto 1st gear before the vehicle comestoa stop. When accelerating again, it is necessary to shift up to the desired range.
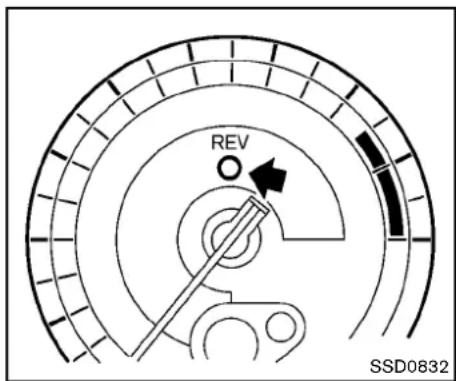
text_image
REV SSD0832Upshiftindicator:
Theup-shiftindicatorislocatedinthetachometerandshowsthedriverthetimingtoshift intoahighergearbyilluminating. Theuseofthe up-shiftindicatorwillhelpyoutoupshiftata constantenginespeedfromanygear.
Theup-shiftindicatorwillstartflashingwhenthe enginespeedreachesabout500rpmbeforethe setfigurewhiledriving,andthenilluminateafter theenginespeedreachesthesetfigure.
Theenginespeedforupshiftingcanbeseton thevehicleinformationdisplay.See"Tripcomputer"(P.2-22).
Theremaybeaslightdifferencebetween
thetimingoftheup-shiftindicatorilluminationandthetachometerindication.
Acceleratordownshift—InD(Drive) position—
Forpassingorhillclimbing,fullydepressthe acceleratorpedaltothefloor. Thisshifts the transmissiondownintothelowergear,dependingthevehiclespeed.
Fail-safe
Whenthefail-safeoperationoccurs, notethat the transmission will belocked in any of the forward gears according to the condition.
Ifthevehicleisdrivenunderextreme conditions,suchasexcessivewheelspinningandsubsequenthardbraking,the fail-safesystemmaybeactivated.Thiswill occurevenifallelectricalcircuitsare functioningproperly.Inthiscase,push theignitionswitchtotheOFFpositionand waitfor3seconds.Thenpushtheignition switchbacktotheONposition.Thevehicle shouldreturntoitsnormaloperating condition.Ifitdoesnotreturntoitsnormal operatingcondition,haveaNISSANdealer checkthetransmissionand repairifnecessary.
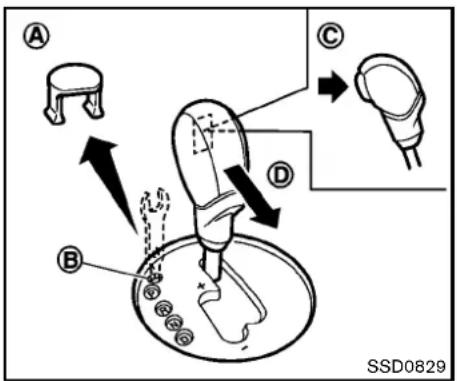
text_image
A B C D SSD0829Shiftlockrelease
If the battery charge is slow, discharged, the selector lever may not be moved from the P (Park) position even with the brake pedal depressed and these selector lever button pushed.
Tomovetheselectorlever, perform the following procedure:
-
PushtheignitionswitchtotheOFFForLOCK position.
-
Apply the parking brake.
-
Removetheshiftlockcover suitabletool. Ⓐ usinga
5-16 Startinganddriving
4.Pushdowntheshiftlock suitabletoolasillustrated. ⑧ usinga
- Pushtheselectorleverbutton © andmove theselectorlevertotheN(Neutral)position D whileholdingdowntheshiftlock.
Nowthevehiclemaybemovedtothedesired location.
If the lever cannot be moved out of P(Park), have a NISSAN dealer check the automatic transmission system as soon as possible.
MANUALTRANSMISSION

WARNING
- Donotdownshiftabruptlyonslip-peryroads. This may cause all loss of control.
- Donotover-revtheengine when shiftingtoalowergear. This may cause a loss of controlor engine damage.

CAUTION
- Donotrestyourfootontheclutch pedal whiledriving.This maydamagetheclutch.
- Fullydepresstheclutchpedalbeforeshiftingtohelppreventtransmissiondamage.
- Stopyourvehiclecompletelybefore shiftingintoR(Reverse).
- When the vehicle is stopped with the engineer running (forexample, at astoplight), shift to N (Neutral) and releasethe clutchpedal with the footbrake applied.
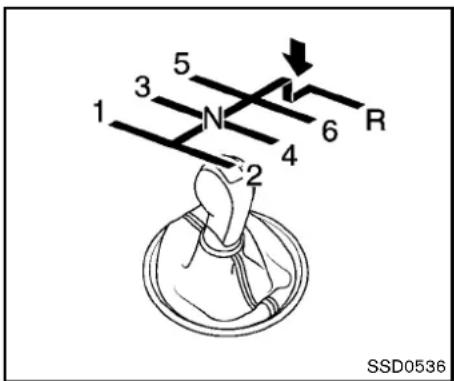
text_image
1 2 3 4 5 6 R SSD0536Shifting
Tochangegears,orwhenupshiftingordown-shifting,fullydepresstheclutchpedal,shiftinto anappropriategear,andthenslowlyand smoothlyreleasetheclutchpedal.
This vehicle is equipped with a short throw shifter manual transmission. To ensure smooth gearchanges, besuretofully depress the clutch pedal before operating the shift lever. If the clutch pedalis not fully depressed before the transmission is shifted, age noisemaybe heard. Transmission damage could occur.
Startthevehiclein1stgearandupshiftto2nd, 3rd,4th,5thand6thgearinsequenceaccord-
ingtothevehiclespeed.
Tobackup, depresstheshiftknobandthen movetheshiftlevertotheR(Reverse)position afterstoppingthevehiclecompletely.
Theshiftknobreturnstoitsoriginalposition whentheshiftleverismovedtotheN(Neutral) position.
IfitisdifficulttomovetheshiftleverintoR (Reverse)or1st(Lowgear), shifttoN(Neutral), then releasetheclutchpedal. Fully depress the clutchpedalagainandshiftintoRor1st.
SynchroRevMatchmode(S-MODE)(if soequippedforManualTransmission models)
The Synchro RevMatchmode(S-MODE) automatically adjust the engines speed to match the selecting gear ratio while changing gears.
Precautions:
- Shiftleverandclutchpedaloperationsare notdifferentthanaconventionalmanual transmission.
●Fullydepresstheclutchpedal.Insufficient pedaldepressionmaycauseslowresponse ofthissystem. - Whentheclutchpedalisdepressedwith thegearstillengaged, theenginespeedis keptattheproperlevelfortheengaged
gear. Thus, the enginespeed may be kept high depending on the gear position and vehiclespeed.
- Whentheclutchpedalisdepressedwith the transmission in neutral, the system operates for approximately 2 seconds, and thentheenginespeed will decrease to the idlespeed.
- When the engine coolant temperature is low right after starting the engine, enginespeed synchronization will be delayed or maybe insufficient.
- Thesystemcontrolstheenginespeedupto therevlimit. NotethatS-MODEisnota functionthatpreventsover-revvingresulting fromshiftingmistakes.
- Thesystemdoesnotoperatewhilethe vehicleisbackingup.
- If the enginespeed is limited lower than usual when the engine oil temperature is extremely high, the system will control up to the limited enginespeed.
- Ifthemalfunctionindicatorlightilluminates, thesystemmaynotoperateandtheS-MODEindicatorturnsoff.

text_image
WARNING 0/0 EXIT S-MODE SSD0830SynchroRevMatchmode(S-MODE)warning:
The SynchroRevMatchmode(S-MODE) warning will appear on the vehicle information display and the S-MODE indicator will turn off if a system malfunction occurs.
If the warning appears, the S-MODE function will not operate, but manual transmission will operate normally and driving can be continued. Havethesystem checked by a NISSAN dealer.
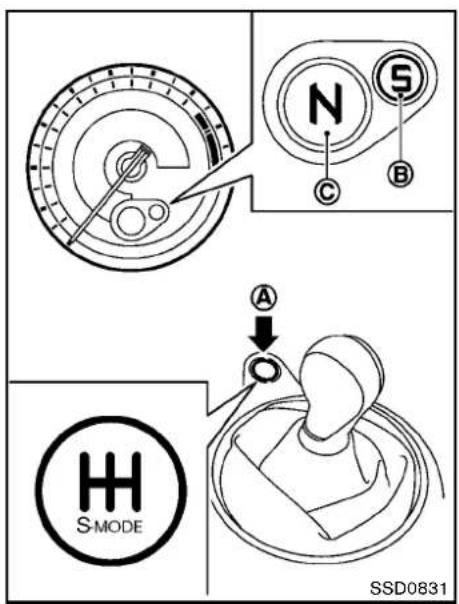
text_image
N S C B A H S MODE SSD0831Activatingthesystem:
ToactivatetheS-MODE,pushtheS-MODE switch Ⓐ.TheS-MODEindicator Ⓑ onthe tachometerwillshow"S".Todeactivate,push andholdtheS-MODEswitchformorethan1 second.TheS-MODEindicatorwillturnoff.
WhiletheS-MODEisoff,youcandrivethe
vehicleasaconventionalmanualtransmission model.
NotethatthestatusoftheS-MODE(onoroff)is memorizedevenaftertheignitionswitchis turnedoff;however,itwillbeinitialized(off) whenthebatteryisdisconnected.
The transmission position indicator ⓒ shows theselected gear: N(Neutral), 1, 2, 3, 4, 5, 6, R (Reverse).
SynchroRevMatchmode(S-MODE)operation:
The Synchro RevMatchmode(S-MODE) automatically adjust the enginespeed by controlling the enginethrottle. The accelerator pedal does not have to be depressed.
Thesystemdetectstheclutchpedalandshift leveroperations, and then calculate the target enginespeed using the shifting gear position and the vehicles speed information.
Thesystemprovidesaccurateenginespeed controlthathelpsachievequickgearshifting andreducesshiftshockonclutchengagement.
•Whendownshifting:
Theenginespeedisautomaticallyincreased tothetargetenginespeedbeforetheclutch isengaged.
- Whenupshifting:
Theenginespeedisautomaticallykeptafter
theenginespeedlowerstothetarget enginespeed.
Rapidclutchengagementbeforetheengine speedlowerstothetargetenginespeed maycauseshiftshock.
- Whenidepressing the clutchpedal with the gear engaged:
Theenginespeedisautomaticallykeptat theproperenginespeedfortheengaged gear.
Thisfunctionwillnotoperatewhenlow(1st) gearisselected.
Thereisdelaybetweentheclutchpedal operationandtheS-MODEoperation.Make suretheenginespeedisadjustedbefore engagingtheclutchagain.

text_image
REV SSD0832Upshiftindicator
Theup-shiftindicatorislocatedinthetachometerandshowsthedriverthetimingtoshift intoahighergearbyilluminating. Theuseofthe up-shiftindicatorwillhelpyoutoupshiftata constantenginespeedfromanygear.
Theup-shiftindicatorwillstartflashingwhenthe enginespeedreachesabout500rpmbeforethe setfigurewhiledriving,andthenilluminateafter theenginespeedreachesthesetfigure.
Theenginespeedforupshiftingcanbeseton thevehicleinformationdisplay.See "Tripcomputer"(P.2-22).
Theremaybeaslightdifferencebetween the timing of the up-shift indicator illumination and the tachometer indication.
Suggestedup-shiftspeeds
Shownbelowaresuggestedvehiclespeedsfor shiftingintoahighergear.Thesesuggestions relatetofueleconomyandvehicleperformance.
Actualup-shiftspeedswillvaryaccordingto roadconditions, theweatherandindividual drivinghabits.
Fornormalaccelerationinlowaltitudeareas [lessthan4,000ft(1,219m)]:
GearchangeMPH(km/h)
1stto2nd8(13)
2ndto3rd 16(26)
3rdto4th 25(40)
4thto5th 28(45)
5thto6th 33(53)
For quick acceleration in low altitude areas or in high altitude areas [over 4,000 ft (1,219 m)]:
GearchangeMPH(km/h)
1stto2nd15(24)
2ndto3rd25(40)
3rdto4th40(64)
4thto5th45(72)
5thto6th 50(80)
Suggested maximumspeedineachgear Downshifttoalowergeariftheengineisnot runningsmoothly,orifyouneedtoaccelerate.
Donotexceedthemaximumsuggestedspeed (shownbelow)inanygear.Forlevelroad driving,usethehighestgearsuggestedforthat speed.Alwaysobservepostedspeedlimits,and driveaccordingtotheroadconditions,which willensuresafeoperation.Donotover-revthe enginewhenshiftingtoalowergearasitmay causeenginedamageorlossofvehiclecontrol.
GearMPH(km/h)
1st38(62)
2nd 63(102)
3rd 91(146)
4th —
5th —
6th
PARKINGBRAKE

WARNING
- Be sure the parking brake is fully released before driving. Failureto dosocancausebrakefailureand leadtoanaccident.
- Do not release the parking brake from outsidethevehicle.
- Donotusethegearshiftinplaceof theparkingbrake. Whenparking, be surethe parking brakeis fully engaged.
- Donotleavechildrenunattended in a vehicle. They could releasethe parking brake and cause an accident.

text_image
② ① ③ SPA2110Toapply: Pull the parking brake leverup ①.
Torelease:
- Firmlyapplythefootbrake.
- While pulling up on the parking brake lever slightly, push the button ② and lower the lever completely ③.
- Before driving, besure the brakewarning light goes out.
CRUISECONTROL
PRECAUTIONSONCRUISECONTROL
- If the cruise control system malfunctions, it will cancel automatically. The CRUISE indicator light on themeter panel will then blink to warn the driver.
- If the engine coolant temperature becomes excessively high, the cruise control system will cancel automatically.
- If the CRUISE indicator light blinks, turn the cruise control mains switchoff and have the system checked by a NISSAN dealer.
●TheCRUISEindicatorlightmayblinkwhen thecruisecontrolmainswitchisturnedON whilepushingtheACCEL/RES,COAST/SETorCANCELswitch.Toproperlysetthe cruisecontrolsystem,performthefollowing procedures.

WARNING
Donotusethecruisecontrolwhen drivingunderthefollowingconditions:
- whenitisnotpossibletokeepthe vehicleatasetspeed
•inheavytrafficorintrafficthat variesinspeed
•onwindingorhillyroads
• onslipperyroads(rain, snow, ice, etc.)
•inverywindyareas
Doingsocouldcausealossofvehicle controlandresultinanaccident.

CAUTION
Onmanualtransmissionmodels, donot shift into N(Neutral) without depressing the clutchpedal when the cruise control is set. Should this occur, depress the clutchpedal and turn the mains with choff immediately. Failure to dosomay cause engaged damage.

text_image
3 CANCEL ACCEL/RES 1 COAST/SET 2 4 ON/OFF SSD08331.ACCEL/RESswitch
2.COAST/SETswitch
3.CANCELswitch
4.MAIN(ON-OFF)switch
CRUISECONTROLOPERATIONS
The cruise control allows driving at a speed between 25 to 89 MPH (40 to 144 km/h) without keeping your foot on the accelerator pedal.
Toturnonthecruisecontrol, push the MAIN switch on. The CRUISE indicator light will illuminate.
Tosetcruisingspeed,acceleratethevehicle tothedesiredspeed,pushtheCOAST/SET switchandreleaseit.Takeyourfootoffthe
5-22Startinganddriving
acceleratorpedal. Your vehicle will maintain the setspeed.
- Topassanothervehicle, depress the acceleratorpedal. When you are a set the pedal, the vehicle will return to the previously setspeed.
- The vehicle may not maintain the sets speed on winding or hilly roads. If this happens, drivewithout the cruise control.
Tocancelthepresetspeed,useoneofthe followingmethods:
●PushtheCANCELswitch.
●Tapthebrakepedal.
●TurntheMAINswitchoff.TheCRUISElight willturnoff.
-Ifyoudepressthebrakepedalwhile pushingtheACCEL/RESorCOAST/SETswitchandresetatthecruising speed,thecruisecontrolwilldisengage. TurntheMAINswitchchoffonceandthen turnitonagain.
—Thecruisecontrolwillautomatically cancelifthevehicleslowsmorethan8 MPH(13km/h)belowthesetspeed.
- If you movethes electorlevertotheN (Neutral) position(AutomaticTransmissionmodels) or depress the clutchpedal (ManualTransmissionmodels), the cruise control will be canceled.
Toresetatafastercruisingspeed,useone ofthefollowingmethods:
- Depresstheacceleratorpedal. Whenthe vehicleattainsthedesiredspeed, pushand releasetheCOAST/SETswitch.
- PushandholdtheACCEL/RESswitch. Whenthevehicleattainsthedesiredspeed, releasetheswitch.
- Push, then quickly releasetheACCEL/RES switch. Each time you do this, the sets speed will increase by about 1 MPH (1.6 km/h).
Toresetataslowercruisingspeed,useone ofthefollowingmethods:
●Lightlytapthebrakepedal. Whenthe vehicleattainsthedesiredspeed, pushthe COAST/SETswitchandreleaseit.
- PushandholdtheCOAST/SETswitch. Releasetheswitchwhenthevehicleslows downtothedesiredspeed.
- Push, then quickly release the COAST/ SETT switch. Each time you do this, the setspeed will decrease by about 1 MPH (1.6 km/h).
Toresumethepresetspeed, pushand releasetheACCEL/RESswitch. The vehicle will resumethelastsetcruisingspeed when the vehiclespeed is over 25 MPH (40km/h).
BREAK-INSCHEDULEINCREASINGFUELECONOMY

CAUTION
During the first 1,200 miles (2,000 km), follow the recommendation to obtain maximum engine performance and ensure the futurer reliability and economy of your new vehicle.
Failuretofollowtheserecommendationsmayresultinshortenedengine lifeandreducedengineperformance.
- Avoiddrivingforlongperiodsatconstant speed,eitherfastorslow.Donotrunthe engineover4,000rpm.
- Donotaccelerateatfullthrottleinanygear.
-
Avoidquickstarts.
●Avoidhardbrakingasmuchaspossible. -
Accelerateslowlyandsmoothly.Maintain cruisingspeedswithaconstantaccelerator position.
●Driveatmoderatespeedsonthehighway. - Avoidunnecessarystoppingandbraking. Keepasafedistancebehindothervehicles.
- Selectagearrangesuitabletoroadconditions.
●Avoidunnecessaryprolongedengineidling. - Keepyourenginetunedup.
- Followtherecommendedperiodicmaintenanceschedule.
- Keep the tires inflated at the correct pressure. Improper time pressure will increase wear and wasteful.
- Makesurethefrontwheelsareproperly aligned.Improperalignmentwillcausepre-maturetirewearandlowerfueleconomy.
●Airconditioneroperationlowersfueleconomy. Usetheairconditioneronlywhen necessary. - Whencruisingathighwayspeeds, itismore economicaltousetheairconditioner and leavethewindowsclosedtoreducedrag.
PARKING/PARKINGONHILLS
①
□
□
□
□

②
□
□
□
□
③
□
□
□
□

SD1006MA

WARNING
- Donotstoporparkthevehicleover flammablematerialssuchasdry grass,wastepaperorrags.They mayigniteandcauseafire.
- Neverleavetheengine running while the vehicle is unattended.
- Donotleavechildrenunattended insidethevehicle.Theycouldunknowinglyactivateswitchesorcontrols.Unattendedchildrencould becomeinvolvedinseriousacci-
dents.
● Safeparking procedures require that both the parking brake be applied and the transmission placed into P(Park) for Automatic Transmission(AT) model or an appropriate gear for Manual Transmission (MT) model. Failure to dosocould cause the vehicle to move unexpectedly or roll away and result in an accident.
- Makesuretheautomatictransmissionsselectorleverhasbeenpushed asfarforwardasitcangoand
cannotbemovedwithoutdepressingthefootbrakepedal.
- Firmly apply the parking brake.
- Automatictransmissionmodels:
MovetheselectorlevertotheP(Park) position.
Manualtransmissionmodels:
PlacetheshiftleverintheR(Reverse)gear. Whenparkingonanuphillgrade, placethe shiftleverinthe1stgear.
-
To help prevent the vehicle from rolling into the street when parked on as sloping drive way, it is good to turn the wheels as illustrated.
-
HEADEDDOWNHILLWITHCURB: ① Turnthewheelsintothecurbandmove thevehicleforwarduntilthecurbside wheelgentlytouchesthecurb.
- HEADEDUPHILLWITHCURB: ② Turnthewheelsawayfromthecurband movethevehiclebackuntilthecurbside wheelgentlytouchesthecurb.
- HEADEDUPHILLORDOWNHILL, NO CURB: ③
Turnthewheelstowardthesideofthe roadsothevehiclewillmoveawayfrom thecenteroftheroadifitmoves.
If the engine is not running oristurned off while driving, the power assist for the steering will not work. Steering will behard to operate.
The power assisted steering uses a hydraulic pump, driven by the engine, to assist steering. If the engine stops through drive belt breaks, you will still have control of the vehicle. However, much greater steering effort is needed, especially in sharp turns and latlowspeeds.
BRAKINGPRECAUTIONS
Thebrakesystemhastwoseparatehydraulic circuits. Ifonecircuitmalfunctions, you will still have braking attwowheels.
Vacuumassistedbrakes
Thebrakeboosteraidsbrakingbyusingengine vacuum.lftheenginestops,youcanstopthe vehiclebydepressingthebrakepedal.However, greaterfootpressureonthebrakepedalwillbe requiredtostopthevehicleandthestopping distancewillbelonger.
Whenthebrakepedalisdepressedslowly and firmly, you may hear a clicking noise and feel a slight pulsation. This is normal and indicate that the Brake Assist System is operating.
Wetbrakes
Whenthevehicleiswashedordriventhrough water,thebrakesmaygetwet.Asaresult,your brakingdistancewillbelongerandthevehicle maypulltoonesideduringbraking.
Todrybrakes, drivethevehicleatasafespeed whilelightlytappingthebrakepedaltoheat-up thebrakes. Do this until the brakes return to normal. Avoid driving the vehicle athigh speeds until the brakes function correctly.
Breakintheparkingbrakeshoeswheneverthe stoppingeffectoftheparkingbrakeisweakened orwhenevertheparkingbrakeshoesand/or drums/rotorsarereplaced,inordertoassurethe bestbrakingperformance.
This procedure is described in the vehicle servicemanual and can be performed by a NISSAN dealer.
Usingthebrakes
Avoidrestingyourfootonthebrakepedalwhile driving. This will cause overheating of the brakes, wearing out the brake and pads faster and reduce gasmileage.
Tohelpsavethebrakesandtopreventthe brakesfromoverheating,reducespeedand downshifttoalowergearbeforegoingdowna slopeorlonggrade.Overheatedbrakesmay reducebrakingperformanceandcouldresultin lossofvehiclecontrol.

WARNING
- While driving on aslippery surface, be careful when braking, accelerating order down shifting. Abrupt braking or accelerating could cause the wheelstoskid and result in an
5-26 Startinganddriving
accident.
- Iftheengineisnotrunningoris turnedoffwhiledriving, thepower assistforthebrakeswillnotwork. Brakingwillbeharder.
BRAKEASSIST
BRAKEASSIST
Whentheforceappliedtothebrakepedal exceedsacertainlevel,theBrakeAssistis activatedgeneratinggreaterbrakingforcethana conventionalbrakeboosterevenwithlightpedal force.

WARNING
TheBrakeAssistisonlyanaidtoassist brakingoperationandisnotacollision warningoravoidancedevice.Itisthe driver'sresponsibilitytostayalert,drive safelyandbeincontrolofthevehicleat alltimes.
ANTI-LOCKBRAKINGSYSTEM(ABS)

WARNING
•TheAnti-lockBrakingSystem(ABS) isasophisticateddevice,but it cannotpreventaccidentsresulting fromcarelessordangerousdriving techniques.Itcanhelpmaintain vehiclecontrolduringbrakingon slipperysurfaces.Rememberthat stoppingdistancesonslipperysurfaceswillbelongerthanonnormal
surfacesevenwithABS.Stopping distancesmayalsobelongeron rough, gravelorsnowcovered roads, orifyouareusingtirechains. Alwaysmaintainasafedistance fromthevehicleinfrontofyou. Ultimately, thedriverisresponsible forsafety.
•Tiretypeandconditionmayalso affectbrakingeffectiveness.
—Whenreplacingtires,installthe specifiedsizeoftiresonallfour wheels.
—Wheninstallingasparetire, makesurethatitistheproper sizeandtypeasspecifiedonthe TireandLoadingInformation label.See“TireandLoading Informationlabel”(P.9-13)of thismanual.
—Fordetailedinformation,see "Wheelsandtires"(P.8-31)of thismanual.
The Anti-lock Braking System (ABS) controls the brakessothewheelsdonotlockduringhard brakingorwhenbrakingonslippery surfaces. Thesystemdetectstherotationspeedateach
wheelandvariesthebrakefluidpressure to preventeachwheelfromlockingandsliding. By preventingeachwheelfromlocking, thesystem helpsthedrivermaintainsteeringcontrol and helpstominimizeswervingandspinning on slippery surfaces.
Usingthesystem
Depressthebrakepedalandholditdown. Depressthebrakepedalwithfirmsteady pressure, but donotpumpthebrakes. The ABSwilloperatetopreventthewheelsfrom lockingup. Steerthevehicletoavoidobstacles.

WARNING
Donotpumpthebrakepedal.Doingso mayresultinincreasedstoppingdistances.
Self-testfeature
TheABSincludeselectronicsensors,electric pumps,hydraulicsolenoidsandacomputer.The computerhasabuilt-indiagnosticfeaturethat teststhesystemeachtimeyoustarttheengine andmovethevehicletatalowspeedinforward orreverse.Whentheself-testoccurs,youmay heara"clunk"noiseand/orfeelapulsationinthe brakepedal.Thisisnormalanddoesnot
indicateamalfunction.Ifthecomputersenses amalfunction,itswitchestheABSoffand illuminatestheABSwarninglightonthe instrumentpanel.Thebrakesystemthenoper- atesnormally,butwithoutanti-lockassistance. IftheABSwarninglightilluminatesduringthe self-testorwhiledriving,havethevehicle checkedbyaNISSANdealer.
Normaloperation
TheABSoperatesatspeedsabove3to6MPH (5to10km/h).
When the ABS sensesthatoneormorewheels are close to locking up, the actuator rapidly applies and releases hydraulic pressure. This action is similar to pumping the brakes very quickly. You may feel apulsation in the brake pedalandhearanoise from under the hoodor feel a vibration from the actuator when it is operating. This is normal and indicate that the ABS is operating properly. However, the pulsation may indicate that road conditions are hazardous and extracare is required while driving.
VEHICLEDYNAMICCONTROL(VDC) SYSTEM
The Vehicle Dynamic Control (VDC) system uses various sensorstomonitor driver inputs and vehicle motion. Under certain driving conditions, the VDC system help stop performance following functions.
- Controlsbrakepressuretoreducewheel slipononeslippingdrivewheelsopoweris transferredtoanonslippingdrivewheelon thesameaxle.
- Controlsbrakepressureandengineoutput toreducedrivewheelslipbasedonvehicle speed(tractioncontrolfunction).
- Controlsbrakepressureatindividualwheels andengineoutputtohelpthedrivermaintain controlofthevehicleinthefollowing conditions:
—understeer(vehicletendstonotfollow thesteeredpath despite increased steeringinput)
—oversteer(vehicletendstospindueto certainroadordrivingconditions).
The VDC system can help the driver to maintain control of the vehicle, but it cannot prevent loss of vehicle control in all drivings situations.
WhentheVDCsystemoperates,theVDC warninglight intheinstrumentpanelflashes sonotethefollowing:
- Theroadmaybelipperyorthesystemmay determinesomeactionisrequiredtohelp
5-28 Startinganddriving
keepthevehicleonthesteeredpath.
- Youmayfeelapulsationinthebrakepedal andhearanoiseorvibrationfromunderthe hood. Thisisnormalandindicatesthatthe VDCsystemisworkingproperly.
- Adjustyourspeedanddrivingtotheroad conditions.
See "VehicleDynamicControl(VDC)warning light" (P.2-14).
Ifamalfunctionoccursinthesystem,theVDC warninglight illuminatesintheinstrument panel.TheVDCsystemautomaticallyturnsoff.
TheVDCOFFswitchisusedtoturnofftheVDC system.TheVDCoffindicator 🌐 illuminatesto indicatetheVDCsystemisoff.WhentheVDC switchisusedtoturnoffthesystem,theVDC systemstilloperatestopreventonedrivewheel fromslippingbytransferringpowertoanon slippingdrivewheel.TheVDCwarninglight flashesifthisoccurs.AllotherVDCfunctions areoff,andtheVDCwarninglight 🌐 willnot flash.TheVDCsystemisautomaticallyresetto onwhentheignitionswitchisplacedintheoff positionthenbacktotheonposition.
See "VehicleDynamicControl(VDC) warning light"(P.2-14) and "VehicleDynamicControl (VDC) off indicator light"(P.2-16).
Thecomputerhasabuilt-indiagnosticfeature thatteststhesystemeachtimeyoustartthe
engineandmovethevehicleforwardorin reverseataslowspeed.Whentheself-test occurs,youmayheara"clunk"noiseand/orfeel apulsationinthebrakepedal.Thisisnormaland isnotanindicationofamalfunction.

WARNING
•TheVDCsystemisdesignedtohelp thedrivermaintainstabilitybut doesnotpreventaccidentsdueto abruptsteering operation athigh speedsorbycarelessordangerous drivingtechniques.Reducevehicle speedandbeespeciallycareful whendrivingandcorneringonslip-perysurfacesandalwaysdrivecarefully.
- Donotmodifythevehicle'ssuspension. If suspension parts such as shockabsorbers,struts,springs, stabilizer bars, bushings and wheelsarenotNISSAN recommendedforyourvehicleorare extremelydeteriorated,theVDC systemmay not operate properly. Thiscouldadverselyaffectvehicle handlingperformance,andtheVDC warninglight mayilluminate.
- Ifbrakerelatedpartssuchasbrake pads,rotorsandcalipersarenot NISSANrecommendedorareextremelydeteriorated,theVDCsystem maynotoperateproperlyandthe VDCwarninglight mayilluminate.
- Ifenginecontrolrelatedpartsare notNISSANrecommendedorare extremelydeteriorated,theVDC warninglight mayilluminate.
- Whendrivingonextremelyinclined surfacesuchashigherbanked corners,theVDCsystemmaynot operateproperlyandtheVDCwarninglight mayilluminate.Donot driveonthesetypesofroads.
- Whendrivingonanunstablesurfacesuchasaturntable,ferry, elevatororramp,theVDCwarning light mayilluminate.Thisisnot amalfunction.Restarttheengine afterdrivingontoastablesurface.
- If wheels sortires other than the NISSAN recommended ones are used, the VDC system may not operate properly and the VDC warning light may illuminate.
•TheVDCsystemisnotasubstitute forwintertiresortirechainsona snowcoveredroad.
PERFORMANCEDAMPERS(NISMO models)

text_image
Technical diagram showing car rear panel and internal suspension components with labeled parts 1 and 2, plus a vehicle body section.1.Frontperformancedamper
2. Rearperformedamper
The performance dampers are installed in the front and rear part of the NISMO models for improved handling and ride.

WARNING
•High-pressure nitrogen gas is sealed insidetheperformedampers. Donotattempttomodifyor disassemblethem.
•Fordisposaloftheperformance dampersorwhenscrappingthe vehicle,contactaNISSANdealer. Neverburnorpuncturetheperformedampers.Incorrectdisposal procedurescouldcauseseriouspersonalinjury.
COLDWEATHERDRIVING
FREEINGAFROZENDOORLOCK
Topreventadoorlockfromfreezing,apply deicerthroughthekeyhole.Ifthelockbecomes frozen,heatthekeybeforeinsertingitintothe keyholeorusethelIntelligentKeysystem.
ANTIFREEZE
Inthewinterwhenitisanticipatedthatthe outside temperature will drop below 32^ F ( 0^ C), checkantifreezetoassureproperwinterprotection. For additional information, see "Engine coolingsystem" (P.8-9).
BATTERY
If the battery is not fully charged during extremely cold weather conditions, the battery fluid may freeze and damage the battery. To maintain maximum efficiency, the battery should be checked regularly. For additional information, see "Battery" (P.8-16).
DRAININGOFCOOLANTWATER
If the vehicle is the be left outsidewithout antifreeze, drain the cooling system, including the engine block. Refill before operating the vehicle. Ford details, see "Engine cooling system" (P.8-9).
TIREEQUIPMENT
SUMMERtireshaveatreaddesignedtoprovide superiorperformanceondrypavement. However, the performance of these tires will be substantially reduced in snowy and dry conditions. If you operate your vehicle on snowy or icy roads, NISSAN recommend the use of MUD & SNOW or ALL SEASON tires on all four wheels. Consulta NISSAN dealer for the tire type, size, speed rating and availability information.
For additional traction on icy roads, studded tires maybe used. However, some U.S. states and Canadian provinces prohibit their use. Check local, state and provincial laws before installing studded tires.
Skidandtractioncapabilitiesofstudded snowtires,onwetordrysurfaces,maybe poorerthanthatofnon-studdedsnow tires.
Tirechainsmaybeused. Fordetails, see "Tire chains" (P.8-37) of this manual.
SPECIALWINTEREQUIPMENT
It is recommended that the following items be carried in the vehicle during winter:
- Ascraper and stiff-bristled brushtoremove ice and snow from the windows and wiper blades.
- Asturdy, flatboardtobeplaced under the jacktogiveitfirmsupport.
- Ashoveltodigthevehicleoutofsnowdrifts.
- Extrawindowwasherfluidtorefillthe reservoirtank.
DRIVINGONSNOWORICE

WARNING
- Wet ice (32°F, 0°C and freezing rain), very cold snow or ice can be slick and very hard to drive on. The vehicle will havemuchlesstraction or "grip" under these conditions. Try to avoid driving on wet ice until the road dissalted or sanded.
- Whateverthecondition,drivewith caution.Accelerateandslowdown withcare.Ifacceleratingordown-shiftingtoofast,thedrivewheels willloseevenmoretraction.
- Allowmorestoppingdistanceunder theseconditions.Brakingshouldbe startedsoonerthanondrypavement.
-
Allowgreaterfollowingdistances onslipperyroads.
-
Watchforslipperyspots(glareice). These may appear on another wise clear road in shaded areas. If a patch of ice is seen ahead, brake before reaching it. Try not to brake while on the ice, and avoid any sudden steering maneuvers.
- Donotusethecruisecontrol on slipperyroads.
- Snowcantrapdangerousexhaust gasesundryourvehicle. Keep snowclearoftheexhaustpipe and fromaroundyourvehicle.
ENGINEBLOCKHEATER(ifso equipped)
Engineblockheatersareusedtoassistwith coldtemperaturestarting.
The engine blockheaters should be used when the outside temperature is 20^ F ( -7^ C) or lower.
Tousetheengineblockheater
- Turntheengineoff.
- Open the hood and unwrap the engine blockheatercord.
- Plug the engine block heater cord into a grounded 3-wire, 3-pronged extension cord.
4.PlugtheextensioncordintoaGroundFault Interrupt(GFI)protected,grounded110-voltAC(VAC)outlet.
5. The engine block heater must be plugged in for at least 2 - 4 hours, depending on outside temperatures, to properly warm the engine coolant. Use an appropriatetimerto turn the engine block heater on.
6. Before starting the engine, unplug and properly store the cord to keep it away from moving parts.

WARNING
- Donotuseyourengineblockheater withanungroundedelectricalsystemora2-pronged adapter. You can beseriouslyinjuredbyanelectrical shockifyou useanungrounded connection.
- Disconnect and properly store the engine block heater cord before starting the engine. Damageto the cord could result in an electrical shock and can cause serious injury.
- Useaheavy-duty3-wire,3-pronged extensioncord ratedforatleast 10A.Plugtheextensioncordintoa
GroundFaultInterrupt(GFI) protected, grounded110-VAC outlet. Failuretousetheproperextension cordoragroundedoutletcanresult inafireorelectricalshockand causeseriouspersonalinjury.
MEMO
Startinganddriving5-33
MEMO
5-34 Starting and driving
6Incaseofemergency
Emergencyengineshutoff....6-2
Flattire....6-2
TirePressureMonitoringSystem(TPMS)......6-2
Changingaflattire(formodelswithsparetire)......6-3
Repairingflattire(formodelswithemergencytire puncturerepairkit)....6-8
Jumpstarting....6-14
Pushstarting....6-16
If your vehicle overheats....6-16
Towingyourvehicle....6-18
TowingrecommendedbyNISSAN(exceptfor NISMOmodels)....6-19
TowingrecommendedbyNISSAN (NISMOmodels)....6-20
Vehiclerecovery(freeingastuckvehicle)......6-21
EMERGENCYENGINESHUTOFF
Toshutofftheengineinanemergencysituation whiledriving,performthefollowingprocedure:
- Rapidlypushthepush-buttonignitionswitch 3consecutivetimes,or
- Pushandholdthepush-buttonignition switchformorethan2seconds.
FLATTIRE
TIREPRESSUREMONITORINGSYSTEM(TPMS)
ThisvehicleisequippedwiththeTirePressure MonitoringSystem(TPMS).Itmonitorstire pressureofalltiresexceptthespare.When thelowtirepressurewarninglightislit,oneor moreofyourtiresissignificantlyunder-inflated. Ifthevehicleisbeingdrivenwithlowtire pressure,theTPMSwillactivateandwarnyou ofitbythelowtirepressurewarninglight.This systemwillactivateonlywhenthevehicleis drivenatspeedsabove16MPH(25km/h).For moredetails,see"Warning/indicatorlightsand audiblereminders"(P.2-9)and"TirePressure MonitoringSystem(TPMS)("P.5-3).

WARNING
- Ifthelowtirepressurewarninglight illuminateswhiledriving,avoidsuddensteeringmaneuversorabrupt braking,reducevehiclespeed,pull offtheroadtoasafelocation and stopthevehicleassoonaspossible.Drivingwithunder-inflatedtires maypermanentlydamagethetires andincreasethelikelihoodoftire failure.Seriousvehicledamage couldoccurandmayleadtoan
accidentandcouldresultinserious personalinjury.Checkthetirepressureforallfourtires.Adjustthetire pressuretotherecommendedCOLD tirepressureshownontheTireand LoadingInformationlabeltoturn thelowtirepressurewarninglight OFF.Ifthelightstillilluminates whiledrivingafteradjustingthetire pressure,atiremaybeflat.Ifyou haveaflattire,replaceitwitha spare tireassoonaspossible.
- Whenasparetireismountedora wheelisreplaced,theTPMSwillnot functionandthelowtirepressure warninglightwillflashforapproximately1 minute.Thelightwill remainonafter1minute.Contact yourNISSANdealerassoonas possiblefortirereplacementand/orsystemresetting.
- ReplacingtireswiththosenotoriallyspecifiedbyNISSANcould affecttheproperoperationofthe TPMS.
- Donotinjectanytireliquidor aerosoltiresealantintothetires, asthismaycauseamalfunction of the tirepressuresensors(formod-
elsnotequippedwiththeemergencytirepuncturerepairkit).
- If you used the Emergency Tire Sealantorepairaminortirepuncture, your NISSAN dealer will also need to replace the TPMS sensor in addition to repairing or replacing the tire (formelsequipped with the emergency tire puncturer repair kit).
•NISSAN recommends using only NISSANG Genuine Emergency Tire Sealant provided with your vehicle. Othertire sealants may damage the valvestemseal which can cause the tire to lose air pressure (formodels equipped with the emergency tire puncturerepair kit).
CHANGINGAFLATTIRE(formodels withsparetire)
If you have a flattire, follow the instructions below.
Stoppingthevehicle
-
Safelymovethevehicleofftheroadand awayfromtraffic.
-
Turnonthehazardwarningflashers.
-
Park on a level surface and apply the parking brake.MovetheselectorlevertotheP (Park)position(Automatictransmission models).MovetheshiftlevertotheR (Reverse)gear(Manualtransmissionmodels).
-
Turnofftheengine.
-
Raisethehoodtowarnothertraffic, and to signal professional road assistance personnel that you need assistance.
-
Have all passengers get out of the vehicle and standinasafe place, away from traffic and clear of the vehicle.

WARNING
- Makesuretheparkingbrakeis securelyappliedandthemanual transmissionisshiftedintoR(Re-
verse), ortheautomatictransmissionintoP(Park).
- Neverchangetireswhenthevehicle isonaslope,iceorslipperyareas. Thisishazardous.
- Neverchangetiresifoncoming trafficisclosetoyourvehicle.Wait forprofessionalroadassistance.
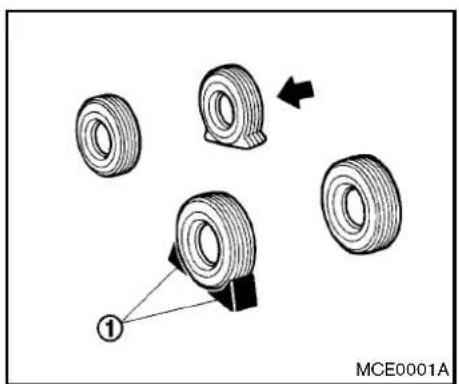
text_image
MCE0001ABlockingwheels
Placesuitableblocks ① atboththefrontand backofthewheeldiagonallyoppositetheflat tiretopreventthevehiclefrommovingwhenitis jackedup.

WARNING
Besuretoblockthewheelasthe vehiclemaymoveandresultinpersonal injury.
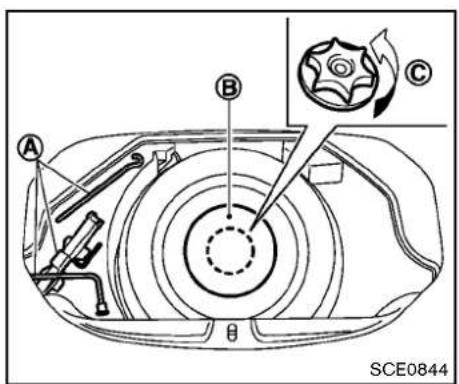
text_image
A B C SCE0844Withoutsubwoofer
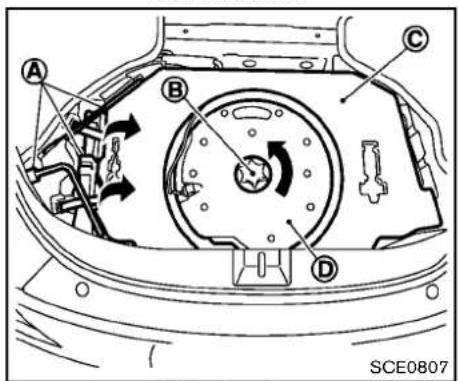
text_image
A B C D SCE0807Withsubwoofer
Gettingthesparetireandtools
Removejackingtools ① locatedunderthe cargoroom/trunkasillustrated.
ForCoupemodels, unfastenthebeltsandliftthe jackuptoremove.
Modelswithoutsubwoofer:
Removethespacer Ⓑ, andturntheretainer ⓒ counterclockwise, thenremovethespare tire.
Modelswithsubwoofer:
Removethesparetirecover Ⓐ.Turnthe retainer Ⓑ counterclockwise,removethe subwoofer Ⓓ andplaceitonthesideofthe cargoroom(withtheflatsurfacefacingdown), thencarefullyremovethesparetire.
Jackingupthevehicleandremovingthe damagedtire

WARNING
- Nevergetunderthevehiclewhileit issupportedonlybythejack.Ifitis necessarytoworkunderthevehicle, supportitwithsafetystands.
•Useonlythejackprovidedwithyour vehicletoliftthevehicle.Donotuse thejackprovidedwithyourvehicle
onothervehicles.Thejackisdesignedforliftingonlyyourvehicle duringatirechange.
- Use the correct jack-uppoints. Never use any other part of the vehicle for jacksupport.
- Neverjackupthevehiclemorethan necessary.
- Neveruseblocksonorunderthe jack.
- Donotstartorruntheenginewhile vehicleisonthejack,asitmay causethevehicletomove.This is especiallytrueforvehicleswith limitedslipdifferentials.
- Donotallowpassengerstostayin thevehiclewhileitisonthejack.
Carefullyreadthecautionlabelattached tothejackbodyandthefollowinginstructions.
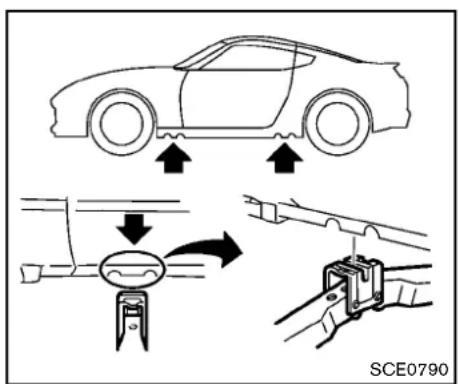
text_image
SCE0790Jack-uppoint
- Placethejackdirectlyunderthejack-up pointasillustratedsothetopofthejack contactsthevehicleatthejack-uppoint. Alignthejackheadbetweenthetwo notchesinthefrontortherearasshown. Alsofitthegrooveofthejackheadbetween thenotchesasshown.
Thejackshouldbeusedonlevelfirm ground.
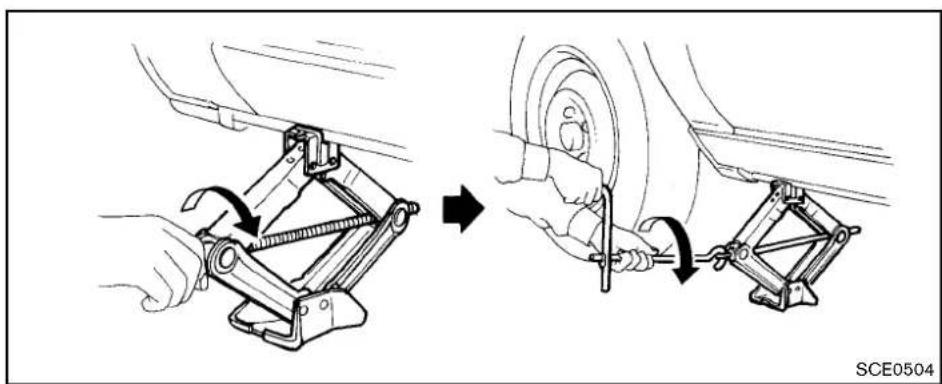
natural_image
Mechanical assembly diagram showing two steps of car wheel mounting and tool installation (no text or symbols)- Looseneachwheelnutoneortwoturnsby turningcounterclockwisewiththewheelnut wrench. Donotremovethewheelnuts untilthetireisofftheground.
3.Toliftthevehicle,securelyholdthejacklever androdwithbothhandsasshownabove. Carefullyraisethevehicleuntilthetireclears theground.Removethewheelnuts,and thenremovethetire.
6-6 Incaseofemergency

text_image
SCE0661Installingthesparetire
The T-typesparetire is designed for emergency use. (Seespecific instructions undertheheading "Wheelsandtires" (P.8-31).)
- Cleananymudordirtfromthesurface betweenthewheelandhub.
- Carefully put the spare tire on and tighten the wheel nuts fingertight. Check that all the wheel nuts contact the wheels surface horizontally.
Modelsequippedwithdifferentsized tiresinthefrontandrear:
Whenreplacingafronttire,makesurethat
theholeinthesparetirewheelisaligned withthepinonthebrakerotor.
- With the wheel nut wrench, tighten wheel nuts alternately and evenly in these sequence as illustrated (①, ②, ③, ④, ⑤) until they are tight.
- Lowerthe vehicles slowly until the tire touchesthe ground. Then, with the wheel nutwrench, tightent the wheel nuts securely in these sequence as illustrated. Lowerthe vehicle completely.

WARNING
- Incorrectwheelnutsorimproperly tightenedwheelnutscancausethe wheeltobecomelooseorcomeoff. Thiscouldcauseanaccident.
- Donotuseoilorgreaseonthe wheelstudsornuts. This could cause thenutstobecomeloose.
- Retightenthewheelnutswhenthe vehiclehasbeendrivenfor600 miles(1,000km)(alsoincasesofa flattire,etc.).
- As soon as possible, tightenthewheel nutstothespecified torque with a
torquewrench. Wheelnuttighteningtorque: 80ft-lb(108N·m)
The wheelnuts must be kept tightened to specification at all times. It is recommended that wheel nuts be tightened to specifications at each lubrication interval.
-AdjusttirepressuretotheCOLDpressure.
COLDpressure: Afterthevehiclehasbeenparkedfor threehoursormoreordrivenlessthan 1mile(1.6km).
COLDtirepressuresareshownonthe TireandLoadingInformationlabel affixedtothedriversidecenterpillar.
Stowingthedamagedtireandtools
Coupemodels:
- Securelystorethedamagedtireandjacking toolsinthestoragearea.
- Placethesparetirecoverandthecargo roomcarpetoverthedamagedtire.
3.Closetherearhatch.

text_image
A B SCE0845Roadstermodels:
Securelystorethejackingtoolsinthestorage area.
Placethesparetirecoverandtrunkroomcarpet backinthetrunk, and thenclosethetrunklid.
Securelystorethedamagedtireaccording to the followingprocedureasillustrated.
- Putthedamaged tire in the plastic bag stored in the trunk.
(A)
2.Movethepassengerseatforward,andthen placethedamagedtire Ⓑ wrappedinthe plasticbagbehindtheseat.
3.Movethepassengerseatbackwardto securethedamagedtire.
Incaseofemergency

WARNING
●Alwaysmakesurethatthesparetire andjackingequipmentareproperly securedafteruse.Suchitemscan becomedangerousprojectilesinan accidentorsuddenstop.
- Thesparetireisdesignedforemergencyuse.Seespecificinstructions undertheheading"Wheelsand tires"(P.8-31).
REPAIRINGFLATTIRE(formodelswith emergencytirepuncturerepairkit)

WARNING
- Afterusing Emergency Tire Sealant torepairaminortirepuncture, do not drivethe vehicleatspeeds faster than 50 MPH (80km/h).
- ImmediatelyafterusingtheEmergencyTireSealanttorepairaminor tirepuncture,takeyourvehicletoa NISSANdealertoinspect,andrepairorreplacethetire.TheEmergency Tire Sealant cannot permanentlysealapuncturedtire.
Continuing operation of the vehicle without a permanent tirerepair can lead to acrash.
- If you used the Emergency Tire Sealantorepairaminortirepuncture, your NISSAN dealer will also need to replace the TPMS sensor in addition to repairing or replacing the tire.
•NISSAN recommends using only NISSANG Genuine Emergency Tire Sealant provided with your vehicle. Othertire sealants may damage the valvestem seal which can cause the tire to lose air pressure.
This vehicle does not have a spare tire. The emergency tire puncturerepairkit (Emergency Tire Sealant) is supplied with the vehicle instead of asparetire. It can be used to temporarily repair minor tire punctures.
If possible, havethe vehicle towed to a facility that can repair or replace the flattire. Using the emergency tire puncture repair kit may cause a malfunction of the tire pressures sensor and cause the low tire pressure warning light to illuminate.
If you have a flat tire, follow the instructions below.

CAUTION
•Toavoidtheemergencytirepuncturekitbeingdamagedduringstorageoruse:
—Onlyusetheemergencytire puncturerepairkitonyourvehicle.Donotuseitonother vehicles.
— Only use the kit to inflate the tiresofyourvehicleandto checkthevehicle'stirepressure.
—Onlyplugthecompressorintoa 12VDCcarpowerpoint.
—Keepthekitfreeofwaterand dirt.
— Do not disassemble or modify thekit.
—Donotdrophekitorallowhard impactstothekit.
- Donotusetheemergencytire puncturerepairkitunderthefollowing conditions. Contact a NISSAN dealer or professional road assistance.
—whenthesealanthaspassedits expirationdate(shownonthe labelattachedtothebottle)
—whenthecutorthepunctureis approximately0.25in(6mm)or longer
—whenthetiresidewallisdamaged
—whenthevehiclehasbeendri-venwithextremelylowtire pressure
—when the tire has come off the inside or the outside of the wheel.
—whenthetirewheelisdamaged
—whentwoormoretiresareflat
Stoppingthevehicle
- Safelymovethevehicleofftheroadand awayfromtraffic.
- Turnonthehazardwarningflashers.
- Parkonalevel surface and apply the parking brake.
- AutomaticTransmissionmodels:
MovetheselectorlevertotheP(Park)
position.
ManualTransmissionmodels:
MovetheshiftlevertotheR(Reverse) position.
- Turnofftheengine.
- Raisethehoodtowarnothertrafficandto signalprofessionalroadassistancepersonnelthatyouneedassistance.
- Have all passengers get out of the vehicle and standinasafe place, away from traffic and clear of the vehicle.

WARNING
Makesuretheparkingbrakeissecurely appliedandthemanualtransmissionis shiftedintoR(Reverse)ortheautomatictransmissionintoP(Park).
- Neverrepairtireswhenthevehicle isonaslope,iceorslipperyareas. Thisishazardous.
●Neverrepairtiresifoncomingtraffic isclosetoyourvehicle.Waitfor professionalroadassistance.

text_image
① ② ③ SCE0866Gettingemergencytirepuncturerepair kit
Takeouttheemergencytirepuncturerepairkit locatedunderthecargoroomorinthetrunk.
Therepairkitconsistsofthefollowingitems:
① Tiresealantbottle
② Aircompressor
③ Speedrestrictionsticker
NOTE:
Formodelswiththeemergencytirepunc- turerepairkit,asparetire,jackandrodare notequippedasstandard.Thesepartsare dealeroptions.ContactaNISSANdealer aboutobtainingtheseparts.See"Chan-
gingaflattire(formodelswithsparetire)"(P.6-3)forusageofjackingtoolsandtire replacement.
Beforeusingemergencytirepuncture repairkit
- Ifanyforeignobject(forexample,ascrewor nail)isembeddedinthetire,donotremove it.
- Checktheexpirationdateofthesealant (shownonthelabelattachedtothebottle). Neveruseasealantwhoseexpirationdate haspassed.
Repairingtire

WARNING
Observethefollowing precautions when using the tirerepair compound.
- Swallowing the compound is dangerous. Immediately drink a much water as possible and seek prompt medical assistance.
- Rinsewellwithlotsofwaterifthe compoundcomesintocontactwith skinoreyes.Ifirritationpersists, seekpromptmedicalattention.
- Keeptherepaircompoundoutof thereachofchildren.
•The emergency repair compound may cause malfunction of the tire pressures sensors and cause the low tire pressure warning light to illuminate. Havethetire pressures sensor replaced as soon as possible.
NOTE:
Donotremoveanynailsorscrewsthat havepenetratedthetirewhenperforming repairs.
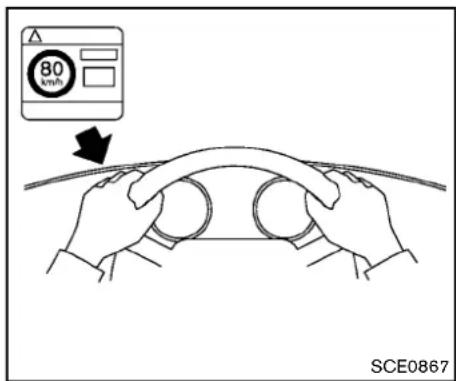
text_image
80 km/h SCE0867- Openthelidoftheaircompressorandtake outthespeedrestrictionsticker, thenputit inalocationwherethedrivercan seeit while driving.

CAUTION
Donot putthe speedrestriction label onthesteeringwheelpad,thespeedometerorthewarninglightlocations.

text_image
Technical diagram showing two-step assembly steps of a mechanical device, labeled with numbered components and a reference number SCE0868.- Takethehose ① and the power plug out of the air compressor. Remov the cap of the bottle holder from the air compressor.
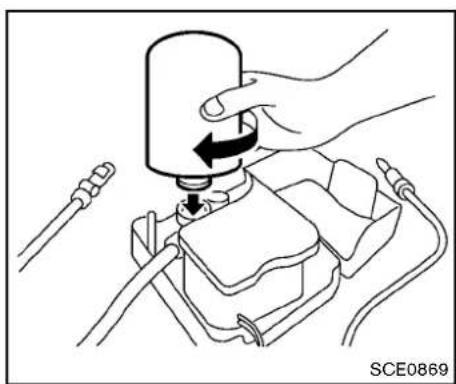
natural_image
Illustration of a hand using a tool to press or install a component, with no visible text or symbols.- Removethecapfromthetiresealantbottle, andscrewthebottleclockwiseontothe bottleholder.(Leavethebottlesealintact. Screwingthebottleontothebottleholder willpiercethesealofthebottle.)
- Removethecapfromthetirevalveonthe flattire.
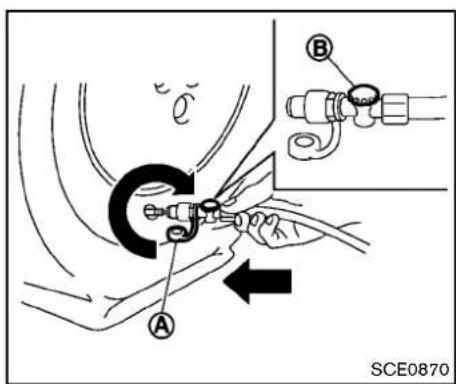
text_image
A B SCE0870- Removetheprotectivecap Ⓐ of thehose andscrew the hoses securely onto the tire valve. Makesure that the pressurerelease valve Ⓑ is securely tightened. Makesure that the air compressors switch this the OFF (○) position, and then insert its power plug into the power outlet in the vehicle.
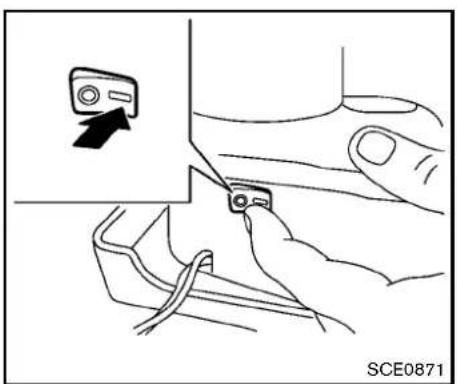
natural_image
Illustration of a hand inserting a device into a device with an arrow indicating the action (no text or symbols present)- Pushtheignitionswitchtothe "ACC" position. Thenturnthecompressorswitch totheON(-)positionandinflatethetireup tothepressurethatisspecifiedonthetire andloadinginformationlabelaffixedtothe driver'ssidecenterpillarifpossible,ortothe minimumof180kPa(26psi).Turntheair compressoroffbrieflyinordertocheck the tirepressurewiththepressuregauge. Ifthetireisinflatedtohigherthan the specifiedpressure,lowerthetirepressure byreleasingairwiththepressurerelease valve.
NOTE:
The compressortirepressuregauge mayshowapressurereadingof87psi (600kPa)forabout30secondswhile inflatingthetire.Thepressuregaugeis indicatingthepressureinsidethesealantcan.Whenthesealanthasbeen injectedintothetirethepressure gaugewilldropandindicateactualtire pressure.

WARNING
•Toavoidseriouspersonalinjury while using the emergency tire puncturerepairkit:
—Securelytightenthecompressor hosetothetirevalve. Failureto dosocancausethesealantto sprayintotheairandgetinto youreyesorontheskin.
- Donotstanddirectlybesidethe damaged tirewhileitisbeing inflatedbecauseoftheriskofthe rupture.Ifthereareanycracksor bumps,turnthecompressoroff immediately.
If the tire pressure does not increase to 180
kPa(26psi)within10minutes, the tire may be seriously damaged and the tire cannot berepaired with thistirerepair kit. ContactaNISSAN dealer.
- Whenthetirepressureisatthespecified amount, turn the air compressor off. If the pressure cannot be inflated to these specified amount, the air compressor can be turned off at the minimum of 180 kPa (26 psi). Remove the power plug from the power outlet and quickly remove the hose from the tire valve. Attach the protective cap and valvecap. Properly stow the emergency tire puncture repair kit in the trunk.

CAUTION
Toavoidseriouspersonalinjurywhen stowingtheemergencytire puncture repairkit:
- Keepthesealantbottlescrewed intothecompressor.Failureretodo socancausethesealanttospray intotheairandgetintoyoureyesor ontheskin.
-
Immediately drivethe vehicle for 10 minutes or 3 km (2 miles) at as speed of 80 km/h (50 MPH) or less.
-
Afterdriving, makesurethattheaircompressorswitchisintheOFFposition, then screwthehosesecurelyontothetirevalve. Checkthetirepressurewiththepressure gauge. The temporaryrepairiscompleted if the tirepressuredoesnotdrop.
Makesurethepressureisadjustedtothe pressurethatisspecifiedonthetireand loadinginformationlabelbeforedriving.
- If the tire pressured drops, repeat the steps from 5 to 9. If the pressured drops again or under 130 kPa (19 psi), the tire cannot be repaired with this trierepair kit. Contact a NISSAN dealer.
Thesealantbottleandhosecannotbe reusedtorepairanotherpuncturedtire. ContactaNISSANdealertopurchase replacements.
Afterrepairingtire
SeeaNISSANdealerfortirerepair/replacement as soon as possible.

WARNING
- Afterusing Emergency Tire Sealant to repairs a minortirepuncture, do not drivethe vehicle speeds faster than 50 MPH (80 km/h).
- ImmediatelyafterusingEmergency TireSealanttorepairaminortire puncture,takeyourvehicletoa NISSANdealertoinspect,andrepairorreplacethetire.TheEmergency Tire Sealant cannot permanentlysealapuncturedtire. Continuingoperationofthevehicle withoutapermanenttirerepaircan leadtoacrash.
- IfyouusedEmergencyTireSealant torepairaminortirepuncture,your NISSANdealerwillalsoneedto replacetheTPMSsensorinaddition torepairingorreplacingthetire.
•NISSAN recommends using only NISSANGenuine Emergency Tire Sealant provided with your vehicle. Othertire sealants may damage the valvestemseal which can cause the tire to lose air pressure.
JUMPSTARTING
Tostartyourenginewithaboosterbattery,the instructionsandprecautionsbelowmustbe followed.

WARNING
- If done incorrectly, jump starting can lead to a battery explosion, resulting in severe injury or death. It could also damage your vehicle.
- Explosivehydrogengasisalways presentinthevicinityofthebattery. Keepallsparksandflamesaway fromthebattery.
- Donotallowbatteryfluidtocome intocontactwitheyes,skin,clothing orpaintedsurfaces.Batteryfluidis acorrosivesulphuricacidsolution whichcancausesevereburns.Ifthe fluidshouldcomeintocontactwith anything,immediatelyflushthecontactedareawithwater.
-
Keepthebatteryoutofthereachof children.
•Theboosterbatterymustberatedat 12volts.Useofanimproperlyrated batterycandamageyourvehicle. -
Whenever working on near a battery, always wears suitable eye protectors (forexample, goggles or industrials safety spectacles) and removerings, metal bands, or any other jewelry. Donotlean over the battery when jump starting.
- Donotattempttojumpstarta frozenbattery.Itcouldexplode andcauseseriousinjury.
- Yourvehiclehasanautomaticenginecoolingfan.Itcouldcomeonat anytime.Keephandsandother objectsawayfromit.

text_image
A ①+ ②+ ③- C B ①+ ④- C ①-②-③-④ SCE0791
WARNING
Alwaysfollowtheinstructionsbelow. Failuretodosocouldresultindamage tothechargingsystemandcause personalinjury.
- If the booster battery is in another vehicle
Ⓐ ,positionthetwovehicles( Ⓐ and Ⓑ ) tobringtheirbatteriesintocloseproximityto eachother.
Donotallowthetwovehiclestotouch.
- Applyparkingbrake. Movetheselectorlever totheP(Park)position(Automatictransmissionmodels). MovetheshiftlevertotheN (Neutral)position(Manualtransmission models). Switchoffallunnecessaryelectricalsystems(light, heater, airconditioner, etc.).
- Removeventcapsonthebattery(ifso equipped). Coverthebatterywithafirmly wrungoutmoistcloth © toreduce explosionhazard.
- Connectjumpercablesinthesequenceas illustrated( ① → ② → ③ → ④ ).

CAUTION
- Alwaysconnectpositive(+)topositive(+)andnegative(-)tobody ground(asillustrated)—nottothe battery.
-
Makesurethejumpercablesdonot touchmovingpartsintheengine compartmentandthatclampsdo notcontactanyothermetal.
-
Start the engine of the booster vehicle and let it run for a few minutes.
A
- Keep the engine speed of the booster vehicle Ⓐ at about 2,000 rpm, and start the engine of the vehicle being jumped started Ⓑ.

CAUTION
Donotkeepthestartermotorengaged formorethan10seconds.Iftheengine does not start right away, push the ignition switchtothe OFFposition andwait10 secondsbeforetrying again.
- After starting your engine, carefully disconnect then negative cable and then the positive cable (④ → ③ → ② → ①).
- Replacetheventcaps(ifsoequipped). Be suretodisposeoftheclothusedtocover theventholesasitmaybecontaminated withcorrosiveacid.
- Putthebatterycoveron.
PUSHSTARTING
Donotattempttostarttheenginebypushing.

CAUTION
●Automatictransmissionmodels cannotbepush-startedortow-started.Attemptingtodosomay causetransmissiondamage.
- Threewaycatalystequippedmodels shouldnotbestedbypushing sincethreewaycatalystmaybe damaged.
- Nevertrytostartthevehicleby towingit;whentheenginestarts, theforwardsurgecouldcausethe vehicletocollidewiththetow vehicle.
IFYOURVEHICLEOVERHEATS

CAUTION
- Donotcontinuetodriveify your vehicleoverheats.Doingsocould causeenginedamageorvehicle fire.
•To avoid the dangerofbeing scalded,neverremovetheradiator capwhiletheengineisstillhot. When the radiator cap is removed, pressurizedhot water willspurt out, possiblycausingseriousinjury.
- Donotopen thehood ifsteamis comingout.
If your vehicle is overheating (indicated by an extremely high temperature gauge reading), or if you feel a lack of engine power, detect abnormal noise, etc., takethefollowing steps:
- Movethevehiclesafelyofftheroad, apply theparkingbrakeandmovetheselector levertotheP(Park)position(Automatic transmission models). Move the shift lever to the N(Neutral) position(Manualtransmissionmodels).
Donotstoptheengine.
- Turnofftheairconditioner. Openallthe windows, movetheaterorairconditioner temperature control to maximum hot and fan control to high speed.
- If engine overheating is caused by climbing along hillionahotday, run the engine at a fastidle (approximately 1,500rpm) until the temperature gauge indication return to normal.
4.Getoutofthevehicle.Lookandlistenfor steamorcoolantescapingfromtheradiator beforeopeningthehood.(Ifsteamor coolantisescaping,turnofftheengine.) Donotopenthehoodfurtheruntilnosteam orcoolantcanbeseen. - Opentheenginehood.

WARNING
Ifsteamorwateriscomingfromthe engine,standcleartopreventgetting burned.
- Visually check if the cooling fan is running. Theradiator hoses and radiator should not leak water. If coolant is leaking or the cooling fandoes not run, stop the engine.

WARNING
Becarefulnottoallowyourhands,hair, jewelryorclothingtocomeintocontact with,orgetcaughtin,enginebeltsor theenginecoolingfan.Theengine coolingfancanstartatanytime.
- Aftertheenginecoolsdown, check the coolantlevelinthereservoirwiththeengine running.Addcoolanttothereservoir if necessary.Haveyourvehiclerepairedat thenearestNISSANdealer.
TOWINGYOURVEHICLE
Whentowingyourvehicle, all State (Provincial in Canada) and local regulations for towing must be followed. Incorrect towing equipment could damage your vehicle. Towing instructions are available from a NISSAN dealer. Local service operators are familiar with the applicable laws and procedures for towing. To assure proper towing and to prevent accident damage to your vehicle, NISSAN recommend that you have as service operator to your vehicle. It is advisable to have the service operator carefully read the following precautions.

WARNING
- Neverrideinavehiclethatisbeing towed.
- Nevergetunderyourvehicleafterit hasbeenliftedbyatowtruck.

CAUTION
- Whentowing, makesure that the transmission, axles, steeringsystem and drivetrain are in working condition. If any unit is damaged, dollies must be used.
6-18 Incaseofemergency
•Alwaysattachsafetychainsbefore towing.
Forinformationabouttowingyourvehiclebehind arecreationalvehicle(RV),see"Flattowing"(P.9-20)ofthismanual.
TOWINGRECOMMENDED BY NISSAN(exceptforNISMOmodels)
NISSANrecommendsthatyourvehiclebe towedwiththedriving(rear)wheelsoffthe groundorplacethevehicleonaflatbedtruckas illustrated.

CAUTION
- Nevertowautomatictransmission modelswiththerearwheelsonthe groundorfourwheelsonthe ground(forwardorbackward),as thismaycauseseriousandexpen-
sivedamagetothedrivetrain.Ifitis necessarytotowthevehiclewith thefrontwheelsraised,alwaysuse towingdolliesundertherear wheels.
- Whentowingrearwheeldrivemodelswiththefrontwheelsonthe groundorontowingdollies:Push theignitionswitchtotheACCorON position,andsecurethesteering wheelinastraight-aheadposition witharopeorsimilardevice.
- If you have to tow manual transmission models with therear wheels on
theground(ifyoudonotusetowing dollies)orfourwheelsonthe ground:
—Pushtheignitionswitchtothe ONpositionandturnoffall accessories.
—Alwaysrelease the parking brake.
—Movethetransmissionshiftle-vertotheN(Neutral)position.
—Observethefollowingrestricted towingspeedsanddistancesfor manualtransmissionmodels only:
•Rearwheelsontheground: Speed: Below50MPH(80 km/h) Distance: Less than 50 miles (80km)
•Fourwheelsontheground: Speed:Below70MPH(112 km/h) Distance:Lessthan500miles (800km)
—If the speedordistance must necessarily begreater, remove the propellershaft before to-
ingtopreventdamagetothe drivetrain.

text_image
SCE0836TOWINGRECOMMENDED BY NISSAN(NISMOmodels)

CAUTION
DonottowNISMOmodelswithany wheelontheground,orwiththefront orrearwheelsraised,becausethismay causedamagetothefrontbumperwith anaerodynamicsplitter,rearbumper withanaerodynamicdiffuserorex-haustpipes.
NISSANrecommendsthatyouplacethevehicle onaflatbedtruckasillustrated.
VEHICLERECOVERY(freeingastuck vehicle)

WARNING
• Standclearofastuckvehicle.
- Donotspinyourtiresathighspeed. This could cause them to explode and result in serious injury. Part of your vehicle could also overheat and bedamaged.
Pullingastuckvehicle
If your vehicle is stuckins and snow, mud, etc., use atowstrap or other devices designed specifically for vehiclerecovery. Always follow the manufacturer's instructions for the recovery device.

text_image
Diagram illustrating car safety instructions with numbered steps and a cross-section showing vehicle clearance.- Accessthemountingholefortherecovery hook.
ExceptforNISMOmodels:Toremovethe cover Ⓐ,firstunhooktheclaws ① using asuitabletoolwrappedinacloth,andthen pullthelowersideofthecover ②.
ForNISMOmodels:Whenthefrontlicense
plateandbracketareinstalled, temporarily removethem.(See "Installingfrontlicense plate"(P.9-14)fortheinstallationprocedures.) Ascrewdriverissuppliedwiththe jackingtoolsforremoval.
- Securely install the vehiclerecovery hook (stored with jacking tools) as illustrated. Attach the tow strap to ther e recovery hook.
Donotusethetiedownhooks ④ fortowingor vehiclerecovery.
Makesurethatthehookisproperlysecured in theoriginalplaceafteruse.
Replacetherecoveryhookcover(exceptfor NISMOmodels)orthefrontlicenseplate(for NISMOmodels).

CAUTION
•Tow chainsorcablesmust beattachedonlytothevehiclerecovery hooksormainstructuralmembers ofthevehicle. Otherwise,thevehiclebodywillbedamaged.
- Donotusethevehicletiedownsto freeavehiclestuckinsand, snow, mud, etc.
- Nevertowavehicleusingthevehicletiedownsorrecoveryhooks.
Incaseofemergency
- Alwayspullthecablestraightout fromthefrontofthevehicle.Never pullonthevehicleatanangle.
- Pullingdevicesshouldberoutedso theydonottouchanypartofthe suspension,steering,brakeorcoolingsystems.
-
Pullingdevicessuchasropesor canvasstrapsarenotrecommended foruseinvehicletowingorrecovery.
-
Applytheacceleratoraslittleaspossible tomaintaintherockingmotion.
- Releasethe acceleratorpedal before shiftingbetween R(Reverse) and D(Drive)(automatictransmissionmodels) or1standR(Reverse)(manualtransmissionmodels).
-
Donotspinthetiresabove35MPH(55 km/h).
-
If the vehicle cannot be freed after a few tries, contact professional towingservice to remove the vehicle.
Rockingastuckvehicle
If your vehicle is stuckins and snow, mud, etc., use the following procedure:
- TurnofftheVehicleDynamicControl(VDC) system.
- Makesuretheareainfrontandbehindthe vehicleisclearofobstructions.
- Turnthesteeringwheelrightandlefttoclear anareaaroundthefronttires.
- Slowlyrockthevehicleforwardandbackward.
- Shiftback and forth between R(Reverse) and D(Drive)(automatic transmission models) or 1 standard R(Reverse)(manual transmission models).
6-22 Incaseofemergency
MEMO
Incaseofemergency6-23
MEMO
6-24 Incaseofemergency
7Appearanceandcare
Cleaningexterior....7-2
Washing....7-2
Softtopcareandcleaning(Roadstermodels)......7-3
Waxing....7-4
Removingspots....7-4
Underbody....7-4
Glass....7-4
Wheels....7-4
Chromeparts....7-5
Tiredressing....7-5
Cleaninginterior....7-5
Airfresheners....7-6
Floormats....7-6
Seatbelts....7-7
Corrosionprotection....7-8
Mostcommonfactorscontributingto
vehiclecorrosion....7-8
Environmentalfactorsinfluencetherate
ofcorrosion....7-8
Toprotectyourvehiclefromcorrosion....7-8
CLEANINGEXTERIOR
Inordertomaintaintheappearanceofyour vehicle,itisimportanttotakepropercareofit. Toprotectthepaintsurface,washyourvehicle assoonasyoucan:
●afterarainfalltopreventpossibledamage fromacidrain
●afterdrivingoncoastalroads
- whencontaminantssuchassoot,bird droppings,treesap,metalparticlesorbugs getonthepaintsurface
- whendustormudbuildsuponthesurface Wheneverpossible,storeorparkyourvehicle insideagarageorinacoveredarea.
Whenitisnecessarytoparkoutside, parkina shadyareaorprotectthevehiclewithabody cover.
Becarefulnottoscratchthepaintsurface whenputtingonorremovingthebody cover.
WASHING
Washdirtoffthevehiclewithawetspongeand plentyofwater.Cleanthevehiclethoroughly usingamildsoap,aspecialvehiclesoapor generalpurposedishwashingliquidmixedwith clean,lukewarm(neverhot)water.

CAUTION
- Donotusecarwashesthatuseacid inthedetergent. Some car washes, especially brushless ones, usesome acid for cleaning. The acid may react with some plastic vehicle components, causing them to crack. This could affect their appearance, and also could cause them not to function properly. Always check with your car was to confirm that acid is not used.
- Donotwashthevehiclewithstrong householdsoap,strongchemical detergents,gasolineorsolvents.
- Donotwashthevehicleindirect sunlightorwhilethevehiclebodyis hot, asthesurfacemaybecome water-spotted.
- Avoidusingtight-nappedorrough cloths, such as washingmitts. Care must be taken when removing caked-ondirtotherforeignsub-stancessothepaintsurface is not scratchedordamaged.
- ForRoadstermodels, observethe following:
—Donotuseanautomaticcar washorahighpressurecar wash. The softtop maybe damaged.
—Avoidapplying directwater pressure,suchashighpres-suredwaterfrom household hoses,ontheliningofthesoft topandvehiclebody. Avoid applyingcontinuouswateron thepartsaroundthesofttop andthewindows.Thesemay causewatertoleakintothe insideofyourvehicle.
Rinsethevehiclethoroughlywithplentyofclean water.
Insideflanges, seamsandfoldsonthedoors, hatchesandhoodareparticularlyvulnerableto theeffectsofroadsalt. Therefore, theseareas
mustberegularlycleaned.Makesurethatthe drainholesintheloweredgeofthedoorare open.Spraywaterunderthebodyandinthe wheelwellstoloosenthedirtandwashaway roadsalt.
Avoidleavingwaterspotsonthepaintsurface byusingadampchamoistodrythevehicle.
natural_image
Diagram of a car being lifted by an overhead conveyor belt, showing no text or symbols on the vehicle itself.NISMOmodels

CAUTION
Donotuseanautomaticcarwashfor NISMOmodels.Therearspoilermaybe damaged.
SOFTTOPCAREANDCLEANING (Roadstermodels)
Propercareandhandlingsshouldbeobserved to maintainagoodappearanceofthesofttop. Impropercaremaycausethetopcloth'ssurface tostiffen,stain,ormat.Followtheinstructions showninthissection.
Itisnotnecessarytowashthesofttopevery timeyouwashthevehiclebody,butcleanthe topregularlybeforeitbecomesquitedirty. Leavingthesofttopdirtyorsoiledforalong periodwillcausedeteriorationtothequalityof thetopmaterial.
Removedustordirtonthesofttopwithasoft brushorsponge,thenrinseitwithplentyof cleanwater.Whenthetopisquitedirty,wash usingamilddetergent,suchasageneral cleanerespeciallymadeforaclothtopora generalpurposedish-washingliquid,mixedwith clean,lukewarm(neverhot)water.Rinsethetop againwithplentyofcleanwatertoremoveall tracesofsoap.

CAUTION
- Donotusestronghouseholdsoap, strongchemicaldetergents,gasolineorsolvents.
Appearanceandcare
- Ifglasscleanergetsonthesofttop, immediatelywashitoffwithclean water.
- Donotapplydirectwaterpressure, suchashighpressuredwaterfrom householdhoses,ontheliningof thesofttopandvehiclebody,asthis maycausewatertoleakintothe insideofyourvehicle.
Aftercleaning,alwaysbesurethetopandits storagearecompletelydrybeforeopeningthe top.Openingthetopwhileitiswetordampmay causeinteriorwaterdamage,waterstainsor mildewonthetop.
WAXING
Regularwaxingprotectsthepaintsurfaceand helpsretainnewvehicleappearance.Polishing isrecommendedtoremovebuilt-upwaxresidue andtoavoidawweatheredappearancebefore reapplyingwax.
ANISSANdealercanassistyouinchoosingthe properproduct.
- Waxyourvehicleonlyafterathorough washing.Followtheinstructionssupplied withthewax.
- Donotuseawaxcontaininganyabrasives, cuttingcompoundsorcleanersthatmay
damagethevehiclefinish.
Machinecompoundoraggressivepolishingona basecoat/clearcoatpaintfinishmaydullthe finishorleaveswirlmarks.
REMOVINGSPOTS
Removetarandoilspots,industrialdust, insects,andtreesapasquicklyaspossible fromthepaintsurfacetoavoidlastingdamage orstaining.Specialcleaningproductsare availableataNISSANdealeroranyautomotive accessorystores.
UNDERBODY
Inareaswhereroadsaltisusedinwinter,the underbodymustbecleanedregularly.Thiswill preventdirtandsaltfrombuildingupand causingtheaccelerationofcorrosiononthe underbodyandsuspension.Before the winter period and again in the spring, the underseal mustbecheckedand,ifnecessary,re-treated.
GLASS
Useglasscleanertoremovesmokeanddust filmfromtheglasssurfaces.Itisnormalforglass tobecomecoatedwithafilmafterthevehicleis parkedinthehotsun.Glasscleanerandasoft clothwilleasilyremovethisfilm.

CAUTION
- Whencleaningtheinsideofthe windows, donotusesharp-edged tools, abrasivecleanersorchlorine-baseddisinfectantcleaners. They could damage the electrical conductors, radioantennaelementsorrear windowdefrosterelements.
- Ifglasscleanergetsonthesofttop, immediatelywashitoffwithclean water(Roadstermodels).
WHEELS
Washthewheelswhenwashingthevehicleto maintaintheirappearance.
- Cleantheinnersideofthewheelwhenthe wheelischangedor theundersideofthe vehicleiswashed.
- Inspectwheelrimsregularlyfordentsor corrosion. Suchdamagemaycauselossof pressureorpoorsealatthetirebead.
- NISSANrecommendsthattheroadwheels bewaxedtoprotectagainstroadsaltin areaswhereitisusedduringwinter.
7-4 Appearance and care

CAUTION
Donotuseabrasivecleanerswhen washingthewheels.
Aluminumalloywheels
Washregularlywithaspongedampenedina mildsoapsolution,especiallyduringwinter monthsinareaswhereroadsaltisused.Salt coulddiscolorthewheelsifnotremoved.

CAUTION
Followthedirectionsbelowtoavoid stainingordiscoloringthewheels:
- Donotuseacleanerthatuses strongacidoralkalicentsto cleanthewheels.
- Donotapplywheelcleanerstothe wheelswhentheyarehot.The wheeltemperatureshouldbethe sameasambienttemperature.
- Rinsethewheeltocompletelyremovethecleanerwithin15minutes afterthecleanerisapplied.
CHROMEPARTS
Cleanchrome parts regularly with an on-abrasive chromopolishtomaintain the finish.
TIREDRESSING
NISSANdoesnotrecommendtheuseoftire dressings.Tiremanufacturersapplyacoatingto thetirestohelpreducediscolorationofthe rubber.Ifatiredressingisappliedtothetires,it mayreactwiththecoatingandformacompound.Thiscompoundmaycomeoffthetire whiledrivingandstainthevehiclepaint.
If you choose a seatired dressing, take the following precautions:
- Useawater-basedtiredressing. The coating on the tired dissolves more easily with an oil-basedtiredressing.
- Applyalightcoatotiredressingtohelp preventitfromenteringthetiretread/grooves(whereitwouldbedifficultto remove).
- Wipeoffexcesstiredressingusingadry towel. Makesurethetiredressingis completelyremovedfromthetiretread/grooves.
- Allowthetiredressingtodryasrecommendedbytiredressingmanufacturer.
CLEANINGINTERIOR
Occasionallyremoveloosedustfromtheinterior trim,plasticpartsandseatsusingavacuum cleanerorsoftbristledbrush.Wipethevinyland leathersurfaceswithaclean,softclothdam-penedinmildsoapsolution,thenwipeclean withadrysoftcloth.
Regularcareandcleaningisrequiredinorderto maintaintheappearanceoftheleather.
Before using any fabric protector, read the manufacturer's recommendations. Some fabric protectors contain chemical that may stain or bleach these at material.
Useaclothdampenedonlywithwater,toclean themeterandgaugelens.

WARNING
Donotusewateroracidiccleaners(hot steamcleaners)ontheseat.Thiscan damagetheseatoroccupantclassificationsensor.Thiscanalsoaffectthe operationoftheairbagsystemand resultinseriouspersonalinjury.

CAUTION
●Neverusebenzine, thinner, orany similar material.
- Smalldirtparticlescanbeabrasive anddamagingtotheleathersurfaces and should be removed promptly.Donotusesaddlesoap, carwaxes,polishes,oils,cleaning fluids,solvents,detergentsorammonia-basedcleanersastheymay damagetheleather'snaturalfinish.
- Onlyusefabricprotectorsapproved byNISSAN.
- Donotuseglassorplasticcleaner onmeterorgaugelenscovers.It maydamagethelenscover.
AIRFRESHENERS
Mostairfreshenersuseasolventthatcould affectthevehicleinterior.Ifyouuseanair freshener,takethefollowingprecautions:
●Hanging-typeairfreshenerscancause permanentdiscolorationwhentheycontact vehicleinteriorsurfaces. Placetheair freshenerinalocationthatallowsittohang freeandnotcontactaninteriorsurface.
- Liquid-typeairfreshenerstypicallyclipon thevents. Theseproductscancause immediatedamageanddiscolorationwhen spilledoninteriorsurfaces.
Carefullyreadandfollowthemanufacturer's instructionsbeforeusingairfresheners.
FLOORMATS

WARNING
Toavoidpotentialpedalinterference that may result in acollisionor injury:
- NEVERplaceafloormatontopof anotherfloormatinthedriverfront position.
- UseonlygenuineNISSANfloor matsspecificallydesignedforuse inyourvehiclemodel.Seeyour NISSANdealerformoreinformation.
- Properlypositionthematsinthe floorwellusingthefloormatpositioningaid.See“Floormatpositioningaid”(P.7-7).
TheuseofgenuineNISSANfloormatscan extend the life of your vehicle carpet and make it easiertocleantheinterior.Matsshouldbe
maintained with regular cleaning and replaced if they become excessively worn.
7-6 Appearance and care
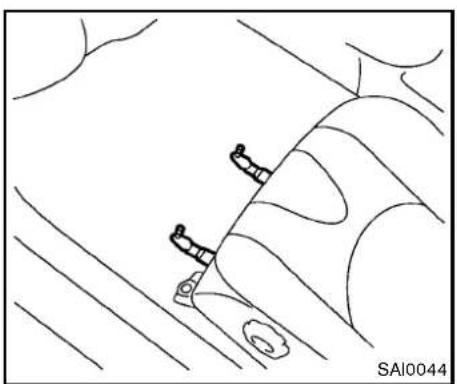
natural_image
Simple line drawing of a road with two vehicles and a circular symbol, no text or symbols presentFloormatpositioningaid
This vehicle includes frontfloormatbracket to actasfloormatpositioningaid.NISSANfloor matshavebeenspecially designed for your vehicle model. The frontfloormatshave grommetholesin them.To install, simply position them at by placing the floormatbracket hook through the floormatgrommethole while centering them at in the floor well.
Periodicallychecktomakecertainthatthemats areproperlypositioned.
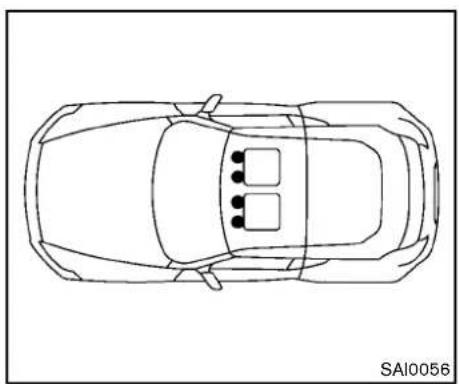
natural_image
Top-down line drawing of a car viewed from the side, showing front and rear views with no text or symbols.Bracketpositions
The illustrations show sthelocationoffloormat brackets.
SEATBELTS
Theseatbeltscanbecleanedbywipingthem withaspongedampenedinamildsoap solution.Allowthebeltstodrycompletely in theshadebeforeusingthem.
See"Seatbelts"(P.1-9).

WARNING
Donotallowwetseatbeltstorollupin theretractor.NEVERusebleach,dye,or chemicalsolventstocleantheseat
belts, sincethesematerialsmayseverelyweakentheseatbeltwebbing.
CORROSIONPROTECTION
MOSTCOMMONFACTORSCONTRIBUTINGTOVEHICLECORROSION
●The accumulation of moisture-retaining dirt and debrisin body panel sections, cavities, and other areas.
- Damagetopaintandotherprotectivecoatingscausedbygravelandstonechipsor minortrafficaccidents.
ENVIRONMENTALFACTORSINFLUENCETHERATEOFCORROSION
Moisture
Accumulation of sand, dirt and water on the vehicle body underside can accelerate corrosion. Wet floor coverings will not dry completely inside the vehicle, and should be removed for drying to avoid floor panel corrosion.
Relativehumidity
Corrosionwillbeacceleratedinareasofhigh relativehumidity,especiallythoseareaswhere thetemperaturesstayabovefreezingwhere atmosphericpollutionexists,orwhereroadsalt isused.
Temperature
Atemperature increase will accelerate the rate of corrosion to those parts which are not well ventilated.
Airpollution
Industrial pollution, the presence of salt in the air in coastal areas, or heavy roads salt use will accelerate the corrosion process. Roads salt will also accelerate the integration of paint surfaces.
TOPROTECT YOURVEHICLEFROM CORROSION
- Washandwaxyourvehicleoftentokepthe vehicleclean.
●Alwayscheckforminordamagetothepaint andrepairitassoonaspossible. - Keepdrainholesatthebottomofthedoors opentoavoidwateraccumulation.
- Checktheunderbodyforaccumulationof sand, dirtorsalt. If present, washwithwater as soonaspossible.

CAUTION
- NEVERremovedirt, sandorother debris from the passenger compartment by washing it out with a hose.
Removedirtwithavacuumcleaner.
- Neverallowwaterorotherliquidsto comeincontactwithelectronic componentsinsidethevehicleas thismaydamagethem.
Chemicalsusedforroadsurfacedeicingare extremelycorrosive. Theyacceleratecorrosion and deteriorationofunderbodycomponents suchastheexhaustsystem,fuelandbrake lines,brakecables,floorpanandfenders.
Inwinter, the underbody must be cleaned periodically.
For additional protection against trust and corrosion, which may be required in some areas, consulta NISSAN dealer.
MEMO
Appearanceandcare7-9
MEMO
7-10 Appearanceandcare
8Maintenanceanddo-it-yourself
Maintenancerequirement....8-3
Scheduledmaintenance....8-3
Generalmaintenance....8-3
Wheretogoforservice....8-3
Generalmaintenance....8-3
Explanationofmaintenanceitems....8-3
Maintenance precautions....8-6
Enginecompartmentchecklocations....8-8
VQ37VHRenginemodel....8-8
Enginecoolingsystem....8-9
Checkingenginecoolantlevel....8-10
Changingenginecoolant....8-10
Engineoil....8-11
Checkingengineoillevel....8-11
Changingengineoilandfilter....8-11
Automatictransmissionfluid....8-13
Powersteeringfluid....8-13
Brakeandclutchfluid....8-14
Brakefluid....8-14
Clutchfluid(Manualtransmissionmodels)......8-15
Windowwasherfluid....8-15
Battery....8-16
Jumpstarting....8-17
Variablevoltagecontrolsystem....8-18
Drivebelts....8-18
Sparkplugs....8-19
Replacingsparkplugs....8-19
Aircleaner....8-19
Windshieldwiperblades....8-20
Cleaning....8-20
Replacing....8-21
Brakes....8-22
Self-adjustingbrakes....8-22
Brakepadwearwarning....8-22
Fuses....8-22
Enginecompartment....8-22
Passengercompartment....8-24
IntelligentKeybatteryreplacement....8-25
Lights....8-27
Coupe....8-27
Roadster....8-28
Headlights....8-29
Exteriorandinteriorlights....8-29
Wheelsandtires....8-31
Tirepressure....8-31
Tirelabeling....8-34
Changingwheelsandtires....8-38
Emergency tire puncturerepairkit (ifsoequipped)....8-41
MAINTENANCEREQUIREMENT
YournewNISSANhasbeendesignedtohave minimummaintenancerequirementswithlong serviceintervalstosaveyoubothtimeand money.However,someday-to-dayandregular maintenanceisessentialtomaintainyour NISSAN'sfinemechanicalcondition,aswell asitsemissionandengineperformance.
Itistheowner's responsibility to make sure that the scheduled maintenance, as well as general maintenance, is performed.
Asthevehicleowner,youaretheonlyonewho canensurethatyourvehiclereceivestheproper maintenancecare.Youareavitallinkinthe maintenancechain.
Generalmaintenanceincludesthoseitems whichshouldbecheckedduringnormalday-to-dayoperation.Theyareessentialforproper vehicleoperation.Itsyourresponsibilityto performtheseproceduresregularlyasprescribed.
Performinggeneralmaintenancechecksrequiresminimalmechanicalskillandonlyafew generalautomotivetools.
These checks or inspections can be done by yourself, a qualified technician, if you prefer, a NISSAN dealer.
WHERETOGOFORSERVICE
Ifmaintenanceserviceisrequiredoryourvehicle appearstomalfunction,havethesystems checkedandservicedbyaNISSANdealer.
NISSANtechniciansarewell-trainedspecialists andarekeptuptodatewiththelatestservice informationthroughtechnicalbulletins,service tips,andin-dealershipinformationsystems.
They are completely qualified to work on NISSAN vehicles before work begins.
YoucanbeconfidentthataNISSANdealer's servicedepartmentperformsthebestjobto meetthemaintenancerequirementsonyour vehicle—inareliableandeconomicalway.
GENERALMAINTENANCE
During thenormalday-to-day operation of the vehicle, general maintenances should be performed regularly as prescribed in this section. If you detect any unusual sounds, vibrations or smell, besure to check for the cause or have a NISSAN dealer do it promptly. In addition, you should notify a NISSAN dealer to youth think that repairs are required.
When performing any checks or maintenance work, see "Maintenance precautions" (P.8-6).
EXPLANATIONOFMAINTENANCE ITEMS
Additionalinformationonthefollowing itemswith“\*”isfoundlaterinthissection.
Outsidethevehicle
Themaintenanceitemslistedhereshouldbe performedfromtimetotime,unlessotherwise specified.
Doorsandenginehood:Checkthatalldoors andtheenginehood,operateproperly. Also ensure that all latcheslocksecurely. Lubricate hinges, latches, latchpins, rollersandlinksif necessary. Makesure that these secondary latch keep the hood from opening when the primary latch is released.
Whendrivinginareasusingroadsaltorother corrosivematerials, checklubricationfrequently.
Lights*: Clean the headlights on a regular basis.
Maintenanceanddo-it-yourself
Makesurethattheheadlights,stoplights,tail lights,turnsignallights,andotherlightsareall operatingproperlyandinstalledsecurely.Also checkheadlightaim.
Roadwheelnuts(lugnuts)*:Whenchecking thetires,makesurenowheelnutsaremissing, andcheckforanyloosewheelnuts.Tightenif necessary.
Tirerotation*:Tires cannot be rotated, asthe fronttires are adifferentsize from thereartires and the direction of wheel rotation is fixed in each tire.
Tires*:Checkthepressurewithagaugeoften andalwayspriortolongdistancetrips.If necessary,adjustthepressureinalltires, includingthespare,tothepressurespecified. Checkcarefullyfordamage,cutsorexcessive wear.
TirePressureMonitoringSystem(TPMS) transmittercomponents:ReplacetheTPMS transmittergrommetseal,valvecoreandcap whenthetiresarereplacedduetowearorage.
Tire, wheelalignment and balance: If the vehicles should pull to either sidewalk while driving on a straight and level road, or if you detect one even or abnormal tire wear, ther may be needed for wheel alignment.
If the steering wheel or seat vibrates at normal highways speeds, wheel balancing maybe 8-4 Maintenance and do-it-yourself
needed.
For additional information regarding tires, refer to "Important Tire Safety Information" (US) or "Tire Safety Information" (Canada) in the NISSAN Warranty Information Booklet.
Windshield: Cleanthewindshieldonaregular basis. Checkthewindshieldatleasteverysix monthsforcracksorotherdamage. Havea damagedwindshieldrepairedbyaqualified repairfacility.
Windshieldwiperblades*:Checkforcracks orweariftheydonotwipeproperly.
Insidethevehicle
Themaintenanceitemslistedhereshouldbe checkedonaregularbasis,suchaswhen performingscheduledmaintenance,cleaning thevehicle,etc.
Acceleratorpedal: Check the pedal for smooth operation and makes sure the pedal does not catch or require uneven effort. Keep the floormataway from the pedal.
AutomatictransmissionP(Park)mechanism:Onafairlysteephill,checkthatyour vehicleisheldsecurelywiththeselectorleverin theP(Park)positionwithoutapplyingany brakes.
Brakepedal: Checkthepedalforsmooth operation. If the brakepedals suddenly goes
downfurtherthannormal, thepedalfeels spongyorthevehicleseemstotakelongerto stop, seeaNISSANdealerimmediately. Keep thefloormatawayfromthepedal.
Brakes: Check that the brakes donot pull the vehicle to onesidewhen applied.
Parkingbrake: Check the parking brake operation regularly. The vehicle should be securely held on a fairly steep hill with only the parking brake applied. If the parking brakeneeds adjusted, see a NISSAN dealer.
Seatbelts: Check that all part so these seat belt system (forexample, buckles, anchors, adjuster and retractors) operate properly and smoothly, and are installed securely. Check the belt webbing for cuts, fraying, wearordamage.
Seats: Checkseatpositioncontrolssuchas seatadjusters, seatbackrecliner, etc. to ensure they operates smoothly and that all latcheslock securely every position. Check that the head restraints move up and down smoothly and that the locks (if so equipped) hold securely in all latched positions.
Steeringwheel: Checkforchangesinthe steeringconditions, suchasexcessivefreeplay, hardsteeringorstrangenoises.
Warninglightsandchimes: Makesurethat all warninglightsandchimesareoperating properly.
Windshielddefroster:Checkthattheair comesoutofthedefrosteroutletsproperly and insufficientquantitywhenoperatingtheheater orairconditioner.
Windshieldwiperandwasher*:Checkthat thewipersandwasheroperateproperlyandthat thewipersdonotstreak.
Underthehood and vehicle
Themaintenanceitemslistedhereshouldbe checkedperiodically(forexample,eachtimeyou checktheengineoilorrefuel).
Battery*:Checkthefluidlevelineachcell.It shouldbebetweentheMAXandMINlines. Vehiclesoperatedinhightemperaturesorunder severeconditionrequirefrequentchecksofthe batteryfluidlevel.
Brakeandclutchfluidlevels*: Makesure that the brake and clutch fluid levels are between the MAX and MIN lines on the reservoirs.
Enginecoolantlevel*:Checkthecoolantlevel whentheengineiscold.
Enginedrivebelts*: Makesurethatnobeltis frayed, worn, crackedorily.
Engineoillevel*:Checkthelevelafterparking thevehicleonalevelspotandturningoffthe engine.Waitmorethan15minutesfortheoilto drainbackintotheoilpan.
Exhaustsystem: Makesuretherearenoloose supports, cracksorholes. If the sound of the exhaust seems unusual or there is a mell of exhaust fumes, immediately have the exhaust system inspected by a NISSAN dealer. (See "Precautions when starting and driving" (P.5-2) forexhaust gas (carbon monoxide).)
Fluidleaks: Checkunderthevehicleforfuel, oil, waterorotherfluidleaksafterthevehiclehas beenparkedforawhile. Waterdrippingfromthe airconditionerafteruseisnormal. If you should notice anyleaks or if gasolinefumes are evident, check for the cause and have it corrected immediately.
Powersteeringfluidlevel*andlines:Check the level with the engine off. Check the lines for proper attachment, leaks, cracks, etc.
Radiatorandhoses: Checkthefrontofthe radiatorandcleanoffanydirt, insects, leaves, etc., that may have accumulated. Makesurethe hoseshavenocracks, deformation, rotorloose connections.
Underbody:Theunderbodyisfrequentlyexposedtocorrosivesubstancesuchasthose usedonicyroadsortocontroldust.Itisvery importanttoremovethesesubstances,otherwiserustwillformonthefloorpan,frame,fuel linesandaroundtheexhaustsystem.Attheend ofwinter,theunderbodyshouldbethoroughly
flushedwithplainwater,beingcarefultoclean thoseareaswheremudanddirtmayaccumulate.Foradditionalinformation,see"Cleaning exterior"(P.7-2).
Windshieldwasherfluid*:Checkthatthereis adequatefluidinthereservoir.
MAINTENANCEPRECAUTIONS
When performing any inspection or maintenance work, your vehicle, always take care to prevent serious accidental injury to yourself for damage to the vehicle. The following are general precautions which should be closely observed.

WARNING
- Parkthevehicleonalevelsurface, applytheparkingbrakesecurely andblockthewheelstoprevent thevehiclefrommoving.Formanualtransmissionmodels,movethe shiftlevertoN(Neutral).Forautomatictransmissionmodels,move theselectorlevertoP(Park).
- Besuretheignitionswitchisinthe OFForLOCKpositionwhenperforminganypartsreplacementor repairs.
- Neverconnectordisconnectthe batteryoranytransistorizedcomponentwhiletheignitionswitchis intheONposition.
-
Neverleavetheengineorautomatic transmission related component harnessesdisconnectedwhilethe ignitionswitchisintheONposition.
-
If you must work with the engine running, keep your hands, clothing, hair and tools away from moving fans, belts and any other moving parts.
- Itisadvisabletosecureorremove anylooseclothingandremoveany jewelry,suchasrings,watches,etc. beforeworkingonyourvehicle.
●Alwaysweareyeprotectionwhen-everyouworkonyourvehicle. - Ifyoumustruntheengineinan enclosedspacesuchasagarage,be surethereisproperventilationfor exhaustgasestoescape.
- Nevergetunderthevehiclewhileit issupportedonlybyajack.Ifitis necessarytoworkunderthevehicle, supportitwithsafetystands.
- Keepsmokingmaterials,flameand sparksawayfromfueltankandthe battery.
- Yourvehicleisequippedwithan automaticenginecoolingfan.Itmay comeonatanytimewithoutwarning,eveniftheignitionkeyisinthe OFFpositionandtheengineisnot running.Toavoidinjury,always
disconnectthenegativebattery cablebeforeworkingnearthefan.
- Thefuelfilterorfuellinessshouldbe servicedbyaNISSANdealerbecausethefuellinesareunderhigh pressureevenwhentheengineis off.

CAUTION
- Donotworkunderthehoodwhile theengineishot.Turntheengine offandwaituntilcoolsdown.
- Avoiddirectcontactwithusedengineoilandcoolant.Improperly disposedengineoil,coolant,and/orothervehiclefluidscandamage theenvironment.Alwaysconformto localregulationsfordisposalof vehiclefluid.
This "8. Maintenance and do-it-yourself" section gives instructions regarding only those items which are relatively easy for an owner to perform.
AgenuineNISSANServiceManualisalso available.(See "Owner's Manual/ServiceManualorderinformation"(P.9-24).)
You should be aware that incomplete or imporeservicing may result in operating difficulties over excessive emissions, and could affect your warranty coverage. If doubt about any servicing, were recommend that it bedone by a NISSAN dealer.
Maintenanceanddo-it-yourself8-7
ENGINECOMPARTMENTCHECK LOCATIONS

text_image
1 2 3 4 5 6 7 8 9 10 11 12 10 JVM0086X- Enginecoolantreservoir
VQ37VHRENGINEMODEL
1.Fuse/fusiblelinkholder
2.Battery
3.Radiatorfillercap
4. Engineoildipstick
5. Engineoilfillercap
6.Brakefluidreservoir
- Clutchfluidreservoir(ManualTransmission models)
- Powersteeringfluidreservoir
- Windowwasherfluidreservoir
10Aircleaner
11.Drivebeltlocation
8-8 Maintenance and do-it-yourself
ENGINECOOLINGSYSTEM
Theenginecoolingsystemisfilledatthefactory withapre-dilutedmixtureof50%Genuine NISSANLongLifeAntifreeze/Coolant(blue)and 50%watertoprovideyear-roundanti-freeze andcoolantprotection.Theantifreezesolution containsrustandcorrosioninhibitors.Additional enginecoolingsystemadditivesarenotnecessary.

WARNING
- Neverremovetheradiatororcool- antreservoircapwhentheengineis hot.Waituntiltheengineand radiatorcooldown.Seriousburns couldbecausedbyhighpressure fluidescapingfromtheradiator. Seeprecautionsin"Ifyourvehicle overheats"(P.6-16)ofthismanual.
- Theradiatorisequippedwitha pressuretyperadiatorcap.Topreventenginedamage,useonlya genuineNISSANradiatorcap.

CAUTION
- Neveruseanycoolingsystemadditivessuchasradiatorsealer.Additivesmayclogthecoolingsystem andcausedamagetotheengine, transmissionand/orcoolingsystem.
- Whenaddingorreplacingcoolant, be sure to use only Genuine NISSANLongLifeAntifreeze/Coolant(blue)orequivalent.Genuine NISSANLongLifeAntifreeze/Coolant(blue)ispre-dilutedtoprovide antifreeze protection to -34 °F (-37 °C).Ifadditionalfreezeprotectionisneededduetowheatherwhere youoperateyourvehicle,addGenuineNISSANLongLifeAntifreeze/Coolant(blue)concentratefollowingthedirectionsonthecontainer. Ifanequivalentcoolantotherthan GenuineNISSANLongLifeAntifreeze/Coolant(blue)isused,followthecoolantmanufacturer's instructionstomaintain minimum antifreeze protection to -34 °F (-37 °C).Theuseofothertypesof coolantsolutionsotherthanGenu
ineNISSANLongLifeAntifreeze/Coolant(blue)orequivalentmay damagetheenginecoolingsystem.
•Thelifeexpectancyofthefactory-fill coolantis105,000miles(168,000 km)or 7years.Mixing anyother typeofcoolantotherthanGenuine NISSANLongLifeAntifreeze/Coolant(blue),including Genuine NISSANLongLifeAntifreeze/Coolant(green),ortheuseofnon-distilledwaterwillreducethelife expectancyofthefactory-fillcoolant.RefertotheNISSAN Service and MaintenanceGuidefor more details.
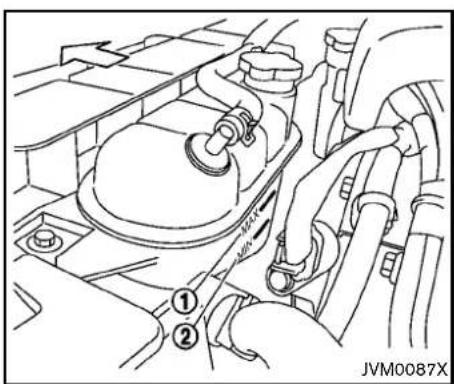
text_image
JVM0087XCHECKINGENGINECOOLANTLEVEL
Checkthecoolantlevelinthereservoirwhen theengineisrunningandafteritreaches normaloperatingtemperature.Ifthecoolant levelisbelowtheMINlevel ②,addcoolantup totheMAXlevel ①.Ifthereservoirisempty, checkthecoolantlevelintheradiatorwhen theengineiscold.Ifthereisinsufficient coolantintheradiator,filltheradiatorwith coolantuptotheradiatorfillercapabovethe radiatorupperhoseopeningandalsoadditto thereservoiruptotheMAXlevel ①.Putonthe fillercapabovetheradiatorupperhoseandwith thereservircapopen,starttheengine.Runthe engineuntilreachesnormaloperatingtem-
perature.AddcoolantuptotheMAXlevel Tightenthecapse securelyafteraddingengine coolant.
If the coolingsystem requires coolant frequently, have it checked by a NISSAN dealer.
CHANGINGENGINECOOLANT
MajorcoolingsystemrepairsshouldbeperformedbyaNISSANdealer.Theservice procedurescanbefoundintheappropriate NISSANServiceManual.
Improperservicingcanresultinreduced heaterperformanceandengineoverheating.

WARNING
- To avoid the danger of being scalded,neverchangethecoolant whentheengineishot.
- Neverremovetheradiatorcapwhen theengineishot.Seriousburns couldbecausedbyhighpressure fluidescapingfromtheradiator.
- Avoiddirectskincontactwithused coolant.Ifskincontactismade, washthoroughlywithsoaporhand cleanerassoonaspossible.
①.
- Keepcoolantoutofreachofchildrenandpets.
Enginecoolantmustbedisposedofproperly. Checkyourlocalregulations.
ENGINEOIL
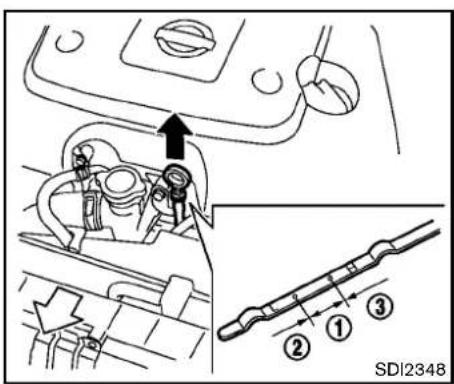
text_image
SDI2348CHECKINGENGINEOILLEVEL
- Parkthevehicleonalevelsurfaceandapply theparkingbrake.
- Runtheengineuntilreachesoperating temperature.
- Turnofftheengine. Waitmorethan15 minutesfortheoiltodrainbackinto theoilpan.
- Removethedipstickandwipeitclean. Reinsertitalltheway.
- Removethedipstickagainandchecktheoil level.Itshouldbewithintherange ① .Ifthe oillevelisbelow ② ,removetheoilfillercap andpourrecommendedoilthroughthe
opening.Donotoverfill ③.
- Recheckoillevelwiththedipstick. Itisnormaltoaddsomeoilbetweenoil maintenanceintervalsorduringthebreak-inperiod,dependingontheseverity of operatingconditions.
CAUTION
Oillevelshouldbecheckedregularly. Operatingtheenginewithaninsufficientamountofoilcandamagethe engine, and such damage is not covered by warranty.
CHANGINGENGINEOILANDFILTER
Vehicleset-up
- Parkthevehicleonalevelsurfaceandapply theparkingbrake.
- Runtheengineuntiltreachesoperating temperature.
- Turntheengineoffandwaitmorethan15 minutes.
-
Raise and support the vehicle using a suitable floor jack and safety jack stands.
-
Placethesafetyjackstandsunderthe vehiclejack-uppoints.
-
Asuitableadaptershouldbeattachedto thejackstandsaddle.
-
Removetheplasticengineundercover.
a. Removethesmallplasticclipsatthe centeroftheundercover.
b. Then removethe boltsthathold the undercoverinplace.

CAUTION
Makesurethecorrectliftingandsupportpointsareusedtoavoidvehicle damage.
Maintenanceanddo-it-yourself8-11
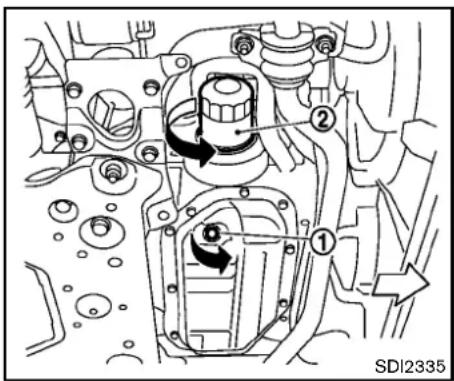
text_image
① ② SDI2335Engineoilandfilter
- Placealargedrainpanunderthedrainplug.
- Removetheoilfillercap.
3.Removethedrainplug ① withawrench andcompletelydraintheoil.

CAUTION
Becarefulnottoburnyourself,asthe engineoilishot.
- Wasteoil must be disposed of properly.
- Checkyourlocalregulations.
(Performsteps4to7onlywhentheengine oilfilterchangeisneeded.)
- Loosentheoilfilter ② withanoilfilter wrench. Removetheoilfilter by turning it by hand.
- Wipetheengineoilfiltermountingsurface withacleanrag.

CAUTION
Besuretoremoveanyoldrubber gasketremainingonthemountingsurfaceoftheengine.Failureretodoso couldleadtoenginedamage.
- Coatthegasketonthenewfilterwithclean engineoil.
- Screwintheoilfilterclockwiseuntilaslight resistanceisfelt, thentightenadditionally morethan2/3turn.
Oilfiltertighteningtorque: 11to15ft-lb (14.7to20.5N·m)
- Cleanandre-installthedrainplugwitha newwasher.Securelytightenthedrainplug withawrench.
Drainplugtighteningtorque: 22to29ft-lb (29to39N·m)
Donotuseexcessiveforce.
- Refillenginewithrecommendedoilthrough theoilfilleropening, and install theoilfiller capsecurely.
See "Capacitiesandrecommendedfuel/lubricants"(P.9-2)fordrainandrefillcapacity. Thedrainandrefillcapacitydependson theoiltemperatureanddrain time. Use thesespecificationsforreferenceonly.Alwaysusethedipsticktodetermine the properamountofoilintheengine.
-
Start the engine and check for leakage around the drain plug and the oil filter. Correct as required.
-
Turntheengineoffandwaitmorethan 15 minutes. Check the oil level with the dipstick. Add engine oil if necessary.
Aftertheoperation
- Install the engine undercover into position as the following steps.
a.Pullthecenterofthesmallplasticclip out.
b. Hold the engine undercover intoposition.
8-12 Maintenance and do-it-yourself
AUTOMATICTRANSMISSIONFLUID POWERSTEERINGFLUID
c.Inserttheclipthroughtheundercover intotheholeintheframe,thenpushthe centeroftheclipintolocktheclipin place.
d.Installtheboltsthatholdtheundercover
inplace.Becarefulnottostripthebolts
rover-tightenthem.
-
Lowerthevehiclecarefullytotheground.
-
Disposeofwasteoilandfilterproperly.

WARNING
•Prolonged and repeated contact with used engine oil may causes skin cancer.
- Trytoavoiddirectskincontactwith usedoil.Ifskincontactismade, washthoroughlywithsoaporhand cleanerassoonaspossible.
- Keepusedengineoiloutofreachof children.
Whencheckingorreplacementisrequired,we recommendaNISSANdealerforservicing.

CAUTION
•UseonlyGenuineNISSANMaticS
ATF.Donotmixwithotherfluids.
- Usingautomatictransmissionfluid otherthanGenuineNISSANMaticS ATFwillcausedeteriorationindriveabilityandautomatictransmissiondurability,andmaydamage theautomatictransmission,which isnotcoveredbytheNISSANnew vehiclelimitedwarranty.
text_image
HOT MAX COLD MAX HOT MIN COLD MIN ① ② ③ ④ ① ③ ② ④ SDI1765ACheckthefluidlevelinthereservoir.
Thefluidlevelshouldbecheckedwiththe engineoffusingtheHOTrange(①): HOT
MAX., ②:HOTMIN.)atfluidtemperaturesof 122to176°F(50to80°C)orusingtheCOLD
range(③:COLDMAX., ④:COLDMIN.)at fluid temperatures of 32 to 86°F (0 to 30°C).
IfthefluidisbelowtheMINline,addGenuine NISSANPSForequivalent.Removethecap andfillthroughtheopening.
BRAKEANDCLUTCHFLUID

CAUTION
- Donotoverfill.
•Use Genuine NISSANPSFor equivalent.
For further brake and clutch fluid information, see "Capacities and recommended fuel/lubricants" (P.9-2) of this manual.

WARNING
- Useonlynewfluidfromasealed container.Old,inferiororcontaminatedfluidmaydamagethebrake andclutchsystem.
- Besuretocleanthefillercapbefore removing.

CAUTION
Donotspillthefluidonpaintedsurfaces.Thiswilldamagethepaint.If fluidisspilled,washthesurfacewith water.
text_image
SDI2025ABRAKEFLUID
Checkthefluidlevelinthereservoir.Ifthefluidis belowtheMINline ① orthebrakewarning lightcomeson,addGenuineNISSANSuper HeavyDutyBrakeFluidorequivalentDOT3 fluiduptotheMAXline ② .Iffluidmustbe addedfrequently,thesystemshouldbechecked byaNISSANdealer.
WINDOWWASHERFLUID
text_image
MAX MIN ① ② ① ② SDI1906ACLUTCHFLUID(Manualtransmission models)
Checkthefluidlevelinthereservoir.Ifthefluid levelisbelowtheMINline ①,addGenuine NISSANSuperHeavyDutyBrakeFluidor equivalentDOT3fluiduptotheMAXline ②. Iffluidmustbeaddedfrequently,thesystem shouldbecheckedbyaNISSANdealer.

natural_image
Mechanical assembly diagram showing a valve mechanism with directional arrows (no text or symbols)Fillthewindowwasherfluidreservoirperiodically.Addwindowwasherfluidwhenthelow windowwasherfluidwarninglightcomeson.
Tofillthewindowwasherfluidreservoir, lift the capoffthereservoirtankandpourthewindow washerfluidintothetankopening.
Addawashersolventtothewaterforbetter cleaning.Inthewinterseason,addawindshield washerantifreeze.Followthemanufacturer's instructionsforthemixtureratio.
Refillthereservoirmorefrequentlywhendriving conditionsrequireanincreasedamountof windowwasherfluid.
RecommendedfluidisGenuineNISSANWind-
shieldWasherConcentrateCleaner&Anti-freezeorequivalent.

CAUTION
- Donotsubstituteengineanti-freeze coolantforwindowwashersolution. Thismayresultindamagetothe paint.
- Donotfillthewindowwasher reservoirtankwithwasherfluid concentratesatfullstrength.Some methylalcoholbasedwasherfluid concentratesmaypermanentlystain thegrilleifspilledwhilefillingthe windowwasherreservoirtank.
- Pre-mixwasherfluidconcentrates withwatertothemanufacturer's recommended levelsbeforepouring the fluid into the windowwasher reservoir tank. Donot use the windowwasherreservoirtank to mix the washer fluid concentrate and water.
BATTERY
- Keepthebatterysurfacecleananddry. Cleanthebatterywithasolutionofbaking sodaandwater.
- Make certaintytheterminalconnections are cleanandsecurelytightened.
- If the vehicle is not to be used for 30 days or longer, disconnect then negative (-) battery terminal cable to prevent discharging it.

CAUTION
When the battery cable is removed from the battery terminal, donot close either offrontdoors. The automatic window adjusting function will not work, and the sideroof panel may be damaged.
Todisconnectthenegative(−)batteryterminal, perform the procedure in the following order. Otherwise, the window and the sideroof panel may contact and bedamaged.
- Closethewindows.
- Openthehood.
- Closeandlockallthedoors.
- Disconnectthenegative(-)batteryterminal.
- Securelyclosethehood.
Toconnectthenegative(-)batteryterminal,
8-16 Maintenance and do-it-yourself
perform the procedure in the following order. Otherwise, the window and the sideroof panel may contact and bedamaged.
- Unlockandopenthedriversidedoor.Do notclosethedoor.
- Openthehood.
- Connectthenegative(-)batteryterminal. Thenclosethehood.
- Fullyopenthedriversidedoorwindow.
- Closethedriversidedoorandthewindow.

WARNING
- Donotexposethebatterytoflames orelectricalsparks.Hydrogengas generatedbythebatteryisexplosive.Donotallowbatteryfluidto contactyourskin,eyes,fabrics,or paintedsurfaces.Aftertouchinga batteryorbatterycap,donottouch orrubyoureyes.Thoroughlywash yourhands.Iftheacidcontactsyour eyes,skinorclothing,immediately flushwith waterfor atleast 15 minutesandseekmedicalattention.
- Donotoperatethevehicleifthe fluid in the battery is low. Low batteryfluidcancauseahigherload
onthebatterywhichcangenerate heat,reduce batterylife, and in somecasesleadtoanexplosion.
- Whenworkingonornearabattery, alwayswearsuitableeyeprotection andremovealljewelry.
- Batteryposts,terminalsandrelated accessoriescontainleadandlead compounds. Wash hands after handling.
- Keepthebatteryoutofthereachof children.
text_image
① ② ③ DI0137MFCheckthefluidleveleachcell(Removethe batterycoverifitisnecessary).Itshouldbe betweentheUPPERLEVEL ① andLOWER LEVEL ② lines.
Ifitisnecessarytoaddfluid,addonlydistilled watertobringtheleveltotheindicatorineach filleropening.Donotoverfill.
- Removethecellplugs ③.

text_image
A B SDI1480E2.AdddistilledwateruptotheUPPERLEVEL ① line.
If the side of the battery is not clear, check the distilled water level by looking directly above the cell; the condition indicates OK and the conditions need more to be added.
3.Tightencellplugs ③.
Vehiclesoperatedinhighttemperaturesorunder severeconditionsrequirefrequentchecksofthe batteryfluidlevel.
JUMPSTARTING
Ifjumpstartingisnecessary,see "Jumpstarting" (P.6-14).Iftheengineedsnotstartbyjump starting,thebatterymayhavetobereplaced. ContactaNISSANdealer.
VARIABLEVOLTAGECONTROL SYSTEM

CAUTION
- Donotgroundaccessoriesdirectly tothebatteryterminal.Doingsowill bypasssthevariablevoltagecontrol systemandthevehiclebatterymay notchargecompletely.
- Useelectricalaccessorieswiththe engineerunningtoavoiddischarging thevehiclebattery.
The variable voltage control system measures the amount of electrical discharge from the battery and control voltage generated by the generator.
DRIVEBELTS
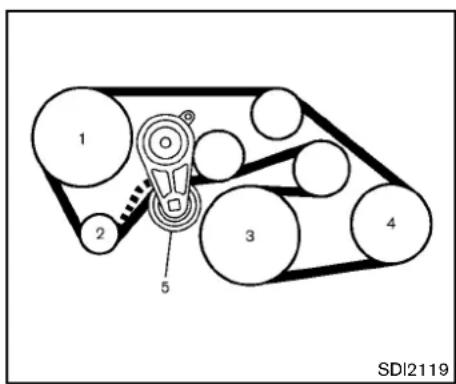
text_image
1 2 3 4 5 SDI2119VQ37VHRengine
- Powersteeringfluidpump
- Alternator
3.Crankshaftpulley - Airconditionercompressor
5.Drivebeltauto-tensioner

WARNING
BesuretheignitionswitchisintheOFF orLOCKpositionbeforeservicingdrive belts.Theenginecouldrotateunexpectedly.
- Visually inspect the belt for sign of unusual wear, cuts, fraying or looseness. If the belt is in poor condition or loose, have it replaced or adjusted by a NISSAN dealer.
- Havethebeltconditioncheckedregularly.
SPARKPLUGSAIRCLEANER

WARNING
Besuretheengineandtheignition switchareoffandthattheparking brakeisengagedsecurely.

CAUTION
Besuretousethecorrectsocketto removethesparkplugs.Anincorrect socketcandamagethesparkplugs.
text_image
SDI2020REPLACINGSPARKPLUGS
Ifreplacementisrequired,seeaNISSANdealer forservicing.
Iridium-tippedsparkplugs
Itisnotnecessarytoreplacetheiridium-tipped sparkplugsasfrequentlyastheconventional typesparkplugssincetheywilllastmuchlonger. Followthemaintenanceschedulein"NISSAN ServiceandMaintenanceGuide",butdonot reusethembycleaningorregapping.
Alwaysreplacesparkplugswithrecommendedorequivalentones.
text_image
① ② ① SDI2350Removetheretainers outthefilterelement
① asillustratedandpull ②.
Thefilterelements should not be cleaned and reused. Replace it according to them maintenance intervals. See "NISSANService and Maintenance Guide" form maintenance intervals. When replacing the filter, wipethe inside of the air
Maintenanceanddo-it-yourself8-19
cleanerhousingandthecoverwithadamp cloth.

WARNING
- Operatingtheenginewiththeair cleanerremovedcancauseyouor otherstobeburned.Theaircleaner notonlycleanstheair,itstops flameiftheenginebackfires.lfit isnotthere,andtheenginebackfires,youcouldbeburned.Donot drivewiththeaircleanerremoved, andbecarefulwhenworkingonthe enginewiththeaircleanerremoved.
- Neverpourfuelintothethrottle bodyorattempttostarttheengine withtheaircleanerremoved.Doing socouldresultinseriousinjury.
WINDSHIELDWIPERBLADES
CLEANING
If your windshield is not clear after using the windshield washer or if a blade chatters when running, wax or other material may be on the blade or windshield.
Cleantheoutsideofthewindshieldwitha washersolutionoramildetergent.Your windshielddiscleanifbeadsdonotformwhen rinsingwithclearwater.
Cleaneachbladebywipingitwithacloth soakedinawashersolutionoramilddetergent. Thenrinsethebladewithclearwater.Ifyour windshieldisstillnotclearaftercleaningthe bladesandusingthewiper,replacetheblades.

CAUTION
Wornwindshieldwiperbladescan damagethewindshieldandimpair drivervision.

text_image
A ① SDI2359REPLACING
Replacethewiperbladesiftheyareworn.
- Liftthewiperarmawayfromthewindshield.
- Pushthereleasetab Ⓐ, and then movethe wiperbladedownthewiperarm ① while pushing thereleasetabtoremove.
- Insertthenewwiperbladeontothewiper armuntilaclicksounds.
- Rotatethewiperbladesothedimpleisin thegroove.

CAUTION
•Afterwiperbladereplacement,returnthewiperarmtoitsoriginal position;
otherwiseitmaybedamagedwhen thehoodisopened.
- Makesurethewiperbladescontact theglass;otherwisethearmmaybe damagedfromwindpressure.
natural_image
Simple line drawing of a container with two arrows pointing downward (no text or symbols)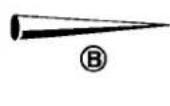

SDI2362
Becarefulnottoclogthewashernozzle Thismaycauseimproperwindshieldwasher operation.lfthenozzleisclogged,removeany objectswithaneedleorsmallpin ⑧. Be carefulnottodamagethenozzle.
BRAKESFUSES
Ifthebrakesdonotoperateproperly,havethe brakescheckedbyaNISSANdealer.
SELF-ADJUSTINGBRAKES
Your vehicle is equipped with self-adjusting brakes.
Thedisc-typebrakesself-adjusteverytimethe brakepedalisapplied.

WARNING
SeeaNISSANdealerforabrake systemcheckifthebrakepedalheight doesnotreturntonormal.
BRAKEPADWEARWARNING
Thediscbrakepadshaveaudiblewearwarnings.Whenabrakepadrequiresreplacement,it willmakeahighpitchedscrapingsoundwhen thevehicleisinmotion.Thisscrapingsoundwill firstoccuronlywhenthebrakepedalis depressed.Aftermorewearofthebrakepad thesoundwillalwaysbeheardevenifthebrake pedalisnotdepressed.Havethebrakes checkedassoonaspossibleifthewearwarning soundisheard.
Undersomedrivingorclimateconditions, occasionalbrakesqueak,squealorothernoise maybeheard.Occasionalbrakenoiseduring
8-22 Maintenance and do-it-yourself
lighttomoderatestopsisnormalanddoesnot affectthefunctionorperformanceofthebrake system.
Properbrakeinspectionintervalsshould befollowed.Foradditionalinformation,seethe maintenancelogsectionofyour“NISSAN ServiceandMaintenanceGuide”.

natural_image
Technical diagram of a vehicle engine compartment with directional arrows indicating flow or movement (no text labels)ENGINECOMPARTMENT

CAUTION
Neveruseafuseofahigherorlower amperageratingthanthatspecified on the fuseboxcover. This could damage the electrical system or cause a fire.
Ifanyelectricalequipmentdoesnotoperate, checkforanopenfuse.
-
Besuretheignitionswitchispushedtothe OFForLOCKpositionandtheheadlight switchisturnedtoOFF.
-
Opentheenginehood and remove the cover on the battery and the fuse/fusible link holder.
- Removethefuse/fusiblelinkholdercover.
- Removethefusewiththefusepullerlocated inthepassengercompartmentfusebox.
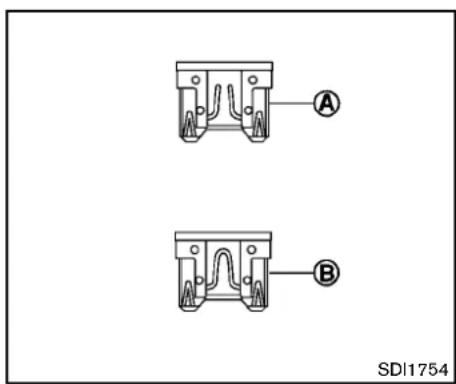
text_image
A B SDI1754Fusiblelinks
Ifanyelectricalequipmentdoesnotoperateand fusesareingoodcondition,checkthefusible links.Ifanyofthesefusiblelinksaremelted, replaceonlywithgenuineNISSANparts.
- If the fuse is open Ⓐ, replace it with anew fuse Ⓑ. Spare fuses are stored in the passenger compartment fuse box.
- Ifanewfusealsoopens, havetheelectrical systemcheckedandrepairedbyaNISSAN dealer.
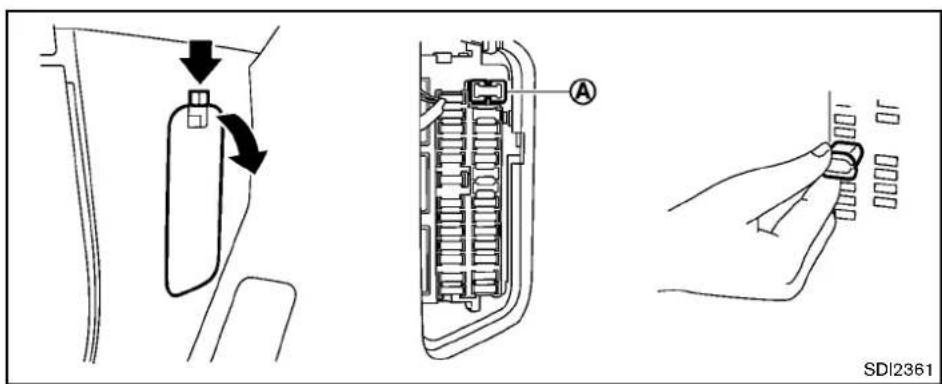
text_image
SDI2361PASSENGERCOMPARTMENT

CAUTION
Neveruseafuseofahigherorlower amperageratingthanthatspecified on the fuseboxcover. This could damage the electrical system or cause a fire.
Ifanyelectricalequipmentdoesnotoperate, checkforanopenfuse.
- Besuretheignitionswitchispushedtothe OFForLOCKpositionandtheheadlight switchisturnedtoOFF.
8-24 Maintenance and do-it-yourself
- Openthefuseboxlid.
- Removethefusewiththefusepuller
- If the fuse is open, replace it with an new fuse. Sparefuses are stored in the fuse box.
- Ifanewfusealsoopens, havetheelectrical system checked and repaired by a NISSAN dealer.

Extendedstorageswitch(ifsoequipped)
Toreduce batterydrain, the extended storage switch comes from the factory switched off.
Prior to delivery of your vehicle, the switch is pushed in (switched on) and should always remain on.
Ifanyelectricalequipmentdoesnotoperate, removetheextendedstorageswitchandcheck foranopenfuse.
NOTE:
Iftheextendedstorageswitchmalfunc- tions,orifthefuseisopen,itisnot necessarytoreplacetheswitch.Inthis case,removetheextendedstorageswitch

text_image
① ② SDI2704INTELLIGENTKEYBATTERY REPLACEMENT
andreplaceitwithanewfuseofthesame rating.
Howtoremovetheextendedstorage switch:
- Toremovetheextendedstorageswitch, be suretheignitionswitchisintheOFFFor LOCKposition.
- BesuretheheadlightswitchisintheOFF position.
- Removethefuseboxcover.
4.Pinchthelockingtabs ① foundoneach sideofthestorageswitch. - Pullthestorageswitchstraightoutfromthe fusebox ②.
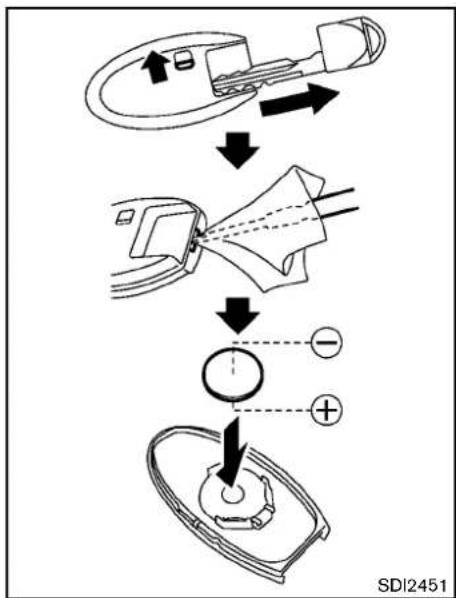
flowchart
graph TD
    A["Patient with laparoscopic implant"] --> B{Balance}
    B -->|Yes| C["Endoscopic device placement"]
    B -->|No| D["Endoscopic device placement"]
    C --> E["+/- polarity indicator"]
    D --> F["+/- polarity indicator"]

CAUTION
Becarefulnottoallowchildrento swallowthebatteryandremovedparts.
Replacethebatteryasfollows:
- Removethemechanicalkeyfromthekey.
- Insertasmallscrewdriverintotheslitofthe cornerandtwistitoseparatetheupperpart fromthelowerpart.Useaclothtoprotect thecasing.
- Replacethebatterywithanewone.
Recommendedbattery:
CR2032orequivalent
- Donottouchtheinternalcircuitand electricterminalsasdoingsocould causeamalfunction.
- Holdthebatterybytheedges.Holding thebatteryacrossthecontactpointswill seriouslydepletethestoragecapacity.
- Makesurethatthe⊕sidefacesthe bottomcase.
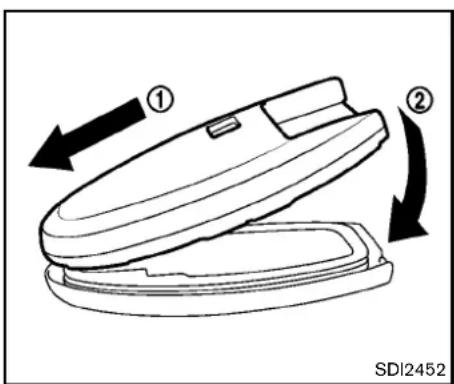
text_image
① ② SDI2452-
Alignthetipsoftheupperandlowerparts ① , and then push them together untilitis securely closed ② .
-
Operatethebuttonstocheckitsoperation. SeeaNISSANdealerifyouneedanyassistance forreplacement.
FCCNotice:
ForUSA:
ThisdevicecomplieswithPart15ofthe FCCRules.Operationissubjecttothe followingtwoconditions:(1)Thisdevice maynotcauseharmfulinterference,and (2)thisdevicemustacceptanyinterferencereceived,includinginterferencethat
8-26 Maintenance and do-it-yourself
maycauseundesiredoperation.
Note: Changesormodificationsnotexpresslyapprovedbythepartyresponsible forcompliancecouldvoidtheuser's authoritytooperatetheequipment.
ForCanada:
This device complies with RSS-210 of Industry Canada. Operations subject to the following two conditions: (1) this device may not cause interference, and (2) this device must accept any interference, including interference that may cause undesired operation of the device.
LIGHTS
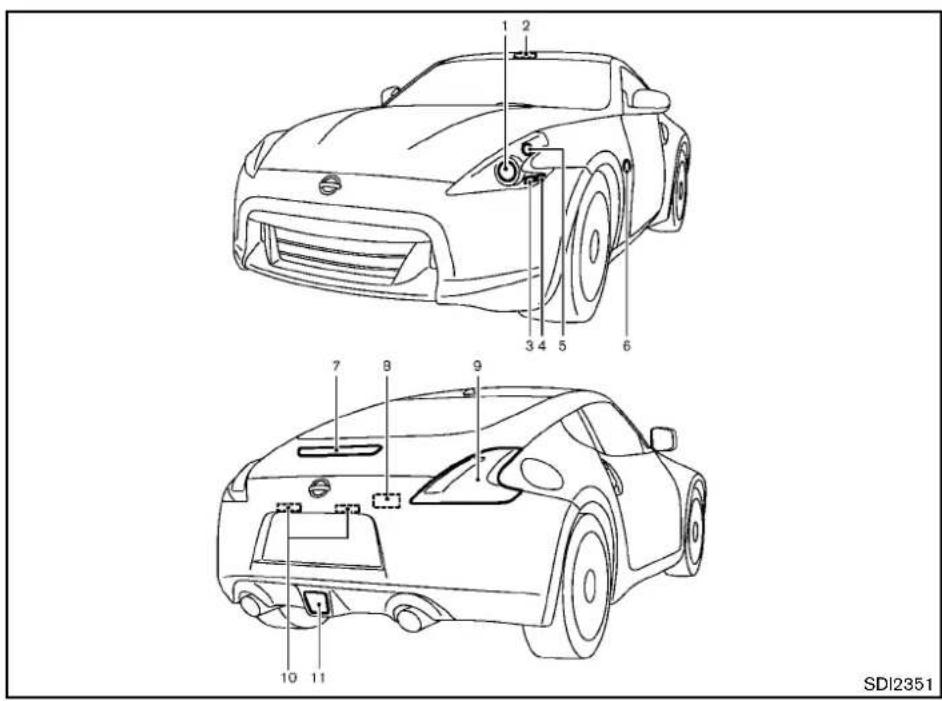
text_image
1 2 3 4 5 6 7 8 9 10 11 SDI2351COUPE
- Headlight(high-andlow-beam)
2.Maplight
3.Frontparklight
4.Frontsidemarkerlight
5.Frontturnsignallight
6.Sideturnsignallight - High-mounted stoplight
8.Cargolight - Rearcombinationlight(rearturnsignal/tail/stop/sidemarker/back-uplight)
- Licenseplatelight
- Rearfoglight(ifsoequipped)

SDI2448
ROADSTER
- Headlight(high-andlow-beam)
2.Maplight
3.Frontparklight
4.Frontsidemarkerlight
5.Frontturnsignallight
6.Sideturnsignallight - High-mounted stoplight
8.Trunklight
9.Cargoareacourtesylight - Rearcombinationlight(rearturnsignal/tail/stop/sidemarker/back-uplight)
- Licenseplatelight
12.Rearfoglight(ifsoequipped)
8-28 Maintenance and do-it-yourself
HEADLIGHTS
Fogmaytemporarilyforminsidethelensofthe exteriorlightsintherainorinacarwash.A temperaturedifferencebetweentheinsideand theoutsideofthelenscausesthefog.Thisis notamalfunction.Iflargedropsofwatercollect insidethelens,contactaNISSANdealer.
Replacing

WARNING

HIGHVOLTAGE
When xenonheadlights are on, they produce a high voltage. Topreventan electric shock, never attempt to modify or disassemble. Always have your xenonheadlights replaced a NISSAN dealer. For additional information, see "Headlight and turn signals switch" (P.2-31).
Usethesamenumberandwattageshowninthe followingchartasoriginallyinstalled.
Ifreplacementisrequired,seeaNISSANdealer.
EXTERIORANDINTERIORLIGHTS
| ItemWattage(W)BulbNo. | ||
| Headlight* | ||
| High/Lowbeams(Xenon)35D2S | ||
| Frontturnsignallight* | 28/8 | 7444NA |
| Frontparklight* | 5 | W5W |
| Frontsidemarkerlight* | LED | — |
| Sideturnsignallight* | LED | — |
| Rearcombinationlight* | ||
| back-up | 16 | W16W |
| turnsignal | 21 | WY21W |
| stop/tail/sidemarker | LED | — |
| Rearfoglight(ifsoequipped)* | 21 | T20 |
| Licenseplatelight* | 5 | T10 |
| Maplight | 8 | — |
| Vanitymirrorlight | 2 | — |
| Cargoareacourtesylight(Roadster)* | 5 | — |
| Cargolight(Coupe)* | 3.4 | — |
| Trunklight(Roadster)* | 3.4 | — |
| High-mountedstoplight* | LED | — |
*: SeeaNISSANdealerforreplacement.
NOTE:AlwayscheckwiththePartsDepartmentataNISSANdealerforthelatestinformationaboutparts.
Replacementprocedures
AllotherlightsareeithertypeA,B,C,D,EorF. Whenreplacingabulb,firstremovethelens and/orcover.
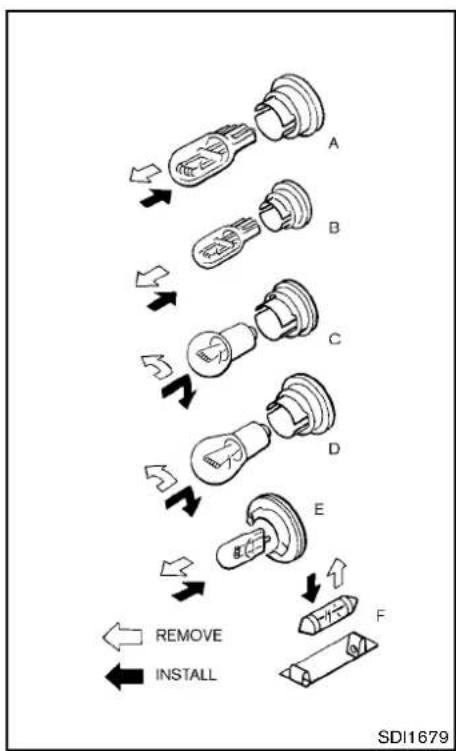
flowchart
graph TD
    A["Solid Light Bulb"] --> B["Switch"]
    B --> C["Close-up"]
    C --> D["Switch"]
    D --> E["Close-up"]
    E --> F["Switch"]
    F --> G["Close-up"]
    G --> H["Switch"]
    H --> I["Switch"]
    I --> J["Remove"]
    I --> K["Install"]
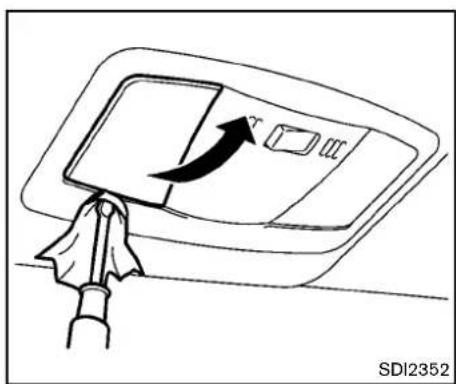
natural_image
Diagram of a hand holding a device with an arrow indicating rotation or movement (no text or symbols present)Maplight
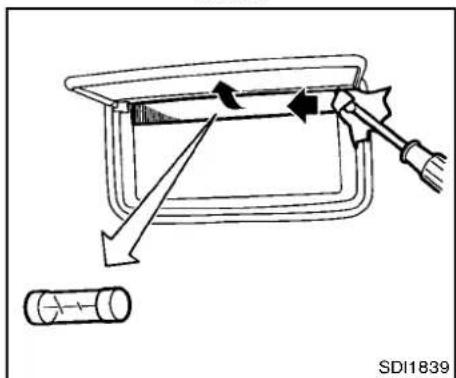
text_image
SD11839Vanitymirrorlight
8-30 Maintenance and do-it-yourself
WHEELSANDTIRES
If you have a flattire, see "Flattire" (P.6-2). TIREPRESSURE
TirePressureMonitoringSystem(TPMS)
This vehicle is equipped with the Tire Pressure Monitoring System (TPMS). It monitor tire pressure of all tires except the spare. When the low tire pressure warning light is lit, one or more of your tires is significantly under inflated.
The TPMSwillactivateonlywhenthevehicleis drivenatspeedsabove16MPH(25km/h). Also, thissystemmaynotdetectasuddendrop intirepressure(forexampleaflattirewhile driving).
Formoredetails, see "Lowtirepressurewarning light" (P.2-12), "TirePressureMonitoringSystem(TPMS)" (P.5-3) and "TirePressureMonitoringSystem(TPMS)" (P.6-2).
Tireinflationpressure
Check the pressure of the tires (including the spare) often and always prioritolong distancetrips. There recommended tire pressures specifications are shown on the Tire and Loading Information label under the "Cold Tire Pressure" heading. The Tire and Loading Information label is affixed to the driverside center pillar. Tire pressures
shouldbecheckedregularlybecause:
●Mosttiresnaturallyloseairovertime.
- Tirescanloseairsuddenlywhendriven overpotholesorotherobjectsorifthe vehiclestrikesacurbwhileparking.
Thetirepressuresshouldbechecked whenthetiresarecold. Thetiresare consideredCOLDafterthevehiclehas beenparkedfor3ormorehours,ordriven lessthan1 mile(1.6km)atmoderate speeds.
Incorrect tire pressure, including underinflation, may adversely affect tire life and vehicle handling.

WARNING
- Improperlyinflatedtirescanfail suddenlyandcauseanaccident.
•TheGrossVehicleWeighttrating (GVWR)islocatedontheF.M.V.S.S./C.M.V.S.S.label.Thevehicleweightcapacityisindicated ontheTireandLoadingInformationlabel.Donotloadyour vehiclebeyondthiscapacity.
Overloadingyourvehiclemay resultinreducedtirelife,unsafe operatingconditionsduetoprematuretirefailure,orunfavorable handling characteristics andcouldalsoleadtoaserious accident.Loadingbeyondthe specifiedcapacitymayalsore-sult in failure of other vehicle components.
- Beforetakingalongtrip,or wheneveryouheavilyloadyour vehicle,use atire pressure gaugetoensurethatthetire pressuresareatthespecified level.
- For additional information regarding tires, refer to "Important TireSafetyInformation" (US) or "TireSafetyInformation" (Canada) in the Warranty Information Booklet.
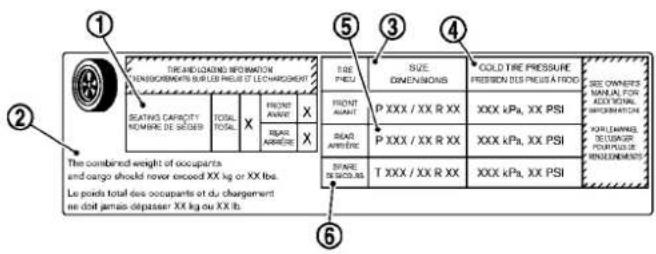
text_image
① TRE AND LOADING INFORMATION CONSENSOMS BURLED PRIE ET LECHARGENT SEATING CAPACITY NOMBRE DE SÉDIER TOTAL X FRENT AUMENT REPAR ARRIÈRE X THE Combined Weight of occupants and cargo should never exceed XX kg or XX lbs. Le poids total des occupants et du chargement en dot jamais dépasser XX kg ou XX lb. ② ③ SIZE DIMENSIONS FRONT AMOUNT P XXX / XX R XX XXX kPa, XX PSI COLD TIRE PRESSURE PRESSION DES PRIEST À FROID SEE OWNERS MANUEL FOR ACCIDENTIAL INFORMATION KARELLANATE DE LAUXAGE POURITUE DE RÉGULÉMENTS ④ STARE DES COUATS T XXX / XX R XX XXX kPa, XX PSI ⑤ ⑥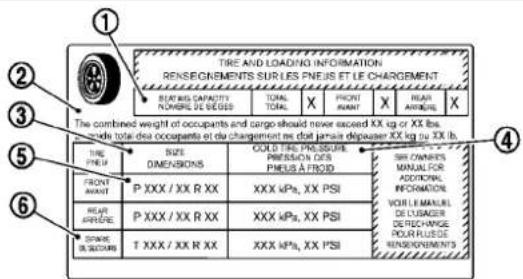
text_image
TIRE AND LOADING INFORMATION RENSEIGNMENTS SUR LES PNEUS ET LE CHARGEMENT REPARS CAPACITY NOMBRE DE DESIGES TOTAL X PARENT AVANT X ARRIÈRE X The combined weight of occupants and cargo should never exceed XX kg or XX lbs. made total dea occupants et du chargement me clot jamais déposer XX kg nu XX lb. TIRE PNEUS SIZE DIMENSIONS COLD TIRE PRESSURE PRESSION DES PNEUS À FROD FRONT AVANT P XXX / XX R XX XXX kPa, XX PSI REAR ARRIÈRE P XXX / XX R XX XXX kPa, XX PSI STONE IS SEOURS T XXX / XX R XX XXX kPa, XX PSI SIR CHANNELS MANUAL FOR ADDITIONAL INFORMATION VOIR LE MANUEL DE USAGER DEFECHANCE POUR FLUÈDE RENSEIGNMENTSSDI2462
TireandLoadingInformationlabel
① Seatingcapacity: Themaximumnumberofoccupantsthatcanbeseatedin thevehicle.
② Vehicleloadlimit: See "Vehicleloadinginformation" (P.9-17).
③ Originalsize: Thesizeofthetires originally installed on the vehicle at the factory.
④ Coldtirepressure:Inflatethetiresto thispressurewhenthetiresarecold. TiresareconsideredCOLDafterthe vehiclehasbeenparkedfor3ormore
hours, or driven less than 1 mile (1.6 km) at moderate speeds. There recommended cold tire inflation issue by the manufacturer to provide the best balance of tire wear, vehicle handling, driveability, tire noise, etc., upto the vehicle's GVWR.
⑤ Tiresize—see "Tirelabeling" (P.8-34).
⑥ Sparetiresizeorcompactsparetire size(ifsoequipped)
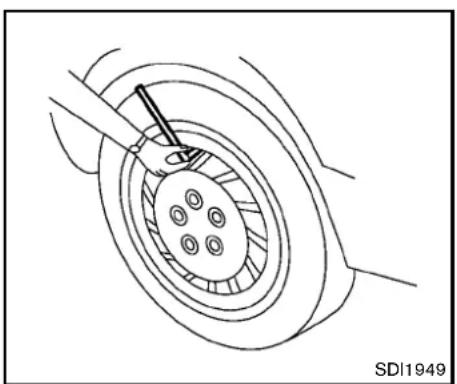
natural_image
Technical line drawing of a mechanical component with a central hub and circular base (no text or symbols)Checkingthetirepressure
- Removethevalvestemcapfromthe tire.
- Pressthepressuregaugesquarelyonto thevalvestem.Donotpresstoohardor forcethevalvestemsideways,orairwill escape.Ifthehissingsoundofair escapingfromthetireisheardwhile checkingthepressure,repositionthe gaugetoeliminatethisleakage.
- Removethegauge.
- Read the tire pressure on the gauge stemand compare it to the specific
tionshownontheTireandLoading Informationlabel.
- Addairtothetireasneeded. If too muchairisadded, pressthecoreofthe valvestembrieflywiththetipofthe gaugestemtoreleasepressure. Re-checkthepressureandaddorrelease airasneeded.
6.Installthevalvestemcap. - Check the pressure of allothertires, including the spare.
Coupemodels(exceptforNISMOmodels):
| SIZE | COLDTIRE INFLATION PRESSURE | |
| FRONT ORIGINAL TIRE | 225/50R1895W | 240kPa, 35PSI |
| 245/40R1994W | 240kPa, 35PSI | |
| REARORIGINAL TIRE | 245/45R1896W | 240kPa, 35PSI |
| 275/35R1996W | 240kPa, 35PSI | |
| SPARE TIRE | T145/80-D17107M | 420kPa, 60PSI |
| T145/70-R18107M | 420kPa, 60PSI |
Roadstermodels(exceptforNISMOmodels):
| SIZE | COLDTIRE INFLATION PRESSURE | |
| FRONT ORIGINAL TIRE | 225/50R18 95W | 260kPa, 38PSI |
| 245/40R19 94W | 240kPa, 35PSI | |
| REARORIGINAL TIRE | 245/45R18 96W | 260kPa, 38PSI |
| 275/35R19 96W | 240kPa, 35PSI | |
| SPARE TIRE | T145/80-D17107M | 420kPa, 60PSI |
| T145/70-R18107M | 420kPa, 60PSI |
NISMOmodels:
| SIZE | COLDTIRE INFLATION PRESSURE | |
| FRONT ORIGINAL TIRE | 245/40R19 98Y | 240kPa, 35PSI |
| REARORIGINAL TIRE | 285/35R19 99Y | 240kPa, 35PSI |
| SPARE TIRE | T145/70-R18 | 420kPa, 60PSI |
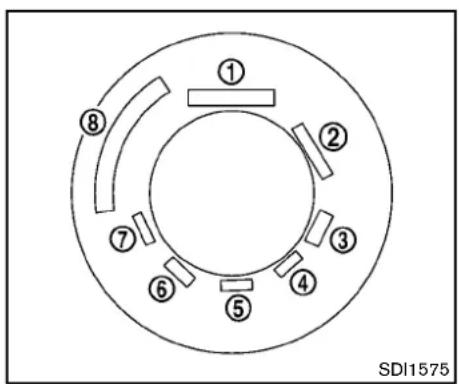
text_image
① ② ③ ④ ⑤ ⑥ ⑦ ⑧ SDI1575Example
TIRELABELING
Federallawrequirestiremanufacturersto placestandardizedinformationonthesidewallofalltires. This information identifies and describes the fundamental characteristics of the forehand also provides the identification number (TIN) for safety standard certification. The TIN can be used to identify the rein case of a recall.

text_image
P215/60R16 94H P 215 60 R 16 94 H ↑ ↑ ↑ ↑ ↑ ↑ ↑ ↑ 1 2 3 4 5 6 7 SDI1606Example
① Tiresize(example:P215/60R1694H)
1.P: The "P" indicate the entire is designed for passenger vehicles. (Not all times havethis information.)
2. Three-digitnumber(215): This number gives the width in millimeters of the tire from sidewalled getosidewalledge.
3. Two-digitnumber(60): This number, knownastheaspectratio, gives the tire's ratio of height to width.
4.R:The"R"standsforradial.
5. Two-digit number(16): This number is the wheel or rim diameter in inches.
- Two-orthree-digitnumber(94): This numberisthetire'sloadindex.Itisa measurementofhowmuchweighteach tirecansupport.Youmaynotfindthis informationonalltiresbecauseitisnot requiredbylaw.
7.H:Tirespeedrating.Youshouldnot drivethevehiclefasterthanthetire speedrating.

- DOT: Abbreviation for the "Department of Transportation". Thesymbol can be placed above, below to the left for right of the Tire Identification Number.
- Two-digitcode: Manufacturer's identification mark
- Two-digitcode: Tiresize
- Three-digitcode: Tiretypecode(Optional)
Maintenanceanddo-it-yourself8-35
- Three-digitcode: DateofManufacture
- Fournumbersrepresenttheweekand yearthetirewasbuilt. Forexample, the numbers3103meansthe31stweekof 2003. If these numbers are missing, then look on the othersidewallofthe tire.
③ Tireplycompositionandmaterial Thenumberoflayersorpliesof rubber-coatedfabricinthetire. Tiremanufacturersalsomustindicate thematerialsinthetire,whichinclude steel,nylon,polyester,andothers.
④ Maximumpermissibleinflationpressure Thisnumberisthegreatestamountof airpressurethatshouldbeputinthe tire.Donotexceedthemaximum permissibleinflationpressure.
⑤ Maximumloadrating Thisnumberindicatethemaximum loadinkilogramsandpoundsthatcan becarriedbythetire. Whenreplacing thetiresonthevehicle,alwaysusea tirethasthesameloadratingas thefactoryinstalledtire.
⑥ Termof"tubeless"or"tubetype" Indicateswhetherthetirerequiresan innertube("tubetype")ornot("tubeless").
⑦ Theword“radial”
Theword“radial”isshown,ifthetire hasradialstructure.
⑧ Manufacturerorbrandname
Manufacturerorbrandnameisshown.
Othertire-relatedterminology:
Inadditiontothemanytermsthatare definedthroughoutthissection,Intended OutboardSidewallis(1)thesidewallthat containsawhitewall,bearswhitelettering orbearsmanufacturer,brandand/ormodel namemoldingthatishigherordeeperthan thesamemoldingontheothersidewallof thetire,or(2)theoutwardfacingsidewall ofanasymmetricaltirethathasaparticular sidethatmustalwaysfaceoutwardwhen mountedonavehicle.
TYPESOFTIRES

WARNING
- Whenchangingorreplacingtires, besureallfourtiresareofthesame type(Example:Summer,AllSeason or Snow) and construction. A NISSANdealermaybeabletohelp youwith information abouttiretype, size,speedratingandavailability.
- Replacementtiresmayhavealower speed rating than the factory equippedtires, and may not match the potential maximum vehicle speed. Never exceed them maximum speed rating of the tire.
- ReplacingtireswiththosenotoriginallyspecifiedbyNISSANcould affecttheproperoperationofthe TPMS.
- Foradditionalinformationregardingtires,referto"ImportantTire SafetyInformation"(US)or"Tire SafetyInformation"(Canada)inthe WarrantyInformationBooklet.
Allseasontires
NISSANspecifiesallseasontiresonsome modelstoprovidegoodperformanceallyear, includingsnowyandicyroadconditions.All SeasontiresareidentifiedbyALLSEASON and/orM&S(MudandSnow)onthetire sidewall.Snowtireshavebettersnowtraction thanAllSeasontiresandmaybemoreappropriateinsomeareas.
Summertires
NISSANspecifiessummertiresonsome modelstoprovidesuperiorperformanceondry roads.Summertireperformanceissubstantially reducedinsnowandice.Summertiresdonot havethetiretractionratingM&Sonthetire sidewall.
Ifyouplantooperateyourvehicleinsnowyor icyconditions,NISSANrecommendstheuseof SNOWtiresorALLSEASONtiresonallfour wheels.
Snowtires
Ifsnowtiresareneeded,itisnecessarytoselect tiresequivalentinsizeandloadratingtothe originalequipmenttires.Ifyoudonot,itcan adverselyaffectthesafetyandhandlingofyour vehicle.
Generally, snowtireswillhavelowerspeed ratingsthanfactoryequippedtiresandmaynot
matchthepotentialmaximumvehiclespeed. Neverexceedthemaximumspeedratingofthe tire.
If you install snowtires, they must be the same brand, construction and tread pattern on all four wheels, and the same sizes as the original tires.
For additional traction on icy roads, studded tires maybe used. However, some U.S. states and Canadian provinces prohibit their use. Check local, state and provincial laws before installing studded tires. Skidand traction capabilities of studded snowtires, on wetordry surfaces, may be poorer than that of non-studded snowtires.
TIRECHAINS

CAUTION
Tirechains/cablesshouldnotbeinstalledon19-inchszetires.Doingso willcausedamagetothevehicle.Ifyou plantousetirechains/cables,you shouldinstall18-inchszetiresonyour vehicle.
Useoftirechainsmaybeprohibitedaccording tolocation.Checkthelocallawsbeforeinstallingtirechains.Wheninstallingtirechains,make
suretheyarethepropersizeforthetiresonyour vehicleandareinstalledaccordingtothechain manufacturer'ssuggestions.UseonlySAE ClassSchains.Class"S"chainsareusedon vehicleswithrestrictedtiretovehicleclearance. VehiclesthatcanuseClass"S"chainsare designedtomeettheSAEstandardminimum clearancesbetweenthetireandtheclosest vehiclesuspensionorbodycomponentrequired toaccommodatetheuseofawintertraction device(tirechainsorcables).Theminimum clearancesaredeterminedusingthefactory equippedtiresize.Othertypesmaydamage yourvehicle.Usechaintensionerswhenrecommendedbythetirechainmanufacturererto ensureatightfit.Looseendlinksofthetire chainmustbesecuredorremovedtoprevent thepossibilityofwhippingactiondamagetothe fendersorunderbody.Ifpossible,avoidfully loadingyourvehiclewhenusingtirechains.In addition,driveatareducedspeed.Otherwise, yourvehiclemaybedamagedand/orvehicle handlingandperformancemaybeadversely affected.
Tirechainsmustbeinstalledonlyonthe rearwheelsandnotonthefrontwheels.
NeverinstalltirechainsonaTEMPORARYUSE ONLYsparetire.
Donotusetirechainsondryroads.Drivingwith
tirechainsinsuchconditionscancausedamage tothevariousmechanismsofthevehicledueto someoverstress.
CHANGINGWHEELSANDTIRES
Tirerotation
Tirescannotberotatedonthisvehicle becausethefronttiresareadifferentsize thanthereartires.
Apinisonthefrontbrakerotortoprevent therearwheelsfrombeinginstalledin placeofthefrontwheels.Thesparetire canbeinstalledinplaceofthefrontand rearwheels.Wheninstallingthesparetire inthefrontwheel,theholeinthesparetire wheelmustbealignedwiththepinonthe brakerotor.

WARNING
- Retightenthewheelnutswhen thevehiclehasbeendrivenfor 600miles(1,000km)(alsoin casesofaflattire,etc.).
- For additional information regarding tires, refer to "Important Tire Safety Information" (US) or
8-38 Maintenance and do-it-yourself
"TireSafetyInformation"(Canada)intheWarrantyInformation Booklet.
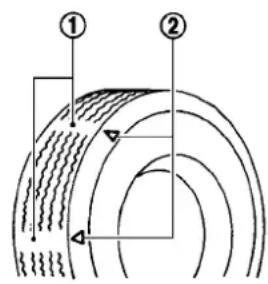
text_image
Diagram showing two labeled sections (① and ②) with concentric curved lines and directional arrows, likely illustrating a physical or engineering concept.SDI1663
- Wearindicator
2.Wearindicatorlocationmark
Tirewearanddamage

WARNING
- Tiressshouldbeperiodicallyin- spectedforwear,cracking,bul- gingorobjectscaughtinthe tread.Ifexcessivewear,cracks, bulgingordeepcutsarefound, thetire(s)shouldbereplaced.
- Theoriginaltireshavebuilt-in treadwearindicators.When wearindicatorsarevisible,the tire(s)shouldbereplaced.
- Tiresdegradewithageanduse. Havetires,includingthespare, over6yearsoldcheckedbya qualifiedtechnician,because sometiredamagemaynotbe obvious.Replacethetiresas necessarytopreventtirefailure andpossiblepersonalinjury.
- Improperserviceofthespare tiremayresultinseriouspersonalinjury.Ifitisnecessaryto repairthesparetire,contacta NISSANdealer.
- For additional information regarding tires, referto "Important TireSafetyInformation" (US) or "TireSafetyInformation" (Canada) in the Warranty Information Booklet.
Replacingwheelsandtires
When replacing atire, usethes namesize, tread design, speed rating and load carrying capacity as originally equipped. (See "Specifications" (P.9-8) for recommended types and sizes of tires and wheels.)

WARNING
- Theuseoftiresotherthanthose recommended or the mixed use of tiresofdifferentbrands,construction(bias,bias-beltedorradial),or tread patterns can adversely affect the ride, braking, handling,ground clearance,body-to-tireclearance, tirechainclearance,speedometer calibration,headlightaimandbumperheight.Someoftheseeffects mayleadtoaccidentsandcould resultinseriouspersonalinjury.
- If the wheels are changed for any reason, always replace with wheels which have the same off-set dimension. Wheel of different off-set could cause premature tire wear, degrade vehicle handling characteristics and/or interference with the brakediscs/drums. Such interfer
encecanleadtodecreasedbraking efficiencyand/orearlybrakepad/ shoewear.See"Wheelsandtires" (P.9-9)ofthismanualforwheeloff-setdimensions.
- Whenasparetireismountedora wheelisreplaced, the TPMSwill not functionandthelowtirepressure warninglightwillflashforapproximately1 minute. Thelightwill remainonafter1 minute. Contact yourNISSANdealerassoonas possiblefortirereplacementand/orsystemresetting.
- Replacing tires with those not originally specified by NISSAN could affect the proper operation of the TPMS.
- Donotinstalladeformedwheelor tireevenifithasbeenrepaired. Suchwheelsortirescouldhave structuraldamageandcouldfail withoutwarning.
•Theuseofretreadtireisnotrecommended. - Foradditionalinformationregardingtires,referto"ImportantTire SafetyInformation"(US)or"Tire
Maintenanceanddo-it-yourself
SafetyInformation"(Canada)inthe WarrantyInformationBooklet.
Wheelbalance
Unbalanced wheels may affect vehicle handling and tire life. Even with regular use, wheels can get out of balance. Therefore, they should be balanced as required.
Wheelbalanceservicesshouldbeperformedwiththewheelsoffthevehicle. Spinbalancingthewheelsonthevehicle could lead to mechanical damage.
For additional information regarding tires, refer to "Important Tire Safety Information" (US) or "Tire Safety Information" (Canada) in the NISSAN Warranty Information Booklet.
Careofwheels
See "Cleaningexterior"(P.7-2)fordetailsabout careofthewheels.
Sparetire(TEMPORARYUSEONLY(T-type)sparetire)(ifsoequipped)
ObservethefollowingprecautionsiftheT-type sparetiremustbeused,otherwiseyourvehicle couldbedamagedorinvolvedinanaccident.

WARNING
•TheT-typesparetireshouldbeused foremergencyuse.Itshouldbe replacedwiththestandardtireat thefirstopportunitytoavoidpossibletireordifferentialdamage.
- DrivecarefullywhiletheTEMPORARYUSEONLYsparetireisinstalled.Avoidsharpturnsand abruptbrakingwhiledriving.
- Periodicallychecksparetireinflationpressure.Alwayskeepthe pressureoftheTEMPORARYUSE ONLYsparetireat60psi(420kPa, 4.2bar).Alwayskeepthepressure ofthefullsizesparetire(ifso equipped)attherecommended pressureforstandardtires,asindicatedontheTireandLoading Informationlabel.ForTireand LoadingInformationlabellocation, see“TireandLoadingInformation label”intheindexofthismanual.
- With the TEMPORARY USE ONLY spare tire installed donot drive your vehicle speeds faster than 50 MPH (80km/h).
- Whendrivingonroadscoveredwith snoworice,theTEMPORARYUSE ONLYsparetireshouldbeusedon thefrontwheelsandoriginaltire usedontherearwheels(drive wheels).Usetirechainsonlyon thetworearoriginaltires.
•TiretreadoftheTEMPORARYUSE ONLYsparetirewillwearatafaster ratethanthestandardtire.Replace thesparetireassoonasthetread wearindicatorsappear.
- Donotusethesparetireonother vehicles.
- Donotusemorethanonesparetire atthesametime.

CAUTION
- DonotusetirechainsonaTEM-PORARYUSEONLYsparetire.Tire chainswillnotfitproperlyandmay causedamagetothevehicle.
- Because the TEMPORARY USE ONLY spare tire is smaller than the original tire, ground clearance is reduced. To avoid damage to the
vehicle, donotdriveoverobstacles. Also do not drive the vehicle through an automatic car wash since it may get caught.
EMERGENCYTIREPUNCTURERE- PAIRKIT(ifsoequipped)
The emergency tire puncturerepairkit (Emergency Tire Sealant) is supplied with the vehicle instead of asparetire. It can be used to temporarily repair minor tire punctures.
If possible, havethe vehicle towed to a facility that can repair or replace the flattire. Using the emergency tire puncture repair kit may cause a malfunction of the tire pressures sensor and cause the low tire pressure warning light to illuminate.
See "Flattire" (P.6-2) formoredetails.
MEMO
8-42 Maintenance and do-it-yourself
9Technicalandconsumerinformation
Capacitiesandrecommendedfuel/lubricants....9-2
Fuelrecommendation....9-4
Engineoilandoilfilterrecommendation....9-6
Airconditioningsystemrefrigerantand
lubricantrecommendations....9-7
Specifications....9-8
Engine....9-8
Wheelsandtires....9-9
Dimensions....9-10
Whentravelingorregisteringyourvehiclein
anothercountry....9-11
Vehicleidentification....9-11
VehicleIdentificationNumber(VIN)plate....9-11
Vehicleidentificationnumber(chassisnumber)......9-11
Engineserialnumber....9-12
F.M.V.S.S./C.M.V.S.S.certificationlabel....9-12
Emissioncontrolinformationlabel....9-12
TireandLoadingInformationlabel....9-13
Airconditionerspecificationlabel....9-13
Installingfrontlicenseplate....9-14
ExceptforNISMOmodels....9-14
ForNISMOmodels....9-16
Removingairdeflectors(exceptfor
NISMOmodels)....9-16
Vehicleloadinginformation....9-17
Terms....9-17
Vehicleloadcapacity....9-18
Loadingtips....9-19
Measurementofweights....9-19
Towingatraler....9-20
Flattowing....9-20
Automatictransmission....9-20
Manualtransmission....9-20
Uniformtirequalitygrading....9-21
Treadwear....9-21
TractionAA,A,BandC....9-21
TemperatureA,BandC....9-21
Emissioncontrolsystemwarranty....9-22
Reportingsafetydefects....9-22
ReadinessforInspection/Maintenance(I/M)test......9-23
EventDataRecorders(EDR)......9-23
Owner'sManual/ServiceManualorderinformation.....9-24
CAPACITIES AND RECOMMENDED FUEL/LUBRICANTS
The following are approximate capacities. The actual refill capacities may be a little different. When refilling, follow the procedure instructed in the "8.Maintenance and do-it-yourself" section to determinethe proper refill capacity.
| Capacity(Approximate) | Recommendedspecifications | ||||
| USmeasureImpmeasureLiter | |||||
| Fuel19gal15-7/8gal71.9See“Fuelrecommendation”(P.9-4). | |||||
| Engineoil*1DrainandrefillWithoilfilterchange5-1/8qt4-3/8qt 4.9 | EngineoilwithAPICertificationMark*2,*3ViscositySAE5W-30*2,*3 | ||||
| Without oil filter change | 4-7/8 qt | 4 qt | 4.6 | ||
| CoolingsystemAutomatictransmissionmodel | Withreservoir | 9-5/8qt | 8qt | 9.1 | Pre-dilutedGenuineNISSANLongLifeAntifreeze/Coolant(blue)orequivalent |
| Reservoir | 7/8qt | 3/4qt | 0.8 | ||
| Manualtransmissionmodel | Withreservoir | 9-3/4qt8-1/8qt | 9.2 | ||
| Reservoir | 7/8qt | 3/4qt | 0.8 | ||
| Automatic transmission fluid | — | — | — | Genuine NISSAN Matic S ATF*4 | |
| Manualtransmissiongearoil | — | — | — | GenuineNISSANManuaTransmissionFluid(MTF)HQMulti75W-85orAPIGL-4,ViscositySAE75W-85 | |
| Differentialgearoil | — | — | — | ForATmodels:APIGL-5SyntheticGearOil,ViscositySAE75W-90*5ForMT models:Genuine NISSAN Differential Oil Hypoid Super GL-5 80W-90 or API GL-5,ViscositySAE80W-90*9 | |
| Power steeringfluid(PSF) | Refill to the proper oil level according to the instructions in the *8.Maintenanceanddo-it-yourself*section. | GenuineNISSANPSForequivalent*6 | |||
| Brakeandclutchfluid | GenuineNISSANSuperHeavyDutyBrakeFluid*7orequivalentDOT 3 | ||||
| Multi-purposegrease | NLGINo. 2(Lithiumsoapbase) | ||||
| Air conditioning system refrigerant | — | — | — | HFC-134a (R-134a)*8 | |
| Air conditioning system lubricants | — | — | — | NISSAN UV Luminous Oil Type S or exact equivalent | |
| Windowwasherfluid | 4-3/4 | 4 | 4.5 | Genuine NISSAN Windshield Washer Concentrate Cleaner & Antifreeze orequivalent | |
*1: Foradditionalinformation,see"Engineoil"(P.8-11)forchangingengineoil.
*2: Foradditionalinformation,see"Engineoilandoilfilterrecommendation"(P.9-6).
*3: NISSAN recommends Genuine NISSAN Ester Oil available at a NISSAN dealer.
*4: Using automatic transmission fluid other than Genuine NISSAN Matic S ATF will cause deterioration in driveability and automatic transmission durability, and may damage the automatic transmission, which is not covered by the NISSAN new vehicle limited warranty.
*5: SeeaNISSANdealerforserviceforsyntheticoil.
9-2 Technical and consumer information
*6:DEXRON TM VltypeATFmayalsobeused.
*7: Available in mainland USA through a NISSAN dealer.
*8:Foradditionalinformation,see"Vehicleidentification"(P.9-11)forairconditionerspecificationlabel.
*9: For hot climates, viscosity SAE 90 is suitable for ambient temperatures above 32^ (0^) .
Technicalandconsumerinformation9-3
FUELRECOMMENDATION
VQ37VHRengine
Useunleadedpremiumgasolinewithanoctane ratingofatleast91AKI(Anti-KnockIndex) number(Researchoctanenumber96).
If premium gasoline is not available, unleaded regular gasolinewith an octanerating of 87 AKI number (Research octanenumber 91) maybe temporarily used, but only under the following precautions:
●Havethefueltankfilledonlypartiallywith unleadedregulargasoline,andfillupwith unleadedpremiumgasolineassoonas possible.
- Avoidfullthrottledrivingandabruptacceleration.
However, formaximumvehicleperformance, the use of unleaded premium gasoline is recommended.

CAUTION
- Usingafuelotherthanthatspecifiedcouldadverselyaffecttheemissioncontrolsystem,andmayalso affectwarrantycoverage.
- Undernocircumstances should leaded gasolinebeused, because this will damage the three-way catalyst.
- DonotuseE-85fuelinyourvehicle. Yourvehicleisnotdesignedtorun onE-85fuel.UsingE-85fuelcan damagethefuelsystemcomponentsandisnotcoveredbythe NISSANvehiclelimitedwarranty.
Gasolinespecifications
NISSAN recommends using gasoline that meets the World-Wide Fuel Charter (WWFC) specifications where it is available. Many of the automobile manufacturers developed this specification to improve emissions system and vehicle performance. Ask your service station manager if the gasolinemeets the World-Wide Fuel Charter (WWFC) specifications.
Reformulated gasoline
Somefuelsuppliersarenowproducingreformulated gasolines. These gasolines are specially designedtoreducevehicleemissions.NISSAN supportseffortstowardscleanerairandsuggeststhatyouusereformulatedgasolinewhen available.
Gasolinecontainingoxygenates
Somefuelsuppliers sell gasoline containing oxygenatessuchasethanol, MTBE and methanol with or without advertising their presence.
NISSANdoesnotrecommendtheuseoffuels ofwhichtheoxygenatecontentandthefuel compatibilityforyourNISSANcannotbereadily determined.Ifindoubt,askyourservicestation manager.
If you use oxygenate-blend gasoline, please take the following precautions asthe usage of such fuelsmay cause vehicle performance problems and/or fuel system damage.
- Thefuelshouldbeunleadedandhave anoctaneratingnolowerthanthat recommendedforunleadedgasoline.
- elfanoxygenate-blend, excepting a methanol blend, is used, it should contain nomorethan 10% oxygenate. (MTBEmay, however, beaded up to 15%.)
- Ifamethanolblendisused, it should containnomorethan5% methanol (methylalcohol, woodalcohol). It should also contain suitable amount of appropriate cosolvents and corrosion inhibitors. If not properly formulated with appropriate cosolvents and corrosion inhibitors, such methanol
blendsmaycausefuelsystemdamage and/orvehicleperformanceproblems. Atthistime, sufficientdataisnot availabletoensurethatallmethanol blendsaresuitableforuseinNISSAN vehicles.
Ifanyundesirabledriveabilityproblemssuchas enginestallingorhardhotstartingareexperiencedafterusingoxygenate-blendfuels,immediatelychangetoanon-oxygenatefuelora fuelwithalowblendofMTBE.
Takecarenottospillgasolineduring refueling. Gasolinecontainingoxygenates cancausepaintdamage.
E-85fuel
E-85fuelisamixtureofapproximately 85% fuel ethanoland 15% unleaded gasoline.E-85can onlybeusedinaFlexibleFuelVehicle(FFV).Do notuseE-85fuelinyourvehicle.U.S.governmentregulationsrequirefuelethanoldispensing pumpstobeidentifiedbyasmall,square, orangeandblacklabelwiththecommon abbreviationortheappropriatepercentagefor thatregion.
Aftermarketfueladditives
NISSANdoesnotrecommendtheuseofany aftermarketfueladditives(Example: fuelinjector cleaner, octanebooster, intakevalvedeposit removers, etc.) whicharesoldcommercially. Manyoftheseadditivesintendedforgum, varnishordepositremovalmaycontainactive solventorsimilaringredientsthatcanbeharmful tothefuelsystemandengine.
Octaneratingtips
Usingunleadedgasolinewithanoctane ratinglowerthanrecommendedabovecan causepersistent, heavysparkknock. (Sparkknockisametallicrappingnoise.) Ifsevere, thiscanleadtoenginedamage. Ifyoudetectapersistentheavyspark knockevenwhenusinggasolineofthe statedoctanerating, orifyouhearsteady sparkknockwhileholdingasteadyspeed onlevelroads, haveaNISSANdealer correctthecondition. Failuretocorrect theconditionmisuseofthevehicle, for whichNISSANisnotresponsible.
Incorrectignitiontimingwillresultinknocking, after-runoroverheating. Thisinturnmaycause excessivefuelconsumptionordamagetothe engine. Ifanyoftheabovesymptomsare encountered, haveyourvehiclecheckedata NISSANdealerorothercompetentservice
facility.
However, now and then you may notice light spark knock for short time while accelerating or driving up hills. This is no cause for concern, because you get the greatest fuel benefit when there is light spark knock for short time under heavy engine load.
①

text_image
AMERICAN PETROLEUM INSTITUTE FOR GASOLINE ENGINES CERTIFIED②

text_image
API SERVICE SM SAE 5W-30 ENERGY CONSERVINGSTI0505
- API certification mark
2.APIservicesymbol
ENGINEOILANDOILFILTERRE- COMMENDATION
Selectingthecorrectoil
Itisessentialtochoosethecorrectgrade, quality,andviscosityengineoiltoensure satisfactoryenginelifeandperformance,see "Capacitiesandrecommendedfuel/lubricants" (P.9-2).NISSANrecommendstheuseofan energyconservingoilinordertoimprovefuel economy.
SelectonlyengineoilsthatmeettheAmerican PetroleumInstitute(API)certificationorInterna-
tionalLubricantStandardizationandApproval Committee(ILSAC)certificationandSAEviscositystandard. TheseoilshavetheAPI certificationmarkonthefrontofthecontainer.
Oilswhichdonothavethespecifiedquality labelshouldnotbeusedastheycouldcause enginedamage.
Oiladditives
NISSANdoesnotrecommendtheuseofoil additives. Theuseofanoiladditiveisnot necessarywhentheproperoiltypeisusedand maintenanceintervalsarefollowed.
Oilwhichmaycontainforeignmatterorhas beenpreviouslyusedshouldnotbeused.
Oilviscosity
Theengineoilviscosityorthicknesschanges withtemperature.Becauseofthis,itisimportant thattheengineoilviscositybeselectedbased onthetemperaturesatwhichthevehiclewillbe operatedbeforethenextoilchange.Choosing anoilviscosityotherthanthatrecommended couldcauseseriousenginedamage.
Selectingthecorrectoilfilter
Yournewvehicleisequippedwithahigh-quality genuineNISSANoilfilter.Whenreplacing,use thegenuineoilfilteroritsequivalentforthe reasondescribedinchangeintervals.
Changeintervals
Theoilandoilfilterchangeintervalsforyour enginearebasedontheuseofthespecified quality oils and filters. Oil and filter other than the specifiedquality,oroilandfilter changeintervals longerthanrecommendedcouldreduceengine life.Damagetoenginescausedbyimproper maintenanceoruseofincorrectoilandfilter qualityand/orviscosityisnotcoveredbythe newNISSANvehiclelimitedwarranties.
Yourenginewasfilledwithahighqualityengine oilwhenitwasbuilt.Youdonothavetochange theoilbeforethefirstrecommendedchange interval.Oilandfilterchangeintervalsdepend uponhow youuseyourvehicle.Operationunder
the following conditions may require more frequent oil and filter changes.
●repeatedshortdistancedrivingatcold
outsidetemperatures,
●drivingindustyconditions,
●extensiveidling,
- stopandgo "rushhour" traffic, Refertothe "NISSANServiceandMaintenance Guide" forthemaintenanceschedule.
AIRCONDITIONINGSYSTEMREFRIGERANTANDLUBRICANTRECOMMENDATIONS
The air conditioning system in your NISSAN vehicle must be charged with the refrigerant HFC-134a(R-134a) and the lubricant, NISSAN UV luminous Oil Type Sortheexact equivalents.

CAUTION
Theuseofanyotherrefrigerantor lubricantwillcauseseveredamageto theairconditioningsystemandwill requirethereplacementofallairconditionersystemcomponents.
TherefrigerantHFC-134a(R-134a)inyour NISSANvehiclewillnotharmtheearth'sozone
layer. Although this refrigerant does not affect the earth's atmosphere, certain governmental regulations require thereafter recovery and recycling of any refrigerant during automotive air conditioningsystem service. Your NISSAN dealer has the trained technicians and equipment needed to recover and recycle your air conditioningsystem refrigerant.
ContactaNISSANdealerwhenservicingyour airconditioningsystem.
SPECIFICATIONS
ENGINE
| ModelVQ37VHR | ||
| TypeGasoline,4-cycle | ||
| Cylinderarrangement6-cylinder,V-slantedat60° | ||
| Bore × Stroke | in (mm) | 3.760 × 3.385 (95.5 × 86.0) |
| Displacementcuin(cm | ^3 225.54(3,696) | |
| Firingorder1-2-3-4-5-6 | ||
| Idlespeedrpm | ||
| Ignitiontiming(B.T.D.C.)degree/rpm | Noadjustmentisnecessary. | |
| SparkplugStandardFXE24HR-11 | ||
| Sparkpluggap(Normal) | in(mm) | 0.043(1.1) |
| Camshaftoperation | Timingchain | |
This spark ignition system complies with the Canadian standard ICES-002.
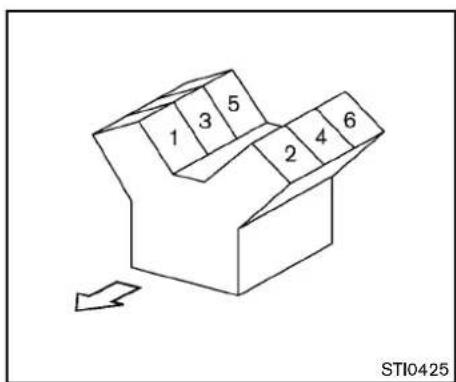
text_image
1 3 5 2 4 6 STI0425VQ37VHRengine
9-8 Technical and consumer information
WHEELSANDTIRES
Roadwheel
| TypeSizeOffsetin(mm) | ||||
| Conventional | Front:18 × 8J | 1.69(43) | ||
| Rear:18 × 9J | 0.59(15) | |||
| Front:19 × 9J | 1.85(47) | |||
| Rear:19 × 10J | 1.18(30) | |||
| NISMOmodels | Front:19 × 9.5J | 1.57(40) | ||
| Rear:19 × 10.5J | 0.90(23) | |||
| Spare | 17 × 4T*1 | 1.18(30) | ||
| 18 × 4T*1 | 0(0) | |||
*1:ifsoequipped
Technicalandconsumerinformation9-9
Tire
| TypeSizePressurePSI(kPa)[Cold] | |||
| Conventional | Front:225/50R1895WRear:245/45R1896W | 35(240)*238(260)*3 | |
| Front:245/40R1994WRear:275/35R1996W | 35(240) | ||
| NISMOmodels | Front:245/40R19Rear:285/35R19 | ||
| Spare(T-type) | T145/80D17107M*1T145/70R18107M*1 | 60(420) | |
| —*3,*4 | |||
*1:ifsoequipped
*2:Coupemodels
*3:Roadstermodels
*4: The emergency tire puncture repair kit is supplied.
DIMENSIONS
in(mm)
| Overalllength167.2(4,246)*1 |
| 167.4(4,253)*2 |
| 173.4(4,405)*1,*3 |
| 173.5(4,407)*2,*3 |
| Overallwidth72.6(1,845) |
| Overallheight51.8(1,315) |
| 52.2(1,325)*4 |
| Fronttread61.0(1,550)*5 |
| 60.6(1,540)*6 |
| 61.2(1,555)*6,*3 |
| Reartread62.8(1,595)*5 |
| 61.6(1,565)*6 |
| 62.2(1,580)*6,*3 |
| Wheelbase100.4(2,550) |
*1: Withoutfrontlicenseplatebracket
*2:Withfrontlicenseplatebracket
*3:NISMOmodels
*4:Roadstermodels
*5:18-inchwheelmodels
*6:19-inchwheelmodels
WHENTRAVELINGOR REGISTERING YOUR VEHICLE IN ANOTHER COUNTRY
If you plantotravelinanothercountry, you should first find out if the fuel available is suitable for your vehicle's engine.
Using fuel with too low an octanerating may cause engaged damage. All gasoline vehicles must be operated with unleaded gasoline. Therefore, avoid taking your vehicle to areas where appropriate fuel is not available.
Whentransferringtheregistrationofyour vehicletoanothercountry,state,province ordistrict,itmaybenecessarytomodifythe vehicletomeetlocalawsandregulations.
Thelawsandregulationsformotorvehicle emissioncontrolandsafetystandardsvary accordingtothecountry,state,provinceor district;therefore,vehiclespecificationsmay differ.
When any vehicle is to be taken into another country, state, province or district and registered, its modifications, transportation, and registration are the responsibility of the user. NISSAN is not responsible for any inconvenience that may result.
VEHICLEIDENTIFICATION
text_image
STI0612VEHICLEIDENTIFICATIONNUMBER (VIN)PLATE
Thevehicleidentificationnumberplateisattachedasshown.Thisnumberistheidentificationforyourvehicleandisusedinthevehicle registration.

text_image
MINT STI0613VEHICLEIDENTIFICATIONNUMBER (chassisnumber)
Thenumberisstampedasshownintheengine compartment.
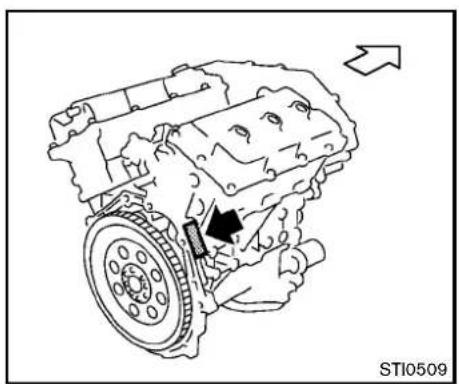
natural_image
Technical line drawing of an engine block with a directional arrow indicating motion (no text or symbols present)ENGINESERIALNUMBER
Thenumberisstampedontheengineasshown.
natural_image
Diagram showing a road with lane markings and a shaded rectangular area, no readable text or symbols present.F.M.V.S.S./C.M.V.S.S.CERTIFICATION LABEL
The Federal/Canadian Motor Vehicle Safety Standards (F.M.V.S.S./C.M.V.S.S.) certification labelisaffixedasshown. This label contains valuable vehicle information, such as: Gross Vehicle Weight Ratings (GVWR), Gross Axle Weight Rating (GAWR), month and year of manufacture, Vehicle Identification Number (VIN), etc. Review it carefully.

text_image
SARVICK STI0615EMISSIONCONTROLINFORMATION LABEL
The emission control information label is attached as shown.
natural_image
Diagram showing road network with a highlighted vehicle and directional arrow (no text or symbols)TIREANDLOADINGINFORMATION LABEL
ThecoldtirepressureisshownontheTireand LoadingInformationlabelaffixedtothepillaras illustrated.
natural_image
Technical line drawing of a car dashboard frame with no visible text or symbolsAIRCONDITIONERSPECIFICATION LABEL
Theairconditionerspecificationlabelisattachedasshown.
INSTALLINGFRONTLICENSEPLATE
Step 1
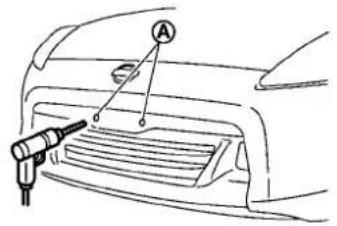
text_image
Diagram showing a car's front grille with a tool labeled 'A' pointing to the grille area, likely indicating a measurement or inspection.Step 4
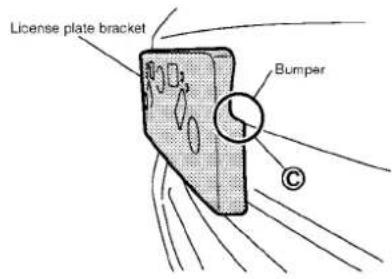
text_image
License plate bracket BumperStep 2
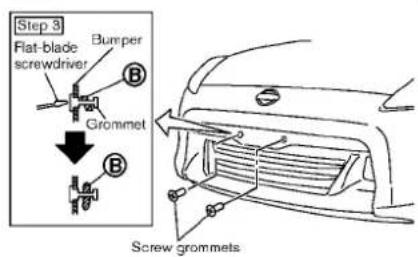
text_image
Step 3 Flat-blade screwdriver Bumper Grommet Screw grommetsStep 6

text_image
Step 6 Step 5 J-nut ScrewsSTI0618
EXCEPTFORNISMOMODELS
Usethefollowingstepstomountthelicense plate:
Beforemountingthelicenseplate, confirm that the following parts are enclosed in the plastic bag.
●Licenseplatebracket
J-nut × 2
- Screw × 2
- Screwgrommet × 2
- Parkthevehicleonflat, levelground. Locate
thetwodents Ⓐ onthefrontbumper. Carefullydrilltwopilotholesusinga0.39in (10mm)drillbit.(Besurethatthedrill onlygoesthroughthebumperfascia.
- Insertgrommetsintotheholeonthebumper fascia.
- Insertaflat-bladescrewdriver into the grommetholetoadd90°turnontothepart (B).
- Makesurethesideendsurfaceofthe licenseplatebracketisalignedwiththe bumper ⓒ.

text_image
D UP STI0629Markthecenterofthehole Ⓓ onboth sideswithafelt-tippen.Removethebracket fromthebumper,andthenopen0.9to1.0 inch(22to25mm)diameterholesonthe bumperusingthemarks Ⓓ asacenter.
- InsertJ-nutsintothelicenseplatebracket beforeplacingthelicenseplatebracketon thefascia.
- Install the license plate bracket with screws.
- Install the license plate with boltsthatareno longer than 0.55 in (14mm).
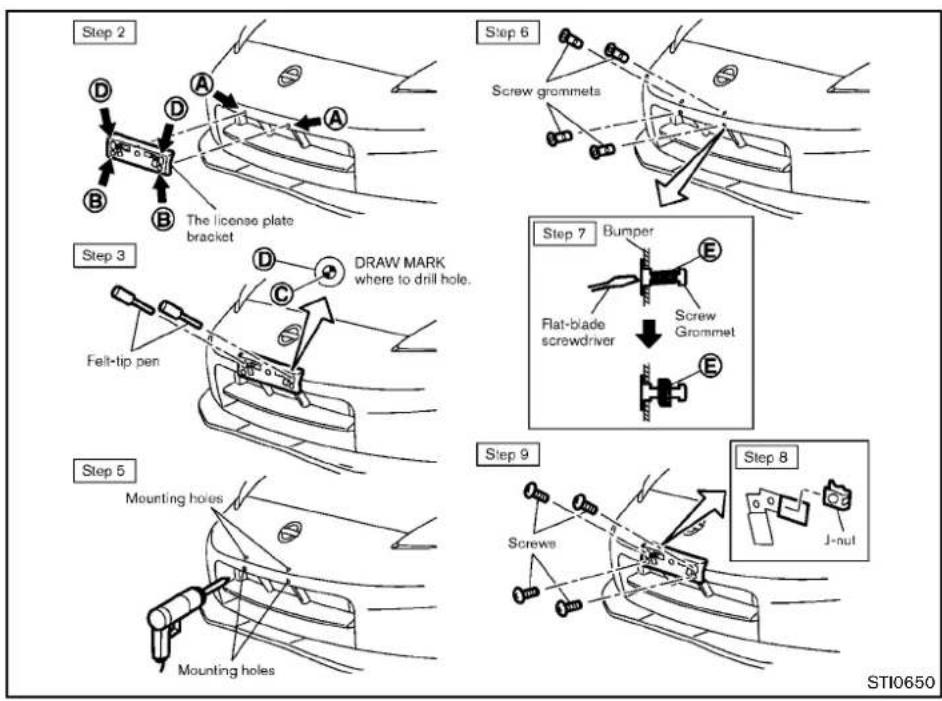
flowchart
graph TD
    A["Step 2: The license plate bracket"] --> B["Step 3: Draw mark where to drill hole"]
    B --> C["Step 5: Mounting holes"]
    C --> D["Step 6: Screw gnommets"]
    D --> E["Step 7: Bumper"]
    E --> F["Step 8: J-nut"]
FORNISMOMODELS
Usethefollowingstepstomountthelicense plate:
Beforemountingthelicenseplate, confirm that the following parts are enclosed in the vinyl bag.
- Licenseplatebracket
●J-nut × 2 -
Screw × 4
●Screwgrommet × 4 -
Parkthevehicleonflat, levelground.
- Temporarily placethelicenseplate bracket while aligning points Ⓐ of the front bumper fasciawitholes Ⓑ in the license plate bracket.
- Confirm that points A and B are aligned. Hold the license plate bracket and mark the points C on the bumper faciathrough the center of the holes D with afelt tippen.
- Removethelicenseplatebracket.
- Carefully drilltwoshallowpilotholes and © usinga0.39in(10mm)drillbitat themarked locations.(Besurethatthe drillonlygoesthroughthefascia.)
- Insertgrommets into the hole on the fascia.
-
Insertaflat-bladescrewdriver into the grommetholetoadda90°turnontothe part (E).
9-16 Technical and consumer information -
InsertaJ-nutintothelicenseplatebracket beforeplacingthelicenseplatebracketon thefascia.
- Install the license plate bracket with the screws.
- Install the license plate with bolt sthat are not longer than 0.55 in (14mm).
Whentherecoveryhookisused,youneedto temporarilyremovethefrontlicenseplate and bracketfromthevehicle.(See "Vehiclerecovery (freeingastuckvehicle)("P.6-21)forfurther details.)
REMOVINGAIRDEFLECTORS (exceptforNISMOmodels)

text_image
A B STI0623Leftside
This vehicle is equipped with air deflectors in front of the front wheels. The deflectors will chan the airflow to help improve aerodynamic performance.
Whentransportingyourvehicleonatrailer,the airdeflectorsmayinterferewithasteepslopeto atrailerbed.Inthiscase,removethedeflectors fromtheundercoverofthevehicle.
- Loosenthreescrewsasshownandremove theleft-sideairdeflector Ⓐ.
- Tightentheremovedscrew originalposition. ⑧ inits
- Perform the same procedure to remove the right-side air deflector.
VEHICLELOADING INFORMATION
- Storethetwoairdeflectorsandfourscrews toreinstallinthereverseorder.
- When reinstalling, makesureallsixscrews are firmly tightened on both hair deflectors.

WARNING
- Itisextremelydangeroustoride inacargoareainsidethevehicle.Inacollision,peopleriding intheseareasaremorelikelyto beseriouslyinjuredorkilled.
- Donotallowpeopletoridein anyareaofvehiclethatisnot equippedwithseatsandseat belts.
- Besureeveryoneinyourvehicle isinaseatandusingaseatbelt properly.
TERMS
It is important to familiarize yourself with the following terms before loading your vehicle:
- CurbWeight(actualweightofyour vehicle)-vehicleweightincluding: standardequipment,fluids,emergency tools,andsparetireassembly.This weightdoesnotincludepassengers andcargo.
- GVW(GrossVehicleWeight)-curb weightplusthecombinedweightof optionalequipment,passengersand cargo.
- GVWR(GrossVehicleWeightRating) -maximumtotalcombinedweightofthe unloadedvehicle,passengers,luggage, hitch,trailertongueloadand anyother optionalequipment. Thisinformationis locatedontheF.M.V.S.S./C.M.V.S.S. label.
●GAWR(GrossAxle WeightRating)-maximumweight(load)limitspecified forthefront orrearaxle. This informationislocatedontheF.M.V.S.S./C.M.V.S.S.label. - GCWR(GrossCombinedWeightRating) - The maximum total weight rating ofthevehicle, passengers, cargo, and trailer.
●VehicleCapacityWeight,Loadlimit, Totalloadcapacity-maximumtotal weightlimit specified of theload (passengersandcargo)forthevehicle. Thisisthemaximumcombined weight ofoccupantsandcargothatcanbe
Technicalandconsumerinformation
loaded into the vehicle. If the vehicle is used to tow a trailer, the trail is tongue weight must be included as part of the cargoload. This information is located on the Tire and Loading Information label.
●Cargocapacity-permissibleweightof cargo, theweightoftotaloccupants weightsubtractedfromtheloadlimit.
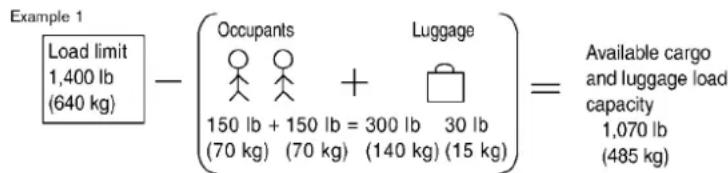
text_image
Example 1 Load limit 1,400 lb (640 kg) - (Occupants Luggage 150 lb + 150 lb = 300 lb 30 lb (70 kg) (70 kg) (140 kg) (15 kg) )= Available cargo and luggage load capacity 1,070 lb (485 kg)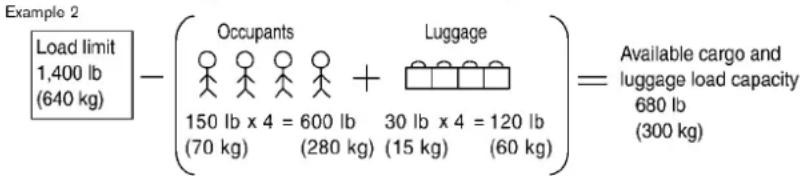
text_image
Example 2 Load limit 1,400 lb (640 kg) - (Occupants 150 lb x 4 = 600 lb (70 kg) (280 kg) (30 lb x 4 = 120 lb (15 kg) (60 kg)) Luggage Available cargo and luggage load capacity 680 lb (300 kg)STI0365
VEHICLELOADCAPACITY
Donotexceedtheloadlimitofyourvehicle shownas"Thecombinedweightofoccupantsandcargo"ontheTireandLoading Informationlabel.Donotexceed the numberofoccupantsshownas"Seating Capacity"ontheTireandLoadingInformationlabel.
Toget "the combined weight of occupants and cargo", add the weight of alloccupants, then add the total luggageweight. Examples are shown in the illustration.
Stepsfordeterminingcorrectloadlimit
- Locatethestatement "Thecombined weightofoccupantsandcargoshould neverexceedXXXkgorXXXlbs" on your vehicle'splacard.
- Determinethecombinedweightofthe driverandpassengersthatwillberiding inyourvehicle.
- Subtract the combined weight of the driver and passengers from XXXkgor XXXlbs.
- Theresultingfigureequalstheavailable amountofcargoandluggageload
capacity. Forexample, if the XXX amount equals 1400 lbs. and therewill be five 150 lb. passengers in your vehicle, the amount of available cargo and luggage load capacity is 650 lbs. (1400-750(5x150)=650 lbs or 640-340(5x70)=300 kg.)
- Determinethecombinedweightof luggageandcargobeingloadedon thevehicle.Thatweightmaynotsafely exceedtheavailablecargoandluggage loadcapacitycalculatedinStep4.
- If your vehicle will betowing a trailer, load from your trailer will be transferred to your vehicle. Consult this manual to determine how this reduces the available cargo and luggage load capacity of your vehicle.
Beforedrivingloadedvehicle, confirm that you donot exceed the Gross Vehicle Weight Rating (GVWR) or the Gross Axle Weight Rating (GAWR) for your vehicle. (See "Measurement of weights" (P.9-19).)
Alsochecktiresforproperinflationpressures.SeetheTireandLoadingInformation label.
LOADINGTIPS
- TheGVWmustnotexceedGVWRor GAWRasspecifiedontheF.M.V.S.S./C.M.V.S.S.certificationlabel.
- Donotloadthefrontandrearaxleto the GAWR. Doingsowillexceedthe GVWR.

WARNING
- Properlysecureallcargotohelp preventitfromslidingorshifting.Donotplacecargohigher thantheseatbacks.Inasudden stoporcollision,unsecuredcargocouldcausepersonalinjury.
- Do not load your vehicle any heavierthantheGVWRorthe maximum front and rear GAWRs.Ifyoudo,partsofyour vehiclecanbreak,tiredamage couldoccur,oritcanchangethe wayyourvehiclehandles.This couldresultinlossofcontrol andcausepersonalinjury.
- Overloading could not only shortenthelifeofyourvehicle andthetires,butalsocouldlead to hazardous vehicle handling andlongbrakingdistance.This maycauseaprematuretire malfunction,whichcouldresult inaseriousaccidentandpersonalinjury.Failurerescausedby overloadingarenotcoveredby thevehicle'swarranty.
MEASUREMENTOFWEIGHTS
Securelooseitemstopreventweightshifts that could affect the balance of your vehicle. Whenthevehicle is loaded, drive to scale and weigh the front and therear wheels separately to determine axle loads. Individual axle loads should not exceed either of the gross axle weight ratings (GAWR). The total of the axle load should not exceed the gross vehicle weight rating (GVWR). Theseratings are given on the vehicle certification label. If weight ratings are exceeded, move or remove itemsto bring all weights below theratings.
Technical and consumer information
TOWINGATRAILER
FLATTOWING
Donottowatralerwithyourvehicle.Towingyourvehiclewithallfourwheelsonthe
groundissometimescalledflattowing.This methodissometimesusedwhentowinga vehiclebehindarecreationalvehicle,suchasa motorhome.

CAUTION
- Failuretofollowtheseguidelines canresultinseveretransmission damage.
- Whenever flattowing your vehicle, alwaystowforward, never backward.
- DONOTtowanyautomatictransmissionvehiclewithallfourwheels ontheground(flattowing).Doing soWILLDAMAGEinternaltransmissionpartsduetolackoftransmissionlubrication.
- Foremergencytowingprocedures refer to "Towingrecommended by NISSAN(exceptforNISMOmodels)"(P.6-19)ofthismanual.
AUTOMATICTRANSMISSION
Totowavehicleequippedwithanautomatic transmission,anappropriatevehicledollyMUST beplacedunderthetowedvehicle'sdrive wheels.Alwaysfollowthedollymanufacturer's recommendationswhenusingtheirproduct.
MANUALTRANSMISSION
●Alwaystowwiththemanualtransmissionin Neutral.
- Your vehiclespeed should never exceed 70 MPH (112km/h) when flattening your vehicle.
- Aftertowing500miles,startandidlethe
enginewiththetransmissioninNeutralfor
twominutes.Failuretoidletheengineafter
every500miles oftowingmay cause
damagetothetransmission'sinternalparts.
UNIFORMTIREQUALITYGRADING
DOT(DepartmentOfTransportation)Quality Grades: Allpassengercartiresmustconformto federalsafetyrequirementsinadditiontothese grades.
Qualitygradescanbefoundwhereapplicable onthetiresidewallbetweentreadshoulderand maximumsectionwidth.Forexample:
Treadwear200TractionAATemperatureA TREADWEAR
Thetreadweargradeisacomparativerating basedonthewearrateofthetirewhentested undercontrolledconditionsonaspecified governmenttestcourse. Forexample, atire graded 150 would wearone and one-half (1 1/2) times as well on the government course as atire graded 100. There relative performance of tires depends upon actual condition so their use, however, and may depart significantly from thenorm duetovariations indriving habits, service practices and differences in road characteristics and climate.
TRACTIONAA,A,BANDC
Thetractiongrades, from highest to lowest, are AA, A, Band C. Those grades represent the tire's sability to stop on wet pavement as measured under controlled conditions specified government tests surfaces of asphalt and concrete. Atiremarked C may have poor traction performance.

WARNING
Thetractiongradeassignedtothistire isbasedonstraight-aheadbraking tractiontests, and does not include acceleration, cornering, hydroplaning, or peaktraction characteristics.
TEMPERATUREA,BANDC
ThetemperaturegradesA(thehighest),B,and C,representingthetire'sresistancetothe generationofheatanditsabilitytodissipate heatwhentestedundercontrolledconditionson aspecifiedindoorlaboratorytestwheel.Sustainedhightemperaturecancausethematerial ofthetiretodegenerateandreducetirelife,and excessivetemperaturecanleadtosuddentire failure.ThegradeCcorrespondstoalevelof performancewhichallpassengercartiresmust meetundertheFederalMotorVehicleSafety StandardNo.109.GradesBandArepresent higherlevelsofperformanceonthelaboratory testwheelthanthemminumrequiredbylaw.

WARNING
Thetemperaturegradeforthistireis establishedforatirethatisproperly inflatedandnotoverloaded.Excessive speed,under-inflation,orexcessive loading,eitherseparatelyorincombination,cancauseheatbuild-upand possibletirefailure.
EMISSIONCONTROLSYSTEM WARRANTY
YourNISSANiscoveredbythefollowing emissionwarranties.
ForUS:
●EmissionDefectsWarranty
●EmissionsPerformanceWarranty
Detailsofthesewarrantiesmaybefoundwith othervehiclewarrantiesinyourWarrantyInformationBookletwhichcomeswithyourNISSAN.IfyoudidnotreceiveaWarranty InformationBooklet,oritislost,youmayobtainareplacementbywritingto:
●NissanNorthAmerica,Inc.
ConsumerAffairsDepartment
P.O.Box685003
Franklin,TN37068-5003
ForCanada:
EmissionControlSystemWarranty
Detailsofthiswarrantymaybefoundwithother vehiclewarrantiesinyourWarrantyInformation BookletwhichcomeswithyourNISSAN.Ifyou didnotreceiveaWarrantyInformationBooklet, oritislost,youmayobtainareplacementby writingto:
●NissanCanadaInc.
5290OrbitorDrive
Mississauga, Ontario,
L4W4Z5
REPORTINGSAFETYDEFECTS
ForUSA
If you believe that your vehicle has a defect which could cause crash or could cause injury or death, you should immediately inform the National Highway Traffic Safety Administration (NHTSA) in addition to notifying NISSAN.
If NHTSA receive a very similar complaint, it may open an investigation, and if it finds that as safety defect exists in a group of vehicles, it may order a recall and remedy campaign. However, NHTSA cannot become involved in individual problems between you, your dealer, or NISSAN.
To contact NHTSA, you may call the Vehicle Safety Hotline toll-free at 1-888-327-4236(TTY:1-800-424-9153);goto http://www.safercar.gov;orwriteto:Administrator,NHTSA,400SeventhStreet, SW.,Washington,D.C.20590.Youcan alsoobtain otherinformationabout motor vehiclesafetyfrom
http://www.safercar.gov.
YoumaynotifyNISSANbycontactingour ConsumerAffairsDepartment,toll-free,at 1-800-NISSAN-1.
ForCanada
If you believethat your vehicle has a defect which could cause acrashor could cause injury or death, you should immediately inform Transport Canada in addition to notifying NISSAN.
If Transport Canadareceives complaints, it may open an investigation, and if it finds that as safety defect exists in a group of vehicles, it may request that NISSAN conduct a recall campaign. However, Transport Canadacannot become involved in individual problems between you, your dealer, or NISSAN.
YoumaycontactTransportCanada'sDefectInvestigationsandRecallsDivisiontollfreeat1-800-333-0510.Youmayalso reportsafetydefectsonlineat:
https://wwwapps.tc.gc.ca/Saf-Sec-Sur/7/PCDB-BDPP/Index.aspx.
Additional information concerning motor vehicles safety maybe obtained from Transport Canada's Road Safety Information Centre at 1-800-333-0371 or online at www.tc.gc.ca/roadsafety(English speakers) or www.tc.gc.ca/securiteroutiere
9-22 Technical and consumer information
(Frenchspeakers).
TonotifyNISSANofanysafetyconcerns pleasecontactourConsumerInformation Centretollfreeat1-800-387-0122.
READINESSFORINSPECTION/MAINTENANCE(I/M)TEST
Duetolegalrequirementsinsomestates and Canadian Provinces, your vehicle maybe required to be in what is called the "ready condition" for an inspection/Maintenance (I/M) test of the emission control system.
The vehicle is set to the "ready condition" when it is driven through certain driving patterns. Usually, the "ready condition" can be obtained by ordinary usage of the vehicle.
Ifapowertrainsystemcomponentisrepairedor thebatteryisdisconnected,thevehiclemaybe resettoa"notreadycondition".Beforetaking thel/Mtest,checkthevehicle'sinspection/maintenanceetestreadinesscondition.Placethe ignitionswitchintheONpositionwithout startingtheengine.IftheMalfunctionIndicator Light(MIL)comesonsteadyfor20secondsand thenblinksfor10seconds,thel/Mtest conditionis"notready".IftheMILdoesnot blinkafter20seconds,thel/Mtestconditionis "ready".
ContactaNISSANdealertoset"readycondition"ortopreparethevehiclefortesting.
EVENTDATARECORDERS(EDR)
ThisvehicleisequippedwithanEvent DataRecorder(EDR).Themainpurposeof anEDRistorecord,incertaincrashor near crash-likesituations,suchasanairbag deploymentor hittinga roadobstacle,data thatwillassistinunderstandinghowa vehicle'ssystemsperformed.TheEDRis designedtorecorddatarelatedtovehicle dynamicsandsafetysystemsforashort periodoftime,typically30secondsorless. TheEDRinthisvehicleisdesignedto recordsuchdataas:
- Howvarious systems in your vehicle were operating;
- Whetherornotthedriverandpassengersafetybeltswerebuckled/fas-tened;
- Howfar(ifatall)thedriverwas depressingtheacceleratorand/or brakepedal;and,
- Howfastthevehiclewastraveling.
- Soundsarenotrecorded.
Thesedatacanhelpprovideabetter understandingofthecircumstancesin whichcrashesandinjuriesoccur.NOTE: EDRdataarerecordedbyyourvehicleonly ifanontrivialcrashsituationoccurs;no dataarerecordedbythe EDRunder normaldrivingconditionsandnopersonal
Technical and consumer information
data(e.g.name, gender, age and crash location) are recorded. However, other parties, such as law enforcement, could combine the EDR data with the type of personally identifying datar routinely acquired during acrash investigation.
ToreaddatarecordedbyanEDR, special equipmentisrequiredandaccesstothe vehicleortheEDRisneeded.Inadditionto thevehiclemanufacturerandNISSAN dealer,otherparties,suchaslawenforcement,thathavethespecialequipment,can readtheinformationiftheyhaveaccessto thevehicleortheEDR.
OWNER'SMANUAL/SERVICE MANUALORDERINFORMATION
GenuineNISSANServiceManualsforthis modelyearandpriorcanbepurchased.A genuineNISSANServiceManualisthebest sourceofserviceandrepairinformationforyour vehicle.Thismanualisthesameoneusedbythe factorytrainedtechniciansworkingataNISSAN dealer.GenuineNISSANOwner'sManualscan alsobepurchased.
IntheUSA:
Forcurrentpricingandavailabilityofgenuine
NISSANServiceManualscontact:
1-800-450-9491
www.nissan-techinfo.com
Forcurrentpricingandavailabilityofgenuine
NISSANOwner'sManualscontact:
1-800-247-5321
InCanada:
TopurchaseacopyofagenuineNISSAN ServiceManualorOwner'sManualforth this modelyearandpriorpleasecontactaNISSAN dealer.Forthephonenumberandlocationofa NISSANdealerinyourareacalltheNISSAN InformationCenterat1-800-387-0122anda bilingualNISSANrepresentativewillassistyou.
10Index
A
ABS(Anti-lockBrakingSystem)....5-26
Advancedairbagsystem....1-33
Airbagsystem Advancedairbagsystem....1-33 Frontpassengerairbagandstatuslight....1-35 Front-seatmountedside-impact supplementalairbagsystem....1-38 Roof-mountedcurtainside-impact supplementalairbagsystem....1-38
Airbagwarninglabels....1-40
Airbagwarninglight....1-41,2-13
Aircleanerhousingfilter....8-19
Airconditioner Airconditioneroperation....4-24 Airconditionerservice....4-30 Airconditionerspecificationlabel....9-13 Airconditioningsystemrefrigerantand lubricantrecommendations....4-30,9-7 In-cabinmicrofilter....4-30
Airdeflectors....9-16
Alarm, Howtostopalarm(seevehicle
securitysystem)....2-28
Alcohol,drugsanddriving....5-7
Antenna....4-79
Anti-lockBrakingSystem(ABS)....5-26
Anti-lockbrakingsystem(ABS)warninglight.....2-10
Appearancecare Exteriorappearancecare....7-2 Interiorappearancecare....7-5
Audiblereminders....2-16
Audiooperationprecautions....4-31
Audiosystem....4-31
Steeringwheelaudiocontrols....4-77
Autochanger CompactDisc(CD)....4-49 Autolightsystem....2-32 Automatic Airconditioner(TypeA)....4-25 Airconditioner(TypeB)....4-28 Automaticadjustingfunction (frontwindows)....2-46 Automatictransmissionfluid(ATF)....8-13 Doorlocks....3-5 Drivingwithautomatictransmission....5-12 AUX(Auxiliary)button....4-46,4-51 Auxiliaryinputjacks....4-75 Avoidingcollisionandrollover....5-6
B
Battery....8-16 Batterysaversystem....2-34 IntelligentKey....8-25 Variablevoltagecontrolsystem....8-18 Beforestartingtheengine....5-11 Belts(Seedrivebelts)....8-18 Bluetooth® hands-freephonesystem (modelswithnavigationsystem)....4-81 Bluetooth® hands-freephonesystem (modelswithoutnavigationsystem)....4-91 Bluetooth® streamingaudio....4-63 Boosterseats....1-24 Brake Anti-lockBrakingSystem(ABS)....5-26 Brakeandclutchfluid....8-14 Brakefluid....8-14 Brakesystem....5-25 Parkingbrakeoperation....5-20 Warninglight....2-10
Break-inschedule....5-23 Brightnesscontrol....4-7 DisplayON/OFFbutton....4-7 Instrumentpanel....2-34 Bulbcheck/instrumentpanel....2-10 Bulbreplacement....8-27
C
Cabinairfilter....4-30 Capacitiesandrecommendedfuel/lubricants....9-2 CarphoneorCBradio....4-80 Cargocover....2-43 Catalyticconverter,Threewaycatalyst....5-3 CD/CF/USBmemorycareandcleaning....4-76 Centermulti-functioncontrolpanel (modelswithnavigationsystem)....4-3 Childrestraints....1-18 Boosterseats....1-24 Precautionsonchildrestraints....1-18 Toptetherstrap....1-19 Childsafety....1-15 Chimes Audiblereminders....2-16 Seatbeltwarninglightandchime....2-13 Circuitbreaker,Fusiblelink....8-23 Cleaningexteriorandinterior....7-2,7-5 Clock....2-8,2-25 Clutchfluid....8-14 Cockpit....2-3 Coldweatherdriving....5-31 CompactDisc(CD)changer(See audiosystem)....4-49 CompactDisc(CD)player(See audiosystem)....4-45,4-54 Compactsparetire....8-40
Consolebox....2-42
Coolant
Capacitiesand
recommendedfuel/lubricants....9-2
Changingenginecoolant....8-10
Checkingenginecoolantlevel....8-10
Corrosionprotection....7-8
Cover,Cargocover....2-43
Cruisecontrol....5-21
Cupholders....2-40
D
Dampers,Performancedampers....5-30
Daytimerunninglightsystem....2-34
Defrosterswitch, Rearwindow
defrosterswitch....2-31
Dimensions....9-10
Drivebelts....8-18
Driving
Coldweatherdriving....5-31
Drivingwithautomatictransmission....5-12
Drivingwithmanualtransmission....5-16
Precautionswhenstartinganddriving....5-2
DVDplayeroperation....4-56
E
Economy,Fuel....5-23
Elapsedtime....2-23
Emergencytirepuncturerepairkit....6-8
Emissioncontrolinformationlabel....9-12
Emissioncontrolsystemwarranty....9-22
Engine
Beforestartingtheengine....5-11
Break-inschedule....5-23
Capacitiesand
recommendedfuel/lubricants....9-2
Changingenginecoolant....8-10
Changingengineoilandfilter....8-11
Checkingenginecoolantlevel....8-10
Checkingengineoillevel....8-11
Coolanttemperaturegauge....2-7
Emergencyengineshutoff....5-10
Engineblockheater....5-32
Enginecompartmentchecklocations......8-8
Enginecoolingsystem....8-9
Engineoil....8-11
Engineoilandoilfilterrecommendation....9-6
Engineoilreplacementindicator....2-21
Engineoiltemperaturegauge....2-8
Engineoilviscosity....9-6
Engineserialnumber....9-12
Enginespecifications....9-8
Enginestartoperationindicator....2-18
Enginestartoperationindicator(Manual
Transmissionmodels)....2-19
If your vehicle overheats....6-16
Startingtheengine....5-11
EventDataRecorders(EDR)....9-23
Exhaustgas(carbonmonoxide)....5-2
F
F.M.V.S.S./C.M.V.S.S.certificationlabel....9-12
Filter
Aircleanerhousingfilter....8-19
Changingengineoilandfilter....8-11
Flashers(Seehazardwarningflasherswitch).....2-35
Flattire....6-2
Repairingflattire(withemergencytire
puncturerepairkit)....6-8
Flattowing....9-20
Floormatcleaning....7-6
Fluid
Automatictransmissionfluid(ATF)....8-13
Brakeandclutchfluid....8-14
Brakefluid....8-14
Capacitiesand
recommendedfuel/lubricants....9-2
Enginecoolant....8-9
Engineoil....8-11
Powersteeringfluid....8-13
Windowwasherfluid....8-15
FM-AMradiowithCompactDisc(CD)player....4-43
FM-AM-SATradiowithcompactdisc(CD)
changer(modelswithoutnavigationsystem).....4-47
FM-AM-SATradiowithcompactdisc(CD)
player(modelswithnavigationsystem)......4-52
Foglightswitch....2-35
Frontmanualseatadjustment....1-4
Frontpassengerairbagandstatuslight......1-35
Frontpowerseatadjustment....1-2
Frontseat, Frontseatadjustment....1-2
Fuel
Capacitiesand
recommendedfuel/lubricants....9-2
Fueleconomy....5-23
Fueleconomyinformation(display)....4-9
Fueloctanerating....9-4
Fuelrecommendation....9-4
Fuel-fillercap....3-34
Fuel-fillerdoor....3-34
Gauge....2-7
LOOSEFUELCAPwarning....3-35
Fuses....8-22
Fusiblelinks....8-23
G
Garagedooropener, HomeLink ^®
UniversalTransceiver....2-49
Gascap....3-34
Gauge....2-5
Enginecoolanttemperaturegauge....2-7
Fuelgauge....2-7
Odometer....2-6
Speedometer....2-6
Tachometer....2-6
Tripcomputer....2-22
Generalmaintenance....8-3
Glovebox....2-41
H
Hands-freephonesystem,Bluetooth®
(modelswithnavigationsystem)......4-81
Hands-freephonesystem,Bluetooth®
(modelswithoutnavigationsystem)......4-91
Hatch,Rearhatch....3-16
Hazardwarningflasherswitch....2-35
Headrestraints....1-5
Headlights
Bulbreplacement....8-29
Headlightswitch....2-32
Xenonheadlights....2-31
Heatedseats....2-36
Heater
Engineblockheater....5-32
Heaterandairconditioneroperation....4-24
HomeLink® UniversalTransceiver....2-49
Hoodrelease....3-16
Horn....2-36
|
Ignitionswitch
(Push-button)....5-8
Manualtransmissionmodels....5-16
Immobilizersystem....2-28
In-cabinmicrofilter....4-30
Indicatorlights....2-14
INFObutton....4-8
Insidemirror....3-37
Inspection/maintenance(I/M)test....9-23
Instrumentbrightnesscontrol....2-34
Instrumentpanel....2-4
Instrumentpocket....2-40
IntelligentKey....3-2
IntelligentKeybatterydischargeindicator....2-19
IntelligentKeyremovalindicator....2-18
IntelligentKeysystem....3-6
Batteryreplacement....8-25
IntelligentKeysystemwarninglight....2-11
Keyoperatingrange....3-8
Keyoperation....3-9
Warningsignals....3-11
Interiorlightcontrolswitch....2-47
Interiorlightreplacement....8-29
Interiorlights....2-46
Interiortrunklidrelease....3-19
iPod ^® playeroperation....4-68
J
Jumpstarting....6-14
K
Keylessentry(Seeremotekeyless
Foglightswitch....2-35
Headlightswitch....2-32
Headlightsbulbreplacement....8-29
Indicatorlights....2-14
Interiorlightcontrolswitch....2-47
Interiorlights....2-46
Maplights....2-46
Replacement....8-27
Trunklight 2-49
Vanitymirrorlights....2-48
Warning/indicatorlightsand
audiblereminders....2-10
Xenonheadlights....2-31
Lights, Exterior and interior light replacement.....8-29
Loadinginformation(Seevehicle
loadinginformation)....9-17
Lock
Automaticdoorlocks....3-5
Doorlocks....3-4
Lockingwithmechanicalkey....3-4
Lowtirepressurewarninglight....2-12
Lowtirepressurewarningsystem
(Seetirepressuremonitoringsystem(TPMS))....5-3
M
Maintenance
Battery....8-16
Generalmaintenance....8-3
Insidethevehicle....8-4
Maintenanceindicators....2-21
Maintenance precautions....8-6
Maintenancerequirements....8-3
Outsidethevehicle....8-3
Seatbeltmaintenance....1-14
Malfunctionindicatorlight(MIL)....2-14
Manualfrontseatadjustment....1-4
Maplights....2-46
Masterwarninglight....2-13
Mechanicalkey(IntelligentKeysystem)....3-3
Meter
Tripcomputer....2-22
Metersandgauges....2-5
Instrumentbrightnesscontrol....2-34
Mirror
Insidemirror....3-37
Outsidemirrors....3-38
Vanitymirror....3-39
Multi-functioncontroller....4-4
N
Newvehiclebreak-in....5-23
NISSANVehicleImmobilizerSystem....2-28
NISSANvoicerecognitionsystem....4-103
Nokeywarning....2-18
0
Odometer....2-6
Off-roadrecovery....5-6
Oil
Capacitiesand
recommendedfuel/lubricants....9-2
Changingengineoilandfilter....8-11
Checkingengineoillevel....8-11
Engineoil....8-11
Engineoilviscosity....9-6
Oilfilterreplacementindicator....2-21
Openingthesofttop
Operation,Operationalindicators....2-18
Outsidemirrors....3-38
Overheat, If your vehicle overheats....6-16
Owner's Manual/ServiceManual
orderinformation....9-24
P
Panicalarm....3-14
Parking
Brakebreak-in....5-26
Parkingbrakeoperation....5-20
Parkingonhills....5-24
Performancedampers....5-30
Phone
Bluetooth® hands-freephonesystem
(modelswithnavigationsystem)....4-81
Bluetooth® hands-freephonesystem
(modelswithoutnavigationsystem)......4-91
CarphoneorCBradio....4-80
Power
Frontseatadjustment....1-2
Powerwindows....2-44
Precautions....5-21
Audiooperation....4-31
Brakingprecautions....5-25
Childrestraints....1-18
Cruisecontroloperations....5-17
Maintenance....8-6
Seatbeltusage....1-9
Supplementalrestraintsystem....1-28
Whenstartinganddriving....5-2
Pushstarting....6-16
Pushwarning(Automatic
Transmissionmodels)....2-19
Push-buttonignitionswitch....5-8,5-9
R
Radio....4-31
CarphoneorCBradio....4-80
FM-AMradiowithCompactDisc
(CD)player....4-43
FM-AM-SATradiowithcompactdisc(CD)
changer(modelswithout
navigationsystem)....4-47
FM-AM-SATradiowithcompactdisc(CD)
player(modelswithnavigationsystem)......4-52
Rapidairpressureloss....5-6
Readinessforinspection/maintenance
(I/M)test....9-23
Rearhatch....3-16
Rearhatchopener....3-16
Rearhatchopenerswitch....3-17
Rearparcelbox....2-42
Rearwindowdefrosterswitch....2-31
RearViewmonitor(modelswith
navigationsystem)....4-18
Recorders, Eventdata....9-23
Registeringyourvehicleinanothercountry......9-11
Remotekeylessentrysystem....3-13
Repairingflattire(withemergencytirepuncture
repairkit)....6-8
Reportingsafetydefects....9-22
Rollover....5-6
Roof,Softtop....3-21
S
Safety,Childseatbelts....1-15
Satelliteradiooperation....4-48,4-53
Seatadjustment
Frontmanualseatadjustment....1-4
Frontpowerseatadjustment....1-2
Frontseats....1-2
Seatbelt(s)
Childsafety....1-15
Infants....1-15
Injuredpersons....1-11
Largerchildren....1-16
Precautionsonseatbeltusage....1-9
Pregnantwomen....1-11
Seatbeltcleaning....7-7
Seatbeltextenders....1-14
Seatbeltmaintenance....1-14
Seatbeltwarninglightandchime....2-13
Seatbelts....1-9
Seatbeltswithpretensioners....1-39
Three-pointtype....1-11
Seat(s)
Climatecontrolledseats....2-38
Heatedseats....2-36
Seats....1-2
Secondaryrearhatchrelease....3-18
Secondarytrunklidrelease....3-20
Securitysystem(NISSANVehicleImmobilizer
System),Enginestart....2-28
Securitysystem,Vehiclesecuritysystem......2-27
Selectorlever,Shiftlockrelease......5-16
Servicingairconditioner....4-30
SETTINGbutton....4-11
Shiftlockrelease,Transmission....5-16
Shift"P" warning(Automatic
Transmissionmodels)....2-19
Shifting
Automatictransmission....5-12
Manualtransmission....5-16
Softtop
Careandcleaning....7-3
Ifthetopdoesnotopenorclose....3-28
OpeningusingtheIntelligentKey......3-26
Softtopindicatorlight....2-15,3-24
Softtopoperation....3-21
Sparetire....9-9
Sparkplugs....8-19
Speedometer....2-6
Starting
Beforestartingtheengine....5-11
Jumpstarting....6-14
Precautionswhenstartinganddriving....5-2
Pushstarting....6-16
Startingtheengine....5-11
STATUSbutton....4-7
Statuslight, Frontpassengerairbag......1-35
Steering
Powersteeringfluid....8-13
Powersteeringsystem....5-25
Steering-wheel-mountedcontrols
foraudio....4-77
Storage....2-40
Sunvisors....3-36
Supplementalairbagwarninglabels....1-40
Supplementalairbagwarninglight.....1-41,2-13
Supplementalrestraintsystem....1-28
Precautionsonsupplemental
restraintsystem....1-28
Switch
Autolightswitch....2-32
Foglightswitch....2-35
Hazardwarningflasherswitch....2-35
Headlightswitch....2-32
Ignitionswitch....5-12
Ignitionswitchmanual
transmissionmodels....5-16
Turnsignalswitch....2-35
Vehicledynamiccontrol(VDC)offswitch.....2-39
SynchroRevMatchmode(S-MODE)....5-17
T
Tachometer....2-6
Temperaturegauge,Enginecoolant
temperaturegauge....2-7
Theft(NISSANVehicleImmobilizerSystem),
Enginestart....2-28
Three-waycatalyst....5-3
Tiltsteering....3-36
Tire
Pressure, Lowtirepressurewarninglight.....2-12
Sealant....6-8
Tirereplacementindicator....2-21
Tires
Emergencytirepuncturerepairkit....6-8
Flattire....6-2
Lowtirepressurewarningsystem....5-3
Sparetire....8-40
TireandLoadinginformationlabel.....8-32,9-13
Tirechains....8-37
Tiredressing....7-5
Tirepressure....8-31
Tirepressuremonitoring
system(TPMS)....5-3,6-2
Tirerotation....8-38
Uniformtirequalitygrading....9-21
Wheel/tiresize....9-9
Wheelsandtires....8-31
Tonneaucover(seecargocover)....2-43
Top,Softtop....3-21
Touchscreen....4-4
Towing
Flattowing....9-20
Towtrucktowing....6-18
Towingatraler....9-20
TPMS,Tirepressuremonitoringsystem....5-3
TPMS,Tirepressurewarningsystem....6-2
Trailertowing....9-20
Transceiver, HomeLink ^® UniversalTransceiver....2-49
Transmission
Automatictransmissionfluid(ATF)......8-13
Drivingwithautomatictransmission....5-12
Drivingwithmanualtransmission....5-16
Transmissionselectorleverlockrelease......5-16
Transmitter(Seeremotekeylessentrysystem)....3-13
Travelingorregisteringyourvehiclein
anothercountry....9-11
Tripcomputer....2-22
Tripodometer....2-23
Triplemeter....2-8
Trunk
Interiortrunklidrelease....3-19
Light 2-49
Secondarytrunklidrelease....3-20
Trunklid....3-18
Trunkreleasepowercancelswitch....3-19
Turnsignalswitch....2-35
U
Underbodycleaning....7-4
Uniformtirequalitygrading....9-21
USBmemoryoperation....4-59
v
Vanitymirror....3-39
Vanitymirrorlights....2-48
Variablevoltagecontrolsystem....8-18
Vehicle
Dimensions....9-10
Vehicledynamiccontrol(VDC)offswitch.....2-39
Vehicledynamiccontrol(VDC)system......5-28
Ventilators....4-24
Voicecommand(Bluetooth ^® Hands-Free
PhoneSystem)....4-97
Voicecommand(NISSANvoice
recognitionsystem)....4-108
Voltmeter....2-8
W
Warning
Hazardwarningflasherswitch....2-35
Lights....2-10
Tirepressuremonitoring
system(TPMS)....5-3,6-2
Warning/indicatorlightsand
audiblereminders....2-9
Warninglabels, Airbagwarninglabels.....1-40
Warninglight
Airbagwarninglight....1-41,2-13
Anti-lockbrakingsystem(ABS)
warninglight....2-10
Brakewarninglight....2-10
IntelligentKeysystemwarninglight....2-11
Lowtirepressurewarninglight....2-12
Seatbeltwarninglightandchime....2-13
Warningsandalerts(vehicle
informationdisplay)....2-20
Warranty, Emission control system warranty.....9-22
Washerswitch, Windshieldwiperand
washerswitch....2-29
Washing....7-2
Waxing....7-4
Wheel/tiresize....9-9
Wheelsandtires....8-31
Careofwheels....7-4
Cleaningaluminumalloywheels....7-5
Windowwasherfluid....8-15
Window(s)
Automaticadjustingfunction....2-46
Cleaning....7-4
Powerwindows....2-44
Windshieldwiperandwasherswitch....2-29
Wiper
Windshieldwiperandwasherswitch....2-29
Wiperblades....8-20
x
Xenonheadlights....2-31
GASSTATIONINFORMATION
FUELRECOMMENDATION:
VQ37VHRengine
Useunleadedpremiumgasolinewithanoctane ratingofatleast91AKI(Anti-KnockIndex) number(Researchoctanenumber96).
If premium gasoline is not available, unleaded regulargasolinewithanoctanerating of 87 AKI number (Research octanenumber 91) maybe temporarily used, but only under the following precautions:
●Havethefueltankfilledonlypartiallywith unleadedregulargasoline,andfillupwith unleadedpremiumgasolineassoonas possible.
- Avoidfullthrottledrivingandabruptacceleration.
However, formaximumvehicleperformance, the use of unleaded premium gasoline is recommended.

CAUTION
- Usingafuelotherthanthatspecifiedcouldadverselyaffecttheemissioncontrolsystems,andmayalso affectwarrantycoverage.
- Undernocircumstances should leaded gasolinebeused, sincethis willdamagethethreewaycatalyst.
- DonotuseE-85fuelinyourvehicle. Yourvehicleisnotdesignedtorun onE-85fuel.UsingE-85fuelcan damagethefuelsystemcomponentsandisnotcoveredbythe NISSANvehiclelimitedwarranty.
For additional information, see "Capacities and recommended fuel/lubricants" (P.9-2).
ENGINEOILRECOMMENDATION:
●EngineoilwithAPICertificationMark
- ViscositySAE5W-30
See "Capacitiesandrecommendedfuel/lubricants" (P.9-2) forengineoilandoilfilter recommendation.
COLDTIREPRESSURES:
Thelabelistypicallylocatedonthedriverside centerpillaroronthedriver'sdoor. For additionalinformation,see"Wheelsandtires" (P.8-31).
NEWVEHICLEBREAK-INPROCEDURE DURESRECOMMENDATION:
During the first 1,200 miles (2,000 km) of vehicle use, follow there recommendations outlined in the "Break-inschedule" (P.5-23) of this Owner's Manual. Follow these recommendations for the futurer reliability and economy of your new vehicle.
Printing: December 2011 (17)
Publication No.: OM2E-0Z34U0
Printed in Japan
TOOUM-1TG1D
Z34-D