PE-190D - Sewing machine BROTHER - Free user manual and instructions
Find the device manual for free PE-190D BROTHER in PDF.

User questions about PE-190D BROTHER
0 question about this device. Answer the ones you know or ask your own.
Ask a new question about this device
Download the instructions for your Sewing machine in PDF format for free! Find your manual PE-190D - BROTHER and take your electronic device back in hand. On this page are published all the documents necessary for the use of your device. PE-190D by BROTHER.
USER MANUAL PE-190D BROTHER
"IMPORTANT SAFETY INSTRUCTIONS"
When using a embroidery machine, basic safety precautions should always be taken, including the following:
"Read all instructions before using."
DANGER — To reduce the risk of electric shock.
- The embroidery machine should never be left unattended while plugged in. Always unplug the embroidery machine from the electrical outlet immediately after using and before cleaning.
- Always unplug before changing the light bulb. Replace bulb with same type rated 2.4 watts.
WARNING — To reduce the risk of burns, fire, electric shock, or injury to persons.
- Do not allow this embroidery machine to be used as a toy. Close attention is necessary when the embroidery machine is used by or near children.
- Use this embroidery machine only for its intended use as described in this manual. Use only accessories recommended by the manufacturer as contained in this manual.
- Never operate this embroidery machine if it has a damaged cord or plug, if it is not working properly, if it has been dropped or damaged, or dropped into water. Return the embroidery machine to the nearest authorized dealer or service center for examination, repair, electrical or mechanical adjustment.
- Never operate the embroidery machine with any air openings blocked. Keep ventilation openings of the embroidery machine and foot control free from the accumulation of lint, dust, and loose cloth.
- Never drop or insert any object into any opening.
- Do not use outdoors.
- Do not operate where aerosol (spray) products are being used or where oxygen is being administered.
- To disconnect, turn the main switch to the symbol "O" position which represents off, then remove plug from outlet.
- Do not unplug by pulling on cord. To unplug, grasp the plug, not the cord.
- Keep fingers away from all moving parts. Special care is required around the embroidery machine needle.
- Always use the proper needle plate. The wrong plate can cause the needle to break.
- Do not use bent needles.
- Do not pull or push fabric while stitching. It may deflect the needle causing it to break.
- Switch the embroidery machine to the symbol "O" position when making any adjustments in the needle area, such as threading needle, changing needle, threading bobbin, or changing presser foot, and the like.
- Always unplug the embroidery machine from the electrical outlet when removing covers, lubricating, or when making any other user servicing adjustments mentioned in the instruction manual.
"SAVE THESE INSTRUCTIONS"
"This embroidery machine is intended for household use."
FOR USERS IN THE UK, EIRE, MALTA AND CYPRUS ONLY.
If your embroidery machine is fitted with a 3 pin non rewireable BS plug then please read the following.
IMPORTANT
If the available socket outlet is not suitable for the plug supplied with this equipment, it should be cut off and an appropriate three pin plug fitted. With alternative plugs an approved fuse must be fitted in the plug.
NOTE
The plug severed from the main lead must be destroyed as a plug with bare flexible cord is hazardous if engaged in a live socket outlet. In the event of replacing the plug fuse, use a fuse approved by ASTA to BS 1362, i.e. carrying the mark, rating as marked on plug.
Always replace the fuse cover, never use plugs with the fuse cover omitted.
WARNING
DO NOT CONNECT EITHER WIRE TO THE EARTH TERMINAL WHICH IS MARKED WITH THE LETTER 'E', BY THE EARTH SYMBOL OR COLOURED GREEN OR YELLOW.
The wires in this mains lead are coloured in accordance with the following code:
Blue Neutral
Brown Live
As the colours of the wiring in the main lead of this appliance may not correspond with the coloured markings identifying the terminals in your plug, proceed as follows.
The wire which is coloured blue must be connected to the terminal which is marked with the letter 'N' or coloured black or blue.
The wire which is coloured brown must be connected to the terminal which is marked with the letter 'L' or coloured red or brown.
IMPORTANT (In the United Kingdom)
Mains Supply (AC 230/240V \~ , 50 Hz only)
DO NOT cut off the mains plug from this equipment. If the plug fitted is not suitable for the power points in your home or the cable is too short to reach a power point, then obtain an appropriate safely approved extension lead or consult your dealer.
BE SURE to replace the fuse only with an identical approved type, as originally fitted, and to replace the fuse cover.
If nonetheless the mains plug is cut off ensure to remove the fuse and dispose of the plug immediately, to avoid a possible shock hazard by inadvertent connection to the mains supply.
CONGRATULATIONS ON CHOOSING OUR COMPUTER EMBROIDERY MACHINE
Your machine is an advanced computerized home embroidery machine.
To fully enjoy all of its features, we suggest that you study this booklet.
-
Be sure to keep your eye on the needle while sewing. Do not touch the balance wheel, thread take-up, needle, or other moving parts.
-
Remember to turn off the power switch and unplug the cord when:
• Operation is complete
● Replacing or removing the needle or any other parts
● A power failure occurs during use
- Maintaining the machine
- Leaving the machine unattended.
-
Plug the machine directly into the wall. Do not use extension cords.
-
Always be sure to turn off the main power switch when inserting and removing the embroidery card. Do not touch the embroidery card inserted in the card slot while your machine turns on.
For a longer service life
- When storing your embroidery machine, avoid direct sunlight and high humidity locations. Do not store your embroidery machine beside a space heater, iron, or other hot objects.
- Use only neutral soaps or detergents to clean the case. Benzene, thinner, and scouring powders can damage the case and machine, and should never be used.
- Do not drop or hit the machine.
- Always consult the operation manual or use the "BASIC OPERATION" key when replacing or installing any assemblies; needle, or other parts to assure correct installation.
For repair or adjustment
In the event a malfunction occurs or adjustment is required, first follow the troubleshooting table in the back of the operation manual to inspect and adjust the machine yourself. If the problem persists, please consult your nearest authorized service center.
- Please note that specifications and external appearance are subject to change for improvement without notice.
CONTENTS
CHAPTER 1
MACHINE KNOWLEDGE .... 3
PRINCIPAL PARTS AND
THEIR DESCRIPTION .... 3
MAIN POWER SWITCH AND
CONNECTORS.... 4
SELECTION KEYS.... 5
"START/STOP" BUTTON....5
ACCESSORIES....6
OPTIONS 7
OPERATION (SELECTION KEYS)...... 8
HOW TO USE THE LANGUAGE
SELECTION KEY.... 11
How to clear the
language selection.... 12
BOBBIN WINDING AND
INSTALLATION.... 13
Setting the bobbin.... 15
UPPER THREADING.... 16
Auto needle threading device 17
PREPARATION BEFORE
EMBROIDERING 18
Attaching stabilizer material.... 18
Embroidering different
types of fabric 18
Setting the fabric in the
embroidery frame.... 20
Fitting the embroidery frame
to the machine 22
Removing the embroidery frame ..... 22
THREAD TENSION ADJUSTMENT..... 23
ADJUSTING THE LCD
SCREEN CONTRAST.... 24
If the LCD is hard to see when the power
is turned on....' 24
CHANGING THE NEEDLE.... 25
CHAPTER 2
EMBROIDERING.... 26
EMBROIDERY 26
Start embroidering 28
Embroidering advice.... 29
HOW TO SELECT PATTERNS...... 30
Selecting built-in embroidery patterns.... 30
Selecting alphabetic characters..... 31
Uppercase & lowercase.... 32
Changing the character size to one of three different sizes .... 33
Correcting characters 33
Checking the characters input ..... 34
Changing the color of single characters.... 34
Selecting frame patterns.... 35
Selecting one-point patterns.... 37
Displaying the embroidery time for one-point patterns.... 39
Displaying the color names for one-point patterns.... 39
Selecting patterns from a memory card.... 40
MEMORY 41
Saving a pattern combination in memory.... 41
Retrieving a pattern which has been saved 42
CHANGING THE SETTINGS FOR THE
SELECTED PATTERN.... 43
Moving the position (LAYOUT)...... 43
Changing the embroidery position.... 44
Checking the embroidery area...... 44
Embroidering from a specific starting point.... 45
Changing the pattern direction...... 45
Mirror imazing patterns.... 46
Changing the size of characters and frame patterns.... 47
Changing thread density of the stitch on characters and some frame patterns ... 47
SEWING A BASIC EMBROIDERY
PATTERN....48
Embroidering multi-color patterns..... 48
Embroidering single color patterns ... 48
Embroidering a single color pattern when "MULTI COLOR" is displayed... 49
Embroidering characters that extend beyond one frame.... 50
EMBROIDERY APPLICATIONS ..... 51
Combining a frame pattern with a design.... 51
Embroidering appliques (using a frame pattern) 52
Embroidering onto small pieces of fabric or onto corners ..... 53
IF THREAD BREAKS DURING
EMBROIDERING OR WHEN PARTLY
COMPLETING A PATTERN.... 54
If thread breaks during embroidering.... 55
Re-embroidering from the beginning 56
MAINTENANCE.... 57
CHANGING THE LIGHT BULB...... 57
CLEANING 58
ERROR MESSAGE 59
TROUBLESHOOTING.... 62
PATTERNS...... 65
EMBROIDERING USING A
SMALL FRAME (OPTIONAL)...... 67
EMBROIDERING USING A
EXTRA-SMALL FRAME
(OPTIONAL) 68
EMBROIDERING USING A
LARGE FRAME (OPTIONAL).... 69
Linking two or more embroidered patterns (using the 90° rotation feature) .... 70
MACHINE KNOWLEDGE CHAPTER 1
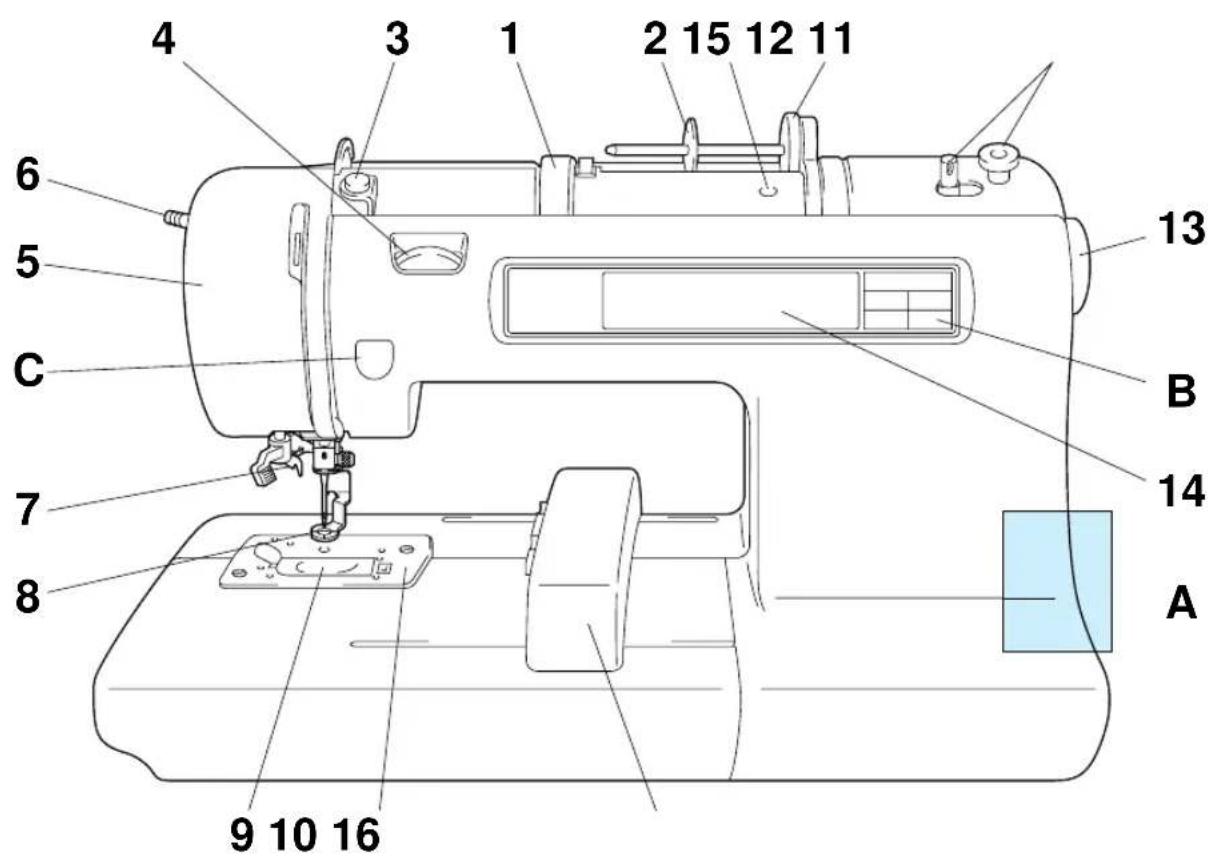
PRINCIPAL PARTS AND THEIR DESCRIPTION
text_image
4 3 1 2 15 12 11 6 5 C 13 B 7 8 14 A 9 10 161-Handle
2-Spool cap
3-Bobbin winding guide
4—Upper thread tension dial
5-Face plate
6-Presser foot lever
7-Needle threader
8-Presser foot
9-Bobbin cover
10-Needle plate
11-Bobbin winding device
12-Spool felt
13-Balance wheel
14-LCD (Liquid Crystal Display)
15-Hole for extra spool pin
16-Carriage (Embroidery arm)
A-MAIN POWER SWITCH AND CONNECTORS
B-SELECTION KEYS
C-“START/STOP” BUTTON
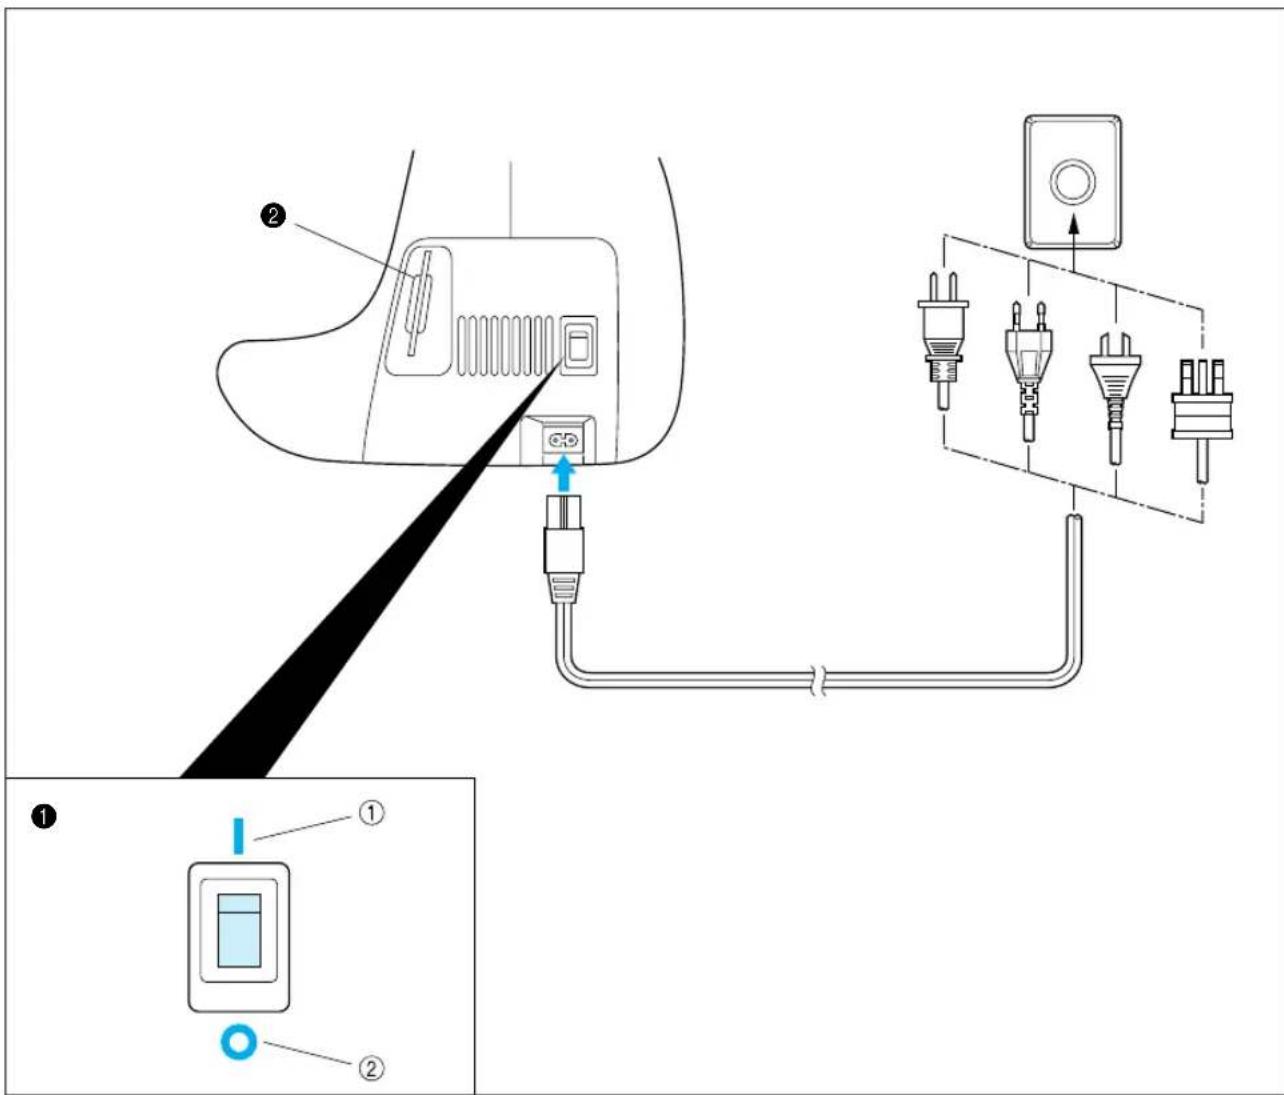
MAIN POWER SWITCH AND CONNECTORS
text_image
Diagram showing a device connection with labeled components and a close-up of its internal wiring, including plug connectors and terminal blocks.1 Power switch
① ON
② OFF
② Memory card slot
CAUTION
- When leaving the embroidery machine unattended, the main switch of the machine must be switched off and the plug removed from the socket-outlet.
- When servicing the sewing machine, or when removing covers or changing lamps, the machine must have the plug removed from the socket-outlet.
- For U.S.A. only
This appliance has a polarized plug (one blade wider than the other). To reduce the risk of electric shock, this plug is intended to fit in a polarized outlet only one way. If the plug does not fit fully in the outlet, contact a qualified electrician to install the proper outlet. Do not modify the plug in any way.
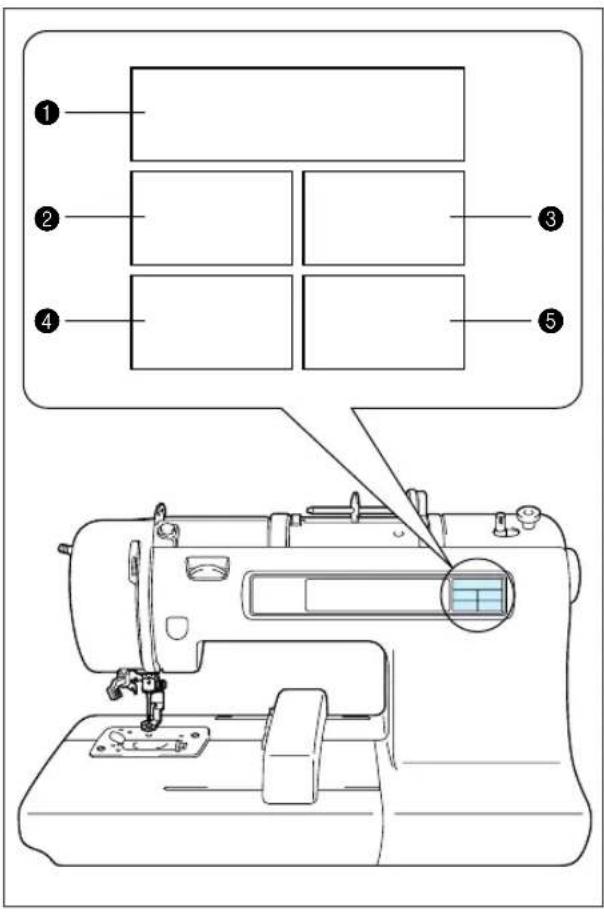
SELECTION KEYS
text_image
Diagram of a sewing machine with labeled parts and a close-up view of the device's front panel.① "CHARACTERS & DESIGNS" KEY
Use this key for embroidering characters and patterns.
② "CARD" KEY
Use this key to select a memory card for embroidery patterns.
③ "MEMORY" KEY
Use this key for saving or retrieving pattern combinations in the machine.
④ "BASIC OPERATION" KEY
Use this key for more information on how to use this embroidery machine.
⑤ "MODIFY & ADVISE" KEY
Use this key when you have problems with embroidering. This is a useful key to remember.
"START/STOP" BUTTON

text_image
Technical diagram showing a mechanical or electrical component with labeled component '1'Press this button to start the machine, and then press it once more to stop the machine.
* The machine will operate at low speed while the button is being pressed and then speed up when the button is released.
* When the machine stops, the needle will stop at its highest position.
* If "Raise the needle." appears on the display, press the "START/STOP" button to stop the needle at its highest position.
① "START/STOP" BUTTON
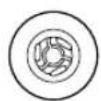
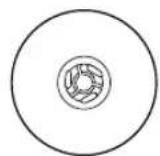
ACCESSORIES
1
2
3
4

5
6
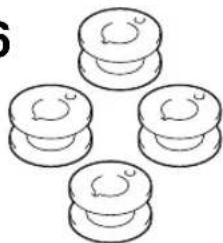
natural_image
Simple line drawing of four identical mechanical components with circular features (no text or symbols)7
8
9

natural_image
Simple grid pattern with intersecting lines inside a rounded square (no text or symbols)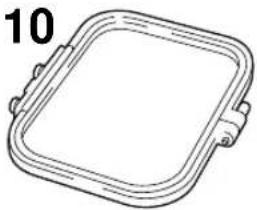
natural_image
Simple line drawing of a square frame with rounded corners and a small protrusion at the bottom (no text or symbols)11
natural_image
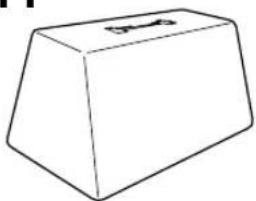
Simple line drawing of a 3D geometric shape resembling a truncated prism or wedge (no text or symbols)12

13
14
natural_image
Simple line drawing of a 3D geometric shape resembling a truncated trapezoidal prism (no text or symbols)| No. | Parts Name Parts Code | |
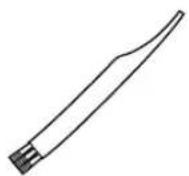
| 1 | Cleaning brush XA4527-001 | |
| 2 | Needle set 75/11 3pcs., 90/14 1 pc. | X59535-001 |
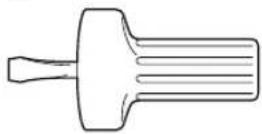
| 3 | Screwdriver X53666-001 | |
| 4 | Scissors 184783-001 | |
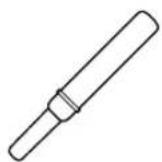
| 5 | Seam ripper X54243-001 | |
| 6 | Bobbins (4 pcs) ***** | |
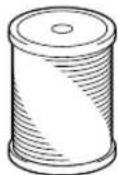
| 7 | Spool cap (Small) 130013-003 | |
| 8 | Spool cap (Large) 130012-003 | |
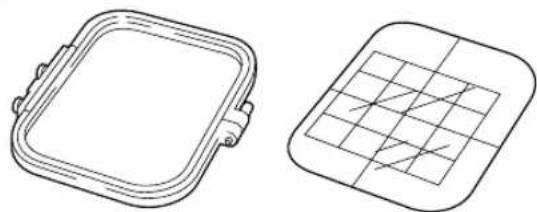
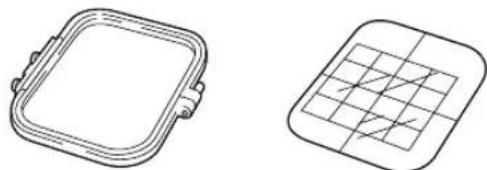
| 9 | Embroidery sheet (Regular) XA3728-001 | |
| 10 | Embroidery frame (Regular) X58739-003 | |
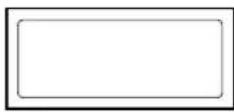
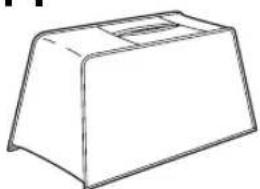
| 11 | Machine cover (soft type)* X59351-001 | |
| 12 | Extra spool pin** 130920-051 | |
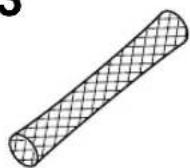
| 13 | Net*** 127610-000 | |
| 14 | Machine cover**** XA0181-051 |
* When placing the machine cover on the machine while the embroidery frame is still attached, touch "CHARACTERS & DESIGNS" or "CARD" to return the embroidery arm to it's storage position. An alternate method to return the embroidery arm to it's storage position would be to turn the machine off and then turn it on again, allow the arm to re-set itself and then turn off the machine. A cover might not be provided in some countries.
** An extra spool pin should be used for decorative thread such as metallic thread.
*** If using special threads which wind quickly off the thread spool, attach a net to the spool before using.
**** In some countries, the No. 14 machine cover is supplied as an accessory in place of the No. 11 machine cover (soft type).
***** Distributed in sets of 10 when ordered separately.
(Parts Code)
USA and Canada: XA3811-051
Other countries: XA3812-051
OPTIONS
1
natural_image
Two technical line drawings of rectangular components: a rounded square frame and a grid-patterned square (no text or symbols)2

natural_image
Two technical line drawings of electronic devices: a rectangular frame with connectors and a grid-patterned case (no text or symbols)3
natural_image
Two technical line drawings of rectangular components: a rounded square frame and a grid-patterned square (no text or symbols)4

natural_image
Three technical line drawings of electronic components: a circular component, a grid-patterned oval, and a rectangular plate (no text or symbols)5

natural_image
Pure architectural or engineering diagram showing a U-shaped structure with brickwork patterns (no text or symbols)6
7

natural_image
Line drawing of a cylindrical object with a flanged top and internal ridges (no text or symbols)8

| No. | Parts Name | Parts Code | |
| U.S.A. | Others | ||
| 1 | Embroidery set (Regular) SA417 XA3727-001 | ||
| 2 | Embroidery set (Large) SA418 XA3733-001 | ||
| 3 | Embroidery set (Small) SA416 XA3730-001 | ||
| 4 | Embroidery set (Extra-small) SA415 XA3713-001 | ||
| 5 | Brother poly 40 color thread set | SA740 X80928-100 | |
| 6 | Brother poly #90 bobbin thread | EBT-PE X80919-001 | |
| 7 | Backing material (Stabilizer material) | SA517 X80914-001 | |
| 8 | Memory card | ||
| No. 1 Alphabet SA298 X58317-001 | |||
| No. 2 Flower SA299 X58321-001 | |||
| No. 3 Dinosaur SA300 X58362-001 | |||
| No. 6 Moskowitz's World SA303 X58497-001 | |||
| No. 7 Country Life SA304 X59322-001 | |||
| No. 8 Holiday SA305 X59357-001 | |||
| No. 9 Hobby Craft | SA306 X59511-001 | ||
| No. 10 Monogram emblem | SA307 X59567-001 | ||
| No. 11 Frame | SA311 XA0257-001 | ||
| No. 12 Transportation | SA312 XA0275-001 | ||
| No. 13 Sports Emblem | SA313 XA0517-001 | ||
| No. 14 Large Floral | SA314 XA1223-001 | ||
| No. 15 Cute Kids | SA315 XA1325-001 | ||
| No. 16 Dogs & Cats | SA316 XA1406-001 | ||
| No. 17 Nintendo | SA317 XA1434-001 | ||
| No. 19 Marine | SA319 XA2452-001 | ||
| No. 20 Petite Designs | SA320 XA2869-001 | ||
| No. 21 Needlework | SA321 XA2873-001 | ||
| No. 25 Horse | SA325 XA3791-001 | ||
WARNING
Embroidery Cards purchased in foreign countries may not work with your machine.
Most of the instructions are in the machine's memory. Messages on the LCD screen guide you through each operation.
flowchart
graph TD
    A["Component A"] --> B["WINDING BOBBIN"]
    A --> C["SETTING BOBBIN"]
    A --> D["UPPER THREADING"]
    B --> E["CHANGING NEEDLE"]
    C --> F["EMBROIDERY"]
    D --> G["LANGUAGE SELECTION"]
    B --> H["Next"]
    I["SWITCH FUNCTION"] --> J["SELF-INTRODUCTION"]
    K["MEMORY"] --> L["BRIGHTNESS OF LCD"]
    M["TIME/THREAD COLOR DISPLAY"] --> N["NEXT"]
    J --> O["OPERATION KEY"]
    L --> O
    N --> P["SELECTION KEY"]
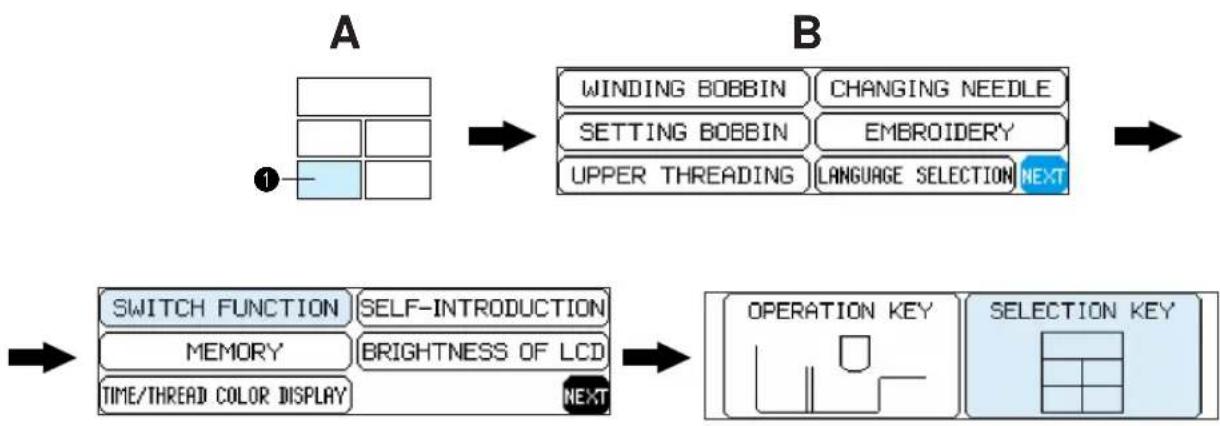
① "BASIC OPERATION" key
1. Press "BASIC OPERATION".
2. Touch "NEXT".
3. Touch "SWITCH FUNCTION".
4. Touch "SELECTION KEY".

text_image
A BUsing the selection keys

flowchart
graph TD
    A["1"] --> B["2"]
    B --> C["3"]
    C --> D["4"]
    D --> E["5"]
A. Selection keys
Select one of the five keys that explain the functions of the machine, and press that key.
When you press the key, the LCD at the left will change to display the information that you requested.
① "CHARACTERS & DESIGNS" KEY
② "CARD" KEY
③ "MEMORY" KEY
4 "BASIC OPERATION" KEY
⑤ "MODIFY & ADVISE" KEY
Operation using the screen

text_image
ABCabc 0-9 &? ABCabc 0-9 &? ABC 0-9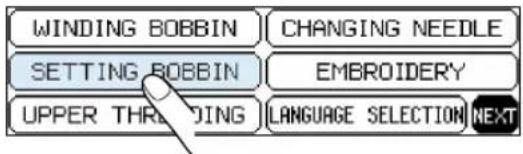
text_image
WINDING BOBBIN CHANGING NEEDLE SETTING BOBBIN EMBROIDERY UPPER THROWING LANGUAGE SELECTION NEXTB. LCD screen
A pattern or operation can be selected by gently touching the box on the screen which corresponds to the pattern or operation that you wish to select.

flowchart
graph TD
    A["Start"] --> B["WINDING BOBBIN"]
    B --> C["CHANGING NEEDLE"]
    C --> D["SETTING BOBBIN"]
    D --> E["EMBROIDERY"]
    E --> F["UPPER THREADING"]
    F --> G["LANGUAGE SELECTION NEXT"]
    G --> H["Place thread spool so the end is coming off from the bottom front. NEXT"]
    H --> I["Next Step"]
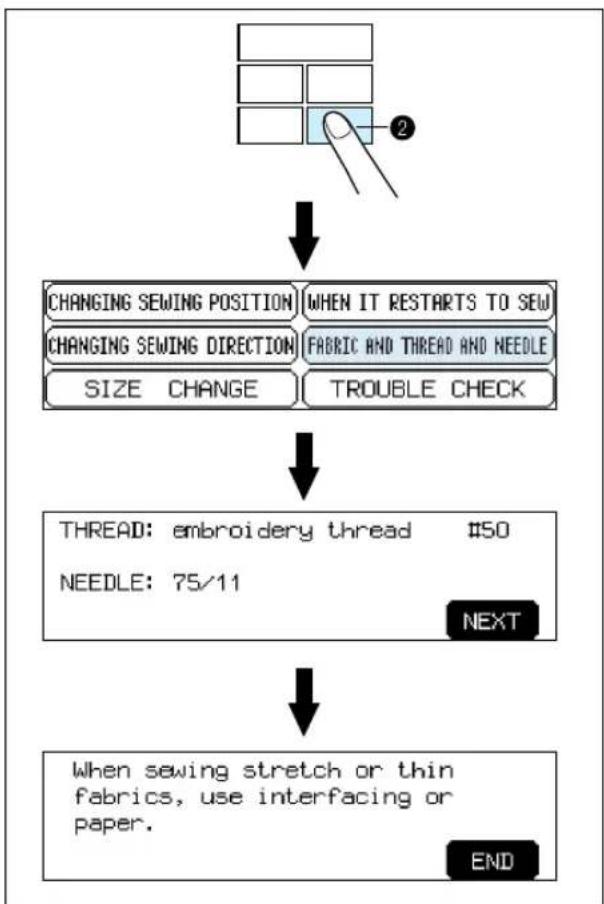
flowchart
graph TD
    A["Shelter"] --> B{Changing Sewing Position}
    B --> C["When it restarts to sew"]
    B --> D["Changing Sewing Direction"]
    D --> E["Fabric and Thread and Needle"]
    D --> F["SIZE CHANGE"]
    D --> G["TROUBLE CHECK"]
    B --> H["THREAD: embroidery thread #50"]
    H --> I["NEEDLE: 75/11"]
    I --> J["Next"]
    H --> K["When sewing stretch or thin fabrics, use interfacing or paper."]
    K --> L["END"]
Example: To find out how to wind a bobbin
- Press "BASIC OPERATION".
- Touch "WINDING BOBBIN".
The operation procedure for winding a bobbin will be displayed.
① "BASIC OPERATION" key
Example: To find out the combination of fabric, needle and thread
- Press "MODIFY & ADVISE".
- Touch "FABRIC AND THREAD AND NEEDLE".
② "MODIFY & ADVISE" key
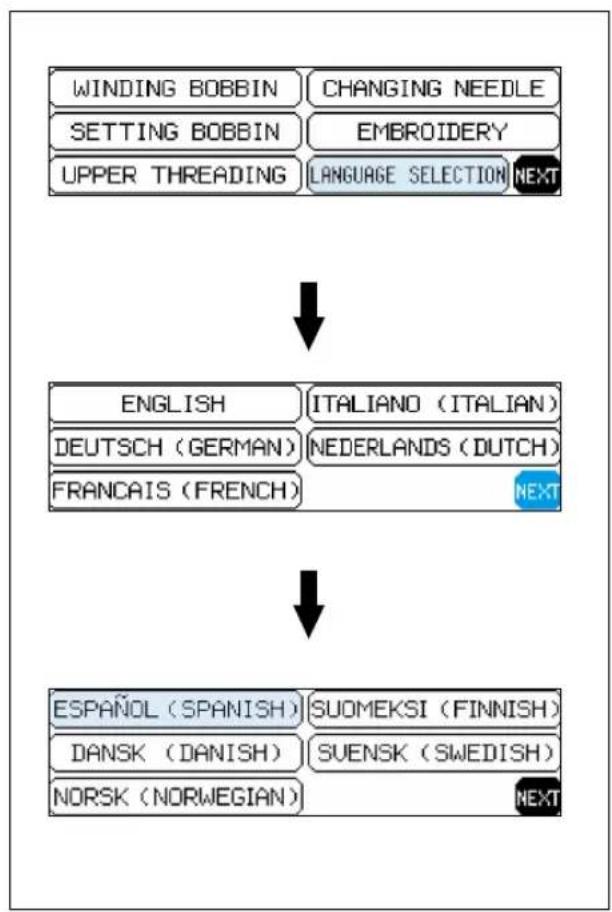
HOW TO USE THE LANGUAGE SELECTION KEY
You can use the "LANGUAGE SELECTION" key to easily change the display language for all the keys and messages on the LCD screen to the language you need.

flowchart
graph TD
    A["1"] --> B["WINDING BOBBIN"]
    A --> C["SETTING BOBBIN"]
    A --> D["UPPER THREADING"]
    B --> E["CHANGING NEEDLE"]
    C --> F["EMBROIDERY"]
    D --> G["LANGUAGE SELECTION"]
    H["ENGLISH"] --> I["ITALIANO (ITALIAN)"]
    H --> J["DEUTSCH (GERMAN)"]
    H --> K["NEDERLANDS (DUTCH)"]
    H --> L["FRANÇAIS (FRENCH)"]
    L --> M["NEXT"]
    N["PORTUGUÉS (PORTUGUESE)"] --> O["TÜRKÇE (TURKISH)"]
    N --> P["中国语 (CHINESE)"]
    Q["ESPAÑOL (SPANISH)"] --> R["SUOMEKSI (FINNISH)"]
    Q --> S["DANSK (DANISH)"]
    Q --> T["NORSK (NORWEGIAN)"]
    U["NEXT"] --> V["NEXT"]
- Press "BASIC OPERATION".
- Touch "LANGUAGE SELECTION".
- The language display screen will then appear. Touch the key which corresponds to the desired language.
* You can move to the next screen by touching "NEXT".
① "BASIC OPERATION" key
flowchart
graph TD
    A["WINDING BOBBIN"] --> B["CHANGING NEEDLE"]
    C["SETTING BOBBIN"] --> D["EMBROIDERY"]
    E["UPPER THREADING"] --> F["LANGUAGE SELECTION NEXT"]
    B --> G["ENGLISH"]
    D --> H["ITALIANO (ITALIAN)"]
    G --> I["DEUTSCH (GERMAN)"]
    H --> J["NEDERLANDS (DUTCH)"]
    I --> K["FRANÇAIS (FRENCH)"]
    J --> L["NEXT"]
    K --> M["ESPAÑOL (SPANISH)"]
    L --> N["SUOMEKSI (FINNISH)"]
    M --> O["DANSK (DANISH)"]
    N --> P["SUENSK (SWEDISH)"]
    O --> Q["NORSK (NORWEGIAN)"]
    P --> R["NEXT"]
Example: To change the display language to Spanish
- Touch "LANGUAGE SELECTION".
- Touch "NEXT".
- Touch "ESPAÑOL (SPANISH)". This will change the language setting to Spanish.
- The display will then return to the screen which was previously being displayed.
NOTE
* When the "LANGUAGE SELECTION" is used to set the display language, error messages will also be displayed in the language selected.
* The display language can be selected from a list of 13 languages (English, German, French, Italian, Dutch, Spanish, Danish, Norwegian, Finnish, Swedish, Portuguese, Turkish and Chinese).
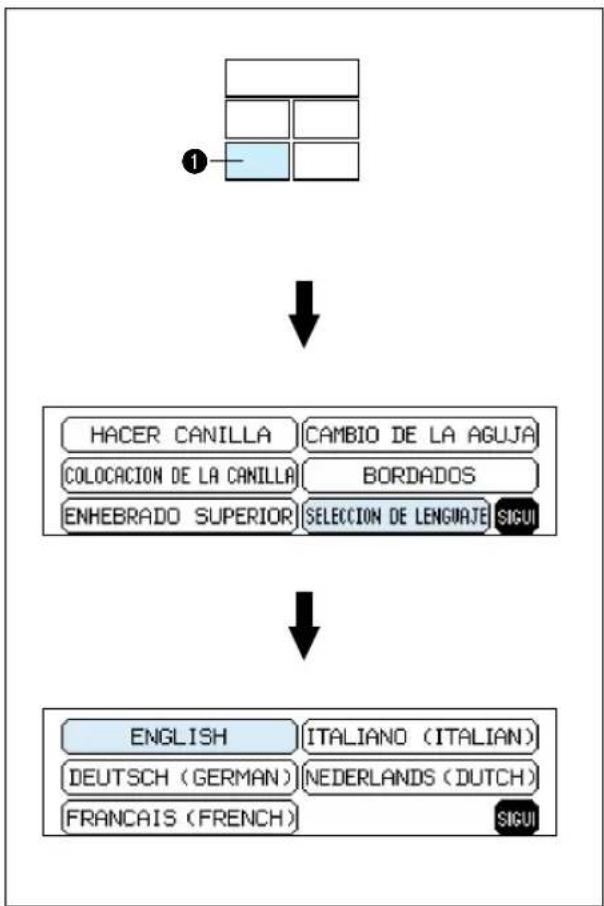
How to clear the language selection
flowchart
graph TD
    A["1"] --> B["HACER CANILLA"]
    A --> C["COLOCACION DE LA CANILLA"]
    A --> D["ENHEBRADO SUPERIOR"]
    B --> E["CAMBIO DE LA AGUJA"]
    C --> F["BORDADOS"]
    D --> G["SELECCION DE LENGUAJE SIGUI"]
    H["ENGLISH"] --> I["ITALIANO (ITALIAN)"]
    J["DEUTSCH (GERMAN)"] --> K["NEDERLANDS (DUTCH)"]
    L["FRANCAIS (FRENCH)"] --> M["SIGUI"]
Example: To change the display language from Spanish back to English
- Press "BASIC OPERATION".
- Touch "SELECCION DE LENGUAJE".
- Touch "ENGLISH".
This will cancel the Spanish language setting and return all screen displays and error messages to the English language.
① "BASIC OPERATION" key
CAUTION
- This function can not be used as a translation function.
- If the power supply is turned off, the current language setting will be retained and will not be cleared.
BOBBIN WINDING AND INSTALLATION
How to wind a bobbin and set the lower thread.

flowchart
graph LR
    A["Grid"] --> B["1"]
    B --> C["WINDING BOBBIN"]
    B --> D["SETTING BOBBIN"]
    B --> E["UPPER THREADING"]
    C --> F["CHANGING NEEDLE"]
    D --> G["EMBROIDERY"]
    E --> H["LANGUAGE SELECTION NEXT"]
① "BASIC OPERATION" key

text_image
Technical diagram of a sewing machine with numbered parts and blue directional arrows indicating motion or assembly.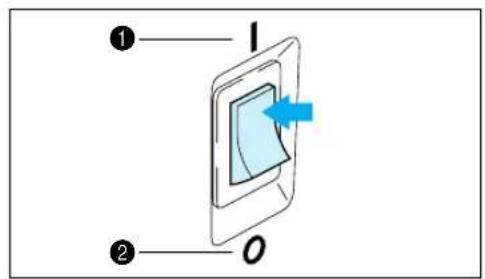
text_image
Diagram showing a device with labeled components and directional arrow, marked with numbers ① and ②.- Connect the machine to the power supply and turn on the main power.
① ON
② OFF

text_image
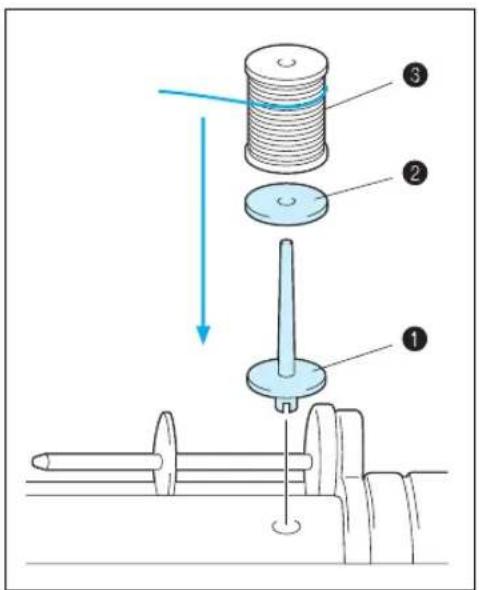
Technical diagram showing two mechanical assembly setups with labeled components and cross-sectional views- Set the thread spool. The thread end should come from the bottom front of the spool. The spool cap closest to the thread spool size should be used to hold the spool securely on the spool post.
* The spool cap should be pushed on as far as it will go.
① Spool cap
② Spool
③ Spool felt
NOTE
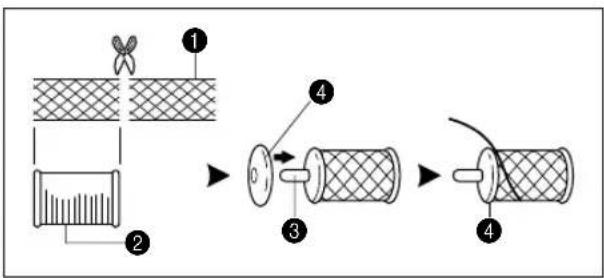
* If using a fine thread such as cross wound thread, remove the spool felt and slightly separate the spool cap from the thread on the spool before using.
① Cross wound thread
② Spool cap (small)
③ Separate slightly
4 No spool felt
text_image
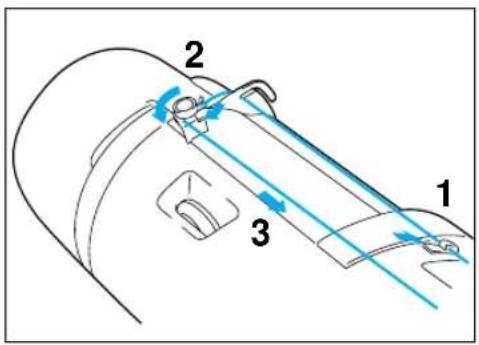
Technical diagram of a mechanical component with numbered parts and directional arrows indicating motion or flow.- Guide the thread through the machine and the bobbin winding guide as marked with the dotted line.

text_image
Diagram of a mechanical device with labeled parts and directional arrows, showing components like '1' and '2'.- Guide the thread through the small hole in the side of the bobbin from the inside. Holding the thread end, push the bobbin winder shaft to right.
* Match the groove of the bobbin with the spring on the shaft.
① Spring on the shaft
② Groove in the bobbin
natural_image
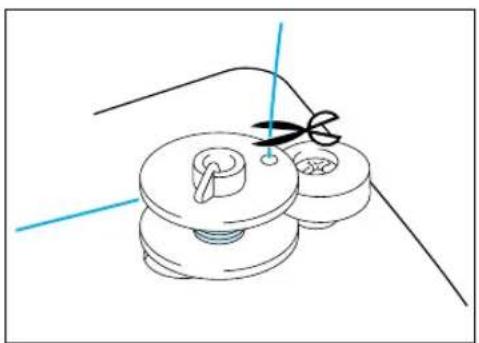
Line drawing of a mechanical component with two pulleys and a screw, no text or symbols present- Holding the thread end, press the "START/STOP" button. Wind the thread a few times around the bobbin and press the "START/STOP" button again.
Trim the excess thread from the top of the bobbin after the machine stops.
* It is important to trim the thread close to the spoolend.

natural_image
Diagram of a mechanical or fluidic device with a labeled component (no text or symbols present)- Press the "START/STOP" button. The machine will stop automatically when the bobbin is full. Press the "START/STOP" button to stop at any time or when the bobbin has stopped moving and the motor is still running.
① "START/STOP" button - Push the bobbin shaft to the left. Remove the bobbin and continue sewing.
- Set the bobbin into the shuttle as shown on page 15.
It's a good idea to have several full bobbins on hand before start your project.
Setting the bobbin
text_image
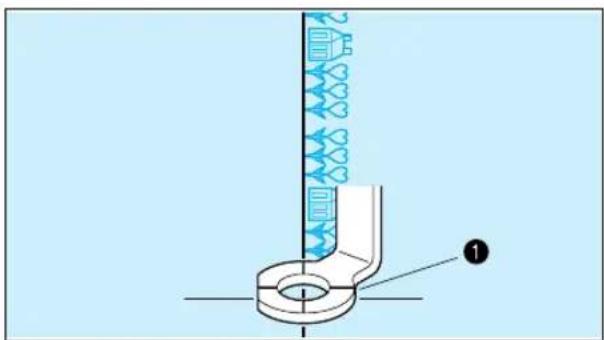
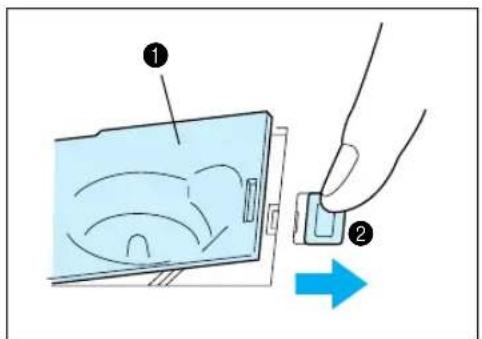
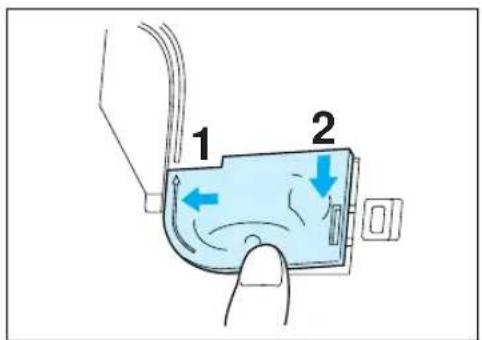
Diagram showing a hand inserting a device into a device with labeled parts and directional arrowThe bobbin cover is located in front of the needle plate.
- Slide open the bobbin cover by pushing the bobbin release button to the right.
① Bobbin cover
② Bobbin cover release button.
- Insert the bobbin into the shuttle following the thread direction as noted in the etching under the bobbin cover.
* (Use a plastic bobbin as shown on page 6)

natural_image
Illustration of hands performing a mechanical tool with a blue circular component and dashed line indicating motion (no text or symbols)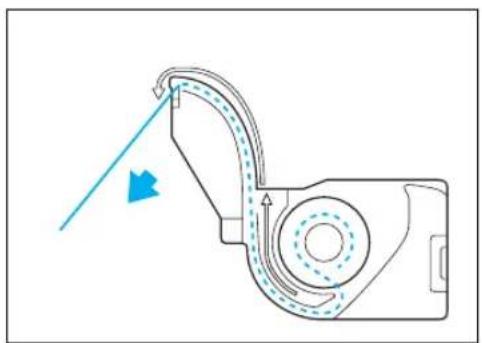
natural_image
Diagram of a mechanical device with airflow direction indicated by arrows (no text or symbols)- Guide the thread end around the finger through the channel toward the back, pulling the thread toward you which will cut off any excess.
text_image
1 2- Close the bobbin cover by placing the left end in place and pressing down lightly on the right end to snap in place.
* There is no need to pull up the lower (bobbin) thread, it is done automatically.
Embroidery can begin without pulling out the lower thread.
UPPER THREADING
Thread according to the number and arrow marks on the machine.

flowchart
graph LR
    A["Grid"] --> B["1"]
    B --> C["WINDING BOBBIN"]
    B --> D["SETTING BOBBIN"]
    B --> E["UPPER THREADING"]
    C --> F["CHANGING NEEDLE"]
    D --> G["EMBROIDERY"]
    E --> H["LANGUAGE SELECTION NEXT"]
① "BASIC OPERATION" key
text_image
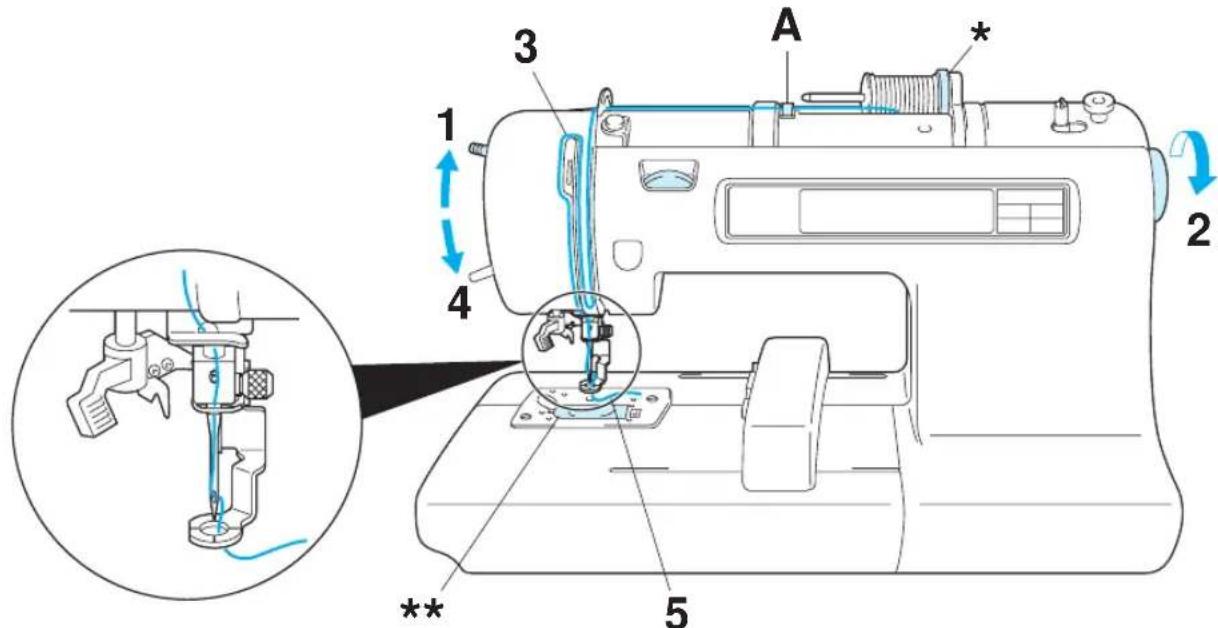
A * 1 2 3 4 5 **- Raise the presser foot lever (If the presser foot is not raised, the upper thread cannot be threaded.)
- Turn the balance wheel to raise the needle to its highest position.
- Guide the thread as illustrated with the solid line on the machine following the number sequence.
- Lower the presser foot.
- Thread the needle using the auto needle threading device (See page 17) or manually.
* Be sure the spool felt is behind the spool. (shown above *)
** You do not need to pull the lower thread up before you start embroidering.
CAUTION
Always be sure to raise the presser foot before removing the upper thread to prevent damage to the thread tension system.
USING THE EXTRA SPOOL PIN AND NET
Extra spool pin
text_image
Diagram of a mechanical assembly with numbered components and directional arrows indicating motion or forceUse when embroidering with metallic thread.
- Insert the extra spool pin into the hole on the top of the machine.
- Install the spool felt and the thread spool in that order, and then thread the upper thread.
* Do not thread the thread onto bracket (A).
* When sewing using the metallic thread, set thread tension control dial (B) to the "0" position.
* When setting the thread spool, set it so that the thread winds off from the front of the spool.
* If using metallic thread, we recommend that you use a 90/14 home sewing machine needle.
① Insert the extra spool pin into the hole on the top of the machine
② Spool felt
③ Thread spool
NOTE
This method keeps the thread from twisting as it comes off the spool pin.
flowchart
graph LR
    A["Step 1: Cutting down"] --> B["Step 2: Stacking down"]
    B --> C["Step 3: Rolling down with a wire"]
    C --> D["Step 4: Rolling down with a wire"]
Auto needle threading device

text_image
Diagram illustrating sewing process steps with numbered labels and directional arrows indicating movement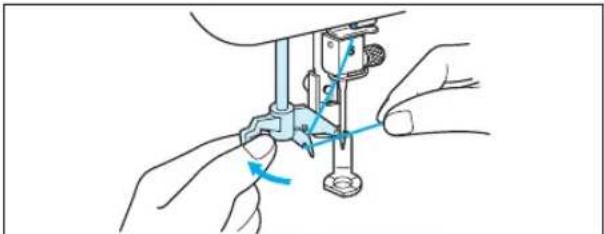
natural_image
Illustration of hands using a mechanical tool to adjust or install a component (no text or symbols visible)
text_image
Technical diagram showing two mechanical assembly steps with numbered components and a blue line indicating a reference or measurement.
natural_image
Line drawing of a sewing machine needle stitching a small object, with no text or symbols present.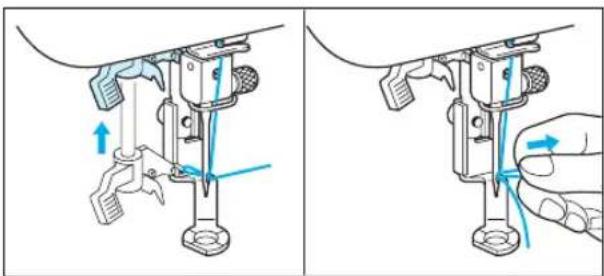
natural_image
Two-panel illustration showing a sewing machine mechanism with blue arrows indicating force direction (no text or symbols)Net
If using special threads which wind quickly off the thread spool, attach a net to the spool before using. * Cut the net to match the size of the spool.
1 Net
② Thread spool
③ Spool pin
4 Spool cap
- Guide the thread through the wire loop thread guide (number "6") and gently pull the thread towards you.
- Lower the presser foot.
- Lower the needle threader lever until it stops. Hook the thread into the guide and pull it across to the right.
① Wire loop thread guide
② Needle threader lever
3 Guide
* The needle threading device cannot be used while the needle is lowered.
4. Push the needle threader lever toward the back. Check to be sure that the hook has passed through the eye of the needle and route the thread under the metal guides and the hook.
* Pull the thread toward you and check that it is being held by the thread hook.
1 Hook
② Metal guides
③ Thread correctly under the metal guides and the hook.
5. While gently holding the thread, pull the needle threader lever forward.
6. Release the thread from the needle threader lever.
7. Pull the upper thread through the needle eye toward the rear of the machine.
Be sure to turn off the power before carrying out the following.

flowchart
graph LR
    A["1"] --> B["WINDING BOBBIN"]
    A --> C["SETTING BOBBIN"]
    A --> D["UPPER THREADING"]
    B --> E["CHANGING NEEDLE"]
    C --> F["EMBROIDERY"]
    D --> G["LANGUAGE SELECTION NEXT"]
① "BASIC OPERATION" key
Attaching stabilizer material

text_image
Diagram of a device with labeled parts, showing layered structure with numbered annotations.Attach a stabilizer material to the reverse side of the area of fabric to be embroidered.
It is not necessary to attach a stabilizer material to fabric which is already sufficiently stiff. For thin, knit and stretch fabric which may move in the frame, attach the fabric to a non-woven stabilizer material before embroidering.
The stabilizer material should be framed along with the fabric for the best results.
There are many types of non-woven stabilizers available on the market. The goal of the stabilizer is to prevent stretch or movement of the fabric. Best results for stretch, knit or light weight fabrics will be obtained by using a light weight non-woven iron-on stabilizer.
① Embroidery frame
② Fabric
③ Non-woven stabilizer material
Embroidering different types of fabric
natural_image
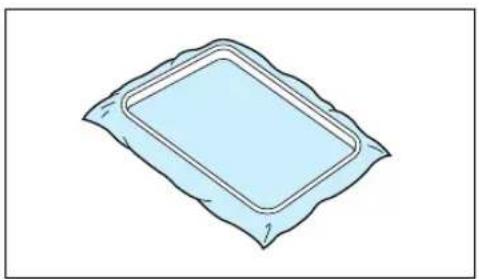
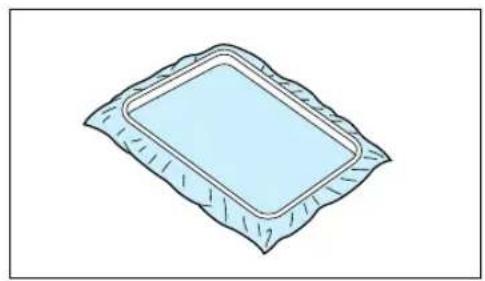
Simple line drawing of a rectangular object with a curved top and bottom edges, resembling a medical or laboratory device (no text or symbols)From normal fabrics to thick fabrics
natural_image
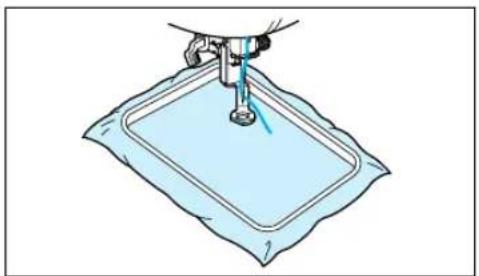
Illustration of a sewing machine stitching a light blue fabric patch (no text or symbols)It's a good idea to place a piece of stabilizer fabric under (not within) the frame holding the fabric being embroidered.
natural_image
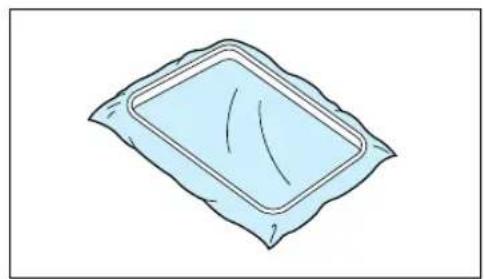
Simple line drawing of a rectangular object with a curved top and bottom edges, resembling a tray or vent (no text or symbols)Thin fabrics such as organza or cotton batiste.

natural_image
Illustration of a sewing machine stitching a light blue fabric patch (no text or symbols)After selecting your fabric, place a piece of stabilizer fabric within the frame beneath the fabric being embroidered.
We also recommend using a spray-on stabilizer first, allow it to dry or iron to dry then use a non-woven stabilizer with it in the frame.
natural_image
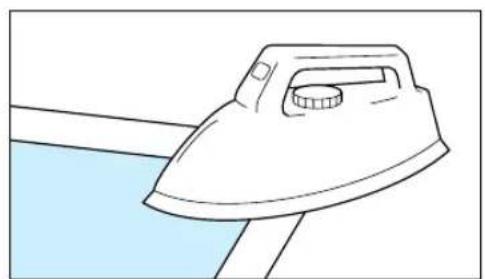
Simple line drawing of a rectangular object with a curved top and internal lines, resembling a medical or decorative component (no text or symbols)Stretchable fabrics such as jerseys
natural_image
Line drawing of a steam iron on a surface, no text or symbols presentAdhere a piece of iron-on stabilizer material which is slightly larger than the frame onto the fabric to be embroidered, and then stretch it over the frame area.
* SA517 (X80914-001)

natural_image
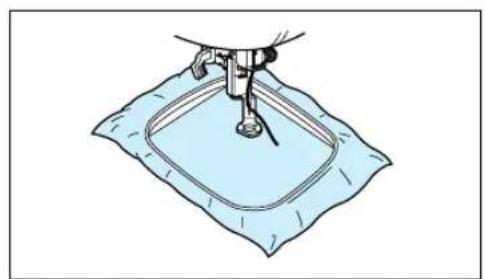
Illustration of hands performing a medical or therapeutic procedure on a patient's abdomen (no text or symbols present)A stabilizer material that can be torn away without affecting the embroidering is ideal.
natural_image
Illustration of a sewing machine stitching a light blue fabric patch (no text or symbols)Use the smallest frame possible that can still accommodate the pattern being embroidered, as this will give better results.
Setting the fabric in the embroidery frame
text_image
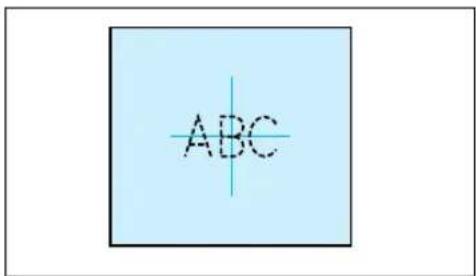
ABC- Make a mark on the fabric with chalk or marking pencil indicating the center of the area to be embroidered.
text_image
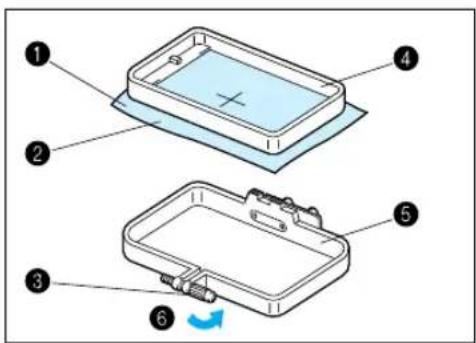
Diagram of a device with numbered parts and a blue cross symbol indicating a component, likely illustrating a mechanical or electrical assembly.- Loosen the adjusting screw of the outer frame, place the fabric on top of the outer frame with the right side of the fabric up, and then place the inner frame into the outer frame to clamp the fabric.
* Make sure that the ▼ marks of the outer and inner frames are aligned.
① Fabric
② Right side surface for embroidering
③ Adjusting screw
4 Inner frame
⑤ Outer frame
6 Loosen
natural_image
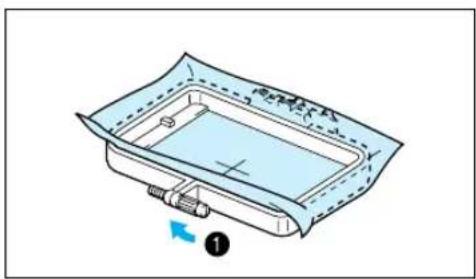
Diagram of a mechanical component with a blue sheet and a blue housing, showing a directional arrow (no text or symbols)- Firmly tighten the adjusting screw, and then temporarily remove the fabric and the inner frame from the outer frame.
① Tighten

text_image
Diagram showing a device with labeled parts, including a grid and battery cover, with arrows indicating internal movement.- Place the embroidery sheet on top of the inner frame so that the center crosshairs on the embroidery sheet and the mark on the fabric are aligned.
1 Inner frame
2 Vertical + horizontal crosshair lines

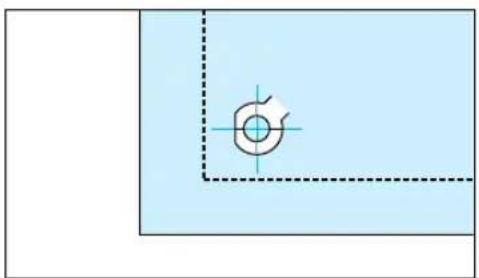
text_image
Diagram of a device panel with labeled components and grid layout① Area available for embroidering
② Vertical + horizontal crosshair lines
③ Center of the crosshairs and the pattern
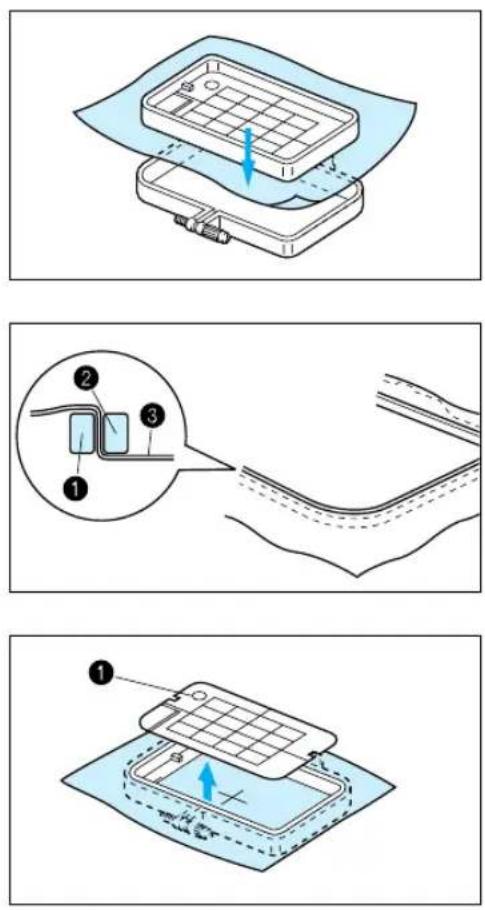
- Insert the fabric and inner frame back into the outer frame while ensuring that the mark on the fabric does not slip out of position.
Correct setting
* Clamp securely so that the edges of the outer frame and inner frame are even.
① Outer frame
② Inner frame
③ Fabric
- Check to be sure that the center of the design is in the correct location based on the crosshairs of the embroidery sheet.
Remove the embroidery sheet using the finger hole to pull up.
① Finger hole for lifting
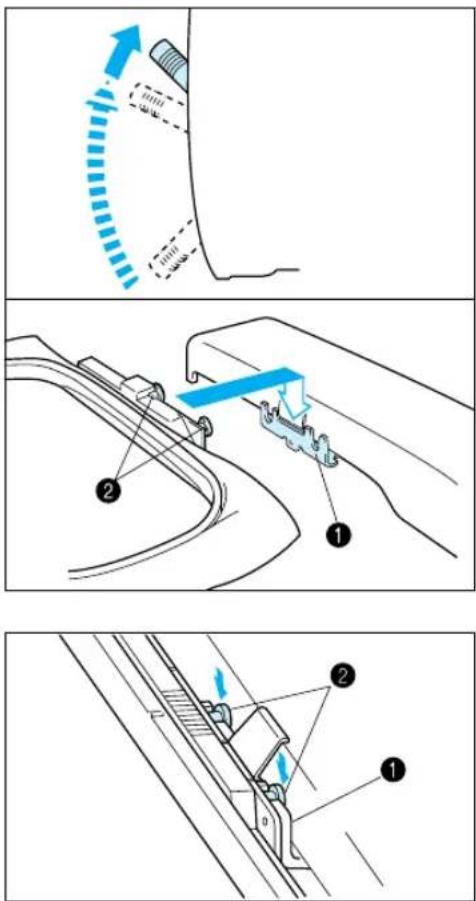
Fitting the embroidery frame to the machine
text_image
Technical diagram illustrating mechanical assembly steps with labeled components and directional arrows- Raise the presser foot to its highest position. Then pass the embroidery frame under the presser foot with the mounting pins on the right side and the fabric right side up.
① Frame holder
② Pins
- Align the two pins on the embroidery frame with the frame holder, and then insert the frame into the frame holder until a click is heard.
* Be sure to insert both pins. If only the forward or the back pin is inserted, the pattern may not turn out correctly.
① Frame holder
② Pins
Removing the embroidery frame
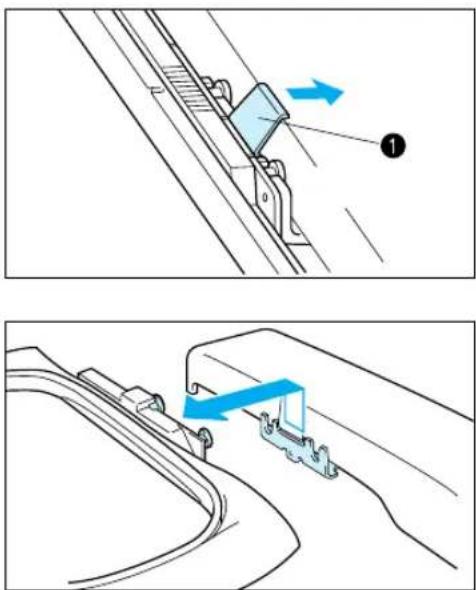
text_image
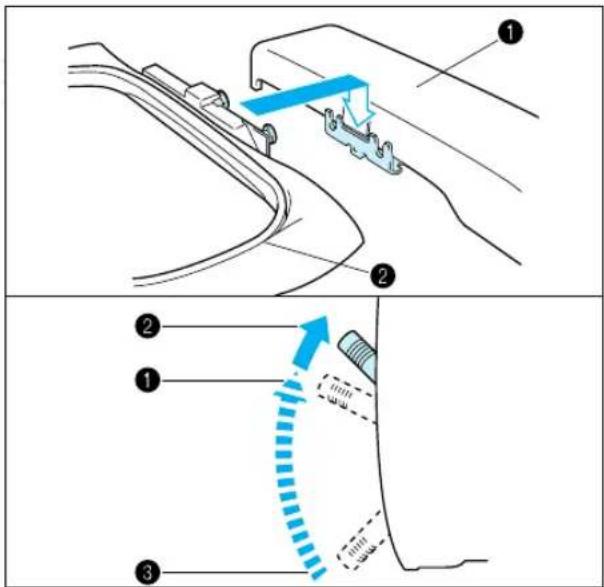
Technical diagram showing two mechanical assembly steps with labeled components and directional arrows indicating motion or movement.Push the release lever to the right and remove the embroidery frame by pulling up.
1 Release lever
THREAD TENSION ADJUSTMENT
Use this procedure when changing the thread tension.
text_image
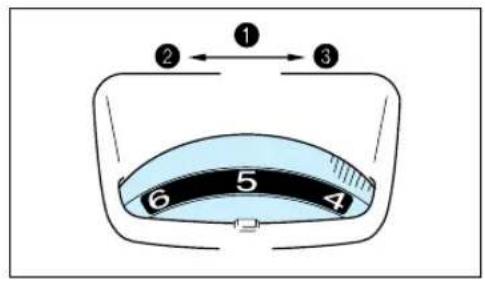
① ② ← ③ ④ ⑤ ⑥Upper thread tension dial
① Upper thread tension setting
② Weak (Decrease thread tension)
③ Strong (Increase thread tension)

text_image
A 1 6 5 B 4 3 5A- To tighten the upper thread tension, adjust the dial to the right.
B- To loosen the upper thread tension, adjust the dial to the left.
* The standard position is between "4" and "6". However, a sewing test should always be done to check for the proper thread tension. Thread tension may need to be adjusted with the use of different thread, fabric or stabilizer fabric.

text_image
A ① A ②Correct thread tension
Adjust so that the lower thread stitch width on the reverse surface of the fabric is about one-third of the total width. Correct tension is important because too much or too little tension will cause poor quality embroidery or your fabric to pucker.
① Top surface of fabric
② Reverse side of fabric

text_image
A ① A ②If upper thread tension is too strong
The lower thread will be visible on top surface of the fabric. Decrease the upper thread tension.
① Top surface of the fabric
② Reverse side of the fabric

text_image
A ① A ②If upper thread tension is too weak
The upper thread will be loose. Increase the upper thread tension.
① Top surface of fabric
② Reverse side of fabric
ADJUSTING THE LCD SCREEN CONTRAST
To adjust the brightness of the LCD screen

flowchart
graph LR
    A["Grid"] --> B["Switch Function"]
    B --> C["SELF-INTRODUCTION"]
    C --> D["MEMORY"]
    D --> E["BRIGHTNESS OF LCD"]
    E --> F["TIME/THREAD COLOR DISPLAY"]
    F --> G["Next"]
① "BASIC OPERATION" key
text_image
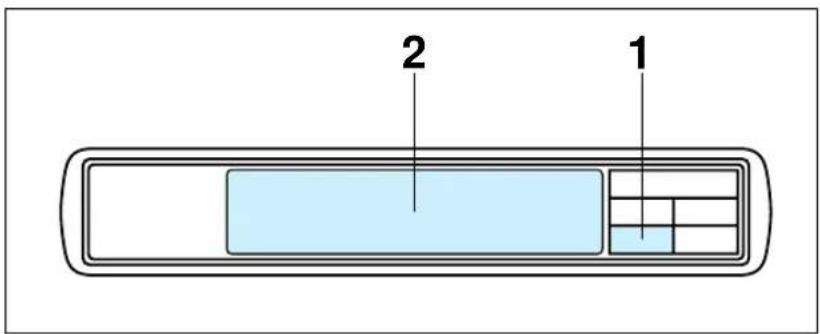
2 1- Press "BASIC OPERATION".
- Touch "NEXT", "BRIGHTNESS OF LCD" and "NEXT".
text_image
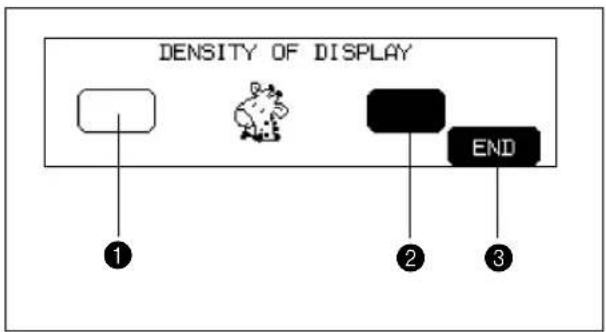
DENSITY OF DISPLAY ① ② ③To adjust the contrast of the LCD screen
① "Dull" Touch this key to make contrast less (lighter).
② "Sharp" Touch this key to make contrast greater (darker).
③ Touch "END" to return to the screen which was previously being displayed.
* If the contrast is adjusted too far, the display screen becomes invisible. Reset it by turning the power switch off and then on again.
If the LCD is hard to see when the power is turned on

natural_image
Line drawing of a hand pointing at a rectangular panel with a grid, no text or symbols present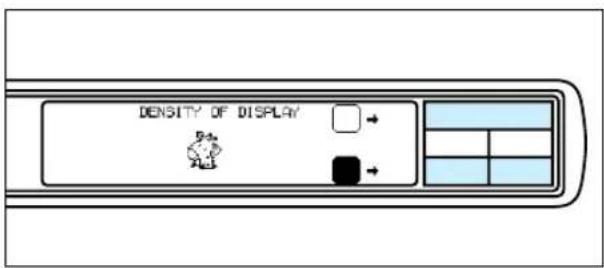
text_image
DENSITY OF DISPLAY 5.4x A10-
While touching the LCD (anywhere is OK), turn the power off and then back on again.
-
Touch any one of the lower two selection keys (BASIC OPERATION, MODIFY & ADVISE). The LCD will become darker each time one of these keys is touched. If you would like to make the LCD lighter, touch the upper selection key (CHARACTERS & DESIGNS).
- After you have finished adjusting, turn the power off and back on again once more.
CHANGING THE NEEDLE
Set the needle securely.

flowchart
graph LR
    A[" "] --> B["1"]
    B --> C["WINDING BOBBIN"] --> D["CHANGING NEEDLE"]
    B --> E["SETTING BOBBIN"] --> F["EMBROIDERY"]
    B --> G["UPPER THREADING"] --> H["LANGUAGE SELECTION"] --> I["NEXT"]
① "BASIC OPERATION" key
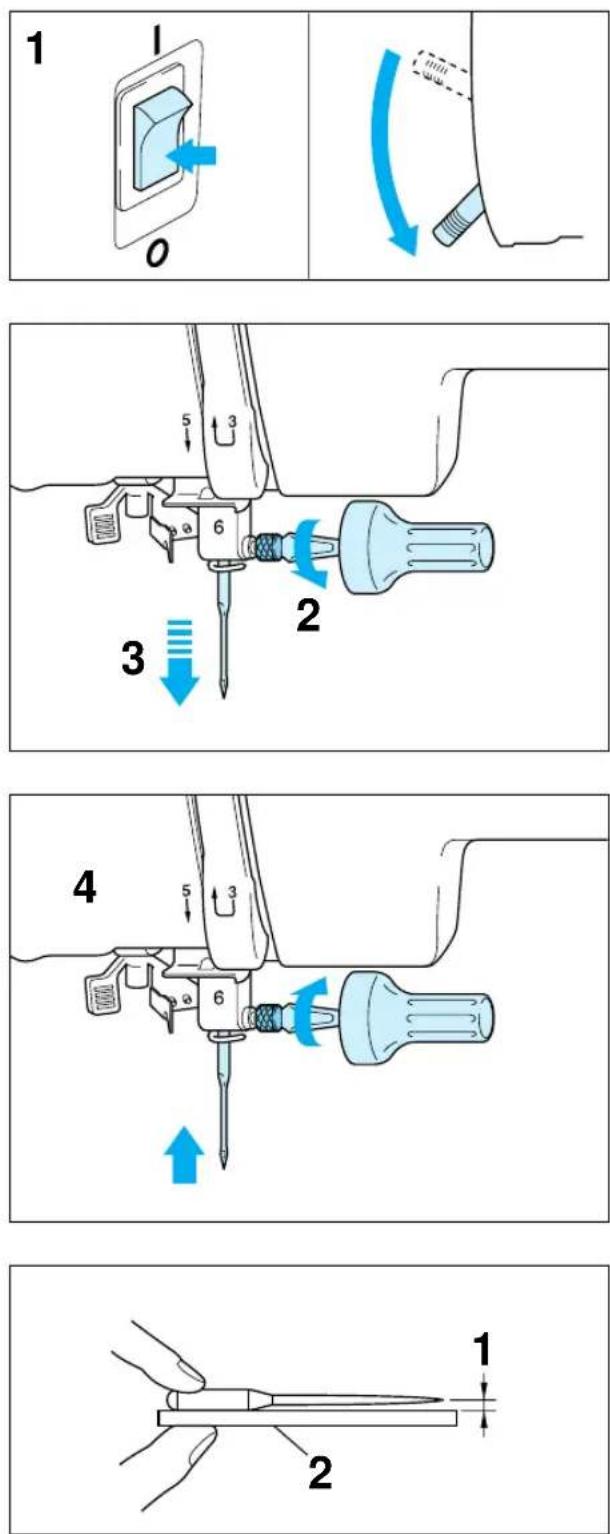
- Turn the power switch off and lower the presser foot lever. Turn the balance wheel to raise the needle to its highest position.
- Loosen the needle screw with a screwdriver.
-
Slide the needle out.
-
Insert the new needle into the needle shaft as far up as it will go with the flat side of the needle facing away from you. Secure it by firmly tightening the screw with a screwdriver.
- Turn the power switch on.
Checking for a bent needle
1 Place the needle on a flat surface and check whether the space is parallel or not.
② Flat surface
(Needle-plate, glass, ruler etc.)
If the space is not parallel then the needle is bent and should be thrown away to prevent damage to your project or the machine.
text_image
Diagram of a sewing machine with numbered parts and blue directional arrows indicating motion or assembly.
natural_image
Diagram of a mechanical component with a coiled spring and shaft, labeled with number 1 (no text or symbols on the diagram itself)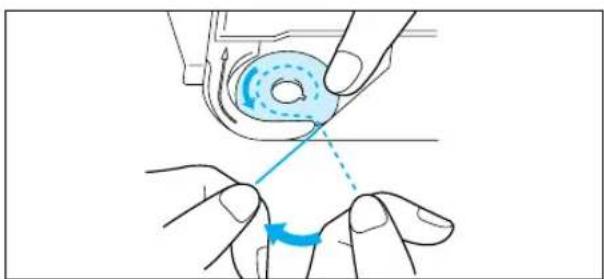
natural_image
Illustration of hands operating a mechanical component with a blue arrow indicating rotation (no text or symbols)- Thread the upper thread following the solidline and numerical sequence marked on your machine. Be sure to attach the spool felt as shown in the illustration.
① Spool felt (See page 16 – 17)
- Thread the lower (bobbin) thread. (See page 15)
text_image
Technical diagram showing mechanical assembly steps with numbered components and blue arrows indicating motion direction
text_image
Diagram showing a sewing machine needle stitching a fabric, with labeled parts and a blue arrow indicating the process.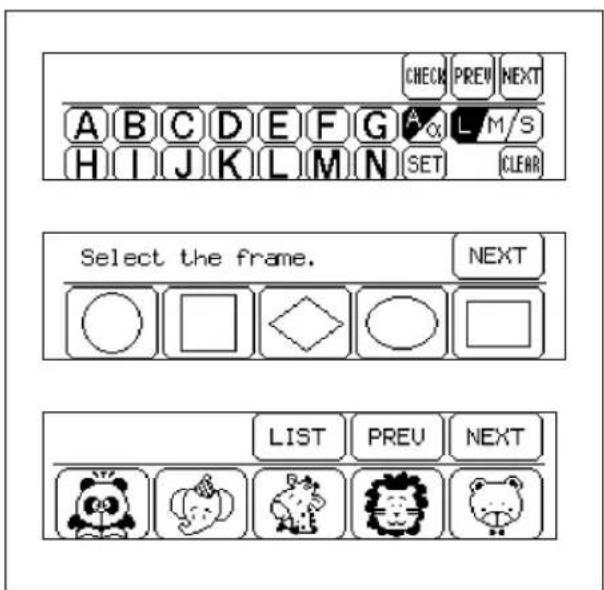
text_image
CHECK PREV NEXT A B C D E F G A L M/S H I J K L M N SET CLEAR Select the frame. NEXT ○ □ ◇ ○ □ LIST PREV NEXT
text_image
Diagram showing a car interior with a blue arrow indicating clockwise motion and a labeled component marked '1'- Place the fabric in the embroidery frame and then attach the frame to the machine. (See page 20 – 22)
① Carriage (embroidery arm)
② Embroidery frame
NOTE
Do not push down the carriage too hard as you attach the hoop. Use caution so as not to move the carriage sideways.
* It is easier to move the embroidery frame under the presser foot if the presser foot lever is raised higher than its normal "up" position.
① Normal presser foot lever "up" position
② Presser foot lever pushed up
③ Presser foot lever down position
-
Turn on the power. The light will shine when the power is turned on.
-
Select a pattern.
-
Lower the presser foot lever and press the "START/STOP" button to start the machine.
① "START/STOP" button
Start embroidering

natural_image
Line drawing of a hand holding a needle inserted into a medical device (no text or symbols)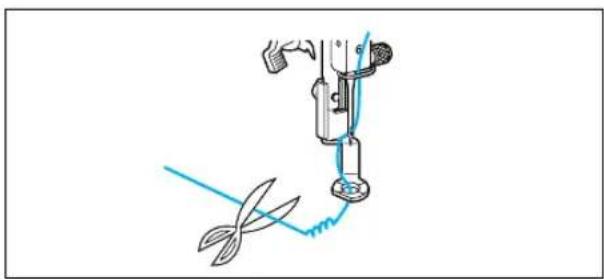
natural_image
Illustration of a sewing machine needle stitching a blade, with no text or symbols present.- After threading the needle, pass the thread from the top to the bottom through the hole of the presser foot, and gently pull the end of the thread.
- Lower the presser foot and press the "START/STOP" button to start the machine. After sewing 5 – 6 stitches, stop the machine and raise the presser foot again. Trim off any excess thread at the edge of the design. After trimming, lower the presser foot and press the "START/STOP" button again to start the machine.
- The machine will stop sewing when it has completed all the stitching with the current thread color.
Embroidering advice
| Thread Needle | |
| Embroidery thread #50 Home sewing machine needle 75/11 | |
* The recommended lower (bobbin) thread is #60 - #90 synthetic thread.
* For thin and stretch fabrics which are difficult to embroider, attach the fabric to non-woven stabilizer fabric before embroidering.
* If embroidering on a thick fabric with stabilizer (see page 18), it is recommended that a stronger 90/14 home sewing machine needle be used.
HOW TO SELECT PATTERNS
Selecting built-in embroidery patterns

text_image
ABCabc 0-9 &? ABCabc 0-9 &? ABC 0-9
flowchart
graph TD
    A["LIST"] --> B["FLOR Fruits"]
    B --> C["FLOR Flowers"]
    C --> D["FLOR Flowers"]
    D --> E["FLOR Flowers"]
    E --> F["NEXT"]
    style A fill:#f9f,stroke:#333
    style B fill:#ccf,stroke:#333
    style C fill:#cfc,stroke:#333
    style D fill:#fcc,stroke:#333
    style E fill:#cff,stroke:#333
    style F fill:#ffc,stroke:#333

text_image
ABCabc 0-9 &? ABCabc0-9 &? ABC 0-9A
Select the type of built-in embroidery patterns you wish to embroider.
* If the power is turned on without a memory card inserted, the display shown at the left will appear.
B
* If the power is turned on with a memory card inserted, the screen corresponding to the memory card will appear. (Example: No.2 The Flower card) To select built-in patterns press the "CHARACTERS & DESIGNS" key.
① "CHARACTERS & DESIGNS" key
Selecting alphabetic characters
Alphabetic characters
ABCabc0\~9&?
ABCabc0\~9&?
ABC 0-9
Three different fonts are available for alphabetic characters. Touch the key that corresponds to the typeface you would like to use.

flowchart
graph TD
    A["ABCabc0-9?"] --> B["B"]
    B --> C["B"]
    C --> D["BU"]
    D --> E["BUS"]
Example: To select the characters to form the word "BUS"
-
Touch " ABCabc0-9&?"
-
Touch "B".
-
Touch "NEXT".
-
Touch "U".
-
Touch "S".
① Screen A – The operation of each key shown on this screen is described on the following page.
Screen A
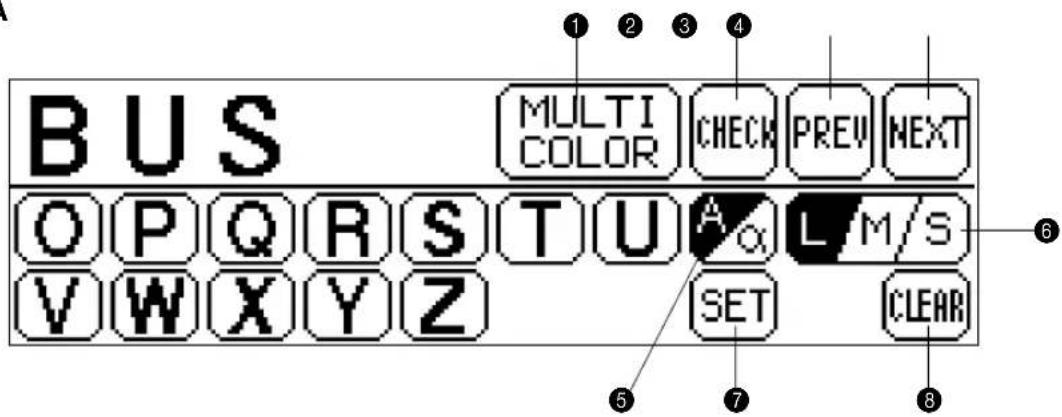
text_image
BUS MULTI COLOR CHECK PREV NEXT OP Q R S T U A α L M/S V W X Y Z SET CLEAR ① ② ③ ④ ⑤ ⑦ ⑧① Touch this key to have the machine sew a reinforcement stitch and stop for the changing of thread each time a new character is embroidered. (Refer to page 34.)
② Touch this key to check the character selected. (Refer to page 34.)
③ Touch this key to return to the previous screen character choices.
4 Touch this key to display the next character screen in the sequence.
⑤ Touch this key to switch between uppercase and lowercase. (Refer to page 32.)
⑥ Touch this key to change the character size to one of three different sizes. (Refer to page 33.)
⑦ Touch this key if you would like to change the character position, character size and thread density, or if you would like to use the Help function.
To change the character position: (Refer to page 43)
To change the character size: (Refer to page 47)
To change the thread density: (Refer to page 47)
To use the Help function: (Refer to page 54)
8 Touch this key to clear the selected characters one by one. (Refer to page 33.)
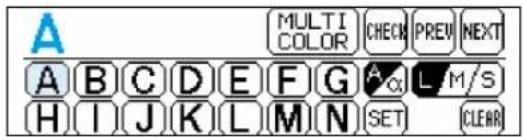
Uppercase & lowercase

text_image
A MULTI COLOR CHECK PREV NEXT A B C D E F G A L M/S H I J K L M N SET CLEAR
text_image
A MULTI COLOR CHECK PREV NEXT a b c d e f g L M/S h i j k l m n SET CLEAR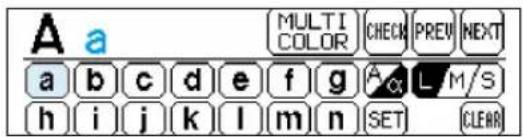
text_image
A a MULTI COLOR CHECK PREV NEXT a b c d e f g A L M/S h i j k l m n SET CLEARThe characters to be selected can be switched from uppercase to lowercase and vice versa by touching "A/a".
- Touch "A".
- Touch "A/a" to switch to lowercase.
- Touch "a".
Changing the character size to one of three different sizes
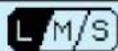
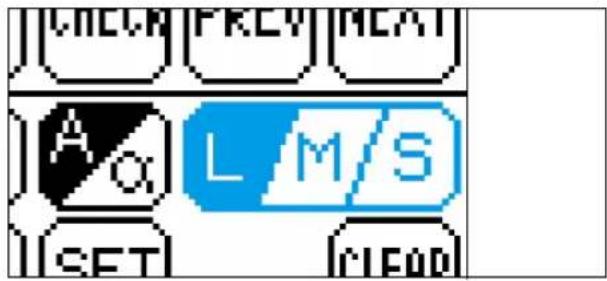
text_image
CHECK PREV MEAT A L M/S SET CLEADThe size of the characters can be changed by touching the "L/M/S" key. Each time it is pressed it changes as shown below. (L → M → S → L ..) The size of all characters will be changed to the last character size selected.
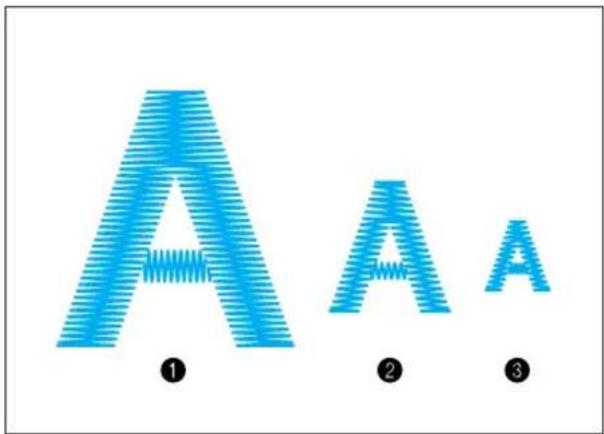
text_image
A ① A A ② ③ALPHABETIC CHARACTERS
Actual size
① Large (L)
② Medium (M)
3 Small (S)
Correcting characters


text_image
LM/S CLEAROne character can be cleared with a backspace each time "CLEAR" is touched.
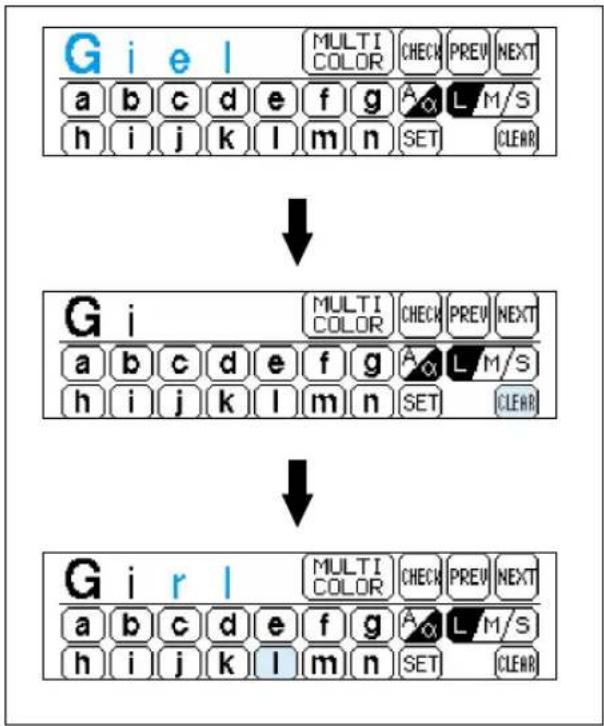
flowchart
graph TD
    A["Input: G i e l"] --> B["Multi Color Check Prev Next"]
    B --> C["Output: G i"]
    C --> D["Multi Color Check Prev Next"]
    D --> E["Output: G i r l"]
    E --> F["Multi Color Check Prev Next"]
    F --> G["Output: G i r l"]
Example: If "Giel" has been entered instead of "Girl".
- Touch "CLEAR" twice.
- Enter the correct characters.
Checking the characters input

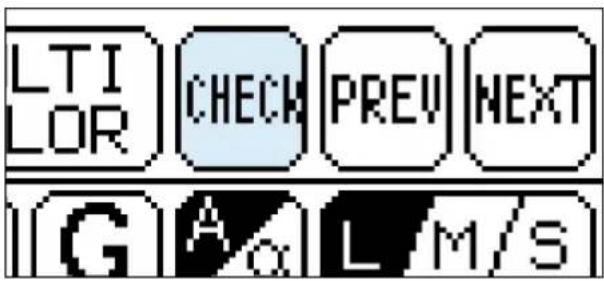
text_image
LTI LOR CHECK PREV NEXT G A α L M/STouch "CHECK" to check the characters which have been selected.
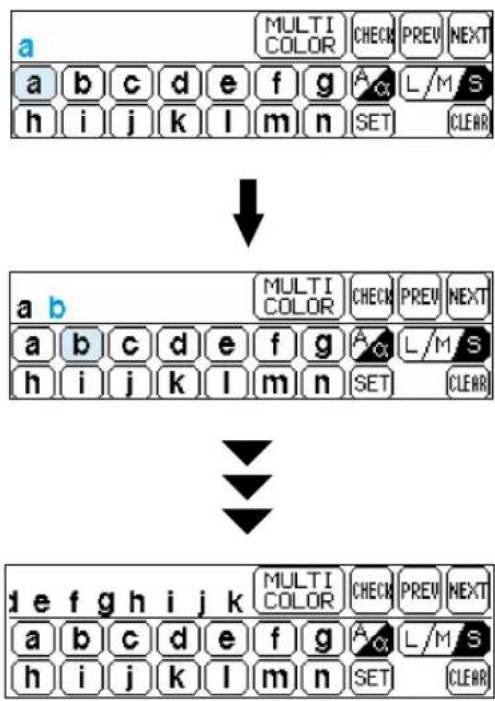
text_image
a MULTI COLOR CHECK PREV NEXT a b c d e f g A L/M S h i j k l m n SET CLEAR ↓ a b MULTI COLOR CHECK PREV NEXT a b c d e f g A L/M S h i j k l m n SET CLEAR ↓ d e f g h i j k MULTI COLOR CHECK PREV NEXT a b c d e f g A L/M S h i j k l m n SET CLEARExample: If the characters "abcdefghijk" have been selected in lowercase characters
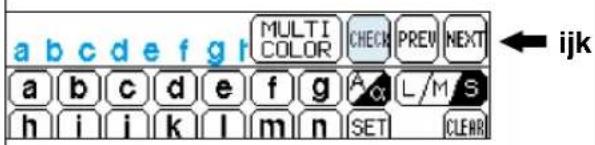
text_image
a b c d e f g r MULTI COLOR CHECK PREW NEXT a b c d e f g A or L/M S h i j k l m n SET CLEARThe display appears as shown in the illustration at left after the "k" is touched.
* The machine will not accept your next character if it exceeds the embroidery area. To continue the word or phrase change to a smaller size character.
By touching "CHECK", the display will scroll through all the characters from the first character selected.
* If all the characters selected appear on the display at once, then the display will not move.
Changing the color of single characters

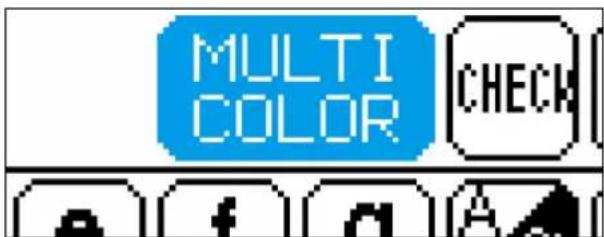
text_image
MULTI COLOR CHECKIf "MULTI COLOR" is selected before embroidering starts, the machine will stop after each character is sewn so that you can change the thread.
Selecting frame patterns


flowchart
graph TD
    A["Select the frame."] --> B["Select the stitch."]
    B --> C["SET"]
    C --> D["PART-TERN"]
* Frame patterns are created by combining the desired frame and type of stitch.
Example

- Touch "
* If another type of pattern such as characters or if a memory card has been inserted, press "CHARACTERS & DESIGNS" first and then touch "☐". - Select the desired shape for the frame.
If you touch "NEXT", additional frame shapes will be displayed. (There are a total of 10 different frame shapes available.) - Select the desired type of stitch to form the frame.
② If you touch "NEXT", additional stitch types will be displayed. (There are a total of 12 different stitch types available.) - The combined pattern is then shown on the LCD screen.
③ Screen A – The operation of each key shown on this screen is described on the following page.
Screen A
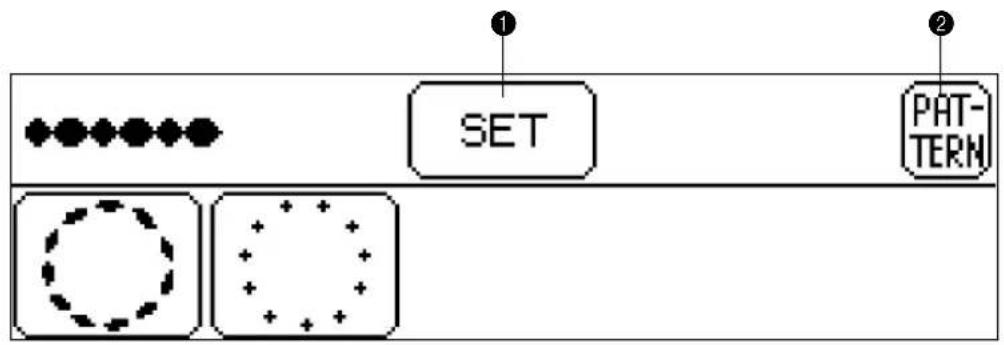
text_image
① SET PHT- TERN① Touch this key if you would like to change the pattern position, pattern size and thread density, or if you would like to use the Help function.
To change the pattern position: (Refer to page 43)
To change the pattern size: (Refer to page 47)
To change the thread density: (Refer to page 47)
(It may not be possible to change the thread density for some patterns.)
To use the Help function: (Refer to page 54)
② Touch this key to return to the pattern selection screen.
Selecting one-point mark patterns

natural_image
Blue cartoon giraffe head illustration with bow tie (no text or symbols)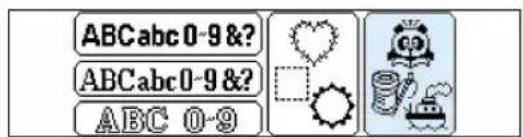
text_image
ABCabc 0-9 &? ABCabc 0-9 &? ABC 0-9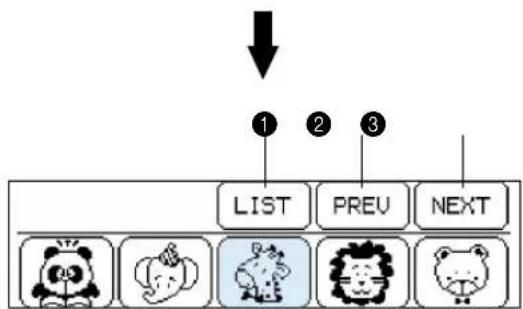
flowchart
graph TD
    A["1"] --> B["LIST"]
    C["2"] --> D["PREV"]
    E["3"] --> F["NEXT"]

text_image
MULTI COLOR SET L S PATTERN 1/3 THREAD COLORExample
- Touch "

- Select the desired pattern to be embroidered. (Example: Touch the giraffe)
① Touch this key to display all available patterns on the screen. You can then select the desired pattern by touching it.
② Touch this key to return to the previous pattern screen.
③ Touch this key to move to the next pattern screen.
- The pattern is now selected.
4 Screen A – The operation of each key shown on this screen is described on the following page.
Screen A

text_image
2 3 4 5 6 MULTI COLOR SET L S PATTERN 1 直 1/ 3 7 8 THREAD COLOR① This indicates the order of color changes.
② Touch this key to display the total time required for embroidering the pattern and the time remaining until the pattern is finished. The time taken to change the threads is not included in these times. (The time is calculated after the key is touched, and is then displayed.) (Refer to page 39.)
③ Touch this key to switch between the multicolor mode and single-color mode. (It is not possible to change between multi color mode and single color mode if "MULTI COLOR" is not displayed on the screen).
④ Touch this key if you would like to change the pattern position, or if you would like to use the Help function.
To change the pattern position: (Refer to page 43)
To use the Help function: (Refer to page 54)
⑤ Touch this key to change the size of the pattern. (It is not possible to change the size of patterns if "L/S" is not displayed on the screen.)
6 Touch this key to return to the pattern selection screen.
⑦ The total number of colors and the number of the color currently being sewn will be displayed.
⑧ Touch this key to change the display in ① to the color name (reference). (Refer to page 39.) ( It is not possible to display the color name if "THREAD COLOR" is not displayed on the screen.)
Displaying the embroidery time for one-point patterns


flowchart
graph LR
    A["Grid with 1 -"] --> B["Switch Function"]
    B --> C["SELF-INTRODUCTION"]
    C --> D["MEMORY"]
    D --> E["BRIGHTNESS OF LCD"]
    E --> F["TIME/THREAD COLOR DISPLAY"]
    F --> G["Next"]
① "BASIC OPERATION" key
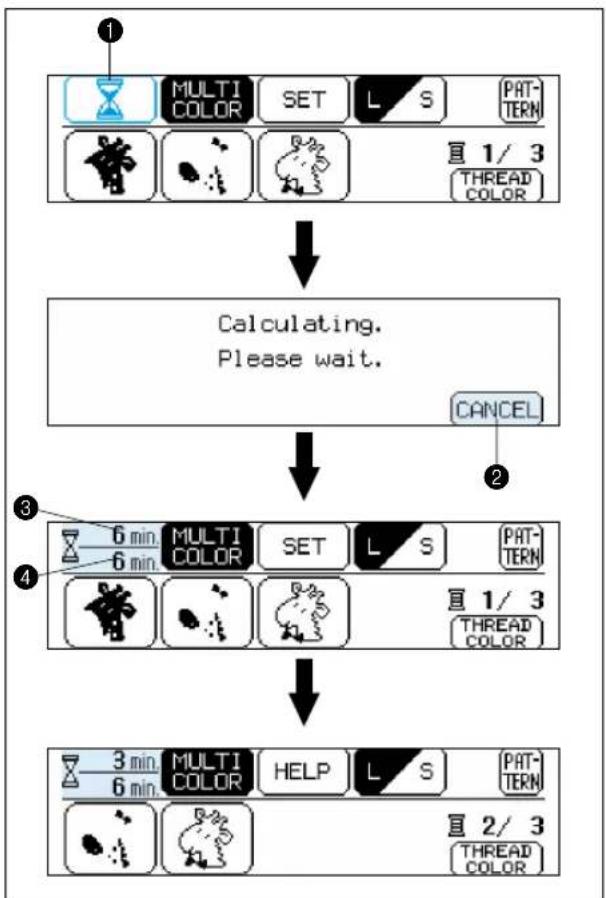
flowchart
graph TD
    A["①"] --> B["MULTI COLOR SET L S PATTERN"]
    B --> C["②"]
    C --> D["③"]
    D --> E["④"]
    E --> F["Calculating. Please wait."]
    F --> G["CANCEL"]
If you would like to know the time it takes to embroider a pattern, touch the time display key ("☐"). The time required will then be calculated and displayed. The time taken to change the threads is not included.
This function can also be used with some of the patterns on the memory cards, but in such cases the time displayed may be somewhat different from the time given on the pattern sheet for that memory card.
- After selecting the pattern, touch " Z". ① Time display key
- The embroidering time will then be calculated. ② Touch this key to cancel the calculation.
- The required time and the remaining time will be shown on the display. ③ Remaining time ④ Total required time
- The time remaining will change at the end of each color embroidery.
Displaying the color names for one-point patterns


flowchart
graph LR
    A["Grid"] --> B["“WINDING BOBBIN” CHANGING NEEDLE"]
    A --> C["SETTING BOBBIN EMBROIDERY"]
    A --> D["UPPER THREADING LANGUAGE SELECTION NEXT"]
    B --> E["SWITCH FUNCTION SELF-INTRODUCTION"]
    C --> F["MEMORY BRIGHTNESS OF LCD"]
    D --> G["TIME/THREAD COLOR DISPLAY NEXT"]
If you touch "THREAD COLOR", the color names (reference) of the different threads to be used will be displayed in order.
- After selecting the pattern, touch "THREAD COLOR". ① "THREAD COLOR" key
- The color names will then be displayed. * If you touch "THREAD COLOR" once more, the display will return to the previous screen. * It is not possible to display the color name if "THREAD COLOR" is not displayed on the screen.
- After selecting the pattern, touch "THREAD COLOR".
① "THREAD COLOR" key - The color names will then be displayed.
* If you touch "THREAD COLOR" once more, the display will return to the previous screen.
* It is not possible to display the color name if "THREAD COLOR" is not displayed on the screen.
Selecting patterns from a memory card
Be sure to turn off the power switch before inserting or removing the memory cards.

natural_image
Diagram of a switch mechanism with labeled terminals (0 and 1), no text or symbols present- Turn the power switch off.

natural_image
Diagram of a device with a screen and directional arrow, no text or symbols present- Insert the memory card into the card slot according to the direction of the arrow mark on the memory card.
① Direction arrow on memory card
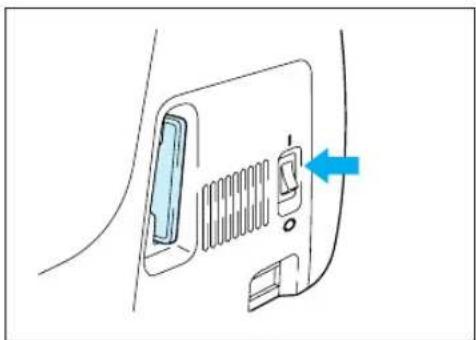
natural_image
Diagram of a car front panel with a blue arrow pointing to the door (no text or symbols present)- Turn the power switch on.
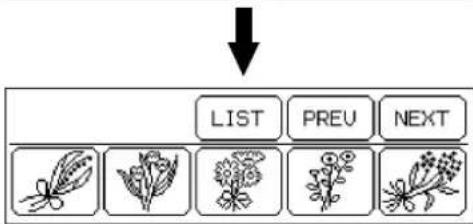
flowchart
graph TD
    A["LIST"] --> B["PREV"]
    B --> C["NEXT"]
IMPORTANT
* If the card is inserted in a direction other than that indicated by the arrow on the card, the connector in the card slot will become damaged.
* Insert so that the card appears as shown in the illustration at left. If you try to push the card in any further, the connector will become damaged.
* Be sure to turn the power switch off before removing the card. Pull the card straight out from the slot.
* Always keep the memory cards in their proper case when they are not in use.
- The pattern selection screen for the inserted memory card will be displayed.
(The illustration shows the pattern selection screen for the No. 2 Flower card.)
The selection process from this point is the same as for selecting built-in patterns.

text_image
Diagram with a highlighted blue rectangle and numbered label '2' pointing to it, surrounded by empty rectangular cells.* If you use a selection key to display another screen, you can return to the above pattern selection screen by touching "CARD".
② "CARD" key
MEMORY
Up to 5 different pattern combinations can be saved and retrieved from memory.

flowchart
graph LR
    A["Grid"] --> B["Switch Function"]
    B --> C["SELF-INTRODUCTION"]
    C --> D["MEMORY"]
    D --> E["BRIGHTNESS OF LCD"]
    E --> F["TIME/THREAD COLOR DISPLAY"]
    F --> G["Next"]
① "BASIC OPERATION" key
Saving a pattern combination in memory
text_image
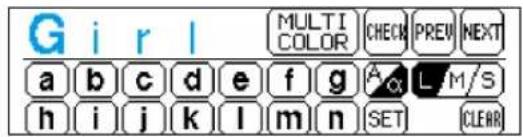
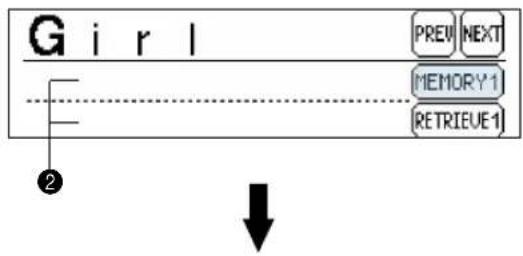
G i r l MULTI COLOR CHECK PREW NEXT a b c d e f g A L M/S h i j k l m n SET CLEAR
flowchart
graph TD
    A["Girl"] --> B["PREW"]
    A --> C["NEXT"]
    A --> D["MEMORY1"]
    A --> E["RETRIEUE1"]
    F["2"] --> G["Down Arrow"]
Saving

text_image
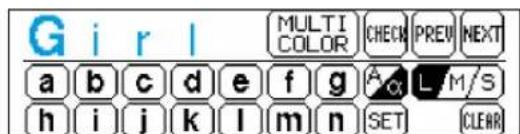
G i r l MULTI COLOR CHECK PREV NEXT a b c d e f g A L M/S h i j k l m n SET CLEARExample: To save the "Girl" pattern in memory address 1.
-
Enter the characters to form the word or monogram.
-
Press "MEMORY".
① "MEMORY" key
- Touch "MEMORY 1".
② If any patterns have already been saved, they will be displayed on the screen. Touch "NEXT" to look for an empty memory space if MEMORY 1 has been used.
* If the new pattern is saved to a space where an old pattern has already been saved, the old pattern will be deleted.
* Do not turn off the power while a pattern is being saved (while "Saving" is displayed).
-
The pattern is now saved in memory.
-
For the next example press "CHARACTERS & DESIGNS", touch "A:O:Sa:U:U&I" to select desired font style and enter characters to create the pattern "Boy". Press "MEMORY", touch "NEXT" and "MEMORY 2" to save the pattern.
Retrieving a pattern which has been saved
RETRIEVE 1

flowchart
graph TD
    A["1"] --> B["2"]
    B --> C["3"]
    C --> D["4"]
    D --> E["5"]
    E --> F["6"]
    F --> G["7"]
    G --> H["8"]
    H --> I["9"]
    I --> J["10"]
    J --> K["11"]
    K --> L["12"]
    L --> M["13"]
    M --> N["14"]
    N --> O["15"]
    O --> P["16"]
    P --> Q["17"]
    Q --> R["18"]
    R --> S["19"]
    S --> T["20"]
    T --> U["21"]
    U --> V["22"]
    V --> W["23"]
    W --> X["24"]
    X --> Y["25"]
    Y --> Z["26"]
    Z --> AA["27"]
    AA --> AB["28"]
    AB --> AC["29"]
    AC --> AD["30"]
    AD --> AE["31"]
    AE --> AF["32"]
    AF --> AG["33"]
    AG --> AH["34"]
    AH --> AI["35"]
    AI --> AJ["36"]
    AJ --> AK["37"]
    AK --> AL["38"]
    AL --> AM["39"]
    AM --> AN["40"]
    AN --> AO["41"]
    AO --> AP["42"]
    AP --> AQ["43"]
    AQ --> AR["44"]
    AR --> AS["45"]
    AS --> AT["46"]
    AT --> AU["47"]
    AU --> AV["48"]
    AV --> AW["49"]
    AW --> AX["50"]
    AX --> AY["51"]
    AY --> AZ["52"]
    AZ --> BA["53"]
    BA --> BB["54"]
    BB --> BC["55"]
    BC --> BD["56"]
    BD --> BE["57"]
    BE --> BF["58"]
    BF --> BG["59"]
    BG --> BH["60"]
    BH --> BI["61"]
    BI --> BJ["62"]
    BJ --> BK["63"]
    BK --> BL["64"]
    BL --> BM["65"]
    BM --> BN["66"]
    BN --> BO["67"]
    BO --> BP["68"]
    BP --> BQ["69"]
    BQ --> BR["70"]
    BR --> BS["71"]
    BS --> BT["72"]
    BT --> BU["73"]
    BU --> BV["74"]
    BV --> BW["75"]
    BW --> BX["76"]
    BX --> BY["77"]
    BY --> BZ["78"]
    BZ --> CA["79"]
    CA --> CB["80"]
    CB --> CC["81"]
    CC --> CD["82"]
    CD --> CE["83"]
    CE --> CF["84"]
    CF --> CG["85"]
    CG --> CH["86"]
    CH --> CI["87"]
    CI --> CJ["88"]
    CJ --> CK["89"]
    CK --> CY["90"]
    CY --> CZ["91"]
    CZ --> DA["92"]
    DA --> DB["93"]
    DB --> DC["94"]
    DC --> DD["95"]
    DD --> DE["96"]
    DE --> DF["97"]
    DF --> DG["98"]
    DG --> DH["99"]
Example: To recall the "Boy" pattern saved in memory space 2
- Touch "MEMORY".
① "MEMORY" key
-
Touch "NEXT".
-
Touch "RETRIEVE 2".
-
The pattern retrieved will appear on the screen. Press "START/STOP" button to embroider the pattern.
* Patterns which are saved from an embroidery card can only be retrieved if the memory card containing that pattern has been inserted into the card slot of the machine.
CHANGING THE SETTINGS FOR THE SELECTED PATTERN

Moving the position (LAYOUT)

The position for embroidering the pattern can be changed by touching the "LAYOUT" key. This is useful if you want to embroider a pattern somewhere such as in the corner of the fabric or if you want to align a pattern away form the center of the embroidery area of frame.

flowchart
graph TD
    A["Character"] --> B["Multi Color Check Preview Next"]
    B --> C["A B C D E F G A L M/S H I J K L M N SET CLEAR"]
    C --> D["Frame pattern"]
    D --> E["SET PAT-TERN"]
    E --> F["●●●●●●●●●●●●●●●●●●●●●●●●●●●●●●●●●●●●●●●●●●●●●●●●●●●●●●●●●●●●●●●"]
    F --> G["↓"]
    G --> H["A HELP LAYOUT ENLARGE REDUCE THREAD DENSITY RETURN"]
    H --> I["3 4 5 6 8"]
    I --> J["1 $ 3.3 cm ↔ 3.0 cm 2 90°"]
    J --> K["← CENTER → TRIAL → SET END 7 10 11"]
    K --> L["START CONTB"]
    L --> M["← CENTER → TRIAL → SET END 7 10 11"]
Touch "SET" and then "LAYOUT" to display the above screen.
① Indicates the current pattern size.
Note:
Characters and patterns may sometimes be displayed in slightly larger than actual size.
② Touch this key to rotate the selected pattern in 90° steps. (Refer to page 45)
③ Indicates the area which can be embroidered.
4 Indicates the current center needle drop position.
⑤ Indicates the embroidering position and embroidering area for the current pattern and size selected.
6 Touch these keys to move the embroidering position within the embroidery area. (Refer to page 44)
⑦ If you touch this key, the embroidering position will be returned to the center of the embroidery area.
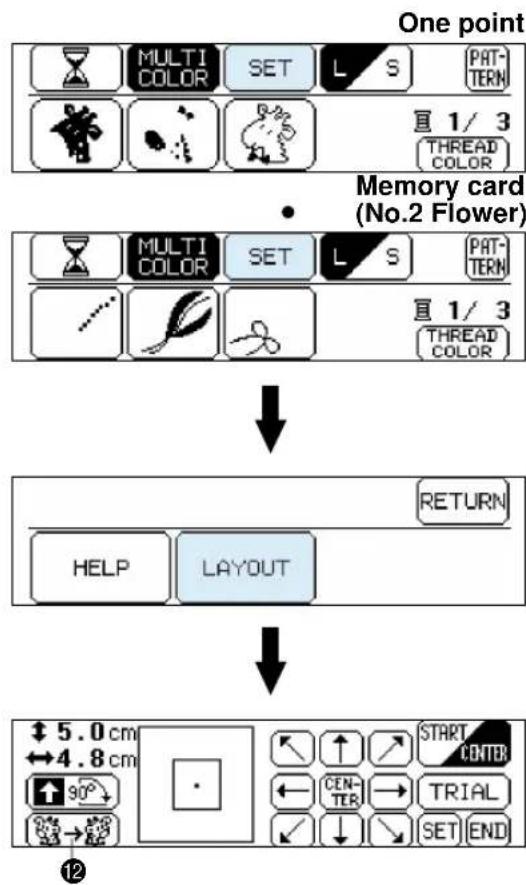
flowchart
graph TD
    A["One point"] --> B["Memory card (No.2 Flower)"]
    B --> C["1/3 THREAD COLOR"]
    B --> D["MULTI COLOR SET L/S PATTERN"]
    B --> E["MULTI COLOR SET L/S PATTERN"]
    B --> F["RETURN"]
    B --> G["HELP LAYOUT"]
    B --> H["START CENTER"]
    B --> I["90° → ← CENTER → TRIAL"]
    B --> J["SET END"]
8 This moves the needle position to the middle of the pattern or to the sewing start position. Use it when you would like to set the embroidering position. (Refer to page 45)
9 If you touch this key, the embroidery frame will move to trace the area required for the selected design, so that you can check the embroidering position.(Refer to page 44)
10 Touch this key to return to the previous selection screen.
If you touch this key, the display will change from the layout screen back to the original screen.
12 If you touch this key, the pattern will be reversed horizontally (mirror imaged).
This function cannot be used with some patterns. (Refer to page 46)
Changing the embroidery position


text_image
Diagram showing a square with a central dot and nine directional arrows, one labeled 'CENTER' in the center.Touch the arrow key that corresponds to the direction in which you would like to move the pattern. The embroidery position will then move.
* If you touch the "CENTER" key, the embroidery position will return to the center.
* Use the hole on the embroidery foot as a guide, and never lower the needle while it is moving.

text_image
Diagram showing a selection box with an arrow pointing to a selected region, alongside eight directional arrows and a central 'CENTER' button.Example: To move the embroidery position to the upper right corner
Touch the “↗” key.
* The embroidery position or area display can be moved by touching the corresponding arrow key. If the arrow key is touched once, the frame and display will move one step; if the key is touched continuously, the frame and display will move continuously.
Checking the embroidery area


natural_image
Technical diagram of a mechanical assembly with a central component and dashed-line directional arrows (no text or symbols)If "TRIAL" is touched, the embroidery frame will move and the presser foot will trace the embroidery area to be used for the currently selected pattern and size.
* Do not lower the needle. Use the hole of the presser foot as a guide instead.
Embroidering from a specific starting point


text_image
ABC- Make a mark at the starting position on the fabric in the frame as shown in the illustration. The mark cannot be too close to the edge of the frame as the presser foot prevents the needle from getting very close to the frame.
natural_image
Pure geometric diagram with a central circular feature and dashed lines, no text or symbols present.- Touch "START/CENTER" to select "START" and then touch the arrow key to align the hole of the presser foot with the mark.

text_image
ABC- Embroider the pattern.
Changing the pattern direction


text_image
↑ 3.6 cm ← 8.7 cm ↑ 90° → ↑ 8.7 cm ← 3.6 cm → 90°The pattern will be rotated clockwise in 90° steps as shown in the illustration at left each time "90° clockwise" is touched.

text_image
ABC A C A B C A B CMirror imazing patterns

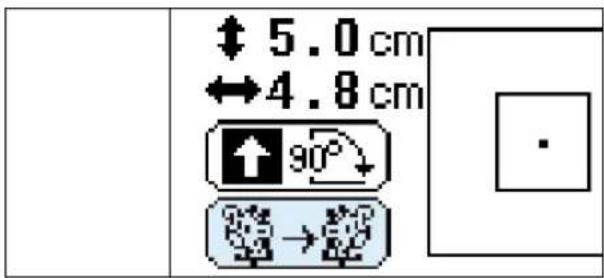
text_image
↑ 5.0 cm ↔ 4.8 cm 90° →- Touch the “→” key to reverse the pattern horizontally.
* If the “key appears on the display in reverse mode, it indicates that the pattern has been reversed horizontally showing a mirror image.
* The “ key will not be displayed for some patterns.
Changing the size of characters and frame patterns


flowchart
graph TD
    A["Multi Color"] --> B["CHECK"]
    B --> C["PREV"]
    C --> D["NEXT"]
    A --> E["A"]
    E --> F["L/M/S"]
    F --> G["CLEAR"]
    H["HELP"] --> I["LAYOUT"]
    I --> J["ENLARGE REDUCE"]
    J --> K["THREAD DENSITY"]
    L["ENLARGE"] --> M["START CENTER"]
    N["RESET"] --> O["TRIAL"]
    P["REDUCE"] --> Q["SET END"]
* The sizes of characters and frame patterns can be changed as desired.
1. Touch "SET".
2. Touch "ENLARGE/REDUCE"
3. Touch "ENLARGE" to make the character or frame pattern larger, and touch "REDUCE" to make it smaller. If you touch "RESET", the pattern size will return to the original size.
① "ENLARGE" key
② "RESET" key
③ "REDUCE" key
* Characters can be enlarged and reduced to sizes ranging from "L" to "S".
* The enlargement sizes for frame patterns will vary according to the pattern.
* Refer to page 43 for instructions on how to use other keys in this screen.
Changing thread density of the stitch on characters and some frame patterns


flowchart
graph TD
    A["A"] --> B["MULTI COLOR CHECK PREV NEXT"]
    B --> C["ABCDEFG L M/S"]
    C --> D["H I J K L M N SET CLEAR"]
    D --> E["↓"]
    E --> F["A"]
    F --> G["RETURN"]
    G --> H["HELP LAYOUT ENLARGE REDUCE THREAD DENSITY"]
    H --> I["↓"]
    I --> J["A"]
    J --> K["END"]
    K --> L["THREAD DENSITY + 0000 STD 0000 -"]
    L --> M["1"]

text_image
③ ① ② A A AThe thread density adjustment is not available for all patterns. Patterns other than the characters and some frame patterns are not adjustable.
- Touch "SET".
- Touch "THREAD DENSITY".
- The thread density of the stitches will become farther apart (coarser) each time “−” key is touched. The thread density of the stitches will become closer together (finer) each time “+” key is touched.
① STD (standard)
② + (stitches closer together)
③ – (stitches farther apart)
* The normal setting is "STD" (standard).
SEWING A BASIC EMBROIDERY PATTERN
Embroidering multi-color patterns


text_image
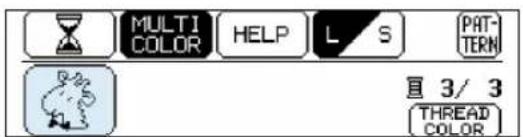
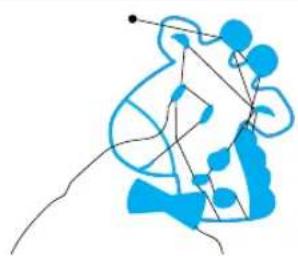
MULTI COLOR SET L S PATTERN 直 1/3 THREAD COLOR(1) (2) (3)


text_image
MULTI COLOR HELP L S PATTERN 直 2/3 THREAD COLOR(2) (3)

text_image
MULTI COLOR HELP L S PATTERN 直 3/ 3 THREAD COLOR(3)
natural_image
Abstract blue line drawing of a stylized human figure with dynamic lines and dots (no text or symbols)When a pattern is selected it is broken down into color diagrams on the screen. The order of embroidering is shown left to right. The diagram on the left is for the first thread color.
- Thread the first color. (See page 16 – 17)
When the "START/STOP" button is pressed, the first part of the pattern (1) will be sewn and then the machine will stop automatically.
* Be sure to raise the presser foot before changing the thread.
* When embroidering is completed for this color, the screen display will automatically move to the left one position. - Replace the upper thread with the next color and press the "START/STOP" button. The second part of the pattern (2) will be embroidered and the machine will then stop automatically.
- Replace the upper thread with the next color and press the "START/STOP" button. The third part of the pattern (3) will be embroidered and the machine will then stop automatically.
- Trim any excess thread.
Embroidering single color patterns

text_image
G i r l MULTI COLOR CHECK PREV NEXT a b c d e f g A a L M/S h i j k l m n SET CLEAR- Thread the machine. (See page 16 - 17)
- Install the embroidery frame. (See page 20 - 22)
- Lower the presser foot.
- Press the "START/STOP" button to sew the pattern: the machine will stop automatically when it is finished.
- Raise the presser foot.
- Trim any excess thread.
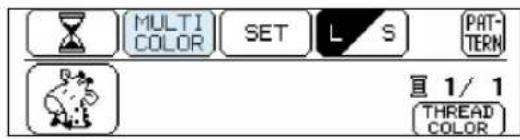
Embroidering a single color pattern when "MULTI COLOR" is displayed

text_image
MULTI COLOR SET L S PATTERN 直 1/1 THREAD COLOR- Touch "MULTI COLOR" to change to the single color mode. If the "START/STOP" button is pressed, a single color of the pattern will be embroidered and then the machine will stop automatically.
* It is not possible to change between multi color mode and single color mode if "MULTI COLOR" is not displayed on the screen.
- Trim any excess thread.
Embroidering characters that extend beyond than one frame
LAYOUT

text_image
ABC MULTI COLOR CHECK PREW NEXT A B C D E F G A O L M/S H I J K L M N SET CLEAR
text_image
ABC RETURN HELP LAYOUT ENLARGE REDUCE THREAD DENSITY
text_image
START CENTER CENTER TRIAL SET END
text_image
ABC 1
text_image
ABC ①
text_image
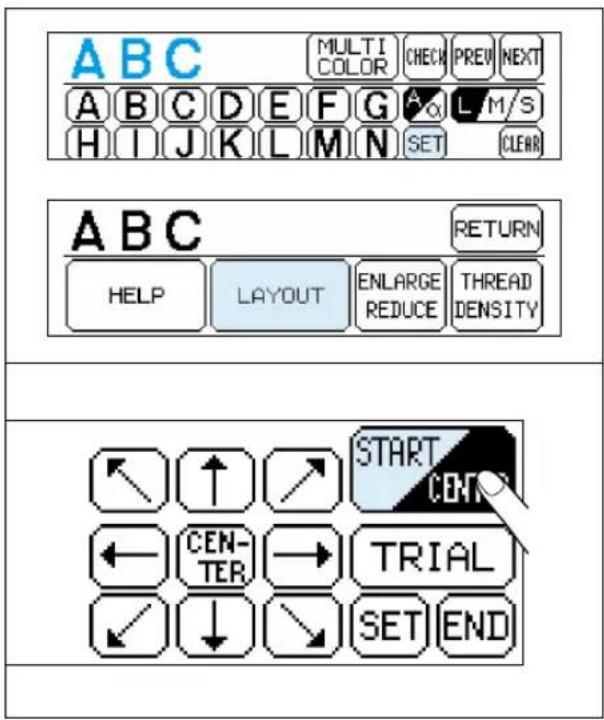
ABCDE* This function is useful when there are many characters to embroider and you cannot embroider them all in the same frame.
Example: ABCDE in large size
-
Input "ABC", then touch "SET" and then "LAYOUT". After this, touch "START/CENTER" to switch to "START".
-
Press the "START/STOP" button to start embroidering. When embroidering has finished, the machine will sew the finishing position automatically. You can use the finishing position as the starting position for the characters to be embroidered next when the fabric is re-framed with the finishing point and last character just inside the left edge of the frame.
① Finishing position
3. Input the remaining letters "DE", and then touch "START/CENTER" to select "START".
4. Touch the arrow keys to move the start point of the needle to the finishing position of the last character and then press the "START/STOP" button to start the machine.
① Finishing position (Use it for the starting position of "DE".)
Finished pattern
text_image
ABC MULTI COLOR CHECK PREV NEXT A B C D E F G L M/S H I J K L M N SET CLEAR ABC RETURN HELP LAYOUT ENLARGE REDUCE THREAD DENSITY START CENT ← CENTER → TRIAL ✓ ↓ → SET END
text_image
ABC ①
text_image
ABC 1
text_image
ABCDEEMBROIDERING APPLICATIONS
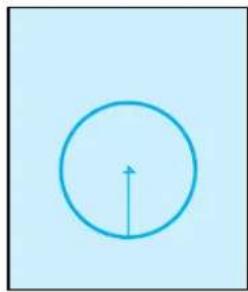
Combining a frame pattern with a design
natural_image
Simple blue circle with a vertical arrow inside, set against a light blue background (no text or symbols)- Select a frame pattern and embroider it. A “+” mark is sewn after embroidering of the frame pattern in the center of pattern. This mark can be used as a guide when embroidering characters or patterns to position them within the frame pattern.

natural_image
Simple line drawing of a cartoon hippo inside a circle (no text or symbols)- Using the "+" mark inside the frame pattern as a guide, align the needle using the center needle layout function. Embroider the design.

natural_image
Blue circular logo with a stylized animal head inside, no text or symbols present.Making badges or decorative patches
- After embroidering a frame pattern and the combined design, sew an extra frame pattern on the outside using the “— — —” stitch slightly larger than the original frame pattern.

natural_image
Illustration of a cartoon cow inside a circular frame with scissors, against a light blue background (no text or symbols)- Cut cleanly around the frame pattern, following the line of the outside pattern.

natural_image
Blue circular icon with a cartoon giraffe face inside, no text or symbols present.The finished badge or decorative patch is now ready to be attached to a project.
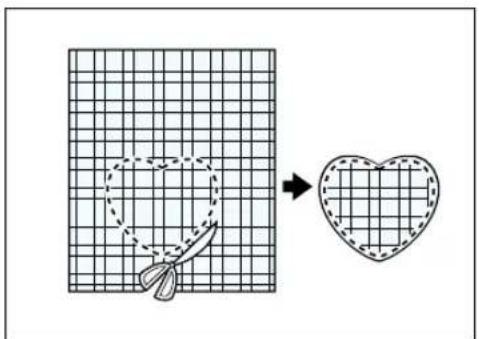
Embroidering appliques (using a frame pattern)
text_image
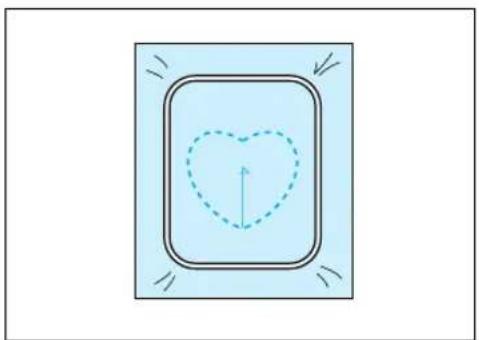
Diagram showing a sewing process: cutting a heart shape into a dashed outline, with a hand holding the scissors.- Select the applique fabric for the project, attach a stabilizer material, place in the embroidery frame and on the machine.
- Select the frame shape to be embroidered and the “— — —” stitch. Embroider it onto the applique fabric. Remove the fabric from the frame.
Cut neatly around the outside of the shape made by the stitches.
natural_image
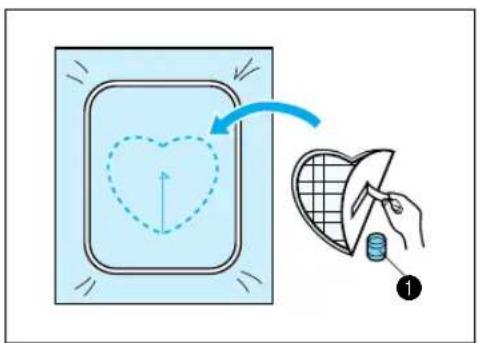
Simple diagram with a heart-shaped outline and directional arrows, no text or symbols present.- Attach a stabilizer material onto the back of the fabric on the project where the applique is to be placed. Center the area where the applique is to be placed in the embroidery hoop. Embroider it in the same way using the same frame pattern shape and “— — —” stitch as in step 2.
text_image
Diagram illustrating a heart-shaped outline with directional arrows and a hand holding a small object, labeled with number ①.- Apply a thin layer of fabric adhesive to the rear of the applique which is created in step 2, and then attach it to the base fabric so that it follows the frame shape just stitched.
① Adhesive
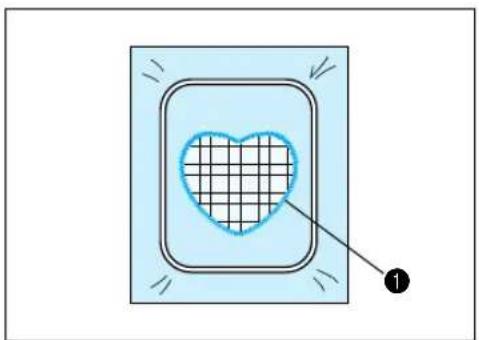
natural_image
Diagram showing a heart inside a square frame with arrows and a numbered label (1), no text or symbols present.- Without changing the frame shape or size, select the " "—stitch, and use it to embroider the applique material onto the project.
① Satin stitch “”
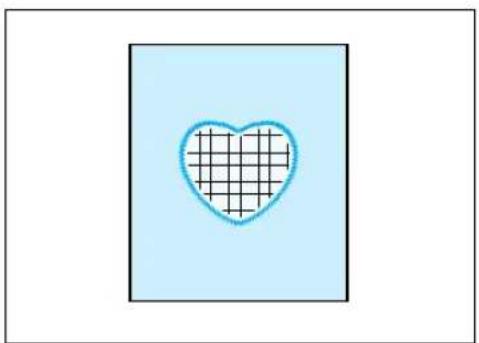
natural_image
Simple heart shape with a grid pattern inside, set against a light blue background (no text or symbols)The finished applique on the project
Embroidering onto small pieces of fabric or onto corners
A
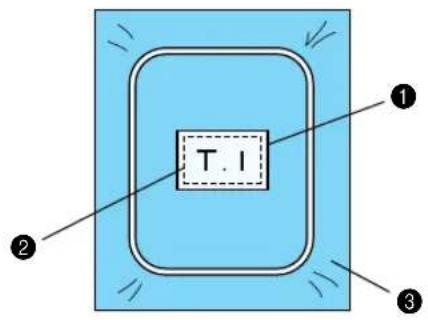
text_image
T. I ① ② ③B

text_image
① T. I ② ③C

text_image
T.1 ① ②Use stabilizer material to provide extra support while embroidering. After embroidering is completed, remove the stabilizer material carefully.
Case A
1 Fabric
② Secure with double faced tape or a basting stitch
③ Stabilizer
Case B
1 Fabric
② Secure with double faced tape or a basting stitch
③ Stabilizer
Case C
① Ribbon (Secure with double faced tape)
② Stabilizer
IF THREAD BREAKS DURING EMBROIDERING OR WHEN PARTLY COMPLETING A PATTERN

Before embroidering
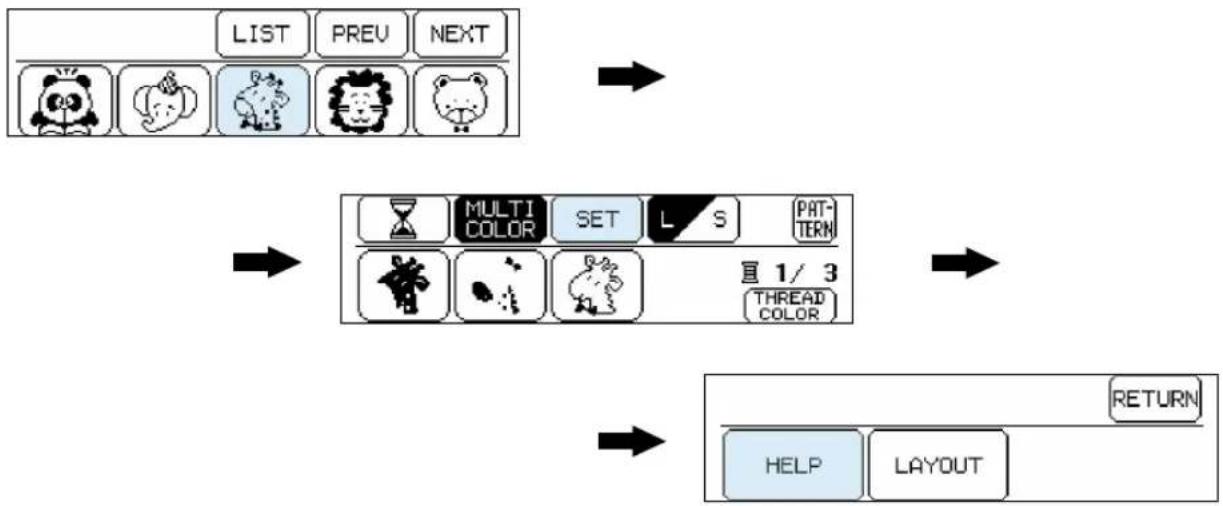
flowchart
graph TD
    A["LIST"] --> B["MULTI COLOR"]
    B --> C["SET"]
    C --> D["1/3 THREAD COLOR"]
    D --> E["RETURN"]
    F["HELP"] --> E
    G["LAYOUT"] --> E
While embroidering

text_image
MULTI COLOR HELP L/S PATTERN 直 1/3 THREAD COLOR* When embroidering starts, "SET" will change to "HELP".
Touch "HELP", then the following screen options will appear

text_image
① HOME FORWARD SEARCH REVERSE SEARCH FORWARD BACK END 直 1/3 THREAD COLOR① Touch this key to move back to the start position for a pattern.
② Touch this key to move ahead to the start of the next color or character without embroidering
③ Touch this key to move back to the start of the current color or character without embroidering
4 Touch this key to move forward stitch by stitch without embroidering.
(If touched continuously, the stitch will be advanced in 9-stitch jumps starting from the 6th single stitch)
⑤ Touch this key to move back stitch by stitch without embroidering.
(If touched continuously, the stitch will be moved back in 9-stitch jumps starting from the 6th single stitch)
⑥ Touch this key to return to the previous screen and allow embroidery to begin.
If thread breaks during embroidering


text_image
LTI OR HELP L
text_image
Diagram showing a car interior with a blue arrow indicating clockwise motion and a labeled component marked '1'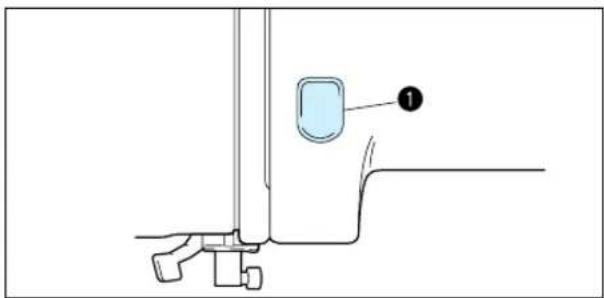
text_image
Technical diagram showing a mechanical assembly with labeled component 1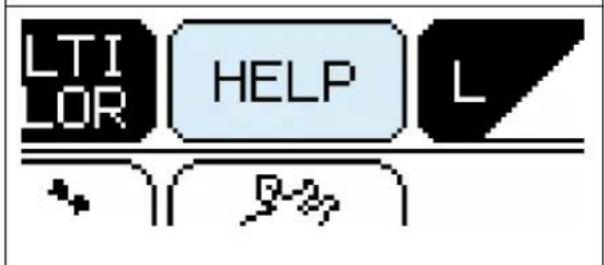
text_image
LTI OR HELP L D#The machine stops automatically when the upper thread breaks. When this happens do the following.
- If the upper thread breaks.
* Re-thread the upper thread. If the lower thread breaks or the bobbin runs out of the thread.
* Cut the upper thread above the fabric in the frame and then remove the embroidery frame. Replace the lower (bobbin) thread and then re-attach the embroidery frame.
- Touch "BACK" to move back a few stitches to slightly before the position where the thread broke or the bobbin ran out of the thread.
* If it is not possible to move back to the position where the thread broke, touch "REVERSE SEARCH" to move back to the beginning of that color, and then touch "FORWARD" to move forward to just before the position where the thread broke or the bobbin ran out of the thread.
- Lower the presser foot lever and press the "START/STOP" button to restart embroidering.
* If the machine stopped because the upper thread ran out, the upper thread may be tangled on the reverse side of the fabric (thread nesting). Remove the embroidery frame to check for this and trim off any excess build up.
① "START/STOP" button
If you stop the machine by pressing the "START/STOP" button and need to adjust the stitch location.
Touch "HELP".
Follow the same procedure as for "The machine stops automatically when the thread breaks."
① "START/STOP" button
Re-embroidering from the beginning


text_image
LTI OR HELP L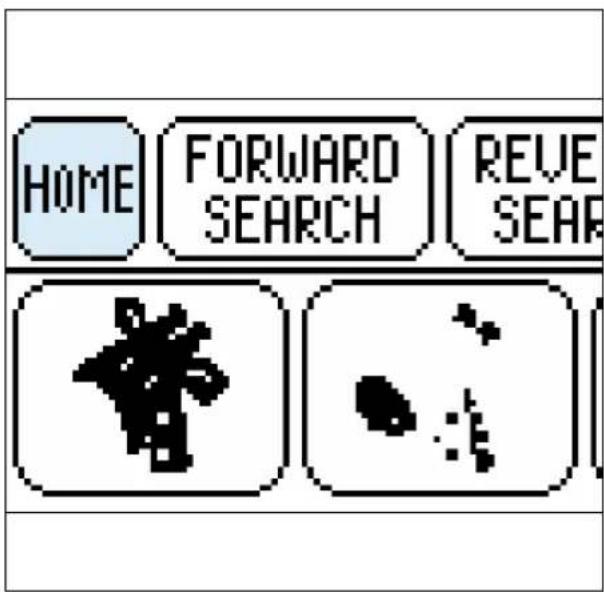
text_image
HOME FORWARD SEARCH REVE SEAR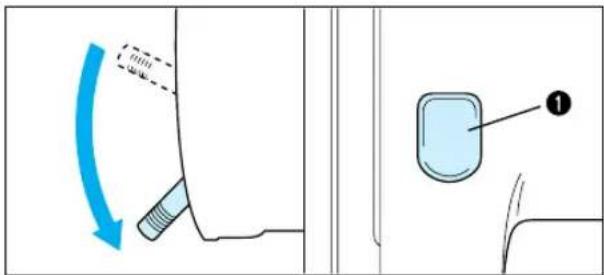
text_image
Diagram showing a mechanical component with blue motion arrow and labeled component 1-
Touch "HOME" to move back to the start position for a pattern.
-
Lower the presser foot lever and press the "START/STOP" button to start embroidering.
① "START/STOP" button
MAINTENANCE
CHANGING THE LIGHT BULB

text_image
1 I ① O ②When replacing the light bulb
- Turn the main power switch off.
① ON ② OFF
* The power cord plug must be removed from the socket outlet prior to changing the bulb.

text_image
Technical diagram of a mechanical device with labeled parts and directional arrows indicating motion or flow.- Loosen the screw in the end cap at the left side of the machine.
- Remove the end cap.
- Replace the snap-in light bulb with a new one of the same type.
* Light bulbs are available through your dealer. (8 V, 2.4 W/Parts code X50228-001 or item #SA105.)
CLEANING

text_image
Diagram of a sewing machine needle with labeled parts and directional arrows indicating motion or repair.
text_image
700mm -500mm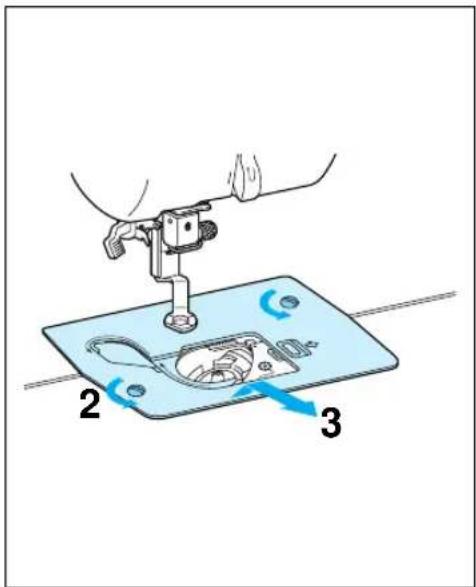
text_image
Diagram showing a sewing machine needle stitching a component, labeled with parts 2 and 3 and directional arrows indicating rotation.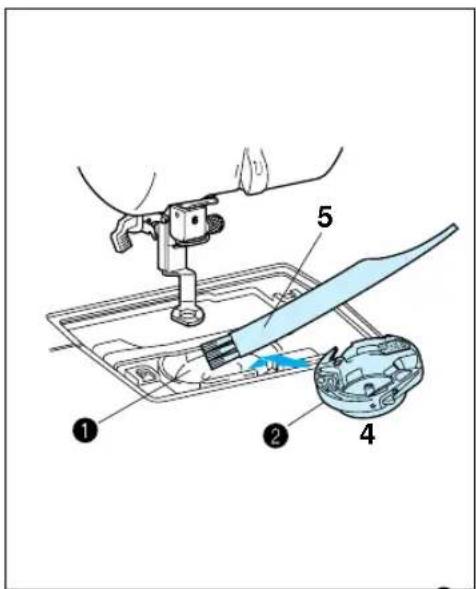
text_image
Diagram illustrating a cleaning or cleaning process with labeled parts including tool, brush, and container
text_image
Technical diagram of a device with labeled parts, showing internal components and a blue tool interacting with a component.Always keep the machine clean.
-
Turn off the power, remove the needle, and then raise the presser foot lever.
① Use a screwdriver to loosen the screw to remove. -
Loosen the screws on the needle plate.
-
Remove the needle plate.
-
Take out the inner rotary hook.
-
Remove any accumulated lint and threads from the inner hook and race with a brush or a small vacuum cleaner attachment.
① Race
2 Inner rotary hook
* Lint and dust accumulated in the race can cause poor quality stitching.
- Put the inner rotary hook back in position by placing the projection of the hook next to spring of the stopper.
1 Projection of the hook
② Spring of the stopper
ERROR MESSAGE
When the machine is not properly set and the "START/STOP" button is pressed, or a correction in your operation is required, machine will not start and will instruct you with an alarm and error number on the LCD.
Warning message displays
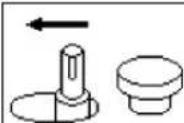
Return bobbin winding shaft to left.
This message is displayed when the bobbin winding shaft is at the right side and the "START/STOP" button is pressed. This message may be displayed after the display warns you to raise the needle to the highest position.
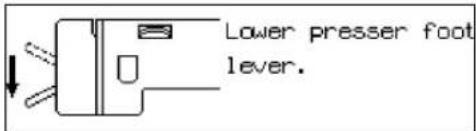
text_image
Lower presser foot lever.This message is displayed when the "START/STOP" button is pressed while the presser foot lever is raised.
Select pattern.
This message is displayed when a pattern has not been selected and the "START/STOP" button is pressed or "SET" is touched.
Check if upper or lower thread is cut.
This message is displayed when the machine senses that the upper or lower thread has broken or no upper thread is threaded or the bobbin runs out of the thread.
Check if thread is entangled. Check if needle is bent.
This message is displayed if the motor locks. This could be caused by a tangled thread or embroidering with a bent needle.
No pattern is memorized.
This message is displayed when "RETRIEVE" is touched and there is no pattern stored in that memory space.
This pattern is stored in other embroidery card.
This pattern can not be saved in the memory.
Embroidery card is not inserted. Turn off main power and insert card.
Raise the presser foot and re-thread.
This key does not work when needle is at low position. Raise the needle to high position and touch key again.
Embroidery pattern is exceeding sewing area.
Raise the needle to high position.
Color cannot be changed halfway.
This message is displayed when the RETRIEVE key is touched and the design in the machine's memory is from a different memory card than is currently inserted.
Memory card patterns cannot be saved into the machine's memory. However, the characters from memory card #1, the Alphabet card and #10, Monogram emblem card, can be saved and retrieved while the card is inserted. The card that the design was saved from must be inserted in order to retrieve the design.
This message is displayed when you are trying to save patterns that cannot be combined.
This message is displayed if "CARD" is touched while no memory card is inserted.
This message is displayed when the "START/STOP" button is pressed but the presser foot has not been raised to change the thread color.
If you are not changing the thread color, raise the presser foot lever, lower it again, and then press the "START/STOP" button to start the machine.
This message is displayed if an attempt is made to move the embroidery frame while the needle is in the down position. Use the balance wheel to move the needle to the highest position. Then continue.
This message is displayed if the combined size of patterns exceeds the size of the embroidering area.
This message is displayed if the needle is in the down position when the power is turned on.
This message is displayed if "MULTI COLOR" is pressed when pattern embroidering has already begun.
| Complete pattern entry. |
This message is displayed if the "START/STOP" button is pressed when pattern input for a "frame pattern" has not yet been completed.
| No more stitches can be combined. |
This message is displayed when the total number of characters or patterns combined exceeds a maximum 35.
| Calculating cannot be done half-way through. |
This message is displayed if you touch the “☐” key while the machine is embroidering.
Instruction message displays
| Winding bobbin thread. |
This message is displayed during bobbin winding.
| Saving |
This message is displayed after a "MEMORY" space is touched to save a pattern to that space. The power should not be turned off while this is on the display.
| Calculating. Please wait. |
This message is displayed while the machine is calculating after you touched the "☐" key. Touch "CANCEL" if you would like to interrupt the calculation process.
Audio alarms
- Proper operation will sound: One beep - Improper (wrong) operation will sound: Two or four beeps
TROUBLESHOOTING
Check for the cause of the problem without worrying.
Whenever embroidering becomes difficult, review the section of the instruction book which explains the operation you are performing to make sure that you are using the machine correctly. If you still have difficulty, the following check list may help you correct it. If you still experience difficulties, contact your dealer or nearest authorized service center.
Trouble with thread and stitches
| Symptom | Probable cause | Remedy |
| 1. Upper thread breaks | 1. The upper threading is not correct. | 1. Re-thread the upper thread. |
| 2. The upper thread is tangled. | 2. Clean the race or inner rotary hook. | |
| 3. The spool of thread is not correctly set. | 3. Set the spool of thread correctly. | |
| 4. The correct needle is not used. | 4. Change to the proper needle. | |
| 5. A thread other than the designated upper embroidery thread is being used. | 5. Replace with the designated upper embroidery thread. | |
| 2. Lower thread breaks | 1. The upper thread is tangled. | 1. Clean the race or inner rotary hook. |
| 2. The bobbin is not threaded properly in the shuttle. | 2. Remove the bobbin, reset the bobbin properly and pull the bobbin thread through the channel. | |
| 3. A thread other than the designated lower embroidery thread is being used. | 3. Replace with the designated lower embroidery thread. | |
| 3. Skipped stitches | 1. The needle is not correctly inserted. | 1. Set the needle properly. |
| 2. The correct needle is not used. | 2. Change to the proper needle. | |
| 3. The fabric has been placed in the embroidery frame incorrectly. | 3. Place the fabric in the embroidery frame correctly. | |
| 4. The embroidery frame has been attached to the machine incorrectly. | 4. Attach the embroidery frame to the machine correctly. | |
| 5. Thin or stretch fabric is being used with no stabilizer fabric attached. | 5. Attach stabilizer fabric. | |
| 4. Fabric puckers | 1. The upper thread tension is too strong. | 1. Decrease the upper thread tension using the upper thread tension dial. |
| 2. The upper or lower thread is not threaded correctly. | 2. Thread the upper and lower threads correctly. | |
| 3. Thin or stretch fabric is being used with no stabilizer fabric attached. | 3. Attach stabilizer fabric. | |
| 4. The fabric has been placed in the embroidery frame incorrectly. | 4. Place the fabric in the embroidery frame correctly. | |
| 5. The correct needle is not being used. | 5. Change to the proper needle. | |
| 5. Lower thread is visible on the top surface of the fabric | 1. The upper thread tension is too strong. | 1. Decrease the upper thread tension using the upper thread tension dial. |
| 2. The upper or lower thread is not threaded correctly. | 2. Thread the upper and lower threads correctly. | |
| 3. The thread has been threaded incorrectly through the inner rotary hook. | 3. Remove the bobbin, reset the bobbin properly and pull the bobbin thread through the channel. | |
| 4. A thread other than the designated lower embroidery thread is being used. | 4. Replace with the designated lower embroidery thread. | |
| 6. Upper thread is loose | 1. The upper thread tension is too weak. | 1. Increase the upper thread tension using the upper thread tension dial. |
| 2. The upper or lower thread is not threaded correctly. | 2. Thread the upper and lower threads correctly. | |
| 3. Threads other than the designated upper and lower embroidery thread are being used. | 3. Replace with the designated upper and lower embroidery threads. | |
| 7. Embroidered pattern is out of shape | 1. The fabric has been placed in the embroidery frame incorrectly. | 1. Place the fabric in the embroidery frame correctly. |
| 2. The embroidery frame has been attached to the machine incorrectly. | 2. Attach the embroidery frame to the machine correctly. | |
| 3. Thin or stretch fabric is being used with no stabilizer fabric attached. | 3. Attach stabilizer fabric. | |
| 4. Threads other than the designated upper and lower embroidery thread are being used. | 4. Replace with the designated upper and lower embroidery threads. | |
| 5. The thread is tangled. | 5. Cut and remove the tangled threads inside the rotary hook using scissors. Clean the race or inner rotary hook. | |
| 8. Threading is not possible | 1. The needle is installed incorrectly. | 1. Install the needle correctly. |
| 2. The needle threader lever will not turn. | 2. Turn the balance wheel to raise the needle to its highest position. | |
| 9. Thread is not cut during automatic thread cutting. | 1. Thread has accumulated around the thread cutting knife. | 1. Remove the needle plate and clean away the accumulated thread. |
Mechanical problems
| Symptom | Probable cause | Remedy |
| 1. Machine operation is slow and noisy | 1. Thread scraps and dust have accumulated under the needle plate. | 1. Remove the thread scraps and dust with a brush. |
| 2. The machine does not start | 1. The “START/STOP” button is not pressed. | 1. Press the “START/STOP” button. |
| 2. The main power switch is in the off position. | 2. Turn the power on. | |
| 3. The presser foot is not lowered. | 3. Lower the presser foot. | |
| 4. Check Error messages. | 4. See “ERROR MESSAGE” on page 59. | |
| 3. The needle breaks | 1. The needle is not correctly inserted. | 1. Remove the needle and reset a new needle properly. |
| 2. The correct needle is not used. | 2. Change to the proper needle. |
Caution
- This machine is equipped with a thread breakage sensor. Accordingly, if the upper thread is not threaded, the machine will not operate even if the “START/STOP” button is pressed. In addition, a loud noise which is different from the normal operation noise is generated by the needle bar holding mechanism during layout changes, layout change tests and also when the embroidery frame travels a lot during embroidery. This sound is normal and is not the result of a malfunction.
- If the power goes off during embroidering:
- Turn the power off and unplug the machine. Damage may occur if the machine is on when the power comes back on.
- To start again, while the main power switch is off, plug the unit in. Then turn the main power switch on and select an operation. Refer to page 54, using the "HELP" function to get back to the point where the machine went off.
PATTERNS
Character embroidering chart
Sizes: [L] 30 mm (1-3/16"), [M] 15 mm (9/16")
[S] 7.5 mm (1/4")
ABCDEFGHIJKLMNOPQRSTUVWXYZ
TUVWXYZ abcdefghijklm
nopqrstuvwxyz
ÄÄÄÄENÖÖÇÜBäaaäæëéêñööiçüù
0123456789
&?!.-_()',/
Sizes: [L] 30 mm (1-3/16"), [M] 15 mm (9/16")
[S] 9 mm (0-3/8")
Sizes: [L] 30 mm (1-3/16"), [M] 15 mm (9/16")
[S] 10 mm (0-3/8")
ABCDEFGHIJKLMNOPQRSTUVWXYZ
TUVWXYZ abcdefghijklm
nopqrstuvwxyz
ÄÄÄÄENÖÖÇÜßäååæëéêñööiçüù
0123456789
&?!.-_()',/
0123456789 ABCDEFGHIJKLMNOPQRSTUVWXYZ
Frame pattern embroidering chart

text_image
Frames StitchesOne point mark embroidery pattern
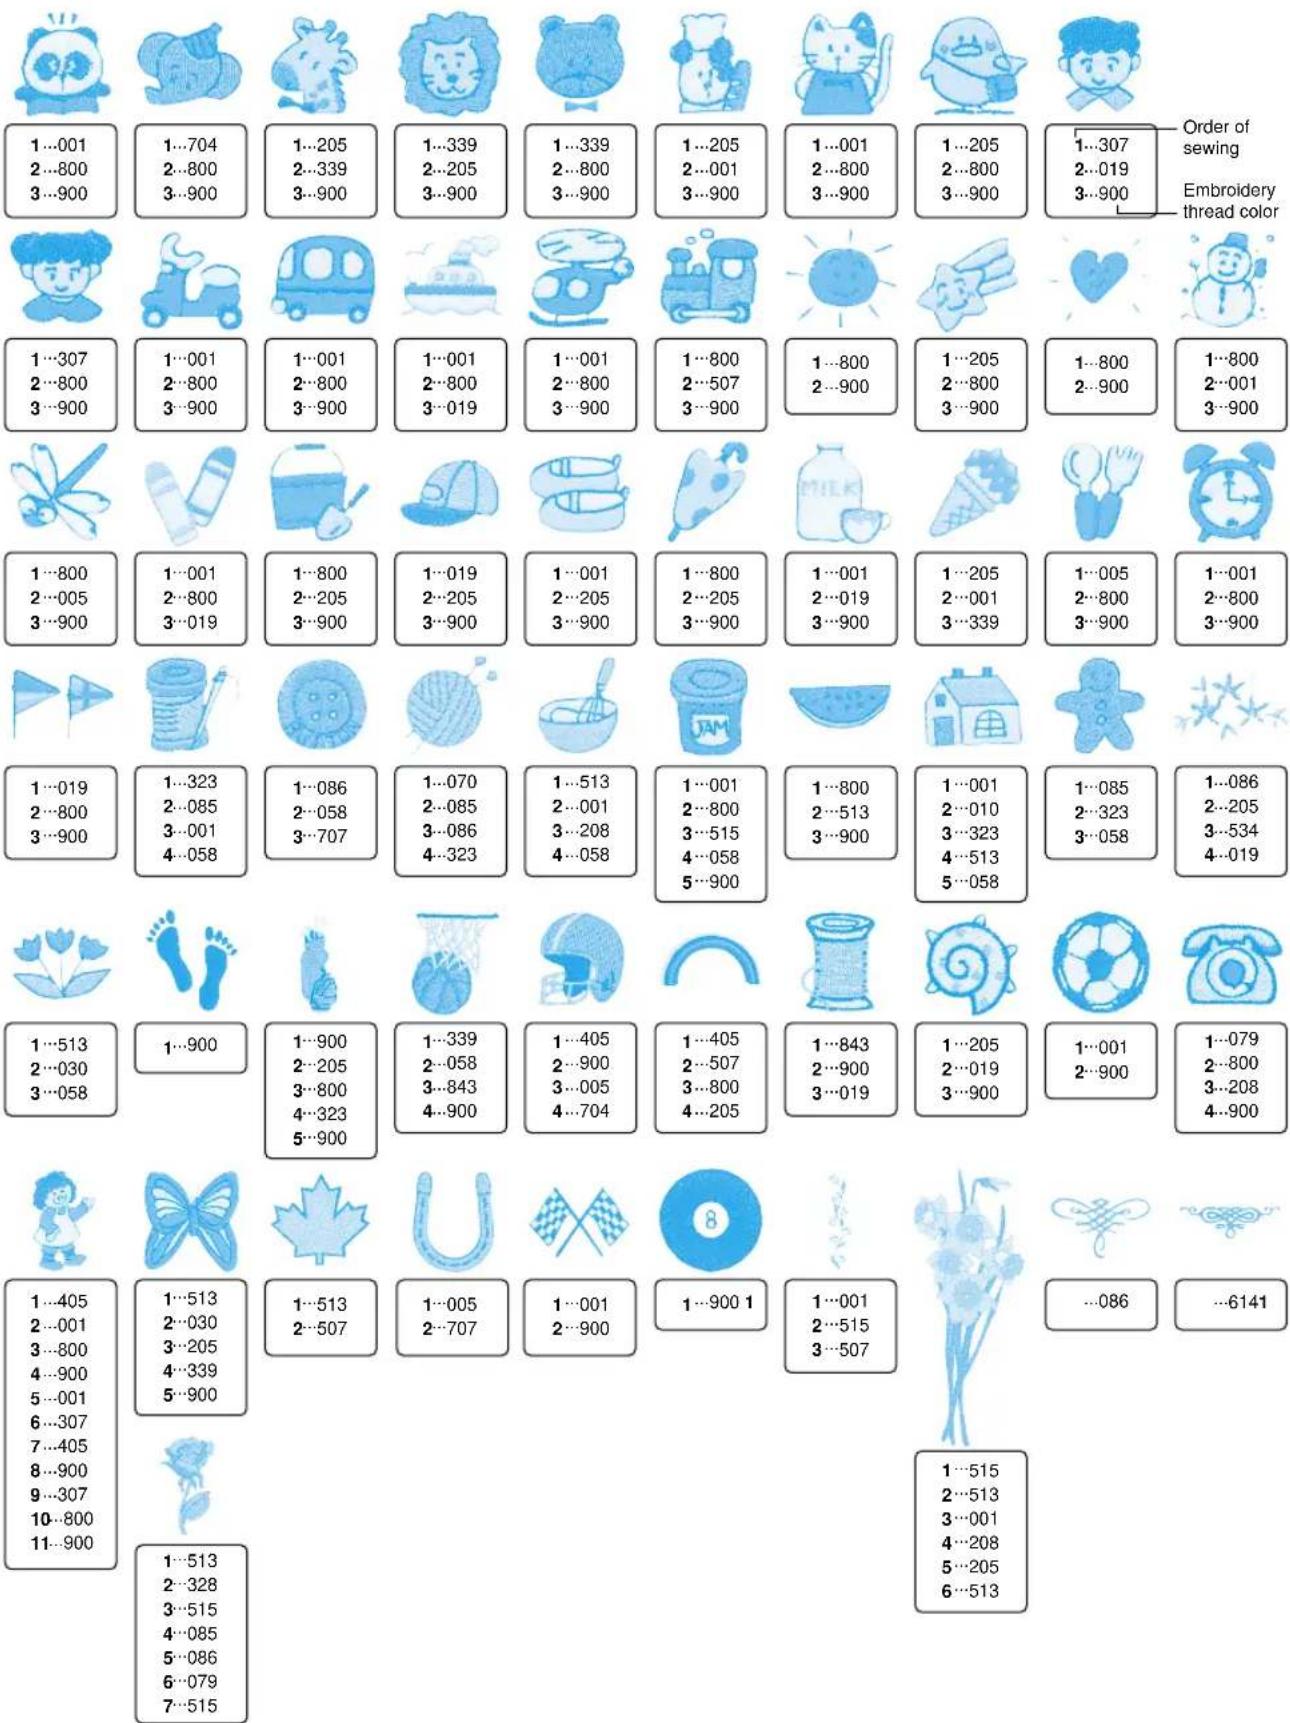
text_image
1...001 2...800 3...900 1...704 2...800 3...900 1...205 2...339 3...900 1...339 2...205 3...900 1...339 2...800 3...900 1...205 2...001 3...900 1...001 2...800 3...900 1...205 2...800 3...900 1...307 2...019 3...900 Order of sewing Embroidery thread color 1...307 2...800 3...900 1...307 2...800 3...900 1...307 2...800 3...900 1...307 2...800 3...900 1...307 2...800 3...900 1...307 2...800 3...900 1...307 2...019 3...900 1...307 2...800 3...900 1...307 2...800 3...900 1...307 2...800 3...900 1...307 2...800 3...900 1...307 2...800 3...900 1...6141Patterns which are stored in the machine or memory cards are for home use only. These patterns are not to be used for any activity other than home use.
EMBROIDERING USING A SMALL FRAME (OPTIONAL)
Embroidering items such as handkerchiefs and collars

text_image
Technical diagram showing a mechanical component with labeled parts and two views of a sewing machine tool.
flowchart
graph TD
    A["START CENTER"] --> B["TRIAL"]
    B --> C["SET END"]

natural_image
Technical line drawing showing a sewing machine stitching a garment with a collar (no text or symbols)
natural_image
Illustration of a steam iron and a square glass container (no text or symbols)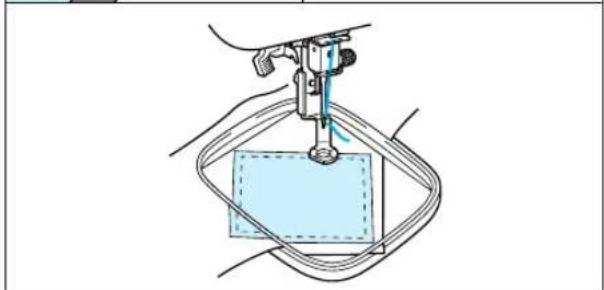
natural_image
Medical procedure diagram showing a surgical instrument inserted into a patient's box (no text or labels)If the accessory frame is too large to hold the fabric to be embroidered, you can use the optional small frame.
① Embroidery sheet
② Embroidering range (Maximum)
Height: 70 mm (2-3/4")
Width: 70 mm (2-3/4")
CAUTION
Take note of the following when using the small frame.
- Always make sure that the initial setting operation for the carriage (embroidery arm) after the power is turned on — in other words, the movement of the carriage (embroidery arm) in order to set the position — is completed before installing the small embroidery frame.
- If you do not change the position of the pattern on the "LAYOUT" screen, check that the embroidering area for the pattern selected is within 70 mm (2-3/4") in height and width by touching the "LAYOUT" key. If it is, the pattern can be embroidered correctly.
- If you have changed the position of the pattern using the arrow keys in the "LAYOUT" screen, use the "TRIAL" function to check that the pattern does not extend past the edges of the frame before starting embroidering. Before touching "TRIAL", raise the needle and the presser foot lever to their highest positions.
Embroidering handkerchiefs and cuffs
Set the handkerchief into the small frame. You can use the rotation function to move the needle to the desired embroidering location.
Embroidering items which won't fit into the frame
For items which won't fit into the frame, baste or iron a piece of stabilizer fabric onto the part to be embroidered, and then place the entire piece into the frame together with the fabric to be embroidered.
EMBROIDERING USING A EXTRA-SMALL FRAME (OPTIONAL)
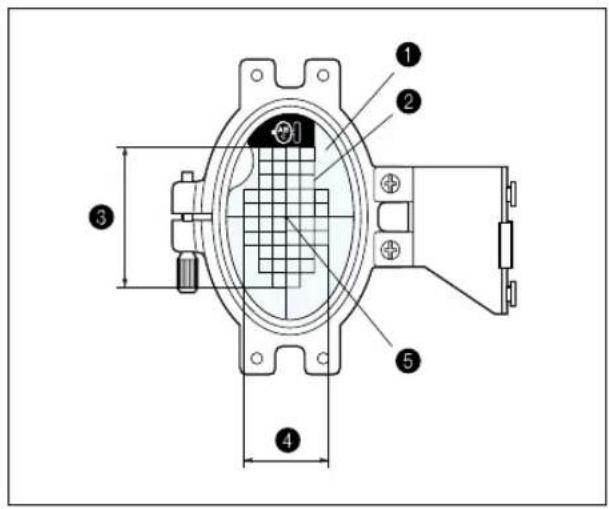
text_image
Technical diagram of a mechanical component with numbered parts and dimension annotations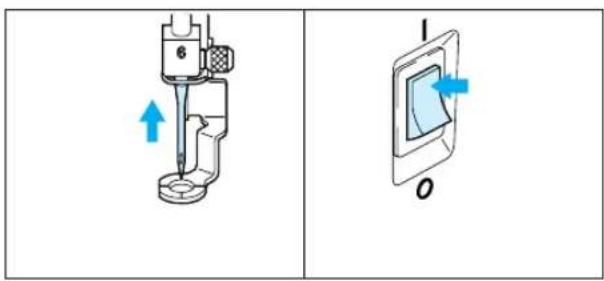
text_image
Technical diagram showing a mechanical device labeled '6' and a close-up of a component with blue arrows indicating direction.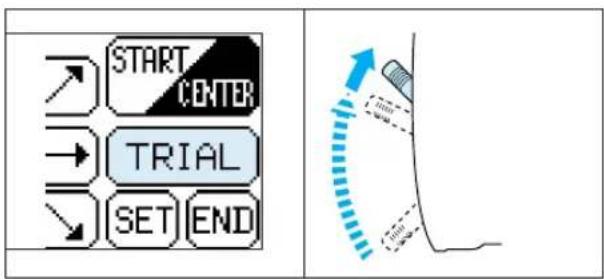
flowchart
graph TD
    A["START CENTER"] --> B["TRIAL"]
    B --> C["SET END"]

text_image
Technical diagram of a mechanical assembly with numbered components labeled 1 to 4
text_image
Technical diagram of a mechanical component with numbered parts and dimension linesAn extra-small frame which is smaller than the small frame mentioned on the previous page is also available as an option. It is used mostly for monogramming initials on pockets or cuffs.
The extra-small frame can be used to embroider even smaller articles.
① Embroidery sheet (vertical type)
② Embroidery range
③ Maximum embroidering area – Height : 50 mm (1-15/16")
4 Maximum embroidering area – Width : 30 mm (1-3/16")
⑤ Center of pattern
CAUTION
Take note of the following when using the extra-small frame.
- Always make sure that the initial setting operation for the carriage (embroidery arm) after the power is turned on — in other words, the movement of the carriage (embroidery arm) in order to set the position — is completed before installing the extra-small embroidery frame.
- Using the arrow keys in the "LAYOUT" screen, use the "TRIAL" function to check that the pattern does not extend past the edges of the frame before starting embroidering.
- Before touching "TRIAL", raise the needle and the presser foot lever to their highest positions.
* The extra-small frame can also be used horizontally by changing the position of attachment to the frame fixing plate. Use a screwdriver to remove the two screws in order to change the attachment position.
* Use the horizontal attachment sheet when the frame is attached horizontally.
① Frame fixing plate
② Screws (x 2)
③ Washers (x 2)
4 Nuts (x 2)
⑤ Embroidery sheet (horizontal type)
6 Embroidery range
7 Maximum embroidering area – Height : 30 mm (1-15/16")
8 Maximum embroidering area – Width : 50 mm (1-3/16")
9 Center of pattern
EMBROIDERING USING A LARGE FRAME (OPTIONAL)
Embroidering range

text_image
1 2 3 4 a b c 5① Embroidering range
$$ 1 8. 2 \times 1 1 \mathrm{cm} $$
$$ (7 - 3 / 1 6 ^ {\prime \prime} \times 4 - 5 / 1 6 ^ {\prime \prime}) $$
② Center when frame is clamped in position "a".
③ Center when frame is clamped in position "b".
4 Center when frame is clamped in position "c".
⑤ Reference line
Combining patterns in the height direction

text_image
ABC- If the overall height is within 18.2 cm (7-3/16"), you can embroider the respective patterns simply by changing the clamping position of the frame.

text_image
a b c- Once the pattern at the top has been embroidered, move the clamp from position "a" to position "b" or position "c".

natural_image
Illustration of a sewing machine needle stitching blue circular patterns (no text or symbols)- Embroider the pattern at the bottom.
Linking two or more embroidered patterns (using the 90° rotation feature)

text_image
Diagram showing two sequences of heart-shaped icons, labeled ① and ②, with house and flower symbols above.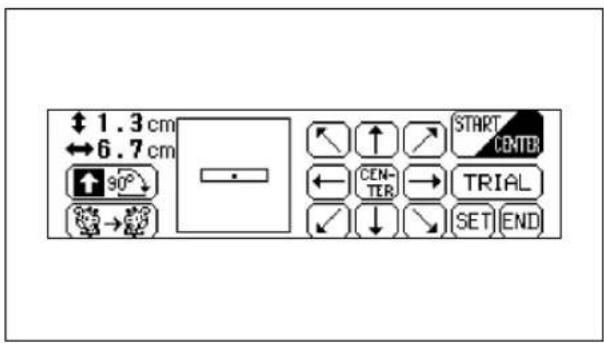
text_image
↑ 1.3 cm ↔ 6.7 cm 90° → START CENTER ← CENTER → TRIAL ✓ ↓ → SET END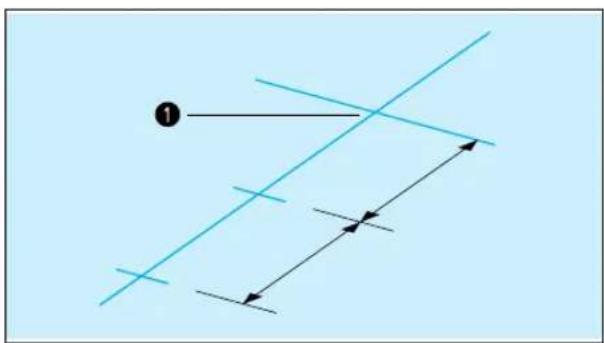
natural_image
Pure geometric lines and arrows without any text, numbers, or symbols
natural_image
Illustration of hands holding a blue cloth with a grid-patterned smartphone (no text or symbols)Example: Patterns in Flower card (No. 2)
- Check the lengths of the patterns you wish to embroider continuously by touching "LAYOUT". If the length is within 18.2 cm (7-3/16"), you can proceed with embroidering just by changing the embroidery location, without having to re-set the fabric in the frame.
① Finished appearance
② Within 18.2 cm (7-3/16")
After selecting the pattern, touch "LAYOUT" to check the size of the pattern.
The size of the pattern is displayed on the left side on the screen.
- Draw a line on the fabric marking the place where the patterns will be embroidered. Find the center line, and then draw the line along the whole length of the pattern, marking it off into two even lengths. Mark the embroidery start position with a cross by drawing another line across this line.
① Embroidery start position - Align the line on the fabric with a line on the embroidery sheet, and fit the fabric and embroidery sheet into the frame. Clamp the frame with the carriage at the place indicated by "a". (see next page)
- After touching "LAYOUT", touch "90° clockwise" to change the arrow in the display so that it points to the right. Then touch "START/CENTER" to set the current needle position as the embroidery start position.
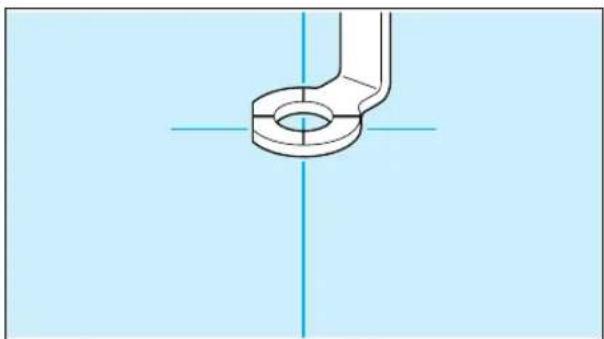
natural_image
Technical line drawing of a pipe fitting with centerlines (no text or symbols)
text_image
a c
text_image
Diagram of a laboratory apparatus with labeled component 1, showing a funnel and tubing structure.- Use the arrow keys to move the needle to the embroidery start position, and then start embroidering.
- Move the frame to the place indicated by "c" and clamp it again with the carriage.
- Embroider the next pattern. If using the same pattern, go straight ahead and start embroidering. If using a different pattern, select the new pattern. After touching "LAYOUT", touch "90° clockwise" to change the arrow in the display so that it points to the right. Then touch "START/CENTER" to set the current needle position as the embroidery start position.
- Use the arrow keys to move the needle to the previous embroidery end position, and then continue embroidering.
① Previous embroidery end
text_image
Diagram showing a device connection with labeled components and a schematic diagram illustrating the wiring or wiring layout.1 Interruptor principal
① ON
② OFF
② Ranura de tarjeta de memoria
PRECAUCION
text_image
Diagram of a sewing machine with labeled parts and a close-up view of the device's front view.text_image
Technical diagram showing a mechanical or electrical component with labeled part '1'natural_image
Simple line drawing of four identical cylindrical objects with circular ends, arranged in a triangular pattern (no text or symbols)7

8

9

natural_image
Simple grid pattern with intersecting lines inside a rounded square (no text or symbols)
natural_image
Simple line drawing of a square frame with rounded corners and a small protrusion at the bottom (no text or symbols)11
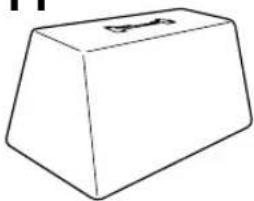
natural_image
Simple line drawing of a 3D rectangular prism with a small protrusion on top (no text or symbols)12

13

14

natural_image
Simple line drawing of a 3D geometric shape resembling a truncated prism or container (no text or symbols)natural_image
Two technical line drawings of rectangular components: a rounded square frame and a grid-patterned square (no text or symbols)2

natural_image
Two technical line drawings of electronic devices: a rectangular frame with internal components and a grid-patterned case (no text or symbols)3

natural_image
Two technical line drawings of rectangular components: a square frame and a grid-patterned square (no text or symbols)4

natural_image
Three technical line drawings of electronic components: a circular component, a grid-patterned oval, and a rectangular plate (no text or symbols)5

natural_image
Pure architectural or engineering diagram showing a symmetrical U-shaped structure with brickwork patterns (no text or symbols)6
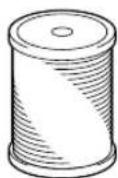
7

natural_image
Line drawing of a cylindrical object with a flanged top and internal ridges (no text or symbols)8

| No. | Nombre de las partes | Código | |
| U.S.A. Otros | |||
| 1 | Juego de bordado extra (normal) | SA417 XA3727-001 | |
| 2 | Juego de bordado (grande) SA418 | XA3733-001 | |
| 3 | Juego de bordado (pequeño) SA419 | 6 XA3730-001 | |
| 4 | Juego de bordado (Extra pequeño) | SA415 XA3713-001 | |
| 5 | Juego de hilo de color poli #40 de Brother | SA740 X80928-100 | |
| 6 | Hilo de bobina poli #90 de Brother | EBT-PE X80919-001 | |
| 7 | Entretela (material estabilizador) | SA517 X80914-001 | |
| 8 | Tarjeta de memoria | ||
| No. 1 Alfabeto SA298 X58317-001 | |||
| No. 2 Flores SA299 X58321-001 | |||
| No. 3 Dinosaurios SA300 X58362-001 | |||
| No. 6 Moskowitz's World SA303 X58497-001 | |||
| No. 7 Estilo "country" SA304 X59322-001 | |||
| No. 8 Fiestas SA305 X59357-001 | |||
| No. 9 Artesanías SA306 X59511-001 | |||
| No. 10 Monogramas SA307 X59567-001 | |||
| No. 11 Marco | SA311 XA0257-001 | ||
| No. 12 Transportes | SA312 XA0275-001 | ||
| No. 13 Emblemas deportivos | SA313 XA0517-001 | ||
| No. 14 Flores grandes | SA314 XA1223-001 | ||
| No. 15 Niños bonitos | SA315 XA1325-001 | ||
| No. 16 Perros y gatos | SA316 XA1406-001 | ||
| No. 17 Nintendo | SA317 XA1434-001 | ||
| No. 19 Marine | SA319 XA2452-001 | ||
| No. 20 Diseños pequeños | SA320 XA2869-001 | ||
| No. 21 Bordados | SA321 XA2873-001 | ||
| No. 25 Caballo | SA325 XA3791-001 | ||
ADVERTENCIA
text_image
Technical diagram of a sewing machine with numbered parts and blue directional arrows indicating motion or assembly.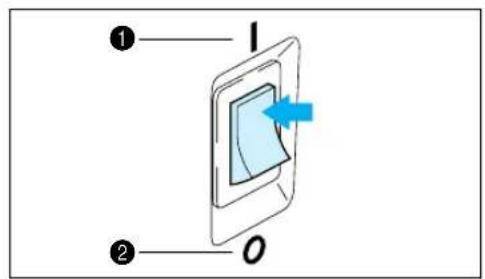
text_image
Diagram showing a device with labeled components and directional arrow, marked with numbers ① and ②.text_image
Diagram of a mechanical device with labeled parts, showing internal components and a fiber or wire connection.text_image
Technical diagram of a mechanical component with numbered parts and directional arrows indicating motion or flow.text_image
Diagram showing a mechanical assembly with labeled parts and directional arrows, likely illustrating a motion or force system.natural_image
Line drawing of a mechanical component with two pulleys and a screw, no text or symbols present
natural_image
Diagram of a mechanical or fluidic device with a labeled component (no text or symbols present)text_image
Diagram showing a hand inserting a device into a device with labeled parts and directional arrownatural_image
Illustration of hands performing a mechanical tool with a blue circular component and dashed line indicating motion (no text or symbols)natural_image
Diagram of a mechanical device with airflow direction indicated by arrows (no text or symbols)text_image
Diagram of a mechanical assembly with numbered components and directional arrows indicating motion or forceflowchart
graph LR
    A["Step 1: Cutting down"] --> B["Step 2: Stacking down"]
    B --> C["Step 3: Rolling down with a wire"]
    C --> D["Step 4: Rolling down with a wire"]
Redecilla
text_image
Diagram illustrating sewing process steps with numbered labels and directional arrows indicating movement
natural_image
Illustration of hands assembling a mechanical component with blue arrows indicating motion (no text or symbols)
text_image
Technical diagram showing two mechanical assembly steps with numbered components and a blue line indicating a reference or measurement.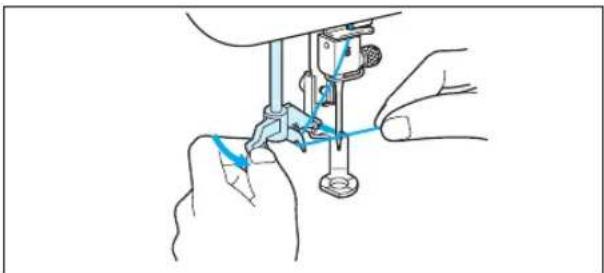
natural_image
Line drawing of a sewing machine needle stitching a small object, with no text or symbols present.
natural_image
Two-panel illustration showing a sewing machine mechanism with blue arrows indicating force direction (no text or symbols)text_image
Diagram of a device with labeled parts, showing layered structure with numbered annotations.natural_image
Simple line drawing of a rectangular object with a curved top and flared bottom, resembling a medical or decorative component (no text or symbols)natural_image
Illustration of a sewing machine stitching a light blue fabric patch (no text or symbols)natural_image
Simple line drawing of a rectangular tray or vent with a light blue interior (no text or symbols)natural_image
Illustration of a sewing machine stitching a light blue fabric patch (no text or symbols)natural_image
Simple line drawing of a rectangular object with a curved top and internal lines, resembling a medical or decorative component (no text or symbols)natural_image
Line drawing of a steam iron on a surface, no text or symbols presentnatural_image
Illustration of hands performing a medical or therapeutic procedure on a patient's abdomen (no text or symbols present)natural_image
Illustration of a sewing machine stitching a light blue fabric patch (no text or symbols)text_image
Diagram of a device with numbered components and a blue cross symbol indicating a specific area or feature.natural_image
Diagram of a mechanical component with a blue sheet and a blue housing, showing a directional arrow (no text or symbols)text_image
Diagram showing a device with labeled parts, including a grid and battery cover, with arrows indicating internal movement.text_image
Diagram of a device panel with labeled components and grid layout① Marco exterior
② Marco interior
③ Tejido
text_image
Technical diagram illustrating three-step mechanical assembly steps with labeled components and directional arrowstext_image
Technical diagram showing two mechanical assembly steps with labeled components and directional arrows indicating motion or movement.natural_image
Technical line drawing of a mechanical component with a blue arrow indicating a specific part (no text or symbols present)AJUSTE DE TENSION DEL HILO
text_image
① ② ← ③ ④ ⑤ ⑥natural_image
Line drawing of a hand pointing at a rectangular panel with a grid, no text or symbols present
text_image
DENSIDAD DE LA PANTILLAnatural_image
Diagram of a mechanical device with a coiled spring and shaft, labeled with number 1 (no text or symbols on the diagram itself)
natural_image
Illustration of hands performing a mechanical operation with a blue arrow indicating rotation (no text or symbols present)text_image
Technical diagram showing mechanical assembly steps with numbered components and blue arrows indicating motion direction
text_image
Diagram showing a sewing machine needle stitching a fabric, with labeled parts and a blue arrow indicating the process.
text_image
COMP PREV SIGUI A B C D E F G A G M/P H I J K L M N AJUS TAR BORR Seleccionar el bastidor. SIGUI ○ □ ◇ ○ □ LISTA PREV SIGUI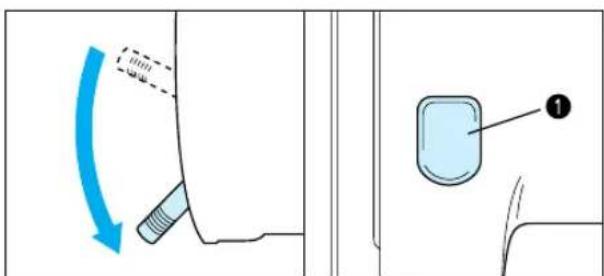
text_image
Diagram showing a car interior with a blue arrow indicating clockwise motion and a labeled component marked '1'natural_image
Line drawing of a hand pulling a sewing machine needle with a blue cable (no text or symbols)natural_image
Illustration of a sewing machine needle stitching a spool, with no text or symbols present.flowchart
graph TD
    A["LISTA"] --> B[" flowers icon"]
    B --> C[" flowers icon"]
    C --> D[" flowers icon"]
    D --> E[" flowers icon"]
    E --> F[" flowers icon"]
    F --> G[" flowers icon"]
    G --> H[" "]
    style A fill:#f9f,stroke:#333
    style B fill:#ccf,stroke:#333
    style C fill:#cfc,stroke:#333
    style D fill:#fcc,stroke:#333
    style E fill:#cff,stroke:#333
    style F fill:#ffc,stroke:#333
    style G fill:#cfc,stroke:#333
    style H fill:#fcc,stroke:#333
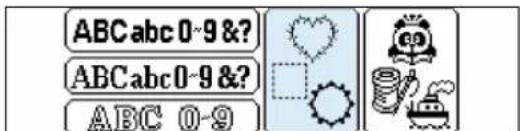
text_image
ABCabc 0-9 &? ABCabc 0-9 &? ABC 0-9A
text_image
A G M P AJUS RODDtext_image
A ① A A ② ③CARACTERES ALFABETICOS
Tamaño normal
1 Grande (G)
② Mediano (M)
③ Pequeño (P)
text_image
G M/P BORRflowchart
graph TD
    A["ABC abc 0-9 &?"] --> B["Selectangular Shape"]
    C["ABC abc 0-9 &?"] --> D["Regular Shape"]
    E["ABC 0-9"] --> F["Circle Shape"]
    G["Circle Shape"] --> H["Square Shape"]
    I["Diamond Shape"] --> J["Diamond Shape"]
    K["Circle Shape"] --> L["Box Shape"]
    M["Box Shape"] --> N["Circle Shape"]
    O["Circle Shape"] --> P["Square Shape"]
    Q["Circle Shape"] --> R["Square Shape"]
    S["Circle Shape"] --> T["Square Shape"]
    U["Circle Shape"] --> V["Square Shape"]
    W["Circle Shape"] --> X["Square Shape"]
    Y["Circle Shape"] --> Z["Square Shape"]
    AA["Circle Shape"] --> AB["Square Shape"]
    AC["Circle Shape"] --> AD["Square Shape"]
    AE["Circle Shape"] --> AF["Square Shape"]
    AG["Circle Shape"] --> AH["Square Shape"]
    AI["Circle Shape"] --> AJ["Square Shape"]
    AK["Circle Shape"] --> AL["Square Shape"]
    AM["Circle Shape"] --> AN["Square Shape"]
    AO["Circle Shape"] --> AP["Square Shape"]
    AQ["Circle Shape"] --> AR["Square Shape"]
    AS["Circle Shape"] --> AT["Square Shape"]
    AU["Circle Shape"] --> AV["Square Shape"]
    AW["Circle Shape"] --> AX["Square Shape"]
    AY["Selectangular Shape"] --> Z
    AZ["Selectangular Shape"] --> AA
    BA["Selectangular Shape"] --> AF
    BB["Selectangular Shape"] --> AU
    BC["Selectangular Shape"] --> AK
natural_image
Blue line art illustration of a giraffe with decorative spots (no text or symbols)
text_image
ABCabc 0-9&? ABCabc0-9&? ABC 0-9
flowchart
graph TD
    A["1 LISTA"] --> B["2 PREV"]
    A --> C["3 SIGUI"]

text_image
MULTI- COLOR AJUSTAR G P DIBU- J0 亘 1/3 COLOR DE HILO ④Ejemplo
- Presione "

natural_image
Diagram of a device inside a car's rear panel, showing a screen with a blue arrow and label (no text or symbols present)natural_image
Diagram of a car rear panel with a blue arrow pointing to the door (no text or symbols present)text_image
Diagram with a highlighted blue rectangle and numbered label '2' pointing to it, surrounded by empty rectangular cells.text_image
Diagram showing a square with a minus sign and nine directional arrows, one labeled 'CENTR' in the center.text_image
Diagram showing a selection box with arrow and directional icons, including a zoomed-in view of the center button.natural_image
Technical diagram of a mechanical assembly with a central component and directional arrows, no visible text or symbols.natural_image
Pure geometric diagram with a central circular feature and dashed lines, no text or symbols present.text_image
ABC A B C D E F G H I J K L M N O P Q R S T U V W X Y Zflowchart
graph TD
    A["A"] --> B["A"]
    B --> C["A"]
    C --> D["FIN"]
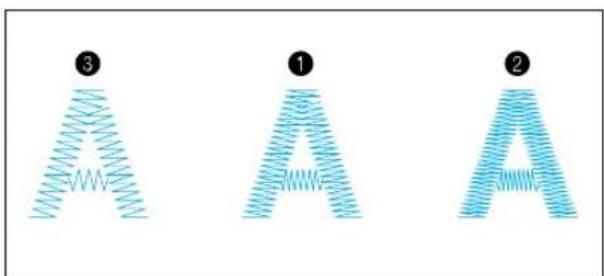
text_image
③ ① ②natural_image
Abstract blue line drawing of a stylized human figure with dynamic motion lines (no text or symbols)text_image
ABC MULTI- COLOR COMP PREV SIGUI A B C D E F G A G M/P H I J K L M N RJUS TAR BORR
text_image
ABC RETORNO AYUDA COMPOSI AMPLIAR REDUCIR DENSIDAD DEL HILO
text_image
COMIE CENT ← CENTR → PRUEBA ↓ ↓ → AJUSTAR FIN
text_image
ABC ①
text_image
ABC ①ABCDE
natural_image
Simple blue circle with a vertical arrow inside, set against a light blue background (no text or symbols)natural_image
Simple line drawing of a cartoon hippo inside a circle (no text or symbols)natural_image
Blue circular logo with a stylized animal head inside, no text or symbols present.natural_image
Illustration of a cartoon cow inside a circular frame with scissors, against a light blue background (no text or symbols)natural_image
Blue circular icon with a cartoon giraffe face inside, no text or symbols present.text_image
Diagram showing a hand holding a heart-shaped object with scissors, transforming into a separate heart-shaped object.natural_image
Simple diagram with a heart-shaped outline and dashed inner circle, surrounded by arrows (no text or symbols)text_image
Diagram illustrating heart-shaped outline editing with directional arrow and magnified view of a heart shape, labeled with step number ①.natural_image
Diagram showing a heart inside a square frame with arrows and a numbered label (1), no text or symbols present.natural_image
Simple heart shape with a grid pattern inside, set against a light blue background (no text or symbols)Aplique terminado.
text_image
① T. I ② ③C
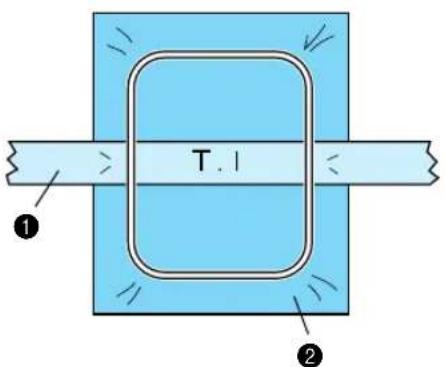
text_image
T.1 ① ②natural_image
Abstract blue line drawing of a stylized letter 'A' with a pointed tip, no text or symbols present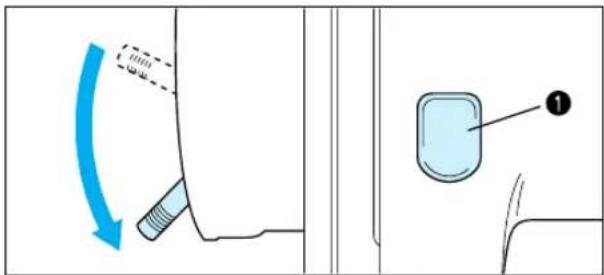
text_image
Diagram showing a car interior with a blue arrow indicating clockwise motion and a labeled component marked '1'
text_image
Diagram showing a mechanical or electrical component with labeled component 1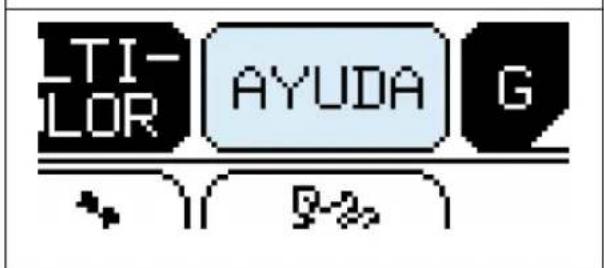
text_image
TI- LOR AYUDA G 9-20text_image
Diagram showing a car interior with a blue arrow indicating clockwise motion and a labeled component marked '1'text_image
1 I ① O ②text_image
Diagram of a sewing machine needle with labeled parts and directional arrows indicating motion or force
text_image
700mm -500mm
text_image
Diagram showing a sewing machine needle stitching a component, labeled with parts 2 and 3 and blue directional arrows indicating motion.
text_image
Diagram illustrating a cleaning or cleaning process with labeled parts including tool, brush, and container
text_image
Technical diagram of a device with labeled parts, showing internal components and a blue tool interacting with a component.natural_image
Collection of abstract geometric shapes and line patterns, including circles, squares, diamonds, ovals, triangles, hearts, octagons, shields, and various black-and-white line segments (no text or symbols)text_image
Technical diagram showing a mechanical component with labeled parts and two views of the tool, one with blue arrows indicating motion or force.
text_image
COMIE CENTR PRUEBA AJUS TAR FIN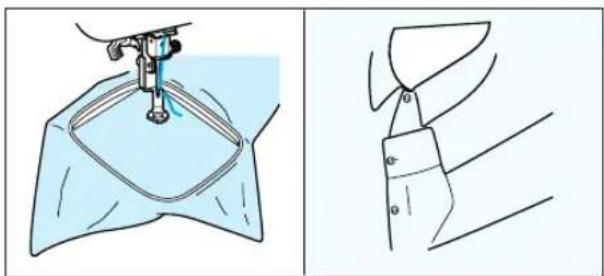
natural_image
Technical line drawing showing a sewing machine stitching a garment with a collar (no text or symbols)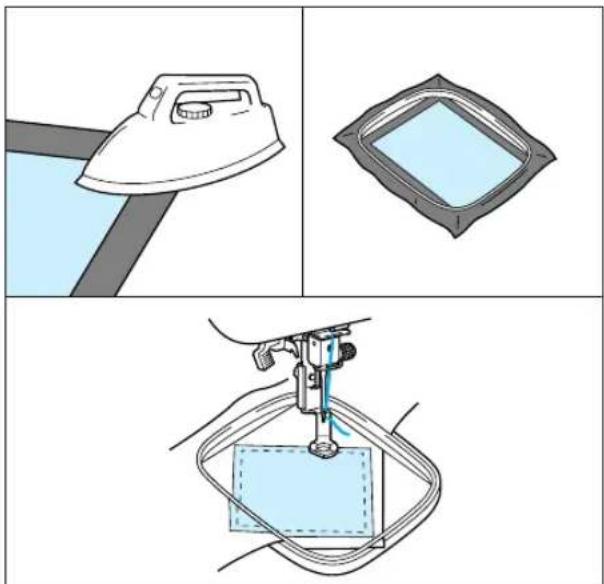
natural_image
Three-step diagram showing a hair iron, a square frame, and a hand holding a tool (no text or symbols)text_image
Technical diagram of a mechanical or electrical component with numbered parts and dimension annotations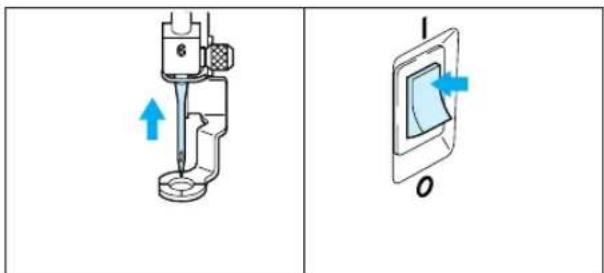
text_image
Technical diagram showing a sewing machine with blue directional arrows indicating movement, alongside a labeled component with 'O' and '1'.
text_image
COMIE CENTR PRUEBA AJUS TAR FIN
text_image
Technical diagram of a mechanical assembly with numbered components labeled 1 to 4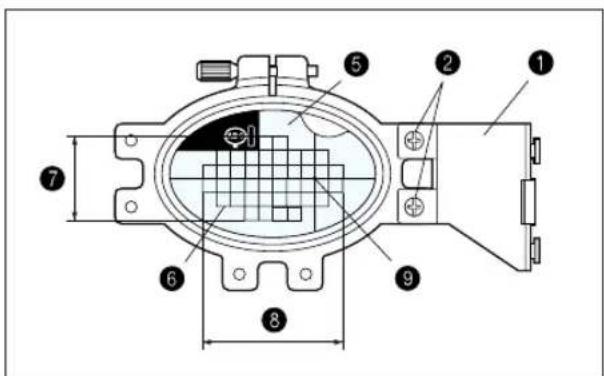
text_image
Technical diagram of a mechanical component with numbered parts and dimension linesnatural_image
Illustration of a sewing machine needle stitching a blue circular pattern with letters A and B (no text or symbols on the diagram itself)text_image
Illustration showing two groups of heart-shaped flowers, labeled ① and ②, likely for counting or educational purposes.
text_image
↑ 1.3 cm ↔ 6.7 cm 90° → COMIE CENTR ← CENTR → PRUEBA ✓ ↓ ↓ AJUS TAR FIN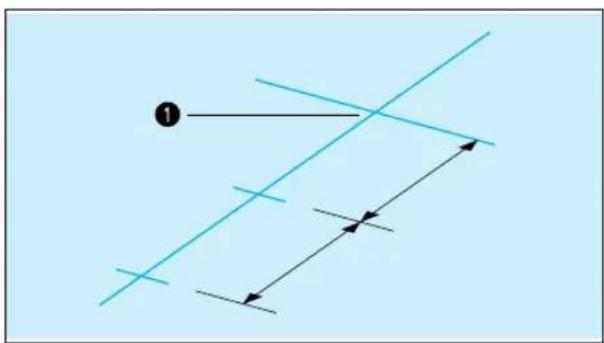
natural_image
Pure geometric lines and arrows without any text, numbers, or symbols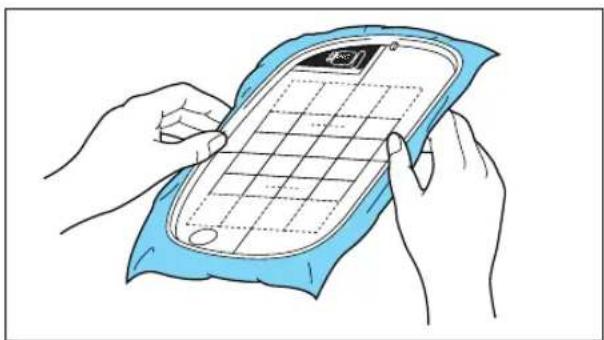
natural_image
Illustration of hands holding a blue towel next to a smartphone with grid paper (no text or symbols)natural_image
Technical line drawing of a pipe fitting with centerlines (no text or symbols)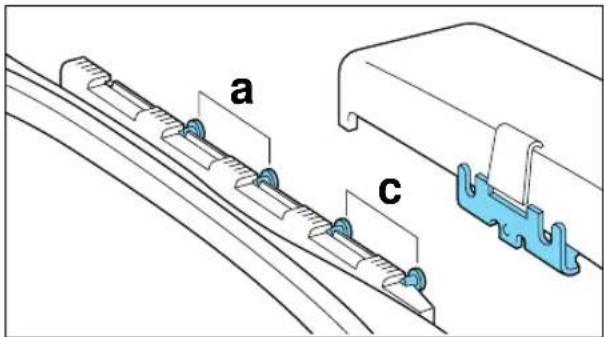
text_image
a c