42PD8700C - TV HITACHI - Free user manual and instructions
Find the device manual for free 42PD8700C HITACHI in PDF.

User questions about 42PD8700C HITACHI
0 question about this device. Answer the ones you know or ask your own.
Ask a new question about this device
Download the instructions for your TV in PDF format for free! Find your manual 42PD8700C - HITACHI and take your electronic device back in hand. On this page are published all the documents necessary for the use of your device. 42PD8700C by HITACHI.
USER MANUAL 42PD8700C HITACHI
PowerConnection......8
ConnectionsToTheAerialInputSocket...8
HowToConnectOtherDevices......8
InsertingBatteriesInTheRemote
ControlHandset......8
SwitchingTheTVON/OFF......8
ToswitchtheTVon:....8
ToswitchtheTVoff:....8
InitialSettings......9
OperatingTheTV....10
Operatingwiththebuttonsonthe
TVset....10
OperatingWithRemoteControl......10
EverydayOperation......11
InformationBanner....11
ELECTRONICPROGRAMMEGUIDE.11
DisplayingTheSubtitles......12
Teletext....12
IDTVMenuSystem....12
ChannelList....12
Installation....15
Configuration....17
Timers....19
TVSetup....20
CommonInterface....20
AnalogueTVMenuSystem......21
Picturemenu....21
Soundmenu....22
Featuremenu....24
Installmenu....25
Programmenu....26
Sourcemenu....27
PCMode......27
Installation....27
MenuSysteminPCmode......27
PCPicturePositionMenu......27
PCPictureMenu....28
SoundMenu....28
FeatureMenu....28
SourceMenu....28
SoundinPCmode....28
OtherFeatures....29
TVStatus....29
Mutelndicator....29
PIPandPAPmodes....29
FreezePicture....29
ZoomModes....29
Teletext....30
ToOperateTeletext....30
ToSelectAPageOfTeletext....30
ToSelectIndexPage....30
ToSelectTeletextWithATVProgramme.30
ToReveal"Concealed"Information...31
ToSelectASubcodePage......31
ToExitTeletext....31
ToDisplayTheTime....31
Fastext....31
ConnectPeripheralEquipment......32
HighDefinition....32
ViaTheScart....32
ViaAerialInput....32
Decoder....32
TVAndVideoRecorder....32
PlaybackNTSC....32
CopyFacility....32
SearchForAndStoreTheTestSignal
OfTheVideoRecorder......32
CameraAndCamcorder....33
ConnectTheDecoderToTheVideo
Recorder....33
ConnectingHeadphones......33
ConnectingSubwoofer....33
AerialConnection....34
Tips....35
Specifications....36
AppendixA:PCInputTypicalDisplay
Modes....37
AppendixB: DVDPlayerSelection.....38
AppendixC:DVDPlayerSelection
(continued)....39
AppendixD:MainandPIP-PAPPicture
Combinations....40
UKGuarantee....41
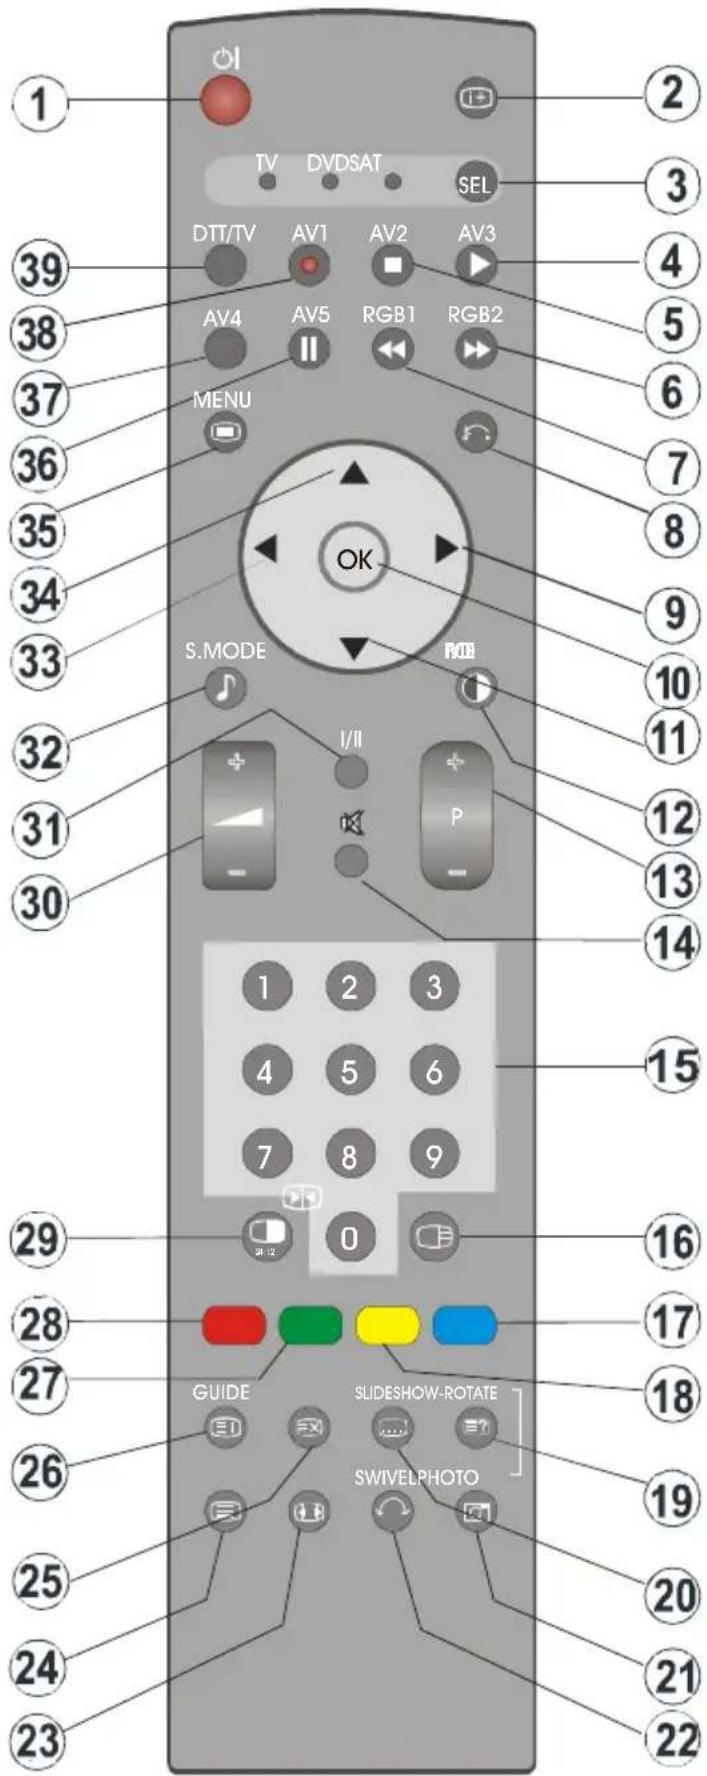
RemoteControlButtons
1 |=StandbyOn/Off
2 i+ =ProgramInformation
3 SEL=SelectTV/DVD/SATT
4 AV3=AV3mode
⑤ AV2=AV2mode
6 RGB2=NoFunction
⑦ RGB1=PCmode
8 = Gobacktoppreviousmenu
9 ▶=CursorRight
10 OK=Enter
11 ▼ =CursorDown
12 =PictureMode
13 P + / - = Programme Up / Down
14 π×=MuteOn/Off
15 0 - 9 = Digitbuttons
16 = PIP/PAP/TV
17 BLUE=OnlyusedinTeletextmode
18 YELLOW=OnlyusedinTeletextmode
19 ? =Reveal
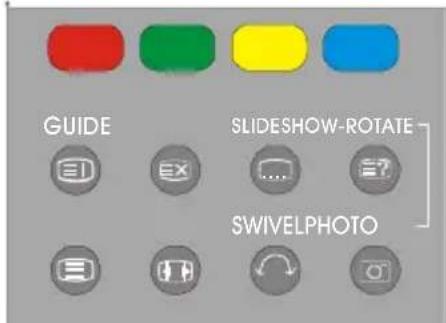
20 SLIDESHOW/ .... =Nofunction/Subtitle
21 PHOTO=NoFunction
22 SWIVEL=NoFunction
23 📋 =Aspectratio
24 =TeletextOn/Off
25 ≡× = Time
26 = GuideforDTT/IndexPageforTV
27 GREEN=OnlyusedinTeletextmode
28 RED = PAT (Picture and Text)
29 = FreezeOn/Off
30 + / - =VolumeUp/Down
31 I/II=Mono/Stereo-DualA-B
32 ♩ =EqualizerSoundMode
33 = Cursor Left
34 ▲ = CursorUp
35 =MenuOn/Off
36 AV5 = AV5 mode
37 AV 4 = AV 4 mode
38 A V 1 = AV 1 mode
39 DTT/TV=SelectorbuttonforDigital/Analoguemode
text_image
1 TV DVDSAT SEL DTT/TV AV1 AV2 AV3 AV4 AV5 RGB1 RGB2 MENU OK S.MODE P/OE I/II P 1 2 3 4 5 6 7 8 9 0 GUIDE SLIDESHOW-ROTATE SWIVELPHOTO 29 28 27 26 25 24 23 2 3 4 5 6 7 8 9 10 11 12 13 14 15 16 17 18 19 20 21 22PLASMATV
FRONTVIEW

text_image
LEDSPEAKERSPEAKER ON/OFF SWITCHREARVIEW
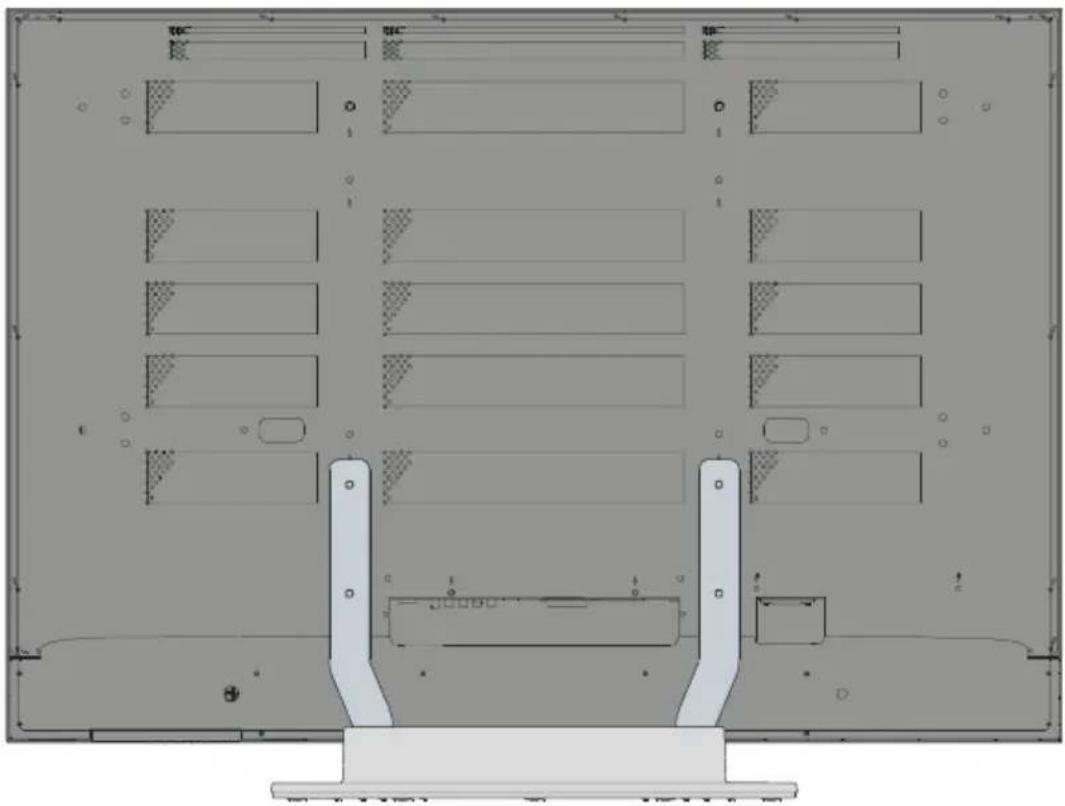
natural_image
Technical diagram of a server rack with multiple slots and mounting base (no text or labels)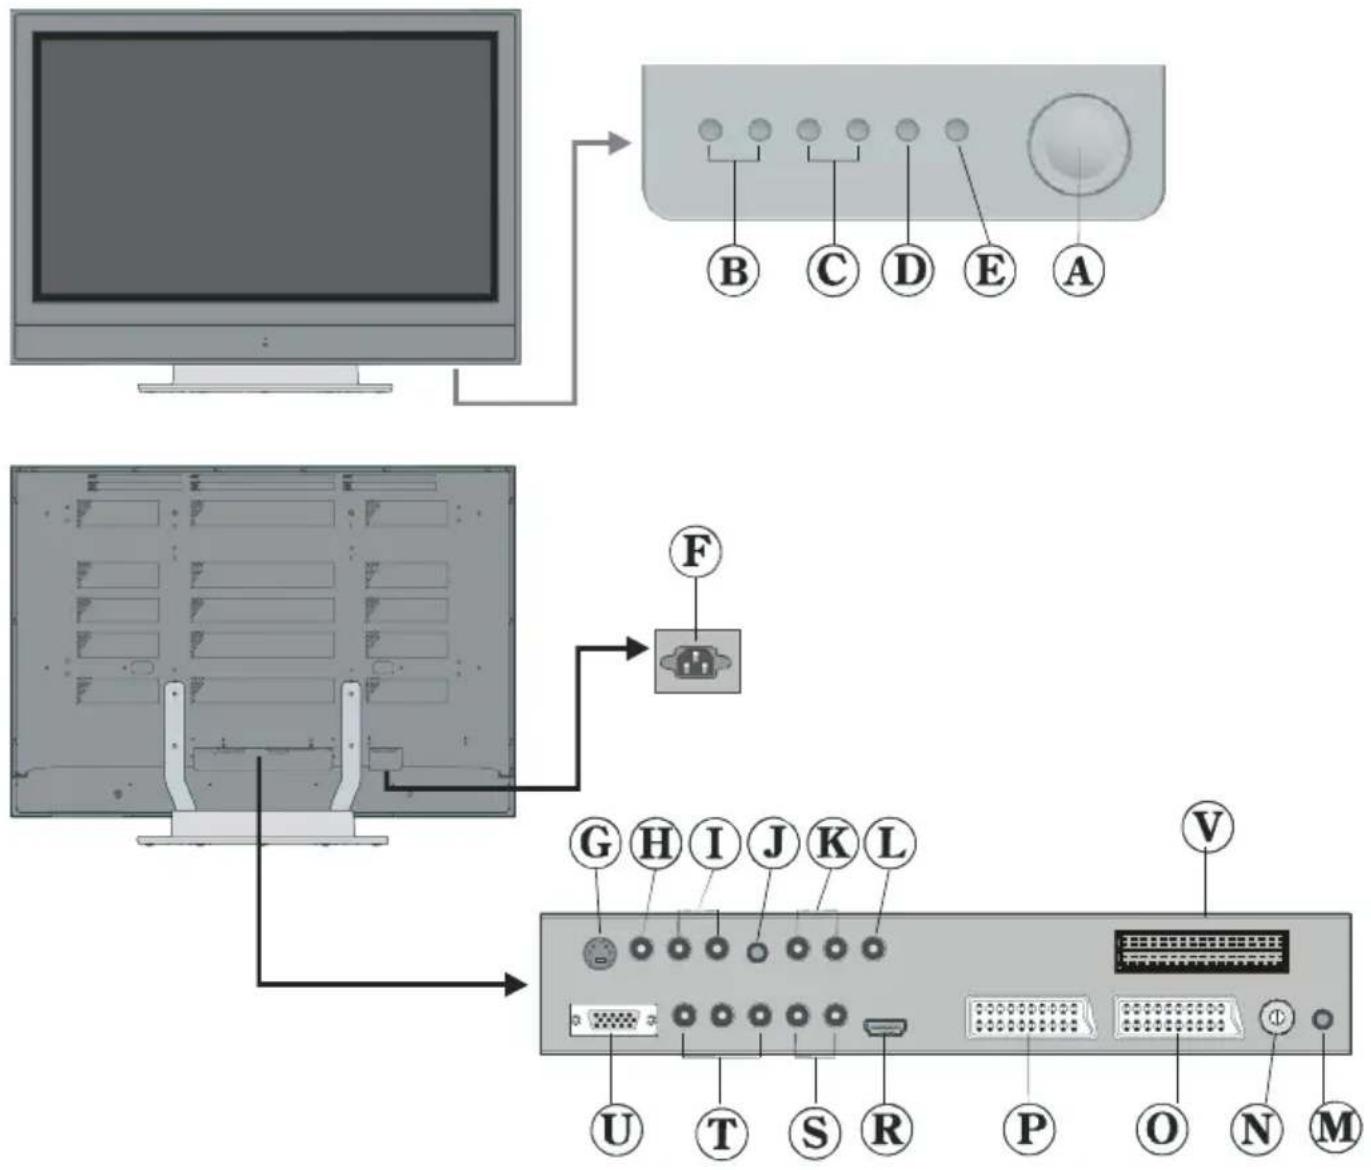
text_image
Diagram showing computer monitor connected to a network interface with labeled ports and connectorsⒶ On/Offswitch
⑧ VolumeUp,VolumeDownbuttons
© Prog.Up,Prog.Downbuttons
D MENUbutton
E TV/AVbutton
F Powercordinput
G S-VHSInput
H VideoInput
① AudioInputs
① Headphone
©AudioLineOuts
L SubwooferOut
M PCAudioInput
N Aerial
① Scart2(AV-2)
P Scart1(AV-1)
® HDMIInput(AV-5)
⑤ ComponentAudioInputss
⑦ ComponentVideo(YPbPr)Inputs
U VGAInput
V CISlot

Preparation
Forventilation, leaveaspaceofatleast10 cmfreeallaroundtheset. Topreventany faultandunsafesituations, pleasedonot placeanyobjectsontopoftheset.
Usethisapparatusintropicaland/ormoderateclimates.
Features
•Remotecontrolledcolourtelevision.
• Fully integrated Digital TV (DVB-T)
- 100programmesfromVHF,UHFbandsor cablechannelscanbepreset.
- Itcantunecablechannels.
- ControllingtheTVisveryeasybyitsmenu drivensystem.
- Ithas2Scartsocketsforexternaldevices (such as video, videogames, audioset, etc.)
•3DSVirtualSurroundSound
•Stereosoundsystem(German+Nicam).
•FullfunctionTeletext.
Fasttext(1000Pages),TOPtext.
•Headphoneconnection.
- Directchannelaccess.
•A.P.S.(AutomaticProgrammingSystem).
- Allprogrammescanbenamed.
- Forwardorbackwardautomatictuning.
- Sleeptimer.
-ChildLock.
•Automaticsoundmutewhennotransmission.
•NTSCPlayback.
•AVinandS-VHSinareavailable.
- IthasVGAconnectorforexternaldevices suchascomputer.
- IthasanHDMIconnectorforDigitalVideo and Audio. This connection is also designed to accept High Definitions signals.
- IthasPIP/PAP/PATfunctions.
•AVL(AutomaticVolumeLimiting)
• TVPictureinPC
- Whennovalidsignalisdetected, after 5 minutestheTVswitchesitselfautomatically tostand-bymode.
- PLL(ChannelSearch)
•PCInput(SupportuptoSXGA1280x1024)
- StereoPCAudioInput
•Plug&PlayforWindows9X,ME,2000,XP
• 3 D C om b Fi l ter
•AudioLineOut
PanelFeatures
•42-inchPLASMAdisplay.
•Highresolution(1024x1080)
•Contrastratio(4000:1typical)
•Brightness(typical)1400cd/m 2.
•Displaycolour16.77Million.
SafetyPrecautions
Please read the following recommended safety precautions carefully for yoursafety
IMPORTANT SAFETY INFORMATION ON OPERATING YOURTV
Do'sandDon'ts
DO's
ThisTelevisionhasbeendesignedandmanufactured to meet international safety standards, butlikeanyelectricalequipment,caremustbe takenifyouaretoobtainthebestresultsand safetyistobeassured.
DOreadtheoperatinginstructionsbeforeyou attempttousetheequipment.
DOconsultyourdealerifyouareinanydoubt aboutinstallation,operationorsafetyofyour equipment.
DObecarefulwithglasspanelsordoorson equipment.
This TVissuppliedwithafittedmainsplug. Thisplugmustnotbecutoffasitmaycontain aspecialradiointerferencefilter,theremoval ofwhichcouldleadtoimpairedperformance. Ifyouwishtoextendthelead,obtainanappro-
priatesafetyapprovedextensionleaderconsultyourdealer.
Observethemanufacturersinstructionswhen connectingextensionleadstotheTV.Check thefuseratingonthenewplug,thisshouldbe fittedwitha5AmpfusewhichconformstoeitherASTAorBSI(BS1362)approvals,these
areeasilyidentifiablebyeitherthe

symbols.Ifyouareinanydoubtabouttheinstallationofanextensionlead,pleaseconsult acompetentelectrician.
DON'Ts
DON'Tcontinuetooperatetheequipmentif youareinanydoubtaboutitworkingnormally, orifitisdamagedinanywayswitchoff,with-drawthemainsplugandconsultyourdealer.
DON'TplacewaterfilledvesselsontopofT.V. cabinets.
DON'Tremoveanyfixedcoverasthismayexposedangerousvoltages.
DON'Tleaveequipmentswitchedonwhenitis unattendedunlessitisspecificallystatedthat itisdesignedforunattendedoperationorhas astand-bymode.Switchoffusingtheswitch ontheequipmentandmakesureyourfamily knowhowtodothis.Specialarrangements mayneed to be made for infirmorhandicappedpeople.
DON'Tuseequipmentsuchaspersonalstereosorradiossothatyouaredistractedfrom therequirementsoftrafficsafety.Itisillegalto watchtelevisionwhilstdriving.
DON'T obstruct the ventilation of the equipment, forexamplewithcurtainsorsoftfurnishings. Overheatingwillcausedamageandshorten thelifeoftheequipment.
DON'TusemakeshiftstandsandNEVERfix legsorstandstotheTVwithanyscrewsother thanthoseprovided-toensurecompletesafety alwaysusethemanufacturersapprovedstand withthefixingsprovided.
DON'Tallowelectrical equipment to be exposed to rainormoisture.
ABOVEALL
- NEVERletanyone,especiallychildren pushanythingintoholes,slotsorany otheropeninginthecase-thiscouldresultinafatalelectricshock.
- NEVERguessortakechanceswithelectricalequipmentofanykind-itisbetterto besafethansorry!
1.PowerSource
Thesetshouldbeoperatedonlyfroma220-240VAC,50Hz.outlet.Ensureyouselect thecorrectvoltagesettingforyourconvenience.
2.PowerCord
Donotplacetheset, apieceoffurniture, etc. onthepowercord(mainslead)orpinchthe cord. Handlethepowercordbytheplug.Do notpullouttheplugbytuggingthecordand nevertouch the power cord when your handsarewetathiscouldcauseashort circuitorelectricshock. Nevermakeaknotin thecordortieitwithothercord. Thepower cordshouldbeplacedinsuchawaythat theyarenotlikelytobesteppedon.
Adamagedpowercordcancausefireorgiveyouanelectricshock.Whenitisdamagedandneedtobechanged,itshouldbe donebyqualifiedpersonel.
3. Moisture and Water
Donotusethisequipmentinahumidand dampplace(avoidthebathroom,thesinkin thekitchen,andnearthewashingmachine). Donotexposethisequipmenttorainorwater,asthismaybedangerousanddonot place objects filled with liquids,suchas flowervasesontopoftheset.Avoidfrom drippingorsplashing.
Ifanysolidobjectorliquidfallsintothecabinet,unplugthesetandhaveitcheckedby qualifiedpersonnelbeforeoperatingitany further.
4.Cleaning
Beforecleaning, unplugthesetfromthewall outlet. Donotuseliquidoraerosolcleaners. Usesoftanddrycloth.
5.Ventilation
Theslotsandopeningsonthebackcover areintendedforventilationandtoensurereliableoperation. Toppreventoverheating, theseopeningsmustnotbeblockedorcoveredinanyway.
6.HeatandFlames
Thesetshouldnotbeplacedneartonaked flamesandsourcesofintenseheat,suchas anelectricheater.Ensurethatnonaked flamesources,suchaslightedcandles,are placedontopoftheset.
7.Lightning
Incaseofstormandlightningorwhengo-ingonholiday, disconnectthepowercord fromthewalloutlet.
8.ReplacementParts
When replacement parts are required, besure the servicetechnician has used replacement parts which are specified by the manufacturer or havethesamespecifications asthe original alone. Unauthorised substitutions may result in fire, electrical shock, or other hazards.
9.Servicing
Pleasereferallservicingtoqualifiedpersonnel.Donotremovethecoveryyourselfas thismayresultinanelectricshock.
Instructionsforwastedisposal:
- Packaging and packaging aids are recyclable and should principally be recycled. Packaging materials, such as foil bag, must be kept away from children.
- Battery, including those which is heavy metal-free, should not be disposed of with household waste. Pleased dispose of used battery in an environmentally sound manner. Find out about the legal regulations which apply in your area.
- Themainsplugisusedtodisconnectthe TV fromthemainsandthereforeitshallremain readilyoperable.
Warning: Topreventinjury, this device must be securely attached to the floor/wall in accordance with the installation instructions.

text_image
100 mm 100 mm 100 mm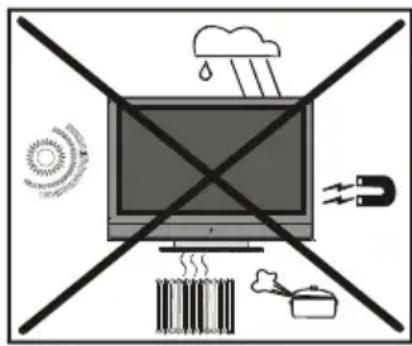
text_image
Diagram illustrating weather and energy symbols including rain, solar, magnet, and storage with crossed lines"The Plasma TV is a very high technology productgivingyoufinepicturedetails.Occasionally,afewnon-activepixelsmayremain stillonthescreen.Long-timeunmovingstill picturesmaycausepermanentshadeeffect onthescreenandeventhepicturehasbeen changed, its influence lasts as ghost picture.Thisghosteffectmaydisturbtheuser eventhoughitwilldiminishinthecourseof time.Topreventthis,don'tleavestillpictures forexampleteletextpagesorfrozenpictures onthescreenforalongtime.Plesenote thatthisdoesnotaffecttheperformanceof yourproduct."
"DONOTLEAVEYOURTVATSTAND-BY OROPERATINGWHENYOULEAVEYOUR HOUSE"
Besuretogroundtheconnectionproperly.
ConnectthegroundterminaloftheACinletofthisdisplaywiththegroundterminalprovided
atthepoweroutletusingtheenclosedpowercord.Iftheprovidedplug doesnotfityouroutlet,consultanelectricianforreplacementofthe obsoleteoutlet.

Surely connect the groundwire.
BeforeSwitchingOnYourTV
PowerConnection
IMPORTANT: The TV set is designed to operate on 220-240VAC, 50Hz.
•Afterunpacking,allowtheTVsettoreachthe ambientroomtemperaturebeforeyouconnectthesettothemains.
ConnectionsToTheAerialInput Socket

text_image
750 VHF/UHF REAROFTHETV CABLETV- ConnecttheaerialorcableTVplugtothe Aerialinputsocketlocatedattherearofthe TVandconnectthecableplugcomingout fromtheTVoutsocketlocatedonthede-vices(VCR,DVB-Tetc.)tothissocketas well.
HowToConnectOtherDevices
IMPORTANT: SwitchofftheTVbeforeconnectinganyexternaldevice.
Socketsforexternalconnectionsareatthe rearsideoftheTV.Forconnectionofother devicesviaScartrefertothemanualsofthe relateddevices.
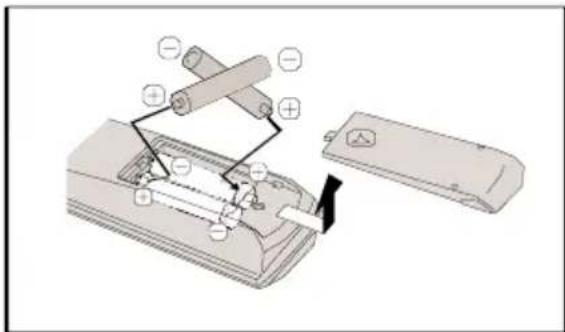
InsertingBatteriesInTheRemote ControlHandset
- Remove the battery cover located on the back of the handset by gently pulling downwards from the indicated part.
- Insert two AA/R6 or equivalent type batteries inside. Placethebatteriesintherightdirections.
•Replacethebatterycover.
text_image
Diagram of a battery pack assembly with labeled components and polarity indicatorsNOTE: Removethebatteriesfromremote controlhandsetwhenitisnottobeusedfor alongperiod. Otherwiseitcanbedamaged due to anyleakage of batteries.battery leakage.
SwitchingTheTVON/OFF
ToswitchtheTVon:
YourTVwillswitchonintwosteps:
1-Connectthepowersupplycordtothesystem. Press On/Off switch “①” on the TV. ThentheTVswitchesitselftostand-bymode andtheledonthefrontoftheTVbecomes Red.
2-ToswitchontheTVfromstand-bymode either:
Pressadigitbuttonontheremotecontrolso thataprogrammenumberisselected,or,
Press the P/CH+ or P/CH- button on the TV or press the "P-" or "P+" button on the remotecontrol, so that last modes switched off is selected.
ByeithermethodtheTVwillswitchonand theledbecomesgreen.
ToswitchtheTVoff:
- Press the “○|(stand-by)” button on the remote control, so the TV will switch to standby mode and the GREENLED will become RED.
To power down the TV completely, press Standby/operateswitch“ ①”,
or,
Unplug the power cord from the mains socket.
InitialSettings
When the TVisturnedonforthefirsttime, IDTVisonfirst.Becausethisisthefirsttime that IDTVhasbeenused,therearenochannelsstoredinthememory.
WhentheTVisturnedonforthefirsttime, themenuforthelanguageselectionappearsonthescreen. Themessage"Wel-comepleaseselectyourlanguage!"is writteninallanguageoptionssequentially inthemenuonthescreen.
Bypassing ▲ orbutton highlight the language you want to set and press "OK" button. In themenu "Set Language" is written next to "OK" item to indicate that "Press OK button to set the highlighted language option."
Youcangetinformationaboutthemenuus-agebypressing“ i+”button.Andpress“ ” buttonagaintoexitthehelpmenu.
AfterpressingOK, theFirsttimeInstallation
Menuwillappearonscreen.Press ◀ or ▶ buttons,selectcountryitemyouwanttoset andpress"OK"button

text_image
FirsttimeInstallation ChooseCountry OK Setcountryandcontinueinstallation GERMANYAftertheFirsttimeInstallationisset, the followingmessageappearsonthescreen.

text_image
Doyouwanttostaratautomaticsearch? Yes No- Tostartautomaticsearch, select“Yes”, to cancelselect“No”.
- Toselectanoption"YesorNo", highlight theitem byusing ◀ or ▶ buttonsand press"OK"button.
TheIDTVwillautomaticallytunetotheVHF andUHFtransmissionchannelslookingfor digitalterrestrial.
TVbroadcastsanddisplayingthenamesof channels found. This processwill take aboutfiveminutes.Tocancelsearching,you
canpress" "buttonatanytimeduringthe process.

text_image
Automatic Search Codec4:3 Codec16:9 SearchingUHFchannels62.Pleasewalt.Thiswilltakeafewminutes 62% MEN... CancelsearchingAfter Automatic Search process is completed, the following message asking for analogue channel search appears on the screen. TV switch the analogue TV mode.

text_image
Do you want to search for analogue channels? Yes NoPressthe "OK" button to search for analogue channels. The following menu appears on the screen for analogue channel search.

text_image
AUTO PROGRAM Language Country English UK PLEASE CHECK ANTENNA CABLE AUTO. PROGRAMMING SYSTEM OK CancelIninitialapsmenu:
PresstheBLUEbuttontocancelAPSifyou do not want to delete your existing programmelist.
TocontinueAPS, firstselectthelanguage andcountrybypassing ◀ / ▶ buttonand thenpresstheREDor"OK"button.
During initial apsthe following message appears on the screen.

text_image
APSisrunning... UK-1055,25Mhz CancelAfterinitialapsisfinalized,aprogrammelist willappearonthescreen.Intheprogramme listyouwillseetheprogrammenumbers andnamesassignedtotheprogrammes.
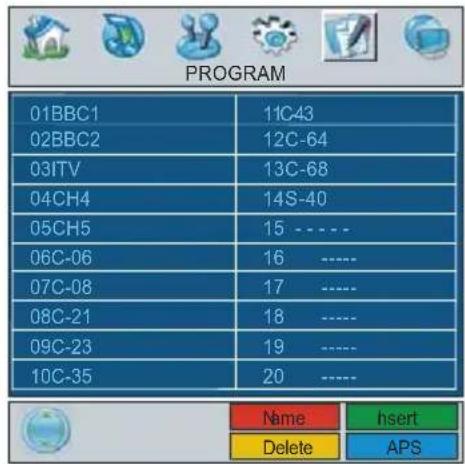
text_image
PROGRAM 01BBC1 11C43 02BBC2 12C-64 03ITV 13C-68 04CH4 14S-40 05CH5 15 ---- 06C-06 16 ---- 07C-08 17 ---- 08C-21 18 ---- 09C-23 19 ---- 10C-35 20 ---- Name hsert Delete APSIf you donot accept the locations and/or the program names, you can change them in Program menu. For details see Program menu page 26.
TodisplaychannellistinIDTV, switchtothe IDTV via pressing the "DTT/TV" button. Then pressthe " [■]" buttontoentermainmenu, Channel List will be highlighted. Press the OK buttontoenterthemenu.
Operating The TV
You can operate your TV using both the remotecontrolhandsetandthebuttonsonthe set.
Operatingwiththebuttonsonthe TVset
Volumesettingandprogrammeselection can be made by using the buttons on the control panel at the bottom of the TV.
Volume Setting
Pressthe“- ▲” buttontodecreasevolume orthe“ ▲+” button to increase volume. A volumelevelscale(slider)willbedisplayed atthebottomofthescreen.
ProgrammeSelecting
Pressthe “^” button to select the next programme orthe “V”buttontoselectthe previous programme.
EnteringTheMenu
Press the "MENU" button on the control panelatthebottomoftheTVtoenterthe menu.
“∧ / ∨” and “▲ + / - ▲” buttons on the TV are used as navigation buttons in menu.
AVMode
Press the "AV" button on the control panel at the bottom of the TV to switch your TV to AVmodes.
OperatingWithRemoteControl
TheremotecontrolhandsetofyourTVisdesignedtocontrolallthefunctionsofyourTV. Thefunctionswill bedescribedinaccordancewith themenusystemof yourTV.
Functions of the menu system are describedinMenuSystemsection.
Volume Setting
Pressthe + button to increase volume. Press the - button to decrease volume. A volume levelscale(slider) will be displayed at the bottom of the screen.
ProgrammeSelecting(direct access):
Press digit buttons on the remote control handsettoselectprogrammesbetween0 and9. The TV will switch to these selected programme after a short delay.
- For a two digit programme number enter the second digit after pressing the first digit within 2 seconds.
EverydayOperation
(DIGITALTELEVISION)
Pressingthe“DTT/TV”buttonatanytime whilewatchingtelevisionprogrammeswill switchtheTVsetbetweenthedigitalterrestrialtelevisionbroadcastingandtheanaloguebroadcasting.
InformationBanner
- Whenever you changethe channel using the "P+" or "P-" buttons or the number buttons, TV display the channelpicture along with an information banner at the bottom of the screen. This will remain on the screen for approximately three seconds.
- Theinformationbannercanalsobedis-playedbypassingthe“ i+”buttonatany timewhilewatchingtheTV.Pressingthe “i+”buttonagainremovesthebanner.

text_image
4 R T L 0 9 CH48 Signal: Now:NEWS 04:35-11:00 Next:NEWS 11:00-17:55Theinformationbannergivesanumberof facts on the channel selected and the programmeonit:
- The name of the channel is displayed along with its channellist number and an indication of the strength of the signal received on this channel.
• The current and next programme information are given with the start and finish time. - The current time information is displayed along with channel name.
Hint
Notallchannelsbroadcasttheprogramme data. If the name and times of the programmearenotavailablethen“NoInformationAvailable”isdisplayedintheinformationbanner.
If theselectedchannelislocked, you must enter the correct four-digit key to view the channel.

text_image
EnterLockKeyELECTRONICPROGRAMME GUIDE(EPG)
Some, but not all, channel send information about the current and next events. Please note that event information is updated automatically. If there is no event information data available for channels, only channel namewith "NoInformationAvailable" banner is displayed.
- Press ^34 (GUIDE) button to view the EPG menu.
- Press ▲ or ▼ buttonstonavigateinChannelisorProgrammes.
- Press ◀ or ▶ buttonstonavigatethrough thechannelandprogrammelist.
- InEPGMenu, you can easily set the extended help information by pressing the "i+" button and bypassing this button again you can close this window.
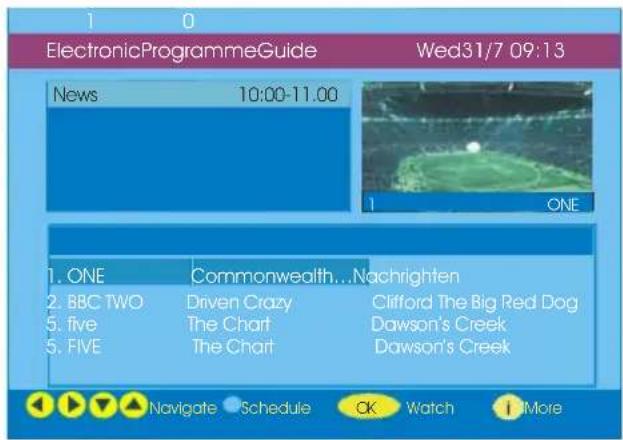
text_image
ElectronicProgrammeGuide Wed31/7 09:13 News 10:00-11.00 1 ONE 1. ONE Commonwealth...Nachrighten 2. BBC TWO Driven Crazy Clifford The Big Red Dog 5. five The Chart Dawson's Creek 5. FIVE The Chart Dawson's Creek Navigate Schedule OK Watch More- IntheEPGMenuallchannelsaredisplayed. Thecurrentchannelishhighlighted when youentertheEPGmenu.Use ▲ or ▼ buttonstochangethechannel.Alsopress REDorGREENbuttonstomakeup/down scroll for the channels. And press "SELECT" buttonowatchthehighlighted channel.
- If you highlight an event, short event description, extended event description, start and finishes the event are displayed on the screen.
- Ifyoupress"OK"buttonwhenanextevent ishighlighted,areminderissetforthehigh-lightedprogrammeandaclockiconap-
pearsacrossthehighlightedchannelline asshowninthefollowingEPGmenufigure. Programmeremindersissettosignalthata programmeisabouttostartwhenyouare watching another channel. If you set re- mindertoaprogramme,thenyouwillbe askedforswitchingtothatchannelwhenthe remindertimeisreached.
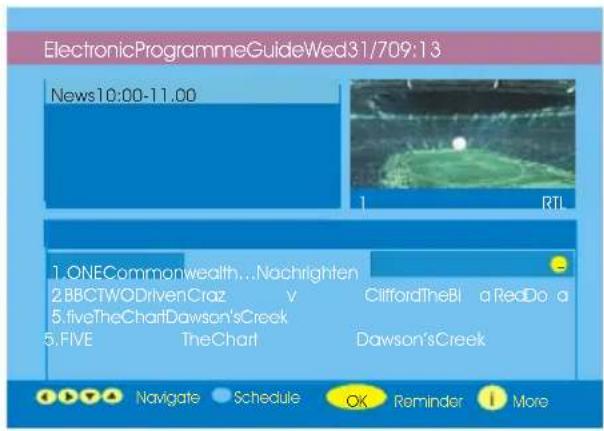
text_image
ElectronicProgrammeGuideWed31/709:13 News10:00-11.00 1. ONECommonwealth...Nachrighten 2.BBCTWODrivenCraz v 5.fiveTheChartDawson'sCreek 5.FIVE TheChart Dawson'sCreek CliffordTheBl aRedDo a Dawson'sCreek Navigate Schedule OK Reminder More- By pressing the "BLUE" button you can view the extended schedule of the programmes.
- Bypassingthe“ i+”buttonyoucansee thedetailedhelpinformationeasily.Andby pressing“ i+” buttonagainyoucanexit Helpmenu.
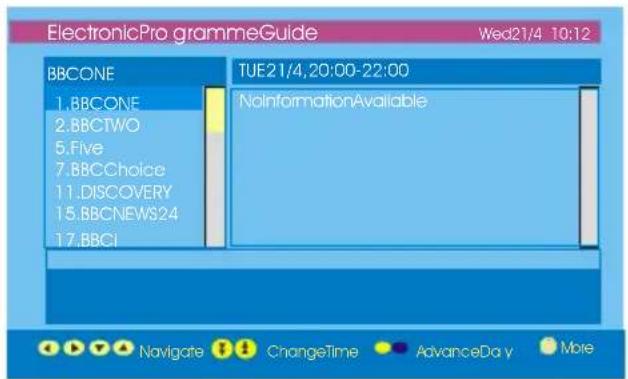
By pressing the "BLUE" button, the following EPG Menu appears on the screen.
text_image
ElectronicProgrammeGuide Wed21/4 10:12 BBCONE 1.BBCONE 2.BBCTWO 5.Five 7.BBCChoice 11.DISCOVERY 15.BBCNEWS24 17.BBCI TUE21/4,20:00-22:00 NoInformationAvailable Navigate ChangeTime AdvanceDay More- Bypassing"YELLOW/BLUE"button,you canadvancetheschedulebackward/forward of a day.
- BypassingREDorGREENbuttonsyou canchangethescheduletime.
- If you press "i+" button you can se the detailed help information easily. And by pressing "i+" button again you can exit Help menu.
Displaying The Subtitles
WithDigitalterrestrialbroadcasting(DVB-T), someprogrammesarebroadcastwithsub-titles. Subtitles can be displayed when watchingtheseprogrammes.
- WheneverGREENbuttonispressed, SubtitleselectionOSDwillbedisplayedonthe screen. You can set Subtitles as ON or OFF. ForSubtitleLanguageoptions, referto "LanguageSettings" in the "ConfigurationMenu" section.
TELETEXT
Useofteletextandandsfunctionsare identical to the analogue text system. Please dorefertothe"Analogueteletext"explanations.
Note: WhensubtitlesaresettoON, teletext service cannot be used in the Digital Mode. To enable teletext, set subtitles "OFF".
IDTV Menu System
The IDTV Menucanonly beshown when watching Digital terrestrial broadcasting. Press the "DTT/TV" button to turn the IDTV on while TV is in the analogue mode.
1. Press MENU "☐" button.
Themenubelow appearsonthescreen:
text_image
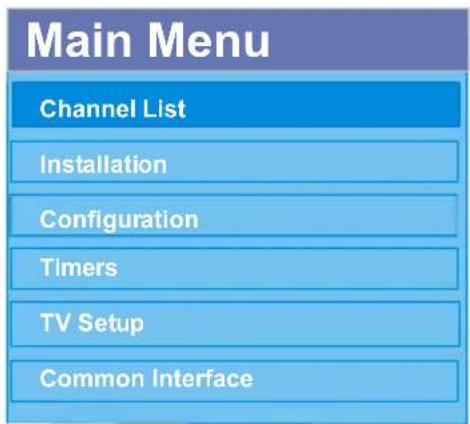
Main Menu Channel List Installation Configuration Timers TV Setup Common InterfaceChannelList
Using ▲ or ▼ buttons on the remote control in Mainmenu, makesurethatthefirstitem, ChannelList, ishighlighted and press the "OK" button to display the Channel List.
The following operations can be performed in this menu:
- Navigating the whole list of channels
2.Movingchannels* - Deletingchannels
- Renamingchannels
5.Addinglockstochannels - Settingfavourites
*Depending on your selection of Country in the first time installation, "MOVE" option of the Channel List may not be visible.

text_image
CHANNELLIST 1.BBCONE 2.BBCTWO 3.ITV8 4.Channel4 5.BBCTHREE 6.Teletext 7.BBCFOUR 8.SkyTravel 9.UKHistory 10.RTL Select Move Delete Edit Name Lock Favourites FunctionsSelectChannelWatch OKNavigating the whole channel list
- Press ▲ or ▼ keysforselectingthepreviousornextchannel.
- YoucanpressREDorGREEN buttonsto movethepageuporpagedown.
- Towatchaspecificchannel, highlightitus- ing ▲ or ▼ buttons and then press "OK" button, while the "Select" itemonChannel
TheListmenuishhighlightedviausing

▶ buttons.
Movingthechannels inthechannel list
- Press ▲ or ▼ buttonstoselectthechannelthatwillbemoved.
- Press ◀ or ▶ buttons to select the "Move" itemonChannelListmenu.
"Move"iswrittennextto"OK"itemtoindicate thatpress"OK"tomovethehighlighted channeltothedesiredpositiononthechannelist.
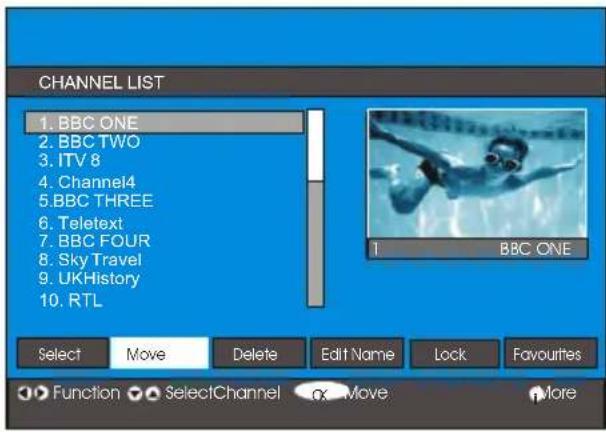
text_image
CHANNEL LIST 1. BBC ONE 2. BBC TWO 3. ITV 8 4. Channel4 5. BBC THREE 6. Teletext 7. BBC FOUR 8. Sky Travel 9. UKHistory 10. RTL BBC ONE Select Move Delete Edit Name Lock Favourites Function SelectChannel oX Move More- Press"OK"button, theselectedchannel becomeshighlighted.
- Use ▲ or ▼ buttonstoselectthenew position of the channel and press "OK" buttontoplacethechanneltotheselectedpositionandreturnthemenu.
Deleting the channels in the channel list
- Press ▲ or ▼ buttonstoselectthechannelthatwillbedeleted.
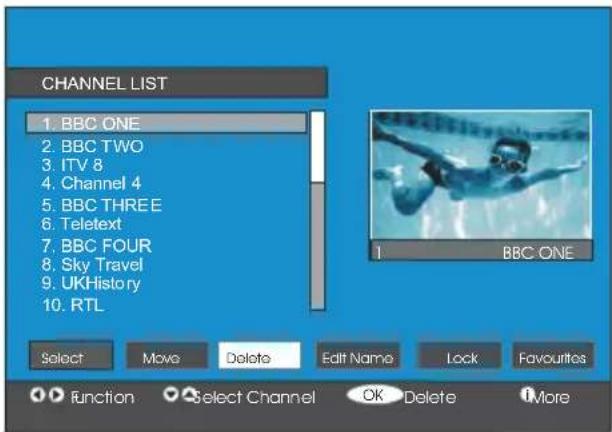
- Press ◀ or ▶ buttonstoselectthe"Delete"itemonChannelListmenu.
AsseenonChannelListmenu, "Delete" is written next to "OK" at the bottom of the screentoindicate that pressing OK button will delete the highlighted channel in the channel list.
text_image
CHANNEL LIST 1. BBC ONE 2. BBC TWO 3. ITV 8 4. Channel 4 5. BBC THREE 6. Teletext 7. BBC FOUR 8. Sky Travel 9. UKHistory 10. RTL BBC ONE Select Move Delete Edit Name Lock Favourites function Select Channel OK Delete MorePress"OK"buttontodeletethehighlighted channelinthechannellist. Thentheme-sagebelowappearsonthescreen.

text_image
The selected service will be permanently deleted, and favourite list will be turned off. Are you sure? Yes No- Press or button to highlight the desired option.
- If"OK"buttonispressedwhile"Yes"is highlighted, thehighlightedchannelisdeleted.
- Selecting“No”cancelsthedeleteoperation.
Renamingchannels
Torenameaspecificchannel,thechannel mustbehighlightedviapressing ▲ or ▼ buttonsandthenhighlightthe“EditName”
itembypressing ◀ orbuttons.Press "OK"buttontoactivaterenamefeature.
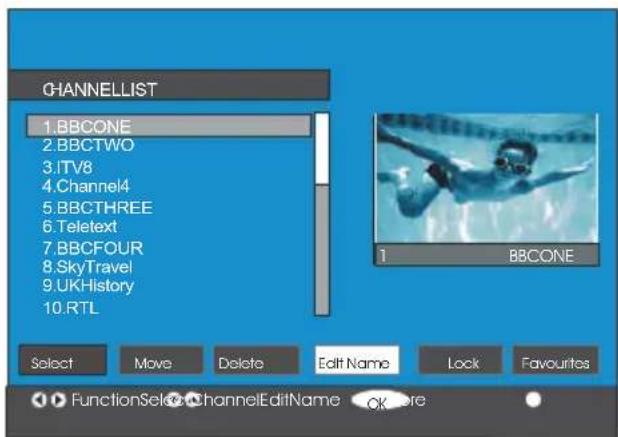
text_image
CHANNELLIST 1.BBCONE 2.BBCTWO 3.ITV8 4.Channel4 5.BBCTHREE 6.Teletext 7.BBCFOUR 8.SkyTravel 9.UKHistory 10.RTL Select Move Delete Edit Name Lock Favourites FunctionSelect ChannelEditName OK hereNow pressing ◀ or buttonsmovesto the previous/nextcharacter.Pressing ▲ or ▼ buttonstogglesthecurrentcharacter,i.e.,'b' characterbecomes'a'on ▼ and'c'on. ▲ Pressing the numeric buttons '0...9' replace the highlighted character asthe buttonpressedone by one.
Pressthe" "buttontocanceltheeditingor "OK" buttonosavethenewname.
Addinglockstochannels
ChannelLockingprovidesapassword-protectedaccesstochannelsselectedbypar-ents.
Inordertolockachannelyoushouldknow theParentalLockpassword(defaultvalueis setto0000inthefactoryandcanonlybe changed from the Configuration Menu).
Bypassing ▲ or ▼ buttons, highlight the channel to belocked and select the "Lock" option bypassing ◀ or ▶ buttons. Then
pressthe"OK"button,apasswordboxis displayed.
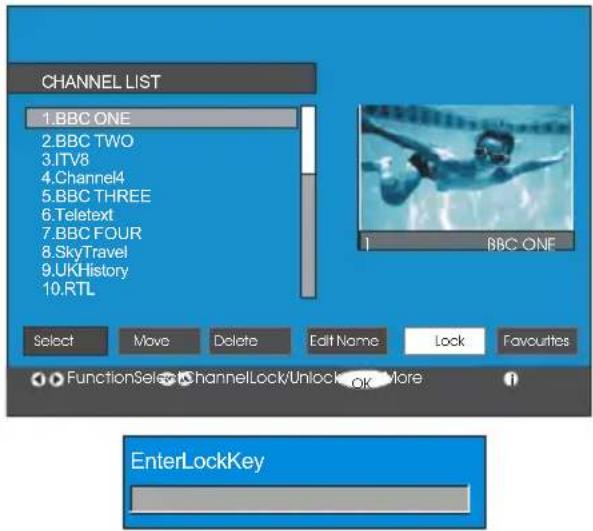
text_image
CHANNEL LIST 1.BBC ONE 2.BBC TWO 3.ITV8 4.Channel4 5.BBC THREE 6.Teletext 7.BBC FOUR 8.SkyTravel 9.UKHistory 10.RTL BBC ONE Select Move Delete Edit Name Lock Favourites FunctionSelect ChannelLock/Unlock OK More EnterLockKeySettingFavourites
Youcansetvariouschannelsasfavourites sothatonlythefavouritechannelsarenavigated. Tosetafavouriteyoushouldhigh-lightthe"Favourites"itematbottomofthe ChannelListmenu.
Tosetafavouriteyoushouldhighlththe "Favourites"itematbottomoftheChannel List menu, and then pressing "OK" key, Edit Favourite Lists menu appears on the screen.
Youcanlistyourfavouritechannelsusing List 1, List 2, List 3, List 4 or List 5.
Using5listsenableslistingchannelsfor differentcategories(sport,musicetc.).And byactivatingthefavouriteslistnumberthat youwantinFavouriteMode submenuof Configurationmenu,youenableonlythe channelsintheselectedlist.Configuration menu is entered from the Main Menu.

text_image
CHANNEL LIST 1. BBC ONE 2. BBC TWO 3. ITV 8 4. Channel 4 5. BBC THREE 6. Teletext 7. BBC FOUR 8. Sky Travel 9. UKHistory List 1 List 2 List 3 List 4 List 5 Select List Select Channel OK Add/Remove MoreHowToAddAChannelToFavouriteList:
- Bypassing“ ▲” / “▼”buttons, highlight the channel that you want to add to the favourite list.
- Selectthelistnumberbypassing"

"▶"buttons.
- By pressing "OK" button, the highlighted channelisaddedtoselectedlistnumber.
Foreachchannel,aniconindicateswhich favouritelistachannelisin.(i.e.Infigure above, ① iconindicatesthatBBCONEis addedtoList1.)
Toremoveanychannelthatisaddedtoa favouritelist:
- Highlightthechannelthatyouwanttore-movefromthefavouritelistyouhaveadded; - Highlightthelistnumberthatthechannel willberemoved,andpress"OK"button.The iconindicatingtheaddedlistnumberdisappearsonthemenu.
Note: A channel can be added to more than one favour itelist.
ToactivateFavourites, gototheConfiguration menu and select the list number in FavouriteModeyouwanttoactivate by
pressing ◀ or buttons. To cancel Favourites, set FavouriteModetoOff.
Using"BLUE"buttontonavigatethrough thefavouritechannels:
Youcannavigatethroughthefavouritechannellistsviapressing"BLUE"button. For eachpressingof"BLUE"button,youcan navigateethroughthefavouritechannelsthat aretopoftheeachchannellist,sequentially. Whileachannellistisselected,youcan navigateethroughthefavouritechannelsin thatlistbypressing "P+"or"P-"buttons.
OnScreenHelpPressing iButton
Forallmenuspress" "buttontodisplay thehelpinformationaboutthemenufunc- tions.ForChannelListmenuthefollowing messageisdisplayedonthescreen.
Press the SELECT button on your remote control to tuneto the highlighted channel. Press MENU to exit this screen.
WhenyouseeMoreinamenu,pressthe
i+ buttononthe remotecontrolforon screenhelponhowtousethemenu.
Installation
The Installation menu is there to help you for building a Channel Table in the most efficientway.

text_image
MainMenu ChannelList Installation Configuration Timers TV Setup CommonInterfaceThismenuincludesthefollowingitems:
-
AutomaticSearch
-
ManualSearch
-
FirstTimeInstallation
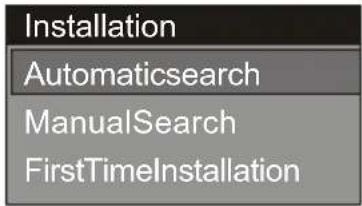
text_image
Installation Automaticsearch ManualSearch FirstTimeInstallationAutomaticSearch:
Automaticsearch is started by pressing "SELECT" buttonwhile AutomaticSearch itemishhighlighted.
The following message appears on the screen.

text_image
Pleasecheckantennaconnection.Dyouwant tostartautomatic search?Yourprevious... Yes NoHighlight"Yes" or "No" viausing buttonsandpress "SELECT" buttonose-lect.
If"Yes"isselected,AutomaticSearchis started.
Selecting“No”cancelIsAutomaticSearch. Aftersearchiscompletedfordigitalchannels, a message asking search for analogue channels appear on the screen.

text_image
Doyouwanttosearchfor analoguechannels? Yes NoHighlight"Yes" and press "SELECT" button to searhforanaloguechannels. The following menu appear on the screen for a analogue channel search.
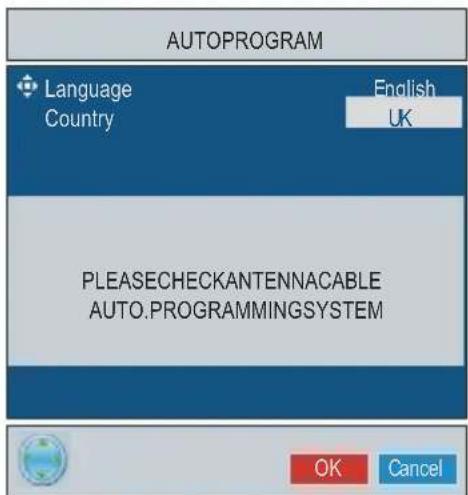
text_image
AUTOPROGRAM Language Country English UK PLEASECHECKANTENNACABLE AUTO.PROGRAMMINGSYSTEM OK CancelPresstheBLUEbuttontocancelAPSifyou do not want to delete your existing programmelist.
TocontinueAPS, firstselectthelanguage and country bypassing ◀ / ▶ button and thenpresstheREDor"OK"button.

text_image
APSisrunning... UK-1055,25Mhz CancelAfterAPSisfinalized, theprogrammable willappearonthescreen. In theprogramme tableyouwillseetheprogrammenumbers andnamesassignedtotheprogrammes.
If you donot accept the locations and/or the program names, you can change them in a pssub-menu in the settings menu.
Alltheservicesaresearchedandachannel tableiscreatedautomatically.
Allchannelsfoundarestoredinasorted formwithrespecttotheirchannelnumbers. Someservicesmaynotappearwiththecorrectchannelnumber.Atthetimeofprinting,
notallbroadcastersaresendingtheirchannelnumberinformation.
ManualSearch:
InManualSearch, thenumberofthemultiplexisenteredmanuallyandonlythatmultiplexissearchedorthechannels. Forevery validchannelnumber, signallevel, signal qualityandnetworknameareshownatthe bottomofthescreen.
In both manual and autosearchany existing channel in the database is not a store to avoid redundant duplicates of that channel.
FirstTimelnstallation
Theusercanusethisitemtoloaddefault settings, which had been loaded to there-ceiveratthefactory.
Toinstallfactorysettings, highlight "First TimeInstallation" menuitemandpress "OK" button, thenyouwillbeaskedtotings. Selecting "Yes" by pressing "OK" button while the "Yes" is highlighted and then the existing channel table will be deleted.

text_image
Are you sure you want to delete all channels and settings for first time installation? Yes NoAfter factory settings areloaded, "First Time Installation" menuwillbedisplayed.
Themenuwhichisdisplayedforlanguage selectionappearsonthescreenatfirst. By using ▲ or ▼ buttons,selectthedesired languageoption,andpress"OK"buttonto activate.
Afterthelanguageisselected, amessage askingforautomaticsearchstartappears onthescreen.

text_image
Doyouwanttostarautomaticsearch? Yes NoHighlight“Yes” item bypassing buttonsandpress“OK” buttonostartinstallation. Aftersearchiscompletedfordigital channels, a message asking search for analoguechannelsappearsonthescreen.

text_image
Do youwanttosearchfor analoguechannels? Yes NoHighlight"Yes" item by press in buttonsandpress"OK"buttontosearchfor analoguechannels.Thefollowingmenuappearsonthescreenforanaloguechannel search.

text_image
AUTOPROGRAM Language Country English UK PLEASECHECKANTENNACABLE AUTO.PROGRAMMINGSYSTEM OK CancelPresstheBLUEbuttontocancelAPSifyou do not want to delete your existing programmelist.
TocontinueAPS, firstselectthelanguage andcountrybypassing ◀ / ▶ buttonand then press the RED or "OK" button.
Configuration
Press" buttonodisplaytheMainMenu andthe▼ buttontwicetohighlightConfiguration,thenpress"OK"buttonodisplaythe Configurationmenu.Press" "b u tt on t exitthemenu.

text_image
MainMenu ChannelList Installation Configuration Timers TVSetup CommonInterfaceThevariousconfigurationfunctionsaredisplayedinalist, alongwithaquarter-screen imageofthecurrentlyselectedchannel. You canselectafunctionbyhighlightingthecorrespondingmenulineusingthe ▲ or buttons.

text_image
Configuration FavouriteMode Off Channel List Tv Only LanguageSettings ParentalSettings TimeSettings Receiver Upgrade V0.7(EU) 4 Ate Country Germany Change Favourite Mode OK Select Mode MoreFavouriteMode
This function enables or disables the favourite channellist mode.
Use ◀ or ▶ buttonstosetFavouriteMode to"List1,List2,...,List5orOff".
Selecting "Off" disables the favourite channelList mode.
Ifthe“FavouriteMode”issetonviaselectingachannellistnumber, innormaloperating mode pressing “P +” and “P -” buttons willonlynavigate throughthechannelsthat werepreviouslydefinedasfavouritesinthe selectedchannellist.
ChannelList
In the Configuration Menu, highlight the ChannelListitembypassing ▲ orbit-tons.
Usethe ◀ or ▶ buttonstosettheChannel List to "TV only or Radio only".
Thisfeatureenablesnavigationonlythrough theselectedchannellisttype.
If"Radioonly"isset,youcanonlynavigate throughtheRadiochannelsinthechannel list via using P + or P - buttons.
LanguageSettings
IntheconfigurationMenu, highlight the Language Settingsitem by pressing ▲ c buttons. PressOKandLanguageSettings submenu will bed displayed on the screen:

text_image
SystemLanguage AudioLanguage SubtitleLanguage English English OffUseorbuttons!ohighlightthemenu itemthatwillbeadjusted.
SystemLanguage
System Language determines the on-screenmenulanguage.
Use ◀ orbuttonstosettheSystemLanguagesetting.
AudioLanguage
Digitalterrestrialtelevisionchannelscan broadcastsimultaneousountracksinmore thanonelanguage. Thisfunctionselects whichlanguagesoundtrackyouwillhear whenswitchingtoachannelbroadcasting withthemultiplesoundtracks.
Use ◀ orbitonstocyclethroughthe languageoptions.
SubtitleLanguage
Digitalterrestrialtelevisionchannelscan broadcast with subtitles displayed on-screenforthehard-of-hearing. This function selects the desired subtitle language and enables the automatic display of subtitles whenever subtitle information is broadcast.
Use ◀ orbuttonstocyclethrough“Off” andlanguageoptions.
ParentalSettings
Somechannelsbroadcastmaterialwhich youdonotwantyoungermembersofthe familytowatch.Anychannelcanbe'locked' sothatitcannotbeselectedforviewingwith-outfirstafour-digitPINcodebeingentered. In this way any channelnotsuitable for youngerviewerscanbeprotected.
Thisfunctionenablesordisablesthemenu protectionsystemandallowsthePINcode tobechanged.ChannelAndMenuProtectionLockfeature.
(SeeChannelListmenuFavouritesonpage 14)
Use ▲ orbitonstohighlightParental Settings. Press "OK" button to enter Parental SettingsMenu. Aboxaskingforthelockkey isdisplayed.

text_image
EnterLockKeyThereisonlyonekeywhichissetto"0000" initially.Enterlockkey.IfwrongLockkeyis entered,thefollowingmessageisdisplayed onthescreenanditisreturnedback.
WrongLockKey
Ifitiscorrect, the Parental Settings Menu including following items displayed:

text_image
MaturityLock MenuLock SetLockKey Age 5 InstallationUseor ▲ buttonstohighlightthemenu itemthatwillbeadjusted.
MaturityLock:
Use ▶ orbuttonstosetMaturityLockto the"Off,Age4,Age5......Age17orAge18". ("Off,Age4,Age5,...,Age18,Freigegeben ab6Jahren,Universalviewing(FRA)orX-ratedESP".)
MenuLock:
Thereyoucanset/resetlockingfortheMain MenuorthelInstallationMenutorestrictaccess.Ifthemenulockisdisabled,therewill befreeaccesstothemenusystem.
Off: Allmenusare unlocked.
MainMenu: Mainmenuisaccessibleonly with the correct clock key. So the user cannot add, delete, rename, move channels, cannot settimers.
Installation: Installationmenuislocked, so theusercannotaddchannels.
ChangeswillbeupdatedafterexitingConfigurationMenu.
SetLockKey:
Alsointhismenuyoucanchangethelock keyandset/changeparentallockmode.
TimeSettings
IntheconfigurationMenu, highlight the Time Settingsitembypassing ▲ or buttons. PressOKandTimeSettingssubmenuwill bedisplayedonthescreen:

text_image
CurrentTime 14:26 TimeZoneSetting Auto TimeZone GMT+0Useorbuttons.highlghttheTime ZoneSetting.TimeZoneSettingissetus- ing ◀ orbuttons.ItcanbesettoAUTOor MANUAL.WhenAUTOisselected,Current Time and Time Zone options will not be availabletobeset.
IfMANUALoptionisselectedastheTime ZoneSetting,TimeZone canbealtered:
- Bypassing ▲ or buttonsselectTime Zone.Use ◀ or ▶ buttonstochangethe TimeZonebetweenGMT-12or GMT+12. CurrentTimeonthetopofthemenulistwill thenchangeaccordingtotheselectedTime Zone.
ReceiverUpgrade
TheIDTVcanbeupgradedviatheconfigurationmenu, enteredfromthemainmenu.
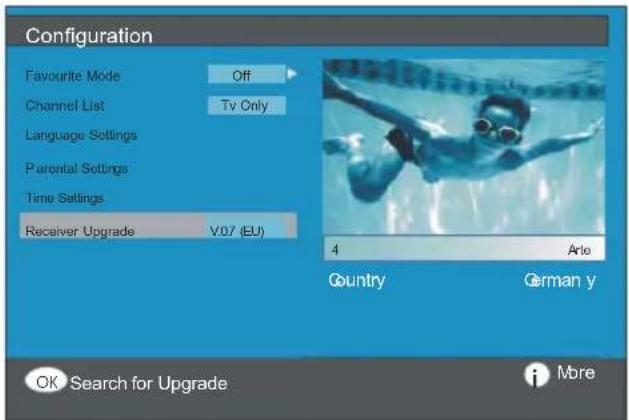
text_image
Configuration Favourite Mode Off Channel List Tv Only Language Settings Parental Settings Time Settings Receiver Upgrade V0.7 (EU) 4 Aris Country German y OK Search for Upgrade MoreIntheconfigurationmenu, highlight the "ReceiverUpgrade" item bypassing ▲ or ▼ buttonsandpress "OK" button to startup upgrade process. The following menu appears on the screen.

text_image
SoftwareUpgrade Searching for upgrade. Please wait, or press MENU to cancel. Search Progress:Afterthesearchprogressiscompleted,the message "Completedsearchingforupgrade.Nonewsoftwarewasfound"appearsonthescreenifnonewsoftwareis found.
Timers
Display the Main Menu by pressing the "☐". Highlightthe Timerslinebypassing ▲ or ▼ buttonsandpress"OK"buttontodisplay theTimermenu.

text_image
Main Menu Channel List Installation Configuration Timers TV Setup Common InterfaceUptofiveseparatetimereventscanbeset andeach isdisplayedintheProgramme Timersscreen,showingtheeventnumber, thechanneltobeselected,thestarttime, endtime,dateandthemode-whetherthat eventisactive(andwillbeactedon)ornot.

text_image
Programme Timers No Channel Name Start End Date Mode 1. ITV 1 20:00 21:00 12/05/2005 Active 2. BBC ONE 00:00 00:00 01/01/2005 Inactive 3. BBC ONE 00:00 00:00 01/01/2005 Inactive 4. BBC ONE 00:00 00:00 01/01/2005 Inactive 5. BBC ONE 00:00 00:00 01/01/2005 Inactive 6. BBC ONE 00:00 00:00 01/01/2005 Inactive 10:42 04/07/2005 Move/Change Exit Edit Timer More- Tosetanevent, highlight its mode button using ▲ orbitonsandpress "OK" button to display the timer entry window.
| Type: | TV |
| Name: | 3.ITV |
| Start: | 00:00 |
| End: | 00:00 |
| Date: | 03/06/2005 |
| Mode: | Once |
- Herethesixsettingsofchanneltype, channelname, starttime, endtime, dateandfrequencymodecanbeset. You can move freelybetweeneachsettingusing ▲ (buttons.
- Thechanneltypeissetusing orbit-
tons.ltenablesdisplayingonlytheselected
typechannels.
•Thechannelnameissetusing buttonstodisplaythechannelwhichbroadcaststheprogramme. - Thestarttime, endtime and date are each set with then number button son theremote controlin 24-hour format.
- The frequency modeled determines how often there receive operates this event and is set with the or buttonstobeeither
Once, Daily, or Weekly. Press OK button to completesetup.
Hint Ifaninvalidnumberforthestartorendtimes orthedateisentered, "Enteredtimeisnot valid"messageappearsonthemenu.
RECORDING FROMIDTV
ConnectyourVCRtoAV2viaascartlead.
SettheAV2-OUTinthefeaturemenuto DDT, asillustratedanddescribedonpage 24.
Setthetimeasdescribedabove.
SetyourTVtostandbyusingtheremotecontrol.
SetyourVCRtocorrespondwiththetimeset onyourTVandselectexternalinput(referto yourVCRinstructionbook).
NB. If you switch on your TV whilst the timer recording is active and then switch back to
standby, the timerrecording will be cancelled; the timersetting will be deleted and the desired programmewill not berecorded.
TVSetup
TobeabletogothroughTVfunctions,you canusethisitem.
The digital TV Setup menus screen is accessed from the MainMenu Pressthe button to display the MainMenu and use or ▼ buttons to highlight "TV Setup". Press "OK" button to display TV Setup menu screen.


text_image
MainMenu ChannelList Installation Configuration Timers TVSetup CommonInterfaceDetailedinformationforallmenuitemsisin AnalogueTVMenuSystemsection.
CommonInterface
- Press "☐" button to display the Main Menu andusethe ▲ or ▼ buttonstohighlighthe "CommonInterface" lineandpress"OK" button.
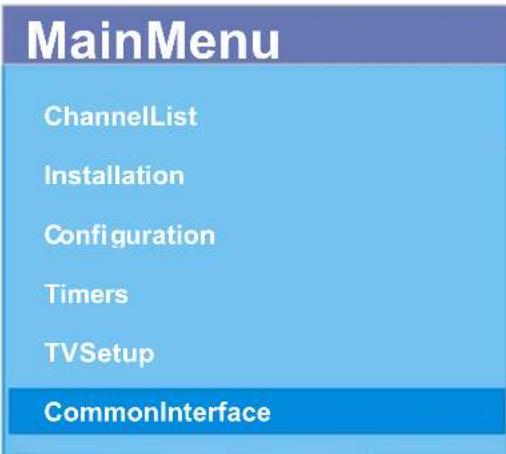
text_image
MainMenu ChannelList Installation Configuration Timers TVSetup CommonInterfaceItisrequiredtosubscribetoapaychannel companytoviewthepaychannelsofthe DigitalTerrestrialbroadcasting.
Obtain the Conditional Access Module (CAM) and the Viewing card by subscribing to apaychannel company, then insert into the Television using the following procedure.
1.SwitchofftheTVandunplugfromthe mains.
2. Insert the CAM, then Viewing Card to the slot that is located in the terminal cover at the left-hand side of the TV (from front view).
•TheCAMshouldbecorrectlyinserted,itis impossibletoinsertfullyifreversed. The CAMortheTVterminalmaybedamagedif theCAMisforcefullyinserted.
3. Connect the TV to the mains supply, switchonandthenwaitforfewmoments untilthecardisactivated.
- SomeCAMsmayrequirethefollowingset up.Please settheCAMbyenteringtheIDTV menu, Common Interface then pressing "OK" button.(CAMsetupmenuisnotdisplayedwhenitisnotrequired.)
- Toseetheviewingcontractinformation: EnterIDTV;press" "button,thenhighlight CommonInterfaceandpress"OK"button.
- Whennomoduleisinserted, "NoCommon Interfacemoduledetected"messageappearsonthescreen.
- Refertothemoduleinstructionmanualfor detailsofthesettings.
AnalogueTVMenuSystem
YourTVhasbeendesignedwithamenu systemtoprovideeasymanipulationofa multifunctionsystem.
Pressthe buttontoenterthemenu. Press ▶/▶ buttontoselectamenutitleand then ▲/▼ buttontoselectamenuitemand ▶/▶ or"OK"buttontoenterthemenuitem.
- Press the button to exit themenu.
- Press the button to return to the previous menu.
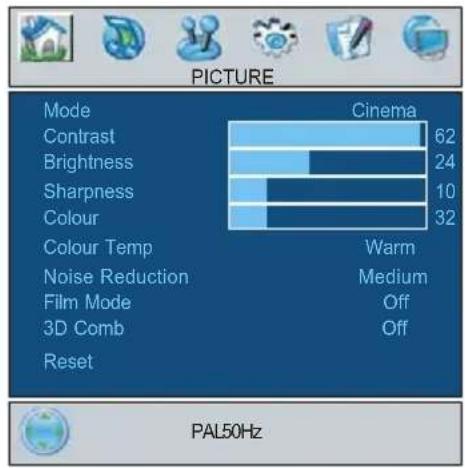
Picturemenu
Bypassing ◀/▶ button,selectthefirsticon. Picturemenuappearsonthescreen.
text_image
PICTURE Mode Cinema Contrast 62 Brightness 24 Sharpness 10 Colour 32 Colour Temp Warm Noise Reduction Medium Film Mode Off 3D Comb Off Reset PAL50HzMode
Bypassing ▲ / ▼ button,selectMode. Press ◀ / ▶ buttontochooseoneofthese options: Natural, Dynamic and Cinema. Picturemodecanbechangeddirectlyby pressingthe ⏻ button.
Contrast
Bypassing ▲ / ▼ button,selectContrast. Press ▶ buttontoincreasecontrast.Press buttontodecreasecontrast.Contrastlevel canbeadjustedbetween0and63.
Brightness
Bypassing ▲ / ▼ button,selectBrightness. Press ▶ buttontoincreasebrightness. Press ◀ button to decrease brightness. Brightnesslevelcanbeadjustedbetween0 and63.
Sharpness
Bypassing ▲ / ▼ button,selectSharpness. Press ▶ buttontoincreasesharpness.Press ◀ buttonodecreasesharpness.Sharpnesslevelcanbeadjustedbetween0and31.
Colour
Bypassing ▲ / ▼ button,selectColour. Press ▶ buttonoincreasecolour.Press buttontodecreasecolour.Colourlevelcan beadjustedbetween0and99.
Hue
Thisitemisdisplayedinpicturemenuwhen theTVreceivesanNTSCsignal.Bypressing ▲ / ▼ button,selecthue. P r e s ➤ button toincreasehue.Press ◀ buttontodecrease hue.Huelevelcanbeadjustedbetween-31 and31.
ColourTemp
Bypassing ▲ / ▼ button,selectColour Temp. Press/s/▶ buttontochooseoneof these options: Cool, Normal and Warm.
NoiseReduction
Thisitemisusedtoreducetheimagenoise andimprovethepicturequalityatweaksignals.
Bypassing ▲ / ▼ button,selectNoiseReduction.Press ◀/ ▶ button to set Noiseduction level to Off, Low, Medium or High.
FilmMode
Filmsarerecordedatadifferentnumberof framespersecondtonormaltelevision programmes.
Bypassing ▲ / ▼ button,selectFilmMode. Press ◀ / ▶ buttontosetthisfeatureOnor Off.Turnthisfeatureonwhenyouarewatch- ing films to see the fast motions scenes clearly.
3DComb
3DCombisusedtoimprovecolourtransitionsandcolourqualityof pictures.
Bypassing ▲ / ▼ button,select3DComb. Press ◀ / ▶ buttonosetthisfeatureOnor Off.
Reset
Bypassing ▲ / ▼ button,selectReset. Press ◀/ ▶ or"OK"buttontoresetthepicture modestofactorydefaultsettings.
Soundmenu
Bypressing ◀ / ▶ button,selectthesecond icon.Soundmenuappearsonthescreen.

text_image
SOUND Volume 10 Equalizer Balance 0 Headphone Sound Mode Stereo AVL Cn Effect Off Dynamic Bass Off 3DS Cn Subwoofer OffVolume
Bypassing ▲ / ▼ button,selectVolume. Press ▶ buttontoincreasevolumelevel. Press ◀ buttontodecreasevolumelevel. Volumelevelcanbeadjustedbetween0 and63.
Equalizer
Bypassing ▲ / ▼ button,selectEqualizer. Press ◀ / ▶ or"OK"buttontoenterequalizer menu.

text_image
SOUND Equalizer Sound Mode 120Hz 500Hz 1.5kHz 5kHz 10kHz User 0 0 0 0 0 0Inequalizermenuthesoundmodecanbe changedtoUser,Pop,Rock,Jazz,Flatand Classicbypassing ◀ / ▶ button.Equalizer menusettingscanonlybechangedwhen Sound Mode is User. Select the desired frequencyby ▲ / ▼ buttonandincreaseorde Decreasethefrequencygainbypassing ◀ / ▶ button.
Pressthe 📋 buttonoreturntotheprevious menu.
Balance
Bypassing ▲ / ▼ button,selectBalance. Press ▶ buttontoincreasebalancetothe right.Press ◀ buttontodecreasebalanceto theleft.Balancelevelcanbeadjustedbetween-31and31.
Headphone
Bypassing ▲ / ▼ button,selectHeadphone.Press ◀ / ▶ or"OK"buttontoenter hedphonemenu.
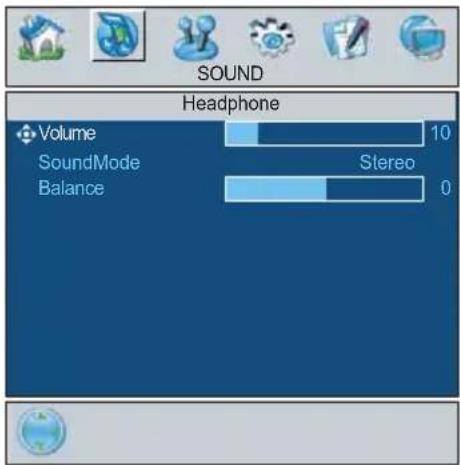
text_image
SOUND Headphone Volume 10 SoundMode Stereo Balance 0volume
Bypassing ▲ / ▼ button,selectVolume. Press ▶ buttontoincreasehpvolumelevel. Press ◀ buttontodecreasehpvolumelevel. Headphonevolumelevelcanbeadjusted between0and63.
soundmode
Bypassing ▲ / ▼ button,selectSound Mode.Press ◀ /▶ buttontochangesound mode.
Soundmodeisusedtoidentifysoundmodeof theheadphoneandcanbesettomono,ste- reo,dual a or dual b according to the transmis- sion.
balance
Bypassing ▲ / ▼ button,selectBalance. Press ▶ buttontoincreasebalancetothe right.Press ◀ buttontodecreasebalanceto theleft.Balancelevelcanbeadjustedbetween-31and31.
Pressthe 📋 buttonotreturnntotheprevious menu.
SoundMode
Bypassing ▲ / ▼ button,selectSound Mode.Press ◀ / ▶ buttonochangethe mode.
You can select Mono, Stereo, Dual A or Dual Bmode, only if these selected channels support sthat mode.
Incaseofbilingualbroadcast(DualSound), youcanselectoriginalordubbedlanguage usingmodeoption.
AVL
AutomaticVolumeLimiting(AVL)function adjuststhesoundtoobtainfixedoutputlevel betweenprograms, havingdifferentsound levels.
Pressing ◀ ➤ buttonwillturnthisfeatureon oroff.
Effect
Youcanusethisfeaturetoswitchthesound effectonoroff. If thecurrentsoundsystemis Monoandthesoundeffectisswitchedon, thenthesoundwillbeheardasifitisStereo. If thecurrentsoundsystemisStereo, switchingthiseffectonwillgiveamorespatialeffect.
Pressing ◀ / ▶ buttonwillturnthisfeatureon oroff.
DynamicBass
DynamicBassisusedtoincreasebasseffectoftheTVset.
Bypassing ▲ / ▼ button,selectDynamic Bass.Bypassing ◀ / ▶ buttonsetDynamic basstoLow,HighorOFF.ItisnotrecommendedtoselectHighiflisteningathigh volumelevels.Thereisasubwooferoutput thatcanacceptanactivesubwooferifyou wishtocreateveryhighlevelsofBass.
3DS
Thisfeatureisusedtocreatetheimpressionthatsoundiscomingfromaroundtheroominsteadoffromthesetspeakers. Pressingthe ◀ / ▶ buttonswillturnthefeatureonoroff.
SubWoofer
Itispossibletoconnectanexternal,active subwoofertothesettogiveamuchdeeper basseffect.
Bypassing ▲ / ▼ button, select Subwoofer. Subwoofer can besetto Onor Off.
SetSubwoofertoOnwhenyouconnectan externalsubwoofertotheset.
Featuremenu
Bypassing ◀ / ▶ button, select the third icon. Feature menu appear on the screen.

text_image
FEATURE SleepTimer Off ChildLock Off Language English Av-2Out DTT DefaultZoom Panoramic BlueBack groundOn MenuBack g roundTranslucent MenuTimeout30sec TeletextLang uag e W ScreenSaverSleepTimer
Bypassing ▲ / ▼ button, select Sleep Timer. ThetimercanbeprogrammedbetweenOffand2hours instepsof10minutesbypassing ◀ / ▶ button.lfsleeptimer isactivated, attheendoftheselectedtime, theTVgoesautomaticallytostand-bymode.
Child Lock
Youcanusethisfeaturetopreventchildren turningtheTVonorchangingprogramsor adjustmentsetc.withoutremotecontrol.
Thechildlockfeaturecanbesetby ◀/▶ button to either on or off. When off is selected, therewillbenodifferenceintheoperationof your TV. When on is selected, the TV can only be controlled by the remote control handset.Inthiscasethecontrolpanelbuttons,exceptthePoweron/offbutton,atthe bottomoftheTVwillnotwork.Ifoneofthese buttonsispressed,"ChildLockOn"willbe displayedonthescreen.
Language
Bypassing ▲ / ▼ button,selectLanguage. Bypassing ◀ / ▶ button,youcanselectthe language.
AV-2Out
Bypassing ▲ / ▼ button, select AV-2Out. You can set AV-2 Out to TV, AV-1, DTT, AV-3, AV-4, AV-5 or PC RGB by pressing ◀ / ▶ button.
Note: Only audio output is available for Av-4 and PC. The other options have both audio and video outputs.
DefaultZoom
Bypassing ▲ / ▼ button,selectDefault Zoom. You can set Default Zoom to Panoramic,4:3or14:9Zoombypassing ◀ / ▶ button.IfthereisnoWSSoraspectratio (picturesize)informationandzoommodeis selectedasAutobypassingthe 📄 button, then the zoom mode will automatically changetoDefaultZoomsetting.Seealso ZoomModesonpage29.
Blue Background
YoucansettheTVtoautomaticallychange toabluescreenifthesignalisweakorabsent,orwhenthereisnoinputfromanexternaldevice.
The Blue Background feature can be turned onoroffbypassing ◀/▶ button.
MenuBackground
Bypassing ▲ / ▼ button, select Menu Background. You can changemenuback-ground to Translucent or Opaque by pressing ◀ / ▶ button.
MenuTimeout
Bypassing ▲ / ▼ button, select Menu Timeout. Press ◀/▶ buttontochangemenu timeoutto15sec,30secor60sec.
Teletext Language
Bypassing ▲ / ▼ button,selectTeletext Language. Press ◀ / ▶ button to change TeletextLanguageto West,East,Cyrillic,
Turk/Gre or Arabic. This will normally be set to West for Western Europe.
Screen Saver
Bypassing ▲ / ▼ button,selectScreen Saver. Press ◀ / ▶ or"OK"buttontoenter screensavermenu.
Thismenuhashthreeitemsrelatedtopossibleimageretentionprobleminplasma displaypanels.Firsttwoitems(Screen Wipe,Inverse)ofthismenuareusedtore-movetheeffectsaftertheproblemoccured andthelastitem(PixelShift)isusedtopre-ventthisproblem.
Screen Wipe :WhenOKispressedonthis itemthepanelisdrivenwithfullwhitepicture foronehourunlessanyusercommandis entered.Duringthismodeifanyusercommandisentered,ScreenSavermenuwillbe displayedonthescreenwithScreenWipe highlighted.
Inverse: When OK is pressed on the colour of each pixel of the displayed image is inverted for one hour unless any user command is entered.
Pixel Shift : This item can be set to off, 5, 10,20,40min.or1hour.Wholepictureis shifted2pixelsinthedirectionsofthefigure shownbelow.
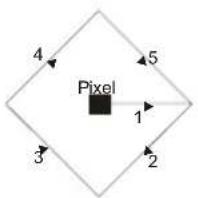
The time entered in this setting to refer to the time between the picture being moved. If you are using games consoles similar set to 5 mins but try not to leave static images on the screen for long period so time.
Install menu
Bypressing ◀/▶ button, select the fourth icon.Installmenuappearsonthescreen.
text_image
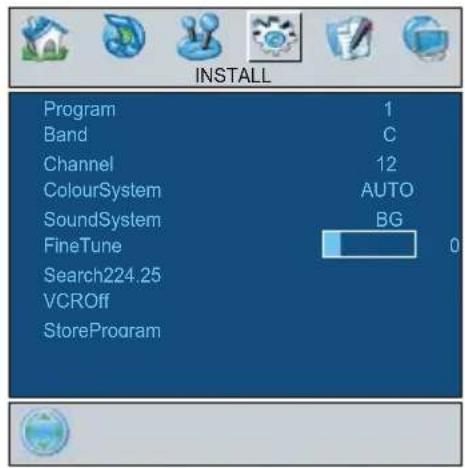
INSTALL Program 1 Band C Channel 12 ColourSystem AUTO SoundSystem BG FineTune 0 Search224.25 VCROff StoreProgramProgram
Bypassing ▲ / ▼ button,selectProgram. Press ◀ / ▶ buttontoselecttheprogram number.Youcanalsoenteranumbervia digitbuttonsontheremotecontrol.There are100programstoragebetween0and99.
Band
Band canbeselectedeither“C”or“S”by his item pressing ◀/ ▶ button.
Channel
Channel canbechangedby ◀ / ▶ buttonor DigitButtons.
Colour System
Bypassing ▲ / ▼ button,selectColour System. Press ◀/▶ buttontochangethe coloursystemtoPAL, PAL60, SECAM or AUTO.
Note: In AV mode, you can choose NTSC 3.58 and NTSC4.43 as well.
Sound System
Bypassing ▲ / ▼ button, selectSo und System. Press ◀/▶ buttonochangethe sound system to BG, DK, I or L/L'.
Fine Tune
Bypassing ▲ / ▼ button,selectFine Tune. Press ◀ / ▶ buttontoadjustthetuning.
Search
Bypassing ▲ / ▼ button,selectSearch. Press ◀ / ▶ buttonostortprogramsearching.Thesearchingwillstopwhenasignalis
found.Youcanalsoenterafrequencyvalue directlybypassingthedigitbuttons.
VCR(VideoCassetteRecorder)
- Thisitemcanbeseeninallmodesexcept Av-3andPC.
- If you want to watch a VCR source from one of these modes, then it will be better to set VCR mode "on". For this, while the cursor is on this is to press the / button to set it "On".
- If you want to watch a DVD, then you must set this item "Off".
StoreProgram
Bypassing ▲ / ▼ button,selectStoreProgram.Press ◀ or"OK"buttontostorethe adjustments."ProgramStored"willbedisplayedonthescreen.
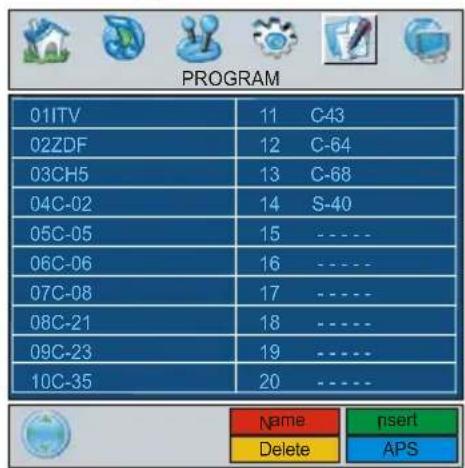
Programmenu
Bypassing ◀ / ▶ button, select the fifthicon. Program menu appear son the screen.
text_image
PROGRAM 01ITV 11 C43 02ZDF 12 C-64 03CH5 13 C-68 04C-02 14 S-40 05C-05 15 ---- 06C-06 16 ---- 07C-08 17 ---- 08C-21 18 ---- 09C-23 19 ---- 10C-35 20 ---- Name nset Delete APSBymovingthecursorinfourdirectionsyou can reach 20 programmes in the same page.Youcanscrollthepagesupordown bypassingthenavigationbuttonstoseeeall theprogrammesinTVmode(excepttheAV mode).
Bycursoraction, programmeselectionis doneautomatically.
Name:
To change the name of a decided programme, select the programme and presstheREDbutton.
The first letter of these selected name starts to blink. Press ▲ / ▼ buttontochangethat letter and ◀ / ▶ buttontoselect the other letters. Bypassing the RED button, you can store thename.
Insert:
Select the programmewhichyouwanttoin-sert by navigation buttons. Press the GREENbutton. By navigation buttonsmove theselected programme to the decided programmespace and press the GREEN buttonagain.
Delete:
Todeleteaprogramme, press the YELLOW button. Pressing the YELLOW button again erasestheselectedprogrammefromthe programmelist, and the programmes below shiftoneup.
APS(AutomaticProgrammingSystem)
When you press the BLUE button for APS, the following warnings screen will be displayed.

text_image
PROGRAM Country UK WARNING! Allprestoredprograms willbedeleted OK CancelPresstheBLUEbuttontocancelAPSifyou do not want to delete your existing programmelist.
TocontinueAPS, firstselect the country by pressing ◀ / ▶ button and then press the REDor "OK" button.

text_image
APSisrunning... UK-I 055,25Mhz CancelAfterAPSisfinalized, theprogrammetable willappearonthescreen.
Sourcemenu
Bypressing ◀ / ▶ button,selectthesixth icon.Sourcemenuappearsonthescreen.

text_image
SOURCE:TV TV/DTT AV-1 AV - 2 AV-3 AV-4 AV-4S AV-5 PCRGBIn sourcemenu, highlight a source by pressing ▲ / ▼ buttonandswitchtothat modebypassing ◀/ ▶ or "OK"button.
PCMode
Installation
•PoweroffbothComputerandDisplaybefore makinganyconnections.
- SetyourPC'sresolutioncorrectlybefore connectingtotheTV.Seethetableonpage 37forsupportedmodes.
- UseaD-SUBcabletoconnecttheTV'sPC inputtothecomputer'sRGBoutputterminal.

text_image
15PinMiniD-SubConnector 10 5 1 6 15 11- TightenthescrewsoftheDisplaycableuntil theconnectorsarefastenedsecurely(finger-tightenonly).
MenuSysteminPCmode
Pressthebutton.Themenuwillbedis-playedinthemiddleofthescreen.
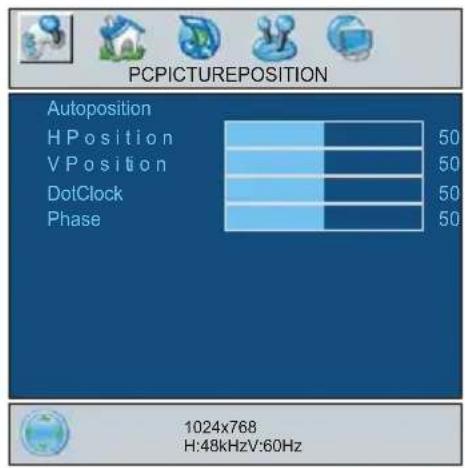
PCPicturePositionMenu
Bypassing ◀/▶ button,selectthefirsticon.PCPicturePositionmenuappearsonthe screen.
text_image
PCPICTUREPOSITION Autoposition H Position V Position DotClock Phase 50 50 50 50 1024x768 H:48kHzV:60HzAutoposition
If you shift the picture horizontally or vertically to an unwanted position, us this item to put the picture into correct place automatically.
- SelectAutopositionitembyusing buttons.
- Presor "OK" button.
Warning: Autopositionadjustmentrecommendedtobedonewiththefullscreenimagefortheproperadjustment.
H(Horizontal)Position
Thisitemshifts the image horizontally to righthandside or lefthandside of the screen.
- SelectHPositionitembyusing ▲ / ▼ button.
- Use ◀/ ▶ buttontoadjustthevalue.
V(Vertical)Position
Thisitemshiftstheimageverticallytowards thetoporbottomofthescreen.
- Select V Position item by using ▲ / ▼ button.
- Use ◀/ ▶ buttontoadjustthevalue.
DotClock
DotClockadjustmentscorrectinterference thatappearasverticalbandingindotintensive presentationslikespreadsheetsor paragraphsortextinsmallerfonts.
- Use ◀ / ▶ buttontoadjustthevalue.
Phase
DependingontheresolutionandscanfrequencythatyouinputtotheTVSet,youmayseeahazyornoisypictureonthescreen.In suchacaseyoucanusethisitemtogeta clearpicturebytrialanderrormethod.
- Use ◀ / ▶ buttontoadjustthevalue.
PCPictureMenu
Bypassing ◀ / ▶ button,selectthesecond icon.PCPicture menu appears on the screen.

bar
PCPICTURE | Category | Value | |---|---| | Contrast | 46 | | Brightness | 30 | | ColourTempNormal | | | R | 32 | | G | 32 | | B | 32 | | Reset | |Contrast, Brightness and Colour Temperature adjustments in this menu are identical to adjustments defined in TV picture menu.
WhenColourTempisManual,youcanalso adjusttheR,G,Bitems.R,GandBadjust theTVimagecolourinPCmode.Youcan changetheTVcolourtoyourdesiredcolour: R(Red),G(Green),B(Blue)
SelectResetandpress ◀ / ▶ or "OK" button toresetthepicturemodestofactorydefault settings.
SoundMenu
By pressing ◀/▶ button, select the third icon. Soundmenuappearsonthescreen.
The items in this menu are described at Soundmenustartingpage22.
FeatureMenu
Bypressing ◀ / ▶ button, select the fourth icon. Feature menu appear on the screen.
Theitemsinthismenuaredescribedat Featuremenustartingpage24.
SourceMenu
Bypressing ◀/▶ button,selectthefifthicon. Sourcemenuappearsonthescreen.
In source menu, highlight a source by pressing ▲ / ▼ button and switch to that mode bypassing ◀/ ▶ or "OK" button.
SoundinPCmode
- ConnectthePC'sAudiooutputtotheTV's PCAudiolnsocketwithanaudiocable.
OtherFeatures
TVStatus
ProgrammeNumber, ProgrammeName, Sound Indicator and Zoom Mode are displayed on the upperrightside of the screen when an new programme is entered or button is pressed.
Mutelndicator
It is placed in the upper left side of the screenwhenenabled.

Tocancelmute, there are two alternatives; the first one is pressing the button and these second one is increasing/decreasing the volume level.
PIPandPAPmodes
PressthebuttontoswitchtoPIPmode.
AtPIPMode,asmallpicture(PIPpicture)is displayedonthemainpicture.
ForPIP picturerestrictions, seetableon page40.
Pressthe button w icetos witcht mode.
AtPAPMode, twopictures withequalsizes are displayed on the screen. Aspect Ratios of the windows are fixed.
WhenyouswitchtoPAPMode, Mainwindow inPIPMode is displayed on the right side of the screen.
Sourcerestrictions of PAP Mode aresame as in PIP Mode.
FreezePicture
Youcanfreezethepictureonthescreenby pressingthe button.AtPIPandPAPayouts;onlythemainpicturecanbefrozen.
ZoomModes
Zoommodecanbechangedbypressing the 📋 button.Youcanchangethescreen sizeaccordingtothepictureaspectratio. Selecttheoptimumonefromthefollowing ZOOMmodes.
Note: Youcanonlychoose4:3andFULLinPC mode.
Auto:
WhenaWSS(WideScreenSignalling)signal, which show the aspect ratio of the picture, is included in the broadcasts signal or the signal from an external device, the TV automatically changesthe ZOOM mode according to the WSS signal.
- When the AUTO mode does not function correctly due to poor WSS signal quality or when you want to change the ZOOM mode, changeto another ZOOM modemanually.
Full:
This uniformly stretches the left and right sidesofanormalpicture(4:3aspectratio) tofillthewideTVscreen.

text_image
P A P- For16:9aspectratiopicturesthathavebeen squeezedintoanormalpicture(4:3aspect ratio),usetheFullmodetoresthepicturetoitsoriginalshape.
16:9Zoom:
Thiszoomsupthewidepicture(16:9aspect ratio)tothefullscreen.

natural_image
Diagram showing transformation of a square with circular holes into a larger square with circles (no text or symbols)16:9 Subtitle:
Thiszoomsupthewidepicture(16:9aspect ratio)withsubtitlestothefullscreen.

text_image
SUBTITLE SUBTITLE"DefaultZoom"Modes:
4:3
Usetoviewanormalpicture(4:3aspect ratio)asthisisitsoriginalshape.

natural_image
Diagram showing transformation of a square with four circles to a square with one circle, both without any text or symbols.14:9Zoom:
Thiszoomsupthewidepicture(14:9aspect ratio)totheupperandlowerlimitsofthe screen.

natural_image
Diagram showing transformation of a square with four circles to a larger square with four circles, no text or symbols present.Panoramic:
Thisstretchestheleftandrightsidesofa normalpicture(4:3aspectratio)tofillthe screen,withoutmakingthepictureappear unnatural.

natural_image
Diagram showing transformation of a square with four circles to a larger square with four circles (no text or symbols)Thetopandbottomofthepictureareslightly cutoff.
Teletext
TeletextisaninformationsystemthatdisplaystextonyourTVscreen.UsingtheTeletextinformationsystemyoucanviewapage ofinformationonasubjectthatisavailable inthelistofcontents(index).
ToOperateTeletext
- SelectaTVstationwhereTeletextisbeing transmitted.
- Pressthe button. Usually the list of tents(index) is displayed on the screen.
text_image
GUIDE SLIDESHOW-ROTATE SWIVELPHOTOToSelectAPageOfTeletext
- Presstheappropriatedigitbuttonsforthe requiredTeletextpagenumber.
Theselectedpagenumberisdisplayedin thetopleftcornerofthescreen.TheTeletext pagecountersearches untilthe selected pagenumberislocated,thedesiredpageis thendisplayedonthescreen.
- Press the button to movethe Teletext screenforwardonepageatatime.
- Press the button to movethe Teletext screenbackward done page at a time.
ToSelectIndexPage
- Toselectthepagenumberoftheindex(generallypage100),pressthe button.
ToSelectTeletextWithATV Programme
- PresstheREDbutton. Thetextisnowsuperimposedovertheprogrammeonthe screen.
- Press the buttonagaintoreturntothe Teletextpage.
ToReveal“Concealed” Information
- Pressingthebuttononcewillrevealanswersonaquizorgamespage.
- Pressingthe 📄 buttonagainwillconceal therevealedanswers.
ToSelectASubcodePage
Subcode pages are subsections of long Teletextpagesthatcanonlybedisplayedon thescreenonesectionatatime.
- SelecttherequiredTeletextpagebypassing button.
- Selecttherequiredsubcodepagenumber bypassingfourdigitbuttons(e.g.0001).
- If these selected subcode page is not displayed in a short time, press the × button. TV programmewill bed displayed on the screen.
- Teletextpagenumberwillbedisplayedon theupperleftcornerofthescreenwhenthe selectedpageisfound.
- Pressthe 📄 buttonodisplaytheselected Teletextpage.
ToExitTeletext
- Pressthebutton. Thescreenwillswitch toTVmode.
ToDisplayTheTime
- WhilewatchingaTVprogrammewithTele-texttransmissionpressthe button. The currenttimeinformation,capturedfromTele-textwillbedisplayedonthescreen.
- If the programme being watched does not have Teletext transmission, no information will be displayed.
Fastext
YourTVsupportsthe1000pageTeletext system.Whenthepagenumberofanyof the1000pagesinmemoryisentered,the systemwillnotsearchforthe requested page;insteaditwilldisplaythepageautomatically. If therequested page is not in memory, the system will search forthere- quested pagenumber and save the 1000 pages including the requested page into memory after finding it.
- Press the button to mov the Teletext screen forward done page at a time.
- Press the button to mov the Teletext screen backward done page at a time.
ForFastext
Thesubject-headingfortheinformationmay haveaparticularcolour.
- Press an appropriate RED, GREEN, YELLOW orBLUEbuttoninordertoreachtherelevant pagequickly.
ForTOPtext
TOPtextmodeofoperationwillbeactivated automaticallyaccordingtothetransmission.
- IfTOPtexttransmissionispresent,colour codedbuttonswillappearinstatusrow.
- IfTOPtexttransmissionisnotpresent,statusrowwillnotappear.
Thesubject-headingforinformationmaybe locatedincolouredbox.
InTopmodethe ▲ or ▼ commandswillrequestthenextorpreviouspagerespectively. IfTOPtexttransmissionisnotavailable, in case ofoperationofthese commands, wraparoundoccurs.Forexamplepage100 appearstobeonegreaterthanpage199.
ConnectPeripheral Equipment
Thereisawiderangeofaudioandvideo equipmentthatcanbeconnectedtoyourTV.
The following connection diagram show you where the different (Optional) equipment should be connected at there are side of the TV.
HighDefinition
YourHitachiPlasmaTelevisioniscapable ofdisplayingHighDefinitionpicturesfrom devicesuchasaHighDefinitionSatellite ReceiverorDVDPlayer. Thesedevices mustbeconnectedviatheHDMIsocket (AV-5)orComponentSocket(AV-3).These socketscanaccepteither720por1080isignals.
ViaTheScart
PlasmaTVhas2Scartsockets.Ifyouwant toconnectperipherals(e.g.video,decoder, etc.)whichhaveScartsocketstotheTV,use SCART1,SCART2inputs.
Ifanexternaldeviceisconnectedviathe Scartsockets,theTVwillbeswitchedtoAV modeautomatically.
ViaAerialInput
IfyouwanttoconnecttoyourTV, peripherals likevideorecordersordecoders,butthede-viceyouwanttoconnectdoesnothavea Scartsocket,youshouldconnectittothe AerialinputoftheTV.
If the VCRisconnected via Aerial input it is suggested to use Programme0.
Decoder
CableTVoffersyouawidechoiceofprograms.Mostofthemarefree,othersareto bepaidforbytheviewer.Thismeansthat youwillneedtosubscribetothebroadcast-ingorganisationwhoseprogrammesyou wishtoreceive.Thisorganisationwillsupply you a corresponding decoder unit to allow theprogrammestobeunscrambled.
For further information ask your dealer. See also the booklets supplied with your decoder.
Connectadecoderwithanaerialsocket totheTV
- Connecttheaerialcable.
Connectadecoderwithoutanaerial sockettotheTV
- ConnectthedecodertotheTVwithaScart cabletoSCART1.
TVAndVideoRecorder
- Connecttheaerialcables.
Betterpicturequalitycanbeobtainedifyou alsoconnectaScartcabletoSCARTsockets.
PlaybackNTSC
Tousethisoptionyoucan;
- ConnectanNTSCVCRplayertoaScart socketattherearsideoftheTV.
- ConnectanNTSCVCRplayertoRCAJacks attherearsideoftheTV.
CopyFacility
SourceselectionforVCRrecording.
- SelectFeaturemenu.
- SelectAv-2Outbypressing ◀/ ▶ button.
- Selectasourcetocopythepicturefromthat source.
SearchForAndStoreTheTest SignalOfTheVideoRecorder
- Unplug the aerial cable from the aerial socket of your videorecorder.
- SwitchonyourTVandputthevideorecorder onthetestsignal.(Seethebookletforyour videorecorder.)
- Enter the Install menu and select search.
- Searchforthetestsignalofyourvideore-corderinthesamewayasyousearchedfor andstoredtheTVsignals.Storethetestsignalunderprogrammenumber0.
-Replace the aerial cable in the aerial socket of your video recorder once you have stored the testsignal.
CameraAndCamcorder
ToConnectToAVInput
ConnectyourcameraorcamcordertoAV (AV-4)inputattherearsideoftheTV.
- ConnectyourequirementtotheTVviaVIDEO (yellow), AUDIO R (red) and AUDIO L (white) inputs. You must connect the jack to their input using the same colour.
ToConnectToS-VHSInput
ConnectyourcameraorcamcorderS-VHS inputattherearsideoftheTV.
- ConnectyourequirepmenttotheTVviaS-VHS inputandaudioinputsofAVinputsbyusing S-VHScables.
ConnectTheDecoderToThe VideoRecorder
SomevideorecordershaveaspecialScart socketfordecoder.
- ConnectaScartcabletotheScartsocketof yourdecoderandtothespecialScartsocket ofyourvideorecorder.Refertothebooklet ofyourvideorecorder.
• To connect your video record to the TV, refer to the TV and Video Record section.
If you want to connect more equipment to your TV, consult your dealer.
ConnectingHeadphones
Use the stereoheadphones socket at the rearside of the TV, to connect headphones.
ConnectingSubwoofer
UseSubwooferOutsockettoconnectan external,activesubwoofertothesettogivea muchdeeperbasseffect.
AerialConnection
OutdoorAerialConnection

text_image
Round 75 ohmcoaxialcable 75Ω VHF/UHFRearofTV
ConnectPeripheralEquipment
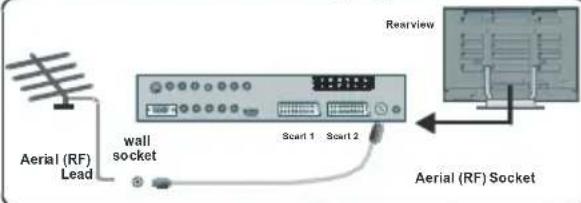
eitherconnecttheaerialstraighttoyourTV...
text_image
Aerial (RF) Lead wall socket Scart 1 Scart 2 Rearview Aerial (RF) Socket...orconnecttheaerialthroughaVCR...

flowchart
graph TD
    A["Aerial (RF) Socket"] --> B["Scan1"]
    A --> C["Scan2"]
    D["Aerial (RF) Lead"] --> E["wall socket"]
    E --> F["(RF)connector leadVCRtoTV"]
    F --> G["Aerial(RF)SocketVCR"]
    G --> H["Optional Start I end TV in VCR"]
    H --> I["RR"]
- It is recommended that a cartlead should be fitted between your TV and VCR to enhance your picture and sound quality. Scart leads are essential if you have a stereo TV and Rand wish to obtain stereosound from you equipment. These lead can be purchased from your Hitachidealer or any good High Street electrical retailer.
...orthroughaVCRandsatellitedecoder.
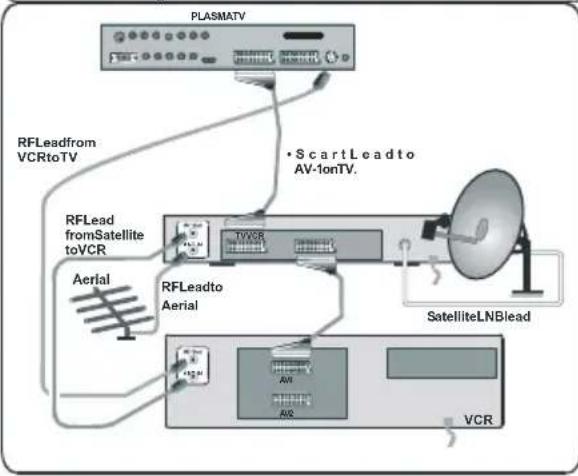
flowchart
graph TD
    A["PLASMATV"] --> B["RFLead from VCRtoTV"]
    B --> C["RFLead from Satellite to VCR"]
    C --> D["RFLeadto Aerial"]
    D --> E["SatelliteLNBlead"]
    E --> F["VCR"]
    D --> G["Aerial"]
    G --> H["• ScartLeadto AV-1onTV."]
..orthrou ghasatellitedecoder...
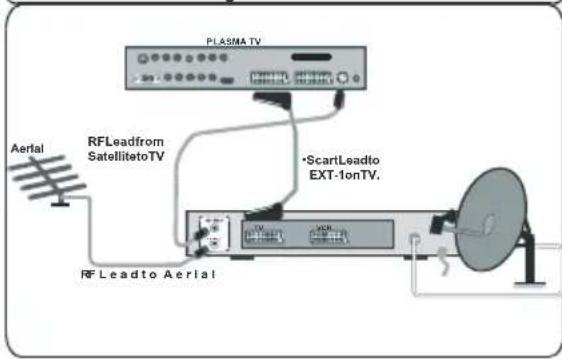
text_image
PLASMA TV Aerial RFLeadfrom SatellitetoTV •ScartLeadto EXT-1onTV. RF Leadto Aerialheadphoneconnection
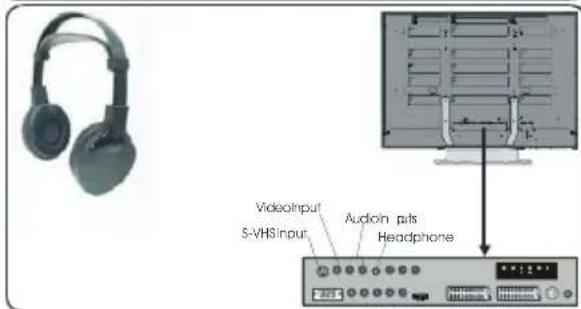
text_image
VideoInput S-VHSInput Audoin pits Headphonecamcorderconnection

text_image
Headphone DCInput A/Input/Output OUTTips
CareOfTheScreen
Cleanthescreenwithaslightlydamp,soft cloth.Donotuseabrasivesolventsasthey maydamagetheTVscreencoatinglayer.
PoorPicture
HaveyouselectedthecorrectTVsystem?Is yourTVsetorhouseaeriallocatedtooclose tonon-earthedaudioequipmentorneon lights,etc.?
Mountainsorhighbuildingscancause doublepicturesorghostimages.Sometimesyoucanimprovethepicturequalityby changingthedirectionoftheaerial.
IsthepictureorTeletextunrecognisable? Checkify you have entered the correct frequency.
Thepicturequalitymaydegradewhentwo peripheralsareconnectedtotheTVatthe sametime.Insuchacase,disconnectone oftheperipherals.
NoPicture
Is the aerial connected properly? Are the plugsconnectedtightlytotheaerialsocket? Istheaerialcabledamaged?Aresuitable plugsusedtoconnecttheaerial?Ifyouare indoubt,consultyourdealer.
NoPicturemeansthatyourTVisnotreceivinganytransmission.Haveyoupressedthe correctbuttonsontheremotecontrol?Try oncemore.
Sound
Youcannothearanysound.Didyouper-hapsinterruptthesound,pressingthe button?
Sound is coming from only one of the speakers. Isthe balancesettoonedirection extreme? See Soundmenu.
RemoteControl
YourTVnolongerrespondstotheremote control. Perhaps the batteries are exhausted. IfsoyoucanstillusethelocalbuttonsatthebottomoftheTV.
Haveyouselectedthewrongmenu?Press the buttonotreturntoTVmodeorpress the buttonotreturntothepreviousmenu.
Nosolution:
SwitchyourTVsetoffandon.Ifthisdoesnot work,calltheservicepersonnel;neverattempttorepairityourself.
Specifications
TVBROADCASTING
PAL/SECAMB/GD/KK'I/I'L/L'
RECEIVINGCHANNELS
VHF(BANDI/III)
UHF(BANDU)
HYPERBAND
CABLETV(S1-S20/S21-S41)
NUMBEROFPRESETCHANNELS100
CHANNELINDICATOR
OnScreenDisplay
RFAERIALINPUT
75Ohm(unbalanced)
OPERATINGVOLTAGE
220-240VAC,50Hz.
AUDIO
3-DS
AUDIOOUTPUTPOWER(W RMS.)(%10THD)
2 × 10
POWERCONSUMPTION(W)
360W
<3W(Stand-by)
PANEL
42"(106cmvisible)ScreenSize
DIMENSIONS(mm)
| DIMENSIONS(mm) | |||
| D | L | H | Weight(kg)(withoutstand) |
| 30010 | 4578536 | ||
ISO13406-2Pixelfaultclass:ClassII
DTTSpecifications
Frequencyrange
474-850MHz
50-860MHz(VHF)
Signallevel-
82.3dBm
Transmissionstandards
DVB-T,MPEG-2
Demodulation
COFDMwith2K/8KFFTmode
FEC
allDVBmodes
Video
MP@ML,PAL,4:3/16:9
Audio
MPEGLayerI&II32/44.148kHz
AppendixA:PCInputTypicalDisplayModes
Thedisplayhasamaximumresolutionof1280x1024,verticalsync.frequencyrangeof56-85Hzandahorizontalsync.frequencyrangeof30-69KHz.
The following table is an illustration of some of the typical videodisplay modes.
| Mode | Resolution | Frequency | ||
| Horizontal | VerticalHor.(kHz) | Ver.(Hz) | ||
| 1640 | 40031.5 | 70 | ||
| 2640 | 48031.5 | 60 | ||
| 3* | 848 | 480 | 31.0 | 60 |
| 4640 | 48037.9 | 72 | ||
| 5640 | 48037.5 | 75 | ||
| 6640 | 48043.3 | 85 | ||
| 7800 | 60035.2 | 56 | ||
| 8800 | 60037.9 | 60 | ||
| 9800 | 60048.1 | 72 | ||
| 10 | 800 | 600 | 46.9 | 75 |
| 11 | 800 | 600 | 53.7 | 85 |
| 12 | 1024 | 76848.4 | 60 | |
| 13 | 1024 | 76856.5 | 70 | |
| 14 | 1024 | 76860.0 | 75 | |
| 15 | 1024 | 76868.7 | 85 | |
| 16 | 1152 | 86467.5 | 75 | |
| 17 | 1280 | 1024 | 64.0 | 60 |
| 18* | 1280 | 768 | 47.8 | 60 |
| 19* | 1280 | 768 | 56.1 | 70 |
*OnlyavailableinFullandPAPmodes,notin4:3mode.
AppendixB:DVDPlayerSelection
YoucanusethisremotecontroltooperatetheselectedbrandofDVDplayerbypassingthe followingbuttonsontheremotecontrolsimultaneously.
| MakersofDVDplayer | SetMaker | SetMakerSetType | SetTypeMakersofDVDplayer | ||
| HITACHI | i+ 1 | 1~3 | RCA | i+ 0 | i+ 1 |
| FUNAI | i+ 2 | 1 | Mitsubishi | i+ 1 | i+ 1 |
| Pioneer | i+ 3 | 1~6 | ONKYO | i+ RED | i+ 1~3 |
| Panasonic | i+ 4 | 1~4 | ZENITH | i+ GREEN | i+ 1 |
| TOSHIBA | i+ 5 | 1~4 | THOMSON | i+ YELLOW | i+ 1 |
| Philips | i+ 6 | 1~2 | SHINCO | i+ BLUE | i+ 1 |
| JVC | i+ 7 | 1 | SKYWORTH | i+ 3i | i+ 1 |
| SAMSUNG | i+ 8 | 1 | BUBUKO | i+ 3x | i+ 1 |
| Sony | i+ 9 | 1~4 | DENON | i+ .... | i+ 1~2 |
| Sharp | i+ 12-4-12 | 1~2 |
Example
To operate HITACHI DVD player, press and hold the INFO button, followed by the "1" button.
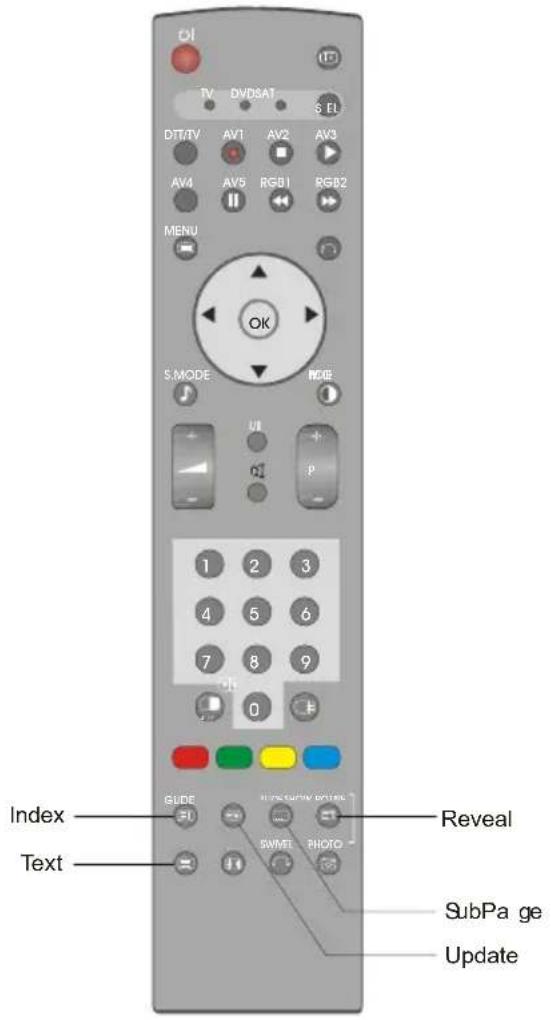
text_image
O! TV DVDSAT S FL DIT/TV AV1 AV2 AV3 AV4 AV5 RGB1 RGB2 MENU OK S.MODE MODE UI + p 1 2 3 4 5 6 7 8 9 0 Index Reveal Text SWME PHOTO SubPage UpdateNote: Not all models of the listed brands can be operated using this remote control.
Note: Slide Show, Photo, Swivel and Rotate buttons have no function.
AppendixC: DVDPlayerSelection(continued)
Setuphint:
Example)HITACHIDVD ①
TooperateHITACHIDVDplayer, pressandholdthebutton, followedbythe
① button.
1. Setupthemaker.
Press SEL buttontoindicatetheDVDLEDontheremotecontrol.
WhilsttheDVDLEDisflashing, press ① and ①.
2. Setupthemakertype.
Releasethe ① buttonwhilstkeepingbuttondepressed.
Then, pressthe ① button.
3. Confirmthesetting.
Aftersettingthemakerandtype, pressthePOWERbuttonontheremotecontrol. If the DVD does not switch on, repeat step 1 and 2 using other maker types as listed in the chart on 38.
NOTE
- Notallmodelsofthelistedmakerscanbeoperatedusingthisremotecontrol.
InformationforusersapplicableinEuropeanUnioncountries

natural_image
Symbol of a trash bin with crossed lines indicating no waste or discharge, and a solid black rectangle below (no text or labels)This symbol on the product or on its packaging means that you electrical and electronic equipment should be disposed at the end of life separately from your household wastes. There are separate collections systems for recycling in EU.
For more information, please contact the local authority or the dealer where you purchased the product.
Intheunlikelyeventthatthisproductshoulddevelopafault,weundertaketoreplaceorrepair anypartoftheproductwhichfailsduetoamanufacturingdefectwithin12monthsofthedate ofpurchaseprovidedthat:
i) The product has been installed and used only in accordance with the instruction supplied with the product
ii) The product has not been repaired, maintained, or modified by any person other than a Hitachiauthorised engineer
iii) The product serial number has not been removed or altered
Thisguaranteedoesnotapplytoproductacquiredsecondhandorforcommercialorcommunaluse
Thisguaranteedoesnotcoverthereplacementofexhaustedbatteries,theadjustmentof usercontrols,oraerialalignment.
AnypartsreplacedunderthisguaranteeshallbecomethepropertyofHitachiEuropeLtd.
Pleasenotethatevidenceofthedateofpurchasewillberequiredbeforeanyserviceunder thisguaranteeiscarriedout.
THIS GUARANTEE DOES NOT AFFECT YOUR STATUTORY RIGHTS.
INALLCASESOFDIFFICULTYPLEASECONSULTYOURHITACHIDEALER

IMPORTANT-lfplacingTVintocabinetoralcove,ensurethereisatleasta100mm(10cm)gaptothesides, rear and top of the TV. This is to allow for adequate ventilation during operation. Please read the mainUsersGuideformoresafetyinformationbeforeinstallation.
1
insertthebatteriesintoyourhandset
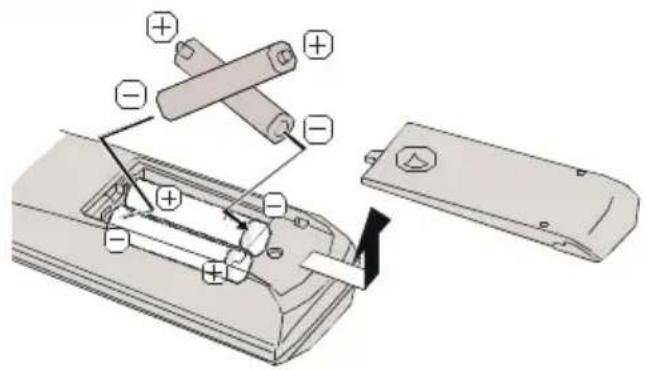
text_image
Diagram of a device's internal components with polarity labels and assembly indicators2a
eitherconnecttheaerialstraighttoyourTV...

text_image
Aerial(RF) Lead wall socket Scart 1 Scart 2 Rearview Aerial(RF)Socket2b
...orconnecttheaerialthroughaVCR...

flowchart
graph TD
    A["Aerial(RF)Socket"] -->|Scart 1| B["Scart 2"]
    A -->|Scart 2| C["Aerial(RF)SocketVCR"]
    C -->|OptionalScartLead TVtoVCR| D["VCR"]
    E["Aerial(RF)Lead"] --> F["wall socket"]
    F --> G["(RF)connector leadVCRtoTV"]
    G --> H["AV-1"]
    G --> I["AV-2"]
- It is recommended that a scart lead should be fitted between your TV and VCR to enhance your picture and sound quality. Scartleads are essential if you have a stereo TV and VR and wish to obtain stereosound from your equipment. These leads can be purchased from your Hitachidealer or any good High Street electrical retailer.

...orthroughasatellitedecoder...
GB

text_image
PLASMATV Aerial RFLeadfrom SatellitetoTV • Scart Lead to EXT-1onTV. RFLeadtoAerial RF OUT ANT_IN TV VCR SatelliteLNBlead
...orthroughaVCRandsatellitedecoder.
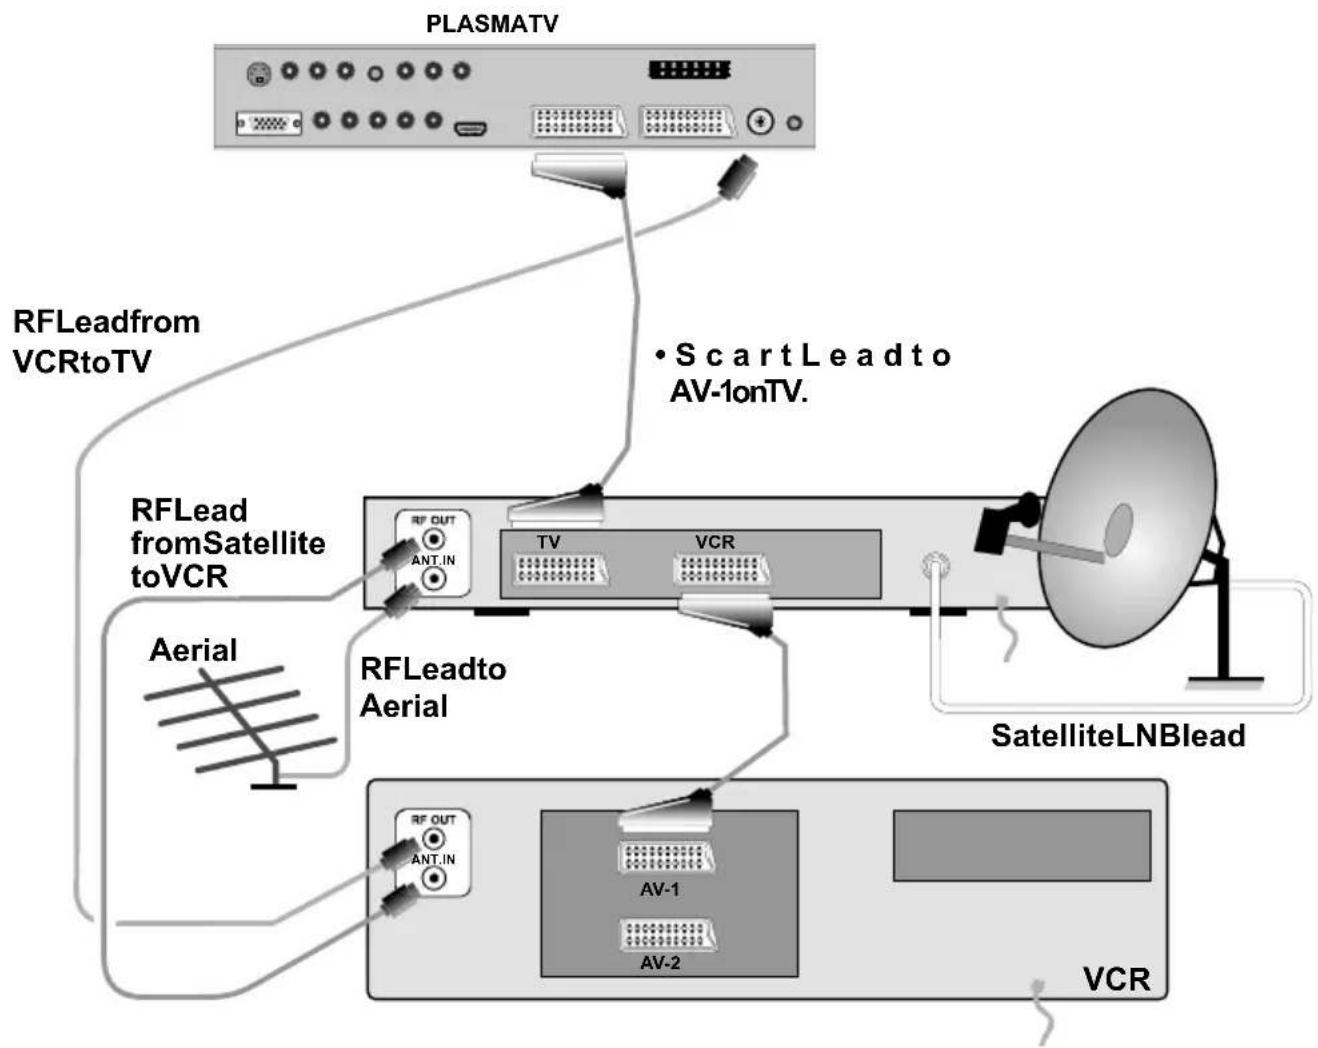
flowchart
graph TD
    A["PLASMATV"] --> B["RFLead from VCRtoTV"]
    A --> C["RFLead from Satellite to VCR"]
    A --> D["Aerial"]
    A --> E["RFLead to Aerial"]
    A --> F["SatelliteLNBlead"]
    A --> G["VCR"]
    A --> H["AV-1"]
    A --> I["AV-2"]
    A --> J["RF OUT ANT.IN"]
    A --> K["• ScartLead to AV-IonTV."]

connecttheTVplugtothemainssocket

text_image
Plug the mainslead intotheTV ...
text_image
UK plug insert plug... ...and switch on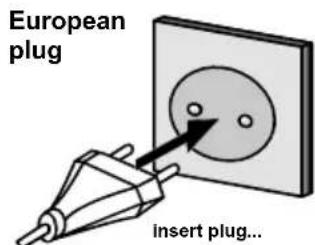
text_image
European plug insert plug...
switchyourTVon bypassingtheOn/Offbutton
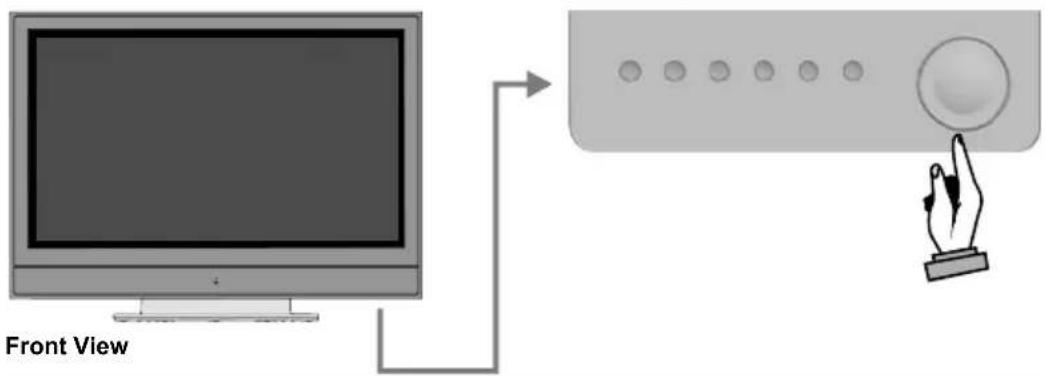
text_image
Front ViewNB: When the set is first switched on, the set will be in standby and the indicator on the front of the set will illuminate red. Press the channel up down (P-, P+) or numeric buttons (1, 2, 3, ...) to operate.
basicfunctionsofremotecontrol

text_image
To enter the main menu For navigation of the menus Volume Up/Down* To return to previous menu S MODE P ACIDE VII P Programme Up/Down* To select a programme number. GUIDE TLEUSHOW BOX/BL SWYELPHOTO*Also used for navigation in menus


importantnotebeforestartingAutoSetup
If you have a Video Cassette Recorder or a Satellite receiver connected to your TV please ensure that they are switched before automatic tuning begins. In the case of a VCR, insert a pre-recorded tape and begin playback of your equipment. These measures ensure that all you are external equipmentistuned during the Auto Setup procedure.
5
startA.P.S.(AutoProgrammingSystem)
1
When the TVisturnedonforthefirsttime, themenuforthelanguageselection appearonthescreen. Themessage "Welcomepleaseselectyour language!" iswritteninalllanguageoptionssequentiallyinthemenuonthe screen. Bypressingor button highlightthelanguageyouwanttosetand press"OK". After"then, FirsttimeInstallationMenuwillappearonscreen. By pressing or buttons, select country item you want to set and press "OK"
2
Afterthe FirstTimeInstallation isset, the following message appears on the screen.
3
To start automatic search, select "Yes", to cancel select "No". This process will take about five minutes. Tocancelsearching, you can press "button many timed during the process."
4
After AutomaticSearch processiscompleted, amessageaskingforanalogue channel search appears on the screen. To continue APS, first select the language and country by pressing ◀ button and then press the RED or "OK"button.
5
AfterAPSisfinalized, theprogrammablewillappearonthescreen. Fordetails ProgrammenupleaserefertotheInstallationMenusectionoftheinstruction book.

text_image
Firsttimeinstallation ChooseCountry OK Setcountryandcontinueinstallation UK
text_image
Do you want to start automatic search? Yes No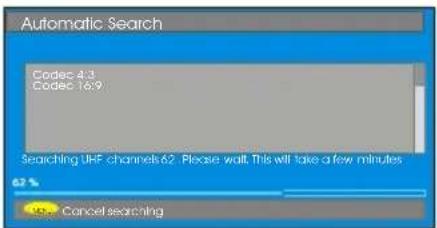
text_image
Automatic Search Codes 4.3 Codes 16.9 Searching UHF channels 62. Please wait. This will take a few minutes 62 % Cancel searching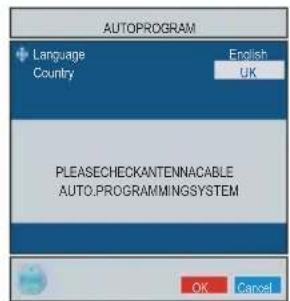
text_image
AUTOPROGRAM Language Country English UK PLEASECHECKANTENNACABLE AUTO.PROGRAMMINGSYSTEM OK Cancel
text_image
APS is running... UK - I 055,25 Mhz Cancel
importantnote.
OncetheTVhasfoundallyourlocalstations,theyarethenautomatically assignedaprogrammenumberandname,ifavailablefromthe broadcast.
HITACHI
Inspire the Next
Hitachi Ltd.
Consumer Business Group
Shin-Otemachi Bldg 5f, 2-1, Otemachi 2-Chome,
Chiyoda-Ku, Tokyo 100-0004 Japan
HITACHI EUROPE LTD. HITACHI EUROPE S.A.
Consumer Affairs Department 364, Kifissias Ave. & I, Delfon Str.
PO Box 3007 152 33 Chalandri
Maidenhead
Berkshire SL6 8ZE
Athens
GREECE
Tel: 1 - 6837200
UNITED KINGDOM
Tel: 0870 405 4405 Fax: 1 - 6835694
Email: consumer.mail@hitachi-eu.com Email: dmgservice.gr@hitachi-eu.com
HITACHI EUROPE GmbH HITACHI EUROPE S.A.
Munich Office Gran Via Carles III, 86 Planta 5 ^a
Dornacher Strasse 3 Edificios Trade - Torre Este
Email: customerservice.italy@hitachi-eu.com
HITACHI EUROPE AB
Box 77
SWEDEN
Tel: 08 562 711 00
Email: csgswe@hitachi-eu.com
HITACHI EUROPE S.A.S
Lyon Office
Digital Media Group
94 Quai Charles de Gaulles, 69006 Lyon
FRANCE
Tel: 04 72 14 29 70
Fax: 04 72 14 29 99 Email csgnor@hitachi-eu.com