GFC1238 Type 2 - Lawn mower BLACK & DECKER - Free user manual and instructions
Find the device manual for free GFC1238 Type 2 BLACK & DECKER in PDF.

User questions about GFC1238 Type 2 BLACK & DECKER
0 question about this device. Answer the ones you know or ask your own.
Ask a new question about this device
Download the instructions for your Lawn mower in PDF format for free! Find your manual GFC1238 Type 2 - BLACK & DECKER and take your electronic device back in hand. On this page are published all the documents necessary for the use of your device. GFC1238 Type 2 by BLACK & DECKER.
USER MANUAL GFC1238 Type 2 BLACK & DECKER
natural_image
Line drawing of a lawn mower with attached lever and handle (no text or symbols)GFC1234
GFC1238
GFC2438


A

natural_image
Line drawing of a lawn mower with adjustable arm and wheels (no text or symbols)
natural_image
Technical line drawing of a mechanical assembly with a bolt and bracket (no text or symbols)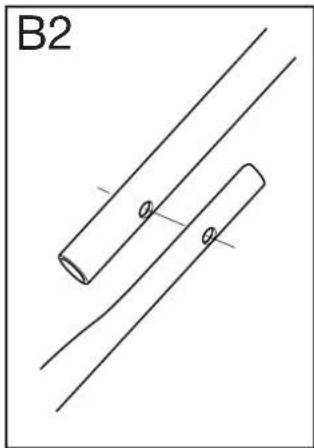
natural_image
Diagram of two cylindrical objects with parallel lines and two small circular features, labeled B2 (no text or symbols on the objects themselves)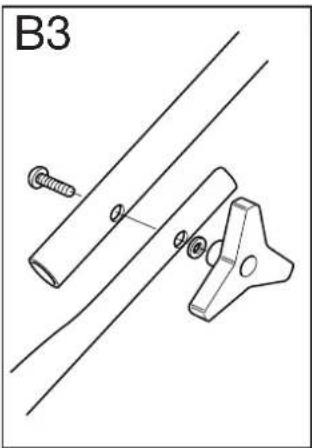
natural_image
Technical line drawing of a mechanical bracket assembly with bolts and a pin (no text or symbols)102


natural_image
Line drawing of a mechanical device with directional arrows indicating motion (no text or symbols)
natural_image
Line drawing of hands using a tool to cut a piece of food, no text or symbols present
text_image
C3 1 2 1 2 1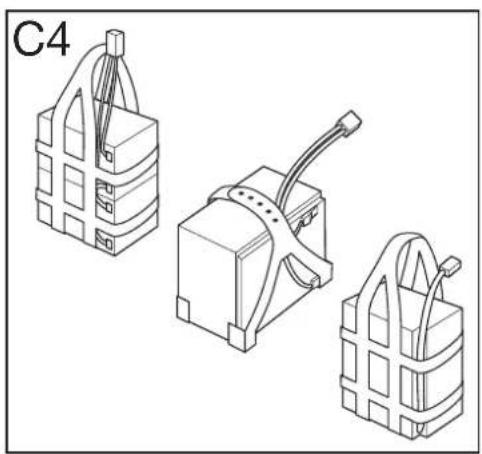
natural_image
Three technical line drawings of electrical components with wires, no text or symbols present
natural_image
Line drawing of a lawn mower with a roller, shown in perspective view (no text or symbols)
natural_image
Illustration of hands using a tool to lift a rope or cable (no text or symbols present)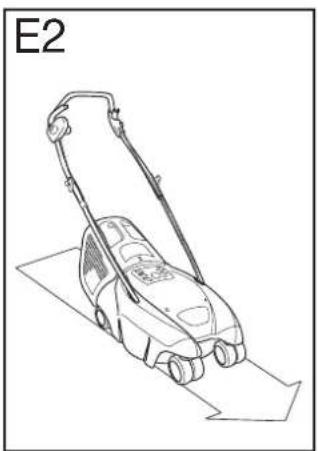
natural_image
Line drawing of a lawn mower on a ramp, labeled E2 (no text or symbols on the diagram itself)


text_image
E3
text_image
E4
text_image
E5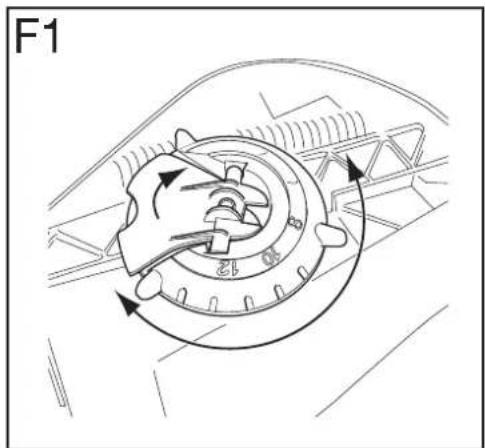
text_image
F1
natural_image
Line drawing of a hand using a tool to lift a cart with three wheels (no text or symbols)
natural_image
Line drawing of hands operating a mechanical component with a tool (no text or symbols)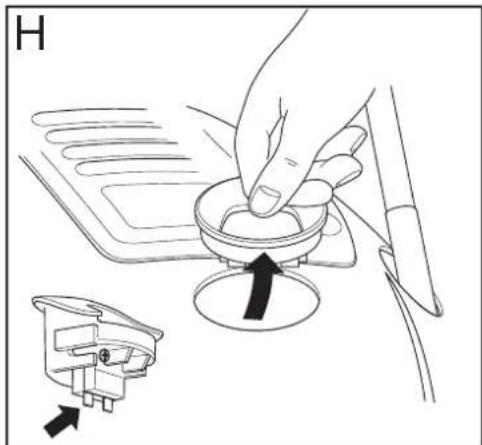
text_image
H


| English |
| Italiano |
| Deutsch |
| Français |
| Nederlands |
| Español |
| Português |
| Ελληνικά |
| Danmark |
| Suomi |
| Norge |
| Sverige |

BLACK&
DECKER
Cordless Rotary Lawnmower
User manual
Congratulations!
On your purchase of your Black & Decker cordless lawnmower.
This user manual provides important operating and maintenance instructions for all of the mowers in the Black & Decker 4x4 cordless range.
Know your mower
Read this manual carefully. Observe all the recommended safety instructions before, during and after using your machine, and maintain your machine in good working order.
Familiarise yourself with the controls on your machine before attempting to operate it, but above all, be sure you know how to stop your machine in an emergency.
Retain this manual and all other literature supplied with your machine for future reference.
Safety instructions
Training
- Never allow children or persons who are unfamiliar with this type of machine to use it, nor anyone who has not read this leaflet.
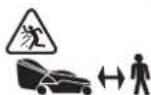
Do not allow children, animals or other persons near your machine when in use - always keep them at least 6m (20ft) away from the cutting area.
- Remember that the operator/user is responsible for accidents or hazards occurring to other people or their property.
Preparation
- To protect your feet, always wear stout shoes or boots - freshly cut grass is damp and slippery.
- Use a face mask if dusty.
- Do not operate in gaseous explosive atmospheres.
- Do not mow barefoot or in open sandals.
- Wear long trousers to protect your legs - any debris left on the lawn or cutting path may be picked up and ejected by the blades.
• Always be sure your machine is in a safe operating condition.
- Before using your machine, remove safety key and visually check that the blade, blade nut and cutter assembly are not worn or damaged. A damaged blade or worn blade nut is a major hazard and must be replaced. Also check that the blade nut is securely fastened.
- Always check that your lawn or cutting path is clear of all sticks, stones, wire and other debris. Contact with such debris may be dangerous or may damage your mower and could be thrown by the blade.
- Check grassbox frequently for wear or damage.
Operation
- When tilting the handle downwards (or to the side) to start your mower, do not tilt it more than is absolutely necessary. Always ensure that both hands are in the operating position and feet are well away from the blades before returning your mower to the ground, and commence cutting using both hands to guide it.
- Avoid accidental starting. Ensure switch is off when inserting safety key.

Your mower will continue to run for a short time after releasing the switch lever. Always allow your mower to stop on its own.
- Release switch lever to turn mower off and remove the safety key:
- Whenever you leave your machine unattended.
- Before checking, cleaning or working on the mower.
• Before clearing a blockage. -
If the mower starts to vibrate abnormally (check immediately).
• After striking a foreign object. Inspect the mower for damage and make repairs as necessary. -
Never run the unit whilst on its' side or attempt to stop the blade - always allow it to stop on its own.
- Do not put hands or feet near or under rotating parts.
- Keep clear of discharge openings at all times.

- Avoid using the machine during rain and avoid wet grass if possible.
- Mow only in daylight or good artificial light.
- Do not pull your machine towards you or walk backwards when mowing.
- Do not cross gravel paths or roads whilst the blade is rotating.
• Always be sure of your footing, particularly on slopes.
• Always mow across the face of slopes, never up and down. Exercise extreme caution when changing direction on slopes. - Do not cut excessively steep slopes and always wear non-slip footwear.
- Check the grassbag frequently for wear or damage, and replace if necessary.
- Walk, never run. Do not force the mower.
- Never pick up or carry your mower while the motor is running.
- Ensure the blades have stopped rotating when tilting for transporting the mower to and from the area to be mowed.
- When transporting your unit, always remove the safety key, adjust the cut height setting to a mid position and take extreme care when lifting.
- Never operate the mower with defective guards or shields.
- In order to prevent accidental starting or unauthorised use of your lawnmower, a removable safety key has been supplied with your mower. The mower will be completely disabled when this safety key has been removed from the mower. Always remove the key before doing any cleaning or maintenance and especially before changing the blade.
- If for any reason you come in contact with battery electrolyte flush with water immediately, seek medical advice if it comes in contact with eyes.
- Store your machine in a dry place when not in use, remove the safety key and place out of the reach of children.
- Do not use solvents or cleaning fluids to clean your machine - use a blunt scraper to remove grass and dirt. Always remove the safety key before cleaning.
- Do not charge or store the unit outdoors.
- Do not operate your machine if any parts are defective; discard all defective parts and fit new parts before use.
- Replace worn or damaged parts for safety.
Maintenance and storage
ENGLISH
- Keep all nuts, bolts and screws tight to be sure your mower is in a safe working condition.
- Use only Black & Decker recommended replacement parts and accessories.
Black & Decker's policy is one of continuous improvement to our products and, as such, we reserve the right to change product specifications without prior notice.
Features (Fig. A)
A
Your purchase of the Black & Decker lawnmower gives you a product combining quality with modern design and the following features, to provide safe, efficient and easy mowing.
- Cordless - there is no need for extension cables while mowing.
- Gasless - there is no need for petrol and oil to buy, mix, store or transport.
- Clean - there are no emissions, the mower is environmentally friendly.
- Rechargeable batteries - provides reliable power.
- Easy to start - starts first time every time.
- Specially designed switch box and safety key to prevent accidental starting of the mower.
- Ergonomically designed upswept handle for comfortable use and greater manoeuverability.
- A blade brake for added safety. Stops the blade from rotating within 3 seconds, once the switchbox lever is released.
• Large handle wing nuts for easy assembly and storage.
- Fourteen height of cut positions which provides the flexibility to deal with most grass conditions.
- Your mower has 360° rotating wheels for maximum manoeuvrability, which allows cutting right up to the edge of the lawn as well as around obstructions.
- The rear wheels are lockable to enable accurate straight-line cutting.
- Easy grassbox removal.
- Tough, durable plastic deck which will not rust and contributes to low noise and low vibration.
- Powerful and efficient permanent magnet motor which gives effective cutting and bagging in all reasonable conditions and a low noise level.
Carton contents
The carton contains:
1 Lawnmower body
1 Handle assembly (3 parts)
1 Grassbox assembly (2 parts)
1 Spanner/scraper
1 Screwdriver
1 Battery
1 Battery cover
1 Charger
1 Safety key
1 Spare fuse
2 Wing nuts
2 Washers
2 Shaped washers
2 Bolts for upper handle
2 Bolts for lower handle
5 Screws for grassbox
1 Wiper (UK only)
2 Screws for wiper (UK only)
2 Cable clips
1 Instruction manual
- Carefully unpack all parts.
Assembling the handle
- Place the mower with its wheels on a firm and level surface.
B1
- Insert the handle bars into the openings as shown in fig. B1, so that the curve makes them widen at the top.
- Secure each of the bars with a bolt and shaped washer as shown. Securely tighten the bolt using the spanner supplied.
B2
- Place the U-shaped upper handle bar onto the bars as shown.
B3
- Secure the upper handle bar using the bolts, washers and wing nuts as shown.
- Secure the cables to the handle using the cable clips supplied.
!
Do not use any tools to tighten the wing nuts.
Grassbox assembly (Fig. C)
The grassbox comes supplied in two halves. In order to assemble proceed as follows:
C1
- Align the two halves of the grassbox as shown.
- Fit the two halves together with the 5 screws, using the screwdriver supplied.
Fitting the grassbox to your mower:
C2
- The spring loaded rear flap is lifted and the top of the grassbox is placed over the mounting.
- The rear flap can now be released to lock the grassbox into position.
Removing the grassbox from your mower:
The full grassbox may be removed by raising the grassflap, freeing the grassbox from its mounting and resting it on the lawn. The grassflap can be gently lowered, leaving both hands free to lift the full grassbox.
C3
Battery Cover Fitting
- Assemble battery cover provided inserting hinge no.1 into mower body then push home hinge no.2.
C4
Fitting the Battery strap
- Locate the battery and its carrying strap.
• Fit the battery carrying strap as shown. - The strap should be kept on the battery at all times.
Battery information
- The battery in your cordless lawnmower is a sealed lead acid system. The battery employs an absorbed electrolyte and, can therefore, be stored in any position without fear of leakage.
!
The battery has been charged at the factory, but you will need to recharge it for a minimum of 30 hours before every use to make sure it is fully charged.
- For optimal performance the battery should be recharged after each use.
• For winter storage ensure:
- The mower is fully charged before storing.
- The temperature of the storage location is below 25°C.
• Storage duration is less than 6 months.
• Always store your mower in a dry and cool location.
- Keep the mower and battery away from water, heat sources (such as radiators, heaters, stoves etc.), flames or chemicals.
Charging instructions

• Always charge your mower indoors in a well ventilated area, where it is dry and protected from the weather.
- Charge mower in a location where the temperature is more than 5°C (41°F) and below 40°C (104°F).

Warning! Do not attempt to charge non-rechargeable batteries.
To charge
- The battery on your mower can be charged on the mower or can be removed and charged away from the mower if a mains socket is not at hand.
To charge the battery ON the mower
- Remove the safety key and store in a safe place away from children.
- Open the battery cover by sliding the catch and opening upwards.
- Disconnect the battery lead (red and black) by pulling it from the socket at the side of the battery recess.
- The red and black socket of the charger is then connected to the red and black socket of the battery.
Note: The charger socket will fit one way only.
- Connect the charger to the mains socket and switch on.
- The red indicator on the charger will turn on. This indicates that the battery is being charged.
Double light charger
- When the battery becomes charged, normal time 24 to 30 hours, the red light will go out and the green light will turn on.
- It is safe to leave your battery on charge until ready to use.
When charging is finished
- Disconnect the charger from the battery and connect the battery to the socket on the mower.
- Your mower is now ready for use.
To charge the battery OFF the mower
- Remove the safety key and open battery cover as described above and disconnect the battery.
- Lift out battery out of the mower using the carry handle.
- Charge as described above.
• After charging, replace in mower and connect to the mower socket.
ENGLISH
Battery disposal
When the mower's battery requires replacing discharge the energy from the battery by running the mower until the motor stops. Remove the battery from the mower.

Warning: The battery may still have some residual charge even after the motor stops. It is therefore necessary to protect against accidental short circuit of the battery terminals with uninsulated tools or materials of a conductive nature, such as, but not limited to steel wool or aluminium foil.
Batteries must be disposed of in a responsible manner.

This symbol indicates the lead acid battery contained within this unit must be disposed of properly and not discarded in everyday household waste which may be disposed of in an incinerator or landfill site.
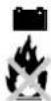
Lead acid batteries can be harmful to the environment and can explode when exposed to fire. Do not incinerate.
The battery should be taken to a Black & Decker service centre, your local dealer or your local recycling station. If necessary, contact your local authority for disposal information.
If the cutting performance begins to deteriorate, please refer to the "Fault finding" guide.

Warning! It is essential that the red lead is fitted to the red terminal and the black lead is fitted to the black terminal when installing a new battery.
How to use your mower (Fig. E)
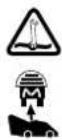
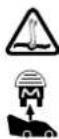
Important! Always observe all the relevant warnings when using your machine.

Warning! Never attempt to operate your machine with one hand. You must guide your machine with both hands.

Safety key
- In order to prevent accidental start-up or unauthorised use of your cordless mower, a removable safety key has been incorporated into the design of your mower. The mower will be completely disabled when this safety key has been removed from the mower.
• Always use the grassbox provided.

Warning! Always remove the safety key from mower when leaving it unattended, even for a short period of time.
- Your safety key will be found in the parts pack (plus one spare fuse).
Starting
- Insert the safety key into position and push fully home.
E1
- Tilt the handle downwards to slightly raise the front of your mower and to reduce the risk of lawn damage whilst starting, depress the safety lock-off button on the switchbox and whilst still depressed pull the switch lever towards you. Your mower will start and you can now allow the lock-off button to be released and lower your mower to its proper cutting position, and commence cutting using both hands to guide it.
- To turn the mower off, just release the lever. The spring-loaded "snap-action" lever will relocate itself back into its original position inside the switch housing.
Note: Your mower has 360^ rotating wheels for maximum manoeuvrability. The rear wheels can be locked into position for straight, accurate, cutting as follows:
E2
- Push the mower forwards until all the wheels rotate towards the rear of the mower.
E3
- Pull the locking lever on the left-hand side of the mower until the ratchet engages.
E4
- To unlock the wheels push the release button forwards.
E5
- Should the lever fully engage on the ratchet, but the rear wheels not lock into place, then release the lever, unscrew the cable adjustment by one turn and re-engage the lever and ratchet. Repeat until the wheels fully lock into position.
Your mower will continue to operate whilst you are pulling the switch lever. To stop your mower release the switch lever.
When you have finished using your mower we recommend that you clean all debris from it before putting it away. Refer to the 'Care and maintenance' section.
Note: To obtain the best results cut your lawn or grassed area regularly and do not cut when the grass is wet.
If, when mowing, loose grass is seen to be scattered from beneath the mower, the grassbag is probably full and should be emptied.
Manoeuverability (Fig. D)
Your mower has fully rotating wheels and as such is capable of manoeuvring around trees posts and other objects. It also allows accurate mowing of contoured features in your garden like flower beds.
For maximum manoeuvrability release the rear wheel locking mechanism by pushing the release button forwards.
Height of cut adjustment (Fig. F)

Warning! Remove the safety key before making any adjustment and give the blade time to stop rotating: the cutting blades are sharp.

- Flip the lever outwards and hold it firmly.
- Using the lever, rotate the knob to set the desired height of cut.
- Flip the lever back to lock the knob.

- To produce a stripe on your lawn, first slide the striping flap in position and fix with the 2 screws provided, then adjust the height of cut to a low position (UK only).
Note: For longer or uneven growth lawns (particularly the first cut of the season) first use a higher height setting and then finish with a second cut to the desired length.
Maintenance of blades
The steel blade is designed to give a fine finish in long or tough grass.
If, however, because of damage or wear the cutting performance deteriorates, then the mower may require a new blade, or at least the existing blade to be sharpened.
We recommend that the steel blade is sharpened or a new blade fitted at the beginning of the season.
Replacement blades are available from Black & Decker dealers and service centres.

Warning! When fitting a new blade use only the Black & Decker replacement part specified for your machine - do not attempt to fit any other blade.
Fitting new blade (Fig. G)

Observe all the relevant warnings before changing the blade.
Warning! Remove safety key before changing the blade.

- Turn your mower over on its side so that the underside of the cutter cover is exposed.
- Using a cloth placed over the blade or heavy duty gloves to protect your hands, grip the blade and, using a spanner, loosen and remove the nut from the motor spindle. Turn the nut in an anti-clockwise direction to loosen it.
- The blade can now be replaced and the washer and nut reassembled.
Note: Some mowers are fitted with a clutch washer, between the blade nut and the blade, which must be reassembled at all times.
Overload protection (Fig. H)
- Your machine is fitted with overload protection. If you work too quickly in long grass, or in heavy conditions, you may overload the motor. If this occurs, the safety key fuse will blow, causing the machine to stop.
- This is not a fault of the machine but a safety device to protect your machine.
- When this occurs, remove the safety key and inspect the fuse link. If link is broken, the fuse has blown and needs to be replaced with a new fuse. One of which is supplied as a spare in your parts pack. Alternatively, you can purchase a new key from any Black & Decker service centre.
To obtain the best results:
- Cut the grass regularly.
- Do not cut wet grass.
- When the grass is longer than 10cm (4 inches), it is advisable to go over the lawn on a high cut setting and then finish using a lower setting.
Care and maintenance
The advice given in this section covers the general care and maintenance of the main body of your mower. Advice relating to the blades is given in "Maintenance of blades". Advice relating to the maintenance and storage of the battery is given in "Battery information".
- Always keep your machine clean and free from grass cuttings, especially the underside of the cutter deck and the air vents.
- At the end of each cutting session we recommend that the build up of grass on the underside of the cutter cover is removed using a blunt scraper, the spanner included with this mower may be used for this purpose.
- Clean all plastic components with a damp cloth.
- Caution! Do not use solvents or cleaning fluids as these may damage the plastic components of your mower.
ENGLISH
Hints for optimum use
- When cutting long grass, set the mower to the highest height of cut.
- Fully charge the battery before first use.
- Charge the battery immediately after use.
- Before storing, fully charge the battery.
- Do not store the mower or battery at extreme temperatures.
- If the battery is stored for a long period of time, regularly charge it.
- Note that after prolonged storage the battery will only attain full capacity after several discharge/charge cycles.
Fault finding
If your mower does not operate correctly, use the following table to locate the problem.
Problem Solution
Mower does not run (a) Check to make sure safety key when switch lever has been inserted correctly. is activated (b) Remove the safety key, turn mower over and check that the blade is free to turn. (c) Has battery been fully charged? (d) Check that the fuse has not blown.
Mower stops when mowing (a) Remove safety key. Turn mower over and check that blade is free to turn. (b) Raise cutting height of wheels and start mower. (c) Has battery been fully charged? (d) Inspect safety key fuse link, if broken the safety key has blown and requires replacement.
Mower runs but cutting (a) Has battery been fully charged? performance is poor (b) Battery may need replacing. Refer to 'Battery disposal' section.
Mower is too hard to push (a) Raise cutting height to reduce drag on grass. Check each wheel for ease of rotation.
Mower is abnormally noisy (a) Remove safety key. Turn unit and vibrates on its side and check blade for
damage. If damaged replace with Black & Decker replacement blade, (b) If there is no visible damage to the blade or underside of the mower return to your local service centre or authorised dealer.

Warning! Always remove safety key before carrying out any inspection.
Protecting the environment
Tools

Black & Decker provides a facility for recycling Black & Decker products and rechargeable batteries once they have reached the end of their working life. This service is provided free of charge. To take advantage of this service please return your product to any authorised repair agent who will collect them on our behalf.
Batteries

Black & Decker batteries can be recharged many times. At the end of their useful life, discard batteries with due care for our environment:
- Run the battery down completely, then remove it from the tool.
- Batteries are recyclable. Take them to any authorised repair agent or a local recycling station.
You can check the location of your nearest authorised repair agent by contacting your local Black & Decker office at the address indicated in this manual. Alternatively, a list of authorised Black & Decker repair agents and full details of our after-sales service and contacts are available on the Internet at: www.2helpU.com.
Guarantee
Black & Decker is confident of the quality of its products and offers an outstanding guarantee. This guarantee statement is in addition to and in no way prejudices your statutory rights. The guarantee is valid within the territories of the Member States of the European Union and the European Free Trade Area.
If a Black & Decker product becomes defective due to faulty materials, workmanship or lack of conformity, within 24 months from the date of purchase, Black & Decker guarantees to replace defective parts, repair products subjected to fair wear and tear or replace such products to ensure minimum inconvenience to the customer unless:
• The product has been used for trade, professional or hire purposes;
- The product has been subjected to misuse or neglect;
• The product has sustained damage through foreign objects, substances or accidents;
- Repairs have been attempted by other persons than authorised repair agents or Black & Decker service staff.
To claim on the guarantee, you will need to submit proof of purchase to the seller or an authorised repair agent. You can check the location of your nearest authorised repair agent by contacting your local Black & Decker office at the address indicated in this manual. Alternatively, a list of authorised Black & Decker repair agents and full details of our after-sales service and contacts are available on the Internet at: www.2helpU.com.
Other outdoor tools
Black & Decker has a full range of outdoor power tools that make life in the garden easy. If you would like further information on the following products, please contact our Service and Information Centre (see the address page towards the end of this manual) or your local Black & Decker retailer.
String trimmers
Chainsaws
Cordless shear
Hedgetrimmers
Lawnmowers
Lawnrakers
Leafbusters
Shredders
Not all products are available in all countries.
EC Declaration of Conformity
GFC1234/GFC1238/GFC2438
Black & Decker declares that these tools conform to:
98/37/EC, 89/336/EEC, 73/23/EEC,
EN 55014, EN 60335, EN 61000,
2000/14/EC, Lawn mower, L ≤ 50 cm, Annex VIII, No. 0086
B.S.I., HP2 4SQ, United Kingdom
Level of sound pressure, measured according to 2000/14/EC:
L_pA (sound pressure) dB(A) 79
L_wa (acoustic power) dB(A) 93
L_WA (guaranteed) dB(A) 96
Hand/arm weighted vibration value according to EN 50144: < 2.5 m/s²

Brian Cooke
Director of Engineering
Spennymoor, County Durham DL16 6JG,
United Kingdom
1-12-2001
B.S.I., HP2 4SQ, United Kingdom
Director of Engineering
Spennymoor, County Durham DL16 6JG,
United Kingdom
1-12-2001
Tondeuse 4x4 sans fil
1 Poignée (3 parties)
1 Bac de ramassage (2 parties)
B.S.I., HP2 4SQ, United Kingdom
Director of Engineering Spennymoor, County Durham DL16 6JG, United Kingdom 1-12-2001
Spennymoor, County Durham DL16 6JG,
United Kingdom
1-12-2001
2000/14/CEE, corta-relvas, L ≤ 50 cm, Annex VIII, No. 0086
B.S.I., HP2 4SQ, Reino Unido
Reservedele / reparationer
B.S.I., HP2 4SQ, United Kingdom
Director of Engineering
Spennymoor, County Durham DL16 6JG,
United Kingdom
1-12-2001
Akkuruohonleikkuri
Käyttöohje
Onnittelut!
Director of Engineering Spennymoor, County Durham DL16 6JG, United Kingdom 1-12-2001
98/37/EØF, 89/336/EØF, 73/23/EØF,
EN 55014, EN 60335, EN 61000,
2000/14/EØF, Gressklipper, L ≤ 50 cm, Annex VIII, No. 0086
B.S.I., HP2 4SQ, England
Lydnivået, målt i henhold til 2000/14/E∅F:
L_24 (lydnivå) dB(A) 79
L_w4 (lydeffekt) dB(A) 93
L_wA (garantert) dB(A) 96
Director of Engineering
Spennymoor, County Durham DL16 6JG,
United Kingdom
1-12-2001
Batteridriven gräsklippare
Bruksanvisning
Grattis!
B.S.I., HP2 4SQ, England
Director of Engineering
Spennymoor, County Durham DL16 6JG, United Kingdom
1-12-2001
Reservdelar / reparationer
other
| Component | Number | |-----------|--------| | Battery pack | 108 | | Motor | 110 | | Battery casing | 132 | | Motor housing | 133 | | Battery casing box | 134 | | Motor housing box | 209 | | Motor housing box | 206 | | Motor housing box | 195 | | Motor housing box | 196 | | Motor housing box | 197 | | Motor housing box | 199 | | Motor housing box | 201 | | Motor housing box | 200 | | Motor housing box | 207 | | Motor housing box | 208 | | Motor housing box | 140 | | Motor housing box | 138 | | Motor housing box | 143 | | Motor housing box | 145 | | Motor housing box | 146 | | Motor housing box | 150 | | Motor housing box | 151 | | Motor housing box | 154 | | Motor housing box | 155 | | Motor housing box | 156 | | Motor housing box | 158 | | Motor housing box | 159 | | Motor housing box | 160 | | Motor housing box | 161 | | Motor housing box | 157 | | Motor housing box | 800 | | Motor housing box | 165 | | Motor housing box | 166 | | Motor housing box | 167 | | Motor housing box | 168 | | Motor housing box | 300 | | Battery casing | 120 | | Battery casing | 121 | | Battery casing | 122 | | Battery casing | 123 | | Battery casing | 124 | | Battery casing box | 170 LH | | Battery casing box | 171 RH | | Battery casing box | 170 LH | | Battery casing box | 170 LH | | Battery casing box | 170 LH | | Battery casing box | 170 LH | | Battery casing box | 700 | E13067 www.2helpU.com 24 - 11 - 2000
natural_image
Empty white canvas with black border, gray squares, and a color palette at top (no text or symbols)| Australia DEWALT Industrial Power Tool Company Tel. 03 9895 92007 Clarice Road, Box Hill, Victoria 3128 Fax 03 9899 7465 | ||
| Belgique/België Black & Decker (Belgium) N.V. Tel. 02/719.07.11Weihoek 1, 1930 Zaventem Fax 02/719.08.10 | ||
| Danmark Black & Decker Tel. 70 20 15 10Hejrevang 26B, 3450 Allerød Fax 48 14 13 99Internet: www.blackdecker.dk | ||
| Deutschland Black & Decker GmbH Tel. 06126/21 24 83Black & Decker Str. 40, D - 65510 Idstein Fax 06126/21 26 01 | ||
| Ελλάς Black & Decker (Ελλάς) A.E. Τηλ. (01) 8981-616Στράβωνος 7 & Βουλιαγμένης 159 Φαξ (01) 8983-570Γλυφάδα 16674, Ελλάδα Service (01) 8982-630 | ||
| España Black & Decker Spain Tel. 934 797 400Parque de Negocios "Mas Blau" Fax 934 797 419Edificio Muntadas, c/Bergadá, 1, Of. A608820 El Prat de Llobregat (Barcelona) | ||
| France | Black & Decker (France) S.A.S.B.P. 21, 69571 Dardilly Cédex | Tel. 04 72 20 39 20Fax 04 72 20 39 00 |
| Helvetia | Eduard LuggenBlack & Decker-Service SchweizIndustriestrasse 1 / Postfach 3238157 Dielsdorf | Tel. 01/854 01 01Fax 01/854 02 02 |
| Italia | Black & Decker Italia SpAViale Elvezia 220052 Monza (MI) | Tel. 039-23871Fax 039-2387592/2387594Numero verde 800-213935 |
| Nederland | Black & Decker (Nederland) BVFlorijnstraat 10, 4879 AH Etten-Leur | Tel. 076-5082000Fax 076-5038184 |
| New Zealand | Black & Decker Tel. 09 579 760081 Hugo Johnson DrivePenrose, Auckland, New Zealand | Fax 09 579 8200 |
| Norge | Black & Decker (Norge) A/SPostboks 248, Leirdal, 1011 OsloInternet: www.blackdecker.no | Tlf. 22 90 99 00Fax 22 90 99 01 |
| Österreich | Black & Decker Vertriebsges.m.b.H Tel. 01 66116-0Erlaaerstraße 165, 1231 Wien | Fax 01 66116-14 |
| Portugal | Black & Decker Tel. 214667500Rua Egas Moniz 173,2766-651 S. João do Estoril | Fax 214667575 |
| South Africa | Black & Decker South Africa (Pty) LtdPhysical address:39'Commerce CrescentEastgate, ext. 12, Sandton, Kramerville 2148Postal address:Postnet Suite 107, Private Bag X65Halfway House 1685 | Tel. (011) 653-1400Fax (011) 653-1499 |
| Suomi Black & Decker Oy Palotie 3, 01610 Vantaa | Puh: (09) 825 4540Fax: (09) 825 45 444 | |
| Black & Decker Oy,Brandvägen 3, 01610 Vanda | Tel: (09) 825 4540Fax: (09) 825 45 444 | |
| Sverige | Black & Decker ABBox 603, 421 26 Västra Frölunda,Besöksadr. Ekonomivägen 11 | Tel: 031-68 60 00Fax: 031-68 60 08 |
| Türkiye | Black & Decker Merkez ServisDudullu Cad. Kerembey Sok. No. 1Küçükbakkalköy/Istanbul | Tel. 0216 455 89 73Faks 0216 455 20 52 |
| United Kingdom | Black & Decker Tel. 01753 511234210 Bath RoadSlough, Berkshire SL1 3YD | Fax 01753 551155Helpline 01753 574277 |
| Forhandler adresseHändleradresseΔιεύθυνση αντιπροσώπουAddress of dealerDirección del detallistaCachet du revendeurIndirizzo del rivenditoreAdres van de dealerForhandlerens adresseMorada do revendedorJälleenmyyyjän osoiteÄterförsäljarens adress | IndkøbsdatoKaufdatumΗμερομηνία αγοράσDate of purchaseFecha de compraDate d'achatData d'acquistoAankoopdatumInnkjøpsdatoData de compraOstopäiväInköpsdatum |
| Navn/Name/Ovoç/Name/Nombre/Nom/Nome/Naam/Navn/Nome/Nimi/Namn:____Adresse/Adresse/ΔιεύθυνσηAddress/Dirección/Adresse/Indirizzo/Adres/Adresse/Morada/Osoite/Adress:________By/Wohnort/Πόλη/Town/Ciudad/Ville/Cittá/Plaats/By/Localidade/Paikkakunta/By:____Postnr./Postleitzahl/Kωδικόο/Postcode/Code postal/Código/Codice postale/Postcode/Postnr./Código postal/Postinumero/Postnr.:____Er maskinen en gave?/Ist diese Maschine ein Geschenk?/H μηχανή είναι δώρο?/Is this product a gift?/? Ha recibido usted esta herramienta como regalo?/S'agit-il d'un cadeau?/Si tratta di un regalo?/Kreeg u deze | machine cadeau?/Er maskinen en gave?/Recebeu esta ferramenta como presente?/Onko kone lahja?/?Är maskinen en gåva?Ja/Ja/Naɪ/Yes/Si/Oui/Si/Ja/Ja/Sim/Kyllä/JaNej/Nein/Oχι/No/No/Non/No/Nee/Nei/Não/Ei/NejHvor meget kostede maskinen?/Was war der Preis dieses Werkzeuges?/?Ποιά είναι τιμή του εργαλείου autού?/?What was the price of this tool?/?Cual fue el precio de esta herramienta?/?Prix payé?/?Quanto ha pagato questo prodotto?/?Wat was de prijs van dit produkt?/?Hvor meget kostet maskinen?/?Que preço pagou por esta ferramenta?/?Paljonko kone maksoi?/?Hur myket kostade maskinen?____Er dette din første B&D maskine?/?Ist dieses Werkzeug.-/Eivai to εργαλείο autó-/?Is this tool-/?Es esta herramienta que comprado.-/Est-ce-/?Questo prodotto è-/Is deze machine.-/Er dette din første B&D maskin?/?Esta ferramenta è-/Onkotämä ensimmäinen B&D-koneesi?/?Är detta Din första B&D-velu?↑ | Ja/ein Erstkauf?/?η πρώτη σσσ αγορὰ?/?your first purchase?/?la primera de este tipo?/?un ler achat?/?il suo primo acquisto?/?uw eerste aankoop?/?Ja/a sua primeira compra?/?Kyllä/JaNej/Ersatzkauf?/?γιαντικατάσταση?/?a replacement?/?un reempalzo?/?un achat de remplacement?/?una sostituzione?/?een vervanging?/?Nei/uma substitução?/?Ei/NejForhandler adresse/Händleradresse/Διεύθυνση αντιπροσώπου/Address of dealer/Dirección del detallista/Cachet du revendeur/Indirizzo del rivenditore/Dealeradres/Forhandlerens adresse/Morada dorevendedor/Jälleenmyyjän osoite/Äterförsäljarens adressCat. no. GFC1234/GFC1238/GFC2438 | Venligst sæt kryds i ruden såfremt De ikke måtte ønske at modtage information fra anden virksomhed end Black & Decker.Bitte ankreuzen, falls Sie weiteres Informationsmaterial von Black & Decker erhalten möchten.Паракалеюθε να σημειώσετε εάν δέν θέλετε να πάρετε πληροφορίες άλλησε σταιρείσα εκτόσ τησα Black & Decker.Data protection act: Tick the box if you prefer not to receive information from us or others.Señale en la casilla sino quiere recibir información de otras empresas.Si vous ne souhaitez pas recevoir d'informations de la part d'autres sociétés que Black & Decker, cochez cette case.Barrate la casella se non desiderate ricevere informazioni da altre aziende.A.u.b.dit vakje aankruisen indien u geen informatie wenst te ontvangen van andere bedrijven dan Black & Decker.Vennligst kryss av dersom De ikke ønsker informasjon fra andre bedrifter enn Black & Decker.Por favor, assinale com uma cruz se desejar receber informação de outras empresas, além da Black & Decker.Merkitkää rasti ruutuum, mikäli ette halua vastaanottaa informaatiota muulta taholta kuin Black & Deckeriltä.Vänligen kryssa för i rutan om Ni inte vill ha information från andra företag än Black & Decker. |
| Denmark | Veniligst kilp denne del ud og send trankeret tl Black & Decker it dit land. | Per favore triangilate guesta parte, insertela in una questa con francobolllo e speditela subito dopo l'acquisito del prodotto all'indirizzo della Black & Decker nella votstra nazione (vedi sopra). | Italieno | Sverige | for favorre triangilate guesta parte, insertela in una questa con francobolllo e speditela subito dopo l'acquisito del prodotto all'indirizzo della Black & Decker nella votstra nazione (vedi sopra). |
| Deutsch | Bite schiniden Sie diesen Abschnitt ab, stecken ihn in einen frankerten umschlag und schicken ihn direct an die Black & Decker Adresse Ihres Landeds. | Black & Decker Adresse Ihres Landeds. | Nederlands | Krip dit gedelete ut, zend het in een gefrankeerde, geadreseserde envelop direct na uw aankoop naar het black & Decker-adres in uw land (zie boven). Veniligst kilp ut denne delen umiddelbat efter du har pakket ut dit product og legg dat ! en adresser konvolut till Black & Decker (Norge) A/S (se adresse over). | Your product and post it to the Black & Decker addresses in your country (above).If you live in Australia or New Zealand, please register by phone. Portuguese:For favor, recorte esta parte, colouge-a num envolope selado e anderegado a entveio-log opas a compra de seu produto para o anderego da Black & Decker de seu país. Leiikaa ini timaa osa, laita se ohisiean kuronen ja postita kwori yllä oltevan pakaliliesen Black & Decker ositteseen. Var vanlig klipp ur denna del. Skiry Ditt namn och adress pa est frankerat kuer, och sand det genast till Black & Deckeres adress ! Ditt land (se oven). |
| Elnviwka | Hapapackau kohyte auto to koulqui kat TaxUpoployte to alizago hierd tiny apyoda tou produvtro dao onty bisduvorn into Black & Decker onty elaloda (Pabnte nduw). | Norge | Nordans | for favor, recorte esta parte, colouge-a num envolope selado e anderegado a entveio-log opas a compra de seu produto para o anderego da Black & Decker de seu país. Lesikaa ini timaa osa, laita se ohisiean kuronen ja postita kwori yllä oltevan pakaliliesen Black & Decker ositteseen. Var vanlig klipp ur denna del. Skiry Ditt namn och adress pa est frankerat kuer, och sand det genast till Black & Deckeres adress ! Ditt land (se oven). | |
| English Please complete this section immediately after the purchase of your product and post it to the Black & Decker addresses in your country (above). | |||||
| Español | Despues de haber comprado su herramienta envite usted, por favor, esta tariete a la central de Black & Decker en su país. | Soumi | Portugues | If you live in Australia or New Zealand, please register by phone. | |
| Français | Decoupez cette partie et envoyez-1a sous envolope timbre a l'adresse de Black & Decker dans votre pays (voir ci-dessus), cecl immediatement apres votre actat. | ||||
| Nederland | Florinstraat 10, 4879 AH Etten-Leuer |
| New Zealand | Call 0900 97766 (max. call charge $2.00 ex. tax) |
| Norge | Stromsveien 344, 1081 Oslo |
| Osterreich | Elaeier Strasse 165, 1231 Wien |
| South Africa | Black & Decker, Suite 107, PN X65, Halfway Hse, 1685 |
| Suomi | Black & Decker, OY, Ralsstine 7C, 01510 Vantaa |
| Sverige | Box 603, 421 26 Vastra Fruinda |
| UK & Ireland | PO Box 821, Slough, Berkshire, SL1 34R |
Australia Call 1900 937766 (max. call charge \$2.00) Belgique/België Weihoek 1, 1930 Zaventem Denmark Heijrevang 26B, 3450 Allerod Deutschland Black & Decker Str. 40, D-65510 Idstein Emdo Black & Decker EMdo, Συγρου 154, 17671 Kolλθέα España 43883 Roda de Barà (Tarragona) France BP21, 69571 Dardilly Cedex Helvetia Rütistraße 14, 8952 Schlieren, Schweiz Italia Viale Elvezia 2, 20052 Monza (MI)
Nederland New Zealand Norge Österreich Portugal Rua Egas. Moniz 173, S. João do Estoril, 2768 Estoril Codex South Africa Suomi Sverige UK & Ireland Fiorijnstraat 10, 4879 AH Etten-Leur Call 0900 97766 (max. call charge \$2.00 ex. tax) Strømsveien 344, 1081 Oslo Erlaer Straße 165, 1231 Wien Black & Decker Suite 107, PN X65, Halfway Hse, 1685 Box 603, 421 26 Västra Frölunda PO Box 821, Slough, Berkshire, SL1 3AR
• GARANTI KORT • GARANTIEKARTE • KAPTA ETYH2H2 • GUARANTEE CARD • TARJETA DE GARANTIA • CARTE DE GARANTIE • TAGLIANDO DI GARANZIA • GARANTIE-KAART • GARANTI KORT • CARTÃO DE GARANTIA • TAKUUKORTI • GARANTIBEVIS