DOS-560C - Baby monitor ALECTO - Free user manual and instructions
Find the device manual for free DOS-560C ALECTO in PDF.

User questions about DOS-560C ALECTO
0 question about this device. Answer the ones you know or ask your own.
Ask a new question about this device
Download the instructions for your Baby monitor in PDF format for free! Find your manual DOS-560C - ALECTO and take your electronic device back in hand. On this page are published all the documents necessary for the use of your device. DOS-560C by ALECTO.
USER MANUAL DOS-560C ALECTO
natural_image
Alecto medical device displaying a sleeping baby's face on screen, next to a white spherical device (no text or symbols visible on device body)natural_image
Diagram of a mechanical device with a coiled cable and attached ring, showing internal components (no text or symbols)natural_image
Mechanical assembly diagram showing a cylindrical component connected to a ring with wires, no visible text or symbolsThis wireless unit will give you added security and comfort for many years. The DOS-560C is easy to install in almost any place where you need audio/video surveillance. To safely use all the high technical functions of the wireless unit, please read the installation and operating instructions in this manual and keep it for future reference.
FEATURES
- Highly reliable stable wireless circuit to assure best quality picture
- Compact, lightweight, versatile and wireless system
- Easy to install and operate
- 5,6 Inch color LCD monitor
- Low, minimum lighting requirement
The Alecto DOS-560C complies to the essential requirements and provisions as described in the European Directive 1999/5/EC. The declaration of conformity is available on the website www.alecto.info

text_image
ion www.Alecto.INFOThe usage of the wireless audio/video system is free of license. It cannot be guaranteed that the transmission is without interference caused by other wireless systems or atmospheric disturbance.
Read the following precautions prior to install or use the system:
* Do not let any light shine directly into the camera's lens.
* The monitor is for indoor use only. The camera can be placed outdoors. The monitor and the camera are not suitable for usage in areas in which aggressive or explosive damp can or will occur.
* Always use the supplied power adapter for monitor and camera.
* Prior to install the system, test its functionality.
* During use, the power adapter, monitor and camera will get warm. Never cover the cooling openings of the adapter, monitor and camera.
FUNCTIONS
Monitor (fig.1):
- A B C D: indication which channel is displayed
- SCAN: lights when the SCAN function is activated
- VOLUME: volume control
-
OFF-ON-LCD OFF: OFF: monitor switched OFF ON: monitor switched ON
LCD OFF: monitor switched ON but without image -
CHANNEL: selection button channel-1 \~ channel 4
-
and brightness adjustment
-
12V DC: power input connector 12VDC / 600mA
-
AV OUTPUT: output for recording on a VCR or for connecting to a standard TV set
Camera (fig.2):
1 Infrared LED's: illuminates close objects in a dark surrounding
2 CCD-Camera lens: delivers sharp image to the CCD sensor.
3 Channel-LED's: indication selected channel
4 Mic.: built-in microphone
5 OFF 1 2 3 4 : power switch of the camera / selector switch between the 4 channels
6 DC-jack: power input connector 9VDC / 500mA
INSTALLATION
Monitor:
- Find a correct place for the monitor.
- Connect the supplied power adapter (12VDC / 600mA) to the monitor and plug the adapter in a 230 Volt mains outlet.
- You can connect the audio/video output to a VCR to record the sound and the image.
Camera:
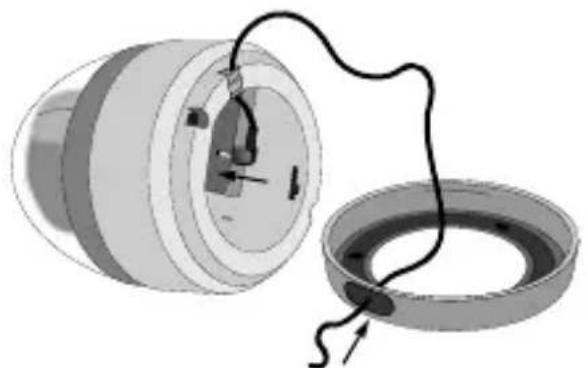
- Remove the mounting-ring from the camera (turn anti clockwise) and mount this ring on the required location.
-
Adapter cord coming from behind: Connect the adapter cord with the DC 12V jack on the camera-unit
-
Adapter cord coming from aside: Remove the small cover from the ring and pull the adapter cord through this hole. Pay attention to use the cord-throughput and connect the power plug with the DC 12V jack on the camera-unit
natural_image
Mechanical assembly diagram showing a cylindrical component connected to a ring with wires (no text or symbols)- Use the OFF 1 2 3 4 switch (bottom side camera) to assign the channel. (it is advised to now momentarily connect the power adapter with a mains socket to check whether the signal is received well by the monitor).
- Mount the camera onto the mounting-ring.
- Remove the plastic cover from the camera, aim the camera and place back the cover.
- After the power adapter is connected with a 230 Volt outlet, the unit is ready for use.
AV-output:
Use this output to connect to a standard TV set for better viewing or to connect to a VCR for recording. The required AV-cable can be obtained through the Alecto Service department on telephone number +31 (0)73 6411355.
USAGE
Camera:
- Use the "OFF 1 2 3 4" switch to select the cannel you want to use. (select OFF to switch-off the camera).
- Turn the camera on the observed subject.
Monitor:
- Slide the "OFF ON LCD-OFF" switch into position ON to switch-on the receiver.
- Use button "CHANNEL" to select the same channel as you selected on the camera.
- You can control the audio level using the "VOLUME" controller.
- Use buttons and to adjust the brightness.
In case the selected channel is disturbed or is in use by another transmitter, use the “CHANNEL” switch to select another channel. The camera and the monitor must both be set to the same channel.
Scan:
In case more camera's are to be observed, you can select the SCAN mode with button "CHANNEL". With 6 seconds interval, all 4 channels are scanned and its picture will come on the screen.
Sound only:
Slide the "OFF ON LCD-OFF" switch into position LCD-OFF to switch-off the image but to keep the sound.
CARE AND MAINTENANCE
- Only clean the monitor and the camera with a soft and moistures cloth. Never use chemical cleansers.
- Avoid placing in a strong electromagnetic field or close to radio transmitters, the audio and video quality might be disturbed.
- Do not locate the camera and/or monitor close to sensitive electronic equipment.
- Do not place the camera and/or monitor in direct sunlight.
- The monitor is for indoor use only. Do not use the monitor in a moisture surrounding.
- The use of the set under extreme conditions (temperature, moisture, etc), might reduce the lifetime of the video observation system.
- At the end of the product lifecycle, you should not throw this product into the normal household garbage but bring it to a collection point for the recycling of electrical and electronic equipment.

natural_image
Mechanical assembly diagram showing a cylindrical component connected to a ring with wires, no visible text or symbolsYou have a guarantee of 12 months after the date of purchase of this Alecto DOS-560C. We guarantee during this period the free repair of defects caused by material- and construction faults. This at the importers discretion. It is only possible to claim to the guarantee when you enclose your purchase ticket.
HOW TO ACT:
If you notice a defect, consult the manual first. If this manual gives you no definite answer, consult your dealer with a clear description of your complaint. He will collect the device together with this guarantee card and the dated purchase ticket and he will take care of a prompt repair, respectively free sending to the importer.
THE GUARANTEE EXPIRES:
When used inexpert, faulty connections, use of unoriginal parts or accessories, negligence and defects caused by fire, flood, stroke of lightning and natural disasters. With unqualified modifications or repairs by third persons. With incorrect transport without a suitable packing. If the device is not handed in with the correct filled in guarantee card and the purchase ticket.
All further responsibilities, in particular subsequent damages, are excluded.
GARANTIESCHEIN
Name:
Adresse:
Postleitzahl:
Ort:
Telefonnummer:
Bewahren
Ihren
Ka
text_image
1 2 3 Pheas
text_image
4 + ME M 2W 6 5 MF A B C EAfb. 2
Illustr. 2
Fig. 2
Abb. 2