Clavinova CLP-F01 - Piano YAMAHA - Free user manual and instructions
Find the device manual for free Clavinova CLP-F01 YAMAHA in PDF.

User questions about Clavinova CLP-F01 YAMAHA
0 question about this device. Answer the ones you know or ask your own.
Ask a new question about this device
Download the instructions for your Piano in PDF format for free! Find your manual Clavinova CLP-F01 - YAMAHA and take your electronic device back in hand. On this page are published all the documents necessary for the use of your device. Clavinova CLP-F01 by YAMAHA.
USER MANUAL Clavinova CLP-F01 YAMAHA
Check your power supply
Make sure that your local AC mains voltage matches the voltage specified on the name plate on the bottom panel. In some areas a voltage selector may be provided on the rear of the main unit near the power cord. Make sure that the voltage selector is set for the voltage in your area. The voltage selector is set at 240V when the unit is initially shipped. To change the setting use a "minus" screwdriver to rotate the selector dial so that the correct voltage appears next to the pointer on the panel.
WICHTIG
For information on assembling the keyboard stand, refer to the instructions at the end of this manual.
PRODUCT SAFETY MARKINGS: Yamaha electronic products may have either labels similar to the graphics shown below or molded/stamped facsimiles of these graphics on the enclosure. The explanation of these graphics appears on this page. Please observe all cautions indicated on this page and those indicated in the safety instruction section.

text_image
CAUTION RISK OF ELECTRIC SHOCK DO NOT OPEN CAUTION: TO REDUCE THE RISK OF ELECTRIC SHOCK. DO NOT REMOVE COVER (OR BACK). NO USER-SERVICEABLE PARTS INSIDE. REFER SERVICING TO QUALIFIED SERVICE PERSONNEL.See bottom of Keyboard enclosure for graphic symbol markings.

The exclamation point within the equilateral triangle is intended to alert the user to the presence of important operating and maintenance (servicing) instructions in the literature accompanying the product.

The lightning flash with arrowhead symbol, within the equilateral triangle, is intended to alert the user to the presence of uninsulated “dangerous voltage” within the product’s enclosure that may be of sufficient magnitude to constitute a risk of electrical shock.
IMPORTANT NOTICE: All Yamaha electronic products are tested and approved by an independent safety testing laboratory in order that you may be sure that when it is properly installed and used in its normal and customary manner, all foreseeable risks have been eliminated. DO NOT modify this unit or commission others to do so unless specifically authorized by Yamaha. Product performance and/or safety standards may be diminished. Claims filed under the expressed warranty may be denied if the unit is/has been modified. Implied warranties may also be affected.
SPECIFICATIONS SUBJECT TO CHANGE: The information contained in this manual is believed to be correct at the time of printing. However, Yamaha reserves the right to change or modify any of the specifications without notice or obligation to update existing units.
ENVIRONMENTAL ISSUES: Yamaha strives to produce products that are both user safe and environmentally friendly. We sincerely believe that our products and the production methods used to produce them, meet these goals. In keeping with both the letter and the spirit of the law, we want you to be aware of the following:
Battery Notice: This product MAY contain a small non-rechargeable battery which (if applicable) is soldered in place. The average life span of this type of battery is approximately five years. When replacement becomes necessary, contact a qualified service representative to perform the replacement.
Warning: Do not attempt to recharge, disassemble, or incinerate this type of battery. Keep all batteries away from children. Dispose of used batteries promptly and as regulated by applicable laws. Note: In some areas, the servicer is required by law to return the defective parts. However, you do have the option of having the servicer dispose of these parts for you.
Disposal Notice: Should this product become damaged beyond repair, or for some reason its useful life is considered to be at an end, please observe all local, state, and federal regulations that relate to the disposal of products that contain lead, batteries, plastics, etc.
NOTICE: Service charges incurred due to lack of knowledge relating to how a function or effect works (when the unit is operating as designed) are not covered by the manufacturer's warranty, and are therefore the owners responsibility. Please study this manual carefully and consult your dealer before requesting service.
NAME PLATE LOCATION: The graphic below indicates the location of the name plate. The model number, serial number, power requirements, etc., are located on this plate. You should record the model number, serial number, and the date of purchase in the spaces provided below and retain this manual as a permanent record of your purchase.
text_image
ClaynsModel
Serial No.
Purchase Date
PRECAUTIONS
PLEASE READ CAREFULLY BEFORE PROCEEDING
* Please keep this manual in a safe place for future reference.

WARNING
Always follow the basic precautions listed below to avoid the possibility of serious injury or even death from electrical shock, short-circuiting, damages, fire or other hazards. These precautions include, but are not limited to, the following:
Power supply/Power cord
- Only use the voltage specified as correct for the instrument. The required voltage is printed on the name plate of the instrument.
- Check the electric plug periodically and remove any dirt or dust which may have accumulated on it.
- Use only the supplied power cord/plug.
- Do not place the power cord near heat sources such as heaters or radiators, and do not excessively bend or otherwise damage the cord, place heavy objects on it, or place it in a position where anyone could walk on, trip over, or roll anything over it.
Do not open
- Do not open the instrument or attempt to disassemble the internal parts or modify them in any way. The instrument contains no user-serviceable parts. If it should appear to be malfunctioning, discontinue use immediately and have it inspected by qualified Yamaha service personnel.
Water warning
- Do not expose the instrument to rain, use it near water or in damp or wet conditions, or place containers on it containing liquids which might spill into any openings.
- Never insert or remove an electric plug with wet hands.
Fire warning
- Do not put burning items, such as candles, on the unit. A burning item may fall over and cause a fire.
If you notice any abnormality
- If the power cord or plug becomes frayed or damaged, or if there is a sudden loss of sound during use of the instrument, or if any unusual smells or smoke should appear to be caused by it, immediately turn off the power switch, disconnect the electric plug from the outlet, and have the instrument inspected by qualified Yamaha service personnel.

CAUTION
Always follow the basic precautions listed below to avoid the possibility of physical injury to you or others, or damage to the instrument or other property. These precautions include, but are not limited to, the following:
Power supply/Power cord
- When removing the electric plug from the instrument or an outlet, always hold the plug itself and not the cord. Pulling by the cord can damage it.
- Remove the electric plug from the outlet when the instrument is not to be used for extended periods of time, or during electrical storms.
- Do not connect the instrument to an electrical outlet using a multiple-connector. Doing so can result in lower sound quality, or possibly cause overheating in the outlet.
Assembly
- Read carefully the attached documentation explaining the assembly process. Failure to assemble the instrument in the proper sequence might result in damage to the instrument or even injury.
Location
- Do not expose the instrument to excessive dust or vibrations, or extreme cold or heat (such as in direct sunlight, near a heater, or in a car during the day) to prevent the possibility of panel disfiguration or damage to the internal components.
- Do not use the instrument in the vicinity of a TV, radio, stereo equipment, mobile phone, or other electric devices. Otherwise, the instrument, TV, or radio may generate noise.
- Do not place the instrument in an unstable position where it might accidentally fall over.
- Before moving the instrument, remove all connected cables.
Connections
- Before connecting the instrument to other electronic components, turn off the power for all components. Before turning the power on or off for all components, set all volume levels to minimum. Also, be sure to set the volumes of all components at their minimum levels and gradually raise the volume controls while playing the instrument to set the desired listening level.
Maintenance
- Gently remove dust and dirt with a soft cloth. Do not wipe too hard since small particles of dirt can scratch the instrument's finish.
- When cleaning the instrument, use a soft, dry or slightly damp cloth. Do not use paint thinners, solvents, cleaning fluids, or chemical-impregnated wiping cloths.
Handling caution
- Take care that the key cover does not pinch your fingers, and do not insert a finger or hand in any gaps on the key cover or instrument.
- Never insert or drop paper, metallic, or other objects into the gaps on the key cover, panel or keyboard. If this happens, turn off the power immediately and unplug the power cord from the AC outlet. Then have the instrument inspected by qualified Yamaha service personnel.
- Do not place vinyl, plastic or rubber objects on the instrument, since this might discolor the panel or keyboard.
- Bumping the surface of the instrument with metal, porcelain, or other hard objects can cause the finish to crack or peel. Use caution.
- Do not rest your weight on, or place heavy objects on the instrument, and do not use excessive force on the buttons, switches or connectors.
- Do not operate the instrument for a long period of time at a high or uncomfortable volume level, since this can cause permanent hearing loss. If you experience any hearing loss or ringing in the ears, consult a physician.
Using the bench (If included)
- Do not place the bench in an unstable position where it might accidentally fall over.
- Do not play carelessly with or stand on the bench. Using it as a tool or step-ladder or for any other purpose might result in accident or injury.
- Only one person should sit on the bench at a time, in order to prevent the possibility of accident or injury.
- If the bench screws become loose due to extensive long-term use, tighten them periodically using the included tool.
Saving data
Saving and backing up your data
- Depending upon the Backup Settings (page 50), internal data is retained for about 1 week after the power is turned off. If the period is exceeded, the data will be lost. Be sure to turn the power switch on for a few minutes at least once a week. The data could be lost due to malfunction or incorrect operation. Save important data to external media such as the Yamaha MDF3 MIDI data filer.
Backing up the external media
- To protect against data loss through media damage, we recommend that you save your important data onto two external media.
Yamaha cannot be held responsible for damage caused by improper use or modifications to the instrument, or data that is lost or destroyed.
Always turn the power off when the instrument is not in use.
Thank you for purchasing the Yamaha Clavinova! We recommend that you read this manual carefully so that you can fully take advantage of the advanced and convenient functions of the Clavinova.
We also recommend that you keep this manual in a safe and handy place for future reference.
About this Owner's Manual
This manual consists of three main sections: "Introduction," "Reference" and "Appendix."
■ Introduction (page 2):
Please read this section first.
■ Reference (page 15):
This section explains how to make detailed settings for the Clavinova's various functions.
■ Appendix (page 67):
This section introduces reference material.
* T he models CLP-F01 will be referred to as the CLP/Clavinova in this Owner's Manual.
* The illustrations and LED displays shown in this owner's manual are for instructional purposes only and may appear somewhat different from those on your instrument.
COPYRIGHT NOTICE
This product incorporates and bundles computer programs and contents in which Yamaha owns copyrights or with respect to which it has license to use others' copyrights. Such copyrighted materials include, without limitation, all computer software, MIDI files, WAVE data. Any unauthorized use of such programs and contents outside of personal use is not permitted under relevant laws. Any violation of copyright has legal consequences. DON'T MAKE, DISTRIBUTE OR USE ILLEGAL COPIES.
Trademarks:
• A pple and Macintosh are trademarks of Apple Computer, Inc.
- Windows is a registered trademark of Microsoft® Corporation.
• A ll other trademarks are the property of their respective holders.
"The Clavinova-Computer Connection," is a supplementary guidebook that describes, for beginners, what you can do with your Clavinova and a personal computer and how to set up a Clavinova-Computer system (the manual is not written for any specific models). The document is available as a PDF file (in English) at the following Internet address.
Yamaha Manual Library:
http://www2.yamaha.co.jp/manual/english/
Table of Contents
Introduction
Application Index...... 7
Accessories 8
Features......9
Before Using the Clavinova 10
Key Cover ....10
Music Rest 11
Turning the Power On....12
Setting the Volume....13
Using Headphones (option)....13
Using the Speaker Switch....13
Reference
Panel Controls and Terminals...... 16
Listening to the Demonstration Tunes .... 18
Listening to 50 Piano Preset Songs ...... 19
Practicing a One-Hand Part Using 50 Preset Songs (Part Cancel Function) .....20
A-B Repeat for 50 Preset Songs ....22
Selecting & Playing Voices...... 23
Selecting Voices....23
Using the Pedals 23
Adding Variations to the Sound – [VARIATION]/[BRILLIANCE]/ [REVERB]/[EFFECT]......24
Touch Sensitivity - [TOUCH] ......26
Transposition - [TRANSPOSE]......27
Combining Two Voices (Dual mode)....28
Splitting the Keyboard Range and Playing Two Different Voices (Split mode)....29
Using the Metronome....31
Recording Your Performance 32
Recording to [TRACK 1]....32
Re-recording TRACK 1....34
Recording to [TRACK 2]....34
Changing the Initial Settings (Data recorded at the beginning of a song) ....36
Playing Back Recorded Songs ....37
Playing Back a Song.... 37
Useful Playback Functions 38
Detailed Settings - [FUNCTION]...... 39
Basic Procedure in Function Mode 40
About Each Function.... 42
F1. Fine Tuning of the Pitch.... 42
F2. Selecting a Scale.... 43
F3. Dual Mode Functions 44
F4. Split Mode Functions...... 45
F5. Other Functions 46
F6. Metronome Volume 47
F7. Preset Song Part Cancel Volume...... 47
F8. MIDI Functions.... 47
F9. Backup Functions.... 50
About MIDI....51
Connections ....52
Connectors.... 52
Connecting a Personal Computer 54
Troubleshooting....58
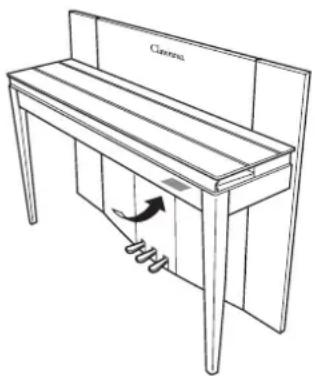
Keyboard Stand Assembly 59
Preset Voice List 62
Demo Song List ......64
Index......65
Appendix
Factory Setting List ......68
MIDI Data Format ....69
MIDI Implementation Chart ....73
Specifications 74
Application Index
Use this index to find reference pages that may be helpful for your particular application and situation.
Listening
Listening to demo songs with different voices.... "Listening to the Demonstration Tunes" on page 18 Listening to songs from "50 Greats for the Piano".... "Listening to 50 Piano Preset Songs" on page 19 Listening to my recorded performance.... "Playing Back Recorded Songs" on page 37
Playing
Using the three performance control pedals.... "Using the Pedals" on page 23 Playing an accompaniment that matches pitch.... "Transposition – [TRANSPOSE]" on page 27 Selecting a touch sensitivity type.... "Touch Sensitivity – [TOUCH]" on page 26 Fine tuning the pitch of the entire instrument when you play the Clavinova along with other instruments or CD music.... "Fine tuning of the pitch" on page 42
Changing voices
Viewing the list of voices....“Preset Voice List” on page 62 Simulating a concert hall....“[REVERB]” on page 24 Combining two voices....“Combining Two Voices (Dual mode)” on page 28 Playing different sounds with left and right hands ....“Splitting the Keyboard Range and Playing Two Different Voices (Split mode)” on page 29 Making the sound more brilliant or mellower....“[BRILLIANCE]” on page 24 Adding spread or swell to the sound....“[EFFECT]” on page 25 Enhancing the sound with effects....“[VARIATION]” on page 24
Practicing
Muting the right- or left-hand part ....“Practicing a One-Hand Part Using 50 Preset Songs (Part Cancel Function)” on page 20 Practicing a specified phrase repeatedly....“A-B Repeat for 50 Preset Songs” on page 22 Practicing with an accurate and steady tempo ....“Using the Metronome” on page 31 Practicing using your recorded song....“Recording Your Performance” on page 32
Recording
Recording your performance...... “Recording Your Performance” on page 32
Settings
Adjusting the Clavinova settings .... "Detailed Settings – [FUNCTION]" on page 39
Connecting the Clavinova to other devices
What is MIDI? ......"About MIDI" on page 51 Recording your performance......"AUX OUT jacks" on page 52 Raising the volume......"AUX OUT jacks" on page 52 Outputting other instruments' sound from the Clavinova......"AUX IN jacks" on page 53 Connecting a computer ......"Connecting a Personal Computer" on page 54
Assembling
Assembling and disassembling the Clavinova .... “Keyboard Stand Assembly” on pages page 59–61
Accessories
- "50 Greats for the Piano" (Music Book)
- Owner's Manual
This manual contains complete instructions for operating your Clavinova.
- Bench
A bench may be included or optional, depending on your locale.
Tuning
Unlike an acoustic piano, the Clavinova does not need to be tuned. It always stays perfectly in tune.
■ Transporting
If you move to another location, you can transport the Clavinova along with your other belongings. You can move the unit as it is (assembled) or you can disassemble the unit.
Transport the keyboard horizontally. Do not lean it up against a wall or stand it up on its side. Do not subject the instrument to excessive vibration or shock.
Features
The Yamaha Clavinova CLP-F01 digital piano offers unmatched sonic realism and natural grand-piano type playability as well as Yamaha's original "AWM Dynamic Stereo Sampling" tone-generation technology for rich, musical voices, and a newly wooden keyboard that provides graded key weight and response throughout the keyboard range.
The Grand Piano 1, 2 and 3 voices feature totally samples painstakingly recorded from a full concert grand piano. The Grand Piano 1 and 3 voices feature three velocity-switched samples (Dynamic Sampling), special “Sustain Sampling” (page 88) that samples the unique resonance of an acoustic grand piano’s soundboard and strings when the damper pedal is pressed, and “Keyoff Samples” that add the subtle sound produced when the keys are released. The CLP-F01 comes much closer to the sound of a true acoustic piano.

flowchart
graph TD
    A["TEMPO [▼"] [▲]/FUNCTION
You can change the song tempo (speed) and select useful functions using this buttons (pages 39–50).] --> B["[METRONOME"]
Control the metronome functions (page 31).]
    B --> C["[DEMO"]
Demonstration play-back is available for each voice (page 18).]
    C --> D["[BRILLIANCE"]
Adjust the brightness of the tone using this control (page 24).]
    D --> E["[MASTER VOLUME"]
Adjust the volume level using this control (page 13).]
    E --> F["This switch turns the internal speakers on or off (page 13)."]
    F --> G["A set of standard stereo headphones can be plugged in here for private practice (page 13)."]
    H["The Clavinova includes 50 preset songs.<br>This section enables you to listen to these songs, practice using a convenient practice function, and record and play back your performance (pages 19–22, 32–38)."] --> I["[REVERB"] / [EFFECT]
Add reverb (reverberation) and effects to the sound (pages 24, 25).]
    I --> J["Voice buttons<br>Select voices from 28 internal sounds including Grand Piano (page 23). You can also combine two voices at the same time (page 28)."]
    J --> K["[TRANSPOSE"]
You can shift the pitch of the entire keyboard up or down so that the pitch will match that of another instrument or singer, while you play the same, unshifted keys (page 27).]
    K --> L["[TOUCH"]
Fine-tune the touch response (page 26).]
    M["Connect recording equipment (such as a cassette tape recorder) here to record your performance (page 52)."] --> N["Delivers the output of the Clavinova for connection to an instrument amplifier, mixing console, PA system, or recording equipment (page 53)."]
    N --> O["This jack and selector switch allow direct connection to a personal computer for sequencing and other music applications (pages 54–57)."]
    O --> P["Connect a MIDI device here to use various MIDI functions (pages 47–49). (About MIDI → page 51)"]
Before Using the Clavinova
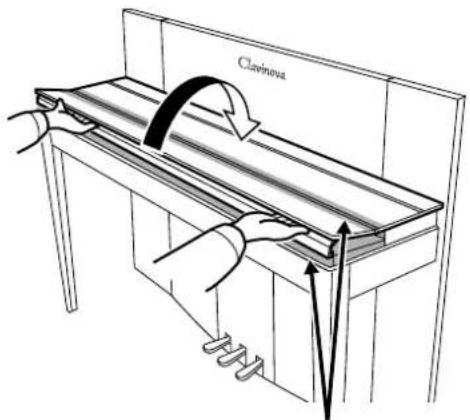
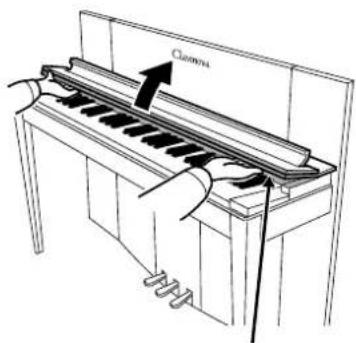
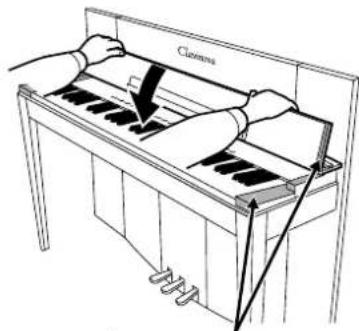
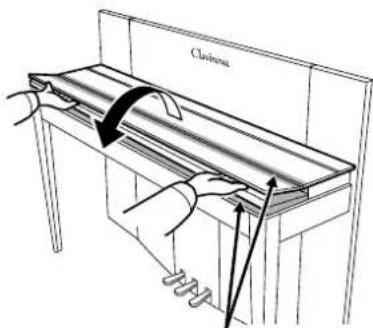
Key Cover
To open the key cover:
- To open the cover, insert your fingers in the indentations on its front, lift the cover gently and fold it back.
text_image
Clavinova
CAUTION
Be careful to avoid catching your fingers when opening or closing the cover.
- Raise the folded cover and lean it against the front panel.
text_image
Cancilla
CAUTION
Be careful to avoid catching your fingers when opening or closing the cover.
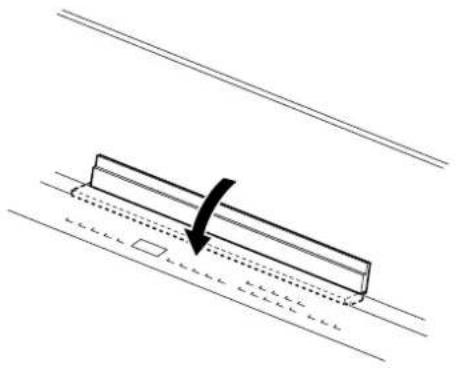
To close the key cover:
-
If the music rest (page 11) is raised, lift it up and against the cover.
-
Pull the cover down and toward yourself gently.
text_image
Closms
CAUTION
Be careful to avoid catching your fingers when opening or closing the cover.
- Unfold the cover and gently lower its front half.
text_image
Cltrinsic
CAUTION
Be careful to avoid catching your fingers when opening or closing the cover.

CAUTION
Hold the key cover with both hands when opening or closing it, and do not release it until it is fully opened or closed. Be careful to avoid catching fingers (yours or others, and especially those of children) in folding portion or between the cover and main unit.
Music Rest
The music rest is attached to the inside of the key cover.
To position the music rest for use:
Pull the music rest on the cover down and toward yourself.
natural_image
Diagram of a mechanical component with a black arrow indicating force direction, placed on a horizontal surface (no text or symbols)To replace the music rest:
Lift the music rest up and against the cover.
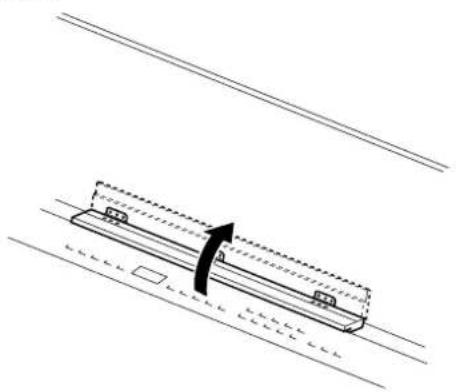
natural_image
Diagram of a mechanical component with a curved arrow indicating motion, no text or symbols presentTurning the Power On
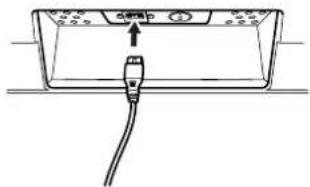
1. Connect the power cord.
Insert the plugs at the ends of the cord, one into the AC INLET on the Clavinova, and the other into a standard AC outlet.
In some areas, a plug adaptor may be provided to match the pin configuration of the AC wall outlets in your area.
①
text_image
drip②

natural_image
Diagram of a plug inserted into an electrical outlet (no text or symbols)(The shape of plug differs depending on locale.)
2. Turn the power on.
Press the [POWER] button.
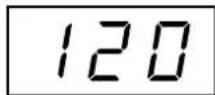
- The display located in the center of the front panel and the power indicator located below the left end of the keyboard lights up.
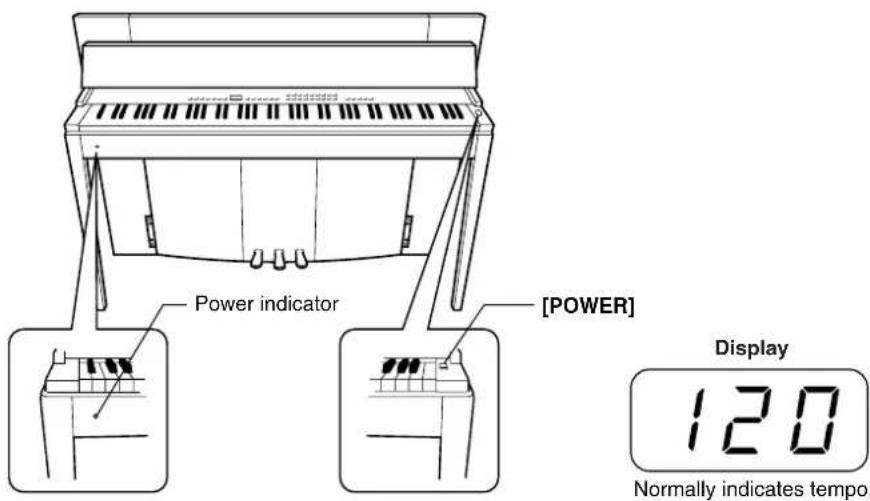
text_image
Power indicator [POWER] Display 120 Normally indicates tempo.When you're ready to turn off the power, press the [POWER] button again.
• T he display and the power indicator turn off.
TIP
Power indicator
If you close the key cover without turning the power off, the power indicator remains lit, indicating that the power is still on.
Setting the Volume
Initially set the [MASTER VOLUME] control about halfway between the "MIN" and "MAX" settings. Then, when you start playing, re-adjust the [MASTER VOLUME] control to the most comfortable listening level.
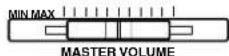
The level decreases. The level increases.

CAUTION
Do not use the Clavinova at a high volume level for a long period of time, or your hearing may be damaged.
TERMINOLOGY
MASTER VOLUME:
The volume level of the entire keyboard sound.
TIP
You can also adjust the [PHONES] output level and the AUX IN input level using the [MASTER VOLUME] control.
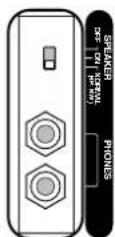
Using Headphones (option)
Connect a pair of headphones to one of the [PHONES] jacks. Two [PHONES] jacks are provided.
You can connect two sets of standard stereo headphones. (If you are using only one pair of headphones, you can plug them into either jack.)
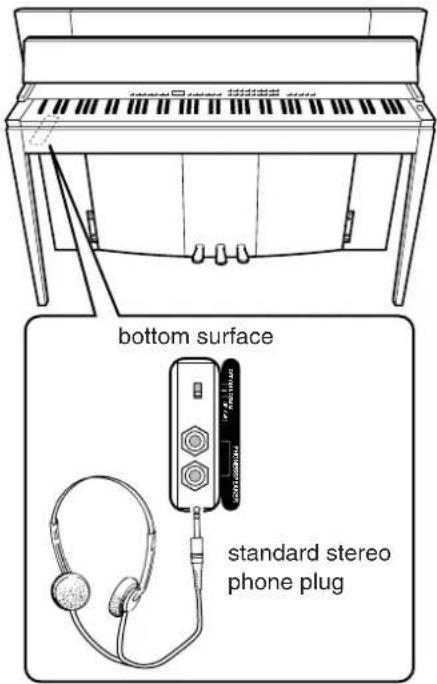
text_image
bottom surface standard stereo phone plugUsing the Speaker Switch
This switch turns the internal speakers on or off.
NORMAL (HP. SW) ...... The speakers produce sound as long as a pair of headphones is not connected.
ON .... The speakers always produce sound.
OFF The speakers produce no sound.
MEMO
Reference
This section explains how to make detailed settings for the Clavinova's various functions.
Panel Controls and Terminals 16
Listening to the Demonstration Tunes 18
Listening to 50 Piano Preset Songs.... 19
Practicing a One-Hand Part Using 50 Preset Songs (Part Cancel Function)....20
A-B Repeat for 50 Preset Songs 22
Selecting & Playing Voices 23
Selecting Voices 23
Using the Pedals 23
Adding Variations to the Sound – [VARIATION]/[BRILLIANCE]/[REVERB]/[EFFECT].... 24
Touch Sensitivity - [TOUCH].... 26
Transposition - [TRANSPOSE]...... 27
Combining Two Voices (Dual mode)....28
Splitting the Keyboard Range and Playing Two Different Voices (Split mode) 29
Using the Metronome....31
Recording Your Performance.... 32
Recording to [TRACK 1] 32
Re-recording TRACK 1....34
Recording to [TRACK 2] 34
Changing the Initial Settings (Data recorded at the beginning of a song).... 36
Playing Back Recorded Songs 37
Playing Back a Song 37
Useful Playback Functions.... 38
Detailed Settings - [FUNCTION].... 39
Basic Procedure in Function Mode.... 40
About Each Function 42
F1. Fine Tuning of the Pitch 42
F2. Selecting a Scale.... 43
F3. Dual Mode Functions 44
F4. Split Mode Functions 45
F5. Other Functions.... 46
F6. Metronome Volume 47
F7. Preset Song Part Cancel Volume 47
F8. MIDI Functions.... 47
F9. Backup Functions.... 50
About MIDI....51
Connections 52
Connectors 52
Connecting a Personal Computer.... 54
Troubleshooting.... 58
Keyboard Stand Assembly 59
Preset Voice List....62
Demo Song List....64
Index 65
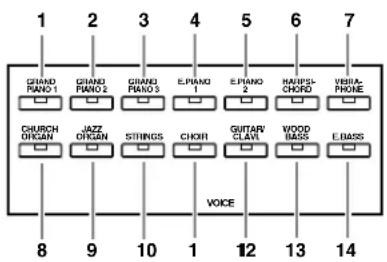
Panel Controls and Terminals
Top panel

text_image
② MIN MAX MASTER VOLUME MELLOW | BRIGHT BRILLIANCE DEMO START/STOP METRONOME TEMPO FUNCTION# TEMPO/OTHER VALUE 8.8.8. ③ TEMPO/FUNCTION # ④ ⑤ ⑥ ⑦ - NO YES + △ ○ USER 1 ○ USER 2 ○ USER 3 TRACK TRACK START/STOP REC 1 2 ▼/■ ● SONG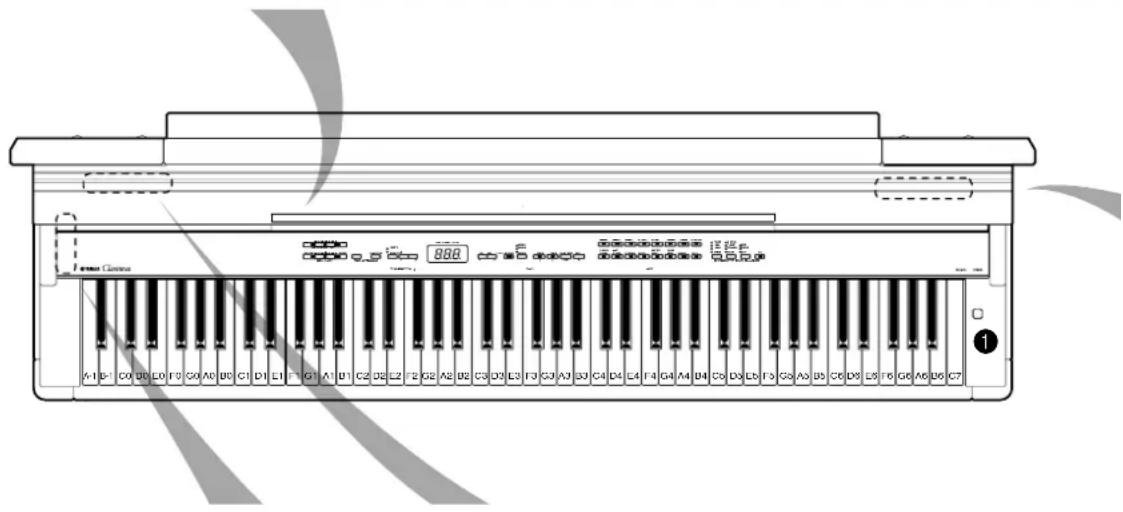
text_image
888 A1 B- C0 D6 L0 F3 G0 A0 B0 C1 D1 L1 F1 G1 A1 B1 C2 D3 L2 F2 G2 A2 B2 C3 D3 L3 F3 G3 A3 D4 D5 F4 G4 A4 D6 D6 L6 F5 G5 A5 B5 C6 D6 L7 F6 G6 A6 D6 C7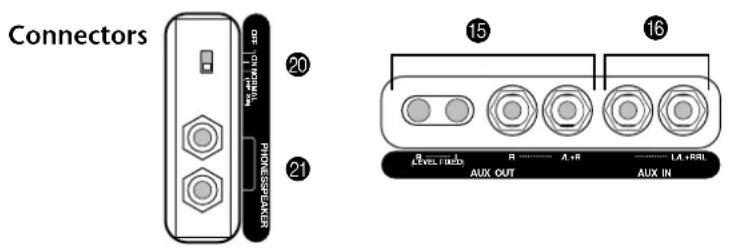
text_image
Connectors 20 21 15 16 LEVEL FIXED R ...... A+R ...... LA+IRL AUX OUT AUX IN① [POWER] ......P12
② [MASTER VOLUME] ......P13
③ [BRILLIANCE]..... P24
④ [DEMO].....P18
⑤ METRONOME [START/STOP].....P31
⑥ [TEMPO/FUNCTION #▲▼] .....P31, 40
⑦ LED display.....P17
⑧ [−/NO] / [+/YES] [PRESET] [USER 1] [USER 2] [USER 3] [TRACK 1] [TRACK 2] SONG [START/STOP] [REC] ......P19–22, P32–38
⑨ Voice buttons ......P23
10 [SPLIT].....P29
11 [REVERB].....P24
12 [EFFECT].... P25
13 [TOUCH] P26
14 [TRANSPOSE] P27
15 AUX OUT ...... P52
16 AUX IN.... P53
17 [TO HOST] P51-57
18 HOST SELECT P51-57
19 MIDI [IN] [OUT] [THRU] ...... P51–57
20 [SPEAKER].... P13
21 [PHONES].... P13
22 Soft (Left) Pedal..... P24
23 Sostenuto (Center) Pedal..... P24
24 Damper (Right) Pedal ...... P23
text_image
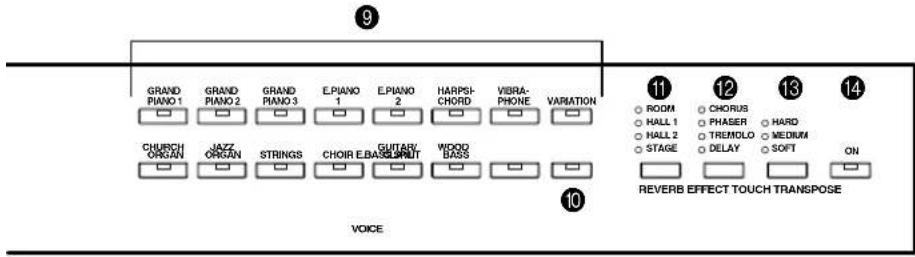
9 GRAND PIANO 1 GRAND PIANO 2 GRAND PIANO 3 E.PIANO 1 E.PIANO 2 HARPSI-CHORD VIBRA-PHONE VARIATION CHURCH ORGAN JAZZ ORGAN STRINGS CHOIR E.BASKOUT WOOD BASS VOICE 10 11 ROOM CHORUS HALL 1 PHASER HALL 2 TREMLO STAGE DELAY ON 12 13 14 REVERB EFFECT TOUCH TRANSPOSE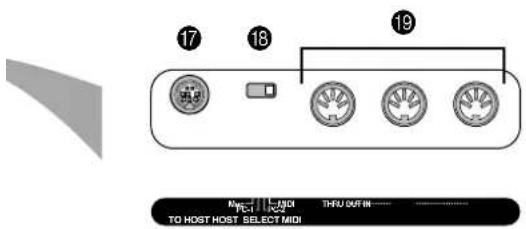
text_image
17 18 19 NO. THU OUT IN TO HOST HOST SELECT MIDI
natural_image
Line drawing of three identical footshells with numbered labels (22, 23, 24) and vertical supports, no text or symbols present.Display
• C check the operation on the display in the center of the top panel as you proceed.
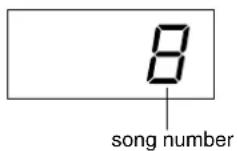
• T he display indicates different values, as shown below, depending on the operation.
Tempo (Normal indication)

A song number of "50 Greats for the Piano"

Function number Parameter value
Listening to the Demonstration Tunes
Demonstration tunes are provided that effectively demonstrate each of the CLP-F01's voices.

text_image
2 5 MAYAIC DATA DATA DATA DATA DATA DATA DATA DATA DATA DATA DATA DATA DATA DATA DATA DATA DATA DATA DATA DATA DATA DATA DATA DATA DATA DATA DATA DATA DATA DATA DATA DATA DATA DATA DATA DATA DATA DATA DATA DATA DATA DATA DATA DATA DATA DATA DATA DATA DATA DATA DLETATION 8.88. SONG. 3 3 VIVEProcedure
1 Turn the power on.
(In case the power is not turned ON) Press the [POWER] button.
When the power is turned ON, one of the voice button LEDs will light.
Initially set the [MASTER VOLUME] control about half way between the “MIN” and “MAX” settings. Then, when you start playing, re-adjust the [MASTER VOLUME] control to the most comfortable listening level.
2 Engage Demo mode.
Press the [DEMO] button to engage Demo mode. The voice button indicators will flash in sequence.
Press one of the voice buttons to start playback of all songs starting from the corresponding voice demo tune — featuring the voice normally selected by that voice button. (If you press the SONG [START/STOP] button instead of a voice button, the GRAND PIANO 1 demo tune will begin playback.)
Adjust the volume/brilliance
Use the [MASTER VOLUME] control to adjust the volume and the [BRILLIANCE] control to adjust the brilliance (page 24).
Press the SONG [START/STOP] button or the voice button of the currently-playing demo to stop playback.
5 Exit from Demo mode.
Press the [DEMO] button to exit from Demo mode and return to normal play mode.
The voice button indicators will stop flashing in sequence.
TIP
For a list of the demo songs, see page 64.
NOTE
MIDI reception is not possible in Demo Song mode.
Demo song data is not transmitted via the MIDI connectors.
NOTE
Demo mode cannot be engaged while a user song recorder (page 32) or user song playback (page 37) is in use.
TERMINOLOGY
Mode:
A mode is a status under which you can execute a certain function. In Demo mode, you can play back demonstration tunes.
NOTE
You cannot adjust the tempo of demo songs.
You cannot use the part cancel function (page 47) or the song A–B repeat function (page 22) in Demo mode.
NOTE
You can demo the piano voices with various effects by pressing the [VARIATION] button, then pressing the desired voice button. Refer to the "Piano Voice Demo Description" on page 64 for the complete list of demo sounds for the piano voices with various effects.
Listening to 50 Piano Preset Songs
The Clavinova provides performance data of 50 piano songs. You can simply listen to these songs (page 19) or use them for practice (page 20). You can also refer to the included “50 Greats for the Piano” that contains scores for 50 piano preset songs.

text_image
2-1 1 4 2-2 3 MACHINE VOLUME FULLER PATTERN ..... LILK BELLAR COLD MUSHROOM TEST FUNCTION # 8.88 STANDARD VALVE 0.153 1 ... 0.167 0.153 1 ... 0.167 0.153 1 ... 0.167 0.153 1 ... 0.167 0.153 1 ... 0.167 0.153 1 ... 0.167 0.153 1 ... 0.167 0.153 1 .../0.153 1 0.153 1 .../0.153 1 0.153 1 .../0.153 1 0.153 1 .../0.153 1 0.153 1 .../0.153 1 0.153 1 .../0.153 1 0.153 1 .../0.152 1 0.153 1 .../0.152 1 0.153 1 .../0.152 1 0.153 1 .../0.152 1 0.153 1 .../0.152 1 0.153 1 .../0.152 1 0.153 1 .../0.249 2 0.153 1 .../0.249 2 0.153 1 .../0.249 2 0.153 1 .../0.249 2 0.153 1 .../0.249 2 0.153 1 .../0.249 2 0.153 1 .../0.248 2 0.153 1 .../0.248 2 0.153 1 .../0.248 2 0.153 1 .../0.248 2 0.153 1 .../0.248 2 0.153 1 .../0.248 2 0.153 1 .../0.349 2 0.153 1 .../0.349 2 0.153 1 .../0.349 2 0.153 1 .../0.349 2 0.153 1 .../0.349 2 0.153 1 .../0.349 2 0.153 1 .../0.449 2 0.153 1 .../0.449 2 0.153 1 .../0.449 2 0.153 1 .../0.449 2 0.153 1 .../0.449 2 0.153 1 .../0.449 2 0.153 1 .../6. 0.153 1 .../6. 0.153 1 .../6. 0.153 1 .../6. 0.153 1 .../6. 0.153 1 .../6. 0.153 1 .../6. 0.153 1 .../6. 0.153 1 .../6. 0.153 1 .../6. SAMS SAMS SAMS SAMS SAMS SAMS SAMS SAMS SAMS SAMS SAMS SAMS SAMS SAMS SAMS SAMS SAMS SAMS SAMS SAMS SAMS SAMS SAMS SAMS SAMS SAMS SAMS SAMS SAMS SAMS SAMS SAMS SAMS SAMS TAXIS TAXIS TAXIS TAXIS TAXIS TAXIS TAXIS TAXIS TAXIS TAXIS TAXIS TAXIS TAXIS TAXIS TAXIS TAXIS TAXIS TAXIS TAXIS TAXIS TAXIS TAXIS TAXISProcedure
1 Engage Preset Song mode.
Press the [PRESET] button to engage Preset Song mode. The [PRESET], [TRACK 1] and [TRACK 2] indicators will light.
2 Play any of the 50 preset songs.
2-1 Press the [-/NO], [+/YES] buttons to select the number of the tune you want to play (the number will appear on the LED display).
1 - 50: Select a preset song number and play only the song.
ALL: Play all preset songs in sequence.
rnd: Play all preset songs continuously in random order.
2-2 Press the SONG [START/STOP] button to start playback.
Adjust the Volume
Use the [MASTER VOLUME] control to adjust the volume.
Adjust the tempo
You can use the [TEMPO/FUNCTION# ▼
▲] buttons to adjust the playback tempo as required. The default tempo can be recalled by simultaneously pressing the
[▼] and [▲] buttons.
This produces a relative tempo variation, with a range from “-50” through “---” to “50” at maximum; the range will differ depending on the selected song.
3 Stop playback.
Playback will stop automatically when the selected preset song has finished. To stop the song during playback (or continuous playback), press the SONG [START/STOP] button.
• To play back another song continuously, see procedure 2 above.
NOTE
Preset Song mode cannot be engaged while the unit is in Demo Song mode (page 18), while a song is playing back (page 37), or when the user song recorder (page 32) is in use.
TERMINOLOGY
Song:
On the CLP-F01, performance data is called a "Song." This includes demonstration tunes and piano preset tunes.
TIP
You can play the keyboard along with the preset song. You can change the voice playing on the keyboard.
TIP
You can adjust the Brilliance control (page 24) and Reverb type (page 24) that is applied to the voice you play on the keyboard and for the preset song playback. You can change the Effect type (page 25) and Touch sensitivity (page 26) for the keyboard voice.
NOTE
The default tempo “---” is automatically selected whenever a new preset song is selected, or when playback of a new preset song begins during “ALL” or “rnd” playback.
NOTE
When you select a different song (or a different song is selected during chained playback), an appropriate reverb type will be selected accordingly.
4 Exit from Preset Song mode.
Press the [PRESET] button to exit Preset Song mode. The indicator turns off, and the unit returns to normal play mode.
How to use the practice functions
You can turn the left- and right-hand parts on or off as required so you can practice the corresponding part (part cancel function) and continuously repeat a specified phrase within a song (song A-B repeat function). For more information, see pages 20–22.
NOTE
MIDI reception is not possible in Piano Song mode.
Piano song data is not transmitted via the MIDI connectors.
Practicing a One-Hand Part Using 50 Preset Songs (Part Cancel Function)
The 50 preset songs have separate left- and right-hand parts on individual tracks. You can turn the left- and right-hand parts on or off as required so you can practice the corresponding part (the part that is turned off) on the keyboard. The right-hand part is played by [TRACK 1] and the left-hand part is played by [TRACK 2].

text_image
1 2 3 MIL KINCHI WATER COLUMB RUMBER INFLUORES DATA INSTRUMENTS TESTFUNCTION # TRANSMER VALUE 8.88. SONG VOLUME 100% 100% 100% 100% 100% 100% 100% 100% 100% 100% 100% 100% 100% 100% 100% 100% 100% 100% 100% 100% 100% 100% 100% 100% 100% 100% CHANGE #P.L.C. #T.K.S. #H.R.W. #P.L.C. #T.K.S. #H.R.W. #P.L.C. #T.K.S. #H.R.W. #P.L.C. #T.K.S. #H.R.W. #P.L.C. #T.K.S. #H.R.W. #P.L.C. #T.K.S. #H.R.W. #P.L.C. #T.K.S. #H.R.W. #P.L.C. #T.K.S. #P.L.C. #T.K.S. #P.L.C. #T.K.S. #P.L.C. #T.K.S. #P.L.C. #T.K.S. #P.L.C. #T.K.S. #P.L.C. #T.K.S. #P.L.C. #T.K.S. #P.L.C. #T.K.S. #P.L.C. #T.K.S. #P.L.C. #T.K S. #P.L.C. #T.K.S. #P.L.C. #T.K.S. #P.L.C. #T.K.S. #P.L.C. #T.K.S. #P.L.C. #T.K.S. #P.L.C. #T.K.S. #P.L.C. #T.K.S. #P.L.C. #T.K.S. #P.L.C. #T.K.S. #P.L.C. #T.K/S. #P.L.C. #T.K/S. #P.L.C. #T.K/S. #P.L.C. #T.K/S. #P.L.C. #T.K/S. #P.L.C. #T.K/S. #P.L.C. #T.K/S. #P.L.C. #T.K/S. #P.L.C. #T.K/S. #P.L.C. #T.K/S. #P.L.C. #T.K/- #P.L.C. #T.K/- #P.L.C. #T.K/- #P.L.C. #T.K/- #P.L.C. #T.K/- #P.L.C. #T.K/- #P.L.C. #T.K/- #P.L.C. #T.K/- #P.L.C. #T.K/- #P.L.C. #T.K/- #P.L.C. #T.K/+ #P.L.C. #T.K/- #P.L.C. #T.K/- #P.L.C. #T.K/- #P.L.C. #T.K/- #P.L.C. #T.K/- #P.L.C. #T.K/- #P.L.C. #T.K/- #P.L.C. #T.K/- #P.L.C. #T.K/- #P.L.C. #T.K/, #P.L.C. #T.K/- #P.L.C. #T.K/- #P.L.C. #T.K/- #P.L.C. #T.K/- #P.L.C. #T.K/- #P.L.C. #T.K/- #P.L.C. #T.K/- #P.L.C. #T.K/- #P.L.C. #T.K/- #P.L.C. #T.K/| #P.L.C. #T.K/- #P.L.C. #T.K/- #P.L.C. #T.K/- #P.L.C. #T.K/- #P.L.C. #T.K/- #P.L.C. #T.K/- #P.L.C. #T.K/- #P.L.C. #T.K/- #P.L.C. #T.K/- #P.L.C. #T.K/ - #P.L.C. #T.K/- #P.L.C. #T.K/- #P.L.C. #T.K/- #P.L.C. #T.K/- #P.L.C. #T.K/- #P.L.C. #T.K/- #P.L.C. #T.K/- #P.L.C. #T.K/- #P.L.C. #T.K/- #P.L.C. #T.K/-(1) #P.L.C. #T.K/- #P.L.C. #T.K/- #P.L.C. #T.K/- #P.L.C. #T.K/- #P.L.C. #T.K/- #P.L.C. #T.K/- #P.L.C. #T.K/- #P.L.C. #T.K/- #P.L.C. #T.K/- #P.L.C. #T.K/~ # # # # # # # # # # # # # # # # # # # # # # # # # # # # # # # # # # # # # # # # # # # # # # # # # # # # # # # # # # # # # # # # # # # # # # # # # # # # # # # # # # # # # # # # # # # # # # # # # # # # #,##,##,##,##,##,##,##,##,##,##,##,##,##,##,##,##,##,##,##,##,##,##,##,##,##,##,##,##,##,##,##,##,##,##,##,##,##,##,##,##,##,##,##,##,##,##,##,##,##,##,##Procedure
1 Turn off the playback part you wish to practice.
After you select a song to practice, press the [TRACK 1] or [TRACK 2] button to turn off the corresponding part.
When you first select a song, both [TRACK 1] and [TRACK 2] indicators light up, indicating that you can play back both parts. When you press one of the buttons to turn off playback, the corresponding button indicator turns off and the corresponding part playback is muted.
- P r essing the buttons repeatedly toggles playback between on and off.
2 Start playback and playing.
Press the SONG [START/STOP] button to start playback. Play the part you just turned off.
natural_image
Illustration of a hand pressing down on a piano keyboard (no text or symbols)NOTE
The Preset Song Part Cancel function cannot be used during "ALL" or "rnd" (page 19) play-back.
TIP
The parts can be turned on or off even during playback.
TIP
The "Preset Song Part Cancel Volume" function described on page 47 can be used to set the canceled part so that it plays at a volume from "0" (no sound) to "20". The normal setting is "5".
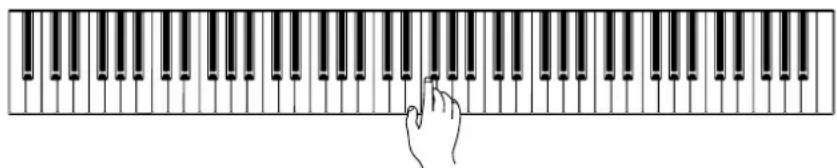
Starting playback automatically as you start playing the keyboard (Synchro Start)
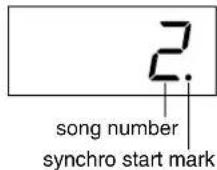
When the Synchro Start function is engaged, playback of the selected preset song will begin automatically as soon as you start playing on the keyboard. To engage the Synchro Start function press the SONG [START/STOP] button while holding the part button for the ON part. A dot will appear in the lower right corner of the display.
(Repeat the previous operation to disengage the Synchro Start function.) Playback will then start as soon as you begin playing on the keyboard.
Left Pedal Start/Stop
The left pedal can be assigned to start and stop preset song playback via the "Left Pedal Mode" function described on page 46.
3 Stop playback.
When playback is complete, it automatically stops and the Clavinova locates the top of the song. If you wish to stop playback in the middle of a song, press the SONG[START/STOP] button.
NOTE
If you hold a track button that is OFF while pressing the SONG [START/STOP] button, that track will be turned ON and the unit will engage Synchro Start mode.
NOTE
Both parts are automatically turned ON whenever a new song is selected.
A-B Repeat for 50 Preset Songs
The A-B Repeat function can be used to continuously repeat a specified phrase within a preset song. Combined with the Part Cancel function described below, this provides an excellent way to practice difficult phrases.

text_image
1 2 TESTOR FUNCTION 4 SONG VOUTProcedure
1 Specify the beginning (A) and the end (B) of the phrase, and start practicing.
Select and play a preset song, then press the [TEMPO/
FUNCTION#] button at the beginning of the phrase you want to repeat.
This sets the “A” point appear on the display).

To specify the end (B) of the phrase, press the [TEMPO/FUNCTION#] button a second time at the end of the phrase.
This sets the “B” point ( appear on the display).
At this point, repeat playback will begin between the specified A and B points.


natural_image
Illustration of a hand typing on a piano keyboard (no text or symbols present)2 Stop playback.
Press the SONG [START/STOP] button to stop playback while retaining the specified A and B points. A-B repeat playback will resume if you press the SONG [START/STOP] button again.
To cancel the A and B points, press the [TEMPO/FUNCTION#] button once.
NOTE
The A-B Repeat function cannot be used during "ALL" or "rnd" (page 19) playback.
NOTE
- To set the "A" point at the very beginning of the song, press the [TEMPO/FUNCTION#] button before starting playback.
- To set the B point at the song's end, press the [TEMPO/FUNCTION#] button after song playback is complete and before R - disappears from the display.
TIP
An automatic lead-in (to help guide you into the phrase) starts at the A point of the song. However, when the A point is set at the beginning of the song, the automatic lead-in is not played.
NOTE
The A and B points are automatically canceled when a new song is selected.
Selecting & Playing Voices
Selecting Voices

text_image
Voice buttons RANGE 100000 100000 100000 RANGE VOLUME 100000 100000 RANGE VOLUME 100000 RANGE VOLUME 100000 RANGE VOLUME 100000 RANGE VOLUME 100000 RANGE VOLUME 100000 RANGE VOLUME 100000 RANGE VOLUME 100000 RANGE VOLUME 100000 RANGE VOLUME 1025 RANGE VOLUME 1025 RANGE VOLUME 1025 RANGE VOLUME 1025 RANGE VOLUME 1025 RANGE VOLUME 1025 RANGE VOLUME 1025 RANGE VOLUME 1025 RANGE VOLUME 1025 RANGE VOLUME 1025 RANGE VOLUME 102.5 RANGE VOLUME 102.5 RANGE VOLUME 102.5 RANGE VOLUME 102.5 RANGE VOLUME 102.5 RANGE VOLUME 102.5 RANGE VOLUME 102.5 RANGE VOLUME 102.5 RANGE VOLUME 102.5 RANGE VOLUME 102.7 RANGE VOLUME 102.7 RANGE VOLUME 102.7 RANGE VOLUME 102.7 RANGE VOLUME 102.7 RANGE VOLUME 102.7 RANGE VOLUME 102.7 RANGE VOLUME 102.7 RANGE VOLUME 102.7 RANGE VOLUME 102.7Procedure
Select the desired voice by pressing one of the [VOICE] buttons.
Then, when you start playing, re-adjust the [MASTER VOLUME] control for the most comfortable listening level.
natural_image
Illustration of two hands typing on a piano keyboard (no text or symbols)TIP
To learn characteristics of the voices, listen to demo songs for each voice (page 18). Refer to "Preset Voice List" on page 62 for more information on the characteristics of each preset voice.
TERMINOLOGY
Voice:
On the Clavinova, a voice means a "tone" or "tonal color."
TIP
You can control the loudness of a voice by adjusting the force with which you strike the keys, although different playing styles (touch sensitivities) have little or no effect with certain musical instruments.
Refer to "Preset Voice List" on page 62.
Using the Pedals
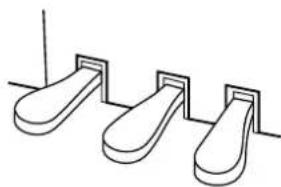
The Clavinova has three foot pedals that produce a range of expressive effects similar to those produced by the pedals on an acoustic piano.
Damper (Right) Pedal
The damper pedal functions in the same way as a damper pedal on an acoustic piano. When the damper pedal is pressed, notes sustain longer. Releasing the pedal immediately stops (damps) any sustained notes.
When you select the GRAND PIANO 1 or 3 voice on the CLP-F01, pressing the damper pedal activates the instrument's special "Sustain Samples" to accurately recreate the unique resonance of an acoustic grand piano's soundboard and strings.
natural_image
Simple line drawing of three identical foot pushers with vertical guide rails (no text or symbols)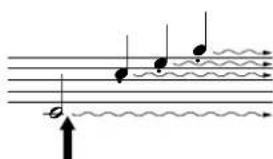
text_image
Musical notation diagram showing rhythmic patterns with notes, rests, and wavy lines indicating sound or rhythm.When you press the damper pedal here, the notes you play before you release the pedal have a longer sustain.
TIP
The depth of the effect produced by the "Sustain Samples" can be adjusted via the "Pedal Functions" (page 46) in Function mode.
Sostenuto (Center) Pedal
If you play a note or chord on the keyboard and press the sostenuto pedal while the note(s) are held, those notes will sustain as long as you hold the pedal (as if the damper pedal had been pressed) but all subsequently played notes will not be sustained. This makes it possible to sustain a chord, for example, while other notes are played "staccato."

text_image
Musical notation diagram showing a staff with notes and a wavy line indicating motion or vibrationWhen you press the sostenu-to pedal here while holding the note, the note will sustain as long as you hold the pedal.
Soft (Left) Pedal
The soft pedal reduces the volume and slightly changes the timbre of notes played while the pedal is pressed. The soft pedal will not affect notes that are already playing when it is pressed.
TIP
Organ, string and choir voices will continue to sound for as long as the sostenuto pedal is depressed.
TIP
The left pedal can be assigned to song start/stop operation or variation function via the "Left Pedal Mode" described on page 46.
■ Adding Variations to the Sound – [VARIATION]/[BRILLIANCE]/[REVERB]/[EFFECT]
![YAMAHA Clavinova CLP-F01 - ■ Adding Variations to the Sound – [VARIATION]/[BRILLIANCE]/[REVERB]/[EFFECT] - 1](/content/2026/06/1239175/images/7e3719faba33994c9444241483bf13a0bd4702704870c87be66368d0e1046de8.jpg)
text_image
[BRILLIANCE] [−/NO] [+/YES] [VARIATION] [REVERB] [EFFECT] DATA: 0.000 DATA: 0.000 DATA: 0.000 DATA: 0.000 DATA: 0.000 DATA: 0.000 DATA: 0.000 DATA: 0.000 DATA: 0.000 DATA: 0.000 DATA: 0.000 DATA: 0.000 DAYS: 123456789 DAYS: 123456789 DAYS: 123456789 DAYS: 123456789 DAYS: 123456789 DAYS: 123456789 DAYS: 123456789 DAYS: 123456789 DATA: 123456789 DATA: 123456789 DATA: 123456789 DATA: 123456789 DATA: 123456789 DATA: 123456789 DATA: 123456789 DATA: 123456-[VARIATION]
Lets you alter another aspect of the effect, depending on the selected type. Refer to "Preset Voice List" on page 62 for more information on the characteristics of each variation.
Procedure
Pressing the [VARIATION] or selected voice button toggles the variation on and off. The indicator lights (ON) each time the [VARIATION] button is pressed.
[BRILLIANCE]
This control can be used to change the tonality or "timbre" of the sound output. The control range is from MELLOW to BRIGHT.
[REVERB]
This control enables you to select various digital reverb effects that would add extra depth and expression to the sound to create a realistic acoustic ambience.
OFF: When no reverb effect is selected, no REVERB indicator is lit.
ROOM: This setting adds a continuous reverb effect to the sound, similar to the acoustic reverberation you would hear in a room.
HALL 1: For a "bigger" reverb sound, use the HALL 1 setting. This effect simulates the natural reverberation of a small-size concert hall.
HALL 2: For a truly spacious reverb sound, use the HALL 2 setting. This effect simulates the natural reverberation of a large concert hall.
STAGE: Simulates the reverb of a stage environment.
TIP
Normal setting = OFF
TERMINOLOGY
Normal setting:
The "Normal setting" refers to the default setting (factory setting) obtained when you first turn on the power to the Clavinova.
TIP
The left pedal can be assigned to ON or OFF the variation via the "Left Pedal Mode" function described on page 46.
NOTE
When the BRILLIANCE is set to BRIGHT, the overall sound will be slightly louder. If the MAS-TER VOLUME is set at a high level the sound may become distorted. If so, lower the MAS-TER VOLUME level.
TIP
The default reverb type (including OFF) and depth settings are different for each voice.
Procedure
Pressing the [REVERB] button repeatedly toggles the reverb on and off.
The indicators light in sequence each time the [REVERB] button is pressed. No effect is produced when all indicators are off.
Even if the REVERB effect is OFF, a “Soundboard Reverb” effect will be applied when the GRAND PIANO 1, 2, or 3 voice is selected.
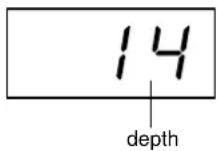
Adjusting Reverb Depth
Adjust the reverb depth for the selected voice by using the [-/NO] [+/YES] buttons while holding the [REVERB] button. The depth range is from 0 through 20. The current depth setting appears on the LED display while the [REVERB] button is held.
[EFFECT]
The [EFFECT] button allows you to select an effect to give your sound greater depth and animation.
OFF: When no effect is selected, no EFFECT indicator is lit.
CHORUS: A shimmering, broadening effect
PHASER: Adds a sweeping effect to the sound.
TREMOLO: Tremolo effect
DELAY: Echo effect
Procedure
To select an effect type press the [EFFECT] button a few times until the indicator corresponding to the desired type lights (the indicators light in sequence each time you press the [EFFECT] button). No effect is produced when all indicators are off.
Adjusting Effect Depth
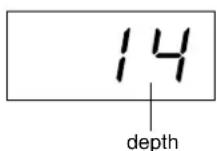
You can adjust the effect depth for the selected voice by using the [-/NO] and [+/YES] buttons while holding the [EFFECT] button.
The depth range is from 0 through 20. The current depth setting appears on the LED display while the [EFFECT] button is held.
TIP
Releasing the [REVERB] button changes the reverb type. If you are changing the reverb depth by holding the [REVERB] button, pressing the [REVERB] button will not change the reverb type.
TIP
depth 0: no effect
depth 20: maximum reverb depth
TIP
Default depth settings are different for each voice.
TIP
The default effect type (including OFF) and depth settings are different for each voice.
TIP
Releasing the [EFFECT] button changes the effect type. If you are changing the depth settings by holding the [EFFECT] button, pressing the [EFFECT] button will not change the effect type.
TIP
depth 0: no effect
depth 20: maximum effect depth
TIP
Default depth settings are different for each voice.
Touch Sensitivity - [TOUCH]
You can select four different types of keyboard touch sensitivity — HARD, MEDIUM, SOFT or FIXED — to match different playing styles and preferences.
HARD: Requires that the keys be played quite hard to produce maximum loudness.
MEDIUM: Produces a fairly “standard” keyboard response.
SOFT: Allows maximum loudness to be produced with relatively light key pressure.
FIXED: All notes are produced at the same volume no matter how hard the keyboard is played.
You can adjust the volume.
TIP
This setting does not change the weight of the keyboard.
TIP
Normal setting = MEDIUM
TIP
The touch sensitivity type will become the common setting for all voices. However, the touch sensitivity settings may have little or no effect with certain voices that are not normally responsive to keyboard dynamics. (Refer to the "Preset Voice List" on page 62.)

text_image
[-/NO] [+/YES] [TOUCH] TLEMPFUNCTION # 8.88. 200A 100A 100A 100A 100A 100A 100A 100A 100A 100A 100A 100A 100A 100A 100A 100A 100A 100A 100A 100A 100A VOLTProcedure
To select a touch sensitivity type press the [TOUCH] button a few times until the indicator corresponding to the desired type lights (the indicators light in sequence each time the [TOUCH] button is pressed). No indicator is lit when “FIXED” is selected.
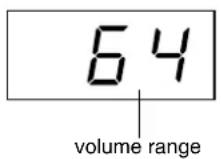
Changing the volume when FIXED is selected
When you select FIXED, you can set the volume for notes played in FIXED mode by using the [-/NO] and [+/YES] buttons while you hold the [TOUCH] button. The current volume level appears on the display. The volume range is from 1 through 127. The default setting is 64.
TIP
1: minimum volume 127: maximum volume
TIP
The touch volume set in FIXED mode will become the common setting for all voices.
TIP
Releasing the [TOUCH] button changes the touch type. If you are changing the volume by holding the [TOUCH] button, pressing the [TOUCH] button will not change the touch sensitivity type. (FIXED mode will remain selected.)
Transposition – [TRANSPOSE]
The Clavinova's Transpose function makes it possible to shift the pitch of the entire keyboard up or down in semitone intervals to facilitate playing in difficult key signatures, and to let you easily match the pitch of the keyboard to the range of a singer or other instruments. For example, if you set the transposition amount to "5," playing key C produces pitch F. In this way, you can play a song as though it were in C major, and the Clavinova will transpose it to the key of F.
![YAMAHA Clavinova CLP-F01 - Transposition – [TRANSPOSE] - 1](/content/2026/06/1239175/images/7913431d827a3d581b5b161fa1c74af008adac62dc4481d2cc34c43efa49976d.jpg)
text_image
[-/NO] [+/YES] [TRANSPOSE] TEMPOR STANDARD TOLERANCE TEMPOR TEMPOR TEMPOR TEMPOR TEMPOR TEMPOR TEMPOR TEMPOR TEMPOR TEMPOR TEMPOR TEMPOR TEMPOR TEMPOR TEMPOR TEMPOR TEMPOR TEMPOR TEMPOR TEMPOR TEMPOR TEMPOR TEMPOR TEMPOR TEMPOR TEMPOR TEMPOR TEMPOR TEMPOR TEMPOR TEMPOR TEMPOR TEMPOR TEMPORProcedure
Use the [-/NO] and [+/YES] button while holding the [TRANSPOSE] button to transpose down or up as required. The amount of transposition appears on the LED display while the [TRANSPOSE] button is held. The default transpose setting is “0”.
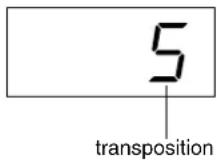
The [TRANSPOSE] button indicator remains lit when a transpose setting other than "0" is selected. Every time the [TRANSPOSE] button is pressed after that switches the transpose function ON or OFF.
TERMINOLOGY
Transpose:
Changing the key signature of a song. On the Clavinova, transposing shifts the pitch of the entire keyboard.
TIP
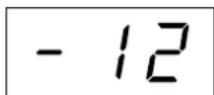
The transposition range:
-12: -12 semitones (down one octave)
0: normal pitch
12: 12 semitones (up one octave)
TIP
Notes below and above the A-1 .... C7 range of the CLP-F01 sound one octave higher and lower, respectively.
Combining Two Voices (Dual mode)
You can play two voices simultaneously across the entire range of the keyboard. In this way, you can simulate a melody duet or combine two similar voices to create a thicker sound.

text_image
1 2 MILION MINI LATOR STATION FUNCTION 4 TOLERANCE ALIC 8.88. SONG OUTPUT OUTPUT OUTPUT OUTPUT OUTPUT OUTPUT OUTPUT OUTPUT OUTPUT OUTPUT OUTPUT OUTPUT OUTPUT OUTPUT OUTPUT OUTPUT OUTPUT OUTPUT OUTPUT OUTPUT OUTPUT OUTPUT OUTPUT OUTPUT OUTPUT OUTPUT OUTPUT OUTPUT OUTPUT OUTPUT OUTPUT OUTPUT OUTPUT OUTPUT OUTPUT OUTPUT OUTPUT OUTPUT OUTPUT OUTPUT OUTPUT OUTPUT OUTPUT OUTPUT OUTPUT OUTPUT OUTPUT OUTPUT OUTPUT OUTPUT OCCP OCCP OCCP OCCP OCCP OCCP OCCP OCCP OCCP OCCP OCCP OCCP OCCP OCCP OCCP OCCP OCCP OCCP OCCPProcedure
1 Engage Dual mode.
Press two voice buttons at the same time (or press one voice button while holding another). The voice indicators of both selected voices will light when Dual mode is active.
- According to the voice numbering priority shown in the diagram on the right, the lower value voice number will be designated as Voice 1 (the other voice will be designated as Voice 2).
Voice numbering priority
text_image
1 2 3 4 5 6 7 GRAND PIANO 1 GRAND PIANO 2 GRAND PIANO 3 EPIANO 1 EPIANO 2 RAUPS-CHORD VERBAL PHONE CHURCH ORGAN JAZZ ORGAN STINGS CHOR GUTAR CLAVI WOOD BASS EBASS 8 9 10 1 12 13 14 VOICEThe CLP-F01 Function mode provides access to a number of other Dual mode functions, such as volume balance setting or octave setting (page 44). (If you do not set Dual mode functions, the appropriate setting will be set in each voice by default.)
2 Exit Dual mode and return to normal play mode.
To return to the normal single-voice play mode, press any single voice button.
NOTE
Dual and Split (page 29) modes cannot be engaged at the same time.
TIP
[VARIATION] in Dual Mode The [VARIATION] button's indicator will light if the variation is engaged for either or both of the Dual mode voices. While Dual mode is engaged, the [VARIATION] button can be used to turn the variation for both voices on or off. To turn the variation on or off for only one of the voices, hold the voice button for the other voice and press the button of the voice for which you want to change the variation.
TIP
[REVERB] in Dual Mode The reverb type assigned to Voice 1 will take priority over the other. (If the reverb is set to OFF, Voice 2 reverb type will be in effect.) Reverb depth setting via the panel controls (i.e., pressing the [-/NO] or [+/YES] buttons while holding the [REVERB] button — see page 24) will be applied only to Voice 1.
TIP
[EFFECT] in Dual Mode Depending on the conditions, one effect type may take priority over the other. Depth will be decided according to the depth default value of the voice combination. However, using function F3 (page 44) you can adjust the depth value for each voice to your liking. Effect depth setting via the panel controls (i.e., pressing the [-/NO] or [+/YES] buttons while holding the [EFFECT] button — see page 25) will be applied only to Voice 1.
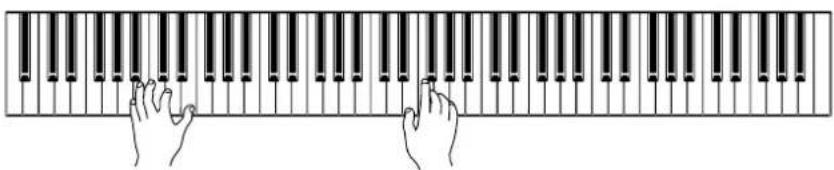
Splitting the Keyboard Range and Playing Two Different Voices (Split mode)
Split mode enables you to play two different voices on the keyboard — one with the left hand and another with the right hand. For example, you can play a bass part using the Wood Bass or Electric Bass voice with the left hand, and a melody with the right hand.

text_image
Voice buttons [SPLIT] MATERIAL VOLUME 8.88. STANDARD SIZE 100% 100% 100% 100% 100% 100% 100% 100% 100% 100% 100% 100% 100% 100% 100% 100% 100% 100% 100% 100% 100% 100% 100% 100% 100% 100% OUTPUT TRANSMISSION 4 TRANSMISSION 5 TRANSMISSION 6 TRANSMISSION 7 TRANSMISSION 8 TRANSMISSION 9 TRANSMISSION 10 TRANSMISSION 11 TRANSMISSION 12 TRANSMISSION 13 TRANSMISSION 14 TRANSMISSION 15 TRANSMISSION 16 TRANSMISSION 17 TRANSMISSION 18 TRANSMISSION 19 TRANSMISSION 20 TRANSMISSION 21 TRANSMISSION 22 TRANSMISSION 23 TRANSMISSION 24 TRANSMISSION 25 TRANSMISSION 26 TRANSMISSION 27 TRANSMISSION 28 TRANSMISSION 29 TRANSMISSION 30 TRANSMISSION 31 TRANSMISSION 32 TRANSMISSION 33 TRANSMISSION 34 TRANSMISSION 35 TRANSMISSION 36 TRANSMISSION 37 TRANSMISSION 38 TRANSMISSION 39 TRANSMISSION 40 TRANSMISSION 41 TRANSMISSION 42 TRANSMISSION 43 TRANSMISSION 44 TRANSMISSION 45 TRANSMISSION 46 TRANSMISSION 47 TRANSMISSION 48 TRANSMISSION 49 TRANSMISSION 50 TRANSMISSION 51 TRANSMISSION 52 TRANSMISSION 53 TRANSMISSION 54 TRANSMISSION 55 TRANSMISSION 56 TRANSMISSION 57 TRANSMISSION 58 TRANSMISSION 59 TRANSMISSION 60 TRANSMISSION 61 TRANSMISSION 62 TRANSMISSION 63 TRANSMISSION 64 TRANSMISSION 65 TRANSMISSION 66 TRANSMISSION 67 TRANSMISSION 68 TRANSMISSION 69 TRANSMISSION 70 TRANSMISSION 71 TRANSMISSION 72 TRANSMISSION 73 TRANSMISSION 74 TRANSMISSION 75 TRANSMISSION 76 TRANSMISSION 77 TRANSMISSION 78 TRANSMISSION 79 TRANSMISSION 80 TRANSMISSION 81 TRANSMISSION 82 TRANSMISSION 83 TRANSMISSION 84 TRANSMISSION 85 TRANSMISSION 86 TRANSMISSION 87 TRANSMISSION 88 TRANSMISSION 89 TRANSMISSION 90 TRANSMISSION 91 TRANSMISSION 92 TRANSMISSION 93 TRANSMISSION 94 TRANSMISSION 95 TRANSMISSION 96 TRANSMISSION 97 TRANSMISSION 98 TRANSMISSION 99 TRANSMISSION 100Procedure
1 Engage Split mode.
Press the [SPLIT] button so that its indicator lights. The default setting (WOOD BASE) will be selected for the left-hand voice at first.
The Function mode provides access to a number of other Split mode functions (page 45). (If you make no settings for Split mode functions, the appropriate setting will be set in each voice by default.)
2 Specify the split point (the border between the right-and left-hand range).
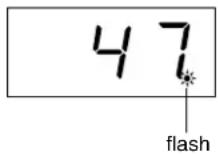
You can change the split point to any other key by pressing the key while holding the [SPLIT] button (the name of the current split-point key appears on the LED display while the [SPLIT] button is held).
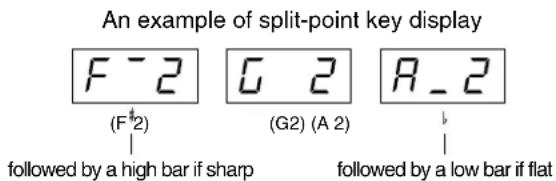
text_image
An example of split-point key display F - 2 (F #2) followed by a high bar if sharp G 2 (G2) (A 2) R - 2 followed by a low bar if flatThe split point is initially set at the F#2 key by default.
If you do not need to change the split point, skip this procedure.
NOTE
Dual (page 28) and Split modes cannot be engaged simultaneously.
TIP
A specified "split point" key is included in the left-hand range.
TIP
The split point can also be set via Function 4 (page 45).
3 Select a voice for the right hand.
Press a voice button.
4 Select a voice for the left hand.
Press the corresponding voice button while holding the [SPLIT] button. (The indicator of the Left Voice button will light while the [SPLIT] button is pressed.) To turn the variation on or off for the split voice, hold the [SPLIT] button and press the [VARIATION] button or the currently-selected voice button.
5 Exit Split mode and return to normal play mode.
Press the [SPLIT] button again so that its indicator goes out.
TIP
[VARIATION] in Split Mode
You can turn the variation on or off for Split mode voices. Normally, the voice indicator of the right voice lights in Split mode. The [VARIATION] can be used to turn the variation for the right voice on or off as required. While the [SPLIT] button is held, however, the voice indicator of the left voice lights. In this state the [VARIATION] button turns the variation for the left voice on or off.
TIP
[REVERB] in Split Mode
The reverb type assigned to the right voice will take priority over the other. (If the reverb is set to OFF, the left voice's reverb type will be in effect.) Reverb depth setting via the panel controls (i.e. pressing the [-/NO] or [+/YES] buttons while holding the [REVERB] button — see page 24) will be applied to the right voice only.
TIP
[EFFECT] in Split Mode
Depending on the conditions, one effect type will take priority over the other. The depth will be decided according to the depth default value of the voice combination. However, using function F4 (page 45) you can change the depth value for each voice as you like. Effect depth setting via the panel controls (i.e. pressing the [-/NO] or [+/YES] buttons while holding the [EFFECT] button — see page 25) will be applied to the right voice only.
Using the Metronome
The Clavinova features a built-in metronome (a device that keeps an accurate tempo) that is convenient for practicing.

text_image
1 2 [TEMPO/FUNCTION# ▲▼] [-/NO] [+/YES] TEST-FUNCTION # 8.8.8 SAMS VREF THICK TRACK CUSTOMER TOG TAXI TRAVES STOCKS PUMBER HOLDEN WHIP MINIMUM MINIMUM MINIMUM MINIMUM MINIMUM MINIMUM MINIMUM MINIMUM MINIMUM MINIMUM MINIMUM MINIMUM MINIMUM MINIMUM MINIMUM MINIMUM MINIMUM MINIMUM MINIMUM MINIMUM MINIMUM MINIMUM MINIMUM MINIMUM MINIMUM MINIMUM MINIMUM MINIMUM MINIMUM MINIMUM MINIMUM MINIMUM MINIMUM MINIMUMProcedure
1 Start the metronome.
The metronome sound is turned on by pressing the METRONOME [START/STOP] button.
text_image
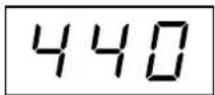
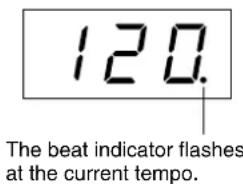
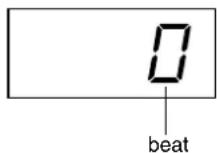
120. The beat indicator flashes at the current tempo.Adjusting the tempo
The tempo of the metronome and user song recorder playback (the recorder is described in the next section) can be set from 32 to 280 beats per minute by using the [TEMPO/FUNCTION# ▼ ▲] buttons (when the [TEMPO/FUNCTION# ▼ ▲] button's [TEMPO] indicator is lit).
Adjusting the time signature
The time signature (beat) of the metronome can be set by using the [-/NO] and [+/YES] buttons while holding the METRONOME [START/STOP] button. You can set the beat to 0, 2, 3, 4, 5 or 6. The current setting appears on the LED display while you are holding the METRONOME [START/STOP] button.
2 Stop the metronome.
Turn off the metronome by pressing the METRONOME [START/STOP] button.
TIP
If the [TEMPO/FUNCTION#] button's [FUNCTION#] indicator is lit, press the [TEMPO/FUNCTION#] button to light the [TEMPO] indicator.
TIP
The volume of the metronome can be adjusted via the Metronome Volume function in Function mode (page 47).
Recording Your Performance
The ability to record and play back what you've played on the CLP-F01 keyboard can be an effective practice aid. You can, for example, record just the left-hand part, and then practice the right-hand part while playing back the recorded left-hand part. Or, since you can record up to two tracks separately, you could record the left- and right-hand parts separately, or record both parts of a duet and hear how they sound when played back. The CLP-F01's two-track Song Recorder allows the recording of up to three User Songs.
TIP
You can record your performance (audio data) to a cassette tape recorder or other recording device via the AUX OUT connector (page 52).
TERMINOLOGY
Recording vs. Saving:
The format of performance data recorded on a cassette tape differs from that of data recorded on the Clavinova. A cassette tape records audio signals. The Clavinova "saves" information regarding note timing, voices, and a tempo value, but not audio signals. When you play back recorded songs, the Clavinova produces sound based on the saved information. Therefore, recording on the Clavinova may be more accurately called "saving information." However, this book often uses the word "recording" because it seems to make more sense.
Recording to [TRACK 1]
![YAMAHA Clavinova CLP-F01 - Recording to [TRACK 1] - 1](/content/2026/06/1239175/images/9110a34adbd4c35172418a2e3677703011a8e32b25bcc2bf92ba007ada2193b4.jpg)
text_image
1 4 5 6 7 3 2 8.88 TRANSMET DATA TRANSMET DATA TRANSMET DATA TRANSMET DATA TRANSMET DATA TRANSMET DATA TRANSMET DATA TRANSMET DATA TRANSMET DATA TRANSMET DATA TRANSMET DATA TRANSMET DATA TRANSMET DATA TRANSMET DATA TRANSMET DATA TRANSMET DATA TRANSMET DATA TRANSMET DATA TRANSMET DATA TRANSMET DATA TRANSMET Data TRANSMET Data TRANSMET Data TRANSMET Data TRANSMET Data TRANSMET Data TRANSMET Data TRANSMET Data TRANSMET Data TRANSMET Data TRANSMET Data TRANSMET Data TRANSMET Data TRANSMET Data TRANSMET Data TRANSMET Data TRANSMET Data TRANSMET Data TRANSMET Data TRANSMET Data TRANSMET DATA TRANSMET Data TRANSMET Data TRANSMET Data TRANSMET Data TRANSMET Data TRANSMET Data TRANSMET Data TRANSMET Data TRANSMET Data TRANSMET Data TRANSMET Data TRANSMET Data TRANSMET Data TRANSMET Data TRANSMET Data TRANSMET Data TRANSMET Data TRANSMET Data TRANSMET DATA TRANSMET DATA TRANSMET DATA TRANSMET DATA TRANSMET DATA TRANSMET DATA TRANSMET DATA TRANSMET DATA TRANSMET DATA TRANSMET DATA TRANSMET DATA TRANSMET DATA TRANSMET DATA TRANSMET DATA TRANSMET DATA TRANSMET DATA TRANSMET DATA TRANSMET DATA TRANSMET DATA TRANSMET DUTS TRANSMET DUTS TRANSMET DUTS TRANSMET DUTS TRANSMET DUTS TRANSMET DUTS TRANSMET DUTS TRANSMET DUTS TRANSMET DUTS TRANSMET DUTS TRANSMET DUTSProcedure

CAUTION
Notes on recording
All user song recorder data will be retained in memory for about one week after the power is turned off. If you want to keep your recorded data for longer periods of time, turn the power on for a few minutes at least once a week.
It is also possible to store the data to an external MIDI storage device such as the Yamaha MIDI Data Filer MDF3 by using the Bulk Data Dump function described on page 49.
1 Select a song for recording.
Press the [USER 1/2/3] button to select a song for recording.
The indicator of the selected song will light. (No song is selected if none of the indicators are lit.)
2 Make all the initial settings.
Before you begin to record, select the voice you want to record (or voices if you will be using Dual or Split mode). Make any other desired settings (tempo, reverb, etc.) as well. You might also want to set the volume. You can also adjust the playback volume using [MASTER VOLUME].
NOTE
When the unit is in Demo Song mode, the [USER 1/2/3] button cannot be used to select a song.
NOTE
When the unit is in Demo Song or Preset Song mode, Record mode cannot be engaged.
NOTE
To avoid erasing data from the track:
If the track contains data, the track indicator lights up green when you press the [USER 1/2/3] button. Note that recording new data on this track will erase the existing data.
3 Engage Record mode.
Press the [REC] button to engage Record mode.
Recording does not actually start yet.
The [TRACK 1] or the [TRACK 2] indicator flashes in red.
The amount of memory available for recording will be shown on the LED display in approximate kilobytes, and the right-most dot on the LED display will flash at the current METRONOME tempo setting.
Record mode can be disengaged before recording by pressing the [REC] button a second time.
4 Select the record track.
When Record mode is engaged in the previous step, the last-recorded track will automatically be selected for recording and its indicator — i.e. the [TRACK 1] or [TRACK 2] button indicator — will glow red. If you want to record on a different track, press the appropriate track button so that its indicator glows red.
5 Start recording.
Recording will begin automatically as soon as you play a note on the keyboard or press the SONG [START/STOP] button. The current measure number will appear on the display while recording.

6 Stop recording.
Press either the [REC] or SONG [START/STOP] button to stop recording.
The indicator of the recorded track will glow green to indicate that it now contains data. (Record mode is disengaged automatically.)
7 Play back the recorded performance.
Press the SONG[START/STOP] button to play back the recorded performance. To stop playback in the middle of a song, press the SONG[START/STOP] button.
NOTE
The amount of memory available for recording:
This value in KiloBytes (a unit used of measurement for data) indicates how much space remains available for recording on the Clavinova. You can record up to a maximum of about 9,400 notes on the CLP-F01 depending on pedal usage and other factors.
TIP
If a user song ([USER 1/2/3]) is not selected (the lamp is not lit), pressing the [REC] button will result in the [USER 1] song's [TRACK 1] being selected and Record mode engaged. At this time, [TRACK 2] play-back will be turned off if the track contains data.
TIP
If the metronome was on when you started recording, you'll be able to keep time with the metronome while recording, but the metronome sound will not be recorded.
TIP
For more recording information, see page 35.
TIP
The left pedal can be assigned to start and stop recording via the "Left Pedal Mode" function described on page 46.
NOTE
The record track indicator will begin to flash when the recorder memory is almost full. If the memory becomes full during recording, "FUL" will appear on the display and recording will stop automatically. (All recorded data up to that point will be retained.)
NOTE
Pressing the SONG [START/STOP] button to start recording, then pressing it again to stop recording will erase all previously-recorded data on the selected track.
Re-recording TRACK 1
This section explains how to record again in case your performance was not satisfactory.
- Select a voice or voices (and other settings) for recording, if necessary.
Repeat Step 1 on page 32 if you wish to change the previous settings.
- Re-engage Record mode.
Press the [REC] button, again.
The selected track's indicator flashes in red.
Follow the procedure from Step 5 on page 33 to re-record.
Recording to [TRACK 2]
This section explains how to record another part on the second track.
- Select a voice or voices (and other settings) for the recording.
Select a voice (or voices) for recording. Select other settings, if necessary.
- Re-engage Record mode.
Press the [REC] button again.
The selected track's indicator flashes in red.
- Select a recording track.
Select a track that you have not already used for recording. The selected track's indicator lights up red. (The indicator of a track that contains previously-recorded data will glow green.)
You can record new sounds and notes on each pass while listening to the recorded track.
Follow the procedure from Step 5 on page 33 to record.
TIP
If you want to change the tempo, time signature, reverb type, or effect type when re-recording a track or when recording to another track, do so after you engage Record mode (step 3).
NOTE
You cannot re-record in the middle of a song.
TIP
If you want to change the tempo, time signature, reverb type, or effect type when re-recording a track or when recording to another track, do so after entering Record mode (step 3).
NOTE
If you don't want to hear the previously-recorded track while you record (for example, when you want to record a song different from what you recorded on the previous track), press the playback track button before pressing the [REC] button (step 2, above) so that its indicator is turned off.
The user song recorder records the following data:
Data in addition to the notes and voices you play is recorded. This data includes "Individual Tracks" and "Entire Song." See below.
Individual Tracks
• N o t es played
• Voice selection
• [ V ARIATION] ON/OFF
• P edal (Damper/Soft/Sostenuto)
• [REVERB] depth
• [EFFECT] depth
• D ual mode voices
• D ual balance (F3)
• D ual detune (F3)
• D ual octave shift (F3)
- Split mode voices
- Split balance (F4)
- Split octave shift (F4)
Entire Song
• T e m p o
• T ime signature (beat)
• [REVERB] type (including OFF)
• [EFFECT] type (including OFF)
Changing the Initial Settings (Data recorded at the beginning of a song)
The initial settings (data recorded at the beginning of a song) can be changed after the recording. For example, after recording, you can change the voice to create a different ambience or adjust the song tempo to your taste.
You can change the following initial settings.
Individual Tracks
• Voice selection
• [ V ARIATION] ON/OFF
• [REVERB] depth
• [EFFECT] depth
• D ual mode voices
- Split mode voices
Entire Song
• Tempo
• T ime signature (beat)
• [REVERB] type (including OFF)
• [EFFECT] type (including OFF)
- Engage Record mode (page 33) and select a track to change the initial settings.
The indicator glows red. (Data shared by two tracks can be changed via either track.)
- Change the settings via the panel controls.
For example, if you wish to change the recorded voice from [E. PIANO 1] to [E. PIANO 2], press the [E. PIANO 2] button.
Be careful not to press the SONG [START/STOP] button or a key on the keyboard, either of which will start recording and erase all previously-recorded data on the selected track.
- Press the [REC] button to exit Record mode.
Be careful not to press the SONG [START/STOP] button or a key on the keyboard, either of which will start recording and erase all previously-recorded data on the selected track.
NOTE
You can cancel changes made to the initial settings by selecting a different track after Step 2, then exiting Record mode during Step 3 without pressing the [REC] button. (Changes made to the data shared by two tracks are also canceled.)
Playing Back Recorded Songs
You can play back songs recorded using the Record function (pages 32–36). You can also play the keyboard along with the play-back.
NOTE
Song data is not transmitted via the MIDI connectors.
Playing Back a Song

text_image
1 2 3 TEST/OFFUNCTION # 8.88. COMS VOICEProcedure
1 Select the desired song.
Press the [USER 1/2/3] button to select a song for recording.
The indicator of the selected song will light. (No song is selected if none of the indicators are lit.)
2 Start playback.
Press the SONG [START/STOP] button.
The current measure number appears on the display during playback.

- You can play the keyboard while the Clavinova is playing back a song. You can also play the notes in a voice different from the playback voice by selecting a voice from the panel.
Adjust the volume
Use the [MASTER VOLUME] control to adjust the volume.
Adjust the tempo
You can use the [TEMPO/FUNCTION# ▼ ▲] buttons to adjust the playback tempo as required before or during playback. The default tempo (the song's original tempo) is set when you press the [▼] and [▲] buttons simultaneously.
3 Stop playback.
When playback is complete, the Clavinova automatically stops and locates the top of the song. To stop playback in the middle of a song, press the SONG [START/STOP] button.
NOTE
When the unit is in Demo Song mode, you cannot use the [USER 1/2/3] button to select a song.
NOTE
When the unit is in Demo Song or Preset Song mode, you cannot play back recorded songs.
NOTE
Playback cannot be started when the recorder contains no data.
TIP
You can also enjoy playing duets with yourself by recording one part of a duet or a song for two pianos, then playing the other part while the recorded part plays back.
TIP
If the metronome is being used during playback, the metronome will automatically stop when playback is stopped.
TIP
If the REVERB type is changed via the panel controls during playback, both the playback and keyboard reverb effects will be changed.
TIP
If the EFFECT type is changed via the panel controls during playback, the playback effect may be switched off in some cases.
Useful Playback Functions
Turning track playback on and off
When you select a song on the Clavinova, the indicators for tracks that contain data (one of [TRACK 1] [TRACK 2] or both) are lit in green. While the Clavinova is playing or stopped, pressing these track buttons turns off the indicators, and the data on those tracks is not played. Pressing the track buttons toggles track playback on and off.
Starting playback automatically when you start playing the keyboard (Synchro Start)
You can start playback as soon as you start playing the keyboard. This is called the "Synchro Start" function.
To engage the Synchro Start function, press the SONG [START/STOP] button while holding a track button that is ON.
The right-most dot on the display will flash at the current tempo.
(Repeat the previous operation to disengage the Synchro Start function.)

Playback will then start as soon as you begin playing on the keyboard.
This function is useful when you wish to match the timing of the beginning of the play-back sound and the start of your own performance.
Assigning the START/STOP function to the left pedal
The left pedal can also be assigned to song start/stop operation via the “Pedal Start/Stop” (page 46).
This is convenient for starting playback of the recorded part anytime after you have started playing.
TIP
Tracks can be turned on or off before or during playback.
TIP
You can adjust the volume of a part of a song from "50 Greats for the Piano" for which play-back is turned off (pages 20, 47).
During recorder playback, the volume of a track that is turned off will always be "0."
NOTE
If you press the SONG [START/STOP] button while holding down a track button that is OFF, track playback is turned on and the Synchro Start function is placed on stand-by.
TERMINOLOGY
Synchro:
Synchronous; occurring at the same time.
Detailed Settings – [FUNCTION]
You can set various parameters to make the best use of Clavinova functions, such as fine tuning the pitch, selecting a voice for the metronome, repeating playback, etc.
The following parameters are available.
The CLP-F01 has nine main functions.
Some of these main functions consist of a set of sub-modes.
Parameter List
| Function Sub-Mode Function number Reference page | |||
| Fine tuning of the pitch | — | F | |
| Selecting a scale | Scale F2.1 43 | ||
| Base Note F2.2 43 | |||
| Dual mode functions | Dual Balance F3.1 44 | ||
| Dual Detune F3.2 44 | |||
| Voice 1 Octave Shift F3.3 44 | |||
| Voice 2 Octave Shift F3.4 44 | |||
| Voice 1 Effect Depth F3.5 44 | |||
| Voice 2 Effect Depth F3.6 44 | |||
| Reset | F3.7 44 | ||
| Split mode functions | Split Point | F4.1 45 | |
| Split Balance | F4.2 45 | ||
| Right Voice Octave Shift | F4.3 45 | ||
| Left Voice Octave Shift | F4.4 45 | ||
| Right Voice Effect Depth | F4.5 45 | ||
| Left Voice Effect Depth | F4.6 45 | ||
| Damper Pedal Range | F4.7 45 | ||
| Reset | F4.8 45 | ||
| Other Functions | Left Pedal Mode | F5.1 46 | |
| Soft Pedal Effect Depth | F5.2 46 | ||
| Sustain Sample Depth | F5.3 46 | ||
| Keyoff Sample Volume | F5.4 46 | ||
| Metronome volume | — | F6 | 47 |
| Preset Song Part Cancel Volume | — | F | |
| MIDI Functions | MIDI Transmit Channel Selection | F8.1 47 | |
| MIDI Receive Channel Selection | F8.2 48 | ||
| Local Control ON/OFF | F8.3 48 | ||
| Program Change ON/OFF | F8.4 48 | ||
| Control Change ON/OFF | F8.5 48 | ||
| MIDI Transmit Transpose | F8.6 49 | ||
| Panel/Status Transmit | F8.7 | 49 | |
| Bulk Data Dump | F8.8 49 | ||
| Backup Functions | Voice | F9.1 50 | |
| MIDI | F9.2 50 | ||
| Tuning | F9.3 50 | ||
| Others | F9.4 50 | ||
Basic Procedure in Function Mode
Follow the steps below to use the functions.
(If you become lost while using a function, return to this page and read the basic procedure.)

text_image
1 5 2 4 3 4 RISKING DATA VOLUME TROG FUNCTION 8 TROG FUNCTION 9 8.88. FLOOD VOLUME 0.0001 0.0002 0.0003 0.0004 0.0005 0.0006 0.0007 0.0008 0.0009 0.0010 0.0011 0.0012 0.0013 0.0014 0.0015 0.0016 0.0017 0.0018 0.0019 0.0020 0.0021 0.0022 0.0023 0.0024 0.0025 0.0026 0.0027 0.0028 0.0029 0.0030Procedure
1 Engage Function mode.
Press the [TEMPO/FUNCTION#] button so that its [FUNCTION#] indicator lights.
F** will appear on the display. (The indication of “*” varies depending on the status of the unit and usage.)
2 Select a function.
Use the [TEMPO/FUNCTION# ▼ ▲] buttons to select the desired function from F1–F9.
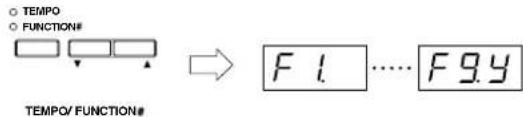
text_image
TEMPO FUNCTION# TEMPO/ FUNCTION# F1....F9.43 Use the [-/NO] [+/YES] buttons.
If the function does not include sub-modes, start setting the parameters. If the function includes sub-modes, press the [+/YES] button once to enter the respective sub-mode.
4 Operate the desired function using the following two buttons.
① [TEMPO/FUNCTION# ▼ ▲]
Selects the desired function/sub-mode.
② [-/NO] or [+/YES]
After you select the desired function or sub-mode, set the ON/OFF, select the type, or change the value, accordingly.
Depending on the setting, the default setting (which is used when you first turn on the power to the Clavinova) is recalled by pressing the [-/NO] and [+/YES] buttons simultaneously.
NOTE
Functions cannot be selected during Demo/Preset Song mode or when the user song recorder is in operation.
NOTE
To cancel the function in Step 2, 3, or 4, press the [TEMPO/FUNCTION# ▼ ▲] button any time to exit Function mode.
TIP
After you select the function, the current setting will be displayed when the [-/NO] or [+/YES] button is pressed for the first time.
Operation Example 1 (F1. Fine tuning of the pitch)
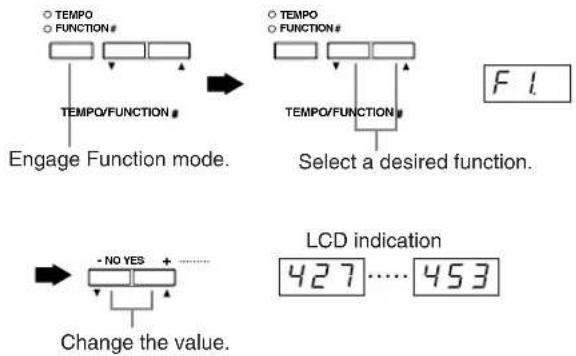
flowchart
graph TD
    A["○ TEMPO<br>○ FUNCTION#"] --> B["Engage Function mode."]
    C["○ TEMPO<br>○ FUNCTION#"] --> D["Select a desired function."]
    E["○ TEMPO<br>○ FUNCTION#"] --> D
    F["○ TEMPO<br>○ FUNCTION#"] --> D
    G["○ TEMPO<br>○ FUNCTION#"] --> H["LCD indication 427....453"]
    I["○ TEMPO<br>○ FUNCTION#"] --> H
    J["○ TEMPO<br>○ FUNCTION#"] --> H
    K["○ TEMPO<br>○ FUNCTION#"] --> H
    L["○ TEMPO<br>○ FUNCTION#"] --> M["Change the value."]
    N["○ TEMPO<br>○ FUNCTION#"] --> M
    O["○ TEMPO<br>○ FUNCTION#"] --> M
    P["○ TEMPO<br>○ FUNCTION#"] --> M
    Q["○ TEMPO<br>○ FUNCTION#"] --> R["Change the value."]
Operation Example 2 (F3.1 "Dual Balance")

flowchart
graph TD
    A["TEMPO"] --> B["TEMPOR/FUNCTION#"]
    C["FUNCTION#"] --> D["TEMPOR/FUNCTION#"]
    E["TEMPO/FUNCTION#"] --> F["TEMPOR/FUNCTION#"]
    G["TEMPOR/FUNCTION#"] --> H["TEMPOR/FUNCTION#"]
    I["TEMPOR/FUNCTION#"] --> J["TEMPOR/FUNCTION#"]
    K["TEMPOR/FUNCTION#"] --> L["TEMPOR/FUNCTION#"]
    M["TEMPOR/FUNCTION#"] --> N["TEMPOR/FUNCTION#"]
    O["TEMPOR/FUNCTION#"] --> P["TEMPOR/FUNCTION#"]
    Q["TEMPOR/FUNCTION#"] --> R["TEMPOR/FUNCTION#"]
    S["TEMPOR/FUNCTION#"] --> T["TEMPOR/FUNCTION#"]
    U["TEMPOR/FUNCTION#"] --> V["TEMPOR/FUNCTION#"]
    W["TEMPOR/FUNCTION#"] --> X["TEMPOR/FUNCTION#"]
    Y["TEMPOR/FUNCTION#"] --> Z["TEMPOR/FUNCTION#"]
    AA["TEMPOR/FUNCTION#"] --> AB["TEMPOR/FUNCTION#"]
    AC["TEMPOR/FUNCTION#"] --> AD["TEMPOR/FUNCTION#"]
    AE["TEMPOR/FUNCTION#"] --> AF["TEMPOR/FUNCTION#"]
    AG["TEMPOR/FUNCTION#"] --> AH["TEMPOR/FUNCTION#"]
    AI["TEMPOR/FUNCTION#"] --> AJ["TEMPOR/FUNCTION#"]
    AK["TEMPOR/FUNCTION#"] --> AL["TEMPOR/FUNCTION#"]
    AM["TEMPOR/FUNCTION#"] --> AN["TEMPOR/FUNCTION#"]
    AO["TEMPOR/FUNCTION#"] --> AP["TEMPOR/FUNCTION#"]
    AQ["TEMPOR/FUNCTION#"] --> AR["TEMPOR/FUNCTION#"]
    AS["TEMPOR/FUNCTION#"] --> AT["TEMPOR/FUNCTION#"]
    AU["TEMPOR/FUNCTION#"] --> AV["TEMPOR/FUNCTION#"]
    AW["TEMPOR/FUNCTION#"] --> AX["TEMPOR/FUNCTION#"]
    AY["TEMPOR/FUNCTION#"] --> AZ["TEMPOR/FUNCTION#"]
    BA["TEMPOR/FUNCTION#"] --> BB["TEMPOR/FUNCTION#"]
    BC["TEMPOR/FUNCTION#"] --> BD["TEMPOR/FUNCTION#"]
    BE["TEMPOR/FUNCTION#"] --> BF["TEMPOR/FUNCTION#"]
    BG["TEMPOR/FUNCTION#"] --> BH["TEMPOR/FUNCTION#"]
    BI["TEMPOR/FUNCTION#"] --> BJ["TEMPOR/FUNCTION#"]
    BK["TEMPOR/FUNCTION#"] --> BL["TEMPOR/FUNCTION#"]
    BM["TEMPOR/FUNCTION#"] --> BN["TEMPOR/FUNCTION#"]
    BO["LCD indication F3.4"] --> BP["F3.4"]
    BQ["LCD indication F3.1"] --> BR["F3.1"]
    BS["LCD indication 0....20"] --> BT["LCD indication 0....20"]
5 Do the following when you finish using the function.
To exit Function mode, press the [TEMPO/FUNCTION#] button so that its [TEMPO] indicator lights.
About Each Function
F1. Fine Tuning of the Pitch
You can fine tune the pitch of the entire instrument. This function is useful when you play the Clavinova along with other instruments or CD music.
- Engage Function mode and select F1
- Use the [-/NO] and [+/YES] buttons to lower or raise the pitch of the A3 key in approximately 0.2 Hz increments.
$$ \boxed {4 2 7} \dots \boxed {4. 4 0} \quad \boxed {4 5 3} $$
Tenths of a hertz are indicated on the LED display by the appearance and position of one or two dots, as in the following example:
| Display Value | |
| 440 | 440.0 |
| 440 | 440.2 |
| 440 | 440.4 |
| 440. | 440.6 |
| 440. | 440.8 |
Setting range: 427.0–453.0 (Hz)
Normal setting: 440.0 (Hz)
TERMINOLOGY
Hz (Hertz):
This unit of measurement refers to the frequency of a sound and represents the number of times a sound wave vibrates in a second.
TIP
You can also use the keyboard to set the pitch (in any mode other than Function mode).
To tune up (in about 0.2Hz steps): Hold the A-1 and B-1 keys (two white keys at the left end) simultaneously and press any key between C3 and B3.
To tune down (in about 0.2Hz steps): Hold the A-1 and A#-1 keys (a white and a black key at the left end) simultaneously and press any key between C3 and B3.
To restore standard pitch: Hold the A-1, A‡ -1 and B-1 (two white keys and one black key at the left end) simultaneously and press any key between C3 and B3.
- Refer to "Panel Controls and Terminals" on page 16 for information on the key and key name assignment.
(During the procedure described above, the display indicates a value in Hz <4.27. After the procedure, the display returns to the previous indication.)
TIP
You can also tune in about 1Hz steps (in any mode other than Function mode).
To tune down or up, respectively, in approximately 1 Hz increments: Hold the A-1 and A*-1 keys (a white and a black key at the left end) or A-1 and B-1 keys (two white keys at the left end) simultaneously and press the [-/NO] or [+/YES] button.
To restore standard pitch: Hold the A-1 and A ^4 -1 keys (a white and a black key at the left end) or A-1 and B-1 keys (two white keys at the left end) simultaneously and press the [-/NO] [+/YES] buttons simultaneously.
(During the procedure described above, the display indicates a value in Hz <4.27. After the procedure, the display returns to the previous indication.)
F2. Selecting a Scale
You can select various scales.
Equal Temperament is the most common contemporary piano tuning scale. However, history has known numerous other scales, many of which serve as the basis for certain genres of music. You can experience these tunings with the Clavinova.
Equal
One octave is divided into twelve equal intervals. Currently the most popular piano tuning scale.
PureMajor/PureMinor
Based on natural overtones, three major chords using these scales produce a beautiful, pure sound. They are sometimes used for chorus parts.
Pythagorean
This scale, designed by Pythagoras, a Greek philosopher, is based on the interval of a perfect 5th.
The 3rd produces swells, but the 4th and 5th are beautiful and suitable for some leads.
MeanTone
This scale is an improvement of the Pythagorean in that the swell of the 3rd has been eliminated. The scale became popular during the late 16th century through the late 18th century, and was used by Handel.
These scales combine Mean Tone and Pythagorean in different ways. With these scales, modulation changes the impression and feel of the songs. They were often used in the era of Bach and Beethoven. They are often used today to reproduce the music of that era on harpsichords.
-
Engage Function mode and select F24
-
Press the [+/YES] button to engage the scale function's sub-mode, then use the [TEMPO/FUNCTION# ▼▲] buttons to select the desired sub-mode.
Press the [-/NO] and [+/YES] buttons to select the number of the desired tuning.
Sub-mode
F2.1: Scale
Setting range: 1: Equal Temperament
2: Pure Major
3: Pure Minor
4: Pythagorean
5: Mean Tone
6: Werckmeister
7: Kirnberger
Normal setting: 1: Equal Temperament
F2.2: Base Note
If you select a scale other than Equal Temperament, you need to specify the root. (You can specify the root note with Equal Temperament selected, but it is not effective. The base note setting is effective for tunings other than the Equal Temperament tuning.)
Setting range: C, C ^# , D, E ^b , E, F, F ^# , G, A ^b , A, B ^b , B
Normal setting: C
• R oot indication example
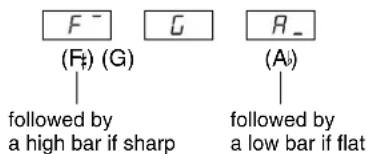
text_image
F⁻ (G) (F₁) followed by a high bar if sharp G (Aₕ) R_ (Aₖ) followed by a low bar if flatF3. Dual Mode Functions
You can set various parameters for Dual mode to optimize the settings for the songs you play, such as adjusting the volume balance between two voices.
Dual mode function settings are set individually for each voice combination.
- Select the voices in Dual mode and engage Function mode and select F3y
- Press the [+/YES] button to engage the Dual mode function's sub-mode, then use the [TEMPO/FUNCTION#] buttons to select the desired sub-mode. Press the [-/NO] [+/YES] button to assign values.
NOTE
If Dual mode is not engaged, will appear instead of F3Y and you will be unable to select Dual mode functions. You can switch from Function mode to Dual mode.
Sub-mode
F31: Dual Balance
Setting range: 0 – 20 (A setting of “10” produces an equal balance between the two Dual mode voices. Settings below “10” increase the volume of Voice 2 in relation to Voice 1, and settings above “10” increase the volume of Voice 1 in relation to Voice 2.)
Normal setting: Different for each voice combination.
You can set one voice as the main voice, and another voice as a softer, mixed voice.
F3.2 Dual Detune
Setting range: -10 - 0 - 10 (With positive values, the pitch of Voice 1 is raised and the pitch of Voice 2 is lowered. With negative values, the pitch of Voice 1 is lowered and the pitch of Voice 2 is raised.)
TIP
The available setting range is wider in the lower range ( ± 60 cents for A-1), and narrower in the higher range ( ± 5 cents for C7). (100 cents equal one semitone.)
Normal setting: Different for each voice combination.
Detune Voice 1 and Voice 2 for Dual mode to create a thicker sound.
F33: Voice 1 Octave Shift
F34: Voice 2 Octave Shift
Setting range: -1, 0, 1
Normal setting: Different for each voice combination.
You can shift the pitch up and down in octave steps for Voice 1 and Voice 2 independently. Depending on which voices you combine in Dual mode, the combination may sound better if one of the voices is shifted up or down an octave.
F35: Voice 1 Effect Depth
F36: Voice 2 Effect Depth
Setting range: 0 - 20
Normal setting: Different for each voice combination.
These functions make it possible to individually set the depth of the effect for Voices 1 and 2 for Dual mode. (The effect depth settings cannot be changed unless the [EFFECT] is ON. Function mode must be exited before the [EFFECT] can be turned ON.)
- “Voice 1” and “Voice 2” are explained on page 28.
F37: Reset
This function resets all Dual mode functions to their default values. Press the [+/YES] button to reset the values.
TIP
SHORTCUT:
You can jump directly to the Dual mode functions by* pressing the [TEMPO/FUNCTION#] button while holding the two Dual mode voice buttons.
To exit Function mode, you still need to press the [TEMPO/FUNCTION#] button so that the TEMPO indicator lights up.
F4. Split Mode Functions
This menu enables you to make various detailed settings for Split mode.
By changing the split point or other setting, you can optimize the settings for the songs you play.
You can make these settings for each combination of voices individually.
- Select the voices in Split mode and engage Function mode and select F4y
- Press the [+/YES] button to engage the Split mode function's sub-mode, then use the [TEMPO/FUNCTION#] buttons to select the desired sub-mode. Press the [-/NO] [+/YES] button to assign values.
NOTE
If Split mode is not engaged, will appear instead of F4y and you will be unable to select Split mode functions. Also note that you must exit Function mode before you can engage Split mode.
Sub-mode
F41 Split Point
Setting range: The entire keyboard Normal setting: F #2
Set the point on the keyboard that separates the right and left-hand sections (split point). The pressed key is included in the left-hand range.
- Instead of pressing the [- / NO] [ + / YES] buttons, you can engage the split point by pressing the appropriate key on the keyboard.
- If Function mode is not engaged, you can change the split point to any other key by pressing the key while holding the [SPLIT] button (page 29).
• A n example of a key name indication for a split point

text_image
F-2 G2 R_2 (F2) (G2) (A2) followed by a high bar if sharp followed by a low bar if flatF42: Split Balance
Setting range: 0 – 20 (A setting of “10” produces an equal balance between the two Split mode voices. Settings below “10” increase the volume of the left voice in relation to the right voice, and settings above “10” increase the volume of the right voice in relation to the left voice.)
Normal setting: Different for each voice combination.
The volume level of the two voices combined in Split mode can be adjusted as required.
F43: Right Voice Octave Shift
F44: Left Voice Octave Shift
Setting range: -1, 0, 1
Normal setting: Different for each voice combination You can shift the pitch up and down in octave steps for the Right Voice and Left Voice independently. Make a setting depending on the note range of the songs you play.
F45: Right Voice Effect Depth
F46: Left Voice Effect Depth
Setting range: 0 - 20
Normal setting: Different for each voice combination These functions make it possible to individually set the depth of the effect for the left and right Split mode voices.
The effect depth settings cannot be changed unless the [EFFECT] is ON. You must exit Function mode before you can turn on an [EFFECT].
F47: Damper Pedal Range
Setting range: ALL (for both voices)
1 (for the right Voice)
2 (for the left Voice)
Normal setting: ALL
The Damper Pedal Range function determines whether the damper pedal affects the right voice, the left voice, or both the left and right voices in Split mode.
F48: Reset
This function resets all Split mode functions to their default values. Press the [+/YES] button to reset the values.
TIP
SHORTCUT:
You can jump directly to Split mode functions by pressing the [TEMPO/FUNCTION#] button while holding the [SPLIT] button.
To exit Function mode, you still need to press the [TEMPO/FUNCTION#] button so that the TEMPO indicator lights up.
F5. Other Functions
This function conveniently lets you set operation of the left pedal to one of the modes listed below.
-
Engage Function mode and select F.S.Y
-
Press the [+/YES] button to engage the other functions' sub-mode, then use the [TEMPO/FUNCTION# ▼ ▲] buttons to select the desired sub-mode.
Press the [-/NO] or [+/YES] button to select the desired pedal function or assign the values.
Sub-mode
FS1 Left Pedal Mode
Setting range:
-
Soft Pedal The soft pedal reduces the volume and slightly changes the timbre of notes played while the pedal is pressed. The soft pedal will not affect notes that are already playing.
-
Song Start/Stop This mode allows you to start or stop song playback. In this mode, the Left Pedal functions in the same manner as the SONG [START/STOP] button on the panel.
-
Variation This mode enables you to switch the Voice's variation on or off. In this mode, the left pedal functions in the same manner as the [VARIATION] button on the panel.
Normal setting: 1(Soft Pedal)
F52 Soft Pedal Effect Depth
Setting range: 1 – 15
Normal setting: 3
This function sets the depth of the soft pedal effect.
FS3 Sustain Sample Depth
Setting range: 0 - 20
Normal setting: 12
The GRAND PIANO 1 and 3 voice features special “Sustain Samples” that recreate the unique resonance of an acoustic grand piano’s soundboard and strings when the damper pedal is pressed. This function lets you adjust the depth of this effect.
F54 Keyoff Sample Volume
Setting range: 0 - 20
Normal setting: 10
You can adjust the volume of the keyoff sound (the subtle sound produced when the keys are released) for voices [GRAND PIANO 1, 3], [HARPSICHORD] (including their variations) and variation of [GUITAR/CLAVI.].
F6. Metronome Volume
You can change the volume of the metronome sound.
Use this function to adjust the metronome volume.
-
Engage Function mode and select F6.
-
Use the [-/NO] and [+/YES] buttons to set the metronome volume as required.
Setting range: 1 - 20
Normal setting: 10
TIP
SHORTCUT:
You can jump directly to the metronome functions by pressing the [TEMPO/FUNCTION#] button while holding the METRONOME [START/STOP] button.
To exit Function mode, you still need to press the [TEMPO/FUNCTION#] button so that the TEMPO indicator lights up.
F7.
Preset Song Part Cancel Volume
This function sets the volume at which a “canceled” part is played during preset song playback. Adjust the part volume to a comfortable level and use the “canceled” part as a guide with which to play along.
-
Engage Function mode and select F7
-
Use the [-/NO] and [+/YES] buttons to set the volume as required.
Setting range: 0 - 20
Normal setting: 5
F8. MIDI Functions
You can make detailed adjustments to MIDI settings.
For more information about MIDI, see the "About MIDI" section (page 51).
TIP
The HOST SELECT switch on the bottom surface must be set to "MIDI" to enable the MIDI connectors. When you use the TO HOST connector, set the HOST SELECT switch to the appropriate position for the type of computer you are using (pages 51–57). In this situation, all MIDI settings described below will affect the MIDI signal in and out of the TO HOST connector.
-
Engage Function mode and select F8Y
-
Press the [+ / YES] button to engage the MIDI function's sub-mode, then use the [TEMPO/ FUNCTION# ▼▲] buttons to select the desired sub-mode.
Press the [-/NO] or [+/YES] button to set a selected parameter.
Sub-mode
F8.1: MIDI Transmit Channel Selection
In any MIDI control setup, the MIDI channels of the transmitting and receiving equipment must be matched for proper data transfer.
This parameter enables you to specify the channel on which the Clavinova transmits MIDI data.
Setting range: 1 – 16, OFF (not transmitted)
Normal setting: 1
NOTE
In Dual mode, Voice 1 data is transmitted on its specified channel. In Split mode, right voice data is transmitted on its specified channel. In Dual mode, Voice 2 data is transmitted on the next greater channel number relative to the specified channel. In Split mode, left voice data is transmitted on the next greater channel number relative to the specified channel. In either mode, no data is transmitted if the transmit channel is set to "OFF".
NOTE
Demo/preset song data and recorder playback data are not transmitted via MIDI.
F82: MIDI Receive Channel Selection
In any MIDI control setup, the MIDI channels of the transmitting and receiving equipment must be matched for proper data transfer. This parameter enables you to specify the channel on which the Clavinova receives MIDI data.
Setting range: ALL, 1&2, 1 - 16
Normal setting: ALL
TIP
ALL:
A "Multi-timbre" Receive mode is available. It allows simultaneous reception of different parts on all 16 MIDI channels, enabling the Clavinova to play multi-channel song data received from a music computer or sequencer.
1&2:
A "1&2" Receive mode is available. It allows simultaneous reception on channels 1 and 2 only, enabling the Clavinova to play 1 and 2 channel song data received from a music computer or sequencer.
TIP
Program change and other like channel messages received will not affect the CLP-F01's panel settings or the notes you play on the keyboard.
NOTE
No MIDI reception occurs when Demo/Preset Song mode is engaged.
F83: Local Control ON/OFF
“Local Control” refers to the fact that, normally, the CLP-F01 keyboard controls its internal tone generator, allowing the internal voices to be played directly from the keyboard. This situation is “Local Control On,” since the internal tone generator is controlled locally by its own keyboard.
Local control can be turned OFF, however, so that the CLP-F01 keyboard does not play the internal voices, but the appropriate MIDI information is still transmitted via the MIDI OUT connector when notes are played on the keyboard. At the same time, the internal tone generator responds to MIDI information received via the MIDI IN connector.
Setting range: ON/OFF
Normal setting: ON
F84: Program Change ON/OFF
Normally the CLP-F01 will respond to MIDI program change numbers received from an external keyboard or other MIDI device, causing the correspondingly-numbered voice to be selected on the corresponding channel (the keyboard voice does not change). The CLP-F01 will normally also send a MIDI program change number whenever one of its voices is selected, causing the correspondingly-numbered voice or program to be selected on the external MIDI device if the device is set up to receive and respond to MIDI program change numbers. This function makes it possible to cancel program change number reception and transmission so that voices can be selected on the CLP-F01 without affecting the external MIDI device.
TIP
For information on program change numbers for each of the CLP-F01's voices, refer to page 69 in the MIDI Data Format section.
Setting range: ON/OFF
Normal setting: ON
F8.5: Control Change ON/OFF
Normally the CLP-F01 will respond to MIDI control change data received from an external MIDI device or keyboard, causing the voice on the corresponding channel to be affected by pedal and other “control” settings received from the controlling device (the keyboard voice is not affected).
The CLP-F01 also transmits MIDI control change information when the pedal or other appropriate controls are operated.
This function makes it possible to cancel control change data reception and transmission so that, for example, the CLP-F01's pedal and other controls can be operated without affecting an external MIDI device.
TIP
For information on control changes that can be used with the CLP-F01, refer to the MIDI Data Format on page 69.
Setting range: ON/OFF
Normal setting: ON
F86: MIDI Transmit Transpose
This function allows the MIDI note data transmitted by the CLP-F01 to be transposed up or down in semitone increments by up to plus or minus 12 semitones. The pitch of the CLP-F01 itself is not affected.
Setting range: -12 - 0 - 12 (in semitones)
Normal setting: 0
F8.7 Panel/Status Transmit
This function causes all the current CLP-F01 panel settings (selected voice, etc.) to be transmitted via the MIDI OUT terminal. This is particularly useful if you will be recording performances to a MIDI sequence recorder, such as the Yamaha MIDI Data Filer MDF3, which will be used to control the CLP-F01 on playback. By transmitting the CLP-F01 panel settings and recording them on the MIDI sequence recorder prior to the actual performance data, the CLP-F01 will be automatically restored to the same settings when the performance is played back.
TERMINOLOGY
Setup Data:
Data that contains a set of panel settings for the Clavinova.
Procedure
- Set up the panel controls as desired.
- Connect the Clavinova to a sequencer via MIDI, and set up the sequencer so it can receive the setup data.
- Engage Function mode and select .F8.7
- Press the [+/YES] button to transmit the panel/status data.
End will appear on the LED display when the data has been successfully transmitted.
TIP
See page 70 for a list of the "Panel Data Contents" transmitted by this function.
TIP
Receiving the transmitted data:
- Connect the Clavinova via MIDI to the device to which the setup data was transmitted previously.
- Start sending the setup data from the device.
The Clavinova automatically receives the setup data, which will be reflected in the panel settings.
(For the data to be accepted, the Clavinova that receives the setup data should be the same model as the one that transmitted the setup data to the sequencer.)
TIP
For more information on transmitting and receiving setup data via MIDI, refer to the owner's manual for the connected MIDI device.
F88: Bulk Data Dump
You can save current song data on the Clavinova as MIDI bulk data by transferring it to a connected MIDI data filer (such as an MDF3) or a sequencer. To play back the saved song data, send the bulk data back from the storage device to the Clavinova and follow the usual playback procedure.
TERMINOLOGY
bulk data:
A complete set or extended sequence of data.
Procedure
- Record your performance on the Clavinova.
- Connect the Clavinova to MDF3, a MIDI data filer via MIDI, and set up the MDF3 so it will receive bulk data.
- Engage Function mode and select .F88
- Press the [+/YES] button to begin bulk transmission.
End will appear on the LED display when the data has been successfully transmitted.
NOTE
No MIDI note/panel data transmission or data reception occurs during a bulk data dump transmit operation.
TIP
Receiving (returning) the transmitted data:
- Connect the CLP-F01 via MIDI to the device to which the data was previously transmitted.
- Start sending the data from the device.
The CLP-F01 automatically receives the data from the unit. (At this time, any data previously stored in the Clavinova will be erased.)
Then, follow the usual playback procedure.
(For the data to be accepted, the Clavinova that receives the data should be the same model as the one from which the data was once transmitted to the MIDI data filer.)
NOTE
The reload operation cannot be executed when Demo/Preset Song mode or the user song recorder is in operation, or when Function mode is engaged.
TIP
For more information on transmitting and receiving bulk data via MIDI, refer to the owner's manual for the connected MIDI device.
F9. Backup Functions
TERMINOLOGY
Backup:
You can back up some settings, such as voice selection and reverb type, so that they will not be lost when you turn off the power to the Clavinova.
If the backup function is turned on, the settings at power off are effective. If the backup function is turned off, the settings in memory are erased when you turn off the power. In this case, when you turn on the power to the unit, the default settings (the initial settings) will be used. (The factory setting default list is found on page 68.)
However, the backup settings themselves, and the contents of the user song recorder memory, are always backed up.

CAUTION
Even if the backup function is turned on via one of the functions described below, the data will be retained in memory for only about one week if the power is not turned on during this time. If the backup period is exceeded, all settings will be reset to their default values. If you want to retain the backup settings for longer periods, be sure to turn the power on for a few minutes at least once a week.
You can turn the backup function on or off for each function group (each of the following sub-mode functions).
- Engage Function mode and select F94
- Press the [+/YES] button to engage the backup function's sub-mode, then use the [TEMPO/FUNCTION# ▼ ▲] buttons to select the desired sub-mode.
Press the [-/NO] or [+/YES] button to turn the backup function on or off.
Sub-mode
F91: Voice
F92: MIDI
F93: Tuning
F94: Others
Setting range: ON/OFF
Normal setting: OFF (all groups)
Description of sub-modes
F91: Voice
• V oice (Keyboard, Dual, and Split)
- D ual (ON/OFF, Voice, and Dual Functions for each voice combination)
- Split (ON/OFF, Voice, and Split Functions for each voice combination)
• R everb (ON/OFF, Type, and Depth for each voice)
• Effect (ON/OFF, Type, and Depth for each voice)
• V a r iation (for each voice)
• T ouch Sensitivity (including the FIXED volume)
- M etronome (Beat, Volume R6settings > )
- P r eset Song Part Cancel Volume( settings)
F92: MIDI
The MIDI functions (settings)
(expect for the F)8.7 F8.8
F9.3: Tuning
- T r anspose
• T uning( /settings) - Scale (including base note) (settings)
F94: Others
Other functions (Fsettings)
Factory Preset Recall
All Dual mode, Split mode, reverb, effect, touch sensitivity, tuning settings, and the settings affected by the Backup Functions can be restored to their original factory preset values by holding the C7 key (right-most key on the keyboard) while turning the [POWER] button ON. This also erases all user song recorder data, and sets all backup on/off settings (F9) to "OFF". (The factory setting list is found on page 68.)
About MIDI
MIDI (Musical Instrument Digital Interface) is a standard format for data transmission/reception. It enables the transfer of performance data and commands between MIDI devices and personal computers.
Using MIDI, you can control a connected MIDI device from the Clavinova, or control the Clavinova from a connected MIDI device or computer.
MIDI connectors
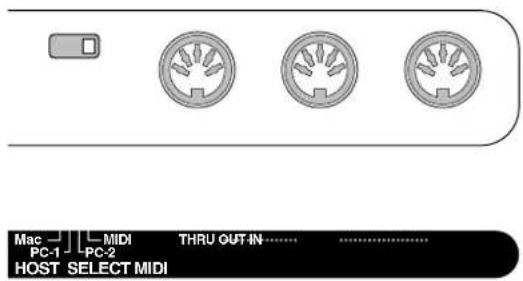
text_image
Mac PC-1 MIDI PC-2 THRU OUT IN... HOST SELECT MIDIMIDI [IN]: Receives MIDI data.
MIDI [OUT]: Transmits MIDI data.
MIDI [THRU]: Transmits data received at the MIDI [IN] connector as it is.
MIDI cables
Prepare dedicated MIDI cables.
[TO HOST] connector
Use this connector to connect the Clavinova to a computer.
![YAMAHA Clavinova CLP-F01 - [TO HOST] connector - 1](/content/2026/06/1239175/images/950202a23d5fa195794bc5b2a3282d506d5ac34d1c3ea172488e8fd3cd747b72.jpg)
text_image
Mac PC-1 MIDI PC-2 TO HOST HOST SELECTTIP
MIDI performance data and commands are transferred in the form of numeric values.
TIP
Since MIDI data that can be transmitted or received varies depending on the type of MIDI device, check the "MIDI Implementation Chart" to find out what MIDI data and commands your devices can transmit or receive. The Clavinova's MIDI Implementation Chart appears on page 73.
NOTE
When you are using the MIDI connectors, set the [HOST SELECT] switch to "MIDI" (page 56).
NOTE
When you are using the [TO HOST] connector, set the [HOST SELECT] switch, according to the type of computer you are using (page 56).
TIP
You can also obtain detailed information about MIDI from various music books and other publications.
Connections
Connectors

CAUTION
Before connecting the Clavinova to other electronic components, turn off the power to all the components. Before turning the power on or off to all components, set all volume levels to minimum (0). Otherwise, electrical shock or damage to the components may result.
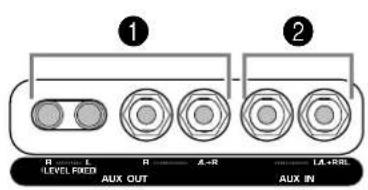
text_image
① ② R L R A-R LA+REL LEVEL FIXED AUX OUT AUX IN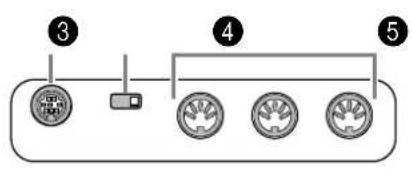
flowchart
graph LR
    A["③"] --> B["④"]
    B --> C["⑤"]

1 AUX OUT [R] [L] Pin jacks (LEVEL FIXED), [R] [L/L+R] Phone jacks
You can connect these jacks to a stereo system to amplify the Clavinova or to a cassette tape recorder to record your performance. Refer to the diagram below and use audio cables to make the connections.
![YAMAHA Clavinova CLP-F01 - AUX OUT [R] [L] Pin jacks (LEVEL FIXED), [R] [L/L+R] Phone jacks - 1](/content/2026/06/1239175/images/7cedb6fd00702fc6cb0976c4a810c28c32a1a5c451647eddd7c76be1ab7c5d8d.jpg)
CAUTION
Do not route the output from the AUX OUT jacks to the AUX IN jacks. That is, when you connect an external audio device to the AUX OUT jacks, do not connect the audio device to the Clavinova's AUX IN jacks. If you make this connection, the signal input at the AUX IN jacks will be output from AUX OUT. This creates an audio loop, causing audio oscillation and abnormal playback, and leading to malfunction of both pieces of equipment.

CAUTION
When the Clavinova's AUX OUT jacks are connected to an external audio system, first turn on the power to the Clavinova, then to the external audio system. Reverse this order when you turn the power off.
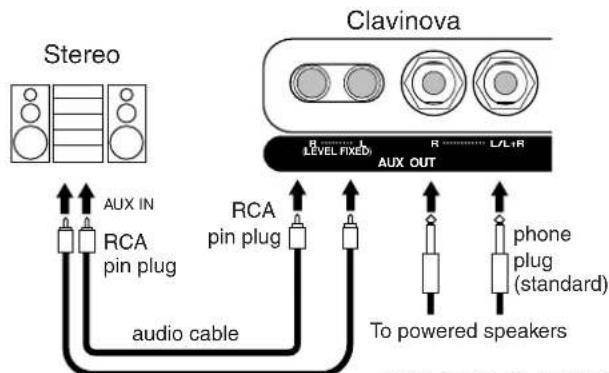
flowchart
graph TD
    A["Stereo"] -->|AUX IN| B["RCA pin plug"]
    B --> C["audio cable"]
    C --> D["RCA pin plug"]
    D --> E["To powered speakers"]
    F["Clavinova"] --> G["RLEVEL FIXED"]
    G --> H["AUX OUT"]
    H --> I["L/L1R"]
    I --> J["phone plug (standard)"]
When these are connected (with RCA pin plug; LEVEL FIXED), the sound is output to the external device at a fixed level, regardless of the [MASTER VOLUME] control setting.
When these are connected (with standard phone plugs), you can use the [MASTER VOLUME] control to adjust the volume of the sound output to the external device.
NOTE
Use audio cables and adaptor plugs with no resistance.
NOTE
The Clavinova's [MASTER VOLUME] and [BRILLIANCE] control setting does not affect the signal output from the AUX OUT (LEVEL FIXED) jacks.
② AUX IN [R], [L/L+R] jacks
The stereo outputs from another instrument can be connected to these jacks, allowing the sound of an external instrument to be reproduced via the Clavinova's speakers. Refer to the diagram below and use audio cables to make the connections.
CAUTION
When the Clavinova's AUX IN jacks are connected to an external device, first turn on the power to the external device, then to the Clavinova. Reverse this order when you turn the power off.
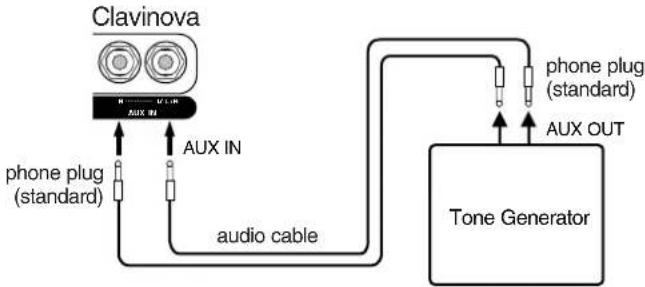
flowchart
graph TD
    A["Clavinova"] -->|AUX IN| B["Tone Generator"]
    A -->|audio cable| B
    C["phone plug (standard)"] --> A
    D["phone plug (standard)"] --> B
    E["AUX OUT"] --> B
③ TO HOST jack
This jack allows direct connection to a personal computer. (Refer to “Connecting a personal computer” on page 54 for more information.)
4 HOST SELECT switch
This switch should be set according to the type of connected MIDI device or personal computer. (Refer to “Connecting a personal computer” on page 54 for more information.)
⑤ MIDI [IN], [OUT], [THRU] connectors
Use MIDI cables to connect external MIDI devices to these connectors.
Make sure you set the HOST SELECT switch to MIDI when you use these connectors.
(Refer to "About MIDI" on page 51 for more information.)
NOTE
The Clavinova's [MASTER VOLUME] and [BRILLIANCE] control settings affect the input signal from the AUX IN jacks, but the [REVERB] and [EFFECT] settings do not.
NOTE
If you connect the Clavinova to a monaural device, use only the AUX IN [L/L+R] jack or AUX OUT [L/L+R] jack.
Connecting a Personal Computer
You can enjoy computer music data on the Clavinova by connecting a computer to the TO HOST (or MIDI) jack.
NOTE
When the Clavinova is used as a tone module, performance data with voices that are not found on the Clavinova will not be played correctly.
"The Clavinova-Computer Connection," is a supplementary guidebook that describes, for beginners, what you can do with your Clavinova and a personal computer and how to set up a Clavinova-Computer system (the manual is not written for any specific models). The document is available as a PDF file (in English) at the following Internet address.
Yamaha Manual Library:
http://www2.yamaha.co.jp/manual/english/
There are three methods by which to connect the Clavinova to a personal computer:
- Connect the serial port on the computer to the Clavinova's TO HOST jack (page 55).
- Use a MIDI interface and the Clavinova's MIDI connectors (page 56).
- Use the USB port on the computer and the UX16, UX96, or UX256, a USB interface (page 57).
For more information, refer to the specified pages.
NOTE
When connecting the Clavinova to a personal computer, first turn off the power to both the Clavinova and the computer before you connect any cables or set the HOST SELECT switch. After making the connections and switch settings, turn on the power to the computer first, then to the Clavinova.
NOTE
If you do not use the [TO HOST] jack of the Clavinova, make sure you disconnect the cable from the jack. If the cable is left connected, the Clavinova may not function properly.
NOTE
HSF will appear in the display if the host computer is not turned on, the connecting cable is not properly connected, the HOST SELECT switch is not in the proper position, or the MIDI driver or MIDI application is not active. In this situation, turn the power off to both the Clavinova and the computer, and check the cable connection and the position of the HOST SELECT switch. Once the connection and HOST SELECT switch position is verified, turn the power of the computer on first, then the Clavinova, and check whether the MIDI driver and MIDI application function properly.
NOTE
When the [HOST SELECT] switch is set to "PC-1," PC-2," or "Mac," you can use the [TO HOST] jack, but the MIDI connectors are disabled since no data transfer occurs via the MIDI connectors. On the other hand, when the [HOST SELECT] switch is set to "MIDI," you can use the MIDI connectors, but not the [TO HOST] jack since no data is transferred via the [TO HOST] jack.
1. Connecting the serial port on the computer to the Clavinova's TO HOST jack
Connect the computer's serial port (RS-232C or RS-422) to the Clavinova's TO HOST jack.
With this connection, the Clavinova functions as a MIDI interface. Therefore, you do not need a special MIDI interface.
Connection
Use a special serial cable (page 55) to connect the computer's serial port (RS-232C or RS-422) to the Clavinova's TO HOST jack.

flowchart
graph TD
    A["Clavinova"] --> B["TO HOST SELECT"]
    B --> C["modem portRS-232C (D-sub 9-pin) RS-232C (D-sub 25-pin)"]
    C --> D["Windows Windows Macintosh"]
    style A fill:#f9f,stroke:#333
    style B fill:#ccf,stroke:#333
    style C fill:#cfc,stroke:#333
    style D fill:#fcc,stroke:#333
Type of serial cables and connection pin assignments
Depending on the type of computer you connect, use one of the following serial cables.
Windows (with a serial port of D-sub 9-pin)
(Yamaha CCJ-PC2 or equivalent)
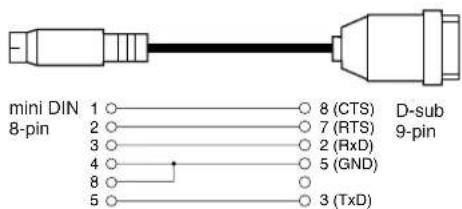
text_image
mini DIN 1 ○ 8 (CTS) D-sub 8-pin 2 ○ 7 (RTS) 9-pin 3 ○ 2 (RxD) 4 ○ 5 (GND) 8 ○ 3 (TxD) 5 ○Windows (with a serial port of D-sub 25-pin)
(Yamaha CCJ-PC1NF or equivalent)
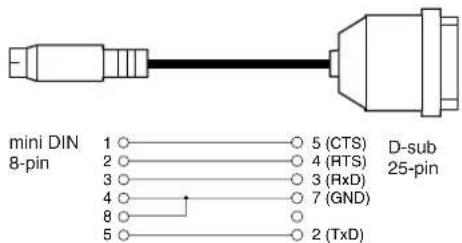
text_image
mini DIN 8-pin 1 ○─○ 5 (CTS) 2 ○─○ 4 (RTS) 3 ○─○ 3 (RxD) 4 ○─○ 7 (GND) 8 ○─○ 5 ○─○ 2 (TxD) D-sub 25-pinMacintosh
System peripheral plug → 8-pin plug
(Yamaha CCJ-MAC or equivalent)
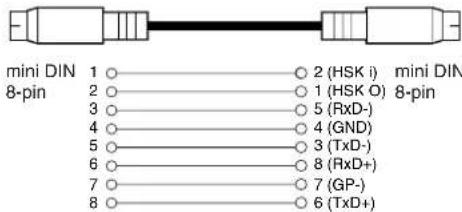
text_image
mini DIN 1 ○ 2 (HSK i) mini DIN 8-pin 2 ○ 1 (HSK O) 8-pin 3 ○ 5 (RxD-) 4 ○ 4 (GND) 5 ○ 3 (TxD-) 6 ○ 8 (RxD+) 7 ○ 7 (GP-) 8 ○ 6 (TxD+)Pin assignment
The following diagram shows the pin assignments for each cable.
Pin numbers (view from front)
mini DIN 8-pin

D-sub 25-pin
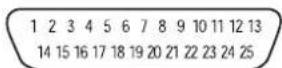
D-sub 9-pin
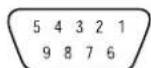
Clavinova HOST SELECT switch setting
Set the Clavinova HOST SELECT switch properly according to the type of connected computer.
• Macintosh: "Mac" (data transfer rate: 31,250bps, 1MHz clock)
- Windows: "PC-2" (data transfer rate: 38,400bps)
TIP
If your system does not work properly with the connections and settings listed above, your software may require different settings. Check your software operation manual and set the HOST SELECT switch to the proper data transfer rate. (Data transfer rate of "PC-1" is 31,250bps.)
2. Using a MIDI interface and the Clavinova's MIDI connectors
Connection
Use a MIDI interface device to connect a computer to the Clavinova using special MIDI cables.
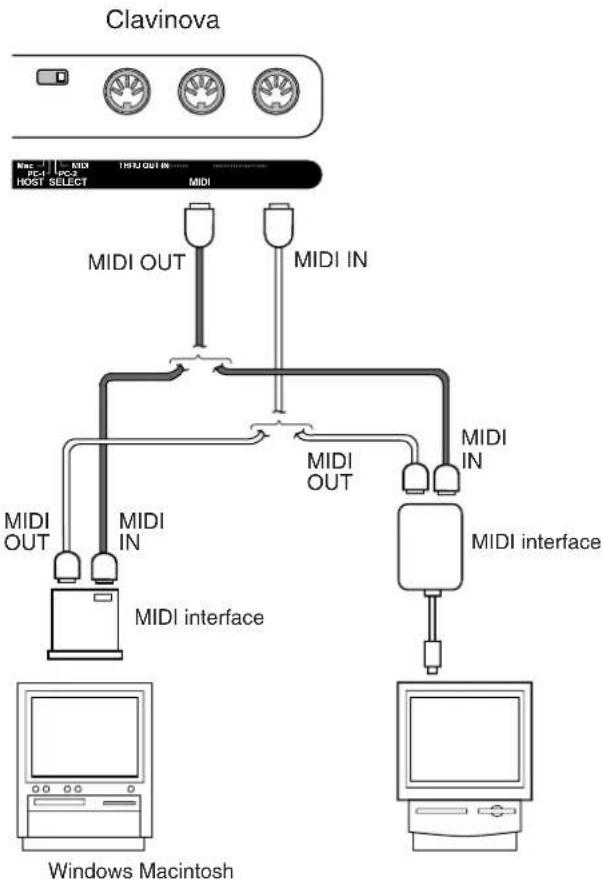
flowchart
graph TD
    A["Clavinova"] -->|MIDI OUT| B["MIDI interface"]
    A -->|MIDI IN| C["MIDI interface"]
    B -->|MIDI OUT| D["Windows Macintosh"]
    C -->|MIDI IN| E["Macintosh"]
    D --> F["Computer"]
    E --> G["Computer"]
Clavinova HOST SELECT switch setting
Set the Clavinova HOST SELECT switch to "MIDI."
3. Connecting the computer's USB port to the Clavinova via a USB interface, such as the UX16, UX96, or UX256
Connect the computer's USB port to the USB interface (such as the UX16, UX96 or UX256) using a USB cable. Install the driver (that came with the USB interface) on the computer, and connect the USB interface to the Clavinova using a serial cable or MIDI cables.
For more information, refer to the instruction manual for the USB interface.
An example of connecting the USB interface to the Clavinova using a serial cable
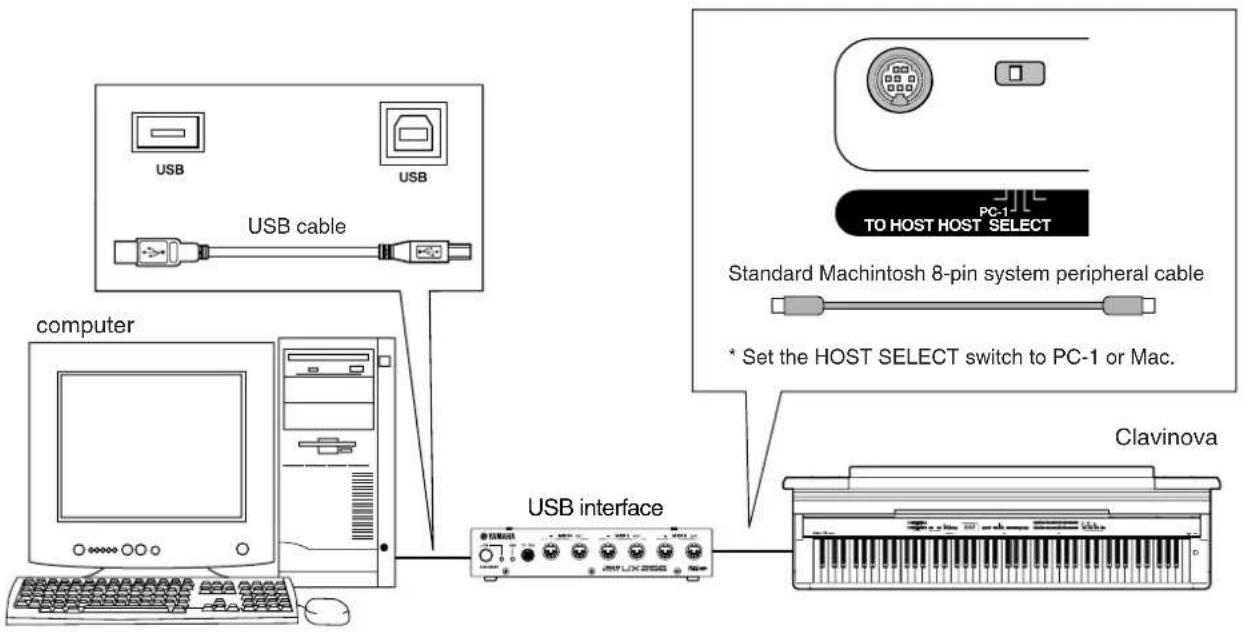
flowchart
graph TD
    A["Computer"] --> B["USB cable"]
    B --> C["USB interface"]
    C --> D["Clavinova"]
    style A fill:#f9f,stroke:#333
    style B fill:#ccf,stroke:#333
    style C fill:#cfc,stroke:#333
    style D fill:#fcc,stroke:#333
    note right of C: Standard Machintosh 8-pin system peripheral cable
    note right of D: * Set the HOST SELECT switch to PC-1 or Mac.
An example of connecting the USB interface to the Clavinova using MIDI cables
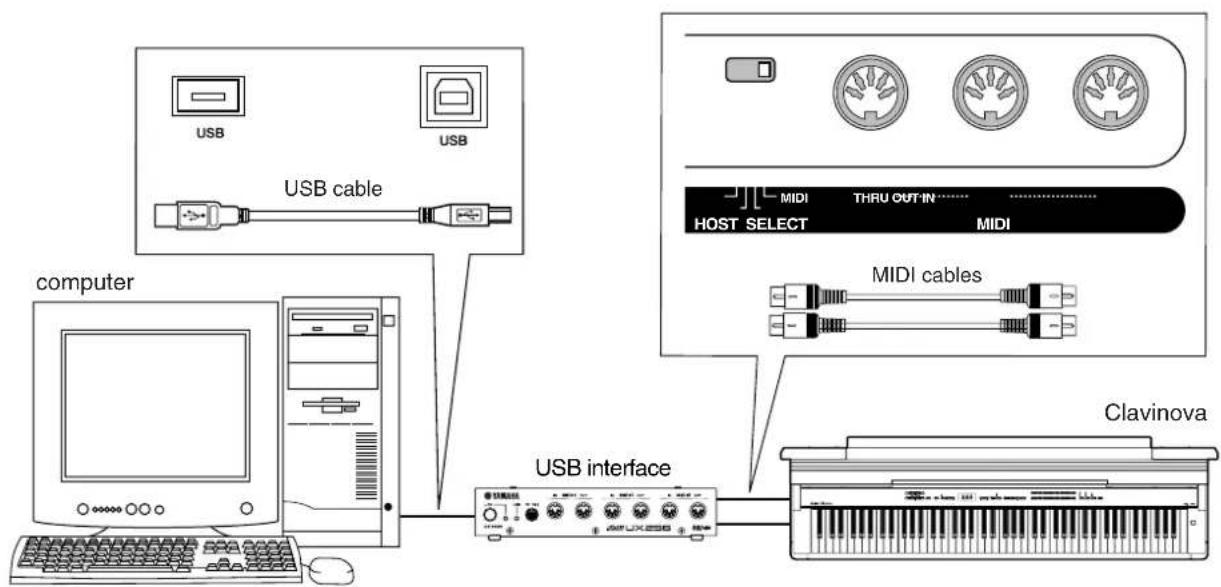
flowchart
graph TD
    A["computer"] --> B["USB cable"]
    B --> C["USB interface"]
    C --> D["Clavinova"]
    E["MIDI cables"] --> C
    F["HOST SELECT"] --> C
    G["THRU OUT IN"] --> C
    H["USB"] --> I["USB cable"]
Troubleshooting
| Problem Possible Cause and Solution | |
| The Clavinova does not turn on. The Clavinova | has not been plugged in properly. Securely insert the female plug into the socket on the Clavinova, and the male plug into a proper AC outlet (page 12). |
| A click or pop is heard when the power is turned on or off. | This is normal when electrical current is being applied to the instrument. |
| Noise is heard from the speakers or headphones. | The noise may be due to interference caused by the use of a mobile phone in close proximity to the Clavinova. Turn off the mobile phone, or use it further away from the Clavinova. |
| The overall volume is low, or no sound is heard. | The Master Volume is set too low; set it to an appropriate level using the [MASTER VOLUME] control.Make sure a pair of headphones is not connected to the headphones jack (when the SPEAKER switch is set to the “NORMAL” position). If the SPEAKER switch is set to the “OFF” position, set it to “NORMAL” or “ON” (page 13).Make sure that Local Control (page 48) is ON. |
| The speakers do not switch off when a pair of headphones is connected. | The SPEAKER switch may be switched “ON.” Set the SPEAKER switch to the “NORMAL” position (page 13). |
TIP
If 5 appears on the display, an internal malfunction has occurred. In this case, contact your Yamaha dealer.
Keyboard Stand Assembly

CAUTION
- Be careful not to confuse parts, and be sure to install all parts in the correct direction. Please assemble in accordance with the sequence given below.
- Assembly should be carried out by at least two persons.
- Be sure to use the correct screw size, as indicated below. Use of incorrect screws can cause damage.
- Be sure to tighten up all screws upon completing assembly of each unit.
- To disassemble, reverse the assembly sequence given below.
Have a Phillips-head (+) screwdriver ready.

Remove the following parts from the package.
Assembly Parts
6 × 45 mm long screws × 4
6 × 14 mm short screws × 12

Cord holders × 2


Rear panel (left) Rear panel (center) Rear panel (right)
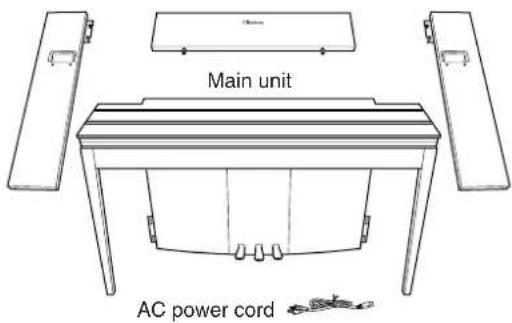
text_image
Main unit AC power cordkeyboard stand stabilizers: 2 pieces

natural_image
Technical line drawing of a metal bracket with mounting holes and internal compartments (no text or symbols)Included in the packing pads.
Preparing the rear panels
When the package is shipped from the factory, the rear panels are secured to the wooden fixing pads with screws. Before you can start assembling the rear panels, you must first remove them from the fixing pads.
Removing the panels:
Stack two packing pads (included in the packing box with the rear panels) under the rear panels, then remove the screws as shown in the illustrations.

CAUTION
- Do not use screws fixing rear panels to assemble the Clavinova.
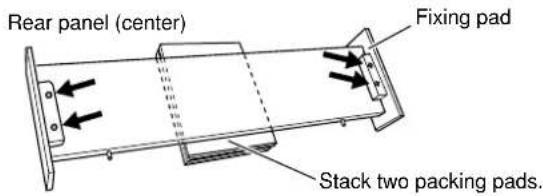
text_image
Rear panel (center) Fixing pad Stack two packing pads.Rear panels (left, right)
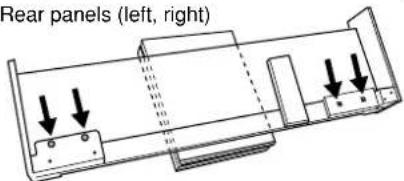
text_image
Rear panels (left, right)1
Insert the rear panel (center).
Position the rear panel (center) so that the word "Clavinova" faces the front (keyboard side). Then insert the projections on the panel into the holes on top of the unit, as shown in the illustration.
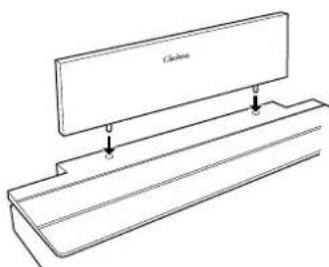
natural_image
Technical line drawing of a mechanical assembly with a flat plate and two mounting holes (no text or symbols)
CAUTION
- When the rear panel (center) is inserted in the main unit, do not apply pressure to the rear panel (center) from the front or rear. Doing so may damage the projections of the rear panel (center), allowing it to fall or be damaged.
2 Install the rear panels (left and right).
① Attach two short screws (6 × 14mm) to each edge of the rear panel (center) using your fingers so that the screw threads project about 10mm from the surface. Make sure that the screws will not loosen and fall out of the holes.
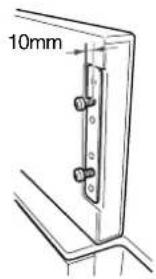
text_image
10mm② Make sure that the screws you finger-tightened in Step ① have not loosened. Then position the handhold of the rear (left) panel toward the rear, and hook the bracket of the rear (left) panel onto the projecting screws as shown in the illustration ②. When doing so, be careful that the bracket does not scratch the rear panel (center).
③ Align the holes located under the handhold on the rear panel (left) with the holes on the main unit, then tighten two long screws (6 × 45mm) to secure the panel to the unit.
④ Lightly tighten two short screws (6 × 14mm) into the bracket on the bottom of the unit to secure the panel to the unit.
text_image
Position the bracket to the rear of the rear panel (left).⑤ Follow the same steps to install the rear panel (right).
3 Fasten the rear panels securely.
Tighten the screws securely in the order shown in the illustration. Be careful not to permit mis-aligned levels on the front surface, or a gap on the top surface of rear panels (center, left, and right).
text_image
1 2 3 1 2 3 Edges must be flush. Do not allow a gap.4 Attach the fall-prevention bracket.
Align the second and fourth holes on the fall-prevention bracket with the bracket holes on the bottom of the unit, then secure the bracket using two short screws (6 × 14mm).
natural_image
Technical line drawing of a mechanical assembly with bracket and mounting bracket (no text or symbols)5 Set the voltage selector and connect the power cord.
① Insert the AC power cord plug into the AC INLET connector on the rear of the unit.
② Attach the cord holders in the locations along the path of the power cord on the rear panel, then clip the cord into the holders.
text_image
Cord holdersVoltage Selector
Before connecting the AC power cord, check the setting of the voltage selector which is provided in some areas. To set the selector for 110V, 127V, 220V or 240V main voltages, use a "minus" screwdriver to rotate the selector dial so that the correct voltage for your region appears next to the pointer on the panel. The voltage selector is set at 240V when the unit is initially shipped. After the proper voltage has been selected, connect the AC power cord to the AC INLET and an AC wall outlet. A plug adaptor may be also provided in some areas to match the pin configuration of the AC wall outlets in your area.
WARNING
An improper voltage setting can cause serious damage to the Clavinova or result in improper operation.
After completing the assembly, please check the following.
- Are there any parts left over?
→ Review the assembly procedure and correct any errors. - Is the Clavinova clear of doors and other movable fixtures?
→ Move the Clavinova to an appropriate location.
- Does the Clavinova make a rattling noise when you shake it?
→ Tighten all screws.
→ Be sure to install the fall-prevention brackets securely.
- Is the power cord inserted securely into the sockets?
→ Check the connection.
- If the main unit creaks or is otherwise unsteady when you play on the keyboard, refer to the assembly diagrams and retighten all screws.
When you move the assembled instrument, be sure to grasp the handles and the bottom of the keyboard.

CAUTION
Do not hold the key cover. Improper handling can result in damage to the instrument or personal injury.

text_image
Key cover Customs Hold here.Do not hold here.
| Voice Name | Stereo Sampling | Touch Response | Dynamic Sampling*1 | Key-Off Sampling*2 | Voice Descriptions |
| GRANDPIANO 1 | ○ | ○ | ○ | ○ | Recorded samples from a full concert grand piano. Also includes three levels of dynamic sampling, sustain samples, and key-off samples for exceptionally realistic acoustic grand piano sound. Perfect for classical compositions as well as any other style that requires acoustic piano. |
| VARIATION | ○ | ○ | ○ | ○ | Warm and mellow piano. Good for classical compositions. |
| GRANDPIANO 2 | ○ | ○ | — | — | Spacious and clear piano with bright reverb. Good for popu-lar music. |
| VARIATION | ○ | ○ | — | — | Bright, spacious piano. Good for popular or rock music. |
| GRANDPIANO 3 | ○ | ○ | ○ | ○ | A very bright piano sound good for rock music. |
| VARIATION | ○ | ○ | ○ | ○ | A honky-tonk piano sound that is an enjoyable variation from the grand piano voices. |
| E.PIANO 1 | — | ○ | ○ | — | An electronic piano sound created by FM synthesis. Extremely “musical” response with varying timbre according to keyboard dynamics. Good for standard popular music. |
| VARIATION | — | ○ | — | — | A synth-generated type electronic piano sound often heard in popular music. Used in the DUAL mode it blends well with an acoustic piano voice. |
| E.PIANO 2 | — | ○ | ○ | — | The sound of an electric piano using hammer-struck metallic “tines”. Soft tone when played lightly, and an aggressive tone when played hard. |
| VARIATION | — | ○ | ○ | — | A slightly different electric piano sound often heard in rock and popular music. |
| HARPSICHORD | ○ | — | — | ○ | The definitive instrument for baroque music. Since harpsi-chord uses plucked strings, there is no touch response. There is, however, a characteristic additional sound when the keys are released. |
| VARIATION | ○ | — | — | ○ | Mixes the same voice an octave higher for a more brilliant tone. |
| VIBRAPHONE | ○ | ○ | ○ | — | Vibraphone played with relatively soft mallets. The tone becomes more metallic the harder you play. |
| VARIATION | ○ | ○ | — | — | Stereo-sampled, spacious, and realistic marimba. |
| CHURCH ORGAN | ○ | — | — | — | This is a typical pipe organ sound (8 feet + 4 feet + 2 feet). Good for sacred music from the Baroque period. |
| VARIATION | ○ | — | — | — | This is the organ's full coupler sound often associated with Beach's “Toccata and Fugue”. |
| JAZZ ORGAN | — | — | — | — | The sound of a “tonewheel” type electric organ. Often heard in jazz and rock idioms. |
| VARIATION | — | — | — | — | Uses a rotary speaker effect with a different speed. The variations speed is faster. If the variation is selected while holding a chord, the speed of the effect will gradually change. |
| STRINGS | ○ | ○ | — | — | Stereo-sampled, large-scale strings ensemble with realistic reverb. Try combining this voice with piano in the DUAL mode. |
| VARIATION | ○ | ○ | — | — | Spacious strings ensemble with a slow attack. Try combining this voice with a piano or electric piano in the DUAL mode. |
| CHOIR | — | ○ | — | — | A big, spacious choir voice. Perfect for creating rich harmonies in slow pieces. |
| VARIATION | — | ○ | — | — | A choir voice with a slow attack. Try combining this voice with a piano or electric piano in the DUAL mode. |
| Voice Name | Stereo Sampling | Touch Response | Dynamic Sampling^*1 | Key-Off Sampling^*2 | Voice Descriptions |
| GUITAR/CLAVI. | — | ○ | — | — | Warm and natural-sounding nylon guitar. Enjoy the quiet ambience of nylon strings. |
| VARIATION | — | ○ | — | ○ | A hammer-struck keyboard instrument that utilizes an elec-tric pickup that is often heard in funk and soul music. Its tone is noted for the unique sound produced when the keys are released. |
| WOOD BASS | — | ○ | — | — | An upright bass played fingerstyle. Ideal for jazz and Latin music. |
| VARIATION | — | ○ | — | — | Adds a cymbal voice to the bass sound. Ideal for walking bass lines in jazz tunes. |
| E.BASS | — | ○ | — | — | Electric bass for a wide range of music styles, jazz, rock, popular, and more. |
| VARIATION | — | ○ | — | — | A fretless bass good for styles such as jazz, fusion, etc. |
*1. Dynamic Sampling provides multiple velocity-switched samples to accurately simulate the timbral response of an acoustic instrument.
*2. Contains a very subtle sample that is produced when the keys are released.
Demo Song List
| Voice Name Title Composer | |
| GRAND PIANO 1 Consolation No.3 F. Liszt | |
| HARPSICHORD Gavotte J.S. Bach |
The demonstration pieces listed above are short rearranged excerpts the original compositions.
All other songs are original (©2004 Yamaha Corporation).
Piano Voice Demo Description
| Voice Name Piano Voice Demo | |
| GRAND PIANO 1 Stereo sampling | |
| GRAND PIANO 2 Monaural sampling | |
| GRAND PIANO 3 Dynamic sampling; mezzo piano | |
| E.PIANO 1 Dynamic sampling; mezzo forte | |
| E.PIANO 2 Dynamic sampling; forte | |
| HARPSICHORD With sustain sampling | |
| VIBRAPHONE Without sustain sampling | |
| CHURCH ORGAN | With key-off sampling |
| JAZZ ORGAN | Without key-off sampling |
Numerics
50 Greats for the Piano ....19
50 Piano Preset Songs ....19
A
A-B Repeat for 50 Preset Songs ......22
Accessories....8
Adding Variations ......24
Adjust
Brilliance 18,24
Tempo (50 Piano Preset Songs)....19
Tempo (Recorded Songs) 37
Volume (50 Piano Preset Songs) 19
Volume (Demo) 18
Volume (Metronome) 47
ALL (LED display) 19
Assembly....59–61
AUX IN 16,53
AUX OUT....16, 52
B
Backup Functions....50
BRILLIANCE....16, 24
C
Center Pedal 16,24
Combining Two Voices (Dual mode)....28
Connecting a Personal Computer....54
Connections....52
Connectors ....52
D
Damper Pedal 16, 23, 45
DEMO....16, 18
Demo Song List ....64
Detailed Settings (FUNCTION)....39
Dual mode 28,44
E
EFFECT....16, 25
F
Factory Setting List ....68
Fine Tuning of the Pitch....42
FUL (LED display)....33
FUNCTION 16,42-50
Basic Procedure....40
Function Parameter List ....68
H
HOST SELECT.... 16, 53, 56
HST (LED display).... 54
K
Key Cover ....10
L
LED display 16
Left Pedal 16, 24, 46
List
Demo Song 64
Factory Setting.... 68
Functions....39
Preset Voice 62
M
MASTER VOLUME....13, 16
METRONOME 16,31
Metronome Volume 47
MIDI 51
MIDI [IN] [OUT] [THRU] ....16, 53
MIDI cables 51, 56, 57
MIDI connectors.... 51, 56
MIDI Data Format....69
MIDI driver 55
MIDI Functions ....47
Music Rest 11
N
Normal setting 24
P
PHONES....13, 16
Piano Voice Demo Description....64
Pitch → Fine Tuning of the Pitch....42
POWER....12, 16
Practicing a One-Hand Part Using 50 Preset Songs.....20
Precautions 3–4
PRESET....16, 19
Preset Song Part....47
Preset songs → 50 Piano Preset Songs .....19
Preset Voice List 62
R
REC → Recording .....16, 33
Recording....32
Initial Settings....36
Re-recording....34
REVERB....16, 24
Right Pedal....16, 23
rnd (LED display)....19
S
Scale....43
Scn (LED display)....58
Serial cable 55, 57
Soft Pedal 16, 24, 46
Sostenuto Pedal 16, 24
SPEAKER....13, 16
Specifications....74
SPLIT 16,29,45
START/STOP (Demo)....18
START/STOP (METRONOME)....16, 31
Start/Stop (Pedal)....38
START/STOP (SONG) 16
Start/Stop playback
50 Piano Preset Songs....19
Demonstration Tunes ....18
Recorded Songs 37
Useful Playback Functions....38
Start/Stop recording....33
Sustain Pedal....46
Synchro Start
50 Piano Preset Songs....21
Recorded Songs 38
T
TEMPO....16, 19, 37
TEMPO (METRONOME) 31
TO HOST 16,51
TOUCH.... 16,26
Touch Sensitivity....26
TRACK 1/2 (50 Piano Preset Songs) ......20
TRACK 1/2 (Recording)....33
Track Playback On and Off 38
Transporting 8
TRANSPOSE.... 16,27
Troubleshooting....58
Tuning → Fine Tuning of the Pitch....42
U
USB 57
USER 1/2/3 32
V
VARIATION 24
VOICE 16,23
Appendix
This section introduces reference material.
| Backup Group | ||
| Voice GRAND PIANO 1 | F9.1 | |
| Variation OFF | ||
| Dual Mode OFF | ||
| Split Mode OFF | ||
| Split Mode Left Voice WOOD BASS | ||
| Reverb Type Preset for each voice | ||
| Reverb Depth Preset for each voice | ||
| Effect Type Preset for each voice | ||
| Effect Depth Preset for each voice | ||
| Touch Sensitivity MEDIUM | ||
| Volume in the FIXED Mode 64 | ||
| Metronome | OFF | — |
| Metronome Time Signature | 0 (no accent) | F9.1 |
| Tempo | 120 | — |
| Transpose 0 F9.3 |
Function
| Function number | Function | Default | Backup Group |
| F1 | Tuning | A3=440Hz | F9.3 |
| F2.1 | Scale | 1 (Equal Temperament) | |
| F2.2 | Base Note | C | |
| F3.1 | Dual Balance | Preset for each voice combination | F9.1 |
| F3.2 | Dual Detune | Preset for each voice combination | |
| F3.3, F3.4 | Dual Octave Shift | Preset for each voice combination | |
| F3.5, F3.6 | Dual Effect Depth | Preset for each voice combination | |
| F4.1 | Split Point | F#2 | |
| F4.2 | Split Balance | Preset for each voice combination | |
| F4.3, F4.4 | Split Octave Shift | Preset for each voice combination | |
| F4.5, F4.6 | Split Effect Depth | Preset for each voice combination | |
| F4.7 | Damper Pedal Range | ALL | |
| F5.1 | Left Pedal Mode | 1 (Soft Pedal) | F9.4 |
| F5.2 | Soft Pedal Effect Depth | 3 | |
| F5.3 | Sustain Sample Depth | 12 | |
| F5.4 | Keyoff Sample Volume | 10 | |
| F6 | Metronome Volume | 10 | F9.1 |
| F7 | Preset Song Part Cancel Volume | 5 | |
| F8.1 | MIDI Transmit Channel | 1 | F9.2 |
| F8.2 | MIDI Receive Channel | ALL | |
| F8.3 | Local Control | ON | |
| F8.4 | Program Change Send & Receive | ON | |
| F8.5 | Control Change Send & Receive | ON | |
| F8.6 | MIDI Transmit Transpose | 0 | |
| F9 | Backup | All OFF | Always backed up |
If you're already very familiar with MIDI, or are using a computer to control your music hardware with computer-generated MIDI messages, the data provided in this section can help you to control the CLP-F01.
Data format: [9nH] -> [kk] -> [vv]
9nH = Note ON/OFF event (n = channel number)
kk = Note number (Transmit: 09H ~ 78H = A-2 ~ C8 / Receive: 00H ~ 7FH = C-2 ~ G8)*
vv = Velocity (Key ON = 01H ~ 7FH, Key OFF = 00H)
Data format: [8nH] -> [kk] -> [vv] (reception only)
8nH = Note OFF event (n = channel number)
kk = Note number: 00H ~ 7FH = C-2 ~ G8
vv = Velocity
* If received value exceeds the supported range for the selected voice, the note is adjusted by the necessary number of octaves.
2. CONTROL CHANGE
Data format: [BnH] -> [cc] -> [vv]
    BnH = Control change (n = channel number)
    cc = Control number
    vv = Data Range
(1) Bank Select
ccH Parameter Data Range (vvH)
00H Bank Select MSB 00H:Normal
20H Bank Select LSB 00H...7FH
Bank selection processing does not occur until receipt of next Program Change message.
(2) Main Volume (reception only)
ccH Parameter Data Range (vvH)
07H Volume MSB 00H...7FH
(3) Expression
ccH Parameter Data Range (vvH)
0BH Expression MSB 00H...7FH
(4) Damper
ccH Parameter Data Range (vvH)
40H Damper MSB 00H...7FH
(5) Sostenuto
ccH Parameter Data Range (vvH)
42H Sostenuto 00H-3FH:off, 40H-7FH:on
(6) Soft Pedal
ccH Parameter Data Range (vvH)
43H Soft Pedal 00H-3FH:off, 40H-7FH:on
(7) Effect1 Depth (Reverb Send Level)
ccH Parameter Data Range (vvH)
5BH Effect1 Depth 00H...7FH
Adjusts the reverb send level.
(8) Effect4 Depth (Variation Effect Send Level)
ccH Parameter Data Range (vvH)
5EH Effect4 Depth 00H...7FH
Data format: [BnH] -> [cc] -> [vv]
    BnH = Control event (n = channel number)
    cc = Control number
    vv = Data Range
(1) All Sound Off
ccH Parameter Data Range (vvH)
78H All Sound Off 00H
Switches off all sound from the channel. Does not reset Note
On and Hold On conditions established by Channel Messages.
(2) Reset All Controllers
ccH Parameter Data Range (vvH)
79H Reset All Controllers 00H
Resets controllers as follows.
Controller Value
Expression 127 (max)
Damper Pedal 0 (off)
Sostenuto 0 (off)
Soft Pedal 0 (off)
(3) Local Control (reception only)
ccH Parameter Data Range (vvH)
7AH Local Control 00H (off), 7FH (on)
(4) All Notes Off
ccH Parameter Data Range (vvH)
7BH All Notes Off 00H
Switches OFF all the notes that are currently ON on the specified channel. Any notes being held by the damper or sostenuto pedal will continue to sound until the pedal is released.
(5) Omni Off (reception only)
ccH Parameter Data Range (vvH)
7CH Omni Off 00H
Same processing as for All Notes Off.
(6) Omni On (reception only)
ccH Parameter Data Range (vvH)
7DH Omni On 00H
Same processing as for All Notes Off.
(7) Mono (reception only)
ccH Parameter Data Range (vvH)
7EH Mono 00H
Same processing as for All Sound Off.
(8) Poly (reception only)
ccH Parameter Data Range (vvH)
7FH Poly 00H
Same processing as for All Sound Off.
- When control change reception is turned OFF in the Function mode, control change data will not be transmitted or received except for Bank Select and Mode messages.
- Local on/off, OMNI on/off are not transmitted. (The appropriate note off number is supplied with "All Note Off" transmission).
- When a voice bank MSB/LSB is received, the number is stored in the internal buffer regardless of the received order, then the stored value is used to select the appropriate voice when a program change message is received.
- The Multi-timbre and Poly modes are always active. No change occurs when OMNI ON, OMNI OFF, MONO, or POLY mode messages are received.
4. PROGRAM CHANGE
Data format: [CnH] -> [ppH]
CnH = Program event (n = channel number)
ppH = Program change number
P.C.#=Program Change number
| Voice Name MSB | LSB | P.C.#(1-128) | |
| GRANDPIANO 1 | 0 | 122 | 1 |
| VARIATION | 0 | 123 | 1 |
| GRANDPIANO 2 | 0 | 112 | 1 |
| VARIATION | 0 | 112 | 2 |
| GRANDPIANO 3 | 0 | 122 | 2 |
| VARIATION | 0 | 122 | 4 |
| E.PIANO 1 | 0 | 122 | 6 |
| VARIATION | 0 | 122 | 89 |
| E.PIANO 2 | 0 | 122 | 5 |
| VARIATION | 0 | 123 | 5 |
| HARPSICHORD | 0 | 122 | 7 |
| VARIATION | 0 | 123 | 7 |
| VIBRAPHONE | 0 | 122 | 12 |
| VARIATION | 0 | 122 | 13 |
| CHURCH ORGAN | 0 | 123 | 20 |
| VARIATION | 0 | 122 | 20 |
| JAZZ ORGAN | 0 | 122 | 17 |
| VARIATION | 0 | 123 | 17 |
| STRINGS | 0 | 122 | 49 |
| VARIATION | 0 | 122 | 50 |
| CHOIR | 0 | 122 | 53 |
| VARIATION | 0 | 123 | 53 |
| GUITAR/CLAVI. | 0 | 122 | 25 |
| VARIATION | 0 | 122 | 8 |
| WOOD BASS | 0 | 122 | 33 |
| VARIATION | 0 | 124 | 33 |
| E.BASS | 0 | 122 | 34 |
| VARIATION | 0 | 122 | 36 |
- If you assign Program Change numbers using numbers 0 through 127, subtract one (1) from a Program change number (P.C. #) listed above. For example, if you wish to change to a Program with the P.C. #1, specify number 0.
- When program change reception is turned OFF in the Function mode, no program change data is transmitted or received. Also, Bank MSB/LSB is not transmitted or received.
5. SYSTEM REALTIME MESSAGES
[rrH]
F8H: Timing clock
FAH: Start
FCH: Stop
FEH: Active sensing
| Data | Transmission | Reception |
| F8H | Transmitted every 96 clocks | Received as 96-clock tempo timing when MIDI clock is set to External |
| FAH | Recorder start | Recorder startNot received when the MIDI clock is set to Internal. |
| FCH | Recorder stop | Recorder stopNot received when the MIDI clock is set to Internal. |
| FEH | Transmitted every 200 milliseconds | If a signal is not received via MIDI for more than 400 milliseconds, the same processing will take place for All Sound Off, All Notes Off and Reset All Controllers as when those signals are received. |
- Caution: If an error occurs during MIDI reception, the Damper, Sostenuto, and Soft effects for all channels are turned off and an All Note Off occurs.
6. SYSTEM EXCLUSIVE MESSAGES (Yamaha MIDI Format)
Panel Data Transmit
Data format: [F0H] -> [43H] -> [0nH] -> [7CH] -> ... -> [F7H]
F0H, 43H, 0nH, 7CH (n: channel number)
00H, 2DH (data length)
43H, 4CH, 20H, 20H (CL)
43H, 4CH, 50H, 27H, 30H, 34H (CLP'04)
30H, 30H (version x, y)
[PANEL DATA]
[CHECK SUM (1byte)] = 0-(43H+4CH+20H+......+Data end) F7H
- Panel Data Contents
| (1) 1'st Voice | (18) Split Dumper Mode |
| (2) Dual On/Off | (19) Reverb Type 1 |
| (3) Dual Voice | (20) Reverb Type 2 |
| (4) Dual Balance | (21) Reverb Depth 1 |
| (5) Dual Detune | (22) Reverb Depth 2 |
| (6) Dual Voice1 Octave | (23) Effect Type 1 |
| (7) Dual Voice2 Octave | (24) Effect Type 2 |
| (8) Dual Voice1 Effect Depth | (25) Effect Depth |
| (9) Dual Voice2 Effect Depth | (26) Variation On/Off |
| (10) Split On/Off | (27) Touch Sensitivity |
| (11) Split Voice | (28) Fixed Data |
| (12) Split Point | (29) Left Pedal |
| (13) Split Balance | (30) Soft Pedal Depth |
| (14) Split Voice1 Octave | (31) Absolute tempo low |
| (15) Split Voice2 Octave | (32) Absolute tempo high |
| (16) Split Voice1 Effect Depth | (33) Key-Off Sampling D |
| (17) Split Voice2 Effect Depth |
- P anel data send requests cannot be received.
7. SYSTEM EXCLUSIVE MESSAGES (Universal System Exclusive)
(1) Universal Realtime Message
Data format: [F0H] -> [7FH] -> [XnH] -> [04H] -> [01H] -> [IIH] -> [mmH] -> [F7H]
MIDI Master Volume
- Simultaneously changes the volume of all channels.
- When a MIDI master volume message is received, the volume only has affect on the MIDI receive channel, not the panel master volume.
FOH = Exclusive status
7FH = Universal Realtime
7FH = ID of target device
04H = Sub-ID #1=Device Control Message
01H = Sub-ID #2=Master Volume
//H = Volume LSB
mmH = Volume MSB
F7H = End of Exclusive
or
FOH = Exclusive status
7FH = Universal Realtime
XnH = When n is received n=0\~F, whichever is received. X = don't care
04H = Sub-ID #1=Device Control Message
01H = Sub-ID #2=Master Volume
//H = Volume LSB
mmH = Volume MSB
F7H = End of Exclusive
(2) Universal Non-Realtime Message (GM On)
General MIDI Mode On
Data format: [F0H] -> [7EH] -> [XnH] -> [09H] -> [01H] -> [F7H]
F0H = Exclusive status
7EH = Universal Non-Realtime
7FH = ID of target device
09H = Sub-ID #1=General MIDI Message
01H = Sub-ID #2=General MIDI On
F7H = End of Exclusive
or
FOH = Exclusive status
7EH = Universal Non-Realtime
XnH = When received, n=0\~F.
X = don't care
09H = Sub-ID #1=General MIDI Message
01H = Sub-ID #2=General MIDI On
F7H = End of Exclusive
When the General MIDI mode ON message is received, the
MIDI system will be reset to its default settings.
This message requires approximately 50ms to execute, so sufficient time should be allowed before the next message is sent.
8. SYSTEM EXCLUSIVE MESSAGES (XG Standard)
(1) XG Native Parameter Change
Data format: [F0H] -> [43H] -> [1nH] -> [4CH] -> [hhH] -> [mmH] -> [llH] -> [ddH] -> [F7H]
F0H = Exclusive status
43H = YAMAHA ID
1nH = When received, n=0\~F.
When transmitted, n=0.
4CH = Model ID of XG
hhH = Address High
mmH = Address Mid
llH = Address Low
ddH = Data
F7H = End of Exclusive
Data size must match parameter size (2 or 4 bytes).
When the XG System On message is received, the MIDI system will be reset to its default settings.
The message requires approximately 50ms to execute, so
sufficient time should be allowed before the next message is sent.
(2) XG Native Bulk Data (reception only)
Data format: [F0H] -> [43H] -> [0nH] -> [4CH] -> [aaH] -> [bbH] -> [hhH] -> [mmH] -> [/H] -> [ddH] ->...-> [ccH] -> [F7H]
F0H = Exclusive status
43H = YAMAHA ID
0nH = When received, n=0\~F.
When transmitted, n=0.
4CH = Model ID of XG
aaH = ByteCount
bbH = ByteCount
hhH = Address High
mmH = Address Mid
//H = Address Low
ddH = Data

ccH = Check sum
F7H = End of Exclusive
- Receipt of the XG SYSTEM ON message causes reinitialization of relevant parameters and Control Change values. Allow sufficient time for processing to execute (about 50 msec) before sending the CLP-F01 another message.
- XG Native Parameter Change message may contain two or four bytes of parameter data (depending on the parameter size).
- F or information about the Address and Byte Count values, refer to Table 1 below. Note that the table's Total Size value gives the size of a bulk block. Only the top address of the block (00H, 00H, 00H) is valid as a bulk data address.
9. SYSTEM EXCLUSIVE MESSAGES (Clavinova MIDI Format)
Data format: [F0H] -> [43H] -> [73H] -> [xxH] -> [nnH] -> [F7H]
FOH = Exclusive status
43H = Yamaha ID
73H = Clavinova ID
01H = Product ID (CLP common)
or
7FH= Extended Product ID
47H = Product ID
nnH = Substatus
nn Control
02H Internal MIDI clock
03H External MIDI clock
06H Bulk Data (the bulk data follows 06H)
F7H = End of Exclusive
* When nn=02H or 03H, CLP common ID (01H) is recog-
nized as well as 7FH, 47H.
BULK DUMP FORMAT
F0H, 43H, 73H
7FH, 47H = Product ID
06H = Bulk ID
05H = Sequence data
0nH, 0nH, 0nH, 0nH = Data length
[BULK DATA] =
[CHECK SUM (1byte)] = 0-sum (BULK DATA)
F7H = End of Exclusive
10. SYSTEM EXCLUSIVE MESSAGES (Special Control)
Data format: [F0H] -> [43H] -> [73H] -> [7FH] -> [47H] -> [11H] -> [0nH] -> [ccH] -> [vvH] -> [F7H]
FOH = Exclusive status
43H = Yamaha ID
73H = Clavinova ID
7FH = Extended Product ID
47H = Product ID
11H = Special control
0nH = Control MIDI change (n=channel number)
cc = Control number
vv = Value
F7H = End of Exclusive
Control 0n ccH vvH Split Point Always 00H 14H 14H : Split Key Num- ber
Metronome Always 00H 1BH 00H : off
01H: -
02H:2/4
03H : 3/4
04H:4/4
05H:5/4
06H : 6/4
7FH : No accent
Damper Level ch: 00H-0FH 3DH(Sets the Damper Level
for each channel)
00H-7FH
Channel Detune ch: 00H-0FH 43H (Sets the Detune value
for each channel)
00H-7FH
Voice Reserve ch: 00H-0FH 45H 00H : Reserve off 7FH : on*
* When Volume, Expression is received for Reserve On, they will be effective from the next Key On. Reserve Off is normal.
11. SYSTEM EXCLUSIVE MESSAGES (Others)
Data format: [F0H] [43H] [1nH] [27H] [30H] [00H] [00H] [mmH] [UH] [ccH] [F7H]
Master Tuning (XG and last message priority) simultaneously changes the pitch of all channels.
FOH = Exclusive Status
43H = Yamaha ID
1nH = When received, n=0\~F.
When transmitted, n=0.
27H = Model ID of TG100
30H = Sub ID
00H =
00H =
mmH = Master Tune MSB
llH = Master Tune LSB
ccH = don't care (under 7FH)
F7H = End of Exclusive
| 00 00 00 4 020C - 05F4(*1) MASTER TUNE -50 - +50[cent] 00 04 00 00 | |||||
| 01 1st bit 3 - 0 → bit 15 - 12 400 | |||||
| 02 2nd bit 3 - 0 → bit 11 - 8 | |||||
| 03 3rd bit 3 - 0 → bit 7 - 4 | |||||
| 4th bit 3 - 0 → bit 3 - 0 | |||||
| 04 | 1 | 00 - 7F | MASTER VOLUME | 0 - 127 | 7F |
| 05 1 — — | |||||
| 06 | 1 | 34 - 4C(*2) | TRANSPOSE | -12 - +12[semitones] | 40 |
| 7E | 00 | XG SYSTEM ON | 00=XG system ON | ||
| 7F 00 | RESET ALL PARAMETERS 00=ON (receive only) | ||||
| 02 01 00 | 2 | 00-7F | REVERB TYPE MSB | Refer to Effect MIDI Map | 01(=HALL1) |
| 00-7F | REVERB TYPE LSB 00 : basic type | 00 | |||
| 02 01 40 | 2 | 00-7F | VARIATION TYPE MSB | Refer to Effect MIDI Map | 00(=Effect off) |
| 00-7F | VARIATION TYPE LSB | 00 : basic type | 00 |
| 08 nn 11 1 00 - 7F | DRY LEVEL | 0 - 127 | 7F |
| nn = Part Number | |||
| MSB | LSB | |
| ROOM | 02H | 10H |
| HALL 1 | 01H | 10H |
| HALL 2 | 01H | 11H |
| STAGE | 03H | 10H |
| Sound board | 03H | 12H |
| MSB | LSB | |
| CHORUS | 42H | 10H |
| PHASER | 48H | 10H |
| TREMOLO | 46H | 10H |
| DELAY | 05H | 10H |
| TransmittedFunction... Recognized Remarks | |||
| Basic Default Channel Changed | 11 - 16 | 11 - 16 | |
| Mode Default Messages Altered | 3X********** | 1 *1X X | Poly Mode only |
| Note Number : True voice | 9 - 120********** | 0 - 1270 - 127 | |
| Velocity Note ON Note OFF | O 9nH,v=1-127X 9nH,v=0 | O 9nH,v=1-127X 9nH,v=0 or 8nH | |
| After Key's Touch Ch's | X X | X X | |
| Pitch Bend | X | X | |
| Control 0,32 Change 7 11 64 66 67 91 94 | OOOOOOOO | OOOOOOOO | Bank Select Volume Expression Damper Sostenuto Soft pedal Reverb Depth Effect Depth |
| Prog Change : True # | O********** | O | |
| System Exclusive | O | O | |
| Common : Song Pos. : Song Sel. : Tune | XXX | XXX | |
| System : Clock Real Time : Commands | OO | OO | |
| : All Sound Off Aux : Reset All Cntrls : Local ON/OFF Mes- : All Notes OFF sages: Active Sense : Reset | OOXXOOXX | O (120,126,127)O (121)O (122)O (123-125)OXX | |
| Notes: *1= Recieve Mode is always multi timbre and Poly mode. | |||
Specifications / Technische Daten / Caractéristiques techniques / Especificaciones
| Keyboard Newly | wooden keyboard |
| Sound Source AWM Dynamic Stereo Sampling | |
| Polyphony 64 Notes Max. | |
| Voice Selection 14 × 2 variations for each voice | |
| Effect Reverb, Effect, Brilliance | |
| Volume Master Volume | |
| Controls | Dual, Split, Metoronome, Transpose, Touch (Hard/Medium/Soft/Fixed), Functions, Speaker ON/OFF |
| Recording/Playback 2-track recording/playdown playback (3 user songs), Tempo Adjustment, Synchro Start | |
| Pedal Damper (apply a half pedal), Sostenuto, Soft | |
| Demo Songs 14 voice Demo Songs, 50 preset Songs | |
| Jacks/Connectors | MIDI (IN/OUT/THRU), PHONES × 2, AUX IN, AUX OUT(L/L+R,R), AUX OUT (LEVEL FIXED)(L,R), TO HOST |
| Main Amplifiers | 40W × 2 |
| Speakers | 16cm × 2, 5cm × 2 |
| Dimensions (W × D × H) | 1427mm × 400mm × 995mm[56-3/16" × 15-3/4" × 39-3/16"] |
| Weight | 71kg (156lbs., 8oz) |
| Accessories | Owner's Manual, “50 greats for the Piano” (Music Book), Bench (included or optional depending on locale) |