LED1926DVXWH - TV SALORA - Free user manual and instructions
Find the device manual for free LED1926DVXWH SALORA in PDF.

User questions about LED1926DVXWH SALORA
0 question about this device. Answer the ones you know or ask your own.
Ask a new question about this device
Download the instructions for your TV in PDF format for free! Find your manual LED1926DVXWH - SALORA and take your electronic device back in hand. On this page are published all the documents necessary for the use of your device. LED1926DVXWH by SALORA.
USER MANUAL LED1926DVXWH SALORA
natural_image
Illustration of a giant panda eating bamboo in a forest setting (no text or symbols visible)USB MULTIMEDIA WEERGAVE (IN DVD MODUS)
ON SCREEN DISPLAY IN MEERDERE TALEN
MULTIFUNCTIONELE AFSTANDSBEDIENING
INGANGEN: CVBS, AUDIO R/L, HDMI, SCART, PC AUDIO, VGA, YPBPR
UITGANGEN: HOOFDTELEFOON, CVBS, AUDIO L/R
AFNEEMBARE STEUN VOOR VOET
AANSLUITING VOOR EXTERNE ANTENNE
INGEBOUWDE LUIDSPREKERS
RUISONDERDRUKKING
ALGEMENE ONDERDELEN
HOOFDEENHEID

text_image
12 13flowchart
graph LR
    A["Input Box 1"] --> B["Output Box 2"]
text_image
Favorite List 1 C-4 2 C-12 3 C-24 4 C-28 5 C-31 OK Enter
text_image
Channel List 1 C-4 2 C-12 3 C-24 4 C-28 5 C-31 OK EnterHOOFDMENU
text_image
CHANNEL Auto Tuning ATV Manual Tuning Programme Edit Move Menu OK Enter Exit1.1 Automatisch afstemmen
text_image
Programme Edit 1 C-4 2 C-12 3 C-24 4 C-28 5 C-31 Delete Rename Move Skip OK Enter Fav Menutext_image
PICTURE Picture Mode Standard Contrast 50 Brightness 50 Color 50 Tint 50 Sharpness 30 Color Temperature Medium Noise Reduction Middle2.1 Beeldmodus
text_image
Sound Mode Treble Bass Balance Auto Volume Standard 50 50 0 Off SOUND Move Menu OK Enter Exit3.1 Geluidmodus
text_image
OPTION OSD Language English TT Language West Aspect Ratio 16:9 Blue Screen Off Key Lock Off Reset Move Menu OK Enter Exit5.1 OSD taal
natural_image
Top-down schematic of a computer setup with monitor, keyboard, and drive unit (no text or labels)①
text_image
Van ongeveer 30°②

natural_image
Illustration of a decorative object resembling a stylized mask or button with a central dot pattern (no text or symbols)
Drukken
③

natural_image
Two identical mechanical components with a circular head and grid pattern, showing a downward arrow (no text or symbols)④

natural_image
Diagram of a mechanical or electrical component with no visible text, numbers, or symbolsSPECIFICATIES
| Scherm 18.5 inch LED TV | |
| Resoutie 1366×768 | |
| Pixelgrootte | 0.3(H)×0.3(V)mm |
| Luminantie 250 cd/m2 | |
| Contrastverhouding 1000:1 | |
| Beeldschermverhouding 16:9 | |
| Reactietijd 6 ms | |
| Kijkhoek 170(H)/160(V) | |
| Zichtbaar bereik | 409.8(H)×230.4(V)mm |
| Levensduur | 30,000 uur |
| MULTIMEDIA WEERGAVE FORMATEN (DVD MODUS) | Film: MPEG-1, MPEG-2, MPEG-4 |
| Muziek: WMA | |
| Foto: JPEG | |
| Ondersteunde discs | DVD/CD/CDR/CDRW/DVD-R/DVD+R/DVD-RW/DVD+RW/VCD/SVCD |
| VOEDING AC adapter (normaa) | DC 12 V 2.5A) |
| VERBRUIK ≤30W | |
| GEBRUIKSTEMPERATUUR -5°C tot 45°C | |
| AFMETINGEN 443(B) x 170(D) | x 308(H) mm |
| GEWICHT Ongeveer 3.1 Kg | |
natural_image
Illustration of a giant panda eating bamboo in a forest setting (no text or symbols visible)Read all of the instructions before using this TV and keep the instruction manual in a safe place for future reference.
IMPORTANT INSTRUCTIONS
Safety information
CAUTION:
DVD/VIDEO CD/CD PLAYER IS A CLASS 1 LASER PRODUCT. HOWEVER THIS DVD/VIDEO CD/CD PLAYER USES A VISIBLE LASER BEAM WHICH COULD CAUSE HAZARDOUS RADIATION EXPOSURE IF DIRECTED. BE SURE TO OPERATE THE DVD/VIDEO CD/CD PLAYER CORRECTLY AS INSTRUCTED.
WHEN THIS DVD/VIDEO CD/CD PLAYER IS PLUGGED TO THE WALL OUTLET, DO NOT PLACE YOUR EYES CLOSE TO THE OPENING OF THE DISC TRAY AND OTHER OPENINGS TO LOOK INTO THE INSIDE OF THIS PLAYER.
USE OF CONTROLS OR ADJUSTMENTS OR PERFORMANCE OF PROCEDURES OTHER THAN THOSE SPECIFIED HEREIN MAY RESULT IN HAZARDOUS RADIATION EXPOSURE.
DO NOT OPEN COVERS AND REPAIR YOURSELF. REFER SERVICING TO QUALIFIED PERSONNEL.
WARNING:
- TO PREVENT FIRE OR SHOCK HAZARD. DO NOT USE THIS POWER CORD WITH AN EXTENSION CORD, RECEPTACLE OR OTHER OUTLET UNLESS THE BLADES CAN BE FULLY INSERTED TO PREVENT BLADE EXPOSURE.
- TO PREVENT FIRE OR SHOCK HAZARD. DO NOT EXPOSE THIS APPLIANCE TO RAIN OR MOISTURE.
CAUTION - LASER RADIATION WHEN OPEN, DO NOT STARE INTO BEAM. VENTILATION WARNING - THE NORMAL VENTILATION OF THE PRODUCT SHALL NOT BE IMPEDED FOR INTENDED USE.

The lightning flash and arrow head within the triangle is a warning sign alerting you of “dangerous voltage” inside the product.

text_image
CAUTION RISK OF ELECTRIC SHOCK DO NOT OPENCAUTION: TO REDUCE THE RISK OF ELECTRIC SHOCK. DO NOT REMOVE COVER (OR BACK). NO USER SERVICEABLE PARTS INSIDE. REFER SERVICING TO QUALIFIED SERVICE PERSONNEL.

The exclamation point within the triangle is a warning sign alerting you of important instructions accompanying the product.
Always follow basic safety precautions when using electrical products, especially when children are present.
WARNING: To avoid the risk of electrical shock, make sure the product is unplugged from the electrical outlet before relocating, servicing, or cleaning it.
Read all instructions before using
- Do not use this product near water.
● Install the product in accordance with the operating instructions. - Do not set the product near heat sources, such as radiators, heat registers, stoves, or other apparatus (including amplifiers) that produce heat.
- Protect the power cord from being walked on or pinched, particularly at plugs, convenience receptacles, and the point where they exit the product.
- Where the MAINS plug or an appliance coupler is used as the disconnect device, the disconnect device shall remain readily operable.
● Unplug the product during lightning storms or when unused for long periods of time. - The product shall not be exposed to dripping or splashing and that no objects filled with liquids, such as vases, shall be placed on the product.
- Do not place in or expose the product to direct sunlight, extreme heat, humid or dusty locations.
- Never operate this product if it has a damaged power cord or plug, do not work properly, has been dropped, damaged, or exposed to moisture, water, or other liquids.
- Do not attempt to examine or repair this product yourself; take the product to a service center for inspection and repair.
- Keep magnetic objects such as speakers, at a distance from the player.

LASER SAFETY
This set employs an optical laser beam system in the CD mechanism designed with built-in safeguards. Do not attempt to disassemble. Exposure to this invisible laser light beam may be harmful to the human eye. This is a Class-1 laser product. Use of controls, adjustments or procedures other than those specified herein may result in hazardous laser light beam exposure. This compact disc player should not be adjusted or repaired by anyone except qualified service personnel. The laser mechanism in the set corresponds to the stylus (needle) of a record player. Although this product uses a laser pick-up lens, it is completely safe when operated according to directions.
NOTE: The manufacturer is not responsible for any radio or TV interference caused by unauthorized modifications. Such modifications could void the user's authority to operate the equipment.
1) Operate turning controls and switches as instructed in the manual.
2) Before turning on the power for the first time, make sure that the adaptor is properly installed.
3) Store your discs in a cool area to avoid damage from heat.
Battery Handling and Usage
- Keep batteries away from children and pets. Only adults should handle batteries.
● Never throw batteries into a fire or expose them to fire or other heat sources.
● Follow the battery safety and usage instructions.
DISC Handling and Maintenance
Handling precautions
- Hold the disc by the edges so the surface will not be soiled with fingerprints. Fingerprints, dirt and scratches can cause skipping and distortion.
- Do not write on the label side with a ball-point pen or other writing utensils.
- Do not use record cleaning sprays, benzine, thinner, static electricity prevention liquids.
- Be careful not to drop or bend the disc.
- Do not install more than 1 disc on the disc compartment.
- Do not try to close the disc cover when the disc is not installed properly.
- Be sure to store the disc in its exclusive case when not in use.
If the surface is soiled
Wipe gently with a soft, damp (water only) cloth.
When wiping discs, always move the cloth from the center hole toward the outside, which will not cause distortion. (If you wipe the discs using a circular motion, circular scratches are likely to occur, which will cause distortion.)
If the disc is brought from a cold to a warm environment, moisture may form on the disc.
Wipe this moisture off with a soft, dry, lint-free cloth before using the disc.
Improper disc storage
You can damage discs if you store them in the following places:
- Areas exposed to direct sunlight
- Humid or dusty areas
- Areas directly exposed to a heat outlet or heating appliance
ACCESSORIES
Instruction Manual....1
Remote Control....1
AC Adaptor....1
All the pictures in this manual are just for your reference, appearance and display should subject to the final product.
TABLE OF CONTENTS
GETTING STARTED
IMPORTANT INSTRUCTIONS....1-3
ACCESSORIES....3
FEATURES....5
GENERAL PARTS....6
REMOTE CONTROL....7-8
REMOTE CONTROL PREPARATION....9
BASIC CONNECTION....10-14
OPERATIONS
BASIC OPERATIONS....15-24
DVD....15-22
TV....23-24
MAIN MENU....25-30
TV MODE....25-29
AV/YPBPR/HDMI MODE....29
PC MODE....30
FOR REFERENCE
MAINTENANCE....31
WALL MOUNTING....31
STAND INSTALLATION....32
SPECIFICATIONS....33
TROUBLESHOOTING....34-35
REGION CODE SETTING....35
FEATURES
18.5" TFT DISPLAY
This player has a built-in 18.5" TFT display window to provide clear vision and low radiation.
WITH BUILT-IN DVD PLAYER
SUPPORT AUTO TV SCANNING
SUPPORT TELETEXT (EUROPE) FUNCTION
SUPPORT USB MULTIMEDIA PLAYBACK (IN DVD MODE)
SUPPORT MULTI-LANGUAGE ON SCREEN DISPLAY
SUPPORT FULL FUNCTION REMOTE CONTROL
SUPPORT CVBS, AUDIO R/L, HDMI, SCART, PC AUDIO, VGA AND YPBPR INPUT
SUPPORT EARPHONE, CVBS AND AUDIO R/L OUTPUT
WITH DETACHABLE STAND HOLDER
WITH EXTERNAL ANTENNA JACK
WITH BUILT-IN SPEAKERS
WITH NOISE REDUCTION FUNCTION
GENERAL PARTS
MAIN UNIT
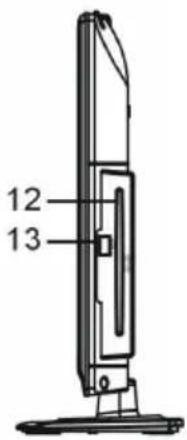
text_image
12 13- TFT display screen
- Remote control sensor
- Power indicator- In standby mode the indicator light will display red color; when switching on the unit the indicator light will display blue color.
- Stand holder
- ▲ - To enter/eject a disc.
- ▶ To play or pause playing.
- VOL +/- button- To increase/decrease the volume level or move left/right.
- CH +/- button- To select next/previous channel or move up/down.
- MENU button- To enter menu setting page.
- TV/AV button- To select the input source.
- POWER button - To switch ON/OFF the TV.
-
Disc slot-To insert a disc according to the silk screen on the side of this slot.
-
USB2 slot-For multimedia playback in DVD mode.
- Y Pb Pr input jack
- RF input jack- To connect the antenna.
- EARPHONE output terminal
- USB1 slot- For software upgrade only in TV mode.
- CVBS and AUDIO R/L output terminals-For DVD mode only.
- POWER input
- CVBS and AUDIO R/L input terminals
- HDMI input terminal
- SCART input terminal
- PC AUDIO input terminal
- VGA input terminal
REMOTE CONTROL
-
To set the unit in standby mode; press it again to switch it on.
-
TV/AV: To display the input source list.
-
NUMBER BUTTONS (0-9): To input the number information, such as channel number and so on.
-
-/--: To switch the digit when selecting multiple digit channels.
-
◯: To return to the previous channel.
-
PICTURE: To switch the picture mode.
-
SOUND: To switch the sound mode.
-
DISPLAY: To display information of current program.
-
SLEEP: To set desired sleep time.
-
MUTE: To mute the sound; press it again to exit MUTE mode.
-
VOL+/-: To turn up/down the volume.
-
CH+/-: To play next/previous channel.
-
EXIT: To exit the menu page.
-
MENU: To display the main menu; press it again to return to previous menu page.
-
▲/▼/◄/►: UP/DOWN/LEFT/RIGHT navigation buttons.
-
OK: To confirm selection.
-
ASPECT/ ▲: Press this button repeatedly to select desired aspect ratio of screen in TV mode; to enter/eject a disc in DVD mode.
-
FAV/ ▶: To display favorite channel list in TV mode; to play/pause playing in DVD mode.
-
AUTO/GOTO: To adjust the screen automatically in PC/VGA mode; to play from a certain point in DVD mode.
-
NICAM/A2/ ■: To select desired sound track in TV mode; to stop playing in DVD mode.
-
SETUP: To enter setup menu page in DVD mode.
-
TITLE: To display the title when playing a disc.

text_image
TV/AV 1 2 3 4 5 6 7 8 9 0 -/-- 5 PICTURE SOUND SLEEP DISPLAY 6 8 7 9 VOL+ MUTE CH+ 10 11 VOL- CH- 12 EXIT MENU 13 14 15 OK 16 ASPECT FAV NICAM/A2 AUTO ▲ ▶ II ■ GOTO 19 SETUP TITLE ANGLE AUDIO 20 TEXT HOLD PGDN PGDP 23 D.MENU D.SWITCH REPEAT SUBTITLE 24 INDEX SIZE REVEAL SUBPAGE 27 RED GREEN YELLOW ©YAN 31 PROGRAM ZOOM SLOW A-B 35 34REMOTE CONTROL
- AUDIO: To switch the audio output mode when playing a disc.
- ANGLE: To select the available angle when playing a multi-angle disc.
- TEXT/D.MENU: To display the available teletext information in TV mode; to display the DVD menu when playing a disc.
- HOLD/D.SWITCH: To hold teletext in TV mode; to switch between video and audio in DVD mode.
- PGUP/SUBTITLE: Page up of available teletext; to open/close subtitle in DVD mode.
- PGDN/REPEAT: Page down of available teletext; to change the repeat mode in DVD mode.
- INDEX/ ←: To display the index of teletext in TV mode; to play fast backward in DVD mode.
- SIZE/ ▶: To switch teletext size in TV mode; to play fast forward in DVD mode.
- SUBPAGE/ ▶To display the sub-page of teletext; to play next chapter in DVD mode.
- REVEAL/ ◀: To hide teletext or display hidden characters; to play previous chapter in DVD mode.
- RED/PROGRAM: To enter programming page in DVD mode.
- GREEN/ZOOM: To zoom in/out in DVD mode.
- CYAN/A-B: To repeat playing between two specific points in DVD mode (A-B).
- YELLOW/SLOW: In DVD mode, playback at lower speed.

text_image
TV/AV 1 2 3 4 5 6 7 8 9 0 -/-- PICTURE SOUND SLEEP DISPLAY 5 6 8 9 VOL+ MUTE CH+ 10 11 VOL- CH- 12 EXIT MENU 13 14 15 OK 16 ASPECT FAV NICAM/A2 AUTO ▲ ▶ II ■ GOTO 19 20 SETUP TITLE ANGLE AUDIO 23 21 TEXT HOLD PGDN PGDF 24 22 D.MENU D.SWITCH REPEAT SUBTITLE 27 25 INDEX SIZE REVEAL SUBPAGE 31 26 29 << >> || > 30 30 REP GREEN YELLOW OYAN 32 33 PROGRAM ZOOM SLOW A-B 35 34REMOTE CONTROL PREPARATION
BATTERY INSTALLATION
Install the batteries as the following pictures. Be sure + and – terminals are positioned as indicated in the battery compartment (Fig1).
SERVICE LIFE OF BATTERIES
- The batteries normally last for one year although this depends on how often the remote control is used.
- If the remote control fails to work even when it is operated near the player, replace the batteries.
- Use two size AAA dry batteries.
NOTE:
- Do not drop, step on or otherwise impact the remote control. This may damage the parts or lead to malfunction.
- If the remote control is not going to be used for a long time, remove the batteries.
Point the remote control from no more than about 6m from the remote control sensor and within about 60° of the front of the player (Fig2).
NOTES:
- The operating distance may vary according to the brightness of the room.
- Do not point bright light at remote control sensor.
- Do not place objects between the remote control and the remote control sensor.
- Do not use this remote control while simultaneously operating the remote control of any other equipment.

text_image
Fig1 ① Push and open ② Press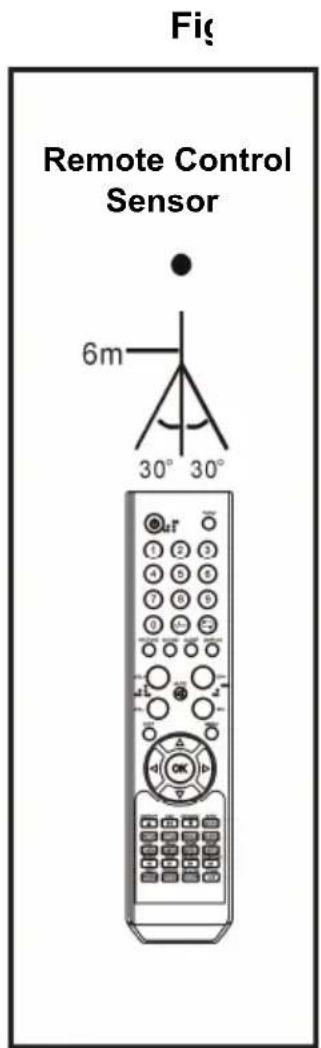
text_image
Fig Remote Control Sensor 6m 30° 30° OutBASIC CONNECTION
- Ensure all the cables are disconnected from the main unit before connecting to AC power source.
- Read through the instructions before connecting other equipments.
CONNECTING TO AC POWER SOURCE
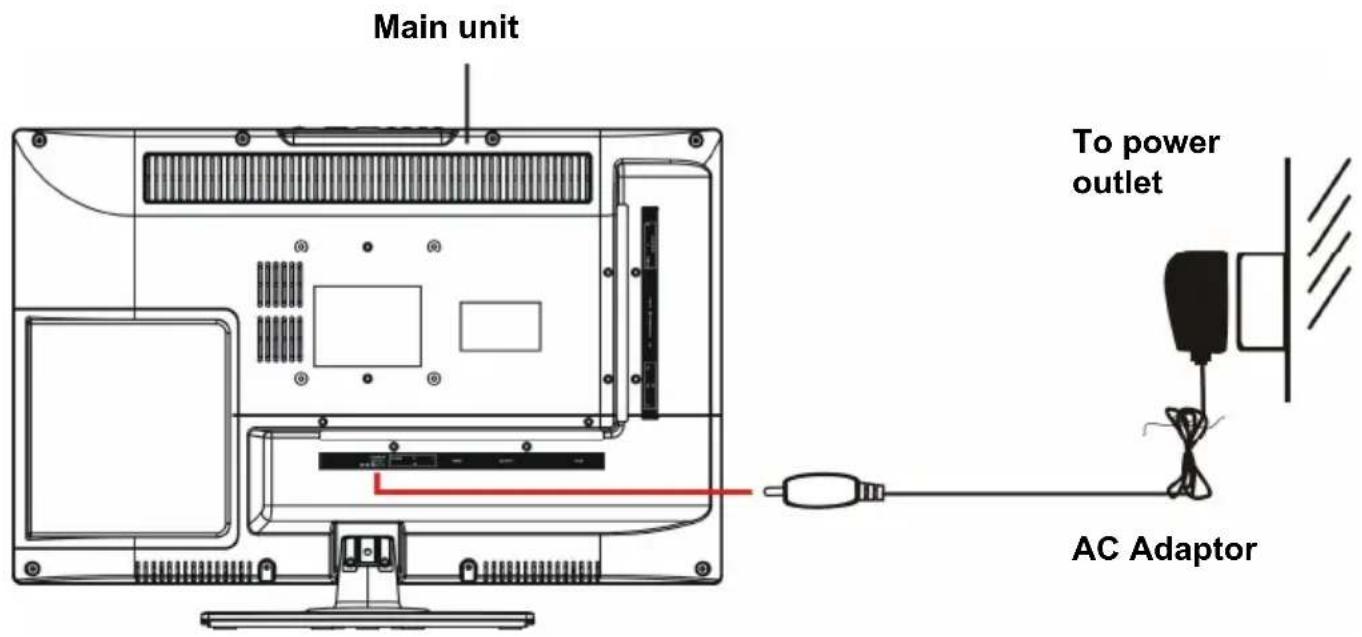
text_image
Main unit To power outlet AC AdaptorCONNECT EXTERNAL ANTENNA TO UNIT
Install external antenna into antenna jack for best picture.
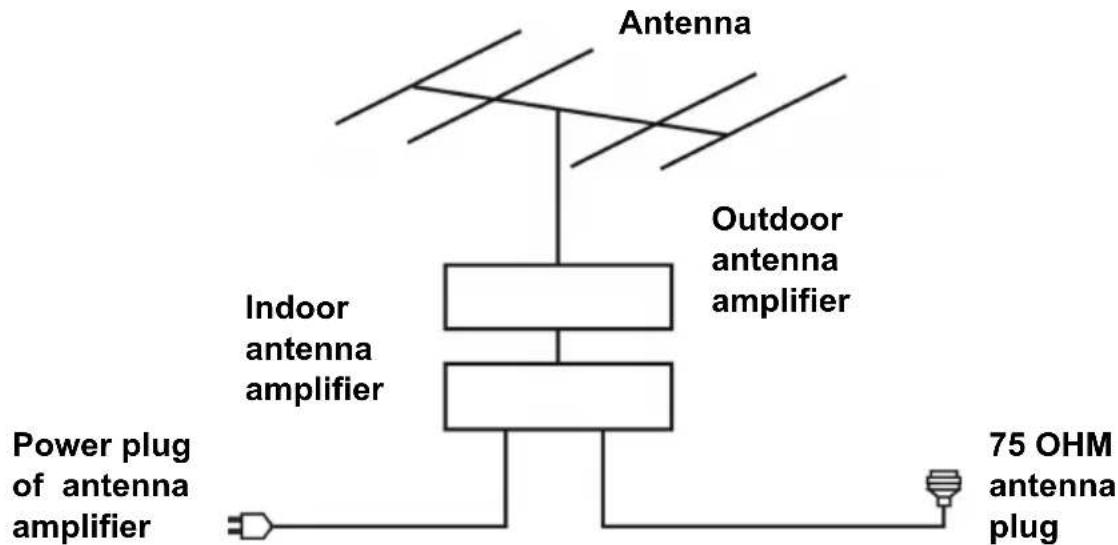
text_image
Antenna Outdoor antenna amplifier Indoor antenna amplifier Power plug of antenna amplifier 75 OHM antenna plugCOMPOSITE AV (CVBS) CONNECTION
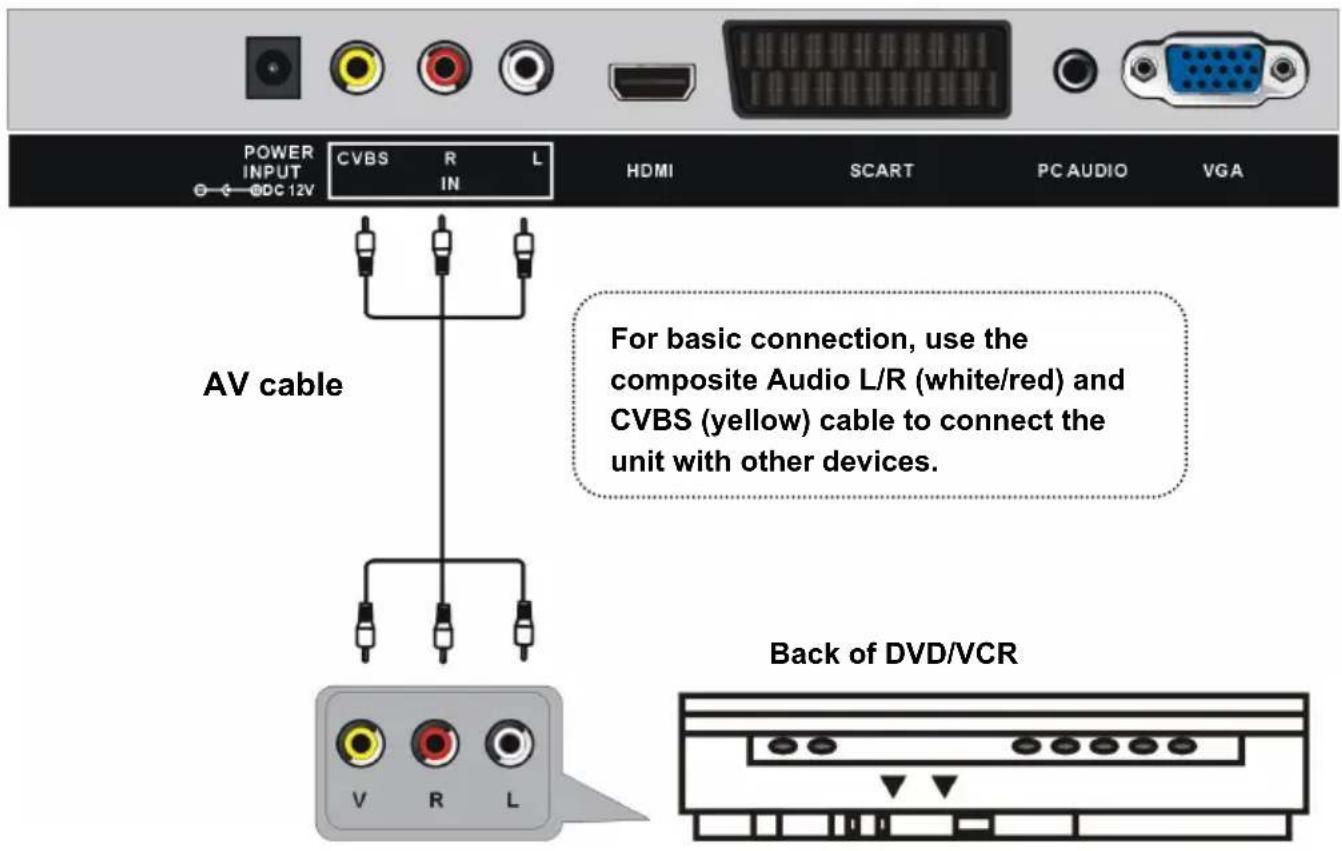
text_image
POWER INPUT DC 12V CVBS R L HDMI SCART PC AUDIO VGA AV cable For basic connection, use the composite Audio L/R (white/red) and CVBS (yellow) cable to connect the unit with other devices. Back of DVD/VCRCOMPONENT (YPbPr) CONNECTION
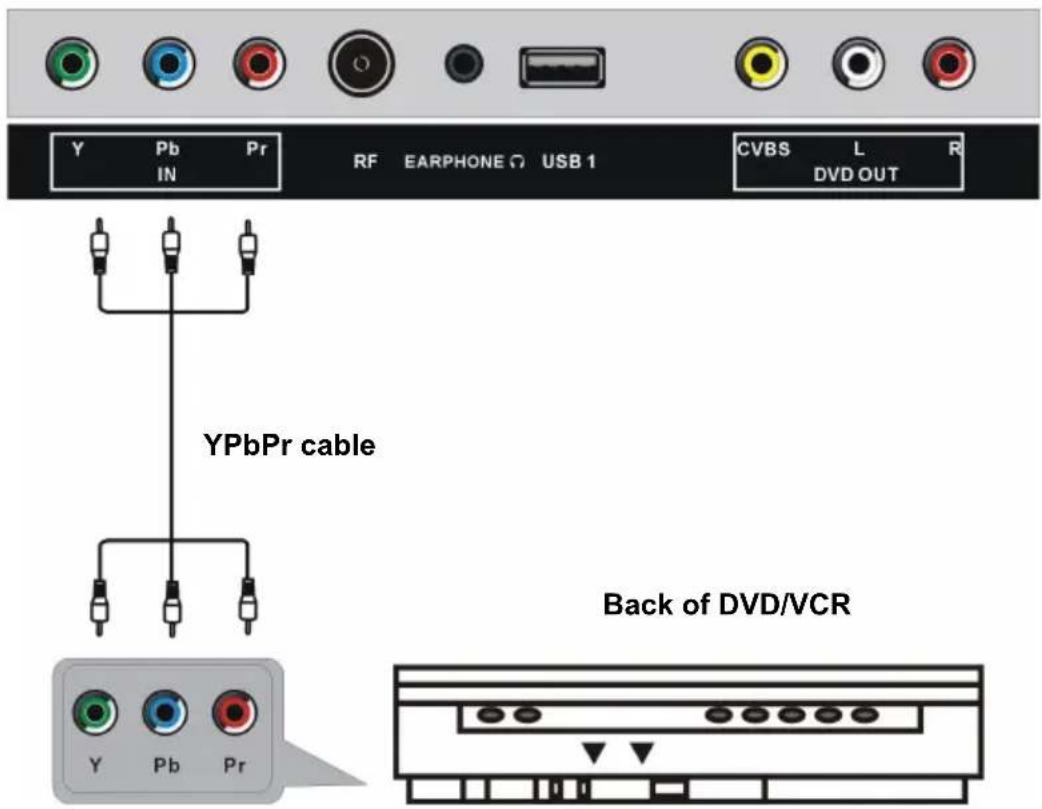
text_image
Y Pb Pr RF EARPHONE USB 1 CVBS L R IN DVD OUT YPbPr cable Back of DVD/VCR Y Pb PrHDMI CONNECTION
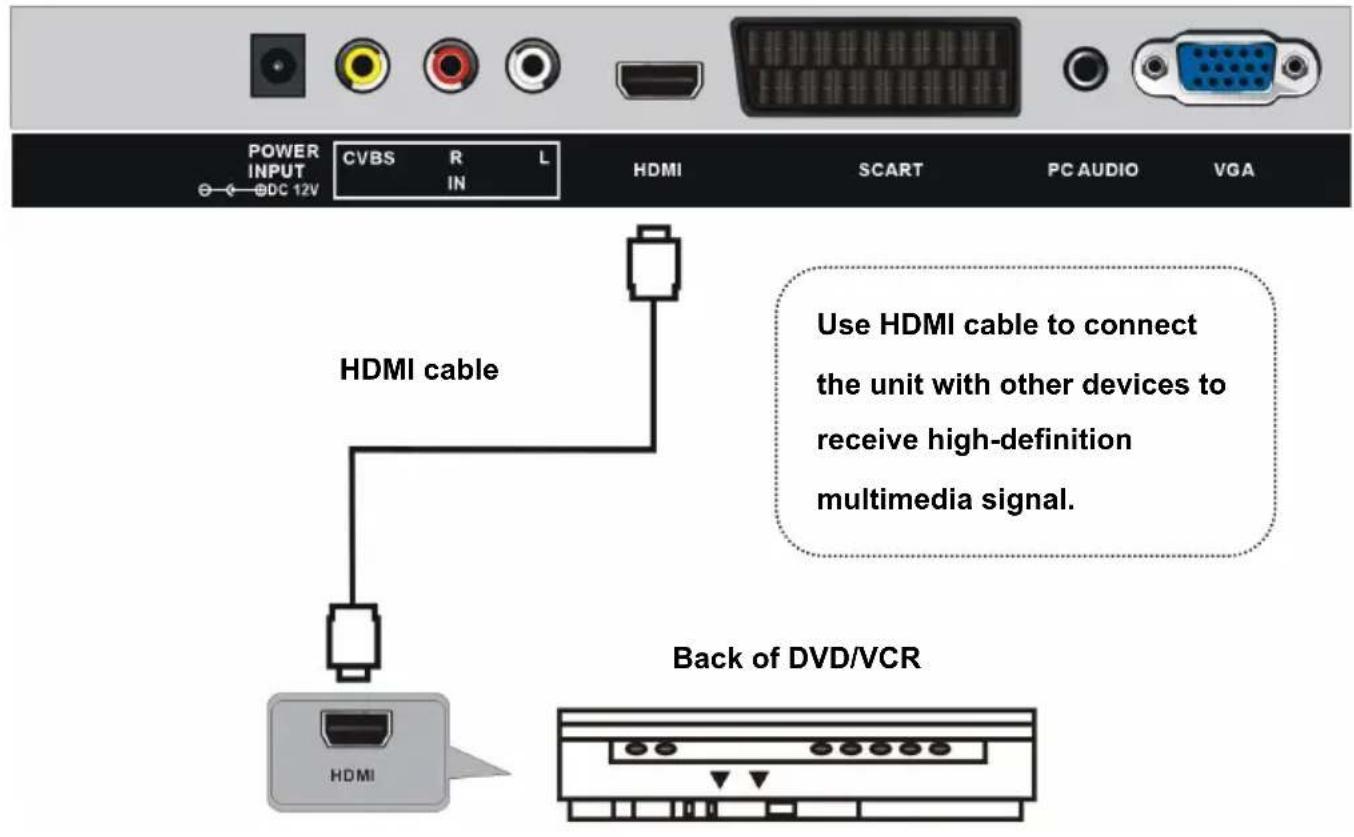
text_image
POWER INPUT DC 12V CVBS R IN L HDMI SCART PC AUDIO VGA HDMI cable Use HDMI cable to connect the unit with other devices to receive high-definition multimedia signal. Back of DVD/VCRSCART CONNECTION

text_image
POWER INPUT DC 12V CVBS R L IN HDMI SCART PC AUDIO VGA SCART cable Back of DVD/VCRPC/VGA CONNECTION

text_image
POWER INPUT CVBS R L HDMI SCART PC AUDIO VGA BDC 12V Use VGA cable and Audio cable to connect the unit with TV or PC, and use this product as a monitor. Back of PC Audio cable VGA cable AUDIO RGB-PC OUTPUTCOMPOSITE AV OUT (CVBS OUTPUT FOR DVD MODE) CONNECTION

text_image
Y Pb Pr RF EARPHONE USB 1 CVBS L R IN DVD OUT External Display Device AV cable V L RCONNECT EARPHONE TO THE UNIT

text_image
Y Pb Pr IN RF EARPHONE USB 1 CVBS L R DVD OUT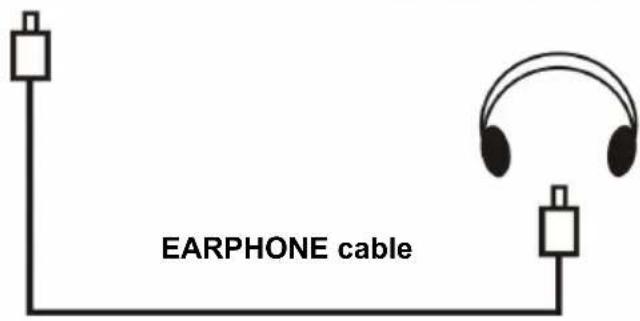
text_image
EARPHONE cableUSB2 CONNECTION (FOR DVD MODE)
Insert a USB or SD/MMC/MS memory device for multimedia files playback.

text_image
USBMAKE SURE ALL THE EQUIPMENTS AND AC ADAPTOR ARE CONNECTED PROPERLY AND THE UNIT IS SET IN CORRECT MODE BEFORE KINDS OF OPERATIONS.
BASIC OPERATIONS
- Press ⏻ button on unit top or remote control to power ON the unit (indicator will glow blue); press it again to power OFF (standby mode) the unit (indicator will glow red).
DVD
- Press TV/AV button on unit top or remote control to switch this unit to DVD mode.
1. Basic play
a) Make sure the disc compartment has no disc. Place a disc into the disc compartment. Hold the disc without touching either of its surfaces, position it with the readable (mirror) side facing towards you, then the disc will automatically enter into the disc compartment; or you can press
▲ button on unit top or remote control to enter the disc into the disc compartment.
b) Once the disc is in the disc compartment, the player starts to read the disc immediately.
c) When a menu screen appears on the unit, press the navigation buttons or press the number buttons to select preferred track number, then press OK button to confirm.
d) To stop playing and return to the menu screen, press TITLE or D.MENU button.
2. Stopping play
Press ■ (STOP) button to stop playing.
NOTE: When player is stopped, the player records the point where STOP was pressed (RESUME function). Press▶(PLAY) button again, playback will resume from this point. When the tray is taken out or ■(STOP) is pressed again, the RESUME function will be cleared.
3. Skipping ahead or backward
Skipping ahead
During playback, press button to skip the next chapter (DVD) or a track (Video CD/CD).
Skipping backward
During playing, press◀◀ button to skip the previous chapter (DVD) or track (Video CD/CD).
flowchart
graph LR
    A["Input Block 1"] --> B["Output Block 2"]
4. Fast forward/Fast backward
During playback, press button or <button to fast forward/backward.
Press ▶ (PLAY) button to resume normal play.

flowchart
graph LR
    A["2K"] --> B["FF 4K"]
    B --> C["..."]
    C --> D["FF 8X"]
    D --> E["..."]
    E --> F["FF 16X"]
    F --> G["32K"]
    H["2K"] --> I["FF 4K"]
    I --> J["..."]
    J --> K["FF 8X"]
    K --> L["..."]
    L --> M["FF 16X"]
    M --> N["32K"]
5. Pause/play
During playback, press▶ button to pause playing, press it again to resume normal playback.
flowchart
graph LR
    A["Button"] --> B["Play Button"]
6. Music playback
a) Insert the disc which contains music files and after a few seconds, the screen will show all the folders on the disc.
b) Select the folder you want to play by the navigation buttons and press the OK button to confirm.
c) The files in this folder are displayed and select the desired song by navigation buttons, then press the (PLAY) or OK button to start playback.
d) In file selecting page, press▶ or ▶ button to turn the current menu page to the next or previous menu page.
e) Press REPEAT button on remote control to change play mode.
- SINGLE: play one file only.
- REPEAT ONE: repeat one file.
- REP DIR: all the files in the folder will be played repeatedly.
- FOLDER: all the files in the folder will be played.
NOTE: The available repeat modes may vary for different disc.

text_image
01:53 040:36 128Kbps 001/124 \MUSIC/ #_ALAN #_BUZZ #_CANDY #_DIANA #_MANDY #_SIMPSON7. Movie playback
a) Insert the disc which contains movie files and after a few seconds, the screen will show all the folders on the disc.
b) Select the folder you want to play by the navigation buttons and press the OK button to confirm.
c) The files in this folder are displayed and select the desired file by navigation buttons, then press the (PLAY) or OK button to start playback.
text_image
00:00 00:00 001/124 AV ----ALAN AV ----BUZZ AV ----CANDY AV ----DIANA AV ----MANDY AV ----SIMPSONd) During normal playing, press▶or ▶button, the player will play the next or previous file.
e) Press REPEAT button to change play mode.
- SINGLE: play one file only.
- REPEAT ONE: repeat one file.
- REP DIR: all the files in the folder will be played repeatedly.
- FOLDER: all the files in the folder will be played.
NOTE: The available repeat modes may vary for different disc.
f) Press D.MENU button to return to play list page.
8. JPEG playback
For JPEG picture CD, select the folder you want to play by the navigation buttons and press OK button to confirm. The files in this folder are displayed and select your pictures by using the up/down navigation buttons and press OK button to start playback. Thumbnail of picture will be displayed while you scrolling across the file name. Then press the ▶ (PLAY) or OK button to start playback.
text_image
00:00 00:00 002/124 \Belle\ .. BOAT DOG FLOWER SHUTTLE LOVESNOTE: The time of loading and displaying a picture depends on its size.
During playback, press D.MENU button to return to file selecting page.
Press REPEAT button to change play mode.
- SINGLE: play one file only.
- REPEAT ONE: repeat one file.
- REP DIR: all the files in the folder will be played repeatedly.
- FOLDER: all the files in the folder will be played.
NOTE: The available repeat modes may vary for different disc.
Skip to next/previous picture
Press ▶ button to skip to the next picture or ◀ button to skip to the previous picture. If no key is pressed for 3 seconds, it will skip to next picture automatically.
Rotating pictures
- Press RIGHT navigation button to rotate the picture clockwise.
- Press LEFT navigation button to rotate the picture counter-clockwise.
Flipping pictures
- Press UP navigation button to flip the picture vertically.
- Press DOWN navigation button to flip the picture horizontally.
Picture Shrink/Zoom
Press ZOOM button repeatedly to enlarge or shrink picture to 50%, 75%, 100%, 125%, 150% and 200%.
NOTE: If the picture is enlarged, you may press navigation buttons to pan across other portions of the picture.
Slideshow effects
Press PROGRAM button on remote control repeatedly to select desired effects.
Available options: Wipe Top, Wipe Bottom, Wipe Left, Wipe Right, Diagonal Wipe Left Top, Diagonal Wipe Right Top, Diagonal Wipe Left Bottom, Diagonal Wipe Right Bottom, Extend From Center H, Extend From Center V, Compress To Center H, Compress To Center V, Window H, Window V, Wipe From Edge To Centre and Move In From Top.
9. Enjoying Video CD with playback control
a) When playing VCD 2.0 with PBC, the player will show the VCD version.
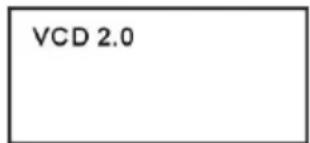
text_image
VCD 2.0b) Press D.MENU button on remote control repeatedly to set PBC ON or OFF.
c) Press number buttons to select corresponding track.
Example: Track 9, press 0 and 9, several seconds later, it will automatically switch to track 9.
Track 15, press -/-- and 5, several seconds later, it will automatically switch to track 15.
d) Press ▶ or ◀ button, the player will play the next or previous track.
10. USB playback
To switch this unit to USB mode, press SETUP button on remote control and select Source in the menu. Then select USB input source using navigation buttons.
a) Insert a USB memory device which contains music, picture or movie files.
b) After several seconds, all the folders in the USB will display on monitor screen.
c) Select a folder you want to play using the navigation buttons and press the OK button to confirm.
d) The files in this folder are displayed and select the desired file by navigation buttons, then press the OK button to start to play.

text_image
01:53 040:36 128Kbps 001/124 \MUSIC/ #调 ----ALAN #调 ----BUZZ #调 ----CANDY #调 ----DIANA #调 ----MANDY #调 ----SIMPSONe) In file selecting page, press ▶dr button to turn the current menu page to the next or previous menu page.
f) Press REPEAT button to change play mode.
- SINGLE: play one file only.
- REPEAT ONE: repeat one file.
- REP DIR: all the files in the folder will be played repeatedly.
- FOLDER: all the files in the folder will be played.
NOTE: The available repeat modes may vary for different device.
11. Viewing from different angle (DVD only)
Some DVDs may contain scenes which have been shot simultaneously from a number of different angles. For these discs, the same scene can be viewed from each of these different angles using the ANGLE button.
12. Repeat play
Press REPEAT button during playback, it will repeat play one chapter or one title (for DVD disc), or repeat play track (for VCD/CD).
DVD DISC
text_image
CHAPTER REPEAT CHAPTER TITLE REPEAT TITLE ALL REPEAT ALLVCD/CD DISC (In the PBC OFF mode)

text_image
TRACK REPEAT TRACK ALL REPEAT DISCA-B repeat play
Repeating sections between two specific points (A-B repeat)
a) Press A-B button during playing at the point where repeat play is to be started (A).
b) Press A-B button at the point where repeat play is to be ended (B). Repeat play of the selection between points A and B starts.
c) Press A-B button again to return to normal play.
13. Program play
a) Press PROGRAM button and the screen will display the program menu.
b) Press navigation buttons to choose memory index and then press OK button to start input.
Enter desired titles/chapters numbers by using the numeric buttons. The selected titles/chapters are stored into the memory. Select▶ on the menu to see the next page. Up to 20 memories can be stored.
c) Select START on the menu and press OK button to

text_image
1 -- 2 -- 3 -- 4 -- 5 -- Exit 6 -- 7 -- 8 -- 9 -- 10 -- ▶▶start program play or select EXIT on the menu and press OK button to exit without program play. d) To stop the program, press PROGRAM button and select STOP on the menu, then press OK button to confirm selection.
14. GOTO
Press GOTO button continuously to select the item you want to set and enter a time number, chapter number, track number, etc. Accordingly, the disc will be played from the selected point.
15. DISPLAY
Press DISPLAY button to display the playing status of your disc.
16. Change subtitle language (DVD only)
It is possible to change the subtitle language to a different language from the one selected at the initial settings. (This operation works only with discs on which multiple subtitle languages are recorded)
CHANGING SUBTITLE LANGUAGE

flowchart
graph LR
    A["SUBTITLE 01/03 CHINESE"] --> B["SUBTITLE 01/03 ENGLISH"]
- Press SUBTITLE button during play, the screen will display the current language.
- Press SUBTITLE button again to change language or turn off.
NOTE: When no subtitles are recorded, press this button will not work.
17. ZOOM play
This function allows you to enjoy a motion picture. Press ZOOM button when playing, the screen shows: Press navigation button to scroll across the enlarged picture.
flowchart
graph TD
    A["2X"] --> B["3X"]
    B --> C["4X"]
    C --> D["1/2"]
    D --> E["1/3"]
    E --> F["1/4"]
    F --> A
18. Changing audio soundtrack language (DVD/VCD/CD disc)
It is possible to change the audio soundtrack language to a different language from the one selected at the initial settings (This operation works only with discs on which multiple audio soundtrack languages are recorded).
- When playing a disc, press AUDIO button to select desired and available soundtrack or soundtrack language.
NOTE: When no soundtrack or soundtrack languages are recorded, pressing this button will not work.
19. Initial settings
Once the initial programming is entered it will be retained in memory until changed, the player can always be operated under the same conditions.
Common procedure for initial settings
- Press SETUP button on remote control.
- Use the navigation buttons to select preferred item, and press OK button, each screen for setting the value is displayed. Then move the navigation buttons to set the item and press OK button to confirm the settings.
- Press SETUP button to close setup menu.
- Use LEFT or RIGHT navigation button to switch to another main setup item. Then pres RIGHT or OK button to enter submenu page; press LEFT button to return to previous menu page.
1. GENERAL
1.1 TV DISPLAY - It is for selecting TV output mode.
Options:
a) Normal /PS: Pan & scan mode.
b) Normal/ LB: Letter box mode.
c) Wide: 16:9 wide screen mode.
1.2 OSD LANG - It is used to choose your desired OSD language.

text_image
-- General Setup Page -- TV Display Wide OSD Lang Eng Last Memory Off Source Go To General Setup Page1.3 Last Memory - Enter another input source (except USB) during DISC playback, and then back to DVD input source again, this unit will resume playback from the point where last playback was stopped, if Last Memory is ON.
1.4 Source - It is used to select your input source in DVD mode.
2. AUDIO
Downmix - It is used to select desired audio output mode.
Options:
a) LT/RT-Left/Right mix mode
b) STEREO
3. PREFERENCE
3.1 TV System - Select desired TV system.
3.2 Audio - Select desired audio language, if your disc contains multiple audio languages.
3.3 Subtitle - Select desired subtitle language, if your disc contains multiple subtitle languages.
3.4 Disc Menu - Select desired language of your disc menu, if your disc menu contains multiple MENU languages.
3.5 Parental - Select desired program rating.
3.6 Password - Change the password. Input the password using number buttons on remote control.
NOTE: The factory default password is "0000", you can change it, but you should write it down and keep it safe.
3.7 Default - It is used to reset to factory settings.
text_image
-- Audio Setup Page -- Downmix STR Go To Audio Setup Page
text_image
-- Preference Page -- TV System Auto Audio Dut Subtitle Off Disc Menu Dut Parental Password Default Go To Preference PageTV
- Press TV/AV button on unit top or remote control to set the unit in TV mode.
SELECT DESIRED PROGRAM
- Press CH+ button to play next channel.
- Press CH- button to play previous channel.
- Press number buttons on remote control directly to select desired program.
NOTE: Press -/-- button repeatedly to switch the digit when selecting multiple digit channels.
VOLUME CONTROL
- Press VOL+ or VOL- to adjust the level of current volume.
Available range: 0-100.
MUTE CONTROL
- Press MUTE button to mute the sound, press it again to turn on the sound.
INPUT SOURCE SELECTION
- Press TV/AV button on unit top or remote control to display the sources list.
- Press UP or DOWN navigation button to select desired input source, and then press OK button to confirm selection.
Available options: TV, AV, SCART, YPBPR, HDMI, PC, DVD.
PICTURE MODE
- Press PICTURE button on remote control repeatedly to select desired PICTURE mode directly.
Available options: User, Dynamic, Standard, Mild.
SOUND MODE
- Press SOUND button on remote control repeatedly to select SOUND mode directly.
Available options: Standard, Music, Movie, Sports, User.
SLEEP TIME SETTING
- Press SLEEP button on remote control repeatedly to select SLEEP TIME directly.
Available options: Off, 10min, 20min, 30min, 60min, 90min, 120min, 180min, 240min.
VIDEO SIZE SETTING
- Press ASPECT button on remote control repeatedly to select VIDEO SIZE directly. Available options: Auto, 4:3, 16:9, Zoom1, Zoom2, PAL+.
NOTE: The available video size may be different for different input source.
SOUND SETTING
- Press NICAM/A2 button on remote control repeatedly to select desired soundtrack.
NOTE: In different channels, pressing NICAM/A2 button may have different options.
INFORMATION DISPLAY
- Press DISPLAY button on remote control to display related information of your channel, including channel number, color system, sound system and so on.
TELETEXT
When displaying available teletext:
- Press TEXT button on remote control to display the teletext.
- Press HOLD button on remote control to hold the teletext.
- Press PGUP button on remote control to display previous page.
- Press PGDW button on remote control to display next page.
- Press INDEXT button on remote control to display the index.
- Press SIZE button on remote control repeatedly to switch teletext size.
- Press REVEAL button on remote control to hide or display hidden characters.
- Press SUBPAGE button on remote control to enter subpage.
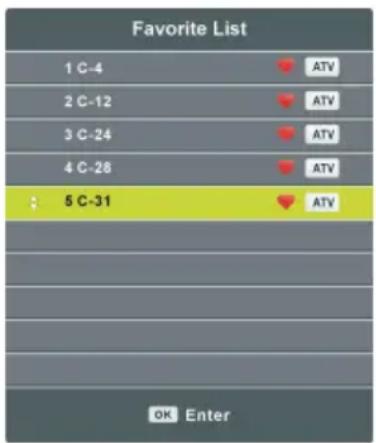
FAVORITE LIST
- Press FAV button on remote control to display the Favorite List.
- Press UP/DOWN navigation button to select a favorite channel, and press OK button to watch it.
QUICK SELECTION
- Press OK button on remote control to display the Channel List.
- Press UP/DOWN navigation button to select a channel, and press OK button to watch it.
text_image
Favorite List 1 C-4 2 C-12 3 C-24 4 C-28 5 C-31 OK Enter
text_image
Channel List 1 C-4 2 C-12 3 C-24 4 C-28 5 C-31 OK Enter ATV ATV ATV ATVMAIN MENU
● The unit contains different setting menus. Once the initial programming is entered, it will be remained in the memory until change, and the unit can always be operated under the same conditions.
● The settings will be remained in the memory until the settings are changed ever after setting the player to standby mode.
Common procedure for initial settings
- Press MENU button on remote control to display the main menu.
- Press LEFT/RIGHT navigation button to select submenus.
- Press UP/DOWN navigation button to select the option that you want to adjust.
- Press OK or RIGHT navigation button to enter submenu page.
- Press navigation buttons to select/adjust option to desired value. Then press OK button to confirm selection.
- Press MENU button to return to previous menu page.
- Press EXIT button to exit menu page.
TV MODE
- Press TV/AV button on unit top or remote control to switch this unit to TV mode.
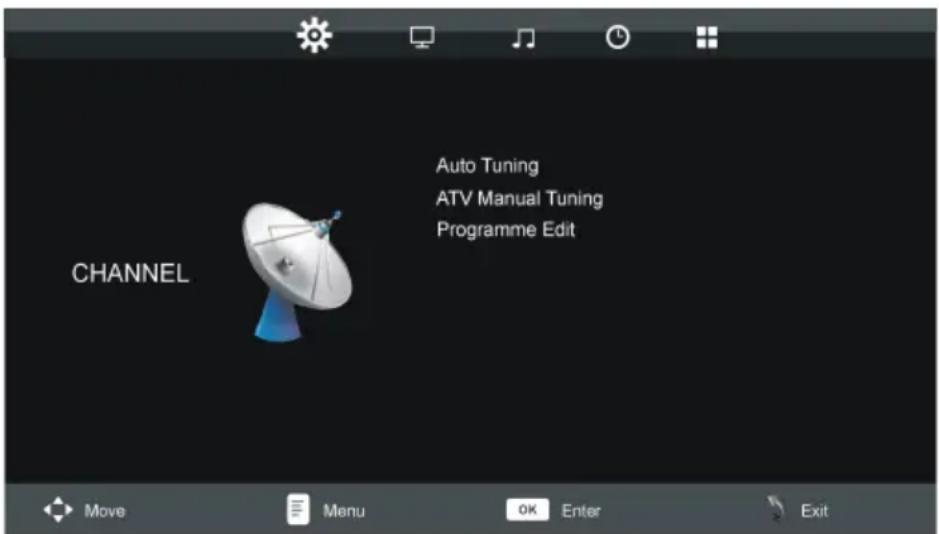
1. CHANNEL
text_image
Auto Tuning ATV Manual Tuning Programme Edit CHANNEL Move Menu OK Enter Exit1.1 Auto Tuning
- Press UP or DOWN navigation button to select this item, and then press OK button to start auto channel tuning.
1.2 ATV Manual Tuning
- Press UP or DOWN navigation button to select this item, and press OK button to enter it.
- Press UP or DOWN navigation button to select the second option.
- Press LEFT or RIGHT navigation button to adjust it.
1.3 Programme Edit
- Press UP or DOWN navigation button to select this item, and press OK button to enter it.
text_image
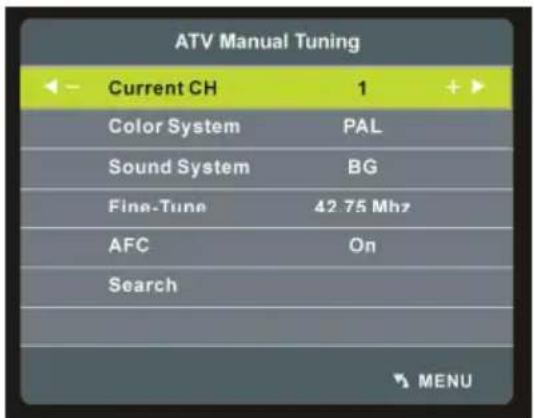
ATV Manual Tuning Current CH 1 + Color System PAL Sound System BG Fine-Tune 42.75 Mhz AFC On Search MENU
text_image
Programme Edit 1 C-4 2 C-12 3 C-24 4 C-28 5 C-31 Delete Rename Move Skip OK Enter Fav Menu- Press RED button to delete highlighted channel.
- Press GREEN button to enter Rename mode. Then press UP/DOWN navigation button to adjust the value; press LEFT/RIGHT navigation button to move the cursor.
- Press YELLOW button to enter Move mode. Then press UP/DOWN navigation button to select desired position and press YELLOW button again to move it.
- Press BLUE button to skip current channel.
- Press FAV button to set current channel as a favorite channel, and press FAV button again to set it as a normal channel.
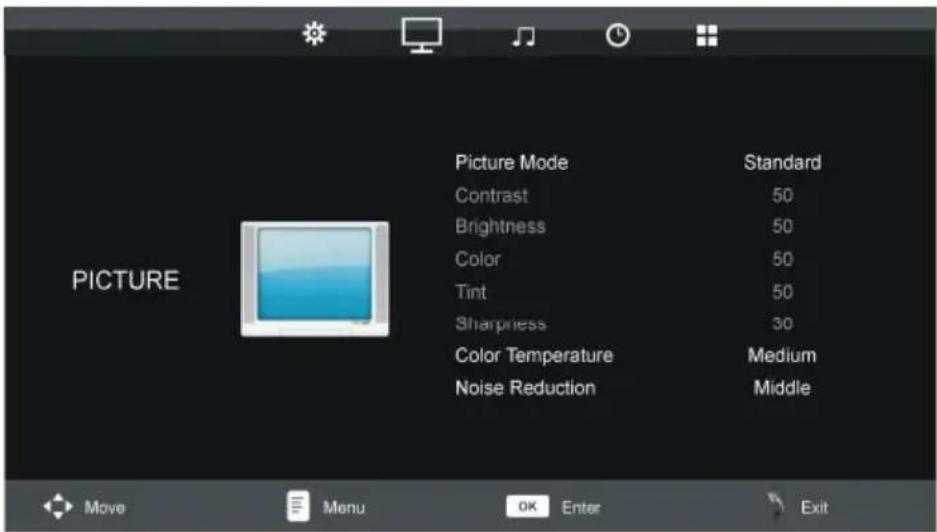
2. PICTURE
text_image
PICTURE Picture Mode Standard Contrast 50 Brightness 50 Color 50 Tint 50 Sharpness 30 Color Temperature Medium Noise Reduction Middle2.1 Picture Mode
Available options: User, Dynamic, Standard, Mild.
NOTE: The value of Contrast, Brightness, Colour, Tint and Sharpness is adjustable only when Picture Mode is User.
2.2 Contrast
The value of contrast can be adjusted from 0-100.
2.3 Brightness
The value of brightness can be adjusted from 0-100.
2.4 Color
The value of color saturation can be adjusted from 0-100.
2.5 Tint
The value of tint can be adjusted from 0-100.
NOTE: This item is available only in NTSC system.
2.6 Sharpness
The value of sharpness can be adjusted from 0-100.
2.7 Color Temperature
This item is used to adjust the optimum color temperature for suitable viewing.
Available options: Medium, Cool, Warm.
2.8 Noise Reduction
Available options: Off, Low, Middle, High.
3. SOUND
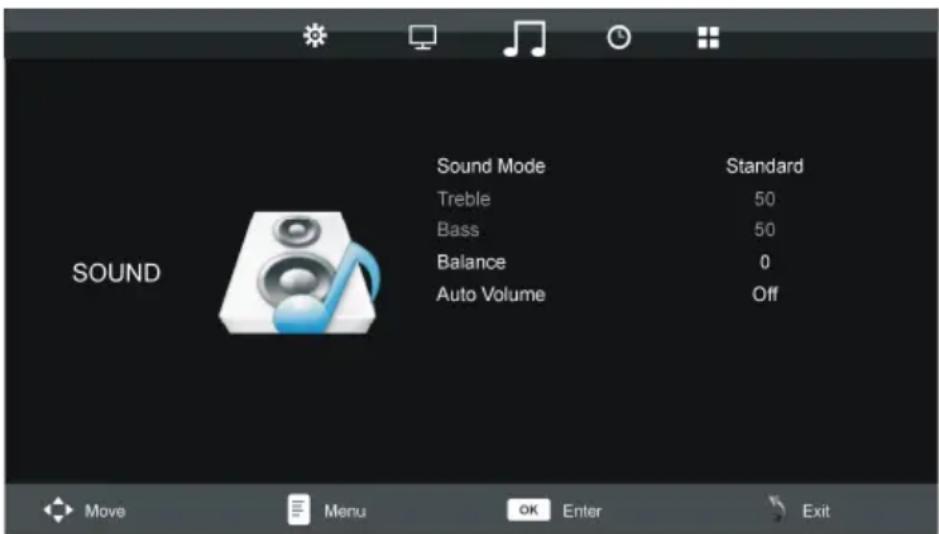
text_image
Sound Mode Treble Bass Balance Auto Volume Standard 50 50 0 Off SOUND Move Menu OK Enter Exit3.1 Sound Mode
Available options: Standard, Music, Movie, Sports, User.
NOTE: The value of Treble and Brass is adjustable only when Sound Mode is User.
3.2 Treble
This item is used to adjust the level of higher-pitched sounds from 0-100.
3.3 Bass
This item is used to adjust the level of lower-pitched sounds from 0-100.
3.4 Balance
This item is used to adjust the audio output between left and right speakers from -50 to 50.
3.5 Auto Volume
This item is used to turn on/off Auto Volume function.
4. TIME
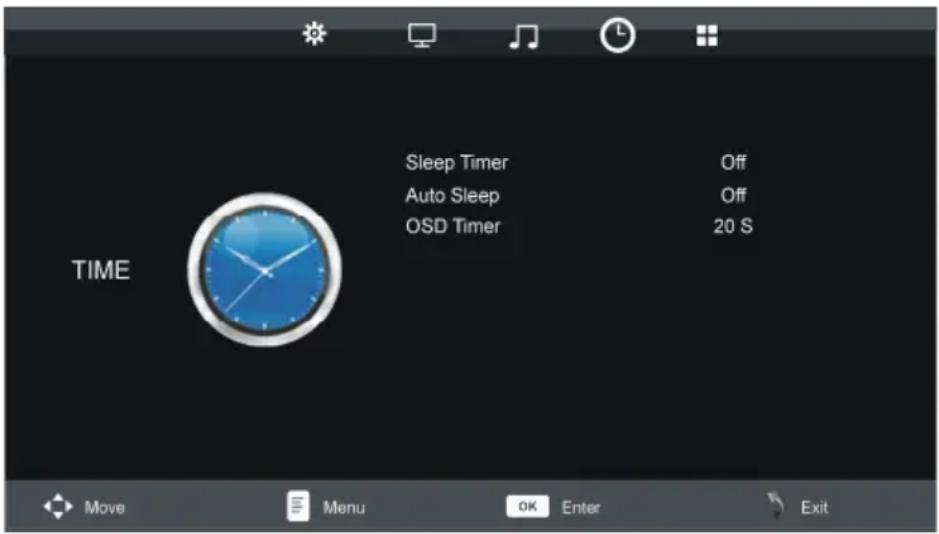
text_image
TIME Sleep Timer Off Auto Sleep Off OSD Timer 20 S Move Menu OK Enter Exit4.1 Sleep Timer
This item is used to set the automatic sleep time in standby mode.
This item is used to set the auto standby duration.
Available options: Off, 3H, 4H, 5H.
4.3 OSD Timer
This item is used to set the OSD (on screen display) time.
Available options: 5S, 10S, 15S, 20S, 25S, 30S.
5. OPTION

text_image
OPTION OSD Language English TT Language West Aspect Ratio 16:9 Blue Screen Off Key Lock Off Reset Move Menu OK Enter Exit5.1 OSD Language
This item is used to select desired On Screen Display language.
5.2 TT Language
This item is used to select desired TT language.
5.3 Aspect Ratio
Available options: Auto, 4:3, 16:9, Zoom1, Zoom2, PAL+.
NOTE: Aspect Ratio may not be adjustable if no available signals are present.
5.4 Blue Screen
This item is used to set the blue background ON or OFF. The screen background will turn blue at very weak or no signal condition, if BLUE SCREEN is ON.
5.5 Key Lock
- Press OK button repeatedly to turn on/off Key Lock.
5.6 Reset
This item is used to reset the unit to factory default settings.
AV/YPBPR/HDMI
- Press TV/AV button on unit top or remote control to select desired input source.
- For the PICTURE, SOUND, TIME and OPTION menus, please refer to the menu operations of TV mode.
PC MODE
- Power on your computer and this TV.
- Connect your computer to this TV using a VGA cable.
- Press TV/AV button on unit top or remote control to switch this unit to PC mode.
- Press MENU button to display the main menu and press LEFT or RIGHT navigation button to select SCREEN.

text_image
Screen Auto Adjust Horizontal Pos. 50 Vertical Pos. 50 Clock 50 Phase 93 Move Menu OK Enter Exit- Press UP or DOWN navigation button to select desired option and press OK button to enter submenu.
- Press LEFT or RIGHT navigation button to adjust the value.
Auto Adjust
This item is used to adjust the value of screen automatically.
Horizontal Pos.
This item is used to adjust the value of horizontal position from 0-100.
Vertical Pos.
This item is used to adjust the value of vertical position from 0-100.
Clock
This item is used to adjust the value of clock from 0-100.
Phase
This item is used to adjust the value of phase from 0-100.
NOTE: The picture will shake with unsuitable phase setting.
- For the PICTURE, SOUND, TIME and OPTION menus, please refer to the menu operations of TV mode.
MAINTENANCE
- Be sure to press POWER button to set the player to the standby mode and disconnect the AC adaptor before maintaining the player.
● Wipe the player with a dry, soft cloth. - If the surface is extremely dirty, wipe clean with a cloth which has been dipped in a weak soap-water solution and wrung out thoroughly, and then wipe again with a dry cloth.
● Never use alcohol, benzene, thinner, cleaning fluid or other chemicals. And do not use compressed air to remove dust.
WALL MOUNTING
- Contact a professional for assistance when wall mounting your TV. We are not responsible for any damage to the product or injury to yourself, if you mount the TV on your own.
- Do not wall mount the TV while TV is turned on. It may cause personal injury due to electric shock.
● Use standard M4*10mm screws (4 pieces) to mount this TV.
Back of your TV
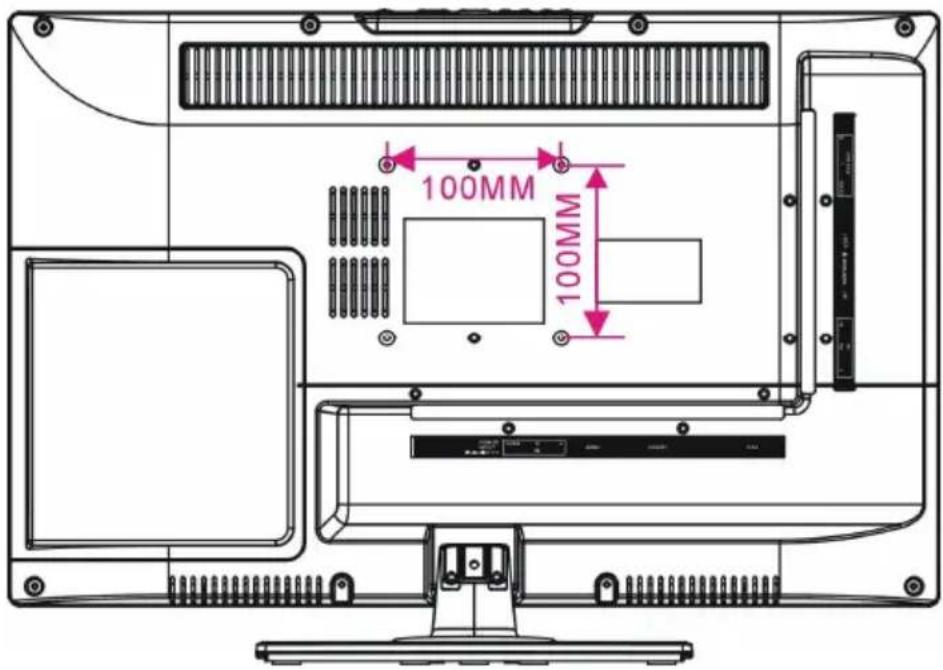
text_image
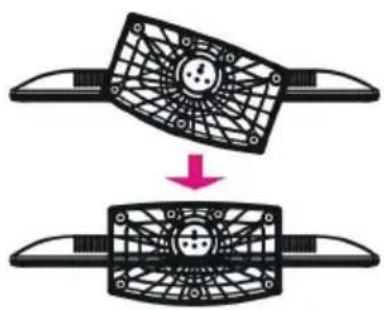
100MM 100MMSTAND INSTALLATION
Your TV is packaged with the Stand and the Cabinet separated. Before enjoying this TV, please carry out the Stand Installation according to the instructions below.
Step 1
Place the TV faced down on a soft cloth or cushion to prevent the panel from being damaged.
Step 2
Rotate the Stand clockwise to make an angle (about 30 degrees) between the TV and Stand.
Step 3
Force the stand and TV until the TV is fully seated on the stand.
Step 4
Rotate the Stand counterclockwise about 30 degrees until a slight click sound happened.
Step 5
Tighten the included screw with a screw driver.
NOTES:
- Unplug the AC adaptor first when installing or removing the TV Stand.
- To get a proper installation direction guide for LOCK and RELEASE, please follow the instructions on the TV Stand.
natural_image
Two mechanical components with a circular head and mesh patterns, showing a transformation from top to bottom (no text or symbols)④

natural_image
Technical line drawing of a computer chassis with monitor, keyboard, and drive unit (no text or symbols)①

text_image
About 30°②

natural_image
Symmetrical abstract geometric pattern with central circle and radial lines (no text or symbols)↑
Press
③

natural_image
Pure mechanical component diagram without any text, numbers, or symbols[NO TEXT]
SPECIFICATIONS
| Display Device | 18.5 inch LED TV |
| Resolution 1366×768 | |
| Pixel Pitch | 0.3(H)×0.3(V)mm |
| Luminance 250 cd/m2 | |
| Contrast Ratio 1000:1 | |
| Aspect Ratio 16:9 | |
| Response Time 6 ms | |
| Viewing Angle 170(H)/160(V) | |
| Visible Range | 409.8(H)×230.4(V)mm |
| Life Time | 30,000 Hrs |
| MULTIMEDIA PLAYBACK FORMAT (DVD MODE) | Movie: MPEG-1, MPEG-2, MPEG-4 |
| Music: WMA | |
| Photo: JPEG | |
| Supported discs | DVD/CD/CDR/CDRW/DVD-R/DVD+R/DVD-RW/DVD+RW/VCD/SVCD |
| POWER SOURCE AC adaptor(normal DC 12 V 2.5A) | |
| POWER CONSUMPTION | ≤30W |
| OPERATION TEMPERATURE | -5°C to 45°C |
| MEASUREMENT 443(W)×170(D)×308(H)mm | |
| WEIGHT Approx. 3.1 Kg | |
Specifications are subject to change without notice.
GENERAL TROUBLESHOOTING
Check the following points before assuming malfunctions of this unit:
| Symptom[COMMON] Remedy | |
| No power. Insert the adaptor securely into the power outlet. | |
| No picture. Ensure that the equipment is connected properly. | |
| ● No sound.● Distorted sound. | ● Ensure that the equipment is connected properly.● Ensure that the input setting for the TV and stereo system are correct.● Adjust the master volume to a suitable volume by pressing VOL+/VOL- button. |
| No operations can be performed with the remote control unit. | ● Check the batteries are installed with the correct polarities.● The batteries are exhausted; replace them with new ones.● Point remote control at the remote control sensor and operate it again.● Operate the remote control unit at a distance of no more than 6m from the remote control sensor.● Remove the obstacles between the remote control and remote control sensor. |
| No key operation (by the main unit and/or the remote control unit) is effective. | Disconnect the power adaptor and then reconnect it.(The player may not be operating properly due to lightning, static electricity or some other factors.) |
| Symptom[TV] Remedy | |
| No or poor picture. | ● Adjust antenna or use an external antenna.● Relocate the unit near a window (if inside a building).● Move units away from this product that causes interference.● Do Auto Tuning again.● Try another channel. |
| No sound or poor sound. | ● Check the audio settings.● Press MUTE button on remote control to cancel mute function.● Unplug the headphone. |
| Noise or other interface. | Electronic equipment near the unit is causing interface. Relocate the unit or move the equipment. |
| Symptom [DVD] Remedy | |
| Play does not start even when title is selected. | Confirm the region code setting is right. |
| Audio soundtrack and/or subtitle language is not the initial settings. | If the audio soundtrack and/or subtitle language does not exist on the disc, the language selected at the initial settings will not be seen/heard. |
| No subtitles. Subtitles appear only with discs which contain them.Subtitles are cleared from the TV monitor, Perform the steps display the subtitles. | |
To be continued
GENERAL TROUBLESHOOTING
| Alternative audio soundtrack (or subtitle) languages fail to be selected. | ● An alternative language is not selected with discs which do not contain more than one language. ● In the case of some discs, the alternative language can not be selected by operating the LANGUAGE or SUBTITLE button. Try selecting it from the DVD menu if one is available. |
| Angle cannot be changed. | This function is dependent on software availability. Even if a disc has a number of angles recorded, these angles may be recorded for specific scenes only. |
| The password for rating level has been forgotten. | Please contact your local sales dealer. |
| Symptom [Video CD] Remedy | |
| No menu play. This function works only for Video CDs with playback control. | |
| Symptom [USB] Remedy | |
| My player does not recognize my USB key or my external hard disk when plugged to the DVD player's USB slot. | Would you please refer first to the instructions describing how to use USB devices with this unit. If the problem still occurs: This machine has though been tested with the majority of the market's Flash memory-based devices (USB keys and MP3 players) and hard disks (Music/ Movie players with HDD), however, this unit may not be compatible with certain devices, in particular external self-powered hard disks. |
Region code setting
Region coding: All DVD discs are coded by the sales territory. Please note the player is set to region 2 coding by the factory which cannot be changed. This is in compliance with the DVD patent requirements.
The region number for this DVD player is


natural_image
Large television displaying a giant panda eating bamboo in a forest setting (no text or symbols visible)INSTRUCTIONS IMPORTANTES....1-3
ACCESSORIES....3
CARACTERISTIQUES....5
COMMANDES ET CONNEXIONS APPAREIL....6
TELECOMMANDE....7-8
PREPARATION DE LA TELECOMMANDE....9
CONNEXTIONS DE BASE....10-14
COMMANDES
OPERATION DE BASE....15-24
DVD....15-22
TV....23-24
MENU PRINCIPAL....25-30
MODE TV....25-29
MODE AV/YPBPR/HDMI....29
MODE PC....30
REFERENCES
ENTRETIEN....31
MONTAGE AU MUR....31
INSTALLATION DU PIED....32
SPECIFICATIONS....33
EN CAS DE PROBLEMES....34-35
CODE REGIONAL....35
CARACTERISTIQUES
ECRAN 18.5" TFT
text_image
Y Pb Pr IN RF EARPHONE USB 1 CVBS L R DVD OUT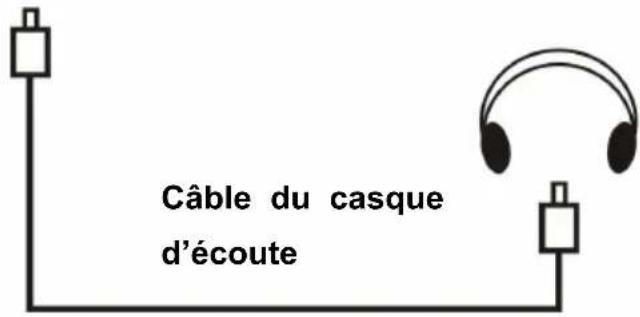
flowchart
graph LR
    A[" "] --> B[" "]
7. Reproduction films
text_image
Favorite List 1 C-4 2 C-12 3 C-24 4 C-28 5 C-31 OK Enter Channel List 1 C-4 2 C-12 3 C-24 4 C-28 5 C-31 OK EnterMENU PRINCIPAL
text_image
CHANNEL Auto Tuning ATV Manual Tuning Programme Edit Move Menu OK Enter Exit1.1 Syntonisation autoimatique
text_image
Programme Edit 1 C-4 2 C-12 3 C-24 4 C-28 5 C-31 Delete Rename Move Skip OK Enter Fav Menutext_image
Picture Mode Contrast Brightness Color Tint Sharpness Color Temperature Noise Reduction Standard 50 50 50 50 30 Medium Middle2.1 Mode image
text_image
Sound Mode Treble Bass Balance Auto Volume Standard 50 50 0 Off SOUND Move Menu OK Enter Exit3.1 Mode son
text_image
OPTION OSD Language English TT Language West Aspect Ratio 16:9 Blue Screen Off Key Lock Off Reset Move Menu OK Enter Exit5.1 Langue OSD
natural_image
Two mechanical components with a circular head and grid pattern, showing a downward arrow (no text or symbols)④

natural_image
Top-down schematic of a computer chassis showing front, top, and side views (no text or labels)①

natural_image
Diagram of a mechanical component labeled 'Environ', showing a grid-like structure with no readable text or symbols.②

natural_image
Pure diagram of a mechanical component with grid pattern and circular holes (no text or symbols)
Pousser
③

natural_image
Pure mechanical component diagram without any text, numbers, or symbols
SPECIFICATIONS
| Ecran 18.5 pouces LED | |
| Résolution 1366 x 768 | |
| Dimensions pixels 0.3(H) x 0.3(V) mm | |
| Luminance 250 cd/m2 | |
| Contraste 1000 :1 | |
| Format écran 16 :9 | |
| Temps de réponse 6 ms | |
| Angle de vue 170(H)/160(V) | |
| Ecran visible 409.8(H) x 230.4(V) | |
| Durée de vie 30.000 heures | |
| FORMAT DE LECTURE MULTIMEDIA(MODE DVD) | Film: MPEG-1, MPEG-2, MPEG-4 |
| Musique: WMA | |
| Photo: JPEG | |
| Discs supportés | DVD/CD/CDR/CDRW/DVD-R/DVD+R/ |
| DVD-RW/DVD+RW/VCD/SVCD | |
| ALIMENTATION Adaptateur AC (normal DC 12 V - 2.5A) | |
| CONSOMMATION ≤ 30 W | |
| TEMPERATUR D'OPERATION | -5°C - 45°C |
| DIMENSIONS 443(L) x 170(P) x 308(H) mm | |
| POIDS Environ 3.1 Kg | |