
HB951 - Solar bench PHILIPS - Free user manual and instructions
Find the device manual for free HB951 PHILIPS in PDF.


| Product Type | Indoor Tanning Appliance (Solar Bench) |
| Brand | Philips |
| Model | HB951 |
| Power Supply | Mains voltage; requires 16A standard fuse or automatic fuse |
| Maximum Session Duration | 30 minutes (timer-limited) |
| Maximum Tanning Hours per Year | 20 hours (1200 minutes) |
| Tanning Lamps | Philips HPA flex power 400-600 (replacement type) |
| UV Filters | Special glass panes (must be intact) |
| Protective Goggles | Included (must be worn during use) |
| Facial Tanning Function | Yes (extra face tan option) |
| Cooling System | Fans with 3-minute post-operation cooling |
| Overheating Protection | Automatic shut-off if vents blocked |
| Height Adjustment | Yes (via knob and telescopic stand) |
| Body Distance | Minimum 65 cm between UV filters and body |
| Transport Position | Foldable with locking catches |
| Storage Cooling Time | 15 minutes before folding |
| Remote Control | Yes (display and buttons for time and functions) |
| Cleaning | Damp cloth for exterior; methylated spirits for UV filters |
| Replacement Lamps | Contact authorized Philips service center |
Frequently Asked Questions - HB951 PHILIPS
User questions about HB951 PHILIPS
0 question about this device. Answer the ones you know or ask your own.
Ask a new question about this device
Download the instructions for your Solar bench in PDF format for free! Find your manual HB951 - PHILIPS and take your electronic device back in hand. On this page are published all the documents necessary for the use of your device. HB951 by PHILIPS.
USER MANUAL HB951 PHILIPS
With this tanning appliance you can suntan comfortably at home. The tanning lamps emit visible light, heat and ultraviolet light, giving you the impression you are sunbathing in real sunlight. The special UV filters only pass the light that is required to get a tan.
The tanning lamps emit sufficient infrared light to provide a comfortable warmth.
Type HB955: besides a tanning session, you can take a relax session by just switching on the special infrared lamps.
A timer ensures that each session does not last longer than 30 minutes. Just as with natural sunlight, overexposure must be avoided (see chapter 'Tanning and your health').
Important
- Check if the voltage indicated on the appliance corresponds to the mains voltage in your home before you connect the appliance.
If the plug has not been inserted properly into the wall socket, it may become hot. Make sure you insert the plug properly into the wall socket.
The appliance must be connected to a circuit that is protected with a 16A standard fuse or automatic fuse. - Always unplug the appliance after use.
- Water and electricity are a dangerous combination! Do not use this appliance in wet surroundings (e.g. in the bathroom or near a shower or swimming pool).
If you have just been swimming or have just taken a shower, dry yourself thoroughly before using the appliance. - Let the appliance cool down after use for approx. 15 minutes before folding it back into transport position and storing it.
- Make sure the vents in the lamp units and in the base remain open during use.
The appliance has been fitted with an automatic protection against overheating. If the appliance is insufficiently cooled (e.g. because the vents are covered), the appliance will switch off automatically. Once the cause of overheating has been removed and the appliance has cooled down, the appliance can be switched on again. - The UV filters become very hot when using the appliance. Do not touch them.
- The appliance contains hinging parts, so be careful not to get your fingers stuck between these parts.
- Never use the appliance when a UV filter is damaged, broken or missing.
- Make sure children do not play with the appliance.
- Do not exceed the recommended session time and the maximum number of tanning hours (see 'Tanning sessions: how often and how long?').
- Do not take a tanning and/or relax session if you have a disease and/or if you use a medication or cosmetics that increase the sensitivity of your skin. Be extra careful if you are hypersensitive to UV light or infrared light. Consult your doctor in case of doubt.
- Do not tan a particular part of your body more than once a day. Avoid excessive exposure to natural sunlight on the same day.
- Consult your doctor if ulcers, moles or persistent lumps develop on the skin.
The appliance is not to be used by people who get sunburnt without tanning when exposed to the sun, by persons suffering from sunburn, by children, or by persons who suffer (or have previously suffered) from skin cancer or who are predisposed to skin cancer. - Always wear the protective goggles provided with the appliance while tanning to protect your eyes from excessive doses of visible light, UV light and infrared light (also see the chapter 'Tanning and your health').
- Remove creams, lipstick and other cosmetics well in advance of a tanning session.
-
Do not use any quick-tan lotions or creams meant to speed up the tanning process.
-
Do not use sun creams or lotions meant to protect your skin against sunburn.
If your skin should feel taut after the tanning session, you may apply a moisturising cream. - To acquire an even tan you should lie directly below the lamp units.
- Do not choose a tanning distance of less than 65 cm.
- Only move the appliance when it is in transport position. Make sure that the two parts of the appliance have been properly fastened before you move it. Do not attempt to lift the appliance on your own.
- Colours may fade under the influence of the sun. The same effect may occur when using this appliance.
- Do not expect the appliance to yield better results than the natural sun.
Tanning and your health
The sun, UV and tanning
The sun
The sun supplies various types of energy. Visible light enables us to see, ultraviolet (UV) light gives us a tan and the infrared (IR) light in sunrays provides the heat in which we like to bask.
UV, tanning and your health
Just as with natural sunlight, the tanning process will take some time. The first effect will only become visible after a few sessions (see chapter 'Tanning sessions: how often and how long?').
Overexposure to UV light (natural sunlight or artificial light from your tanning appliance) can cause sunburn.
Besides many other factors, such as overexposure to natural sunlight, incorrect and excessive use of a tanning appliance may increase the risk of skin and eye problems. The degree to which these effects occur is determined by the nature, intensity and duration of the exposure on the one hand and the sensitivity of the person involved on the other hand.
The more the skin and the eyes are exposed to UV light, the higher the risk of keratitis, conjunctivitis, damage to the retina, cataracts, premature skin ageing and the development of skin tumours will be. Some medications and cosmetics increase the sensitivity of the skin.
Therefore it is highly important:
that you follow the instructions in chapters 'Important' and 'Tanning sessions: how often and how long?'.
▶ that the tanning distance (distance between the UV filters and the body) is 65 cm.
that you do not exceed the maximum number of tanning hours per year (i.e. 20 hours or 1200 minutes).
▶ that you always wear the goggles provided while tanning.
IR, relaxation and your health (HB955 only)
Warmth has a relaxing effect. Think of what a hot bath or lazing in the sunshine does to you. You can enjoy the same relaxing effect by switching on the infrared lamps.
Bear in mind the following when you have a relax session:
- Avoid getting too hot. Increase the distance between yourself and the lamps, if necessary.
- If your head gets too hot, cover it or move your body so that less heat is emitted towards your head.
- Close your eyes during a relax session.
- Do not let the relax session last too long (see chapter 'Relax sessions: how often and how long?').
Tanning sessions: how often and how long?
- Do not take more than one tanning session per day, over a period of five to ten days.
- Allow an interval of at least 48 hours between the first and the second session.
- After this 5- to 10-day course, we advise you to give your skin a rest for a while.
▶ Approximately one month after a course, your skin will have lost much of its tan. You can then start a new course.
If you want to keep your tan, do not stop tanning after the course, but continue taking one or two tanning sessions a week. - Whether you choose to stop tanning for a while or whether you continue tanning on a lower frequency, do remember that you must not exceed the maximum number of tanning hours.
- For this appliance the maximum is 20 tanning hours (=1200 minutes) a year.
This maximum also holds if you use the appliance for the tanning of parts of your body (function and ).
Example
Suppose you take a 10-day tanning course, with an 8-minute session on the first day and a 20-minute session on the nine following days.
The entire course will then last (1 × 8 minutes) + (9 × 20 minutes) = 188 minutes.
This means you can take 6 of these courses in a year, as 6 × 188 minutes = 1128 minutes.
Of course, the maximum number of tanning hours applies to each separate part or side of the body that is tanned (e.g. the back or front of the body).
As is shown in the table, the first session of a tanning course should always last 8 minutes, irrespective of the sensitivity of the skin.
If you think that the sessions are too long for you (e.g. because your skin feels taut and tender after the session), we advise you to reduce the length of the sessions by e.g. 5 minutes.
For a beautiful all-over tan, turn your body slightly during the session so that the sides of your body are better exposed to the tanning light.
| Duration of the tanning session for each separate part of the body | For persons with very sensitive skin | For persons with normal sensitive skin | For persons with less sensitive skin |
| 1st session | 8 minutes | 8 minutes | 8 minutes |
| rest of at least 48 hours | |||
| 2nd session | 10 minutes | 20-25 minutes | 30 minutes* |
| 3rd session | 10 minutes | 20-25 minutes | 30 minutes* |
| 4th session | 10 minutes | 20-25 minutes | 30 minutes* |
| 5th session | 10 minutes | 20-25 minutes | 30 minutes* |
| 6th session | 10 minutes | 20-25 minutes | 30 minutes* |
| 7th session | 10 minutes | 20-25 minutes | 30 minutes* |
| 8th session | 10 minutes | 20-25 minutes | 30 minutes* |
| 9th session | 10 minutes | 20-25 minutes | 30 minutes* |
| 10th session | 10 minutes | 20-25 minutes | 30 minutes* |
*) or longer, depending on your skin sensitivity.
If your skin feels slightly taut after tanning, you can apply a moisturising cream.
Note: If you are only tanning a part of your body, you can also use the tanning schedules mentioned in the table above, together with the information in the chapter 'Tanning sessions: how often and how long?'
Relax sessions: how often and how long?
HB955 only
If you do not want to get up right away after the tanning session, you can switch on the infrared lamps for a relax session, during which the infrared lamps keep you warm.
You can also take a relax session without a tanning session. You can do this several times a day (e.g. 30 minutes in the morning and in the evening).
Preparing for use
- The appliance can be easily moved and stored in transport position (fig. 2).
If you want to give your face an extra tan (types HB951 and HB952 only) or if you only want to tan a part of your body (i.e. just the legs or the upper half of your body; types HB952 and HB955 only), make sure you place the appliance at the correct side of the bed (fig. 3).
Open the appliance by pulling the catches on both sides of the base out as indicated by the arrow (fig. 4).
The upper part of the appliance is now unlocked.
2 The upper part comes slightly up (by itself or with a little help) (fig. 5).
3 Grab the handle with both hands and put one foot against the appliance to prevent it from sliding away. Tilt the upper part by pulling the handle and tracing an arc with it (fig. 6).
Do not tilt the upper part too far.
4 Pull the upper part up and towards you at the same time (fig. 7). This requires some effort.
5 Move both lamp units sideways as far as possible, until they are in line with each other (fig. 8).
6 The distance between the UV filters and your body must be 65 cm. The distance between the UV filters and the surface on which you are lying down (e.g. a bed) must be 85 cm (fig. 9).
7 Support the upper part of the stand when you set or adjust the height of the appliance (fig. 10).
Loosen knob 'A' by turning it anti-clockwise (two or three turns).
8 Put your hand under the horizontal part of the stand and extend the stand to the required height (fig. 11).
9 Firmly fasten knob 'A' again and release the stand (fig. 12).
- You can determine whether the appliance has been set to the required height by pulling out the measuring tape (fig. 13).
- The measuring tape will automatically rewind if you move the red tab sideways (fig. 14).
The appliance is now ready for use.
Using the appliance
I Fully unwind the mains cord.
2 Put the plug in the wall socket.
- The remote control will show all the functions that need to be adjusted by the user. The tanning or relax time is shown as 00 (fig. 15).
- Only types HB951 and HB952 show the symbol : the symbol to tan your face.
- Only types HB952 and HB955 show the symbol ✕: the symbol to tan a part of the body.
- Only type HB955 shows the symbol (relax).
Adjusting functions
I Use the ◀▶ buttons to switch from function to function (fig. 16).
The underlined symbol shows the function you are programming.
2 Selecting tanning, facial tanning, tanning a part of the body or relaxing.
Choose symbol ⚙if you want to tan your whole body.
Choose symbol ⚙ and ℰ if you want to tan your whole body and give your face an extra tan (types HB951 and HB952).
Choose ✦ if you want to tan just a part of the body (types HB952 and HB955 only).
Choose symbols and if you want to tan just a part of the body, including an extra facial tanning (type HB952 only).
Choose symbol ≈ if you prefer a relax session (warmth) for the whole body (type HB955 only).
Note: In these directions for use, functions ⚙ ∈ are used as examples of what may be shown on the display.
Setting the time for a tanning or relax session.
Set the time of the tanning or relax session by pushing the + button to put the time forward or by pushing the - button to put the time backward (fig. 17).
Keep the button pressed in to adjust the time more quickly.
2 Lie down directly under the lamp units of the appliance to ensure that the sides of your body are also tanned properly.
3 Put on the protective goggles provided.
4 Switch on the tanning lamps or the infrared lamps by pressing the start button ① (fig. 18).
Note: During start-up the tanning lamps may produce a humming sound. This sound will stop as soon as the lamps are burning properly.
Note: The tanning lamps will start to emit a visibly stronger light after about 60 seconds, which means they are now burning at full power. From this moment onwards you can switch the facial tanner on or off.
Note: If the lamps fail to go on after about 20 seconds, switch the appliance off (①), let the lamps cool down for 3 minutes, set the tanning time and switch the appliance back on again (①).
- A blinking signal will appear; the set time is shown on the display (25 minutes in this case) (fig. 19).
The countdown of the set tanning or relax time will now start.
- You can switch the facial tanner (☀️, ☺) on or off during the session without having to switch off the whole appliance (fig. 20).
▶ (This also holds for the extra face tan in combination with ⚙).
The chosen symbols stay visible in the display, but the other symbols do not.
During the last minute of the session you will hear an intermittent beeping sound (fig. 21).
During this minute, you can press the pause/repeat button to repeat the set time (fig. 22).
- The display shows the set time and starts to count down. The beeping stops.
- It is also possible to set a new time.
By doing this, you can avoid the 3-minute waiting time which is necessary to allow the tanning lamps to cool down after they have been switched off.
This waiting time does not apply to the infrared lamps (type HB955 only).
5 Set a new time by pushing the + or - buttons. Then push the start button ① (fig. 23).
The beeping stops and the time that has just been set starts counting down.
- When you do not repeat the session by pressing ☑ or set a new time during the last minute of the session, the countdown continues and the appliance will automatically switch off as soon as the set time has passed.
Interrupting the tanning or relax session
Interrupt the tanning session by pushing the pause/repeat 🌐 button (fig. 24).
The lamps will be switched off, P appears in the display together with the remaining time. For 3 minutes the remaining time will blink. During this time the lamps cool down. When the blinking has stopped, you can switch the appliance back on again by pushing the Ⓞ button. The remaining time will now be counted down.
2 Interrupt the relax session by pushing the pause/repeat 🌐 button.
The lamps will be switched off, P appears in the display together with the remaining time (not blinking). You can switch the appliance back on immediately by pushing the ① button. The waiting time does not apply to the infrared lamps. The remaining time will be counted down.
Changing the tanning or relax time during a session
When you are tanning, you can change the set time by pushing the ① button. The lamps will be switched off. Then set a new time by pushing the + - buttons. Wait until the set time has stopped blinking (this will take 3 minutes because the lamps have to cool down first) and push the ① button again.
2 When relaxing (☑), you can change the set time by pushing the ① button. The lamps will be switched off. You can set a new time and switch the appliance back on immediately by pushing the ① button. The waiting time does not apply to the infrared lamps (the newly set time does not blink on the display).
- Make sure the right lamps are on: (HB955 only)
▶ Tanning: four lamps emitting bluish light.
▶ Relax: four lamps emitting reddish light.
After the tanning session
Keep track of the number of sessions you have had by means of the memory knobs (types HB952 and HB955 only). The appliance has two memory knobs: one per person (fig. 25).
Cooling
The appliance is cooled by means of fans to prevent materials and parts from becoming too hot. The tanning lamps won't go on if they are too hot (see for instance "Interrupting the tanning or relax session").
- After you have switched off the tanning lamps or infrared lamps, the fans will continue to work for three more minutes.
This is convenient, because it enables you to use the tanning lamps again only 3 minutes after switching them off.
The infrared lamps do not require a cooling down period before they can be switched on again.
If you have switched the tanning appliance off by removing the plug from the wall socket, the fans won't provide cooling for three more minutes, of course.
If you have switched the tanning appliance off by removing the plug from the wall socket and another person wishes to use the appliance for a tanning session right away, the newly set time won't
ENGLISH12
blink on the display. This means that the next person will have to keep track of the three-minute cooling-down period himself.
HB955 only: if you want to use the appliance for a tanning session immediately after having used it for a relax session (¶), you should also let the appliance cool down for three minutes. As a result of the relax session, the tanning lamps will have become hot and will need to cool down before they can be switched on.
Cleaning
I Always unplug the appliance and let it cool down before you start cleaning it.
2 Clean the outside of the appliance with a damp cloth.
Do not let any water run into the appliance.
3 Do not use scouring pads.
Never use abrasive liquids like scouring agents, petrol or acetone to clean the appliance.
- You can clean the outside of the UV filters with a soft cloth sprinkled with some methylated spirits.
Storage
Let the appliance cool down for 15 minutes before you put it in transport position and store it.
- In the meantime, you can wind up the cords and put them in the base of the appliance.
2 Make sure the cords and remote control unit are stored properly, as they might otherwise get stuck between parts of the appliance when you put the appliance in transport position (fig. 26).
3 Firmly hold the upper part of the stand with one hand and loosen the height adjustment knob (A) by turning it anti-clockwise (fig. 27).
4 Slide in the stand fully (fig. 28).
5 Firmly fasten the height adjustment knob (A) by turning it clockwise (fig. 29).
6 Turn the two lamp units towards each other (fig. 30).
7 Grab the handle with both hands, put one foot against the appliance to prevent it from sliding away and tilt the upper part with the stand backward (fig. 31).
The automatic unlocking system will only work if you tilt the upper part with the stand backward far enough. However, you should be careful not to tilt it backward too far because you might lose your balance if you do.
8 Push the upper part down (fig. 32).
9 Lower it slowly onto the base (fig. 33).
10 Fasten the lamp units to the base by pushing both catches in the direction of the arrow (fig. 34).
Replacement
The light emitted by the tanning lamps will become less bright in time (i.e. after a few years in case of normal use). When this happens, you will notice a decrease in the tanning capacity of the appliance. You can solve this problem by setting a slightly longer tanning time or by having the tanning lamps replaced.
- Types HB952 and HB955 only: The remote control of the appliance includes a counter that registers the number of operating hours.
Choose function ⚙. Set the time to 00 and hold down the pause/repeat ⏻ button to display the number of operating hours (fig. 35).
The maximum number of hours the counter can display is 999. After it has reached this number, it will continue to count up from 000.
2 When you release the pause/repeat button, the number of operating hours disappears from the display.
- After 750 burning hours, an L will appear on the left-hand side of the display. This means that the tanning power of the appliance has decreased so much that replacement of the tanning lamps is advisable (fig. 36).
Of course, you can choose to postpone replacement for a while by setting a longer tanning time.
3 To remove the L from the display, press the pause/repeat 📋 button, with time indication 00 and function symbol ⚙ on the display. Hold down the pause/repeat button and press first the + button and then the – button and the L will disappear from the display (fig. 37).
The UV filters protect against undesired exposure. It is therefore important to have a damaged or broken filter replaced right away.
For type HB955 only: have the infrared lamps replaced when they stop functioning.
Have the tanning lamps (Philips HPA flex power 400-600), the infrared lamps (no. 4222 062 95590), the UV filters and the mains cord replaced by a service centre authorised by Philips. Only they have the knowledge and skills required for this job and the original spare parts for the appliance.
Environment
The lamps of the appliance contain substances that can be harmful to the environment. When you discard the lamps, make sure they are not thrown away with the normal household waste but are handed in at an official collection point.
Guarantee & service
If you need service or information or if you have a problem, please visit the Philips Web site at www.philips.com or contact the Philips Customer Care Centre in your country (you will find its phone number in the worldwide guarantee leaflet). If there is no Customer Care Centre in your country, turn to your local Philips dealer or contact the Service Department of Philips Domestic Appliances and Personal Care BV.
Guarantee restrictions
The tanning lamps are not covered by the terms of the international guarantee.
Troubleshooting
If the appliance does not work properly, this may be due to a defect. In that case we advise you to contact your dealer or a Philips service centre.
The appliance may also fail to work properly because it has not been installed or is not used in accordance with the instructions. In that case you are able to solve the problem yourself by following the troubleshooting tips below.
| Problem | Possible cause |
| The appliance does not start | The plug has not been (properly) inserted into the wall socket. |
| There is a power failure. Check if the power supply works by connecting another appliance. | |
| The lamps are still too hot to go on. Let them cool down for 3 minutes first. | |
| The appliance was not sufficiently cooled and the overheating protection switched the appliance off automatically. Remove the cause of overheating (e.g. remove a towel that is blocking one or more vents). Wait for 10 minutes and switch the appliance back on. | |
| The fuse cuts off the power when you switch on the tanning appliance or during use. | Check the fuse of the circuit to which the tanning appliance is connected.The correct fuse type is a 16A standard fuse or an automatic fuse.The fuse may also blow because you have connected too many appliances to the same circuit. |
| Poor tanning results | You are using an extension cord that is too long and/or does not have the correct rating (16A). Consult your dealer. Our general advice is not to use an extension cord. |
| You are not following the tanning schedule suitable for your skin type. | |
| The distance between the lamps and the surface you lie on is larger than prescribed. | |
| When the lamps have been used for a long time, the tanning capacity will decrease.This effect only becomes noticeable after several years. You can solve this problem by selecting a slightly longer tanning time or by having the lamps replaced. After 750 operating hours an L will appear on the display telling you that it is advisable to have the lamps replaced. | |
| The appliance cannot be put back into transport position. | You have not pushed the upper part of the appliance backward far enough. Make sure you first push the upper part backward before pushing it down (see 'Storage'). |
natural_image
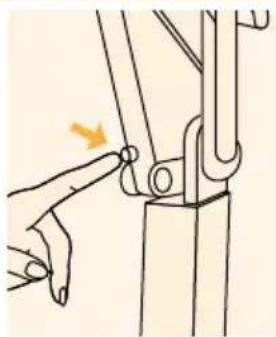
Illustration of a hand adjusting a vertical pipe joint with a yellow arrow indicating force direction (no text or symbols)The appliance fails to unlock automatically. In that case you first have to press unlocking button (B), after which you can fold the appliance back into its transport position in the manner indicated in the chapter 'Storage'. If the appliance fails to unlock several times, contact your dealer or a Philips service centre.
Error codes
The display of the remote control may show error codes. Below we will explain what you should do if an error code appears on the display.
Note: E01 appears in the display for 5 seconds and at the same time you hear a beeping sound.
Note: E02 and codes with a higher number remain visible on the display. If these codes appear, the appliance has a serious problem and must not be used any longer.
| Error code | Solution |
| E01 | Check the openings of the vents (see 'appliance does not start' in the 'Troubleshooting guide'). |
| Check the UV filters (the special glass panes that cover the lamps). If these filters are broken, damaged or missing, stop using the appliance and contact your dealer or a Philips service centre. | |
| E02 and codes with a higher number | Contact your local dealer or a Philips service centre. |
Kasutusjuhend
Päevitamisseade
natural_image
Illustration of a hand using a tool to lift or adjust a vertical pole, with no text or symbols present.natural_image
Illustration of a hand using a tool to lift or adjust a vertical pole, with no text or symbols present.natural_image
Illustration of a hand using a tool to lift or lift a vertical pole, with an arrow indicating the motion direction (no text or symbols present)
- Important
- Tanning and your health
- The sun
- UV, tanning and your health
- IR, relaxation and your health (HB955 only)
- Tanning sessions: how often and how long?
- Example
- As is shown in the table, the first session of a tanning course should always last 8 minutes, irrespective of the sensitivity of the skin.
- Relax sessions: how often and how long?
- Preparing for use
- Using the appliance
- ENGLISH12
- Cleaning
- Storage
- Replacement
- Environment
- Guarantee & service
- Guarantee restrictions
- Troubleshooting
- Error codes
- Kasutusjuhend
- Päevitamisseade
Brand : PHILIPS
Model : HB951
Category : Solar bench