Xonar DG - Soundcard ASUS - Free user manual and instructions
Find the device manual for free Xonar DG ASUS in PDF.

User questions about Xonar DG ASUS
0 question about this device. Answer the ones you know or ask your own.
Ask a new question about this device
Download the instructions for your Soundcard in PDF format for free! Find your manual Xonar DG - ASUS and take your electronic device back in hand. On this page are published all the documents necessary for the use of your device. Xonar DG by ASUS.
USER MANUAL Xonar DG ASUS
PCI 5.1 & Headphone Amp Audio Card
User manual
natural_image
Diagram of an electronic device rear panel with integrated circuits and connectors (no text or labels)E11118
Revised Edition v4
November 2015
Copyright © 2015 ASUSTeK Computer Inc. All Rights Reserved.
No part of this manual, including the products and software described in it, may be reproduced, transmitted, transcribed, stored in a retrieval system, or translated into any language in any form or by any means, except documentation kept by the purchaser for backup purposes, without the express written permission of ASUSTeK COMPUTER INC. ("ASUS").
Product warranty or service will not be extended if: (1) the product is repaired, modified or altered, unless such repair, modification of alteration is authorized in writing by ASUS; or (2) the serial number of the product is defaced or missing.
ASUS PROVIDES THIS MANUAL "AS IS" WITHOUT WARRANTY OF ANY KIND, EITHER EXPRESS OR IMPLIED, INCLUDING BUT NOT LIMITED TO THE IMPLIED WARRANTIES OR CONDITIONS OF MERCHANTABILITY OR FITNESS FOR A PARTICULAR PURPOSE. IN NO EVENT SHALL ASUS, ITS DIRECTORS, OFFICERS, EMPLOYEES OR AGENTS BE LIABLE FOR ANY INDIRECT, SPECIAL, INCIDENTAL, OR CONSEQUENTIAL DAMAGES (INCLUDING DAMAGES FOR LOSS OF PROFITS, LOSS OF BUSINESS, LOSS OF USE OR DATA, INTERRUPTION OF BUSINESS AND THE LIKE), EVEN IF ASUS HAS BEEN ADVISED OF THE POSSIBILITY OF SUCH DAMAGES ARISING FROM ANY DEFECT OR ERROR IN THIS MANUAL OR PRODUCT.
SPECIFICATIONS AND INFORMATION CONTAINED IN THIS MANUAL ARE FURNISHED FOR INFORMATIONAL USE ONLY, AND ARE SUBJECT TO CHANGE AT ANY TIME WITHOUT NOTICE, AND SHOULD NOT BE CONSTRUED AS A COMMITMENT BY ASUS. ASUS ASSUMES NO RESPONSIBILITY OR LIABILITY FOR ANY ERRORS OR INACCURACIES THAT MAY APPEAR IN THIS MANUAL, INCLUDING THE PRODUCTS AND SOFTWARE DESCRIBED IN IT.
Products and corporate names appearing in this manual may or may not be registered trademarks or copyrights of their respective companies, and are used only for identification or explanation and to the owners' benefit, without intent to infringe.
Contents
Notices......iv
Safety information ...... v
Trademarks ...... v
License ...... v
- Introduction ...... 1
1.1 Package contents .... 1
1.2 System requirements....1
1.3 Specifications summary 2
-
Xonar DG card layout 3
-
Installing the hardware.... 5
-
Installing software....6
-
Connecting speakers and peripherals....7
5.1 Connecting digital speaker systems (Home Theater) ...... 7
5.2 Connecting stereo headphones....8
5.3 Connecting Analog Speaker Systems 10
5.4 Connecting microphone....14
5.5 Connecting Line-In audio sources 15
-
Software Utilities.... 16
-
Troubleshooting and FAQs....17
[Troubleshooting] 17
[FAQ] 18
Notices
Federal Communications Commission Statement
This device complies with Part 15 of the FCC Rules. Operation is subject to the following two conditions:
• This device may not cause harmful interference, and
- This device must accept any interference received including interference that may cause undesired operation.
This equipment has been tested and found to comply with the limits for a Class B digital device, pursuant to Part 15 of the FCC Rules. These limits are designed to provide reasonable protection against harmful interference in a residential installation. This equipment generates, uses and can radiate radio frequency energy and, if not installed and used in accordance with manufacturer's instructions, may cause harmful interference to radio communications. However, there is no guarantee that interference will not occur in a particular installation. If this equipment does cause harmful interference to radio or television reception, which can be determined by turning the equipment off and on, the user is encouraged to try to correct the interference by one or more of the following measures:
• Reorient or relocate the receiving antenna.
- Increase the separation between the equipment and receiver.
- Connect the equipment to an outlet on a circuit different from that to which the receiver is connected.
- Consult the dealer or an experienced radio/TV technician for help.
Canadian Department of Communications Statement
This digital apparatus does not exceed the Class B limits for radio noise emissions from digital apparatus set out in the Radio Interference Regulations of the Canadian Department of Communications.
This class B digital apparatus complies with Canadian ICES-003.
Australia statement notice
From 1 January 2012 updated warranties apply to all ASUS products, consistent with the Australian Consumer Law. For the latest product warranty details please visit http://support.asus.com. Our goods come with guarantees that cannot be excluded under the Australian Consumer Law. You are entitled to a replacement or refund for a major failure and compensation for any other reasonably foreseeable loss or damage. You are also entitled to have the goods repaired or replaced if the goods fail to be of acceptable quality and the failure does not amount to a major failure.
If you require assistance please call ASUS Customer Service 1300 2787 88 or visit us at http://support.asus.com
Safety information
- Before installing the device on a motherboard, carefully read all the manuals that came with the package.
- To prevent electrical shock hazard or short circuits, switch off the power supply before installing the device on a motherboard or connecting any signal cables to the device.
- If the device is broken, do not try to fix it by yourself. Contact a qualified service technician or your retailer.
- Before using the product, make sure all cables are correctly connected. If you detect any damage, contact your dealer immediately.
- To avoid short circuits, keep paper clips, screws, and staples away from connectors, sockets and circuitry.
- Avoid dust, humidity, and temperature extremes. Do not place the product in any area where it may become wet.
- Place the product on a stable surface.
- If you encounter technical problems with the product, contact a qualified service technician or your retailer.

This symbol of the crossed out wheeled bin indicates that the product (electrical and electronic equipment) should not be placed in municipal waste. Check local regulations for disposal of electronic products.
Trademarks
Xonar and ASUS logo are trademarks of ASUSTek Computer Inc. "Dolby" and "Dolby Digital Live", "Dolby Pro Logic IIx", "Dolby Virtual Speaker", "Dolby Headphone" are trademarks of Dolby Laboratories. EAX and A3D are trademarks of Creative Technology Ltd. Microsoft, DirectSound3D, Windows are trademarks of Microsoft Corporation. Other company and product names may be trademarks of the respective companies with which they are associated. ASIO is a trademark and software of Steinberg Media Technologies GmbH
License
Dolby Master Studio driver is manufactured under license from Dolby Laboratories.
1. Introduction
1.1 Package contents
• ASUS Xonar DG PCI audio card
- Low Profile Bracket x1
- Support CD x1
- Quick Start Guide x1
1.2 System requirements
- One PCI 2.2 (or higher) compatible slot for the audio card
- Microsoft ^ Windows ^ 7/8/8.1/10 (32/64bit)
- Intel ^ Pentium ^ 4 1.4 GHz or AMD ^ Athlon 1400 CPU or faster CPU
• 256 MB (or above) DRAM system memory - 60 MB available HDD space for driver installation package
- CD-ROM drive (or DVD-ROM drive) for software installation
- High-quality headphones or powered analog speakers to enjoy the ultra-high fidelity sound of the card
1.3 Specifications summary
Items Description
| Audio Performance | |
| Output Signal-to-Noise Ratio (A-Weighted): | 105dB for 5.1CH100dB for Headphone-out@150ohm loading |
| Input Signal-to-Noise Ratio (A-Weighted): | 103dB |
| Output Total Harmonic Distortion + Noise at 1kHz(A-Weighted): | Up to 0.0025% (-92dB) |
| Input Total Harmonic Distortion + Noise at 1kHz(A-Weighted): | Up to 0.0022% (-93dB) |
| Frequency Response (-3dB, 24-bit/96kHz Input): | <10Hz to 48kHz |
| Output/Input Full-Scale Voltage | 1Vrms (3Vp-p) |
| Headphone Impedance | Optimized for 32~150Ω |
| Bus Compatibility | |
| PCI | PCI v2.2 or above bus compatible |
| Main Chipset | |
| Audio Processor | C-Media CMI8786 High-Definition Sound Processor (Max. 96KHz/24bit) |
| D-A Converter of Digital Sources: | Cirrus Logic CS4245*1 (104dB DNR, Max. 192KHz/24bit) / Cirrus Logic CS4361*1 (103dB DNR, Max. 192KHz/24bit) |
| A-D Converter for Analog Inputs: | Cirrus Logic CS4245*1 (104dB DNR, Max. 192KHz/24bit) |
| Sample Rate and Resolution | |
| Analog Playback Sample Rate and Resolution | 44.1K/48K/96KHz @ 16/24bit for all channels |
| Analog Recording Sample Rate and Resolution | 44.1K/48K/96KHz @ 16/24bit |
| S/PDIF Digital Output | 44.1K/48K/96KHz @ 16/24bit, Dolby Digital, DTS, WMA-Pro |
| ASIO 2.0 Driver Support: | 44.1K/48K/96KHz @ 16/24bit |
| I/O Ports | |
| Analog Output Jack: | 3.50mm mini jack *3 (Front/Side/Center-Subwoofer) |
| Analog Input Jack: | 3.50mm mini jack *1 (Line-In/Mic-In) |
| Other line-level analog Input (for CD-IN/TV Tuner): | Aux-In (4-pin header on the card) |
| Digital S/PDIF Output | High-bandwidth Optical Connector supports 96KHz/24bit-additional SPDIF-out header for HDMI audio output |
| Front-Panel Audio Header | Supports headphone jack-detection, automatically switch audio output from back-panel to front |
| Driver Features | |
| Operation System | Windows 8.1 (32/64bit)/ 8 (32/64bit)/ 7 (32/64bit) |
| Bass Boost | Applies a +6dB boost on 2Khz to 4Khz band of the extracted voice. |
| Voice Clarity | Enables or disables the compressor audio processing. Works as an auto volume to ensure a constant loudness. |
| Compressor | Controls the Compressor Rate between 0 and 1. Threshold, Attack and Release are preset and not available to the user. |
| Noise Gate | Enables or disables the Noise Gate audio processing. The Noise Gate cuts the unpleasant noises between words or sentences for clearer voice communication. When Noise Gate is disabled, the Perfect Voice can be disabled. |
| Perfect Voice | Enables or disables the Perfect Voice audio processing. The Perfect Voice has been designed to analyze and estimate the amount of ambient noise before eliminating them through spectral subtraction. The Noise Gate is enabled when Perfect Voice is enabled. |
| Virtual Surround | Virtual Surround is only for Speaker > audio config 2.0 and headphones > audio config 2.0. |
| ASIO 2.0 Driver Support: | Supports 44.1K/48K/96K/192KHz @ 16/24bit with very low latency |
| Accessories | |
| Accessories | -Low-profile bracket |
* Specifications are subject to change without notice.
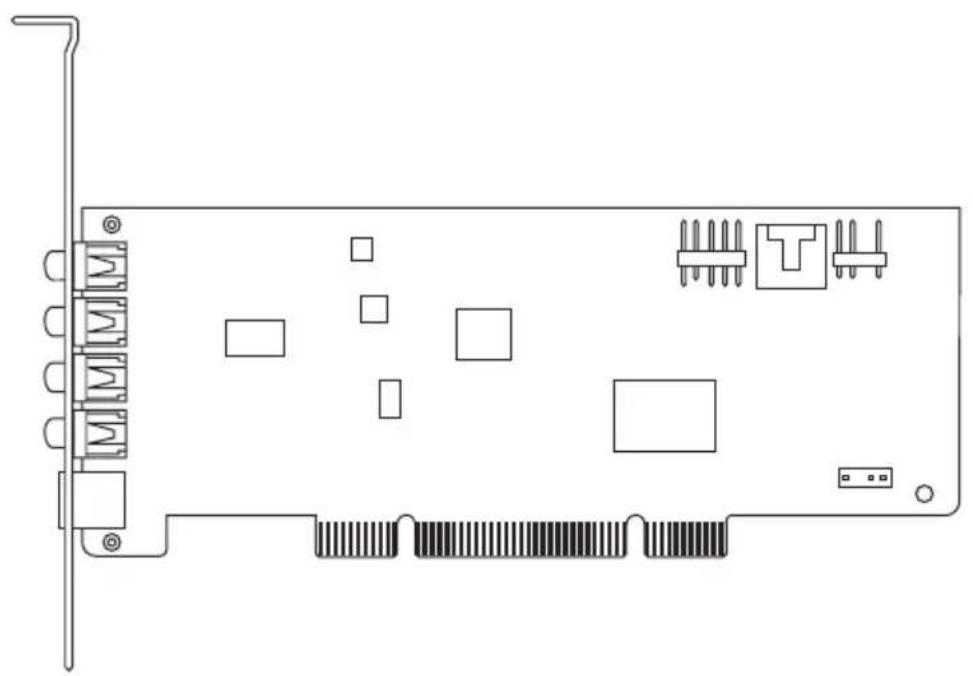
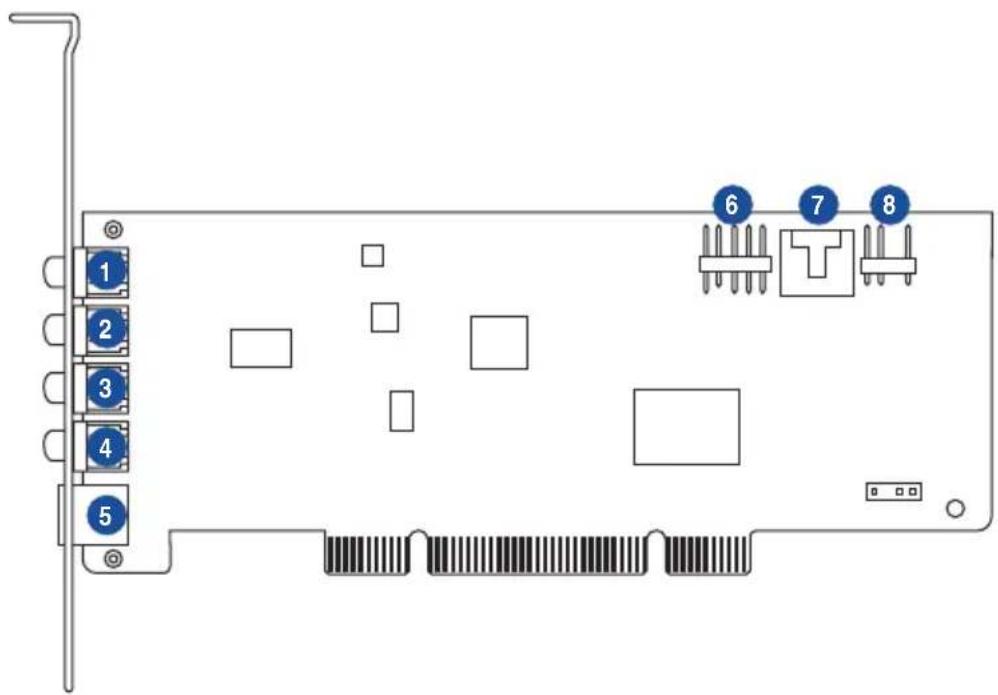
2. Xonar DG card layout
text_image
1 2 3 4 5 6 7 8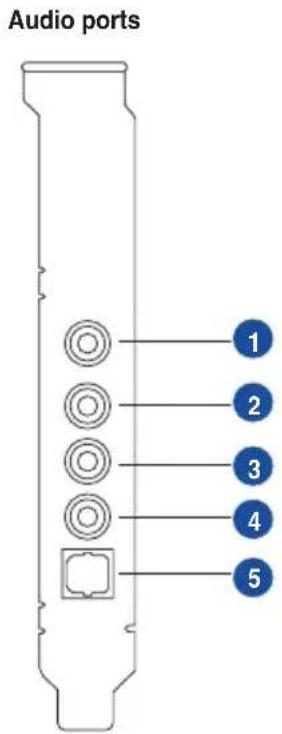
text_image
Audio ports 1 2 3 4 5| No Item Description | ||
| 1 | Microphone In port | Connect your external PC microphone to this 3.5mm port for voice input. Built-in high-quality Microphone pre-amplifier. |
| Line In port | Connect analog devices like MP3 players, CD players, music synthesizers and other line-level sound sources to this 3.5mm port for audio recording or processing. | |
| 2 | Headphone/Front Out port | Connect your headphones or 2 channel speakers to this 3.5mm port. For multi-channel speaker systems, connects to the front left/right input on the powered speakers. |
| 3 | Side Surround Out port | Connects to the surround channel input on 4/5.1 powered analog speakers. |
| 4 | Center/Subwoofer Out port | Connects to the center/subwoofer input on 5.1 powered analog speakers. |
| 5 S/PDIF Out port | Optical TOSLINK digital output port. Connects to external digital decoder or digital speaker systems, Home Theater systems, AV receivers for outputting digital audio including PCM, DTS Digital, DTS, WMA-Pro, etc. | |
| 6 | Front panel audio header | 9-pin Intel AC'97 / HDA front-panel which supports audio jack-detection and audio FP Headphone selection for Analog Out on the Audio Center. |
| 7 Aux Input Header | 4-pin header. Usually connects to the Analog Audio output of TV tuner card or other sound source inside your PC system. (To monitor your TV tuner card's audio from this Aux-In, you must enable the “monitor” function for Aux-In in the Xonar DG Audio Center's recording mixer.) | |
| 8 S/PDIF Out header | Connects to the supported graphics card with HDMI. | |
3. Installing the hardware
Installing the audio card

Before you proceed with the following installation steps, it's recommended that you disable your onboard audio device in your BIOS settings, or uninstall any other audio cards on your PC. (For BIOS setting or uninstallation of other sound cards, refer to the user manuals of your motherboard and audio card.)
Installing the Xonar DG card
- Power OFF the computer, the monitor, and all other peripheral devices connected to your computer.
- Unplug the computer power cord from your computer and power outlet.
- Touch the metal back or side panel of the computer to avoid static electricity.
- Remove the chassis cover.
- Remove the metal bracket from an available PCI slot for the Xonar DG audio card.
- Carefully insert the audio card into the PCI slot. Ensure the audio card sits properly in place.
- Secure the audio card with screws and the metal bracket.
- Put back the chassis cover.
- Reconnect all cables.
- Plug the power cord to the computer and to a power outlet.
- Power ON the computer.
natural_image
Technical line drawing of a computer motherboard with connectors and modules (no text or symbols)4. Installing software
Installing the card driver
Ensure that you have installed the audio card driver before installing the Xonar DG driver. Otherwise, driver installation error may occur.
- After you have installed the Xonar DG card, turn on your computer. Windows® automatically detects the audio card and searches for device drivers. When prompted for the drivers, click Cancel.
- Insert the support CD into the optical drive. If Autorun is enabled in your system, the setup starts automatically. If not, run setup.exe from your support CD.
- Follow the onscreen instructions to finish the installation.

The version and content of the support CD are subject to change without notice.
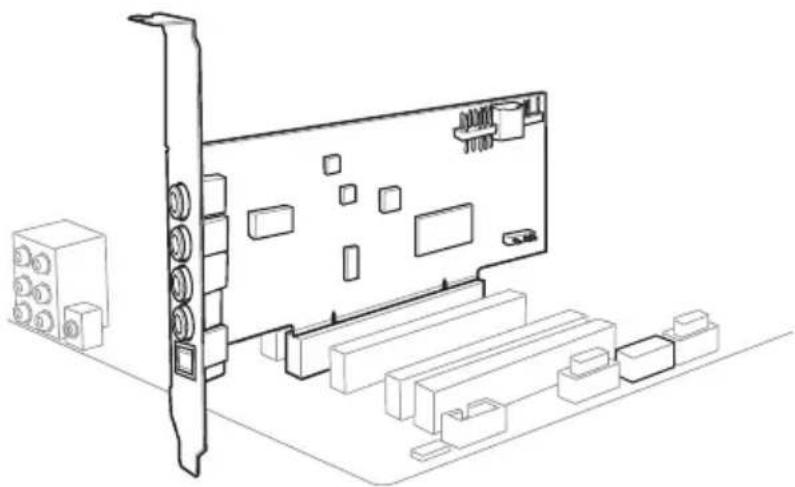
5. Connecting speakers and peripherals
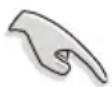
5.1 Connecting digital speaker systems (Home Theater)
The Xonar DG makes playback through your home theater system possible, creating an immersive and impressive cinema surround sound experience. A single digital cable connection can carry high-quality digital audio from any of your PC audio sources to any digital speakers or AV Receivers.
text_image
Decoder Box Amplifier Front Left Central Front Right Subwoofer La Surname Ra Surname 1 SPDIF Out| No Item Description | |
| 1 Optical cable | Plug your decoder's TOSLINK optical cable into the S/PDIF-Out connector. |
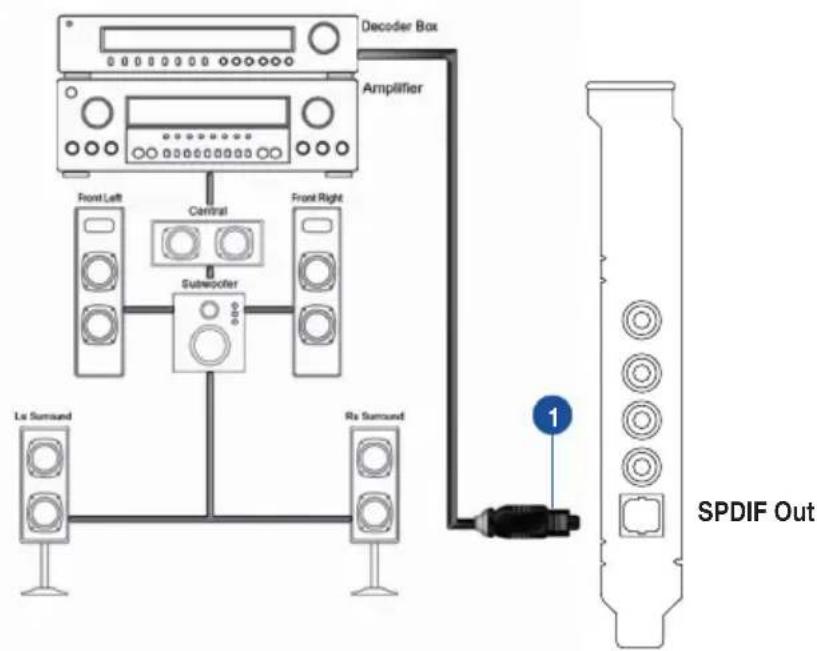
5.2 Connecting stereo headphones
5.2.1 Connecting Stereo Headphones
text_image
Diagram showing audio headset connection to a device with labeled ports and connector| No Item Description | |
| 1 Front Out/Headphone Jack | The Front Out jack has a built-in high-quality amplifier to drive headphones. Connect your stereo headphones directly to this jack. |
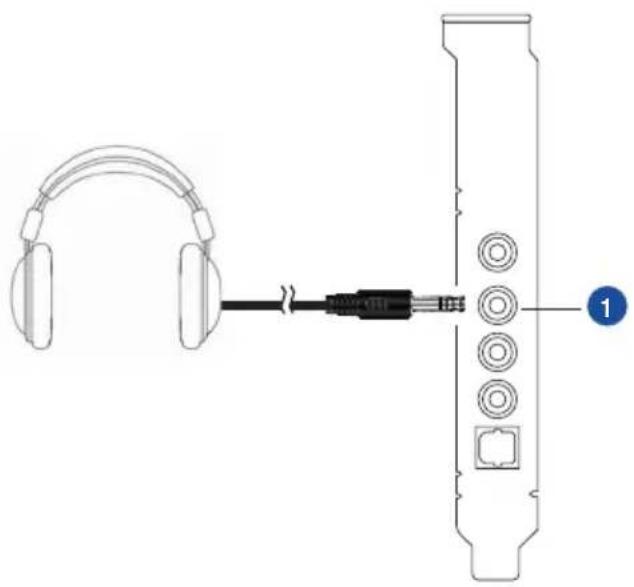
5.2.2 Connecting 5.1 channel Headphones
text_image
Diagram showing audio headset connections to a connector with labeled pins 1, 2, and 3| No Item Description | |
| 1 Front Out | Connect the front-channel 3.5mm plug of your 5.1 headphone into this jack. |
| 2 Side Surround Out | Connect the surround-channel 3.5mm plug of your 5.1 headphone into this jack. |
| 3 Center/Subwoofer Out | Connect the Center/Bass-channel 3.5mm plug of your 5.1 headphone into this jack. |
5.3 Connecting Analog Speaker Systems
5.3.1 Connecting Analog Power Amplifier

text_image
Ftrans CtrlSte FR FL SW C EXT IN ER SL Side 1 2 3| No Item Description | |
| 1 Front Out | Connects to the “left front” and “right front” input ports of the analog amplifier with the mini-jack to RCA cable. |
| 2 Side Surround Out | Connects to the “left surround” and “right surround” input ports of the analog amplifier with the mini-jack to RCA cable. |
| 3 Center/Subwoofer | Connects to the “Center” and “subwoofer” input ports of the analog amplifier with the mini-jack to RCA cable. |
5.3.2 Connecting 2 channel speakers
2 Speakers
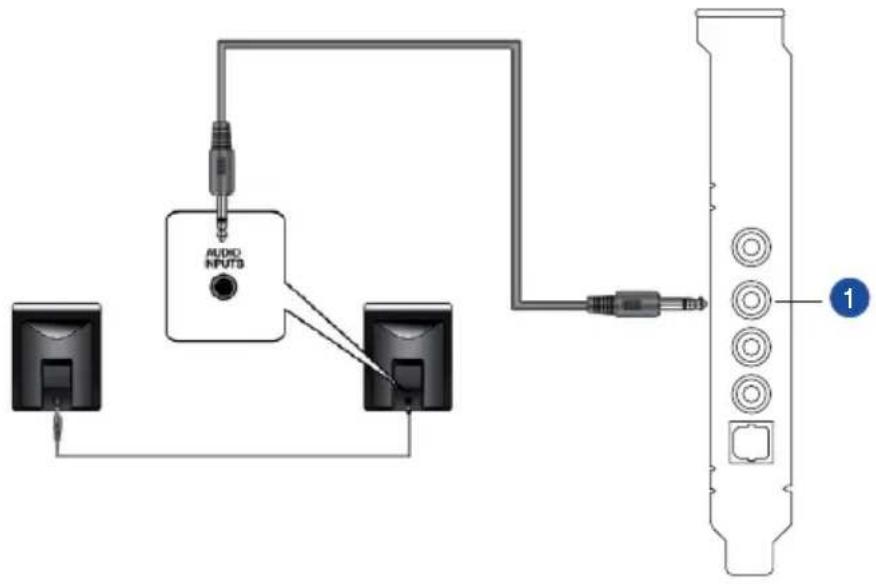
text_image
AUDIO INPUTS 1| No Item Description | |
| 1 Front Out/Headphone Jack | Connect the 2 speaker set's 3.5mm plug into this Front Out jack. |
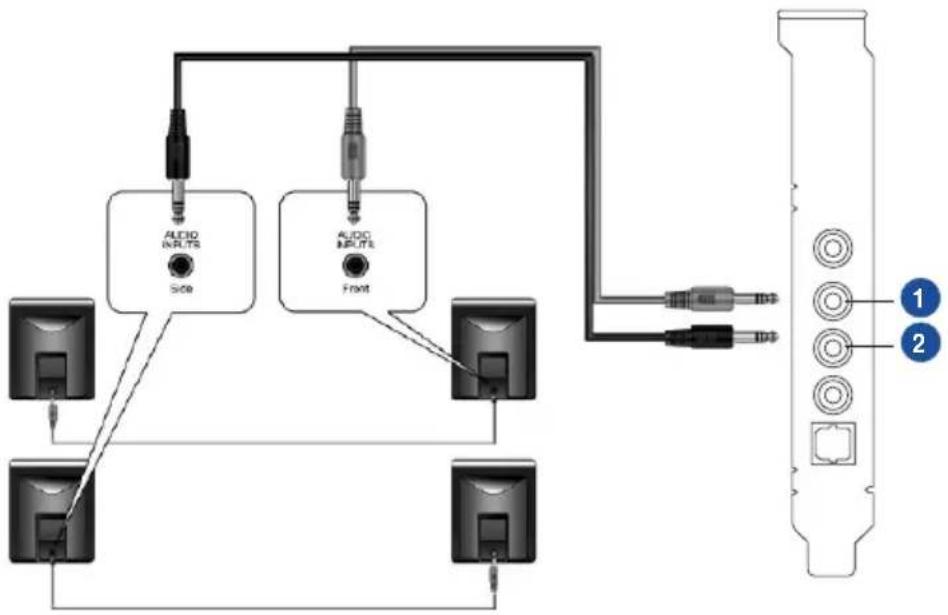
5.3.3 Connecting 4 Channel Speakers
4 Speakers
flowchart
graph TD
    A["Computer"] --> B["Switch"]
    C["Computer"] --> D["Switch"]
    E["Computer"] --> F["Switch"]
    G["Computer"] --> H["Switch"]
    I["Switch"] --> J["Output Panel"]
    K["Switch"] --> L["Output Panel"]
    M["Switch"] --> N["Output Panel"]
    O["Switch"] --> P["Output Panel"]
    Q["Switch"] --> R["Output Panel"]
    S["Switch"] --> T["Output Panel"]
    U["Switch"] --> V["Output Panel"]
    W["Switch"] --> X["Output Panel"]
    Y["Switch"] --> Z["Output Panel"]
    AA["Switch"] --> AB["Output Panel"]
    AC["Switch"] --> AD["Output Panel"]
    AE["Switch"] --> AF["Output Panel"]
| No Item Description | |
| 1 Front Out | Connects to the Front input port of the 4 speakers with the mini-jack cable. |
| 2 Side Surround Out | Connects to the Surround input port of the 4 speakers with the mini-jack cable. |
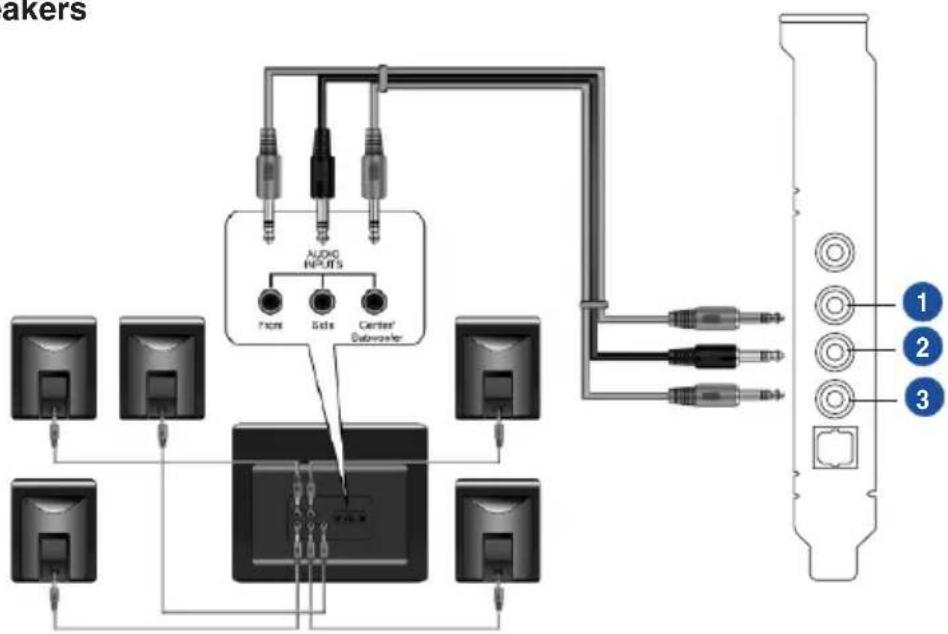
5.3.4 Connecting 5.1 Channel Speakers
5.1 Speakers
flowchart
graph TD
    A["ACDC"] --> B["ACDC"]
    B --> C["ACDC"]
    C --> D["ACDC"]
    D --> E["ACDC"]
    E --> F["ACDC"]
    F --> G["ACDC"]
    G --> H["ACDC"]
    H --> I["ACDC"]
    I --> J["ACDC"]
    J --> K["ACDC"]
    K --> L["ACDC"]
    L --> M["ACDC"]
    M --> N["ACDC"]
    N --> O["ACDC"]
    O --> P["ACDC"]
    P --> Q["ACDC"]
    Q --> R["ACDC"]
    R --> S["ACDC"]
    S --> T["ACDC"]
    T --> U["ACDC"]
    U --> V["ACDC"]
    V --> W["ACDC"]
    W --> X["ACDC"]
    X --> Y["ACDC"]
    Y --> Z["ACDC"]
    Z --> AA["ACDC"]
    AA --> AB["ACDC"]
    AB --> AC["ACDC"]
    AC --> AD["ACDC"]
    AD --> AE["ACDC"]
    AE --> AF["ACDC"]
    AF --> AG["ACDC"]
    AG --> AH["ACDC"]
    AH --> AI["ACDC"]
    AI --> AJ["ACDC"]
    AJ --> AK["ACDC"]
    AK --> AL["ACDC"]
    AL --> AM["ACDC"]
    AM --> AN["ACDC"]
    AN --> AO["ACDC"]
    AO --> AP["ACDC"]
    AP --> AQ["ACDC"]
    AQ --> AR["ACDC"]
    AR --> AS["ACDC"]
    AS --> AT["ACDC"]
    AT --> AU["ACDC"]
    AU --> AV["ACDC"]
    AV --> AW["ACDC"]
    AW --> AX["ACDC"]
    AX --> AY["ACDC"]
| No Item Description | |
| 1 Front Out | Connects to the Front input port of the 5.1 speakers with the mini-jack cable. |
| 2 Side Surround Out | Connects to the Surround input port of the 5.1 speakers with the mini-jack cable. |
| 3 Center/Subwoofer | Connects to the Center/Subwoofer input port of the 5.1 speakers with the mini-jack cable. |
5.4 Connecting microphone
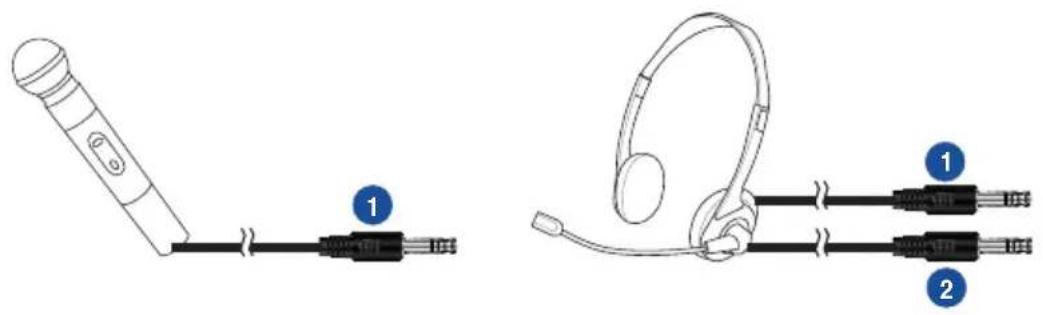
text_image
Diagram showing two types of electronic devices: a handheld device connected to a USB cable and a headset with labeled connectors.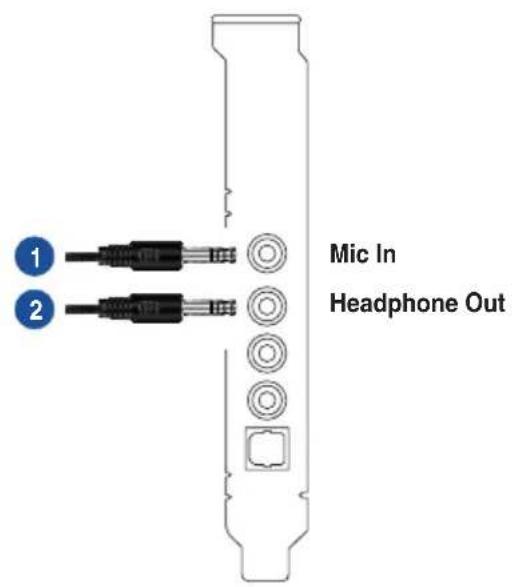
text_image
1 2 Mic In Headphone Out| No Item Description | |
| 1 Microphone Input Jack | Connect the microphone's 3.5mm plug into this Mic-In jack for voice communication, recording, or karaoke. |
| 2 Headphone Jack | The Front Out jack has a built-in high-quality amplifier to drive headphones. Connect your stereo headphones directly to this jack. |
5.5 Connecting Line-In audio sources
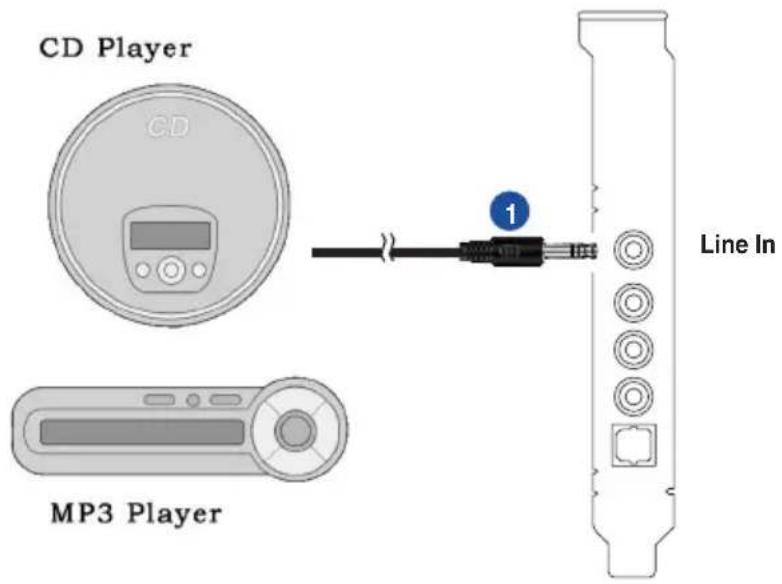
text_image
CD Player CD MP3 Player Line In| No Item Description | |
| 1 Line Input Jack | Connect the 3.5mm plug of the CD/MP3 Player or any other Line level analog audio sources into this Line-In jack for sound recording (See the “Mixer” section of the driver guide). |
6. Software Utilities
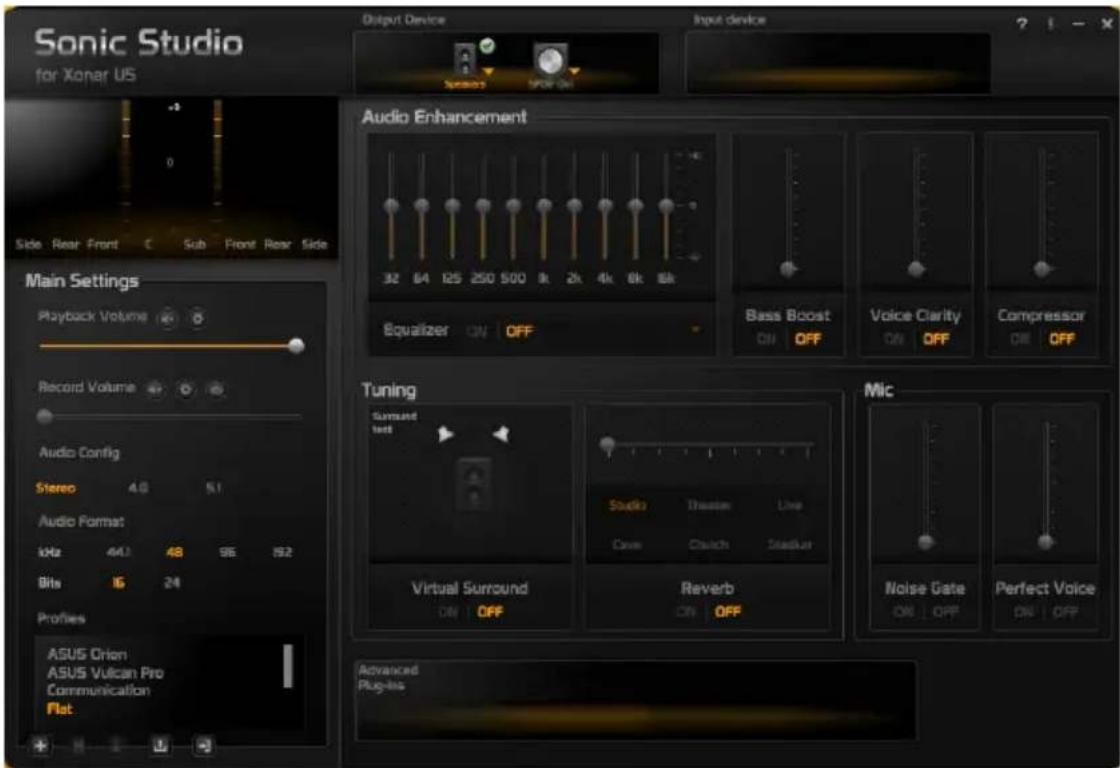
Sonic Studio overview
Sonic Studio comes with advanced sound algorithms and virtual surround effects to enhance your gaming and entertainment experience.
text_image
Sonic Studio for Xonar US Output Device Input Device Main Settings Playback Volume Record Volume Audio Config Stereo 4.0 5.1 Audio Format kHz 44.1 48 96 92 Bits 16 24 Profiles ASUS Orion ASUS Vulcan Pro Communication Flat Audio Enhancement 32 64 125 250 500 8k 2k 4k 6k 8k Equalizer ON OFF Bass Boost ON OFF Voice Clarity ON OFF Compressor ON OFF Tuning Surround test Sounds Theses Line Cave Clutch Stadler Virtual Surround ON OFF Reverb ON OFF Mic Noise Gate ON OFF Perfect Voice ON OFF Advanced Plug-lbs
For more details about using Sonic Studio, refer to the Sonic Studio manual.
7. Troubleshooting and FAQs
[Troubleshooting]
The audio card driver could not be installed on my PC.
Instructions:
- Make sure that you have properly plugged the audio card in the PCI slot on your motherboard.
- Check that the Windows hardware device manager has discovered a multimedia audio device. If no device is found, please try scanning for new hardware.
- Try soft reboot (restart) your Windows.
- Remove the card, plug it into another PCI slot, and try again.
I cannot find the Xonar DG Audio Center
Instructions:
- Make sure you have installed the driver
- Locate the Xonar DG Audio Center icon in the system tray on the bottom right-hand corner of the screen. Double-click the icon to open the Xonar DG Audio Center utility.

-
If the icon could not be found in the system tray, go to the Windows Control Panel and double click the "Xonar DG Audio Center" icon to make it visible in the system tray again.
-
After the driver installation is complete, it's recommended that you reboot your computer to complete the setup. If the icon still doesn't appear, please try installing the driver package again.
I cannot hear any sound from my analog speakers
Instructions:
- Ensure that you have connected speakers properly and have powered on your speakers.
- Ensure that the device master volume or the software player has NOT been muted on the Xonar DG Audio Center.
-
Go to the sound and audio device of Windows Control Panel to check if the playback default device is set to Xonar DG Audio Device, instead of other onboard AC97 or HDA codec device. If it's not, please set it to Xonar DG Audio Device and restart your applications.
-
Try restarting your Windows.
I cannot hear any sound from the S/PDIF output
Instructions:
- Ensure that you have enabled S/PDIF output in the Audio Center GUI (Main page).
- Ensure that you are connecting the correct S/PDIF output jack on the card to the decoder's (AV receiver) S/PDIF input jack.
- You may need to select the correct input and mode of your decoder or AV receiver.
- If you are using 96KHz PCM output, please make sure your decoder can support 96KHz decoding. Try changing it to 44.1K or 48KHz first.
I cannot hear audio input (Mic, Line-in, AUX, etc.) from my speakers Instructions:
- Go to the mixer recording page in the Audio Center and select the correct input as the recording source. If you are using Windows Vista, also go to system audio control panel to see the current default recording/input device is right.
- Remember to turn on the digital monitoring button for that recording source.
I cannot hear the TV tuner audio from my speakers Instructions:
- If you are using a traditional TV tuner card which has analog audio output, please connect it to the Aux-In header on the audio card
- Select Aux-In as the recording source and remember to turn on the digital monitoring button on the recording mixer page
- If you are using a TV tuner card which has digital audio output instead of analog, check that the sound is not muted and whether other applications can play sound out. If you still have problem, read the TV tuner card's software user guide.
[FAQ]
Q1: Does the Xonar DG support Windows 7/Vista?
Answer:
Yes, the Xonar DG driver package does support Windows 7/Vista 32/64 bit and most key features are available. In addition, Xonar DG supports unique DS3D GX on Windows 7/Vista, which can recover DirectSound 3D hardware and EAX gaming sound effects on Windows 7/Vista for a lot of existing DirectX games.
Q2: Why does the Xonar DG support Dolby® Headphone?
Answer:
Dolby is the ONLY brand and technology recognized by the CE industry and available on a wide range of audio equipment. Xonar DG includes the feature to make your PC a powerful media and entertainment center.
Q3: Does the Xonar DG support EAX on Vista?
Answer:
Yes, Xonar DG can support the latest EAX on Windows 7/ Vista /XP through innovative DirectSound3D Game EXtensions v2.5 (DG3D GX 2.5) technology.
Q4: Why do I need Dolby Headpone for PC games?
Answer:
Dolby Headphone is the best 3D sound positioning, spatial modeling and 5.1-channel virtualization technology for regular stereo headphones and speaker headphones.
Q5: What is the most important benefit of the Xonar DG for gamers?
Answer:
- Headphone amplifier: Enables accurate sound positioning in superb quality for unparalleled gaming experience.
- Dolby headphone: Delivers a realistic and spacious 2-to-5.1 surround and 3D positional sound field over any set of stereo headphones.
- GX 2.5: Enables the latest EAX gaming audio and restore surround gaming in Windows Vista/7 without additional software.
Q6: Will PCM sound output through S/PDIF be just 2 channels even with different analog output channels?
Answer:
The S/PDIF protocol specification (IEC-60958) can only carry 2-channel PCM data or non-PCM AC3/DTS data. So, when a user selects PCM output for S/PDIF, the Xonar sound card will always deliver 2 channel PCM data through the S/PDIF output port.
Q7: Why can I hear and record sound from other recording devices when Wave/Digital is selected in Record on Vista?
Answer:
Different from Windows XP, Vista has a multiple devices/streams concept in audio structure, in which the concept can be categorized into Digital Input and Analog Input. In other words, multiple recording devices can be used and working at the same time. In this case, Wave In or SPDIF-In, considered as a Digital Input, is an independent recording device from Analog Devices such as Mic In, Line In, or Aux In. Therefore, if you have analog inputs other than Wave In and set to be monitored, you are able to hear and even record sound from those analog devices even Wave In / SPDIF-In is selected as the default recording device.
If you don't want to hear the analog input sounds at that situation, simply turn off "monitoring" function on other analog input devices.