E7799 Xonar Phoebus - Soundcard ASUS - Free user manual and instructions
Find the device manual for free E7799 Xonar Phoebus ASUS in PDF.

User questions about E7799 Xonar Phoebus ASUS
0 question about this device. Answer the ones you know or ask your own.
Ask a new question about this device
Download the instructions for your Soundcard in PDF format for free! Find your manual E7799 Xonar Phoebus - ASUS and take your electronic device back in hand. On this page are published all the documents necessary for the use of your device. E7799 Xonar Phoebus by ASUS.
USER MANUAL E7799 Xonar Phoebus ASUS
Copyright © 2012 ASUSTeK COMPUTER INC. All Rights Reserved.
No part of this manual, including the products and software described in it, may be reproduced, transmitted, transcribed, stored in a retrieval system, or translated into any language in any form or by any means, except documentation kept by the purchaser for backup purposes, without the express written permission of ASUSTeK COMPUTER INC. ("ASUS").
Product warranty or service will not be extended if: (1) the product is repaired, modified or altered, unless such repair, modification of alteration is authorized in writing by ASUS; or (2) the serial number of the product is defaced or missing.
ASUS PROVIDES THIS MANUAL "AS IS" WITHOUT WARRANTY OF ANY KIND, EITHER EXPRESS OR IMPLIED, INCLUDING BUT NOT LIMITED TO THE IMPLIED WARRANTIES OR CONDITIONS OF MERCHANTABILITY OR FITNESS FOR A PARTICULAR PURPOSE. IN NO EVENT SHALL ASUS, ITS DIRECTORS, OFFICERS, EMPLOYEES OR AGENTS BE LIABLE FOR ANY INDIRECT, SPECIAL, INCIDENTAL, OR CONSEQUENTIAL DAMAGES (INCLUDING DAMAGES FOR LOSS OF PROFITS, LOSS OF BUSINESS, LOSS OF USE OR DATA, INTERRUPTION OF BUSINESS AND THE LIKE), EVEN IF ASUS HAS BEEN ADVISED OF THE POSSIBILITY OF SUCH DAMAGES ARISING FROM ANY DEFECT OR ERROR IN THIS MANUAL OR PRODUCT.
SPECIFICATIONS AND INFORMATION CONTAINED IN THIS MANUAL ARE FURNISHED FOR INFORMATIONAL USE ONLY, AND ARE SUBJECT TO CHANGE AT ANY TIME WITHOUT NOTICE, AND SHOULD NOT BE CONSTRUED AS A COMMITMENT BY ASUS. ASUS ASSUMES NO RESPONSIBILITY OR LIABILITY FOR ANY ERRORS OR INACCURACIES THAT MAY APPEAR IN THIS MANUAL, INCLUDING THE PRODUCTS AND SOFTWARE DESCRIBED IN IT.
Products and corporate names appearing in this manual may or may not be registered trademarks or copyrights of their respective companies, and are used only for identification or explanation and to the owners' benefit, without intent to infringe.
Contents
Notices ...... v
Safety information ...... vi
Trademarks ...... vi
License ...... vi
- Introduction.... 1
1.1 Package Contents .... 1
1.2 System Requirements .... 1
1.3 General Specification.... 2
- About Hardware 4
2.1 Xonar Phoebus Audio Processing Card 4
- Installing the Xonar Hardware 6
3.1 Preparing Your Computer 6
3.2 Installing the Audio Processing Card 6
3.3 Connecting TV tuner card 8
- Installing Software 9
4.1 Installing the Audio Card Driver 9
4.2 Uninstalling or Reinstalling Software 9
- Connecting Speakers and Peripherals ....11
5.1 Connecting to Phoebus Control Box ....11
5.2 Connecting Digital Speaker Systems (Home Theater) .... 13
5.3 Connecting stereo headphones 14
5.4 Connecting Analog Speaker Systems 16
5.5 Connecting Microphone 21
5.6 Connecting Line-In audio sources 21
- Xonar Phoebus Driver Guide 23
6.1 Introduction to the Xonar Phoebus Audio Center GUI ..... 23
6.2 Speaker Function Introduction 25
6.3 Headphone Function Introduction 36
6.4 S/PDIF Function Introduction 46
6.5 Microphone Function Introduction 53
6.6 Line-in Device Function Introduction 61
6.7 Aux-in Device Function Introduction 64
6.8 Information Page Introduction 67
6.9 Tray Icon Function Introduction 67
Contents
7. Troubleshooting and FAQs 69
7.1 Troubleshooting 69
Notices
Federal Communications Commission Statement
This device complies with Part 15 of the FCC Rules. Operation is subject to the following two conditions:
• This device may not cause harmful interference, and
- This device must accept any interference received including interference that may cause undesired operation.
This equipment has been tested and found to comply with the limits for a Class B digital device, pursuant to Part 15 of the FCC Rules. These limits are designed to provide reasonable protection against harmful interference in a residential installation. This equipment generates, uses and can radiate radio frequency energy and, if not installed and used in accordance with manufacturer's instructions, may cause harmful interference to radio communications. However, there is no guarantee that interference will not occur in a particular installation. If this equipment does cause harmful interference to radio or television reception, which can be determined by turning the equipment off and on, the user is encouraged to try to correct the interference by one or more of the following measures:
• Reorient or relocate the receiving antenna.
- Increase the separation between the equipment and receiver.
- Connect the equipment to an outlet on a circuit different from that to which the receiver is connected.
- Consult the dealer or an experienced radio/TV technician for help.
Canadian Department of Communications Statement
This digital apparatus does not exceed the Class B limits for radio noise emissions from digital apparatus set out in the Radio Interference Regulations of the Canadian Department of Communications.
This class B digital apparatus complies with Canadian ICES-003.
Australia statement notice
From 1 January 2012 updated warranties apply to all ASUS products, consistent with the Australian Consumer Law. For the latest product warranty details please visit http://support.asus.com. Our goods come with guarantees that cannot be excluded under the Australian Consumer Law. You are entitled to a replacement or refund for a major failure and compensation for any other reasonably foreseeable loss or damage. You are also entitled to have the goods repaired or replaced if the goods fail to be of acceptable quality and the failure does not amount to a major failure.
If you require assistance please call ASUS Customer Service 1300 2787 88 or visit us at http://support.asus.com
Safety information
- Before installing the device on a motherboard, carefully read all the manuals that came with the package.
- To prevent electrical shock hazard or short circuits, switch off the power supply before installing the device on a motherboard or connecting any signal cables to the device.
- If the device is broken, do not try to fix it by yourself. Contact a qualified service technician or your retailer.
- Before using the product, make sure all cables are correctly connected. If you detect any damage, contact your dealer immediately.
- To avoid short circuits, keep paper clips, screws, and staples away from connectors, sockets and circuitry.
- Avoid dust, humidity, and temperature extremes. Do not place the product in any area where it may become wet.
- Place the product on a stable surface.
- If you encounter technical problems with the product, contact a qualified service technician or your retailer.

This symbol of the crossed out wheeled bin indicates that the product (electrical and electronic equipment) should not be placed in municipal waste. Check local regulations for disposal of electronic products.
Trademarks
Xonar and ASUS logo are trademarks of ASUSTek Computer Inc. "Dolby" and "Dolby Digital Live", "Dolby Pro Logic Ilx", "Dolby Virtual Speaker", "Dolby Headphone" are trademarks of Dolby Laboratories. "DTS" and "DTS CONNECT", "DTS Interactive", "DTS Neo: PC" are trademarks of Digital Theater Systems, Inc. EAX and A3D are trademarks of Creative Technology Ltd. Microsoft, DirectSound3D, Windows are trademarks of Microsoft Corporation. Other company and product names may be trademarks of the respective companies with which they are associated. ASIO is a trademark and software of Steinberg Media
Technologies GmbH.
License
Dolby Master Studio driver is manufactured under license from Dolby Laboratories; DTS Connect driver is manufactured under license from Digital Theater Systems, Inc.
1. Introduction
1.1 Package Contents
• Xonar ^TM Phoebus 7.1 Channel PCI Express Audio Card
• Phoebus Control Box
- Driver CD
• S/PDIF TOSLINK optical adaptor x1
• ATX 4P-to-6P Power Cable x1
- Quick Start Guide
1.2 System Requirements
• One PCI Express 1.0 (or higher) compatible slot for the audio card
- 6-pin peripheral power cable connector from your computer's power supply unit (PSU)
- Microsoft ^ Windows ^ Vista/Win 7 (32/64bit) / XP(32/64bit) / MCE2005
- Intel ^ Pentium ^ 4 1.4GHz or AMD Athlon 1400 CPU or faster CPU
• More than 256 MB system memory
- More than 60 MB available storage space for driver installation
- CD-ROM drive (or DVD-ROM drive) for software installation
- High-quality headphones, powered analog speakers, or a Dolby Digital decoder, to enjoy the audio card's high fidelity
1.3 General Specification
| Items Description | |
| Audio Performance | |
| Output Signal-to-Noise Ratio (A-Weighted) | 118dB for Front channel of Line-out112dB for other channels of Line-out110dB for Headphone-out with 600ohm load |
| Input Signal-to-Noise Ratio (A-Weighted): | 118dB |
| Output Total Harmonic Distortion + Noise at 1kHz (-3dB) : | 0.00039% (-108dB) for Front channel of Line-out0.00063% (-102dB) for other channels of Line-out0.0019% (-94dB) for Headphone-out with 600ohm load |
| Input Total Harmonic Distortion + Noise at 1kHz (-3dB) : | 0.0003% (-110dB) for Line-in |
| Frequency Response (-3dB, 24-bit/96kHz format): | < 10Hz to 46KHz |
| Output / Input Full-Scale Voltage 2 Vrms (5.65 Vp-p) | |
| Headphone Output Full-Scale Voltage | Up to 6.8 Vrms (supports headphones with up to 600ohms impedance) |
| Bus Compatibility | |
| PCI Express - PCI Express Rev.1.0a specification compatible- Max. full 2.5Gbps bandwidth per direction and optimized latency for high-definition audio processing- Compatible with x1, x4, x8, x16 PCI Express slots | |
| Main Chipset | |
| Audio Processor ASUS CM8888 HDT High-Definition Sound Processor(Max. 192KHz / 24bit) | |
| 24-bit D-A Converter of Digital Sources | Texas Instruments PCM1796 * 1 for Front-Out (123dB SNR, Max. 192kHz/24bit)Cirrus-Logic CS4362A * 1 for other 6 channels (114dB SNR, Max. 192kHz/24bit) |
| High Fidelity Headphone Amplifier Texas Instruments 6120A2*1 (120dB SNR, -117dB THD+N @ Vcc±12V, RL=600Ω, f=1kHz) | |
| 24-bit A-D Converter for Analog Inputs | Cirrus-Logic CS5381* 1 (120dB SNR, Max. 192kHz/24bit) |
| Sample Rate and Resolution | |
| Analog Playback Sample Rate and Resolution | 44.1K/48K/88.2K/96K/176.4K/192KHz @ 16/24bit |
| Analog Recording Sample Rate and Resolution | 44.1K/48K/88.2K/96K/176.4K/192KHz @ 16/24bit |
| S/PDIF Digital Output 44.1K/48K/88.2K/96K/176.4K/192KHz @ 16/24bit,Dolby Digital | |
(continued on the next page)
| Items Description | |
| I/O Ports | |
| Analog Output Jack 3.5mm jack * 1 (Headphone out) | |
| Analog Input Jack 3.5mm jack * 1 (Shared by Line-In / Mic-In) | |
| Digital S/PDIF Output High-bandwidth TOS-Link combo port supports 192KHz/24bit | |
| Other line-level analog input (for TV Aux-In (4-pin header on the card) Tuner or CD-ROM): | |
| Driver Features | |
| Operation System Windows Vista / Win 7(32/64bit) / XP(32/64bit) / MCE2005 | |
| Dolby® Digital Live Dolby Digital Live encodes any audio signal on PC in real-time to Dolby Digital (AC3) 5.1 surround sounds to your home theater environment through one single S/PDIF connection | |
| Dolby® Headphone Dolby Headphone technology allows users to listen to music, watch movies, or play games with the dramatic 5.1-channel surround or realistic 3D spacious effects through any set of stereo headphones. | |
| Dolby® Virtual Speaker Dolby Virtual Speaker technology simulates a highly realistic 5.1-speaker surround sound listening environment from as few as two speakers. | |
| Dolby® Pro-Logic IIxx Dolby Pro-Logic IIx is the well-known technology to process any native stereo or 5.1-channel audio into a 7.1-channel output, creating a seamless, natural surround soundfield. | |
| DirectSound3D Game EXtensions 3.0 | GX 3.0 supports EAX gaming sound effects and DirectSound 3D hardware enhanced functions for more games on Windows Vista/Win 7 & XP. (DirectX/ DirectSound 3D compatible) |
| Smart Volume NormalizerTM | Normalizes the volume of all audio sources into a constant level and also enhances your 3D sound listening range and advantages in gaming |
| FlexBassTM | Professional Bass Management / Enhancement system |
| Xear 3DTM Virtual Speaker Shifter Virtual 7.1 speaker positioning | |
| Other Effects 10-band Equalier / 27 Environment Effects | |
| ASIO 2.0 Driver Support: Supports 44.1K/48K/88.2K/96K/176.4K/192KHz @16/24bit with very low latency | |
*Specifications are subject to change without notice.
2. About Hardware
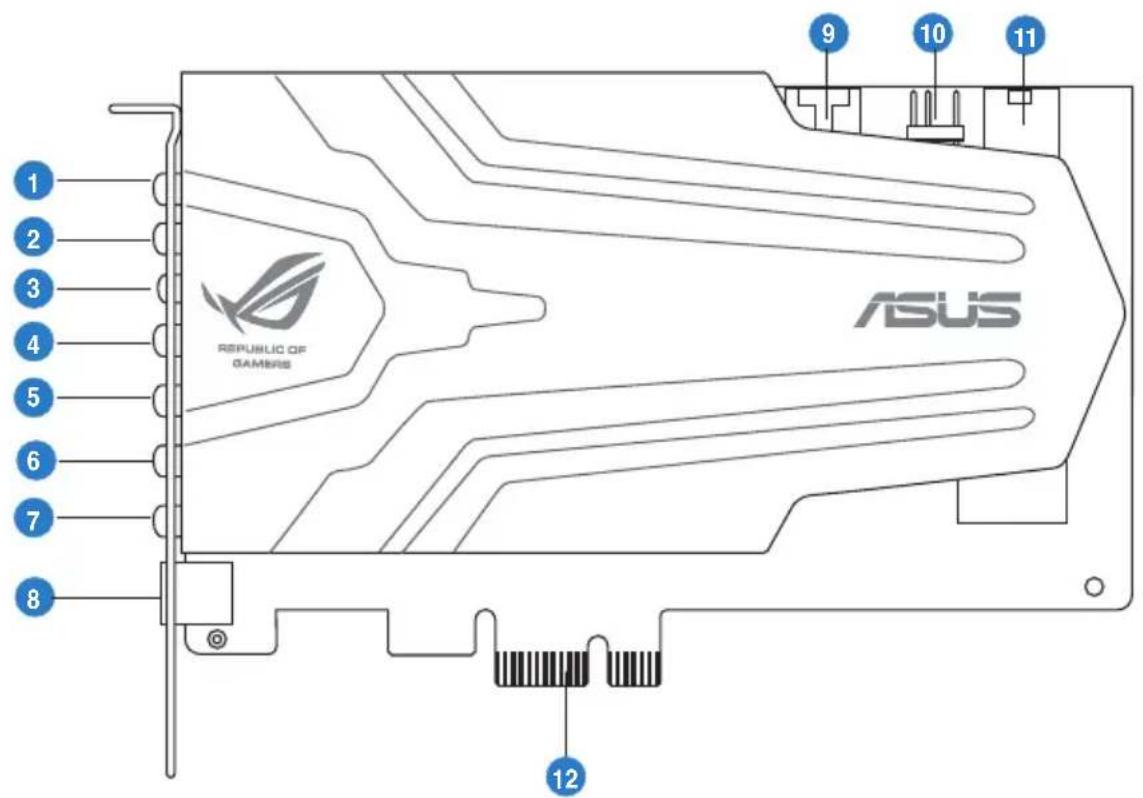
2.1 Xonar Phoebus Audio Processing Card
text_image
1 2 3 4 5 6 7 8 ASUS 9 10 11 REPUBLIC OF GAMMAS 12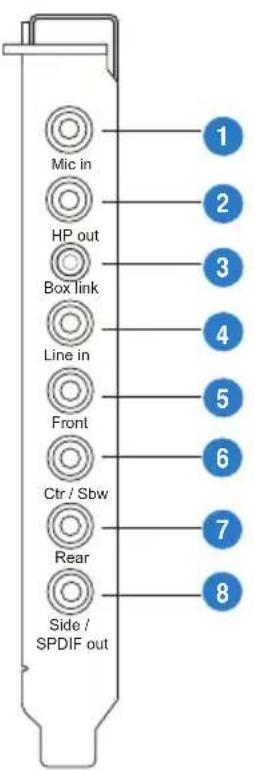
text_image
Mic in HP out Box link Line in Front Ctr / Sbw Rear Side / SPDIF out| No Item Description | ||
| 1 Microphone Input Port | Connect your external PC microphone to this 3.5mm jack for voice input. Built-in high-quality Microphone pre-amplifier. | |
| 2 Headphone Output Port | Connect your headphones to this jack. | |
| 3 Box Link | Connect the Xonar Phoebus Control Box to this 2.5mm port. | |
| 4 Line Input Port | Connect analog devices like MP3 players, CD players, music synthesizers, and other line-level sound sources to this 3.5mm jack for audio recording or processing. | |
| 5 Front Output Port | For 2 channel speaker systems, connects to the front left / right input on the powered speakers. | |
| 6 | Center/Subwoofer Out Port | Connect to the center / subwoofer input on 5.1/7.1 powered analog speakers. |
| 7 Rear Output Port | Connect to the back surround input on 7.1 powered analog speakers. | |
| 8 | S/PDIF Output / Side Out port | Digital output jack. Connect to an external digital decoder or digital speaker systems, Home Theater systems, AV receivers for outputting digital audio including PCM, Dolby Digital, DTS, WMA-Pro, etc. Connect to the surround channel input on 5.1 powered analog speakers. |
| 9 Aux Input Header | 4-pin header. Usually connects to the Analog Audio output of TV tuner card or other sound source inside your PC system. (To monitor your TV tuner card's audio from this Aux-In, you must enable the “monitor” function for Aux-In in the Xonar Audio Center software's recording mixer.) | |
| 10 S/PDIF Out Header | Connects to the graphics card with HDMI support. | |
| 11 | Power connector | Connects to the 6-pin power cable of your power supply unit. |
| 12 | PCI Express Bus Golden Fingers | Inserts into the PCI Express slot on your motherboard. |
3. Installing the Xonar Hardware
3.1 Preparing Your Computer

Before you proceed with the following installation steps, it's recommended that you disable your onboard audio device in your BIOS settings, or uninstall any other sound cards on your PC. (For BIOS setting or uninstallation of other sound cards, refer to the user manuals of your motherboard and sound card)
- Power OFF the computer, the monitor, and all other peripheral devices connected to your computer.
- Unplug the computer power cord from your computer and power outlet.
- Touch the metal back or side panel of the computer to avoid static electricity.
-
Remove the chassis cover.
-
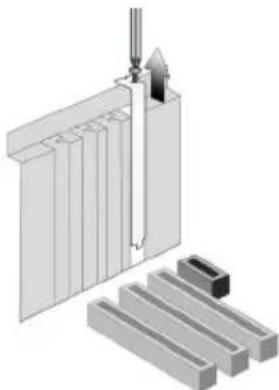
Remove the metal bracket from an available PCIE slot for the Xonar Phoebus audio card.
natural_image
Diagram of a mechanical assembly with a tool inserted into a block and multiple slanted components (no text or symbols)3.2 Installing the Audio Processing Card
- Face the bracket of the Xonar Phoebus audio card toward the back panel of your computer and insert the audio card gently into an available PCI Express slot. Make sure it's completely inserted into the PCI Express slot. (Warning! Do not force the audio card into the slot. Make sure that the gold pins of the card's PCI Express connector are aligned with the motherboard's PCI Express connector before you insert the card into the PCI Express slot. If it does not fit properly, gently remove it and try again.)

natural_image
Technical line drawing of a mechanical assembly with blue arrows indicating motion or force direction (no text or symbols)-
Secure the audio card bracket to the back of your computer with the screw that you removed. Refer to section 3.1.
-
Connect the power cable of your power supply to the power connector on the Xonar Phoebus audio card.
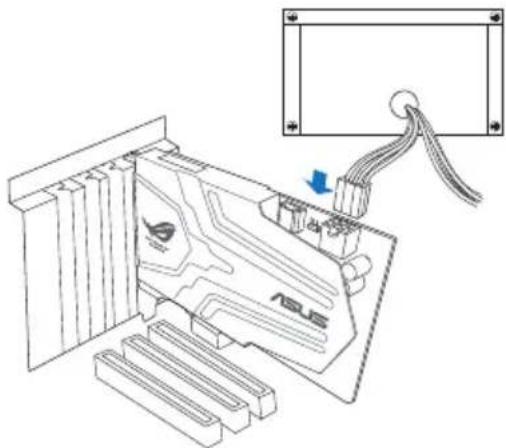
natural_image
Technical line drawing of an electronic device with a USB cable and labeled component (no text or symbols beyond the label)
The PCI Express high-quality audio card requires additional power from your computer. If the power cable is not connected properly, the audio card will not work at all.
3.3 Connecting TV tuner card
If you have a traditional PCI or PCI Express TV tuner card on your PC, you may need to connect it to the audio card to send the tuner card's sound to your PC speakers.
- Secure the PCI/PCI Express TV tuner card and screw it into the back-panel.
- Connect the audio output header from the TV tuner card to the Aux-In header of the audio card, as shown in the figure below.

For optimum TV audio quality, Xonar uses ADC recording to digitize the signal and loops it back to DAC playback. Please select Aux-In as the recording source in the Xonar Audio Center's recording mixer and enable the monitoring button to pass this signal to the audio output. Using this setup, you can even turn on sound effects such as Pro-Logic IIx to expand the stereo TV audio to 5.1 or 7.1 channel surround sound. TV audio on your PC will become even better than on your TV set!

natural_image
Technical line drawing of an electronic device chassis with connectors and wiring (no text or symbols)4. Installing Software
4.1 Installing the Audio Card Driver
-
After you have installed your audio card, turn on your computer. Windows automatically detects your audio card and searches for device drivers. When prompted for the audio drivers, click the Cancel.
-
Insert the Support CD into the optical drive. If Windows ® AutoPlay mode is enabled in your system, the setup starts automatically. If not, double-click the setup.exe from your Support CD.
-
Follow the onscreen instructions to finish the installation.

The version and content of the support CD are subject to change without notice.
4.2 Uninstalling or Reinstalling Software
4.2.1 Uninstalling Software
-
Click Start -> Settings -> Control Panel.
-
Double-click the Add/Remove Programs icon.
-
Click the Change or Remove Programs button.
-
Select each program you would like to remove, and then click the Add/Remove (or Change/Remove) button.

text_image
Control Panel Add to New Project From Now Add to Control Panel Add to New Project From Now Add to Control Panel Add to New Project From Now Add to Control Panel Add to New Project From Now Add to Control Panel Add to New Project From Now Add to Control Panel Add to New Project From Now Add to Control Panel Add to New Project From Now Add to Control Panel Add to New Project From Now Add to Control Panel Add to New Project From Now Add to Control Panel Add To New Project From Now Add To Control Panel Add To New Project From Now Add To Control Panel Add To New Project From Now Add To Control Panel Add To New Project From Now Add To Control Panel Add To New Project From Now Add To Control Panel Add To New Project From Now Add To Control Panel Add To New Project From Now Add To Control Panel Add To New Project From Now Add To Control Panel Add To New Project From Now Add To Control Panel All Options: 100% 466.0000000000000000000000000000000000000000000000000000000000000000000000000000000000000000000000000000 12378888888888888888888888888888888888888888888888888888888888888888888888888888888888888888888888888888 12379999999999999999999999999999999999999999999999999999999999999999999999999999999999999999999999999999 12371111111111111111111111111111111111111111111111111111111111111111111111111111111111111111111111111111 25672222222222222222222222222222222222222222222222222222222222222222222222222222222222222222222222222222-
In the InstallShield Wizard dialog box, select the Remove option.
-
Restart your computer when prompted.
4.2.2 Reinstalling Software
To reinstall the Xonar Phoebus card driver:
- Before reinstalling any software, it's recommended to uninstall the existing software first.
- After finishing the uninstallation of the software, please follow the installation process again to reinstall the same or updated software.
5. Connecting Speakers and Peripherals
5.1 Connecting to Phoebus Control Box
5.1.1 Connecting Phoebus Box
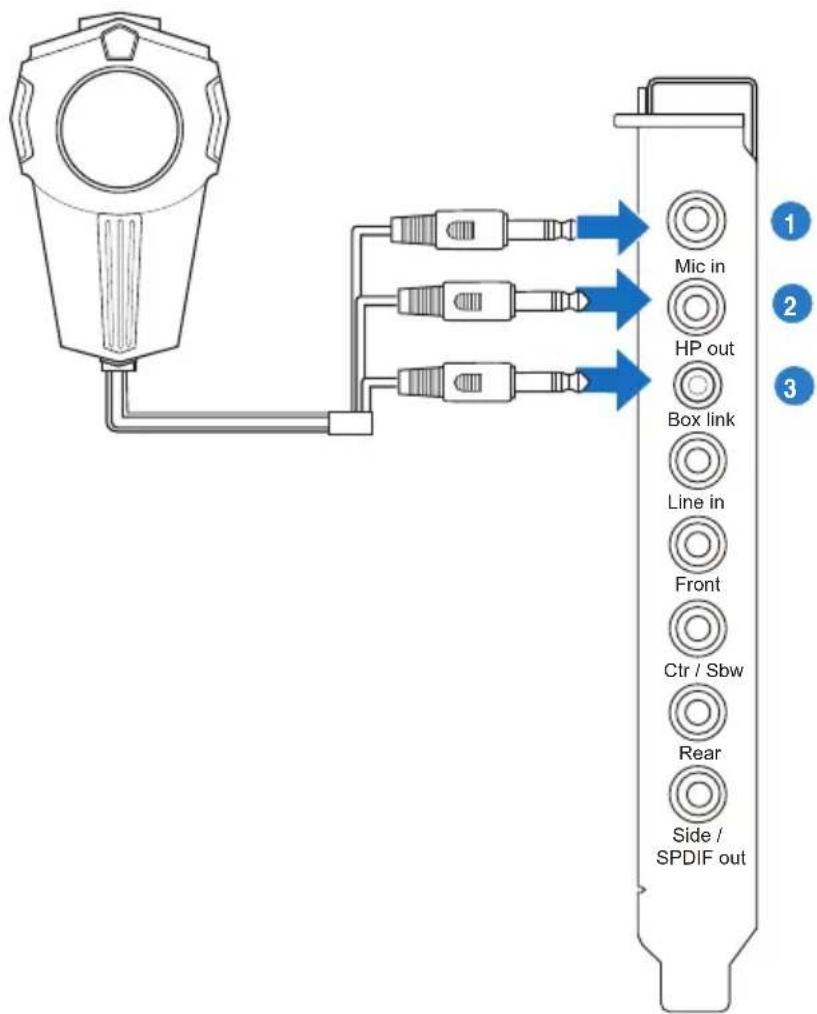
text_image
Mic in HP out Box link Line in Front Ctr / Sbw Rear Side / SPDIF out| No Item Description | |
| 1 Microphone Input Port | Connect the microphone's 3.5mm plug from the Phoebus Control Box into this Mic-In port for voice communication, recording or karaoke. |
| 2 Headphone Port | The headphone port has a built-in high-quality amplifier to drive headphones. Connect the Phoebus Control box directly to this port. |
| 3 Box Link Port | Connect the Phoebus Control box directly to this port. |
5.1.2 Connecting Phoebus Box with external headphone and microphone
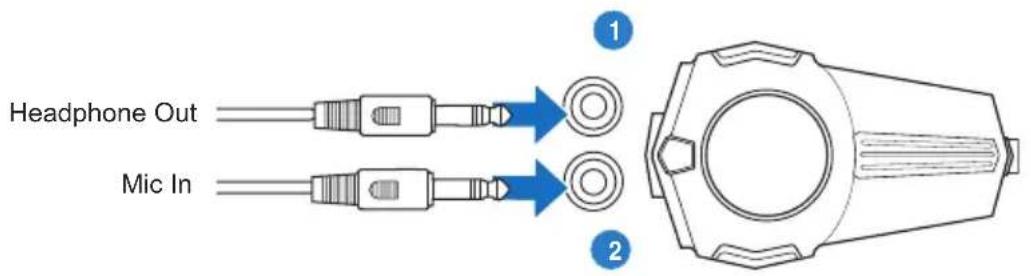
text_image
Headphone Out Mic In| No Item Description | |
| 1 Headphone Port | Connect headphone to headphone port on Phoebus Control box |
| 2 Microphone Input Port | Connect microphone's 3.5mm plug to Phoebus Control Box Mic-In port. |
5.2 Connecting Digital Speaker Systems (Home Theater)
Xonar Phoebus makes playback through your home theater system possible, creating an impressive surround sound experience. A single digital cable connection can carry high-quality digital audio from any of your PC audio sources to any digital speakers or AV Receivers.

flowchart
graph TD
    A["Speaker Array"] --> B["Front Left"]
    A --> C["Central"]
    A --> D["Subwoofer"]
    A --> E["Front Right"]
    B --> F["Ls Surround"]
    C --> G["Lb Surround"]
    D --> H["Rb Surround"]
    E --> I["Rs Surround"]
    J["Decoder Box"] --> K["Amplifier"]
    L["SpDIF / Side"] --> M["1"]
    M --> N["2"]
| No Item Description | ||
| 1 Optical | adapter | Plug the optical TOSLINK adapter into the S/PDIF-Out connector. |
| 2 Optical | cable | Connect your decoder's S/PDIF-In port to the optical adapter with the TOSLINK optical cable. |
5.3 Connecting stereo headphones
5.3.1 Connecting stereo headphones
Connecting stereo hadphones
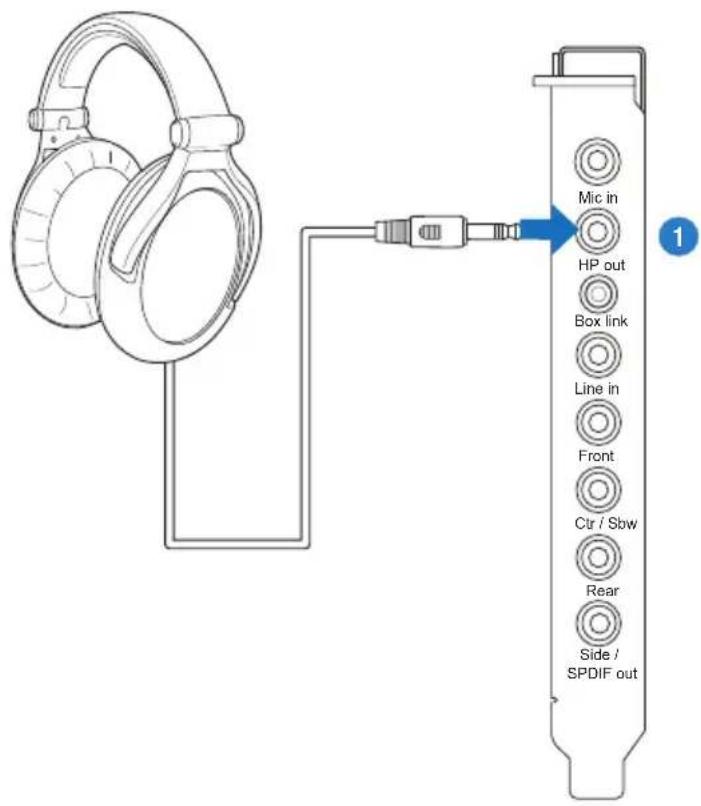
text_image
Mic in HP out Box link Line in Front Ctr / Sbw Rear Side / SPDIF out| No Item Description | |
| 1 Headphone Out Port | The Headphone Out Port has a built-in high-quality amplifier to drive headphones. Please connect your stereo headphones directly to this jack. |
Connecting 5.1 channel hadphones
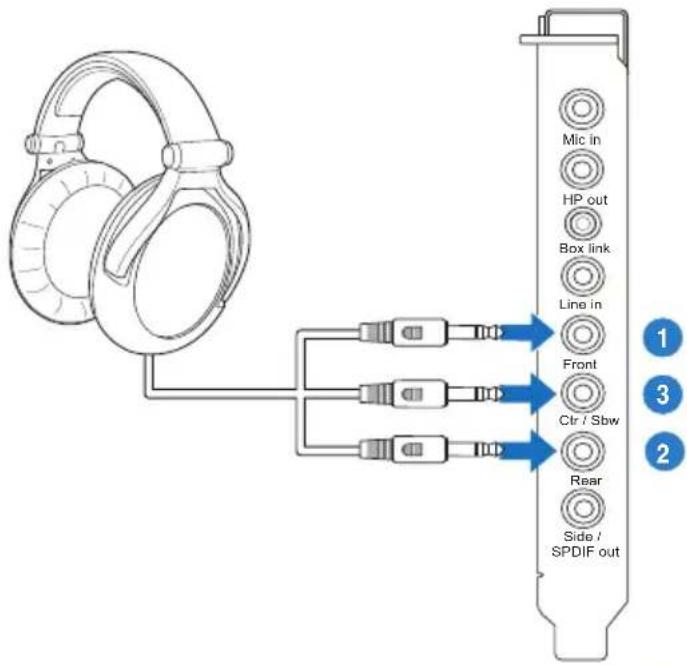
text_image
Mlc in HP out Box link Line in Front Ctr / Sbw Rear Side / SPDIF out| No Item Description | |
| 1 Front Out | Connect the front-channel 3.5mm plug of your 5.1 headphones into this jack. |
| 2 Back Surround Out | Connects to the Back Surround input port with the mini-jack cable. |
| 3 Center/Subwoofer Out | Connect the Center/Bass-channel 3.5mm plug of your 5.1 headphone into this jack. |
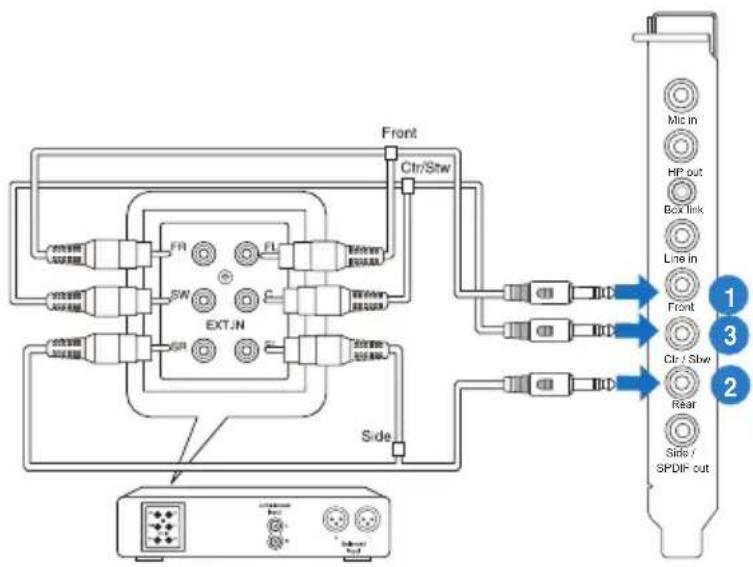
5.4 Connecting Analog Speaker Systems
5.4.1 Connecting Analog Power Amplifier
flowchart
graph TD
    A["Front"] --> B["Channel"]
    B --> C["Switch"]
    C --> D["External"]
    D --> E["SPDIF out"]
    F["Side"] --> G["External"]
    H["Front"] --> I["Channel"]
    I --> J["External"]
    J --> K["SPDIF out"]
    style A fill:#f9f,stroke:#333
    style F fill:#f9f,stroke:#333
    style H fill:#f9f,stroke:#333
    style B fill:#ccf,stroke:#333
    style C fill:#ccf,stroke:#333
    style D fill:#ccf,stroke:#333
    style E fill:#ccf,stroke:#333
    style G fill:#ccf,stroke:#333
    style I fill:#ccf,stroke:#333
    style J fill:#ccf,stroke:#333
    style K fill:#ccf,stroke:#333
    style_L["Micro"] --> M["Capacitor"]
    L --> N["Line"] --> O["Front"] --> P["Capacitor"]
    Q["Micro"] --> R["Capacitor"]
    S["Line"] --> T["Capacitor"]
    U["Micro"] --> V["Capacitor"]
| No Item Description | |
| 1 Front Out | Connects to the “left front” and “right front” input ports of the analog amplifier with the mini-jack to RCA cable. |
| 2 Back Surround Out | Connects to the Back Surround input port with the mini-jack cable. |
| 3 Center/Subwoofer | Connects to the “Center” and “subwoofer” input ports of the analog amplifier with the mini-jack to RCA cable. |
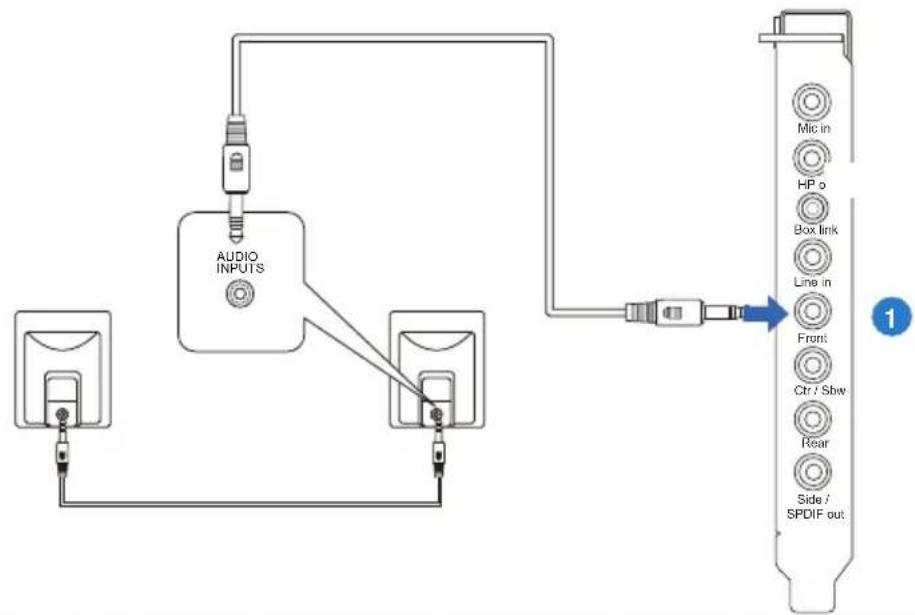
5.4.2 Connecting 2/2.1 Channel Speakers
2 Speakers
flowchart
graph TD
    A["Audio INPUTS"] --> B["Microphone"]
    B --> C["Microphone"]
    C --> D["Microphone"]
    D --> E["Spodial Out"]
    style A fill:#f9f,stroke:#333
    style E fill:#bbf,stroke:#333
| No Item Description | |
| 1 Front Out Port | Connect the 2 channel speaker set's 3.5mm plug into this Front Out jack. |
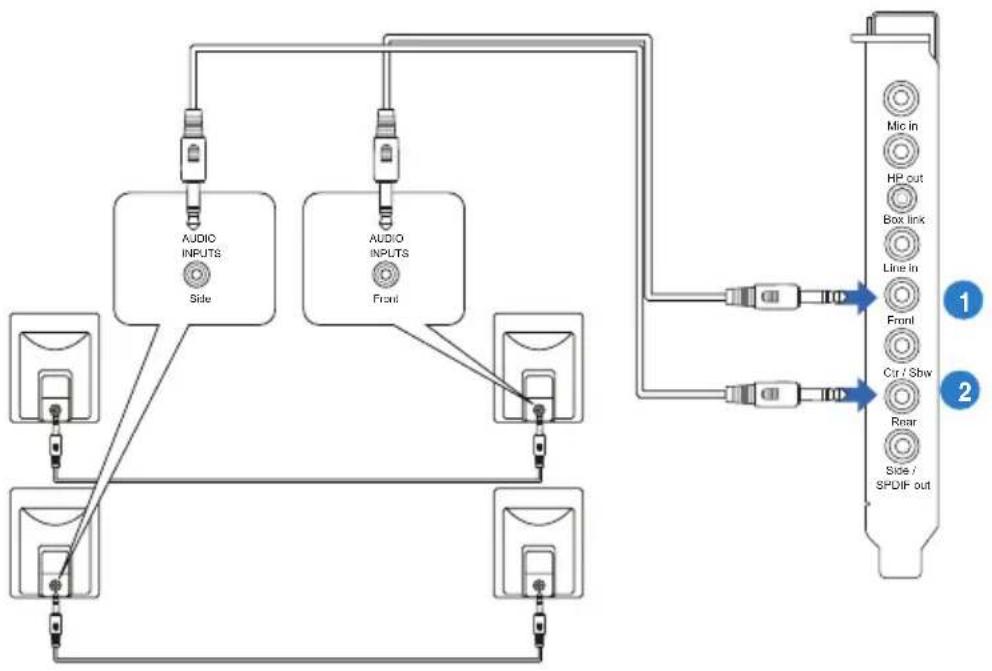
4 Speakers
flowchart
graph TD
    A["Audio INPUTS Side"] --> B["Audio INPUTS Front"]
    C["Audio INPUTS Side"] --> D["Audio INPUTS Front"]
    E["Audio INPUTS Side"] --> F["Audio INPUTS Front"]
    G["Audio INPUTS Side"] --> H["Audio INPUTS Front"]
    I["Audio INPUTS Side"] --> J["Audio INPUTS Front"]
    K["Audio INPUTS Side"] --> L["Audio INPUTS Front"]
    M["Audio INPUTS Side"] --> N["Audio INPUTS Front"]
    O["Audio INPUTS Side"] --> P["Audio INPUTS Front"]
    Q["Audio INPUTS Side"] --> R["Audio INPUTS Front"]
    S["Audio INPUTS Side"] --> T["Audio INPUTS Front"]
    U["Audio INPUTS Side"] --> V["Audio INPUTS Front"]
    W["Audio INPUTS Side"] --> X["Audio INPUTS Front"]
    Y["Audio INPUTS Side"] --> Z["Audio INPUTS Front"]
    AA["Audio INPUTS Side"] --> AB["Audio INPUTS Front"]
    AC["Audio INPUTS Side"] --> AD["Audio INPUTS Front"]
    AE["Audio INPUTS Side"] --> AF["Audio INPUTS Front"]
    AG["Audio INPUTS Side"] --> AH["Audio INPUTS Front"]
    AI["Audio INPUTS Side"] --> AJ["Audio INPUTS Front"]
    AK["Audio INPUTS Side"] --> AL["Audio INPUTS Front"]
    AM["Audio INPUTS Side"] --> AN["Audio INPUTS Front"]
    AO["Audio INPUTS Side"] --> AP["Audio INPUTS Front"]
    AQ["Audio INPUTS Side"] --> AR["Audio INPUTS Front"]
    AS["Audio INPUTS Side"] --> AT["Audio INPUTS Front"]
    AU["Audio INPUTS Side"] --> AV["Audio INPUTS Front"]
    AW["Audio INPUTS Side"] --> AX["Audio INPUTS Front"]
    AY["Audio INPUTS Side"] --> AZ["Audio INPUTS Front"]
    BA["Audio INPUTS Side"] --> BB["Audio INPUTS Front"]
    BC["Audio INPUTS Side"] --> BD["Audio INPUTS Front"]
    BE["Audio INPUTS Side"] --> BF["Audio INPUTS Front"]
    BG["Audio INPUTS Side"] --> BH["Audio INPUTS Front"]
    BI["Audio INPUTS Side"] --> BJ["Audio INPUTS Front"]
    BK["Audio INPUTS Side"] --> BL["Audio INPUTS Front"]
    BM["Audio INPUTS Side"] --> BN["Audio INPUTS Front"]
    BO["Mic in"] --> BP["Mic in"]
    BP --> BQ["HP out"]
    BQ --> BR["Box link"]
    BR --> BS["Line in"]
    BS --> BT["Front"]
    BT --> BU["Cir / Sbw"]
    BU --> BV["Rear"]
    BV --> BW["Side / SPDIF out"]
| No Item Description | |
| 1 Front Out | Connects to the Front input port of the 4/4.1 speakers with the mini-jack cable. |
| 2 Back Surround Out | Connects to the Back Surround input port with the mini-jack cable. |
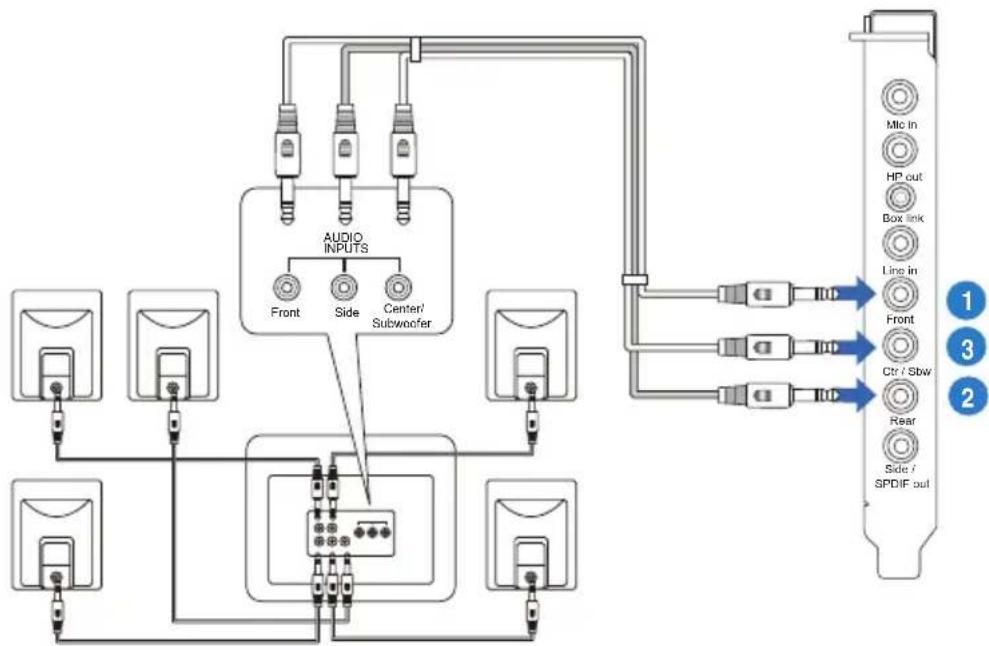
5.1 Speakers
flowchart
graph TD
    A["Audio Inputs"] --> B["Front"]
    A --> C["Side"]
    A --> D["Center/ Subwoofer"]
    E["Display Units"] --> A
    F["Audio Inputs"] --> G["Central Display Unit"]
    H["Audio Inputs"] --> I["Central Display Unit"]
    J["Audio Inputs"] --> K["Central Display Unit"]
    L["Audio Inputs"] --> M["Central Display Unit"]
    N["Audio Inputs"] --> O["Central Display Unit"]
    P["Audio Inputs"] --> Q["Central Display Unit"]
    R["Audio Inputs"] --> S["Central Display Unit"]
    T["Audio Inputs"] --> U["Central Display Unit"]
    V["Audio Inputs"] --> W["Central Display Unit"]
    X["Audio Inputs"] --> Y["Central Display Unit"]
    Z["Audio Inputs"] --> AA["Central Display Unit"]
    AB["Audio Inputs"] --> AC["Central Display Unit"]
    AD["Audio Inputs"] --> AE["Central Display Unit"]
    AF["Audio Inputs"] --> AG["Central Display Unit"]
    AH["Audio Inputs"] --> AI["Central Display Unit"]
    AJ["Audio Inputs"] --> AK["Central Display Unit"]
    AL["Audio Inputs"] --> AM["Central Display Unit"]
    AN["Audio Inputs"] --> AO["Central Display Unit"]
    AP["Audio Inputs"] --> AQ["Central Display Unit"]
    AR["Audio Inputs"] --> AS["Central Display Unit"]
    AT["Audio Inputs"] --> AU["Central Display Unit"]
    AV["Audio Inputs"] --> AW["Central Display Unit"]
    AX["Audio Inputs"] --> AY["Audio Inputs"]
    AZ["Audio Inputs"] --> BA["Audio Inputs"]
    BB["Audio Inputs"] --> BC["Audio Inputs"]
    BD["Audio Inputs"] --> BE["Audio Inputs"]
    BF["Audio Inputs"] --> BG["Audio Inputs"]
    BH["Audio Inputs"] --> BI["Audio Inputs"]
    BJ["Audio Inputs"] --> BK["Audio Inputs"]
    BL["Audio Inputs"] --> BM["Audio Inputs"]
    BN["Audio Inputs"] --> BO["Audio Inputs"]
    BP["Audio Inputs"] --> BQ["Audio Inputs"]
    BR["Audio Inputs"] --> BS["Audio Inputs"]
    BT["Audio Inputs"] --> BU["Audio Inputs"]
    BV["Audio Inputs"] --> BW["Audio Inputs"]
    BX["Audio Inputs"] --> BY["Audio Inputs"]
    BZ["Audio Inputs"] --> CA["Audio Inputs"]
    CB["Audio Inputs"] --> CC["Audio Inputs"]
    CD["Audio Inputs"] --> CE["Audio Inputs"]
    CF["Audio Inputs"] --> CG["Audio Inputs"]
    CH["Audio Inputs"] --> CI["Audio Inputs"]
    CJ["Audio Inputs"] --> CK["Audio Inputs"]
    CE1["Mic In"] --> AD
    CE2["HP out"] --> AD
    CE3["Box link"] --> AD
    CE4["Line in"] --> AD
    CE5["Front"] --> AD
    CE6["Ctr / Sbw"] --> AD
    CE7["Rear"] --> AD
    CE8["Side / SPDIF out"] --> AD
    AD1["Mic In"] --> AE
    AD2["HP out"] --> AE
    AD3["Box link"] --> AE
    AD4["Line in"] --> AE
    AD5["Ctr / Sbw"] --> AE
    AD6["Rear"] --> AE
    AD7["Side / SPDIF out"] --> AE
| No Item Description | |
| 1 Front Out | Connects to the Front input port of the 5.1 speakers with the mini-jack cable. |
| 2 Back Surround Out | Connects to the Back Surround input port with the mini-jack cable. |
| 3 Center/Subwoofer | Connects to the Center/Subwoofer input port of the 5.1 speakers with the mini-jack cable.. |
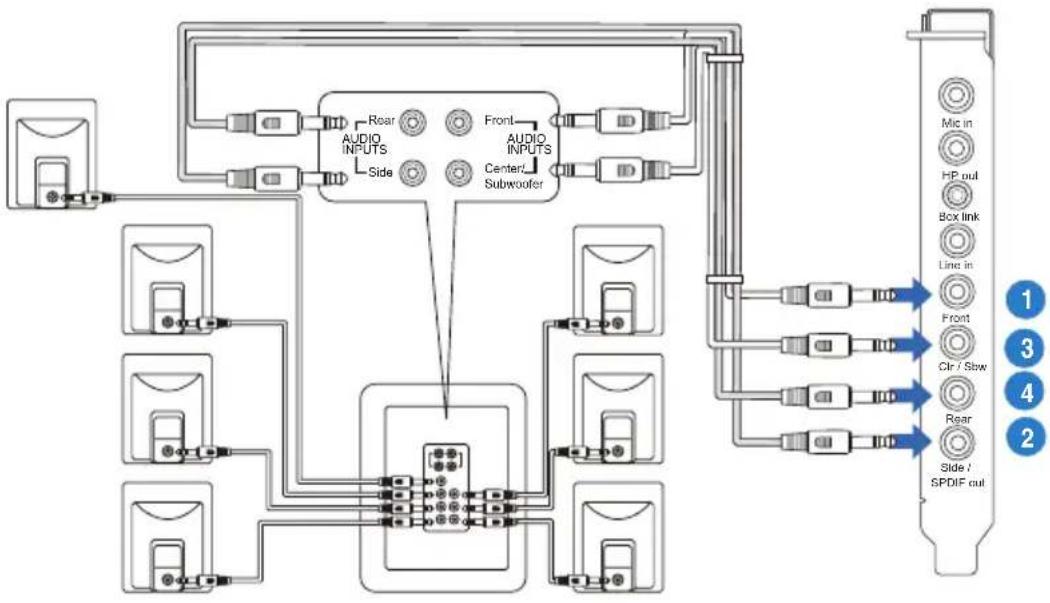
Connecting 7.1 channel speakers
7.1 speakers
flowchart
graph TD
    A["Input"] --> B["Audio INPUTS"]
    B --> C["Side"]
    C --> D["Central Audio Input"]
    D --> E["Front"]
    D --> F["Subwoofer"]
    D --> G["Audio INPUTS"]
    G --> H["Side"]
    H --> I["Output Unit"]
    I --> J["Mix in"]
    I --> K["HP out"]
    I --> L["Box link"]
    I --> M["Line in"]
    I --> N["Front"]
    I --> O["Clr / Slow"]
    I --> P["Rear"]
    I --> Q["Side / SPDIF out"]
| No Item Description | |
| 1 Front Out | Connects to the Front input port of the 7.1 speakers with the mini-jack cable. |
| 2 Side Surround Out | Connects to the Surround input port of the 7.1 speakers with the mini-jack cable. |
| 3 Back Surround Out | Connects to the Back Surround input port of the 7.1 speakers with the mini-jack cable. |
| 4 Center/Subwoofer | Connects to the Center/Subwoofer input port of the 7.1 speakers with the mini-jack cable. |
5.5 Connecting Microphone
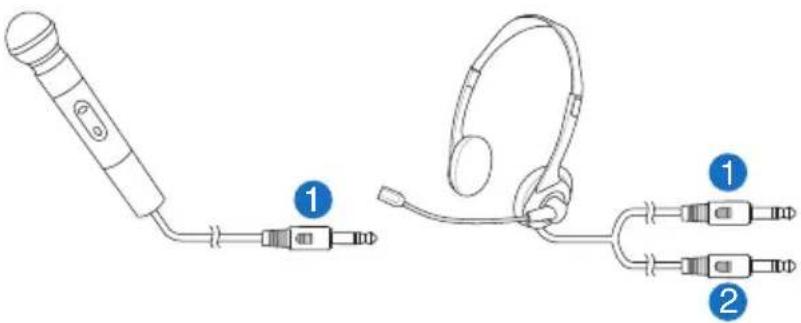
text_image
Diagram showing two types of audio/video ear devices with labeled parts, including a handheld device and a pair of headphones.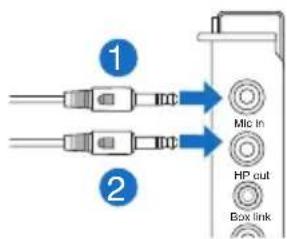
text_image
① ② Mic in HP cut Box link| No Item Description | |
| 1 Microphone Input Port | Connect the microphone's 3.5mm plug into this Mic-In port for voice communication, recording, or karaoke. |
| 2 Headphone Port | The headphone port has a built-in high-quality amplifier to drive headphones. Connect your stereo headphones directly to this jack. |
5.6 Connecting Line-In audio sources
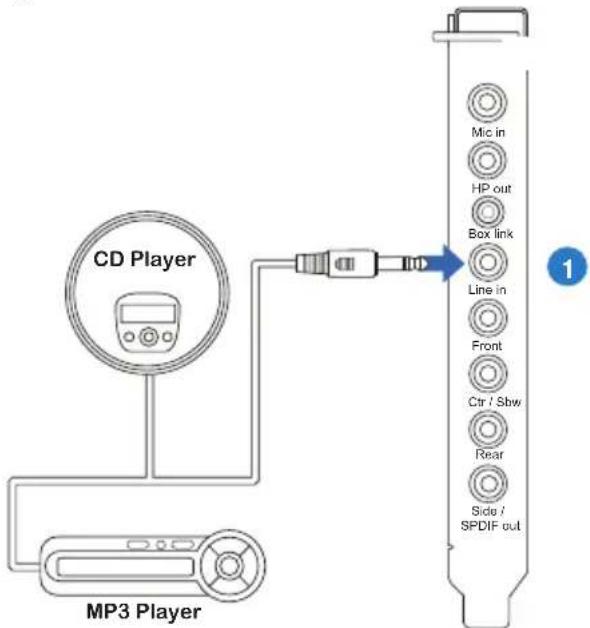
text_image
CD Player MP3 Player Mio in HP out Box link Line in Front Ctr / Sbw Rear Side / SPDIF out 1| No Item Description | |
| 1 Line Input Jack | Connect the 3.5mm plug of the CD/MP3 Player or any other Line level analog audio sources into this Line-In jack for sound recording. |
6. Xonar Phoebus Driver Guide
6.1 Introduction to the Xonar Phoebus Audio Center GUI
- After finishing the driver installation and rebooting your computer, you will find the Xonar Phoebus Audio Center's icon in the system tray on the bottom right-hand corner of the screen. Double click this icon to open the Xonar Audio Center utility.

text_image
AM 03:12
If the icon could not be found in the system tray, go to the Windows Control Panel and double click the "Xonar Phoebus Audio Center" icon.
6.1.1 Function Pop-up Menu
Xear Audio Center provides several sound effects. There is a pop menu for each output / input device and you can enter the sound effect page to enjoy music, movie and gaming.
To open the pop-up menu::
- Double-click the left button of the mouse on the Device icon.
- Left-click the mouse on the Device icon.
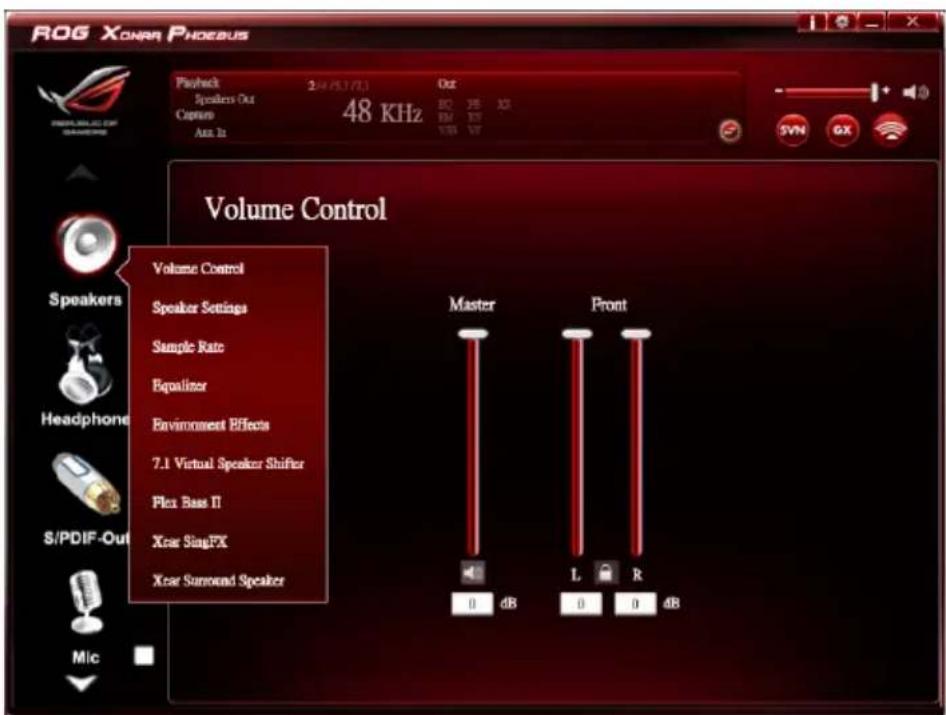
text_image
ROG XONAR PHOEBUS Playback 2:47.5.1/7.3 Speakers Out Capture 48 KHz Auto In Out BO 3B 3C BM 3F VSB 3V Volume Control Volume Control Speaker Settings Sample Rate Equalizer Environment Effects 7.1 Virtual Speaker Shifter Flex Bass II Xcar SingFX Xcar Surround Speaker Master Front 0 dB L R 0 0 4B S/PDIF-Out Mic6.1.2 Audio Status Panel
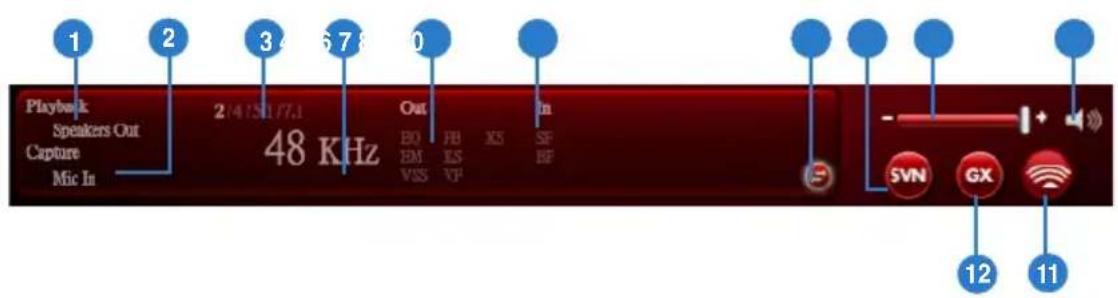
text_image
1 2 3 6 7 8 0 Playback Speakers Out Capture Mic In 2/4 ISI/7.1 48 KHz Out EQ BM VIS HB LS VF XS SF BF In - + - SVN GX 12 11| No Item Description | |
| 1 Playback (Speaker Out) | Indicates the output default device. |
| 2 Capture (Mic In) | Indicates the input default device. |
| 3 Speaker Numbers | Indicates the speaker numbers for Speaker device only. |
| 4 Sample Rate | Indicates the sample rate of playback sources. |
| 5 Audio Output effect indicator | Indicates the playback sound effect status.Abbreviation of Sound effect:EQ: EqualizerEM: Environment EffectsVSS: 7.1 Virtual Speaker ShifterFB: Flex Bass IIKS: Xear SingFX for key shiftingVF: Xear SingFX for vocal fadingXS: Xear Surround |
| 6 In effect indicator | Indicates the playback sound effect status.Abbreviation of Sound effect:SF: Xear SingFX for microphone echoSF: Xear SingFX for Magic Voice |
| 7 Switch to Profile Panel button | Click to switch the status bar to the Profile panel. |
| 8 Smart Volume Normalizer (SVN)(Vista / XP only) | Click to enable the SVN function. SVN is abbreviated from Smart Volume Normalization, which normalizes the volume of all audio sources into a constant level and also enhances your 3D sound listening range and advantages in gaming. |
| 9 Volume Adjust | Click to increase or decrease volume. |
| 10 Mute / Unmute | Click to mute or unmute a device. |
| 11 SonarMax | Click to enable SonarMax with amplified 3D/2D sounds. |
| 12 GX | Click to enable GX 2.0. |
6.1.3 Profile Panel
This profile panel for sound effect contains a preset mode and a user-defined mode.
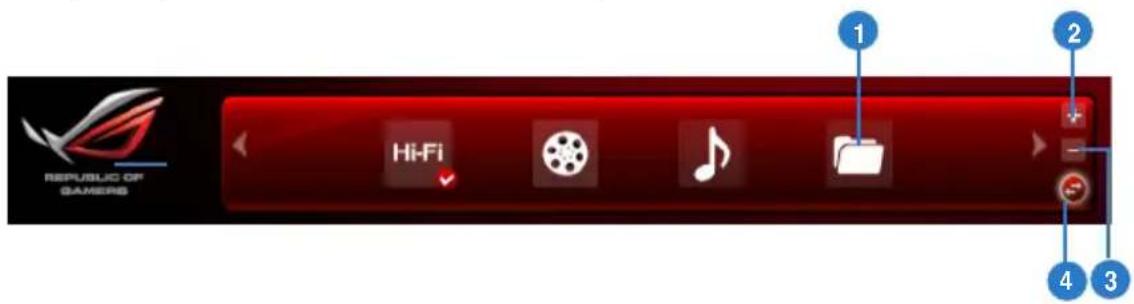
text_image
1 2 Hi-Fi 4 3| No Item Description | |
| 1 Profile Mode | Click to select the presets in profile mode. |
| 2 Add Profile | Adjust specific sound effects (EQ, EM etc...) settings and click “+” to create a user-defined mode. |
| 3 Delete Profile | Click to delete a user-defined mode. |
| 4 Switch Button | Click to switch between the Profile panel and Audio Status Panel. |
6.2 Speaker Function Introduction
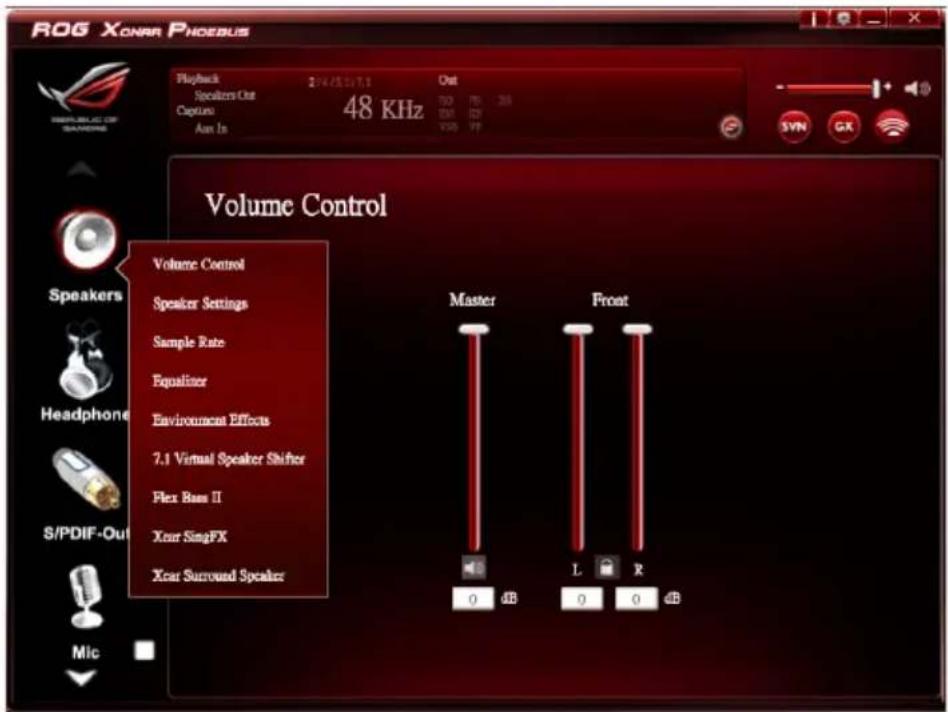
text_image
ROG XCNAR PHOEBUS Playback 2/4/5/17:1 Out Speakers Out Capture 48 KHz Aon In Volume Control Volume Control Speaker Settings Sample Rate Equalizer Environment Effects 7.1 Virtual Speaker Shifter Flex Bass II Xcar SingFX Xcar Surround Speaker Master Front 0 dB L R 0 0 0 dB Syn GX
Click the device icon on the right side to open the pop-up menu.
6.2.1 Dolby ® Home Theater (Windows® 7 Only)
Function Introduction

text_image
DOLBY HOME THEATER® v4 PROFILES MOVIE MUSIC GAME P1 Create a Custom Profile P2 Create a Custom Profile P3 Create a Custom Profile P4 Create a Custom Profile P5 Create a Custom Profile P6 Create a Custom Profile INTELLIGENT EQUALIZER GRAPHIC EQUALIZER G VOLUME LEVELER SURROUND VIRTUALIZER DIALOGUE ENHANCER HEADPHONES Dolly, Dolly Home Theater, and the double D-gemler are explained trademarks of Dolly Laboratories. ©2010 Dolly Laboratories. All rights reserved.
- The following items will be replaced by Dolby ^ Home Theater V4 under Windows ^ 7 Operating System.
- 7.1 Virtual Speaker Shifter
- 10-Band Equalizer
- Refer to Dolby's official manual for Dolby ^® Home Theater V4 functions.
6.2.2 Volume Control
Function Introduction
text_image
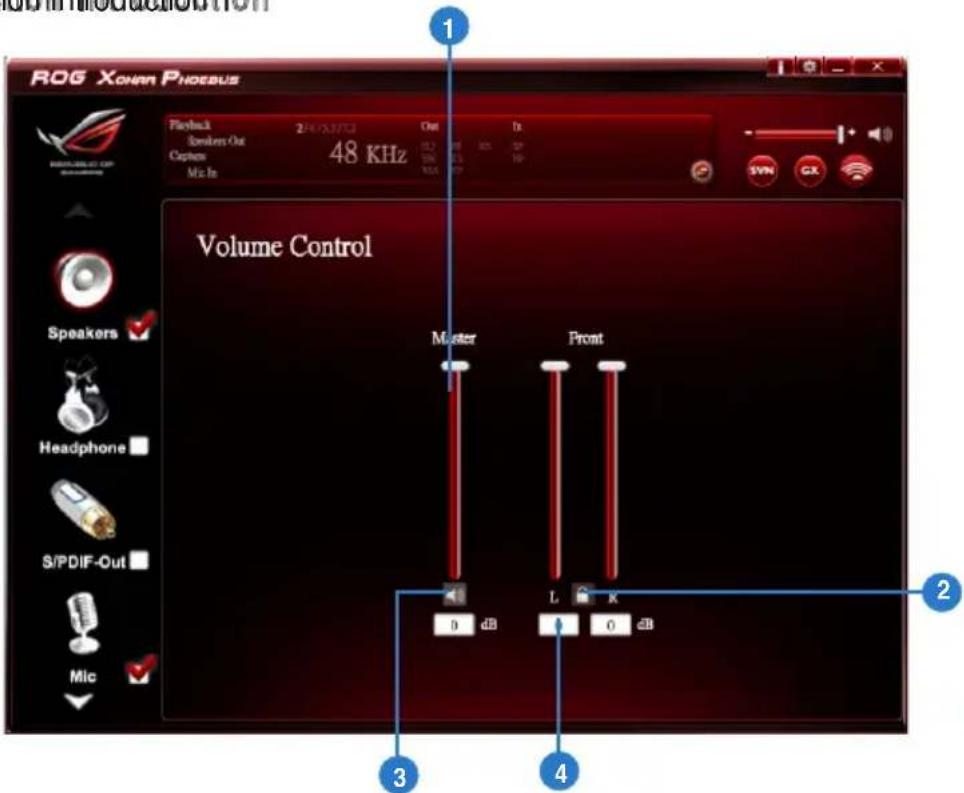
ROG XOHARA PNOEBUS Playback 2/4/23/23 Out Speaker Out Capcom 48 KHz Mic In Volume Control Speakers ✓ Headphone ✓ S/PDIF-Out ✓ Mic ✓ Master Front D dB L K O dB 2 3 4The function allows you to control the volume of the Speaker.
| No Item Description | |
| 1 Volume Control bar | Master – Adjust the volume level for all channels.Front - Adjust the volume level for the front channel. |
| 2 Left/ Right Channel Lock | Click to lock the left / right channel to sync L/R channel. |
| 3 Mute / Un-mute | Click to mute or ummute all channels. |
| 4 dB Input Area | Key in a dB value in this field to set the volume level. |
6.2.3 Speaker Setting
Function Introduction
text_image
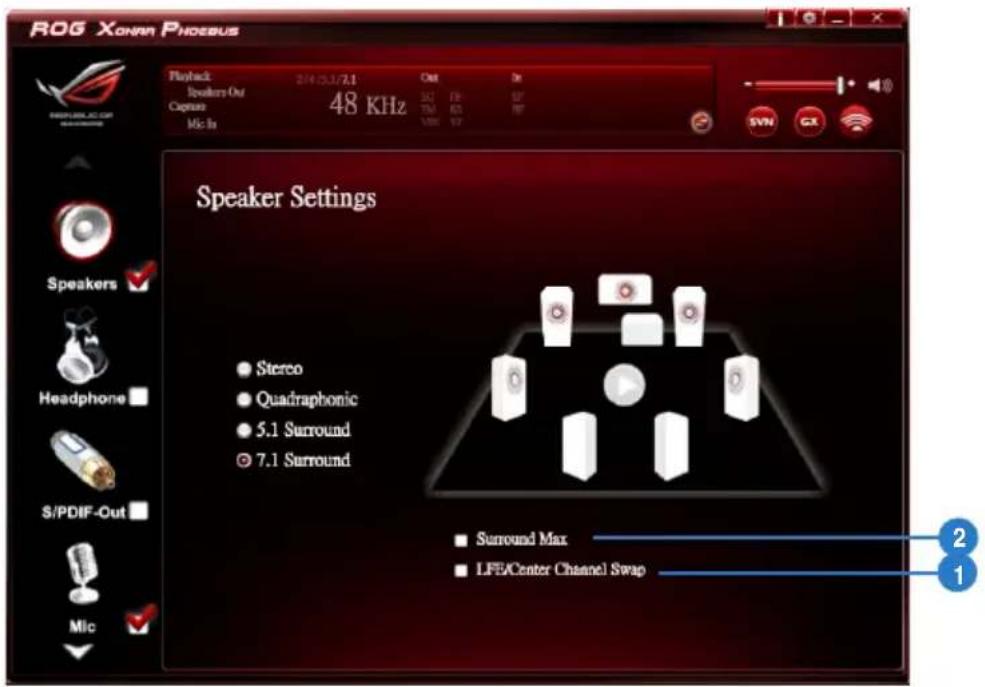
ROG XONNN PHOEBUS Playback: 2/4/03/21 Out Dr Speakers-Out Caputo 48 KHz TM 63 RF Mic In Vdc 57 Speaker Settings Speakers ✓ Headphone $/PDIF-Out Mic ✓ Stereo Quadraphonic 5.1 Surround 7.1 Surround Surround Max LFE/Center Channel Swap 2 1This function allows you to set the speaker numbers (stereo, quadraphonic, 5.1 surround, 7.1 surround).
| No Item Description | |
| 1 LFE / Center Channel Swap | When enabled, the function can swap the audio stream between Center/LFE. (Available for 5.1 and above) |
| 2 Surround Max | When enabled, the function allows the stereo to have the benefits of multi-surround effects. |
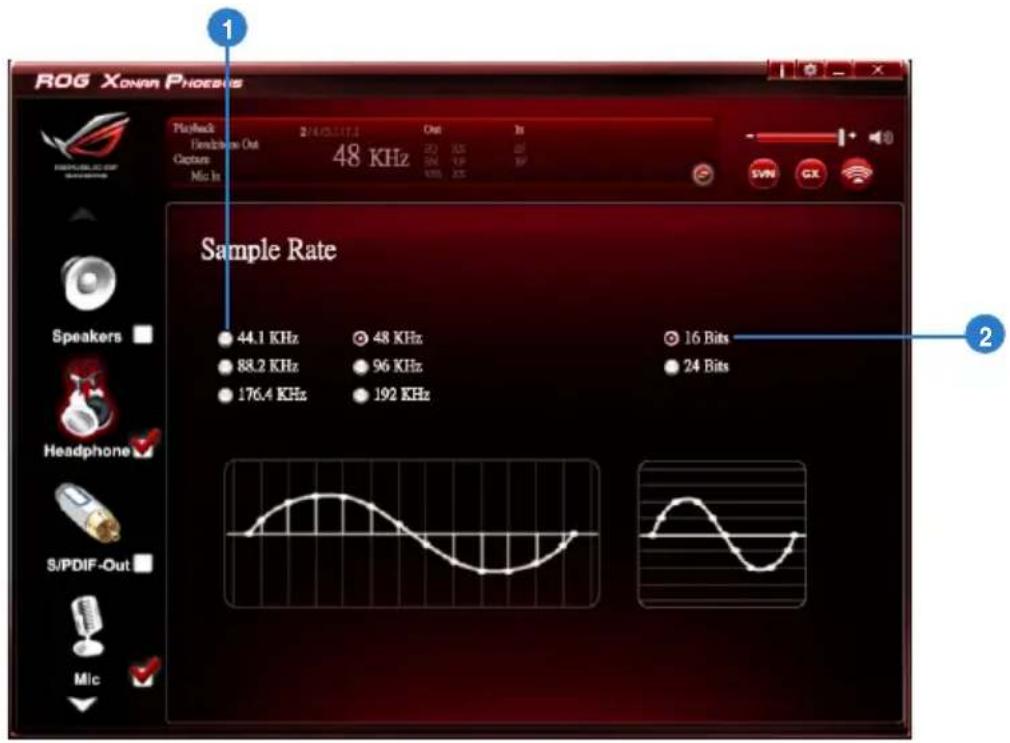
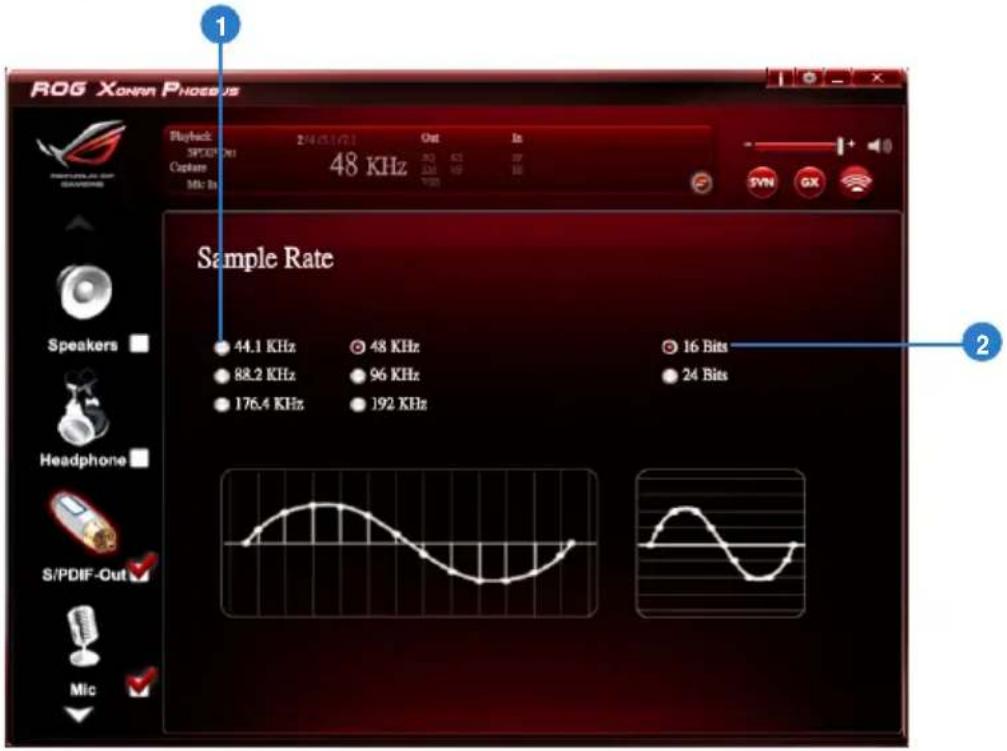
6.2.4 Sample Rate
Function Introduction
text_image
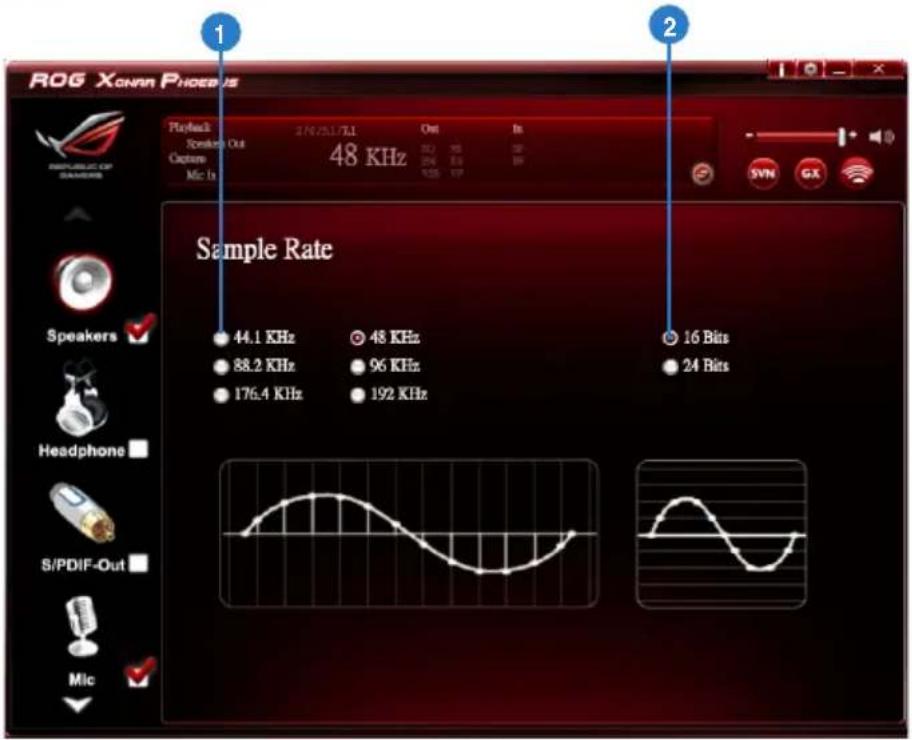
ROG XONAR PHOENIX 1 2 Sample Rate 44.1 KHz 48 KHz 88.2 KHz 96 KHz 176.4 KHz 192 KHz 16 Bits 24 BitsThis function allows you to set the sample rate for the Speaker.
| No Item Description | |
| 1 Sample Rate button | 44.1 KHz - set the playback sample rate to 44.1K48 KHz - set the playback sample rate to 48K88.2 KHz - set the playback sample rate to 88.2K96 KHz - set the playback sample rate to 96K176.4 KHz - set the playback sample rate to 176K192 KHz - set the playback sample rate to 192K |
| 2 Bit Depth button | 16bit - set the playback bit depth to 16bit24bit - set the playback bit depth to 24bit |
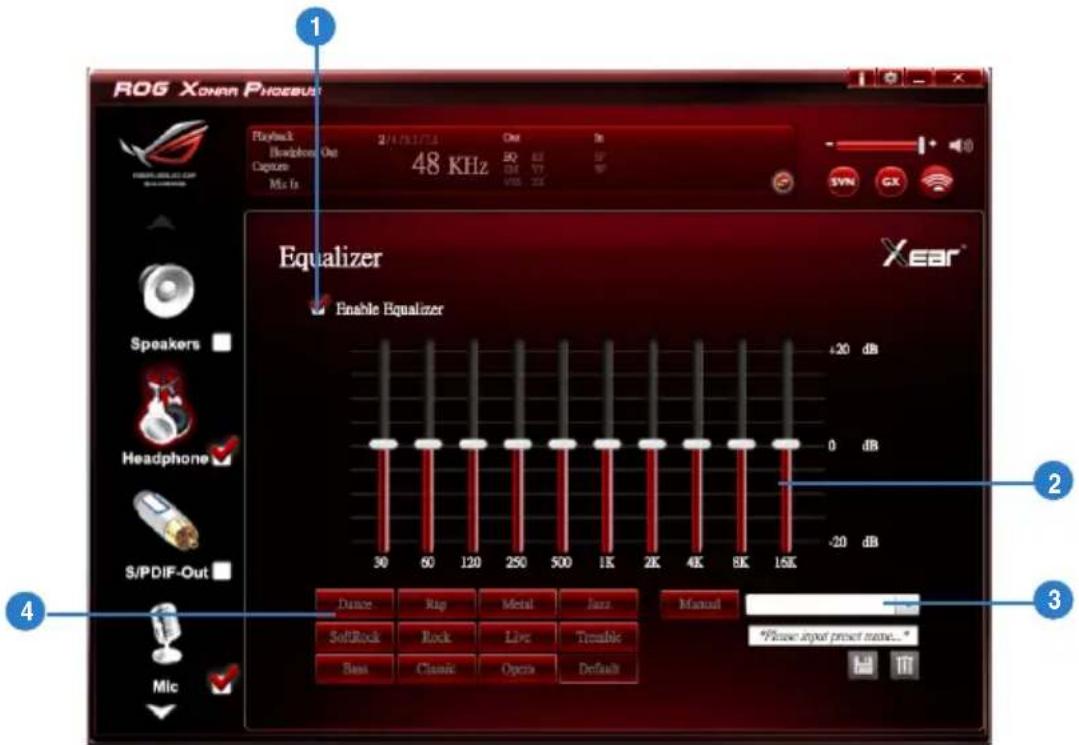
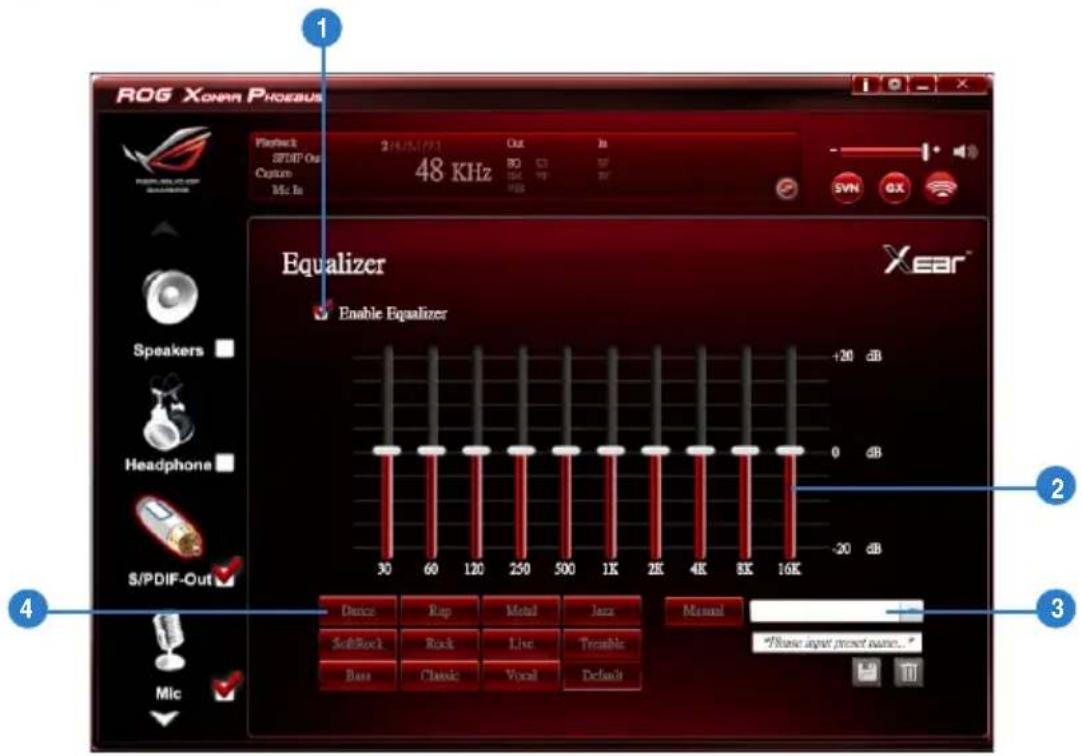
6.2.5 Equalizer
Function Introduction
text_image
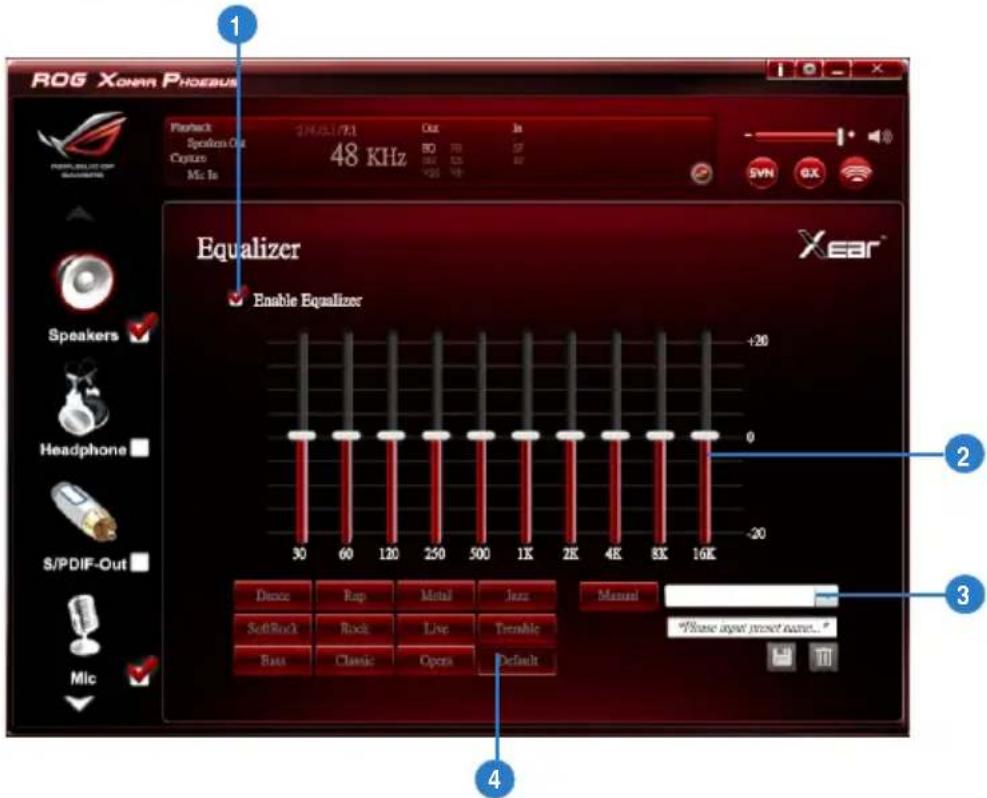
ROG XONNN PROEBUS Playback Spedion Out Capture MC: Ts 24/03/17/21 Out 50 Hz 60 Hz 70 Hz 80 Hz 90 Hz 48 KHz Equalizer Enable Equalizer Xear® Speakers ✓ Headphone ✓ S/PDIF-Out ✓ Mic ✓ -120 0 -20 30 60 120 250 500 1K 2K 4K 8K 16K Dance Rap Metal Jazz Manual SoftRock Rock Live Tremble *Please input preset name...* SaaS Classic Open DefaultThis 10-band EQ function allows you to adjust the EQ band manually and create customized preset items or click to select a preset EQ mode.
| No Item Description | |
| 1 EQ enable/disable switch | Click to enable / disable EQ. |
| 2 EQ band controller | Change the gain setting for each band (30/ 60/ 120/ 250/ 500/ 1K/ 2K/ 4K/ 8K/ 16K). |
| 3 Manual mode | Change the gain setting for each band, key in a name in the input field and then clicksaveto add your new setting. New setting will appear in the Manual Mode List. Clicktrashto delete settings. |
| 4 Preset mode | Select a preset mode for equalizer that is designed accordingly. There are 12 preset modes such as Bass, Treble, Live, Rock, Jazz, etc. |
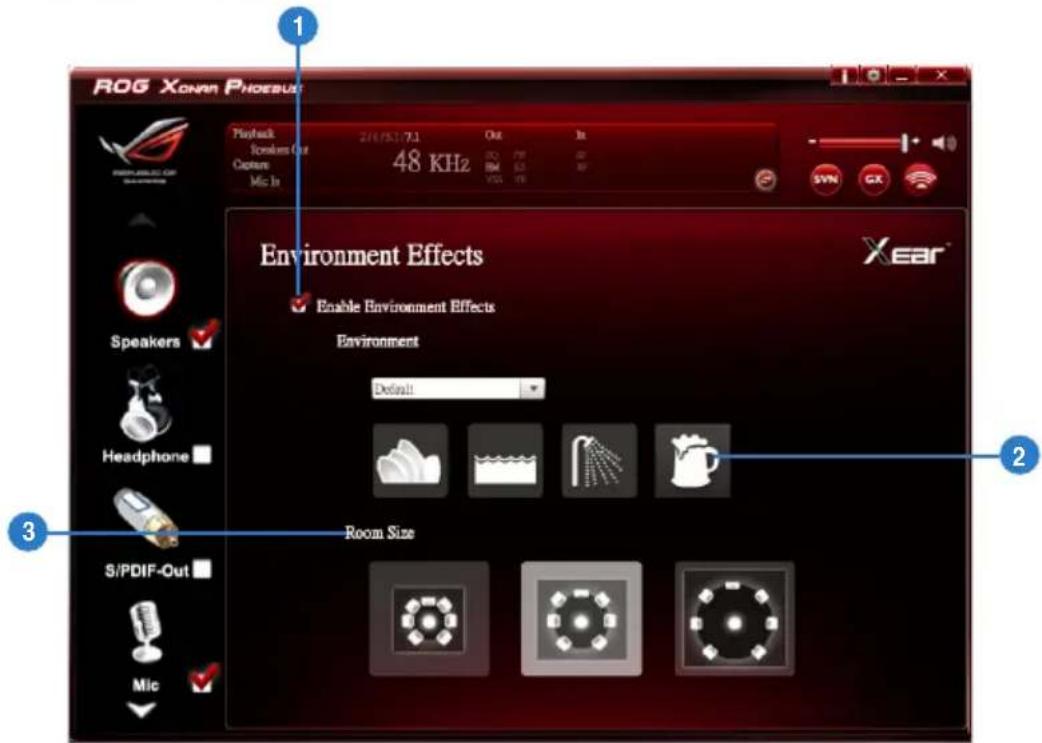
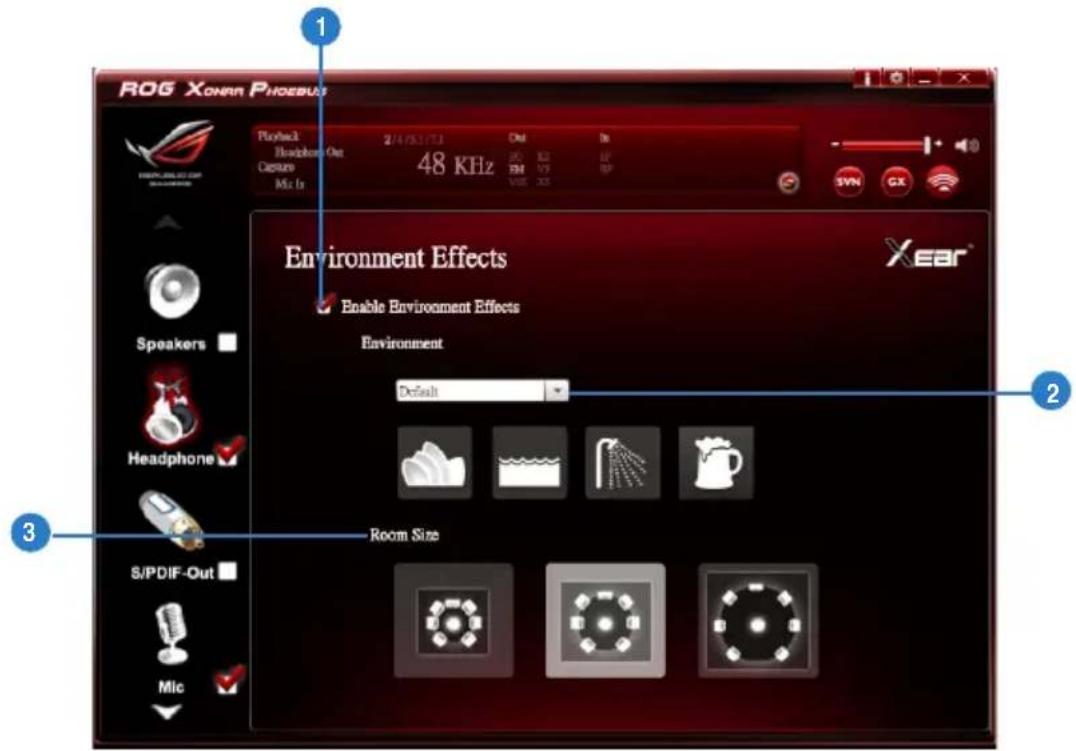
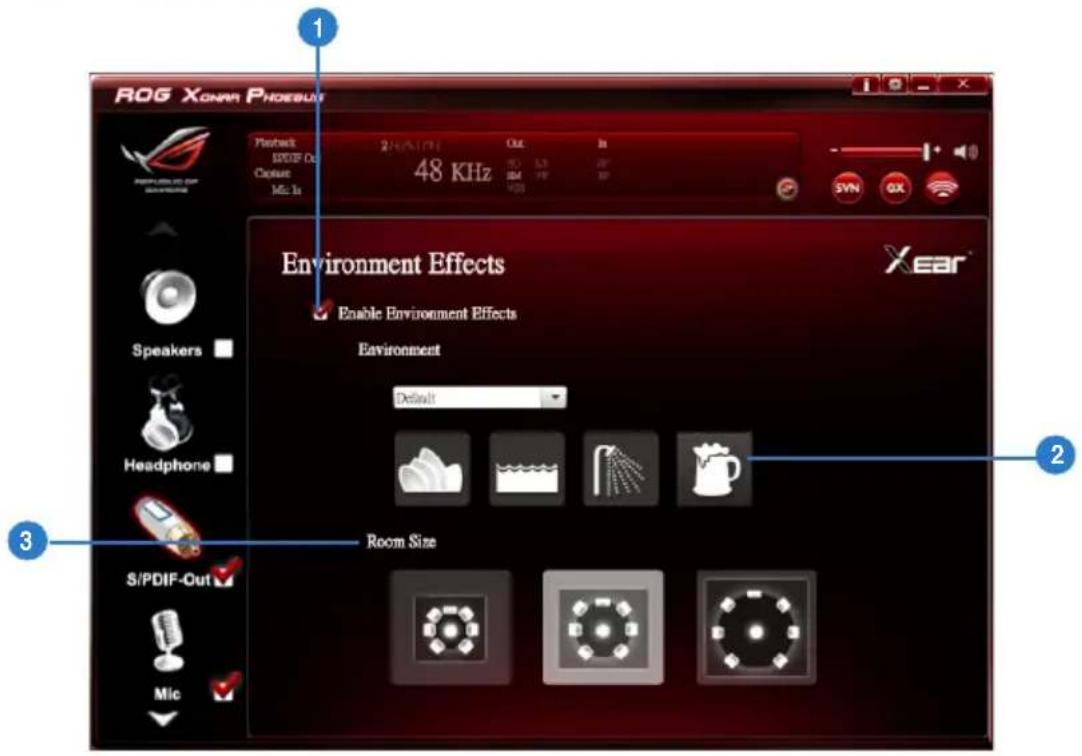
6.2.6 Environment Effect
Function Introduction
text_image
ROG XONAR PHOEBUS Playback Speaker Out 48 KHz OK In 26/51/7.1 30 79 42 Capto: BM 62 30 Mic In SYNC GX Environment Effects Enable Environment Effects Environment Default Room Size Speakers ✓ Headphone ✓ S/PDIF-Out ✓ Mic ✓ 2 3This function provides 28 special environment emulations for different sound reflections and revweberation.
| No Item Description | |
| 1 Environment Effect enable/disable switch | Click on the check box to enable / disable Environment Effect. |
| 2 Environment Effect mode | Click on an Environment Effect button or drop the dropdown list to choose an Environment Effect. |
| 3 Room Size | Change the Room Size icon to simulate a larger or smaller space. |
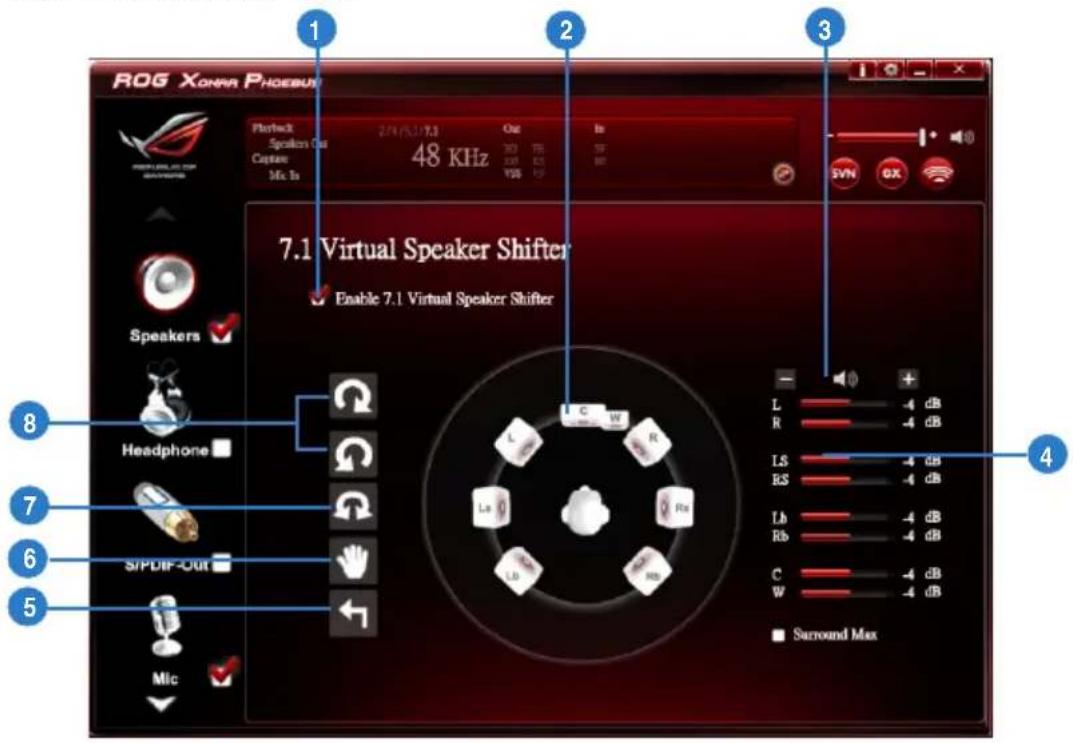
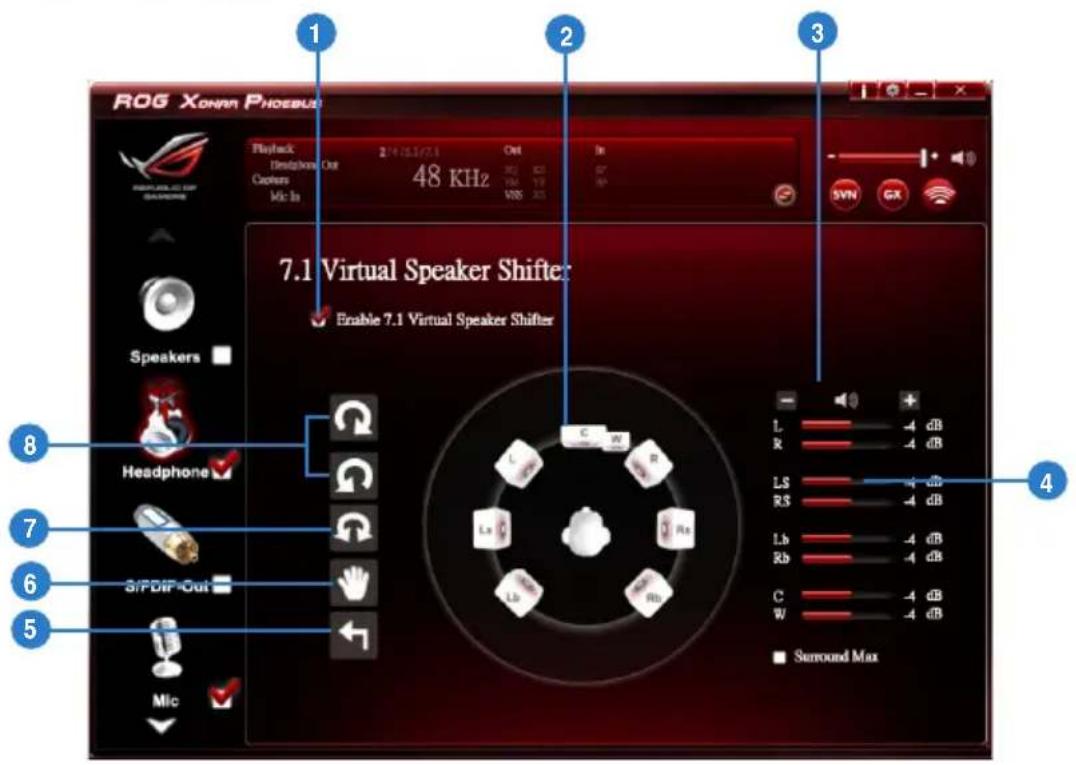
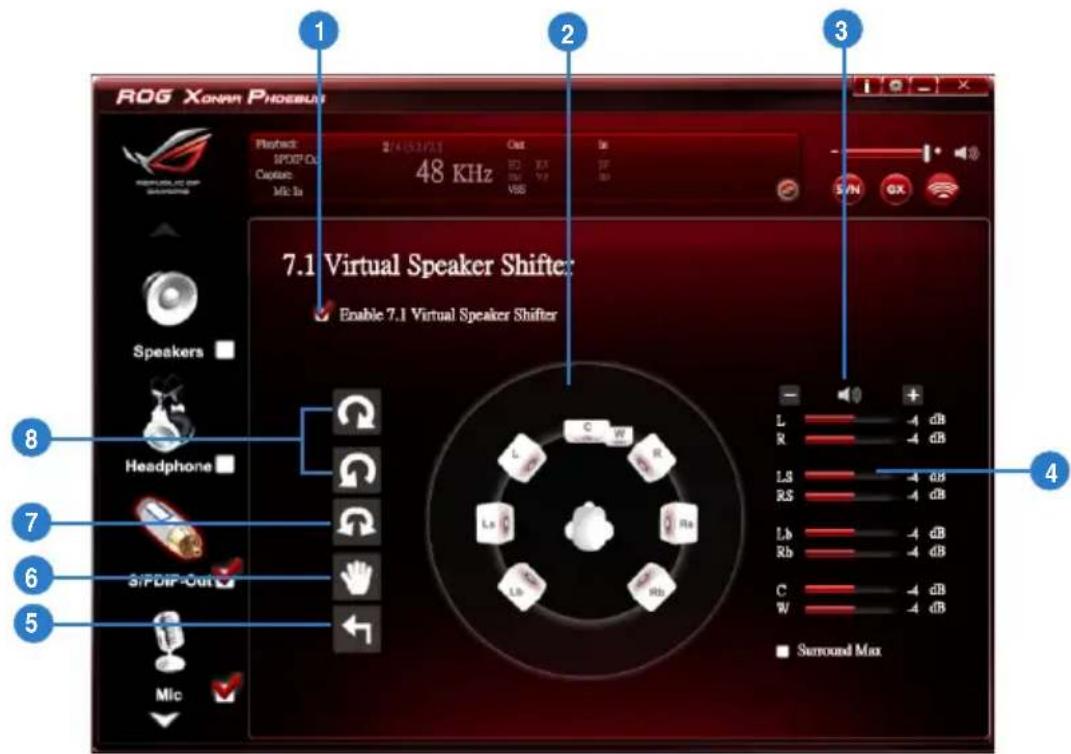
6.2.7 7.1 Virtual Speaker Shifter
Function Introduction
text_image
ROG XONAR PHOEBUS 1 2 3 4 5 6 7 8 9 10 11 12 13 14 15 16 17 18 19 20 21 22 23 24 25 26 27 28 29 30 31 32 33 34 35 36 37 38 39 40 41 42 43 44 45 46 47 48 KHz 49 VDD/10VDD 2.74 VDD/10VDD Out In 48 VDD 30 VDD 70 VDD 10 VDD 15 VDD 20 VDD 25 VDD 30 VDD 35 VDD 40 VDD 45 VDD 50 VDD 55 VDD 60 VDD 65 VDD 70 VDD 75 VDD 80 VDD 85 VDD 90 VDD 95 VDD 100 VDD 105 VDD 110 VDD 115 VDD 120 VDD 125 VDD 130 VDD 135 VDD 140 VDD 145 VDD 150 VDD 155 VDD 160 VDD 165 VDD 170 VDD 175 VDD 180 VDD 185 VDD 190 VDD 195 VDD 200 VDD 205 VDD 210 VDD 215 VDD 220 VDD 225 VDD 230 VDD 235 VDD 240 VDD 245 VDD 250 VDD 255 VDD 260 VDD 265 VDD 270 VDD 275 VDD 280 VDD 285 VDD 290 VDD 295 VDD 300 VDD 305 VDD 310 VDD 315 VDD 320 VDD 325 VDD 330 VDD 335 VDD 340 VDD 345 VDD 350 VDD 355 VDD 360 VDD 365 VDD 370 VDD 375 VDD 380 VDD 385 VDD 390 VDD 395 VDD 400 VDD 405 VDD 410 VDD 415 VDD 420 VDD 425 VDD 430 VDD 435 VDD 440 VDD 445 VDD 450 VDD 455 VDD 460 VDD 465 VDD 470 VDD 475 VDD 480 VDD 485 VDD 490 VDD 495 VDD 500 VDD 505 VDD 510 VDD 515 VDD 520 VDD 525 VDD 530 VDD 535 VDD 540 VDD 545 VDD 550 VDD 555 VDD 560 VDD 565 VDD 570 VDD 575 VDD 580 VDD 585 VDD 590 VDD 595 VDD 600 VDD 605 VDD 610 VDD 615 VDD 620 VDD 625 VDD 630 VDD 635 VDD 640 VDD 645 VDD 650 VDD 655 VDD 660 VDD 665 VDD 670 VDD 675 VDD 680 VDD 685 VDD 690 VDD 695 VDD 700 VDD 705 VDD 710 VDD 715 VDD 720 VDD 725 VDD 730 VDD 735 VDD 740 VDD 745 VDD 750 VDD 755 VDD 760 VDD 765 VDD 770 VDD 775 VDD 780 VDD 785 VDD 790 VDD 795 VDD 800 VDD| No Item Description | |
| 1 7.1 Virtual speaker shifter enable/disable switch | Click on the check box to enable / disable 7.1 Virtual Speaker to simulate the speaker direction and distance. |
| 2 Virtual Speaker (L/R/Ls/Rs/Lb/Rb/C/W) | Each virtual speaker virtualizes one channel of the 7.1 channel speakers in the real world. |
| 3 Volume Control | Each virtual speaker virtualizes one channel of the 7.1 channel speakers in the real world. |
| 4 Volume indicator | Indicate the volume of each channel. |
| 5 Reset | Reset the location of virtual speakers / virtual listener to default. |
| 6 Manual Shifting (Free Moving Mode) | Use the pointer to click and drag to move the location of individual virtual speakers. |
| 7 Manually Rotation Mode | Use mouse to rotate the virtual speakers on the screen manually. |
| 8 Auto Rotation Mode | The virtual speakers rotate clockwise or counterclockwise slowly. |
6.2.8 Flex Bass II
Function Introduction

text_image
ROG Xonnn Phoenix Playback ResAudio Out Capture Mic In 3/10/2017.1 48 KHz Out DC SM AS PS In 2 SYN GX Flex Bass II Enable FlexBass Cut off frequency 50 100 150 200 250 Hz -12 12 dB Speaker Headphone S/PDIF-Out Mic Lx/Rb C La/Ra Small speaker w/o bus Small speaker w/o bus Small speaker w/o bus Small speaker w/o busThis function allows you to increase / decrease the LFE strength. This function would cut the low frequency band (50\~250Hz) of stereo music content (eg. Mp3, WMA, CD Audio) and transfer to subwoofer or each speaker.
| No Item Description | |
| 1 Flex Bass II enable/ disable switch | Click on this check box to enable / disable Flex Bass II. |
| 2 Bass Level | The bass level range is from -12 to 12dB. |
| 3 Speaker Size | Small Speaker w/o bassWhen the speaker size is set to small, you can hear the sound resonance more obvious and reverberation from subwoofer. |
| 4 Speaker Diagram | You can also check the speaker size from this home theater diagram. |
| 5 Cut Off Frequency | The cut off range of low frequency is from 50Hz to 250Hz. |
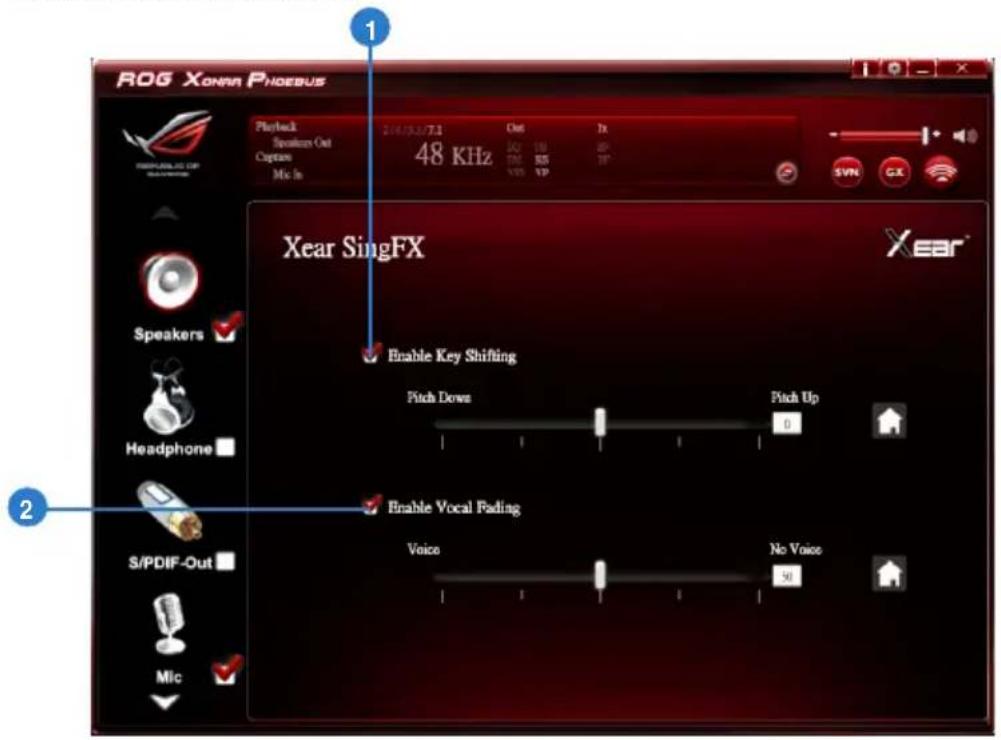
6.2.9 Xear SingFX
Function Introduction
text_image
ROG XONAR PHOESUS Playback Speaker Out Captam Mix In 24/15.3/7.1 48 KHz Out JX JQ 10 SP TRE 55 VP Xear SingFX Enable Key Shifting Pitch Downs Pitch Up 0 Enable Vocal Fading Voice No Voice 50 Speakers ✓ Headphone ✓ S/PDIF-Out ✓ Mic ✓Xear SingFX function provides two features for karaoke applications.
| No Item Description | |
| 1 Key Shifting switch | It provides the key change function. There are four steps to shift up or down. Use the slide bar to change the key level. |
| 2 Vocal Fading | It provides the vocal removing function for any stereo music content (eg. Mp3, WMA and CD). Use the slide bar to change the vocal fading level. |
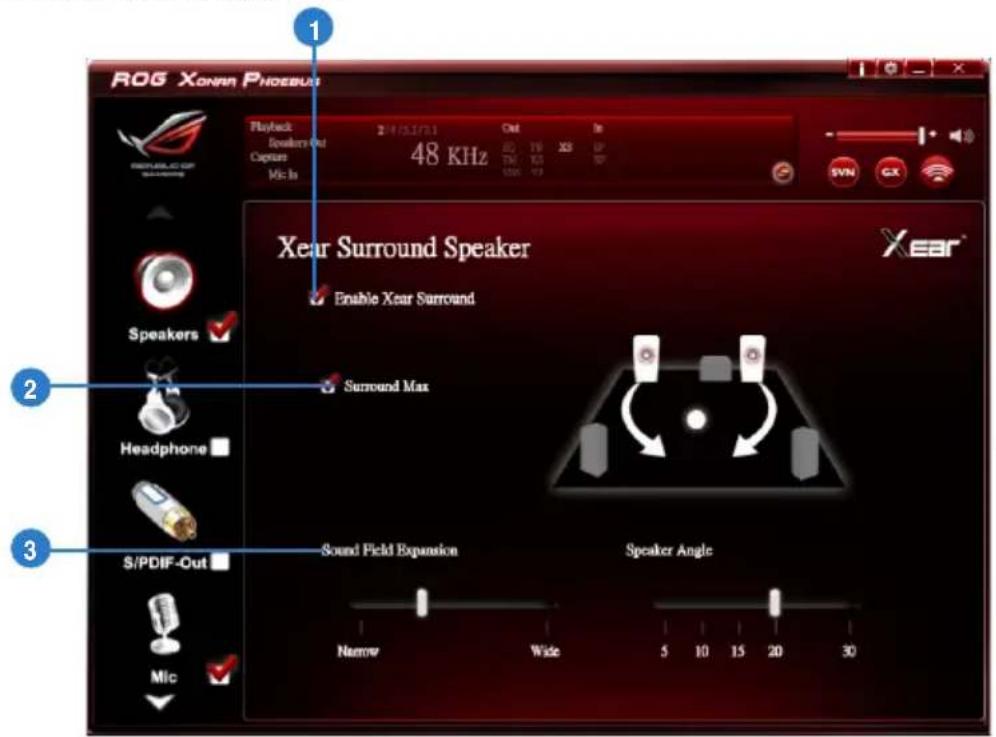
6.2.10 Xear Surround Speaker
Function Introduction
text_image
ROG Xonnn Phodesius Playback Speakers Out Capture Mlc In 24/05/17/1 Out In 48 KHz TX TX TX SNN CX Xear Surround Speaker Enable Xear Surround Surround Max Headphone S/PDIF-Out Sound Field Expansion Speaker Angle Narrow Wide 5 10 15 20 30| No Item Description | |
| 1 Xear SurroundSpeaker enable/disable switch | The Xear Surround Speaker allows you to enjoy the multichannel effects on stereo. Click the checkbox to enable or disable it. |
| 2 Surround Max | Click the checkbox to enable or disenable the Surround Max. |
| 3 Sound FieldExpansion & Speaker Angle | Change to simulate a larger or smaller space. |
6.3 Headphone Function Introduction
Function Introduction
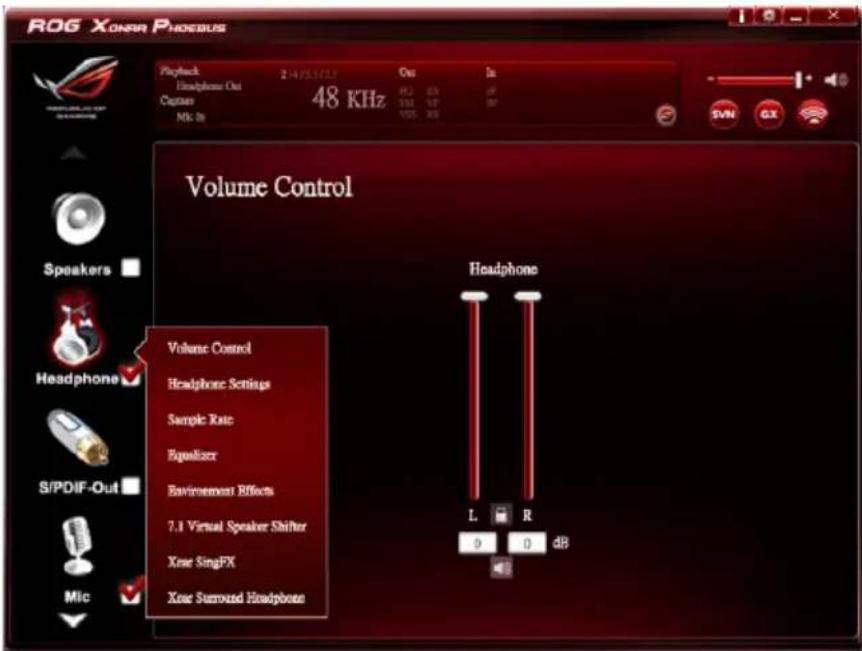
text_image
ROG XONAR PHOEBUS Playback 2:475.5723 Out In Headphone Out 48 KHz Capture 101 VP BP Mic In 100 X8 Volume Control Speakers Headphone S/PDIF-Out Mic Volume Control Headphone Settings Sample Rate Equalizer Environment Effects 7.1 Virtual Speaker Shifter Xue SingFX Xue Surrowd Headphone Headphone L R 0 0 dB
Click the device icon on the right side to open the pop-up menu.
6.3.1 Dolby ^® Home Theater (Windows ^® 7 Only)
Function Introduction
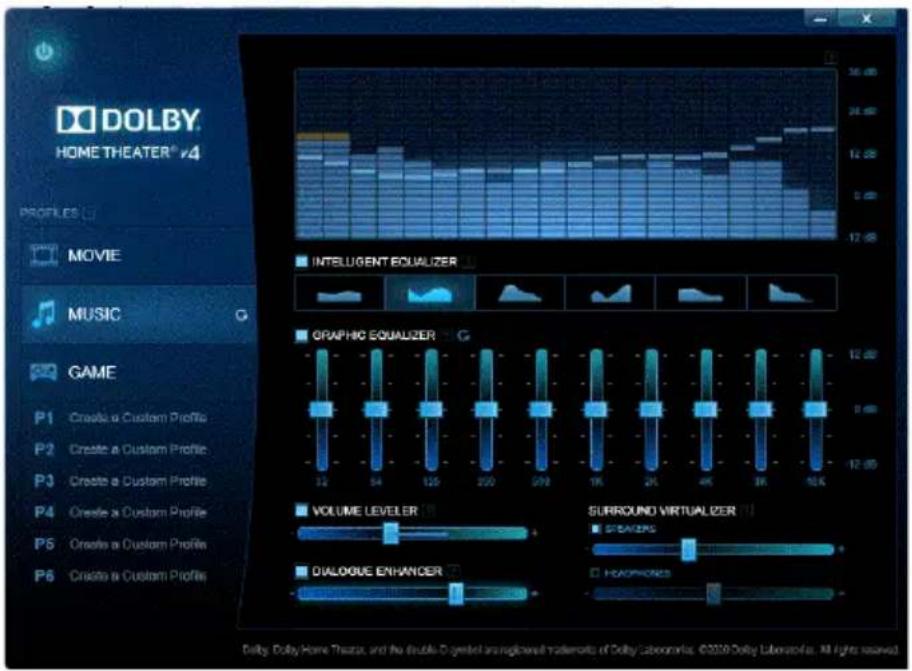
text_image
DOLBY HOME THEATER® v4 PROFILES MOVIE MUSIC GAME P1 Create a Custom Profile P2 Create a Custom Profile P3 Create a Custom Profile P4 Create a Custom Profile P5 Create a Custom Profile P6 Create a Custom Profile INTELIGENT EQUALIZER GRAPHIC EQUALIZER G VOLUME LEVELER SURROUND VIRTUALIZER STRAWERS DIALOGUE ENHANCER HEADphones Dolly, Dolby, Home Theater, and the double symbol are neglected trademarks of Dolby Laboratories. ©2020 Dolby Laboratories. All rights reserved.
- The following items will be replaced by Dolby ^ Home Theater V4 under Windows ^ 7 Operating System.
- 7.1 Virtual Speaker Shifter
- 10-Band Equalizer
- Refer to Dolby's official manual for Dolby ^® Home Theater V4 functions.
6.3.2 Volume Control
Function Introduction
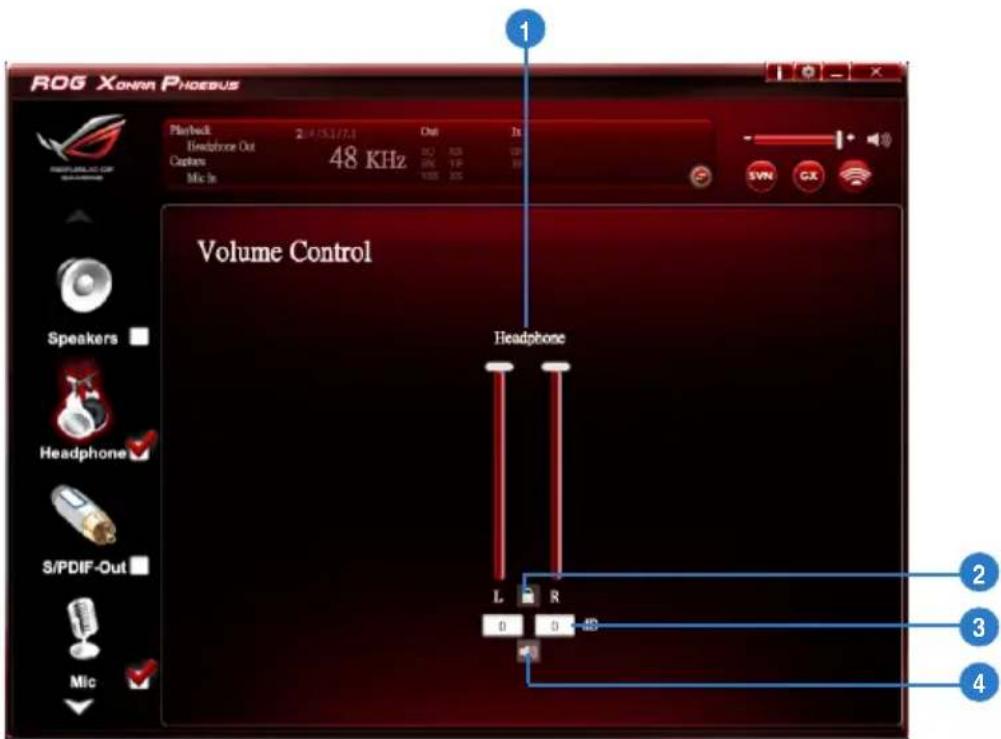
text_image
ROG Xonna Phoenix Playback 2:4/53/77.1 Chat In Headphone Out Capiens 48 KHz Mic In 1000 200 Volume Control Headphone Speakers Headphone S/PDIF-Out Mic L R 0 0 48 2 3 4| No Item Description | |
| 1 Volume control bar | Adjust the volume level for all channels. |
| 2 Left/ Right Channel Lock | Click the lock/ unlock button to lock / unlock the left channel and right channel to sync L/R channel. |
| 3 dB Input Area | Key in a dB value in this text box to set the volume level. |
| 4 Mute / Un-mute | Click this button to enable / disable the mute function |
6.3.3 Headphone Settings
Function Introduction
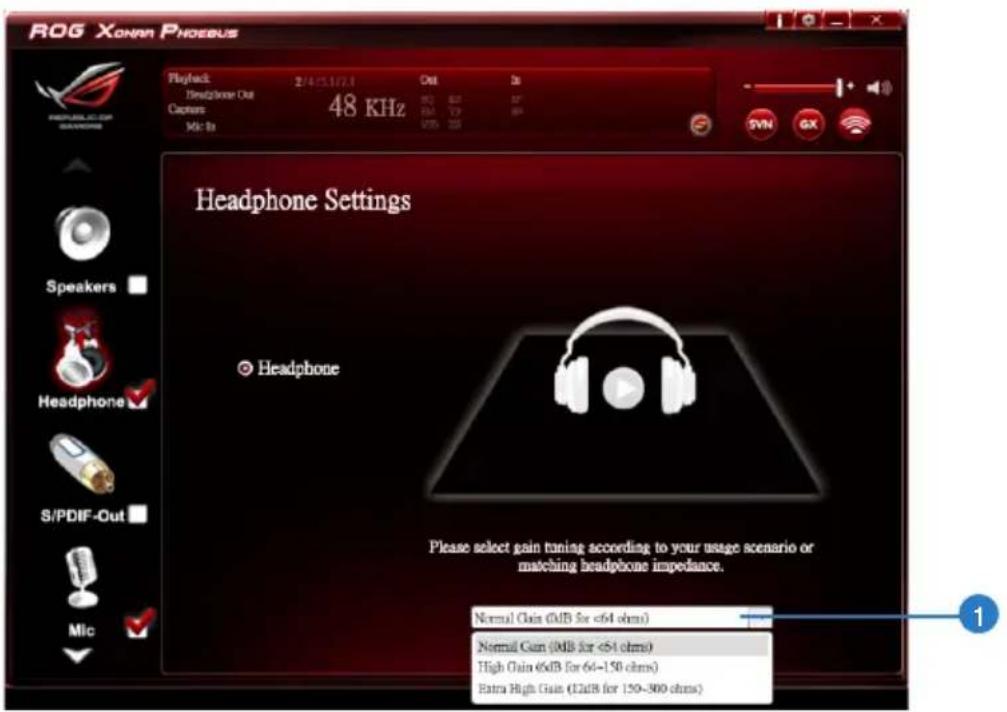
text_image
ROG XONNN PROBUS Playback: 2/4/15.1/7.1 Out In Headphone Out Captors: 48 KHz Mio In VDS 200 Headphone Settings ● Headphone Please select gain tuning according to your usage scenario or matching headphone impedance. Normal Gain (0dB for <64 ohms) Normal Gain (0dB for <54 ohms) High Gain (6dB for 6d-150 ohms) Extra High Gain (12dB for 150-300 ohms)
You can set the gain setting based on your headphone impedance.
| No Item Description | |
| 1 Normal Gain | 0dB for < 64 ohms |
| High Gain | 6dB for 64 ~150 ohms |
| Extra High Gain | 12dB for > ohms |
6.3.4 Sample Rate
Function Introduction
text_image
ROG XONAR PHOENIX 1 Playback Frequencies Out Capture Mio In 214/03.117.3 Out In 48 KHz 48 KHz 96 KHz 16 Bits 24 Bits Sample Rate Speakers Headphone S/PDIF-Out Mic 44.1 KHz 88.2 KHz 176.4 KHz 48 KHz 96 KHz 192 KHzThis function page provides a sample rate setting for the headphone device.
| No Item Description | |
| 1 Sample Rate button | 44.1 KHz - set the playback sample rate to 44.1K48 KHz - set the playback sample rate to 48K88.2 KHz - set the playback sample rate to 88.2K96 KHz - set the playback sample rate to 96K176.4 KHz - set the playback sample rate to 176K192 KHz - set the playback sample rate to 192K |
| 2 Bit Depth button | 16bit - set the playback bit depth to 16bit24bit - set the playback bit depth to 24bit |
6.3.5 Equalizer
Function Introduction
text_image
ROG XONAR PHONEBUS Playback Headphone Out Capture Mia Is 2/4/01/7/13 48 KHz Out 3x 50 60 70 80 90 VSS ZX - 1 SNN CX Equalizer Enable Equalizer Xear® Speakers Headphone S/PDIF-Out 30 60 120 250 500 1K 2K 4K 8K 15K -20 dB 0 dB -20 dB Dance Rap Metal Jazz Manual SoftRock Rock Live Tremble Base Classic Opera Default *Please input preset name... MicThis 10-band EQ function allows you to adjust the EQ band manually and create customized preset items or click to select a preset EQ mode.
| No Item Description | |
| 1 EQ enable/disable switch | Click on this check box to enable / disable the Equalizer. |
| 2 EQ band controller | Change the gain setting for each band (30/ 60/ 120/ 250/ 500/ 1K/ 2K/ 4K/ 8K/ 16K) |
| 3 Manual mode | Change the gain setting for each band and key in a name in the input field, and then clicksaveto add your new setting.The new setting will appear in the Manual Mode List. Clicktrashto delete settings. |
| 4 Preset mode | Select a preset mode for equalizer that is designed accordingly. There are 12 preset modes, such as Bass, Treble, Live, Rock, Jazz and so on. |
6.3.6 Environment Effects
Function Introduction
text_image
ROG XONAR PHOESBUS Playback Headphone Out Capture Mic In 2/4/25/17:1 48 KHz Out 20 SM 1/7 20 Environment Effects Enable Environment Effects Environment Default Room Size Speakers Headphone S/PDIF-Out Mic 2 3 1 2 3This function provides 28 special environment emulations for you to enjoy different sound reflection and reverberation.
| No Item Description | |
| 1 Environment Effect enable/disable switch | Click on this check box to enable / disable the Environment Effects. |
| 2 Environment Effect mode | Click on an Environment effect button or drop the dropdown list to choose an Environment effect. |
| 3 Room Size | Change the “Room Size” to simulate a larger or smaller space. |
6.3.7 Virtual Speaker Shifter
Function Introduction
text_image
ROG XONNN PHODEBUS 1 2 3 Playback Headphone Out Cochers Mic In 48 KHz Out In VSS 1.9 VSS 2.5 7.1 Virtual Speaker Shifter Enable 7.1 Virtual Speaker Shifter L -4 dB R -4 dB LS -4 dB RS -4 dB Lb -4 dB Rb -4 dB C -4 dB W -4 dB Surround Max 8 7 6 5 S/PDIP-Out Mic| No Item Description | |
| 1 7.1 Virtual Speaker Shifter enable/disable switch | The 7.1 Virtual Speaker simulates the speaker direction and distance. Click the check box to enable / disable it. |
| 2 Virtual Speaker (L/R/ Ls/Rs/Lb/Rb/C/W) | Each virtual speaker virtualizes one channel of the 7.1 channel speakers in the real world. |
| 3 Volume Control | Each virtual speaker virtualizes one channel of the 7.1 channel speakers in the real world. |
| 4 Volume indicator | Indicate the volume of each channel. |
| 5 Reset | Reset the location of virtual speakers / virtual listener to default. |
| 6 Manual Shifting (Free Moving Mode) | Use the pointer to click and drag to move the location of individual virtual headphones. |
| 7 Manually Rotation Mode | Use the mouse to rotate the virtual speakers on the screen manually. |
| 8 Auto Rotation Mode | The virtual speakers rotate clockwise or counterclockwise slowly. |
6.3.8 Xear SingFX
Function Introduction
text_image
ROG XONAR PHOEBUS 1 Playback Headphone Out Capture Mic In 2 Hertz/Hz Out Is 48 KHz DC SS VP VCS AS Syn GX Xear SingFX Enable Key Shifting Pitch Down Pick Up 0 S/PDIF-Out Enable Vocal Fading Voice No Voice 50 MicThe Xear SingFX function provides two features for karaoke applications.
| No Item Description | |
| 1 Key Shifting switch | It provides the key change function. There are four steps to shift up or down. Use the slide bar to change the key level. |
| 2 Vocal Fading | It provides the vocal removing function for any stereo music content (eg. Mp3, WMA and CD). Use the slide bar to change the vocal fading level. |
6.3.9 Xear Surround Headphone
Function Introduction
text_image
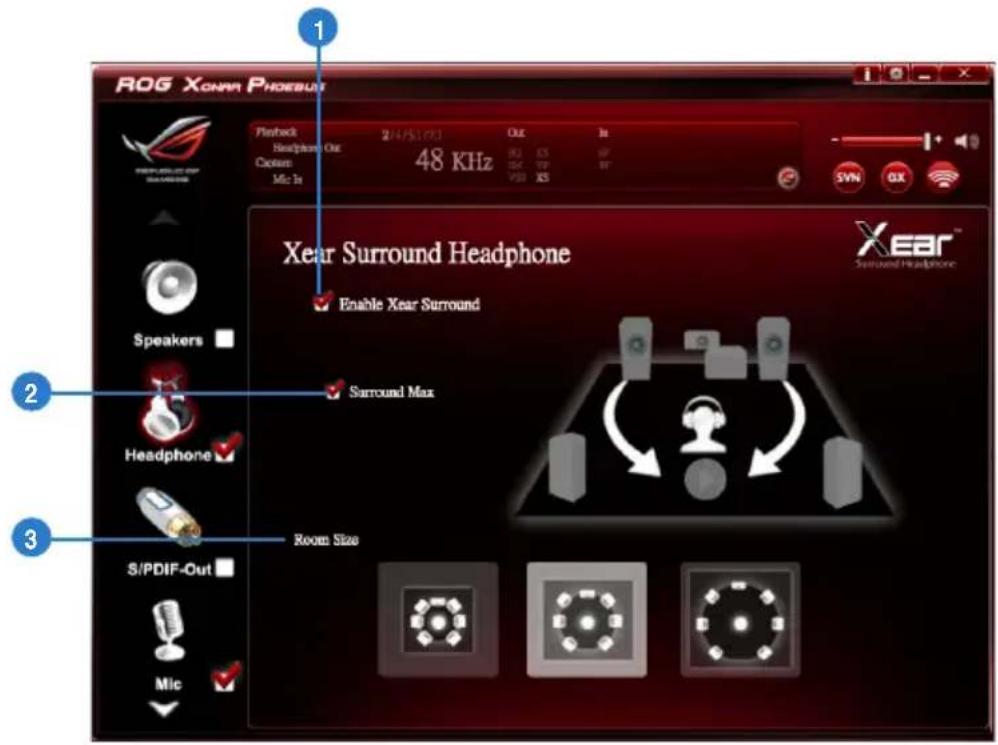
ROG XONAR PHOEBUIT Playback 24/5/19/1 Headphone Out Custom Mic In 48 KHz Out In RSI RSI RSI RSI RSI XEAR Surround Headphone Enable Xear Surround Spround Max Speaker Headphone Room Size S/PDIF-Out Mic XEAR™ Spround Headphone| No Item Description | |
| 1 Xear Surround Headphone enable/ disable switch | The Xear Surround Headphone allows you to enjoy multichannel effects on stereo. Click the check box to enable or disable it. |
| 2 Surround Max | Click the check box to enable or disenable the Surround Max. |
| 3 Room Size | Change the “Room Size” to simulate a larger or smaller space. |
6.4 S/PDIF Function Introduction
Function Introduction
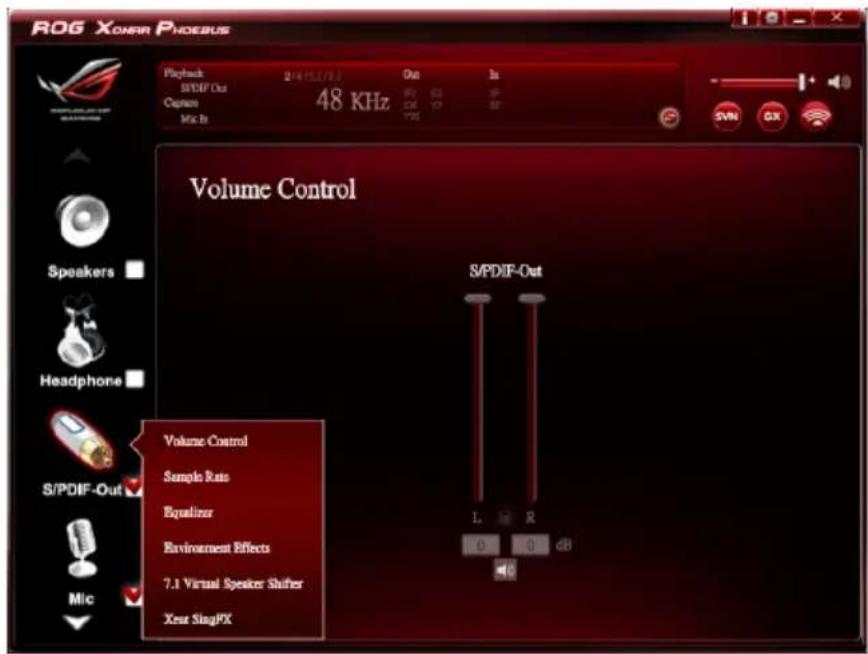
text_image
ROG XONAR PHOEBUS Playtmch 2/4/15.1/7.3 Out In S/PDIF-Out Capture 48 KHz Mic Ib SNX GX Volume Control S/PDIF-Out Volume Control Sample Rate Equalizer Environment Effects 7.1 Virtual Speaker Shifter Xear SingPX L R 0 0 dB Mic
Click the device icon on the right side to open the pop-up menu.
6.4.1 Volume Control
Function Introduction
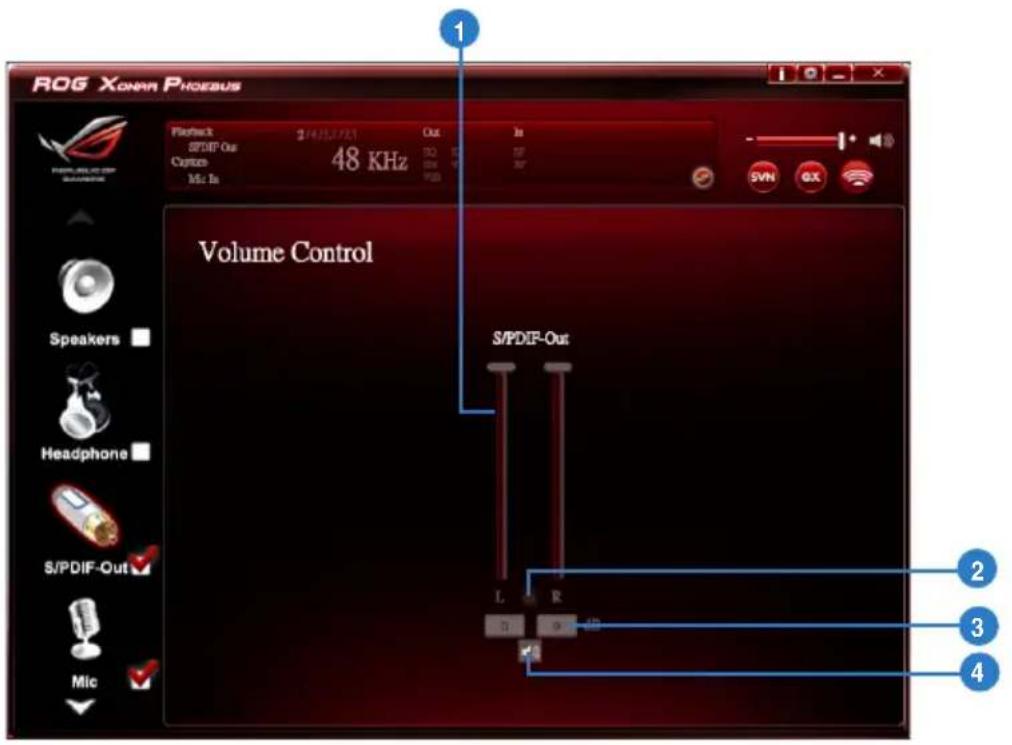
text_image
ROG Xonnn Phoenix Volume Control S/PDIF-Out 1 2 3 4| No Item Description | |
| 1 Volume Control bar | Adjust the volume level for all channels. |
| 2 Left/ Right Channel Lock | Click the lock/ unlock button to lock / unlock the left channel and right channel to sync L/R channel. |
| 3 dB Input Area | Key in a dB value in this text box to set the volume level. |
| 4 Mute / Un-mute | Click the button to enable / disable the mute function. |
6.4.2 Sample Rate
Function Introduction
text_image
ROG XONAR PHOENIX 1 Playback 2/4/03/01 Out In SPDDR Det 48 KHz 2.61 4.9 10 Capture MS: In Sample Rate 44.1 KHz 48 KHz 88.2 KHz 96 KHz 176.4 KHz 192 KHz 16 Bits 24 Bits Speakers Headphone S/PDIF-Out MicThis function allows you to set the sample rate for the S/PDIF device.
| No Item Description | |
| 1 Sample Rate button | 44.1 KHz - set the playback sample rate to 44.1K48 KHz - set the playback sample rate to 48K88.2 KHz - set the playback sample rate to 88.2K96 KHz - set the playback sample rate to 96K176.4 KHz - set the playback sample rate to 176K192 KHz - set the playback sample rate to 192K |
| 2 Bit Depth button | 16bit - set the playback bit depth to 16bit24bit - set the playback bit depth to 24bit |
6.4.3 Equalizer
Function Introduction
text_image
ROG Xonnn Phoenix Playback SPIDF-Out Capture 16K Hz 214/5/7/1 Out BD C3 BP 48 KHz S/N GX SYN E Equalizer Enable Equalizer XEAR Speakers Headphone S/PDIF-Out Dance Rap Metal Jazz Manual SoftRock Rock Live Trouble Base Classic Vocal Defaults *Please input reset name. MicThe 10-band EQ function allows you to adjust the EQ band manually and create customized preset items or click to select a preset EQ mode.
| No Item Description | |
| 1 EQ enable/disable switch | Click on this check box to enable / disable the Equalizer. |
| 2 EQ band controller | Change the gain setting for each band (30/ 60/ 120/ 250/ 500/ 1K/ 2K/ 4K/ 8K/ 16K) |
| 3 Manual mode | Change the gain setting for each band and key in a name in the input field, and then clicksaveto add your new setting.The new setting will appear in the Manual Mode List. Clicktrashto delete settings. |
| 4 Preset mode | Select a preset mode for equalizer that is designed accordingly. There are 12 preset modes, such as Bass, Treble, Live, Rock, Jazz and so on. |
6.4.4 Environment Effects
Function Introduction
text_image
ROG XONAR PHoebuit Playback 1000F Out Capture 1Mx 1x 20KHz 48 KHz Out Is ISO IM VDS SYN OX Environment Effects Enable Environment Effects Environment Default Headphone Room Size S/PDIF-Out Mic 2 3This function provides 28 special environment emulations for you to enjoy different sound reflection and reverberation.
| No Item Description | |
| 1 Environment Effect enable/disable switch | Click on this check box to enable / disable the Environment Effects. |
| 2 Environment Effect mode | Click on an Environment Effect button or drop the dropdown list to choose an Environment Effect. |
| 3 Room Size | Change the “Room Size” to simulate a larger or smaller space. |
6.4.5 Virtual Speaker Shifter
Function Introduction
text_image
ROG XONAR PHOEBUS 1 2 3 Playback SP00P-CL Capture: MIC In 48 KHz Out SP VSS 5/N GX 7.1 Virtual Speaker Shifter: Enable 7.1 Virtual Speaker Shifter Speakers Headphone S/PDIP-Out Mic L R LS RS Lb Rb C W Seround Max 8 7 6 5| No Item Description | |
| 1 7.1 Virtual speaker shifter enable/disable switch | The 7.1 Virtual Speaker simulates the speaker direction and distance. Click the check box to enable / disable it. |
| 2 Virtual Speaker (L/R/Ls/Rs/Lb/Rb/C/W) | Each virtual speaker virtualizes one channel of the 7.1 channel speakers in the real world. |
| 3 Volume Control | Each virtual speaker virtualizes one channel of the 7.1 channel speakers in the real world. |
| 4 Volume indicator | Indicate the volume of each channel. |
| 5 Reset | Reset the location of virtual speakers / virtual listener to default. |
| 6 Manual Shifting (Free Moving Mode) | Use the pointer to click and drag to move the location of individual virtual headphones. |
| 7 Manually Rotation Mode | Use the mouse to rotate the virtual speakers on the screen manually. |
| 8 Auto Rotation Mode | The virtual speakers rotate clockwise or counterclockwise slowly. |
6.4.6 Xear SingFX
Function Introduction

text_image
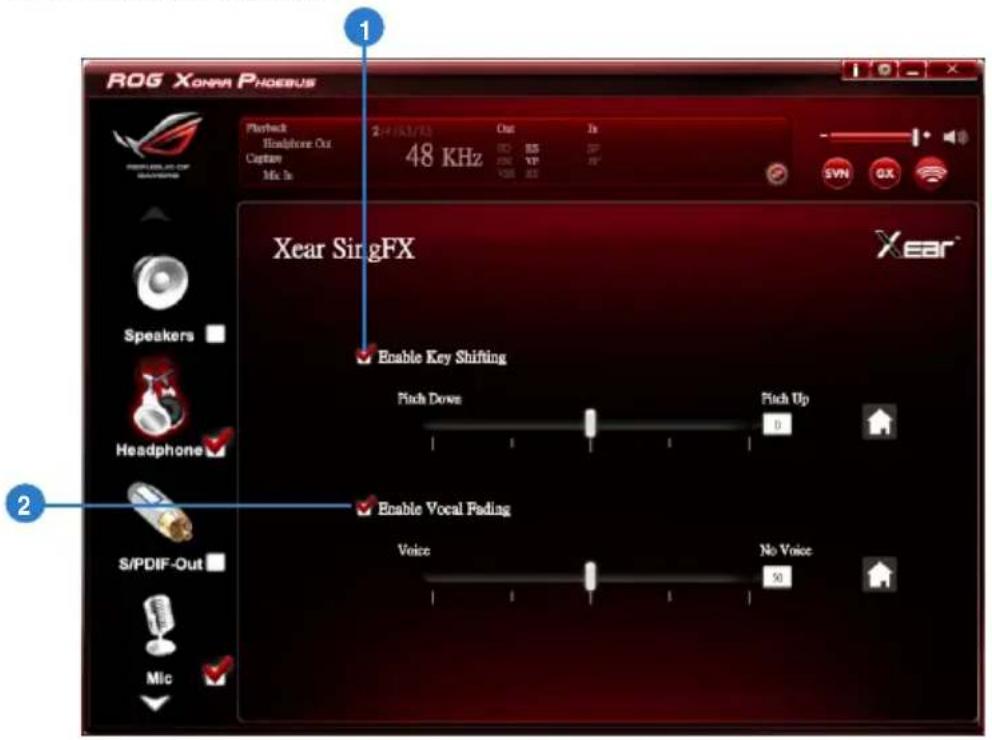
ROG Xohara Phoenix Project: 2403/243 Out In SPOF-Out 48 KHz Capton Mk Ta 48 KHz VIN GX Xear SingFX Enable Key Shifting Pick Down Fitch Up 6 Headphone Enable Vocal Fading Voice No Voice 50 S/PDIF-Out Mic 1 2The Xear SingFX function provides two features for karaoke applications.
| No Item Description | |
| 1 Key Shifting switch | It provides the key change function. There are four steps to shift up or down. Use the slide bar to change the key level. |
| 2 Vocal Fading | It provides the vocal removing function for any stereo music content (eg. Mp3, WMA and CD). Use the slide bar to change the vocal fading level. |
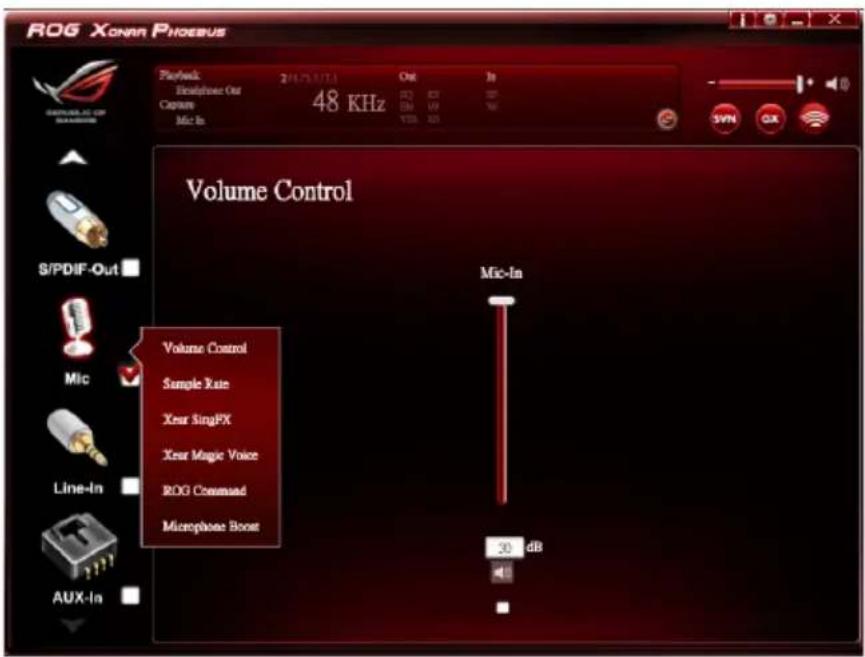
6.5 Microphone Function Introduction
Function Introduction
text_image
ROG Xonar Phoenix Playback Telephone Out Capture Mic-In 241/25/27/2 Out In 48 KHz S/PDIF-Out Mic-In Volume Control Sample Rate Xear SingFX Xear Magic Voice ROG Comissed Microphone Boost 30 dB AUX-In
Click the device icon on the right side to open the pop-up menu.
6.5.1 Volume Control
Function Introduction
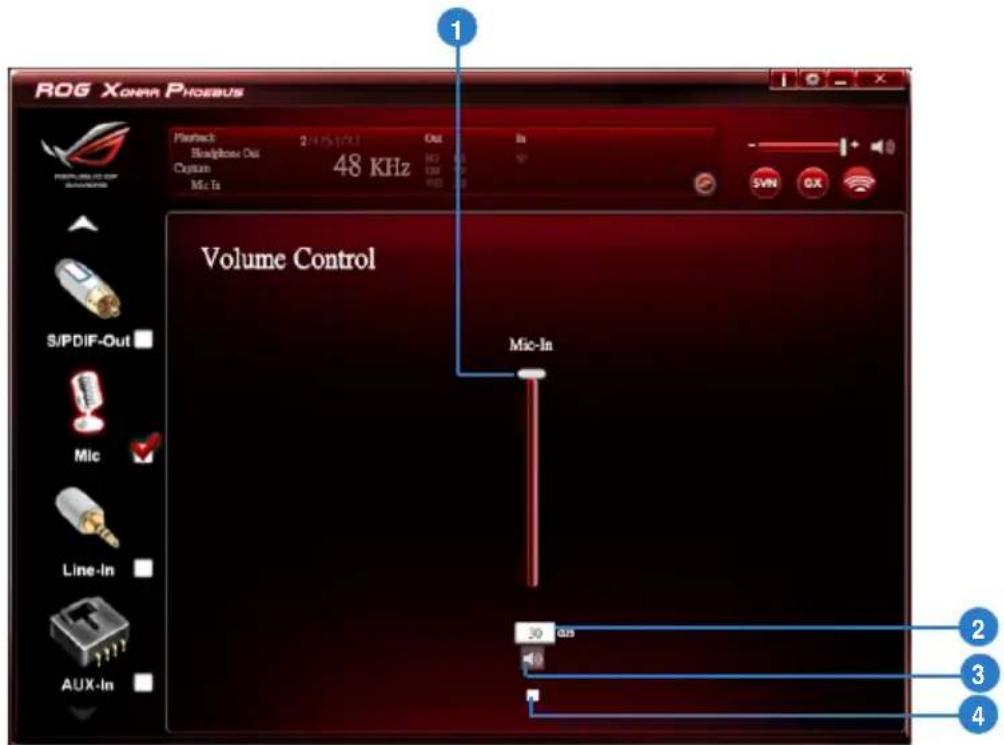
text_image
ROG XONAR PHOEBUS Playback 24/15/17/1 Out In Bluetooth Out Coption 48 KHz Mic In Volume Control Mic-In S/PDIF-Out Mic Line-In AUX-In 30.000 10 2 3 4| No Item Description | |
| 1 Volume Control bar | Adjust the volume level of all channels. |
| 2 dB Input Area | Key in a dB value in this text box to set the volume level. |
| 3 Mute / Un-mute | Click the button to enable / disable the mute function. |
| 4 Monitor | Click the checkbox to enable monitoring. |
6.5.2 Sample Rate
Function Introduction
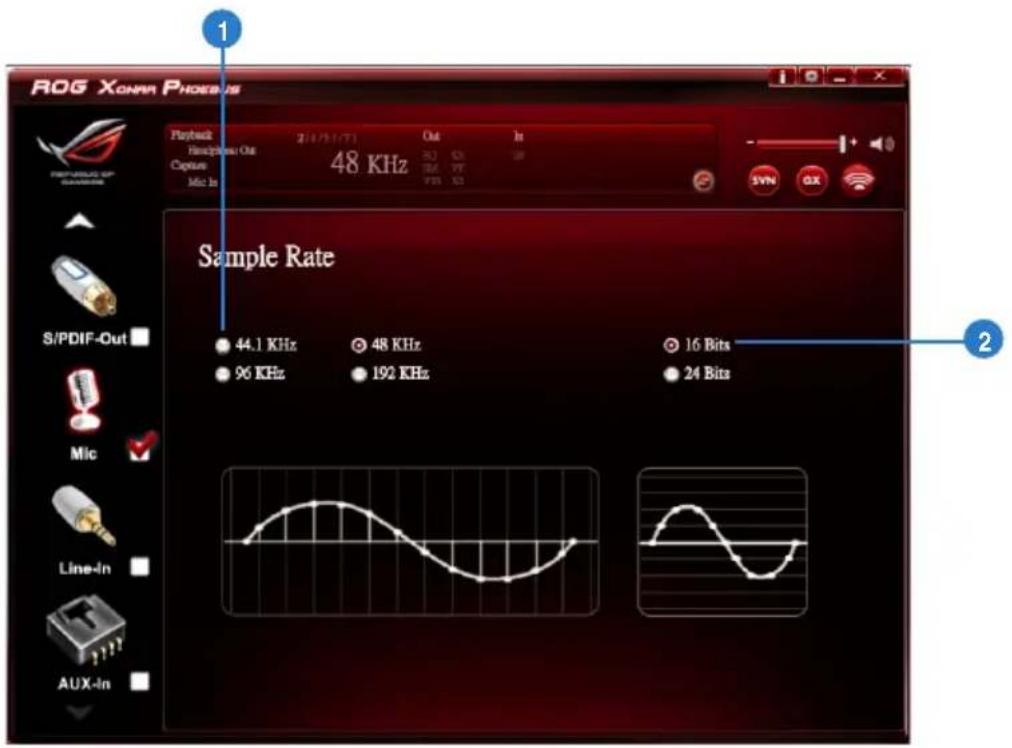
text_image
ROG XONAR PHOENIX Playback Headband Out Capture Mic In 2/1/31/71 48 KHz Out In 52 63 74 75 76 Sample Rate 44.1 KHz 96 KHz 48 KHz 192 KHz 16 Bits 24 Bits S/PDIF-Out Mic Line-In AUX-InThis function allows you to set the sample rate for the microphone device.
| No Item Description | |
| 1 Sample Rate button | 44.1 KHz - set the playback sample rate to 44.1K48 KHz - set the playback sample rate to 48K96 KHz - set the playback sample rate to 96K192 KHz - set the playback sample rate to 192K |
| 2 Bit Depth button | 16bit - set the playback bit depth to 16bit24bit - set the playback bit depth to 24bit |
6.5.3 Xear SingFX
Function Introduction
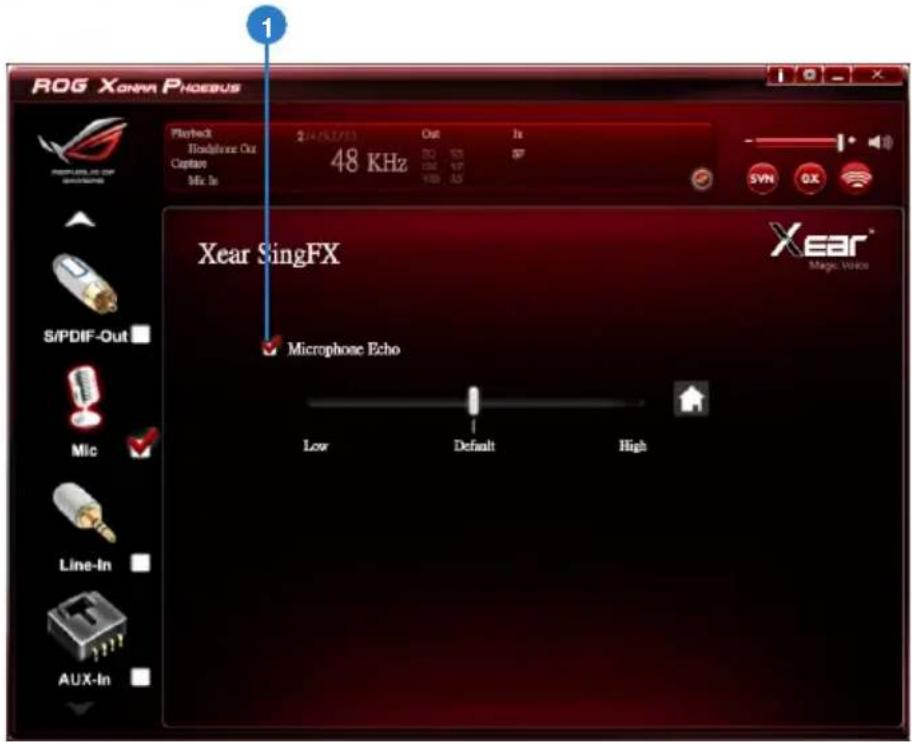
text_image
ROG Xonra Phoenix Playback Headphone Out Capture Mix In 2/14/05/2013 Out 1x 48 KHz 30 100 SP S/N O/X Xear SingFX Microphone Echo Xear® Magic Voice Low Default High Si/PDIF-Out Mic Line-In AUX-InThe Xear SingFX function provides two features for karaoke applications.
| No Item Description | |
| 1 Microphone Echo | Click the check box to enable / disable the Microphone Echo function. Use the slide bar to adjust the echo level. |
6.5.4 Xear Magic Voice
Function Introduction
text_image
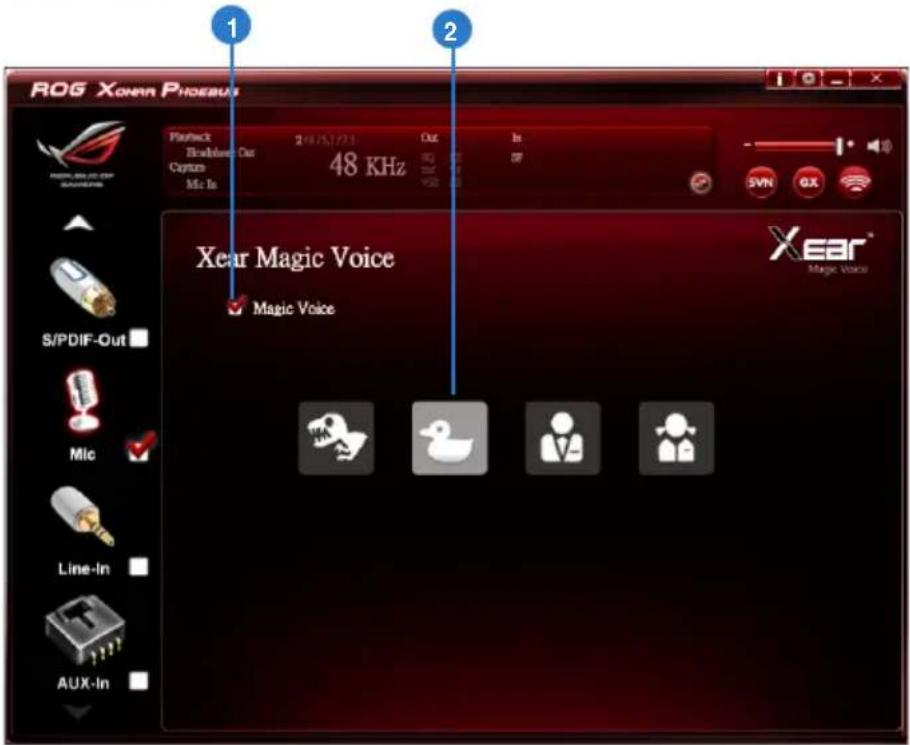
ROG XONAR PHOEBUS Playback Bluetooth Car Custom Mic In 248/51/73 Out In 48 KHz S/PDIF-Out Mic Line-In AUX-In Xear Magic Voice Magic Voice Xear® Magic VoiceWhile talking to your friends online (eg.Messenger, VOIP, online game applications), use the "Magic Voice" effects to simulate funny voices.

Choose one type of voice only at one time.
| No Item Description | |
| 1 Xear Magic Voice | Click this check box to enable / disable the Microphone Magic Voice function. |
| 2 Magic Voice mode (Monster/Carton/Male/Female) | Click to choose a magic voice mode. |
6.5.5 ROG Command Beam Forming
Function Introduction
text_image
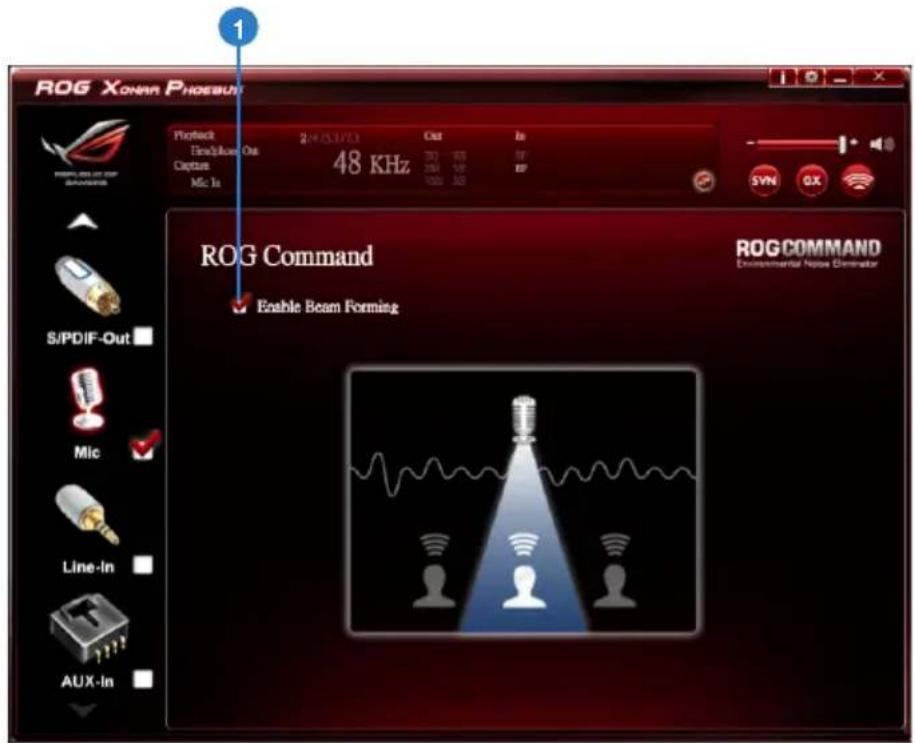
ROG XONAR PHOEBUT Project Track/Flow Out Capture Mic Is 24000/1/03 48 KHz Out ISO USB USB USB Syn GX ROG Command Enable Beam Forming ROG COMMAND Environmental Noise Dimensator S/PDIF-Out Mic Line-In AUX-In
Beam Forming function is available only when the Control Box is connected to the audio card without any other external microphones.
| No Item Description | |
| 1 Beaming Forming | Click the check box to enable / disable the Beam Forming function. |
6.5.6 ROG Command ENC (Environmental Noise Cancellation)
Function Introduction
text_image
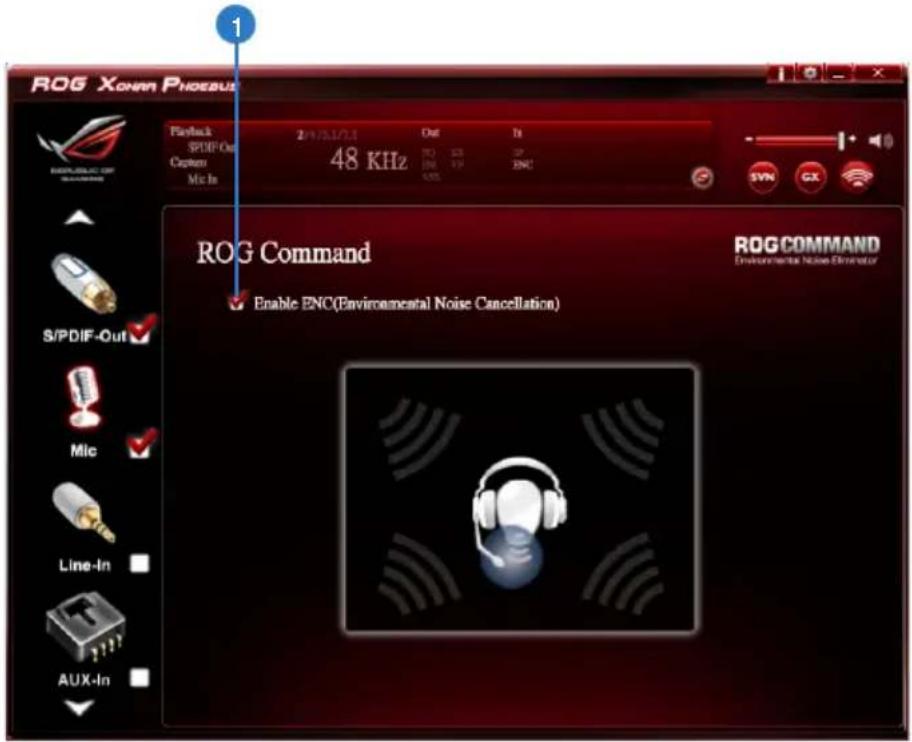
ROG Xonnn Phoenix Playback SPDIF-Out Caption Mic In 2/1/21/21 48 KHz Out 10 35 SP 206 197 200 SYNC S/N CX ROG Command Enable ENC(Environmental Noise Cancellation) ROG COMMAND Environmental Noise Generator
ENC is available only when the Control Box is connected to the audio card with an external microphones.
| No Item Description | |
| 1 Environmental Noise Cancellation | Click the check box to enable / disable the Environmental Noise Cancellation function. |
6.5.7 Microphone Boost
Function Introduction

text_image
ROG Xonan Phoenixus Planoact SPDIF-Out Cyptan Mn In 2 MHz/PS Out In 48 KHz 70 63 57 64 79 246 Microphone Boost S/PDIF-Out Mic Line-In AUX-In 0 dB 20 dB| No Item Description | |
| 1 Microphone Boost | Drag the slide bar to boost microphone volume and sensitivity |
6.6 Line-in Device Function Introduction
Function Introduction

text_image
ROG XONAR PHOENBAS Playback: 24/5/17/1 Out Telephone Out Capture 48 KHz Line-In Volume Control S/PDIF-Out Mic Line-In Volume Control Sample Rate Line-In L R 0 0 dB AUX-In
Click the device icon on the right side to open the pop-up menu.
6.6.1 Volume Control
Function Introduction
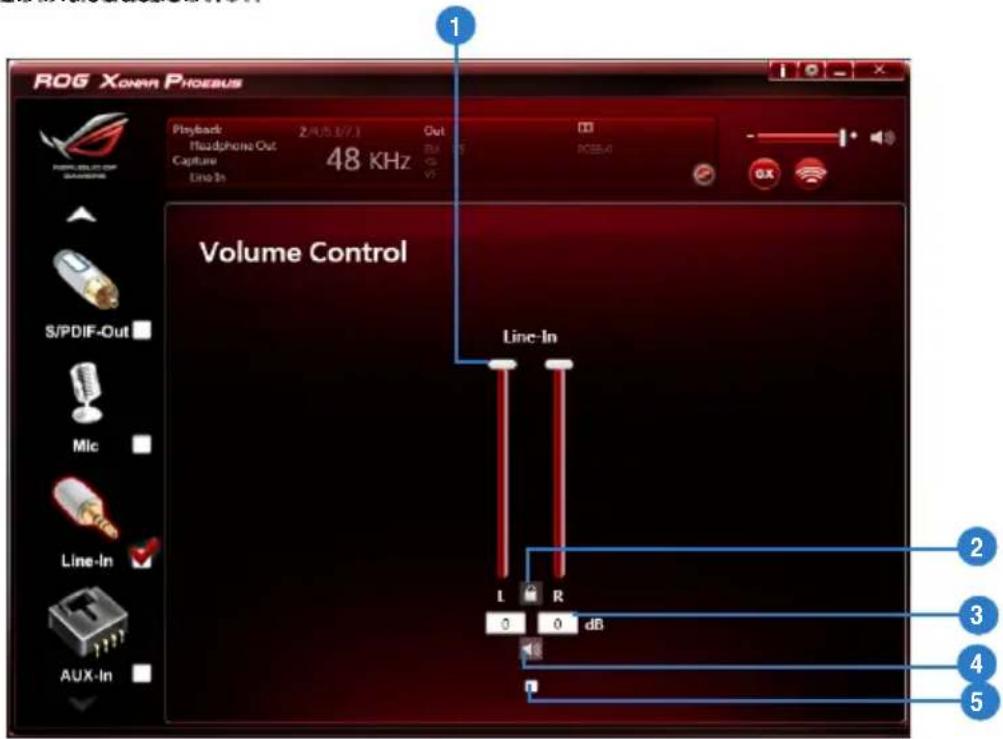
text_image
ROG XONAR PHOEBUS Playback 2/05.17.1 Out Headphone Out Capture 48 KHz Line-In Volume Control S/PDIF-Out Mic Line-In AUX-In Line-In L R 0 0 dB 1 2 3 4 5| No Item Description | |
| 1 Volume Control bar | Adjust the volume level of all channels. |
| 2 Left/ Right Channel Lock | Click the lock/ unlock button to lock / unlock the left channel and right channel to sync L/R channel. |
| 3 dB Input Area | Key in a dB value intthis text box to set the volume level. |
| 4 Mute / Un-mute | Click the button to enable / disable the mute function. |
| 5 Monitor | Click the checkbox to enable monitoring. |
6.6.2 Sample Rate
Function Introduction

text_image
ROG XONNN PHOENIX 1 Product: Brady Wave Out Capture Line In 2/4/5/7/8 48 KHz Out SYN GX Sample Rate 44.1 KHz 48 KHz 16 Bits 88.2 KHz 96 KHz 24 Bits 176.4 KHz 192 KHz Mic Line-In AUX-inThis function allows you to set the sample rate for the line-in device.
| No Item Description | |
| 1 Sample Rate button | 44.1 KHz - set the playback sample rate to 44.1K48 KHz - set the playback sample rate to 48K88.2 KHz - set the playback sample rate to 88.2K96 KHz - set the playback sample rate to 96K176.4 KHz - set the playback sample rate to 176K192 KHz - set the playback sample rate to 192K |
| 2 Bit Depth button | 16bit - set the playback bit depth to 16bit24bit - set the playback bit depth to 24bit |
6.7 Aux-in Device Function Introduction
Function Introduction
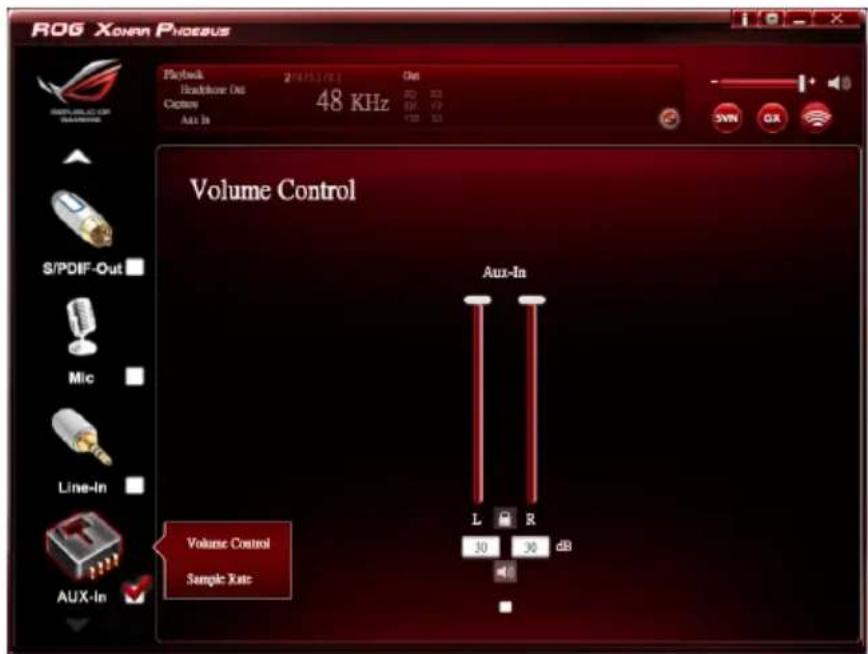
text_image
ROG XONRA PHOEBUS Playback 2/15/16:1 Out Headphone Out 48 KHz Capture Aux In S/PDIF-Out Mic Line-In Aux-In Volume Control Sample Rate Aux-In L R 30 30 dB
Click the device icon on the right side to open the pop-up menu.
6.7.1 Volume Control
Function Introduction
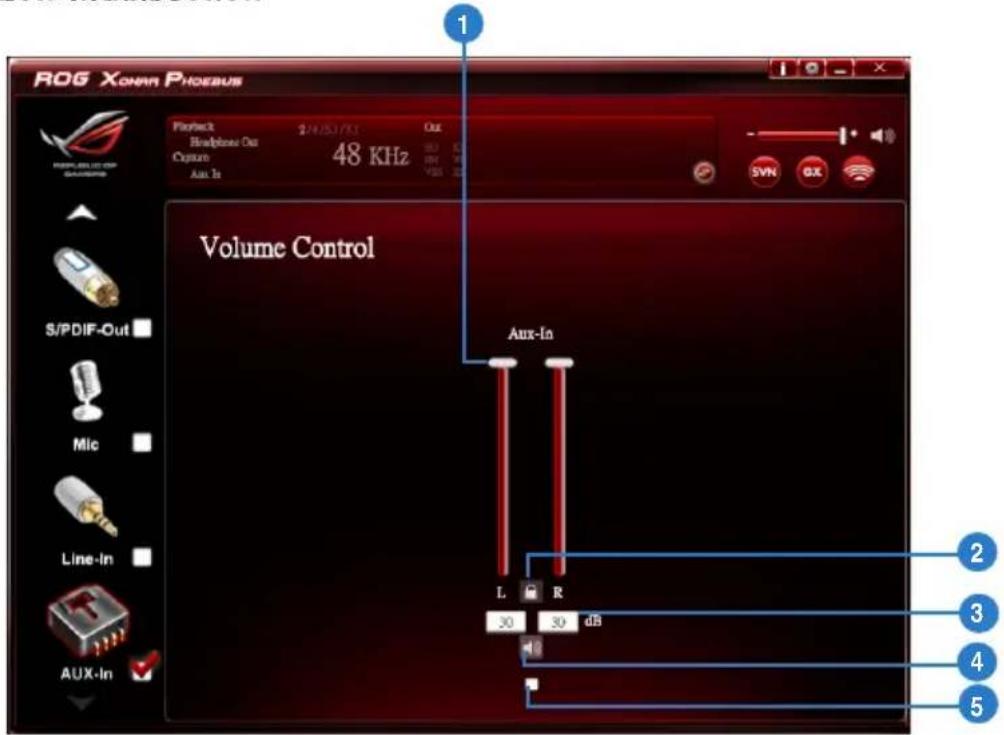
text_image
ROG Xonan Phoenix Playback 24/05/18:1 Telephone Out Cypium 48 KHz Aux-In Volume Control S/PDIF-Out Mic Line-In Aux-In L R 30 30 d5 2 3 4 5| No Item Description | |
| 1 Volume Control bar | Adjust the volume level for all channels. |
| 2 Left/ Right Channel Lock | Click the lock/ unlock button to lock / unlock the left channel and right channel to sync L/R channel. |
| 3 dB Input Area | Key in a dB value in this text box to set the volume level. |
| 4 Mute / Un-mute | Click the button to enable / disable the mute function. |
| 5 Monitor | Click the checkbox to enable monitoring. |
6.7.2 Sample Rate
Function Introduction

text_image
ROG XONAP PHOENIPS 1 Project: 2/4/5/17/201 Flow/Power Out 48 KHz Capture Area To Out SYN OX Sample Rate S/PDIF-Out 44.1 KHz 48 KHz 16 Bits 96 KHz 192 KHz 24 Bits Mic Line-In AUX-InThis function allows you to set the sample rate setting for the aux-in device.
| No Item Description | |
| 1 Sample Rate button | 44.1 KHz - set the playback sample rate to 44.1K48 KHz - set the playback sample rate to 48K96 KHz - set the playback sample rate to 96K192 KHz - set the playback sample rate to 192K |
| 2 Bit Depth button | 16bit - set the playback bit depth to 16bit24bit - set the playback bit depth to 24bit |
6.8 Information Page Introduction
This page lists the driver information and the technologies' trademark logo. You can get both hardware/software details and legal information references here.

text_image
ROG Xonra Phoenix Playback Eheadhouse Out Capture Add In 21/03/17 Out 3Q 15 IN V2 100 10 S/N GX Information Audio CODBC : CM888 Audio Driver Version : 5.12.1.44 Pumpware Version : 1012 DirectX Version : DirectX 9.0c (4.09.0000.0904) CPL Version : 1.0.1.6 ROG Command is powered by C-Media Xear™ Volear ENC and Xear™ Volear BF. "Xear®" technology is intellectual property of C-Media Electronics Inc. "Xear" and "C-Media" are registered trademarks of C-Media Electronics Inc. Copyright 2012 C-Media Inc. All rights reserved. Detail Add S/PDIF-Off Mic Line-In AUX-In
Click the device icon on the left side to open the pop-up menu.
6.9 Tray Icon Function Introduction
Open the "CPL Tray Icon Function List" by right-clicking on the tray Icon in the system tray.
- Open: Click the Open item to restore the USB Audio Software CPL.
- Volume Control: Click the Volume Control item to launch the Volume Mixer of Windows OS, which allows you to control the volume of speakers and other audio devices separately.
- Windows Media Player: Click the Windows Media Player item to launch the Microsoft Windows Media Player.
- Sound Recorder: Click the Sound Recorder item to open the Windows Sound recorder.
- Multimedia Properties: Launch the Multimedia Properties page of Windows OS to select the working sample rate & bit rate.
(1) Select the Speakers device and then click the properties button.
(2) Click the Advanced tab and click the dropdown list to open default format support list as shown in the diagram below.
(3) Follow the same step to change the sample rate & bit rate for Microphone device.
- Open ASIO: Click to open ASIO.
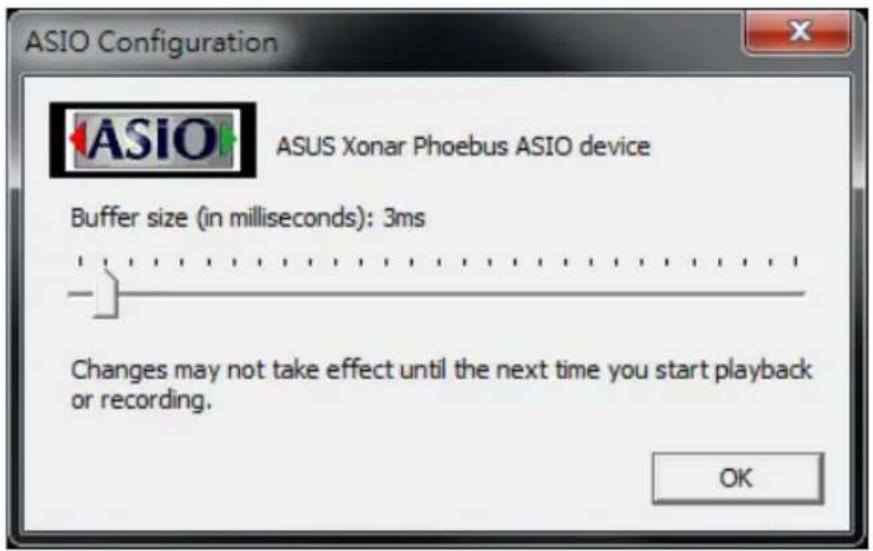
text_image
ASIO Configuration ASUS Xonar Phoebus ASIO device Buffer size (in milliseconds): 3ms Changes may not take effect until the next time you start playback or recording. OK- Settings: Click setting to launch the Advanced Settings page as shown below.

text_image
ROG XIONAN PHOEBUS Playback 2/18/5/17/21 Out Backbox Out AR XUo Advanced Settings Language Select: English UI Transparent: Show System Tray Icon: OK Cancel Apply(1) Language Select: Change the UI language.
(2) UI Transparent: Adjust the UI vision of transparent.
(3) Show System Tray Icon: Check Show System Tray Icon box to show the Xear Audio center icon in the system tray.
- Exit: Click Exit to exit the tray Icon from the system tray.
7. Troubleshooting and FAQs
7.1 Troubleshooting
1: I cannot install the audio card driver in my PC.
Instructions:
(1). Make sure that you have properly plugged the audio card into the PCI Express slot on your motherboard.
(2). Check that the Windows hardware Device Manager has discovered a multimedia audio device. If no device is found, please try scanning for new hardware.
(3). Try to restart your Windows.
(4). Remove the card and plug it into another PCI Express slot.
2: I cannot find the Xonar Phoebus Audio Center.
Instructions:
(1). Make sure you have installed the driver.
(2). Find the Xonar Phoebus Audio Center icon in the system tray on the right bottom of the screen. Double click the icon to launch the Xonar Phoebus Audio Center utility.

text_image
AM 03:12(3). If you cannot find the icon in the system tray, go to the Windows Control Panel and double click the "Xonar Phoebus Audio Center" icon to make it visible in the system tray again.
(4). After the driver installation is complete, it's recommended that you reboot your computer to complete the setup. If the icon still doesn't appear, please try installing the driver package again.
3. I can't hear any sound from my analog speakers
Instructions:
(1). The Xonar Phoebus PCI Express audio card needs the power cable to supply additional power in addition to the basic PCI Express bus power. Please double check you have plugged the small 6-pin power plug into the Xonar Phoebus power connector. If you did not plug the internal power, the Xonar Phoebus audio center will remind you a warning message and won't allow your operation when you double click the Xonar Phoebus audio center icon in the system tray.
(2). Please ensure that you have connected speakers properly and have powered on your speakers.
(3). Please ensure that the device master volume or the software player has NOT been muted on the Xonar Phoebus Audio Center.
(4). If you are using Dolby Digital Live encoder through the S/PDIF output, the analog output will be muted to get rid of the interference between your digital speaker system and analog speakers or headphones. Please check if this is the case.
(5). Please go to the sound and audio device of Windows Control Panel to check if the playback default device is set to Xonar Phoebus Audio Device, instead of other onboard AC97 or HDA codec device. If it's not, please set it to Xonar Phoebus Audio Device and restart your applications.
(6). Please try restart your Windows.
4. I can't hear any sound from the S/PDIF output
Instructions:
(1). Please ensure that you have enabled S/PDIF output in the Audio Center GUI (Main page).
(2). Please ensure that you have connected the correct S/PDIF output jack in the card to the decoder's (AV receiver) S/PDIF input jack.
(3). You may need to select the correct input and mode of your decoder or AV receiver. For Dolby Digital or DTS output, you may have to double check that the AV receiver is in that decoding mode.
(4). If you are using 192KHz PCM output, please make sure that your decoder can support 192KHz decoding. Try changing it to 44.1K or 48KHz first.
5. I can't hear audio input (Mic, Line-in, AUX, etc.) from my speakers Instructions:
(1). Please select the correct input as the recording source. If you are using Windows Vista/Win 7, please also go to system audio control panel to see the current default recording/input device is right.
(2). Please remember to turn on the digital monitoring button for that recording source.
6. I can't hear the TV tuner audio from my speakers
Instructions:
(1). If you are using a traditional TV tuner card which has analog audio output, please connect it to the Aux-In header on the audio card
(2). Select Aux as the recording source and remember to turn on the digital monitoring button in the recording mixer page.
(3). If you are using a TV tuner card which has digital audio output instead of analog, please check that the sound is not muted and whether other applications can play normally. If you still have problem, please read the TV tuner card's software user guide.
7.2 FAQ
Q1: Does the Xonar Phoebus support Windows Vista / Win 7?
Answer:
Yes, the Xonar Phoebus driver package does support Windows Vista / Win 7 32/64 bit and most key features are available. In addition, the Xonar Phoebus supports unique GX on Windows Vista / Win 7, which can recover DirectSound 3D hardware and EAX gaming sound effects on Vista / Win 7 for a lot of existing DirectX games.
Q2: Why does the Xonar Phoebus support Dolby technology?
Answer:
Dolby is the ONLY brands and technology recognized by the CE industry and available on a wide range of audio equipment. The Xonar Phoebus includes these features to make your PC a powerful media and entertainment center.
Q3: Does the Xonar Phoebus support EAX on Vista / Win 7?
Answer:
Yes, The Xonar Phoebus can support EAX not only on Windows XP but also on Vista / Win 7 through innovative GX3.0 technology.
Q4: Why do I need Dolby for PC games?
Answer:
(1). Dolby Headphone is available in the latest game consoles, like XBOX360, PS3, and Wii. Dolby can provide the best gaming sound experience and compatibility with home theater or TV systems.
(2). Dolby Headphone is the best 3D sound positioning, spatial modeling and 5.1-channel virtualization technology for regular stereo headphones and speakers.
Q6: Will PCM sound output through S/PDIF be just 2 channels even with different analog output channels?
Answer:
The S/PDIF protocol specification (IEC-60958) can only carry 2-channel PCM data or non-PCM AC3/DTS data. So, when a user selects PCM output for S/PDIF, the Xonar Phoebus audio card will always deliver 2 channel PCM data through the S/PDIF output port. To attain the 5.1 channel surround sound, you can select DDO, which allows the Xonar Phoebus to deliver 5.1 surround sound for DVD movies, and even stereo music.