
MDG5MP-BNDL - Monitor NEC - Free user manual and instructions
Find the device manual for free MDG5MP-BNDL NEC in PDF.


| Product Type | 5MP grayscale medical LCD monitor |
| Brand | NEC |
| Model | MD205MG-1 (included in MDG5MP-BNDL bundle) |
| Diagonal Size | 51.0 cm / 20.1 inches |
| Native Resolution | 2048 x 2560 (portrait) / 2560 x 2048 (landscape) |
| Pixel Pitch | 0.156 mm |
| Brightness | 400 cd/m² (calibrated), adjustable up to 600 cd/m² |
| Contrast Ratio | 600:1 typical |
| Viewing Angle | ±85° horizontal and vertical (CR > 10) |
| Response Time | 30 ms typical |
| Video Input | DVI-D dual link (max 320 MHz) / single link (max 160 MHz) |
| Grayscale Support | 10-bit (1024 levels) with 10-bit graphics card; 8-bit (256 levels) with 8-bit card, 3061-level palette |
| Power Supply | 100-240 V AC, 50/60 Hz, 3-1.5 A |
| Power Consumption | Varies with configuration, up to 3 A max |
| Dimensions (portrait) | 379.6 x 512.7-632.7 x 247.3 mm (W x H x D) |
| Dimensions (landscape) | 474.3 x 465.3-585.3 x 247.3 mm (W x H x D) |
| Net Weight | 9.8 kg |
| Height Adjustment | 120 mm |
| VESA Mount | Yes, compatible with VESA mounts (screws included) |
| Main Functions | Gamma (1.8, 2.0, 2.2, DICOM, programmable), continuous luminance stabilization (backlight sensor), OSD rotation, OSD lock, image stabilization |
| Screen Cleaning | Soft lint-free cloth, water or isopropyl alcohol; do not use abrasive or solvent-based cleaners |
| Housing Maintenance | Soft cloth moistened with water and mild detergent; do not use benzene, thinner, acetone |
| Safety | Class I (grounded), no patient connection, for professional medical use (diagnostic) |
| Medical Compliance | Compliant with DICOM Part 14, IEC60601-1, IEC60601-1-2 |
Frequently Asked Questions - MDG5MP-BNDL NEC
User questions about MDG5MP-BNDL NEC
0 question about this device. Answer the ones you know or ask your own.
Ask a new question about this device
Download the instructions for your Monitor in PDF format for free! Find your manual MDG5MP-BNDL - NEC and take your electronic device back in hand. On this page are published all the documents necessary for the use of your device. MDG5MP-BNDL by NEC.
USER MANUAL MDG5MP-BNDL NEC
natural_image
Illustration of a computer monitor with a blank screen and stand (no text or symbols)INSTALLATION & MAINTENANCE GUIDE
INSTALLATIONS- UND WARTUNGSHANDBUCH
GUIDE D'INSTALLATION ET DE MAINTENANCE
取扱説明書
安装与维护指南
MD205MG-1


Index
Warning .... English.1
Contents ...... English.2
Quick Start.... English.3
Display Adjustment & Mounting .... English.5
User Controls .... English.6
On-Screen Display .... English.7
Recommended Use.... English.8
Specifications ...... English.9
Features ...... English.10
Troubleshooting .... English.11
References.... English.12
Index
Warnung .... Deutschland.1
TO PREVENT FIRE OR SHOCK HAZARDS, DO NOT EXPOSE THIS UNIT TO RAIN OR MOISTURE. ALSO, DO NOT USE THIS UNIT'S POLARIZED PLUG WITH AN EXTENSION CORD RECEPTACLE OR OTHER OUTLETS UNLESS THE PRONGS CAN BE FULLY INSERTED.
REFRAIN FROM OPENING THE CABINET AS THERE ARE HIGH VOLTAGE COMPONENTS INSIDE. REFER SERVICING TO QUALIFIED SERVICE PERSONNEL.

CAUTION:
CAUTION

TO REDUCE THE RISK OF ELECTRIC SHOCK, MAKE SURE POWER CORD IS UNPLUGGED FROM WALL SOCKET. TO FULLY DISENGAGE THE POWER TO THE UNIT, PLEASE DISCONNECT THE POWER CORD FROM THE AC OUTLET. DO NOT REMOVE COVER (OR BACK). NO USER SERVICEABLE PARTS INSIDE. REFER SERVICING TO QUALIFIED SERVICE PERSONNEL.

This symbol warns user that uninsulated voltage within the unit may have sufficient magnitude to cause electric shock. Therefore, it is dangerous to make any kind of contact with any part inside this unit.

This symbol alerts the user that important literature concerning the operation and maintenance of this unit has been included. Therefore, it should be read carefully in order to avoid any problems.

To guarantee the display performance as specified, it must only be used in conjunction with NEC approved display controllers. The MD205MG-1 cannot be used for a life-support system. This unit is designed as component of a final system which is in compliance to IEC60601-1-1 requirements.

Federal law restricts this device to sale by or on the order of a (licensed healthcare practitioner).
Power Cord Important Information
CAUTION: Please use the power cord provided with this display in accordance with the table below. If a power cord is not supplied with this equipment, please contact your supplier. For all other cases, please use a power cord that matches the AC voltage of the power outlet and has been approved by and complies with the safety standard of your particular country.
When you use this Display in North America, you should use a North America Hospital Grade power cord.
| Plug Type European Hospital Grade | North America Hospital Grade | Japanese (for Japanese Market only) | U.K. | ||
| Plug Shape |  |  |  |  | 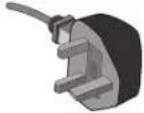 |
| Country | U.S.A./Canada EU | (except U.K.) China Japan | U.K. | ||
| Voltage | 120 230 220 | 100 | 230 |
Intended Use
The MD205MG-1 grayscale display is intended to be used for displaying and viewing of digital images for diagnosis, including digital mammography, by trained physicians.
North America Customers
Grounding reliability can only be achieved when the equipment is connected to an equivalent receptacle marked "Hospital Only" or "Hospital Grade".
That signal input port need to be connected properly and that any unused signal input port shall not be accessible for the patient to contact in the patient area after the LCD is integrated into a medical system.
European Customers

Unpacking, Installation and calibration of this display should only be done by authorized and trained personnel. Any installation done by a non-authorized person is done under his own risk and we accept no responsibility in any device malfunctioning.

Medical Imaging
The NEC MD205MG-1 is designed for 5-megapixel (2048 x 2560) grayscale medical imaging. This display comes fully tuned with a setting for gamma correction that complies with the DICOM Part 14 Standard.
Microsoft and Windows are registered trademarks of Microsoft Corporation in the United States and other countries. All other brands and product names are trademarks or registered trademarks of their respective owners.
Contents
Your new NEC Display display box* should contain the following:
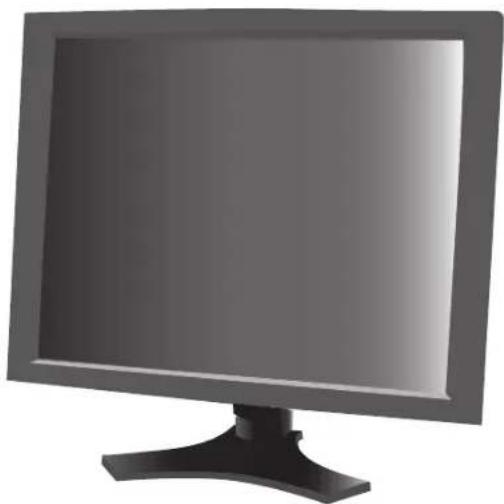
- MD205MG-1 Display with tilt/swivel/pivot/height adjustable stand
- Power Cord
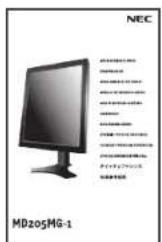
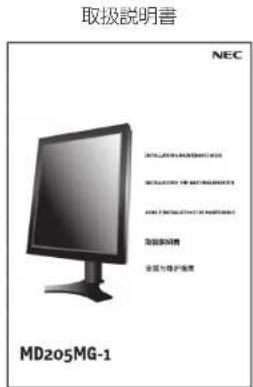
- Quick Reference Guide
• Installation and Maintenance Guide
• Video Signal Cable (DVI-D to DVI-D cable) (Dual link) - CD-ROM
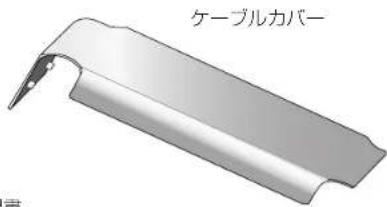
- Cable Cover
- CD-ROM
- Cable Cover

CD-ROM

natural_image
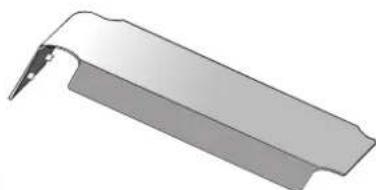
Illustration of a metallic mechanical component with a curved edge and a flat blade (no text or symbols)Cable Cover

natural_image
Four types of gray cable connectors tied with string, no text or symbols visiblePower Cord
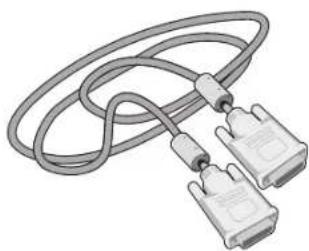
natural_image
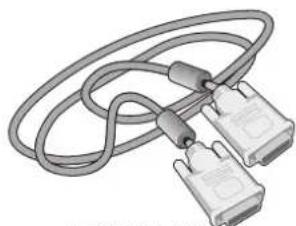
Illustration of a coiled cable with two connected connectors (no text or symbols)Video Signal Cable


natural_image
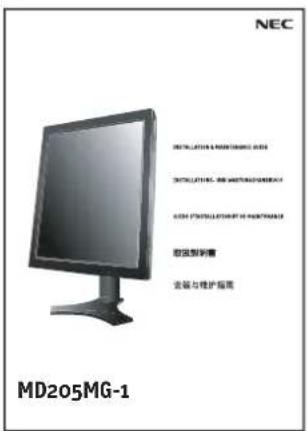
Front view of a flat-screen computer monitor with a black stand (no text or symbols visible)Quick Reference Guide Installation & Maintenance Guide
For complete display card instructions, please refer to the display card installation guide.
For GammaComp MD Quality Control Software, please refer to GammaComp MD User's Guide.
* Remember to save your original box and packing material to transport or ship the display.
Quick Start
Display Card Installation
- Following your PC manufacturer's guidelines, open your computer to access the PCI, AGP or PCI E slot.
- Place the display card into an available PCI, AGP or PCI E slot and secure all screws.
- Replace the computer cover.
NOTE: For information on installing drivers, display modes in multimonitor mode, setting the dip switches, please refer to the display card manufacturer's documentation.
Connecting the LCD to Your PC
Once the display card is successfully installed, follow these instructions to connect the display to your PC.
- Shut down your computer and turn off the power.
- Connect the DVI-D signal cable to the connector of the display card in your system (Figure A.1). Tighten all screws.
NOTE: For dual displays, plug a DVI-D cables into Port 1 and Port 2 of the display card (Figure A.1).
For further information on display card installation, refer to the display card manual.
- Rotate the screen to portrait mode. Refer to "Screen Rotation" section in this manual.
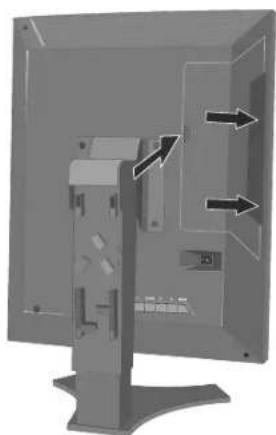
- Remove the connector cover by pressing this mark (III) to unlock. Slide the cover to remove (Figure B.1).
- Connect the DVI-D signal cable to the connector on the back of the display (Figure C.1).
NOTE: Incorrect cable connections may result in irregular operation, damage display quality/components of LCD module, and/or shorten the module life.
- Connect one end of the power cord to the AC inlet on the back of the display and the other end to the power outlet (Figure C.1). Replace the connector cover.
NOTE: Please refer to the "Power Cord Important Information" section of this manual for proper selection of AC power cord.
- Place the DVI cable and the power cable into the specific hooks as indicated (Figure D.1).
NOTE: Make sure all cables are resting flat against the stand.
Please check Raise and Lower, Screen Rotation, and Tilt and Swivel functions (page 5) when you manage cables.
Figure C.1 Figure D.1 Figure B.1
natural_image
3D rendering of a computer monitor with visible internal components and directional arrows indicating flow or movement (no text or symbols)
natural_image
Diagram of a computer monitor with internal components and cable, no visible text or symbols
natural_image
Diagram of a computer monitor with cable routing and control panel (no text or symbols)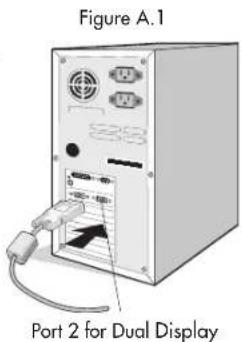
Quick Start –continued
-
Hold all cables firmly and place the cable cover onto the stand (Figure E.1). To remove the cable cover, lift the cover off as shown in Figure F.1.
-
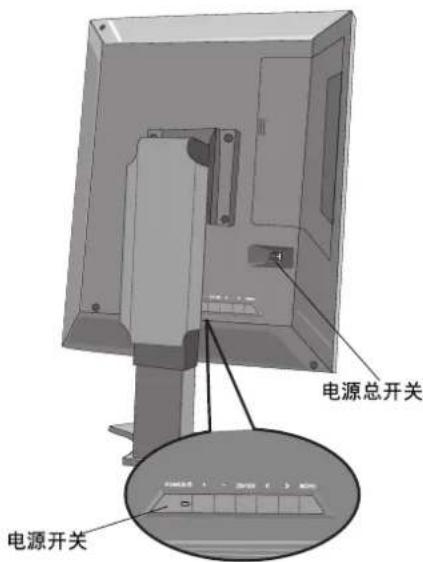
Before operating the display, turn the Vacation Switch, located on the back of the monitor (Figure G.1) to the ON position. After the Vacation Switch is on, then the display can be turned on/off using the power button that is also located on the back of the display.
NOTE: DO NOT switch on/off repeatedly.
-
The display is set to DVI "Dual Link" mode as a factory default. Power up the PC, so that the display receives a video signal. If operation in "Single Link" mode is required, use the rear buttons on the display to change the DVI Link mode. Press "+" "-" "ENTER", "+" "-" and select "Single Link". After changing the DVI Link mode, please reboot the PC again.
-
For further adjustments, please refer to the OSD section for a full description of OSD controls.
NOTE: If you have any problems, refer to the Troubleshooting section.
NOTE: External equipment intended for connection to signal input, signal output, or other connectors, must comply with the relevant IEC standard.
Figure F.1 Figure G.1 Figure E.1

Display Adjustment & Mounting
Raise and Lower Display Screen
The display may be raised or lowered in either portrait or landscape mode. To raise or lower the screen, place hands on each side of the display and lift or lower to the desired height.
NOTE: Handle with care when raising or lowering the display screen and avoid pinching your fingers.
Screen Rotation
Before rotating, the screen must be raised to the highest level to avoid knocking the screen on the stand or pinching your fingers. To rotate the screen, place hands on each side of the display screen and turn clockwise from landscape to portrait or counterclockwise from portrait to landscape. To rotate the orientation of the OSD menu between landscape and portrait, refer to the "OSD" section, "OSD Rotation" function.
Tilt and Swivel
Grasp the left and right sides of the display screen with your hands and adjust the tilt and/or swivel as desired.
NOTE: Handle with care when tilting the screen.

Figure S.1
Figure S.2
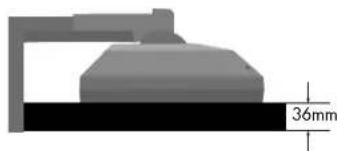
Remove Stand for Mounting
This stand can be removed in order to mount the display using an alternate, VESA approved, mounting method.
- Disconnect all cables.
- Place hands on each side of the display and lift up to the highest position.
Rotate the screen 90° counter clockwise to the landscape position. - In the landscape position, place the display face down on a nonabrasive surface. Place the screen on at least a 36mm platform so that the stand is parallel with the surface (Figure S.1).
- Remove the 4 screws connecting the display to the stand (Figure S.2).
NOTE: Reverse the process to reattach stand.
Handle with care when removing monitor stand.
natural_image
Technical diagram of a mechanical assembly with a 36mm dimension label (no other text or symbols)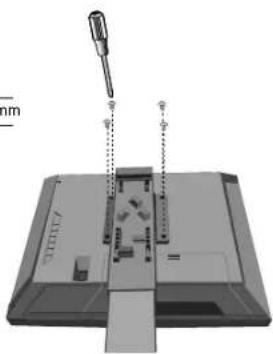
natural_image
3D diagram of a device with a screwdriver inserted, showing internal components and a labeled dimension (no text or symbols present)Flexible Arm Installation
Use a flexible arm that is strong enough to support the weight of the display (approx 7.3kg). Use the 4 screws that were removed from the stand to attach the flexible arm to the display (Figure S.3).
NOTE: Use the original screws (4 pcs) when mounting to avoid damage to the display and stand. To fulfill the safety requirements the display must be mounted to an arm which guarantees the necessary stability under consideration of the weight of the display. The display can only be used with an approved arm (e.g. GS mark).
Figure S.3

natural_image
3D diagram of a device with a car and control panel, no visible text or symbolsUser Controls
The On-Screen Display (OSD) control buttons are located on the back of the display. To access the OSD menu, press the Menu button.
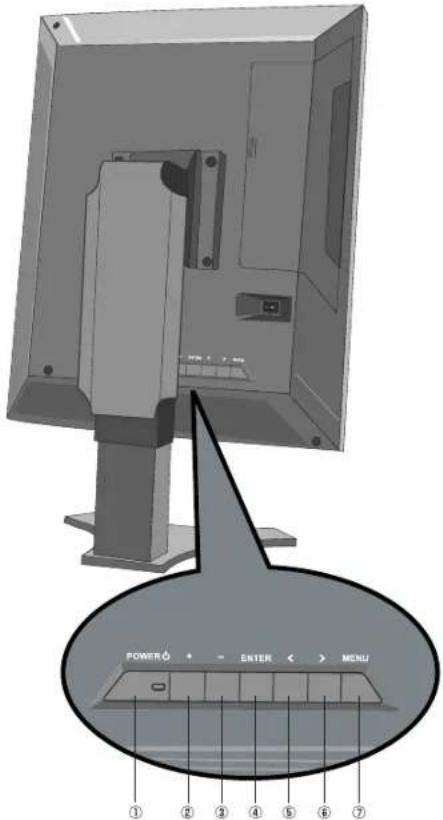
- Power Tums the display ON and OFF.
Power indicator: Green - Normal
Orange - Power saving, No signal
Off - Power off
2/3. +/- Move the bar left/right to increase or decrease the adjustment.
- Enter Enter the OSD menu and sub menu.
5/6. </> Move the function of the OSD menu and the OSD sub menu.
You can access the Hot key mode (Brightness and Contrast) directly, while the OSD menu is off.
- Menu Access the OSD menu. Exit the OSD menu and the OSD sub menu.
On-Screen Display
Image setting
Brightness: Adjusts the overall image and background screen brightness.
Press "+" or "-" to adjust.
Note: When backlight sensor is enabled by "Light set" selections 2 \~ 5, this function is disabled.
Contrast: Adjusts the image brightness in relation to the background.
Press "+" or "-" to adjust.
G. Gamma setting
Gamma: Allows adjustment of monitor Gamma (Grayscale tone curve).
There are six selections.
1: Gamma off Native Gamma.
2: Gamma 1.8 Sets the Gamma value to 1.8
3: Gamma 2.0 Sets the Gamma value to 2.0
4: Gamma 2.2 Sets the Gamma value to 2.2
5: Gamma DICOM Factory calibrated DICOM GSDF (Grayscale Standard Display Function) is active.
6: Gamma User Programmable gamma curve is active for NEC GammaCompMD software calibration.
BackLight sensor setting
Light set: Sets the output luminance of the monitor.
Continuous brightness stabilization setting.
There are five selections.
1: Light off No backlight stabilization.
2: Light 300 Sets brightness to 300cd/m ^2
3: Light 400 Sets brightness to 400cd/m ^2 (Recommended setting for optimal product lifetime and performance)
4: Light 500 Sets brightness to 500cd/m ^2
5: Light 600 Sets brightness to 600cd/m ^2
System Information
Sys Info: Provides information about the current resolution and technical data.
Includes: Horizontal and Vertical frequencies, Display resolution, The name of MCU&FPGA, MCU (Micro Controller Unit) version (Mver) and FPGA (Field Programmable Gate Array) version (Fver)
^a osp, OSD rotate & language setting
OSD Rotation: To switch OSD between landscape and portrait mode.
1 (Normal): Landscape mode
2 (Rotation): Portrait mode
OSD language: OSD control menus are available in seven languages.
Press "<" or "> " to select.
1: English
2: Japanese
3: German
4: French
5: Italian
6: Spanish
7: Swedish
Misc
Reset All: Selecting Reset allows you to reset all OSD control settings.
OSD Lock Out: This control locks out access to all OSD control functions. When attempting to activate OSD controls while in the Lock Out mode, a screen will appear indicating that the OSD controls are locked out. To activate the OSD Lock Out function, press ENTER and hold down for at least 5 seconds.
To deactivate the OSD Lock Out function, press ENTER and hold down for at least 5 seconds while in the OSD menu. No controls can be adjusted while in the lock out mode.
OSD Warning
No Sync: This function gives a warning when there is no Horizontal or vertical Sync.
After power is turned on or when there is a change of input signal, the No Sync window will appear.
English.7
Recommended Use
Safety Precautions and Maintenance

FOR OPTIMUM PERFORMANCE, PLEASE NOTE THE FOLLOWING WHEN SETTING UP AND USING THE NEC DISPLAY:

- DO NOT OPEN THE Display. There are no user serviceable parts inside and opening or removing covers may expose you to dangerous shock hazards or other risks. Refer all servicing to qualified service personnel.
- Do not spill any liquids into the cabinet or use your display near water.
- Do not insert objects of any kind into the cabinet slots, as they may touch dangerous voltage points, which can be harmful or fatal or may cause electric shock, fire or equipment failure.
- Do not place any heavy objects on the power cord. Damage to the cord may cause shock or fire.
- Do not place this product on an unbalanced or unstable cart, stand or table because the display may fall, causing serious damage.
- Do not place any objects onto the display and do not use the display outdoors.
• The lamps in this product contain mercury. Please dispose according to state, local or federal law.
- Do not bend power cord.
- Do not use display in high temperatured, humid, dusty, or oily areas.
- Do not cover vent on display.
Immediately unplug your display from the wall outlet and refer servicing to qualified service personnel under the following conditions:
- When the power supply cord or plug is damaged.
- If liquid has been spilled, or objects have fallen into the display.
- If the display has been exposed to rain or water
- If the display has been dropped or the cabinet damaged.
- If the display does not operate normally by following operating instructions.
- If glass is broken, handle with care.
- If display or glass is broken, do not come in contact with the liquid crystal and handle with care.
- Allow adequate ventilation around the display so that heat can properly dissipate. Do not block ventilated openings or place the display near a radiator or other heat sources. Do not put anything on top of display.
- The power cable connector is the primary means of detaching the system from the power supply. The display should be installed close to a power outlet which is easily accessible.
CAUTION • Handle with care when transporting. Save packaging for transporting.
Image Persistence
Please be aware that LCD Technology may experience a phenomenon known as Image Persistence. Image Persistence occurs when a residual or "ghost" image of a previous image remains visible on the screen. Unlike CRT monitors, LCD monitors' image persistence is not permanent, but constant images being displayed for a long period of time should be avoided. To alleviate image persistence, turn off the monitor for as long as the previous image was displayed. For example, if an image was on the monitor for one hour and a residual image remains, the monitor should be turned off for one hour to erase the image. NOTE: As with all personal display devices, we recommend displaying moving images and using a moving screen saver at regular intervals whenever the screen is idle or turning off the display when not in use.

CORRECT PLACEMENT AND ADJUSTMENT OF THE DISPLAY CAN REDUCE EYE, SHOULDER AND NECK FATIGUE. CHECK THE FOLLOWING WHEN YOU POSITION THE DISPLAY:

- For optimum results during self and copy calibrations, allow 30 minutes for warm-up.
- Adjust the display height so that the top of the screen is at or slightly below eye level. Your eyes should look slightly downward when viewing the middle of the screen.
- Position your display no closer than 16 inches and no further away than 28 inches from your eyes. The optimal distance is 20 inches.
- Rest your eyes periodically by focusing on an object at least 20 feet away. Blink often.
- Position the display at a 90° angle to windows and other light sources to minimize glare and reflections. Adjust the display tilt so that ceiling lights do not reflect on your screen.
- Clean the display surface with a lint-free, non-abrasive cloth. Case of persistent dirt, wipe with cloth permeated by water, ethanol, isopropyl-alcohol completely. Avoid using any cleaning solution or glass cleaner (ex Acid, Alkali and Acetone).
- Adjust the display's brightness control to enhance readability.
- Position whatever you are looking at most of the time (the screen or reference material) directly in front of you to minimize turning your head while you are typing.
- Avoid displaying fixed patterns on the display for long periods of time to avoid image persistence (after-image effects).
Ergonomics
To obtain the best possible ergonomics benefits, we recommend the following:
- Use the preset Size and Position controls with standard signals
- Use non-interlaced signals with a vertical refresh rate of 60Hz
Cleaning the LCD Panel
- When the liquid crystal panel is stained with dust or dirt, please wipe with soft cloth gently.
- Please do not rub the LCD panel with hard material.
- Please do not apply pressure to the LCD surface.
- Please do not use OA cleaner it will cause deterioration or discolor on the LCD surface.
Cleaning the Cabinet
- Unplug the power supply
• Gently wipe the cabinet with a soft cloth
• To clean the cabinet, dampen the cloth with a neutral detergent and water, wipe the cabinet and follow with a dry cloth.
NOTE: Many plastics are used on the surface of the cabinet. DO NOT clean with benzene, thinner, alkaline detergent, alcoholic system detergent, glass cleaner, wax, polish cleaner, soap powder, or insecticide. Do not touch rubber or vinyl to the cabinet for a long time. These types of fluids and fabrics can cause the paint to deteriorate, crack or peel.

natural_image
Silhouette of a person sitting at a desk with a computer, viewed from the side (no text or symbols present)Specifications
Display Specifications MD205MG-1 Display Notes
| LCD Module Diagonal: 51.0 cm/20.1 inches Active matrix; thin film transistor (TFT) liquidViewable Image Size: 51.0 cm/20.1 inches crystal display (LCD); 0.156 mm dot pitch;Native Resolution (Pixel Count): 2048 x 2560 (Portrait) 400 cd/m ^2 calibrated white luminance;2560 x 2048 (Landscape) 600:1 contrast ratio, typical. | |
| Input Signal Video: Digital Input: DVI VideoDot Clock 320Mhz Max (Dual link)VideoDot Clock 160Mhz Max (Single link) | |
| Grayscale Tones 10 Bit: 1024 (10bit) shades of gray froma pallet of 3061 (11.5bit)8 Bit: 256 (8bit) shades of gray from a When used with an recommended pallet of 3061 (11.5 bit) 8 bit display card | |
| Input signal timing Horizontal: 119 kHzVertical: 57.7 Hz | |
| Viewing Angle Left/Right: ±85° (CR > 10)Up/Down: ±85° (CR > 10) | |
| Image Formation Time 30 ms (Typ.) | |
| Active Display Area Portrait: Horiz.: 319 mm/12.6 inchesVert.: 399 mm/15.7 inchesLandscape: Horiz.: 399 mm/15.7 inchesVert.: 319 mm/12.6 inches | |
| Power Supply AC 100-240V ~ 50/60Hz | |
| Current Rating 3 - 1.5 A | |
| Dimensions Portrait: 379.6 mm (W) x 512.7 - 632.7 mm (H) x 247.3 mm (D)14.9 inches (W) x 20.9 - 24.9 inches (H) x 9.7 inches (D)Landscape: 474.3 mm (W) x 465.3 - 585.3 mm (H) x 247.3 mm (D)18.7 inches (W) x 18.3 - 23.0 inches (H) x 9.7 inches (D)Height Adjustment: 120 mm/4.72 inches | |
| Weight 9.8 kg/21.6 lbs | |
| Environmental ConsiderationsOperating Temperature: 10°C to 40°C/50°F to 104°FHumidity: 30% to 75% (without condensation)Feet: 0 to 10,000 Feet/0 to 3,048 mStorage Temperature (in package): -10°C to 60°C/14°F to 140°FHumidity (in package): 10% to 85% (without condensation)Feet (in package): 0 to 40,000 Feet/0 to 12,192 m |
UL-Classification
According to the type of protection against electric shock: CLASS I
According to the degree of protection against electric shock: No Patient connection
According to the degree of protection against ingress of water as detailed in the current edition of IEC529: No Protection
According to the method of sterilization or disinfection recommended by the manufacturer: Not Specified
According to the degree of safety of application in the presence of a FLAMMABLE AN AESTHETIC MIXTURE WITH AIR or a WITH OXYGEN OR NITROUS OXIDE: Not suitable
According to the mode of operation: Continuous operation
Features
DVI-D: The digital-only subset of DVI ratified by the Digital Display Working Group (DDWG) for digital connections between computers and displays. As a digital-only connector, analog support is not provided off a DVI-D connector. As a DVI-based digital only connection, only a simple adapter is necessary for compatibility between DVI-D and other DVI-based digital connectors such as DFP and P&D.
P&D (Plug and Display): The VESA standard for digital flat panel display interfaces. It is more robust than DFP since it allows for other options off a signal connector (options like USB, analog video and IEEE-1394-995). The VESA committee has recognized that DFP is a subset of P&D. As a DVI-based connector (for the digital input pins), only a simple adapter is necessary for compatibility between P&D and other DVI-based digital connector such as DVI and DFP.
Pivoting Stand: Allows users to adjust the display to the orientation that best fits their application, either Landscape orientation for wide documents, or portrait orientation for the ability to preview a full page on one screen at one time.
Reduced Footprint: Provides the ideal solution for environments requiring superior image quality but with size and weight limitations. The display's small footprint and low weight allow it to be moved or transported easily from one location to another.
OSD (On-Screen-Display) Controls: Allow you to quickly and easily adjust all elements of your screen image via simple to use on-screen menus.
Anti-glare and Low-reflection Screen: an anti-glare and low-reflection screen reduces glare and ambient reflection. The BLACK level perception of the display is improved resulting in a clearer image.
Wide Viewing Angle Technology: Allows the user to be able to see the display from any angle (170 degrees) from any orientation — Portrait or Landscape. Provides full 170^ viewing angles either up, down, left or right.
VESA Standard Mounting Interface: Allows users to connect their display to any VESA standard third party mounting arm or bracket. Allows for the display to be mounted on a wall or an arm using any third party compliant device.
Troubleshooting
No picture
- The signal cable should be completely connected to the display card/computer.
- The display card should be completely seated in its slot.
- The vacation switch should be in the ON position.
- Power button should be in the ON position and the computer should be powered on.
- Check to make sure that a supported mode has been selected on the display card or system being used. (Please consult display card or system manual to change graphics mode.)
- Check the display and your display card with respect to compatibility and recommended settings.
- Check the signal cable connector for bent or pushed-in pins.
Vacation Switch does not respond
- Unplug the power cord of the display from the AC outlet to turn off and reset the display.
- Check the Vacation Switch on the back of the display.
Image Persistence
- Please be aware that LCD Technology may experience a phenomenon known as Image Persistence. Image Persistence occurs when a residual or "ghost" image of a previous image remains visible on the screen. Unlike CRT monitors, LCD monitors' image persistence is not permanent, but constant images being displayed for a long period of time should be avoided. To alleviate image persistence, turn off the monitor for as long as the previous image was displayed. For example, if an image was on the monitor for one hour and a residual image remains, the monitor should be turned off for one hour to erase the image.
NOTE: As with all personal display devices, we recommend using a moving screen saver at regular intervals whenever the screen is idle or turning off the display when not in use.
Image is unstable, unfocused or swimming is apparent
- Signal cable should be completely attached to the computer.
- Check the display and your display card with respect to compatibility and recommended signal timings.
- If your text is garbled, change the video mode to non-interlace and use 60Hz refresh rate.
Display image is not sized properly
- Check to make sure that a supported mode has been selected on the display card or system being used. (Please consult display card or system manual to change graphics mode.)
No Video
- If no video is present on the screen, turn the Power button off and on again.
- Make certain the computer is not in a power-saving mode (touch the keyboard or mouse).
The Message "Error Link Message" is displayed
- The display is set to DVI "Dual Link" mode as factory default. If operation in "Single Link" mode is required, use the rear buttons on the display to change the DVI Link mode. Press "+",-", "ENTER", "+",-" and select "Single Link". After changing the DVI Link mode, please reboot the PC again.
References
North America and Canada
NEC Monitor Customer Service & Support
Customer Service and Technical Support: (800) 632-4662
Fax: (801) 907-3805
Parts and Accessories/Macintosh
Cable Adapter: (800) 632-4662
Warranty Information: www.necdisplay.com
Online Technical Support www.necdisplay.com
Sales and Product Information
Sales Information Line: (888) 632-6487
Canadian Customers: (866) 771-0266, Ext#: 4037
Government Sales: (800) 284-6320
Government Sales email: gov@necdisplay.com
Electronic Channels
World Wide Web: www.necdisplay.com
Product Registration: www.necdisplay.com
Drivers and Downloads www.necdisplay.com
Europe
Sales and Product Information
NEC Display Solutions Europe GmbH
Phone: +49(0)89 99699 - 0
Landshuter Allee 12 -14
D-80637 München
Medical Display Customer Service & Support
Phone: +49(0)89 99699 666
Email: med-support@nec-displays.com
Electronic Channels
World Wide Web: www.medical.nec-display-solutions.com
Drivers and Downloads:
www.medical.nec-display-solutions.com
English.12
DECLARATION OF CONFORMITY
For USA
FCC Information
- Use the attached specified cables with the MD205MG-1 grayscale display so as not to interfere with radio and television reception.
(A) Please use the supplied power cord or equivalent to ensure FCC compliance.
(B) Please use the supplied shielded video signal cable.
Use of other cables and adapters may cause interference with radio and television reception. - This equipment has been tested and found to comply with the limits for a class A digital device, pursuant to Part 15 of the FCC Rules. These limits are designed to provide reasonable protection against harmful interference when the equipment is operated in a commercial environment. This equipment generates, uses, and can radiate radio frequency energy and, if not installed and used in accordance with the instruction manual, may cause harmful interference to radio communications. Operation of this equipment in a residential area is likely to cause harmful interference in which case the user will be required to correct the interference at his own expense.
If necessary, the user should contact the dealer or an experienced radio/television technician for additional suggestions. The user may find the following booklet, prepared by the Federal Communications Commission, helpful: "How to Identify and Resolve Radio-TV Interference Problems." This booklet is available from the U.S. Government Printing Office, Washington, D.C., 20402, Stock No. 004-000-00345-4.
For Europe
Means of Conformity
Device Classification: Class I, non-measuring function
Applicable Rules: Annex IX, Rules 1.4 (Section 1) and 1.1 (Section 3)
Product Name: NEC MD205MG-1
20.1" Diagnostic Imaging Grayscale LCD Monitor
Model Numbers: MD205MG-1
UMDNS Code: 16-603
NEC Display Solutions Europe GmbH declares that the products listed are in conformity with the essential requirements and provisions of the Council Directive 93/42/EEC and conform to the applicable clauses of the following standards:

- EN 60601-1
- EN 60601-1-2
- EN 61000-3-2
- EN 61000-3-3
NEC Display Solutions Europe GmbH
Landshuter Allee 12-14. 80637 Muenchen, Germany
For Canada
Canadian Department of Communications Compliance Statement
DOC: This Class A digital apparatus meets all requirements of the Canadian Interference-Causing Equipment Regulations.
C-UL: Bears the C-UL Mark and is in compliance with Canadian Safety Regulations according to CAN/CSA C22.2 No. 601.1.


English.14


WARNUNG

natural_image
Four types of gray cable connectors tied with string, no text or symbols visibleNetzkabel

natural_image
Illustration of a coiled cable with two connected connectors (no text or symbols)
natural_image
Front view of a flat-screen computer monitor with a black stand (no text or symbols visible)natural_image
3D rendering of a computer monitor with visible scrollbars and control panel, showing directional arrows indicating movement (no text or symbols)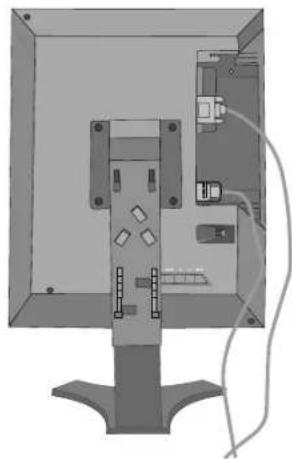
natural_image
Diagram of a computer monitor with cable and connectors, no visible text or symbols
natural_image
Diagram of a computer monitor with cable routing and ventilation slots (no text or symbols)Deutsch.3
natural_image
Illustration of a hand holding a tool interacting with a mechanical component (no text or symbols visible)
natural_image
Illustration of a hand pressing down on a computer monitor (no text or symbols visible)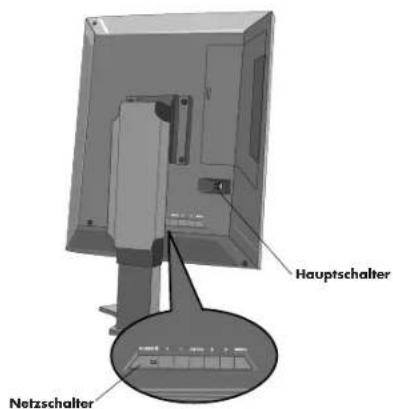
natural_image
Two identical computer monitors with hands holding up and down arrows indicating orientation (no text or symbols)Bildschirmdrehung
natural_image
Illustration of two computer monitors with hands holding different positions (no text or symbols)
natural_image
Two identical cartoon-style computer monitors with arms and legs, each holding a small object (no text or symbols)natural_image
Technical diagram of a mechanical assembly with a 36 mm dimension label (no text or symbols beyond the measurement)Abbildung S.2

natural_image
3D diagram of a device with a pen inserted, showing internal components and a ruler above it (no text or symbols)natural_image
Diagram of a device with a car and control panel, no visible text or symbolsEinstellungen
natural_image
Silhouette of a person sitting at a desk using a computer, viewed from the side (no text or symbols visible)Technische Daten
natural_image
Illustration of a metallic mechanical component with a curved tip and circular base (no text or symbols)Cache-câbles

natural_image
Four types of gray cable connectors tied with string, no text or symbols visiblenatural_image
Illustration of a coiled cable with two connected connectors (no text or symbols)
natural_image
Front view of a flat-screen computer monitor with a black stand (no text or symbols visible)natural_image
Illustration of a computer tower with ports and cables (no text or symbols visible)Figure C.1 Figure D.1 Figure B.1

natural_image
3D rendering of a computer monitor with visible door, left side panel, and directional arrows indicating movement (no text or symbols)
natural_image
Diagram of a computer monitor with cable and labeled ports, no readable text or symbols present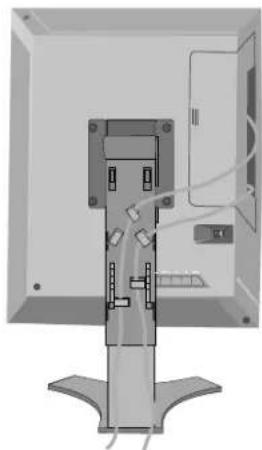
natural_image
Diagram of a computer monitor with cable routing and a control panel (no text or symbols visible)Français.3
Mise en marche rapide – suite
Figure F.1 Figure G.1 Figure E.1

natural_image
Two identical computer monitors with open hands, one with upward arrows and the other with downward arrows (no text or symbols)Rotation de l'écran
natural_image
Illustration of two computer monitors with hands holding and rotating, showing directional arrows (no text or symbols)natural_image
Two identical cartoon-style computer monitors with arms and legs, each holding a blank screen (no text or symbols)Figure S.1
Figure S.2
natural_image
Technical diagram showing a mechanical assembly with a 36 mm dimension label (no other text or symbols)natural_image
Diagram of a device with a pen inserted, showing internal components and a 3D model (no text or symbols)Figure S.3
Installation du bras flexible
natural_image
3D diagram of a vehicle chassis with sensor points and structural components (no text or labels)2 (Rotation) : Mode portrait
natural_image
Silhouette of a person sitting at a desk using a computer, viewed from behind (no text or symbols present)Spécifications
DÉCLARATION DE CONFORMITÉ
Pour les Etats-Unis
Informations de la FCC
natural_image
Illustration of a worker operating a computer monitor with a cylindrical device nearby (no text or symbols)
内部摘除
natural_image
Coiled cable and two connected connectors (no text or symbols visible)
natural_image
Illustration of a flat-screen computer monitor with a blank screen (no text or symbols)CD-ROM
(GammaComp MD Quality Control Software)

クイックリファレンス
日本語-5
使い方
別売品ビデオカードのインストール
natural_image
Three-panel diagram showing a computer monitor setup with cable, left panel, and side view (no text or symbols)日本語-6
警告
natural_image
Diagram of an open computer monitor with internal components and a stand (no text or symbols visible)
natural_image
Illustration of a hand holding a tool interacting with a mechanical component (no text or symbols visible)图F.1图E.1图G.1

natural_image
Illustration of a hand pressing down on a computer monitor (no text or symbols visible)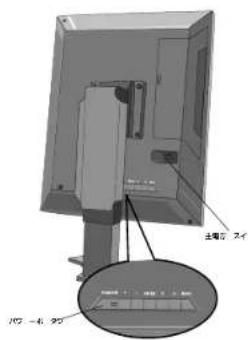
natural_image
Technical diagram showing a mechanical component with a 36mm dimension label (no other text or symbols)
natural_image
3D diagram of a device with a pen and labeled components, no readable text or symbols presentFigure S2Figure S1
お願い
natural_image
3D rendered diagram of a car interior with no visible text or symbolsFigure S3
お願い
1: English
2: Japanese
3: German
4: French
5: Italian
6: Spanish
7: Swedish
⇒リセット
natural_image
Illustration of a flat-screen computer monitor with a curved base (no text or symbols visible)
快速参考指南
安装与维护指南
natural_image
Illustration of two connected audio/video connectors with coiled cable (no text or symbols)视频信号线
natural_image
3D rendering of a gray metal bracket with a curved edge and a small protrusion (no text or symbols)电缆盖
用于双显示器的端口 2
图 D.1

natural_image
Diagram of a computer monitor with visible wiring and control panel (no text or symbols)图 B.1

natural_image
3D rendering of a computer monitor with two arrows pointing to the front panel (no text or symbols visible)图 E.1

natural_image
Illustration of a hand holding a tool interacting with a mechanical component (no text or symbols visible)图 C.1

natural_image
Interior view of a computer monitor with visible ports and cables (no text or labels)图 F.1

natural_image
Illustration of a hand pressing down on a computer monitor with an upward arrow (no text or symbols)简体中文-3
图 G.1
natural_image
3D diagram of a device with a screwdriver inserted, showing internal components and connections (no text or symbols)图S.2
柔性臂安装
natural_image
3D diagram of a device with a central component and three vertical arrows pointing to it, mounted on a base (no text or symbols present)图S.3
natural_image
Silhouette of a person sitting at a desk using a computer, viewed from behind (no text or symbols present)Printed on recycled paper


- MD205MG-1
- Index
- CAUTION
- Power Cord Important Information
- Intended Use
- North America Customers
- European Customers
- Medical Imaging
- Contents
- Quick Start
- Display Card Installation
- Connecting the LCD to Your PC
- Quick Start –continued
- NOTE: DO NOT switch on/off repeatedly.
- Display Adjustment & Mounting
- Raise and Lower Display Screen
- Screen Rotation
- Tilt and Swivel
- Remove Stand for Mounting
- Flexible Arm Installation
- User Controls
- On-Screen Display
- Image setting
- Gamma setting
- BackLight sensor setting
- System Information
- a osp, OSD rotate & language setting
- Misc
- OSD Warning
- Recommended Use
- Safety Precautions and Maintenance
- FOR OPTIMUM PERFORMANCE, PLEASE NOTE THE FOLLOWING WHEN SETTING UP AND USING THE NEC DISPLAY:
- Image Persistence
- CORRECT PLACEMENT AND ADJUSTMENT OF THE DISPLAY CAN REDUCE EYE, SHOULDER AND NECK FATIGUE. CHECK THE FOLLOWING WHEN YOU POSITION THE DISPLAY:
- Ergonomics
- Cleaning the LCD Panel
- Cleaning the Cabinet
- Specifications
- UL-Classification
- Features
- Troubleshooting
- No picture
- Vacation Switch does not respond
- Image is unstable, unfocused or swimming is apparent
- Display image is not sized properly
- No Video
- The Message "Error Link Message" is displayed
- References
- North America and Canada
- Sales and Product Information
- Electronic Channels
- Europe
- DECLARATION OF CONFORMITY
- For USA
- FCC Information
- For Europe
- For Canada
- Canadian Department of Communications Compliance Statement
- WARNUNG
- Bildschirmdrehung
- Einstellungen
- Technische Daten
- Mise en marche rapide – suite
- Rotation de l'écran
- Installation du bras flexible
- Spécifications
- DÉCLARATION DE CONFORMITÉ
- Pour les Etats-Unis
- Informations de la FCC
- 使い方
- 別売品ビデオカードのインストール
- 警告
- お願い
- ⇒リセット
- 柔性臂安装
Brand : NEC
Model : MDG5MP-BNDL
Category : Monitor