HMP7001 - Media player PHILIPS - Free user manual and instructions
Find the device manual for free HMP7001 PHILIPS in PDF.

User questions about HMP7001 PHILIPS
0 question about this device. Answer the ones you know or ask your own.
Ask a new question about this device
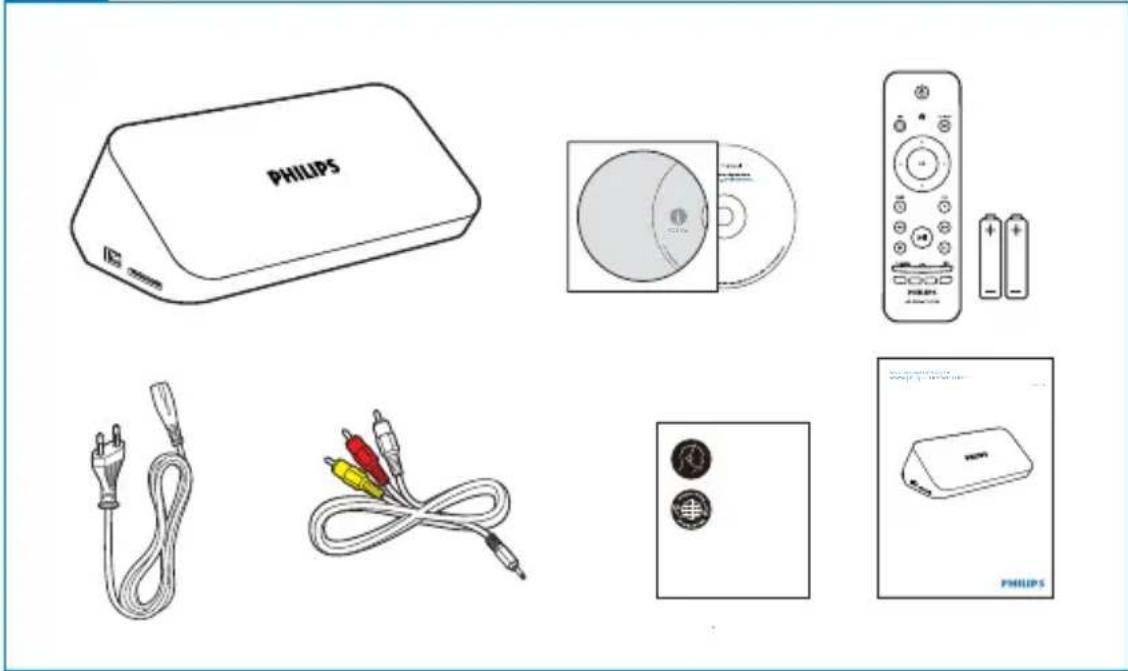
Download the instructions for your Media player in PDF format for free! Find your manual HMP7001 - PHILIPS and take your electronic device back in hand. On this page are published all the documents necessary for the use of your device. HMP7001 by PHILIPS.
USER MANUAL HMP7001 PHILIPS
Register your product and get support at
www.philips.com/welcome
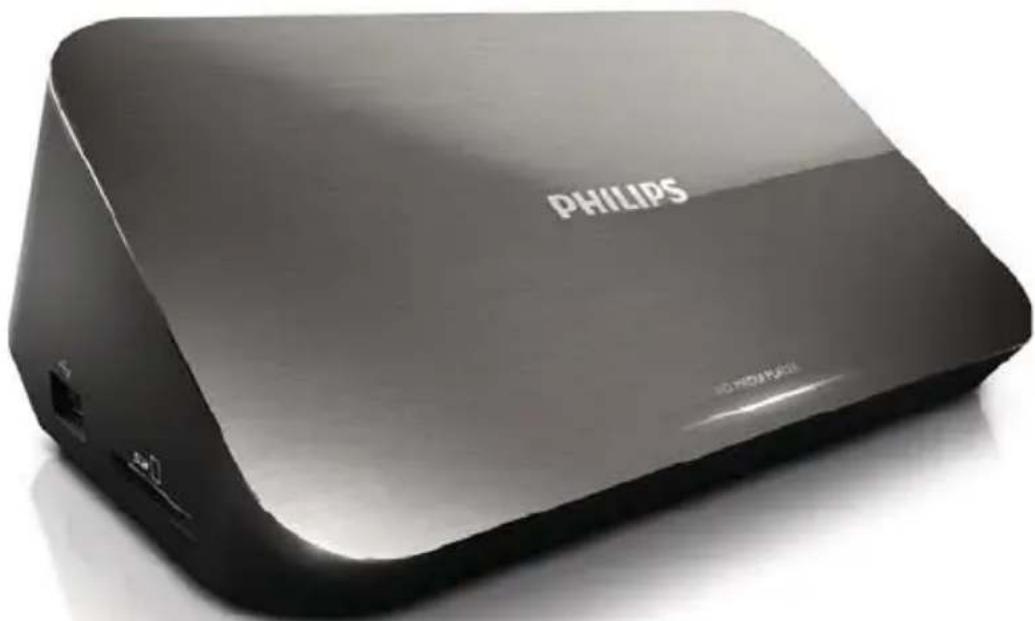
HMP7001
natural_image
Exterior view of a Philips 30-inch H263 electric vehicle (no signage or text beyond branding)User manual
PHILIPS
Trademark notice

HDMI, the HDMI logo, and High-Definition Multimedia Interface are trademarks or registered trademarks of HDMI licensing LLC in the United States and other countries.

Manufactured under license from Dolby Laboratories. Dolby and the double-D symbol are trademarks of Dolby Laboratories.

This item incorporates copy protection technology that is protected by U.S. patents and other intellectual property rights of Rovi Corporation. Reverse engineering and disassembly are prohibited. ABOUT DIVX VIDEO: DivX ^ is a digital video format created by DivX, LLC, a subsidiary of Rovi Corporation. This is an official DivX Certified ^ device that plays DivX video. Visit divx.com for more information and software tools to convert your files into DivX videos. ABOUT DIVX VIDEO-ON-DEMAND: This DivX Certified ^ device must be registered in order to play purchased DivX Video-on-Demand (VOD) movies. To obtain your registration code, locate the DivX VOD section in your device setup menu. Go to vod.divx.com for more information on how to complete your registration.. DivX Certified ^ to play DivX ^ and DivX Plus ^ HD (H.264/MKV) video up to 1080p HD including premium content. DivX ^ , DivX Certified ^ , DivX Plus ^ HD and associated logos are trademarks of Rovi Corporation or its subsidiaries and are used under license.
Manufactured under license under U.S. Patent Nos: 5,956,674; 5,974,380; 6,487,535 & other U.S. and worldwide patents issued & pending. DTS, the Symbol, & DTS and the Symbol together are registered trademarks & DTS 2.0+Digital Out is a trademark of DTS, Inc. Product includes software. © DTS, Inc. All Rights Reserved.

dlna
CERTIFIED
DLNA ^® , the DLNA Logo and DLNA CERTIFIED ^® are trademarks, service marks, or certification marks of the Digital Living Network Alliance.

The Wi-Fi CERTIFIED Logo is a certification mark of the Wi-Fi Alliance.


natural_image
Illustration of various electronic devices including Philips, CD, remote control, and power cord (no text or symbols on main objects)
text_image
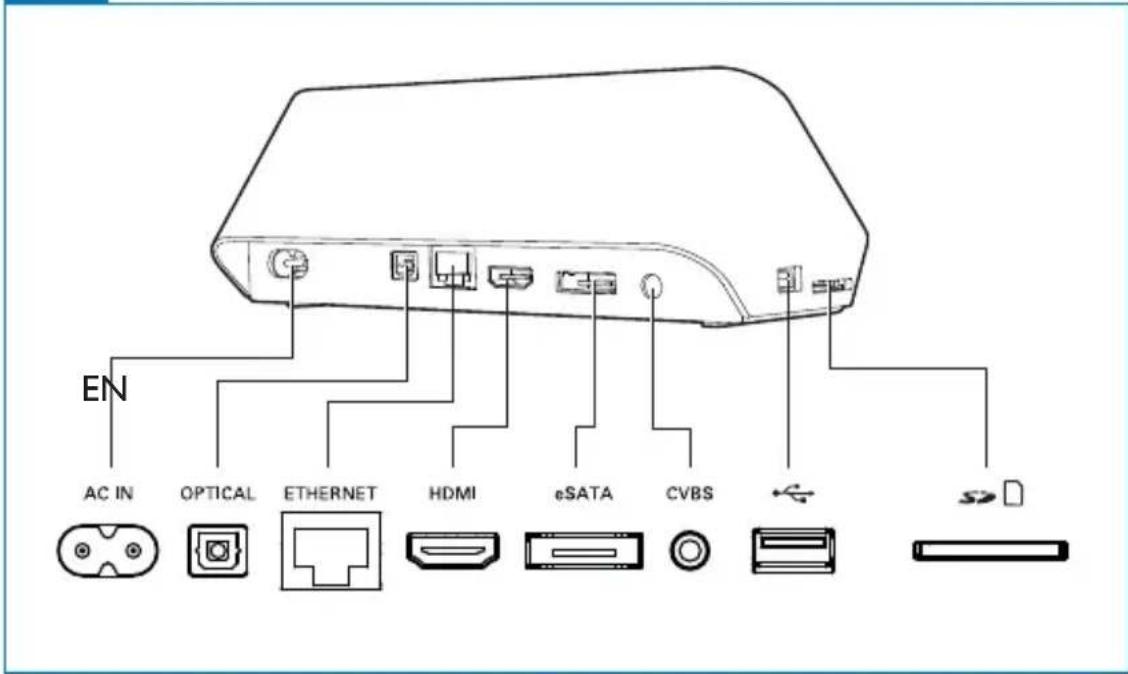
EN AC IN OPTICAL ETHERNET HDMI eSATA CVBS S
HDMI
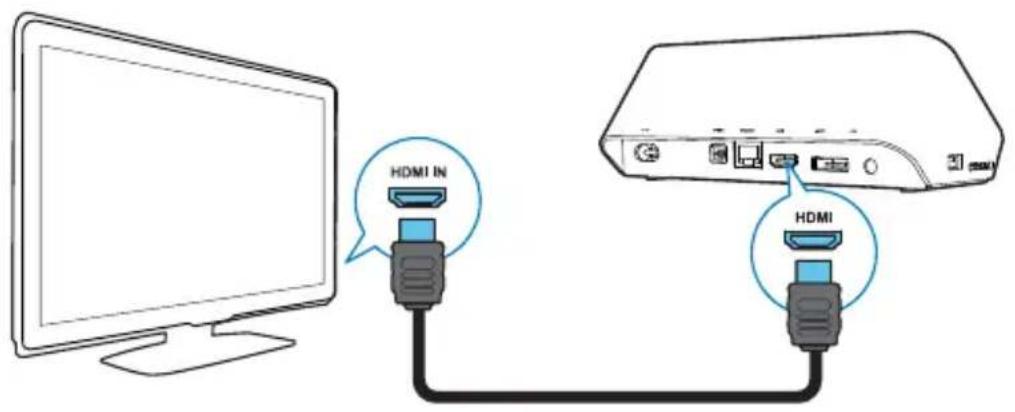
text_image
HDMI IN HDMITV OUT + AUDIO OUT ★ ★
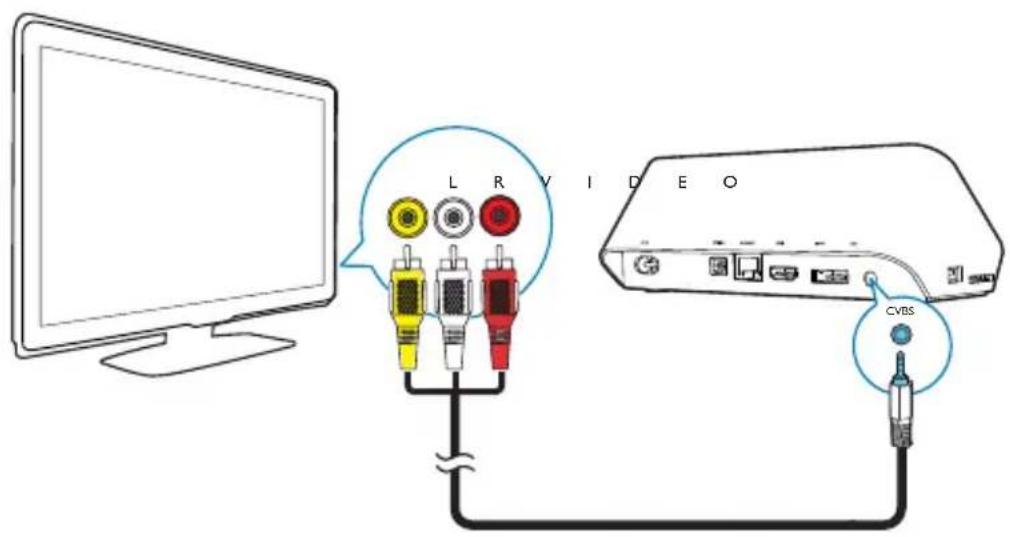
text_image
L R Y I D E O CVBS

natural_image
Three-step diagram showing a blue object being placed on a rectangular device, with arrows indicating motion direction (no text or symbols)
natural_image
Line drawing of a device with a plug inserted into a power outlet, connected to a network switch (no text or symbols present)
text_image
SOURCE TV AV / HDMI
text_image
Diagram showing device connection to a network card and monitor, with labeled components including USB card, Esata, and network setup.
text_image
Diagram showing device connection to a computer via USB and network storage, with labeled components including USBesata, Card, NetTV, and NetworkSetup.
text_image
PHILIPS E: 0.000mm
text_image
WiFi GPT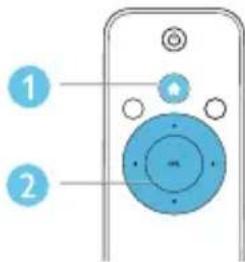
text_image
1 2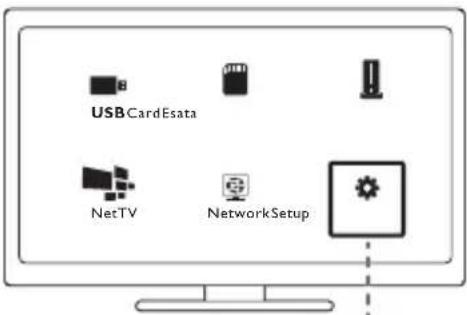
text_image
USBCardEsata NetTV NetworkSetup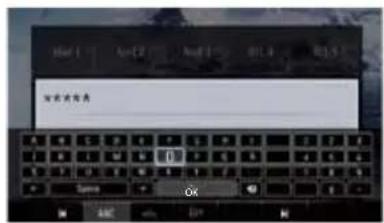
text_image
Mac 1 Apr 2 Jul 3 Oct 4 Oct 5 欢迎光临卡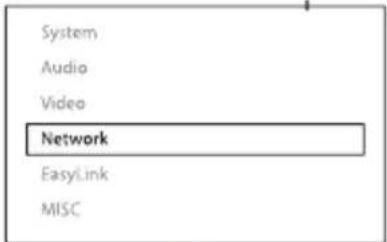
text_image
System Audio Video Network EasyLink MISC


text_image
Private AP Setting
text_image
Ethernet Wireless Network InfoContents
1 Control and play 9
2 Play options 11
Video options 11
Audio option 12
Photo options 12
3 File browsing 13
Browse all files 13
Browse movie files 14
Browse music files 15
Browse photo files 16
4 Manage files 17
Basic operations 17
5 Set up a network 19
Connect to the Internet 19
Wired network setup 20
6 Play from online services 22
Manage your applications 22
7 Play from your home network 24
Play media from an Android device 24
Play media files from a computer (DLNA) 27
8 Play a 3D media file 28
2D to 3D conversion 28
9 Other setup 29
System 29
Audio 30
Video 30
Network 31
MISC 31
10 EasyLink 32
11 Update software 33
Update software through the Internet 33
Update software through USB 33
12 Troubleshooting 35
13 Specification 37
1 Control and play
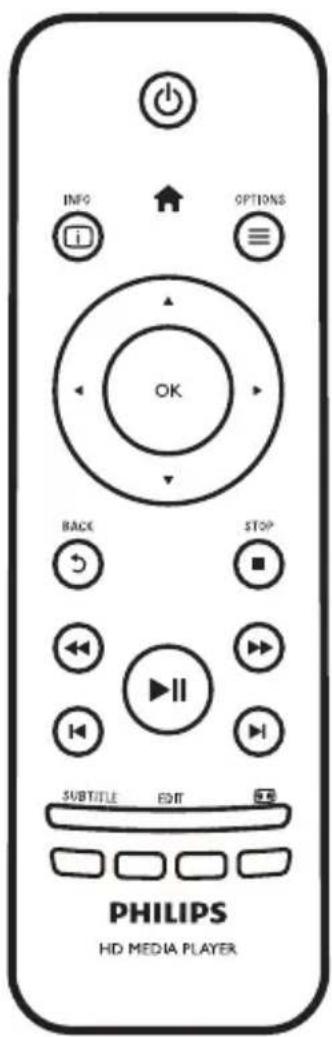
Use your remote control to control the play.
| Function Buttons / Actions | |
| Stop the play. | ■ |
| Pause or resume the play. | ▶|| |
| Skip to the previous/ next media file. | |◀/▶| |
| Return to the home page. | ^ |
| Zoom in or out. | Press 📋 repeatedly.To pan through an enlarged photo, press ▲▼.◀▶ |
| Search backward/forward fast. | Press ◀◀/▶▶ repeatedly to select a speed. |
| Access subtitle settings. SUBTITLE | |
| Rotate a photo. | Press ▲/▼ |
| Navigate menus. | ▲▼◀▶ |
| Confirm a selection or entry. OK | |
| Access option menus during play or in the file list. | ≡ |
| Access the file editing menu in the file folder list. | EDIT |
| Display current playback information. | i |
| Return to the previous menu. | ↘ |
text_image
INFO OPTIONS OK BACK STOP SUBTITLE EDIT PHILIPS HD MEDIA PLAYER
Note
- You can only play DivX videos that were rented or purchased with DivX® registration code in this player. (Refer to "Setup" > "MISC" > [DivX®VOD Code])
- Subtitle files with the following filename extensions (.srt, .smi, .sub, .ssa, .ass, .txt) are supported but not displayed in the file list.
- The subtitle filename has to be the same as the filename of the DivX video (the file extension excluded).
- The DivX video file and the subtitle file must be saved under the same directory.
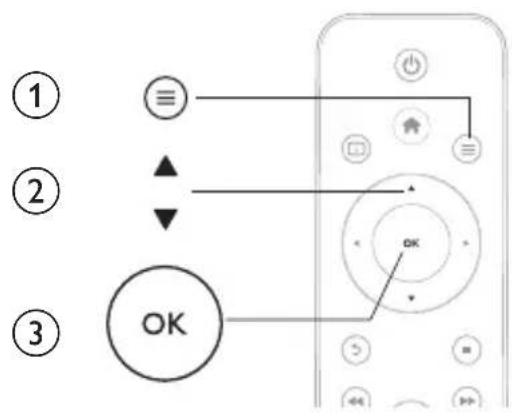
2 Play options
During play, press to access the option items.
text_image
① ② ③ OKVideo options
[Subtitle]: Adjust subtitle settings. Press to select an item and adjust values. Then press OK to confirm.
[Audio]: Select an audio language.
[GOTO]: Skip play to the specific time. Press ◀▶ to select an item and ▲ to adjust values. Then press OK to confirm.
[Repeat Title]: Repeat the current title.
[Repeat All]: Repeat the movie file.
[Repeat Off]: Turn off a repeat mode.

Note
• To use 3D related functions, connect this player to a 3D TV through an HDMI cable.
[2D]: Restore a video to 2D format.
[3D Simulation] (3D simulation): Convert a 2D video to 3D format.
[3D Side by Side] (3D side by side): Convert a video in side by side format to 3D format.
[3D Top Bottom] (3D top bottom): Convert a video in top and bottom format to 3D format.
[Video Setting]: Adjust the video settings. Press ▲▼ to select an item and ▶▶ adjust values. Then press OK to confirm.
Audio option
[Repeat Off]: Turn off a repeat mode.
[Repeat One]: Repeat the current music file.
[Repeat All]: Repeat all the music flies.
[Shuffle Loop]: Play music files in a random loop.
Photo options
[Slide Timing]: Set a display interval for a slideshow.
[Slide Transition]: Select a transition effect for a slideshow.
[Repeat Off]: Turn off a repeat mode.
[Repeat All]: Repeat all the photo flies.
[Shuffle Loop]: Play photo files in a random loop.
[Background Music]: Select and play a music file during slideshow.

Note
• To use 3D related functions, connect this player to a 3D TV through an HDMI cable.
[2D]: Restore a photo to 2D format.
[3D Auto] (3D Auto): Convert a 2D photo to 3D format.
[3D Side by Side] (3D side by side): Convert a photo in side by side format to 3D format.
[3D Top Bottom] (3D top bottom): Convert a photo in top and bottom format to 3D format.
[Video Setting]: Adjust the video settings.
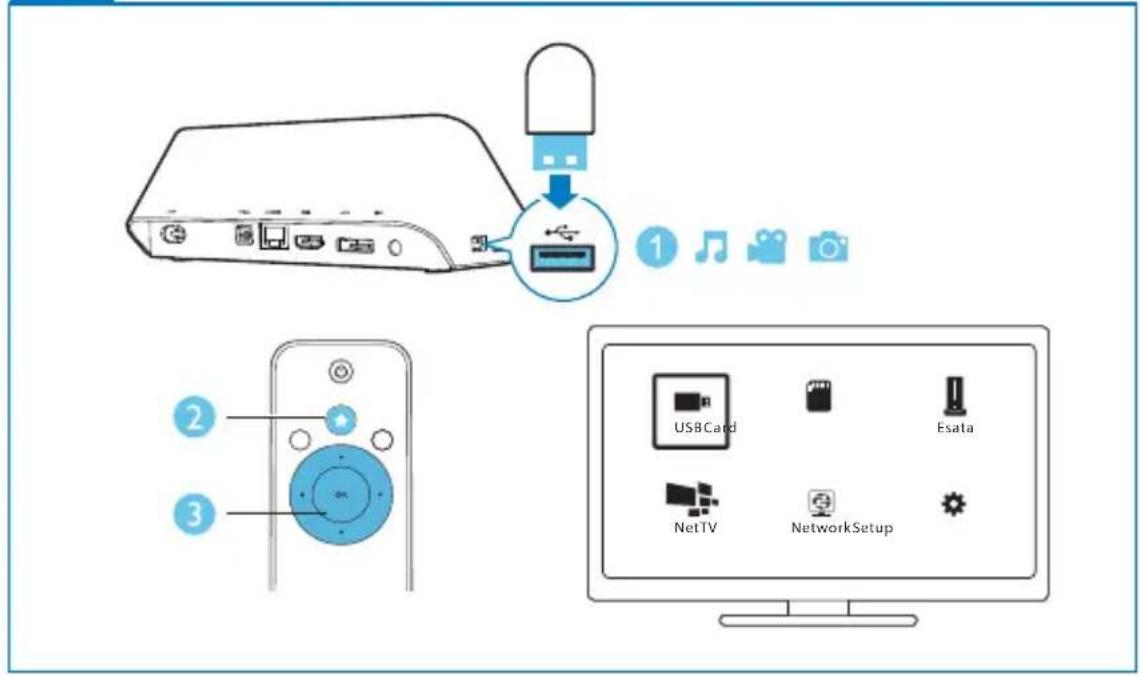
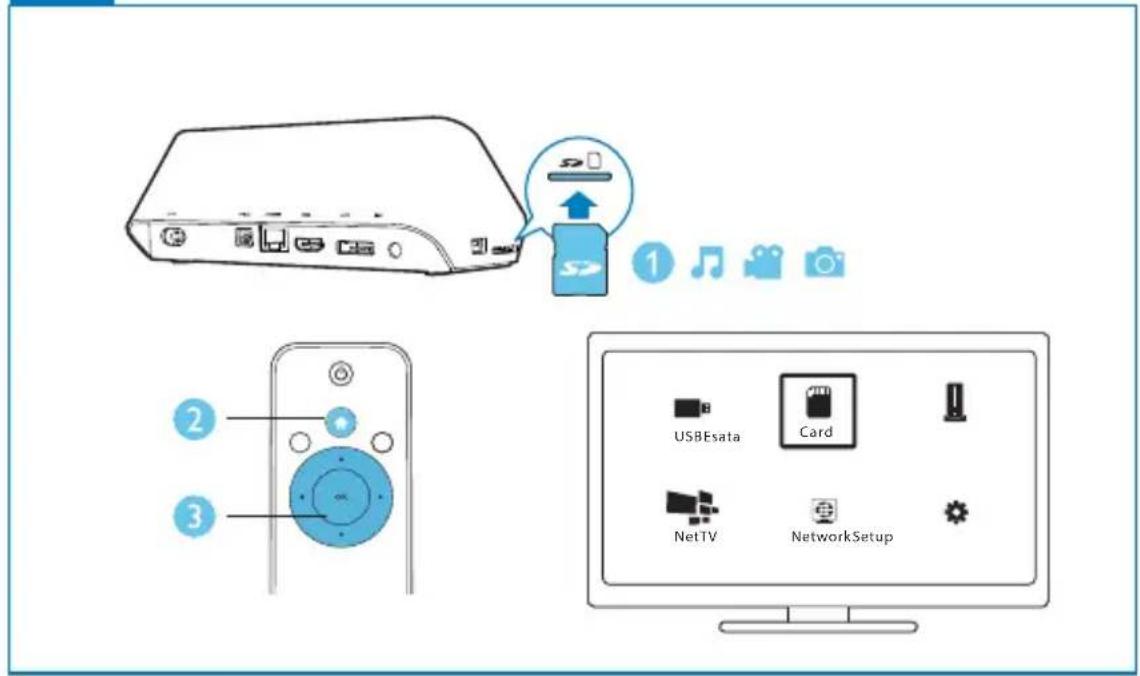
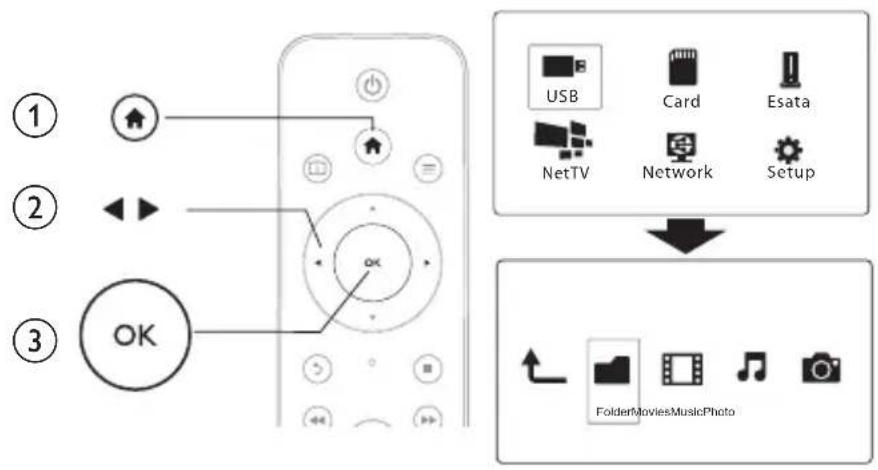
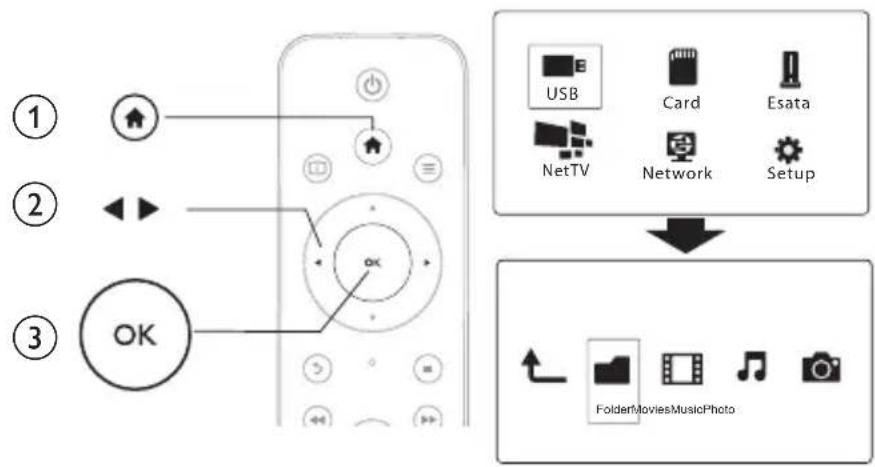
3 File browsing
You can browse media files stored in a USB/SD storage device.
flowchart
graph TD
    A["①"] --> B["USB"]
    C["②"] --> D["Card"]
    E["③"] --> F[" セス"]
    B --> G[" セス"]
    D --> H[" セス"]
    F --> I[" セス"]
    G --> J[" セス"]
    H --> K[" セス"]
    I --> L[" セス"]
    J --> M[" セス"]
    K --> N[" セス"]
    L --> O[" セス"]
    M --> P[" セス"]
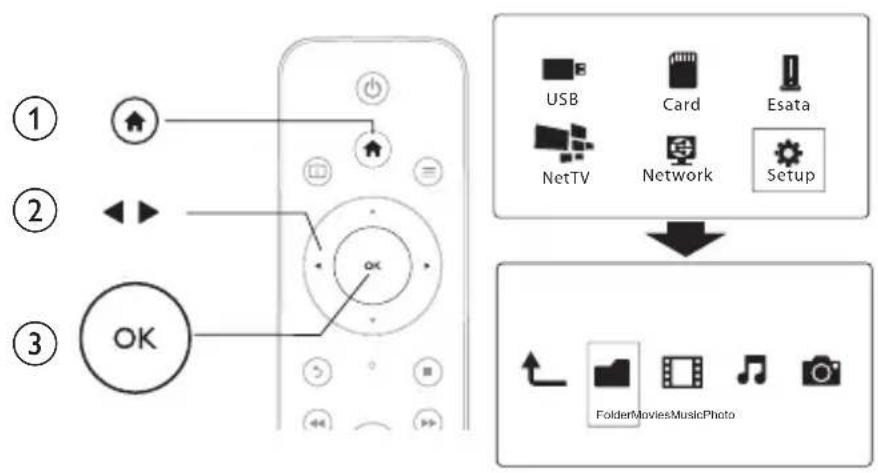
1 Press .
2 Select [USB]/ [Card] / [Esata].
3 Select a mode to browse media files.
- [Folder]
• [Movies]
• [Music]
• [Photos]
Browse all files

text_image
Folder Movies Music Photo1 Press ◀▶ to select [Folder] and press OK to confirm.
2 Select your USB/SD storage device and press OK.
3 Press the file browser.
4 Press /▲ to▼select a mode to view or arrange files.
[Thumbnails]: Display thumbnails of files or folder.
[List]: Display files or folder in a list.
[Preview]: Display files or folders with a preview window.
[All Media] Display all media files.
[Movies]: Display movie files.
[Photos]: Display photo files.
[Music]: Display music files.
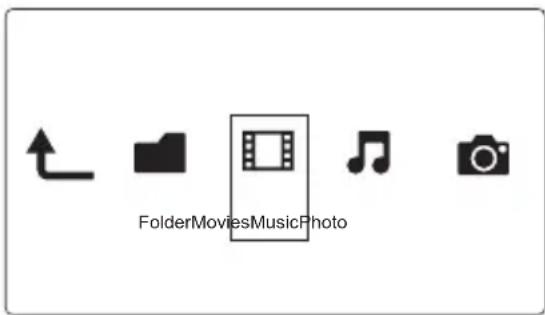
Browse movie files
text_image
FolderMoviesMusicPhoto1 Press ◀▶ to select [Movies] and press OK to confirm.
2 Press the file browser.
3 Press /▲ to▼select a mode to view or arrange files.
[Search]: Search movie files. Follow on screen instruction to type in key words in the mini keyboard and press ▶II to start search.
[Thumbnails]: Display thumbnails of movie files.
[List]: Display movie files in a list.
[Preview]: Display files or folders with a preview window.
[All Movies]: Display all movies files.
[Show DVDs]: Display all DVD content files.
[Flash Animation]: Display all flash files.
[Go to Folder]: Go to the folder where the selected file is placed.
[Name]: List movies files in an alphabetical order of their names.
[Size]: List movies files in the ascending order of their sizes.
[Most Viewed]: List most viewed movie files.
[Recently Added]: List recently added movie files.
Browse music files

text_image
FolderMoviesMusicPhoto1 Press ◀▶ to select [Music] and press OK to confirm.
2 Press the file browser.
3 Press /▲ to▼select a mode to view or arrange files.
[Search]: Search music files. Follow on screen instruction to type in key words in the mini keyboard and press ▶II to start search.
[Thumbnails]: Display thumbnails of music files.
[List]: Display music files in a list.
[Preview]: Display music files with a preview window.
[Go to Folder]: Go to the folder where the selected file is placed.
[All Songs]: Display all music files.
[Albums]: Display music files by albums.
[Artists]: Display music files by artists.
[Genres]: Sort music files by genres.
[Years]: Sort music files by years.
[Playlists]: Display play lists.
[Recently Played]: List recently played music files.
[Recently Added]: List recently added music files.
[Name]: List music files in an alphabetical order of their names.
Browse photo files

text_image
FolderMoviesMusicPhoto1 Press ◀▶ to select [Photos] and press OK to confirm.
2 Press the file browser.
3 Press /▲ to▼select a mode to view or arrange files.
[Search]: Search photo files. Follow on-screen instruction to type in key words in the mini keyboard and press ▶II to start search.
[Thumbnails]: Display thumbnails of photo files or folder.
[List]: Display files or folder in a list.
[Preview]: Display files or folders with a preview window.
[Photo Directory]: Display photo files in the directory mode.
[Leaf Folder View]: Display photo files in the folder mode with a preview of a contained photo.
[Date view]: Sort photo files by date modified.
[All Photos]: Display all photos files.
[Albums]: Sort photo files by albums.
[Name]: List photo files in an alphabetical order of their names.
[Recently Added]: List recently added photo files.
[Recently Played]: List recently played photo files.
4 Manage files
You can manage media files on the storage device.
Basic operations
flowchart
graph TD
    A["①"] --> B["USB"]
    C["②"] --> D["Card"]
    E["③"] --> F[" セス"]
    B --> G[" セス"]
    D --> H[" セス"]
    F --> I[" セス"]
    G --> J[" セス"]
    H --> K[" セス"]
    I --> L[" セス"]
1 Press .
2 Select [USB]/ [Card] / [Esata] >[Folder].
3 Select a partition of your USB/SD storage device and press OK.
4 Press /▲ to▼select a file or folder and press [Edit].
→ The file editing menu is displayed.
5 Press ▲ / ▼ to select your operation and press OK to confirm.
[Copy]: Select a destination and press▶II to confirm.
→ The selected file or folder is copied to the destination.
[Delete]: Select [Yes] and press OK to confirm.
→ The selected file or folder is deleted.
[Move]: Select a destination and press▶II to confirm.
The selected file or folder is moved to the destination.
[Rename]
1 Select [Rename] to edit the name in the mini keyboard, and then press ▶II to confirm.
2 Select [OK] and press OK to apply the new name.
[Multiple Select]
1 Press /▲ to▼select a file or folder and press to ▶Hlto the list.
2 Press [Edit] when you complete adding files and folders.
3 Select an operation.
| [Copy] | Select the destination and press ▶II to confirm. |
| [Delete] | Select [Yes] and press OK to delete the selected files or folders. |
| [Move] | Select the destination and press ▶II to confirm. |
| [Save Playlist] | Select [OK] to save a play list.Select [Rename] to edit the name in the mini keyboard, and then press ▶II to confirm. |
| [Save Photo Album] | Select [OK] to save a photo album.Select [Rename] to edit the name in the mini keyboard, and then press ▶II to confirm. |
![PHILIPS HMP7001 - [Multiple Select] - 1](/content/2026/06/1237123/images/8482e7545605b8ecf7ebe81b0c65f93564f7fab3fe1827cf5d012dec1f1d9f49.jpg)
Note
- Press and hold ■ for two seconds to remove a connected storage device safely.
5 Set up a network
By connecting this player to a computer network and the Internet, you can
- Play photos, music, and video files streamed from your computer.
• Watch online TV programs. - Browse Internet photo albums.
- Update the software of this player through the Internet.
Connect to the Internet
What you need A wireless router that is connected to the Internet

text_image
PHILIPS
text_image
WiFi GPT GPT GPT1 Press .
→ The home page is displayed.
2 Select [Setup] and press OK.
→ The setup menu is displayed.
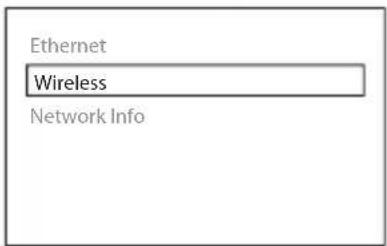
3 Select [Network] > [Wireless] and press OK.
A list of available wireless networks is displayed.
4 Select your network from the list and press OK.
- If your network is encrypted with a Wired Equivalent Privacy (WEP) key, select [Hex code] or [ASCII] to enter the key in hex or ASCII format from the option menu.

Note
- If your network is not in the list, press re-scan available wireless networks.
- If your network is still not in the list, select [Private AP Setting] (private access point setting) to enter the Service Set Identifier(SSID) of your network and web key.
5 Use ▲ and OK to enter your key.
6 Press to confirm.
A connection test is started
→ The status of network connection is displayed after the test is completed.
7 Press OK to exit.
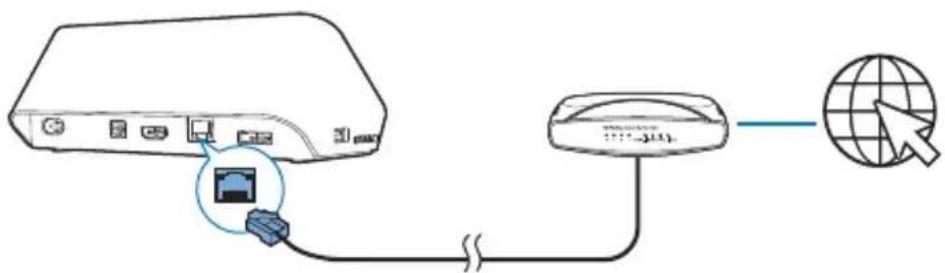
Wired network setup
What you need A wired router that is connected to the Internet and an ethernet cable
flowchart
graph LR
    A["Router"] --> B["Switch"]
    B --> C["Global Globe Icon"]
    style A fill:#f9f,stroke:#333
    style B fill:#ccf,stroke:#333
    style C fill:#cff,stroke:#333
1 Press .
2 Select [Setup] and press OK.
→ The setup menu is displayed.
3 Select [Network] > [Ethernet] > [DHCP IP (AUTO)] > [DHCP (AUTO)] and press OK.
A dialog box is displayed.
4 Select [Yes] and press OK to save the network settings.
20 EN
A connection test is started.
→ The status of network connection is displayed after the test is completed.
5 Press OK to exit.

Note
- If the Dynamic Host Configuration Protocol (DHCP) is unavailable or disabled on the router, manually enter the IP address of the player.
IP address setup
You can set the IP address manually.
1 Select [Network] >[Ethernet] > [FIX IP (MANUAL)].
→ The IP address table is displayed.
2 Press to select a item and press to adjust the value.
3 Press OK when you complete setting the IP address.
A dialog box is displayed.
4 Select [Yes] and press OK to save the network settings.
6 Play from online services
1 On the Home screen of the player, select [Net TV].
→ The registration page is displayed.
2 Follow the on-screen instruction to complete registration.
→ The Net TV page is displayed.
3 Select an application service.
- To get a quick guide on the Net TV, select [Quick Guide].
4 Follow the on-screen instruction and use your remote control to enjoy.
Function Button/Action
| Select a service or item. | ▲▼◄► |
| Confirm a selection. OK | |
| Return to the previous page, or delete input text. | ⇨ |
| Access service options on the screen. Color key | |
| Return to the Home page. | ↑ |
Manage your applications
To add an application
1 On the home page of Net TV, select [App Gallery].
→ The application list is displayed.
2 Select an application and press OK.
→ The option menu is displayed.
3 Select [Add] and press OK.
→ The selected application is added to home page of Net TV.
To remove an application
1 On the home page of Net TV, select an application and press ≡
22 EN
→ The option menu is displayed.
2 Select [Remove App].
→ The selected application is removed.
To lock an application
1 On the home page of Net TV, select an application and press ≡
→ The option menu is displayed.
2 Select [Lock App].
→ The application locking page is displayed.
3 Follow the on-screen instruction and use your remote control to enter password.
→ The selected application is locked.
To move an application
1 Select an application and press .≡
→ The option menu is displayed.
2 Select [Move App].
3 Select the place where you want to move the application and press OK.
→ The selected application is moved to the specified place.
To view security information about an application
1 Select the application and press .≡
→ The option menu is displayed.
2 Select [Security Info].
→ The security information is displayed.
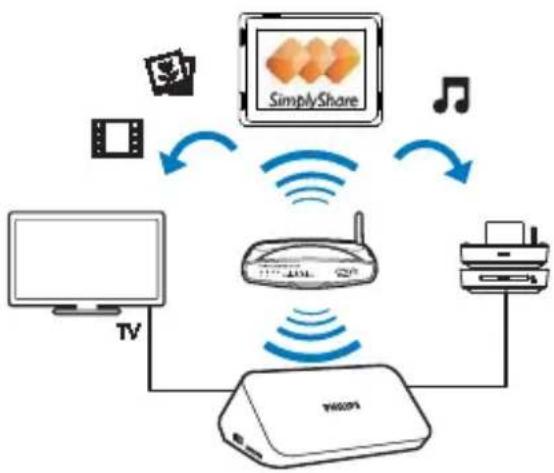
7 Play from your home network
Connect the playerto your home network. With the player, you can play media from a DLNA-compliant device on the same network. In this way, you can enjoy the media play through high-definition TVs (HDTVs) or hi-fi audio systems.
The DLNA-compliant device can be:
- an Android device that runs or tablet; 📋 SimplyShare, such as an Android smartphone
- a computer or device that runs the software of DLNA media server, such as Windows Media Player 11 or higher.

Note
- On the player, make sure that you have switched on DLNA DMR. From the Home screen, go to [Setup] > [System] > DLNA DMR to check the status.
Play media from an Android device
flowchart
graph TD
    TV["TV"] -->|Wireless| WiFi["WiFi"]
    WiFi -->|Wireless| SIMPLYShare["SIMPLY Share"]
    SIMPLYShare -->|Wireless| WiFi
    WiFi -->|Wireless| Printers["Printer"]
    Printers -->|Wireless| WiFi
    WiFi -->|Wireless| TV
    style TV fill:#f9f,stroke:#333
    style WiFi fill:#ccf,stroke:#333
    style SIMPLYShare fill:#cfc,stroke:#333
    style Printers fill:#fcc,stroke:#333
    style WiFi fill:#cff,stroke:#333
Install Philips SimplyShare on the Android device
1 Make sure that you have connected the Android device to the Internet.
- Consult the user manual of your Android device for information.
2 On the Android device, install SimplyShare:
① Go to the Android Market;
② Search for, download, and install SimplyShare.
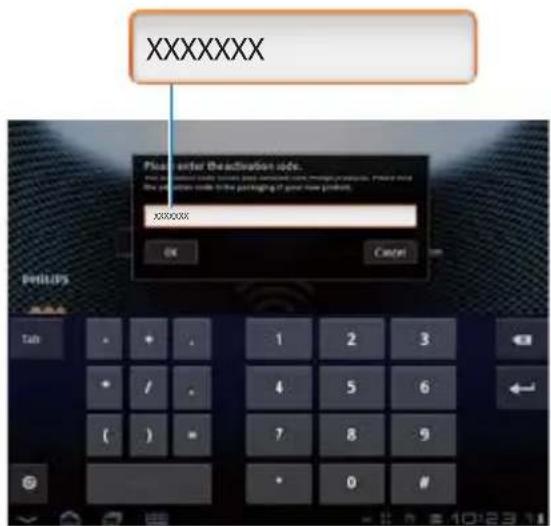
Play media from the Android device
1 Make sure that you have connected the player to the same Wi-Fi network as your Android device.
2 On the Android device, go to SimplyShare from the Home screen:
① Thefirst time you launch 📄 SimplyShare, enter the activation code XXXXXXX as prompted.
text_image
XXXXXXXX Please order the activation code. XXXXXXX OK Cancel TAB + - 1 2 3 */ 4 5 6 ( ) = 7 8 9 * 0 # PHILIPS② Find the Android device, the player, and the connected devices on the network.
3 On the Android device, find your media libraries:
- Tap the Android device.
→ You can find the music, photos, and videos that you store under the following folders on the Android device: Music, Pictures, and Video.
→ You can also find the photos and videos that you take or record on the Android device.
4 Select the player:
- Drag the Android deviceto the player.
→ The player is selected.
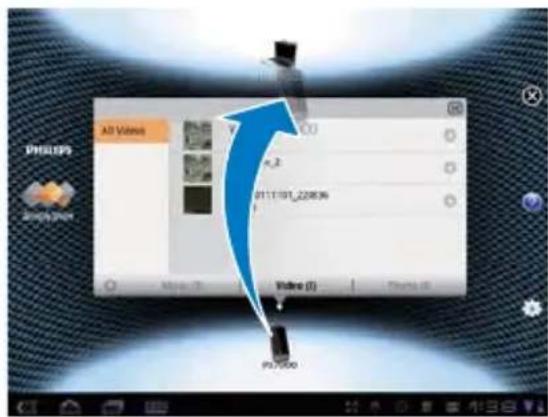
text_image
PHILIPS All Videos 00 +2 0111191_22836 Video (0) Chanc (0) PS75005 Add media to the shared list:
- Tap + on the media file;
• Alternatively, tap the + twice to add all the subsequent media files.
→ The selected files play on the player.

text_image
Air Video VDD001_1 VDD002_1 VDD003_1 VDD: 2011/1/19, 223836 VDD: 2011/1/19, 223836 VDD: 2011/1/19, 223836Play media files from a computer (DLNA)
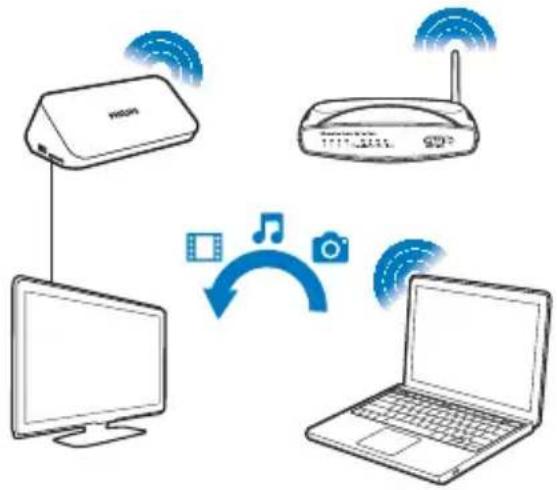
text_image
Diagram illustrating wireless communication between a device, a router, and a laptop with icons for video, music, and camera.1 Make sure that you have connected the player and the PC to the same network.
2 On the PC, launch the software of DLNA media server. Enable the media sharing function.
For example, in Windows Media Player 11, do the following:
① Select Library > Media Sharing ...
② Select the check box next to Share my media to:
If the player is detected, you can find the name of the player in the device list.
③ If necessary, select the playerandclick Allow.
3 On the Home screen of the player, select[Network].
• To browse the media files by folder, go to [Shared Folder].
- To browse the media files as sorted in the DLNA media server, go to [Shared Media Files].
4 Use the remote control to search for and play media files on the player.
8 Play a 3D media file
Before you start, make sure that:
- the TV is 3D compliant, and is connected to this player through HDMI
- your USB/SD storage device contains 3D media files
- you have 3D glasses compatible with the TV.
1 Select and play a 3D media file.
2 Press.≡
→ An option menu is displayed.
3 Select a 3D conversion option.
- For 3D media files in side by side format, select [3D Side by Side] (3D side by side).
- For 3D media files in top and bottom format, select [3D Top Bottom] (3D top bottom).
4 Put on the 3D glasses for 3D effects.
• To exit, press ≡ and select [2D].
2D to 3D conversion
You can convert a 2D media file to 3D format and watch it on your 3D TV.
1 Select and play a 2D media file.
2 Press.≡
→ An option menu is displayed.
3 Select a 2D conversion option.
- For 3D video files, select [3D Simulation] (3D simulation).
- For 3D photo files, select [3D Auto] (3D auto).
4 Put on the 3D glasses for 3D effects.
• To exit, press ≡ and select [2D].
9 Other setup
You can change settings of this player in the setup menu.
text_image
① ② ③ OK USB Card Esata NetTV Network Setup FolderMoviesMusicPhoto1 Press .
2 Select [Setup] and press OK to confirm.
→ The setup menu is displayed.
- Press ▲ / ▼ to select a menu item or setting option.
- Press OK to access the lower-level menu.
- Press ↩ to return to the upper-level menu.
System
[Menu Language]: Select a language for on-screen menu.
[Subtitle]: Select a subtitle language for video.
[Screen Saver]: Enable the screen saver in case of inactivity (for example, in pause or stop mode).
[DLNA DMR]: Enable this player to play photos, music, and video files streamed from your computer.
[Device Name]: Change the name of this player.
[Auto Scan]: Scan media files on a storage device automatically.
[Scan Storage]: Start or stop scanning media files on a storage device.
[Resume Play]: Resume playback of a video file from the point where you last stopped.
[Factory Default]: Reset all settings to factory default.
Audio
[Night Mode]: Equalize loud sound and soft sound. If enabled, you can watch movies at a low volume at night.
[HDMI Output]: Select an output sound format when connecting the HDMI jack.
[SPDIF Output]: Select an output sound format when connecting the digital audio jack.
Video
[Aspect Ratio]: Select display aspect ratio.
[TV System]: Select a video resolution setting that best is supported by your TV. See your TV manual for details.

Note
- If a selected video resolution is not supported with your TV and a blank screen appears, wait for 30 seconds to recover picture display.
- For a composite (CVBS) connection, if no video output is made when you set the video resolution is to an HD resolution (1080p, 1080i, 720p), connect this player to the TV with an HDMI connection to play HD videos.
[Video Zoom]: Zoom in or out video scenes.
[1080P 24Hz]: Use 1080p 24Hz video output mode for video content.

Note
- The video resolution and the frame rate of the video content is 1080p 24Hz.
- Your TV supports the 1080p 24Hz.
- Ensure that you use an HDMI cable to connect this player to your TV.
[Deep Color]: Display colors with more shades and hues when the video content is recorded in Deep Color mode and the TV supports this feature.
[Video Setting]: Adjust the video settings.
Network
[Ethernet]: Configure the IP address of this player.
[Wireless]: Set up a wireless network connection.
[Network Info]: Display the current network status.
[Clear Net TV Memory] (Clear Net TV Memory): Clear the history of Net TV browser (such as cookies).
MISC
[Version Info]: Display the information about software version of this player.
[DivX®VOD Code]: Display the DivX® registration code and deregistration code.
[Online upgrade]: Select to update software from a network.
[USB upgrade]: Select to update software from USB storage device.
10 EasyLink
This player supports Philips EasyLink which uses the HDMI CEC (Consumer Electronics Control) protocol. You can use a single remote control to control EasyLink compliant devices that are connected through HDMI.
1 Connect the HDMI CEC compliant devices through HDMI, and turn on the HDMI CEC operations on the TV and other connected devices (see the user manual of the TV or other devices for details).
2 Press .
3 Select [Setup] > [Easy Link].
4 Select [On] under the options:
• [Easy Link] > [On]
• [One Touch Play] > [On]
• [One Touch Standby] > [On]
• [Auto Power On From TV] > [On]
→ EasyLink function is turned on.
One Touch Play
When you play a file with this player, the connected HDMI CEC TV automatically switches to the HDMI input channel.
One Touch Standby
When you switch a connected device (for example TV) to the standby mode with its own remote control, this player switches to the standby mode automatically.
Auto Power On From TV
When you switch a connected device (for example TV) to this player port with its own remote control and this player is standby mode, this player switches to the power on mode automatically.

Note
• Philips does not guarantee 100% interoperability with all HDMI CEC devices.
11 Update software
Before you update the software of this player, check the current software version:
1 Press .
2 Select [Setup] >[MISC] > [Version Info.], and press OK.
Update software through the Internet
1 Connect the player to the Internet (see "Set up a network").
2 Press ↑, and select [Setup].
3 Select [MISC] > [Online upgrade].
→ If an upgrade media is detected, you are prompted to start the update.
4 Follow the instructions on the TV screen to update the software.
When the update is complete, this player automatically turns off and on again.
Update software through USB

Note
- Do not turn off the power or remove the USB storage device when the software update is in progress because you might damage this player.
1 Check the latest software version on www.philips.com/support.
- Search for your model and click on "Software and drivers".
2 Download the software to the root directory of a USB storage device.
3 Connect the USB storage device to the ✉ (USB) connector on this player.
4 Press .
5 Select [Setup] > [MISC] > [USB upgrade].
→ If an upgrade media is detected, you are prompted to start the update.
6 Follow the instructions on the TV screen to update the software.
When the update is complete, this player automatically turns off and on again.
12 Troubleshooting
If you contact Philips, you will be asked for the model and serial number of this player. The model number and serial number are at the bottom of this player.
Write the numbers here:
Model No. ____
Serial No. ____
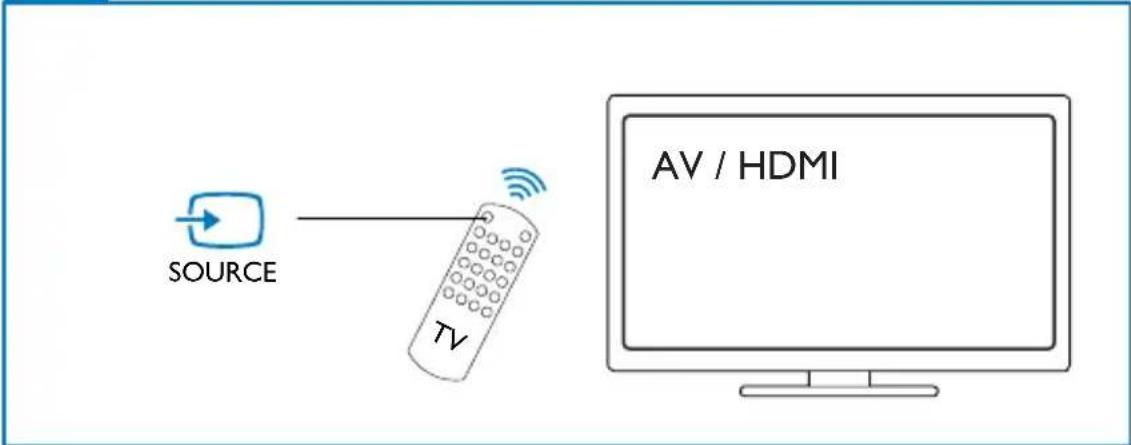
No picture.
- Refer to the TV user manual for how to select the correct video input channel
No sound output from the TV.
- Make sure that the audio cables are connected to the audio input sockets that are grouped with the selected video input sockets.
The contents of the USB storage device cannot be read.
- This player support only USB 2.0 and USB 1.1 storage devices. USB3.0 storage devices are not supported.
- The supported memory size is 1TB maximum.
- Make sure that this player supports these files. (Refer to "Specifications" > "File")
- DRM-protected video files that are stored on a USB/SD storage device cannot be played through an analog video connection (for example, composite). You need to use an HDMI connection to play these files.
Some hard disks cannot be supported.
- This player supports hard disks with rating 500 mA or below. Please check if your hard disk rating is above 500 mA.
My router cannot connect this player after this player is powered on.
- Restart your router to connect it to this player.
DivX subtitles are not displayed correctly.
- Make sure that the subtitle filename is the same as the video filename.
- Make sure that the DivX video file and the subtitle file are saved under the same directory.
Some wireless routers cannot be found.
- Press ▲ / ▼ to browse all the wireless routers in range in the wireless network list.
- Press to rescan all available wireless routers.
The player feels warm
- When this player is in use for a long period of time, some parts of this player will be heated. This is normal.
13 Specification

Note
• Specification and design are subject to change without notice.
File
- Video: MPEG 1/2/4(MPEG 4 Part 2), H.264, VC-1, H.263, VP6(640 × 480), DivX Plus HD, DivX 3/4/5/6, Xvid, WMV (V9), AVI, TS, M2TS, TP, TRP, ISO, VOB, DAT, MP4, MPG, MOV (MPEG 4, H.264), ASF, FLV (640 × 480), MKV, M4V
• Audio: Dolby digital, AAC, RA, OGG, MKA, MP3, WAV, APE, FLAC, DTS, LPCM, PCM, WMA (V9), IMA/MS ADPCM, WMA pro
• Picture: JPEG, JPG, PNG, TIFF, GIF (unanimated GIF), BMP, TIF, M-JPEG, HD-JPEG
USB storage device
• Compatibility: Hi-Speed USB (2.0)
Subtitle support
- .srt, .sub, .smi, .ssa, .ass, .txt, .psb, .idx+.sub
SD card
- Compatibility: SDHC 2.0 (up to 32 GB)
Video
• Signal system: PAL /NTSC
• Composite video output: 1 Vpp \~ 75 ohm
• HDMI output: 480i, 480p, 576i, 576p, 720p, 1080i, 1080p, 1080p24
Audio
- Analog stereo output
• Signal to noise ratio (1 kHz): > 90 dB (A-weighted)
• Dynamic Range (1 kHz): > 80 dB (A-weighted)
• Frequency response: +/-0.2 dB
• Digital output: Optical
Main Unit
• Dimensions (L × W × H): 178 × 57.5 × 91 mm
• Net Weight: 0.34 Kg
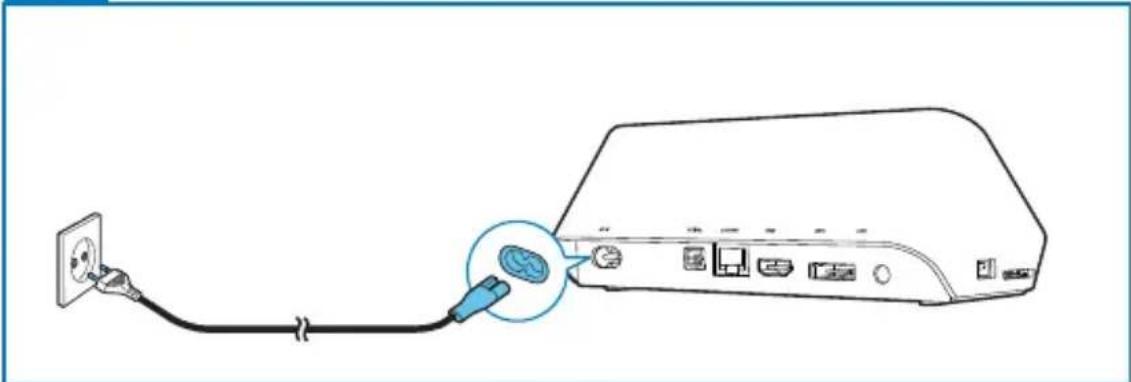
- Input: 230V\~50Hz, 10W
Power
• Power consumption: < 10 W
• Power consumption in standby mode: < 0.5 W
Operating Temperature & Humidity
- 0^ to 40^, 5% to 90% Humidity for all climates.
Storage Temperature & Humidity
- -40 °C to 70 °C, 5% to 95%
USB specification
• USB drive current: DC 5V = 500 mA

text_image
PHILIPSSpecifications are subject to change without notice
All rights reserved.
HMP7001_12_UM_V1.1
