VMX 200 II - Helmet SENNHEISER - Free user manual and instructions
Find the device manual for free VMX 200 II SENNHEISER in PDF.

User questions about VMX 200 II SENNHEISER
0 question about this device. Answer the ones you know or ask your own.
Ask a new question about this device
Download the instructions for your Helmet in PDF format for free! Find your manual VMX 200 II - SENNHEISER and take your electronic device back in hand. On this page are published all the documents necessary for the use of your device. VMX 200 II by SENNHEISER.
USER MANUAL VMX 200 II SENNHEISER
Bluetooth headset for phone calls
VMX 200-II
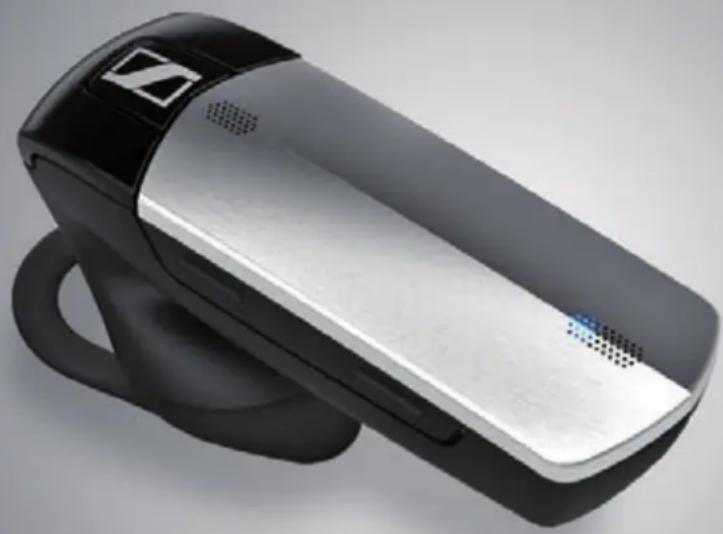
natural_image
Exterior view of a modern handheld device with black and silver casing (no visible text or symbols)Instruction manual
Contents
Important safety information 2
The VMX 200-II Bluetooth headset 4
Delivery includes 5
Product overview 6
VMX 200-II headset 6
Charging accessories 6
Overview of pictograms 7
Overview of the LED indications 8
Overview of buttons 9
Putting the VMX 200-II into operation 10
Charging the headset battery 10
Connecting the headset to a Bluetooth device 11
Using the VMX 200-II 13
Individually adjusting the VMX 200-II and wearing it 13
Switching the VMX 200-II on/off 15
Retrieving information on the remaining talk time 16
Changing the speaker volume 16
Making calls using the headset 17
Managing multiple calls 19
Listening to music using the headset 20
Cleaning and maintaining the VMX 200-II 21
If a problem occurs ... 22
Restoring factory default settings (Reset) 22
If you are out of the Bluetooth transmission range 23
Specifications 24
Manufacturer Declarations 25

Important safety information
Read this instruction manual carefully and completely before using the product.
▶ Always include this instruction manual when passing the product on to third parties.
▶ Do not use an obviously defective product.
Preventing damage to health and accidents
Do not listen at high volume levels for long periods of time to prevent hearing damage.
▶ Always maintain a distance of at least 3.94" (10 cm) between the ear cups and the cardiac pacemaker or implanted defibrillator since the product generates permanent magnetic fields.
Keep the product, accessories and packaging parts out of reach of children and pets to prevent accidents and choking hazards.
Do not use the product in an environment that requires your special attention (e.g. in traffic).
▶ Do not wear the headset during charging since the rechargeable battery can get warm.
Preventing damage to the product and malfunctions
▶ Always keep the product dry and do not expose it to extreme temperatures (hairdryer, heater, extended exposure to sunlight, etc.) to avoid corrosion or deformation.
▶ Only use attachments/accessories supplied or recommended by Sennheiser.
▶ Only clean the product with a soft, dry cloth.
Only use the product in environments where wireless Bluetooth® transmission is permitted.
Intended use/Liability
The VMX 200-II is an accessory for mobile phones or any Bluetooth compliant device with a "hands free profile" (HFP), a "headset profile" (HSP), an "audio video remote control profile" (AVRCP) and an "advanced audio distribution profile" (A2DP). It is intended for wireless communication via Bluetooth connection.
It is considered improper use when this product is used for any application not named in this instruction manual.
Sennheiser does not accept liability for damage arising from abuse or misuse of this product and its attachments/accessories.
Sennheiser is not liable for damages to USB devices that are not consistent with the USB specifications.
Sennheiser is not liable for damages resulting from the loss of connection due to flat or overaged rechargeable batteries or exceeding the Bluetooth transmission range.
Safety instructions for rechargeable batteries
In extreme cases, abuse or misuse of rechargeable batteries can lead to:

WARNING
- explosion,
- fire development,
- heat generation or
• smoke or gas development.
 | Dispose of products with built-in rechargeable batteries at special collection points or return them to your specialist dealer. |  | Switch rechargeable battery-powered products off after use. |
 | Only use rechargeable batteries recommended by Sennheiser and the appropriate chargers. |  | When not using rechargeable batteries for extended periods of time, charge them regularly (about every 3 months). |
 | Only charge rechargeable batteries at ambient temperatures between 10^/50^ and 40^/104^ . |  | Do not heat above 70^/158^ , e.g. do not expose to sunlight or throw into a fire. |
The VMX 200-II Bluetooth headset
The stylish new VMX 200-II Bluetooth headset is the wireless solution for phone calls with superb sound quality. It features VoiceMax Dual Microphone technology that filters away background noise and enhances your voice, thus providing crystal clear speech.
Bluetooth

The VMX 200-II complies with the Bluetooth 3.0 standard and is compatible with all Bluetooth 1.1, 1.2, 2.0, 2.1 and 3.0 devices with a "hands free profile" (HFP), a "headset profile" (HSP), an "audio video remote control profile" (AVRCP) and an "advanced audio distribution profile" (A2DP). The VMX 200-II provides wireless freedom to give hands-free convenience with your mobile phone.
Additional features of the VMX 200-II Bluetooth headset
- VoiceMax Dual Microphone technology – two microphones work in synergy; one to emphasize your voice, the other to remove noise
- Echo-free conversations – digital echo cancellation eliminates all echoes while you are talking
- Easy call control – with just one hand, you can quickly take or end calls and adjust the volume to suit you best
- HD quality sound – crystal-clear, detailed and transparent sound reproduction due to large wideband speaker (11 mm) and extended frequency response
- Lightweight comfort – weighs only 10 grams
- Flexible wearing style – wear left or right, use with or without ear hook
- Long talk time – talk to business partners and friends for up to 10 hours, with up to 12 days of standby time
- Headset battery level indicator displayed on Apple iPhone® screen
- Adaptive volume level – automatic, adaptive volume adjustment for optimized speech intelligibility and sound quality
Delivery includes

VMX 200-II mono Bluetooth headset with built-in rechargeable Lithium-Polymer battery

Ear hook

Ear adapter without loop

Ear adapters with loop (S, M, L)
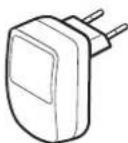
Power supply unit (EU/US version) not supplied with the VMX 200-II USB version
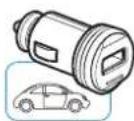
Car charger only for VMX 200-II 3in1 version
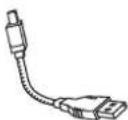
Charging cable
Quick Guide
Safety Guide

A list of accessories can be found on the VMX 200-II product page at www.sennheiser.com. For information on suppliers, contact your local Sennheiser partner: www.sennheiser.com > "Sales Partner".
Product overview
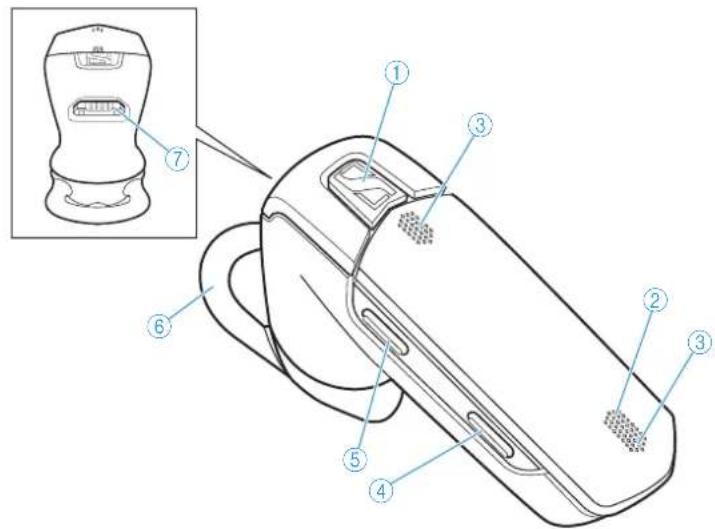
VMX 200-II headset
text_image
Technical diagram of a handheld device with numbered parts and an inset showing a device component with labeled parts 1 through 7.① Multi-function button
② LED
③Microphone
④ Volume down button
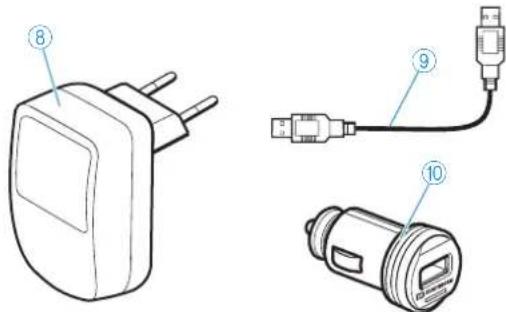
Charging accessories
text_image
Technical diagram showing three types of electrical connectors with numbered labels pointing to their parts.⑧ Power supply unit (EU/US version) not supplied with the VMX 200-II USB version
⑤Volume up button
⑥ Ear adapter with loop
⑦USB socket
⑨ Charging cable
⑩ Car charger only for VMX 200-II 3in1 version
Overview of pictograms
Meaning of the pictograms for pressing a button
| Pictogram Meaning | |
 | Briefly press this button. |
 | Double-press this button. |
 | Keep this button pressed for 5 seconds. |
Meaning of the pictograms for the beeps
| Pictogram Meaning | |
| Ascending sequence of beeps | |
| Descending sequence of beeps | |
| One beep | |
| Several beeps | |
| Two descending beeps | |
| Two ascending beeps | |
| Pictogram Meaning | |
| Ascending sequence of beeps | |
| Descending sequence of beeps | |
| One beep | |
| Several beeps | |
| Two descending beeps | |
| Two ascending beeps | |
Meaning of the pictograms for the flashing of the LED
| Pictogram Meaning | |
| This pictogram symbolizes a flashing. | |
| - | This pictogram symbolizes an interruption. |
| 1s | This pictogram symbolizes a time interval. |
| Pictogram Meaning | |
| This pictogram symbolizes a flashing. | |
| - | This pictogram symbolizes an interruption. |
| 1s | This pictogram symbolizes a time interval. |
Examples of some of the pictograms that are used throughout this instruction manual:
| Pictogram Meaning | |
| The LED flashes rapidly. | |
| The LED flashes once every 3 seconds. | |
| The LED flashes 3 times per second. | |
| Pictogram Meaning | |
| The LED flashes rapidly. | |
| The LED flashes once every 3 seconds. | |
| The LED flashes 3 times per second. | |
The pictogram "i"
Notes marked with the pictogram "i" provide important information on the use of the headset.
Overview of the LED indications
Meaning during operation
| LED Meaning | |
| Headset switches on | |
| Headset switches off | |
| Headset is in pairing mode | |
| Pairing was successful | |
| Pairing has failed or has been cancelled | |
| Connectable state, not connected |
Once the headset is successfully connected, the LED goes off.
Meaning during calls
| LED Meaning | |
| Incoming call | |
| Incoming call + rechargeable battery is weak |
Meaning during charging
| LED Meaning | |
| Charging in progress:battery level between 0% and 50% | |
| Charging in progress:battery level above 50% | |
| Battery is fully charged |
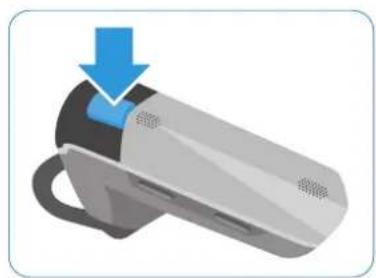
Overview of buttons
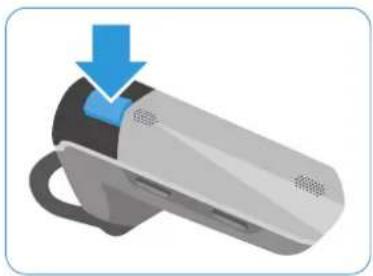
Multi-function button
natural_image
Illustration of a smart device with a blue arrow pointing to the handle (no text or symbols)| Press the button | Function Page | |
 | Accepts a call | 17 |
| Ends a call | 17 | |
| Transfers a call from the mobile phone to the headset | 17 | |
| Accepts an incoming call and ends the active call (managing two calls) | 19 | |
| Ends the active call and makes the call on hold active (managing two calls) | 19 | |
| Stops redialing | 18 | |
| Pauses the track/resumes the track | 20 | |
 | Rejects the incoming call and continues the active call (managing two calls) | 19 |
| Establishes a conference call (managing two calls) | 19 | |
| Transfers a call from the headset to the mobile phone | 17 | |
 | Rejects a call | 17 |
| Voice dialing | 18 | |
| Stops voice dialing | 18 | |
| Rejects the incoming call and continues the active call (managing two calls) | 19 | |
 | Redials the last number | 18 |
| Accepts an incoming call and puts the active call on hold (managing two calls) | 19 | |
| Toggles between two calls (managing two calls) | 19 | |
 | Switches the headset on | 15 |
| Switches the headset off | 15 | |
 | Changes to pairing mode 12 |
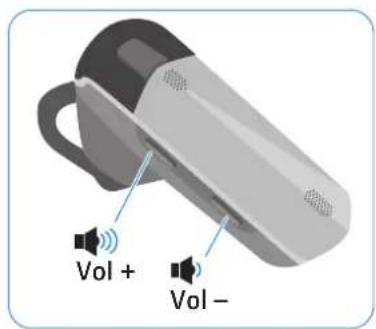
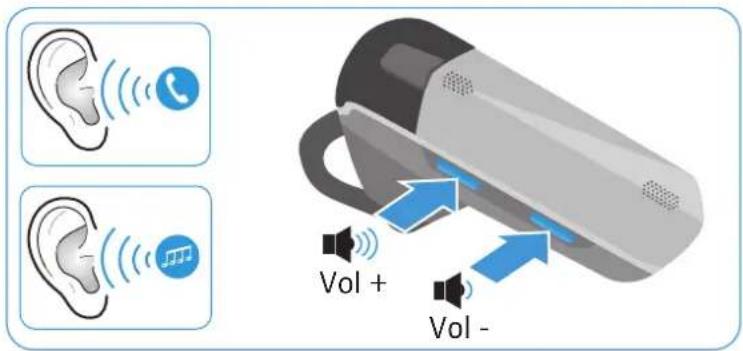
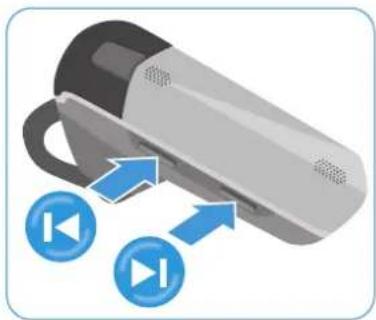
text_image
Vol + Vol -Volume buttons
| Button Duration Function Page | |||
 |  | Increases/reduces the volume 16 | |
| Vol - |  | Mutes the headset's microphone 18 | |
| Vol + |  | Unmutes the headset's microphoneRetrieves information on the remaining talk time | 1816 |
| Vol + Vol - |  | Resets the headset to the factory default settings | 22 |
Putting the VMX 200-II into operation
Charging the headset battery

WARNING
Danger of injury!
Wearing the headset when charging can cause burns and injuries.
Do not wear the headset when charging.

A complete charging cycle takes about 1 hour and 20 minutes. Before using the headset for the first time, charge the rechargeable battery for a complete charging cycle without interruption.
A charging time of ... corresponds to a talk time of ...
approx. 10 min approx. 1 h 30 min
approx. 20 min approx. 2 h 40 min
approx. 40 min approx. 5 h 20 min
approx. 60 min approx. 7 h 30 min
approx. 80 min approx. 10 h
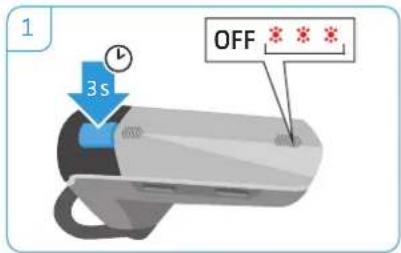
1 Take off the headset and switch it off (see page 15).
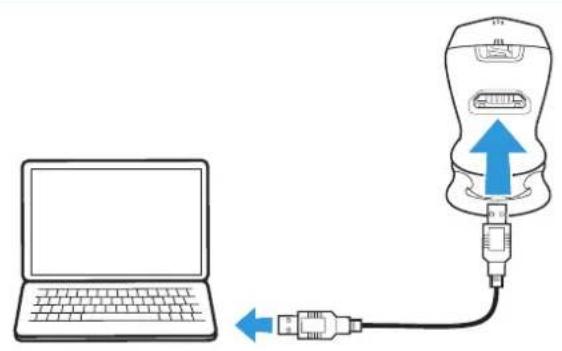
2 Connect the smaller plug of the charging cable to the USB socket of the VMX 200-II.
3 Connect the USB plug of the charging cable to the USB socket of the power supply unit or your computer.
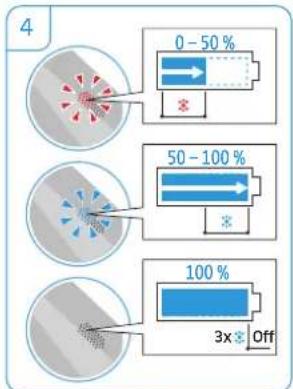
4 The battery is being charged.
The LED lights up red until the charge state reaches 50%. Then the LED lights up blue until the charging cycle is complete. When the rechargeable battery is fully charged, the LED flashes 3 times blue and then goes off.
text_image
1 3s OFF * * *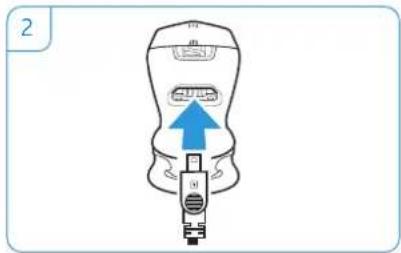
natural_image
Illustration of a medical device with a blue arrow pointing to a component (no text or symbols)
flowchart
graph TD
    A["Laptop"] --> B["USB"]
    C["Charger"] --> B
    D["Electric Charger"] --> B
    E["Car Charger"] --> B
    B --> F["USB Device"]
    style A fill:#f9f,stroke:#333
    style C fill:#ccf,stroke:#333
    style D fill:#cfc,stroke:#333
    style E fill:#fcc,stroke:#333
    note right of F: * not supplied with USB version
    note right of E: ** only supplied with 3in1 version
text_image
4 0 - 50 % 50 - 100 % 100 % 3x OffWhen the battery level drops below 15 minutes of talk time, the LED flashes red and you hear a low battery warning every 5 minutes. The headset automatically switches off after the battery has dropped below the minimum level.
Charging the rechargeable battery using the USB smart charging cable
The shapeable USB charging cable allows you to charge the headset so that it, for example, does not even touch your desk. Its compact size also prevents cable tangles.
natural_image
Diagram showing a laptop connected to a device via USB cable, with no text or symbols present.Connecting the headset to a Bluetooth device
CAUTION
Danger of malfunction!
The transmitted radio waves of mobile phones can impair the operation of sensitive and unprotected devices.
Only make calls with the headset in locations where wireless Bluetooth transmission is permitted.
The headset complies with the Bluetooth 3.0 standard. In order that data can be transmitted wirelessly using Bluetooth technology, you have to pair your headset with Bluetooth devices that support the "hands free profile" (HFP), the "headset profile" (HSP), the "audio video remote control profile" (AVRCP) and the "advanced audio distribution profile" (A2DP).
The headset can save the connection profiles of up to eight Bluetooth devices with which it has been paired. After switch-on, the headset automatically tries to connect to the two last connected Bluetooth devices.
If you pair the headset with a ninth Bluetooth device, the saved connection profile of the first Bluetooth device will be overwritten. If you want to re-establish a connection with the first Bluetooth device, you have to pair the headset again.

text_image
connected storedPairing the VMX 200-II with a Bluetooth device
The following chapter describes, by way of example of a mobile phone, how to pair the VMX 200-II with a Bluetooth device. In case of deviation, proceed as described in the instruction manual of your mobile phone.
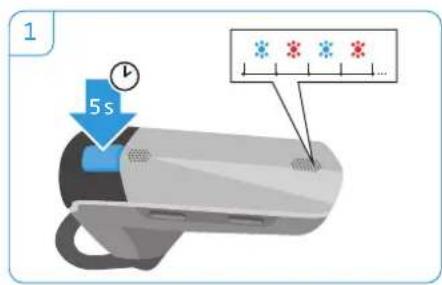
1 Switch the headset off (see page 15). Then keep the multi-function button pressed until the LED alternately flashes blue and red. The headset is in pairing mode.
2 Enable the Bluetooth visibility on your mobile phone.
3 On the mobile phone, start a search for Bluetooth devices. All available devices in the proximity of the mobile phone are displayed.
4 From the found Bluetooth devices, select "Sennheiser VMX 200-II" to establish a Bluetooth connection to the headset. If necessary, enter thedefault PIN code "0000".
5 Once the headset is paired with the mobile phone, the LED turns off.
text_image
1 5 s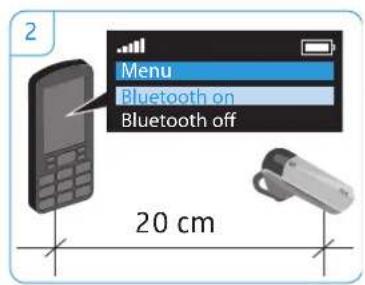
text_image
2 Menu Bluetooth on Bluetooth off 20 cm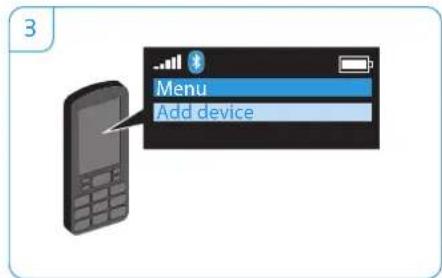
text_image
3 Menu Add device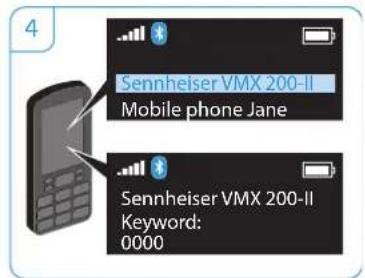
text_image
Sennheiser VMX 200-II Mobile phone Jane Sennheiser VMX 200-II Keyword: 0000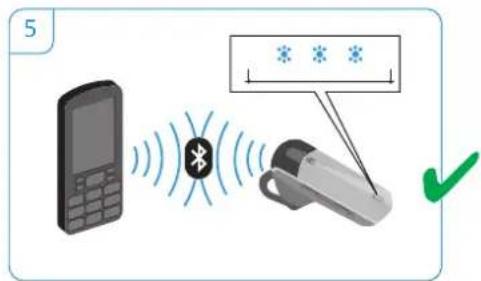
text_image
5 BluetoothIf pairing is not successful within 5 minutes, the headset automatically returns to connectable mode. Repeat the pairing procedure.
Using the VMX 200-II
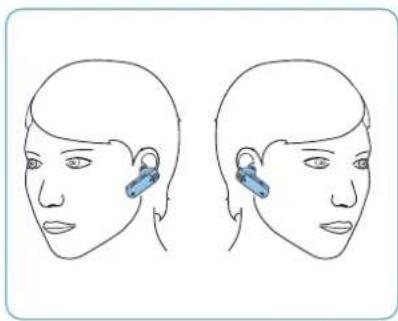
Individually adjusting the VMX 200-II and wearing it
For an optimized and individual wearing comfort, the VMX 200-II can be worn on your left or right ear in two different ways, i.e. with or without the ear hook.
natural_image
Line drawing of a human head with two views showing ear and ear clips (no text or symbols)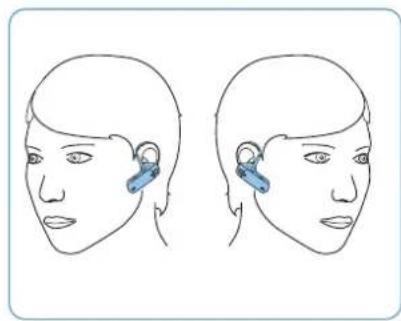
natural_image
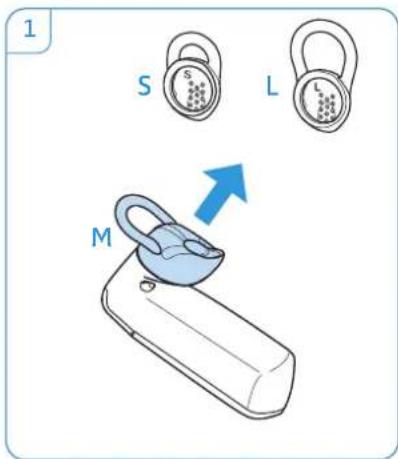
Line drawing of two human head profiles with blue ear tags, no text or symbols presentWearing the VMX 200-II with ear adapter
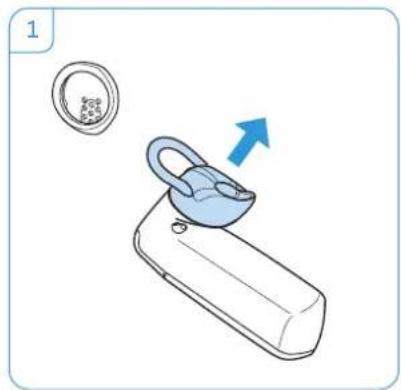
The ear adapter with loop is supplied in 3 different sizes: S, M, L. Size M is pre-installed. Select the size that fits your ear.
1 If the pre-installed ear adapter with loop is not the right size, remove it from the headset.
2 Attach the selected ear adapter with loop to the headset.
3 Move the headset to your ear and insert the loop of the ear adapter.
4 Adjust the angle of the loop so that the headset fits comfortably and securely in your ear.
text_image
1 S L M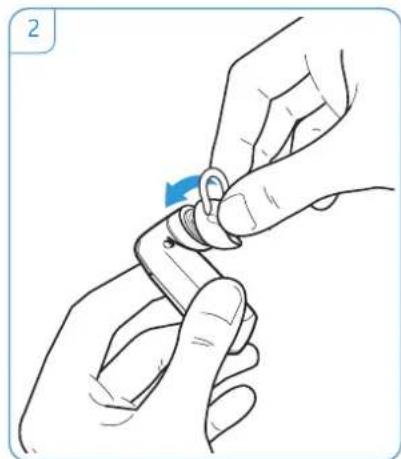
natural_image
Illustration of hands holding a small object with a blue arrow indicating rotation (no text or symbols)
text_image
3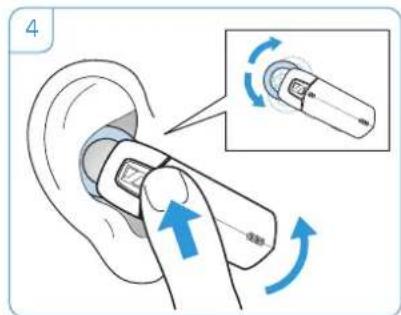
text_image
4Wearing the VMX 200-II using the ear hook
If you prefer using the ear hook, always wear it in combination with the ear adapter without loop to ensure optimum wearing comfort.
1 Remove the pre-installed ear adapter with loop.
2 Attach the ear adapter without loop to the headset.
3 Attach the ear hook to the VMX 200-II. If you want to change the wearing ear of the headset, attach the ear hook the other way round.
4 Move the headset to your ear and guide the ear hook behind your ear.
5 Position the headset so that it fits comfortably.
natural_image
Illustration of a blue-lipped device with a circular inset showing a textured surface (no text or symbols)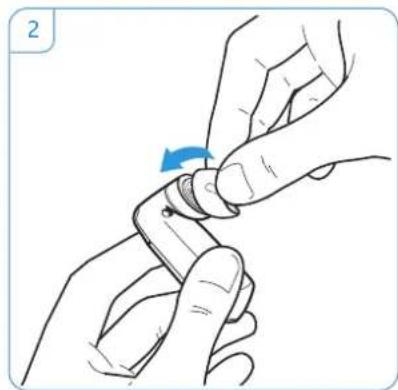
natural_image
Illustration of hands holding a small object with a blue arrow indicating rotation (no text or symbols)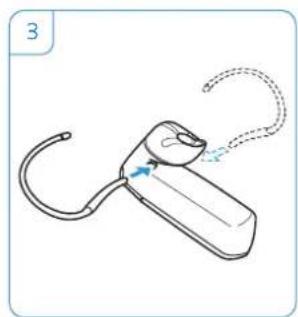
natural_image
Line drawing of a handheld device with curved arm and loop handle (no text or symbols)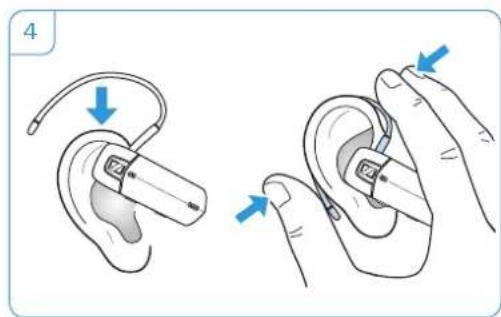
natural_image
Illustration of ear ear anatomy showing insertion and disassembly steps (no text or symbols)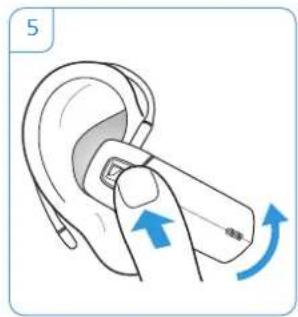
natural_image
Illustration of a hand holding a small ear with a blue arrow indicating clockwise motion (no text or symbols)Switching the VMX 200-II on/off
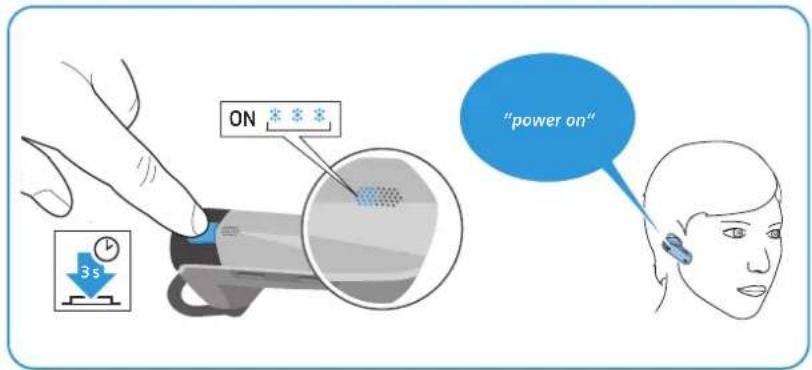
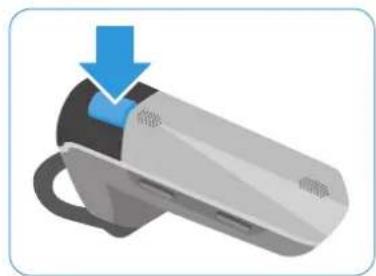
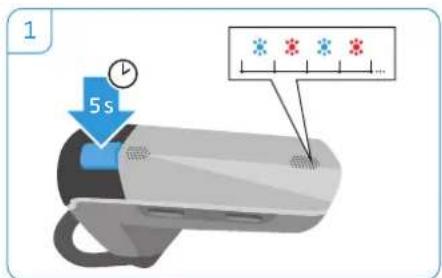
Switching the headset on
Press and hold the multi-function button until the LED flashes blue 3 times. The voice prompt "power on" is announced in the headset. When the headset is paired but not yet connected to the mobile phone, the LED flashes 3 times blue every 5 seconds. Once the headset and the mobile phone are connected, the LED goes off and the voice prompt "connected" is announced in the headset.
text_image
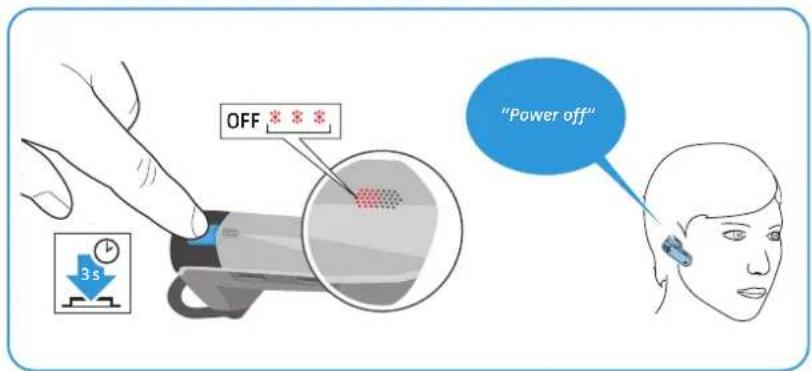
ON 3s "power on"Switching the headset off
▶ Press the multi-function button for 3 seconds.
The voice prompt "power off" is announced in the headset and the LED flashes red 3 times. The headset switches off.
If the headset is switched off during an active call, the call will be transferred to the mobile phone.
text_image
OFF 3s "Power off"If the headset has not been used for more than 1 hour, it automatically switches off to conserve battery power.
i Connection profiles and volume settings are saved automatically when the headset is switched off.
natural_image
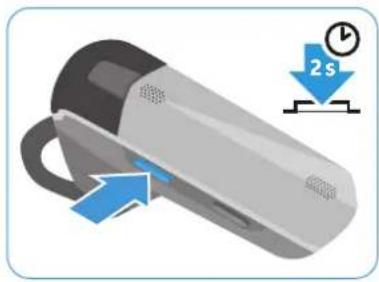
Illustration of a handheld device with blue arrows indicating motion, accompanied by a 2-second time indicator (no text or symbols on the device itself)Retrieving information on the remaining talk time
You can retrieve information on the remaining talk time at any time except when you are on a call or listening to music:
▶ Press the Volume + button for 2 seconds.
Information announced Meaning
| “Between 5 and 10 hours talk time”“Between 2 and 5 hours talk time”“Less than 2 hours talk time” | Remaining talk time |
| “Recharge headset” | 1st time: Remaining talk time is less than 15 minutes.2nd time: Remaining talk time is less than 5 minutes.Charge the headset’s battery (see page 10) |
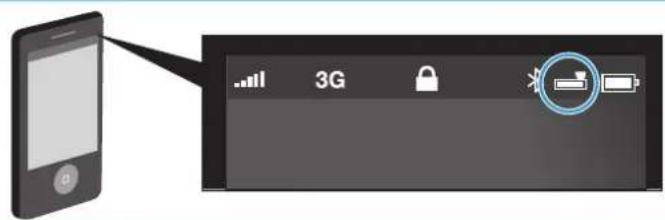
Battery level indicator displayed on Apple iPhone
When the headset is paired with an iPhone, the iPhone screen shows an additional battery level indicator for the headset.
text_image
Diagram showing a smartphone connected to a 3G device interface with icons for signal, lock, and batteryChanging the speaker volume
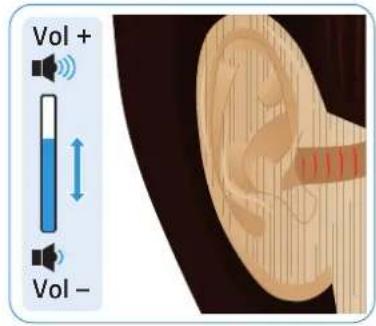
text_image
Vol + Vol -
WARNING
Hearing damage due to high volumes!
Listening at high volume levels for long periods can lead to permanent hearing defects.
▶ Set the volume to a low level before putting on the headset.
Do not continuously expose yourself to high volumes.
Press the
- volume up button to increase the volume.
- volume down button to reduce the volume.
When the minimum or maximum volume is reached, you hear a beep in the headset.
text_image
Vol + Vol -Making calls using the headset
Making a call
▶ Dial the desired number on your mobile phone. You hear a beep in the headset.
If your mobile phone does not automatically transfer the call to the headset, simply press the multi-function button once to transfer the call from the mobile phone to the headset. Alternatively, press a button on your mobile phone (see the instruction manual of your mobile phone).
Accepting/rejecting/ending a call
When your VMX200-II is connected to a mobile phone and you receive a call, you hear a ring tone in the headset and the LED flashes blue. If the headset battery is low, the LED flashes red instead of blue.
If you listen to music, the music is paused until you end the call.
When you receive a call and your headset is switched off, simply switch your headset on to accept the call.
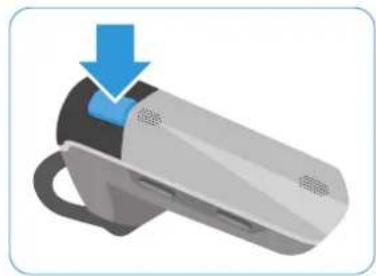
▶ Press the multi-function button:

natural_image
Illustration of a handheld device with a blue arrow pointing to the top part (no text or symbols)| Duration | Function | Voice prompt/beeps | |
 |  | Accepts a call |  |
 |  | Rejects a call "Rejecting call" | |
 |  | Ends a call "Call ended" |
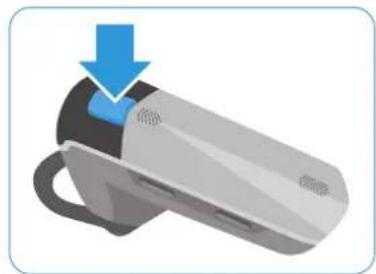
Transferring the call to/from the headset
Once a connection is established, you can transfer the call to/from the headset.
▶ Press the multi-function button:
natural_image
Illustration of a handheld device with a blue arrow pointing to the top part (no text or symbols)| Duration | Function Beep(s) | ||
 |  | Transfers a call from the headset to the mobile phone | [S22K] |
 |  | Transfers a call from the mobile phone to the headset | [HTSX] |
natural_image
Illustration of a surveillance camera with a blue arrow pointing to the lens (no text or symbols present)Redialing
The redialing function must be supported by your mobile phone or Bluetooth device (with HF profile respectively) and be activated.
▶ Press the multi-function button:
| Duration | Function | Voice prompt | |
 |  | Redials the last number "Redialing" | |
 |  | Stops redialing "Call ended" |
Voice dialing
The voice dialing function must be supported by your mobile phone (with HF profile) and be activated. Follow the instructions in the instruction manual of your mobile phone.
▶ Press the multi-function button for about 2 seconds until you hear 2 beeps. Release the multi-function button to start the voice dialing.
natural_image
Illustration of a handheld device with a blue arrow pointing to the top portion of its body (no text or symbols present)| Duration | Function | Voice prompt |


Say the name of the person you want to call. The mobile phone automatically dials the corresponding number.
Muting the headset's microphone
▶ Press the Volume up or down button:
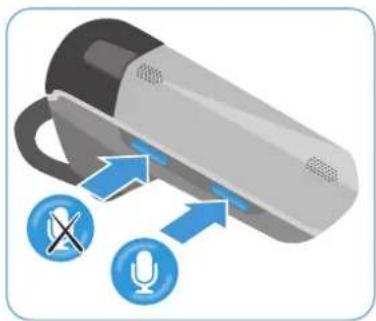
natural_image
Illustration of a handheld device with sound icons and signal arrows, no text or symbols present| Duration | Function | Voice prompt | |
 |  | Mutes the headset's microphone "Mute on" | |
 |  | Unmutes the headset's microphone "Mute off" |
While the microphone is muted, you hear a beep every 4 seconds.
natural_image
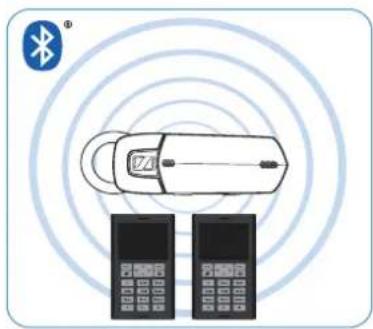
Illustration of a car with sensor waves and two mobile phones below (no text or symbols)Managing multiple calls
You can use the VMX 200-II simultaneously with two connected Bluetooth devices (Multi Connection).
In order for this to function, at least two Bluetooth devices must already be paired with the headset. To do so, follow the instructions in the chapter "Connecting the headset to a Bluetooth device" (see page 11).
Switch the headset on. The headset automatically tries to establish a Bluetooth connection to the two last connected Bluetooth devices.
Managing two calls
You can manage two calls:
• from either two different Bluetooth devices or
• from one Bluetooth device.
If you want to manage two calls from one Bluetooth device, disconnect the second Bluetooth device.
If you receive a call during an active call:
▶ Press the multi-function button:
natural_image
Illustration of a smart air purifier with a blue downward arrow indicating compression or damage (no text or symbols)
| Duration | Active call | 2nd incoming call | Function |
 |  |  | Accepts the incoming call and ends the active callVoice prompt: "Call ended" |
 |  |  | Accepts the incoming call and puts an active call on hold (toggling – phone dependent) |
 |  |  | Rejects the incoming call and continues the active call |
If you put an active call on hold (toggling):
▶ Press the multi-function button again:
| Duration | Active call | 2nd call put on hold | Function |
 |  |  | Ends the active call and makes the call on hold active (phone dependent) |
 |  |  | Establishes a conference call (for 2 calls on one mobile phone only) |
Listening to music using the headset
If your headset has a Bluetooth connection to an audio source (e.g. mobile phone, tablet or computer) and supports the A2DP/AVRCP standard, you can use the headset to listen to music and remote-control your audio source.
Once music is selected and started from the audio source, further changes can be activated directly from the headset as follows:
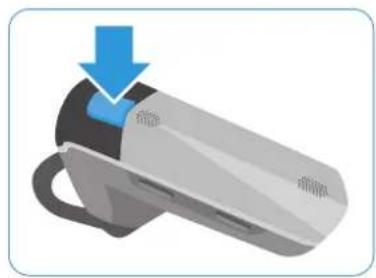
▶ Press the multi-function button or the Volume up or down button:

natural_image
Illustration of a device with a blue arrow pointing to a button labeled '按钮' (button), no text or symbols present.Duration Function


Resumes the track (if paused)


Pauses the track
natural_image
Illustration of a handheld device with blue circular icons pointing to two blue play button symbols (no text or labels)Duration Function


Skips to the next track


Skips to the previous track
natural_image
Illustration of a smart device with a blue arrow pointing to the top part of its body (no text or symbols present)Duration Music Function


Pauses the track and activates voice dialing


Pauses the track and starts redialing
Cleaning and maintaining the VMX 200-II
CAUTION
Liquids can damage the electronics of the product!
Liquids entering the housing of the device can cause a short circuit and damage the electronics.
Keep all liquids far away from the product.
Do not use any cleansing agents or solvents.
Cleaning the headset
▶ Only use a dry cloth to clean the product.
Storing the headset
If you do not use the headset for extended periods of time:
Charge the built-in rechargeable battery every 6 months for about 1 hour.
Store the headset in a clean and dry environment.
If a problem occurs ...
| Problem | Possible cause | Possible solution | Page |
| Headset cannot be switched on | The rechargeable battery is flat. | Recharge the rechargeable battery. | 10 |
| No audio signal | The headset is not paired with the mobile phone. | Check if the headset is paired. If necessary, pair the headset with the mobile phone again. | 12 |
| The volume is adjusted too low. | Increase the volume. 16 | ||
| The headset is switched off. | Switch the headset on. 15 | ||
| Headset cannot be paired | The pairing does not work. | Check if the your Bluetooth device supports the HF or HS profile. | - |
| The mobile phone is switched off. | Switch the mobile phone on. | 15 | |
| Headset does not react to any button press | The operation of the headset is faulty. | Reset the headset to the factory default settings. | 22 |
If a problem occurs that is not listed in the above table or if the problem cannot be solved with the proposed solutions, please contact your local Sennheiser partner for assistance.
To find a Sennheiser partner in your country, search at www.sennheiser.com.
Restoring factory default settings (Reset)
You can restore the following settings to their factory default settings:
- list of paired Bluetooth devices (afterwards empty)
1 Set the headset to pairing mode (see page 12). The LED flashes alternately blue and red, indicating that the headset is in pairing mode.
2 Simultaneously press and hold the volume up button and the volume down button for 3 seconds.
text_image
1 5s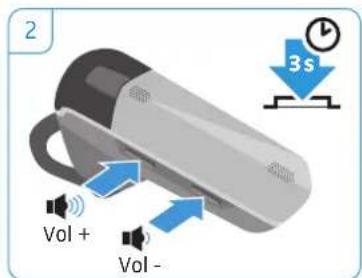
text_image
2 Vol + Vol -If you are out of the Bluetooth transmission range
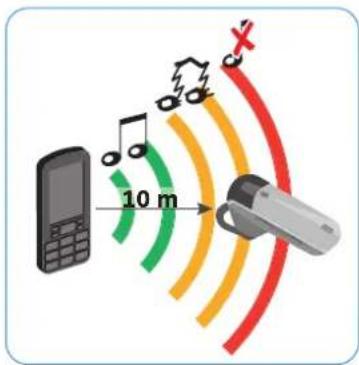
Calling is only possible in the Bluetooth transmission range of the mobile phone. The transmission range largely depends on environmental conditions such as wall thickness, wall composition etc. With a free line of sight, the transmission range of most mobile phones and Bluetooth devices is up to 10 meters.
If the headset gets out of the Bluetooth transmission range of the mobile phone, the sound quality deteriorates and the voice prompt "lost connection" is announced in the headset. This announcement is repeated at regular intervals for 5 minutes.
If you re-enter the Bluetooth transmission range within these 5 minutes, the connection is re-established and the voice prompt "connected" is announced in the headset.
If you spend more than 5 minutes outside the Bluetooth transmission range, the connection breaks down completely and you have to manually re-establish the connection.
To re-establish a connection to the mobile phone:
▶ Briefly press the multi-function button.
Once the connection is successfully re-established, the voice prompt "connected" is announced in the headset.
text_image
10 m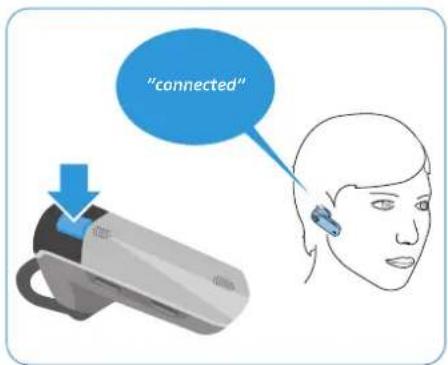
text_image
"connected"Specifications
VMX 200-II
Dimensions (W x H x D) approx. 55 x 26 x 58 mm
Weight without ear hook approx. 10 g
Standby time up to 12 days
Talk time up to 10 hours
Charging time 1 h 20 min
Rechargeable battery (built-in) Lithium Polymer; 3.7 V; 120 mA
Speaker type dynamic, neodymium magnet
Microphone type dual omni-directional electret microphone
Audio digital noise and echo suppression
Operating temperature range +10°C (+50°F) to +40°C (+104°F)
Operating relative humidity 20 to 85%, non-condensing
Storage temperature range -20^(-4^) to +60^(140^)
Storage relative humidity 10 to 95%, non-condensing
Car charger – model number* CAWQ02-5.0-150C/SIL-C05050A

Bluetooth
#
Bluetooth
Bluetooth version 3.0
Range up to 10 m/class 2
Transmission frequency 2402 MHz to 2480 MHz
Profiles HSP (v1.2), HFP (v1.6), A2DP (v1.2), AVRCP (v1.0)
Output power 3.07 dbm/2.028 mW
VMX 200-II power supply unit\*
Model number US version: SSA-3P 050015US EU version: SSA-3P 050015EU
Nominal input voltage 100 - 240 V\~
Nominal input current max. 0.2 A
Mains frequency 50 – 60 Hz
Nominal output voltage 5 V
Nominal output current max. 150 mA
Operating temperature range +10°C (+50°F) to +40°C (+104°F)
Operating relative humidity 20 to 85%, non-condensing
Storage temperature range -20^ ( -4^ ) to +60^ ( 140^ )
Storage relative humidity 10 to 95%, non-condensing
Weight approx. 75 g
Manufacturer Declarations
Warranty
Sennheiser electronic GmbH & Co. KG gives a warranty of 24 months on this product. For the current warranty conditions, please visit our website at www.sennheiser.com or contact your Sennheiser partner.
FOR AUSTRALIA ONLY
Sennheiser's goods come with guarantees that cannot be excluded under the Australian Consumer Law. You are entitled to a replacement or refund for a major failure and compensation for any other reasonably foreseeable loss or damage. You are also entitled to have the goods repaired or replaced if the goods fail to be of acceptable quality and the failure does not amount to a major failure.
This warranty is in addition to other rights or remedies under law. Nothing in this warranty excludes, limits or modifies any liability of Sennheiser which is imposed by law, or limits or modifies any remedy available to the consumer which is granted by law. To make a claim under this warranty, contact Syntec International Pty Ltd, Unit 3, 31 Gibbs Street Chatswood NSW 2067, AUSTRALIA Phone: (02) 9910 6700, email: service@syntec.com.au. All expenses of claiming the warranty will be borne by the person making the claim.
The Sennheiser International Warranty is provided by Syntec International Pty Ltd (ABN 94003433798), unit 3, 31 Gibbs Street Chatswood NSW 2067 Australia.
In compliance with the following requirements
• RoHS Directive (2002/95/EC)
• WEEE Directive (2002/96/EC)

Please dispose of this product by taking it to your local collection point or recycling center for such equipment. This will help to protect the environment in which we all live.
• Battery Directive (2006/66/EC)

The product built-in rechargeable batteries can be recycled. In order to protect the environment, please dispose of defective products with built-in rechargeable batteries as special waste or return them to your specialist dealer.
CE Conformity
• R&TTE Directive (1999/5/EC)
• EMC Directive (2004/108/EC)
- Low Voltage Directive (2006/95/EC)
• ErP Directive (2009/125/EC)
The CE Declaration of Conformity is available on our website at www.sennheiser.com. Before putting the device into operation, please observe the respective country specific regulations!
In compliance with:
Statements regarding FCC and Industry Canada
This device complies with Part 15 of the FCC Rules and with Industry Canada standard(s) for license-exempt radio devices. Operation is subject to the following two conditions: (1) this device may not cause harmful interference, and (2) this device must accept any interference received, including interference that may cause undesired operation.
This equipment has been tested and found to comply with the limits for a Class B digital device, pursuant to Part 15 of the FCC Rules and RSS 210 of Industry Canada. These limits are designed to provide reasonable protection against harmful interference in a residential installation. This equipment generates, uses and can radiate radio frequency energy and, if not installed and used in accordance with the instructions, may cause harmful interference to radio communications. However, there is no guarantee that interference will not occur in a particular installation. If this equipment does cause harmful interference to radio or television reception, which can be determined by turning the equipment off and on, the user is encouraged to try to correct the interference by one or more of the following measures:
- Reorient or relocate the receiving antenna.
- Increase the separation between the equipment and receiver.
- Connect the equipment into an outlet on a circuit different from that to which the receiver is connected.
- Consult the dealer or an experienced radio/TV technician for help.
Changes or modifications made to this equipment not expressly approved by Sennheiser electronic Corp. may void the FCC authorization to operate this equipment.
RF Radiation Exposure Information
Since the radiated output of this device is far below the FCC/IC RF radio frequency exposure limits, it is not subjected to routine RF exposure evaluation as per Section 2.1093 of the FCC rules and RSS GEN rules sections 2.5.1 & 2.5.2.
Trademarks
The Bluetooth ^® word mark and logos are registered trademarks owned by Bluetooth SIG, Inc. and any use of such marks by Sennheiser electronic GmbH & Co. KG is under license.
iPod ^® and iPhone ^® are registered trademarks of Apple Inc, registered in the U.S. and other countries.

natural_image
Line drawing of a handheld electronic device with buttons and display ports (no text or symbols)Sennheiser electronic GmbH & Co. KG
Am Labor 1,30900 Wedemark, Germany
www.sennheiser.com
Publ. 10/12, A02