KAMWO25INWA - Microwaves Kogan - Free user manual and instructions
Find the device manual for free KAMWO25INWA Kogan in PDF.

User questions about KAMWO25INWA Kogan
0 question about this device. Answer the ones you know or ask your own.
Ask a new question about this device
Download the instructions for your Microwaves in PDF format for free! Find your manual KAMWO25INWA - Kogan and take your electronic device back in hand. On this page are published all the documents necessary for the use of your device. KAMWO25INWA by Kogan.
USER MANUAL KAMWO25INWA Kogan
natural_image
Line drawing of a microwave oven with front panel and side door (no text or symbols)Microwave Oven with Inverter
42L, 34L & 25L
KAMWO42INWA, KAMWO34INWA & KAMWO25INWA
Safety & Warnings 3
Overview 5
Assembly 6
Operation 7
Cleaning & Care 16
Notes 19
Safety & Warnings
WARNING: When operating the appliance in combination mode, children should use the oven only under adult supervision due to the high temperatures generated.
- If the door or door seals are damaged, cease use immediately and contact help.Kogan.com for support.
- It is hazardous for anyone other than a licensed trade professional to carry out any service or repair, which involves the removal of any cover, which gives protection against exposure to microwave energy. If the microwave is damaged, cease use immediately and contact help.Kogan.com for support.
- Do not heat liquids or other foods in sealed containers, as they may explode.
- Use only utensils that are suitable for microwave ovens.
- Do not use metallic containers for food or beverages during microwave cooking.
- When heating food in plastic or paper containers, monitor the oven carefully due to the risk of ignition.
- The microwave oven is intended for heating food and beverages only. Do not use it to dry food or clothing, or to heat warming pads, slippers, sponges, damp cloths, or similar items, as this could result in injury, ignition, or fire.
- If smoke is observed, switch off or unplug the appliance and keep the door closed to extinguish flames.
- Microwave heating of beverages can result in delayed eruptive boiling. Handle containers with care to avoid burns.
- Stir or shake the contents of feeding bottles and baby food jars, and always check the temperature before consumption to prevent burns.
- Do not heat eggs in their shell or whole hard-boiled eggs in the microwave, as they may explode, even after heating has ended.
- Failure to keep the oven clean can cause deterioration of the surface, which may affect the appliance's lifespan and create a hazardous situation.
- Do not place the appliance inside a cabinet.
• Take care not to displace the turntable when removing containers from the oven. -
Do not clean the appliance with a steam cleaner.
-
If the power cord or plug is damaged, cease use immediately and contact help.Kogan.com for support.
- This appliance may be used by children aged 8 years and above, and by persons with reduced physical, sensory, or mental capabilities, or those lacking experience and knowledge, provided they have been given supervision or instruction on safe use and understand the associated hazards.
• Children must not play with the appliance.
• Cleaning and maintenance must not be performed by children without supervision. - Do not immerse the turntable in cold water immediately after use. Allow it to cool for at least 20 minutes before submerging it in water to prevent cracking.
Overview
text_image
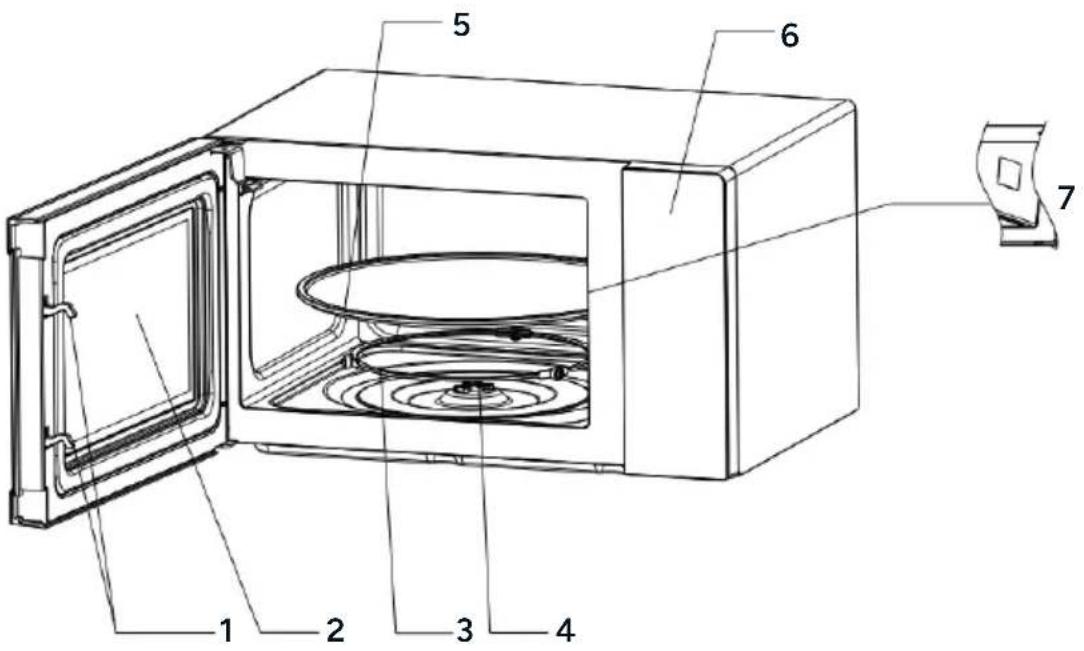
Technical diagram of a microwave oven with numbered parts for identification| 1 | Door Lock | The microwave oven door must be properly closed for it to operate. |
| 2 | Viewing Window | Allow the user to see the cooking status. |
| 3 | Rotating Ring | The glass turntable sits on its wheels. It supports the turntable and helps it stay balanced while rotating. |
| 4 | Rotating Axis | The glass turntable sits on the axis, and the motor underneath drives the turntable to rotate. |
| 5 | Turntable | The food is placed on the turntable, and its rotation during operation helps cook food evenly.Caution:Place the rotating ring first.Fit the turntable onto the rotating axis and ensure it is properly secured. |
| 6 | Control Panel | Refer to the detailed explanation below (the control panel design is subject to change without prior notice). |
| 7 | Waveguide Cover | Located inside the microwave oven, next to the wall of the control panel.Warning: Never remove the waveguide cover. |
Assembly
- Remove all the packaging. If there is a protective film over the microwave, tear it off before use. Carefully inspect the microwave for any damage. If damage is found, contact help.Kogan.com for support.
- Microwave ovens must be placed in a dry, non-corrosive environment, away from heat sources and humidity, such as gas burners or water tanks.
• To ensure proper ventilation:
- Maintain a distance of at least 20cm between the rear of the microwave and the wall.
- Keep at least 5cm of clearance on each side of the microwave.
- Leave at least 20cm of free space above the microwave.
- Ensure the microwave is positioned at least 85cm above the ground.
- Position the microwave oven far from TVs, radios, or antennas to avoid picture distortion or noise interference. The distance should be more than 5 meters.
- The appliance must be positioned so that the power plug is accessible. Ensure proper grounding to prevent electric shock in case of leakage.
- The microwave must always be operated with the door closed.
- Do not place the microwave inside a cabinet. It is designed to be used as a freestanding appliance.
- During the initial use, you may notice an odour or slight smoke due to manufacturing residue or oil on the oven cavity or heating element. This is normal and should dissipate after a few uses. Ensure good ventilation by keeping the door or windows open. It is strongly recommended to place a cup of water inside the microwave, set it to high power, and operate it several times to help remove any odours.
Operation
Control Panel - KAMWO42INWA

flowchart
graph TD
    A["1"] --> B["Potato"]
    A --> C["Pasta"]
    A --> D["Pizza"]
    A --> E["Popcorn"]
    A --> F["Veget."]
    A --> G["Bever."]
    A --> H["Meat"]
    A --> I["Reheat"]
    A --> J["Fish"]
    K["2"] --> L["Micro."]
    K --> M["Defrost"]
    K --> N["Timer"]
    O["3"] --> P["1"]
    O --> Q["2"]
    O --> R["3"]
    S["4"] --> T["5"]
    S --> U["6"]
    V["5"] --> W["7"]
    V --> X["8"]
    V --> Y["9"]
    Z["6"] --> AA["STOP lock"]
    Z --> AB["START ←→"]
    AC["7"] --> AD["Stop clock"]
1 Display Screen 7 0/Clock Button
2 Menu Buttons 8 STOP Button
3 Timer Button 9 Express Cook Button
4 Defrost Button 10 Micro. Button
5 Number Buttons 11 Reheat Button
6 START/+30s Button

text_image
1 Potato Paste Pizzas Popcorn Veget. Bever. Meat Reheat Fish Micro Defrost Timer 1 2 3 Express Cook 4 5 6 7 8 9 STOP 0 START 71 Display Screen 7 0/Clock Button
2 Menu Buttons 8 STOP Button
3 Timer Button 9 Express Cook Button
4 Defrost Button 10 Micro. Button
5 Number Buttons 11 Reheat Button
6 START/+30s Button

text_image
1 Potato Pasta Pizza Ropcorn Veget. Bever. Meat Reheat Fish 11 Micro. Defrost Timer 3 4 9 Express Cook 4 5 6 7 8 9 8 STOP 0 START clock +20s 71 Display Screen 7 O/Clock Button
2 Menu Buttons 8 STOP Button
3 Timer Button 9 Express Cook Button
4 Defrost Button 10 Micro. Button
5 Number Buttons 11 Reheat Button
6 START/+30s Button
Before Cooking
The display illuminates when the microwave is plugged into a power supply, entering standby mode with the display showing '1:00.'
Using the Microwave
- There are 10 microwave power levels. Press the 'Micro.' button repeatedly to select the desired power level.
- Use the number buttons (0–9) to input the cooking time. The maximum time is 99:99.
- Press the 'START/+30s' button to begin operation. A buzzing sound signals the end of cooking.
- If food is turned during cooking, press the 'START/+30s' button to resume.
- If food is removed before time is up, press the 'STOP' button to clear the preset program.
- Never operate the microwave empty.
- At maximum power, the microwave automatically reduces power after extended operation to preserve its lifespan.
| Power Level | Output | Application |
| HIGH | 100% and 90% | Quick and thorough cooking |
| M. HIGH | 80% and 70% | Medium express cooking |
| MED 60% and | 50% Steaming food | |
| M. LOW | 40% and 30% | Defrosting food |
| LOW | 20% and 10% | Keeping food warm |
Defrost
- Two defrost modes are available:
• dEF1: Defrost by weight (100–1500 g).
• dEF2: Defrost by time (up to 99:99).
- To defrost:
- Press the 'Defrost' button to select mode (dEF1 or dEF2).
- Input the food weight or time using the number buttons.
- Press 'START/+30s' to begin. A buzzing sound signals the end.
Caution
- Turn food for uniform defrosting.
• Defrosting typically takes longer than cooking. - Stop defrosting when food is soft enough to cut with a knife.
- Microwave penetrates approximately 4cm into food.
- Consume defrosted food promptly; do not refreeze.
Auto Cooking
- There are 8 automatic menus: potato, pasta, pizza, popcorn, vegetable, beverage, meat, and fish.
- Select the desired menu by pressing the corresponding button repeatedly to choose the desired food weight. The display will show the selected weight.
- After selecting the cooking weight, press the 'START/+30s' button to begin operation. A buzzing sound will notify you when the operation is complete.
| Display | Menu | Weight Options |
| A.1 | Potato | 250g, 500g and 750g. |
| A.2 Pasta | 50g, 100g and 150g. | |
| A.3 Pizza | 200g and 400g. | |
| A.4 | Popcorn | 100g. |
| A.5 | Vegetable | 200g, 400g and 600g. |
| A.6 | Beverage | 1 cup, 2 cups or 3 cups (each approx. 250ml). |
| A.7 Meat | 200g, 400g and 600g. | |
| A.8 | Fish | 200g, 400g and 600g. |
Caution
- Food temperature (20–25°C) affects cooking time. Adjust as needed.
• Weight, temperature, and shape of food may affect results.
Timer
To set a timer:
- In standby mode, press the 'Timer' button. The display will illuminate '0:00.'
- Use the number buttons (0–9) to input the cooking time (max: 99:99).
- Press 'START/+30s' to begin. The buzzer will sound when the timer ends.
Reheat
- The reheat function is designed to help users heat food based on its weight.
- Press the 'Reheat' button repeatedly to select the appropriate weight. The available weight options are 200g, 400g, 600g, 800g, and 1000g.
- After selecting the desired weight, press the 'START/+30s' button to begin. A buzzing sound will notify you when the operation is complete.
Express Cook
Quick Start
-
In standby mode, you can press the number buttons (1–6) directly to set a cooking time of 1–6 minutes. The working time corresponds to the number pressed:
-
Press 1 for 1 minute.
-
Press 2 for 2 minutes, and so on up to 6 minutes.
-
After selecting the time, press the 'START/+30s' button to begin operation. A buzzing sound will notify you when the cooking is complete.
Instant Start
- In standby mode, after placing the food inside and closing the door, press the 'START/+30s' button to start the microwave instantly. The default working time is 30 seconds.
- During operation, press the 'START/+30s' button again to add 30 seconds to the current cooking time. A buzzing sound will notify you when the operation is complete.
0/Clock
The clock function is combined with the '0' button and operates on a 24-hour system.
To set the clock:
- In standby mode, press and hold the '0/Clock' button for more than 3 seconds to enter the clock setting interface.
- Use the number buttons (0–9) to input the desired time.
- Press the 'START/+30s' button to confirm and exit the clock setting mode.
Stop
- During cooking settings, press the 'STOP' button to cancel the settings and return to standby mode.
- While the microwave is operating, press the 'STOP' button to pause. In the paused state, press the 'STOP' button again to cancel the function and return to standby mode.
Start/+30s
- After setting the cooking time or food weight, press the 'START/+30s' button to start the microwave immediately.
- During operation, press the 'START/+30s' button to add 30 seconds to the cooking time.
- In a paused state, press the 'START/+30s' button to resume the previous cooking mode.
Notes:
The menu mode and weight defrosting mode do not allow time adjustment.
Child Lock
- The child lock feature disables the control panel, preventing accidental use or operation by children.
- Press and hold the 'STOP' button for approximately 3 seconds to lock/unlock the microwave.
Utensils Guideline
Use only containers that are suitable and safe for microwave cooking. Heat-resistant ceramic, glass, and plastic containers are recommended. Never use metal containers, as sparks may occur.
| Material | Microwave Safe | Notes |
| Heat-resistant ceramic | Yes | Avoid ceramics with metal rims or glaze. It is recommended to use ceramic, heat-resistant glass and plastic containers that can withstand temperatures above 120°C. |
| Heat-resistant plastic | Yes | Do not use for extended microwave cooking. |
| Heat-resistant glass | Yes | |
| Grill rack No | ||
| Plastic film Yes | Avoid using with high-fat foods to prevent damage. |
Cooking Tips
The following factors may affect the cooking result:
- Food arrangement: Place thicker areas toward the outside of the dish and thinner parts toward the centre. Spread food evenly and avoid overlapping if possible.
- Cooking time length: Start with a short cooking time, evaluate the food after it times out, and extend the cooking time as needed. Overcooking may cause smoke or burns.
- Cooking food evenly: Foods like chicken, hamburgers, or steak should be turned once during cooking. For other foods, stir from the outside toward the centre of the dish once or twice, if applicable.
- Allow standing time: After the cooking time ends, leave the food in the oven for an adequate period. This allows the cooking cycle to complete and the food to cool gradually.
Determining If the Food Is Done
Use the colour and texture of food to assess doneness:
- Steam is released evenly from all parts of the food, not just the edges.
- Poultry joints move easily.
- Pork or poultry shows no signs of blood.
- Fish is opaque and flakes easily with a fork.
Browning Dish
When using a browning dish or self-heating container, always place a heat-resistant insulator, such as a porcelain plate, underneath to prevent damage to the turntable and rotating ring.
Microwave-Safe Plastic Wrap
When cooking food with high-fat content, ensure the plastic wrap does not come into contact with the food to avoid melting.
Microwave-Safe Plastic Cookware
Some microwave-safe plastic cookware may not be suitable for cooking foods with high fat or sugar content. Additionally, do not exceed the preheating time specified in the dish's instruction manual.
Cleaning & Care
WARNING: After use, clean the waveguide cover by wiping it with a damp cloth, then dry it thoroughly with a dry cloth to remove any food splashes or grease. Accumulated grease can overheat, potentially causing smoke or fire.
Microwave Care
- The oven should be cleaned regularly, and food deposits should be removed.
- Disconnect the power cord from the electrical outlet before cleaning. Allow the oven to cool completely. Do not immerse the appliance in water or other fluids.
- Failure to maintain cleanliness may deteriorate the oven's surface, reducing its lifespan and potentially creating a hazardous situation.
- Avoid using harsh detergents, gasoline, abrasive powders, or metal brushes on any part of the appliance.
-
Do not remove the waveguide cover.
• To remove odors from extended use, try the following methods: -
Place several lemon slices in a cup and heat on high power for 2–3 minutes.
- Place a cup of red tea in the oven and heat on high power.
- Put some orange peel in the oven and heat on high power for 1 minute.
- When not in use, store the microwave in a dry, ventilated area.
Tips For Cleaning
Exterior
- Wipe the enclosure with a damp, soft cloth.
Door
- Wipe the door and window with a damp, soft cloth.
- Clean the door seals and adjacent parts to remove spills or splatters.
- Wipe the control panel with a slightly dampened soft cloth.
Interior Walls
- Wipe the interior surfaces with a damp, soft cloth.
- Clean the waveguide cover to remove food splashes.
Turntable, Rotation Ring, and Rotation Axis
- Wash with mild soap and water.
- Rinse with clean water and dry thoroughly.
Servicing
Before Servicing
- Place a cup of water (approx. 150ml) in a glass container inside the oven and close the door securely. The oven lamp should turn off when the door is properly closed. Let the oven run for 1 minute.
-
Check the following:
-
Does the oven lamp illuminate?
- Does the cooling fan work? (Feel airflow from the rear ventilation openings.)
- Does the turntable rotate? (It can rotate clockwise or anticlockwise - this is normal.)
• Is the water inside the oven hot?
If the answer to any of these questions is 'NO,' check your electrical outlet and the fuse in your meter box. If both are functioning correctly, contact help.Kogan.com for support.
Servicing Safeguards
- The high-voltage capacitor retains a charge even after disconnection. Use a screwdriver to short the negative terminal of the capacitor to the oven chassis to discharge it before servicing.
-
During servicing, the following parts may expose potentials above 250V to earth:
-
Magnetron.
• High-voltage transformer.
• High-voltage capacitor.
• High-voltage diode.
• High-voltage fuse.
- The following conditions can cause undue microwave exposure during servicing:
- Improper fitting of the magnetron.
- Improper alignment of the door interlock, hinge, or door.
- Incorrect fitting of the switch support.
• Damaged door, door seal, or enclosure.
Disposal
This marking indicates that this appliance should not be disposed with other household wastes. To prevent possible harm to the environment or human health from uncontrolled waste disposal, recycle it responsibly to promote the sustainable reuse of material resources.
Notes
Need more information?
We hope that this user guide has given you the assistance needed for a simple set-up.
For the most up-to-date guide for your product, as well as any additional assistance you may require, head online to help.Kogan.com.
kogan.com