SantaCruzEQ - Programme audio MAAT - Free user manual and instructions
Find the device manual for free SantaCruzEQ MAAT in PDF.

User questions about SantaCruzEQ MAAT
0 question about this device. Answer the ones you know or ask your own.
Ask a new question about this device
Download the instructions for your Programme audio in PDF format for free! Find your manual SantaCruzEQ - MAAT and take your electronic device back in hand. On this page are published all the documents necessary for the use of your device. SantaCruzEQ by MAAT.
USER MANUAL SantaCruzEQ MAAT
More unique and essential tools and tips at:
www.maat.digital
Table of Contents
Installation & Setup 7
Licensing 7
Online Activation 8
Offline Activation 8
Introduction 10
Features 10
Applications 11
The Interface 11
Overview 12
IIR Filters 12
Minimum Phase 12
Introduction 13
6 versus 12 ....13
What's So Special....14
In Use 15
Baseband Operation 15
HRA 15
The Filters 16
Topologies 17
Shelf and Cut Filter Library 18
The Controls 19
Left Control Cluster 19
Keyboard 19
SORT 19
OVERSAMPLE 19
The Sections....19
In Circuit/Bypass 20
Gain Field 20
Type 20
Shelving Slope 20
Right Control Cluster 21
TPL Meter....21
ARCHITECTURE 22
AUTO GAIN 22
GAIN OUT 22
The Graph 22
Nodes 23
Textual vs Manual Frequency Settings 24
Response Curves 25
Shared Controls 25
Zoom Control....25
User Preferences 26
Preferences 26
General Tab 26
Colors Tab 27
Hot Keys Tab 27
License/Info Tab 28
Bypass 28
Signal Present Meter 28
Undo/Redo 29
Presets 29
Specifications 29
Latency 29
Resonant Frequency 30
System Requirements 30
Supported Platforms 30
Supported Sample Rates 30
Supported Hosts 30
Updates 30
Credits 31
Appendix One 32
Constructing Classic Filters 32
About This Manual 33
Installation & Setup
When preparing for installation of your MAAT SantaCruzEQ, we recommend that you quit all applications prior to proceeding. Also, after downloading the installer and prior to installation, let any anti-malware measures you may have running scan the installer. Then, temporarily disable all anti-malware measures once scanning is complete.
To install, simply double click on the downloaded Installer for your particular operating system. The installation process will guide you through the install procedure. If you have an older OS version, restarting your host may be required. Don't forget to reenable anti-malware measures or simply restart your host.
Licensing
MAAT software is licensed through our dongle-free, cloud-based license control framework. If your hosts are net-connected, our licenses "float," making it easy to move from one machine to another. All you have to do is close all MAAT stuff on one machine before you open anything on another. If you're going to use the laptop in an environment where internet is spotty or non-existent, you can also go offline temporarily for up to 30 days.
To license your MAAT purchase, open yours or instantiate an example in your preferred plug-in host. When licensing, we recommend you open a new session in your DAW just for this purpose.
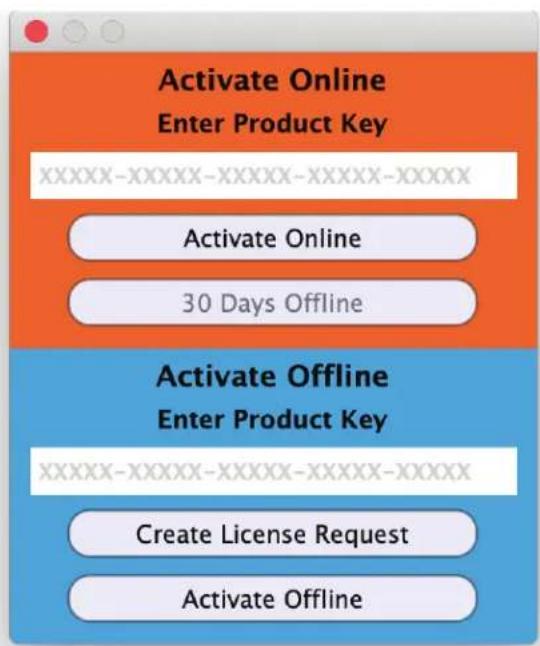
text_image
Activate Online Enter Product Key XXXXXXXX-XXXXXXXX-XXXXXXXX-XXXXX-XXXXX Activate Online 30 Days Offline Activate Offline Enter Product Key XXXXXXXX-XXXXXXXX-XXXXXXXX-XXXXX-XXXXX Create License Request Activate OfflineFigure 1: The initial Activation dialog
Online Activation
Once the Activation dialog appears, paste or type in your Product Key supplied at the time of purchase. Then click on Activate/Deactivate Online and follow the prompts.

NOTE: THE ONLINE PROCESS REQUIRES A LIVE INTERNET CONNECTION. YOU MUST HAVE AN ACTIVE INTERNET CONNECTION FOR ACTIVATION.
A feature of our cloud-connected system is that, if you close a DAW session that contains MAAT plug instances, then open that session on another host, the license will “follow” you onto the new host as long as you have live internet.
You can also return or park your license on our licensing server, and pick it up later on another host. Once your product is licensed, click the Activate/Deactivate Online button to deactivate your license, then repeat to reactivate.
Offline Activation
If, for security reasons you have an offline host computer or you plan on working without a reliable internet connection, it is best to go with an offline license. There are two offline options, temporary offline and full offline.
Temporary Offline
If you plan on working without a reliable internet connection, we designed the temporary offline option just for you. The temporary offline process also requires a live internet connection, but only during activation.
A temp offline license has two unique features:
- It can remain offline, without an internet connection, for up to 30 days
- It auto-renews its lease whenever it does make a server connection
So, if your internet is spotty or unreliable, or you're heading temporarily to a location where an internet connection isn't available, the temporary offline option let's you work untethered to the 'net for up to a month.
By clicking the “30 Days Offline” button, your online license will become temporarily offline for a maximum of 30 days. If, however, you use the product while connected to the internet at all during that time, the “lease” duration is automatically reset, extending another 30 days.

text_image
Activate Online Enter Product Key KYK20 = 2.488 - 7.5x13 - 9.0x13 - 10.0x13 Deactivate Online 30 Days Offline Activate Offline Enter Product Key XXXXXXXX-XXXXXXXX-XXXXXXXX-XXXXX-XXXXX Create License Request Deactivate OfflineFigure 2: The 30 Days Offline activation option
FullOffline
This will license your MAAT product without the need to periodically contact our licensing server. If you anticipate working without the internet for more than a month at a time or, for security purposes, your studio machine is “air gapped” and has no internet, take a moment to surrender your online license, and replace it with an offline version.
Note: A full offline license does need to be explicitly renewed once a year.
To prepare for offline activation, you will need:
- Your Product Key!
- Some method to move your License Confirmation file to the offline host machine.
That latter requirement can be accomplished in any number of ways, but a USB flash drive is often readily available and most convenient. You will also need your Product Key that was supplied to you via e-mail when you purchased your MAAT product.
The offline activation process starts with generating a License Re-
quest, with a “maatr” file extension, which is submitted on-line to our server or via e-mail to MAAT Support support@maatinc.zohodesk.com. A License Confirmation file, with a “maatc” extension, will be returned to you, which will activate your product.
To proceed, click on the Activate/Deactivate Offline button, and follow the prompts.
In a year's time, 365 days from the date the maatr file is created, a full offline license must be renewed using the same maatr/maatc method.
Introduction
It's been a long journey to bring this incarnation of Algorithmix's PEQ Blue to life. We've done a lot of development work in order to create an intuitive, useful and ultra-clean EQ tool. As with other members of our thEQ family, SantaCruzEQ fills a gap in the landscape of modern audio equalization, exceeding all current hardware and software solutions with practical visualization and superior fidelity.
Each member of our thEQ family fulfills a distinct purpose. thEQ-orange is best for analytical work, such as cleaning up unfortunate mix decisions, removing subsonics, and suppressing noise and clutter at midband and frequency extremes. thEQred, though also linear phase, is for aesthetic applications, where you desire to improve material with spectral sculpting. If you need a low cut, reach for thEQorange. If you'd like to alter timbre or voicing, then reach for thEQred.
Moving away from linear phase operation is SantaCruzEQ. Think of blue as red with attitude. Each of SantaCruzEQ's twelve different “flavors” or architectures lend an individual vibe while still maintaining the cleanliness of all thEQ products. If you think a traditional EQ will do the trick, then SantaCruzEQ should be the first place you go.
Features
SantaCruzEQ is the highest fidelity digital collection of classic analog equalizer implementations available.
- Up to one dozen different minimum phase equalizer types, with 10 serial and 2 parallel architectures in SantaCruzEQ12. PEQ (parametric EQ) styles for every taste: standard, vintage, modern and experimental
- Different frequency characteristics: classic, constant-Q, proportional-Q, ideal-Q and special
-
True digital implementation of the analog parallel feedback equalizer, normally impossible due to so-called “delay-free feedback loops”
-
Sample rates up to 384 kHz, perfectly suitable for high resolution DXD, DSD and gaming production and post
- Extended center frequency setup up to 80 kHz for filtering in the ultrasonic
- Adjustable Q or Quality Factor for shelving and cut filters
- Bell filters in all PEQ types normalized to look identically at 6 dB of boost and a Q of 0.71, ideal for fast aural comparisons between different equalizers architectures
- Six Sections, four with five freely assignable parametric filter types: bell, low-shelf, high-shelf, low-cut, and high-cut
- Extremely low noise and low nonlinear distortion filter algorithms result in residual THD+N in the range of 24 bit quantization noise
- Several low-cut and high-cut filters can be cascaded for brick wall slope characteristics
- Very low noise and low distortion up-sampling technique for getting analog-like filter characteristics when working with baseband (44.1 and 48 kHz) sample rates
- All internal calculations are in 80 bit double floating-point accuracy for extremely low distortion
- Economical CPU usage allowing multiple instances to be open simultaneously
- Parameter editing via numerical fields or directly on the graphical display
- User and factory presets for quick setup comparison
Applications
• Recording studios: tracking, mixing and mastering
• HRA production and post
• High sample rate game audio production and post
- Broadcast production and post
- Sound reinforcement: microphone response improvement, speaker deficiency correction and acoustical room compensation
• Sound design and enhancement
• Audio restoration and forensic audio retrieval
• Transmission loss correction
The Interface
SantaCruzEQ's user interface (UI) may lack the eye candy associated with some products. For a pro user in a dimly lit room who's face is directed toward a display all day, the UI is designed to convey maximum information with minimum visual fatigue.

line
| Frequency | Value | | --------- | ----- | | 84 Hz | 84 Hz | | 97 Hz | 97 Hz | | 740 Hz | 740 Hz | | 2.63 kHz | 2.63 kHz | | 4.81 kHz | 4.81 kHz | | 8.91 kHz | 8.91 kHz |Figure 3: SantaCruzEQ's user interface
Overview
IIR Filters
Every classic IIR-based (Infinite Impulse Response) parametric equalizer uses filters that apply phase shift. The original signal is added to its time-shifted version to get a certain amount of amplitude cancellation or reinforcement at the desired frequency. This procedure can be implemented in the analog domain with capacitors, resistors, inductors, and optional gain/buffer constructs using transistors or “valves.” In the digital domain, similar filter characteristic can be simulated by widely available “minimum phase,” IIR filter topologies. SantaCruzEQ is a collection of twelve minimum phase equalizer architectures.
Phase–shifting filters attenuate or amplify a desired frequency, but simultaneously affect the phase of all other frequencies. Phase shift causes the time relationship between harmonics to be destroyed which results in slurred and smudgy impulse response. The narrower the filter or higher the slope, the stronger the frequency–dependent phase shift. A very narrow notch used for removing an unwanted tones from a mix does its job, but also changes, sometimes quite dramatically, the sound character of the whole mix. That’s because the substantial phase shift affects all other regions of the original signal along with the target. Filters can, at extreme settings, also produce resonances, which are electrically akin to feedback in the electro–acoustical realm or the ringing of a bell.
Minimum Phase
Though it may seem as though phase-shifting filters are "bad," in fact most filters exhibit phase shift. The big difference between linear phase
filters and minimum phase filters is that one is linear and the other is not! Not surprisingly, linear phase filters exhibit linear and identical phase shift across all frequencies, while minimum phase filter produce frequency-dependent phase shift. Minimum phase architectures also produce minimal group delay, or frequency dependent time shifting, which is another way of thinking of phase shift. Filters that exhibit more frequency-dependent phase shift than a minimum phase design are classified as non-minimum phase. All architectures in SantaCruzEQ are minimum phase.
For some EQ jobs, frequency-dependent phase shift isn't a bad thing. In fact, it may be what you want to achieve the desired “color” or “vibe.” That’s why, within that broad category of minimum phase filters, we at MAAT have provided a range of architectures or, subjectively, a palette of colors in SantaCruzEQ so you can choose which architecture and accompanying sound character best suits your audio needs.
Introduction
The equalizer is an audio engineer's best friend, the oldest and most popular sound processing tool. From the earliest days, its main function has been to correct or enhance sound by boosting or cutting certain frequency ranges. Engineers have developed countless equalizers for over a half century. Some became legendary and were considered benchmarks. Our linear phase equalizers and their forbearers are examples of those.
The most popular version in recording and post-production studios is the parametric equalizer or PEQ. It offers maximal flexibility due to direct access to all relevant filter parameters. Properly used, the PEQ is a very powerful tool and the best friend of every sound engineer in the battle for perfection. If misused, it can inflict serious aural damage.
SantaCruzEQ is a creative equalizing tool combining the best of both the analog and digital worlds. We constructed ideal digital implementations of the most legendary analog equalizer architectures and then went farther, adding some experimental examples only possible in the digital domain. SantaCruzEQ's architectures are not simulations or models of actual hardware products. They are perfect digital implementations of theoretical analog circuits, free of Johnson noise, component variations, thermal effects and secondary effects like mains contamination and PSU current limitations. By using proprietary filter algorithms, we have achieved a huge dynamic range plus extremely low noise and distortion levels, and thus unparalleled sound purity, something that's impossible with analog circuitry. thEQblue, while building on the solid foundation of Algorithmix's Classic PEQ Blue, actually improves on that benchmark product, with even higher precision coefficients than the original.
6 versus 12
SantaCruzEQ6 and SantaCruzEQ12 differ only in the number of architectures available. SantaCruzEQ6 offers six series architectures, No.s 1
through 6, while SantaCruzEQ12 offers all twelve architectures. Those additional six add more series topologies plus two parallel architectures. We hope you enjoy all the variations in SCEQ, and find favorite sounds you previously could get only with very expensive analog gear.
What's So Special
After Algorithmix unveiled its linear phase equalizers, the best mastering engineers certified their unparalleled sound clarity and transparency, declaring them to be the new benchmark worldwide. Back in the day, their main intention was to develop an equalizer for critical mastering and re-mastering tasks that could significantly boost or cut complex audio material without adding its own “sound.” Passing this difficult test, Algorithmix customers started asking for a classic PEQ for recording and mixing, but with the world famous Algorithmix purity and transparency. They knew that there was no single PEQ style that could satisfy everyone, but our intensive research and development efforts finally resulted in the Classic PEQ Blue, a parametric equalizer with twelve different aspects and the predecessor to thEQblue and SantaCruzEQ.
SCEQ is a careful remix of Algorithmix's Classic PEQ Blue, faithful to the original while improving on that benchmark.
• Algorithmically as pure as possible
- How gain and Q interact with each other, and how they interact when cascading
- A very special type of bell that has the exact Q for a wide range of boost or cut
- A very special implementation that allows for easy aural comparison of type
- Not an emulation or model: no analog fingerprint, no added idiosyncratic noise, dynamic behavior, harmonic or phase distortion
In SantaCruzEQ, different specific filter dependencies have been implemented between boost, cut and Q, which are especially audible when combining multiple Sections, especially bells. In addition, we have implemented very specific filter architectures whereby any parametric bell can be made identical to any other bell, assuming it covers a similar frequency range, by adjustment of gain and Q. In the real world, Q is not defined in the same way across manufacturer implementations. In other words, you cannot compare SantaCruzEQ to another manufacturer's EQ by assuming the actual Q and gain are the same when set to the same numeric values.
To make the twelve different filter architectures comparable, all the filters in SantaCruzEQ are “Q-Normalized” so that they have exactly the same shape, BW and Q at +6 dB of gain and a Q of 0.7. This is a unique feature of SantaCruzEQ. In addition, we do not simulate the distortion and noise of specific analog EQ products. Our thEQ philosophy is to simulate ideally, not emulate or model, the entire range of filter behaviors, especially bells, and their behavior when combined or cascaded.
Given a Section of +6.02 dB of gain and a Q of 0.71, you can switch freely from one architecture to another and the curve will be exactly the same. This allows you to hear the differences in each architecture and decide which is right for your application and material.
In Use
Despite its totally unique underlying technology, SantaCruzEQ can be handled exactly like any other paramet. The real difference is the sonic result: it equalizes as an ideal minimum phase, without the coloration or artifacts associated with its analog antecedents.
Within a chosen PEQ topology, you can select any filter constellation which helps you to solve your specific task. The most typical configuration consists of a low cut or low shelf in the first Section, a high shelf or high cut in the last or rightmost Section(s), and up to four bells in the remaining Sections. For special tasks like noise reduction or band limiting, several low or high cut Sections with identical settings can be overlapped or cascaded. Enter filter settings numerically to insure proper action.
Using specific frequency and Q settings, very steep brick wall filters with desired characteristics like Bessel, Butterworth, or Elliptic can be easily created. As a rule of thumb, higher order produces larger group delay so bear that in mind. Again, higher order may or may not be the sound you're looking for.
Baseband Operation
Experts say that most digital equalizers don't “sound” like their analog predecessors, especially when working with 44.1 or 48 kHz sampling frequencies. Spectrum modifications at the higher end of the frequency spectrum sound improperly balanced. The reason is so called “frequency warping,” which makes for asymmetrical bells and shelving/cut filters that are much steeper than expected based on parameters. With some experience, this problem can be partly compensated by fudging parameters. However, the bell asymmetry cannot be avoided this way. To make the filter automatically sound more analog for 44.1 and 48 kHz, we have enhanced SantaCruzEQ with low noise and low distortion oversampling. There are two different up-sampling filters, automatically configured according to input sample rate, with coefficients optimally calculated for 44.1 and 48kHz. The THD+N (Total Harmonic Distortion plus Noise) of these filters is below the noise floor of perfectly recorded 24 bit audio. The oversampling process absolutely does not degrade your hard won 24 bit signals. In the case when computational power in your system becomes a problem, you can disable oversampling.
HRA
For modern, “high rez” work, SantaCruzEQ offers resonant frequency settings up to 174.14 kHz, based on a 384 kHz sample rate. This means thEQb can tailor into the ultrasonic range when sculpting high resolution projects.
User Tip At 88.2 kHz sampling rates and above, the Nyquist frequency is shifted into the ultrasonic. For clean acoustical recordings with no environmental contamination or high resolution samples, thEQo can be effectively applied at or above 20 kHz to reinforce a palpable sense of “air” and spaciousness of the soundstage.
The Filters
This sub-chapter provides a brief overview of each filter architecture. For a more in-depth discussion, see our Understanding EQ Topologies PDF, available in the Documentation directory on your host computer, and from the product pages of our web site.
| No. | Type Topology & Range | Description |
| 01 | Classic Sym | Serial - +15, -18dB Series symmetrical, almost constant Q bell |
| 02 | Classic Asym | Serial - +15, -18dB Series asymmetrical |
| 03 | Proportional 1 | Serial - ±15dB Series proportional |
| 04 | Proportional 2 | Serial - ±12dB Series proportional |
| 05 | Proportional 3 | Serial - ±12dB Series proportional |
| 06 | Const-Q Asym | Serial - ±12dB Series asymmetrical, constant Q |
| 07 | Const-Q Asy R | Serial - ±12dB Series asymmetrical, constant Q |
| 08 | Const-Q Invers | Serial - ±12dB Series symmetrical, constant Q |
| 09 | Const-Q New | Serial - +15, -18dB Series proportional, constant Q |
| 10 | Const-Q Ideal | Serial - ±15dB Series ideal & constant Q |
| 11 | Parallel FF-FB | Parallel - ±12dB Parallel feed forward/feedback |
| 12 | Parallel LC | Parallel - ±15dB Parallel passive LC |
Table 1 — Equalizer Architectures
When switching between serial and parallel topologies, the output will momentarily mute while buffers are initialized.
| No | Comments & Analog Kinfolk |
| 01 | Common mix desk & outboard gear topology, try on “surgical” applications |
| 02 | Old Skool, boost like No 1 but with narrower cut |
| 03 | More musical than constant Q, especially for mixing and post. Bells are wider at < 6dB and narrower at > 6dB [Pultec/Masselec/Avalon] |
| 04 | Like No 3 but with bigger changes < & > 6dB, try on vocals |
| 05 | Like No 3 but with extra wide bells from 0 to 3dB |
| 06 | Boost like No 1, cut like No 5 (extra wide), as found in some USA products & mixers |
| 07 | Like No 6 but with mirrored boost & cut |
| 08 | Similar to No 7 |
| 09 | Our special topology...try it! |
| 10 | Similar to No 1, no analog relatives! |
| 11 | Complementary amplitude and phase characteristics for boost & cut, found in high end graphic EQs, 1 ^st choice for mastering [Massenburg] |
| 12 | Total advantages with band interaction & asymmetry disadvantages, found in old or newly recreated PEQs, another choice for mastering [Massive Passive] |
Table 2 — Equalizer Narratives
NOTE: A NOTE ABOUT NORMALIZATION ALL 12 TOPOLOGIES ARE NORMALIZED TO HAVE EXACTLY THE SAME BELL SHAPE FOR 6.02 DB OF BOOST AND A Q OF 0.71. USE THIS FEATURE TO AURALLY COMPARE ARCHITECTURES
Topologies
Every architecture has five parametric filter types, including first and second order low and high shelf, first and second order low and high cut, and bell. Set to certain Qs, different bell filters change their bandwidth depending on the boost or cut amount in a specific way. If you combine several bands together, the resulting setup will leave an individual, PEQ architecture-dependent signature on your mix. To allow practical comparison between different equalizer types in SantaCruzEQ, the bells in all architectures have been normalized as mentioned above. Separate bells looks identical for 6.02 dB of boost and a Q of 0.71, independent of the chosen PEQ type.
The Classic Symmetrical is the most common bell shape, used in many mixers and outboard equalizers. It is almost but not exactly constant–Q. The three Proportionals emulate bell characteristics which change their bandwidth proportionally to boost or cut: they become narrower above values greater than 6 dB of boost or cut and wider for settings less than 6 dB of boost or cut. It is said that proportional equalizers behave more musically when used for recording and mixing, since you don't need to
correct Q after every amplitude readjustment. Furthermore, there are three other constant–Q equalizers with characteristics mostly used by American manufacturers.
SantaCruzEQ also offers two proprietary constant-Q types. The first one, Constant-Q Ideal, is a perfect version of the Classic Symmetrical equalizer, having exactly the same bandwidth at any amplitude within the Q's range. To be specific, this is measured 3 dB below maximum amplitude at and above 6 dB of boost. Such PEQs are impossible to implement in the analog domain. The unique Constant-Q New follows a new Q definition: It preserves exactly the same bandwidth at half the maximum amplitude. This for all adjustable amplitude values including, unlike the classical Q definition, the range below 6 dB of boost. Due to its amplitude/bandwidth dependency in terms of the classic Q definition, this new kind of constant-Q PEQ could also be added to the proportional group.
Finally we emulated two vintage parallel equalizers. Unlike the serial parametric equalizer, parallel-connected filters combine differently. They also behave differently in terms of phase. By the way, almost all parametric PEQs employ a serial architecture. Their special “deficiency,” a tendency for bands to interact, is offset by a pleasant sonic character. The Parallel LC emulates old parallel passive PEQ circuitry built with inductors (L) and capacitors (C). The Parallel FF-FB emulates the feed-forward/feed-back structures still very popular in low noise, analog graphic EQs. While the feed-forward path is trivial to implement, the feedback path is impossible to implement in traditional digital signal processing, because of so called “delay-free” feedback loops. In SantaCruzEQ, we apply a very elaborate technique for true emulation of delay-free feedback. The result is a characteristic sound and, in the case of architecture No. 11, perfectly complementary filters for boost and cut.
Shelf and Cut Filter Library
In SantaCruzEQ, not only are various bell filters used, but also different kinds of shelving filters. Nine of the serial equalizers use a new shelving filter generation characterized by a cutoff frequency defined in the middle of the transition region. We found these filter definitions more intuitive than the classical “-3 dB below maximum” approach. The old definition is only used in the Classic Asymmetrical type to conform to its antecedents. All 2nd order shelving filters have a Q adjustment to emulate vintage characteristics with their specific bumps in the transition region at higher slopes. Also, the parallel equalizers are equipped with respective shelving filter shapes typical of the old parallel PEQs, and they interact with other bands as did their analog predecessors.
Everybody needs excellent cut filters. In SantaCruzEQ, any Section can be assigned a 1st or 2nd order cut. The 2nd order filters have a Q adjustment to create resonant filter characteristics as mentioned previously. Dial in some resonance and listen to the result. Also, high or steep slopes can be attained by cascading several Sections of identical cut filters.
The Controls
Let's start in the lower left corner of the user interface (UI). Then we'll jump to the right side of the UI, before covering the conspicuous graphical Section controls and spectrogram.
Left Control Cluster
At bottom left are three button, two of which have traditional rectangular appearance. The top button looks like a miniature keyboard.
Keyboard
The Keyboard button enables and disables the keyboard. When enabled, the keyboard is visible. Its purpose is to provide a musical and aural reference to quickly locate a tonal aspect or issue within your material. The frequency scale in Hertz, located above the keyboard when visible, directly corresponds to the keys on the Keyboard below.
When you mouse over the Keyboard, individual keys highlight in blue, while C keys are visually labeled along with the middle A at 440 Hz. Click on a key to hear that note played. Note that the keyboard-generated audio does not pass through the spectrogram, so any notes you play are not displayed.

NOTE: DUE TO A PECULARITY OF WAVELAB, USERS SHOULD BE AWARE THAT THE KEYBOARD ONLY GENERATES SOUND ONCE PLAYBACK HAS STARTED.
SORT
The SORT button reorders Sections 2 to 5 according to increasing resonant frequency. This Sort feature allows you to arbitrarily activate and use the four center Sections, then sort them in ascending order after the fact.
OVERSAMPLE
SantaCruzEQ employs a very low noise and low distortion oversampling technique for achieving analog-like filter characteristics when working with higher frequency EQ at low sample rates. When host CPU resources permit, Oversampling mode should remain enabled since it automatically is disabled at sample rates above 48 kHz. This will offer better sound quality for EQs at frequencies above 4 kHz.
The Sections
There are always six EQ Sections available. Resonant frequency, gain, topology, Q or rate of change are all individually adjustable within each Section. The first and sixth Sections have topologies limited to multi-order cut or shelf. The second through fifth Sections also include bell or peaking filters in the topology choices.
Numeric fields in each Section can be altered by single or double-clicking within a field, which selects its contents. You can then replace the
current value by typing. The tab key moves focus from one field to the next, while shift-tab moves you to the previous or upper field.
If you click–hold in a numeric field, you can drag up or down to continuously change its value via the mouse. Holding down the shift key while mousing provides fine control of that parameter. An alt or option–click resets the value to the default.
In Circuit /Bypass
The button at the top of each Section serves two functions. It acts as an enable/disable switch, and it displays the current positional number of that Section. Clicking on the switch toggles the Section status from its current state, in circuit or bypassed, to the other.
Section numbers are also displayed in the Graph, discussed below, the filter response graphically superimposed on the spectrogram. The number represents the Section's current position in the group of twelve Sections. The Sort button, discussed above, may change a Section's position and thus, it's number.
Gain Field
The Gain field displays the current gain, positive or negative. Positive gain is shown in green, while negative gain is shown in red. Filters can have ±15 dB of gain.
User Tip: If more gain or loss is needed for extreme situations (!), multiple Sections with identical settings can be cascaded.
Type
Below the Gain field is a glyph or dynamic symbol depicting the filter topology selected for that Section. Its function is twofold; First, it's a menu that provides selection of the three filter types or topologies: bell, shelf or cut. Click on the glyph to display the nine menu choices. Again, Sections one and six have no bells.
The glyph is also contextual in that its appearance changes as you alter the Section's parameters. This provides, at a glance, an easily understood visual overview of each Section's setting.
Shelving Slope
The Q field displays the current Quality Factor (Q), a rate-of-change parameter. Bells and high/low cut filters are specified in Q, a dimensionless number representing resonant frequency divided by bandwidth, while shelving filters can also be thought of as dimensionless rather than the usual dB/octave metric. This is because it really is Q you're controlling “under the hood.”
When asked, Dr. Christoph said that, as expected, for higher Q values the slope is steeper. This holds true for bells and low or high cuts. For shelves with slope values greater than 0.7071, the default, the filter starts to create a “bump” or overshoot in both the pass and stop bands. For
slope = 1, the overshoot is almost invisible. However, for a 2nd order shelf with a slope of 3, the maximum, the overshoot is clearly visible. "We have similar definition problems if we want to speak about Q for bells with boost or cut values of less than ±3 dB," Musialik said. "Mathematically, Q is defined as F _C / BW @ -3 dB below max but, in this case, the max is already below 3 dB!" He adds that, "For bells, the Q is correct only for 6 dB of boost or cut at 3 dB above/below the peak value. For other gain settings, Q is different than what is shown in the Q field." A simple way to think of this is that bandwidth is measured at -3 dB from the peak gain value for any given bell filter configuration.

natural_image
Abstract blue wave-like shape with a white circle highlighting a point, set against a black background (no text or symbols)Figure 4 — Superimposed low and high Q settings showing overshoot differences
Right Control Cluster
To the right of Section six is another grouping of controls and displays...
TPL Meter
The top horizontal space in the right control cluster is occupied by an Input/Output switch, followed by a True Peak Level numeric field measured as dBTP. The Input/Output switch determines the source of the True Peak numeric display, either the plug-in's input or output. Values below zero dBTP are shown in green, while overs are displayed in red. Double clicking in the numeric field resets the display.
For those unfamiliar with True Peak measurements, there are some advantages of True Peak or TP measurement versus classical SPPM or Sample Peak Program metering. In contrast to SPPM, TP will detect and display “inter-sample overs,” trains of samples that, when converted from the digital domain back into analog, may result in amplitudes in excess of a 0 dBFS sample and potentially an overload of a DAC’s output stage. Legacy DACs and many modern DACs will clip the output circuitry during an inter-sample-over event, result in unintended distortion.

NOTE: THE TPL DISPLAY IS ONLY USEFUL IF IT IS THE LAST PLUG—IN IN A SIGNAL CHAIN AND THERE IS NO PROCESSING AFTER IT.
Otherwise, the measured amplitude will no longer be inaccurate “downstream” from the plug-in. Also note that, in a floating point signal chain, values occasionally above zero decibels True Peak can be perfectly acceptable as long as there is attenuation before the final capture or output.
ARCHITECTURE
This menu lets you select one of twelve architectures shown in Tables 1 and 2 above. Architecture names are user adjustable in User Preferences, discussed below.
The two curly arrow buttons under the menu are Previous/Next buttons. They let you jump backward (left button) and forward (right button) by one entry within the Architectures menu.
To the right of the Architecture menu and Previous/Next buttons is a question mark. Mouse down on the ? to see a brief description of the currently selected Architecture.
AUTOGAIN
The Autogain function attempts to match gain in and out of bypass, so your ear/brain isn't fooled by differing loudness when the EQ is in circuit. Autogain relies on a Momentary Loudness measurement to provide a baseline at the moment the AUTOGAIN Button is clicked. This also enables the function, as AUTOGAIN is then displayed in blue. Another click on the button will disable the function. At the moment the function is enabled, a “moving window” measurement compares pre-EQ with post and dynamically dials in gain compensation.
To the right of the AUTOGAIN button is an Autogain Reset button. Clicking on this button with the circular arrow symbol resets the baseline value. To the right of Autogain Reset is a numeric display of the current gain commanded by the Autogain function. As with other numeric fields in SantaCruzEQ, you can either click in the field to manually enter a value, or click-drag up or down to continuously alter the value.
When making a critical Section adjustment and assuming Autogain is already enabled, initiate playback then click on Autogain Reset. From that reference, you can then enable and disable Sections without fear that the amplitude changes provided by your EQ settings will bias your judgment. Click on this button again when switching in and out of bypass may produce a noticeable change in loudness.
GAIN OUT
Up to ±12 dB of output gain compensation is available here. Click or click–drag to alter the value. Option/Alt–click to reset the value.
The Graph
Above the left and right control clusters and center EQ Sections is the Graph or graphical display of the active filter characteristics. All active Sections are shown on the Graph, each with its corresponding shape and Section number.
Underneath is a horizontal frequency scale, with SantaCruzEQ's lower frequency limit of 10 Hz at left, and the Nyquist limit for the current sample rate at right. A vertical amplitude scale at right indicates from ±3 dB up to ±21 dB of range, depending on zoom. For more information on zooming, see the discussion below on the “far right controls.”
Nodes
Double-click in the Graph to enable a new Section. When hovering over an individual Section “node,” the circled Section number, a pennant appears that displays that Section’s parameters. Close to the apex of the pennant is a solo button with a headphone appearance, and an enable/ bypass control above it.
Bypassed Nodes
Sometimes it is desirable to take a node or Section out of “circuit.” When bypassed, a node remains visible but becomes “ghosted” or visually less conspicuous. It shows itself in the Graph but no longer contributes to the Response Curve, see below. A node can be bypassed from either its pennant controls or from the Section controls below the Graph.
To remove a bypassed node or the equivalent resetting a bypassed Section, simply hover over the node in the Graph, and hit the delete or backspace key.
Gain Invert
When you need to ID or notch out a troublesome frequency, it's often easiest to sweep a narrow, high gain bell to aurally locate the frequency. The caret at the apex of the pennant is the Invert Gain button, which multiplies the active Section's gain by -1. This "flips" the action of the active Section, switching it from boost to cut and allowing you to quickly remove that frequency.
Solo
By default, band Solo, represented by the headphone symbol, requires the user to click, hold, and drag. If "Band Solo Lock" is enabled in User Preferences, you no longer need to hold down the mouse button. Simply click once to lock it in Solo mode, and click again to disable soloing.
Pennant Fields
All fields vertically aligned along the straight side of the pennant are editable. Resonant frequency, gain and, depending on topology, Q are all directly editable as with numeric fields elsewhere in the plug-in. The topology callout is a menu, where you can select your choice.
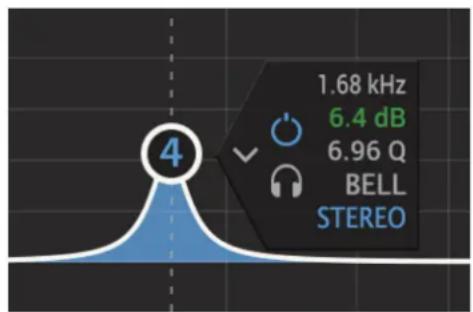
text_image
1.68 kHz 6.4 dB 6.96 Q BELL STEREOFigure 5 — An active Section node with associated pennant
Below the topology callout is the word STEREO. In SantaCruzEQ, all Sections are fixed in stereo mode.
Active Node
The active node' Section is shown with a box surrounding the numeric controls, and a vertical dotted line that intersects the horizontal frequency scale on the Graph. Control or right-click on a keyboard key to force the active node to snap to that keyboard key's frequency.
Once you have grabbed a node, you can move it vertically to change gain and horizontally to change resonant frequency. By holding down the alt or option key while in control of a node, you can change the Q or slope.
Selecting Multiple Nodes
In the Graph, you can marquee multiple nodes to temporarily “group” them. This is most useful for reducing the audibility of multiple Sections once you’ve gotten basic settings and would like to refine your EQ. Once grouped, you can scale the resonant frequency, Q and gain together as a group as long as you use only Node controls in the Graph, not the individual Section controls. Hold down the G key to deselect individual nodes. Shift–drag (marquee) to add more Sections to your current selection.
Textual vs Manual Frequency Settings
The visible resonant or center frequency numeric field is rounded to an integer. “Behind the scenes,” the software actually calculates using a 32 bit floating point value. The result is that, while textual frequency entries will be rounded, manual placement of nodes will not. The result is a possible mismatch of actual frequencies between multiple Sections that appear to be set to the same frequency value. This especially obvious when cascading multiple Sections for higher slopes.
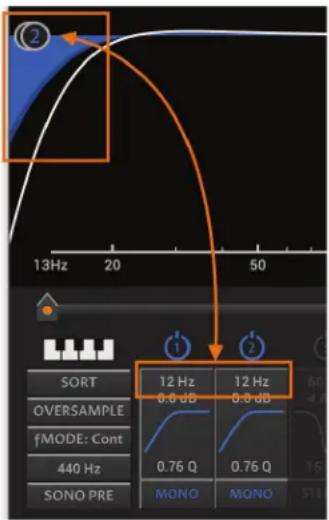
text_image
13Hz 20 50 SORT OVERSAMPLE fMODE: Cont 440 Hz SONO PRE 12 Hz 0.9 dB 0.9 dB 0.76 Q 0.76 Q MONO MONOFigure 6 — Two cascaded Sections with the "same" apparent ☒ setting and differing actual frequencies
Use the numeric keys to select Sections 1 through 10. Simply type the Section number, and the corresponding Section becomes the active node. This selection method does not apply to Sections 11 or 12.
Response Curves
A solid white line graphs the aggregate response of all mono, stereo, left-only and right-only Sections currently active. A less heavy, dotted line displays the aggregate response of all DIFF or left minus right Sections currently active.

NOTE: THE HEAVY WHITE AGGREGATE RESPONSE CURVE, SHOWING THE COMBINED ACTION OF ALL THE SECTIONS, IS QUITE PRECISE BUT NOT 100% ACCURATE. THOUGH FUTURE RELEASES OF SANTACRUZEQ WILL REFINE THAT FEATURE, IT'S ALWAYS BEST TO "USE YOUR EARS."
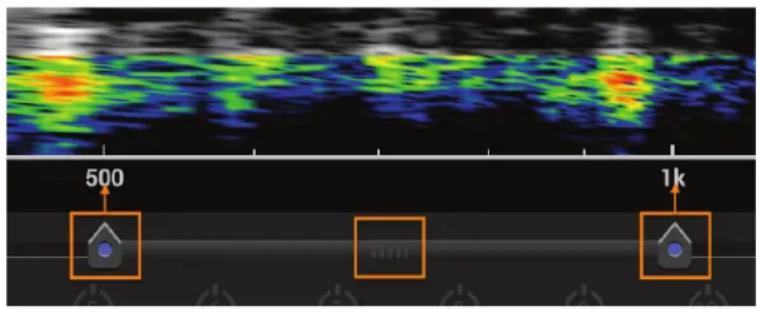
Shared Controls
The horizontal frequency scale used by the Graph is shared by the spectrogram. Below the spectrogram, and keyboard when visible, are two horizontal, dotted arrow-shaped controls. These Limit Arrows determine the horizontal zoom, scope and position on the frequency axis of both the spectrogram and Graph. By click-dragging either control left or right, you can control the amount of zoom or scope; how wide a range of frequencies are visible at once.
By click–dragging the center of the bar connecting the two arrow controls, you control where on the frequency axis you are viewing. The center of the bar, the handle as it were, is marked by five small vertical bars.
text_image
500 1kFigure 7 — Controls shared by the spectrogram and Graph
In the illustration above, the left Limit Arrow is set to 500 Hz, while the right Limit Arrow is set to 1000 Hz. The handle is centrally situated between the two.
Zoom Control
At far right of the UI are the zoom controls. These plus and minus buttons determine the amplitude scope of the Graph. Zoom ranges from ±3 dB to ±21 dB in six steps.
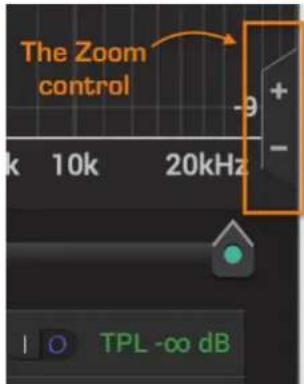
text_image
The Zoom control k 10k 20kHz TPL -∞ dBFigure 8 — The zoom controls
User Preferences
Preferences
Clicking on the gear icon in the upper right corner opens the User Preferences...
GeneralTab
Keyboard Gain
The Gain adjustment sets the repro level for the keyboard sound generator. A range of ±12 dB is available.
CPU Saving Mode
To reduce your CPU load, this check box bypasses five subsystems and disabling the following features:
1) Spectrogram
2) Autogain
3) DIFF Monitoring
4) TPL metering
5) keyboard
Band Solo Lock
This check box toggles the Band Solo Lock mode. By default, band Solo, represented by the headphone symbol, requires the user to click, hold, and drag. If "Band Solo Lock" is enabled in User Preferences, you no longer need to hold down the mouse button. Simply click once to lock it in Solo mode, and click again to disable soloing.
Architecture Names
To make it easier to mentally map each architecture to something less abstract and more familiar, use this menu and button group. For each menu entry, the textual field below allows you to type in
a new name. As an example, Proportional 3 becomes “OMas Top Fave”. That new name will be substituted for the factory name in the main architectures menu in the right control cluster. The Reset to Default button reverts the currently selected architecture back to its factory name.
Save Global Default
The Save State as Global Default button save the current state of the plug-in as the default state it opens into for each new instantiation. Use this button to pre-define your preferred start-up configuration for SantaCruzEQ.
Colors Tab
The Colors tab allows you to map or define the STEREO panorama color in the UI. This is useful if you are color-impaired or find the factory default colors to be unacceptable. You can restore the factory color mapping using the Reset button.
Current Color/Color Chooser
A banner along the top is filled with the current color, and includes the hexadecimal descriptor for that color. Two digits are shown, for alpha or transparency followed by red, then green, and finally blue.
There are several tools for choosing your color choice. You also have a gamut box, with the current color indicated by a small white circle with black surround. To the right of the gamut box is a hue ramp, with double arrows indicating the current hue. Finally, along the bottom are RGBA controls with their current individual hex values.
Hot KeysTab
This tab contains a reminder list of keyboard shortcuts in SantaCruzEQ.
fMODE:
For setting other than Continuous, the shift key bypasses frequency quantization
Sections:
Numeric keys:
Select Sections 1 through 10
Section Reset:
Control/right-click to reset Section to default
Numeric fields:
Shift & drag for fine control of setting
Alt/option-click to reset value to default
Mouse wheel increments/decrements numeric value
Section Nodes:
Shift & drag to override fMODE
Alt/option & drag to change Q or slope
Mouse wheel to change Q or slope
Right-click & drag solos active Section
Control & drag constrains the frequency
Keyboard:
Control/right click to snap active Section to key frequency
Bypass:
Right click disables all Sections
License/Info Tab
This tab contains a link to open this, the user manual, plus a link to activate or deactivate (“park”) your license along with a list of the contributors and their roles. Note that the current version number and installed CPU architecture, 32 or 64 bit, is shown at bottom.
Parking Your License
The Support section of our web site has a wealth of knowledge about licenses handling. See the FAQ for more information:
http://maat.digital/support
Bypass
Below the Preferences gear icon is an “eye” icon. This is a global bypass button that takes all Sections “out of circuit” and removes their DSP load. Right-click on the Bypass button to disable all Sections. This will not reset the Section settings, it will simply turn them off.
User Tip The Bypass/Disable feature allows you to switch off all active bands when adapting your setup from a finished song to a new song. With all Sections disabled, you can “walk through” the Sections, evaluating each one in turn to decide on the needed contribution.
Signal Present Meter
To the right of the Preferences gear and the Bypass icon is a three segment meter to show if signal is present and passing through the plug-in. When the spectrogram is disabled, this meter provides basic confidence metering. The three segment, from bottom to top, are:
Green -48 to -18 dBFS
Yellow -18 to -2 dBFS
Red -2 to 0 dBFS
Very low amplitude signals, below -48 dBFS, do not illuminate any segments.
Undo/Redo
To the left of the User Preferences and Bypass buttons are individual Undo and Redo buttons. These circular arrow buttons provide at least 24 levels of undo and redo, though the actual number depends on available memory.
Presets
To the left of the Undo/Redo buttons is a User Preset menu and a right flanking Save button. The Save button allows you to store a state, while the Preset menu allows you to recall saved settings. If an existing preset is modified, and asterisk appear after its name.
Holding down the option or alt key switches the Save button to a Delete or remove (preset) button. Simply select a preset from the menu. Then, holding down the modifier key, click the button.
SantaCruzEQ presets are stored as cross-platform XML files. For migrating presets from one host to another, you'll find them at...
macOS /Applications/MAAT/SantaCruzEQ/Presets
Windows C:\Program Files\MAAT\SantaCruzEQ\Presets
Specifications
Latency
The latency is a fixed 1354 samples. As the sample rate increases, the latency in the time domain is reduced since more samples pass through the plug-in per second.
| Sample Rate | Latency (seconds) |
| 44100 | 0.031 |
| 48000 | 0.028 |
| 88200 | 0.015 |
| 96000 | 0.014 |
| 176400 | 0.008 |
| 192000 | 0.007 |
| 352800 | 0.004 |
| 384000 | 0.004 |
Resonant Frequency
Effective processing bandwidth per Sample Frequency:
• For 44,100: 20 kHz
• For 48,000: 21.77 kHz
• For 88,200: 40 kHz
• For 96,000: 43.54 kHz
• For 176,400: 80 kHz
• For 192,000: 87.07 kHz
• For 352,800: 160 kHz
• For 384,000: 174.14 kHz
System Requirements
• Mac: macOS 10.8 and newer
• Win: Windows 7 and newer, 32 & 64 bit
• Pro Tools 10.3.10 and newer
- 4GB RAM minimum
Supported Platforms
• AAX, AU, VST2/3 Mac, VST2/3 Win
Supported Sample Rates
• 44.1 to 384 kHz
Supported Hosts
Ableton Live, Cubase, Logic, Nuendo, Pro Tools, Pyramix, SADiE, Sequoia, Studio One & Wavelab
Updates
Please always use the latest version of the software! You can find your current version on the Info Tab of the back panel. You can download the latest version simply by visiting:
http://maat.digital/support/#installers
For optimal security and stability, you should always stay up to date with Operating System revisions, and we keep up with compatibility changes to our products. We also continue to optimize for reduced CPU load, and this very user manual gets its own improvements.
To stay up to date with the latest version and product releases, please subscribe to our occasional newsletter. You'll find a opt-in form on our Contact page, or sign up for a copy of our free and very handy 2BusControl plug-in which will also subscribe you. Don't worry, we know you are busy so we only send out an average of 10 or 12 mailings a year.
Credits
Initiator & UX Concept
DSP Concept & Algorithms
Dr. Christoph M. Musialik
Product Management & UX
Oliver Masciarotte
Plug-In Programming
Adam, agent of Shield
Legacy "Classic PEQ Blue" programming
Dr. Ulrich Hatje/Algorithmix GmbH
VST is a trademark of Steinberg Media Technologies GmbH
Support
For product support, please visit:
https://www.maat.digital/supports
FAQ
Frequently ask questions are addressed in our web site's Support section. Also, comments, suggestions, and words of encouragement regarding all our stuff is always welcome. Ping us at our Support address above.
Troubleshooting
Want to get started troubleshooting a problem on your own? Then run the following utility we've included, and send us the ZIP file that's created:
For macOS, launch;
/Applications/MAAT/Shared/Utilities/DiagnosticsReporter.app
For Windows C drive;
\Program Files\MAAT\Shared\Utilities\DiagnosticsReporter.exe
Share The Love
Would you like to help us in our quest for better sound quality? Help support MAAT by sharing the love...Like us on Facebook!
https://www.facebook.com/maatdigital/
and Twitter too:
https://twitter.com/maat_digital
Please tell your friends and colleagues about us.
Appendix One
Constructing Classic Filters
The filter topologies most often used in audio are Butterworth, which is maximally flat in the passband, and Bessel with linear phase in the passband.
The following is excerpted from the wonderful Op Amp Applications Handbook by Walt Jung; Elsevier, 12.15.2004
Butterworth
The Butterworth filter is the best compromise between attenuation and phase response. It has no ripple in the passband or the stopband, and because of this is sometimes called a maximally flat filter. The Butterworth filter achieves its flatness at the expense of a relatively wide transition region from passband to stopband, with average transient characteristics.
Chebyshev
The Chebyshev...filter has a smaller transition region than the same-order Butterworth filter, at the expense of ripples in its passband. This filter gets its name because the Chebyshev filter minimizes the height of the maximum ripple, which is the Chebyshev criterion. Chebyshev filters have 0dB relative attenuation at DC. Odd order filters have an attenuation band that extends from 0dB to the ripple value. Even order filters have a gain equal to the passband ripple. The number of cycles of ripple in the passband is equal to the order of the filter.
Bessel
Butterworth filters have fairly good amplitude and transient behavior. The Chebyshev filters improve on the amplitude response at the expense of transient behavior. The Bessel filter is optimized to obtain better transient response due to a linear phase (i.e. constant delay) in the passband. This means that there will be relatively poorer frequency response (less amplitude discrimination).
About This Manual
This manual was written in Adobe InDesign 15.1.1, and is set in Robert Slimbach's Minion Pro and Myriad Pro. The cover page is set in Aldo Novarese's modernist geometric Eurostyle. Dr. Christoph Musialik supplied the original Classic PEQ Blue user manual from which some material was adapted for this SantaCruzEQ user manual.
This documentation, as well as the software described in it, is furnished under license and may only be used or copied in accordance with the terms of such license. The information in this manual is furnished for informational use only, is subject to change without notice, and should not be construed as a commitment by MAAT Incorporated. MAAT Incorporated assumes no responsibility or liability for any errors or inaccuracies that may appear in this document.
Except as permitted by such license, no part of this publication may be reproduced, stored in a retrieval system, or transmitted, in any form or by any means, electronic, mechanical, recording, or otherwise, without the prior written permission of MAAT Incorporated.
Notice of Liability
The author and publisher have made every effort to ensure the accuracy of the information herein. However, the information contained in this document is provided without warranty, either express or implied. Neither the authors, MAAT Incorporated, nor its dealers or distributors will be held liable for any damages to be caused either directly or indirectly by the instructions contained in this document, or by the software or hardware products described herein.
MAAT INCORPORATED MAKES NO WARRANTIES, EXPRESS OR IMPLIED, INCLUDING WITHOUT LIMITATION THE IMPLIED WARRANTIES OF MERCHANTABILITY AND FITNESS FOR A PARTICULAR PURPOSE, REGARDING THE SOFTWARE. MAAT INCORPORATED DOES NOT WARRANT, GUARANTEE, OR MAKE ANY REPRESENTATIONS REGARDING THE USE OR THE RESULTS OF THE USE OF THE MAAT INCORPORATED SOFTWARE IN TERMS OF ITS CORRECTNESS, ACCURACY, RELIABILITY, CURRENTNESS, OR OTHERWISE. THE ENTIRE RISK AS TO THE RESULTS AND PERFORMANCE OF THE MAAT INCORPORATED SOFTWARE IS ASSUMED BY YOU. THE EXCLUSION OF IMPLIED WARRANTIES IS NOT PERMITTED BY SOME STATES. THE ABOVE EXCLUSION MAY NOT APPLY TO YOU.
IN NO EVENT WILL MAAT INCORPORATED, ITS DIRECTORS, OFFICERS, EMPLOYEES, OR AGENTS BE LIABLE TO YOU FOR ANY CONSEQUENTIAL, INCIDENTAL, OR INDIRECT DAMAGES (INCLUDING DAMAGES FOR LOSS OF BUSINESS PROFITS, BUSINESS INTERRUPTION, LOSS OF BUSINESS INFORMATION, AND THE LIKE) ARISING OUT OF THE USE OR INABILITY TO USE THE MAAT INCORPORATED SOFTWARE EVEN IF MAAT HAS BEEN ADVISED OF THE POSSIBILITY OF SUCH DAMAGES. BECAUSE SOME STATES DO NOT ALLOW THE EXCLUSION OR LIMITATION OF LIABILITY FOR CONSEQUENTIAL OR INCIDENTAL DAMAGES, THE ABOVE LIMITATIONS MAY NOT APPLY TO YOU.
©2019-2020 MAAT Incorporated — All rights reserved.
MAAT, thEQ, SantaCruzEQ, thEQblue, thEQorange, thEQred and the MAAT logo are trademarks of MAAT Incorporated. All other company or product names are either trademarks or registered trademarks of their respective owners.
200820-1.5