EO 3835B/W - Electric oven DELONGHI - Free user manual and instructions
Find the device manual for free EO 3835B/W DELONGHI in PDF.

| Product type | Electric oven |
| Brand | DELONGHI |
| Model | EO 3835B/W |
| Supply voltage | 220-240 V ~ |
| Maximum power | 2000 W |
| Usable volume | 35 L (approx) |
| Dimensions (W x D x H) | Approx 45 x 35 x 30 cm |
| Weight | Approx 8 kg |
| Temperature range | 60°C to 240°C |
| Timer | 120 minutes max, with automatic shut-off |
| Functions | Keep warm, bake, grill, rotisserie (depending on model) |
| Included accessories | Rack, drip tray, crumb tray, rotisserie (depending on model) |
| Control type | Rotary knobs (thermostat, selector, timer) |
| Interior light | Yes (depending on model) |
| Cleaning | Lowerable top heating element, clean with damp sponge |
| Safety | Automatic shut-off, grounding mandatory |
| Repairability | Parts available through after-sales service |
| General information | Household use, do not immerse, suitable for children under supervision |
Frequently Asked Questions - EO 3835B/W DELONGHI
User questions about EO 3835B/W DELONGHI
0 question about this device. Answer the ones you know or ask your own.
Ask a new question about this device
Download the instructions for your Electric oven in PDF format for free! Find your manual EO 3835B/W - DELONGHI and take your electronic device back in hand. On this page are published all the documents necessary for the use of your device. EO 3835B/W by DELONGHI.
USER MANUAL EO 3835B/W DELONGHI
1.1 Description of the oven and the accessories 14
1.2 Summary of operation 15
1.3 Specifications 16
1.4 Warnings 16
CHAPTER 2 USE OF THE OVEN AND REFERENCE COOKING TIMES
2.1 Use of the controls 17
2.2 Tips on use 18
2.3 How to set the functions 18
- Keeping food warm 18
Oven cooking 19
Grilling and cooking au gratin 20
Grilling with the turnspit (if fitted) 22
CHAPTER 3 CLEANING AND MAINTENANCE 23
ELECTRICAL CONNECTION (UK ONLY)
A) If your appliance comes fitted with a plug, it will incorporate a 13 Amp fuse. If it does not fit your socket, the plug should be cut off from the mains lead, and an appropriate plug fitted, as below.
WARNING: Very carefully dispose of the cut off plug after removing the fuse: do not insert in a 13 Amp socket elsewhere in the house as this could cause a shock hazard.
With alternative plugs not incorporating a fuse, the circuit must be protected by a 15 Amp fuse.
WARNING - THIS APPLIANCE MUST BE EARTHED IMPORTANT
The wires in the mains lead are coloured in accordance with the following code:
Green and yellow:
Blue:
Brown:
Earth
Neutral
Live

If the plug is a moulded-on type, the fuse cover must be re-fitted when changing the fuse using a 13 Amp Asta approved fuse to BS 1362. In the event of losing the fuse cover, the plug must NOT be used until a replacement fuse cover can be obtained from your nearest electrical dealer. The colour of the correct replacement fuse cover is that as marked on the base of the plug.
B) If your appliance is not fitted with a plug, please follow the instructions provided below:
As the colours of the wires in the mains lead may not correspond with the coloured markings identifying the terminals in your plug, proceed as follows:
The green and yellow wire must be connected to the terminal in the plug marked with the letter E or the earth symbol or coloured green or green and yellow.
The blue wire must be connected to the terminal marked with the letter N or coloured black.
The brown wire must be connected to the terminal marked with the letter L or coloured red.
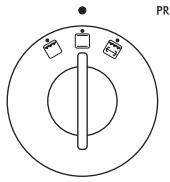
CHAPTER 1 - GENERAL
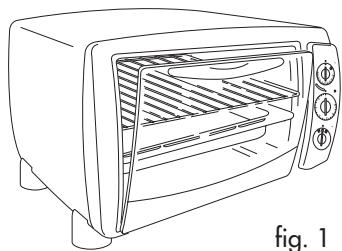
1.1 - DESCRIPTION OF THE OVEN AND THE ACCESSORIES
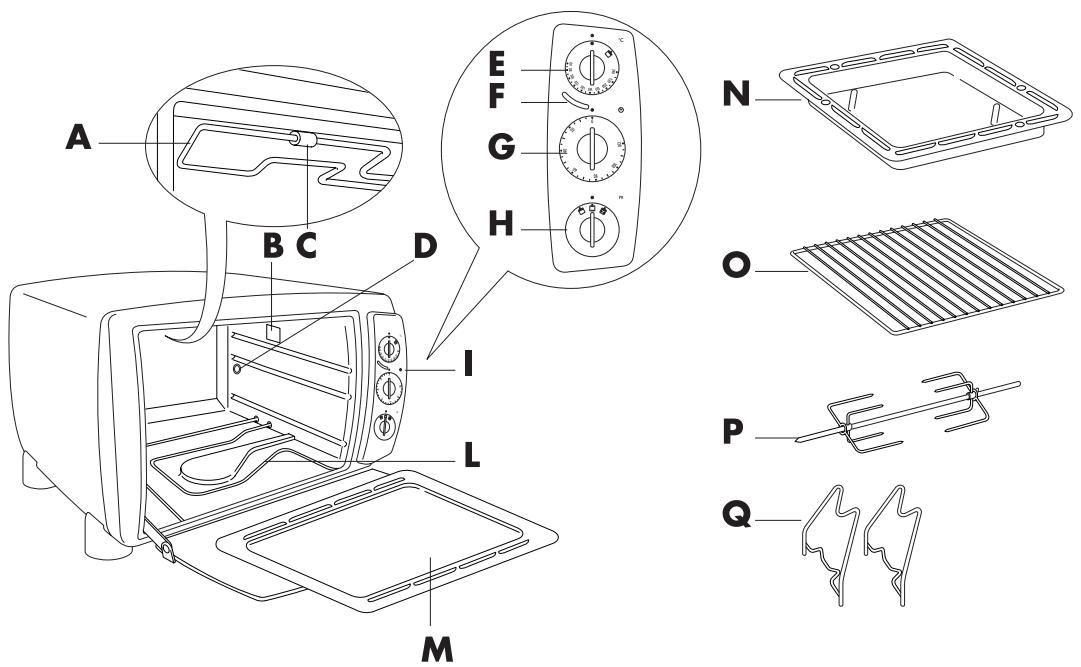
A Top heating element
B Oven light (if fitted)
C Heating element hook
D Turnspit mount (if fitted)
E Thermostat knob
F Thermostat pilot light
G On/off and timer knob
H Function selector knob
Control panel
L Bottom heating element
M Crumb tray
N Dripping pan
Wire rack
P Spit (if supplied)
Q Spit supports (if supplied)
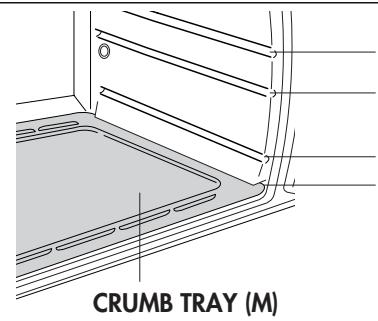
Guide 1
Guide 2
Guide 3
Guide for crumb tray only
To ensure the correct operation of the appliance and achieve excellent results when cooking, ALWAYS place the crumb tray (M) in position at the bottom of the oven.
1.2 - SUMMARY OF OPERATION
| PROGRAM | FUNCTION SELECTOR KNOB SETTING | THERMOSTAT KNOB SETTING | POSITION OF WIRE RACK AND ACCESSORIES | GUIDES | NOTES/TIPS |
| KEEPING FOOD WARM | 60° | 1 2 3 | If the food needs to be kept warm for longer than 20-30 minutes, it should be covered with tinfoil, to prevent it from becoming too dry. | ||
| OVEN COOKING | 60°-240° (see table on page 19) | or | 1 2 3 1 2 3 | Use the dripping pan, sliding it directly into the guides, or a baking pan placed directly on the wire rack. | |
| GRILLING AND COOKING AU GRATIN | 1 2 3 | Ideal for all types of tra- ditional grill; hamburg- ers, frankfurters, kebabs, toast, etc. Place the food directly on the wire rack. The dripping pan is used to collect any drops of fat. | |||
| 1 2 3 | Ideal for dishes that need to be cooked au gratin (e.g. coquilles Saint-Jacques, etc.). In this case, the con- tainer (with the food inside) should be placed on the wire rack. | ||||
| GRILLING WITH THE TURNSPIT (IF FITTED) | 1 2 3 | Ideal for cooking chick- ens, fowl in general, roast pork, etc. A glass of water can be poured into the dripping pan to make cleaning easier and prevent smoke being produced by the burning fat. |
Chapter 1 - General
1.3 - SPECIFICATIONS
Operating voltage . see rating plate
Maximum power absorbed . see rating plate
POWER CONSUMPTION (CENELEC STANDARD HD 376)
To reach 200^ 0.22 KWh
To maintain 200^ for one hour . . . . . . . . . . . . . . . . . . . . . . . . . . . . . . . . . . . . . . . . . . . . . . . . . . . . . . . . . . . . . . . . . .
Total 0,90 KWh
This appliance complies with EEC Directive 89/336 on electromagnetic compatibility.
The materials and objects that come into contact with food products comply with the provisions of EEC Directive 89/109.
1.4 - WARNINGS
- This oven has been designed to cook food. It must not be used for other purposes and must not be modified or tampered with in any way.
- The appliance is not intended for use by young children or infirm persons without supervision. Young children should be supervised to ensure that they do not play with the appliance.
- Before using the oven, make sure it has not been damaged during transport.
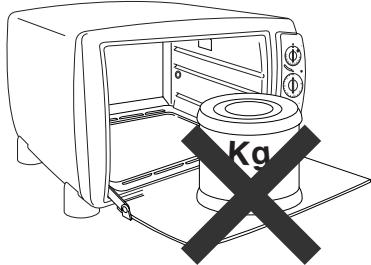
- Position the oven on a horizontal surface at a height of at least 85cm out of the reach of children.
- The temperature of the door or the outer surface may be high when the appliance is operating: only touch the plastic knobs and handles. Do not place anything on top of the oven while in use.
- Before using the oven for the first time, remove all the packaging and paper material inside, such as protective boards, booklets, plastic bags, etc.
-
Before plugging the oven into the power socket, make sure that
-
the mains power supply corresponds to the value shown on the rating plate, fitted to the rear of the appliance;
- the power socket has a rating of at least 10A and is properly earthed; the manufacturer declines all liability if this safety standard is not observed.
- Wash all the accessories thoroughly before use.
-
The following must be kept in mind when the door is open:
-
do not apply excessive force with heavy objects or by pulling the handle downwards.
-
never place heavy containers or hot pans just taken out of the oven on the open door.
-
Never move the oven when it is in operation.
- If the supply cord is damaged, it must be replaced by the manufacturer or its service agent or a similarly qualified person in order to avoid a hazard.
WARNING: Once having removed the appliance from the packaging, check that the door is intact. As the door is made from glass, it is fragile, and should be replaced if visibly chipped, scored or scratched. Furthermore, when using, cleaning or moving the appliance, do not slam or bang the door or pour cold liquids on the glass when the appliance is hot.
Before using the oven for the first time, operate it empty with the thermostat set to maximum for at least 15 minutes, to eliminate the "new" smell and any smoke from the protective material applied to the heating elements before transport. The room must be ventilated during this operation.
CHAPTER 2 - USE OF THE OVEN AND REFERENCE COOKING TIMES
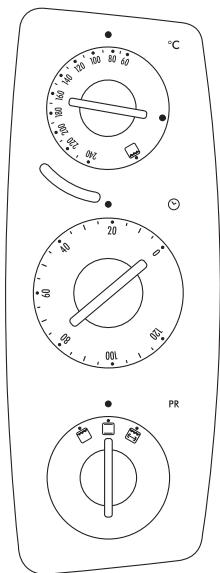
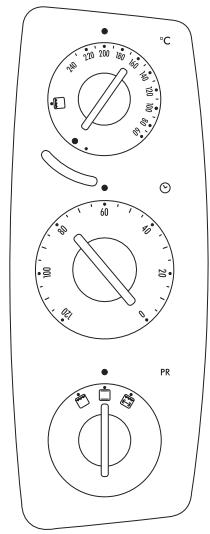
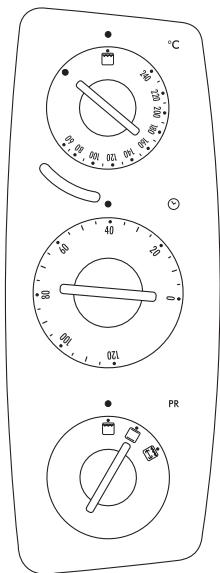
2.1 - USE OF THE CONTROLS
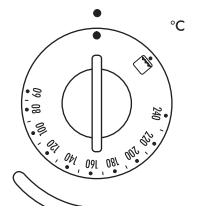
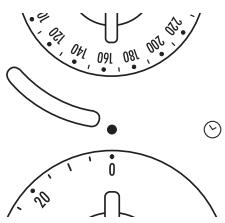
THERMOSTAT KNOB (E)
Select the desired temperature as follows
- Keeping food warm: Thermostat knob set to 60^ .
- Oven cooking: Thermostat knob set from 60^ to 240^ .
- All types of grilling and cooking with the turnspit (if fitted): Thermostat knob in position.
ON/OFF AND TIMER KNOB (G)
- To switch the oven on and to set the cooking time: Turn the knob clockwise to the desired time (max. 120 minutes). A bell will ring when the set time has elapsed, and the oven will automatically switch itself off.
- To switch the oven off: Turn the knob to position "0".
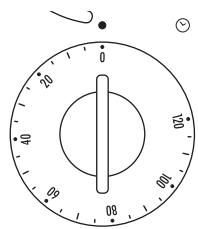
When setting times of less than 10 minutes, first turn the knob all the way round, and then set the desired time.
FUNCTION SELECTOR KNOB (H)
This knob is used to select from the available cooking functions, as follows:

OVEN COOKING AND KEEPING FOOD WARM
(top heating element and bottom heating element on only)

GRILLING

TURNSPIT (IF FITTED)
(top heating element on only, at maximum power)
THERMOSTAT PILOT LIGHT (F)
The light comes on to indicate that the oven is heating up, and goes off when the oven has reached the set temperature.
2.2 - GENERAL ADVICE
- When cooking using the oven or grill functions, the oven should always be preheated to the set temperature for best results.
- The cooking times depend on the quality of the products, the temperature of the food and individual tastes. The times given in the table are only intended as a guide, and may need to be varied. They do not take into account the time required to preheat the oven.
- When cooking frozen food, follow the recommendations on the package.
2.3 - HOW TO SET THE FUNCTIONS
KEEPING FOOD WARM
Place the dripping pan or the wire rack with a pan on top in guide no. 3, as shown in the figure on page 15. This function is used to keep the food warm until serving. The food should not be left in the oven too long, as it may become too dry (to avoid this, cover the pan with tinfoil or baking paper).
Turn the function selector knob (H) to position
Turn the thermostat knob (E) to 60^ .
Turn the ON/OFF and timer knob (G) to the time desired. A bell will ring when the set time has elapsed; if the food being kept warm is served before the end of the set time, manually turn the ON/OFF and timer knob (G) to position "0".
Chapter 2 - Use of the oven and reference cooking times
OVEN COOKING
Turn the function selector knob (H) to position
Select the desired temperature using the thermostat knob (E).
Turn the ON/OFF and timer knob (G) to the time desired.
Wait for the oven to reach the set temperature (the pilot light goes off), then place the dish containing the food on the wire rack (previously placed in the oven), or, if the food is in the dripping pan, place the pan directly into the guide (refer carefully to the table below). A bell will ring when the set time has elapsed.
| RECIPCE | QUANTITY | THERMOSTAT KNOB | TIME | WIRE RACK/DRIP- PING PAN POSITION | OBSERVATIONS AND TIPS |
| FRESH PIZZA | 400 g | 200°C | 25 min. | 3 | Use the dripping pan (N) |
| SAVOURY PIE | 600 g | 220°C | 35 min. | 3 | Use a cake tin |
| FROZEN PIZZA | 450 g | 220°C | 13 min. | 2 | Can be placed directly on the wire rack (O) or on the dripping pan (N) |
| LASAGNE | 1500 g | 200°C | 40 min. | 3 | Place the lasagna pan (if supplied) or a baking pan directly on the wire rack (O) |
| CANNELONI | 2300 g | 200°C | 40 min. | 3 | Place the lasagna pan (if supplied) or a baking pan directly on the wire rack (O) |
| WHOLE CHICKEN | 1500 g | 200°C | 90 min. | 3 | Pierce with a fork to drain the fat |
| ROAST PORK | 1500 g | 200°C | 90 min. | 3 | Leave a little fat around the edges to prevent it from becoming too dry |
| MEAT LOAF | 1000 g | 200°C | 60 min. | 3 | Place it directly in the dripping pan |
| RABBIT PIECES | 1000 g | 200°C | 60 min. | 3 | Add a little water. If necessary, turn half way through cooking. |
| SEA BASS IN SALT | 900 g | 200°C | 60 min. | 3 | Cover the fish completely with rock salt. |
| BAKED BREAM | 1000 g | 190°C | 60 min. | 3 | Can be cooked directly on the drip- ping pan (N) |
| TROUT BAKED IN FOIL | 800 g | 200°C | 60 min. | 3 | Can be cooked directly on the dripping pan (N) wrapped in tinfoil |
| AUBERGINES WITH PARMESAN | 1700 g | 200°C | 35 min. | 2 | Place the baking pan on the wire rack (O) |
| COURGETTES WITH TUNA | 1000 g | 200°C | 50 min. | 2 | Use the dripping pan (N): add oil, tomatoes and water |
| POTATOES AU GRATIN | 1500 g | 200°C | 50 min. | 2 | Place the baking pan on the wire rack (O) |
| APPLE PIE | 1000 g | 190°C | 90 min. | 1 | Place the cake tin on the wire rack (O) |
| MUFFINS | 600 g | 200°C | 20 min. | 2 | Place the muffin cups directly on the dripping pan |
Add around 5 minutes to the cooking time for preheating.
GRILLING AND COOKING AU GRATIN
This function is ideal for grilling hamburgers, chops, frankfurters, sausages, etc. In addition, this function may be used for browning foods: gnocchi alla romana, coquilles Saint-Jacques, etc..
Operate as follows:
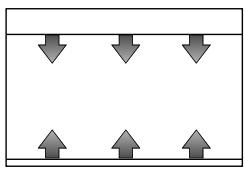
Fit the wire rack (O) in the upper guide (1) and the dripping pan (N) in the centre guide (2), as shown in Figure 1. A glass of water can poured into the dripping pan (N) to make cleaning easier, and prevent smoke being produced by the burning fat.
Turn the function selector knob (H) to position
Turn the thermostat knob (E) to position
Turn the ON/OFF and timer knob (G) to the time desired.
Preheat the oven for 5 minutes, with the door slightly ajar (as highlighted in Figure 1).
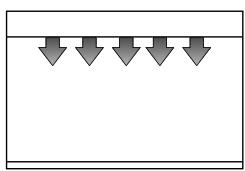
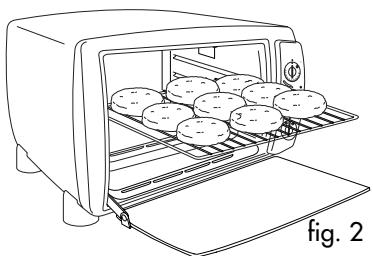
Once the preheating time is complete, place the food being grilled directly on the wire rack (Figure 2) and close the door, leaving it ajar, as shown in Figure 3; remember to turn the food half way through cooking.
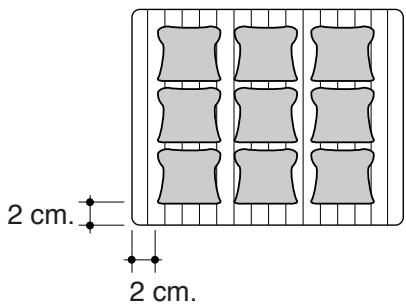
Important: for best results, place the food on the wire rack (O), leaving an empty space of around 2cm near the door (see Figure 2).

In the case of food that has already been cooked or is to be cooked au gratin, place the container directly on the wire rack in the centre guide (2); the door must be left ajar as shown in Figure 4. A bell will ring when the set cooking time has elapsed; if cooking is completed before the end of the set time, manually turn the ON/OFF and timer knob (G) to position "0".
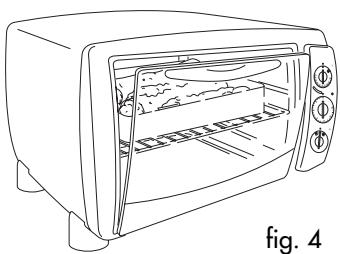
fig. 4
To correctly toast bread, place the slices as shown in the figure to the side, that is, leaving 2cm of free space at the ends of the wire rack.
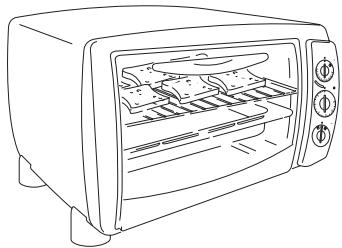
FOR TOASTING BREAD ONLY; the oven door must be closed completely (as shown in the figure to the side)
The table below provides some useful tips for preparing great grilled food.
| RECIPCE | QUANTITY | THERMOSTAT KNOB | TIME | OBSERVATIONS AND TIPS |
| PORK CHOPS (4) | 600 g | 20 min. | Turn after approx. 12 minutes | |
| SAUSAGES (12) | 1200 g | 25 min. | Pierce with a fork to drain the fat. Turn after approx. 15 minutes | |
| HAMBURGERS (6) | 700 g | 20 min. | Turn after approx. 12 minutes | |
| FRANKFURTERS (6) | 500 g | 10 min. | Turn after approx. 3-4 minutes | |
| KEBABBS (4) | 650 g | 25 min. | Turn after approx. 15 minutes | |
| TOAST | 9 fette | 3,5 min. | Turn half way throughasting. | |
| GNOCCHI ALLA ROMANA | 1500 g | 15 min. | Place the baking pan on the wire rack, positioned in the centre guide (2) |
Chapter 2 - Use of the oven and reference cooking times
GRILLING WITH THE TURNSPIT (IF FITTED)
This function is ideal for cooking chickens on the spit, fowl in general, roast pork and veal.
Operat as follows:

fig. 5
Place the food on the spit (P) and hold it firm using the forks (for best results, tie the meat using kitchen string).
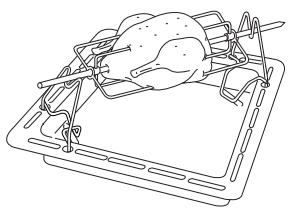
fig. 7
Place the spit on the supports.
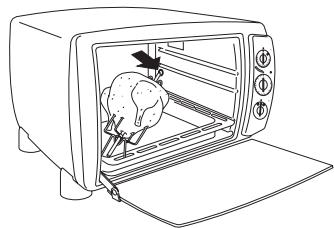
fig. 9
Once the dripping pan is in place, push the spit into the turnspit mount (D), tilting the spit supports (Q) to the right.
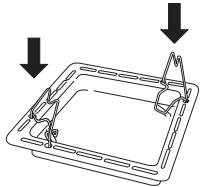
fig. 6
Place the spit supports (Q) on the dripping pan, in the holes provided.
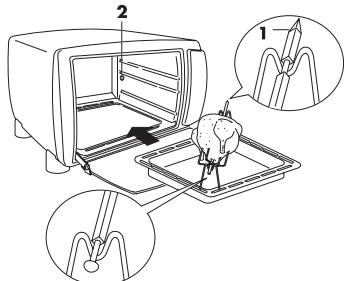
fig. 8
Slide the dripping pan with the food being cooked into the lower guide (3), tilting the spit supports (Q) to the left. Make sure the point of the spit 1 is facing forwards and is correctly inserted into the hole 2.
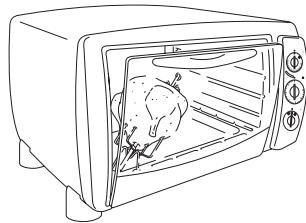
fig. 10
Close the door, leaving it slightly ajar, as highlighted in the figure (half-open).
The oven does not need to be preheated for this function.
Turn the function selector knob (H) to position [E-3].
Turn the thermostat knob (E) to position
Turn the ON/OFF and timer knob (G) to the time desired.
If the cooking time is longer than 2 hours, remember to reset the timer.
Once cooking is complete, manually turn the ON/OFF and timer knob (G) to position "0".

CHAPTER 3 - CLEANING AND MAINTENANCE
Frequent cleaning will prevent the formation of smoke and bad smells during cooking.
Before performing any cleaning operations, always unplug the appliance from the power socket.
Never immerse the appliance in water; do not wash it by spraying it with water.
The wire rack, dripping pan, crumb tray and spit (if supplied) are washed like normal dishes, by hand or in the dishwasher.
Always use a damp sponge to clean the outer surface. Avoid using abrasive products that may damage the surface finish (enamel or paint). Make sure water or liquid soap does not infiltrate through the slits on the right-hand side of the oven.
To clean the inside of the oven, never use corrosive products and do not scrape the walls with sharp objects or blades. Only use non-abrasive liquid detergents.
Do not attempt to push forks, knives or sharp objects into the openings on the right-hand side and the rear of the oven.
Remove the crumb tray (M) by pulling it outwards (see Fig. 10). In case of difficulty, wet the outside parts of the tray. Remove any dirt with a damp cloth.
Dry thoroughly and then put the tray back in place.
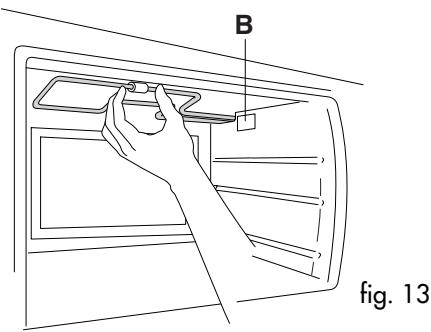
To make the inside ceiling of the oven easier to clean, the top heating element (A) needs to be lowered by pulling the heating element hook towards the door (C) (see Figures 11 and 12).
IMPORTANT: after cleaning, fasten the heating element back in place (Fig. 13). The oven must not be used when the heating element is in the lowered position.
OVEN LIGHT (if fitted)
The oven light (B) is always on when the oven is on. To replace the bulb, contact authorised personnel or an authorised Service Centre.
N.B. The oven can still be used even if the bulb is burnt out.
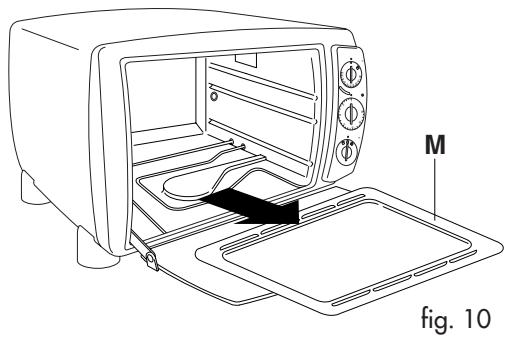
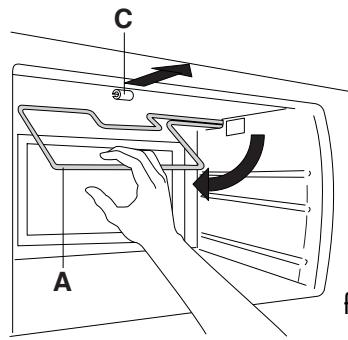
fig. 11
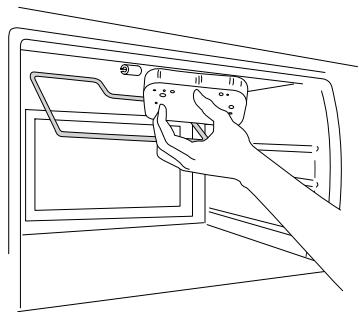
fig. 12