
FPS-L - Shoes Gabor - Free user manual and instructions
Find the device manual for free FPS-L Gabor in PDF.

| Product Type | TV Stand / Easel Display Stand |
| Brand | Gabor |
| Model | FPS-L |
| Height | 54.3 in (138 cm) |
| Width | 32.4 in (82.3 cm) |
| Depth | 20.5 in (52.1 cm) |
| Riser Height | 24 in (61 cm) |
| Weight | 18.1 lb (8.2 kg) |
| Maximum Weight Capacity | 88 lb (40 kg) |
| Recommended Screen Sizes | 50 to 70 in (127 to 177.8 cm) |
| Material | Steel, beechwood |
| VESA Mounting Patterns | 200x200, 300x200, 300x300, 400x200, 400x300, 400x400, 500x400, 600x400 mm |
| Security Features | Anti-tipping cable system with wall clamps |
| Warranty | 3-year limited warranty |
| Cleaning Instructions | Use a soft, dry cloth only |
| Installation | Requires 2 people; includes mounting hardware for wood studs and concrete |
Frequently Asked Questions - FPS-L Gabor
User questions about FPS-L Gabor
0 question about this device. Answer the ones you know or ask your own.
Ask a new question about this device
Download the instructions for your Shoes in PDF format for free! Find your manual FPS-L - Gabor and take your electronic device back in hand. On this page are published all the documents necessary for the use of your device. FPS-L by Gabor.
USER MANUAL FPS-L Gabor
for Large Flat-Panel Displays

natural_image
Line drawing of a simple metal frame structure with four legs and a horizontal plate (no text or symbols)User Manual
Thank you for choosing Gabor.
The Gabor Modern Easel Display Stand is a stylish way to support your display in any apartment, office, home theater, or trade show. The stand's smooth wooden and metal finish will elegantly display flat panel monitors from 50 to 70 inches and up to 88 pounds. Your screen will sit at an optimal viewing height on four stable wooden legs, and the cable management will keep your setup looking clean, without cords everywhere. There is added security with an anti-tipping system, which protects your display from accidentally tipping if anyone gets too close.
Safety Warnings
- Please read and follow the instructions, and keep this manual in a safe place.
- To avoid damage to this product, be careful not to overtighten or improperly thread any of the threaded fittings.
- Clean this product with only a soft, dry cloth.
- Make sure that this product is intact and that there are no missing ports.
- Support surfaces should be sturdy and flat. Do not install this product on a weak, uneven surface.
- Do not exceed the maximum load capacity.
- It is recommended that at least 2 people perform the installation process to prevent injury from mshandling or dropping the product and/or flat panel displays.
-
Do not set up the product on an unsteady structure or one that is prone to vibration, has a chance of being impacted, or is susceptible to other movements; do not install near a heater, fireplace, or any other source of direct heat energy.
-
Always use the included security cable system when installing this product.
- Do not use this product for any flat-panel display other than what it is intended for; the exact specification, size parameters, and weight limits are found both on the product box end in the instruction manual.
- The included mounting hardware (anchor screws, anchors, and anchor washers) is not intended for use on metal studs, and may not be appropriate for old or weak walls; it is best to consult with a qualified professional to determine whether your wall is capable of supporting this bracket.
- This product may contain small parts which can possibly pose a choking hazard; keep out of reach of children and pets.
- If you have safety concerns about assembling this product, contact a qualified professional or installation contractor.
- If this product is missing hardware or there are defective parts, visit www.madebygabor.com or call Customer Service at 212-594-2353.
- All images are for illustrative purposes only.
Product Specifications
Recommended Screen Sizes
50 to 70 in. [127 to 177.8 cm]
Dimensions
Height: 54.3 in. (138 cm)
Riser Height: 24 in. (61 cm)
Width: 32.4 in. (82.3 cm)
Depth: 20.5 in. (52.1 cm)
Max Weight Capacity
88 lb. (40 kg)
Material
Steel, beechwood
Weight
18.1 lb. (8.2 kg)
VESA Mounting Patterns
200×200 mm
300×200 mm
300×300 mm
400×200 mm
400×300 mm
400×400 mm
500×400 mm
600×400 mm

Overview
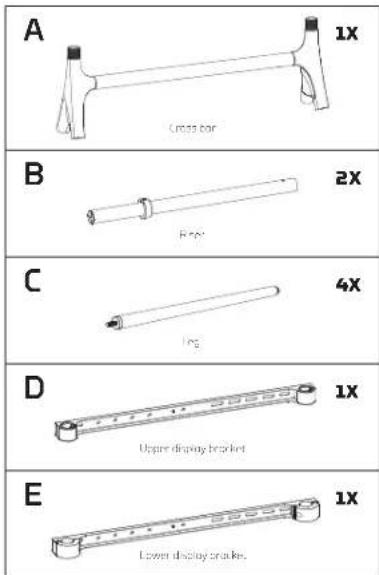
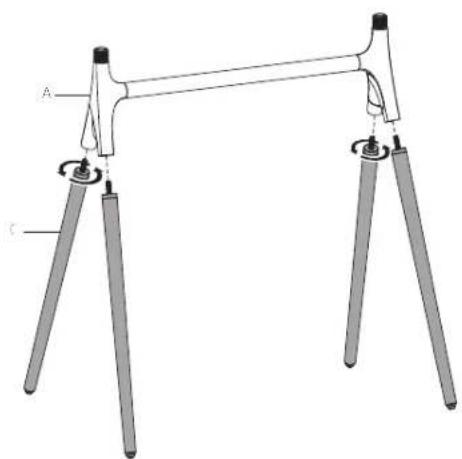
Assembling the Easel Stand
natural_image
Mechanical support structure diagram with labeled components A and C (no text or symbols beyond labels)

natural_image
Technical line drawing of a mechanical assembly with two vertical rods and a base, showing no text or symbols.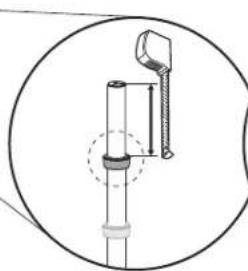
natural_image
Technical diagram of a mechanical assembly with a cylindrical component and a bracket, enclosed in a circular frame (no text or symbols)
natural_image
Diagram of a mechanical device with bidirectional arrows indicating rotation or movement (no text or symbols)Recommended distance: 2 to 6 in, (50 to 150 mm)
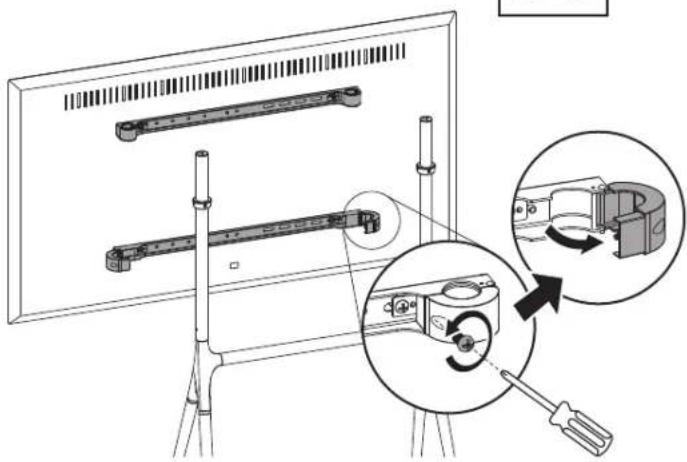
Note: Secure the locking collar before attaching the TV screen. Make sure the screw holes face backwards.
Attaching the Display/TV Brackets


If Your Display Has Recessed Mounting or a Curved Back,
install the spacers between the bracket, and your display.


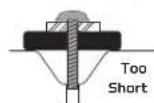
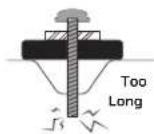
Warning
If the screw is too short, it may not hold the display. If it's too long, it may damage the display.
Mounting the Display On the Easel Stand
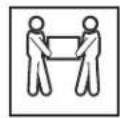
Important! We recommend that two people perform this step.
Note: Make sure the display is not resting directly on the riser.

natural_image
Diagram showing a monitor setup with a mechanical component being processed, including a close-up of the internal mechanism (no text or symbols present)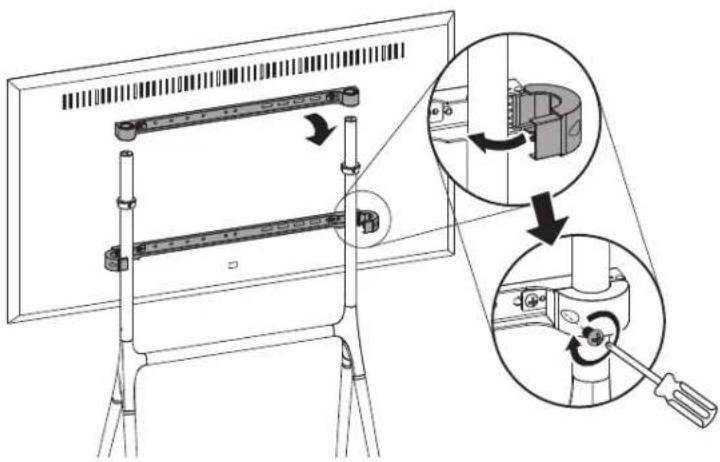
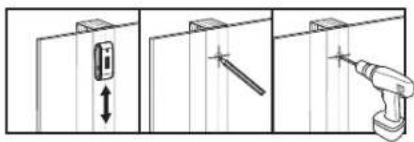
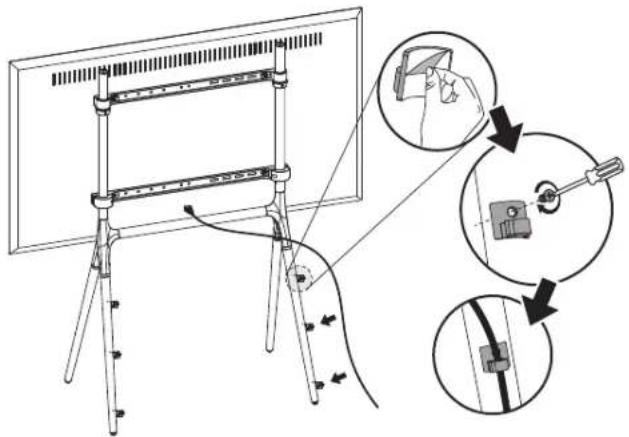
Attaching the Security Clamps to Wooden Studs
It's important to use the security cable system for additional protection against tipping over caused by accidentally bumping or moving the eosel and your display.
Caution: Wooden studs run vertically inside the wall. The security clamps must be mounted to wooden studs at least 1.5 inches wide and spaced 16 inches apart, or the clamps could fall out and result in damage to your display or cause serious personal injury.
-
Use a stud finder to locate the edges of the wooden studs, and mark the center. Use a pencil to mark drilling holes for the four anchor screws.
-
Use a 1/8-inch (3.5 mm) wood drill bit to predrill the marked spots 1.6 inches (40 mm) deep, and then clean out the debris from the holes.


- Use the four anchor screws to attach the security clamps to the wall. Use the Philips screwdriver to further tighten the anchor screws, but do not overtighten.

natural_image
Technical line drawing of a wall-mounted device with attached screwdriver and connector (no text or symbols)Attaching the Security Clamps to a Concrete Wall or Concrete Blocks
It's important to use the security cable system for additional protection against tipping over caused by accidentally bumping or moving the easel and your display.
Warning! Do not drill into the mortar between concrete blocks.
-
Use a pencil to mark drilling holes for the four anchor screws.
-
Use a 9/32-inch (7 mm) concrete drill bit to predrill the marked spots 1.6 inches (40 mm) deep, and then clean out the debris from the holes.

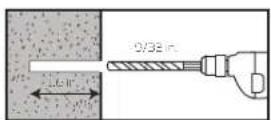

Caution! Make sure the concrete wall or block is solid and at least 8 inches (20 cm) thick. Install the security clamps at least 16 inches apart. If the concrete exhibits cracks or other defects, this may result in failure of the clamp anchors and result in damage to your display or cause serious personal injury.
-
Use a hammer to top the wall anchors into the precrilled holes.
-
Use the four anchor screws to attach the security clamps to the wall. Use the Phillips screwdriver to further tighten the screws, but do not overtighten.

natural_image
Diagram showing a hammer fastening a wall-mounted screw with multiple bolts, alongside a close-up of the bolted screw (no text or symbols present)Attaching the Security Cable


Attaching the Cable
Management Clips
Three-Year Limited Warranty
This Gabor product is warranted to the original purchaser to be free from defects in materials and workmanship under normal consumer use for a period of three (3) years from the original purchase date or thirty (30) days after replacement, whichever occurs later. The warranty provider's responsibility with respect to this limited warranty shall be limited solely to repair or replacement, at the provider's discretion, of any product that fails during normal use of this product in its intended manner and in its intended environment. Inoperability of the product or part(s) shall be determined by the warranty provider. If the product has been discontinued, the warranty provider reserves the right to replace it with a model of equivalent quality and function.
This warranty does not cover damage or defect caused by misuse, neglect, accident, alteration, abuse, improper installation or maintenance. EXCEPT AS PROVIDED HEREIN, THE WARRANTY PROVIDER MAKES NEITHER ANY EXPRESS WARRANTIES NOR ANY IMPLIED WARRANTIES, INCLUDING BUT NOT LIMITED TO ANY IMPLIED WARRANTY OF MERCHANTABILITY OR FITNESS FOR A PARTICULAR PURPOSE. This warranty provides you with specific legal rights, and you may also have additional rights that vary from state to state.
To obtain warranty coverage, contact the Gabor Customer Service Department to obtain a return merchandise authorization ("RMA") number, and return the defective product to Gabor along with the RMA number and proof of purchase. Shipment of the defective product is at the purchaser's own risk and expense.
For more information or to arrange service, visit www.madebygabor.com or call Customer Service at 212-594-2353.
Product warranty provided by the Gradus Group.
www.gradusgroup.com
Gabor is a registered trademark of the Grodus Group. © 2021 Gradus Group LLC. All Rights Reserved.

GABOR®
A Gradus Group Brand


- Thank you for choosing Gabor.
- Safety Warnings
- Product Specifications
- Recommended Screen Sizes
- Dimensions
- Max Weight Capacity
- Material
- Weight
- VESA Mounting Patterns
- Overview
- Mounting the Display On the Easel Stand
- Attaching the Security Clamps to Wooden Studs
- Attaching the Security Clamps to a Concrete Wall or Concrete Blocks
- Three-Year Limited Warranty
Brand : Gabor
Model : FPS-L
Category : Shoes