ALF-12X-HDBASET - Security Camera Alfatron - Free user manual and instructions
Find the device manual for free ALF-12X-HDBASET Alfatron in PDF.

User questions about ALF-12X-HDBASET Alfatron
0 question about this device. Answer the ones you know or ask your own.
Ask a new question about this device
Download the instructions for your Security Camera in PDF format for free! Find your manual ALF-12X-HDBASET - Alfatron and take your electronic device back in hand. On this page are published all the documents necessary for the use of your device. ALF-12X-HDBASET by Alfatron.
USER MANUAL ALF-12X-HDBASET Alfatron
natural_image
Black ALFATRON camera with visible lens and control base (no text or symbols on body)Attention
CE FC EAC CAN ICES-3 (B)/NMB-3(B)
NOTE: This equipment has been tested and was found to comply with the limits for a Class B digital device, pursuant to Part 15 of the FCC Rules. These limits are designed to provide reasonable protection against harmful interference in a residential installation. This equipment can generate and radiate radio frequency energy and, if not installed and used in accordance with the instructions, may cause harmful interference to radio communications. However, there is no guarantee that interference will not occur in a particular installation. If this equipment does cause harmful interference to radio or television reception, which can be determined by turning the equipment off and on, the user is encouraged to try to correct the interference through one or more of the following measures:
---Reorient or relocate the receiving antenna.
---Increase the distance between the equipment and receiver.
---Connect the equipment into an outlet on a circuit different from which the receiver is connected.
---Consult the dealer or an experienced radio/TV technician for help.
WARNING: Changes or modifications not expressly approved by the party responsible for compliance, could void the user's authority to operate the equipment.
Radiation Exposure
This equipment complies with FCC radiation exposure limits set forth for an uncontrolled environment.
This device complies with Industry Canada licence-exempt RSS standard(s). Operation is subject to the following two conditions:
(1) this device may not cause interference, and
(2) this device must accept any interference, including interference that may cause undesired operation of the device.

Do not dispose of this product with the normal household waste at the end of its life cycle. Return it to a collection point for the recycling of electrical and electronic devices. This is indicated by the symbol on the product, user manual or packaging
The materials are reusable according to their markings. By reusing, recycling or other forms of utilization of old devices you make an important contribution to the protection of our environment.
Please contact your local authorities for details about collection points.
Electric Safety
Installation and operation must comply in accordance with electric safety standards
Caution during transport
Avoid stress, vibration and soakage in transportation, storage and installation.
The polarity of the power supply
The power supply of the product is ±12V and the maximum electrical current is 2A.
Below is the drawing, indicating the polarity of the power supply.

natural_image
Technical line drawing of a mechanical component with no visible text or symbolsCareful considerations during installation
Never move the camera by grabbing the camera head directly. Do not rotate the camera head by hand, as mechanical issues may occur.
This device must be installed on a level desk or platform, and cannot be installed askew.
Do not use any corrosive liquid when cleaning the device as the cover is made up of organic material.
Ensure that there are no obstacles within rotation range.
Never power unit up before installation is completed.
Do not disassemble at your own discretion.
We are not responsible for any unauthorized modification or dismantling.
Attention
An Electromagnetic field under a certain rate may affect the camera image!
Context
1. Quick Installation....5
1.1 Camera Interface Explanation 6
1.2 Power on initial configuration 6
1.3 Video Output 6
2. Product overview....6
2.1 Product Introduction ...... 6
2.1.1 Dimension 6
2.1.2 Accessory 6
2.2 Main Features....7
2.2.1 Camera Performance....7
2.2.2 Network performance ...... 7
2.3 Technical Specification 8
2.4 Connections 9
3. Application Instruction 10
3.1 Video Output 10
3.1.1 Power-On Initial Configuration 10
3.2 Remote Controller 10
3.2.1 Button Instruction.... 10
3.2.2 Applications ...... 11
3.3 MENU SETTING 12
3.3.1 Main Menu 12
3.3.2 System Setting 13
3.3.3 Camera Setting.... 14
3.3.4 P/T/Z 16
3.3.5 Video Format 17
3.3.6 Version 17
3.3.7 Restore Default 18
4. Network Connection.... 18
4.1 Connecting Mode.... 18
4.2 IE Log In 21
4.2.1 a) Web client.... 21
4.2.1 b) Download/Install Plugin.... 21
4.2.2 Preview 21
4.2.3 Configuration 22
4.2.4 Video configuration 22
4.2.5 Network configuration.... 24
4.2.6 System configuration.... 25
4.2.7 Logout 26
4.2.9 Wireless network 26
5. Serial Communication Control.... 27
5.1 VISCA protocol list....27
5.1.1 Camera return command.... 27
5.1.2 Camera control command 27
5.1.3, Inquiry command.... 30
5.2, Pelco-D protocol command list 32
5.3 Pelco-P protocol command list 32
- Camera Maintenance and Troubleshooting 33
6.1 Camera Maintenance .... 33
6.2 Troubleshooting.... 33
7. Warranty....35
1. Quick Installation
1.1 Camera Interface Explanation
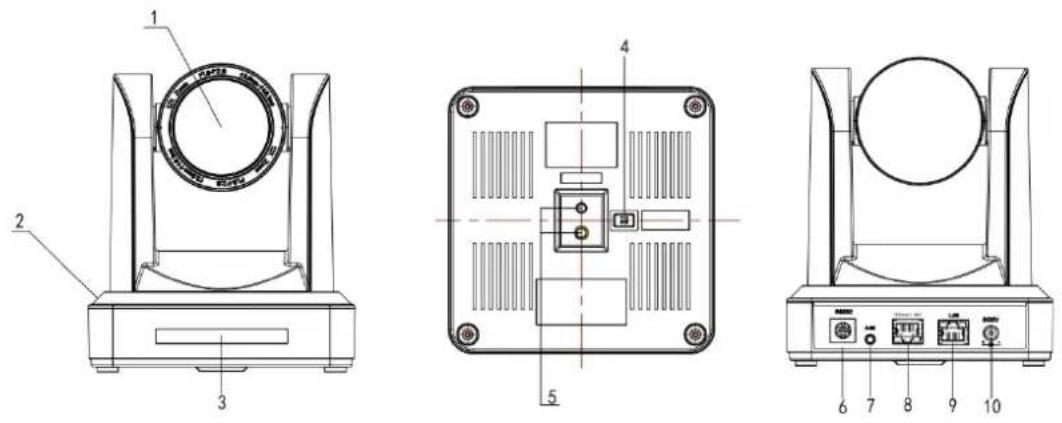
Figure 1.1 Interface of HD BaseT Series
| 1. Camera Lens | 6. RS232 (In) |
| 2. Camera Base | 7. Audio in |
| 3. Remote Controller Receiver Light | 8. HDBaseT Port |
| 4. DIP Switch | 9. LAN Port |
| 5. Tripod Screw Hole | 10. Power Supply |
1.2 Power on initial configuration
1) Power on: Connect DC12V power supply adapter with the power supply socket.
2) Initial configuration: Power the device on with the remote control, the front panel light will flash red. The camera head then moves down and rotates left. The camera head then goes to the HOME position, front and centre. When the remote control receiver light stops blinking and turns green, the self-checking is complete.
Note: If you set preset 0, when Power-on self-test is completed, the camera automatically moves to the preset 0 positions.
1.3 Video Output
HDBaseT video output
a. IP cable connect: HD model pls refer to figure 1.1 No.8 above.
b. Connect the PTZ Camera to the copmpatible Alfatron HDBaseT receiver using a compatible HDBaseT network cable.
1.4 Bracket mount
Note: Bracket can only be wall-mounted or mounted upside-down on the concrete wall. Bracket cannot be installed on plasterboard.
1) Wall mount steps

- Upside down mounting steps

2. Product overview
2.1 Product Introduction
2.1.1 Dimension

Figure 2.2 Camera dimension
2.1.2 Accessory
When unpacking, ensure all the supplied accessories are included:
| Model NO. | Configuration | HDBaseT |
| Accessory | Standard | 1 x Power adapter |
| 1 x RS232 cable | ||
| 1 x User manual | ||
| 4 x Double-side glue shim | ||
| 1 x Warranty card | ||
| 1 x IR Remote controller | ||
| Wall or Ceiling Mount Bracket(The specific bracket required is chosen at purchase) | ||
2.2 Main Features
2.2.1 Camera Performance
The Alfatron ALF-X-HDBaseT series camera offers flawless functionality, superior performance and rich interfaces. The features include advanced ISP processing algorithms to provide high resolution vivid images with a strong sense of depth and excellent colour rendition. It supports H.265/H.264 encoding which makes motion video fluent and clear even with less than ideal bandwidth conditions.
- Superb High-definition Image: Utilizes 1/2.8-inch-high quality CMOS sensor. Resolution is up to 1920x1080 with a frame rate up to 60 fps.
- Various Optical Zoom Lens: It has 5X/10X/12X/20X optical zoom lens for options. The 5X zoom lens has a 80.9° wide view angle without distortion.
- Leading Auto Focus Technology: Leading auto focus algorithm assures the lens is fast, accurate and stable at auto-focusing.
- Low Noise and High SNR: Low Noise CMOS effectively ensures high SNR of camera video.
Advanced 2D/3D noise reduction technology is also used to further reduce the noise while ensuring image sharpness. - Quiet PTZ: By adopting a high accuracy step driving motor, the camera works quietly and moves smoothly and quickly to a designated position.
- Video Outputs: supports HDBaseT.
- Remote Controls: IR remote controller.
- Low-power Sleep Function: Supports low-power sleep/wake up. The consumption is lower than 500mW under sleep mode.
- Support Multiple Control Protocol: Supports VISCA, PELCO-D and PELCO-P protocols which can also be automatically recognized. Supports VISCA control protocol via the IP port.
10.255 Presets Positions: Up to 255 presets (10 presets via remote Controller). - Wide usage Application: Tele-education, Lecture Capture, Webcasting, Videoconferencing, Tele-training, Tele-medicine, Interrogation and Emergency command systems.
2.2.2 Network performance
- Audio Input Interface: Supports 16000/32000/44100/48000 Hz sampling frequency and AAC, MP3, PCM audio coding.
- Multiple Audio/Video Compression: Support H.264/H.265 video compression; AAC, MP3 and PCM audio compression; Supports compression of resolutions up to 1920x1080 with frame rates up to 60 fps and 2 audio channels.
- Multiple network protocols: Supports ONVIF, RTSP, RTMP protocols and RTMP push mode, easy to link streaming media server (Wowza, FMS)
2.3 Technical Specification
| Model | 5X | 10X | 12X | 20X | 30X |
| Camera Parameter | |||||
| Sensor | 1/2.8-inch-high quality HD CMOS sensor | ||||
| Effective Pixels | 16: 9 2.07 megapixel | ||||
| Video Format | HDBaseT video format1080P60/50/30/25/59.94/29.97;1080I60/50/59.94;720P60/50/30/25/59.94/29.97 | ||||
| Optical Zoom | 5Xf=3.6~18mm | 10Xf=4.7~47mm | 12Xf = 3.9 ~ 46.1mm | 20Xf=5.2~98mm | 30Xf=4.3~129mm |
| View Angle | 16.43° (tele)80.9° (wide) | 6.43° (tele)60.9° (wide) | 6.3° (tele)72.5° (wide) | 3.3° (tele)54.7° (wide) | 2.34°(tele)--65.1°(wide) |
| AV | F1.8 - F2.8 | F1.6 - F3.0 | F1.8 - F2.4 | F1.5 - F3.5 | F1.6 ~ F4.7 |
| Digital Zoom | 10X | ||||
| Minimum Illumination | 0.5Lux (F1.8, AGC ON) | ||||
| DNR | 2D & 3D DNR | ||||
| White Balance | Auto / Manual/ One Push/ 3000K/ 4000K/5000K/6500K | ||||
| Focus | Auto/Manual | ||||
| Aperture | Auto/Manual | ||||
| Electronic Shutter | Auto/Manual | ||||
| BLC | ON/OFF | ||||
| WDR | OFF/ Dynamic level adjustment | ||||
| Video adjustment | Brightness, Color, Saturation, Contrast, Sharpness, B/W mode, Gamma curve | ||||
| SNR | >55dB | ||||
| Input/Output Interface | |
| Video Interfaces | HDBaseT(POE), LAN, Audio-in, RS232 |
| Image code stream | Double streams output simultaneously |
| Video Compression format | H.264, H.265 |
| Control Signal Interface | RS-232 Ring through RS232 output, RS-485 |
| Control Protocol | VISCA/Pelco-D/Pelco-P; Baud Rate: 115200/9600/4800/2400bps |
| Audio Input Interface | Double track 3.5mm linear input; |
| Audio Compression Format | AAC/MP3/PMC Audio compression |
| HD IP Interface | 100M IP port(100BASE-TX); support IP Visca control protocol |
| Network Protocol | RTSP/RTMP,ONVIF |
| Power Interface | HEC3800 outlet (DC12V) |
| PTZ Parameter | |
| Pan Rotation | ± 170^ |
| Tilt Rotation | -30^ +90^ |
| Pan Control Speed | 0.1 -60°/sec |
| Tilt Control Speed | 0.1-30°/sec |
| Preset Speed | Pan: 60°/sec, Tilt: 30°/sec |
| Preset Number | 255 presets (10 presets by the remote controller) |
| Other Parameter | |
| Supply Adapter | AC110V-AC220V to DC12V/2A |
| Input Voltage | DC12V ± 10% |
| Input Current | 1A(Max) |
| Consumption | 12W (Max) |
| Store Temperature | -10°C to +60°C |
| Store Humidity | 20% - 95% |
| Working Temperature | -10°C to +50°C |
| Working Humidity | 20%--80% |
| Dimension | 150mmX150mmX167.5mm |
| Weight | 1.4KG |
| Working Environment | Indoor |
| Remote Operation (IP) | Remote Upgrade, Reboot and Reset |
| Accessory | Power Supply, RS232 Control Cable, IR Remoter, Manual |
| Wall or Ceiling Mount Bracket(The specific bracket required is chosen at purchase) | |
2.4 Connections
1) The external interface of the HD model: Audio Input, HDBaseT Output, LAN and DC12V Power Interface.

text_image
3.5 mm audio input interface to MIC network output interface UTP cable RX HDMI cable AC adapter to AC socket DC 12V 1N power supply cable PC, TV or VCR with video input jackFigure 2.6 HD model external interface diagram
3.Application Instruction
3.1 Video Output
3.1.1 Power-On Initial Configuration
Once connecting the power, the camera will initiate the initial configuration, the red indicator light will be flashing. When the camera returns to the HOME position (middle position for Pan / Tilt), the lens will zoom in/out and the auto-testing will be completed. IR LED will also cease flashing. If the preset '0' is set, the camera will rotate to the 0-preset position after initial configuration.
3.2 Remote Controller
3.2.1 Button Instruction
1. Standby Button
After a 3 second long press, the camera will step into standby mode. Long press for 3 seconds again and the camera will self-test and return to the HOME position. (Note: If the power-on mode is turned on and Preset 0 is set, and there is no operation within 12 seconds, the camera will automatically point to the specified preset position.
2. Camera Address Selection
Select the camera address which requires control
3. Number Key
Set or run 0-9 presets
4. \*,# Key
Key combination use
5. Focus Control Key
Auto Focus: Enter autofocus mode.
Manual Focus: Enter manual focus mode.
To adjust the camera focus in manual mode press [focus +] or [focus -].
6. Zoom Control Key
Zoom+: Zoom in
Zoom—: Zoom out
7. Set or Clear Preset key:
To set the preset: Press Set Preset key and 0-9 number key
To clear the preset: Press Clear Preset key and 0-9 number key
8. Pan/Tilt Control Key
Press Key: Up
Press Key: Down
Press Key: Left
Press Key: Right
"HOME" Key: Return to the middle position or enter into the next level menu
9. BLC Control Key
Back Light ON / OFF: Turn on or off the backlight
10. Menu Setting
Open or close the OSD menu
Enter/exit the OSD menu or return to the previous menu.
11. Camera IR Remote Control Address Setting
【*】+【#】+【F1】: Camera Address No.1
【*】+【#】+【F2】: Camera Address No. 2
【*】+【#】+【F3】: Camera Address No. 3
【*】+【#】+【F4】: Camera Address No. 4
12. Key Combination Functions
After completing initialization, the camera can receive and execute the IR commands. Press the remote controller button and the indicator light will flash; release the button, the indicator light will stop flashing. Users can control the pan/tilt/zoom, setting and running preset positions via the IR remote controller.
Button Instruction:
-
In this example, "press the button" means a 'click' rather than a long-press, and a special note will be given if a long-press for more than one second is required.
-
When a button-combination is required, do it in sequence. For example, “【*】+【#】+【F1】” means press“【*】” first and then press“【#】” and lastly press“【F1】”.
1) Camera Selection

text_image
CAMERA SELECT 1 2 3 4Select the camera address to control.
2) Pan/Tilt Control

text_image
SET PRESET CLEAR PRESET HOME BLC ON/OFF MENUUp: press Down press
Left: press Right: press
Back to middle position: press"【HOME】"
Press and hold the up/down/left/right button; the pan/tilt will keep running, from slow to fast, until it runs to the endpoint. The pan/tilt movement stops as soon as the button is released.
3) Zoom Control

text_image
+ FOCUS - AUTO MANUAL + ZOOM -ZOOM IN: press "ZOOM" key
ZOOM OUT: press "ZOOM ◀" key
Press and hold the button, the camera will keep zooming in or zooming out and stops as soon as the button is released.
4) Focus Control
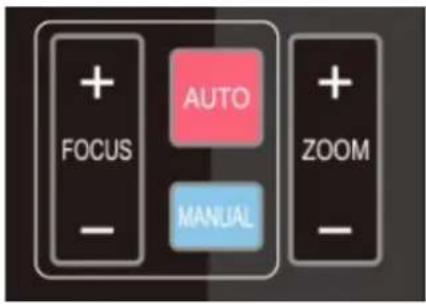
text_image
+ FOCUS - AUTO MANUAL + ZOOM -Focus (near): Press "【focus+】" button (Valid only in manual focus mode)
Focus (far): Press "【focus-】" button (Valid only in manual focus mode)
Auto Focus: Supported
Manual Focus: Supported
Press and hold the button, the focus action will continue and will stop as soon as the button is released.
5) BLC Setting

BLC ON / OFF: supported
6) Presets Setting, Running, Clearing

text_image
1 2 3 4 ·5 · 6 7 8 9 * 0 #- Preset setting: To set a preset position, the user should press the "【SET PRESET】" button first and then press a numbered button between 0 and 9 to set the relative preset.
Note: 10 preset positions in total are available via the remote controller. - Preset Running: Press a numbered button between 0 and 9 to run a relative preset.
- Preset clearing: To clear a preset position, the user can press the "【CLEAR PRESET】" button first and then press the numbered button between 0 and 9 to clear the relative preset.
Note: pressing the“【#】” button three times consecutively to cancel all the presets.

text_image
SET PRESET CLEAR PRESET7) Camera Remote Controller Address Setting

text_image
F1 F2 F3 F4【*】+【#】+【F1】: Camera Address No.1
【*】+【#】+【F2】: Camera Address No. 2
【*】+【#】+【F3】: Camera Address No. 3
【*】+【#】+【F4】: Camera Address No. 4
3.3 MENU SETTING
3.3.1 Main Menu
In normal working mode, press the 【MENU】button to display the menu. Use the arrow buttons to highlight the menus items.

text_image
MENU ==================== Language English (Setup) (Camera) (P/T/Z) (Video Format) (Version) (Restore Default) [ ↑ ↓ ]Select [ ← → ]Change ValueLANGUAGE: Language setting, Chinese / English
SETUP: System setting
CAMERA OPTION: Camera setting
PTZ OPTION: Pan / Tilt setting
VERSION: Camera version setting
Restore Default: Reset setting
[↑↓] Select: For selecting within the menu
[←→] Change Value: For modifying parameters
[MENU] Back: Press [MENU] to return
[Home] OK: Press [Home] to confirm
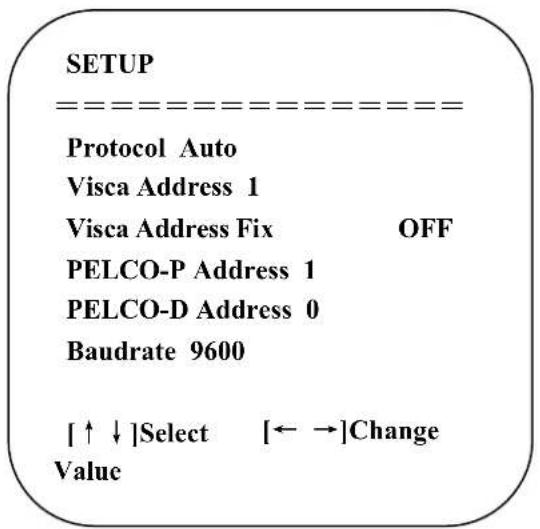
3.3.2 System Setting
Move the pointer to the (Setup) within the Main Menu, click the【HOME】button and enter into the (System Setting) as shown below:
text_image
SETUP --------==----------------=----------------=----------------=----------------=----------------=----------------=----------------=----------------=----------------=----------------=----------------=----------------=----------------=----------------=----------------=----------------=----------------=----------------=----------------=----------------=----------------=----------------=----------------=----------------=----------------=----------------=----------------=----------------=----------------=----------------=----------------=----------------=----------------=----------------=----------------=----------------=----------------=----------------=----------------=----------------=----------------=----------------=----------------=----------------=----------------=----------------=----------------=----------------=----------------=----------------=-----------------------------| Protocol Auto Visca Address 1 Visca Address Fix OFF PELCO-P Address 1 PELCO-D Address 0 Baudrate 9600 [↑↓]Select [←→]Change ValuePROTOCOL: VISCA/Pelco-P/Pelco-D/Auto
Visca address: 1\~7
Visca Address Fix: On/Off
Pelco-P address: 1\~255
Pelco-D address: 1\~255
Baud rate: 2400/4800/9600/115200
3.3.3 Camera Setting
Move the pointer to the (CAMERA) in the Main Menu, click the 【HOME】 button and enter the (CAMERA) as follows:

text_image
CAMERA ------------------------ (Exposure) (Color) (Image) (Focus) (Noise Reduction) [↑↓]Select [←→]Change ValueExposure: Enter the Exposure settings
Color: Enter the the colour settings
Image: Enter the image settings
Focus: Enter the focus settings
Noise Reduction: Enter the noise reduction settings
1) EXPOSURE SETTING
Move the pointer to the (EXPOSURE) within the Main Menu, click the 【HOME】 button and enter the (EXPOSURE SET) as follows:

text_image
EXPOSURE ===================== Mode Auto EV OFF BLC OFF Anti-Flicker 50Hz Gain Limit 3 WDR 5 [↑↓]Select [←→]Change ValueMode: Auto, Manual, Shutter priority, Iris priority and Brightness priority.
EV : On / Off (only available in auto mode)
Compensation Level: -7\~7 (only available in auto mode when EV is ON)
BLC: On / Off options (only available in auto mode)
Anti-Flicker: OFF / 50Hz / 60Hz options ( only available in Auto / Iris priority / Brightness priority modes)
Gain Limit: 0\~15 ( only available in Auto / Iris priority / Brightness priority mode)
WDR: Off,1\~8
Shutter priority: 1/25, 1/30, 1/50, 1/60, 1/90, 1/100, 1/120, 1/180, 1/250, 1/350, 1/500, 1/1000, 1/2000, 1/3000, 1/4000, 1/6000,
1/10000 (only available in Manual and Shutter priority mode)
IRIS Priority: OFF, F11.0, F9.6, F8.0, F6.8, F5.6, F4.8, F4.0, F3.4, F2.8, F2.4, F2.0, F1.8 (only available in Manual and Iris priority mode)
Brightness: 0\~23 (only available in Brightness priority mode)
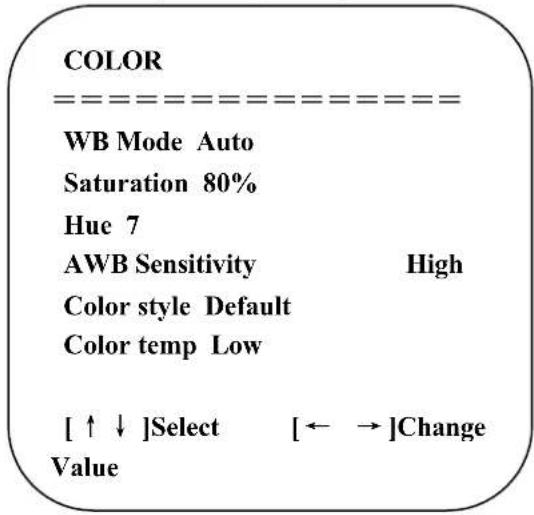
2) COLOR SETTING
Move the pointer to the (COLOR) within the Main Menu, click the 【HOME】 button and enter the (COLOR SET) as follows:
text_image
COLOR ==================== WB Mode Auto Saturation 80% Hue 7 AWB Sensitivity High Color style Default Color temp Low [ ↑ ↓ ]Select [ ← → ]Change ValueWB Mode: Auto, 3000K, 3500K, 4000K, 4500K, 5000K, 5500K, 6000K, 6500K, 7000K, Manual, One Push
Red Gain: 0\~255 (only available in Manual mode)
Blue Gain: 0\~255 (only available in Manual mode)
Saturation: 60%, 70%, 80%, 90%, 100%, 110%, 120%, 130%
Hue: 0\~14
AWB Sensitivity: high / middle / low
Color Style: Default, style1\~4.
Color Temp: high / middle / low
3) IMAGE
Move the pointer to the (IMAGE) within the Menu, click the 【HOME】 button and enter the (IMAGE) as follows:

text_image
IMAGE Brightness 6 Contrast 8 Sharpness 7 Flip-H OFF Flip-V OFF B&W-Mode Color Gamma Default DZoom OFF DCI Close [↑↓]Select [←→]Change ValueContrast: 0\~14
Sharpness: 0\~15
Flip-H: On/Off
Flip-V: On/Off
B&W Mode: Color, black / white
Gamma: Default, 0.47, 0.50, 0.52, 0.55
DZoom: digital zoom options: On/Off
DCI: Dynamic Contrast: Off,1\~8
4) FOCUS
Move the pointer to the (FOCUS) within the Menu, click the 【HOME】 button and enter the (FOCUS) as follows:

text_image
FOCUS --------= Focus Mode Auto AF-Zone Center AF-Sensitivity Low [↑↓]Select [←→]Change ValueFocus Mode: Auto, manual
AF-Zone: Up, middle, down
AF-Sensitivity: High, middle, low
5) NOISE REDUCTION
Move the pointer to the (NOISE REDUCTION) within the Menu, click the 【HOME】 button and enter the (NOISE REDUCTION) as follows:

text_image
NOISE REDUCTION NR-2D Auto NR-3D 3 Dynamic Hot Pixel OFF [↑↓]Select [←→]Change Value2D Noise Reduction: Auto, close, 1\~7
3D Noise Reduction: Close, 1\~8
Dynamic Hot Pixel: Close, 1\~5
3.3.4 P/T/Z
Move the pointer to the (P/T/Z) within the Main Menu, click the 【HOME】 button and enter the (P/T/Z) as follows:
P/T/Z
Depth of field ON
Zoom speed 8
Image Freezing OFF
Acc Curve Slow
[↑ ↓]Select [← →]Change
Value
Depth of Field: Only effective with the remote controller, On/Off;
When zooming in, the PT control speed via remote controller will move slowly),
Zoom Speed: Set the zoom speed for the remote controller, 1\~8
Image Freezing: On / Off
Accelerating Curve: Fast / slow
3.3.5 Video Format
Move the pointer to the (Video Format) within the Menu, click the 【HOME】 button and enter the (Video Format) as follows:
VIDEO FORMAT
| 1080P60 | 1080P50 | |
| 1080I60 | 1080I50 | |
| 1080P30 | 1080P25 | |
| 720P60 | 720P50 | |
| 720P30 | 720P25 | |
| 1080P59.94 | 1080I59.94 | |
| 1080P29.97 | 720P59.94 | |
| 720P29.97 | ||
| [↑] | ↓ | ]Sele |
| [Menu]Back |
Note: 1. S: 1080P60 Downward Compatibility; M: 1080P30 Downward Compatibility
2. Exit menu after modifying parameter to save it after camera is powered off
3.3.6 Version
Move the pointer to the (VERSION) within the Main Menu, click the 【HOME】 button and enter the (VERSION) as follows:
VERSION
MCU Version 2.0.0.15 2015-12-18
Camera Version 2.0.0.13 2015-12-18
AF Version 2.0.0.6 2015-12-11
Lens 12X(20X)
[Menu]Back
MCU Version: Display MCU version information
Camera Version: Display camera version information
AF Version: Display the focus version information
Lens: Display the lens zoom information
Move the pointer to the (RESTORE DEFAULT) within the Main Menu, click the 【HOME】button and enter the (RESTORE DEFAULT) as follows:
RESTORE DEFAULT
Restore Default? NO
|↑↓|Select |←→|Change
Value
|Menu|Back |Home|OK
Restore default: options: yes / no. After restoring to default, the video format will not be restored.
Note: If the address of the former remote controller is not 1 but another from 2,3,4, the corresponding camera address will restore to 1 when all parameters or system parameters are restored. User should change the remoter address to be 1 (press No.1 according to the camera to get normal operation)
4. Network Connection
4.1 Connecting Mode
Direct connection: Connect the camera to a computer via network connecting cable directly to the camera ethernet port.
Ethernet connection mode: Connect the camera to a Router or Switch so that the user can log in the device by the browser.
Note: Please do not place the power and network cables in a place where it can be easily touched or disturbed to prevent lowering the video quality through unstable signal transmission due to poor contact of cables.
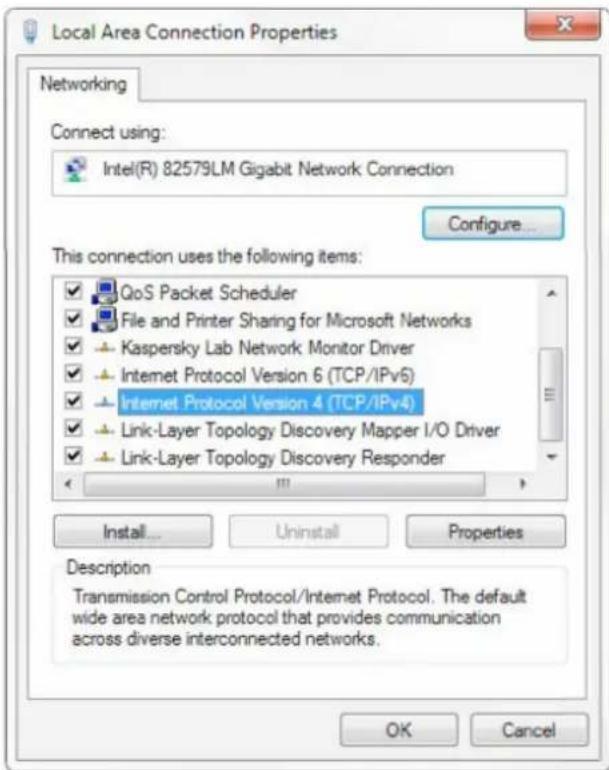
The computer must have the network segment which the camera IP address belongs to. The device will not be accessible without this segment. E.g. The camera default IP address is 192.168.5.163, segment 5 must be added within the TCP/IPv4. Specific steps are as below:
Firstly open the window of Local Area Connection Properties on the computer. Select the "Internet Protocol version 4(TCP/IPv4)" as shown in the picture below. Double click or click the property "Internet" protocol version 4 (TCP/IPv4) to enter into the Internet Protocol Version 4 (TCP/IPv4) Properties window. Select "Advanced" to enter into the Advanced TCP/IP Setting and add IP and subnet mask in the IP browser as pictured below. Click the "Confirm" to finish the adding of the IP segment. User can add the corresponding network segment according to the revised IP address of the camera.
text_image
Local Area Connection Properties Networking Connect using: Intel(R) 82579LM Gigabit Network Connection Configure... This connection uses the following items: ✓ QoS Packet Scheduler ✓ File and Printer Sharing for Microsoft Networks ✓ Kaspersky Lab Network Monitor Driver ✓ Internet Protocol Version 6 (TCP/IPv6) ✓ Internet Protocol Version 4 (TCP/IPv4) ✓ Link-Layer Topology Discovery Mapper I/O Driver ✓ Link-Layer Topology Discovery Responder Install... Uninstall Properties Description Transmission Control Protocol/Internet Protocol. The default wide area network protocol that provides communication across diverse interconnected networks. OK Cancel
text_image
Internet Protocol Version 4 (TCP/IPv4) Properties General You can get IP settings assigned automatically if your network supports this capability. Otherwise, you need to ask your network administrator for the appropriate IP settings. Obtain an IP address automatically Use the following IP address: IP address: 192 . 168 . 0 . 26 Subnet mask: 255 . 255 . 255 . 0 Default gateway: 192 . 168 . 1 . 1 Obtain DNS server address automatically Use the following DNS server addresses: Preferred DNS server: 8 . 8 . 8 . 8 Alternate DNS server: 8 . 8 . 4 . 4 Validate settings upon exit Advanced... OK Cancel
text_image
Advanced TCP/IP Settings IP Settings DNS WINS IP addresses IP address Subnet mask 192.168.0.26 255.255.255.0 Add... Edit... Remove Default gateways: Gateway Metric 192.168.1.1 Automatic Add... Edit... Remove ✓ Automatic metric Interface metric: OK CancelNote: The IP address to be added cannot be the same as that of other computers or devices. The existence of this IP address needs to be verified before adding.
Right click the "Start" icon and select "Run" to input cmd as pictured below to verify if the network segment has been successfully added.

text_image
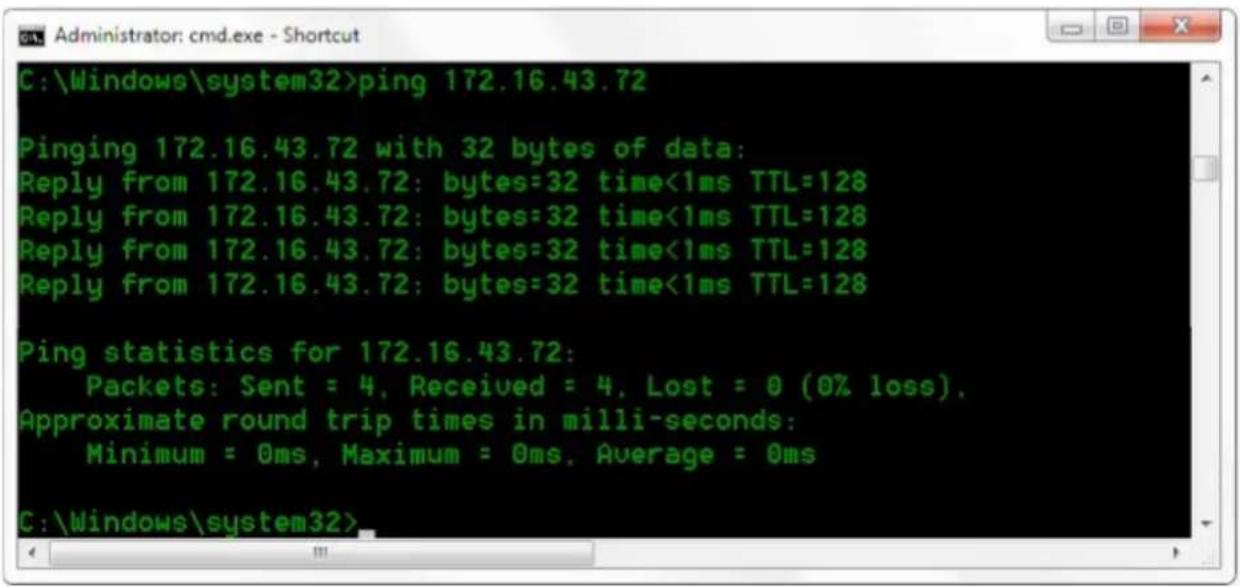
Run Type the name of a program, folder, document, or Internet resource, and Windows will open it for you. Open: cmd OK Cancel Browse...Click "OK" and open the DOS command window, type "ping 192.168.5.26" and press the "Enter" key, it will show the message as below. This means network segment adding has succeeded.
text_image
C:\Windows\system32>ping 172.16.43.72 Pinging 172.16.43.72 with 32 bytes of data: Reply from 172.16.43.72: bytes=32 time<1ms TTL=128 Reply from 172.16.43.72: bytes=32 time<1ms TTL=128 Reply from 172.16.43.72: bytes=32 time<1ms TTL=128 Reply from 172.16.43.72: bytes=32 time<1ms TTL=128 Ping statistics for 172.16.43.72: Packets: Sent = 4, Received = 4, Lost = 0 (0% loss), Approximate round trip times in milli-seconds: Minimum = 0ms, Maximum = 0ms, Average = 0ms C:\Windows\system32>4.2 IE Log In
4.2.1 a) Web client
1) Web client Login
Input the IP address 192.168.5.163 of the device in the address field of browser and click Enter button to enter into Web Client login page. User can log in as administrator and normal user. If logging in as the administrator (Default User name and Password: admin), users can preview, playback, configure and cancel within the Web Client. If logging in as normal user (Default User name and Password: user1 or user2), users can only preview, playback and cancel, there is no option for configuration.
Note: Web access supported browsers: IE, 360 browser and other conventional browsers.
4.2.1 b) Download/Install Plugin
When first using IE browser to access the web conferencing camera, the login page will appear "Playback plug-in is not installed, please download and install!". Click on this message, download and install MRWebXinstall.exe, and follow the prompts.
After installing the plugin, enter the user name and password, click and sign in (initial default user name and password: "admin".
Users can change the user name and password on their own after entering) into the Web client management interface.
4.2.2 Preview
After successful login into the management interface, enter the video preview interface. In the preview screen, users can control pan / tilt, zoom, focus, video capture, sound, full screen and set the preset position, run, delete and other operations.
1) Login as administrator
User name, password, the default admin
PTZ control can be carried out, focus, video capture, sound, full screen and set the preset position, run, and delete; you can preview, playback, configure and log off.
2) Login as a normal user
Default User name/password: user1 or user2
PTZ control can be carried out, focus, video capture, sound, full screen and set the preset position, run, and delete; you can preview, playback and log off.
NOTE: There is no configuration available for normal user login.
4.2.3 Configuration
Click "Configuration" to enter the device parameters setting page.
There are the following options: Local configuration, audio configuration, video configuration, network configuration, PTZ configuration, internet access configuration and system configuration. Detailed description below in following table.
| Menu Explanation | |
| Local configure | Including video preview mode, record video packing time, record video storage route settings etc. |
| Audio configure | Including audio compressing format, sampling frequency, sampling precision, compressing code rate settings etc. |
| Video configure | Including video encoding,video parameters,character-overlapping,character size,video output setting etc. |
| Network configure | Including basic parameters, Ethernet, DNS, wireless network setting, GB28181 etc. |
| System configure | Including equipment property,system time,user management,version update,Reset,Reboot device settings etc. |
1) Local configuration
Video Preview Mode: User can choose real-time priority or fluency priority: The delay will be small when under real-time priority mode and fluency will be good when under fluency priority mode. Setting based on the user need [Default value: real-time normal (2), real-time best (1), fluency normal (3), fluency good (4) and fluency best (5)]
Recording packing time (minute): Set recording video packing time (default is 10, range from 1\~120 minutes)
Recording/Snapshot file storage route: Set the local recording video / snapshot file storage route. (Default D:\MyIPCam\ Click on the "Save" button, "Parameter saved successfully" message is displayed.
2) Audio Configuration
Switch: Choose to enable the audio or not.
Compressing format: Set audio compressing format and the device will reboot automatically after the change (default MP3; PCM and AAC optional)
Sampling frequency: Set sampling frequency and the device will reboot automatically after the change (default 44100,16000,32000 and 48000 optional)
Sampling precision: Set sampling precision (default 16bits)
Compressing code rate: Set audio compressing code rate (default 64 bits, 32, 48, 96 and 128 bits optional)
Note: Click "SAVE" to ensure changes. Restart the device to take effect after saving. Reboot the camera to make the new setting is in effect.
4.2.4 Video configuration
1) Video encoding
Code stream:Stream: Different video output mode settings selectable for Main stream & secondary stream.
Compression Format: Set the video compression format, save and reboot to take effect (primary/ secondary stream) Default: H.264. (H.265 selectable)
Profile: Profile Mode Setting Default HP (BP, MP Optional)
Video Size: Set video image resolution, save and reboot to take effect, main stream default 1920 x 1080 (1280 x 720 optional; default secondary stream 640 x 320. 320 x 180, 1280 x 720, 1920 x 1080 optional)
Stream Rate control: Set rate control mode, save and reboot to take effect (Primary/ secondary stream default variable bit rate, fixed rate is optional).
Image Quality: Set the image quality. Image quality can be changed only when rate control is the variable bit rate.
Rate (Kb/s): Set the video bit rate (main stream default 4096Kb/s, 64-12288Kb/s optional; secondary stream default 1024Kb/s, 64-10240Kb/s optional).
Frame rate (f/s): Set the video frame rate (primary/ secondary stream default 25f/s, primary stream 5-60f/s, optional secondary stream 5-30f/s optional).
Key frame interval: Set the key frame interval (primary stream default 75f, 1-300f optional. Secondary stream 1-150F).
Stream Name: When streaming via RTSP or RTMP, user can modify stream name. Main Stream (live/av0), sub stream (live/av1)
Click on the "Save" button, "Parameter saved successfully" message is displayed.
2) Stream Release
Switch: To turn on / off the main or secondary stream.
Protocol: Primary / Secondary stream applies RTMP protocol.
Host Port: Server port number (default 1935,0-65535 optional)
Host Address: Server IP addresses (default 192.168.5.11)
Stream Name: Choose a different stream name (live / av0, live / av1 optional).
User: Set the user name.
Password: Set the password.
Click the "Save" button to display the "Save successful" message, then settings will take effect.
Method of obtaining RTSP: rtsp://[device IP address]:554/live/av0 (av0 main stream; av1 secondary stream)
3) RTP Broadcasting
Main/Sub Stream: On/off;
Protocol: RTP or TS
Address: Default 224.1.2.3. It can be edited.
Port: Main Stream Default Port: 4000, Sub Stream Default Port: 4002)
Visit: Address comes up after setting. Eg; RTP://224.1.2.3:4000; udp://@224.1.2.3:4000;
4) Video Parameters
A. Focus: Focus mode, focus range, focus sensitivity can be set.
Focus Mode: set the focus mode (the default auto, manual optional)
Focus range: set the focus range (the default middle, the upper and lower optional)
Focus Sensitivity: Set the focus sensitivity (default is low, the high and medium optional)
B. Exposure: Exposure mode, exposure compensation, back light compensation, anti-flicker, gain limit, wide dynamic, shutter speed, aperture value and brightness can be set.
Exposure Mode: Set the exposure mode (default mode automatic; manual shutter priority, aperture priority, brightness priority optional)
Exposure Compensation: Exposure compensation setting is active when it is in auto status (default is off).
Exposure compensation value: Set the exposure compensation value, valid when it is set for auto (default 0,-7 to 7 optional).
BLC: Set backlight compensation, valid when it is auto status (default is off).
Anti-flicker: Set up anti-flicker mode, valid when status of automatic, aperture or brightness priority (default 50Hz, closed, 60Hz optional).
Gain limit: Set the gain limits, auto, active when status of aperture or brightness priority (default 3, 0-15 optional).
Dynamic range: set the dynamic range (default 5, 0-8 optional).
Shutter speed: active when status set to manual or shutter-priority; default 1/100 (1/25, 1/30, 1/50, 1/60, 1/90, 1/100, 1/120, 1/180, 1/250, 1/350, 1/500, 1/1000, 1/2000, 1/3000, 1/4000, 1/6000, 1/10000 optional).
Aperture value: Set the aperture value, active when it is status of manual or aperture-priority; default F1.8 (closed, F11, F9.6, F8.0, F6.8, F5.6, F4.8, F4.0, F3.4, F2.8, F2.4, F2.0, F1.8 optional).
Brightness: Set the brightness value, active when state set to brightness priority; default 7 (0-23 optional).
C. Color: White balance, saturation, colour, white balance, sensitivity, colour temperature, gain red and blue gain can be set.
White balance modes: Set the white balance mode; default automatic (3000K, 4000K, 5000K, 6500K, manual, One-push optional).
Note: Click the "Correction" button when selecting the One-push white balance mode.
Saturation: Set the saturation (default 80%; 60%, 70%, 80%, 90%, 100%, 110%, 120%, 130%, optional).
Auto white balance Sensitivity: Sensitivity Auto white balance settings (default is low; high/ medium optional).
Chroma: Set the chrome (default 7; 0-14 optional).
Color Temperature: Set color temperature (Default setting High; low/ middle is optional)
Red Gain: Set the red gain, effective when it is manual (default 255; 0-255 optional).
Blue Gain: Sets the Blue gain, effective when it is manual (default 199; 0-255 optional).
D. Image: Brightness, Contrast, Sharpness, Black and White mode, Gamma curve, Horizontal Flip and Vertical Flip can be set.
Brightness: Set the brightness (default 6; 0-14 optional).
Contrast: Set the contrast (default 8; 0-14 optional).
Sharpness: Set the sharpness value (default 7; 0-15 optional).
Black and white mode: Set black and white mode (default colour; black / white optional).
Gamma: Gamma value setting (default 0.45; 0.50, 0.52, 0.55 optional).
Flip Horizontal: Set Flip Horizontal (default Off; On optional).
Flip Vertical: Set vertical flip (default Off; On optional).
E. Noise Reduction: 2D noise reduction, 3D noise reduction and dynamic dead pixel correction available.
2D Noise Reduction: Set 2D noise reduction level (default Auto; 1-7 and Off optional).
3D Noise Reduction: Set 3D noise reduction level (default 5; 1-8 and Off optional).
Dynamic dead pixel correction: Set Dynamic dead pixel correction (default Off; 1-8 optional).
Note: Click "Refresh" to make the revision of any video parameters of A, B, C, D, E effective.
5) Character-Overlapping
Display date and time: Set whether to display the time and date (default display).
Display Title: Set whether to display the title (default display).
Font Color of Time: Set font color of time and date (default white; black, yellow, red & blue optional).
Font Color of Title: Set font color of title (default white; black, yellow, red & blue optional).
Moving characters: Set the display position of moving date, time and title, click on the "up, down, left, right" buttons to move the corresponding character position.
Title Content: Set title content (default CAMERA1).
Time Content: Set time content (default 1970/01/10 05:36:00)
Click on the "Save" button, "Parameter saved successfully" message is displayed.
6) Character Size
Mainstream character size: Set the character size of the display, the device will automatically restart after changes are applied and save (default 24; 16 optional)
Secondary stream character size: Set the character size of the display, the device will automatically restart after change and save (default 16; 24 optional)
Click on the "Save" button, "Parameter saved successfully" message is displayed.
7) Video output
Output Format: Set the video output format (default 1080P60; 1080P50, 1080P30, 1080P25, 1080I60, 1080I50, 720P60, 720P50, 720P30, 720P25, 1080P59.94, 1080I59.94, 1080P29.97, 720P59.94, 720P29.97 optional).
Note: only STI and HDBaseT models have this option.
Click on the "Save" button, "Parameter saved successfully" message is displayed.
8) USB subtitle
Display subtitles: Check the box (after checking, USB video output is displayed on the screen caption content)
Font colour: Default white; Black, Yellow, Red & Blue optional
Subtitle: Users can fill in their own
Ticker: User Control; press down, left or right to move the display position of subtitles
Note: only USB3 and USB2 model have this item, STI and HDbaseT models does not have this function.
4.2.5 Network configuration
1) Network port
Data port: Set the data port, the device will restart automatically after change (default 3000; 0-65535 optional).
Web Port: Set Web port, the device will restart automatically after change (default is 80; 0-65535 is optional).
Onvif Port: Set Onvif port, the device will restart automatically after change (default 2000; 0-65535 optional).
Soap Port: Set Soap port (default 1936; 0-65535 optional).
RTMP Port: Set RTMP port (default 1935; 0-65535 optional).
RTSP Port: Set RTSP port, the device will restart automatically after change (default 554; 0-65535 optional).
Visca Port: Set Visca port, the device will restart automatically after change (default 1259; 0-65535 optional).
Click on the "Save" button, "Parameter saved successfully" message is displayed.
RTMP Access: rtmp://[equipment IP address]:1935/live/av0 (av0 mainstream; av1 second stream)
2) Ethernet parameters
DHCP: Enable to obtain IP automatically. Save changes and reboot the device to take effect (Default: OFF)
IP Address: Set the IP address, save changes and reboot the device to take effect (default 192.168.5.163)
Note: This IP address is the same as the one used to login to the Web page.
Subnet Mask: Set the subnet mask (default 255.255.255.0)
Default Gateway: Set the default gateway (default 0.0.0.0)
Physical Address: Set the physical address (the parameter is read-only but can not be modified)
Click on the "Save" button, "Parameter saved successfully" message is displayed.
Note: Ensure there are no IP conflicts when modifying IP address settings or using multiple cameras on the same network.
3) DNS parameters
Preferred DNS server: Set the preferred DNS server. (Default 0.0.0.0).
Alternate DNS server: Alternate DNS server settings. (Default 0.0.0.0).
Click on the "Save" button, "Parameter saved successfully" message is displayed.
4) GB28181
Switch: Set whether open GB28181, can check
Time Synchronization: whether synchronization time is set, you can check
Stream Type: stream typesetting (the default mainstream, secondary stream optional)
Sign effective time (in seconds): 3600 Range 5-65535
Heartbeat time (seconds): 60 Range 1-65535
Register ID: 34020000001320000001
Register User name: IPC
Register Password: 12345678
Equipment ownership: Users can add their own
Administrative regions: Users can add their own
Alarm Zone: Users can add their own
Equipment installation address: Users can add their own
Local SIP Port: 5060 Range 0-65535
GB28181 Server Address: IP address of the computer
Server SIP Port: 5060 Range 0-65535
Server ID: 34020000002000000001
Click on the "Save" button, "Parameter saved successfully" message is displayed.
4.2.6 System configuration
1) Device Properties
Device Name: Set the device name (default: Camera1; user can add their own).
Device ID: Set the device ID (default 1, Read-Only).
System Language: Set the system language (Default: Simplified Chinese; English optional). You will need to login again after modifying and save the setting.
Click on the "Save" button, "Parameter saved successfully" message is displayed.
2) System Time
Date Format: Set the date format (Default: YYYY-MM-DD; That year - month - day. MM-DD-YYYY namely Month - Day - Year, DD-MM-YYYY date - month - year optional).
Date separator: Set the date separator (Default: '/'; '', '-' are optional).
Time Zone: Set the time zone (Default: East eight districts; other time zones are optional).
Time Type: Set the time types (Default: 24 hours; 12 hours is optional).
Time setting: Set time mode (Choose the computer time synchronization, NTP server time synchronization, or set manually).
Computer Time: Set computer synchronization.
Update interval: Set the NTP server to automatic updated time interval. Valid after setting NTP server synchronization (Default: one day; 2-10 days Optional).
NTP server address or domain name: Set NTP server address or domain name (Default: time.nits.gov). Valid after setting NTP server synchronization.
NTP Server Port: Sets the NTP server port (Default: 123). Valid after setting NTP server synchronization.
Note: Setting the time manually, is only active when set to manual time setting is selected.
Click on the "Save" button, "Parameter saved successfully" message is displayed.
3) User Management
Select users: Set the user type (Default: administrator. Common User 1 and Common User 2 is optional)
User name: Set the user name (Select User Administrator - default is admin. Select a common user1, default user1; to select a common user 2, default - user2; the user can modify their own)
Password: Set a password (Select User Administrator - default is admin. Select a common user1, default user1; to select a common user 2, default - user2; the user can modify their own)
Password confirmation: Confirm whether the input passwords are the same or not.
Click on the "Save" button, "Parameter saved successfully" message is displayed.
Please note that the user name and password is case-sensitive.
When logging in using a common user name and password, configuration privileges are revoked and can only preview, view playback or logoff.
4) Version upgrade
MCU version V2.0.0.16 2015-12-18
Camera version V2.0.0.16 2015-12-18
Focus version V2.0.0.6 2015-12-11
Users only read the above version information which is consistent with the menu version but cannot modify. Different types of devices have different information.
To update the file:
Click "Browse ..." installation, and select the upgrade file in the pop-up window.
Click on the "Upgrade" button. The upgrade dialogue will appear and the device will automatically reboot after the update is successful.
Note: Ensure the power and network is always connected during the process or the upgrade will fail
Note: After the version upgrade is complete, you will need to restore factory defaults:
A. Through the web interface to restore the factory default configuration,
B. Through the recovery menu,
C. Through the remote control shortcut * # 6;
Should you use the web interface, passwords will also be restored to the default.
5) Restore factory setting
Click on the "Restore Factory Defaults" button and choose "yes" to factory default, the device will restart automatically and be restored to the factory default setting.
6) Reboot
Click on the "Reboot" button and choose "yes", the device will automatically restart.
4.2.7 Logout
Point to the "Logout" pop-up, In the "Confirmation" dialogue window; select "Yes" or "No". Choose "Yes" to exit the current page and return to the user login interface again.
4.2.9 Wireless network
Should the user equipment have a wireless network module, enter the Web page "Network Configuration" or "Wireless Network" configuration page. The configuration is as follows:
1) Network settings
Wireless network configuration: (only applicable to WiFi model cameras)
Network interface enabled:
DHCP: If checked, device can obtain the IP automatically.
IP address: Set wireless WIFI IP (default 192.168.1.250, if checked DHCP, IP will be assigned automatically)
Note: Wireless IP address can not be in the same segment as the wired IP address.
Subnet Mask: Set the wireless IP subnet mask (Default: 255.255.255.0)
Default Gateway: Set the wireless IP default gateway (Default: 192.168.1.1)
SSID: Can be modified by the user (default-test)
Encryption: If checked, the password can be set.
Password: Password can be changed only if the encryption is enabled.
Click on the "Save" button, when "Parameter saved successfully" message is displayed the save is valid.
Note: The SSID and password should be filled in correctly or else, when restarted and the device is powered off, the wireless WiFi connection will not be successful.
2) WiFi hotlink
Click on the "search" button to search the WIFI hotspot.
Double-click the dialogue box after searching user WIFI hotspot, then input the password to connect to the WIFI. Once connected successfully "successful connect" will be displayed.
3) Wireless WiFi log in page
If the IP address is not obtained via DHCP, then open the browser and enter the wireless network IP address in the address bar (default 192.168.1.250). If DHCP is selected, IP is automatically obtained, login via the user interface settings to view the allocation of IP addresses.
5. Serial Communication Control
Under the common working condition, the camera could be controlled through RS232/RS485 interface(VISCA), RS232C serial parameter are as follows:
Baud rate: 2400/4800/9600/115200 bits / sec; Start bit: 1; data bits: 8; Stop bit: 1; Parity: None.
After power on, the camera first goes left, then back to the middle position. Self-test is finished after the zoom moved to the farthest and then back to the nearest position. If the camera saved 0 preset before, it will be back to that position after initialization. At this point, the user can control the camera by the serial commands.
5.1 VISCA protocol list
5.1.1 Camera return command
| Ack/Completion Message | ||
| Command packet | Note | |
| ACK | z0 41 FF | Returned when the command is accepted. |
| Completion | z0 51 FF | Returned when the command has been executed. |
z = camera address + 8
| Error Messages | ||
| Command packet | Note | |
| Syntax Error | z0 60 02 FF | Returned when the command format is different or when a command with illegal command parameters is accepted |
| Command Not Executable | z0 61 41 FF | Returned when a command cannot be executed due to current conditions. For example, when commands controlling the focus manually are received during autofocus. |
5.1.2 Camera control command
| Command Function | Command packet | Note | |
| AddressSet | Broadcast | 88 30 0p FF | p: Address setting |
| IF_Clear | Broadcast | 88 01 00 01 FF | I/F Clear |
| CommandCancel | 8x 21 FF | ||
| CAM_Power | On 8x 01 04 00 02 FF | Power ON/OFF | |
| Off 8x 01 04 00 03 FF | |||
| CAM_Zoom | Stop | 8x 01 04 07 00 FF | |
| Tele(Standard) | 8x 01 04 07 02 FF | ||
| Wide(Standard) | 8x 01 04 07 03 FF | ||
| Tele(Variable) | 8x 01 04 07 2p FF | p = 0(low) - F(high) | |
| Wide(Variable) | 8x 01 04 07 3p FF | ||
| Direct | 8x 01 04 47 0p 0q 0r 0s FF | pqrs: Zoom Position | |
| CAM_Focus | Stop | 8x 01 04 08 00 FF | |
| Far(Standard) | 8x 01 04 08 02 FF | ||
| Near(Standard) | 8x 01 04 08 03 FF | ||
| Far(Variable) | 8x 01 04 08 2p FF | p = 0(low) - F(high) | |
| Near (Variable) | 8x 01 04 08 3p FF | ||
| Direct | 8x 01 04 48 0p 0q 0r 0s FF | pqrs: Focus Position | |
| Auto Focus | 8x 01 04 38 02 FF | ||
| One Push Mode | 8x 01 04 38 04 FF | ||
| Command | Function | Command packet | Note |
| Manual Focus | 8x 01 04 38 03 FF | ||
| CAM_Zoom Focus | Direct | 8x 01 04 47 0p 0q 0r 0s0t 0u 0v 0w FF | pqrs: Zoom Position tuvw: Focus Position |
| CAM_WB | Auto | 8x 01 04 35 00 FF | |
| 3000K 8x 01 04 35 01 | FF | ||
| 4000k 8x 01 04 35 02 | FF | ||
| One Push mode | 8x 01 04 35 03 FF | ||
| 5000k 8x 01 04 35 04 | FF | ||
| Manual | 8x 01 04 35 05 FF | ||
| 6500k | 8x 01 04 35 06 FF | ||
| 3500K 8x 01 04 35 07 | FF | ||
| 4500K 8x 01 04 35 08 | FF | ||
| 5500K 8x 01 04 35 09 | FF | ||
| 6000K 8x 01 04 35 0A | FF | ||
| 7000K 8x 01 04 35 0B | FF | ||
| CAM_RGain | Reset 8x 01 04 03 00 FF | Manual Control of R Gain | |
| Up | 8x 01 04 03 02 FF | ||
| Down | 8x 01 04 03 03 FF | ||
| Direct | 8x 01 04 43 00 00 0p 0q FF | pq: R Gain | |
| CAM_Bgain | Reset 8x 01 04 04 00 FF | Manual Control of B Gain | |
| Up 8x 01 04 04 02 FF | |||
| Down 8x 01 04 04 03 FF | |||
| Direct | 8x 01 04 44 00 00 0p 0q FF | pq: B Gain | |
| CAM_AE | Full Auto | 8x 01 04 39 00 FF | Automatic Exposure mode |
| Manual | 8x 01 04 39 03 FF | Manual Control mode | |
| Shutter priority | 8x 01 04 39 0A FF | Shutter Priority Automatic Exposure mode | |
| Iris priority | 8x 01 04 39 0B FF | Iris Priority Automatic Exposure mode | |
| Bright | 8x 01 04 39 0D FF | Bright mode | |
| CAM_Shutter | Reset 8x 01 04 0A 00 FF | Shutter Setting | |
| Up | 8x 01 04 0A 02 FF | ||
| Down 8x 01 04 0A 03 FF | |||
| Direct | 8x 01 04 4A 00 00 0p 0q FF | pq: Shutter Position | |
| CAM_Iris | Reset 8x 01 04 0B 00 FF | Iris Setting | |
| Up 8x 01 04 0B 02 FF | |||
| Down 8x 01 04 0B 03 FF | |||
| Direct | 8x 01 04 4B 00 00 0p 0q FF | pq: Iris Position | |
| CAM_Gain Limit | Gain Limit | 8x 01 04 2C 0p FF | p: Gain Position |
| CAM_Bright | Reset 8x 01 04 0D 00 FF | Bright Setting | |
| Up | 8x 01 04 0D 02 FF | ||
| Down 8x 01 04 0D 03 FF | |||
| Direct | 8x 01 04 4D 00 00 0p 0q FF | pq: Bright Position | |
| CAM_ExpComp | On | 8x 01 04 3E 02 FF | Exposure Compensation ON/OFF |
| Off | 8x 01 04 3E 03 FF | ||
| Reset 8x 01 04 0E 00 FF | Exposure Compensation Amount Setting | ||
| Up 8x 01 04 0E 02 FF | |||
| Down 8x 01 04 0E 03 FF | |||
| Direct | 8x 01 04 4E 00 00 0p 0q FF | pq: ExpComp Position | |
| CAM_Back Light | On | 8x 01 04 33 02 FF | Back Light Compensation |
| Off | 8x 01 04 33 03 FF | ||
| CAM_WDRStrength | Reset 8x 01 04 21 00 FF | WDR Level Setting | |
| Up 8x 01 04 21 02 FF | |||
| Down 8x 01 04 21 03 FF | |||
| Direct | 8x 01 04 51 00 00 00 0p FF | p: WDR Level Positon | |
| CAM_NR (2D) | 8x 01 04 53 0p FF | P=0-7 0:OFF | |
| CAM_NR (3D) | 8x 01 04 54 0p FF | P=0-8 0:OFF | |
| CAM_Gamma | 8x 01 04 5B 0p FF | p = 0 - 4 0 : Default 1 : 0.47 2 : 0.503: 0.52 4 : 0.55 | |
| CAM_Flicker | OFF | 8x 01 04 23 00 FF | OFF |
| 50HZ 8x 01 04 23 01 FF 50HZ | |||
| 60HZ 8x 01 04 23 02 FF 60HZ | |||
| CAM_Aperture | Reset 8x 01 04 02 00 FF | Aperture Control | |
| Up | 8x 01 04 02 02 FF | ||
| Down 8x 01 04 02 03 FF | |||
| Direct | 8x 01 04 42 00 00 0p 0q FF | pq: Aperture Gain | |
| CAM_Memory | Reset 8x 01 04 3F 00 pq FF | pq: Memory Number(=0 to 254)Corresponds to 0 to 9 on the RemoteController | |
| Set | 8x 01 04 3F 01 pq FF | ||
| Recall 8x 01 04 3F 02 pq FF | |||
| CAM_LR_Reverse | On | 8x 01 04 61 02 FF | Image Flip Horizontal ON/OFF |
| Off 8x 01 04 61 03 FF | |||
| CAM_PictureFlip | On | 8x 01 04 66 02 FF | Image Flip Vertical ON/OFF |
| Off 8x 01 04 66 03 FF | |||
| CAM_ColorSaturation | Direct | 8x 01 04 49 00 00 00 0p FF | P=0-70:60% 1:70% 2:80% 3:90% 4:100%5:110% 6:120% 7:130% |
| CAM_IDWrite | 8x 01 04 22 0p 0q 0r 0s FF | pqrs: Camera ID (=0000 to FFFF) | |
| SYS_Menu | ON | 8x 01 04 06 06 02 FF | Turn on the menu screen |
| OFF | 8x 01 04 06 06 03 FF | Turn off the menu screen | |
| IR_Receive | ON | 8x 01 06 08 02 FF | IR(remote Controller) receive On/Off |
| OFF 8x 01 06 08 03 FF | |||
| IR_ReceiveReturn | On | 8x 01 7D 01 03 00 00 FF | IR(remote Controller) receive message via the VISCA communication ON/OFF |
| Off | 8x 01 7D 01 13 00 00 FF | ||
| CAM_SettingReset | Reset | 8x 01 04 A0 10 FF | Reset Factory Setting |
| CAM_Brightness | Direct | 8x 01 04 A1 00 00 0p 0q FF | pq: Brightness Position |
| CAM_Contrast | Direct | 8x 01 04 A2 00 00 0p 0q FF | pq: Contrast Position |
| CAM_Flip | OFF | 8x 01 04 A4 00 FF | Single Command For Video Flip |
| Flip-H | 8x 01 04 A4 01 FF | ||
| Flip-V | 8x 01 04 A4 02 FF | ||
| Flip-HV | 8x 01 04 A4 03 FF | ||
| CAM_VideoSystem | Set camera video system | 8x 01 06 35 00 0p FF | P: 0~E Video format0:1080P60 8:720P301:1080P50 9:720P252:1080i60 A: 1080P59.943:1080i50 B: 1080i59.944:720P60 C: 720P59.945:720P50 D: 1080P29.976:1080P30 E: 720P29.977:1080P25 |
| Pan_tiltDrive | Up | 8x 01 06 01 VV WW 03 01 FF | VV: Pan speed 0x01 (low speed) to 0x18 (high speed)WW: Tilt speed 0x01 (low speed) to 0x14 (high speed) |
| Down | 8x 01 06 01 VV WW 03 02 FF | ||
| Left | 8x 01 06 01 VV WW 01 03 FF | ||
| Right | 8x 01 06 01 VV WW 02 03 FF | ||
| Upleft | 8x 01 06 01 VV WW 01 01 FF | YYYY: Pan PositionZZZZ: Tilt Position | |
| Upright | 8x 01 06 01 VV WW 02 01 FF | ||
| DownLeft | 8x 01 06 01 VV WW 01 02 FF | ||
| DownRight | 8x 01 06 01 VV WW 02 02 FF | ||
| Stop | 8x 01 06 01 VV WW 03 03 FF | ||
| AbsolutePosition | 8x 01 06 02 VV WW0Y 0Y 0Y 0Y 0Z 0Z 0Z FF | ||
| RelativePosition | 8x 01 06 03 VV WW0Y 0Y 0Y 0Y 0Z 0Z 0Z FF | ||
| Home | 8x 01 06 04 FF | ||
| Reset | 8x 01 06 05 FF | ||
| Pan-tiltLimitSet | Set | 8x 01 06 07 00 0W0Y 0Y 0Y 0Y 0Z 0Z 0Z FF | W:1 UpRight 0:DownLeftYYYY: Pan Limit Position(TBD)ZZZZ: Tilt Limit Position(TBD) |
| Clear | 8x 01 06 07 01 0W07 0F 0F 0F 07 0F 0F 0F FF | ||
5.1.3, Inquiry command
| Command | Function | Command packet | Note |
| CAM_PowerInq 8x 09 04 00 FF | y0 50 02 FF | On | |
| y0 50 03 FF | Off(Standby) | ||
| CAM_ZoomPosInq | 8x 09 04 47 FF | y0 50 0p 0q 0r 0s FF | pqrs: Zoom Position |
| CAM_FocusAFModelInq | 8x 09 04 38 FF | y0 50 02 FF | Auto Focus |
| y0 50 03 FF | Manual Focus | ||
| y0 50 04 FF | One Push mode | ||
| CAM_FocusPosInq | 8x 09 04 48 FF | y0 50 0p 0q 0r 0s FF | pqrs: Focus Position |
| CAM_WBModelInq | 8x 09 04 35 FF | y0 50 00 FF | Auto |
| y0 50 01 FF | 3000K | ||
| y0 50 02 FF | 4000K | ||
| y0 50 03 FF | One Push Mode | ||
| y0 50 04 FF | 5000K | ||
| y0 50 05 FF | Manual | ||
| y0 50 00 FF | 6500K | ||
| y0 50 06 FF | 6500K | ||
| y0 50 07 FF | 3500K | ||
| y0 50 08 FF | 4500K | ||
| y0 50 09 FF | 5500K | ||
| y0 50 0A FF | 6000K | ||
| y0 50 0B FF | 7000K | ||
| CAM_RGainInq | 8x 09 04 43 FF | y0 50 00 00 0p 0q FF | pq: R Gain |
| CAM_BGainInq | 8x 09 04 44 FF | y0 50 00 00 0p 0q FF | pq: B Gain |
| CAM_AEModelInq | 8x 09 04 39 FF | y0 50 00 FF | Full Auto |
| y0 50 03 FF | Manual | ||
| y0 50 0A FF | Shutter priority | ||
| y0 50 0B FF | Iris priority | ||
| y0 50 0D FF | Bright | ||
| CAM_ShutterPosInq | 8x 09 04 4A FF | y0 50 00 00 0p 0q FF | pq: Shutter Position |
| CAM_IrisPosInq | 8x 09 04 4B FF | y0 50 00 00 0p 0q FF | pq: Iris Position |
| CAM_Gain LimitInq | 8x 09 04 2C FF | y0 50 0p FF | p: Gain Positon |
| CAM_BrightPosInq | 8x 09 04 4D FF | y0 50 00 00 0p 0q FF | pq: Bright Position |
| CAM_ExpCompModelInq | 8x 09 04 3E FF | y0 50 02 FF | On |
| y0 50 03 FF | Off | ||
| CAM_ExpCompPosInq | 8x 09 04 4E FF | y0 50 00 00 0p 0q FF | pq: ExpComp Position |
| CAM_BacklightModelInq 8x 09 04 33 FF | y0 50 02 FF | On | |
| y0 50 03 FF | Off | ||
| CAM_WDRStrengthInq | 8x 09 04 51 FF | y0 50 00 00 00 0p FF | p: WDR Strength |
| CAM_NRLevel(2D) Inq | 8x 09 04 53 FF | y0 50 0p FF | P: 2DNRLevel |
| CAM_NRLevel(3D) Inq | 8x 09 04 54 FF | y0 50 0p FF | P:3D NRLevel |
| CAM_FlickerModelInq | 8x 09 04 55 FF | y0 50 0p FF | p: Flicker Settings(0: OFF,1: 50Hz,2:60Hz) |
| CAM_ApertureInq | 8x 09 04 42 FF | y0 50 00 00 0p 0q FF | pq: Aperture Gain |
| CAM_PictureEffectModelInq | 8x 09 04 63 FF | y0 50 00 FFy0 50 04 FF | OffB&W |
| CAM_MemoryInq | 8x 09 04 3F FF | y0 50 0p FF | p: Memory number last operated. |
| SYS_MenuModelnq 8x 09 06 06 | FF | y0 50 02 FF | On |
| y0 50 03 FF | Off | ||
| CAM_LR_Reverselnq 8x 09 04 61 | FF | y0 50 02 FF | On |
| y0 50 03 FF | Off | ||
| CAM_PictureFlipInq 8x 09 04 66 | FF | y0 50 02 FF | On |
| y0 50 03 FF | Off | ||
| CAM_ColorSaturationInq | 8x 09 04 49 FF | y0 50 00 00 00 0p FF | p: Color Gain setting 0h (60%) to Eh (130%) |
| CAM_IDInq | 8x 09 04 22 FF | y0 50 0p FF | p: Gamma ID |
| IR_ReceiveInq 8x 09 06 08 FF | y0 50 02 FF | On | |
| y0 50 03 FF | Off | ||
| IR_ReceiveReturn | y0 07 7D 01 04 00 FF | Power ON/OFF | |
| y0 07 7D 01 04 07 FF | Zoom tele/wide | ||
| y0 07 7D 01 04 38 FF | AF ON/OFF | ||
| y0 07 7D 01 04 33 FF | Camera _Backlight | ||
| y0 07 7D 01 04 3F FF | Camera _Memory | ||
| y0 07 7D 01 06 01 FF | Pan_titleDriver | ||
| CAM_BrightnessInq | 8x 09 04 A1 FF | y0 50 00 00 0p 0q FF | pq: Brightness Position |
| CAM_ContrastInq | 8x 09 04 A2 FF | y0 50 00 00 0p 0q FF | pq: Contrast Position |
| CAM_FlipInq | 8x 09 04 A4 FF | y0 50 00 FF | Off |
| y0 50 01 FF | Flip-H | ||
| y0 50 02 FF | Flip-V | ||
| y0 50 03 FF | Flip-HV | ||
| CAM_Gammalnq | 8x 09 04 5B FF | y0 50 0p FF | p: Gamma setting |
| CAM_VersionInq | 8x 09 00 02 FF | y0 50 ab cdmn pq rs tu vw FF | ab cd : vender ID ( 0220 )mn pq : model ID ST ( 0950 )U3 (3950)rs tu : ARM Versionvw : reserve |
| VideoSystemInq | 8x 09 06 23 FF | y0 50 0p FF | P: 0~E Video format0:1080P60 8:720P301:1080P50 9:720P252:1080i60 A:1080P59.943:1080i50 B:1080i59.944:720P60 C:720P59.945:720P50 D:1080P29.976:1080P30 E :720P29.977:1080P25 |
| Pan-tiltMaxSpeedInq | 8x 09 06 11 FF | y0 50 ww zz FF | ww: Pan Max Speed zz: Tilt Max Speed |
| Pan-tiltPosInq | 8x 09 06 12 FF | y0 50 0w 0w 0w 0w0z Oz Oz Oz Oz FF | www: Pan Position zzzz: Tilt Position |
Note: [X] in the above table indicates the camera address to be operated, [y]=[x+8] .
5.2, Pelco-D protocol command list
| Function Byte1 Byte2 Byte3 Byte4 Byte5 Byte6 Byte7 | |||||||
| Up | 0xFF | Address | 0x00 | 0x08 | Pan Speed | Tilt Speed | SUM |
| Down | 0xFF | Address | 0x00 | 0x10 | Pan Speed | Tilt Speed | SUM |
| Left | 0xFF | Address | 0x00 | 0x04 | Pan Speed | Tilt Speed | SUM |
| Right | 0xFF | Address | 0x00 | 0x02 | Pan Speed | Tilt Speed | SUM |
| Upleft | 0xFF | Address | 0x00 | 0x0C | Pan Speed | Tilt Speed | SUM |
| Upright | 0xFF | Address | 0x00 | 0x0A | Pan Speed | Tilt Speed | SUM |
| DownLeft | 0xFF | Address | 0x00 | 0x14 | Pan Speed | Tilt Speed | SUM |
| DownRight | 0xFF | Address | 0x00 | 0x12 | Pan Speed | Tilt Speed | SUM |
| Zoom In | 0xFF | Address | 0x00 | 0x20 | 0x00 | 0x00 | SUM |
| Zoom Out | 0xFF | Address | 0x00 | 0x40 | 0x00 | 0x00 | SUM |
| Focus Far | 0xFF | Address | 0x00 | 0x80 | 0x00 | 0x00 | SUM |
| Focus Near | 0xFF | Address | 0x01 | 0x00 | 0x00 | 0x00 | SUM |
| Set Preset | 0xFF | Address | 0x00 | 0x03 | 0x00 | Preset ID | SUM |
| Clear Preset | 0xFF | Address | 0x00 | 0x05 | 0x00 | Preset ID | SUM |
| Call Preset | 0xFF | Address | 0x00 | 0x07 | 0x00 | Preset ID | SUM |
| Query Pan Position | 0xFF | Address | 0x00 | 0x51 | 0x00 | 0x00 | SUM |
| Query Pan Position Response | 0xFF | Address | 0x00 | 0x59 | Value HighByte | Value LowByte | SUM |
| Query Tilt Position | 0xFF | Address | 0x00 | 0x53 | 0x00 | 0x00 | SUM |
| Query Tilt Position Response | 0xFF | Address | 0x00 | 0x5B | Value HighByte | Value LowByte | SUM |
| Query Zoom Position | 0xFF | Address | 0x00 | 0x55 | 0x00 | 0x00 | SUM |
| Query Zoom Position Response | 0xFF | Address | 0x00 | 0x5D | Value HighByte | Value LowByte | SUM |
5.3 Pelco-P protocol command list
| Function | Byte1 | Byte2 | Byte3 | Byte4 | Byte5 | Byte6 | Byte7 | Byte8 |
| Up | 0xA0 | Address | 0x00 | 0x08 | Pan Speed | Tilt Speed | 0xAF | XOR |
| Down | 0xA0 | Address | 0x00 | 0x10 | Pan Speed | Tilt Speed | 0xAF | XOR |
| Left | 0xA0 | Address | 0x00 | 0x04 | Pan Speed | Tilt Speed | 0xAF | XOR |
| Right | 0xA0 | Address | 0x00 | 0x02 | Pan Speed | Tilt Speed | 0xAF | XOR |
| Upleft | 0xA0 | Address | 0x00 | 0x0C | Pan Speed | Tilt Speed | 0xAF | XOR |
| Upright | 0xA0 | Address | 0x00 | 0x0A | Pan Speed | Tilt Speed | 0xAF | XOR |
| DownLeft | 0xA0 | Address | 0x00 | 0x14 | Pan Speed | Tilt Speed | 0xAF | XOR |
| DownRight | 0xA0 | Address | 0x00 | 0x12 | Pan Speed | Tilt Speed | 0xAF | XOR |
| Zoom In | 0xA0 | Address | 0x00 | 0x20 | 0x00 | 0x00 | 0xAF | XOR |
| Zoom Out | 0xA0 | Address | 0x00 | 0x40 | 0x00 | 0x00 | 0xAF | XOR |
| Focus Far | 0xA0 | Address | 0x01 | 0x00 | 0x00 | 0x00 | 0xAF | XOR |
| Focus Near | 0xA0 | Address | 0x02 | 0x00 | 0x00 | 0x00 | 0xAF | XOR |
| Set Preset | 0xA0 | Address | 0x00 | 0x03 | 0x00 | Preset ID | 0xAF | XOR |
| Clear Preset | 0xA0 | Address | 0x00 | 0x05 | 0x00 | Preset ID | 0xAF | XOR |
| Call Preset | 0xA0 | Address | 0x00 | 0x07 | 0x00 | Preset ID | 0xAF | XOR |
| Query Pan Position | 0xA0 | Address | 0x00 | 0x51 | 0x00 | 0x00 | 0xAF | XOR |
| Query Pan Position Response | 0xA0 | Address | 0x00 | 0x59 | Value High Byte | Value Low Byte | 0xAF | XOR |
| Query Tilt Position | 0xA0 | Address | 0x00 | 0x53 | 0x00 | 0x00 | 0xAF | XOR |
| Query Tilt Position Response | 0xA0 | Address | 0x00 | 0x5B | Value High Byte | Value Low Byte | 0xAF | XOR |
| Query Zoom Position | 0xA0 | Address | 0x00 | 0x55 | 0x00 | 0x00 | 0xAF | XOR |
| Query Zoom Position Response | 0xA0 | Address | 0x00 | 0x5D | Value High Byte | Value Low Byte | 0xAF | XOR |
6. Camera Maintenance and Troubleshooting
6.1 Camera Maintenance
1) If thecamera is not in use for and extended period of time, please turn off the power adapter switch and an unplug the AC plug from the mains wall plug.
2) Only use a soft cloth or tissue to clean the camera cover.
3) Only use a soft cloth to clean the lens. Use a neutral cleaner if stubborn dirt is present. Do not use a strong or corrosive cleaner.
6.2 Troubleshooting
1) No video output
A. Check whether the camera power supply is connected and if the power indicator is lit.
B. Check whether the camera completes self test once restarted.
C. Check whether the DIP switch is in normal operating mode (see Table 2.2 and Table 2.3)
D. Check whether the video output cable or video display is functional.
2) No image
Check whether the video output cable or video display is functional
3) Image dithering when zooming in or zooming out
A. Check whether the camera installation position is solid
B. Check whether there is machine vibration around the camera
4) Remote control not working
A. Check Remote control address is set to 1 (if the machine is set back to the factory defaults the remote control addresses need to be set back to 1.)
B. Check if the batteries are still functional and not depleted.
C. Check if the camera mode is the normal operating mode (see Table 2.2 and Table 2.3)
D. Check if the menu is closed as camera control through remote controller is only available after exiting the menu. If the video output is via LAN, the menu will not be displayed and menu will automatically exist after 30 seconds. Only after this has happen can the camera be controlled via the remote controller.
5) Serial control not working.
A. Check whether the camera serial device protocol, baud rate and address is set correctly.
B. Check whether the control cable is properly connected.
C. Check whether the camera mode is in the normal operating mode (see Table 2.2 and Table 2.3)
6) Cannot login via the Webpage
A. Check whether the camera is displaying normally.
B. Check whether the network cable is connected properly (Ethernet port yellow light will flash to indicate normal network cable connection)
C. Check whether your computer is within the correct IP segment and that the segment is consistent with the IP address of the camera.
D. Troubleshooting IP connection from Windows Command Prompt.
Click "Start" menu button in windows OS and select "Run". Then type "cmd" in the text window and click "OK" to enter the DOS command prompt window.
Type in "ping 192.168.5.163" (default address) or 'Ping xxx.xxx.xxx.xxx if an alternate IP address was previously configured. The system will return a message "Reply from 192.168.5.163: bytes=32 time=1ms TTL=64" if successful IP connection exists.
If system returns a message “Reply from 192.168.5.163: Destination host unreachable.”, the recheck network connections and IP address.
7. Warranty
1. Limited warranty in respect of Alfatron Products Only
1.1 This limited warranty covers defects in materials and workmanship in this product.
1.2 Should warranty service be required, proof of purchase must be presented to the Company. The serial number on the product must be clearly visible and not have been tampered with in any way whatsoever.
1.3 This limited warranty does not cover any damage, deterioration or malfunction resulting from any alteration, modification, improper or un reasonable use or maintenance, misuse, abuse, accident, neglect, exposure to excess moisture, fire, improper packing and shipping (such claims must be presented to the carrier), lightning, power surges, or other acts of nature. This limited warranty does not cover any damage, deterioration or malfunction resulting from the installation or removal of this product from any installation, any unauthorized tampering with this product, any repairs attempted by anyone unauthorized by the Company to make such repairs, or any other cause which does not relate directly to a defect in materials and/or workmanship of this product. This limited warranty does not cover equipment enclosures, cables or accessories used in conjunction with this product.
This limited warranty does not cover the cost of normal maintenance. Failure of the product due to insufficient or improper maintenance is not covered.
1.4 The Company does not warrant that the product covered hereby, including, without limitation, the technology and/or integrated circuit(s) included in the product, will not become obsolete or that such items are or will remain compatible with any other product or technology with which the product may be used.
1.5 Only the original purchaser of this product is covered under this limited warranty. This limited warranty is not transferable to subsequent purchasers or owners of this product.
1.6 Unless otherwise specified, the goods are warranted in accordance with the manufacturer's product specific warranties against any defect attributable to faulty workmanship or materials, fair wear and tear being excluded.
1.7 This limited warranty only covers the cost of faulty goods and does not include the cost of labor and travel to return the goods to the Company's premises.
1.8 In the event of any improper maintenance, repair or service being carried out by any third persons during the warranty period without the Company's written authorization, the limited warranty shall be void.
1.9 A 7 (seven) year limited warranty is given on the aforesaid product where used correctly according to the Company's instructions, and only with the use of the Company's components.
1.10 The Company will, at its sole option, provide one of the following three remedies to whatever extent it shall deem necessary to satisfy a proper claim under this limited warranty:
1.10.1 Elect to repair or facilitate the repair of any defective parts within a reasonable period of time, free of any charge for the necessary parts and labour to complete the repair and restore this product to its proper operating condition.; or
1.10.2 Replace this product with a direct replacement or with a similar product deemed by the Company to perform substantially the same function as the original product; or
1.10.3 Issue a refund of the original purchase price less depreciation to be determined based on the age of the product at the time remedy is sought under this limited warranty.
1.11 The Company is not obligated to provide the Customer with a substitute unit during the limited warranty period or at any time thereafter.
1.12 If this product is returned to the Company this product must be insured during shipment, with the insurance and shipping charges prepaid by the Customer. If this product is returned uninsured, the Customer assumes all risks of loss or damage during shipment. The Company will not be responsible for any costs related to the removal or re-installation of this
product from or into any installation. The Company will not be responsible for any costs related to any setting up this product, any adjustment of user controls or any programming required for a specific installation of this product.
1.13 Please be aware that the Company's products and components have not been tested with competitor's products and therefore the Company cannot warrant products and/or components used in conjunction with competitor's products.
1.14 The appropriateness of the goods for the purpose intended is only warranted to the extent that the goods are used in accordance with the Company's installation, classification and usage instructions.
1.15 Any claim by the Customer which is based on any defect in the quality or condition of the goods or their failure to correspond with specification shall be notified in writing to the Company within 7 days of deliver or (where the defect or failure was not apparent on reasonable inspection by the Customer) within a reasonable time after discovery of the defect or failure, but, in any event, within 6 months of delivery.
1.16 If delivery is not refused, and the Customer does not notify the Company accordingly, the Customer may not reject the goods and the Company shall have no liability and the Customer shall pay the price as if the goods had been delivered in accordance with the Agreement.
1.17 THE MAXIMUM LIABILITY OF THE COMPANY UNDER THIS LIMITED WARRANTY SHALL NOT EXCEED THE ACTUAL PURCHASE PRICE PAID FOR THE PRODUCT.