
EFVS-II - TV Stand SANUS - Free user manual and instructions
Find the device manual for free EFVS-II SANUS in PDF.

| Product Type | TV Stand |
| Model | EFVS-II |
| Brand | Sanus |
| Compatible TV Sizes | Up to 60 inches (estimate) |
| Material | Steel and tempered glass (typical for Sanus) |
| Shelves | 2 adjustable video shelves |
| Pillar Height | 8 inches per section |
| Max Shelf Weight Capacity | 50 lbs per shelf (estimate) |
| Maximum Overall Height | 32 inches (with 3 pillar stacks) |
| Width | 40 inches (estimate) |
| Depth | 18 inches (estimate) |
| Weight | 25 lbs (estimate) |
| Assembly Required | Yes, with included Allen key |
| Wire Management | Yes, with wire bushings included |
| Adjustable Shelves | Yes, shelf height can be changed using shelf connectors |
| Modular Design | Yes, stackable pillars allow customization |
| Color | Black (assumed) |
| Mounting Pattern | Not applicable (stand, not wall mount) |
| Warranty | Lifetime warranty (typical for Sanus) |
| Cleanings Instructions | Wipe with a damp cloth; avoid harsh chemicals |
Frequently Asked Questions - EFVS-II SANUS
User questions about EFVS-II SANUS
0 question about this device. Answer the ones you know or ask your own.
Ask a new question about this device
Download the instructions for your TV Stand in PDF format for free! Find your manual EFVS-II - SANUS and take your electronic device back in hand. On this page are published all the documents necessary for the use of your device. EFVS-II by SANUS.
USER MANUAL EFVS-II SANUS
Assembly Instructions for Model: EFVS-II
Thank you for choosing the Sanus Systems Model EFVS-II. Every effort has been made to ensure that your Sanus Systems furniture is perfect. If you have questions or feel that there is a problem of any kind, please contact us at 800-359-5520 or at www.sanus.com. We can quickly help with any issues regarding assembly or missing parts. Replacement parts for Sanus systems products purchased through authorized dealers will be shipped directly to you.

natural_image
Technical line drawing of a multi-tiered rectangular frame structure with no visible text or symbolsSupplied Parts List: (Threaded fasteners are shown full size)


NOTE: Step 1 is necessary only if the EFAV-II assembly has been previously completed.
Step 1 - Remove existing Top Video Shelf
Remove the five Top Bolts and Top Video Shelf. Place the Video Shelf on a smooth soft surface, such a carpeted floor.

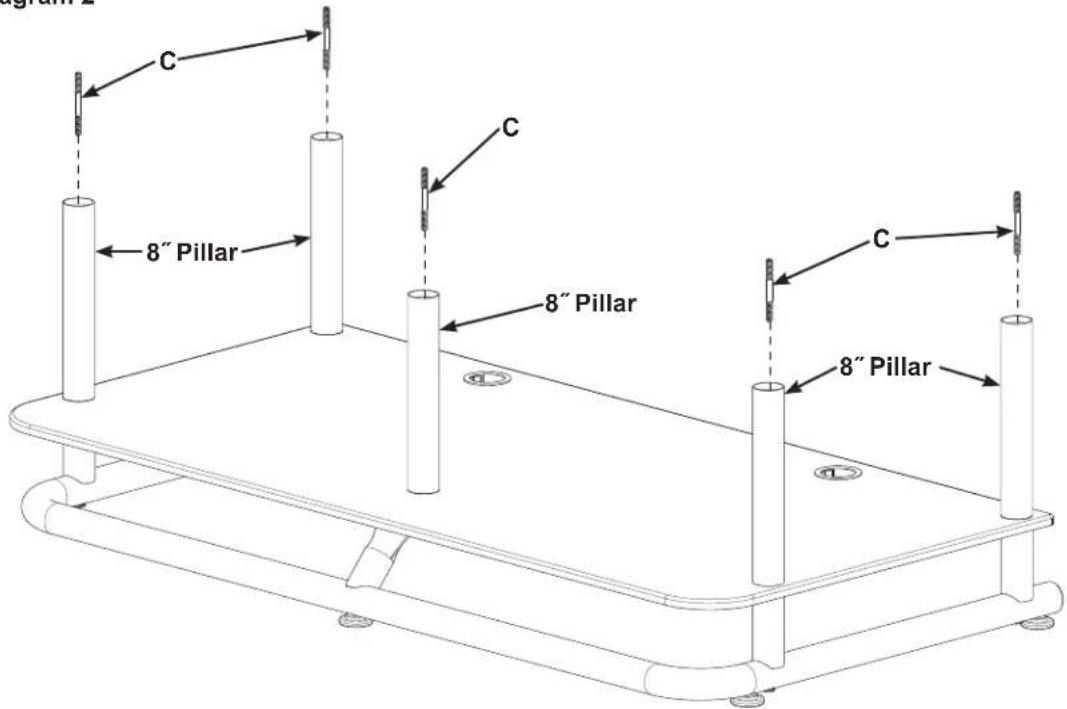
Step 2 - Install Shelf Connectors
Thread a Shelf Connector (C) securely into the five 8" Pillars.
Diagram 2
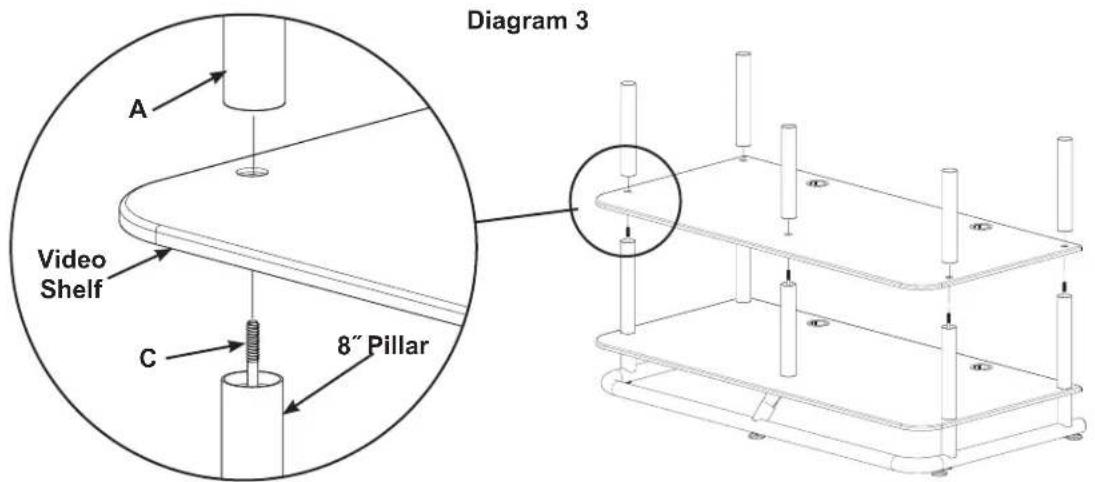
Step 3 - Place a Video Shelf on 8" Pillars
Place the next Video shelf on the 8" Pillars.
Thread a new 8" Pillar (A) onto each Shelf Connector (C) and firmly hand tighten.
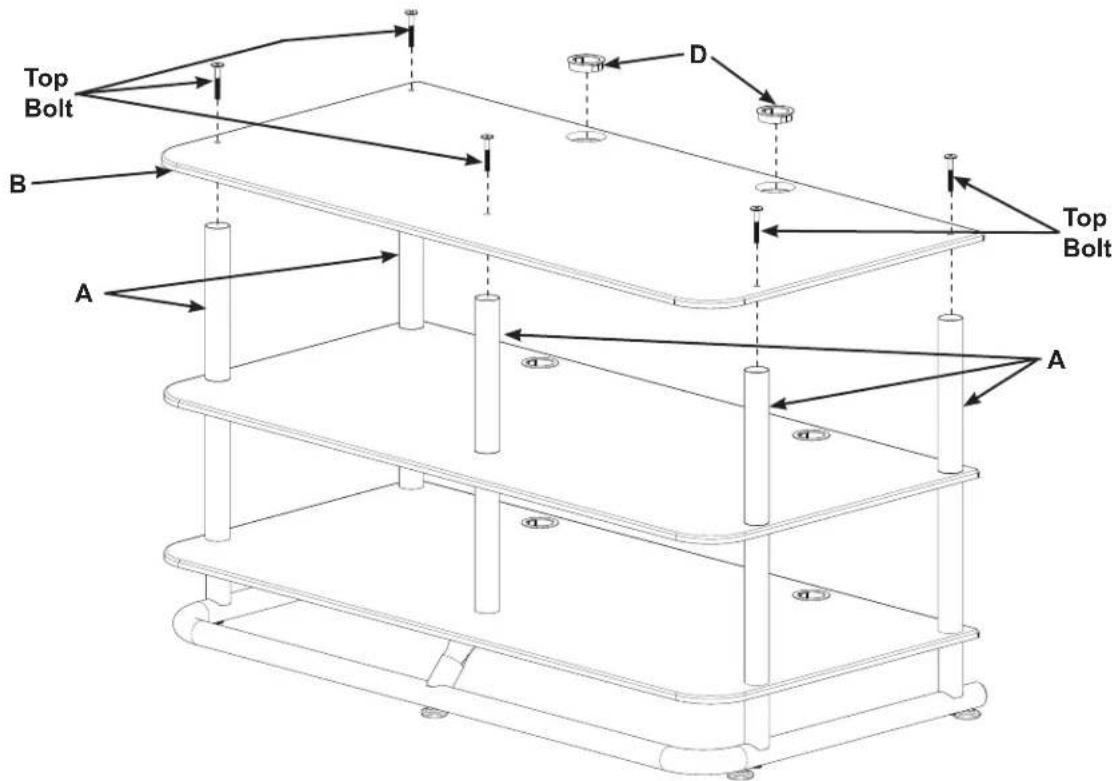
Step 4 - Secure new Top Video Shelf to 8" Pillars
Place the new Video Shelf (B) on the new 8" Pillars (A); then, using an Allen Key and the five Top Bolts, secure the new Video Shelf to the new 8" Pillars.
Install the two new Wire Bushings (D).
Diagram 4


Brand : SANUS
Model : EFVS-II
Category : TV Stand