MFC-7840WR - Fax BROTHER - Free user manual and instructions
Find the device manual for free MFC-7840WR BROTHER in PDF.

User questions about MFC-7840WR BROTHER
0 question about this device. Answer the ones you know or ask your own.
Ask a new question about this device
Download the instructions for your Fax in PDF format for free! Find your manual MFC-7840WR - BROTHER and take your electronic device back in hand. On this page are published all the documents necessary for the use of your device. MFC-7840WR by BROTHER.
USER MANUAL MFC-7840WR BROTHER
SOFTWARE USER'S GUIDE
MFC-7840W
MFC-7440N
MFC-7320
DCP-7045N
DCP-7040
DCP-7030
Trademarks
The Brother logo is a registered trademark of Brother Industries, Ltd.
Brother is a registered trademark of Brother Industries, Ltd.
© 2008 Brother Industries, Ltd. All rights reserved.
Multi-Function Link is a registered trademark of Brother International Corporation.
Windows Vista is either a registered trademark or a trademark of Microsoft Corporation in the United States and/or other countries.
Microsoft, Windows, Windows Server and Internet Explorer are registered trademarks of Microsoft Corporation in the United States and/or other countries.
Apple, Macintosh, Safari and TrueType are trademarks of Apple Inc., registered in the United States and other countries.
Adobe, Flash, Illustrator, PageMaker, Photoshop, PostScript and PostScript 3 are either registered trademarks or trademarks of Adobe Systems Incorporated in the United States and/or other countries.
CorelDRAW, Paint Shop Pro and WordPerfect are trademarks or registered trademarks of Corel Corporation and/or its subsidiaries in Canada, the United States and/or other countries.
Nuance, the Nuance logo, PaperPort and ScanSoft are trademarks or registered trademarks of Nuance Communications, Inc. or its affiliates in the United States and/or other countries.
Each company whose software title is mentioned in this manual has a Software Licence Agreement specific to its proprietary programs.
All other trademarks are the property of their respective owners.
Table of Contents
Section I Windows ®
1 P r i n t i n g 2
Using the Brother printer driver....2
Printing a document....3
Duplex printing....4
Guidelines for printing on both sides of the paper 4
Manual duplex printing ....4
Simultaneous scanning, printing and faxing 4
Printer operation keys....5
Job Cancel....5
Secure Key (MFC models only)....5
Printer Emulation Support (MFC-7840W and DCP-7045N only)....6
Printing the Internal Font List (MFC-7840W and DCP-7045N only)....7
Printing the Print Configuration List (MFC-7840W and DCP-7045N only) 7
Test Print (MFC-7840W and DCP-7045N only) 7
Restoring default printer settings (MFC-7840W and DCP-7045N only) 8
Status Monitor....9
Monitoring the machine's status....9
Printer driver settings....10
Features in the Windows ^® printer driver....11
Basic tab....11
Advanced tab....14
Print Quality 15
Duplex Printing 16
Watermark 17
Page Setting....19
Device Options 20
Support tab 22
Tray Settings 23
Features in the BR-Script (PostScript ^® 3 ^TM language emulation) printer driver (MFC-7840W and DCP-7045N only)....25
Printing Preferences....25
Advanced options....27
Ports tab 29
2 Scanning 30
Scanning a document using the TWAIN driver....30
Scanning a document into the PC 30
Pre-Scanning to crop a portion you want to scan....32
Settings in the Scanner Setup dialog box....33
Scanning a document using the WIA driver (For Windows ^® XP/Windows Vista ^® )....37
WIA compliant ....37
Scanning a document into the PC 37
Pre-Scanning to crop a portion you want to scan using the scanner glass 39
Scanning a document using the WIA driver
(For Windows Photo Gallery and Windows Fax and Scan users)....43
Scanning a document into the PC 43
Pre-Scanning to crop a portion you want to scan using the scanner glass 45
Using the Scan key
(For USB users)....47
Scan to E-mail 47
Scan to Image 48
Scan to OCR 48
Scan to File....49
Using ScanSoft™ PaperPort™ 11SE with OCR by NUANCE™....50
Viewing items 51
Organizing your items in folders 52
Quick links to other applications....52
ScanSoft™ PaperPort™ 11SE with OCR lets you convert image text into text you can edit....52
Importing items from other applications....53
Exporting items into other formats....53
Uninstalling ScanSoft™ PaperPort™ 11SE with OCR....53
3 ControlCenter3 54
Using ControlCenter3....54
Switching the user interface 56
Turning the Auto Load feature off....56
SCAN....57
File type....58
Image (example: Microsoft® Paint)....58
OCR (Word Processing program) 60
E-mail 61
File....62
CUSTOM SCAN 63
File type....64
Customizing a user-defined button....64
COPY 69
PC-FAX (MFC models only)....71
Send 72
Receive/View Received....72
Address Book 73
Setup 73
DEVICE SETTING....74
Remote Setup (MFC models only)....74
Quick-Dial (MFC models only)....75
Status Monitor 76
User's Guide....77
4 Network Scanning
(For models with built-in network) 78
Before using Network Scanning ....78
Network licence 78
Configuring Network Scanning....78
Using the Scan key....82
Scan to E-mail 82
Scan to Image 82
Scan to OCR 83
Scan to File....84
Scan to FTP (MFC-7440N and MFC-7840W only)....84
Scan to FTP Manual Method....88
5 Remote Setup (MFC models only) 90
Remote Setup....90
6 Brother PC-FAX Software
(MFC models only) 92
PC-FAX sending 92
Setting up user information....92
Sending setup....93
Setting up a cover page....94
Entering cover page information....95
Sending a file as a PC-FAX using the Facsimile style user interface 95
Sending a file as a PC-FAX using the Simple style user interface 96
Address Book 98
Brother Address Book 99
Setting up a member in the Address Book....99
Speed Dial setup....100
Setting up a group for broadcasting ....101
Editing member information....102
Deleting a member or group....102
Exporting the Address Book....102
Importing to the Address Book 104
PC-FAX receiving 105
Enabling PC-FAX Receiving software on your machine 106
Running the PC-FAX Receiving software on your PC....106
Setting up your PC 107
Configuring the Network PC-FAX Receiving Settings....108
Viewing new PC-FAX messages....109
7 Firewall settings (For Network users) 110
Before using the Brother software 110
For Windows ^® XP SP2 users 110
For Windows Vista ^® users....112
Section II Apple Macintosh
8 Printing and Faxing 116
Printer operation key 116
Job Cancel....116
Secure Key (MFC models only) 116
Printer Emulation Support (MFC-7840W and DCP-7045N only)....117
Printing the Internal Font List (MFC-7840W and DCP-7045N only)....118
Printing the Print Configuration List (MFC-7840W and DCP-7045N only)....118
Test Print (MFC-7840W and DCP-7045N only) 118
Restoring default printer settings (MFC-7840W and DCP-7045N only)....119
Status Monitor....120
Updating the machine's status 120
Hiding or showing the window....120
Quitting the window 120
Web Based Management (Network Connection Only)....120
Features in the printer driver (For Macintosh) 121
Page Setup....121
Copies & Pages....121
Cover Page (For Mac OS X 10.4 or greater)....123
Layout....123
Secure Print....124
Print Settings 125
Removing the Printer driver for Macintosh 129
Using the BR-Script3 Driver (MFC-7840W and DCP-7045N only) (Post Script ^® 3 ^™ language emulation printer driver)....130
Features in the BR-Script (PostScript ^® 3 ^™ language emulation) printer driver (MFC-7840W and DCP-7045N only)....136
Page Setup....136
Copies & Pages....136
Cover Page (For Mac OS X 10.4)....138
Layout....138
Printer Features....139
Sending a fax (MFC models only) 142
For Macintosh 142
Drag a Vcard from the Mac OS X Address Book application (For Mac OS X 10.2.x to 10.4.x)....145
Using Mac OS X 10.5 Addresses panel ....147
9 Scanning 149
Scanning from a Macintosh 149
Scanning an image into your Macintosh....150
Pre-Scanning an image....150
Settings in the Scanner window 151
Using the Scan key (For USB cable users)....154
Scan to E-mail 154
Scan to Image 155
Scan to OCR 155
Scan to File....156
Using Presto! PageManager....157
Features 157
System requirements for Presto! PageManager 157
NewSoft Technical Support....157
10 ControlCenter2 160
Using ControlCenter2....160
Turning the AutoLoad feature off....161
SCAN....162
File types 163
Image (example: Apple Preview)....163
OCR (word processing application)....165
E-mail 166
File....167
CUSTOM SCAN 168
File types 169
User-defined button 169
Scan to Image 170
Scan to OCR 171
Scan to E-mail 172
Scan to File....173
COPY / PC-FAX (PC-FAX is MFC models only)....175
DEVICE SETTINGS 177
Remote Setup (MFC models only)....177
Quick-Dial (MFC models only)....178
Status Monitor 178
11 Network Scanning 179
Before using Network Scanning ....179
Configuring network scanning 179
Using the Scan key....181
Scan to E-mail 181
Scan to Image 181
Scan to OCR 182
Scan to File....183
Scan to FTP (MFC-7440N and MFC-7840W only)....183
Scan to FTP Manual Method....187
12 Remote Setup 189
Remote Setup (MFC models only) 189
A Index 191
Section I

Windows®
Printing 2
Scanning 30
ControlCenter3 54
Network Scanning (For models with built-in network) 78
Remote Setup (MFC models only) 90
Brother PC-FAX Software (MFC models only) 92
Firewall settings (For Network users) 110
1 Printing

Note
- The screens in this section are from Windows ^® XP. Screens on your PC may vary depending on your operating system.
- If your PC is protected by a firewall, and is unable to print, you may need to configure the firewall settings to allow communication through port number 137. See Firewall settings (For Network users) on page 110.
Using the Brother printer driver
A printer driver is software that translates data from the format used by a PC into the format needed by a particular printer, using a printer command language or page description language.
The printer drivers are on the CD-ROM we have supplied. Install the drivers by following the Quick Setup Guide. The latest printer driver can also be downloaded from the Brother Solutions Center at:
http://solutions.brother.com
Windows® Printing
The dedicated printer drivers for Microsoft® Windows® 2000 Professional/XP/Windows Vista® are available on the CD-ROM supplied with your Brother device. You can install them easily into your Windows® system using our installer program. The drivers support our unique compression mode to enhance printing speed in Windows® applications, and allows you to set various printer settings, including economy printing mode and custom paper size.
Printing a document
When the machine receives data from your computer, it begins printing by picking up paper from the paper tray. The paper tray can feed many types of paper and envelopes. (See the User's Guide for information about the Paper Tray and Recommended paper.)
1 From your application, choose the Print command.
If any other printer drivers are installed on your computer, choose Brother MFC-XXXX or DCP-XXXX Printer* as your printer driver from the Print or Print Settings menu in your software application, and then click OK to begin printing.
*(Where XXXX is your model name. If you are using a LAN cable to connect your machine then LAN will be in the printer driver name.)

Note
For Macintosh users, see Features in the printer driver (For Macintosh) on page 121.
2 Your computer sends the data to the machine.
3 When the machine finishes printing all the data, the LCD shows the machine status.

Note
You can choose the paper size and orientation in your application software.
If your application software does not support your custom paper size, choose the next largest paper size.
Then adjust the print area by changing the right and left margins in your application software.
Duplex printing
The supplied printer driver supports duplex printing.
Guidelines for printing on both sides of the paper
■ If the paper is thin, it may wrinkle.
If paper is curled, turn over the stack, straighten it and then put it back in the paper tray or the Manual Feed Slot.
If the paper is not feeding properly, it may be curled. Remove the paper, straighten it and turn over the stack.
- When you use the manual duplex function, it is possible that there may be paper jams or poor print quality. If there is a paper jam, see Paper jams in the User's Guide. If you have a print quality problem, see Improving the print quality in the User's Guide.
Manual duplex printing
The machine prints all the even-numbered pages on one side of the paper first. Then, the Windows ^® driver instructs you (with a pop-up message) to reinsert the paper. Before reinserting the paper, straighten it well, or you may get a paper jam. Very thin or thick paper is not recommended.
Simultaneous scanning, printing and faxing
Your machine can print from your computer while sending or receiving a fax in memory, or while scanning a document into the computer. Fax sending will not be stopped during PC printing. However, when the machine is copying or receiving a fax on paper, it pauses the PC printing operation, and then continues printing when copying or fax receiving has finished.
Printer operation keys
Job Cancel
To cancel the current print job, press Job Cancel. You can clear the data that is left in the printer memory by pressing Job Cancel. To cancel multiple print jobs, hold down this key until the LCD shows JobCancel(All).

Secure Key (MFC models only)
Secured data is password protected. Only those people who know the password will be able to print the secured data. The machine will not print secure data until the password is entered. After the document is printed, the data will be cleared from the memory. To use this function, you need to set your password in the printer driver dialog box. If you turn the power switch Off, the secured data saved in memory will be cleared.
1 Press Secure.


Note
If the LCD displays No Data !, there is no secured data in the memory.
2 Press ▲ or ▼ to choose the user name. Press OK. The LCD displays the secured jobs list for that name.
3 Press ▲ or ▼ to choose the job. Press OK. Enter your four-digit password and press OK.
4 To print the data, press ▲ or ▼ to choose Print. Press OK.
The machine prints the data.
To delete the secured data, press ▲ or ▼ to choose Delete.
Press OK.
Printer Emulation Support (MFC-7840W and DCP-7045N only)
Your machine will receive print commands in a printer job language or emulation. Different operating systems and applications will send the print commands in different languages. Your machine can receive print commands in a variety of emulations and has an automatic emulation selection feature. When the machine receives data from the computer, it automatically chooses the emulation mode. The default setting is Auto.
Your machine has the following emulation modes. You can change the setting by using the control panel or a web browser.
HP LaserJet Mode
The HP LaserJet mode (or HP mode) is the emulation mode in which this printer supports the PCL6 language of a Hewlett-Packard LaserJet laser printer. Many applications support this type of laser printer. Using this mode will allow your printer to run at its best with those applications.
BR-Script 3 Mode
BR-Script is an original Brother page description language and a PostScript ^® language emulation interpreter. This printer supports PostScript ^® 3 ^™ . The BR-Script interpreter of this printer allows you to control text and graphics on the page.
For technical information about PostScript ^® commands, see the following manuals:
- Adobe Systems Incorporated. PostScript® Language Reference, 3rd edition. Addison-Wesley Professional, 1999. ISBN: 0-201-37922-8
- Adobe Systems Incorporated. PostScript® Language Program Design. Addison-Wesley Professional, 1988. ISBN: 0-201-14396-8
- Adobe Systems Incorporated. PostScript® Language Tutorial and Cookbook. Addison-Wesley Professional, 1985. ISBN: 0-201-10179-3
Setting the Emulation mode
1 For MFC-7840W, press Menu, 4, 1.
For DCP-7045N, press Menu, ▲ or ▼ to choose 3. Printer. Press OK.
Press ▲ or ▼ to choose 1. Emulation. Press OK.
2 Press ▲ or ▼ to choose Auto, HP LaserJet or BR-Script 3. Press OK.
3 Press Stop/Exit.

Note
We recommend that you set the emulation setting with your application software or network server. If the setting does not work properly, choose the required emulation mode manually using the control panel buttons of the machine.
Printing the Internal Font List (MFC-7840W and DCP-7045N only)
You can print a list of the machine's internal (or resident) fonts to see how each font looks before you choose it.
For MFC-7840W, press Menu, 4, 2, 1, and go to Step ③.
For DCP-7045N, press Menu, ▲ or ▼ to choose 3. Printer. Press OK and go to Step ②.
2 Press ▲ or ▼ to choose 2.Print Options. Press OK.
Press ▲ or ▼ to choose 1.Internal Font. Press OK.
3 Press Start. The machine prints the list.
4 Press Stop/Exit.
Printing the Print Configuration List (MFC-7840W and DCP-7045N only)
You can print a list of current printer settings.
For MFC-7840W, press Menu, 4, 2, 2, and go to Step ③.
For DCP-7045N, press Menu, ▲ or ▼ to choose 3. Printer. Press OK and go to Step ②.
2 Press ▲ or ▼ to choose 2.Print Options. Press OK.
Press ▲ or ▼ to choose 2.Configuration. Press OK.
3 Pressr Start. The machine prints the settings.
4 Press Stop/Exit.
Test Print (MFC-7840W and DCP-7045N only)
If you are having problems with print quality, you can do a test print.
For MFC-7840W, press Menu, 4, 2, 3, and go to Step ③. For DCP-7045N, press Menu, ▲ or ▼ to choose 3. Printer. Press OK and go to Step ②.
2 Press ▲ or ▼ to choose 2.Print Options. Press OK. Press ▲ or ▼ to choose 3.Test Print. Press OK.
3 Press Start.
4 Press Stop/Exit.

Note
If the problem appears on the printout, see Improving the print quality in the User's Guide.
Restoring default printer settings (MFC-7840W and DCP-7045N only)
You can return the machine's printer settings to the factory settings. Fonts and macros loaded to the machine's memory will be cleared.
1 For MFC-7840W, press Menu, 4, 3, and go to Step ③.
For DCP-7045N, press Menu, ▲ or ▼ to choose 3.Printer. Press OK and go to Step ②.
2 Press ▲ or ▼ to choose 3. Reset Printer. To restore the default settings, press ▲. To exit without making a change, press ▼. Go to Step 4.
3 To restore the default settings, press 1. To exit without making a change, press 2.
4 Press Stop/Exit.
Status Monitor
The Status Monitor utility is a configurable software tool for monitoring the status of one or more devices, allowing you to get immediate notification of error messages such as paper empty or paper jam.

text_image
Status Monitor Brother MFC-XXXX Printer USB001 Sleep Visit the Original Supplies websiteYou can check the device status at anytime by double-clicking the icon in the tasktray or by choosing Status Monitor located in Start/All Programs/Brother/MFC-XXXX(or DCP-XXXX) on your PC.
There is also a link to the Brother Original Supplies website. Click Visit the Original Supplies website button for more information on Brother original supplies.

Note
For more information about using the Status Monitor software, right-click the Status Monitor icon and choose Help.
Monitoring the machine's status
The Status Monitor icon will change colour depending on the machine status.
A green icon indicates the normal stand-by condition.

A yellow icon indicates a warning.

A red icon indicates a printing error has occurred.

There are two locations where you can display the Status Monitor on your PC - in the tasktray or on the desktop.

Note
- You can check the device status at anytime by double-clicking the icon in the tasktray or selecting the Status Monitor located in the Start/All Programs/Brother/MFC-XXXX (or DCP-XXXX) on your computer.
- For more information about using the Status Monitor software, right click the Status Monitor icon and choose Help.
Printer driver settings

Note
For Macintosh users, see Printing and Faxing on page 116.
You can change the following printer settings when you print from your computer.
Paper Size
■ Multiple Page
Orientation
Copies
■ Media Type
Paper Source
Resolution
■ Toner Save Mode
Print Setting
■ Manual Duplex printing
Watermark
Scaling
- Secure Print ^1
■ Quick Print Setup ^1
Macro
Header-Footer Print
■ Density adjustment
■ Improve Print Output
Features in the Windows ^® printer driver
For more information, see the Help text in the printer driver.

Note
- The screens in this section are from Windows ^® XP. The screens on your PC will vary depending on your operating system.
- You can access the Printing Preferences dialog box by clicking Printing Preferences... in the General tab of the Printer Properties dialog box.
Basic tab
You can also change settings by clicking the illustration on the left side of the Basic tab.
text_image
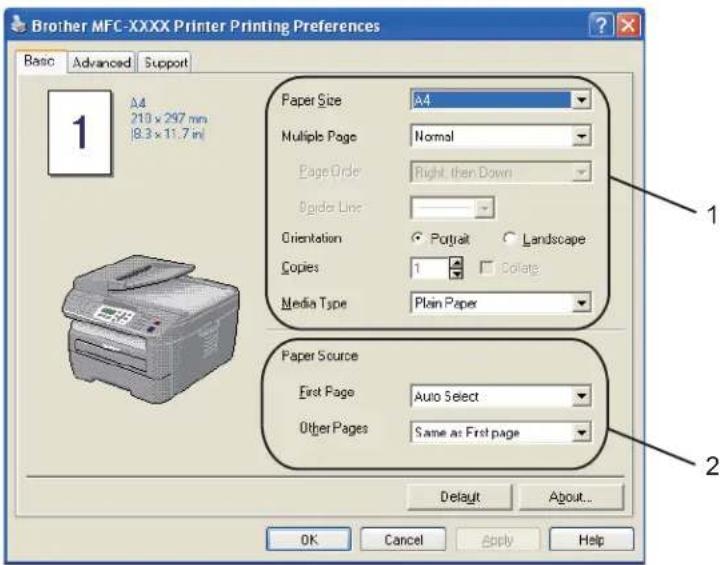
Brother MFC-XXXX Printer Printing Preferences Basic Advanced Support A4 210 x 297 mm [8.3 x 11.7 in] Paper Size A4 Multiple Page Normal Page Order Right, then Down Spider Line Orientation Portrait Landscape Copies 1 Colors Media Type Plain Paper Paper Source First Page Auto Select Other Pages Same as First page Default About... OK Cancel Apply Help1 Choose the Paper Size, Multiple Page, Orientation, Copies and Media Type (1).
2 Choose the Paper Source (2).
3 Click OK to apply your chosen settings.
To return to the default settings, click Default, then OK.
Paper Size
From the drop-down box choose the Paper Size you are using.
Multiple Page
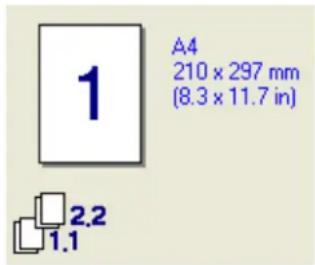
The Multiple Page selection can reduce the image size of a page allowing multiple pages to be printed on one sheet of paper or enlarge the image size for printing one page on multiple sheets of paper.
1
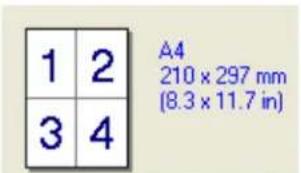
text_image
1 2 A4 210 x 297 mm (8.3 x 11.7 in) 3 44 in 1 1 in 2x2 pages

text_image
A A4 210 x 297 mm (8.3 x 11.7 in)Page Order
When N in 1 option is selected, the page order can be selected from the drop-down list.
Border Line
When printing multiple pages on one sheet with the Multiple Page feature you can choose to have a solid border, dash border or no border around each page on the sheet.
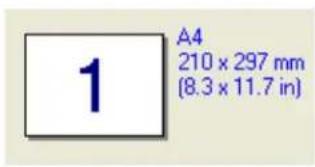
Orientation
Orientation selects the position of how your document will be printed (Portrait or Landscape).

text_image
1 A4 210 x 297 mm (8.3 x 11.7 in)Portrait Landscape
text_image
1 A4 210 x 297 mm (8.3 x 11.7 in)Copies
The copies selection sets the number of copies that will be printed.
Collate
With the Collate check box selected, one complete copy of your document will be printed and then repeated for the number of copies you selected. If the Collate check box is not selected, then each page will be printed for all the copies selected before the next page of the document is printed.
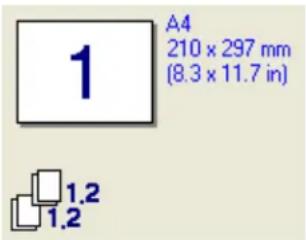
text_image
A4 210 x 297 mm (8.3 x 11.7 in) 1 1.2 1.2Collate box checked Collate box not checked
text_image
1 A4 210 x 297 mm (8.3 x 11.7 in) 2.2 1.1Media Type
You can use the following types of media in your machine. For the best print quality, select the type of media that you wish to use.
Plain Paper
Thin Paper
Thick Paper
Thicker Paper
Bond Paper
Transparencies
Envelopes Env. Thick Env. Thin Recycled Paper

Note
- When using ordinary plain paper choose Plain Paper. When using heavier weight paper, envelopes or rough paper choose Thick Paper or Thicker Paper. For bond paper, choose Bond Paper.
- When you use envelopes, choose Envelopes. If the toner is not fixed to the envelope correctly when Envelopes has been selected, choose Env. Thick. If the envelope is crumpled when Envelopes has been selected, choose Env.Thin.
Paper Source
You can choose Auto Select, Tray1 or Manual and specify separate trays for printing the first page and for printing from the second page onwards.
Advanced tab

text_image
Brother MFC-XX0 X Printer Printing Preferences Basic Advanced Support 600 dpi Resolution HQ 1200 600 dpi 300 dpi Toner Save Mode Off On Print Setting General Graphics Office Document Manual Setting... Default OK Cancel Apply HelpChange the tab settings by clicking one of the appropriate icons:
■ Print Quality (1)
- Duplex (2)
Watermark (3)
Page Setting (4)
■ Device Options (5)
Print Quality
Resolution
You can change the resolution as follows:
• HQ 1200
• 600 dpi
• 300 dpi
■ Toner Save Mode
You can save running costs by turning on the Toner Save Mode, which reduces the print density (print appears lighter).

Note
- We do not recommend Toner Save Mode for printing Photo or Greyscale images.
- Toner Save Mode is not available for HQ 1200 resolution.
Print Setting
You can manually change the print setting.
- General
This is a printing mode for general printing of documents.
- Graphics
This is the best mode for printing documents that contain graphics.
- Office Document
This is the best mode for printing office documents.
- Manual
You can change the settings manually by choosing Manual and clicking the Setting... button. You can set brightness, contrast and other settings.
Duplex Printing

text_image
Brother MFC-XXXX Printer Printing Preferences Basic Advanced Support A B A A Manual Duple: Bucket Printing Duplex Type Flip on Left Edge Flip on Right Edge Flip on Top Edge Flip on Bottom Edge Flip on Top Edge (No Reverse) Flip on Bottom Edge (No Reverse) Binding Offset Dimpl: 0.0 - 8.0 OK Cancel Apply Help■ Manual Duplex
Check Manual Duplex. In this mode, the machine prints all the even numbered pages first. Then the printer driver stops and shows the instructions required to re-install the paper. When you click OK the odd numbered pages are printed. There are six types of manual duplex binding directions available for each orientation.
Booklet Printing
When you want to print a booklet, use this function. To make the booklet, fold the printed pages down the middle.
Binding Offset
If you check the Binding Offset option, you can also specify the offset for binding in inches or millimeters.
Watermark
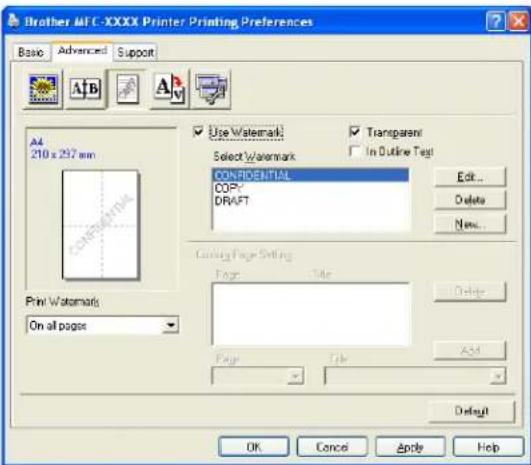
text_image
Brother MFC-XXXX Printer Printing Preferences Basic Advanced Support A4 210 x 297 mm Use Watermark Transparent Select Watermark In Outline Text CONFIDENTIAL COPY DRAFT Edit... Delete New... Drawing Page Setting Page Name Delete Print Watermark On all pages Page OK Cancel Apply HelpYou can put a logo or text into your document as a watermark. You can choose one of the preset Watermarks, or you can use a bitmap file that you have created. Check Use Watermark, and then choose the watermark you want to use.
Transparent
Check Transparent to print the watermarked image in the background of your document. If this feature is not checked then the watermark will be printed on top of your document.
In Outline Text
Check In Outline Text if you only want to print an outline of the watermark.
Print Watermark
You can print the watermark in any of the following ways.
On all pages
■ On first page only
■ From second page
Custom
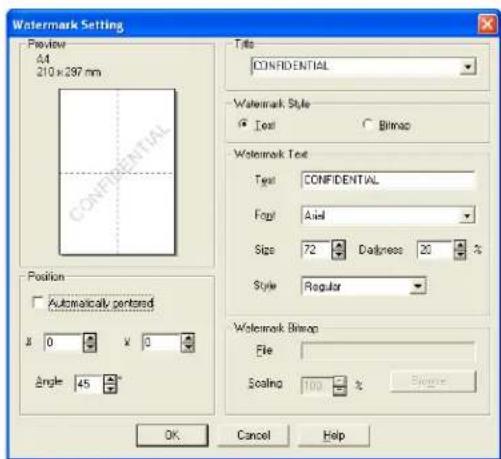
Watermark Setting
text_image
Watermark Setting Preview 44 210 x 297 mm Position Automatically centered x 0 y 0 Angle 45° Title CONFIDENTIAL Watermark Style Text Bitmap Watermark Text Text: CONFIDENTIAL Foot: Axial Size: 72 Dashpress: 20 % Style: Regular Watermark Bitmap File: Scaling: 100 % OK Cancel HelpYou can change the watermark's size and position on the page by selecting the watermark, and clicking the Edit button. If you want to add a new watermark, click the New button, and then choose Text or Bitmap in the Watermark Style.
Title
You can choose CONFIDENTIAL, COPY or DRAFT as the standard title or enter a title you like in the field.
Watermark Text
Enter your Watermark Text into the Text box, and then choose the Font, Size and Style.
Watermark Bitmap
Enter the file name and location of your bitmap image in the File box, or Browse for the file location. You can also set the scaling size of the image.
Position
Use this setting if you want to control the position of the watermark on the page.
Page Setting
text_image
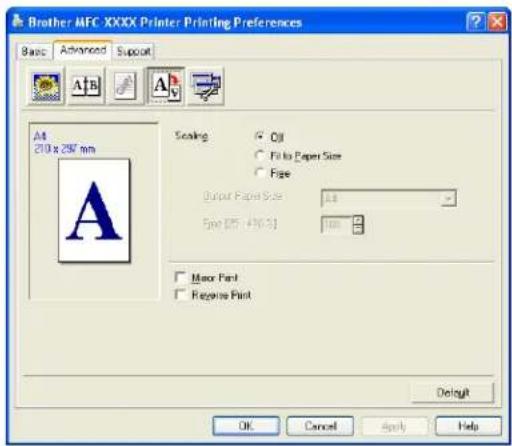
Brother MFC XXXX Printer Printing Preferences Basic Advanced Support A4 210 x 287 mm Sealing Oil Fill to Paper Size Paste Output Padie Size: 1.6 Size [25 - 436.3] mm Major Pad Receive Pad Delay OK Cancel Apply HelpScaling
You can change the print size of your document with the Scaling feature.
- Check Off if you want to print the document as it appears on your screen.
■ Check Fit to Paper Size if you want to enlarge or reduce the document to fit the paper size.
■ Check Free if you want to change the size.
You can also use the Mirror Print or Reverse Print feature for your page setting.
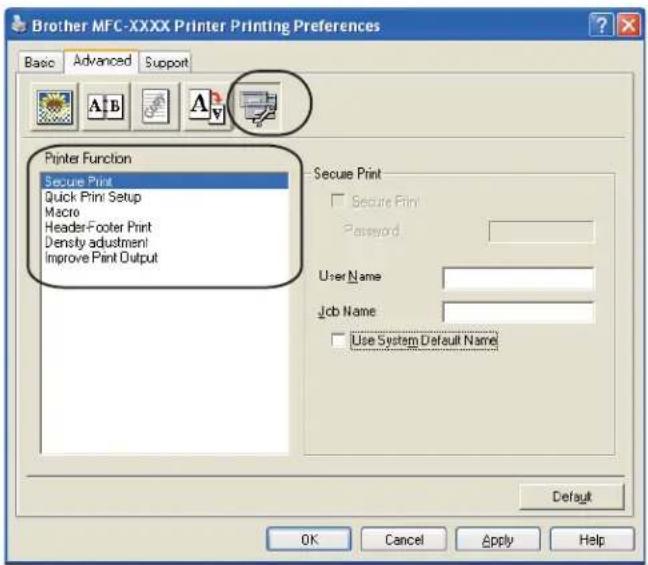
Device Options
text_image
Brother MFC-XXXX Printer Printing Preferences Basic Advanced Support Printer Function Secure Print Quick Print Setup Macro Headers-Footer Print Density adjustment Improve Print Output Secure Print Secure Print Password User Name Job Name Use System Default Name Default OK Cancel Apply HelpYou can change the following printer functions:
- Secure Print
Quick Print Setup
■ Macro (MFC-7840W and DCP-7045N only)
Header-Footer Print
■ Density adjustment
■ Improve Print Output
Secure Print
Secure documents are documents that are password protected when they are sent to the machine. Only the people who know the password will be able to print them. Since the documents are secured at the machine, you must enter the password using the control panel of the machine to print them.
To send a secured document:
1 Select Secure Print from the Printer Function menu and check Secure Print.
2 Enter your password, user name and job name and click OK.
3 You must print the secured documents from the control panel of the machine. (See Secure Key (MFC models only) on page 5.)
To delete a secured document:
You need to use the control panel of the machine to delete a secured document. (See Secure Key (MFC models only) on page 5.)
Quick Print Setup
The feature allows you to quickly choose driver settings by clicking a tasktray icon.
You can turn the quick print setting on or off. By placing a check in the selection boxes for the following functions you can choose which will be available in the quick print setting.
- Multiple Page
- Manual Duplex
- Toner Save Mode
- Paper Source
- Media Type
Macro
You can save a page of a document as a macro to printer memory. You can also execute the saved macro (you can use the saved macro as an overlay on any document). This will save time and increase printing speed for often used information such as forms, company logos, letterhead formats or invoices.
Header-Footer Print
When this feature is enabled, it will print the date and time on your document from your computer's system clock and the PC login user name or the text you entered. By clicking Setting, you can customize the information.
• ID Print
If you select Login User Name, your PC login user name will print. If you select Custom and enter the text in the Custom edit box, the text you entered will print.
■ Density adjustment
Increase or decrease the print density.

Note
The Density adjustment is not available when you set the resolution to HQ 1200.
■ Improve Print Output
This feature allows you to improve a print quality problem.
- Reduce Paper Curl
If you choose this setting, the paper curl may be reduced.
If you print only a few pages, you do not need to choose this setting. Change the printer driver setting in Media Type to a thin setting.
- Improve Toner Fixing
If you choose this setting, the toner fixing on paper may be improved. If this selection does not improve the situation enough, select Thicker paper in Media type settings.
Support tab

text_image
Brother MFC-XXXX series Printing Preferences Basic Advanced Support brother MFC-XXXX Printer Driver Version 0.1 X 18 May 2007 © Brother Industries Ltd. 1933 - 2007 AI rights Reserved. Visit the Genuine Supplies website... Brother Solutions Center Brother Solutions Center... Connect directly to the Brother Solutions Center Web (solutions brother com) site for up to date information on device drivers, user guides, white papers and other documentation available for your Brother product. Print Settings Print Fonts Check Setting OK Cancel Apply Help■ Visit the Genuine Supplies website (1)
You can visit our web site for original/genuine Brother supplies by clicking this button.
■ Brother Solutions Center (2)
The Brother Solutions Center (http://solutions.brother.com) is a web site offering information about your Brother product including FAQs (Frequently Asked Questions), User's Guides, driver updates and tips for using your printer.
■ Print Settings (3)
This will print the pages that show how the internal settings of the printer have been configured.
■ Print Fonts (4) (MFC-7840W and DCP-7045N only)
This will print the pages that show all the internal fonts of the printer.
■ Check Setting... (5)
You can check the current driver settings.
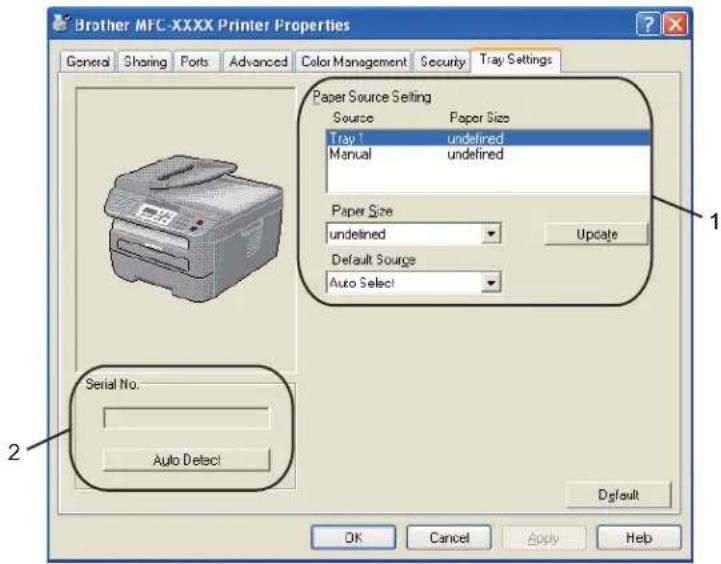
Tray Settings
To access the Tray Settings tab, click the Start button and Printers and Faxes. Right-click your printer icon and click Properties.
text_image
Brother MFC-XXXX Printer Properties General Sharing Ports Advanced Color Management Security Tray Settings Paper Source Setting Source Paper Size Tray 1 undefined Manual undefined Paper Size undefined Default Source Auto Select Update Serial No. Auto Detect Default OK Cancel Apply HelpPaper Source Setting (1)
This feature identifies the paper size defined for each paper tray.
- Paper Size
This setting allows you to define which paper size is used for the tray and manual feed slot. Highlight the paper source you want to define and then choose the paper size from the pull-down menu. Click Update to apply the setting to the paper source.
- Default Source
To save your settings, click OK or Apply. The Auto Select setting will automatically pull paper from any paper source (tray or manual feed slot) that has a defined paper size that matches your document. If paper is in the Manual feed slot, the machine will automatically pull from this slot no matter the size of paper.
Serial No. (2)
By clicking Auto Detect, the printer driver will probe the printer and display its serial number. If it fails to receive the information, the screen will display "----".

Note
The Auto Detect function is not available under the following printer conditions:
• The printer power switch is off.
• The printer is in an error state.
• The printer is in a network shared environment.
- The cable is not connected to the printer correctly.
Features in the BR-Script (PostScript® 3 ™ language emulation) printer driver (MFC-7840W and DCP-7045N only)
For more information, see the Help text in the printer driver.

Note
The screens in this section are from Windows ^® XP. The screens on your PC may vary depending on your operating system.
Printing Preferences

Note
You can access the Printing Preferences dialog box by clicking Printing Preferences... in the General tab of the Brother MFC-XXXX BR-Script3 Properties (or Brother DCP-XXXX BR-Script3 Properties) dialog box.
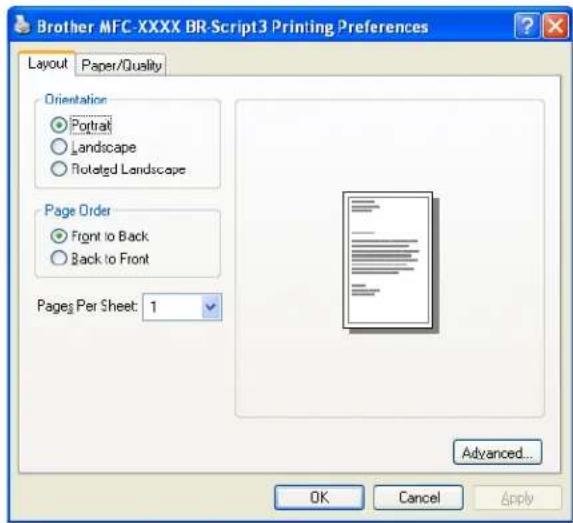
Layout tab
You can change the layout setting by choosing the settings for Orientation, Page Order and Page Per Sheet.
text_image
Brother MFC-XXXX BR-Script3 Printing Preferences Layout Paper/Quality Orientation ● Portrait ○ Landscape ○ Rotated Landscape Page Order ● Front to Back ○ Back to Front Pages Per Sheet: 1 Advanced... OK Cancel Apply- Orientation
Orientation selects the position of how your document will be printed. (Portrait, Landscape or Rotated Landscape)
• Page Order
Specifies the order in which the pages of your document will be printed. Front to Back prints the document so that page 1 is on top of the stack. Back to Front prints the document so that page 1 is on the bottom of the stack.
Printing
Paper/Quality tab
Choose the Paper Source.

text_image
Brother MFC-XXXX BR-Script3 Printing Preferences Layout Paper/Quality Tray Selection Paper Source Automatically Select Advanced... OK Cancel Apply- Paper Source
You can choose Automatically Select, Tray1 or Manual Feed.
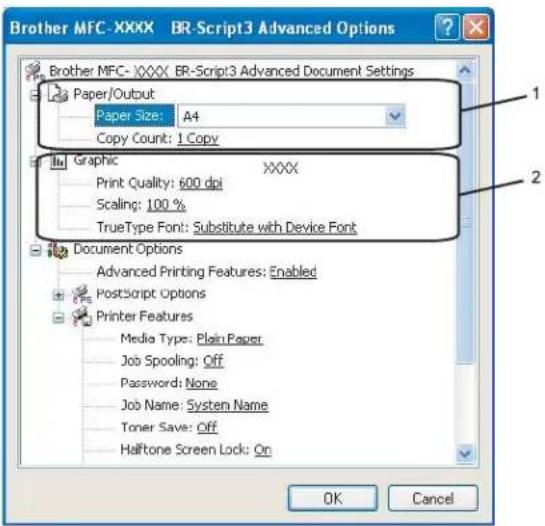
Advanced options
You can access the Advanced options by clicking the Advanced... button on the Layout tab or Paper/Quality tab.
text_image
Brother MFC-XXXX BR-Script3 Advanced Options Paper/Output Paper Size: A4 Copy Count: 1 Copy Graphic XXXX Print Quality: 600 dpi Scaling: 100 % TrueType Font: Substitute with Device Font Document Options Advanced Printing Features: Enabled PostScript Options Printer Features Media Type: Plain Paper Job Spooling: Off Password: None Job Name: System Name Toner Save: Off Halftone Screen Lock: On OK Cancel1 Choose the Paper Size and Copy Count (1).
Paper Size
From the drop-down box choose the Paper Size you are using.
Copy Count
The copy selection sets the number of copies that will be printed.
2 Set the Print Quality, Scaling and TrueType Font settings (2).
Print Quality
Specifies the print resolution.
Scaling
Specifies whether to reduce or enlarge documents, and by what percentage.
TrueType Font
Specifies the TrueType font options. Click Substitute with Device Font (the default) to use equivalent printer fonts for printing documents that contain TrueType fonts. This will permit faster printing; however, you might lose special characters not supported by the printer font. Click Download as Softfont to download TrueType fonts for printing instead of using printer fonts.
3 You can change settings by choosing the setting in the Printer Features list (3):
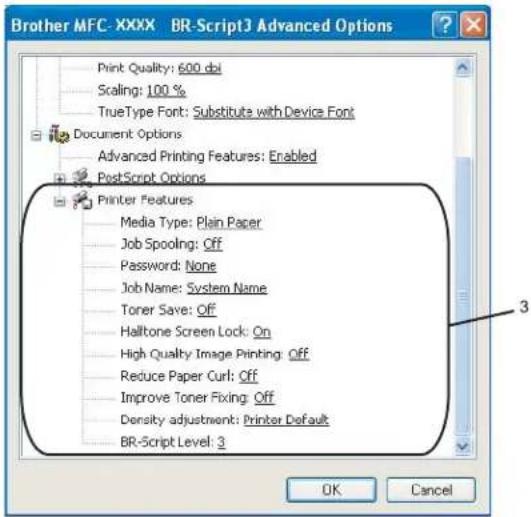
text_image
Brother MFC- XXXX BR-Script3 Advanced Options Print Quality: 600 dpi Scaling: 100 % TrueType Font: Substitute with Device Font Document Options Advanced Printing Features: Enabled PostScript Options Printer Features Media Type: Plain Paper Job Spooling: Off Password: None Job Name: System Name Toner Save: Off Halltone Screen Lock: On High Quality Image Printing: Off Reduce Paper Curl: Off Improve Toner Fixing: Off Density adjustment: Printer Default BR-Script Level: 3 OK CancelMedia Type
You can use the following types of media in your machine. For the best print quality, select the type of media that you wish to use.
Plain Paper
Thin Paper
Thick Paper
Thicker Paper
Bond Paper
Transparencies Envelopes Env. Thick Env. Thin Recycled Paper
Job Spooling
Secure Print allows you to secure documents that are password protected when they are sent to the machine. Only the people who know the password will be able to print them. Since the documents are secured at the machine, you must enter the password using the control panel of the machine. The secured document must have a Password and Job Name.
Password
Choose the password for your secured document that you send to the machine from the drop-down box.
Job Name
Choose the Job name from the drop-down list for your secured document that you sent to the machine.
■ Toner Save
You can conserve toner using this feature. When you set Toner Save Mode to On, print appears lighter. The default setting is Off.

Note
We do not recommend Toner Save to On for printing Photo or Greyscale images.
Halftone Screen Lock
Stops other applications from modifying the Halftone settings. The default setting is on.
■ High Quality Image Printing
You can increase the quality of image printing. If you set High Quality Image Printing to ON, the printing speed will be slower.
■ Reduce Paper Curl
If you choose this setting, the paper curl may be reduced.
If you print only a few pages, you do not need to choose this setting. Change the printer driver setting in Media Type to a thin setting.
■ Improve Toner Fixing
If you choose this setting, the toner fixing on paper may be improved. If this selection does not improve the situation enough, select Thicker paper in Media type settings.
■ Density adjustment
Increase or decrease the print density.

Note
The Density adjustment is not available when you set the resolution to HQ 1200.
BR-Script Level
You can change the BR-script emulation language level. Choose the level from the drop-down list.
Ports tab
If you want to change the port where your printer is connected or the path to the network printer you are using, choose or add the port you want to use.

text_image
Brother MFC- XXXX BR-Script3 Properties General Sharing Ports Advanced Device Settings Brother MFC- XXXX BR-Script3 Print to the following port(s). Documents will print to the first free checked port. Port Description Printer COM1: Serial Port COM2: Serial Port COM3: Serial Port COM4: Serial Port FILE: Print to File USB: Virtual printer port fo... Brother PC-FAX v.2, Brother ... Add Port... Delete Port Configure Port... Enable bidirectional support Enable printer pooling OK Cancel Apply2 Scanning
The scanning operations and drivers will be different depending on your operating system. The machine uses a TWAIN compliant driver for scanning documents from your applications.
For Windows® XP/ Windows Vista®
Two scanner drivers are installed. A TWAIN compliant scanner driver (See Scanning a document using the TWAIN driver on page 30) and a Windows ^® Imaging Acquisition (WIA) driver (See Scanning a document using the WIA driver (For Windows ^® XP/Windows Vista ^® ) on page 37).

Note
- For ScanSoft™ PaperPort™ 11SE, see Using ScanSoft™ PaperPort™ 11SE with OCR by NUANCE™ on page 50.
- If your PC is protected by a firewall, and is unable to network scan, you may need to configure the firewall settings to allow communication through port number 54925 and 137. See Firewall settings (For Network users) on page 110.
Scanning a document using the TWAIN driver
The Brother MFL-Pro Suite software includes a TWAIN compliant scanner driver. TWAIN drivers meet the standard universal protocol for communicating between scanners and applications. This means that you can not only scan images directly into the PaperPort™ 11SE viewer that Brother included with your machine, but you can also scan images directly into hundreds of other software applications that support TWAIN scanning. These applications include popular programs like Adobe® Photoshop®, Adobe® PageMaker®, CorelDRAW® and many more.
Scanning a document into the PC
There are two ways in which you can scan a whole page. You can either use the ADF (automatic document feeder) or the scanner glass.
1 Load your document.
2 Start the ScanSoft™ PaperPort™ 11SE software that was installed during the MFL-Pro Suite installation to scan a document.

Note
The instructions for scanning in this Guide are for when you use ScanSoft™ PaperPort™ 11SE. The scanning steps may vary when using other software applications.
3 Click File, then Scan or Get Photo. You can also click the Scan or Get Photo button. The Scan or Get Photo panel appears on the left side of the screen.
4 Click Select button.
5 Choose the scanner you are using from the Available Scanners list.

Note
- For Windows® XP/Windows Vista®:
Choose TW-Brother MFC-XXXX (TW-Brother DCP-XXXX) or TW-Brother MFC-XXXX LAN (TW-Brother DCP-XXXX LAN).
• For other operating systems:
Choose Brother MFC-XXXX (Brother DCP-XXXX) or Brother MFC-XXXX LAN (Brother DCP-XXXX LAN). (Where XXXX is your model name)
6 Check the Display scanner dialog box on the Scan or Get Photo panel.
7 Click Scan.
The Scanner Setup dialog box appears:.
8 Adjust the following settings, if needed, in the Scanner Setup dialog box:
■ Scan (Image Type) (1)
■ Resolution (2)
■ Scan Type (3)
■ Brightness (4)
Contrast (5)
■ Document Size (6)

text_image
TW-XXXX Scanner Setup - 3.X - Scan: Photo Web Text 1 2 Resolution 300 x 300 dpi Scan type 24bit Colour 3 5 Document Size A1 210 x 257 mm (8.3 x 11.1) mm inch PcsScan Width: 210.0 mm 2480 pixels Height: 291.0 mm 3437 pixels Data Size: 24.3 MB Start Help Default Cancel9 Click Start.
When scanning is finished, click Cancel to return to the PaperPort™ 11SE window.

Note
After you select a document size, you can adjust the scanning area further by clicking the left mouse button and dragging it. This is required when you want to crop an image when scanning. (See Pre-Scanning to crop a portion you want to scan on page 32)
2
Pre-Scanning to crop a portion you want to scan
You can preview your image and crop unwanted portions before scanning by using the PreScan button. When you are satisfied with the preview, click the Start button in the Scanner Setup dialog box to scan the image.
1 Follow the steps from ① to ⑦ of Scanning a document into the PC on page 30.
2 Choose the settings for Scan (Image Type), Resolution, Scan Type, Brightness, Contrast and Document Size, as needed.
3 Click PreScan.
The whole image is scanned into the PC and appears in the Scanning Area (1) of the Scanner Setup dialog box.

text_image
TW-XXXX Scanner Setup - 3.X - Scan Photo Web Text Resolution 300 x 300 dpi Scan Type 24bit Colour Edit Edit Document Size A1: 210 x 297 mm; 8.3 x 11... mm inch PjeScan Width: 210.0 mm 2480 pixels Height: 291.0 mm 3437 pixels Data Size: 24.3 MB Slot Help Default Cancel4 Press and hold down the left mouse button and drag it over the portion you want to scan.
natural_image
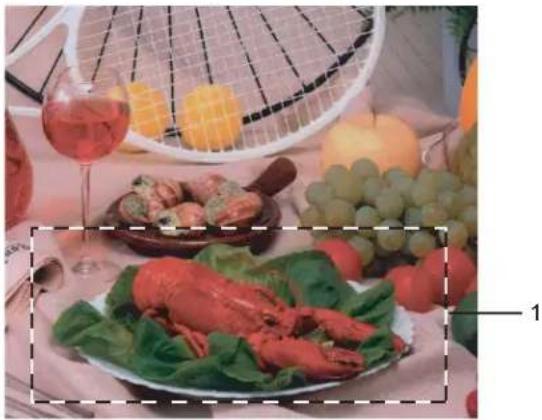
Plated dish of cooked seafood with garnish, a tennis racket, and fruit in background (no visible text or symbols)1 Scanning area

Note
You can enlarge the image using the + icon, and then use the - icon to restore the image to its original size.

Load your document again.

Note
Skip this step if you loaded the document on the scanner glass in Step ①.

Click Start.
This time only the chosen area of the document appears in the PaperPort™ 11SE window (or your application window).

In the PaperPort™ 11SE window, use the options available to refine the image.
Settings in the Scanner Setup dialog box
Image Type
Choose the output image type from Photo, Web or Text. Resolution and Scan Type will be altered for each default setting.
The default settings are listed in the table below:
| Image Type | Resolution | Scan Type | |
| Photo | Use for scanning photo images. | 300 × 300 dpi | 24-bit colour |
| Web | Use for attaching the scanned image to web pages. | 100 × 100 dpi | 24-bit colour |
| Text | Use for scanning text documents. | 200 × 200 dpi | Black & White |
Resolution
You can choose a scanning resolution from the Resolution drop-down list. Higher resolutions take more memory and transfer time, but produce a finer scanned image. The following table shows the resolutions you can choose and the available colours.
| Resolution Black & White/ | Grey (Error Diffusion) | 256 colour True Grey/24 bit colour | |
| 100 × 100 dpi Yes Yes Yes | |||
| 150 × 150 dpi Yes Yes Yes | |||
| 200 × 200 dpi Yes Yes Yes | |||
| 300 × 300 dpi Yes Yes Yes | |||
| 400 × 400 dpi Yes Yes Yes | |||
| 600 × 600 dpi Yes Yes Yes | |||
| 1200 × 1200 dpi Yes No Yes | |||
| 2400 × 2400 dpi Yes No Yes | |||
| 4800 × 4800 dpi Yes No Yes | |||
| 9600 × 9600 dpi Yes No Yes | |||
| 19200 × 19200 dpi Yes No Yes | |||
Scan Type
Black & White
Use for text or line art.
■ Grey (Error Diffusion)
Use for photographic images or graphics. (Error Diffusion is a method for creating simulated grey images without using true grey dots. Black dots are put in a specific pattern to give the appearance of grey.)
True Grey
Use for photographic images or graphics. This mode is more exact because it uses up to 256 shades of grey.
256 Colour
Uses up to 256 colours to scan the image.
24 bit Colour
Uses up to 16.8 million colours to scan the image.
Although using 24 bit Colour creates an image with the most accurate colour, the image file will be about three times larger than a file created with 256 Colour. It requires the most memory and has the longest transfer time.
Brightness
Adjust the setting (-50 to 50) to get the best image. The default value is 0, representing an average.
You can set the Brightness level by dragging the slide bar to the right or left to lighten or darken the image. You can also enter a value in the box to set the level.
If the scanned image is too light, set a lower Brightness level and scan the document again. If the image is too dark, set a higher Brightness level and scan the document again.

Note
The Brightness setting is only available when Black & White, Grey or True Grey is chosen.
Contrast
You can increase or decrease the Contrast level by moving the slide bar to the left or right. An increase emphasizes dark and light areas of the image, while a decrease reveals more detail in grey areas. You can also enter a value in the box to set the Contrast.

Note
The Contrast setting is only available when Grey or True Grey is chosen.
When scanning photographs or other images for use in a word processor or other graphics application, try different settings for the contrast and resolution to see which setting best suits your needs.
Document Size
Choose one of the following sizes:
A4 210 × 297 mm
■ JIS B5 182 × 257 mm
■ Letter 215.9 x 279.4 mm
■ Legal 215.9 x 355.6 mm (Available on ADF models)
A5 148 x 210 mm
■ Executive 184.1 x 266.7 mm
■ Business Card 60 x 90 mm
To scan business cards, choose the Business Card size, and then place the business card face down in the center of the left hand side of the scanner glass, as indicated by the document guidelines.
■ Photo 10 x 15 cm
■ Index Card 127 x 203.2 mm
■ Photo L 89 x 127 mm
■ Photo 2L 13 × 18 cm
■ Postcard 1 100 x 148 mm
■ Postcard 2 (Double) 148 x 200 mm
Custom
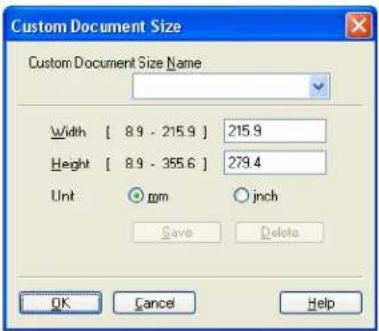
If you choose Custom as the size, the Custom Document Size dialog box appears.
text_image
Custom Document Size Custom Document Size Name Width [ 8.9 - 215.9 ] 215.9 Height [ 8.9 - 355.6 ] 279.4 Unit ○ mm ○ inch Save Delete OK Cancel Help2
Enter the Name, Width and Height for the document.
You can choose 'mm' or 'inch' as the unit for Width and Height.

Note
- You can see the actual paper size you chose on the screen.

- Width: shows the width of scanning area
• Height: shows the height of scanning area
- Data Size: shows the rough data size in Bitmap format. The size will be different for other file formats such as JPEG.
- User adjustable from 8.9 x 8.9 mm to 215.9 x 355.6 mm
(For DCP-7030, 8.9 x 8.9 mm to 215.9 x 297 mm)
Scanning a document using the WIA driver (For Windows® XP/ Windows Vista®)
WIA compliant
For Windows ^® XP /Windows Vista ^® you can choose Windows ^® Image Acquisition (WIA) for scanning images from the machine. You can scan images directly into the PaperPort ^™ 11SE viewer that Brother included with your machine or you can scan images directly into any other application that supports WIA or TWAIN scanning.
Scanning a document into the PC
There are two ways in which you can scan a whole page. You can either use the ADF (automatic document feeder) or the scanner glass.
If you want to scan and then crop a portion of a page after pre-scanning the document, you need to use the scanner glass. (See Pre-Scanning to crop a portion you want to scan using the scanner glass on page 39.)
1 Load your document.
2 Start the ScanSoft™ PaperPort™ 11SE software that was installed during the MFL-Pro Suite installation to scan a document.

Note
The instructions for scanning in this Guide are for when you use ScanSoft™ PaperPort™ 11SE. The scanning steps may vary when using other software applications.
3 Click File, then Scan or Get Photo. You can also click the Scan or Get Photo button. The Scan or Get Photo panel appears on the left side of the screen.
4 Click Select button.
5 Choose the scanner you are using from the Available Scanners list.

Note
Choose WIA-Brother MFC-XXXX (WIA-Brother DCP-XXXX) or WIA-Brother MFC-XXXX LAN (WIA-Brother DCP-XXXX LAN).
6 Check the Display scanner dialog box on the Scan or Get Photo panel.
7 Click Scan. The Scanner Setup dialog box appears.
8 Adjust the following settings, if needed, in the Scanner Setup dialog box:
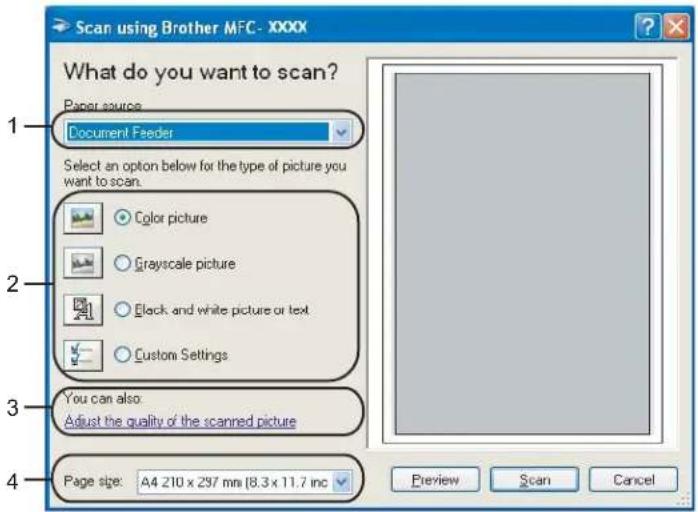
text_image
Scan using Brother MFC - XXXX What do you want to scan? Paper source Document Feeder Select an option below for the type of picture you want to scan. Color picture Grayscale picture Black and white picture or text Custom Settings You can also Adjust the quality of the scanned picture Page size: A4 210 x 297 mm (8.3 x 11.7 inc) Preview Scan Cancel1 Paper source
2 Picture type
3 Adjust the quality of the scanned picture
4 Paper size
9 Choose Document Feeder from the Paper source drop-down list (1).
10 Choose the picture type (2).
11 Choose the Paper size from the drop-down list (4).
12 If you need advanced settings, click Adjust the quality of the scanned picture (3). You can choose Brightness, Contrast, Resolution and Picture type from Advanced Properties. Click OK after you choose a setting.
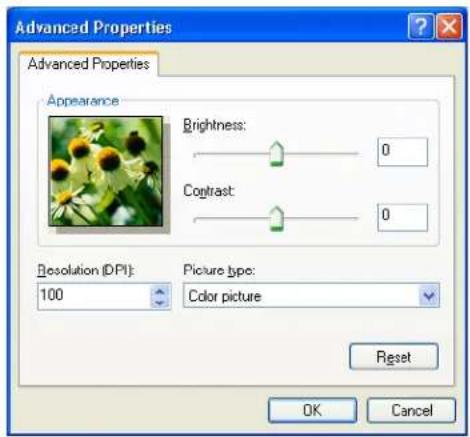
text_image
Advanced Properties Advanced Properties Appearance Brightness: 0 Contrast: 0 Resolution (DPI): 100 Picture type: Color picture Reset OK Cancel
Note
The scanner resolution can be set as high as 1200 dpi.
For resolutions greater than 1200 dpi, use the Brother Scanner Utility. (See Brother Scanner Utility on page 41.)
2
13 Click the Scan button in the Scan dialog box. The machine starts scanning the document.
Pre-Scanning to crop a portion you want to scan using the scanner glass
The Preview button is used to preview an image for cropping any unwanted portions from the image. When you are satisfied with the preview, click the Scan button in the Scan dialog box to scan the image.
1 Follow the steps from ① to ⑦ of Scanning a document into the PC on page 37.
2 Choose Flatbed in the Paper source drop-down list (1).
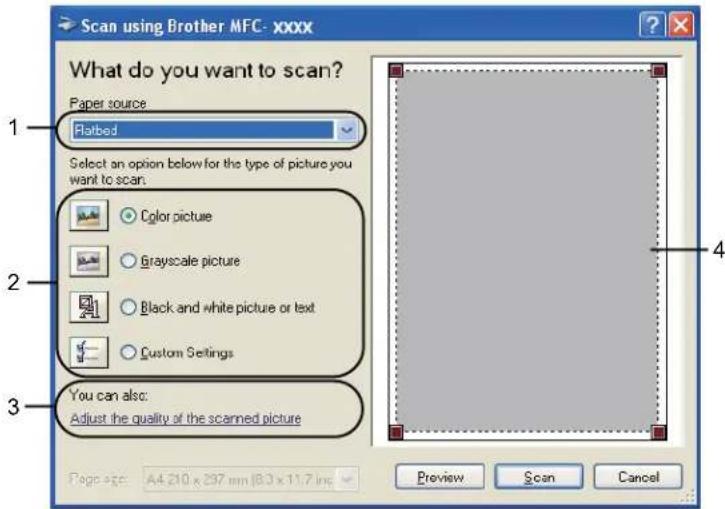
text_image
Scan using Brother MFC- xxxx What do you want to scan? Paper source: Platbed Select an option below for the type of picture you want to scan. Color picture Grayscale picture Black and white picture or text Custom Settings You can also: Adjust the quality of the scanned picture Page size: A4.210 x 297 mm | B3 x 11.7 in Preview Scan Cancel1 Paper source
2 Picture type
3 Adjust the quality of the scanned picture
4 Scanning area
③ Choose the picture type (2).
4 Click Preview.
The whole image is scanned into the PC and appears in the scanning area (4).
Scanning
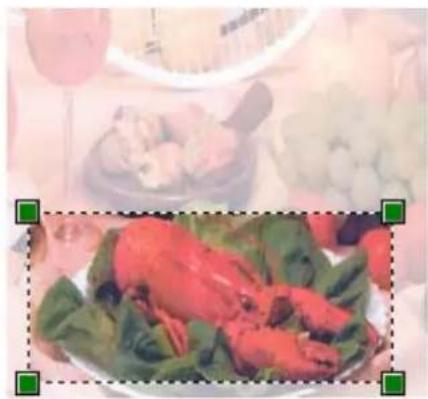
5 Press and hold down the left mouse button and drag it over the portion you want to scan.
natural_image
Plate of cooked seafood with red and green garnishes, blurred background shows food items (no visible text or symbols)2
6 If you need advanced settings, click Adjust the quality of the scanned picture (3). You can choose Brightness, Contrast, Resolution and Picture type from Advanced Properties. Click OK after you choose a setting.
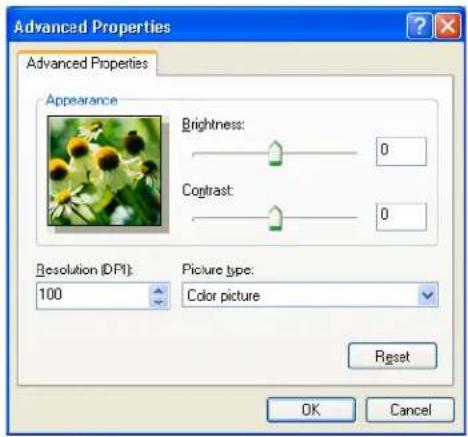
text_image
Advanced Properties Advanced Properties Appearance Brightness: 0 Contrast: 0 Resolution (DPI): 100 Picture type: Color picture Reset OK Cancel7 Click the Scan button in the Scan dialog box.
The machine starts scanning the document.
This time only the chosen area of the document appears in the PaperPort™ 11SE window (or your application window).
Brother Scanner Utility
The Brother Scanner Utility is used for configuring the WIA scanner driver for resolutions greater than 1200 dpi and for changing the paper size. If you want to set Legal size as the default size, use this utility to change the setting. You must restart your PC for the new settings to take effect.
■ Running the utility
You can run the utility by choosing the Scanner Utility located in the Start/All Programs/Brother/MFC-XXXX (or DCP-XXXX) (where XXXX is your model name)/Scanner Settings/Scanner Utility.

text_image
Scanner Utility WIA Device Brother MFC-XXXX Max Resolution(dpi) 600x600 1200x1200 2400x2400 4800x4800 9600x9600 13200x13200 Maximum Scanning Size A4/Letter Legal OK Cancel
Note
If you scan the document at a resolution greater than 1200 dpi, the file size may be very large. Make sure that you have enough memory and hard disk space for the size of the file you are trying to scan. If you do not have enough memory or hard disk space then your PC may freeze and you could lose your file.

Note
For Windows Vista ^® the User Account Control screen appears, do the following.
- For users who have administrator rights: Click Allow.

text_image
User Account Control An unidentified program wants access to your computer Don't run the program unless you know where it's from or you've used it before. BriScUtil.exe Unidentified Publisher Cancel I don't know where this program is from or what it's for. Allow I trust this program. I know where it's from or I've used it before. Details User Account Control helps stop unauthorized changes to your computer.Scanning
- For users who do not have administrator rights: Enter the administrator password and click OK.

text_image
User Account Control An unidentified program wants access to your computer Don't run the program unless you know where it's from or you've used it before. BrScUtilUse Unidentified Publisher To continue, type an administrator password, and then click OK. User Password Details OK Cancel User Account Control helps stop unauthorized changes to your computer.
Scanning a document using the WIA driver (For Windows Photo Gallery and Windows Fax and Scan users)
2
Scanning a document into the PC
There are two ways in which you can scan a whole page. You can either use the ADF (automatic document feeder) or the scanner glass.
If you want to scan and then crop a portion of a page after pre-scanning the document, you need to use the scanner glass. (See Pre-Scanning to crop a portion you want to scan using the scanner glass on page 45.)
1 Load your document.
2 Open your software application to scan the document.
3 Do one of the following:
■ For Windows Photo Gallery
Click File, then Import from Camera or Scanner.
■ For Windows Fax and Scan
Click File, New, then Scan.
4 Choose the scanner you want to use.
5 Click Import. The Scan dialog box appears.
6 Adjust the following settings, if needed, in the Scanner dialog box.
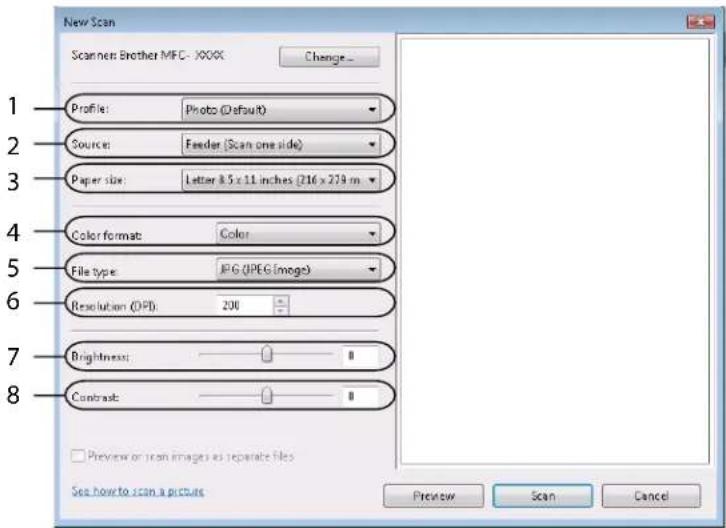
text_image
New Scan Scanner: Brother MFC - XXXC Change... 1 Profile: Photo (Default) 2 Source: Feeder (Scan one side) 3 Paper size: Letter 8.5 x 11 inches (216 x 279 m) 4 Color format: Color 5 File type: JPEG (JPEG images) 6 Resolution (OPI): 200 7 Brightness: 8 Contrast: Preview or iron images as separate files See how to scan a picture Preview Scan Cancel1 Profile
2 Source
3 Paper size
4 Color format
5 File type
6 Resolution
7 Brightness
8 Contrast

Note
The scanner resolution can be set as high as 1200 dpi.
For resolutions greater than 1200 dpi, use the Brother Scanner Utility.
7 Click the Scan button in the Scan dialog box.
The machine starts scanning the document.
Pre-Scanning to crop a portion you want to scan using the scanner glass
The Preview button is used to preview an image for cropping any unwanted portions from the image. When you are satisfied with the preview, click the Scan button in the Scan dialog box to scan the image.
1 Follow the steps from ① to ⑤ of Scanning a document into the PC on page 43.
2 Put the document face down on the scanner glass.
3 Choose Flatbed in the Source drop-down list. Adjust the following settings, if needed, in the Scanner dialog box.

text_image
New Scan Scanner: Brother MFC-XXXX Change... 1 Profile: Photo (Default) 2 Source: Flatbed Paper size: 3 Color format: Color 4 File type: JPEG Image 5 Resolution (DIP): 200 6 Brightness: 0 7 Contrast: 0 Preview or scan images as separate files See how to scan a picture Preview Scan Cancel1 Profile
2 Source
3 Color format
4 File type
5 Resolution
6 Brightness
7 Contrast
8 Scanning area
4 Click Preview.
The whole image is scanned into the PC and appears in the scanning area (8).
Scanning
5 Press and hold down the left mouse button and drag it over the portion you want to scan.
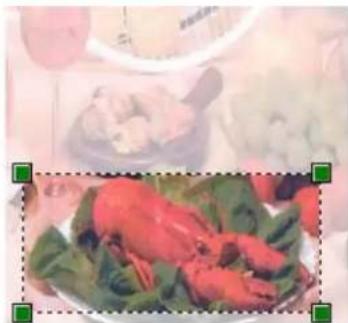
natural_image
Plate of cooked fish with green leaves, possibly a dish or vegetable, against a blurred background (no visible text or symbols)6 Click the Scan button in the Scan dialog box.
The machine starts scanning the document.
This time only the chosen area of the document appears in your application window.
Using the Scan key (For USB users)

Note
If you use the Scan key when connected to a network, see Network Scanning (For models with built-in network) on page 78.
You can use (Scan) on the control panel to scan documents into your word processing, graphics or E-mail applications or a folder on your PC.
Before you can use (Scan) on the control panel, you have to install the Brother MFL-Pro suite and connect the machine to your PC. If you installed the MFL-Pro Suite from the included CD-ROM then the correct drivers and ControlCenter3 are installed. Scanning by (Scan) follows the configuration on Device Button tab of ControlCenter3. (See SCAN on page 57.) For details about how to configure the scan settings of the ControlCenter3 buttons and to launch the application of your choice using (Scan), see Using ControlCenter3 on page 54.
Scan to E-mail
You can scan either a black and white or colour document into your E-mail application as a file attachment. You can change the scan configuration. (See E-mail on page 61.)
1 Put the document face up in the ADF, or face down on the scanner glass.
2 Press (Scan).
3 Press ▲ or ▼ to choose Scan to E-mail. Press OK.
4 Press Start. The machine starts scanning the document, creates a file attachment, and launches your E-mail application, displaying the new message waiting to be addressed.

Note
If you want the scanned data in colour, choose colour in scan type on the Device Button tab of the ControlCenter3 configuration. If you want the scanned data in black and white, choose black and white in scan type on the Device Button tab of the ControlCenter3 configuration. (See SCAN on page 57.)
Scan to Image
You can scan either a black and white or colour document into your graphics application for viewing and editing. You can change the scan configuration. (See Image (example: Microsoft® Paint) on page 58.)
1 Put the document face up in the ADF, or face down on the scanner glass.
2 Press (Scan).
3 Press ▲ or ▼ to choose Scan to Image. Press OK.
4 Press Start.
The machine starts the scanning process.

Note
If you want the scanned data in colour, choose colour in scan type on the Device Button tab of the ControlCenter3 configuration. If you want the scanned data in black and white, choose black and white in scan type on the Device Button tab of the ControlCenter3 configuration. (See SCAN on page 57.)
Scan to OCR
If your document is text, you can have it converted by ScanSoft™ PaperPort™ 11SE OCR to an editable text file and then have the result displayed in your word processing application for viewing and editing. You can change the (Scan) configuration. (See OCR (Word Processing program) on page 60.)
1 Put the document face up in the ADF, or face down on the scanner glass.
2 Press (Scan).
3 Press ▲ or ▼ to choose Scan to OCR. Press OK.
4 Press Start.
The machine starts the scanning process.

Note
If you want the scanned data in colour, choose colour in scan type on the Device Button tab of the ControlCenter3 configuration. If you want the scanned data in black and white, choose black and white in scan type on the Device Button tab of the ControlCenter3 configuration. (See SCAN on page 57.)
Scan to File
You can scan a black and white or a colour document into your PC and save it as a file in a folder of your choice. The file type and specific folder are based on the settings you have chosen in the Scan to File screen of ControlCenter3. (See File on page 62.)
1 Put the document face up in the ADF, or face down on the scanner glass.
2 Press (Scan).
3 Press ▲ or ▼ to choose Scan to File. Press OK.
4 Press Start.
The machine starts the scanning process.

Note
- If you want the scanned data in colour, choose colour in scan type on the Device Button tab of the ControlCenter3 configuration. If you want the scanned data in black and white, choose black and white in scan type on the Device Button tab of the ControlCenter3 configuration. (See SCAN on page 57.)
- If you would like to display the folder window after scanning the document, select Show Folder on the Device Button tab of the ControlCenter3 configuration. (See SCAN on page 57.)
- If you would like to change the file name of scanned documents, enter the file name in File Name section on the Device Button tab of the ControlCenter3 configuration. To change the machine's Scan key settings, right-click the each ControlCenter buttons, click ControlCenter Configuration and click the Device Button tab.
Using ScanSoft™ PaperPort™ 11SE with OCR by NUANCE™

Note
ScanSoft™ PaperPort™ 11SE supports Windows® 2000 (SP4 or greater), XP (SP2 or greater), XP Professional x64 Edition and Windows Vista® only.
2
ScanSoft™ PaperPort™ 11SE for Brother is a document management application. You can use PaperPort™ 11SE to view scanned documents.
PaperPort™ 11SE has a sophisticated, yet easy-to-use filing system that will help you organize your graphics and text documents. It allows you to mix or 'stack' documents of different formats for printing, faxing or filing.
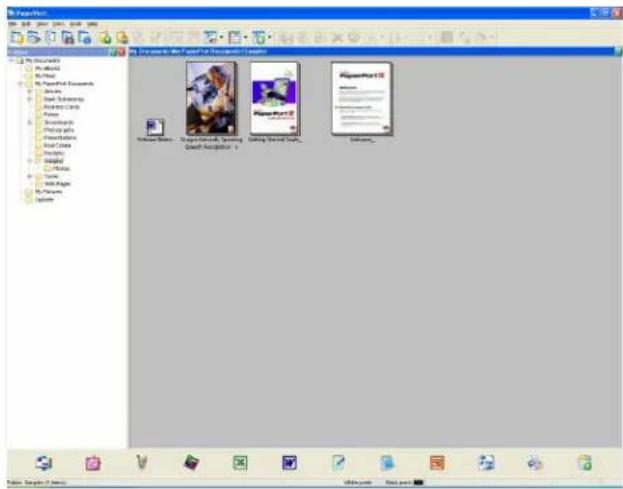
text_image
My Properties My Documents My Office My Print My Personal Documents My Work Main Subscribers Main Subscribers Desktops Photography Representation Real Data History Download Help Time Web Active My Features Options My Properties - SmartIcon, Smart Smart Iconic 1 SmartIcon - SmartIcon SmartForm13 SmartForm13 SmartForm13 SmartForm13This chapter only introduces the basic functions of the software. For more details, see the ScanSoft™ Getting Started Guide. To view the complete ScanSoft™ PaperPort™ 11SE Getting Started Guide, choose Help from PaperPort™ 11SE menu bar and click Getting Started Guide. When you install MFL-Pro Suite, ScanSoft™ PaperPort™ 11SE for Brother is installed automatically. You can access ScanSoft™ PaperPort™ 11SE through the ScanSoft™ PaperPort™ SE program group located in Start/All Programs/ScanSoft PaperPort 11 on your PC.
Viewing items
ScanSoft™ PaperPort™ 11SE gives several ways to view items:
Desktop View displays the item in the chosen folder with a thumbnail (a small graphic that shows each item in a desktop or folder) or an icon.
You can see both PaperPort™ 11SE items (MAX files) and non-PaperPort™ 11SE items (files created using other applications).
All graphical files (PaperPort™ 11SE's *.max and other files) will be displayed and include an icon that indicates the application that the specific file type is associated or created with. Non-graphical files are indicated by a small rectangular thumbnail and are not displayed as actual images.

text_image
My Documents My Documents My Software My Software My Software My Software My Software My Software My Software My Software My Software My Software My Software My Software My Software My Software My Software My Software My Software My Software My Software My Software My Software My Software My Software My Software My Software My Software My Software My Software My Software My Software My Software My Software My Software My SoftwarePage Thumbnails displays a close-up of a single page. You can open a PaperPort™ 11SE item by double-clicking its icon or the thumbnail in Desktop View.
As long as you have the appropriate application on your PC to display it, you can also open a non-PaperPort™ SE item by double-clicking it.

text_image
Scanning Started Guide - All - PaperPort File Edit View Help Guides Tools Help NUANCE ScanSoft Screening Guide SCANSOFT PaperPort SE Getting Started GuideOrganizing your items in folders
PaperPort™ 11SE has an easy-to-use filing system for organizing your items. The filing system consists of folders and items that you choose to view in Desktop View. An item can be a PaperPort™ 11SE item or a non-PaperPort™ 11SE item:
- Folders are arranged in a ‘tree’ structure in the Folder View. You use this section to choose folders and view their items in Desktop View.
■ You can simply drag and drop an item onto a folder. When the folder is highlighted, release the mouse button and the item is stored in that folder. - Folders can be ‘nested’—that is, stored in other folders.
■ When you double-click a folder, its contents (both PaperPort™ 11SE MAX files and non PaperPort™ 11SE files) appear on the Desktop. - You can also use Windows®Explorer to manage the folders and items shown in Desktop View.
Quick links to other applications
ScanSoft™ PaperPort™ 11SE automatically recognizes many other applications on your PC and creates a 'working link' to them.
The bar at the bottom of the PaperPort™ 11SE desktop shows which programs you can use with PaperPort™ 11SE.

natural_image
Row of ten software icons including spreadsheet, PDF, and Excel (no text or labels visible)To send an item from PaperPort ^™ 11SE to another program, simply drag and drop the item from the PaperPort ^™ 11SE desktop to the program icon on the Send To bar. PaperPort ^™ 11SE automatically converts the item to the preferred format.
If PaperPort™ 11SE does not automatically recognize one of the applications on your PC, you can manually create a link using the New Program Link command.
ScanSoft™ PaperPort™ 11SE with OCR lets you convert image text into text you can edit
ScanSoft™ PaperPort™ 11SE can quickly convert a text document image into text that you can edit with a word processing application.
PaperPort™ 11SE uses the optical character recognition software (OCR), which comes with PaperPort™ 11SE. PaperPort™ 11SE can use your preferred OCR application if it is already on your PC. You can convert the entire item, or by using the Copy Text command, you can choose only a portion of the text to convert.
Dragging an item onto a word-processing link icon starts PaperPort™ 11SE's built-in OCR application, or you can use your own OCR application.

natural_image
Row of ten colorful icons including a document, folder, and computer (no text or symbols)Importing items from other applications
As well as scanning items, you can bring items into PaperPort™ 11SE in a variety of ways and convert them to PaperPort™ 11SE (MAX) files in several different ways:
■ Print to the Desktop View from another application, such as Microsoft® Excel.
- Import files saved in other file formats, such as Windows® Bitmap (BMP) or Tagged Image File Format (TIFF).
Exporting items into other formats
You can export or save PaperPort™ 11SE items in several popular file formats, such as BMP, JPEG, TIFF or PDF.
Exporting an image file
1 Click File, then Save As in the PaperPort™ 11SE window. The Save 'XXXXX' as dialog box is displayed.
2 Choose the drive and folder where you want to store the file.
3 Enter the new file name and choose the file type.
4 Click Save to save your file, or Cancel to return to PaperPort™ 11SE without saving it.
Uninstalling ScanSoft™ PaperPort™ 11SE with OCR
For Windows ^® 2000 Professional
1 Click the Start button, Settings, Control Panel, then Add/Remove Programs.
2 Choose ScanSoft PaperPort 11 from the list and click Change or Remove.
For Windows® XP
1 Click the Start button, Control Panel, Add or Remove Programs, and click the Change or Remove Programs icon.
2 Choose ScanSoft PaperPort 11 from the list and click Change or Remove.
For Windows Vista®
1 Click the Start button, Control Panel, Programs and Programs and Features.
2 Choose ScanSoft PaperPort 11 from the list and click Uninstall.
3
ControlCenter3

Note
The features available to you in ControlCenter3 may vary depending on the model number of your machine.
Using ControlCenter3
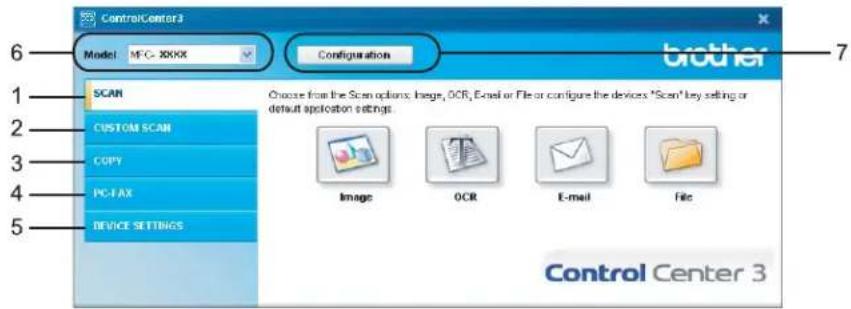
ControlCenter3 is a software utility that lets you quickly and easily access your often used applications. Using ControlCenter3 eliminates the need to manually launch specific applications. ControlCenter3 has the following operations:
1 Scan directly to a file, E-mail, word processor or graphics application of your choice. (1)
② Access to the Custom Scan settings. Custom Scan buttons let you configure a button to meet your own application needs. (2)
3 Access the Copy features available via your PC. (3)
4 Access the 'PC-FAX' applications available for your device. (4)
5 Access the settings available to configure your device. (5)
6 You can choose which machine ControlCenter3 will connect with from the Model drop-down list. (6)
7 You can also open the configuration window for each function and a link to the Brother Solutions Center by clicking the Configuration button. (7)
ControlCenter3
Modern

text_image
Control Center 3 Model MFC- XXXX Configuration SCAN Choose from the Scan options: Image, OCR, E-mail or File or configure the devices 'Scan' key setting or default application settings. COPY PC-FAX DEVICE SETTINGS Custom Image OCR File E-mail brotherClassic
text_image
ControlCenter 3 Model: MFC-XXXX Configuration SCAN CUSTOM SCAN COPY PC-FAX DEVICE SETTINGS Choose from the Scan options: Image, OCR, Email or File or configure the devices "Scan" key setting or default application settings. Image OCR E-mail File controlcenter 3
Note
- To be able to choose another connected model from the Model drop-down list, you must have the MFL-Pro Suite Software installed on your PC for that model.
- For the Modern user interface, you need to install Adobe ^ Flash ^ Player 8 or greater. If you do not have Flash Player 8 or greater, you will be prompted so you can download the latest Flash Player.
Switching the user interface
You can choose the Modern or Classic user interface for ControlCenter3.
To switch the user interface, click Configuration button and select SETUP then SKIN SELECT.
2 From the SKIN SELECT dialog, you can choose your preferred user interface.

text_image
ControlCenter3 Skin Type Modern You can change the appearance of ControlCenter by changing the skin type. OK Cancel3
Turning the Auto Load feature off
Once you start ControlCenter3 from the Start menu, the icon will appear on the task tray. You can open the ControlCenter3 window by double-clicking the icon.
If you do not want ControlCenter3 to run automatically each time you start your PC:
1 Right-click the ControlCenter3 icon in the task tray 2:56 PM, and choose Preferences. The ControlCenter3 preference window appears.
2 Uncheck Start ControlCenter on computer startup.
3 Click OK to close the window.
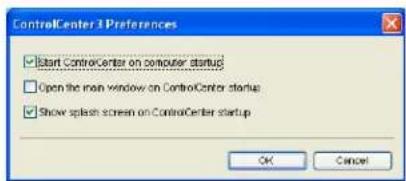
text_image
ControlCenter 3 Preferences ✓ Start ControlCenter on computer startup ✓ Open the main window on ControlCenter startup ✓ Show splash screen on ControlCenter startup OK CancelSCAN
There are four scan options: Scan to Image, Scan to OCR, Scan to E-mail and Scan to File.
■ Image (Default: Microsoft®Paint)
Lets you scan a page directly into any graphic viewer/editor application. You can choose the destination application, such as Microsoft® Paint, Corel® Paint Shop Pro®, Adobe® Photoshop®, or any kind of image editing application on your PC.
OCR (Default: Microsoft Notepad)
Lets you scan a page or document, automatically run the OCR application and put text (not a graphic image) into a word processing application. You can choose the target word processing application, such as Microsoft® Notepad, Microsoft® Word, Corel® WordPerfect® or any word processing application on your PC.
■ E-mail (Default: your default E-mail software)
Lets you scan a page or document directly into an E-mail application as a standard attachment. You can choose the file type and resolution for the attachment.
File
Lets you scan directly to a disk file. You can change the file type and destination folder, as needed.
ControlCenter3 gives you the ability to configure the hardware Scan key on your machine and the ControlCenter3 Software button for each scan feature. To configure the hardware Scan key on your machine choose the Device Button tab (right-click each Control Center button and click ControlCenter Configuration) in the configuration menu for each of the SCAN buttons. To configure the Software button in ControlCenter3 choose the Software Button tab (right-click each Control Center button and click ControlCenter Configuration) in the configuration menu for each of the SCAN buttons.

text_image
ControlCenter 3 Model: MFC-XXXX Configuration brother SCAN CUSTOM SCAN COPY PC-TAX DEVICE SETTINGS Choose from the Scan options: Image, OCR, E-mail or File or configure the devices "Scan" key setting or default application settings. Image OCR E-mail File Control Center 3File type
You can choose from the following list of file types when saving to a folder.
Windows Bitmap (*.bmp)
JPEG (*.jpg)
TIFF - Uncompressed (*.tif)
TIFF - Compressed (*.tif)
TIFF Multi-Page - Uncompressed (*.tif)
TIFF Multi-Page - Compressed (*.tif)
■ Portable Network Graphics (*.png)
PDF (*.pdf)
Image (example: Microsoft® Paint)
The Scan to Image feature lets you scan an image directly into your graphics application for image editing. To change the default settings, right-click the Image button, click ControlCenter Configuration and click the Software Button tab.
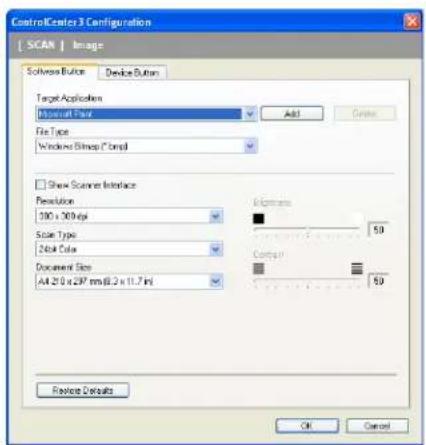
text_image
ControlCenter 3 Configuration SCAN | Image Software Button Device Button Target Applications Application Type Add Create File Type Windows Bitmap / Compl Show Scanner Interface Resolution 100 x 30 bits Scan Type 2bit Color Document Size All 250 x 297 mm @ 2 x 11.7 inch Electrons 50 Control 50 Preview Defaults OK CancelIf you want to scan and then crop a portion of a page after pre-scanning the document, check the Show Scanner Interface box.
Change the other settings, if needed.
To change the destination application, choose the correct application from the Target Application dropdown list. You can add an application to the list by clicking the Add button.

text_image
Add Scan to Image Application If you want to change your application for "Scan to Image", please specify Application Name, Application Location and File Type. And then, click "Add" button to add your application. Application Name Application Location File Type Windows Bitmap (*.bmp) Add Cancel
Enter the Application Name (up to 30 characters) and the Application Location. You can also find the application location by clicking the icon. Choose File Type from the drop-down list.
You can delete an application that you have added by clicking the Delete button in the Software Button tab.
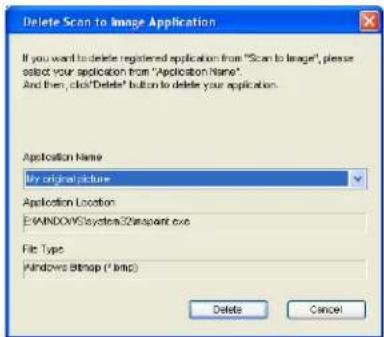
text_image
Delete Scan to Image Application If you want to delete registered application from "Scan to Image", please select your application from "Application Name". And then, click "Delete" button to delete your application. Application Name: By original picture Application Location: E:\WINDOWS\System32\stream.exe File Type: Windows Bitmap (*.bmp) Delete Cancel
Note
This function is also available for Scan to E-mail and Scan to OCR. The window may vary depending on the function.
OCR (Word Processing program)
Scan to OCR scans a document and converts it into text. This text can be edited using your favorite word processing software.
To configure Scan to OCR, right-click the OCR button, click ControlCenter Configuration and click the Software Button tab.

text_image
ControlCenter 3 Configuration SCAN | OCR Software Button Device Button Target Applications Interface Add File Type Tool (T M) OCR Software PaperFor OCR OCR Language English Show Source Interface Resolution 300 x 200 bits Stave Type BlockWhite Document Size A4 210 x 297 mm @ 0.3 x 11.7 bits Brightness 50 Control 50 Preview Defaults OK CancelTo change the word processing application, choose the destination word processing application from the Target Application drop-down list. You can add an application to the list by clicking the Add button. To delete an application, click the Delete button in the Software Button tab.
If you want to scan and then crop a portion of a page after pre-scanning the document, check the Show Scanner Interface box.
You can also configure the other settings for Scan to OCR.
Scan to E-mail lets you scan a document to your default E-mail application, so you can send the scanned job as an attachment. To change the default E-mail application or attachment file type, right-click the E-mail button, click ControlCenter Configuration and click the Software Button tab.
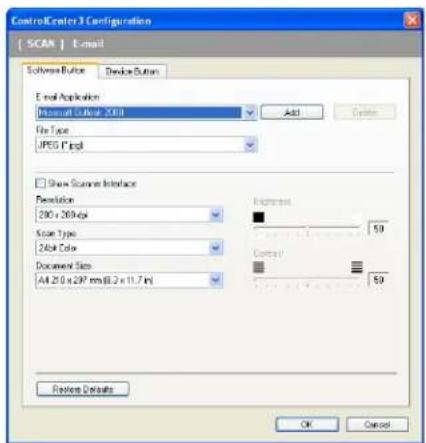
text_image
ControlCenter 3 Configuration SCAN | E-mail Software Buffer Device Button E-mail Application Microsoft Outlook 2001 Add Create File Type JPEG Print Show Scanner Interface Resolution 290 x 26bit Scan Type 2bit Color Document Size All 250 x 297 mm @ 0.2 x 11.7 inch Exposure 50 Control 50 Preview Details OK Cancel
To change the E-mail application, choose your preferred E-mail application from the E-mail Application drop-down list. You can add an application to the list by clicking the Add button ^1 . To delete an application, click the Delete button.
When you first start ControlCenter3 a default list of compatible E-mail applications will appear in the drop-down list. If you are having trouble using a custom application with ControlCenter3 you should choose an application from the list.
You can also change the other settings used to create the file attachments.
If you want to scan and then crop a portion of a page after pre-scanning the document, check the Show Scanner Interface box.
File
The Scan to File button lets you scan an image to a folder on your hard disk in one of the file types shown in the file attachment list. To configure the file type, folder and file name, right-click the File button, click ControlCenter Configuration and click the Software Button tab.
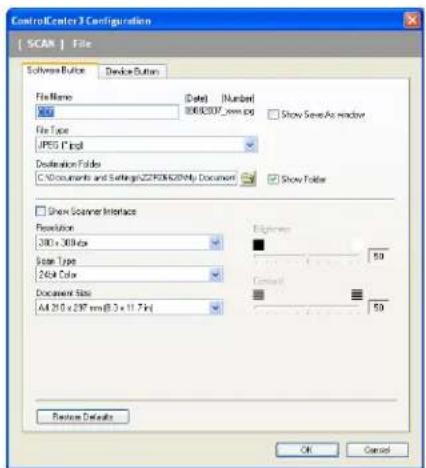
text_image
ControlCenter 3 Configuration SCAN | File Software Button Device Button File Name (Date) Number 000000000000.jpg File Type JPEG Print Destination Folders C:\Documents and Settings\CCP00000000\My Documents Show Save As Window Show Folder Show Scanner Interface Resolution 280 x 368.6x Stream Type 264.4x Document Size A4 25.0 x 297 mm(0.3 x 11.7x) Exptower 50 Default 50 Preview Details OK Cancel
You can change the File Name. Enter the file name you want to use for the document (up to 100 characters) in the File Name box. File name will be the file name you registered, current date and sequential number.
Choose the file type for the saved image from the File Type drop-down list. You can save the file to the default
folder shown in the Destination Folder, or choose your preferred folder by clicking the icon.
To display where the scanned image is saved when scanning is finished, check the Show Folder box. To let you specify the destination of the scanned image every time you scan, check the Show Save as Window box.
If you want to scan and then crop a portion of a page after pre-scanning the document, check the Show Scanner Interface box.
CUSTOM SCAN
The Custom Scan option lets you create your own scan options.
For Modern interface users, place the mouse pointer over the ◀ and click Custom.
To customize a button, right-click the appropriate button and click ControlCenter Configuration. There are four options: Scan to Image, Scan to OCR, Scan to E-mail and Scan to File.
Scan to Image
Lets you scan a page directly into any image viewer/editor software. You can choose any image editor application on your PC.
Scan to OCR
Converts scanned documents into editable text files. You can choose the destination application for the editable text.
Scan to E-mail
Attaches the scanned images to an E-mail message. You can also choose the file attachment type and create a quick send list of E-mail addresses chosen from your E-mail address book.
Scan to File
Lets you save a scanned image to any folder on a local or network hard disk. You can also choose the file type to be used.

text_image
Modern Control Center 3 | Model NFD- XXIX Configuration SCAN COPY PC-FAX DEVICE SETTINGS Custom scan offers four additional Scan buttons that can be renamed and customized to scan to your choice of application. Presets Custom1 Custom2 Custom1 Custom3 brotherClassic
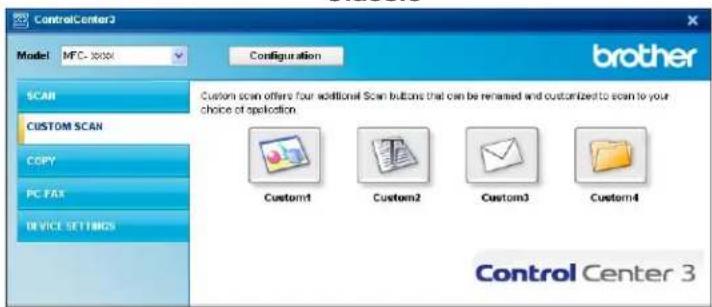
text_image
ControlCenter3 Model: MFC-10000 Configuration brother SCAN CUSTOM SCAN COPY PC FAT DEVICE SETTINGS Custom scan offers four additional Scan buttons that can be renamed and customized to scan to your choice of application. Custom1 Custom2 Custom3 Custom4 Control Center 3File type
You can choose from the following list of file types when saving to a folder.
Windows Bitmap (*.bmp)
JPEG (*.jpg)
TIFF - Uncompressed (*.tif)
TIFF - Compressed (*.tif)
TIFF Multi-Page - Uncompressed (*.tif)
TIFF Multi-Page - Compressed (*.tif)
■ Portable Network Graphics (*.png)
PDF (*.pdf)
Customizing a user-defined button
To customize a button, right-click the button, then click the ControlCenter Configuration button to see the configuration window.
Scan to Image
General tab
To create the button name, enter a name in the Please enter a name for the Custom Button text field (up to 30 characters).
Choose the type of scan from the Scan Action field.
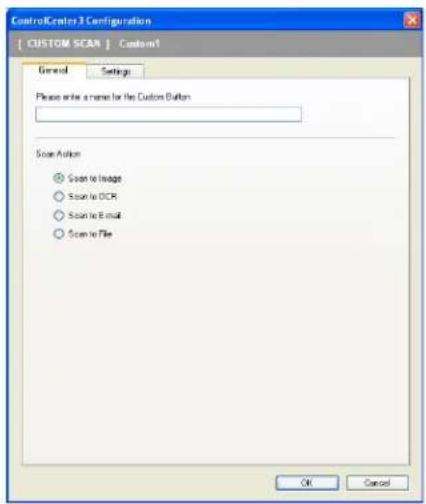
text_image
ControlCluster 3 Configuration [ CUSTOM SCAN ] Custom1 General Settings Please select a name for the Custom Button Scan Action ○ Scan to Image ○ Scan to OCR ○ Scan to Email ○ Scan to File OK CancelSettings tab
Choose the Target Application, File Type, Resolution, Scan Type, Document Size, Show Scanner Interface, Brightness and Contrast settings.

text_image
ControlCenter 3 Configuration [ CUSTOM SCAN | Custom1] General Settings Target Applications Microsoft Flash File Type Windows Bitmap [Drop] Add Delete Show Coswell Interface Resolution 500 x 369 pixels Scale Type 24bit Color Document Size All 210 x 287 pixels (8.3 x 11.7 pixels) Brightness 59 Centroid 59 Paste Defaults OK Cancel3
Scan to OCR
General tab
To create the button name, enter a name in the Please enter a name for the Custom Button text field (up to 30 characters).
Choose the type of scan from the Scan Action field.
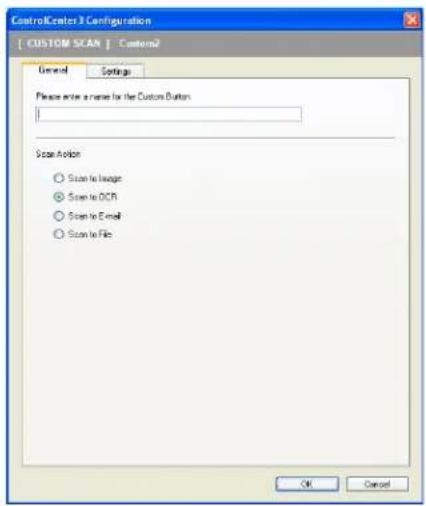
text_image
ControlCenter 3 Configuration [ CUSTOM SCAN ] Custom2 General Settings Please write a name for the Custom Button Scan Action ○ Scan to Image ● Scan to OCR ○ Scan to Email ○ Scan to File OK CancelSettings tab
Choose the Target Application, File Type, OCR Software, OCR Language, Resolution, Scan Type, Document Size, Show Scanner Interface, Brightness and Contrast settings.
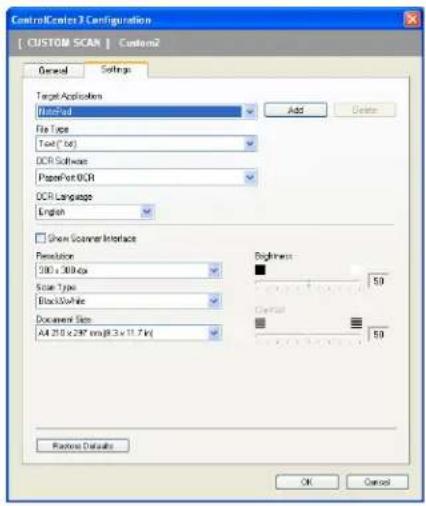
text_image
ControlCenter 3 Configuration [ CUSTOM SCAN | Custom2 General Settings Target Application AutoPad File Type Text (Tak) OCR Software PaperPort UCR OCR Language English Show Scanner Interface Resolution 500 x 300 dpi Scale Type BlackWhite Document Size All 210 x 297 mm @ 3 x 11.7 fps Brightness 50 Control 50 Finish Details OK Cancel3
Scan to E-mail
General tab
To create the button name, enter a name in the Please enter a name for the Custom Button text field (up to 30 characters).
Choose the type of scan from the Scan Action field.
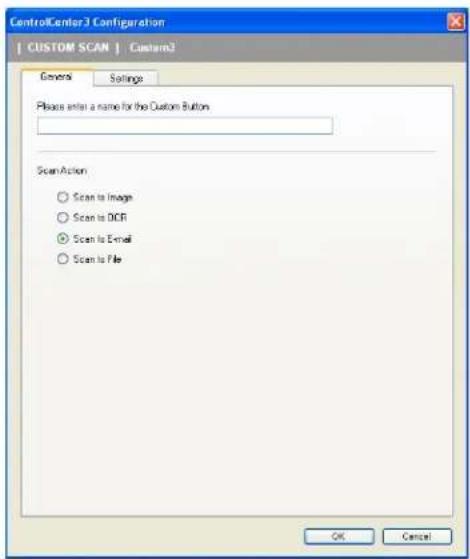
text_image
ControlCenter3 Configuration CUSTOM SCAN | Custom3 General Settings Please enter a name for the Custom Button Scan Action ○ Scan to Image ○ Scan to OCR ○ Scan to Email ○ Scan to File OK CancelSettings tab
Choose the E-mail Application, File Type, Resolution, Scan Type, Document Size, Show Scanner Interface, Brightness and Contrast settings.

text_image
ControlCenter 3 Configuration [ CUSTOM SCAN | Custom] General Settings E-mail Application Microsoft Office 2008 File Type JPSA (*.jpg) Add Delete Show Scanner Interface Resolution 250 x 260 data Scale Type 24bit Data Document Size All 25.0 x 297 mm @ 3 x 11.7 fps Frequency: 50 Control: 50 Paste Details OK Cancel3
Scan to File
General tab
To create the button name, enter a name in the Please enter a name for the Custom Button text field (up to 30 characters).
Choose the type of scan from the Scan Action field.
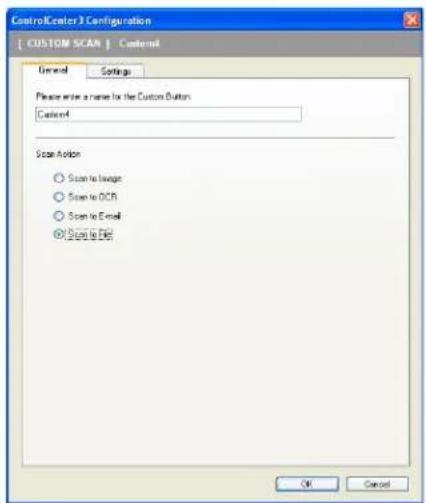
text_image
ControlCenter 3 Configuration [ CUSTOM SCAN ] Custom General Settings Please write a name for the Custom Button: Caser4 Scan Action ○ Scan to Image ○ Scan to OCR ○ Scan to Email ● Scan to File OK CancelSettings tab
Choose the file format from the File Type drop-down list. Save the file to the default folder which is shown in the Destination Folder box or choose your preferred folder by clicking the icon. Check
Show Folder to show where the scanned image is saved after scanning. Check Show Save As Window to specify the destination of the scanned image after every scan.
Choose the Resolution, Scan Type, Document Size, Show Scanner Interface, Brightness and Contrast settings and enter the file name if you want to change.
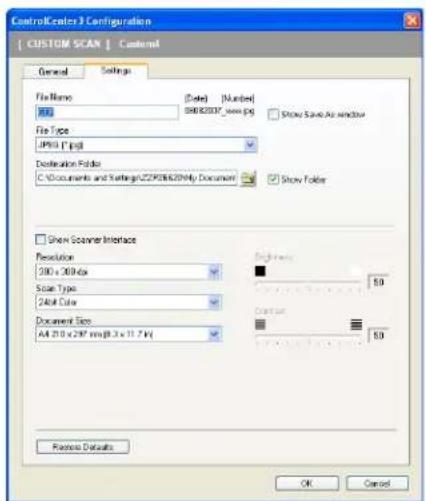
text_image
ControlCenters 3 Configuration [ CUSTOM SCAN ] Customl General Settings File Name (Date) [Number] A01 B8B2037_very.png Show Save As window File Type JP801.1.psd Destination Folder C:\Documents and Settings\CCP0000200\My Documents Show Folder Show Counter Interface Resolution 200 x 368 kx Scale Type 24-bit Color Document Size All 25.0 x 297 mm @ 3 x 11.7 kx Properties OK CancelCOPY
Lets you use the PC and any printer driver for enhanced copy operations. You can scan a page on the machine and print copies using any of the features of the machine's printer driver, or you can direct the copy output to any standard printer driver installed on the PC including network printers.
You can configure your preferred settings on up to four buttons.
The Copy1 to Copy4 buttons can be customized to let you use advanced copy functions such as N in 1 printing.

text_image
ControlCenter3 Model MFC-10000 Configuration brother SCAN CUSTOM SCAN COPY PC-FAX DEVICE SETTINGS Access the Copy features available via your computer Copy1 Copy2 Copy3 Copy4 Control Center 3To use the Copy buttons, configure the printer driver by right-clicking the button and choosing the ControlCenter Configuration.
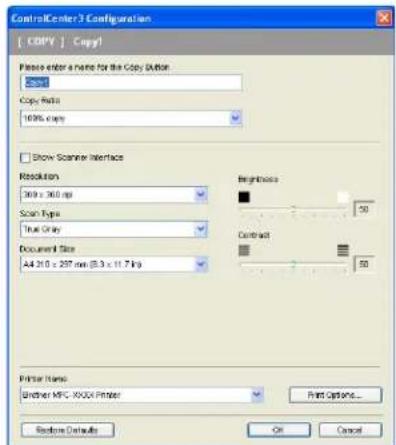
text_image
ControlCenter3 Configuration [ COPY ] Copy! Please enter a name for the Copy Editor Copy: Copy Ratio: 100% copy Show Scanner Interface Resolution 360 x 360 mp Scan Type: True Gray Document Size: A4 210 x 257 mm (8.3 x 11.7 kg) Properties Contrast 50 50 Printer Name: Ethernet MPC XNDA Printer Print Options... Restore Defaults OK CancelEnter a name in Please enter a name for the Copy Button text field (up to 30 characters) and choose Copy Ratio.
Choose the Resolution, Scan Type, Document Size, Show Scanner Interface, Brightness and Contrast settings to be used.
Before finishing the Copy button configuration, choose the Printer Name. To display the printer driver settings, click the Print Options... button and then Properties... button.
In the printer driver settings dialog box, you can choose advanced settings for printing.
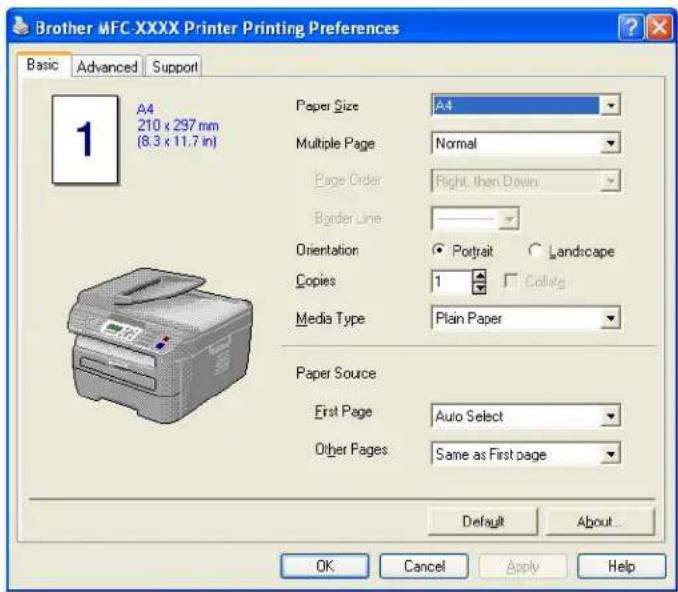
text_image
Brother MFC-XXXX Printer Printing Preferences Basic Advanced Support A4 210 x 297 mm (8.3 x 11.7 in) Paper Size A4 Multiple Page Normal Page Order Right, then Down Border Line Orientation Portrait Landscape Copies 1 Collate Media Type Plain Paper Paper Source First Page Auto Select Other Pages Same as First page Default About... OK Cancel Apply Help
Note
You must configure each of the copy buttons before they can be used.
PC-FAX (MFC models only)
The PC-FAX option lets you send and receive faxes. You can also configure the address book and change some general machine settings.
These buttons are for sending or receiving faxes using the Brother PC-FAX application.
Send
Lets you scan a page or document and automatically send the image as a fax from the PC using the Brother PC-FAX software. (See PC-FAX sending on page 92.)
Receive
By clicking this button, the PC-FAX receive software is activated and your PC starts receiving fax data from your Brother machine. After activating the PC-FAX option, the icon name changes to View Received which when clicked will open an application and display the received faxes. Before using the PC-FAX Receive option, you must select the PC-FAX Receive option from the control panel menu of the Brother machine. (See PC-FAX receiving on page 105.)
Address Book
Lets you open the Brother PC-FAX address book. (See Brother Address Book on page 99.)
Setup
Lets you configure the PC-FAX sending settings. (See Sending setup on page 93.)

Note
PC-FAX supports Black and white faxing only.

text_image
ControlCenter3 Model: MFC - xxxxx Configuration Scan CUSTOM SCAN COPY PC-FAX DEVICE SETTINGS Access the PC-FAX application available on your device. Select configuration to change the application or default settings. Send Receive Address Book Setup Control Center 3Send
The Send button lets you scan a document and automatically send the image as a fax from the PC using the Brother PC-FAX software. (See PC-FAX sending on page 92.)
To change the Send settings, right-click the Send button and click ControlCenter Configuration. You can change the Resolution, Scan Type, Document Size, Show Scanner Interface, Brightness and Contrast settings.

text_image
ControlCenter 3 Configuration [ PC/FAX ] Send PC FAX Driver: Show PC/FAX x 247 Setup... Show Scanner Interface Resolution: 200 x 200 dpi Scan Type: Only (Error Diffusion) Document Size: A4.259 x 287 mm (3.2 x 11.7 mm) Brightness Contract Restore Defaults OK CancelReceive/View Received
The Brother PC-FAX Receiving software option lets you view and store your faxes on your PC. It is automatically installed when you install the MFL-Pro Suite.
By clicking the Receive button, the PC-FAX Receive function is activated and starts to receive fax data from your Brother machine. Before you use the PC-FAX Receive function, you must select the PC-FAX Receive option from the control panel menu of the Brother machine. (See Enabling PC-FAX Receiving software on your machine on page 106.)
To configure the PC-FAX Receive software, see Setting up your PC on page 107.

text_image
ControlCenter3 Model: MTC xxxx Configuration brotter SCAN CUSTOM SCAN COPY PC-FAX DEVICE SETTINGS Access the PC-FAX application available on your device. Select configuration to change the application or default settings. Send Receive Address Book Setup Control Center 3When the PC-FAX receiving software is running, you can open the viewer application with the View Received button. (PaperPort™ 11SE)

text_image
ControlCenter3 Model: MTC-2007 Configuration brither SCAN CUSTOM SCAN COPY PC-FAX DEVICE SETTINGS Access the PC-FAX application available on your device. Select configuration to change the application or default settings. Send View Received Address Book Setup Control Center 33

Note
You can also activate the PC-FAX receiving software from the start menu. (See Running the PC-FAX Receiving software on your PC on page 106.)
Address Book
The Address Book button lets you add, amend or delete contacts from your address book. To edit this address book, click the Address Book button to open the dialog box. (See Brother Address Book on page 99.)
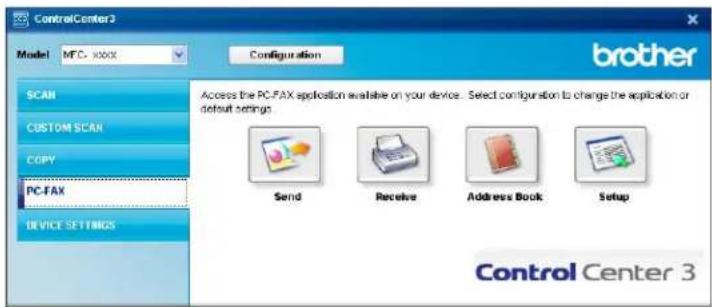
text_image
ControlCenter3 Model MTC xxxx Configuration SCAN CUSTOM SCAN COPY PC-FAX DEVICE SETTINGS Access the PC-FAX application available on your device. Select configuration to change the application or default settings. Send Receive Address Book Setup Control Center 3Setup
By clicking the Setup button, you can configure the user settings of the PC-FAX application. (See Setting up user information on page 92.)
DEVICE SETTING
You can configure or check the machine settings.
■ Remote Setup (MFC models only)
Lets you open the Remote Setup Program. (See Remote Setup on page 90.)
■ Quick-Dial (MFC models only)
Lets you open the Set Quick-Dial window of Remote Setup. (See Remote Setup on page 90.)
Status Monitor
Allows you to open the Status Monitor Utility. (See Status Monitor on page 9)
User's Guide
Lets you view the User's Guide, the Software User's Guide and the Network User's Guide.

text_image
ControlCenter3 Model MTC- xxxx Configuration brother SCAN CUSTOM SCAN COPY PC-FAX DEVICE SETTINGS Access device settings Remote Setup Quick Dial Status Monitor User's Guide Control Center 3Remote Setup (MFC models only)
The Remote Setup button lets you open the Remote Setup Program window to configure the machine setting menus.

Note
For details, see Remote Setup on page 90.

text_image
Brother MFC Remote Setup Program - MFC-XXXX MFC-XXXX General Setup Fax Setup Receive Setup Send Set Quick Dial Report Setting Remote Fax Opt Dial Restrict Copy LAN Word TCP/IP Ethernet WLAN TCP/IP Scan to FTP Initial Setup General Setup Mode Timer 2 Mini Papers Type Plain Papers Size A4 Volume Ring Med Speaker Med Auto Daylight On Off Ecology Tonet Save Off Sleep Time 5 Booper Off Export Print Import OK Cancel ApplyQuick-Dial (MFC models only)
The Quick-Dial button lets you open the Set Quick-Dial window in the Remote Setup Program. You can then easily register or change the Quick-Dial numbers from your PC.

text_image
Brother MFC Remote Setup Program - XXXX MFC-XXXX General Setup Fax Setup Reposks Setup Send Set Quick Dial Report Setting Remote Fax Opt Dial Restrict Copy LAN Wired TCP/IP Ethernet WLAN TCP/IP Scan to FTP Initial Setup Set Quick Dial FAX/TEL NUMBER Types DESTINATION SETTING G1 G2 G3 G4 G5 G6 G7 *01 Faw/Tel STANDARD *02 Faw/Tel STANDARD *03 Faw/Tel STANDARD *04 Faw/Tel STANDARD *05 Faw/Tel STANDARD *06 Faw/Tel STANDARD *07 Faw/Tel STANDARD *08 Faw/Tel STANDARD #001 Faw/Tel STANDARD #002 Faw/Tel STANDARD #003 Faw/Tel STANDARD #004 Faw/Tel STANDARD #005 Faw/Tel STANDARD #006 Faw/Tel STANDARD #007 Faw/Tel STANDARD #008 Faw/Tel STANDARD #009 Faw/Tel STANDARD #010 Faw/Tel STANDARD #011 Faw/Tel STANDARD #012 Faw/Tel STANDARD #013 Faw/Tel STANDARD #014 Faw/Tel STANDARD #015 Faw/Tel STANDARD #016 Faw/Tel STANDARD #017 Faw/Tel STANDARD #018 Faw/Tel STANDARD #019 Faw/Tel STANDARD #020 Faw/Tel STANDARD #021 Faw/Tel STANDARD #022 Faw/Tel STANDARD #023 Faw/Tel STANDARD #024 Faw/Tel STANDARD #025 Faw/Tel STANDARD #026 Faw/Tel STANDARD Export Print Import OK Cancel ApplyStatus Monitor
The Status Monitor button allows you to monitor the status of one or more devices, allowing you to get immediate notification of errors such as paper empty or paper jam. (See Status Monitor on page 9)
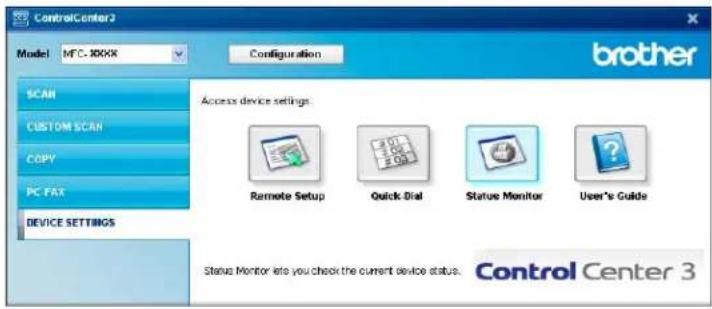
text_image
ControlCenter 3 Model MTC-XXXX Configuration SCAN CUSTOM SCAN COPY PC FAX DEVICE SETTINGS Access device settings. Remote Setup Quick Dial Status Monitor User's Guide Status Monitor lets you check the current device status. Control Center 3
User's Guide
The User's Guide button lets you view the Software User's Guide and the Network User's Guide in HTML format.
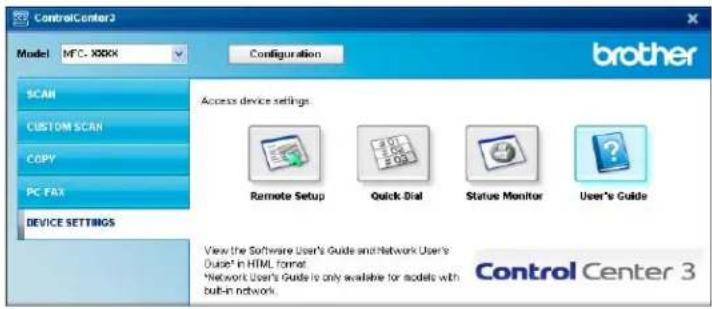
text_image
ControlCenter3 Model: MFC X88X Configuration SCAN CUSTOM SCAN COPY PC FAX DEVICE SETTINGS Access device settings Remote Setup Quick Dial Status Monitor User's Guide View the Software User's Guide and Network User's Duiser® in HTML format *Network User's Guide is only available for models with built-in network. Control Center 34
Network Scanning (For models with built-in network)
To use the machine as a network scanner, the machine must be configured with a TCP/IP address. You can set or change the address settings from the control panel (See Control Panel Setup in the Network User's Guide) or by using the BRAmin Professional software. If you installed the machine following the instructions for a network user in the Quick Setup Guide then the machine should already be configured for your network.

Note
- For network scanning, a maximum of 25 clients can be connected to one machine on a network. For example, if 30 clients try to connect at a time, 5 of those clients will not be shown on the LCD.
- If your PC is protected by a firewall and is unable to network scan, you may need to configure the firewall settings to allow communication through port number 54925 and 137. See Before using the Brother software on page 110.
Before using Network Scanning
Network licence
This product includes a PC licence for up to 5 Users.
This licence supports the installation of the MFL-Pro Software Suite including ScanSoft™ PaperPort™ 11SE on up to 5 PCs on the network.
If you want to use more than 5 PCs with ScanSoft™ PaperPort™ 11SE installed, please buy the Brother NL-5 pack which is a multiple PC licence agreement pack for up to 5 additional users. To buy the NL-5 pack, contact your Brother dealer.
Configuring Network Scanning
If you are using a different machine than the one that was originally registered to your PC during the installation of MFL-Pro Suite software (see the Quick Setup Guide), follow the steps below.

For Windows ^® 2000, click the Start button, Control Panel, then Scanners and Cameras.
For Windows ^® XP, click the Start button, Control Panel, Printers and Other Hardware, then Scanners and Cameras (or Control Panel, Scanners and Cameras).
For Windows Vista ^® , click the Start button, Control Panel, Hardware and Sound, then Scanner and Cameras.
text_image
Scramers and Cameras File Edit View Favorites Tools Help Back Search Folders Scramers and Cameras Imaging Tasks Action imaging device Other Planes Control Panel My Documents Shared Documents My Network Blocks Details Another MPC-ODE LAN② Do one of the following:
For Windows®2000, select your Brother machine from the list and click the properties button.
For Windows® XP, right-click the Scanner Device icon and choose Properties.
The Network Scanner Properties dialog box appears.
■ For Windows Vista, click the Properties button.

Note
For Windows Vista ^® when the User Account Control screen appears, do the following.
- For users who have administrator rights: Click Continue.
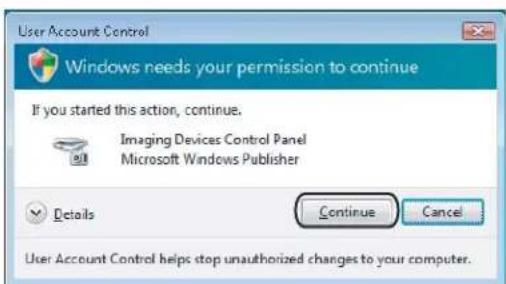
text_image
User Account Control Windows needs your permission to continue If you started this action, continue. Imaging Devices Control Panel Microsoft Windows Publisher Details Continue Cancel User Account Control helps stop unauthorized changes to your computer.- For users who do not have administrator rights: Enter the administrator password and click OK.
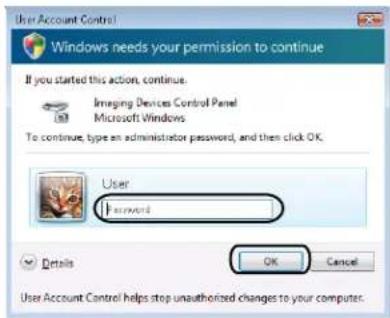
text_image
User Account Control! Windows needs your permission to continue If you started this action, continue. Imaging Devices Control Panel Microsoft Windows To continue, type an administrator password, and then click OK. User Password Details OK Cancel User Account Control helps stop unauthorized changes to your computer.3 Click the Network Setting tab and choose the appropriate connection method.
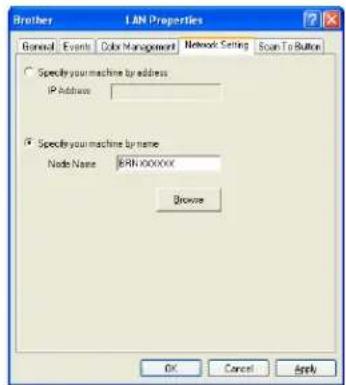
text_image
Brother LAN Properties General Events Color Management Network Setting Scan To Button Specify your machine by address IP Address Specify your machine by name Node Name BRRXXXXXX Browse OK Cancel ApplySpecify your machine by address
Enter the IP address of the machine in IP Address, and then click Apply.
Specify your machine by name
1 Enter the machine node name in Node Name, or click Browse and choose the device you want to use.
2 Click OK.

text_image
Search for Devices NodeName IP Address��ModelName Node Types MAC Address BPK XXXXXX 88, 100X, XX, XXX VPD-XXXX NK-XXXX 88/XX/XX/XX/XXXX Finish OK Cancel4 Click the Scan To Button tab and enter your PC name in the Display Name field. The machine's LCD displays the name you enter. The default setting is your PC name. You can enter any name that you like (Max. 15 characters).
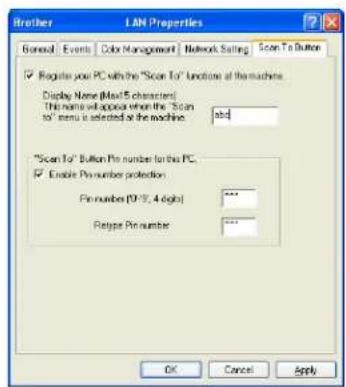
text_image
Brother LAN Properties General Events Color Management Network Setting Scan To Button ✓ Register your PC with the "Scan To"UNDline at the machine. Display Name (Max 5 characters) This name will appear when the "Scan to" menu is selected at the machine *.sd "Scan To" Button Pin number to this PC. ✓ Enable Pin number protection Pin number (10:39, 4 digits) *** Relapse Pin number *** OK Cancel Apply5 If you want to avoid receiving unwanted documents, enter a 4-digit PIN number in the Pin number and Retype Pin number field. To send data to a PC protected by a PIN number, the LCD prompts you to enter the PIN number before the document can be scanned and sent to the PC. (See Using the Scan key on page 82.)
Using the Scan key
Scan to E-mail
When you choose Scan to E-mail your document will be scanned and sent directly to the PC you designated on your network. ControlCenter3 will activate the default E-mail application on the designated PC. You can scan and send a black and white or colour document from the PC as an attachment.
You can change the scan configuration. (See E-mail on page 61.)
1 Put the document face up in the ADF, or face down on the scanner glass.
2 Press (Scan).
3 Press ▲ or ▼ to choose Scan to E-mail. Press OK.
4 Press ▲ or ▼ to choose the destination PC you want to use for E-mailing your document.
Press OK.
If the LCD prompts you to enter a PIN number, enter the 4-digit PIN number for the destination PC on the control panel.
Press OK.
5 Press Start.
The machine starts the scanning process.

Note
If you want the scanned data in colour, choose colour in scan type on the Device Button tab of the ControlCenter3 configuration. If you want the scanned data in black and white, choose black and white in scan type on the Device Button tab of the ControlCenter3 configuration. (See SCAN on page 57.)
Scan to Image
When you choose Scan to Image, your document will be scanned and sent directly to the PC you designated on your network. ControlCenter3 will activate the default graphics application on the designated PC. You can change the Scan configuration. (See Image (example: Microsoft® Paint) on page 58.)
1 Put the document face up in the ADF, or face down on the scanner glass.
2 Press (Scan).
3 Press ▲ or ▼ to choose Scan to Image. Press OK.
4 Press ▲ or ▼ to choose the destination PC you want to send to.
Press OK.
If the LCD prompts you to enter a PIN number, enter the 4-digit PIN number for the destination PC on the control panel.
Press OK.
5 Press Start.
The machine starts the scanning process.

Note
If you want the scanned data in colour, choose colour in scan type on the Device Button tab of the ControlCenter3 configuration. If you want the scanned data in black and white, choose black and white in scan type on the Device Button tab of the ControlCenter3 configuration. (See SCAN on page 57.)
Scan to OCR
When you choose Scan to OCR, your document will be scanned and sent directly to the PC you designated on your network. ControlCenter3 will activate ScanSoft™ PaperPort™ 11SE OCR and convert your document into text for viewing and editing from a word processing application on the designated PC. You can change the Scan configuration. (See OCR (Word Processing program) on page 60.)
1 Put the document face up in the ADF, or face down on the scanner glass.
2 Press (Scan).
3 Press ▲ or ▼ to choose Scan to OCR.
Press OK.
4 Press ▲ or ▼ to choose the destination PC you want to send to.
Press OK.
If the LCD prompts you to enter a PIN number, enter the 4-digit PIN number for the destination PC on the control panel.
Press OK.
5 Press Start.
The machine starts the scanning process.

Note
If you want the scanned data in colour, choose colour in scan type on the Device Button tab of the ControlCenter3 configuration. If you want the scanned data in black and white, choose black and white in scan type on the Device Button tab of the ControlCenter3 configuration. (See SCAN on page 57.)
Scan to File
When you choose Scan to File, you can scan a black and white or colour document and send it directly to a PC you designate on your network. The file will be saved in the folder and file format that you have configured in ControlCenter3. You can change the Scan configuration. (See File on page 62.)
1 Put the document face up in the ADF, or face down on the scanner glass.
2 Press (Scan).
3 Press ▲ or ▼ to choose Scan to File. Press OK.
4 Press ▲ or ▼ to choose the destination PC you want to send to. Press OK. If the LCD prompts you to enter a PIN number, enter the 4-digit PIN number for the destination PC on the control panel. Press OK.
5 Press Start. The machine starts the scanning process.

Note
- If you want the scanned data in colour, choose colour in scan type on the Device Button tab of the ControlCenter3 configuration. If you want the scanned data in black and white, choose black and white in scan type on the Device Button tab of the ControlCenter3 configuration. (See SCAN on page 57.)
- If you would like to change the file name of scanned documents, enter the file name in File Name section on the Device Button tab of the ControlCenter3 configuration. To change the machine's Scan key settings, right-click each Control Center button, click ControlCenter Configuration and click the Device Button tab.
Scan to FTP (MFC-7440N and MFC-7840W only)
When you choose Scan to FTP, you can scan a black and white or colour document directly to an FTP server on your local network or on the internet.
The details required to use Scan to FTP can be entered manually at the control panel or by using Web Based Management to pre-configure and store the details in an FTP Profile.
For information on how to manually enter the Scan to FTP details, see Scan to FTP Manual Method on page 88. To use Web Based Management, type http://xxx.xxx.xxx.xxx (where xxx.xxx.xxx.xxx is the IP address of your machine) into your browser, and then you can configure or change the settings in the Administrator Settings. You can configure up to ten FTP server profiles.

text_image
brother. MFC-XXXX Home Page Maintenance Information List Reports Final Device Administrator Settings Network Configurations General Setup Fair Settings Copy Settings Brother Service Center Administrator Settings Configure Password File Settings Scan to FTP Design Function Link Scan to FTP Profile Name 1 Profile Name 2 Profile Name 3 Profile Name 4 Profile Name 5 Profile Name 6 Profile Name 7 Profile Name 8 Profile Name 9 Profile Name 10 Create a User Defined File Name Default Passive Mode Off On Default Part Number 3 Cancel Submit brother. MFC-XXXX Home Page Maintenance Information List Reports Final Device Administrator Settings Network Configurations General Setup Fair Settings Copy Settings Brother Service Center Administrator Settings Configure Password File Settings Scan to FTP Design Function Link Profile Name 1 Profile Name 2 Profile Name 3 Profile Name 4 Profile Name 5 Profile Name 6 Profile Name 7 Profile Name 8 Profile Name 9 Profile Name 10 Create a User Defined File Name Profile Name Host Address Username Password Shape Directory File Name BPN00007025A2E Quality Color 156 File Type RCF Passive Mode Off On Part Number 28 Cancel Submit1 Enter the name that you want to use for the profile of the FTP server. This name will be displayed on the LCD of the machine and can be up to 15 characters.
2 The Host Address is the domain name of the FTP server. Enter the Host Address (for example ftp.example.com) (up to 60 characters) or the IP address (for example 192.23.56.189).
3 Enter the Username that has been registered with the FTP server for the machine (up to 32 characters).
4 Enter the Password for access to the FTP server (up to 32 characters).
5 Enter the destination folder where your document will be stored on the FTP server (for example /brother/abc/) (up to 60 characters).
6 Choose the file name you want to use for the scanned document. You can choose from seven present and two user defined File Names. The file name that will be used for your document will be the file name you selected plus the last 6 digits of the flatbed/ADF scanner counter plus the file extension (For example, Estimate098765.pdf). You can also manually enter a File Name up to 15 characters.
7 Choose the scan quality from the drop-down list. You can choose Color 150, Color 300, Color 600, Gray 300, Gray 200, Gray 100, B&W 200 or B&W 200x100.
8 Choose the file type for the document from the drop-down list. You can choose PDF or JPEG for colour or greyscale documents and PDF or TIFF for B/W document.
9 You can set Passive Mode to OFF or ON depending on your FTP server and network firewall configuration. By default this setting is ON. You can also change the port number used to access the FTP server. The default for this setting is port 21. In most cases these two settings can remain as default.
Creating a User Defined File Name
In addition to the seven present file names you can store two user defined file names that can be used for creating an FTP Server Profile.
From the Scan to FTP screen in Web Based Management, choose Create a User Defined File Name.

text_image
brother. MFC-XXXX Home Page Maintenance Information Data Reports Final Device Administrator Settings Network Configuration General Settings Fax Settings Copy Settings Sn to FTP Snur Focus Link Administrator Settings Configure Password File Settings Scan to FTP Scan to FTP Profile Name 1 Profile Name 2 Profile Name 3 Profile Name 4 Profile Name 5 Profile Name 6 Profile Name 7 Profile Name 8 Profile Name 9 Profile Name 10 Create a User Defined File Name Default Passive Mode Default Part Number OFF On Cancel Submit2 Enter a file name in one of the two user defined fields and click Submit. A maximum of 15 characters can be entered in each of the user defined name fields.
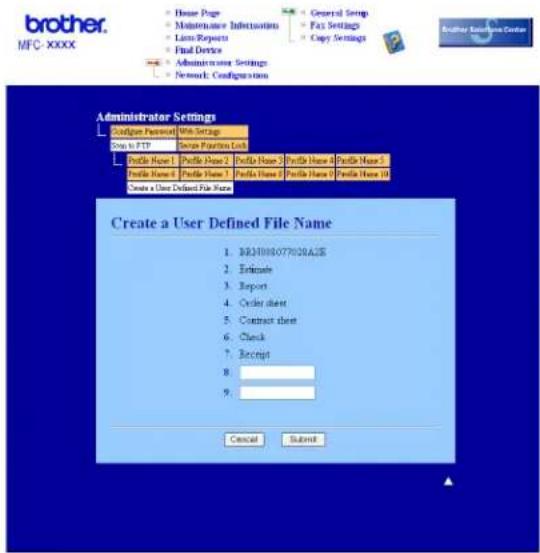
text_image
brother. MFC-XXXX House Page Maintenance Instructions Laws Reports Final Device Administrator Settings Network: Configuration General Setup Fax Settings Copy Settings Administrator Settings Configure Personal Unit Settings Setup to FTP Device Platform Lock Profile Name 1 Profile Name 2 Profile Name 3 Profile Name 4 Profile Name 5 Profile Name 6 Profile Name 7 Profile Name 8 Profile Name 9 Profile Name 10 Create a User Defined File Name Create a User Defined File Name 1. BIRJH00077038A2E 2. Enthusie 3. Report 4. Order sheet 5. Contract sheet 6. Check 7. Receipt 8. 9. Cancel SubmitScan to FTP using FTP Server Profiles
1 Put the document face up in the ADF, or face down on the scanner glass.
2 Press (Scan).
3 Press ▲ or ▼ to choose Scan to FTP. Press OK.
4 Press ▲ or ▼ to choose one of the FTP server profiles listed. Press OK.
■ If the Scan to FTP profile is complete, you will automatically go to Step 10.
If the Scan to FTP profile is not complete, for instance, the login account name and password are missing or the quality or file type are not chosen, you will be prompted to enter any missing information in the following steps.
5 Choose one of the options below:
■ Press ▲ or ▼ to choose Color 150 dpi, Color 300 dpi, Color 600 dpi, Gray 300 dpi, Gray 200 dpi or Gray 100 dpi. Press OK and go to Step ⑥.
■ Press ▲ or ▼ to choose B&W 200 dpi or B&W 200x100 dpi. Press OK and go to Step ⑦.
6 Press ▲ or ▼ to choose PDF or JPEG. Press OK, and go to Step ⑧.
7 Press ▲ or ▼ to choose PDF or TIFF. Press OK.
8 Use the dial pad to enter the username. Press OK.
9 Use the dial pad to enter the password. Press OK.
10 Do one of the following:
■ If you want to start scanning, press Start and go to Step 13.
■ If you want to change the file name, go to Step 11.
11 Press ▲ or ▼ to choose a file name you want to use and press OK. Press Start and go to Step 13.

Note
If you want to change the file name manually, go to Step 12
12 Press ▲ or ▼ to choose
Enter the file name you want to use (up to 15 characters) and press OK. Press Start.
13 The LCD shows Connecting. When the connection to the FTP server is successful the machine starts the scanning process.
Scan to FTP Manual Method
1 Put the document face up in the ADF, or face down on the scanner glass.
2 Press (Scan).
3 Press ▲ or ▼ to choose Scan to FTP. Press OK.
4 Press ▲ or ▼ to choose

Note
If there is no FTP Profile configured, skip Step ④ and go to Step ⑤.
5 Use the dial pad to enter the FTP host address (for example ftp.example.com' Up to 60 characters) or the IP address (for example 192.23.56.189).
Press OK.
6 Use the dial pad to enter the destination folder (for example /brother/abc/, up to 60 characters). Press OK.
7 Press ▲ or ▼ to choose Enter Username or Change Setting. Press OK.
If you choose Enter Username, go to Step 11.
If you choose Change Setting, go to Step 8.
8 Choose one of the options below.
■ Press ▲ or ▼ to choose Color 150 dpi, Color 300 dpi, Color 600 dpi, Gray 300 dpi, Gray200dpi or Gray100dpi. Press OK and go to Step ⑨.
■ Press ▲ or ▼ to choose B&W 200 dpi or B&W 200x100 dpi. Press OK and go to Step 10.
9 Press ▲ or ▼ to choose PDF or JPEG. Press OK, and go to Step 11.
10 Press ▲ or ▼ to choose PDF or TIFF. Press OK.
11 Use the dial pad to enter the username. Press OK.
12 Use the dial pad to enter the password. Press OK.
13 Do one of the following:
■ If you want to start scanning, press Start and go to Step 16.
■ If you want to change the file name, go to Step 14.
14 Press ▲ or ▼ to choose a file name you want to use and press OK.
Press Start and go to Step 16.

Note
If you want to change the file name manually, go to Step 15
15 Press ▲ or ▼ to choose
Enter the file name you want to use (up to 15 characters) and press OK.
Press Start.
16 The LCD shows Connecting. When the connection to the FTP server is successful the machine starts the scanning process.

Note
If a timeout or any other error occurs, start the Scan to FTP process again from the beginning ①. If the username is entered incorrectly then the LCD will show Authenticate Err, please start the process again from the beginning ①.
5
Remote Setup (MFC models only)
Remote Setup
The Remote Setup program lets you configure many machine settings from a Windows® application. When you start this application, the settings on your machine will be downloaded automatically to your PC and displayed on your PC screen. If you change the settings, you can upload them directly to the machine.
Click the Start button, All Programs, Brother, MFC-XXXX (or MFC-XXXX LAN), and Remote Setup.

Note
- If your machine is connected via a Network, you have to enter your password.
- The default password is "access". You can use BRAmin Light or Web Based Management to change this password (See the Network Users Guide for details).
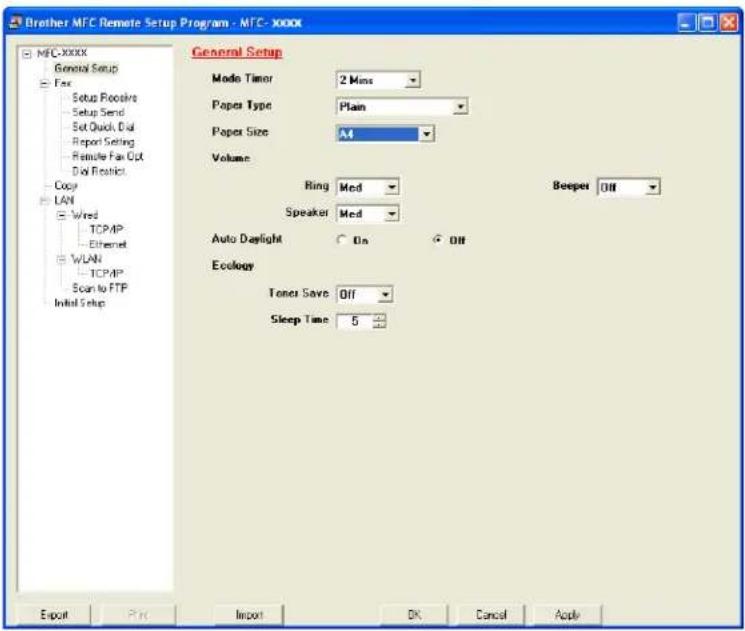
text_image
Brother MFC Remote Setup Program - MFC-XXXX MFC-XXXX General Setup Fare Setup Recovers Setup Send Set Quick, Dial Report Setting Remote Fan Out Dial Restrict Copy LAN Wired TCP/IP Ethernet WLAN TCP/IP Scan to FTP Initial Setup General Setup Mode Timer 2 Mins Paper Type Plain Paper Size A4 Volume Ring Med Speaker Med Auto Daylight On Off Ecology Toner Save Off Sleep Time 5 Beeper Off Export Print Import OK Cancel ApplyOK
Lets you start uploading data to the machine and exit the Remote Setup application. If an error message is displayed, enter the correct data again and then click OK.
Cancel
Lets you exit the Remote Setup application without uploading data to the machine.
Apply
Lets you upload data to the machine without exiting the Remote Setup application.
Lets you print the chosen items on the machine. You cannot print the data until it is uploaded to the machine. Click Apply to upload the new data to the machine and then click Print.
Export
Lets you save the current configuration settings to a file.
Import
Lets you read the settings from a file.

Note
- You can use the Export and Import buttons to save Quick Dial or all your settings for your machine.
- If your PC is protected by a firewall, and is unable to use Remote Setup, you may need to configure the firewall settings to allow communication through port number 137. See Firewall settings (For Network users) on page 110.
6
Brother PC-FAX Software (MFC models only)
PC-FAX sending
The Brother PC-FAX feature lets you to use your PC to send a document from an application as a standard fax. You can even attach a cover page. All you have to do is set up the receiving parties as members or groups in your PC-FAX Address Book or simply enter the destination address or fax number into the user interface. You can use the Address Book Search feature to quickly find members to send to.
For the latest information and updates on the Brother PC-FAX feature, visit http://solutions.brother.com.

Note
- If you are using Windows ^® 2000 Professional, Windows ^® XP and Windows Vista ^® you must log on with Administrator rights.
- The PC-FAX software can only send Black & White fax documents.
Setting up user information

Note
You can access User Information from the FAX Sending dialog box by clicking the icon.

(See Sending a file as a PC-FAX using the Facsimile style user interface on page 95.)
1 Click the Start button, All Programs, Brother, MFC-XXXX (where XXXX is your model name), PC-FAX Sending, then PC-FAX Setup.
The Brother PC-FAX Setup dialog box appears:
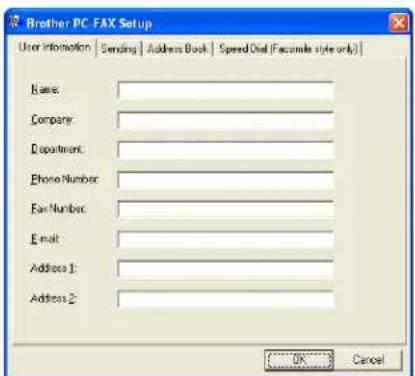
text_image
Brother PC: FAX Setup User Information | Sending | Address Book | Speed-Del (Facsimile style only) Name: Company: Department: Phone Number: Fan Number: Email: Address 1: Address 2: OK Cancel2 Enter this information to create the fax header and cover page.

Click OK to save the User Information.

Note
You can set up the User Information separately for each Windows ^® account.
Sending setup
From the Brother PC-FAX Setup dialog box, click the Sending tab to display the screen below.

text_image
Brother PC-FAX Setup User Information Sending Address Book Speed Dial (Facsimile style only) Dial Setting Outside line access Headset Include header Network PC-FAX Enable User interface Simple style Facsimile style OK Cancel■ Outside line access
Enter a number to access an outside line here. This is sometimes required by local PBX telephone systems (for example, dialling 9 to get an outside line in your office). For PC-Fax send, this number will be applied and Dial Prefix set in the function menu will be ignored.
■ Include header
To add the header information you entered in the User Information tab to the top of your sent faxes, check the Include header box. See Setting up user information on page 92.
User interface
Choose the user interface from two choices: Simple style or Facsimile style.
Simple style
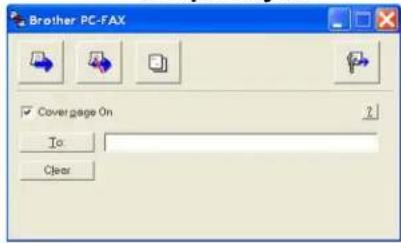
text_image
Brother PC-FAX ✓ Cover page On To ClearFacsimile style
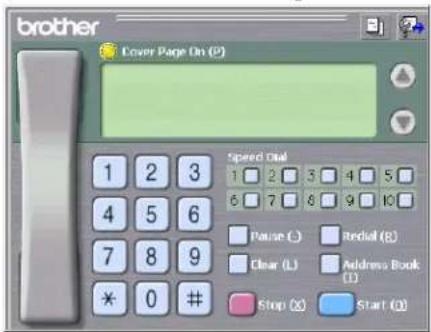
text_image
brother Cover Page On (2) Speed dial 1 2 3 4 5 6 7 8 9 10 Pause (L) Redial (R) Clear (L) Address Book (I) Stop (X) Start (O)Setting up a cover page
From the PC-FAX dialog box, click the icon to access the PC-Fax Cover Page setup screen.
The Brother PC-FAX Cover Page Setup dialog box appears:

text_image
Brother PC- FAX Cover Page Setup To Name: Tano Napoya Department: Sales Company: Brother International Corp From Name: John Doe IE1: 122-456-789 FAX: 992-654-321 E-Mail: abc@der.ghi Department: Marketing Company: Brother Industries, LTD Address1: 123 Rose Hill Drive Address2: Potashila, NJ 088 Form Layout Type 1 Cover page file Default cover page title No cover page title Custom COVER BMP Browser... Argument List Count other page Preview OK CancelEntering cover page information

Note
If you are sending a fax to more than one recipient, the recipient information will not be printed on the cover page.
To
Choose the recipient information you want to add to the cover page.
From
Choose the sender information you want to add to the cover page.
Comment
Enter the comment you want to add to the cover page.
Form
Choose the cover page format you want to use.
■ Cover page title
If you choose Custom, you can put a bitmap file, such as your company logo, on the cover page. Use the browse button to choose the BMP file, and then choose the alignment style.
Count cover page
Check Count cover page to include the cover page in the page numbering.
Sending a file as a PC-FAX using the Facsimile style user interface
1 Create a file in any application on your PC.
2 Click File, then Print.
The Print dialog box appears:

text_image
Print General Select Printer Add Printer Brother MPC3000X USB Printer Brother PC-FAX v2 PaperPort Color PaperPort Status: Ready Location: Comment: Print to file Preferences Fing Printer... Page Range All Selection Current Page Pages: 18635 Enter either a single page number or a single page range. For example, S-12 Number of pages: 1 Delete: 1 2 3 Print Cancel Apply3 Choose Brother PC-FAX v.2 as your printer, and then click Print.
The Facsimile style user interface appears:

text_image
brother Cover Page On (2) Speed Dial 1 2 3 4 5 6 7 8 9 10 Pause () Clear () Address Book (1) Stop (X) Start (O)
Note
If the Simple style user interface appears, change the user interface selection setting. (See Sending setup on page 93.)
4 Enter a fax number using any of the following methods:
■ Use the dial pad to enter the number.
■ Click any of the 10 Speed-Dial buttons.
■ Click the Address Book button, and then choose a member or group from the Address Book.
If you make a mistake, click Clear to delete all the entries.
5 To include a cover page, click Cover Page On.

Note
You can also click the cover page icon to create or edit a cover page.
6 Click Start to send the fax.

Note
- If you want to cancel the fax, click Stop.
- If you want to redial a number, click Redial to scroll through the last five fax numbers, choose a number, and then click Start.
Sending a file as a PC-FAX using the Simple style user interface
1 Create a file in any application on your PC.
2 Click File, then Print. The Print dialog box appears:
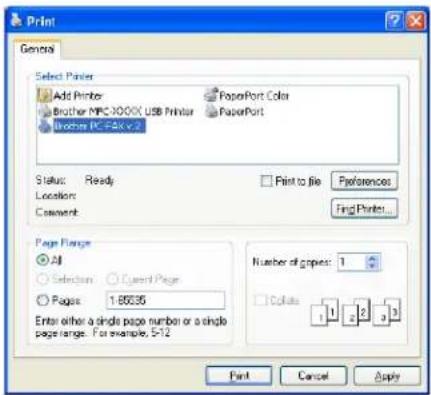
text_image
Print General Select Printer Add Printer Brother MFC3000X USB Printer Brother PC-FAK v.2 PaperPort Color PaperPort Status: Ready Location: Comment: Print to file Preferences Find Printer... Page Range All Selection: Custom Page Pages: 1-85535 Enter either a single page number or a single page range. For example, 5-12 Number of pages: 1 Page: 1 2 3 Print Cancel Apply3 Choose Brother PC-FAX v.2 as your printer, and then click Print. The Simple style user interface appears:

text_image
Brother PC-FAX ✓ Coverage On To Clear
Note
If the Facsimile style user interface appears, change the user interface selection setting. (See Sending setup on page 93.)
4 Enter the fax number using any of the following methods:
■ Enter the fax number in the To: field.
- Click the To: button, and then choose destination fax numbers from the Address Book.
If you make a mistake, click Clear to delete all the entries.
5 To send a cover page and note, check Cover Page On.

Note
You can also click the icon to create or edit a cover page.
6 Click the send


Note
If you want to cancel the fax, click the cancel

Address Book
If Outlook or Outlook Express is installed on your PC, you can choose in the Address Book tab which address book to use for PC-FAX sending. There are four types: Brother Address Book, Outlook, Outlook Express or Windows Mail Address.
For the address book file, you must enter the path and file name of the database file which contains the address book information.
Click the Browse button to choose the database file.
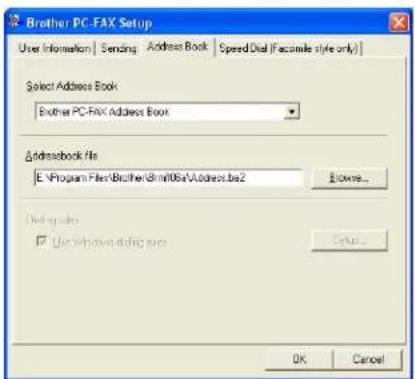
text_image
Brother PC-FAX Setup User Information | Sending | Address Book | Speed Dial (Facsimile style only) Select Address Book Brother PC-FAX Address Book Addressbook File E:\Program Files\Brother\8m06a\Address.be2 Browse... Dining size Use Windows Dining size Setup... OK Cancel6
If you choose Outlook or Outlook Express, you can use the Outlook, Outlook Express Address Book (for Windows® 2000/XP) or Windows Mail Address (for Windows Vista®) by clicking the Address Book button in the FAX Sending dialog box.
Outlook Express Address Book
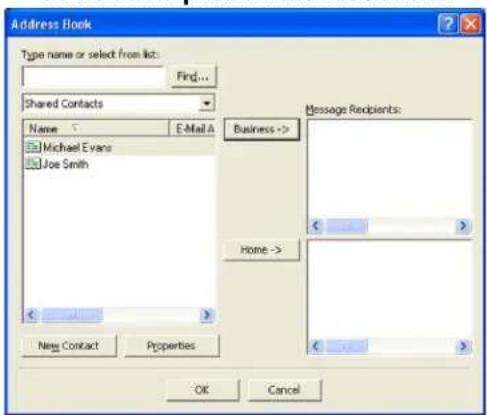
text_image
Address Book Type name or select from list: Find... Shared Contacts Name E-Mail A Michael Evans Joe Smith Business -> Home -> New Contact Properties Message Recipients: OK Cancel
Note
To use your Outlook Address Book, you must select Microsoft® Outlook 2000, 2002, 2003 or 2007 as your default E-mail application.
Brother Address Book
1 Click the Start button, All Programs, Brother, MFC-XXXX or MFC-XXXX LAN (where XXXX is your model name), PC-FAX sending, then PC-FAX Address Book. The Brother Address Book dialog box appears:
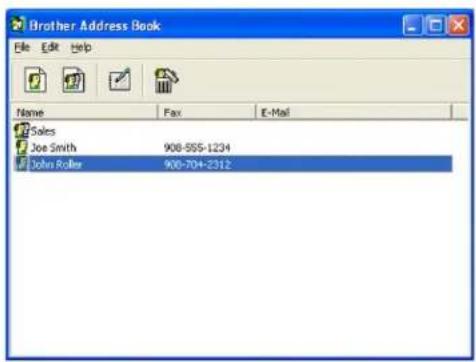
text_image
Brother Address Book File Edit Help Name Fax E-Mail Sales Joe Smith 908-555-1234 John Roller 908-704-2312Setting up a member in the Address Book
In the Brother Address Book dialog box you can add, edit and delete members and groups.
In the Address Book dialog box, click the icon to add a member. The Brother Address Book Member Setup dialog box appears:
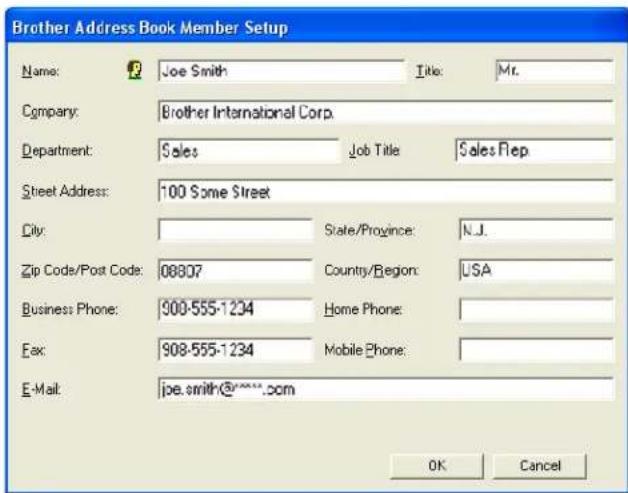
text_image
Brother Address Book Member Setup Name: Joe Smith Title: Mr. Company: Brother International Corp. Department: Sales Job Title Sales Flip Street Address: 100 Some Street City: State/Province: N.J. Zip Code/Post Code: 08807 Country/Region: USA Business Phone: 900-555-1234 Home Phone: Fax: 908-555-1234 Mobile Phone: E-Mail: joe.smith@****.com OK Cancel2 In the Member Setup dialog box, enter the member's information. Name is a required field. Click OK to save the information.
Speed Dial setup
From the Brother PC-FAX Setup dialog box, click the Speed Dial tab. (To use this feature, you must choose the Facsimile style user interface.)

text_image
Brother PC-FAX Setup User Information | Sending | Address Book | Speed Dial (Factsimile style only) Address Book Name Fax Sales Joe Smith 908-555-1234 John Roller 908-704-2310 Add >> Speed Dial No. Name Fax 1 John Foller 908-704-23 2 Joe Smith 908-555-12 3 Sales 4 5 6 7 8 9 10 Clear OK CancelYou can register a member or group on each of the ten Speed Dial buttons.
Registering an address in a Speed Dial button
1 Click the Speed Dial button you want to program.
2 Click the member or group you want to store on the Speed Dial button.
3 Click Add >>.
Clearing a Speed Dial button
1 Click the Speed Dial button you want to clear.
2 Click Clear.

Note
You can select a speed dial from the PC-FAX interface to make sending a document easier & faster.

text_image
brother Cover Page On (P) #1 Joe Smith XXX XXX XXXX Speed Dual 1 2 3 4 5 6 7 8 9 10 Pause (-) Redull (R) Clear (L) Address Book (D) Stop (x) Start (Q)Setting up a group for broadcasting
6
You can create a group to send the same PC-FAX to several recipients at one time.
In the Brother Address Book dialog box, click the icon to create a Group. The Brother Address Book Group Setup dialog box appears:

text_image
Brother Address Book Group Setup Group Name Available Names Sales Group Members John Roler Joe Smith << Remove Add >> OK Cancel2 Enter the name of the new group in the Group Name field.
3 In the Available Names box, choose each member to be included in the group, and then click Add >>. Members added to the group appear in the Group Members box.
4 After all the members you want have been added, click OK.

Note
You can have up to 50 members in a group.
Editing member information
1 Choose the member or group you want to edit.
2 Click the edit icon.
3 Change the member or group information.
4 Click OK.
Deleting a member or group
1 Choose the member or group you want to delete.
2 Click the delete icon.
3 When the confirmation dialog box appears, click OK.
Exporting the Address Book
You can export the whole Address Book to an ASCII text file (*.csv). You can also create a vCard for an address book member that can be attached to an outgoing E-mail. (A vCard is an electronic business card that contains the sender's contact information.) If you are creating a vCard, you must first click on the address book member you want to create the vCard for.
Exporting Address Book entries

Note
If you choose vCard in Step ①, Save as type: will be Vcard (*.vcf).
1 Do one of the following:
■ From the Address Book, click File, Export, then Text.
■ From the Address Book, click File, Export, then Vcard and go to Step 5.
2 From the Available Items column, choose the data fields you want to export and then click Add >>.

Note
Choose the items in the order you want them listed.
3 If you are exporting to an ASCII file, choose Tab or Comma from Divide Character. This chooses Tab or Comma to separate the data fields.
4 Click OK to save the data.

text_image
Select Items Select items in the order you want them to be listed. You can select the separator character to be inverted between items. Available Items Name Title Company Department Job Title Street Address Clip State/Province Zip Code/Post Code Country/Region Business Phone Divide Character Comma Info Selected Items Add >> << Remove OK Cancel5 Enter the name of the file, and then click Save.
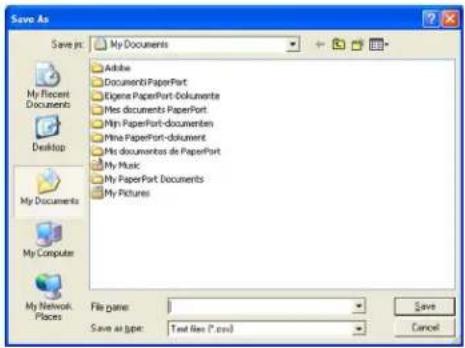
text_image
Save As My Documents Adobe Document6 PaperPort Eigene PaperPort-Dokumente Mes documents PaperPort Min PaperPort-documenten Mine PaperPort-document Mis documents de PaperPort My Music My PaperPort Documents My Pictures File pane: Save as type: Text files (*.csv) Save CancelImporting to the Address Book
You can import ASCII text files (*.csv) or vCards (electronic business cards) into your Address Book.
Importing an ASCII text file
1 Do one of the following:
■ From the Address Book, click File, Import, then Text.
■ From the Address Book, click File, Import, then Vcard and go to Step 5.
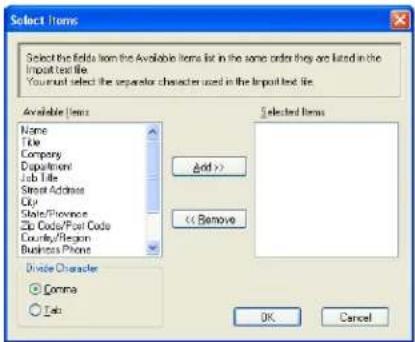
text_image
Select Items Select the Edds from the Available Items list in the same order they are listed in the Import text file. You must select the separator character used in the Import text file. Available Items Name Title Company Department Job Title Store Address City State/Province Code/Post Code Country/Region Business Phone Divide Character ○ Comma ○ Job Selected Items Add >> << Remove OK Cancel2 From the Available Items column, choose the data fields you want to import, and click Add >>.

Note
From the Available Items list choose the fields in the same order they are listed in the import text file.
3 Choose Tab or Comma based on the file format you are importing from Divide Character.
4 Click OK to import the data.
5 Enter the name of the file, and then click Open.
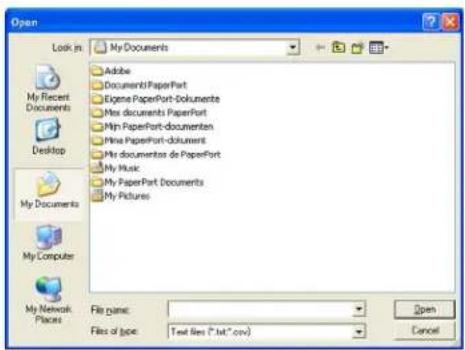
text_image
Open Look in: My Documents Adobe Document1 PaperPort Eigene PaperPort-Dokumente Mes documents PaperPort Mtn PaperPort-documenten Mine PaperPort-document Mis documentos de PaperPort My Music My PaperPort Documents My Pictures My Documents My Computer My Network Places File name: Files of type: Text files (*.txt.* .csv) Open Cancel
Note
If you chose a text file in Step ①, Files of type: will be Text file (*.csv).
PC-FAX receiving

Note
- The PC-FAX software can only receive Black & White fax documents.
- If your PC is protected by a firewall and is unable to use PC-FAX receive, you may need to configure the firewall settings to allow communication through port number 54926 and 137. See Before using the Brother software on page 110.
Depending on the operating system you are using, you may get a Security Alert message when you start the PC-FAX receiving feature. To enable PC-FAX receiving, you must unblock the program.

text_image
Windows Security Alert To help protect your computer. Windows Firewall has blocked some features of this program. Do you want to keep blocking this program? Name: PC-FAX Receive Publisher: Brother Industries Ltd. Keep Blocking Unlock Ask Me Later Windows Firewall has blocked this program from accepting connections from the Internet or a network. If you recognize the program or trust the publisher, you can unblock it. When should I unlock a program?6
The Brother PC-FAX Receive Software lets you view and store faxes on your PC. It is automatically installed when you install the MFL-Pro Suite and works on locally or network connected machines.
When enabled, your machine will receive faxes in its memory. Once it has received the fax, it will automatically be sent to your PC.
If you turn your PC off, your machine will continue to receive and store your faxes in its memory. The machine LCD will display the number of stored faxes received, for example:
PCFaxMsg:001
01
When you switch your PC on, the PC-FAX Receive Software automatically transfers your faxes to your PC. To enable the PC-FAX Receive Software, do the following:
■ Before you use the PC-FAX Receive function, you must choose PC-FAX Receive from the menu on the machine.
■ Run the Brother PC-FAX Receive software on your PC. (We recommend you select the Add to Startup folder check box, so that the software automatically runs and can transfer any faxes on PC startup.)
Enabling PC-FAX Receiving software on your machine
You can optionally enable the Backup Print option. When enabled, the machine will print a copy of the fax before the fax is sent to the PC or the PC is switched off.
1 Press Menu, 2, 5, 1.
2 Press ▲ or ▼ to choose PC Fax Receive. Press OK.
3 Press ▲ or ▼ to choose
4 Press ▲ or ▼ to choose Backup Print:On or Backup Print:Off. Press OK.
5 Press Stop/Exit.

Note
If you choose Backup Print:On, the machine will print the fax, so you will have a copy if there is a power failure before it is sent to the PC. The fax messages are automatically erased from your machine's memory when they have been successfully printed and sent to your PC. When Backup Print is off, your fax messages are automatically erased from your machine's memory when they have been successfully sent to your PC.
Running the PC-FAX Receiving software on your PC
Click the Start button, All Programs, Brother, MFC-XXXX or MFC-XXXX LAN, PC-FAX Receiving and Receive.
The PC-FAX icon appears in your PC tasktray.

Setting up your PC
1 Right-click the PC-FAX icon on your PC tasktray, and then click PC-Fax RX Setup. The PC-Fax RX Setup dialog box appears:
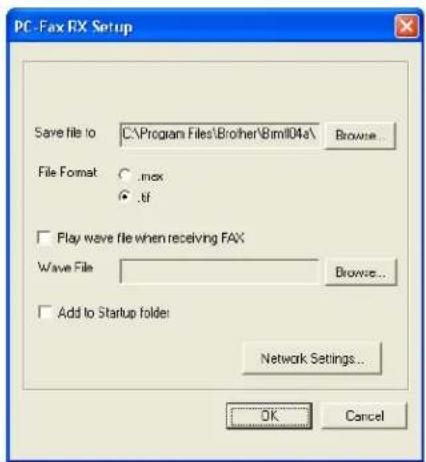
text_image
PC-Fax FX Setup Save file to C:\Program Files\Brother\8mil04a\ Browse... File Format . .max . .tf Play wave file when receiving FAX Wave File Browse... Add to Startup folder Network Settings... OK Cancel2 In Save file to, click the Browse button if you want to change the path where PC-FAX files are saved.
3 In File Format, choose .tif or .max as the received document format. The default format is .tif.
4 To play wave files (.wav sound files) when receiving a fax, check Play wave file when receiving FAX, and enter the path of the wave file.
5 To automatically start the PC-FAX receiving software when you start Windows ^® , check Add to Startup folder.
6 If you want to use the PC-FAX Receiving software, see Configuring the Network PC-FAX Receiving Settings on page 108.
Configuring the Network PC-FAX Receiving Settings
The settings to send received faxes to your computer were automatically configured during the installation of MFL-Pro Suite (See the Quick Setup Guide).
If you are using a different machine than the one that was registered to your PC during the installation of the MFL-Pro Suite software, follow the steps below.
In the PC-FAX RX Setup dialogue box, click the Network Settings button. The Network Settings dialog box appears.
2 You must specify the IP address or Node name of your machine.

text_image
Network Settings Specify your machine by address IP Address Specify your machine by name Node Name BRN_XXXXXX Browse... Display Your PC Name (Max 15 characters) XXXXX OK CancelSpecify your machine by address
Enter the IP address of the machine in IP Address.
Specify your machine by name
Enter the machine node name in Node Name, or click the Browse button and choose the correct Brother machine you want to use from the list.

text_image
Search for Devices Node Name IP Address Model Name Node Type NAC Address BRX-XX-XX 04_XXX_XX_XX MFX-XX NC-XX 04:XX:XX:XX:XX: Refresh OK CancelSpecify your PC name
You can specify the PC name that will appear on the display of the machine. To change the name, enter the new name in Display Your PC Name.
Viewing new PC-FAX messages
Each time your PC is receiving a PC-FAX, the icon will alternate between and . Once the fax has been received, the icon will change to the icon will change to once the received fax has been viewed.
1 Double-click Forum PaperPort™.
2 Open the Fax Received folder.
3 Double-click any new faxes to open and view them.

Note
The name title of your unread PC message will be based on the date and time that the messages were received until you assign a file name. For example 'Fax 2-20-2006 16;40;21.tif'.
7
Firewall settings (For Network users)
Before using the Brother software
Firewall settings on your PC may reject the necessary network connection for network printing, network scanning and PC Fax. If you are using the Windows® Firewall and you installed MFL-Pro Suite from the CD-ROM, the necessary Firewall settings have already been made. If you did not install from the CD-ROM follow the instructions below to configure your Windows Firewall. If you are using any other personal Firewall software, see the User's Guide for your software or contact the software manufacturer.
UDP Port number information for Firewall configuration
| UDP Port | Network Scanning | Network PC-Fax | Network Scanning and Network PC-Fax ^1 |
| External Port number | 54925 | 54926 | 137 |
| Internal Port number | 54925 | 54926 | 137 |
1 Add Port number 137 if you still have trouble with your network connection after you added port 54925 and 54926. Port number 137 also supports printing and Remote Setup over the network.
For Windows® XP SP2 users
1 Click the Start button, Control Panel, Network and Internet Connection and then Windows Firewall. Make sure that Windows Firewall on the General tab is set to On.
2 Click the Advanced tab and Settings... button of Network Connection Settings.
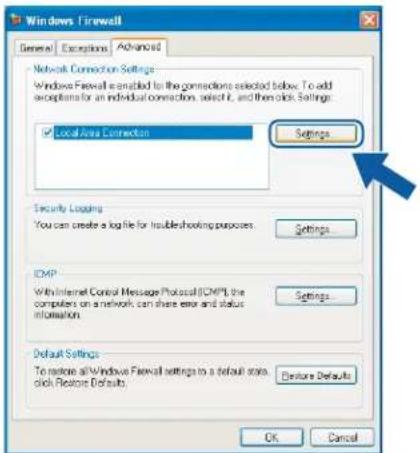
text_image
Windows Firewall General Exceptions Advanced Network Connection Settings Windows Firewall is enabled for the connections selected below. To add exceptions for an individual connection, select it, and then click. Settings: Local Area Connection Settings Security Loading You can create a log file for troubleshooting purposes. Settings ICMP With Internet Control Message Protocol (ICMP), the computers on a network can share error and status information. Settings Default Settings To restore all Windows Firewall settings to a default scale, click Restore Defaults. Restore Defaults OK Cancel3 Click the Add button.
4 Add port 54925 for network scanning by entering the information below:
1 In Description of service: Enter any description, for example "Brother Scanner".
2 In Name or IP address (for example 192.168.0.12) of the computer hosting this service on your network: Enter "Localhost".
3 In External Port Number for this service: Enter "54925".
4 In Internal Port number for this service: Enter "54925".
5 Make sure UDP is selected.
6 Click OK.
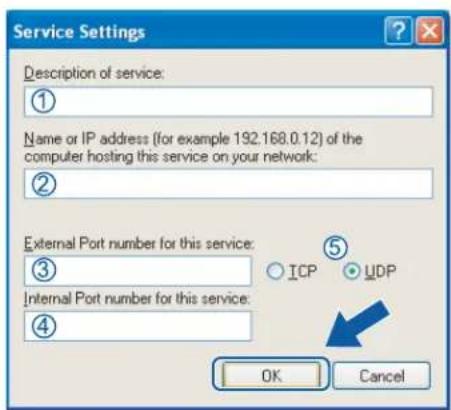
text_image
Service Settings Description of service: ① Name or IP address (for example 192.168.0.12) of the computer hosting this service on your network: ② External Port number for this service: ③ Internal Port number for this service: ④ ICP UDP OK Cancel5 Click the Add button.
6 Add port 54926 for Network PC-Fax by entering the information below:
1 In Description of service: Enter any description, for example "Brother PC-Fax".
2 In Name or IP address (for example 192.168.0.12) of the computer hosting this service on your network: - Enter "Localhost".
3 In External Port Number for this service: Enter "54926".
4 In Internal Port number for this service: Enter "54926".
5 Make sure UDP is selected.
6 Click OK.
7 If you still have trouble with your network connection, click the Add button.
8 Add port 137 for network scanning, network printing and Network PC-Fax receiving by entering the information below:
1 In Description of service: Enter any description, for example "Brother Network Print".
2 In Name or IP address (for example 192.168.0.12) of the computer hosting this service on your network: Enter "Localhost".
3 In External Port Number for this service: Enter "137".
4 In Internal Port number for this service: Enter "137".
5 Make sure UDP is selected.
6 Click OK.
9 Make sure that the new setting is added and is checked, and then click OK.
For Windows Vista® users
1 Click the Start button, Control Panel, Network and Internet, Windows Firewall and click Change settings.
2 When the User Account Control screen appears, do the following.
■ For users who have administrator rights: Click Continue.

text_image
User Account Control Windows needs your permission to continue If you started this action, continue. Windows Firewall Settings Microsoft Windows Details Continue Cancel User Account Control helps stop unauthorized changes to your computer.■ For users who do not have administrator rights: Enter the administrator password and click OK.

text_image
User Account Control Windows needs your permission to continue If you started this action, continue. Windows Firewall Settings Microsoft Windows To continue, type an administrator password, and then click OK. User Password Details OK Cancel User Account Control helps stop unauthorized changes to your computer.3 Make sure that Windows Firewall on the General tab is set to On.
4 Click the Exceptions tab.
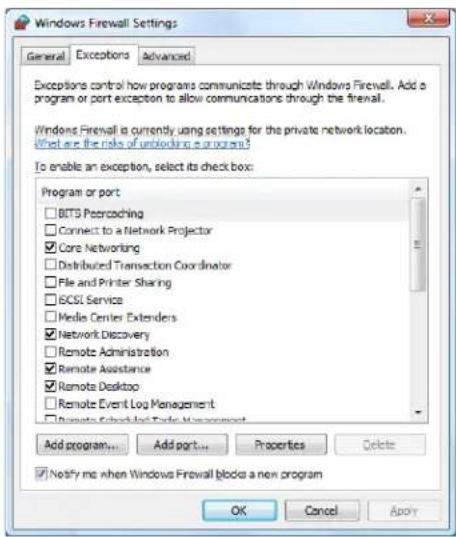
text_image
Windows Firewall Settings General Exceptions Advanced Exceptions control how programs communicate through Windows Firewall. Add a program or port exception to allow communications through the firewall. Windows Firewall is currently using settings for the private network location. What are the risks of unworking a program? To enable an exception, select its checkbox: Program or port □BTS Peercoaching □Connect to a Network Projector ☑Core Networking □Distributed Transaction Coordinator □File and Printer Sharing □BCSI Service □Media Center Extenders ☑Network Discovery □Remote Administration ☑Remote Assistance ☑Remote Desktop □Remote Event Log Management □Remote Feedback Transfer Management Add program... Add port... Properties Delete ☑Notify me when Windows Firewall blocks a new program OK Cancel Apply5 Click the Add port... button.
6 To add port 54925 for network scanning, enter the information below:
1 In Name: Enter any description, for example "Brother Scanner".
2 In Port number: Enter "54925".
3 Make sure UDP is selected.
Then, click OK.
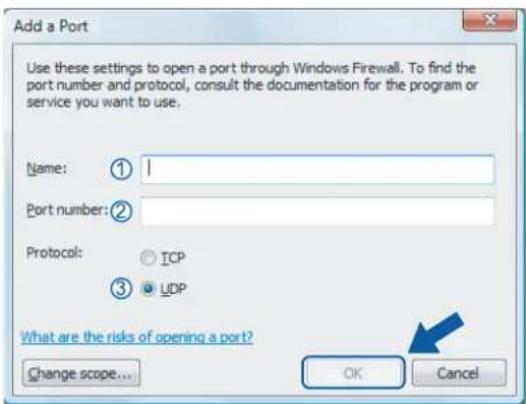
text_image
Add a Port Use these settings to open a port through Windows Firewall. To find the port number and protocol, consult the documentation for the program or service you want to use. Name: ① Port number: ② Protocol: TCP ③ UDP What are the risks of opening a port? Change scope... OK Cancel7 Click the Add port... button.
8 To add port 54926 for Network PC-Fax, enter the information below:
1 In Name: Enter any description, for example "Brother PC-Fax".
2 In Port number: Enter "54926".
3 Make sure UDP is selected.
Then, click OK.
9 Make sure that the new setting is added and is checked, and then click OK.
10 If you still have trouble with your network connection such as Network Scanning or Printing, check File and Printer Sharing box in the Exceptions tab and then click OK.
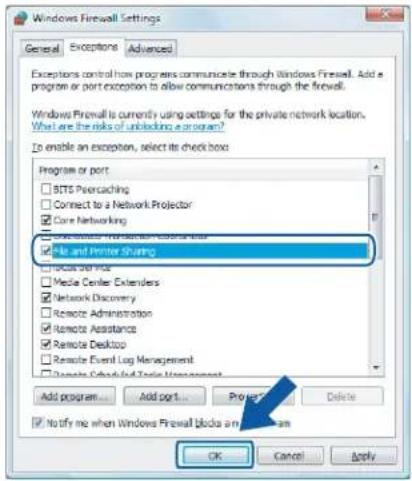
text_image
Windows Firewall Settings General Exceptions Advanced Exceptions control how programs communicate through Windows Firewall. Add a program or port exception to allow communications through the firewall. Windows Firewall is currently using settings for the private network location. What Are the risks of unblocking a program? To enable an exception, select its checkbox: Program or port □ BTS Peetratching □ Connect to a Network Projector □ Core Networking □ OpenButton Implementation Controller □ File and Printer Sharing □ Local Panel □ Media Center Extenders □ Network Discovery □ Remote Administration □ Remote Assistance □ Remote Desktop □ Remote Event Log Management □ Remote Check-and-Trip Management Add program... Add port... Project... Delete ■ Notify me when Windows Firewall blocks a program OK Cancel ApplySection II

Apple Macintosh
Printing and Faxing 116
Scanning 149
ControlCenter2 160
Network Scanning 179
Remote Setup 189
8
Printing and Faxing

Note
The screens are from Mac OS X 10.4.x. Screens on your Macintosh may vary depending on your operating system.
Printer operation key
Job Cancel
To cancel the current print job, press Job Cancel. You can clear the data that is left in the memory by pressing Job Cancel. To cancel multiple print jobs, hold down this key until the LCD shows JobCancel(All).

Secure Key (MFC models only)
Secured data is password protected. Only those people who know the password will be able to print the data. The machine will not print secure data until the password is entered. After the document is printed, the data will be cleared from the memory. To use this function, you need to set your password in the printer driver dialog box.
1 Press Secure.


Note
If the LCD displays No Data !, there is no secured data in the memory.
2 Press ▲ or ▼ to choose the user name. Press OK. The LCD displays job selections.
3 Press ▲ or ▼ to choose the job. Press OK. The LCD prompts you to enter your four-digit password.
4 Enter your password using the control panel. Press OK.
5 To print the Data, press ▲ or ▼ to choose Print. Press OK. The machine prints the data. To delete the secured data, press ▲ or ▼ to choose Delete. Press OK.
Printer Emulation Support (MFC-7840W and DCP-7045N only)
Your machine will receive print commands in a printer job language or emulation. Different operating systems and applications will send the print commands in different languages. Your machine can receive print commands in a variety of emulations and has an automatic emulation selection feature. When the machine receives data from the computer, it automatically chooses the emulation mode. The default setting is Auto.
Your machine has the following emulation modes. You can change the setting by using the control panel or a web browser.
HP LaserJet Mode
The HP LaserJet mode (or HP mode) is the emulation mode in which this printer supports the PCL6 language of a Hewlett-Packard LaserJet laser printer. Many applications support this type of laser printer. Using this mode will allow your printer to run at its best with those applications.
BR-Script 3 Mode
BR-Script is an original Brother page description language and a PostScript ^® language emulation interpreter. This printer supports PostScript ^® 3 ^™ . The BR-Script interpreter of this printer allows you to control text and graphics on the page.
For technical information about PostScript ^® commands, see the following manuals:
- Adobe Systems Incorporated. PostScript® Language Reference, 3rd edition. Addison-Wesley Professional, 1999. ISBN: 0-201-37922-8
- Adobe Systems Incorporated. PostScript® Language Program Design. Addison-Wesley Professional, 1988. ISBN: 0-201-14396-8
- Adobe Systems Incorporated. PostScript® Language Tutorial and Cookbook. Addison-Wesley Professional, 1985. ISBN: 0-201-10179-3
Setting the Emulation mode
1 For MFC-7840W, press Menu, 4, 1.
For DCP-7045N, press Menu, ▲ or ▼ to choose 3.Printer. Press OK.
Press ▲ or ▼ to choose 1. Emulation. Press OK.
2 Press ▲ or ▼ to choose Auto, HP LaserJet or BR-Script 3. Press OK.
3 Press Stop/Exit.

Note
We recommend that you set the emulation setting with your application software or network server. If the setting does not work properly, choose the required emulation mode manually using the control panel buttons of the machine.
Printing the Internal Font List (MFC-7840W and DCP-7045N only)
You can print a list of the machine's internal (or resident) fonts to see how each font looks before you choose it.
For MFC-7840W, press Menu, 4, 2, 1, and go to Step ③.
For DCP-7045N, press Menu, ▲ or ▼ to choose 3. Printer. Press OK and go to Step ②.
2 Press ▲ or ▼ to choose 2.Print Options. Press OK.
Press ▲ or ▼ to choose 1.Internal Font. Press OK.
3 Press Start. The machine prints the list.
4 Press Stop/Exit.
Printing the Print Configuration List (MFC-7840W and DCP-7045N only)
You can print a list of current printer settings.
For MFC-7840W, press Menu, 4, 2, 2, and go to Step ③.
For DCP-7045N, press Menu, ▲ or ▼ to choose 3. Printer. Press OK and go to Step ②.
2 Press ▲ or ▼ to choose 2.Print Options. Press OK.
Press ▲ or ▼ to choose 2.Configuration. Press OK.
3 Press Start. The machine prints the settings.
4 Press Stop/Exit.
Test Print (MFC-7840W and DCP-7045N only)
If you are having problems with print quality, you can do a test print.
For MFC-7840W, press Menu, 4, 2, 3, and go to Step ③.
For DCP-7045N, press Menu, ▲ or ▼ to choose 3. Printer. Press OK and go to Step ②.
2 Press ▲ or ▼ to choose 2.Print Options. Press OK.
Press ▲ or ▼ to choose 3.Test Print. Press OK.
3 Press Start.
4 Press Stop/Exit.

Note
If the problem appears on the printout, see Improving the print quality in the User's Guide.
Restoring default printer settings (MFC-7840W and DCP-7045N only)
You can return the machine's printer settings to the default settings. Fonts and macros loaded to the machine's memory will be cleared.
1 For MFC-7840W, press Menu, 4, 3, and go to Step ③.
For DCP-7045N, press Menu, ▲ or ▼ to choose 3.Printer. Press OK and go to Step ②.
2 Press ▲ or ▼ to choose 3. Reset Printer. To restore the default settings, press ▲. To exit without making a change, press ▼. Go to Step 4.
3 To restore the default settings, press 1. To exit without making a change, press 2.
4 Press Stop/Exit.
Status Monitor
The Status Monitor utility is a configurable software tool for monitoring the status of the machine, letting you see error messages such as paper empty or paper jam at pre-set update intervals. You can also access the web based management. Before you can use the tool you must choose your machine in the Model pop-up menu in ControlCenter2. You can check the device status by clicking the Status Monitor icon in the DeviceSettings tab of ControlCenter2 or by choosing Brother Status Monitor located in Macintosh HD/Library/Printers/Brother/Utilities.
Updating the machine's status

If you want the latest machine status while the Status Monitor window is open, click the icon. You can set what interval the software will update the machine status information. Go to the menu bar, Brother Status Monitor and choose Preferences.

text_image
Status Monitor MFC- XXXX USB Ready Visit the Genuine Supplies websiteHiding or showing the window
After starting the Status Monitor, you can hide or show the window. To hide the window, go to the menu bar, Brother Status Monitor and choose Hide Brother Status Monitor. To show the window, click the Status Monitor icon in the dock or click the Status Monitor in the DeviceSettings tab of ControlCenter2.
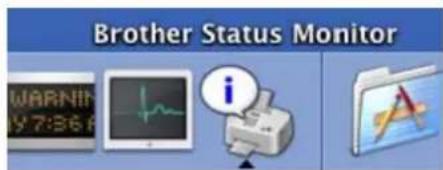
text_image
Brother Status Monitor WARNING 7:36 A iQuitting the window
Go to the menu bar and choose Quit Brother Status Monitor.
Web Based Management (Network Connection Only)
You can access the Web Based Management System by clicking the machine icon on the Status Monitor screen. A standard Web Browser can be used to manage your machine using HTTP (Hyper Text Transfer Protocol). For more information on the Web Based Management System, see Web Based Management in the Network User's Guide.
Features in the printer driver (For Macintosh)
This printer supports Mac OS X 10.2.4 or greater.

Note
The screens in this section are from Mac OS X 10.4. The screens on your Macintosh will vary depending on your operating system version.
Page Setup
You can set the Paper Size, Orientation and Scale.
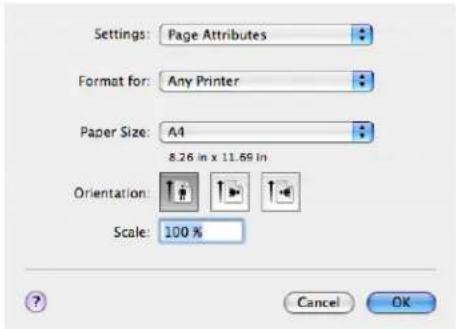
text_image
Settings: Page Attributes Format for: Any Printer Paper Size: A4 8.26 in x 11.69 in Orientation: Scale: 100 % Cancel OKCopies & Pages
From an application such as Apple TextEdit, click File, then Print to start printing.
For Mac OS X 10.2.x to 10.4.x
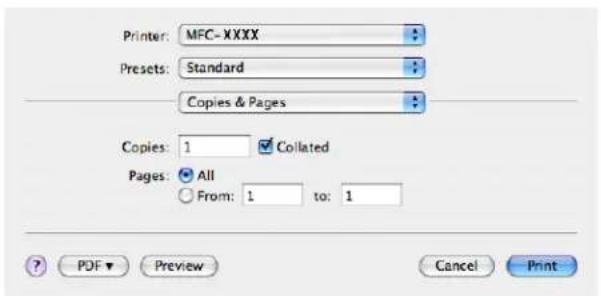
text_image
Printer: MFC-XXXX Presets: Standard Copies & Pages Copies: 1 Collated Pages: All From: 1 to: 1 ? PDF ▼ Preview Cancel PrintFor Mac OS X 10.5
For more page setup options, click the disclosure triangle beside the Printer pop-up menu.
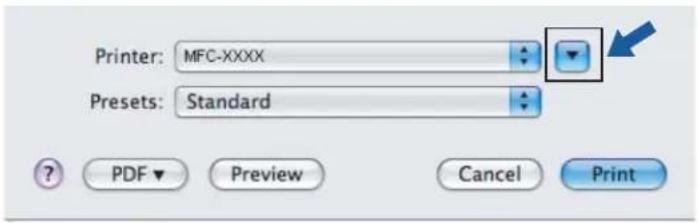
text_image
Printer: MFC-XXXX Presets: Standard PDF Preview Cancel Print
text_image
Printer: Brother MFC-XXXX Presets: Standard Copies: 1 Collated Pages: All From: 1 to: 1 Paper Size: A4 20.99 by 29.70 cm Orientation: TextEdit Print header and footer 1 of 1 PDF Cancel Print
Note
To control special printing features, choose Print Settings from the Print dialog box.

text_image
Printer: Brother MFC-XXXX Presets: Standard Copies: 1 Collated Pages: All From: 1 to: 1 Paper Size: A4 20.99 by 29.70 cm Orientation: TextEdit Layout Color Matching Paper Handling Paper Feed Cover Page Scheduler Print Settings Secure Print Send Fax SummaryCover Page (For Mac OS X 10.4 or greater)
You can make the following cover page settings:

text_image
Printer: MFC-XXXX Presets: Standard Cover Page Print Cover Page: None Before document After document Cover Page Type: Standard Billing Info: PDF Preview Cancel PrintPrint Cover Page
If you want to add a cover page to your document, use this function.
■ Cover Page Type
Choose a template for the cover page.
Billing Info
If you want to add the billing information to the cover page, enter text in the Billing Info box.
Layout
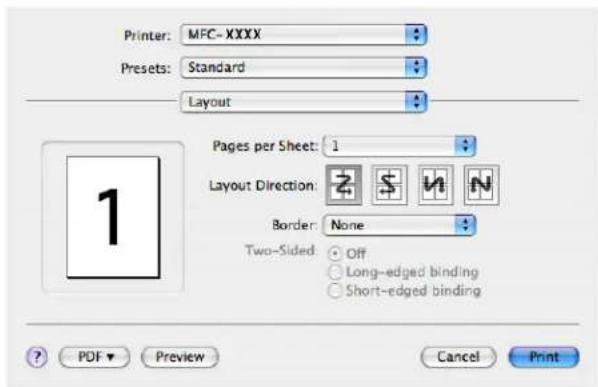
text_image
Printer: MFC-XXXX Presets: Standard Layout Pages per Sheet: 1 Layout Direction: Border: None Two-Sided: Off Long-edged binding Short-edged binding ? PDF ▼ Preview Cancel PrintPages per Sheet
Choose how many pages will appear on each side of the paper.
Layout Direction
When you specify the pages per sheet, you can also specify the direction of the layout.
Border
If you want to add a border, use this function.
Duplex Printing
■ Manual duplex (For Mac OS X 10.3 or greater)
Select Paper Handling.
Choose Even numbered pages and print, and then choose Odd numbered pages and print.
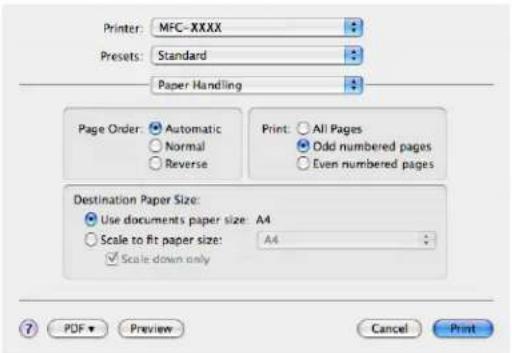
text_image
Printer: MFC-XXXX Presets: Standard Paper Handling Page Order: Automatic Normal Reverse Print: All Pages Odd numbered pages Even numbered pages Destination Paper Size: Use documents paper size: A4 Scale to fit paper size: A4 Scale down only 7 PDF Preview Cancel PrintSecure Print

text_image
Printer: Brother MFC-XXXX Presets: Standard Secure Print ✓ Secure Print User Name: XXXXXXXX Job Name: XXXXXXXX Password : ? PDF Preview Cancel Print- Secure Print:
Secure documents are documents that are password protected when they are sent to the machine. Only the people who know the password will be able to print them. Since the documents are secured at the machine, you must enter the password using the control panel of the machine to print them.
To send a secured document:
1 Choose Secure Print and check Secure Print.
2 Enter your password, user name and job name and click Print.
3 You must print the secured document from the control panel of the machine. (See Secure Key (MFC models only) on page 116.)
To delete a secured document: You need to use the control panel of the machine to delete a secured document. (See Secure Key (MFC models only) on page 116.)
Print Settings
Basic tab
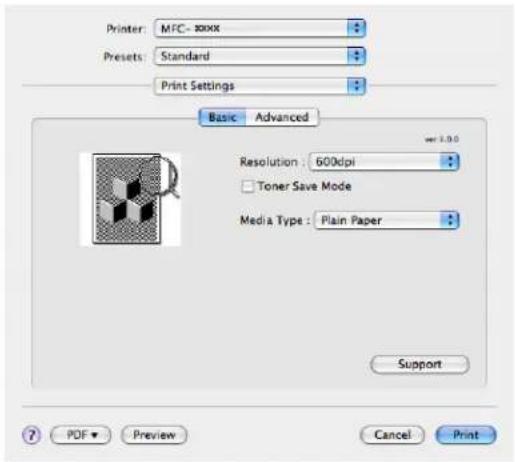
text_image
Printer: MTC- XXXX Presets: Standard Print Settings Basic Advanced Resolution: 600dpi Toner Save Mode Media Type: Plain Paper Support PDF Preview Cancel PrintResolution
You can change the resolution as follows:
You can conserve toner using this feature. When you set Toner Save Mode to On, print appears lighter. The default setting is Off.

Note
- We do not recommend Toner Save Mode for printing Photo or Greyscale images.
- Toner Save Mode is not available for HQ 1200 resolution.
Media Type
You can change the media type to one of the following:
- Plain Paper
- Thin Paper
- Thick Paper
- Thicker Paper
- Bond Paper
- Transparencies
- Envelopes
- Env. Thick
- Env. Thin
- Recycled Paper
Support
You can visit the Brother Solutions Center (http://solutions.brother.com) and our web site for original/genuine Brother supplies by clicking the Support button.
The Brother Solutions Center is a web site offering information about your Brother product including FAQs (Frequently Asked Questions), User's Guides, driver updates and tips for using your printer.
Advanced tab

text_image
Printer: MFC-xxxx Presets: Standard Print Settings Basic Advanced Print Quality: Photo Mirror Print Reverse Print Improve Print Output Reduce Paper Curl Improve Toner Fixing PDF Preview Cancel PrintPrint Quality
You can change the print quality as follows:
- Photo
This is a photograph mode (gradation priority). Choose this setting for printing photographs that have continuous gradation. You can represent soft contrasts between various shades of grey.
- Graphics
This is a graphics mode (contrast priority). Choose this setting for printing text and figures, such as business and presentation documents. You can represent sharp contrasts between shaded areas.
- Chart/Graph
This is the best dither pattern for business documents such as presentations, that include words, graphs or charts. It is particularly suitable for solid colours.
Mirror Print
Check Mirror Print to reverse the data from left to right.
Reverse Print
Check Reverse Print to reverse the data from up to down.
■ Improve Print Output
This feature allows you to improve a print quality problem.
- Reduce Paper Curl
If you choose this setting, the paper curl may be reduced.
If you print only a few pages, you do not need to choose this setting. Change the printer driver setting in Media Type to a thin setting.
- Improve Toner Fixing
If you choose this setting, the toner fixing on paper may be improved. If this selection does not improve the situation enough, select thicker paper in media type settings.
Removing the Printer driver for Macintosh
For Mac OS X 10.2
1 If you are using a USB cable, disconnect it from your machine.
2 Restart the Macintosh.
3 Log on as an 'Administrator'.
4 Run the Print Center (from the Go menu, choose Applications, Utilities), then choose the printer you want to remove and remove it by clicking the Delete button.
5 Drag the HL_MFLPro folder (from the Macintosh HD (Startup Disk), choose Library, Printers, Brother) into the Trash and then empty the Trash.
6 Restart the Macintosh.
For Mac OS X 10.3 or greater
1 If you are using a USB cable, disconnect it from your machine.
2 Restart the Macintosh.
3 Log on as an 'Administrator'.
4 Run the Printer Setup Utility (from the Go menu, choose Applications, Utilities), then choose the printer you want to remove and remove it by clicking the Delete button.
5 Restart the Macintosh.
Using the BR-Script3 Driver (MFC-7840W and DCP-7045N only) (Post Script® 3 ™ language emulation printer driver)

Note
- To use the BR-Script3 printer driver, you need to set the Emulation to BR-Script 3 by using the control panel before connecting the interface cable. (See Printer Emulation Support (MFC-7840W and DCP-7045N only) on page 117.)
- The BR-Script3 printer driver does not support the PC-Fax Sending.
- For network users, see the Network User's Guide for installation steps.
You need to install the BR-Script3 printer driver using the following instructions.

Note
If you use a USB cable and Mac OS, only one printer driver for a machine can be registered in Printer Setup Utility (Print Center for Mac OS X 10.2.x users). If a Brother Laser driver is already listed in the Printer list, you will need to delete it and then install the BR-Script3 printer driver.
■ For Mac OS X 10.2.x to 10.4.x
1 Choose Applications from the Go menu.

text_image
Finder File Edit View Go Window Help Back Forward Enclosing Folder Computer Home Network iDisk Applications Utilities Recent Folders Go to Folder... Connect to Server...2 Open the Utilities folder.
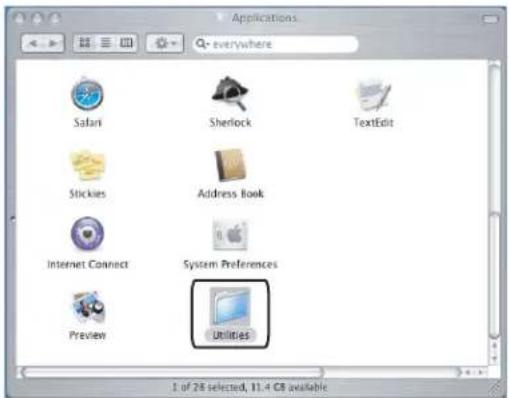
text_image
Applications everywhere Safari Sherlock TextEdit Stickies Address Book Internet Connect System Preferences Preview Utilities 1 of 28 selected, 11.4 GB available3 Open the Printer Setup Utility icon. For Mac OS X 10.2.x users, open the Print Center icon.
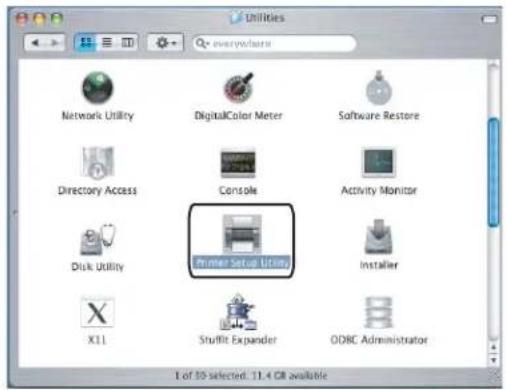
text_image
Network Utility DigitalColor Meter Software Restore Directory Access Console Activity Monitor Disk Utility Printer Setup Options Installer X11 Stuffit Expander ODRC Administrator 1 of 10 selected: 11.4 GB available4 Click Add.

text_image
Printer List Make Default Add Delete Utility Color/Spec Show Info In Menu Name Status Kind HostFor Mac OS X 10.2.4 to 10.3 users, go to Step ⑤. For Mac OS X 10.4.x users, go to Step ⑥.
5 Choose USB.
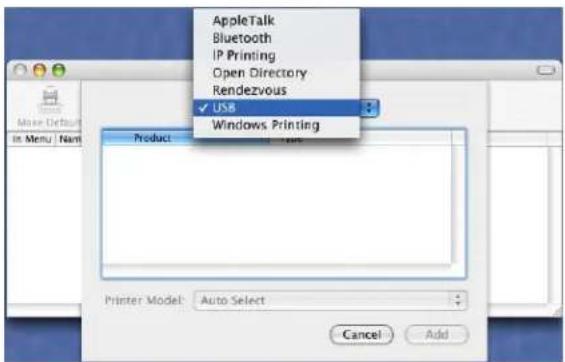
text_image
AppleTalk Bluetooth IP Printing Open Directory Rendezvous ✓ USB Windows Printing Product Printer Model: Auto Select Cancel Add6 Choose the model name and make sure that Brother in Printer Model (Print Using) and the model name which shows BR-Script in Model Name (Model) are selected, and then click Add. For Mac OS X 10.2.4 to 10.3 users:
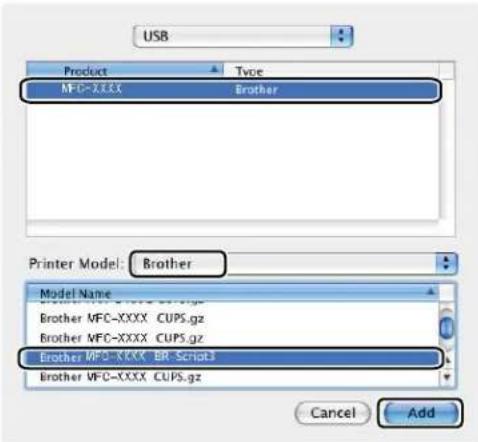
text_image
USB Product Type MFC-XXXX Brother Printer Model: Brother Model Name Brother MFC-XXXX CUPS.gz Brother MFC-XXXX CUPS.gz Brother MFC-XXXX BR_Script3 Brother MFC-XXXX CUPS.gz Cancel AddFor Mac OS X 10.4.x users:
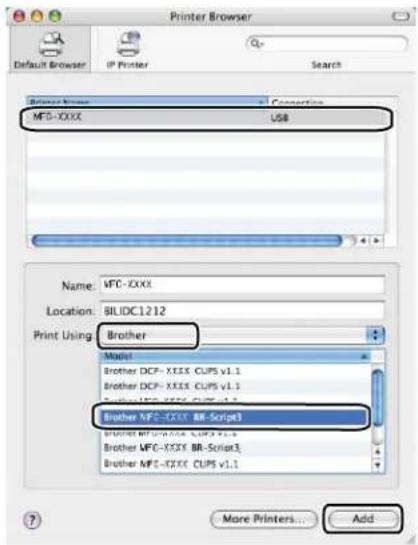
text_image
Printer Browser Default Browser IP Printer Search Browse Name Converting MFC-XXXX USB Name: MFC-XXXX Location: BILDC1212 Print Using: Brother Model Brother DCF=XXXX CUPS v1.1 Brother DCF=XXXX CUPS v1.1 Briather MFC-XXXX BR-Script3 Brother MFC-XXXX CUPS v1.1 Brother MFC-XXXX BR-Script1 Brother MFC-XXXX CUPS v1.1 More Printers... Add7 Choose Quit Printer Setup Utility from the Printer Setup Utility menu.

text_image
Printer Setup Utility About Printer Setup Utility Preferences... Services Hide Printer Setup Utility Hide Others Show All Quit Printer Setup UtilityFor Mac OS X 10.5
1 Choose System Preference from the Apple menu.

text_image
Finder File Edit View Go Window Help About This Mac Software Update... Mac OS X Software... System Preferences... Dock Location Recent Items Force Quit... Sleep Restart... Shut Down... Log Out manual... Ⓧ⌘Q2 Click the Printer & Fax icon.

text_image
System Preferences Show All Personal Acceptance Desktop & Screen Saver Deck Expose & Spaces International Security Spotlight Hardware Bluetooth CDs & DVDs Displays Energy Saver Keyboard & Mouse Print & Fax Sound Internet & Network Mac Network QuickTime Shering System Accounts Date & Time Parental Controls Software Update Speech Startup Disk Time Machine Universal Access3 Click + button which is located below the Printers section.
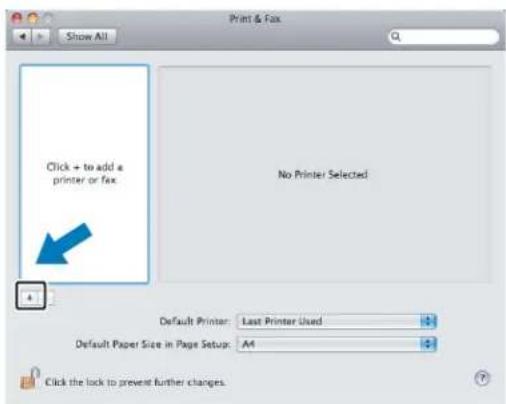
text_image
Print & Fax Show All Click → to add a printer or fax. No Printer Selected Default Printer: Last Printer Used Default Paper Size in Page Setup: A4 Click the lock to prevent further changes.4 Click the Default icon which is located at the top of the dialog box.

text_image
Default Fax Windows Bluetooth AppleTalk More Printers Search Printer Name Kind Brother MFC- xxxx USB Name: No Selection Location: No Selection Print Using: Add5 Choose your machine from the Printer Name list and Select a driver to use... in Print Using.

text_image
DoDai Fax IP Windows Bluetooth AppleTalk More Primer Search Brother MFC- XXXX USB Name: Brother MFC- XXXX Location: DocMacBookPro Print Using ✓ Brother MFC- XXXX CUPS Auto Select Select a driver to use... Other...6 Choose the model name which shows BR-Script in Print Using, and then click Add.

text_image
Printer Name: Knd Brother MFC- XXXX: USB Name: Brother MFC- XXXX Location: Print Using: Select a driver to use... G1 Brother MFC- XXXX - All-Script WCC03 WFC- XXXX - LIF2 Brother MFC- XXXX Brother MFC- XXXX Brother MFC- XXXX Brother MFC- XXXX Add7 Choose Quit System Preferences from the System Preferences menu.

text_image
System Preferences Edit View Window Help About System Preferences Services Hide System Preferences ⌘H Hide Others ⌘H Show All Quit System Preferences ⌘QFeatures in the BR-Script (PostScript® 3 ™ language emulation) printer driver (MFC-7840W and DCP-7045N only)
Page Setup
You can set the Paper Size, Orientation and Scale.

text_image
Settings: Page Attributes Format for: Any Printer Paper Size: A4 8.26 in x 11.69 in Orientation: Scale: 100 % Cancel OKCopies & Pages
From an application such as Apple TextEdit, click File, then Print to start printing.
■ For Mac OS X 10.2.x to 10.4.x

text_image
Printer: MFC-XXXX Presets: Standard Copies & Pages Copies: 1 Collated Pages: All From: 1 to: 1 ? PDF Preview Cancel PrintFor Mac OS X 10.5
For more page setup options, click the disclosure triangle beside the Printer pop-up menu.
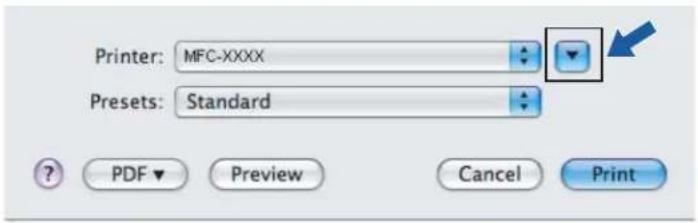
text_image
Printer: MFC-XXXX Presets: Standard PDF Preview Cancel Print
text_image
Printer: Brother MFC-XXXX Presets: Standard Copies: 1 Collated Pages: All From: 1 to: 1 Paper Size: A4 20.99 by 29.70 cm Orientation: TextEdit Print header and footer 1 of 1 PDF Cancel Print
Note
To control special printing features, choose Printer Features from the Print dialog box.

text_image
Printer: Brother MFC-XXXX Presets: Standard Copies: 1 Colated Pages: All From: 1 to: 1 Paper Size: A4 20.59 by 29.70 cm Orientation: TextEdit Layout Color Matching Paper Handling Paper Feed Cover Page Scheduler Secure Print Printer Features SummaryCover Page (For Mac OS X 10.4)
You can make the following cover page settings:

text_image
Printer: MFC-XXXX Presets: Standard Cover Page Print Cover Page: None Before document After document Cover Page Type: Standard Billing Info: PDF Preview Cancel PrintPrint Cover Page
If you want to add a cover page to your document, use this function.
■ Cover Page Type
Choose a template for the cover page.
Billing Info
If you want to add the billing information to the cover page, enter text in the Billing Info box.
Layout

text_image
Printer: MFC-XXXX Presets: Standard Layout Pages per Sheet: 1 Layout Direction: Border: None Two-Sided: Off Long-edged binding Short-edged binding ? PDF ▼ Preview Cancel PrintPages per Sheet
Choose how many pages will appear on each side of the paper.
Layout Direction
When you specify the pages per sheet, you can also specify the direction of the layout.
Border
If you want to add a border, use this function.
Duplex Printing
■ Manual duplex (For Mac OS X 10.3 or greater)
Select Paper Handling.
Choose Odd numbered pages and print, and then choose Even numbered pages and print.
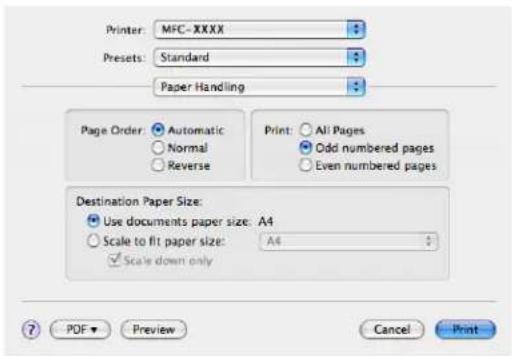
text_image
Printer: MFC-XXXX Presets: Standard Paper Handling Page Order: Automatic Normal Reverse Print: All Pages Odd numbered pages Even numbered pages Destination Paper Size: Use documents paper size: A4 Scale to fit paper size: A4 Scale down only ? PDF Preview Cancel PrintPrinter Features
Feature Sets: Set 1
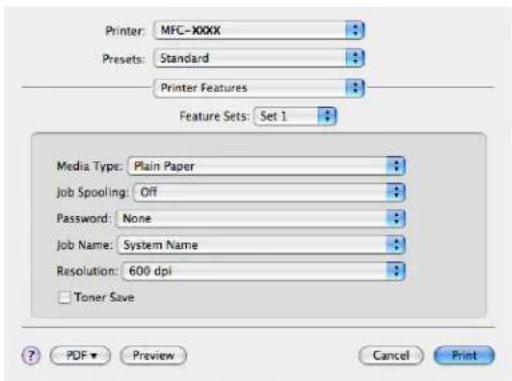
text_image
Printer: MFC-XXXX Presets: Standard Printer Features Feature Sets: Set 1 Media Type: Plain Paper Job Spooling: Off Password: None Job Name: System Name Resolution: 600 dpi Toner Save ? PDF ▼ Preview Cancel PrintMedia Type
You can use the following types of media in your machine. For the best print quality, select the type of media that you wish to use.
Plain Paper
Thin Paper
Thick Paper
Thicker Paper
Bond Paper
Transparencies Envelopes Env. Thick Env. Thin Recycled Paper
Job Spooling
Secure Print allows you to secure documents that are password protected when they are sent to the machine. Only the people who know the password will be able to print them. Since the documents are secured at the machine, you must enter the password using the control panel of the machine. The secured document must have a Password and Job Name.
Password
Choose the password for your secured document that you send to the machine from the drop-down box.
Job Name
Choose the Job name from the drop-down list for your secured document that you sent to the machine.
Resolution
You can change the resolution as follows:
· 3 0 0 dpi
• 6 0 0 dpi
• HQ 1200
Toner Save
You can conserve toner using this feature. When you check Toner Save Mode, print appears lighter. The default setting is Off.

Note
We do not recommend Toner Save for printing Photo or Greyscale images.
Feature Sets: Set 2
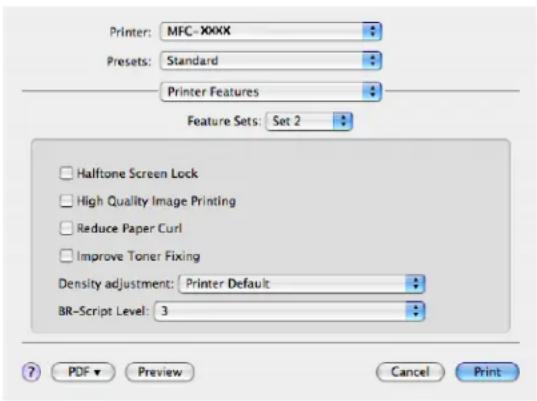
text_image
Printer: MFC-XXXX Presets: Standard Printer Features Feature Sets: Set 2 Halftone Screen Lock High Quality Image Printing Reduce Paper Curl Improve Toner Fixing Density adjustment: Printer Default BR-Script Level: 3 PDF Preview Cancel PrintHalftone Screen Lock
Stops other applications from modifying the Halftone settings. The default setting is on.
■ High Quality Image Printing
You can increase the quality of image printing. If you check High Quality Image Printing, the printing speed will be slower.
■ Reduce Paper Curl
If you check this setting, the paper curl may be reduced.
If you print only a few pages, you do not need to choose this setting. Change the printer driver setting in Media Type to a thin setting.
■ Improve Toner Fixing
If you check this setting, the toner fixing on paper may be improved. If this selection does not improve the situation enough, select Thicker paper in Media type settings.
■ Density adjustment
Increase or decrease the print density.

Note
The Density adjustment is not available when you set the resolution to HQ 1200.
BR-Script Level
You can change the BR-script emulation language level. Choose the level from the drop-down list.
Sending a fax (MFC models only)
For Macintosh
You can send a fax directly from a Macintosh application.

Note
Fax documents will be sent in Black and White only.
1 Create a document in a Macintosh application.
2 From an application such as Apple TextEdit, click File, then Print.
For Mac OS X 10.2.x to 10.4.x

text_image
Printer: MFC-XXXX Presets: Standard Copies & Pages Copies: 1 Coliated Pages: All From: 1 to: 1 ? PDF Preview Cancel PrintFor Mac OS X 10.5
For more page setup options, click the disclosure triangle beside the Printer pop-up menu.

text_image
Printer: MFC-XXXX Presets: Standard PDF Preview Cancel Print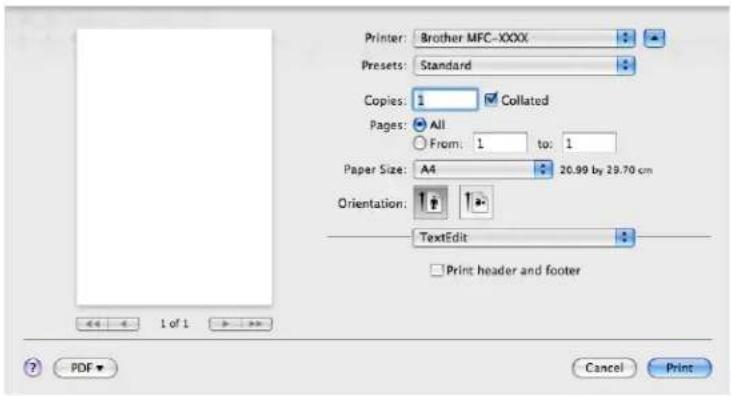
text_image
Printer: Brother MFC-XXXX Presets: Standard Copies: 1 Collated Pages: All From: 1 to: 1 Paper Size: A4 20.99 by 29.70 cm Orientation: TextEdit Print header and footer 1 of 1 PDF Cancel Print3 Choose Send Fax from the pop-up menu.
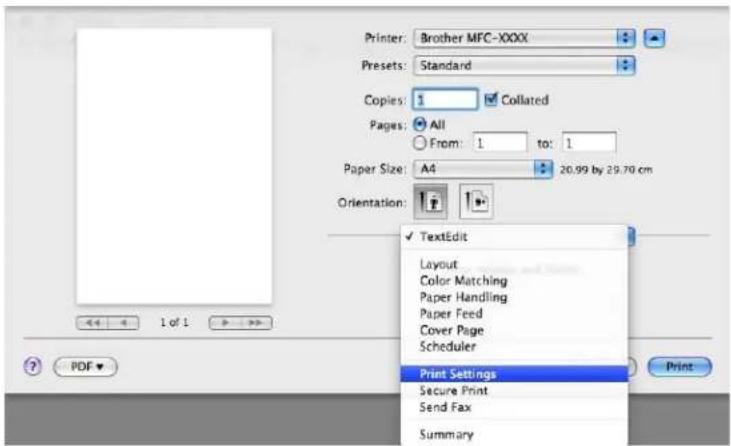
text_image
Printer: Brother MFC-XXXX Presets: Standard Copies: 1 Collated Pages: All From: 1 to: 1 Paper Size: A4 20.99 by 29.70 cm Orientation: ✓ TextEdit Layout Color Matching Paper Handling Paper Feed Cover Page Scheduler Print Settings Secure Print Send Fax Summary 1 of 1 ? PDF ▼ Print4 Choose Facsimile from the Output pop-up menu.
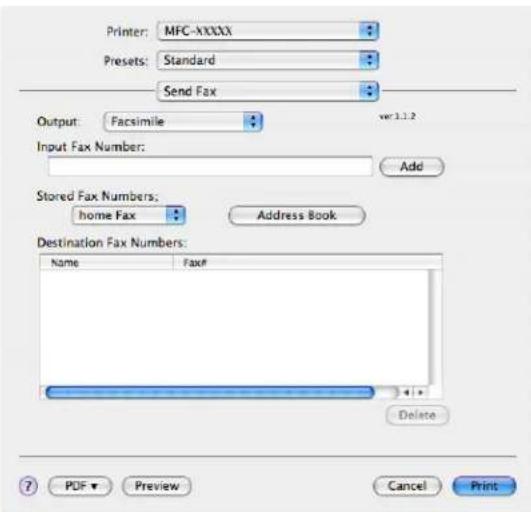
text_image
Printer: MFC-XXXX Presets: Standard Send Fax Output: Facsimile Input Fax Number: Add Stored Fax Numbers: home Fax Address Book Destination Fax Numbers: Name Fax# Delete PDF Preview Cancel Print5 Enter a fax number in the Input Fax Number box, and then click Print to send the fax.

Note
If you want to send a fax to more than one number, click Add after entering the first fax number. The destination fax numbers will be listed in the dialog box.
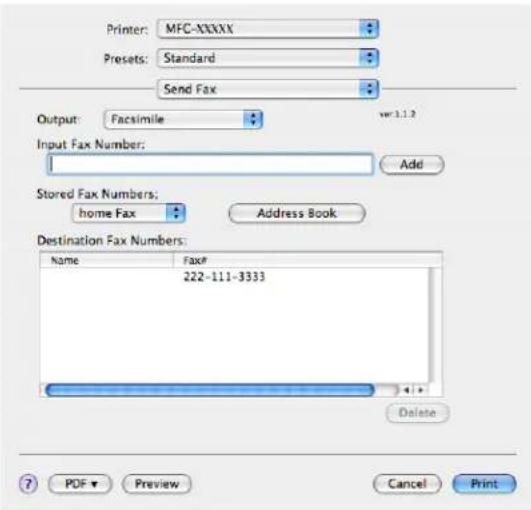
text_image
Printer: MFC-XXXXX Presets: Standard Send Fax Output: Facsimile Input Fax Number: Add Stored Fax Numbers: home Fax Address Book Destination Fax Numbers: Name Fax# 222-111-3333 Delete PDF Preview Cancel PrintDrag a Vcard from the Mac OS X Address Book application (For Mac OS X 10.2.x to 10.4.x)
You can address a fax number using a vCard (an electronic business card) from the Mac OS X Address Book application.
1 Click Address Book.
2 Drag a vCard from the Mac OS X Address Book application to the Destination Fax Numbers field.
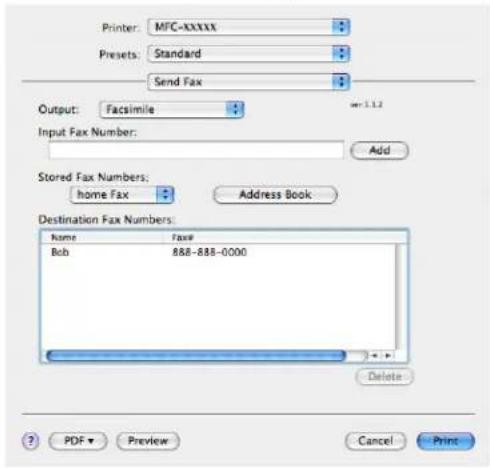
text_image
Printer: MFC-XXXXX Presets: Standard Send Fax Output: Facsimile Input Fax Number: Add Stored Fax Numbers: home Fax Address Book Destination Fax Numbers: Name Fax# Bob 888-888-0000 Delete PDF Preview Cancel Print
text_image
Address Book Group All Directories brother Name Barble Bob manual Bob work 888-888-0001 work fax 808-808-0000 work bob@xxx.yyy.com Note: Edit 3 cards
Note
If both work and home fax numbers are stored in the Mac OS X Address Book, choose work fax or home fax from the Stored Fax Numbers pop-up menu, and then drag a vCard.
3 When you are finished addressing your fax, click Print.
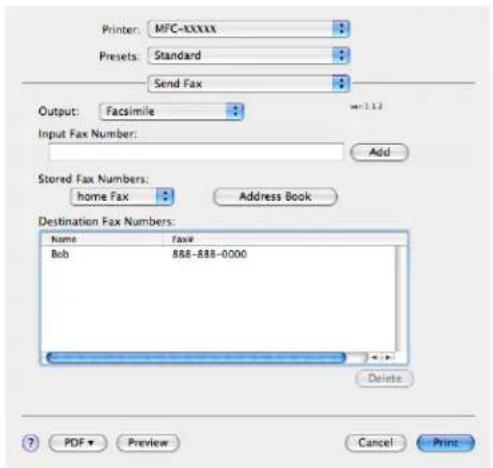
text_image
Printer: MFC-XXXXX Presets: Standard Send Fax Output: Facsimile Input Fax Number: Add Stored Fax Numbers: home Fax Address Book Destination Fax Numbers: Name Fax Bob 888-888-0000 Delete PDF Preview Cancel Print
Note
The vCard used must contain a work fax or home fax number.
Using Mac OS X 10.5 Addresses panel
You can address a fax number using Addresses button.
1 Click Addresses.

text_image
Printer: Brother MFC-XXXX Presets: Standard Copies: 1 Cellated Pages: All From: 1 to: 1 Paper Size: A4 20.99 by 20.70 cm Orientation: Send Fax Output: Facsimile set-1.2.3 Input Fax Number: Add Destination Fax Numbers: Addresses Name: Fake Delete PDF Cancel Print2 Choose the fax number from Addresses panel and then click To.

text_image
Addresses To: 3 cards Group Name Phone Apple Inc. XXX-XXX-XXX (main) Bob 888-888-0001 (work) 888-888-0000 (work fax) xxxxxx XXX-XXX-XXX (home)Printing and Faxing
3 When you are finished addressing your fax, click Print.

text_image
Printer: Brother MFC-XXXX Presets: Standard Copies: 1 Collated Pages: All From: 1 to: 1 Paper Size: US Letter 8.50 by 11.00 inches Orientation: Send Fax Output: Facsimile Input Fax Number: Add Destination Fax Numbers: Address Book Name: FAXE Bob: 088-888-0001 Delete PDF Supplies... Cancel Print9
Scanning
Scanning from a Macintosh
The Brother machine software includes a TWAIN Scanner driver for Macintosh. You can use this Macintosh TWAIN Scanner driver with any applications that support TWAIN specifications.

Note
If you want to scan from a machine on a network, choose the networked machine in the Device Selector application located in Macintosh HD/Library/Printers/Brother/Utilities/DeviceSelector or from the Model pop-up menu of ControlCenter2.
Run your Macintosh TWAIN-compliant application. The first time you use the Brother TWAIN driver, set it as the default driver by choosing Select Source. For each document you scan after this, choose Acquire Image Data or Start. The menu option that lets you choose the Scanner driver may vary depending on your application.

text_image
Brother TWAIN Resolution 3.1.0 Scanning Area 200 x 200 dpi Scan Type 24 Bit Color Document Size A4 Width: 210 Unit: mm Height: 297 Inch Adjust Image ? Default Cancel Start PreScan9

Note
The method of choosing the default driver or scanning a document may vary depending on the application you are using.
Scanning an image into your Macintosh
You can scan a whole page, or scan a portion after pre-scanning the document.
Scanning a whole page
1 Put the document face up in the ADF, or face down on the scanner glass.
2 Adjust the following settings, if needed, in the Scanner Setup dialog box:
Resolution
Scan Type
Document Size
Brightness
Contrast
3 Click Start.
When scanning has finished, the image appears in your graphics application.
Pre-Scanning an image
The PreScan button is used to preview and also lets you crop any unwanted areas from the image. When you are satisfied you are scanning the correct area, click the Start button in the Scanner Setup dialog box to scan the image.
1 Load your document.
2 Click PreScan.
The whole image is scanned into your Macintosh and appears in the Scanning Area.
3 Drag the mouse pointer over the portion you want to scan.

natural_image
Scanning area photo of a horse with visible sprocket and two other horses (no text or symbols)4 Put the document in the ADF again.

Note
If you put the document on the scanner glass in Step 1, skip this step.
5 Adjust the settings for Resolution, Scan Type, Brightness and Contrast in the Scanner Setup dialog box as needed.
6 Click Start.
This time only the chosen area of the document appears in the application window.
7 You can refine the image in your editing software.
Settings in the Scanner window
Resolution
You can change the scanning resolution from the Resolution pop-up menu. Higher resolutions take more memory and transfer time, but produce a finer scanned image. The following table shows the resolutions you can choose and the available colours.
| Resolution Black & White/ | Grey (Error Diffusion) | 8 bit colour | True Grey/24 bit colour |
| 100 × 100 dpi Yes Yes Yes | |||
| 150 × 150 dpi Yes Yes Yes | |||
| 200 × 200 dpi Yes Yes Yes | |||
| 300 × 300 dpi Yes Yes Yes | |||
| 400 × 400 dpi Yes Yes Yes | |||
| 600 × 600 dpi Yes Yes Yes | |||
| 1200 × 1200 dpi Yes No Yes | |||
| 2400 × 2400 dpi Yes No Yes | |||
| 4800 × 4800 dpi Yes No Yes | |||
| 9600 × 9600 dpi Yes No Yes | |||
| 19200 × 19200 dpi Yes No Yes | Yes |
Scan Type
Black & White
Use for text or line art images.
■ Grey (Error Diffusion)
Use for photographic images or graphics. (Error Diffusion is a method for creating simulated grey images without using true grey dots. Black dots are put in a specific pattern to give the grey appearance.)
True Grey
Use for photographic images or graphics. This mode is more exact because it uses up to 256 shades of grey.
8 Bit Colour
Uses up to 256 colours to scan the image.
24 Bit Colour
Uses up to 16.8 million colours to scan the image.
Although using 24 Bit Colour creates an image with the most accurate colours reproduction, the image file size will be about three times larger than a file created using the 8 Bit Colour option. It requires the most memory and has the longest transfer time.
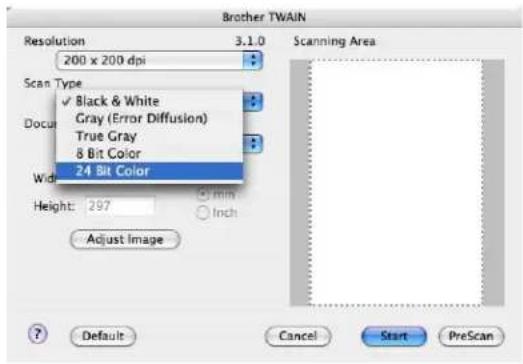
text_image
Brother TWAIN Resolution 3.1.0 200 x 200 dpi Scan Type ✓ Black & White Gray (Error Diffusion) True Gray 8 Bit Color 24 Bit Color Width Height: 297 mm Inch Adjust Image Scanning Area ? Default Cancel Start PreScanDocument size
Choose one of the following document sizes:
A4
JIS B5
Letter
Legal
A5
Executive
Business Card
To scan business cards, choose the Business Card size, and then place the business card face down in the center of the left hand side of the scanner glass, as indicated by the document guidelines.
Photo
Index Card
Photo L
■ Photo 2L
Postcard 1
Postcard 2
■ Custom (User adjustable from 8.9 × 8.9 mm to 215.9 × 355.6 mm.)
After you choose a custom size, you can adjust the scanning area. Click and hold the mouse button as you drag the mouse to crop the image.
Width: Enter the width of the custom size.
Height: Enter the height of the custom size.

Note
User adjustable from 8.9 x 8.9 mm to 215.9 x 355.6 mm
(For DCP-7030, 8.9 x 8.9 mm to 215.9 x 297 mm)
Adjusting the Image
Brightness
Adjust the setting (-50 to 50) to get the best image. The default value is 0, representing an average, and is usually suitable for most images.
You can set the Brightness level by dragging the slide bar to the right or left to lighten or darken the image. You can also enter a value in the box to set the level.

text_image
Custom Brightness 0 Contrast 0 ColorSync Intent Perceptual (Images) Scanner Profile Brother sRGB Scanner Cancel OKIf the scanned image is too light, set a lower Brightness level and scan the document again.
If the image is too dark, set a higher Brightness level and scan the document again.

Note
The Brightness setting is only available if you have set Scan Type to Black & White, Grey or True Grey.
Contrast
You can increase or decrease the contrast level by moving the slide bar to the left or right. An increase emphasizes dark and light areas of the image, while a decrease reveals more detail in grey areas. You can also enter a value in the box to set the Contrast.

Note
The Contrast setting is only available if you have set Scan Type to Grey or True Grey.
When scanning photographs or other images for use in a word processor or other graphics application, try different settings for the Resolution, Scan Type, Brightness and Contrast to see which setting best suits your needs.
Using the Scan key (For USB cable users)

Note
If you use the Scan key on a network, see Using the Scan key on page 181.
You can use the (Scan) key on the control panel to scan documents directly into your word processing, graphics or E-mail applications or to a folder on your Macintosh.
Before you can use the (Scan) key on the control panel, you have to install the Brother MFL-Pro Software Suite and connect the machine to your Macintosh. If you installed the MFL-Pro Suite from the included CD-ROM, then the correct drivers and ControlCenter2 are installed. Scanning by the (Scan) key follows the configuration on the Device Button tab. (See SCAN on page 162.) For details about how to configure the ControlCenter2 buttons to launch the application of your choice using the (Scan) key, see Using ControlCenter2 on page 160.
Scan to E-mail
You can scan either a black and white or colour document into your E-mail application as a file attachment. You can change Scan configuration. (See E-mail on page 166.)
1 Put the document face up in the ADF, or face down on the scanner glass.
2 Press the (Scan) key.
3 Press ▲ or ▼ to choose Scan to E-mail. Press OK.
4 Press Start. The machine starts scanning the document, creates a file attachment, and launches your E-mail application, displaying the new message waiting to be addressed.

Note
If you want the scanned data in colour, choose colour in the scan type on the Device Button tab of the ControlCenter2 configuration. If you want the scanned data in black and white, choose black and white in the scan type on the Device Button tab of the ControlCenter2 configuration. (See E-mail on page 166.)
Scan to Image
You can scan either a black and white or colour document into your graphics application for viewing and editing. You can change the Scan configuration. (See Image (example: Apple Preview) on page 163.)
1 Put the document face up in the ADF, or face down on the scanner glass.
2 Press the (Scan) key.
3 Press ▲ or ▼ to choose Scan to Image. Press OK.
4 Press Start.
The machine starts the scanning process.

Note
If you want the scanned data in colour, choose colour in the scan type on the Device Button tab of the ControlCenter2 configuration. If you want the scanned data in black and white, choose black and white in the scan type on the Device Button tab of the ControlCenter2 configuration. (See Image (example: Apple Preview) on page 163.)
Scan to OCR
If your document is text, you can have it converted by Presto! PageManager to an editable text file and then have the result displayed in your word processing application for viewing and editing. You can change the Scan configuration. (See OCR (word processing application) on page 165.)
1 Put the document face up in the ADF, or face down on the scanner glass.
2 Press the (Scan) key.
3 Press ▲ or ▼ to choose Scan to OCR. Press OK.
4 Press Start.
The machine starts the scanning process.

Note
You must have Presto! PageManager installed on your Macintosh for the OCR feature to work from the Scan key or ControlCenter2. (See Using Presto! PageManager on page 157.)
Scan to File
You can scan a black and white or a colour document into your Macintosh and save it as a file in the folder you choose. The file type and specific folder are based on the settings you have chosen in the Scan to File screen of the ControlCenter2. (See File on page 167.)
1 Put the document face up in the ADF, or face down on the scanner glass.
2 Press (Scan).
3 Press ▲ or ▼ to choose Scan to File. Press OK.
4 Press Start.
The machine starts the scanning process.

Note
- If you want the scanned data in colour, choose colour in the scan type on the Device Button tab of the ControlCenter2 configuration. If you want the scanned data in black and white, choose black and white in the scan type on the Device Button tab of the ControlCenter2 configuration. (See File on page 167.)
- If you would like to change the file name of scanned documents, enter the file name in the File Name section on the Device Button tab of the ControlCenter2 configuration.
Using Presto! PageManager
Presto! PageManager is an application for managing the documents in your Macintosh. Since it is compatible with most image editors and word processing programs, Presto! PageManager gives you unmatched control over your Macintosh files. You can easily manage your documents, edit your E-mail and files and read documents with the OCR software built into Presto! PageManager.
If you use the machine as a scanner, we recommend that you install Presto! PageManager. To install Presto! PageManager, see the Quick Setup Guide.

Note
The complete NewSoft Presto! PageManager 7 User's Guide can be viewed from the Help icon in NewSoft Presto! PageManager 7.
Features
■ OCR: In one step you can scan an image, recognize the text, and edit it with a word processor.
■ Image Editing: Enhance, crop and rotate images, or open them with an image-editing program of your choice.
■ Annotation: Add removable notes, stamps and drawings to images.
■ Treeview Window: View and arrange your folder hierarchy for easy access.
■ Thumbnail Window: View files as thumbnails for easy identification.
System requirements for Presto! PageManager
■ Mac OS X 10.2.4 or greater
CD-ROM drive
- Hard disk drive with at least 400 MB of free disk space for installation
NewSoft Technical Support
For USA
Company name: NewSoft America Inc.
Postal Address: 4030 Clipper Court Fremont, CA 94538, U.S.A.
Telephone: 510 445-8616
Fax: 510 445-8601
E-mail Address: contactus@newsoftinc.com
URL: http://www.newsoftinc.com
For Canada
E-mail Address: contactus@newsoftinc.com (English)
Germany
Company name: SoftBay GmbH
Postal Address: Carlstraße 50, D-52531, Übach-Palenberg
Telephone: 0900 1 409640
(For callers from within Germany, this is not a toll-free call, Callers will be charged at Euro 0.59 per minute)
E-mail Address: de.nsc@newsoft.eu.com
Company name: Avanquest UK
Postal Address: The Software Centre East Way, Lee Mill Industrial Estate Plymouth Devon. PL21 9GE
Telephone: 44-01752-201148
Fax: 44-01752-894833
E-mail Address: uk.nsc@newsoft.eu.com
URL: http://uk.newsoft.eu.com
France
Company name: 5CA
Postal Address: Not Open
Telephone: 089-965-01-09
(For callers from within France, this is not a toll-free call, Callers will be charged at € 1.35 + € 0.34 per minute)
E-mail Address: fr.nsc@newsoft.eu.com
Postal Address: Not Open
Telephone: 0899399878
(For callers from within Italy, this is not a toll-free call, Callers will be charged at Euro 0.80 per minute)
E-mail Address: it.nsc@newsoft.eu.com
Postal Address: Not Open
Telephone: 0807505598
(For callers from within Spain only, this is not a toll-free call, Callers will be charged at Euro 0.94 per minute)
E-mail Address: sp.nsc@newsoft.eu.com
Other countries
E-mail Address: tech@newsoft.eu.com (English)
10 ControlCenter2

Note
The features available to you in ControlCenter2 may vary depending on the model number of your machine.
Using ControlCenter2
ControlCenter2 is a software utility that lets you quickly and easily access your often used applications. Using ControlCenter2 eliminates the need to manually launch specific applications. The icon will appear on the
menu bar. To open the ControlCenter2 window, click the following operations:

icon and choose Open. ControlCenter2 has
1 Scan directly to a file, E-mail, word processor or graphics application of your choice. (1)
2 Custom Scan buttons let you configure a button to meet your own application needs. (2)
3 Access the Copy features available via your Macintosh. (3)
4 Access the settings available to configure your device. (4)
5 You can choose which machine ControlCenter2 will connect with from the Model pop-up menu. (5) You can also open the Device Selector window by choosing Other... from the Model pop-up menu.
6 You can also open the configuration window for each function by clicking the Configuration button. (6)
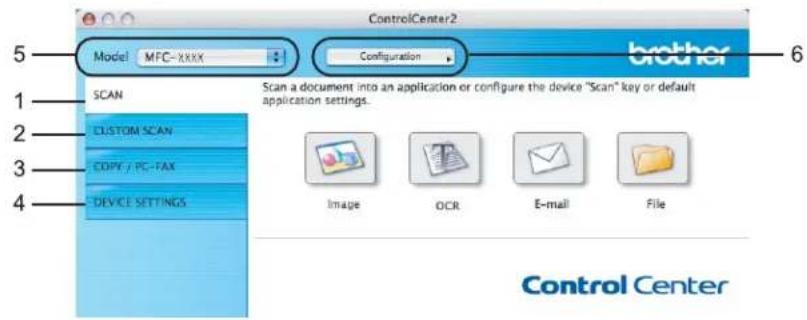
text_image
ControlCenter2 Model MFC-xxxx Configuration brother SCAN 1 CUSTOM SCAN 2 COPY / PC-FAX 3 DEVICE SETTINGS 4 Scan a document into an application or configure the device "Scan" key or default application settings. Image OCR E-mail File Control CenterTurning the AutoLoad feature off
If you do not want ControlCenter2 to run automatically each time you start your Macintosh, do the following.
1 Click the ControlCenter2 icon in the menu bar and choose Preferences. The ControlCenter2 preference window appears.
2 Uncheck Start ControlCenter on computer startup.
3 Click OK to close the window.
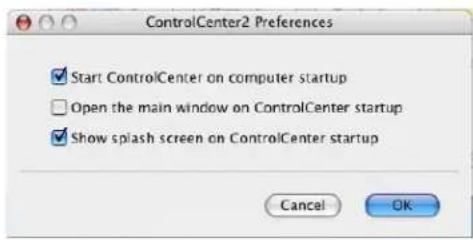
text_image
ControlCenter2 Preferences ✓ Start ControlCenter on computer startup ☐ Open the main window on ControlCenter startup ✓ Show splash screen on ControlCenter startup Cancel OK
Note
The ControlCenter2 application icon is in Macintosh HD/Library/Printers/Brother/Utilities/ControlCenter.
SCAN
There are four scan buttons for the Scan to Image, Scan to OCR, Scan to E-mail and Scan to File applications.
■ Image (Default: Apple Preview)
Lets you scan a page directly into any graphic viewer/editor application. You can choose the destination application, such as Adobe® Photoshop® or any kind of image editing application on your Macintosh.
OCR (Default: Apple TextEdit)
Lets you scan a page or document, automatically run the OCR application and put text (not a graphic image) into a word processing application. You can choose the target word processing application, such as Microsoft® Word or any word processing application on your Macintosh. You must have Presto! PageManager installed on your Macintosh.
■ E-mail (Default: your default E-mail software)
Lets you scan a page or document directly into an E-mail application as a standard attachment. You can choose the file type and resolution for the attachment.
File
Lets you scan directly to a disk file. You can change the file type and destination folder, as needed.
ControlCenter2 gives you the ability to configure the hardware Scan key on your machine and the ControlCenter2 Software button for each scan feature. To configure the hardware Scan key on your machine choose the Device Button (click each of the Control Center buttons while holding down the Ctrl key and choose Device Button) in the configuration menu for each of the SCAN buttons. To configure the Software button in ControlCenter2, choose the Software Button tab (click each of the Control Center buttons while holding down the Ctrl key and choose Software Button) in the configuration menu for each of the SCAN buttons.

text_image
ControlCenter2 Model MFC-XXXX Configuration brother SCAN CLUSTOM SCAN COPY / PC-FAX DEVICE SETTINGS Scan a document into an application or configure the device "Scan" key or default application settings. Image OCR E-mail File Control CenterFile types
You can choose from the following list of file types for attachments or for saving to a folder.
Choose from the pop-up menu the type of file you want the scanned images to be saved in.
Windows Bitmap (*.bmp)
JPEG (*.jpg)
TIFF - Uncompressed (*.tif)
TIFF - Compressed (*.tif)
TIFF Multi-Page - Uncompressed (*.tif)
TIFF Multi-Page - Compressed (*.tif)
■ Portable Network Graphics (*.png)
PDF (*.pdf)
Image
(example: Apple Preview)
The Scan to Image feature lets you scan an image directly into your graphics application for image editing. To change the default settings, click the button while holding down the Ctrl key and choose Software Button.
text_image
Scan To Image Software Button Device Button Target Application Apple Preview Add Delete File Type PDF (*.pdf) Resolution 300 x 300 dpi Brightness Scan Type 24 Bit Color Contrast Document Size A4 210 x 297 mm 50 Show Scanner Interface Restore Defaults Cancel OKIf you want to scan and then crop a portion of a page after pre-scanning the document, check the Show Scanner Interface box.
Change the other settings, if needed.
To change the destination application, choose the destination application from the Target Application pop-up menu. You can add an application to the lists by clicking the Add button.

text_image
Add Scan to Image Application If you want to change your application for "Scan to Image", please specify Application Name, Application Location and File Type. And then, click "Add" button to add your application. Application Name My Original Viewer Application iPhoto Browse... File Type JPEG (*.jpg) Cancel AddEnter the Application Name (up to 30 characters) and choose your preferred application by clicking the Browse button. Also choose the File Type from the pop-up menu.
You can delete an application that you have added. Just choose the Application Name and click the Delete button.

text_image
Delete Scan to Image Application If you want to delete registered application from "Scan to image", please select your application from "Application Name". And then, click "Delete" button to delete your application. Application Name My Original Viewer Application iPhoto File Type JPEG (*.jpg) Cancel Delete
Note
This function is also available for Scan to E-mail and Scan to OCR. The window may vary depending on the function.
OCR
(word processing application)
Scan to OCR converts the graphic page image data into text which can be edited by any word processing application. You can change the default word processing application.
To configure Scan to OCR, click the button while holding down the Ctrl key and choose Software Button.
text_image
Scan To OCR Software Button Device Button Target Application Apple TextEdit File Type Text (*.txt) OCR Software Newsoft OCR OCR Language English Add Delete Resolution 400 x 400 dpi Scan Type Black & White Document Size A4 210 x 297 mm Brightness 50 Contrast 50 Show Scanner Interface Restore Defaults Cancel OKTo change the word processing application, choose the destination word processing application from the Target Application pop-up menu. You can add an application to the list by clicking the Add button. To delete an application, click the Delete button.
If you want to scan and then crop a portion of a page after pre-scanning the document, check the Show Scanner Interface box.

text_image
Scan To E-mail Software Button Device Button E-mail Application Apple Mail Add Delete File Type JPEG (*.jpg) Resolution 200 x 200 dpi Scan Type 24 Bit Color Document Size A4 210 x 297 mm Brightness 50 Contrast 50 Show Scanner Interface Restore Defaults Cancel OKThe Scan to E-mail feature lets you scan a document to your default E-mail application, so you can send the scanned job as an attachment. To change the default E-mail application or attachment file type, click the button while holding down the Ctrl key and choose Software Button.
To change the E-mail application, choose your preferred E-mail application from the E-mail Application pop-up menu. You can add an application to the lists by clicking the Add button ^1 . To delete an application, click the Delete button.
When you first start ControlCenter2 a default list of compatible E-mail applications will appear in the pop-up menu. If you are having trouble using a custom application with ControlCenter2 you should choose an application from the list.
If you want to scan and then crop a portion of a page after pre-scanning the document, check the Show Scanner Interface box.
File
The Scan to File button lets you scan an image to a folder on your hard disk in any file format. This lets you easily archive your paper documents. To configure the file type and folder, click the button while holding down the Ctrl key and choose Software Button.
text_image
Scan To File Software Button Device Button File Name (Date) (Number) CCF 07082007.06000.jpg Show Folder File Type JPEG (*.jpg) Destination Folder Pictures Browse... Show Save As window Resolution 300 x 300 dpi Brightness Scan Type 24 Bit Color Contrast Document Size A4 210 x 297 mm 50 Show Scanner Interface Restore Defaults Cancel OKYou can change the File Name. Enter the file name you want to use for the document (up to 100 characters) in the File Name box. File name will be the file name you registered, current date and sequential number.
Choose the file type for the saved image from the File Type pop-up menu. You can save the file to the default folder, or choose your preferred folder by clicking the Browse button.
To show where the scanned image is saved when scanning is finished, check Show Folder box. To specify the destination of the scanned image every time, check Show Save As window box.
If you want to scan and then crop a portion of a page after pre-scanning the document, check the Show Scanner Interface box.

Note
For supported file types, see File types on page 163.
CUSTOM SCAN
There are four buttons which you can configure to fit your scanning needs.
To customize a button, click the button while holding down the Ctrl key, and the configuration window appears. There are four scan functions: Scan to Image, Scan to OCR, Scan to E-mail and Scan to File.
Scan to Image
Lets you scan a page directly into any image viewer/editor software. You can choose any image editor application on your Macintosh as a destination.
Scan to OCR
Converts scanned documents into editable text files. You can choose the destination application for the editable text. You must install Presto! PageManager for this feature.
Scan to E-mail
Attaches the scanned images to an E-mail message. You can also choose the file attachment type and create a quick send list of E-mail addresses chosen from your E-mail address book.
Scan to File
Lets you save a scanned image to any folder on a local or network hard disk. You can also choose the file type to be used.
text_image
ControlCenter2 Model MFC-XXXX Configuration brother SCAN SCAN a document into a pre-defined application or customize which applications you wish to scan to. CUSTOM SCAN COPY / PC-FAX DEVICE SETTINGS Custom1 Custom2 Custom3 Custom4 Control CenterFile types
You can choose from the following list of file types for attachments or for saving to a folder.
Choose from the pop-up menu the type of file you want the scanned images to be saved in.
■ Windows Bitmap (*.bmp)
JPEG (*.jpg)
TIFF - Uncompressed (*.tif)
TIFF - Compressed (*.tif)
TIFF Multi-Page - Uncompressed (*.tif)
TIFF Multi-Page - Compressed (*.tif)
■ Portable Network Graphics (*.png)
PDF (*.pdf)
User-defined button
To customize a button, click the button while holding down the Ctrl key, and the configuration window appears. Follow these guidelines for button configuration.
Scan to Image
General tab
Enter a name in Name for Custom (up to 30 characters) to create the button name.
Choose the type of scan from the Scan Action field.

text_image
CUSTOM SCAN1 General Settings Name for Custom1 Custom1 Scan Action Scan to Image Scan to OCR Scan to E-mail Scan to File Cancel OKSettings tab
Choose the Target Application, File Type, Resolution, Scan Type, Document Size, Brightness and Contrast settings.
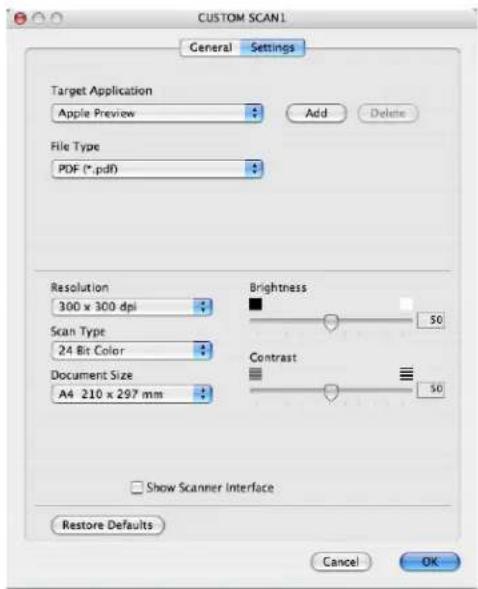
text_image
CUSTOM SCAN1 General Settings Target Application Apple Preview Add Delete File Type PDF (*.pdf) Resolution 300 x 300 dpi Scan Type 24 Bit Color Document Size A4 210 x 297 mm Brightness 50 Contrast 50 Show Scanner Interface Restore Defaults Cancel OKScan to OCR
General tab
Enter a name in Name for Custom (up to 30 characters) to create the button name.
Choose the type of scan from the Scan Action field.
text_image
CUSTOM SCAN2 General Settings Name for Custom2 Custom2 Scan Action ○ Scan to Image ● Scan to OCR ○ Scan to E-mail ○ Scan to File Cancel OKSettings tab
Choose the Target Application, File Type, OCR Software, OCR Language, Resolution, Scan Type, Document Size, Show Scanner Interface, Brightness and Contrast settings.
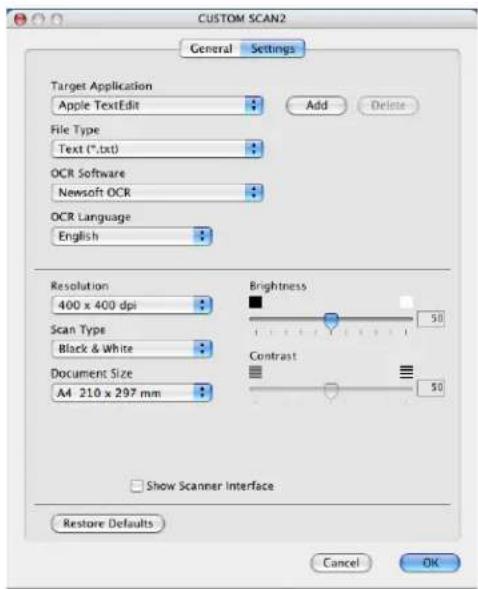
text_image
CUSTOM SCAN2 General Settings Target Application Apple TextEdit File Type Text (*.txt) OCR Software Newsoft OCR OCR Language English Add Delete Resolution 400 x 400 dpi Scan Type Black & White Document Size A4 210 x 297 mm Brightness 50 Contrast 50 Show Scanner Interface Restore Defaults Cancel OKScan to E-mail
General tab
Enter a name in Name for Custom (up to 30 characters) to create the button name.
Choose the type of scan from the Scan Action field.
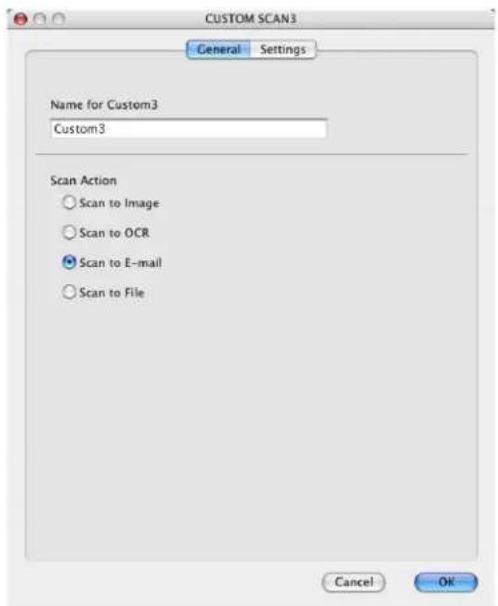
text_image
CUSTOM SCAN3 General Settings Name for Custom3 Custom3 Scan Action ○ Scan to Image ○ Scan to OCR ● Scan to E-mail ○ Scan to File Cancel OKSettings tab
Choose the E-mail Application, File Type, Resolution, Scan Type, Document Size, Show Scanner Interface, Brightness and Contrast settings.

text_image
CUSTOM SCAN3 General Settings E-mail Application Apple Mail Add Delete File Type JPEG (*.jpg) Resolution 200 x 200 dpi Scan Type 24 Bit Color Document Size A4 210 x 297 mm Brightness 50 Contrast 50 Show Scanner Interface Restore Defaults Cancel OKScan to File
General tab
Enter a name in Name for Custom (up to 30 characters) to create the button name.
Choose the type of scan from the Scan Action field.

text_image
CUSTOM SCAN4 General Settings Name for Custom4 Custom4 Scan Action ○ Scan to Image ○ Scan to OCR ○ Scan to E-mail ● Scan to File Cancel OKSettings tab
Choose the file format from the File Type pop-up menu. Save the file to the default folder or choose your preferred folder by clicking the Browse button.
Choose the Resolution, Scan Type, Document Size, Show Scanner Interface, Brightness and Contrast settings and enter the file name if you want to change it.
If you want to specify the destination of the scanned image, check Show Save As Window.
If you want to scan and then crop a portion of a page after pre-scanning the document, check the Show Scanner Interface box.
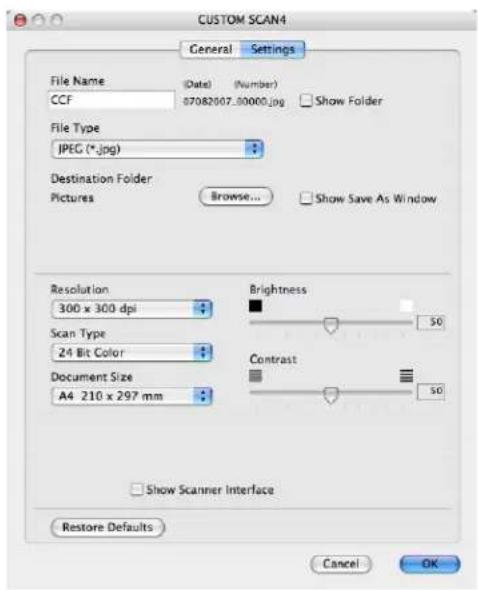
text_image
CUSTOM SCAN4 General Settings File Name (Date) (Number) CCF 07082007_00000.jpg Show Folder File Type JPEG (*.jpg) Destination Folder Pictures Browse... Show Save As Window Resolution 300 x 300 dpi Brightness 50 Scan Type 24 Bit Color Contrast 50 Document Size A4 210 x 297 mm Show Scanner Interface Restore Defaults Cancel OKCOPY / PC-FAX (PC-FAX is MFC models only)
COPY - Lets you use your Macintosh and any printer driver for enhanced copy operations. You can scan a page on the machine and print the copies using any of the features of the machine's printer driver, or you can direct the copy output to any standard printer driver installed on your Macintosh including network printers.
PC-FAX - Lets you scan a page or document and automatically send the image as a fax from the Macintosh. (MFC models only)
You can configure your preferred settings on up to four buttons.
The Copy1-Copy4 buttons can be customized to let you use advanced copy and fax functions such as N in 1 printing.
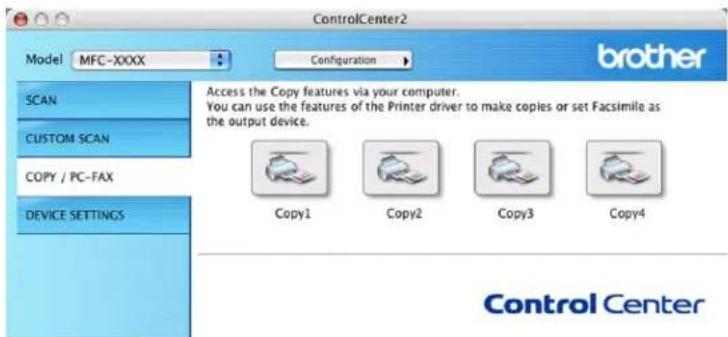
text_image
ControlCenter2 Model MFC-XXXX Configuration brother SCAN CUSTOM SCAN COPY / PC-FAX DEVICE SETTINGS Access the Copy features via your computer. You can use the features of the Printer driver to make copies or set Facsimile as the output device. Copy1 Copy2 Copy3 Copy4 Control CenterTo use the Copy buttons, configure the printer driver by clicking the button while holding down the Ctrl key.
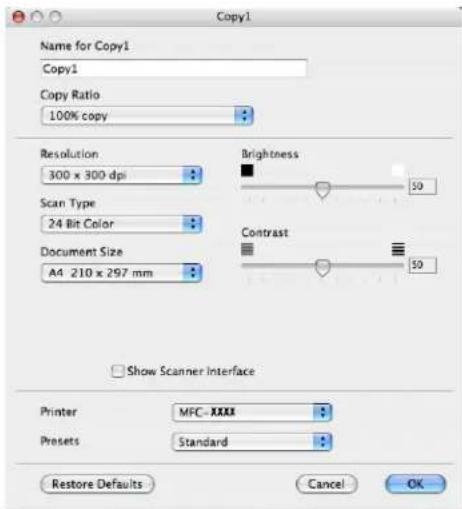
text_image
Copy1 Name for Copy1 Copy1 Copy Ratio 100% copy Resolution 300 x 300 dpi Scan Type 24 Bit Color Document Size A4 210 x 297 mm Brightness 50 Contrast 50 Show Scanner Interface Printer MFC-XXXX Presets Standard Restore Defaults Cancel OKEnter a name in Name for Copy (up to 30 characters).
Choose the Copy Ratio, Resolution, Scan Type, Document Size, Show Scanner Interface, Brightness and Contrast settings to be used.
Before finishing the Copy button configuration, set the Printer. Then choose your print settings from the Presets pop-up menu, then click OK to close the dialog box. By clicking the configured copy button, the print dialog box opens.
To copy, choose Copies & Pages from the pop-up menu.
To fax, choose Send Fax from the pop-up menu. (Sending a fax (MFC models only) on page 142.)

text_image
Printer: MFC-XXXX Presets: Standard Copies & Pages Copies: 1 Collated Pages: All From: 1 to: 1 ? PDF Preview Cancel PrintDEVICE SETTINGS
You can configure or check the machine settings.
■ Remote Setup (MFC models only)
Lets you open the Remote Setup Program. (Remote Setup on page 189.)
■ Quick-Dial (MFC models only)
Lets you open the Set Quick-Dial window of Remote Setup. (Remote Setup on page 189.)
Status Monitor
Allows you to open the Status Monitor Utility.

text_image
ControlCenter2 Model MFC-XXXX Configuration SCAN CUSTOM SCAN COPY / PC-FAX DEVICE SETTINGS Access device settings. Remote Setup Quick-Dial Status Monitor Control CenterRemote Setup (MFC models only)
The Remote Setup button lets you open the Remote Setup Program window to configure the machine setting menus.

Note
For details, see Remote Setup on page 189.
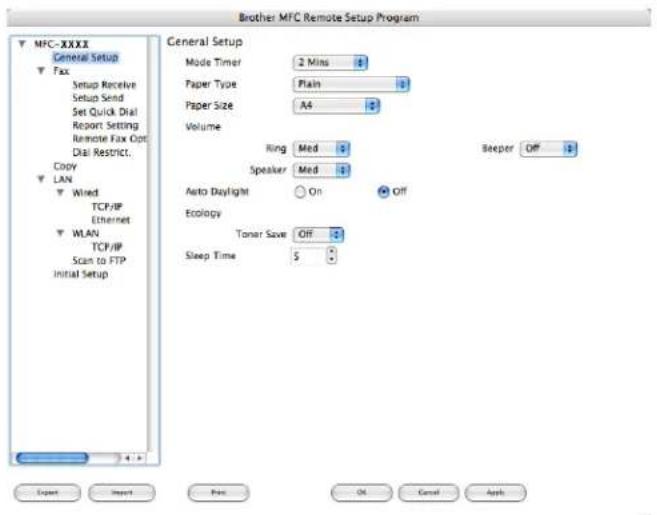
text_image
Brother MFC Remote Setup Program MFC-XXXX General Setup Fax Setup Receive Setup Send Set Quick Dial Report Setting Remote Fax Opt Dial Restrict. Copy LAN Wired TCP/IP Ethernet WLAN TCP/IP Scan to FTP Initial Setup General Setup Mode Timer 2 Mins Paper Type Plain Paper Size A4 Volume Ring Med Speaker Med Auto Daylight On Off Ecology Toner Save Off Sleep Time $ Beeper Off Export Import Print OK Cancel ApplyQuick-Dial (MFC models only)
The Quick-Dial button lets you open the Set Quick-Dial window in the Remote Setup Program, so you can easily register or change the dial numbers on your Macintosh.
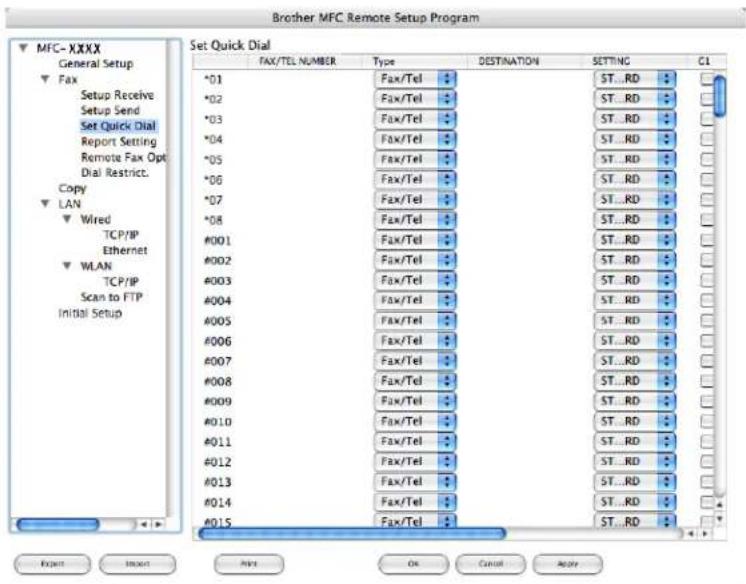
text_image
Brother MFC Remote Setup Program MFC-XXXX General Setup Fax Setup Receive Setup Send Set Quick Dial Report Setting Remote Fax Opt Dial Restrict. Copy LAN Wired TCP/IP Ethernet WLAN TCP/IP Scan to FTP Initial Setup Set Quick Dial FAX/Tel NUMBER Type DESTINATION SETTING C1 *01 Fax/Tel ST...RD *02 Fax/Tel ST...RD *03 Fax/Tel ST...RD *04 Fax/Tel ST...RD *05 Fax/Tel ST...RD *06 Fax/Tel ST...RD *07 Fax/Tel ST...RD *08 Fax/Tel ST...RD #001 Fax/Tel ST...RD #002 Fax/Tel ST...RD #003 Fax/Tel ST...RD #004 Fax/Tel ST...RD #005 Fax/Tel ST...RD #006 Fax/Tel ST...RD #007 Fax/Tel ST...RD #008 Fax/Tel ST...RD #009 Fax/Tel ST...RD #010 Fax/Tel ST...RD #011 Fax/Tel ST...RD #012 Fax/Tel ST...RD #013 Fax/Tel ST...RD #014 Fax/Tel ST...RD #015 Fax/Tel ST...RDStatus Monitor
The Status Monitor button allows you to monitor the status of one or more devices, allowing you to get immediate notification of errors such as a paper jam. (See Status Monitor on page 120.)
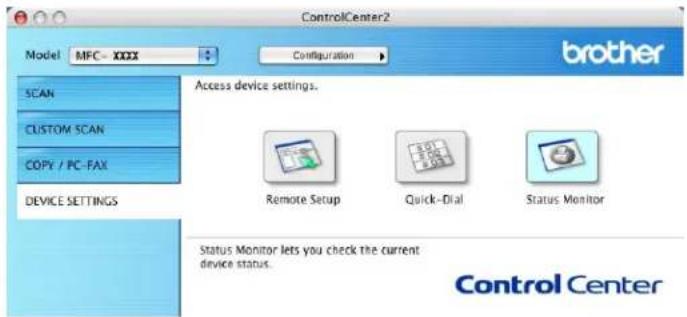
text_image
ControlCenter2 Model MFC - XXXX Configuration brother SCAN CUSTOM SCAN COPY / PC-FAX DEVICE SETTINGS Access device settings. Remote Setup Quick-Dial Status Monitor Status Monitor lets you check the current device status. Control Center11 Network Scanning
If you want to scan from the machine on a network, you must choose the networked machine in the Device Selector application located in Macintosh HD/Library/Printers/Brother/Utilities/DeviceSelector or from the Model pop-up menu in the main screen of ControlCenter2. If you already installed the MFL-Pro Suite Software following the network installation steps in the Quick Setup Guide then this selection should already be made.
To use the machine as a network scanner, the machine must be configured with a TCP/IP address. You can set or change the address settings from the control panel. (See Control Panel Setup in the Network User's Guide.)

Note
For network scanning, a maximum 25 of clients can be connected to one machine on a network. For example, if 30 clients try to connect at a time, 5 clients will not be shown on the LCD.
Before using Network Scanning
Configuring network scanning
From Library, choose Printers, Brother, Utilities and DeviceSelector, and then double-click Device Selector.
The Device Selector window appears. This window can also be opened from ControlCenter2. For more information, see Using ControlCenter2 on page 160.
2 Specify your machine by IP address or mDNS service Name. To change the IP address, enter the new IP address. You can also choose a machine from the list of the available machines. Click Browse to show the list.
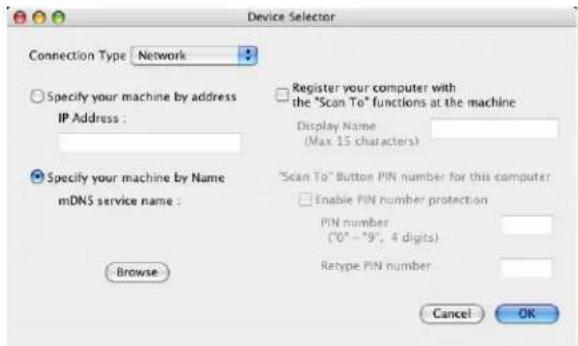
text_image
Device Selector Connection Type Network Specify your machine by address IP Address : Register your computer with the "Scan To" functions at the machine Display Name (Max 15 Characters) Specify your machine by Name mDNS service name : "Scan To" Button PIN number for this computer Enable PIN number protection PIN number (*0^ - *9^, 4 digits) Retype PIN number Browse Cancel OK3 Click OK.

Note
- To use ‘Scan To’ button features on the machine, click the check box for Register your computer with the “Scan To” functions at the machine. Then enter the name you want to be displayed on the machines LCD for your Macintosh. You can use up to 15 characters.
- You can avoid receiving unwanted documents by setting a 4-digit PIN number. Enter your PIN number in the PIN number and Retype PIN number field. To send data to a computer protected by a PIN number, the LCD prompts you to enter the PIN number before the document can be scanned and sent to the machine. (See Using the Scan key on page 181.)
Using the Scan key
Scan to E-mail
When you choose Scan to E-mail, your document will be scanned and sent directly to the Macintosh you designated on your network. ControlCenter2 will activate the default E-mail application on the designated Macintosh for addressing to the recipient. You can scan a black and white or Colour document and it will be sent with the E-mail from the Macintosh as an attachment.
You can change the scan configuration. (See E-mail on page 166.)
1 Put the document face up in the ADF, or face down on the scanner glass.
2 Press (Scan).
3 Press ▲ or ▼ to choose Scan to E-mail. Press OK.
4 Press ▲ or ▼ to choose the destination Macintosh you want to use for E-mailing your document. Press OK. If the LCD prompts you to enter a Pin number, enter the 4-digit Pin number for the destination Macintosh on the control panel. Press OK.
5 Press Start.
The machine starts the scanning process.

Note
If you want the scanned data in colour, choose colour in the scan type on the Device Button tab of the ControlCenter2 configuration. If you want the scanned data in black and white, choose black and white in the scan type on the Device Button tab of the ControlCenter2 configuration. (See E-mail on page 166.)
Scan to Image
When you choose Scan to Image, your document will be scanned and sent directly to the Macintosh you designated on your network. ControlCenter2 will activate the default graphics application on the designated Macintosh. You can change the Scan configuration. (See Image (example: Apple Preview) on page 163.)
1 Put the document face up in the ADF, or face down on the scanner glass.
2 Press (Scan).
3 Press ▲ or ▼ to choose Scan to Image. Press OK.
4 Press ▲ or ▼ to choose the destination Macintosh you want to send to.
Press OK.
If the LCD prompts you to enter a Pin number, enter the 4-digit Pin number for the destination Macintosh on the control panel.
Press OK.
5 Press Start.
The machine starts the scanning process.

Note
If you want the scanned data in colour, choose colour in the scan type on the Device Button tab of the ControlCenter2 configuration. If you want the scanned data in black and white, choose black and white in the scan type on the Device Button tab of the ControlCenter2 configuration. (See Image (example: Apple Preview) on page 163.)
Scan to OCR
When you choose Scan to OCR, your document will be scanned and sent directly to the Macintosh you designated on your network. ControlCenter2 will activate Presto! PageManager and convert your document into text for viewing and editing from a word processing application on the designated PC. You can change the Scan configuration. (See OCR (word processing application) on page 165.)
1 Put the document face up in the ADF, or face down on the scanner glass.
2 Press (Scan).
3 Press ▲ or ▼ to choose Scan to OCR. Press OK.
4 Press ▲ or ▼ to choose the destination Macintosh you want to send to.
Press OK.
If the LCD prompts you to enter a Pin number, enter the 4-digit Pin number for the destination Macintosh on the control panel.
Press OK.
5 Press Start.
The machine starts the scanning process.
Scan to File
When you choose Scan to File, you can scan a black and white or colour document and send it directly to a Macintosh you designate on your network. The file will be saved in the folder and file format that you have configured in ControlCenter2 on the designated Macintosh. You can change the Scan configuration. (See File on page 167.)
1 Put the document face up in the ADF, or face down on the scanner glass.
2 Press (Scan).
3 Press ▲ or ▼ to choose Scan to File. Press OK.
4 Press ▲ or ▼ to choose the destination Macintosh you want to send to.
Press OK.
If the LCD prompts you to enter a Pin number, enter the 4-digit Pin number for the destination Macintosh on the control panel.
Press OK.
5 Press Start.
The machine starts the scanning process.

Note
- If you want the scanned data in colour, choose colour in the scan type on the Device Button tab of the ControlCenter2 configuration. If you want the scanned data in black and white, choose black and white in the scan type on the Device Button tab of the ControlCenter2 configuration. (See File on page 167.)
- If you would like to change the file name of scanned documents, enter the file name in File Name section on the Device Button tab of the ControlCenter2 configuration.
Scan to FTP (MFC-7440N and MFC-7840W only)
When you choose Scan to FTP, you can scan a black and white or colour document directly to an FTP server located locally on your network or on the internet.
The details required to use Scan to FTP can be entered manually at the control panel or by using Web Based Management to pre-configure and store the details in an FTP Profile.
For information on how to manually enter the Scan to FTP details, see Scan to FTP Manual Method on page 187. To use Web Based Management, type http://xxx.xxx.xxx.xxx (where xxx.xxx.xxx.xxx is the IP address of your machine) into your browser, and then you can configure or change the settings in the Administrator Settings. You can configure up to ten FTP server Profiles.
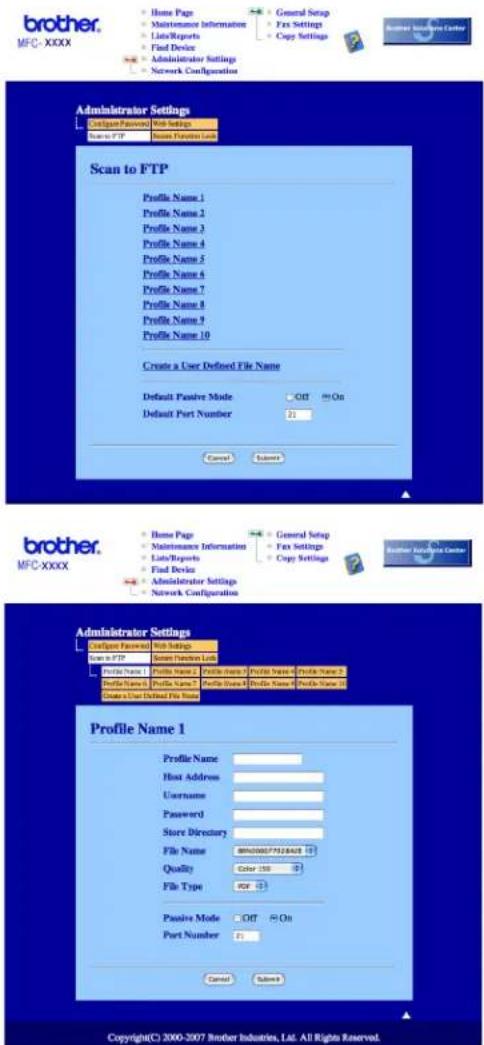
text_image
brother. MFC-XXXX Home Page Maintenance Information List/Reports Find Device Administrator Settings Network Configuration General Setup Fox Settings Copy Settings Braemar Sisler Center Administrator Settings Configure Password Web Settings Name to FTP Name Provider List Scan to FTP Profile Name 1 Profile Name 2 Profile Name 3 Profile Name 4 Profile Name 5 Profile Name 6 Profile Name 7 Profile Name 8 Profile Name 9 Profile Name 10 Create a User Defined File Name Default Passive Mode Off On Default Port Number 21 Cancel Subsea brother. MFC-XXXX Home Page Maintenance Information General Setup List/Reports Fax Settings Copy Settings Find Device Administrator Settings Network Configuration Configure Password Web Settings Name to FTP Name Provider List Profile Name Profile Name Profile Name Profile Name Profile Name Profile Name Profile Name Profile Name Profile Name Profile Name Profile Name Profile Name Profile Name Profile Name Profile Name Profile Name Profile Name Profile Name Profile Name Profile Name Profile Name Profile Name Profile Name Profile Name Profile Name Profile Name Profile Name Profile Name Profile Name Profile Name Profile Name Profile Name Profile Name Profile Name Profile Name Profile Name Profile Name Profile Name Profile Name Profile Name Profile Name Profile Name Profile Name Profile Name Profile Name Profile Name Profile Name Profile Name Profile Name Profile Name Profile Name Profile Name Profile Name Profile Name Profile Name Profile Name Profile Name Profile Name Profile Name Profile Name Profile Name Profile Name Profile Name Profile Name Profile Name Profile Name Profile Name Profile Name Profile Name Profile Name Profile Name Profile Name Profile Name Profile Name Profile Name Profile Name Profile Name Profile Name Profile Name Profile Name Profile Name Profile Name Profile Name Profile Name Profile Name Profile Name Profile Name Profile Name Profile Name Profile Name Profile Name Profile Name Profile Nam Profile Name Profile Name Profile Name Profile Nam Profile Name Profile Name Profile Nam Profile Name Profile Name Profile Nam Profile Name Profile Name Profile Nam Profile Name Profile Name Profile Nam Profile Name Profile Name Profile Nam Profile Name Profile Name Profile Nam Profile Name Profile Name Profile Nam Profile Name Profile Name Profile Nam Profile Name Profile Name Profile Nam Profile Name Profile Name Profile Nam Profile Name Profile Name Profile Nam Profile Name Profile Name Profile Nam Profile Name Profile Name Profile Nam Profile Name Profile Name Profile Nam Profile Name Page: All Rights Reserved. Passive Mode Off On Port Number 21 Cancel Subsea Profile Name 1 Copyright© 2000-2007 Brother Industries, Ltd. All Rights Reserved.1 Enter the name that you want to use for the profile of the FTP server. This name will be displayed on the LCD of the machine and can be up to 15 characters.
2 The Host Address is the domain name of the FTP server. Enter the Host Address (for example ftp.example.com) (up to 60 characters) or the IP address (for example 192.23.56.189).
3 Enter the Username that has been registered with the FTP server for the machine (up to 32 characters).
4 Enter the Password for access to the FTP server for the Username that was registered (up to 32 characters).
5 Enter the destination folder where your document will be stored on the FTP server (for example /brother/abc/) (up to 60 characters).
6 Choose the file name you want to use for the scanned document. You can choose from seven present and two user defined File Names. The file name that will be used for your document will be the file name you selected plus the last 6 digits of the flatbed/ADF scanner counter plus the file extension (For example, Estimate098765.pdf). You can also manually enter a File Name up to 15 characters.
7 Choose the quality that the document will be scanned at from the pull-down list. You can choose Color 150, Color 300, Color 600, Gray 300, Gray 200, Gray 100, B&W 200 or B&W 200x100.
8 Choose the file type for the document from the pull-down list. You can choose PDF or JPEG for colour or greyscale documents and PDF or TIFF for B/W document.
9 You can set Passive Mode to OFF or ON depending on your FTP server and network firewall configuration. By default this setting is ON. You can also change the port number used to access the FTP server. The default for this setting is port 21. In most cases these two settings can remain as default.
Creating a user defined File Name
In addition to the seven present file names you can store two user defined file names that can be used for creating an FTP Server Profile.
From the Scan to FTP screen in Web Based Management, choose Create a User Defined File Name.
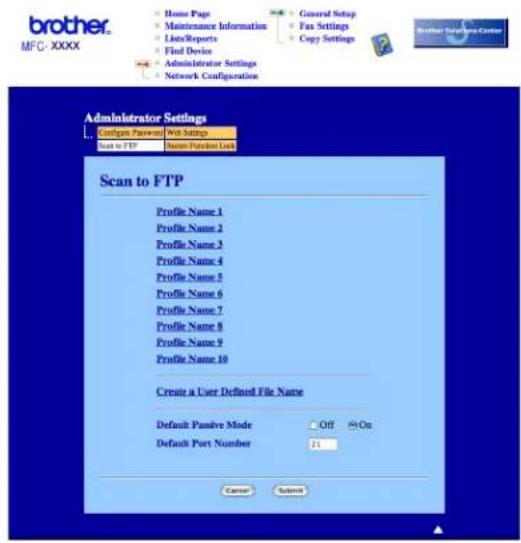
text_image
brother. MFC - XXXX Home Page Maintenance Information List/Reports Find Device Administrator Settings Network Configuration General Setup Fax Settings Copy Settings Brother Controls Center Scan to FTP Name Password List Scan to FTP Administrator Settings Configure Password Web Settings Create a User Defined File Name Profile Name 1 Profile Name 2 Profile Name 3 Profile Name 4 Profile Name 5 Profile Name 6 Profile Name 7 Profile Name 8 Profile Name 9 Profile Name 10 Default Passive Mode Default Port Number Off On 11 Cancel Submit2 Enter a file name in one of the two user defined fields and click Submit. A maximum of 15 characters can be entered in each of the user defined name fields.
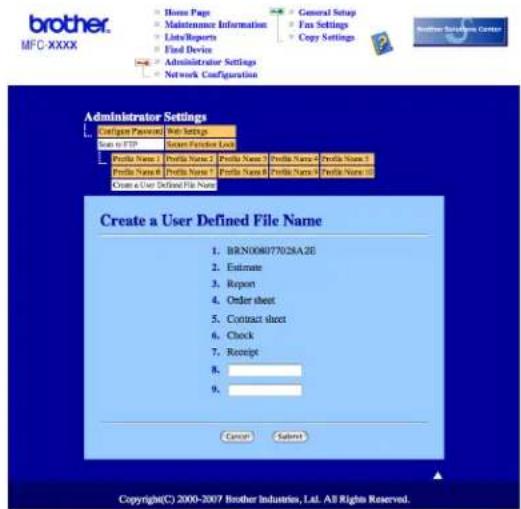
text_image
brother. MFC-XXXX Home Page Maintenance Information List/Reports Find Device Administrator Settings Network Configuration General Setup Fax Settings Copy Settings Administrator Settings Configure Password: Web Settings Scan to FTP Send Preference List Profile Name 1 Profile Name 2 Profile Name 3 Profile Name 4 Profile Name 5 Profile Name 6 Profile Name 7 Profile Name 8 Profile Name 9 Profile Name 10 Open a List Defined File Name Create a User Defined File Name 1. BRN008077028A2B 2. Estimate 3. Report 4. Order sheet 5. Contract sheet 6. Check 7. Receipt 8. 9. Cancel Subnet Copyright(C) 2000-2007 Brother Industries, Ltd. All Rights Reserved.Scan to FTP using FTP Server Profiles
1 Put the document face up in the ADF, or face down on the scanner glass.
2 Press (Scan).
3 Press ▲ or ▼ to choose Scan to FTP. Press OK.
4 Press ▲ or ▼ to choose one of the FTP server profiles listed. Press OK.
■ If the Scan to FTP profile is complete, you will automatically go to Step 10.
If the Scan to FTP profile is not complete, for instance, the login account name and password are missing or the quality or file type are not chosen, you will be prompted to enter any missing information in the following steps.
5 Choose one of the options below:
■ Press ▲ or ▼ to choose Color 150 dpi, Color 300 dpi, Color 600 dpi, Gray 300 dpi, Gray 200 dpi or Gray 100 dpi. Press OK and go to Step ⑥.
■ Press ▲ or ▼ to choose B&W 200 dpi or B&W 200x100 dpi. Press OK and go to Step ⑦.
6 Press ▲ or ▼ to choose PDF or JPEG. Press OK and go to Step 8.
7 Press ▲ or ▼ to choose PDF or TIFF. Press OK.
8 Use the dial pad to enter the username. Press OK.
9 Use the dial pad to enter the password. Press OK.
10 Do one of the following:
■ If you want to start scanning, press Start and go to Step 13.
■ If you want to change the file name, go to Step 11.
11 Press ▲ or ▼ to choose a file name you want to use and press OK. Press Start and go to Step 13.

Note
If you want to change the file name manually, go to Step 12.
12 Press ▲ or ▼ to choose
Enter the file name you want to use (up to 15 characters) and press OK. Press Start.
13 The LCD shows Connecting. When the connection to the FTP server is successful the machine starts the scanning process.
Scan to FTP Manual Method
1 Put the document face up in the ADF, or face down on the scanner glass.
2 Press (Scan).
3 Press ▲ or ▼ to choose Scan to FTP. Press OK.
4 Press ▲ or ▼ to choose

Note
If there is no FTP Profile configured, skip Step ④ and go to Step ⑤.
5 Use the dial pad to enter the FTP host address (for example ftp.example.com), (up to 60 characters) or the IP address (for example 192.23.56.189). Press OK.
6 Use the dial pad to enter the destination folder (for example /brother/abc/, up to 60 characters). Press OK.
7 Press ▲ or ▼ to choose Enter Username or Change Setting. Press OK.
If you choose Enter Username, go to Step 11. If you choose Change Setting, go to Step 8.
8 Choose one of the options below.
■ Press ▲ or ▼ to choose Color 150 dpi, Color 300 dpi, Color 600 dpi, Gray 300 dpi, Gray 200 dpi or Gray 100 dpi. Press OK and go to Step ⑨.
■ Press ▲ or ▼ to choose B&W 200 dpi or B&W 200x100 dpi. Press OK and go to Step ⑩.
9 Press ▲ or ▼ to choose PDF or JPEG. Press OK and go to Step 11.
10 Press ▲ or ▼ to choose PDF or TIFF. Press OK.
11 Use the dial pad to enter the username. Press OK.
12 Use the dial pad to enter the password. Press OK.
13 Do one of the following:
■ If you want to start scanning, press Start and go to Step 16.
■ If you want to change the file name, go to Step 14.
14 Press ▲ or ▼ to choose a file name you want to use and press OK. Press Start and go to Step 16.

Note
If you want to change the file name manually, go to Step 15.
15 Press ▲ or ▼ to choose
Enter the file name you want to use (up to 15 characters) and press OK.
Press Start.
16 The LCD shows Connecting. When the connection to the FTP server is successful the machine starts the scanning process.

Note
If a timeout or any other error occurs, start the Scan to FTP process again from the beginning ①. If the user name is entered incorrectly then the LCD will show Authenticate Err, please start the process again from the beginning ①.
12 Remote Setup
Remote Setup (MFC models only)
The Remote Setup application lets you configure many machine settings from a Macintosh application. When you access this application, the settings on your machine will be downloaded automatically to your Macintosh and displayed on your Macintosh screen. If you change the settings, you can upload them directly to the machine.

Note
The Remote Setup application icon is in Macintosh HD/Library/Printers/Brother/Utilities.

text_image
Brother MFC Remote Setup Program MFC-XXXX General Setup Fax Setup Receive Setup Send Set Quick Dial Report Setting Remote Fax Opti Dial Restrict. Copy LAN Wired TCP/IP Ethernet WLAN TCP/IP Scan to FTP Initial Setup General Setup Mode Timer 2 Mins Paper Type Main Paper Size A4 Volume Ring Med Speaker Med Auto Daylight On Off Ecology Toner Save Off Sleep Time 5 Beeper Off Export Report Print OK Cancel ApplyOK
Lets you start uploading data to the machine and exit the Remote Setup application. If an error message is displayed, enter the correct data again and then click OK.
Cancel
Lets you exit the Remote Setup application without uploading data to the machine.
Apply
Lets you upload data to the machine without exiting the Remote Setup application.
Lets you print the chosen items on the machine. You cannot print the data until it is uploaded to the machine. Click Apply to upload the new data to the machine and then click Print.
Export
Lets you save the current configuration setting to a file.
Import
Lets you read the setting from a file.

Note
- You can use the Export and Import buttons to save Quick Dial or all your settings for your machine.
- If you need to change the machine that was registered to your Macintosh during the installation of MFL-Pro Suite (see the Quick Setup Guide), or if the network environment was changed, you need to specify the new machine. Open the Device Selector and choose the new machine. (For network users only)
A
Index
B
BR-Script 3 mode ......6, 117
C
ControlCenter2
Macintosh 160
ControlCenter3
Windows ^® 54
D
Device options 20
Device Selector 149, 179, 190
DeviceSelector 179
Drivers
Macintosh TWAIN 149
Windows ^® printer 2
TWAIN 30
WIA 37
F
FAX (PC-FAX)
Macintosh sending 142, 145
Windows ^® address book 99
cover page 94
facsimile style 95
group 101
receiving 105
sending 93
simple style 96
N
Network PC FAX
Macintosh (Send only) 142
Windows ^® 92
P
PaperPort™ (Windows®)
importing 53
OCR 52
Presto! PageManager (Macintosh) .....155, 157
Printer driver 25
PS printer driver 25
R
Remote Setup
Macintosh 189
Windows ^® 90
S
Scan
Macintosh into Macintosh .... 150
Network 179
OCR 157
Presto! PageManager 155, 157
Resolution 151
Scan key 154
Windows® Network 78
Resolution 34
Scan key 47,82
ScanSoft™ PaperPort™ 50
WIA Compliant 37
Scan to FTP Macintosh .... 183
Windows ^® 84
brother®
Visit us on the World Wide Web
http://www.brother.com
This product is approved for use in the country of purchase only. Local Brother companies or their dealers will only support machines purchased in their own countries.