
LSSG3020BD - Unspecified LG - Free user manual and instructions
Find the device manual for free LSSG3020BD LG in PDF.


| Product Type | Gas Range |
| Model | LSSG3020BD |
| Brand | LG |
| Overall Dimensions (W x H x D) | 29 7/8" x 37 59/64" x 28 3/4" |
| Height to Cooking Surface | 36" |
| Net Weight | 185.6 lb (84.2 kg) |
| Total Oven Capacity | 6.3 cu. ft. |
| Electrical Requirements | 120 VAC, 60 Hz, 1 kW, 15 or 20 Amp circuit |
| Gas Type | Natural or LP (convertible) |
| Number of Surface Burners | 5 (including oval center burner) |
| Burner Sizes | Small, Medium, Large, Extra Large, Oval |
| Oven Modes | Bake, Broil (Hi/Lo), Convection Bake, Convection Roast, Pizza, Warm, Proof, Self Clean, EasyClean |
| Special Features | Wi-Fi Connectivity, Smart Diagnosis, Sabbath Mode, Meat Probe, Warming Drawer, Timed/Delayed Cook, Lockout |
| Included Accessories | Heavy Rack (2), Gliding Rack (1), Meat Probe, Griddle, Wok Grate, Rear Filler, Anti-Tip Kit, LP Nozzle Conversion Kit |
| Cleaning | Self Clean (3-5 hrs), EasyClean (10 min), Manual cleaning of burners and exterior |
| Safety Features | Anti-tip device, Flame failure protection, Child lock (Lockout), Auto shut-off |
| Warranty | 2 years limited (parts and labor) |
Frequently Asked Questions - LSSG3020BD LG
User questions about LSSG3020BD LG
0 question about this device. Answer the ones you know or ask your own.
Ask a new question about this device
Download the instructions for your Unspecified in PDF format for free! Find your manual LSSG3020BD - LG and take your electronic device back in hand. On this page are published all the documents necessary for the use of your device. LSSG3020BD by LG.
USER MANUAL LSSG3020BD LG
Read this owner's manual thoroughly before operating the appliance and keep it handy for reference at all times.

WARNING
If the information in this manual is not followed exactly, a fire or explosion may result causing property damage, personal injury or death.
- Do not store or use gasoline or other flammable vapors and liquids in the vicinity of this or any other appliance.
• WHAT TO DO IF YOU SMELL GAS - Do not try to light any appliance.
- Do not touch any electrical switch.
- Do not use any phone in your building.
- Immediately call your gas supplier from a neighbor's phone. Follow the gas supplier's instructions.
- If you cannot reach your gas supplier, call the fire department.
- Installation and service must be performed by a qualified installer, service agency, or the gas supplier.
LSSG3017**
LSSG3020**

MFL68920516_09
www.lg.com
Copyright © 2017 - 2022 LG Electronics Inc. All Rights Reserved.
2 TABLE OF CONTENTS
TABLE OF CONTENTS
3 PRODUCT FEATURES
4 IMPORTANT SAFETY INSTRUCTIONS
12 PRODUCT OVERVIEW
12 Parts
12 Accessories
13 INSTALLATION
13 Product Specifications
13 Before Installing the Range
14 Installing the Range
16 Optional Rear Filler
16 Providing Adequate Gas Supply
17 Connecting the Range to Gas
18 Electrical Connections
18 Sealing the Openings
19 Assembling the Surface Burners
19 Checking Ignition of the Surface Burners
20 Leveling the Range
20 Engaging the Anti-tip Device
21 OPERATION
21 Gas Surface Burners
22 Burner Locations
22 Using the Gas Surface Burners
22 Setting the Flame Size
23 In Case of Power Failure
23 Using a Wok
23 Using the Wok Grate
24 Using Stove-Top Grills
24 Using the Griddle
25 The Oven
26 Control Panel Overview
27 Changing Oven Settings
27 Clock
27 Oven Light
27 Minimum & Maximum Default Settings
28 Timer On/Off
28 Wi-Fi
28 Settings
- Setting the Hour Mode
-
Setting Convection Auto Conversion
-
Adjusting the Oven Thermostat
- Turning the Preheat Alarm Light On/Off
- Adjusting the Beeper Volume
- Selecting Fahrenheit or Celsius
29 Lockout
30 Start Time (Delayed Timed Cook)
30 Cook Time (Timed Cook)
31 Removing and Replacing the Oven Racks
31 Recommended Baking and Roasting Guide
32 Bake
33 Convection Mode
33 Convection Bake
34 Cookware for Convection Cooking
34 Convection Roast
35 Broil
37 Pizza
37 Warm
37 Proof
38 Meat Probe
39 Remote Start
39 Sabbath Mode
40 Operating the Warming Drawer
42 SMART FUNCTIONS
42 LG ThinQ Application
43 FCC Notice (For transmitter module contained in this product)
44 FCC RF Radiation Exposure Statement
44 Smart Diagnosis™ Feature
45 MAINTENANCE
45 Gas Surface Burners
47 Cleaning the Exterior
48 Door Care Instructions
48 EasyClean®
51 Self Clean
53 Changing the Oven Light
53 Removing and Replacing the Lift-Off Oven Doors and Drawer
55 TROUBLESHOOTING
55 FAQs
57 Before Calling for Service
60 LIMITED WARRANTY


PRODUCT FEATURES

natural_image
Simple line drawing of a three-tiered abacus with beads and rods (no text or symbols)Multiple Gas Burner Sizes
Choose a burner to fit the size of your cookware.
Cooking multiple items at once is possible by using different burners at the same time.

natural_image
Simple line drawing of a medical cross symbol with two leaves and a plus sign (no text or labels)Safe and Convenient Gas Range
Provides safety and convenience for cooking.

natural_image
Simple line drawing of a container with bubbles and stars, no text or symbols presentSelf Clean & EasyClean®
Useful for easy cleaning.
IMPORTANT SAFETY INSTRUCTIONS
Read and follow all instructions when using the range to prevent the risk of fire, electric shock, personal injury, or damage. This guide does not cover all possible conditions that may occur. Always contact your service agent or manufacturer about problems that you do not understand.
Download this owner's manual at: http://www.lg.com

This is the safety alert symbol. This symbol alerts you to potential hazards that can result in property damage and/or serious bodily harm or death. All safety messages will follow the safety alert symbol and either the word WARNING or CAUTION. These words mean:

WARNING - Indicates a hazardous situation which, if not avoided, could result in death or serious injury.

CAUTION - Indicates a hazardous situation which, if not avoided, could result in minor or moderate injury.
ANTI-TIP DEVICE

WARNING
• TO REDUCE THE RISK OF TIPPING, THE APPLIANCE MUST BE SECURED BY A PROPERLY INSTALLED ANTI-TIP DEVICE. TO CHECK IF THE DEVICE IS INSTALLED PROPERLY, VERIFY THAT THE ANTI-TIP DEVICE IS ENGAGED, OR GRASP THE TOP REAR EDGE OF THE RANGE BACK GUARD AND CAREFULLY ATTEMPT TO TILT IT FORWARD. Refer to the installation section for instructions.
- A child or adult can tip the range and be killed.
- Install the anti-tip device to the structure and/or the range. Verify the anti-tip device has been properly installed and engaged by following the guide of the Anti tip bracket template.
- Engage the range to the anti-tip device by following the guide of the Anti tip bracket template. Ensure the anti-tip device is re-engaged when the range is moved by following the guide of the Anti tip bracket template.
- Re-engage the anti-tip device if the range is moved. Do not operate the range without the anti-tip device in place and engaged.
• See installation instructions for details.
- Failure to do so can result in death or serious burns to children or adults.
- It is possible for a child or adult to tip the range and be killed.
- Verify that the anti-tip device has been properly installed and attached to the floor or wall and engaged to the leveling leg of the range.
- Do not operate the range without the anti-tip device in place and engaged.
- Never remove the oven legs. The range will not be secured to the anti-tip bracket if the legs are removed.
- Do not step or sit on the oven door. The range could be tipped and injury might result from spilled hot liquid, food, or the range itself.


- Do not rest large, heavy items such as whole turkeys on the open oven door. The range could tip forward and cause injury.
- Reengage the anti-tip device after pulling the range out for cleaning, service, or any other reason.
- Failure to follow these instructions can result in death or serious burns to children or adults.
IMPORTANT SAFETY NOTICE
Gas appliances can cause minor exposure to four of these substances, namely benzene, carbon monoxide, formaldehyde and soot, caused primarily by the imperfect combustion of natural or LP gas. Correctly adjusted burners, indicated by a bluish rather than a yellow flame, will minimize imperfect combustion. Exposure to these substances can be minimized by opening windows or using a ventilation fan or hood.

WARNING
- Never use your range as a space heater to heat or warm the room. Doing so may result in carbon monoxide poisoning and overheating of the oven.
- Never wear loose fitting or hanging garments while using the appliance. Be careful when reaching for items placed in cabinets over the range. Flammable materials could be ignited if brought in contact with flame or hot oven surfaces and may cause severe burns.
- Do not place or use combustible materials such as gasoline or other flammable vapors and liquids in the vicinity of this or any other appliance.
- Do not place flammable materials in the oven or near the cooktop.
- Do not allow cooking grease or other flammable materials in or near the range.
- Do not use water on grease fires. Never touch a flaming pan. Turn the controls off. Smother a flaming pan on a surface burner by covering the pan completely with a well-fitting lid, cookie sheet or flat tray. Use a multi-purpose dry chemical or foam-type fire extinguisher.
A grease fire can be put out by covering it with baking soda or, if available, by using a multi-purpose dry chemical or foam-type fire extinguisher.
Flame in the oven or the drawer can be smothered completely by closing the oven door or drawer and turning the control to off or by using a multi-purpose dry chemical or foam-type fire extinguisher. - Do not use the oven for storage.
- Let the burner grates and other surfaces cool before touching them.
- Never block the vents (air holes) of the range. They provide the air inlet and outlet necessary for the range to operate properly with correct combustion. Air openings are located at the rear of the cooktop, at the top and bottom of the oven door, and at the bottom of the range.
- Never obstruct the flow of combustion and ventilation air by blocking the oven vent or air intakes. Doing so restricts air to the burner and may result in carbon monoxide poisoning.

WARNING
- Never cover any slots, holes or passages in the oven bottom or cover an entire rack with materials such as aluminum foil. Doing so blocks air flow through the oven and may cause carbon monoxide poisoning. Aluminum foil linings may also trap heat, causing a fire hazard.
- Large scratches or impacts to glass doors can lead to broken or shattered glass.
- Stepping, leaning or sitting on the doors or drawers of this range can result in serious injuries and also cause damage to the range. Do not allow children to climb or play around the range. The weight of a child on an open door may cause the range to tip, resulting in serious burns or other injury.
- Leak testing of the appliance must be conducted according to the manufacturer's instructions.
- Gas leaks may occur in the system and result in a serious hazard. Gas leaks may not be detected by smell alone. Gas suppliers recommend you purchase and install a UL approved gas detector. Install and use in accordance with the gas detector manufacturer's instructions.
- Do not use commercial oven cleaners on the oven finish or around any part of the oven. They will damage the finish.
- To prevent staining or discoloration, clean appliance after each use.
- Do not attempt to open or close the door or operate the oven until the door is properly installed.
- Never place fingers between the hinge and front oven frame. Hinge arms are spring mounted. If accidentally hit, the hinge will slam shut against the oven frame and injure your fingers.

CAUTION
- Items of interest to children should not be placed in cabinets above the range or on the backsplash of the range - children climbing on the range to reach items could be seriously injured.
- Do not leave children alone or unattended where a range is hot or in operation. They could be seriously burned.
- Do not let anyone climb, stand or hang on the oven door, warming drawer or cooktop. They could damage the range or tip it over, causing severe personal injury.
- Wear gloves when cleaning the range to avoid injury or burns.
- Do not use the oven for storing food or cookware.
- To prevent damage to the oven door, do not attempt to open the door when Lock is displayed.
- Do not stand or place excessive weight on an open door. This could tip the range, break the door, or injure the user.
- Do not use delayed baking for highly perishable foods such as dairy products, pork, poultry, or seafood.
INSTALLATION SAFETY PRECAUTIONS
Have the installer show you the location of the range gas shut-off valve and how to shut it off if necessary.

WARNING
- Make sure your range is properly installed and grounded by a qualified installer, according to the installation instructions. Any adjustment and service should be performed only by qualified gas range installers or service technicians.
- Make sure your range is properly adjusted by a qualified service technician or installer for the type of gas (natural or LP) that is to be used. Your range can be converted for use with either type of gas. See the installation instructions.
- These adjustments must be done by a qualified service technician according to the manufacturer's instructions and all codes and requirements of the authority having jurisdiction. Failure to follow these instructions could result in serious injury or property damage. The qualified agency performing these adjustments assumes responsibility for the conversion.
- Disconnect the electrical supply before servicing the appliance.
- Never use the appliance door as a step stool or seat, as this may result in possible tipping of the appliance and serious injuries.
- This product should not be installed below ventilation type hood systems that direct air in a downward direction. Doing so may cause ignition and combustion problems with the gas burners resulting in personal injury and may affect the cooking performance of the unit.
- Plug your range into a 120-volt grounded outlet only. Do not remove the round grounding prong from the plug. If in doubt about the grounding of the home electrical system, it is your personal responsibility and obligation to have an ungrounded outlet replaced with a properly grounded, three-prong outlet in accordance with the National Electrical Code. Do not use an extension cord with this range.
- To prevent fire hazard or electrical shock, do not use an adapter plug, an extension cord, or remove the grounding prong from the electrical power cord. Failure to follow this warning can cause serious injury, fire or death.
- To prevent poor air circulation, place the range out of the kitchen traffic path and out of drafty locations.
- Do not attempt to repair or replace any part of your range unless it is specifically mentioned in this manual. All other services should be referred to a qualified technician.
- Make sure that all packaging materials are removed from the range before operating it to prevent fire or smoke damage should the packaging material ignite.

WARNING
- To shut off the gas supply to the range, close the range gas shutoff valve by turning it clockwise.

Installer: Inform the consumer of the location of the gas shut-off valve.
• After using your range for an extended period of time high floor temperatures may result. Many floor coverings will not withstand this kind of use.
- Never install the range over vinyl tile or linoleum that cannot withstand such type of use. Never install it directly over interior kitchen carpeting.
SURFACE BURNERS

WARNING
- Even if the top burner flame goes out, gas is still flowing to the burner until the knob is turned to the Off position. If you smell gas, immediately open a window and ventilate the area for five minutes prior to using the burner. Do not leave the burners on unattended.
- Use proper pan size. Do not use pans that are unstable or that can be easily tipped. Select cookware with flat bottoms large enough to cover burner grates. To avoid spillovers, make sure the cookware is large enough to contain the food properly. This will both save cleaning time and prevent hazardous accumulations of food, since heavy spattering or spillovers left on the range can ignite. Use pans with handles that can be easily grasped and remain cool.

CAUTION
- Be sure that all surface controls are set in the Off position prior to supplying gas to the range.
- Never leave the surface burners unattended at high flame settings. Boilovers may cause smoke and greasy spillovers that may ignite.
• Always turn the knobs to the Lite position when igniting the top burners and make sure the burners have ignited. - Control the top burner flame size so it does not extend beyond the edge of the cookware. Excessive flame is hazardous.
- Only use dry pot holders- moist or damp pot holders on hot surfaces may result in burns from steam. Do not let pot holders come near open flames when lifting cookware. Do not use towels or other bulky cloth items. Use a pot holder.
- If using glass cookware, make sure the cookware is designed for range-top cooking.
- To prevent burns from ignition of flammable materials and spillage, turn cookware handles toward the side or back of the range without extending them over adjacent burners.
- Never leave any items on the cooktop. The hot air from the vent may ignite flammable items and will increase pressure in closed containers, which may cause them to burst.
- Carefully watch foods being fried at a high flame setting.
• Always heat fat slowly, and watch as it heats. - If frying combinations of oils and fats, stir together before heating.
- Use a deep fat thermometer if possible to prevent overheating fat from heating beyond the smoking point.
- Use the least possible amount of fat for effective shallow or deep fat frying. Filling the pan with too much fat can cause spillovers when food is added.
- Do not cook foods directly on an open flame on the cooktop.
- Do not use a wok on the surface burners if the wok has a round metal ring that is placed over the burner grate to support the wok. This ring acts as a heat trap, which may damage the burner grate and burner head. It may also cause the burner to work improperly. This may cause carbon monoxide levels which are higher than what is allowed by current standards, resulting in a health hazard.
- Foods for frying should be as dry as possible. Frost or moisture on foods can cause hot fat to bubble up and spill over the sides of the pan.
- Never try to move a pan of hot fat, especially a deep fryer. Wait until the fat is cool.
- Do not place plastic items on the cooktop- they may melt if left too close to the vent.
- Keep all plastics away from the surface burners.
- To prevent burns, always be sure that the controls for all burners are in the Off position and all grates are cool before attempting to remove them.
- If you smell gas, turn off the gas to the range and call a qualified service technician. Never use an open flame to locate a leak.
• Always turn the knobs to the Off position before removing cookware. - Do not lift the cooktop. Lifting the cooktop can cause damage and improper operation of the range.
- If the range is located near a window, do not hang long curtains that could blow over the surface burners and catch on fire.
- Use care when cleaning the cooktop. The pointed metal ends on the electrodes could cause injury.
BROILER
Always use a broiler pan and a grid for excess fat and grease drainage. This will help to reduce splatter, smoke, and flare-ups.

WARNING
When using your broiler, the temperature inside the oven will be extremely high. Take caution to avoid possible burns by:
- Keeping the door closed when broiling (refer to Broil section of the manual)
• Always wearing oven mitts when inserting or removing food items
COOK MEAT AND POULTRY THOROUGHLY
To protect against food-borne illnesses, cook meat and poultry thoroughly—meat to at least an INTERNAL temperature of 160 °F , poultry to at least an INTERNAL temperature of 165 °F and beef, pork, veal & lamb steaks & chops to at least an INTERNAL temperature of 145 °F .
SELF-CLEANING OVEN
Make sure to wipe off excess spillage before operating the Self Clean function.

CAUTION
- Do not leave food, broiler trays, cooking utensils, racks, etc. in the oven during the self clean cycle.
- Do not use oven cleaners. No commercial oven cleaner or oven liner protective coating of any kind should be used in or around any part of the oven. Residue from oven cleaners will damage the inside of the oven when the self clean cycle is used.
- Remove oven racks and other items from oven before starting the self clean cycle.
- Only clean the parts listed in this manual.
- Do not manually clean the door gasket. The door gasket is necessary for a good seal. Care should be taken not to rub, damage or move the gasket.
- If the self cleaning mode malfunctions, turn the range off and disconnect the power supply. Have it serviced by a qualified technician.
- It is normal for parts of the oven to become hot during a Self Clean cycle.
- Avoid touching the door, window or oven vent area during a Self Clean cycle.
OVEN
When opening the door of a hot oven, stand away from the range. The hot air and steam that escape can cause burns to hands, face and eyes.

WARNING
- Never block any slots, holes or passages in the oven bottom or cover an entire rack with materials such as aluminum foil. Doing so blocks air flow through the oven and may cause carbon monoxide poisoning. Aluminum foil linings may trap heat, causing a fire hazard.
- Do not heat food in closed containers. Pressure inside the container could increase and cause the container to burst, resulting in injury.
- Do not line oven walls or bottom with aluminum foil or allow them to contact exposed heating elements in the oven. Doing so could create a fire hazard or cause damage to the range.

WARNING
- Do not use the oven for storage. Items stored in the oven can catch on fire.
- Keep the oven free from grease buildup.
- Insert the oven racks in the desired position while the oven is cool.
- To prevent burns when removing food, slide racks out until the stop engages, then remove food items. This may also protect you from getting burnt by touching hot surfaces of the door or oven walls.
- When placing or removing a griddle, always wear oven mitts.
- When using cooking or roasting bags in the oven, follow the manufacturer's directions.
- Use only glass cookware that is recommended for use in gas ovens.
- Always remove the broiler pan from the range after you finish broiling. Grease left in the pan can catch fire if the oven is used without removing the grease from the broiler pan.
- If meat is too close to the flame while broiling, the fat may ignite. Trim excess fat to prevent excessive flare-ups.
- Make sure the broiler pan is in place correctly to minimize the possibility of grease fires.
- If you have a grease fire in the broiler pan, turn the oven mode knob to the Off position and keep the oven door closed to contain the fire until it burns out.
- For safety and better cooking performance, always bake and broil with the oven door closed. Open door baking or broiling can cause damage to the knobs or valves. Do not leave the oven door open during cooking or while the oven is cooling down.
ENERGY SAVING TIPS
- Multiple-rack cooking saves time and energy. Whenever possible, cook foods requiring the same cooking temperature together in one oven.
- For optimal performance and energy savings, follow the guides on page 31 for proper rack and pan placements.
- Match the size of the cookware to the amount of food being cooked to save energy when heating. Heating 12 quart of water requires more energy in a 3-quart pot than in a 1-quart pot.
- Use cookware with flat bottoms to provide the best contact with the cooktop surface when cooking on the glass-ceramic cooktop.
- Match the size of the cooktop burner or element to the size of the cookware in use. Using a large element for a small pan wastes heating energy, and the exposed surface of the element is a burn or fire hazard.
- Reduce energy use by cleaning light oven soils with the EasyClean® feature instead of self-clean.
- Avoid opening the oven door more than necessary during use. This helps the oven maintain temperature, prevents unnecessary heat loss, and saves on energy use.
Read all instructions before using the appliance.
SAVE THESE INSTRUCTIONS
PRODUCT OVERVIEW
Parts

Accessories
Included Accessories

natural_image
Line drawings of various household appliances including a grid, mesh chamber, cable, and tool (no text or symbols)Heavy rack (2ea) Gliding rack (1ea) Meat probe (1ea) Griddle (1ea) Rear filler (1ea)


Owner's manual (1ea) Wok grate (1ea)
Anti Tip Kit

LP Nozzle Conversion Kit

Cooktop Nozzles (5ea)

Oven Nozzles (2ea)

Installation Guide (1ea)

Choke (1ea)

Set Screw (1ea)
Optional Accessories

Grid

Broiler pan
NOTE
- Contact LG Customer Service at 1-800-243-0000 if any accessories are missing.
- For your safety and for extended product life, only use authorized components.
- The manufacturer is not responsible for product malfunction or accidents caused by the use of separately purchased, unauthorized components or parts.
- The images in this guide may be different from the actual components and accessories, which are subject to change by the manufacturer without prior notice for product improvement purposes.
INSTALLATION
Product Specifications
The appearance and specifications listed in this manual may vary due to constant product improvements.
| Oven Range Models LSSG3017, LSSG3020 | |
| Description Gas Range | |
| Electrical requirements 1 kW 120 VAC | |
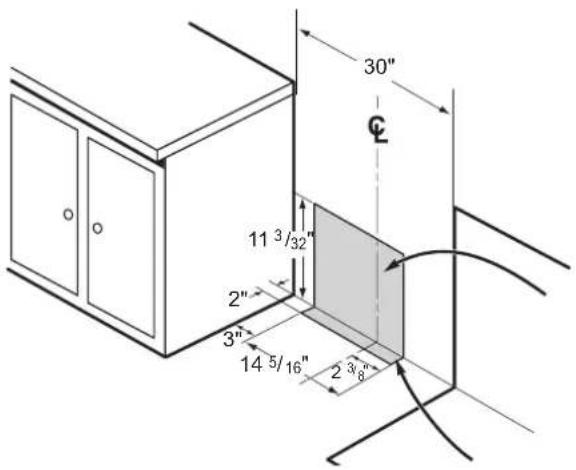
| Exterior Dimensions | 29 7/8" (W) x 37 59/64" (H) x 28 3/4" (D) (D with door closed)75.7 cm (W) x 96.2 cm (H) x 73 cm (D) (D with door closed) |
| Height to cooking surface 36" (91.4 cm) | |
| Net weight 185.6 lb (84.2 kg) | |
| Total capacity Total cap.: 6.3 cu. ft. | |
Before Installing the Range
Make sure your range is properly installed and grounded by a qualified installer, according to the installation instructions. Any adjustment and service should be performed only by qualified gas range installers or service technicians.
In the Commonwealth of Massachusetts
- This product must be installed by a licensed plumber or gas fitter.
- When using ball type gas shut-off valves, they must be the T-handle type.
- When using a flexible gas connector, it must not exceed 3 feet in length.
Preparing for Installation
Tools Needed

Phillips screwdriver

Flat-blade screwdriver

Pencil and ruler


Open-end or adjustable wrench
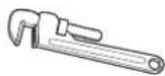
Pipe wrench (2) (one for support)

Level
Materials You May Need
• Gas line shut-off valve
- Pipe joint sealant that resists action of natural and LP gases
- Flexible metal appliance connector (3/4" or 1/2" NPT x 1/2" I.D.)
Never use an old connector when installing a new range.
- Flare union adapter for connection to gas supply line ( ^3/4 " or ^1/2 " NPT x ^1/_2 " I.D.)
- Flare union adapter for connection to pressure regulator on range (1/2" NPT x 1/2" I.D.)
• Liquid leak detector or soapy water
- Lag bolt or 1/2'' O.D. sleeve anchor (for concrete floors only)
Installing the Range
Unpacking and Moving the Range

CAUTION
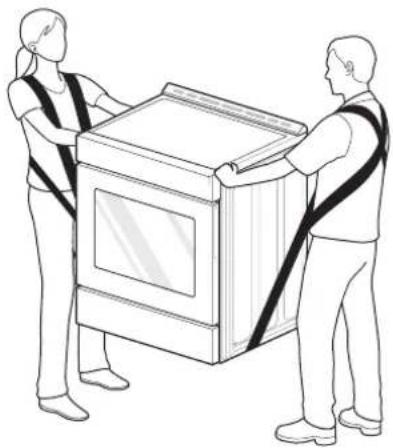
- You should use two or more people to move and install the range. (Excessive Weight Hazard) Failure to do so can result in back or other injury.
- Do not use the door handles to push or pull the range during installation or when moving the range out for cleaning or service. Doing so can result in serious damage to the door of the range.
Remove packing material, tape and any temporary labels from your range before using. Do not remove any warning-type labels, the model and serial number label, or the Tech Sheet that is located on the back of the range.
To remove any remaining tape or glue, rub the area briskly with your thumb. Tape or glue residue can also be easily removed by rubbing a small amount of liquid dish soap over the adhesive with your fingers. Wipe with warm water and dry.
Do not use sharp instruments, rubbing alcohol, flammable fluids, or abrasive cleaners to remove tape or glue. These products can damage the surface of your range.
Your range is heavy and can be installed on soft floor coverings such as cushioned vinyl or carpeting. Use care when moving the range on this type of flooring. Use a belt when moving the range to prevent damaging the floor. Or slide the range onto cardboard or plywood to avoid damaging the floor covering.
natural_image
Line drawing of two people carrying a large appliance on a stand (no text or symbols)Choosing the Proper Location
Do not locate your range where it may be subject to strong drafts. Any openings in the floor or wall behind the range should be sealed. Make sure the openings around the base of the range that supply fresh air for combustion and ventilation are not blocked by carpeting or woodwork.
Your range, like many other household units, is heavy and can be installed on soft floor coverings such as cushioned vinyl or carpeting. Use care when moving the range on this type of flooring.
This appliance must not be installed with a ventilation system that blows air downward toward the range. This type of ventilation system may cause ignition and combustion problems with the gas cooking appliance resulting in personal injury or unintended operation.
When the floor covering ends at the front of the range, the area that the range will be installed on should be built up with plywood to the same level or higher than the floor covering. This will allow the range to be moved for cleaning and servicing, as well as provide proper air flow to the range.
Also, make sure the floor covering can resist temperatures of at least 167 °F (75 °C). See the Installation Safety Instructions included in this manual.
Make sure the wall coverings around your range can resist the heat generated up to 194 °F (90 °C) by the range. See the Installation Safety Instructions included in this manual.
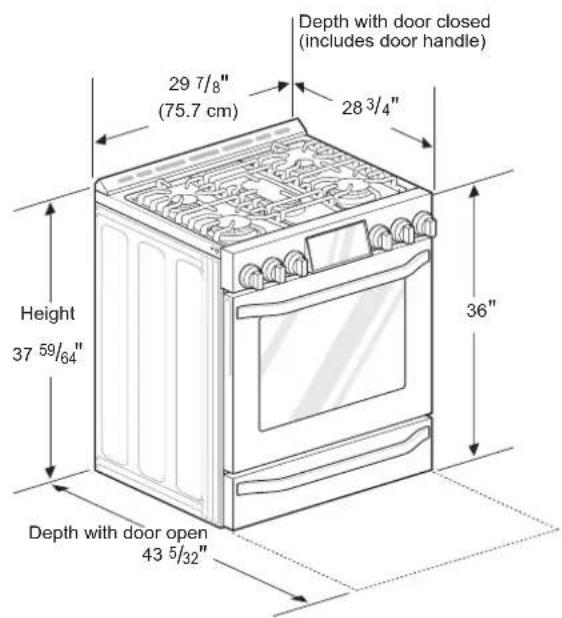
Gas Pipe and Electrical Outlet Locations
Dimensions and Clearances
Provide proper clearance between the range and adjacent combustible surfaces. These dimensions must be met for safe use of your range. The location of the electrical outlet and pipe opening (see Gas Pipe and Electrical Outlet Locations, page 14) may be adjusted to meet specific requirements. The range may be placed with 0" clearance (flush) at the back wall.
Installation Clearances

Dimensions
Installing the Anti-tip Device

The anti-tip bracket is packaged with an installation template. The instructions include necessary information to complete the installation. Read and follow the range installation instruction sheet.

WARNING
- Range must be secured with an approved anti-tip device.
- The range could be tipped by standing, sitting or leaning on an open door if the range or anti-tip device is not properly installed.
• After installing the anti-tip device, verify that it is in place by carefully attempting to tilt the range forward. - This range has been designed to meet all recognized industry tip standards for all normal conditions.
- The installation of the anti-tip device must meet all local codes for securing the appliance.
- The use of this device does not preclude tipping of the range when not properly installed.
• A child or adult can tip the range and be killed.
• Install the anti-tip device to the structure and/or the range. Verify the anti-tip device has been properly installed and engaged by following the guide of the Anti tip bracket template. - Engage the range to the anti-tip device by following the guide of the Anti tip bracket template. Ensure the anti-tip device is re-engaged when the range is moved by following the guide of the Anti tip bracket template.
- Re-engage the anti-tip device if the range is moved. Do not operate the range without the anti-tip device in place and engaged.
• See installation instructions for details. - Failure to do so can result in death or serious burns to children or adults.
Optional Rear Filler
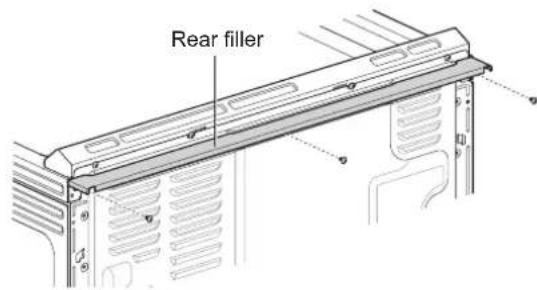
If the counter does not bridge the opening at the rear wall the rear filler kit, that is provided with the slide in range, will be needed.
NOTE
If the countertop depth is greater than 25" there will be a gap between the filler kit and the back wall.
If the countertop depth is less than 24", the control panel will not sit flush with the countertop.
Installing the Rear Filler
1 Using a screwdriver, remove the three screws holding the rear bracket in place.

2 Attach the rear bracket and filler assembly as shown, using the three screws removed in step 1.
Providing Adequate Gas Supply
Your range is designed to operate at a pressure of 5" of water column on natural gas or 10" of water column on LP.
Make sure you are supplying your range with the type of gas for which it is configured.
This range is convertible for use on natural or LP gas. When using this range on LP gas, conversion must be made by a qualified LP installer before attempting to operate the range.
For proper operation, the pressure of natural gas supplied to the regulator must be between 5" and 13" of water column.
For LP gas, the pressure supplied to the regulator must be between 10" and 13" of water column. When checking for correct operation of the regulator, the inlet pressure must be at least 1" more than the operating (manifold) pressure as given above.
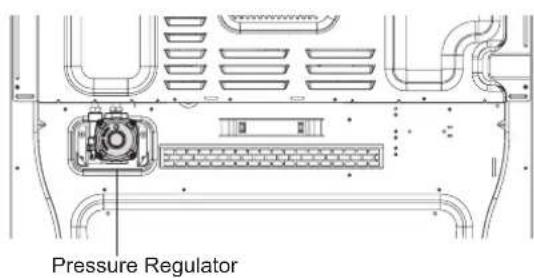
The pressure regulator located at the inlet of the range must remain in the supply line regardless of which type of gas is being used.
A flexible metal appliance connector used to connect the range to the gas supply line should have an I.D. of 58 " and a maximum length of 5 feet. In Canada, flexible connectors must be single wall metal connectors less than 6 feet in length.
Connecting the Range to Gas
Shut off the range gas supply valve before removing the old range and leave it off until the new hook-up has been completed.
Because hard piping restricts movement of the range, the use of a CSA International-certified flexible metal appliance connector should be used unless local codes require a hard-piped connection.
A manual valve shall be installed in an accessible location in the gas piping external to the appliance for the purpose of turning on or shutting off gas to the appliance.
Never reuse an old connector when installing a new range.
To protect against gas leaks, use a qualified pipe joint sealant on all external threads.
1 Install a male 12 " or 34 " flare union adapter to the NPT internal thread of the manual shut-off valve, taking care to back-up the shut-off valve to keep it from turning.
2 Install a male 12 " flare union adapter to the 12 " NPT internal thread at the inlet of the pressure regulator. Use a backup wrench on the pressure regulator fitting to prevent damage.
Check that the gas pressure regulator valve is in the open position.

NOTE
- The gas pressure regulator valve is open when shipped. If the range does not work properly after installation, make sure the regulator valve is still open.
3 Connect a flexible metal appliance connector to the adapter on the range. Position the range to permit connection at the shut-off valve.
4 When all connections have been made, be sure all range controls are in the OFF position and the pressure regulator valve is open before turning on the main gas supply valve. Gas leaks may occur in your system and create a hazard. Gas leaks may not be detected by smell alone.
Check all gas connection joints and fittings for leaks with a non-corrosive leak detection fluid, then wipe off.
Gas suppliers recommend you purchase and install a UL approved gas detector. Install and use in accordance with the installation instructions.

WARNING
- Do not use a flame to check for gas leaks.
- Isolate the range from the gas supply system by closing its individual shut-off valve during any pressure testing of the gas supply system at test pressures equal to or less than 1/2'' psig (3.5 kPa).
Flexible Connector Hookup

Installer: Inform the consumer of the location of the gas shut-off valve.
Pressure Regulator Position
Electrical Connections
Electrical Requirements
120 Volt, 60 Hz, properly grounded dedicated circuit protected by a 15 or 20 Amp circuit breaker, or slow blow fuse.
If an external electrical source is utilized, the appliance, when installed, must be electrically grounded in accordance with local codes or, in the absence of local codes, with the National Electrical Code, ANSI/NFPA 70.
Grounding
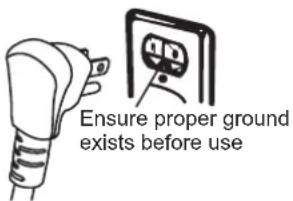
IMPORTANT: FOR PERSONAL SAFETY, THIS APPLIANCE MUST BE PROPERLY GROUNDED.
The power cord of this appliance is equipped with a 3-prong (grounding) plug which mates with a standard 3-prong grounding wall receptacle to minimize the possibility of electric shock hazard from this appliance.
The customer should have the wall receptacle and circuit checked by a qualified electrician to make sure the receptacle is properly grounded.
Where a standard two-prong wall receptacle is encountered, it is the personal responsibility and obligation of the customer to have it replaced with a properly grounded three-prong wall receptacle.
DO NOT, UNDER ANY CIRCUMSTANCES, CUT OR REMOVE THE THIRD (GROUND) PRONG FROM THE POWER CORD.
A word about GFCI's – GFCI's are not required or recommended for gas range receptacles.
Ground Fault Circuit Interrupters (GFCI's) are devices that sense leakage of current in a circuit and automatically switch off power when a threshold leakage level is detected. These devices must be manually reset by the consumer. The National Electrical Code requires the use of GFCI's in kitchen receptacles installed to serve countertop surfaces.
Performance of the range will not be affected if operated on a GFCI-protected circuit but the occasional resetting of the circuit can become an annoyance.
Do not use an adapter plug. Disconnecting of the power cord places undue strain on the adapter and leads to eventual failure of the adapter ground terminal.
Installation must conform with local codes or, in the absence of local codes, with the National Fuel Gas Code, ANSI Z223.1/NFPA 54.
Sealing the Openings
Seal any openings in the wall and floor after electrical and gas supplies are completed.
Preferred Method

CAUTION
Have the circuit checked by a qualified electrician to make sure the receptacle is properly grounded.
Assembling the Surface Burners

CAUTION
Do not operate the burners without all parts in place.
Place the burner caps and heads on the cooktop. Make sure that the caps and heads are placed in the correct locations. There is one small, one medium, one large, one oval(center), and one extra large burner head and cap.
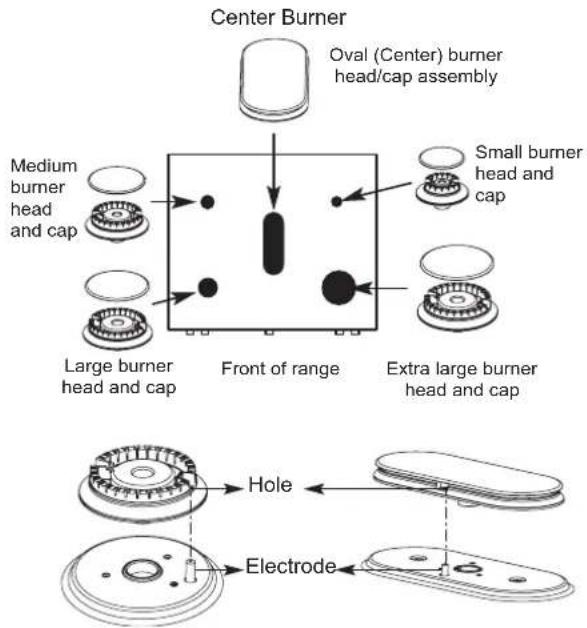
Make sure the hole in the burner head is positioned over the electrode.
Checking Ignition of the Surface Burners
Electric Ignition
Select a surface burner knob and simultaneously push in and turn to the Lite position. You will hear a clicking sound indicating proper operation of the spark module.
Once the air has been purged from the supply lines the burner should ignite within 4 seconds. After the burner ignites, rotate the knob out of the Lite position. Try each burner in succession until all burners have been checked.
Quality of Flames
The combustion quality of the burner flames needs to be confirmed visually.
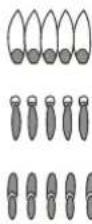
A Yellow flames - Call for service.
B Yellow tips on outer cones - This is normal for LP gas.
C Soft blue flames - This is normal for natural gas.
NOTE
- With LP gas, some yellow tipping on outer cones is normal.
Adjusting the Surface Burner to the Low Flame (Simmer) Setting
1 Light all surface burners.
2 Turn the knob on the burner being adjusted to Lo.
3 Remove the knob.
4 Insert a small, flat-blade screwdriver into the valve shaft.

natural_image
Technical line drawing of a mechanical assembly with a circular component and a tool (no text or symbols)NOTE
Hold the valve shaft with one hand while turning the screw to adjust with the other.
5 Replace the knob.
6 Test the flame stability.
Test 1: Turn the knob from Hi to Lo quickly. If the flame goes out, increase the flame size and test again.
Test 2: With the burner on a Lo setting, open and close the oven door quickly. If the flame is extinguished by the air currents created by the door movement, increase the flame height and test again.
7 Repeat steps 1-6 for each surface burner.
Checking Operation of Bake / Broil Burners
To check ignition of the Bake burner, follow the steps below:
1 Remove all packing materials from inside the oven cavity.
2 Turn oven mode knob to select Bake. 350 °F appears in the display.
3 Press Start.
It may take between 30 and 90 seconds for the burner to start heating.
To check ignition of the Broil burner, follow the steps below:
1 Turn oven mode knob to select Broil High. Hi appears in the display.
2 Make sure the door is closed.
3 Press Start.
It may take between 30 and 90 seconds for the burner to start heating.
NOTE
Do not try to light either the Bake or Broil burners during a power outage. The range has an electrical ignition system and cannot be used without power.
Adjusting Air Shutters (for LP Conversions)
The range comes from the factory with the air shutters adjusted for proper air flow for natural gas. If converted to LP, follow the instructions provided in the conversion kit to properly adjust the air shutters. LP conversion must be performed by a qualified technician.
Leveling the Range
Level the range by adjusting the leveling legs. Extending the legs slightly may also make it easier to insert the rear leg into the anti-tip bracket.

natural_image
Diagram of a door handle with a knob and directional arrow indicating rotation (no text or symbols)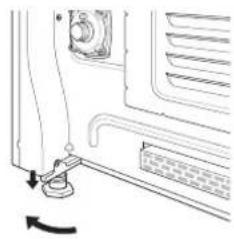
natural_image
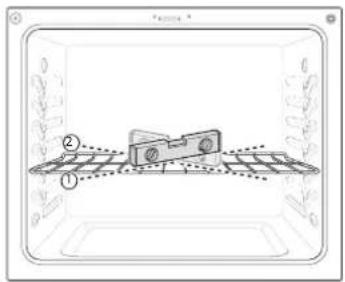
Diagram of a door handle mechanism with a rotation arrow indicating clockwise motion (no text or symbols)Use a level to check your adjustments. Place the level diagonally on the oven rack, and check each direction for level.
First check direction ①.
Then check direction ②. If the level doesn't show level on the rack, adjust the leveling legs.
Engaging the Anti-tip Device

1 Slide the range against the wall, making sure the back leg slides into and engages the anti-tip bracket.
2 Check for proper installation by grasping the front edge of the cooktop and carefully attempting to tilt the range forward.
OPERATION
Gas Surface Burners
Before Use
Read all instructions before using.
Make sure that all burners are properly placed.
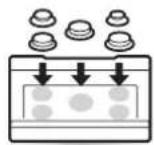
Make sure that all grates are properly placed before using the burner.


CAUTION
Do not operate the burner for an extended period of time without cookware on the grate.
The finish on the grate may chip without cookware to absorb the heat.
Make sure the burners and grates are cool before touching them, or placing a pot holder, cleaning cloth, or other materials on them.
Touching grates before they cool down may cause burns.


CAUTION
WHAT TO DO IF YOU SMELL GAS
- Open windows.
- Do not try to light any appliance.
- Do not touch any electrical switch.
- Do not use any phone in your building.
- Immediately call your gas supplier from a neighbor's phone. Follow the gas supplier's instructions.
- If you cannot reach your gas supplier, call the fire department.
NOTE
Electric spark igniters from the burners cause a clicking noise. All the spark igniters on the cooktop will activate when igniting just one burner.
Burner Locations
Your gas range cooktop has four or five sealed gas burners, depending on the model. These can be assembled and separated. Follow the guide below.


Medium and Large Burners
The medium and large burners are the primary burners for most cooking. These general purpose burners can be turned down from Hi to Lo to suit a wide range of cooking needs.

Small Burner
The smallest burner is used for delicate foods such as sauces or foods that require low heat for a long cooking time.

Extra Large Burner
The extra large burner is the maximum output burner. Like the other four burners, it can be turned down from Hi to Lo for a wide range of cooking applications. This burner is also designed to quickly bring large amounts of liquid to a boil. It can be used with cookware 10 inches or larger in diameter.

Oval Burner
The center, oval burner is for use with a griddle or oval pots.
Using the Gas Surface Burners
1 Be sure that all of the surface burners and grates are placed in the correct positions.
2 Place cookware on the grate.
3 Push the control knob and turn to the Lite position.

The electric spark ignition system makes a clicking noise.

Turn the control knob to control the flame size.


CAUTION
Do not attempt to disassemble or clean around any burner while another burner is on. All the burners spark when any burner is turned to Lite. An electric shock may result causing you to knock over hot cookware.
Setting the Flame Size
Watch the flame, not the knob, as you reduce heat. Match the flame size on a gas burner to the cookware being used for fastest heating.


CAUTION
Never let the flames extend up the sides of the cookware.
NOTE
- The flames on the surface burners may burn yellow in the presence of high humidity, such as a rainy day or a nearby humidifier.
• After LP gas conversion, flames can be bigger than normal when you put a pot on the surface burner.
In Case of Power Failure
In case of a power failure, you can light the gas surface burners on your range with a match.
Surface burners in use when an electrical power failure occurs will continue to operate normally.
1 Hold a lit match to the burner, then push in the control knob.
2 Turn the control knob to the Lo position.

CAUTION
Use extreme caution when lighting burners with a match. It can cause burns and other damage.
Range-Top Cookware
| Aluminum | Medium-weight cookware is recommended because it heats quickly and evenly. Most foods brown evenly in an aluminum skillet. Use saucepans with tight fitting lids when cooking with minimum amounts of water. |
| Cast-Iron | If heated slowly, most skillets will give satisfactory results. |
| Stainless Steel | This metal alone has poor heating properties and is usually combined with copper, aluminum or other metals for improved heat distribution. Combination metal skillets work satisfactorily if they are used with medium heat as the manufacturer recommends. |
| Enamelware | Under some conditions, the enamel of this cookware may melt. Follow cookware manufacturer's recommendations for cooking methods. |
| Glass | There are two types of glass cookware. Those for oven use only and those for top-of-range cooking. |
| Heatproof Glass Ceramic | Can be used for either surface or oven cooking. It conducts heat very slowly and cools very slowly. Check cookware manufacturer's directions to be sure it can be used on gas ranges. |
Using a Wok
If using a wok, use a 14-inch or smaller flat-bottomed piece of wok. Make sure that the wok bottom sits flat on the grate.
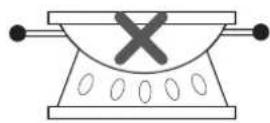

Use flat-bottomed wok

CAUTION
Do not use a wok support ring. Placing the ring over the burner or grate may cause the burner to work improperly, resulting in carbon monoxide levels above allowable standards. This can be hazardous to your health.
Using the Wok Grate
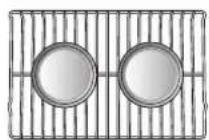
Use the included wok grate to support a 12" to 14" round-bottomed wok.
1 Turn off all burners and allow the grates and cooktop to cool before installing or removing the wok grate. Remove the griddle, if necessary. Do not remove the standard burner grates.
2 Place the wok grate on top of the left or right front burner grate, aligning the notches on the wok grate with the burner grate's fingers. Make sure the side marked FRONT is toward the front.

3 Make sure the wok grate is stable and the wok rests firmly on the wok grate. Use a 12" to 14" round-bottomed wok. Do not use a wok that is the wrong size to fit securely in the wok grate.
NOTE
- The wok grate and griddle cannot be used at the same time.
- For best performance, place the wok grate over the extra large, right front burner.
- Do not use the wok grate with cookware other than a wok.
- Clean the wok grate with hot, soapy water. Do not use oven cleaners, steel wool, or abrasive cleansers. Do not clean with the self-clean mode.

CAUTION
- Turn off all burners and allow wok grate, burner grates, and cooktop to cool before installing or removing wok grate.
- The wok grate retains hot for a long time. Always use an oven mitt when installing or removing the wok grate. Do not store the wok grate on the burner grate.
- Do not use flat-bottomed cookware or incorrectly sized woks with the wok grate. The cookware or wok could tip and cause personal injury.
- Do not use a wok larger than 14" with the wok grate. Doing so could cause burner flames to spread excessively and damage the cooktop.
Using Stove-Top Grills
Do not place stove-top grills on the burner.


CAUTION
Do not use stove top grills on the surface burners. Using a stove top grill on the surface burner will cause incomplete combustion and can result in exposure to carbon monoxide levels above allowable current standards. This can be a health hazard.
Using the Griddle

natural_image
Line drawing of a portable stove with two 'X' marks on top (no text or symbols)The non-stick coated griddle provides an extra-large cooking surface for meats, pancakes or other food usually prepared in a frying pan or skillet.
NOTE
It is normal for the griddle to become discolored over time.
How to Place the Griddle: The griddle can only be used with the center burner. The griddle must be properly placed on the center grate, as shown below.

natural_image
Diagram of a mechanical lever system with labeled 'Front' (no other text or symbols)
CAUTION
- Do not remove the center grate when using the griddle.
- Do not remove the griddle plate until the cooktop grates, surfaces and griddle plate have completely cooled.
- The griddle plate on the cooktop may become very hot when using the cooktop, oven or broiler systems. Always use oven mitts when placing or removing the griddle plate.
Preheat the griddle according to the guide below and adjust for the desired setting.
| Type of Food | Preheat Conditions | Cook Setting |
| Warming Tortillas - 5 (MED) | ||
| Pancakes HI 5 min. HI | ||
| Hamburgers HI 5 min. HI | ||
| Fried Eggs HI 5 min. HI | ||
| Bacon HI 5 min. HI | ||
| Breakfast Sausage Links HI 5 min. HI | ||
| Hot Sandwiches HI 5 min. HI |
NOTE
After cooking on the griddle for an extended period, adjust the griddle temperature settings as the griddle retains heat.
IMPORTANT NOTES
- Avoid cooking extremely greasy foods as grease spillover can occur.
- The griddle can become hot when surrounding burners are in use.
- Do not overheat the griddle. This can damage the non stick coating.
- Do not use metal utensils that can damage the griddle surface. Do not use the griddle as a cutting board.
- Do not place or store items on the griddle.
The Oven
Before Use
Read all instructions before using.
Make sure the electrical power cord and the gas valve are properly connected.
Confirm the correct usage of the range for the type of food you will cook.
Make sure you know how to use the oven (temperature setting, time setting and recipe) for best results.

CAUTION
WHAT TO DO IF YOU SMELL GAS
- Open windows.
- Do not try to light any appliance.
- Do not touch any electrical switch.
- Do not use any phone in your building.
- Immediately call your gas supplier from a neighbor's phone. Follow the gas supplier's instructions.
- If you cannot reach your gas supplier, call the fire department.
NOTE
If using an oven thermometer in the oven cavity, temperatures may differ from the actual set oven temperature with all modes.
In case of power failure, do not use the oven.
The oven and broiler cannot be used during a power outage. If the oven is in use when a power failure occurs, the oven burner shuts off and cannot be re-lit until power is restored. Once power is restored, you will need to reset the oven (or Broil function).


CAUTION
Do not attempt to operate the electric ignition during an electrical power failure.
Do not block, touch or place items around the oven vent during cooking.
Your oven is vented through ducts at the center above the burner grate. Do not block the oven vent when cooking to allow for proper air flow. Do not touch vent openings or nearby surfaces during any cooking operation.
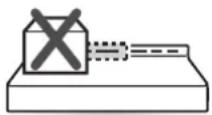

CAUTION
- Do not place plastic or flammable items on the cooktop. They may melt or ignite if left too close to the vent.
- Do not place closed containers on the cooktop. The pressure in closed containers may increase, which may cause them to burst.
- Metal items will become very hot if they are left on the cooktop, and could cause burns.
- Handles of pots and pans on the cooktop may become hot if left too close to the vent.
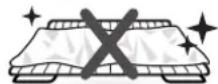
Do not cover racks or oven bottom with aluminum foil.
You may see condensation on the oven door glass.
As the oven heats up, the heated air in the oven may cause condensation to appear on the oven door glass. These water drops are harmless and will evaporate as the oven continues to heat up.

Control Panel Overview
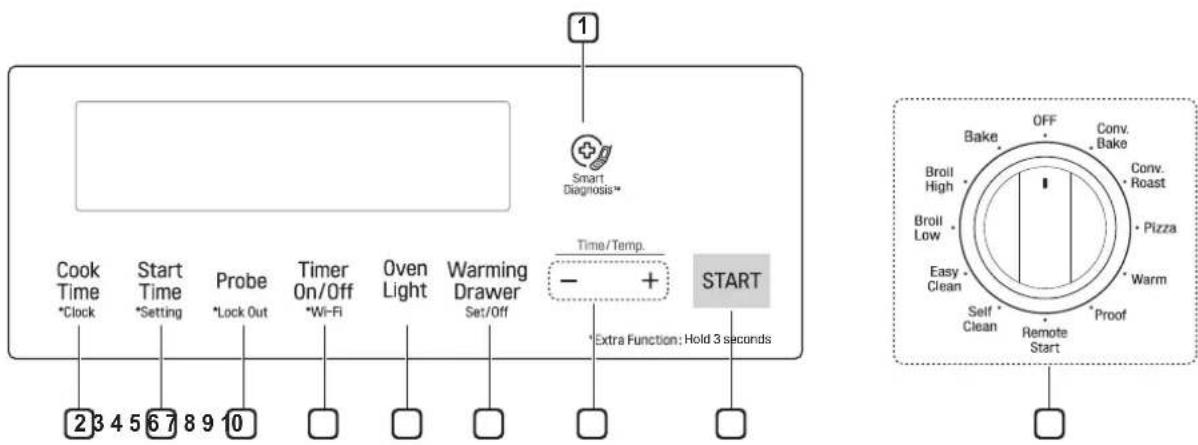
① Smart Diagnosis™
Use during the Smart Diagnosis feature.
② Cook Time / Clock
- Press the button to set the desired amount of time for food to cook. The oven shuts off when the set cooking time runs out.
- Press and hold button for three seconds to set the time of day.
③ Start Time / Setting
- Press the button to set the delayed timed cook. The oven starts at the set time.
- Press and hold button for three seconds to select and adjust oven settings.
4 Probe / Lockout
- Press the button to select Probe function.
- Press and hold button for three seconds to lock the door.
5 Timer On/Off / Wi-Fi
- Press the button to set or cancel timer on oven.
- Press and hold button for three seconds to connect the appliance to a Wi-Fi network.
⑥ Oven Light
Press the button to turn oven light on or off.
⑦ Warming Drawer
Press the button to select the warming drawer function.
8 - /+
Press the plus button to increase cooking time or oven temperature. Press the minus button to decrease cooking time or oven temperature.
9 Start
Press the button to start all oven features.
10 Oven Mode Knob
Turn the knob to select oven operating mode.
Flashing Clock
If the colon in the clock display flashes, press Cook Time for three seconds and reset the clock, or press any key to stop the flashing.
Changing Oven Settings
Clock
The clock must be set to the correct time of day in order for the automatic oven timing functions to work properly.
1 Set the oven mode knob to the Off position.
2 Press and hold Cook Time for three seconds. CLO shows in the display.
3 Press plus(+) or minus(-) to select the desired time. Plus(+) to increase the time and minus(-) to decrease the time.
4 Press Start to enter the time and start the clock.
NOTE
- The time of day cannot be changed during a timed baking or self-clean cycle.
- If no other keys are pressed within 25 seconds of pressing Clock, the display reverts to the original setting.
- If the display colon in the clock is blinking, you may have experienced a power failure. Reset the time.
Oven Light
The interior oven light automatically turns on when the door is opened. Press Light to manually turn the oven light on.
NOTE
The oven light cannot be turned on if the Self Clean function is active.
Minimum & Maximum Default Settings
All of the features listed have a minimum and a maximum time or temperature setting that can be entered into the control. A beep sounds each time a control key is pressed.
Two short tones sound if the entry of the temperature or time is below the minimum or above the maximum setting for the feature.
| Feature | min. Temp. / Time | max. Temp. / Time | Default | |
| Clock | 12 Hr. | 1:00Hr. / min. | 12:59Hr. / min. | |
| 24 Hr. | 0:00Hr. / min. | 23:59Hr. / min. | ||
| Timer | 12 Hr. | 0:10min. / sec. | 11:59Hr. / min. | |
| 24 Hr. | 0:10min. / sec. | 11:59Hr. / min. | ||
| Cook Time | 12 Hr. | 0:01Hr. / min. | 11:59Hr. / min. | |
| 24 Hr. | 0:01Hr. / min. | 11:59Hr. / min. | ||
| Conv. Bake | 300 °F / 150 °C | 550 °F / 285 °C | 350 °F (*325 °F)/ 12 Hr. | |
| Conv. Roast | 300 °F / 150 °C | 550 °F / 285 °C | 350 °F (*325 °F)/ 12 Hr. | |
| Broil | Lo 400 °F | Hi 500 °F | Hi / 3 Hr. | |
| Bake | 170 °F / 80 °C | 550 °F / 285 °C | 350 °F / 12 Hr. | |
| Proof | 0:01Hr. / min. | 11:59Hr. / min. | 12 Hr. | |
| Pizza 12 Hr. | ||||
| Warm 3 Hr. | ||||
| Probe | 80 °F / 27 °C | 210 °F / 100 °C | 150 °F / 65 °C | |
| Self Clean 2 | Hr. 5 Hr. | 3 Hr. | ||
| EasyClean® | 10 min. | |||
* Using Auto Conversion
- Default cook mode times are without setting cook time.
Timer On/Off
The Timer On/Off serves as an extra timer in the kitchen that beeps when the set time has run out. It does not start or stop cooking.
The Timer On/Off feature can be used during any of the oven control functions.
For example to set 5 minutes
1 Set the oven mode knob to the Off position.
2 Press the Timer On/Off. 0:00 with HR inside it appears and Timer flashes in the display.
3 Press plus(+) or minus(-) to set the desired time. Plus(+) to increase the time and minus(-) to decrease the time.
4 Press Timer On/Off or Start to start the Timer. The remaining time countdown appears in the display.
NOTE
If Timer On/Off is pressed, the timer returns to the time of day.
5 When the set time runs out, End shows in the display. The indicator tones sound every 15 seconds until Timer On/Off is pressed.
NOTE
- If the remaining time is not in the display, recall the remaining time by pressing Timer On/Off.
- Press Timer On/Off twice to set the time in minutes and seconds.
- Press Timer On/Off once to set the time in hours and minutes.
Cancelling the Timer
1 Press Timer On/Off once. The display returns to the time of day.
Wi-Fi
The Wi-Fi button is used to connect the appliance to a home Wi-Fi network.
1 Set the oven mode knob to the Off position.
2 Press and hold Timer On/Off for 3 seconds.
3 The power on chime sounds, SEt appears in the display, and the Wi-Fi icon (ablinks.
4 Register the appliance on the Wi-Fi network using the smart phone app.
5 To disconnect the appliance from the network, delete it from the registered appliances in the app.
NOTE
See the Smart Functions section in the owner's manual for more details.
Settings
Set the oven mode knob to the Off position. Press and hold Start Time for three seconds. Then press the Start Time key repeatedly to toggle through and change oven settings.
The Setting key allows you to:
- set the hour mode on the clock (12 or 24 hours)
- enable/disable convection auto conversion
- adjust the oven temperature
- activate/deactivate the preheating alarm light
- set the beeper volume
- switch the temperature scale between Fahrenheit and Celsius
Setting the Hour Mode
The control is set to use a 12-hour clock. To reset the clock to 24-hour mode, follow the steps below.
1 Set the oven mode knob to the Off position.
2 Press and hold Start Time for three seconds.
3 Press plus(+) or minus(-) to set the desired hour mode on the clock.
4 Press Start to accept the desired change.
Setting Convection Auto Conversion
When Conv. Bake and Conv. Roast are selected, Convection Auto Conversion automatically converts the standard recipe temperature entered to a convection temperature by subtracting 25 °F / 14 °C. This auto-converted temperature shows on the display. For example, select Conv. Bake, enter 350 °F, and 325 °F shows on the display after preheat.
Convection Auto Conversion is enabled by default. To change the setting, follow these instructions.
1 Set the oven mode knob to the Off position.
2 Press and hold Start Time for 3 seconds. Then press Start Time repeatedly until Auto appears in the display.
3 Press plus(+) or minus(-) to enable or disable the feature.
4 Press Start to accept the change.
Adjusting the Oven Thermostat
Your new oven may cook differently from the one it replaced. Use your new oven for a few weeks to become more familiar with it before changing the temperature settings. If after familiarizing yourself with the new oven, you still think that it is too hot or too cold, you can adjust the oven thermostat yourself.
NOTE
To begin, either raise or lower the thermostat 15 °F (8 °C). Try the oven with the new setting. If the oven still needs adjustment, raise or lower the thermostat again, using the first adjustment as a gauge. For example, if the adjustment was too much, raise or lower the thermostat 10 °F (5 °C). If the adjustment was not enough, raise or lower the thermostat 20 °F (12 °C). Proceed in this way until the oven is adjusted to your satisfaction.
1 Set the oven mode knob to the Off position.
2 Press and hold Start Time for three seconds. Then press Start Time repeatedly until AdJU appears in the display.
3 To increase the temperature, press plus (+) until the desired amount appears in the display. To decrease the temperature, press minus (-) until the desired amount appears in the display.
4 Press Start to accept the change.
NOTE
- This adjustment does not affect the broiling or Self Clean temperatures. The adjustment is retained in memory after a power failure. The oven thermostat can be increased (+) or decreased (-) as much as 35 °F or 19 °C.
- Once the thermostat is increased or decreased, the display shows the adjusted temperature until it readjusts.
Turning the Preheat Alarm Light On/Off
When the oven reaches its set-temperature, the preheating alarm light flashes 5 times or until the oven door is opened.
You can activate or deactivate the preheating alarm light.
1 Set the oven mode knob to the Off position.
2 Press and hold Start Time for three seconds. Then press Start Time repeatedly until PrE appears in the display.
3 Press plus(+) or minus(-) to turn the function on/off.
4 Press Start to accept the change.
Adjusting the Beeper Volume
1 Set the oven mode knob to the Off position.
2 Press and hold Start Time for three seconds. Then press Start Time repeatedly until Beep appears in the display.
3 Press plus(+) or minus(-) to select the desired volume.
4 Press Start to accept the change.
Selecting Fahrenheit or Celsius
Set the oven temperature display to show either Fahrenheit (°F) or Celsius (°C) units. The oven defaults to Fahrenheit unless changed by the user.
1 Set the oven mode knob to the Off position.
2 Press and hold Start Time for three seconds. Then press Start Time repeatedly until Unit appears in the display.
3 Press plus(+) or minus(-) to select F(Fahrenheit) or C(Centigrade).
4 Press Start to accept the change.
Lockout
The Lockout feature automatically locks the oven door and prevents most oven from being turned on. It does not disable the timer and the interior oven light.
1 Set the oven mode knob to the Off position.
2 Press and hold Probe for three seconds.
3 The lock melody sounds, Loc appears in the display and the lock icon 📋 blinks in the display.
4 Once the oven door is locked, the lock 📁 indicator stops blinking and remains on.
5 To deactivate the Lockout feature, press and hold Probe for three seconds. The unlock melody sounds and the door and the controls unlock.
Start Time (Delayed Timed Cook)
The automatic timer of the Delayed Timed Cook function turns the oven on and off at the time you select. This feature can be used with the Bake, Conv. Bake and Conv. Roast modes.
Setting a Delayed Timed Cook
For example, to bake at 300 °F and delay the start of baking until 4:30, first set the clock for the correct time of day.
1 Turn the oven mode knob to select the Bake mode. 350 °F appears in the display.
2 Set the temperature: press minus(-) until 300 °F appears in the display.
3 Press Cook Time and set the baking time.
4 Press Start Time.
5 Set the start time: press plus(+) until 4:30 appears in the display.
6 Press Start. A short beep sounds and Timed Delay and the start time appear in the display. The oven begins baking at the set start time.
NOTE
- To cancel the Delayed Timed Cook function, turn the oven mode knob to the Off position.
- To change the cooking time, repeat step 3 and press Start.
- If the oven clock is set as a 12-hour clock, you can delay the cook time for 12 hours. If the oven clock is set as a 24-hour clock, you can delay the cook time for 24 hours.
The oven will continue to cook for the set amount of time and then turn off automatically. When the cooking time has elapsed:
• End and the time of day show in the display.
- The cook end indicator tone sounds every 60 seconds until the oven mode knob is turned to the Off position.

CAUTION
- Use the automatic timer when cooking cured or frozen meats and most fruits and vegetables.
Foods that can easily spoil, such as milk, eggs, fish, meat or poultry, should be chilled in the refrigerator. Even when chilled, they should not stand in the oven for more than 1 hour before cooking begins, and should be removed promptly when cooking is completed. - Eating spoiled food can result in sickness from food poisoning.
Cook Time (Timed Cook)
Set the oven to cook for a specific length of time using the Timed Cook feature. This feature can only be used with the Bake, Conv. Bake and Conv. Roast modes.
Setting a Timed Cook
For example, to bake at 300 °F for 30 minutes, first set the clock to the correct time of day.
1 Turn the oven mode knob to select the Bake mode. 350 °F appears in the display.
2 Set the oven temperature. For this example, press minus(-) until 300 °F appears in the display.
3 Press Cook Time. Timed flashes in the display. Bake, 0:00 and 300 °F appear in the display.
4 Set the baking time: press plus(+) until 30:00 appears in the display. The baking time can be set for any amount of time between 1 minute and 11 hours and 59 minutes.
5 Press Start.
The oven will continue to cook for the set amount of time and then turn off automatically. When the cooking time has elapsed:
• End and the time of day show in the display.
- The cook end indicator tone sounds every 60 seconds until the oven mode knob is turned to the Off position.
Changing the Cook Time during Cooking
For example, to change the cook time from 30 minutes to 1 hour and 30 minutes, do the following.
1 Press Cook Time.
2 Change the baking time: press plus(+) until 1 hour and 30 minutes appears in the display.
3 Press Start to accept the change.
Removing and Replacing the Oven Racks

CAUTION
- Replace the oven racks before turning the oven on to prevent burns.
- Do not cover the racks with aluminum foil, or any other material, or place anything on the bottom of the oven. Doing so will result in poor baking performance and may damage the oven bottom.
- Only arrange oven racks when the oven is cool.
Removing Racks
1 While wearing oven mitts, grasp the oven rack*.
2 Pull the rack straight out until it stops.
3 Lift up the front of the rack.
4 Pull out the rack.
* When possible, adjust oven racks before using the oven. Always wear oven mitts if adjusting racks while the oven is on.
Replacing Racks
1 While wearing oven mitts, place the end of the rack on the support*
2 Tilt the front end of the rack up.
3 Push the rack in.
4 Check that the rack is properly in place.
*When possible, adjust oven racks before using the oven. Always wear oven mitts if adjusting racks while the oven is on.
Recommended Baking and Roasting Guide
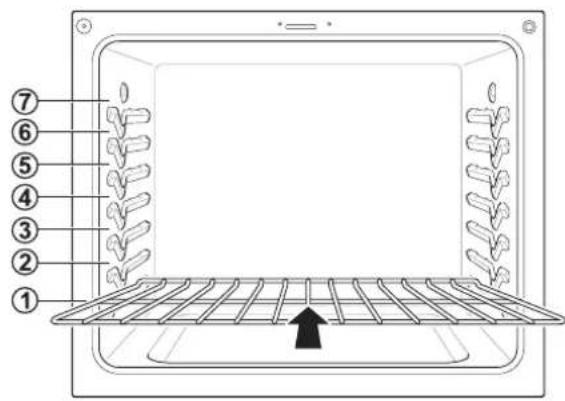
- Center pans on racks for best baking results. If baking with more than one pan, place the pans so that each one has at least 1" to 1 ^1/2 " of air space around it. Do not allow pans to touch the walls of the oven.
- If cooking on single rack, place the rack in the position suggested in the charts on the following pages. Center the cookware as shown in the upper rack of the multiple rack image.
- If cooking on multiple racks in the oven, place racks in positions 1 and 4. For best results, place the cookware as shown, centered on the top rack and toward the front on the bottom rack.
Multiple rack baking

Rack (Position 4)

Rack (Position 1)
Single rack baking
Rack
Bake
Bake is used to prepare foods such as pastries, breads and casseroles. The oven can be programmed to bake at any temperature from 170 °F (80 °C) to 550 °F (285 °C). The default temperature is 350 °F (175 °C).
Setting the Bake Function (example, 375 °F)
1 Turn the oven mode knob to select Bake.
2 Set the oven temperature: for example, press plus(+) until 375 °F appears in the display.
3 Press Start. The oven starts to preheat.
As the oven preheats, the temperature is displayed and rises in 5-degree increments. Once the oven reaches the set temperature, a tone sounds and the oven light blinks on and off.
4 When cooking is complete, turn the oven mode knob to the Off position.
5 Remove food from the oven.
NOTE
- It is normal for the convection fan to operate periodically throughout a normal bake cycle in the oven. This is to ensure even baking results.
- The convection fan may continue to run for a short time after the oven is turned off.
Baking Chart
This chart is only for reference and can be used for oven. Adjust the cook time according to your recipe.
| Food Oven Temperature Rack position | ||
| Cakes | ||
| - Layer cake | 350 °F (175 °C) | 5 |
| - Bundt cake | 350 °F (175 °C) | 3 |
| - Cupcakes | 350 °F (175 °C) | 3 |
| - Pound cake | 350 °F (175 °C) | 3 |
| - Carrot cake(from scratch) | 350 °F (175 °C) | 3 |
| Cookies | ||
| - Sugar cookies | 350 °F (175 °C) | 5 |
| - Chocolate chip | 350 °F (175 °C) | 5 |
| - Brownies | 350 °F (175 °C) | 5 |
| Pizza | ||
| - Rising | 400 °F (204 °C) | 5 |
| - Frozen | 400 °F (204 °C) | 5 |
| - Fresh | 425 °F (218 °C) | 5 |
| Breads | ||
| - Biscuits(canned) | 350 °F (175 °C) | 4 |
| - Biscuits(from scratch) | 375 °F (190 °C) | 4 |
| - Muffins | 400 °F (204 °C) | 4 |
| Fruits andVegetables | ||
| - Apples (baked) | 375 °F (190 °C) | 2 |
| - Potatoes(baked) | 425 °F (218 °C) | 2 |
| Angel food cake 350 °F (175 °C) 1 | ||
| Custards | ||
| - Cheesecake,crème brulée | 325 °F (161 °C)-350 °F (175 °C) | 2 |
| Casserole | ||
| - Frozen lasagna 375 °F (190 °C) 4 | ||
NOTE
- Because the oven temperature cycles, an oven thermometer placed in the oven cavity may not show the same temperature that is set on the oven.
- It is normal for the convection fan to run while preheating during a regular bake cycle.
- The convection fan motor may run periodically during a regular bake cycle.
- The bake burner turns off if the door is left open during baking. If the door is left open for longer than 30 seconds during baking, the bake burner turns off. The bake burner turns back on automatically once the door is closed.
Convection Mode
The convection system uses a fan to circulate heat evenly within the oven. This improves heat distribution and allows for even cooking and excellent results, especially when using multiple racks. Convection cooking can also shorten cooking times.
Convection Bake
Setting the Conv. Bake Function (example: to Conv. Bake 375 °F)
1 Turn the oven mode knob to select Conv. Bake.
2 Set the oven temperature: press plus(+) until 375 °F appears in the display.
- Convection Bake cooks faster and more evenly when cooking foods like cookies, biscuits, rolls, or other baked goods on a single rack. Cookies, muffins, and biscuits will have very good results when using multiple racks.
- Multiple rack cooking may slightly increase times for some foods, but the overall time is reduced.
- Convection Bake gives excellent results for quick breads and yeast breads of all kinds, and breads and pastries brown more evenly.
- Do not use Convection Bake for delicate items like custards, souffles, or cheesecakes, which may be disturbed by the convection fan.
NOTE
- The convection cooking modes automatically reduce the oven temperature by 25^ (14 °C). The display shows the changed temperature.
- This feature is called auto conversion.
- The range comes with this feature enabled.
- To disable the auto conversion feature, see Setting Convection Auto Conversion, page 28.
- The oven fan runs while convection baking. If the door is left open for longer than 30 seconds during baking, the fan stops.
3 Press Start. The display shows Conv. Bake and the converted temperature starting at 100 °F. As the oven preheats, the displayed temperature will increase in 5-degree increments.
4 Once the oven reaches the desired temperature, a tone sounds and the oven light blinks on and off. The display shows the auto converted oven temperature 350 °F, Conv. Bake and
Convection Baking Chart
If auto conversion is disabled, reduce standard recipe temperature by 25 °F ( 14 °C ) for Convection Bake. Temperatures have been adjusted in this chart. Multi-rack cooking may slightly increase cook times for some foods, but the overall time is reduced. This chart is only for reference. Adjust cooking time according to your preference.
| Food | Oven Temperature (converted) | Rack position |
| Cakes | ||
| - Layer cakes | 325 °F (161 °C) | 3 |
| - Bundt cakes | 325 °F (161 °C) | 3 |
| Cakes, Specialty | ||
| - Popovers | 400 °F (204 °C) | 3 |
| - Cupcakes | 325 °F (161 °C) | 3 |
| - Pound cakes | 325 °F (161 °C) | 3 |
| Cookies | ||
| - Sugar cookies | 325 °F (161 °C) | 3 |
| - Chocolate chips | 325 °F (161 °C) | 3 |
| - Brownies | 325 °F (161 °C) | 3 |
| Pizza | ||
| - Frozen | 375 °F (190 °C) | 5 |
| - Fresh | 400 °F (204 °C) | 5 |
| Breads | ||
| - Biscuit, canned | 325 °F (161 °C) | 4 |
| - Biscuit, from scratch | 350 °F (175 °C) | 4 |
| - Muffins | 375 °F (190 °C) | 4 |
| - White bread, loaf | 400 °F (204 °C) | 4 |
| Pastry Crust | ||
| - From scratch | 400 °F (204 °C) | 4 |
| - Refrigerator | 400 °F (204 °C) | 4 |
| Desserts | ||
| - Fruit crisps and cobblers, from scratch | 350 °F (175 °C) | 3 |
| - Pies, from scratch, 2 crust fruit | 350 °F (175 °C) | 3 |
| Angel food cake | 325 °F (161 °C) 1 | |
| Custards | ||
| - Cheesecake, crème brulée | 300 °F (149 °C) - 325 °F (161 °C) | 2 |
| Casserole | ||
| - Frozen lasagna 350 °F | (175 °C) 4 |
Cookware for Convection Cooking
Any cookware safe for use in a conventional oven will work in a convection oven. But for best results, keep the following in mind.
- Make sure pans don't touch the oven walls when centered on the racks. Use cookware that leaves room for air circulation in the oven for best results when convection cooking.
- Leave space between pans. Make sure pans don't touch each other or the oven walls.
- Do not use pans with high sides. Use flat pans with no sides for cookies or biscuits. Use a pan with low sides for oven-baked chicken.
- Metal pans heat the fastest. Heat-resistant paper and plastic containers that are recommended for use in regular ovens can be used in convection ovens. Glass and ceramic pans can also be used. However, metal pans heat the fastest and are recommended for convection cooking.
- Food cooked on pans with dark or matte finishes cooks faster than food on pans with shiny finishes.
- Use the pan size recommended in the recipe.
NOTE
- Some frozen foods have been developed to use commercial convection ovens. For best results in this oven, preheat the oven and use the temperature recommended on the packaging.
- If a food manufacturer gives specific convection cooking instructions, remember that convection autoconversion will reduce the set temperature by 25^ (14 °C). If auto-conversion is enabled, add 25^ (14 °C) when setting the temperature to get a resulting converted temperature which matches the recipe.
Convection Roast
The Convection Roast feature is designed to give optimum roasting performance. Convection Roast combines cooking with the convection fan to roast meats and poultry. The heated air circulates around the food from all sides, sealing in juices and flavors. Food cooked in this manner is crispy brown on the outside while staying moist on the inside.
Setting the Conv. Roast Function (example: to Conv. Roast 375 °F)
1 Turn the oven mode knob to select Conv. Roast.
2 Set the oven temperature: press plus(+) until 375 °F appears in the display.
NOTE
The convection cooking modes automatically reduce the oven temperature by 25 °F ( 14 °C ). The display shows the changed temperature. This feature is called auto conversion. The range comes with this feature enabled. To disable the auto conversion feature, see Setting Convection Auto Conversion, page 28.
3 Press Start. The display shows Conv. Roast and the changing temperature starting at 100 °F. As the oven preheats, the displayed temperature will increase in 5-degree increments.
4 Once the oven reaches the desired temperature, a tone sounds and the oven light flashes on and off. The display shows the auto converted oven temperature 350 °F, Conv. Roast and
5 Place food in oven.
Broil
Your oven is designed for closed-door broiling. Broil uses an intense heat radiation from the upper gas burner.
The Broil function works best when broiling thin, tender cuts of meat (1" or less), poultry or fish.

CAUTION
- Do not use a broiler pan without a grid. The oil can cause a grease fire.
- Do not cover the grid and broiler pan with aluminum foil. Doing so will cause a fire.
• Always use a broiler pan and grid for excess fat and grease drainage. This will help to reduce splatter, smoke, and flare-ups. - Never use a broiler pan that is not thoroughly cleaned and at room temperature. If your broiler pan is damaged, warped, or has heavy permanent soiling, consider replacing it to reduce the amount of smoke you experience during broiling.
NOTE
- Use Lo broil to broil foods such as poultry and thick cuts of meat.
- Remove the pan from the oven to cool down for easy cleaning.
- For best results, use a pan designed for broiling, as shown below. The broiler pan will catch grease spills and the grid will help prevent grease splatters.
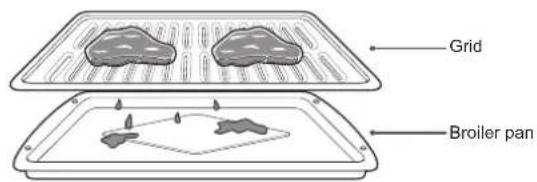
When broiling refer to the broiling guide for placing the rack.

Setting the oven to Broil
1 Turn the oven mode knob to select Broil High or Broil Low.
2 Press Start.
3 Allow the broiler to preheat for five minutes.
4 Place food in the oven.
5 Close the oven door. The oven door must be closed during broiling.

WARNING
When using your broiler, the temperature inside the oven is extremely hot. Take caution to avoid possible burns by:
- Keeping the door closed when broiling
• Always wearing oven mitts when inserting/removing food items
Improper use of the broiler may result in excessive smoke or a grease fire. Improper use conditions include, but are not limited to:
• Broiling on heavy rack in position 6.
- Setting the broiler to a higher power level than recommended.
• Using dirty/greasy broiler pans.
• Broiling beyond recommended cooking times.
NOTE
- This range is designed for closed-door broiling. Close the door to set the Broil function. If the door is open, the Broil function cannot be set and door appears on the display. Close the door and reset the Broil function. Opening the door turns off the broil burner during broiling. If the door is opened during broiling, the broil burner turns off after five seconds. The broiler turns back on automatically once the door is closed.
6 When broiling is finished, turn the oven mode knob to the Off position.
NOTE
During any Broil function, it is normal for the broiler to cycle on and off. The igniter for the broil burner on the ceiling of the oven glows orange periodically during normal broil operation.
Recommended Broiling Guide
The size, weight, thickness, starting temperature, and your preference of doneness will affect broiling times. This guide is based on meats at refrigerator temperature. For best results when broiling, use a pan designed for broiling.
| Food Quantity and/or Thickness | Rack Position | First Side (minutes) | Second Side (minutes) | Comments | |
| Ground Beef Well done | 1 lb. (4 patties) 1/2 to 3/4 " thick | 6 5-7 | 3-4 | Space evenly. Up to 8 patties may be broiled at once. | |
| Beef SteaksRare 6 7 5Medium 6 12 5-6Well Done 6 13 8-9RareMedium 4 12-15 10-12 to 2^1/2 lbs.Well Done 4 25 16-18 | 1" thick1 to 1^1/2 lbs. | Steaks less than 1" thick cook through before browning. Pan frying is recommended. Slash fat. | |||
| 4 10 6-7 | |||||
| Toast | 1 to 9 pieces | 5 1-2 | 1-2 | ||
| Chicken | 1 whole 2 to 2^1/2 lbs., split lengthwise4 bone-in breasts | 2 35-40 25 Brusheach side | with melted butter.Broil skin-side down. | ||
| 2 25-30 10-15 | |||||
| Fish Fillets | 1/4 to 1/2 " thick | 5 | 7-8 | 6 | Handle and turn very carefully.Brush with lemon butter before and during cooking, if desired. |
| Ham Slices(precooked) | 1" thick 1/2 " thick | 34 | 107 | 54 | Increase time 5 to 10 minutes per side for 1^1/2 " thick or home-cured ham. |
| Pork chopsWell Done | 2 ( 1/2 " thick) | 4 10 | 8 | Slash fat. | |
| 2 (1" thick) about 1lb. | 4 13 8-9 | ||||
| Lamb ChopsMediumWell Done 5 10 10MediumWell done | 2 (1" thick) about10 to 12 oz. | 5 6 | 4-7 | Slash fat. | |
| 5 10 4-6 | |||||
| 2 ( 1/2 " thick) about 1lb. | 5 17 12-14 | ||||
| Bacon | 1/2 lb. (about 8 thin slices) | 4 8 3 | Arrange in single | ayer. | |
| Lobster Talls | 2-46 to 8 oz. each | 3 13-16 | Do notturn over. | Cut through back of shell. Spread open.Brush with melted butter before broiling and after half of broiling time. | |
- This guide is only for reference. Adjust cook time according to your preference.
NOTE
The USDA advises that consuming raw or undercooked fish, meat, or poultry can increase your risk of food-borne illness.
The USDA has indicated the following as safe minimum internal temperatures for consumption:
• Ground beef: 160 °F (71.1 °C)
• Poultry: 165 °F (73.9 °C)
- Beef, veal, pork, or lamb: 145 °F (62.8 °C)
• Fish / Seafood: 145 °F (62.8 °C)
Pizza
This function automatically sets the oven temperature to cook either frozen pizza with regular or rising crust, or freshly made pizza. Simply choose the type of pizza (see chart) and set the desired cook time.
Setting the Oven for Pizza
1 Turn the oven mode knob to select the Pizza mode. P1 appears in the display. Press plus(+) or minus(-) repeatedly to toggle between the P1, P2 and P3 options. (See Pizza Chart below.)
2 Press Start. The oven starts to preheat.
As the oven preheats, the temperature is displayed and rises in 5-degree increments. Once the oven reaches the set temperature, a tone sounds and the oven light blinks on and off.
3 Place pizza in the oven, close the door and set the timer following the suggestions in the chart.
4 Turn the oven mode knob to the Off position to cancel Pizza at any time.
5 Remove the food from the oven.
NOTE
Preheating is necessary for better cooking results. Place the food in the oven after preheating.
Pizza Chart
| Display Mode Item Rack position | Recommended time (minutes) | ||
| P1 | Frozen pizza, Regular crust | 5 14-16 | |
| P2 | Frozen pizza, Rising crust | 5 19-21 | |
| P3 Fresh Pizza 5 8-10 | |||
Warm
This function will maintain an oven temperature of 170 °F . The Warm function will keep cooked food warm for serving up to three hours after cooking has finished. The Warm function may be used without any other cooking operations.
Setting the Warm Function
1 Turn the oven mode knob to select Warm.
2 Press Start.
3 Turn the oven mode knob to the Off position when warming is finished.
NOTE
- The Warm function is intended to keep food warm. Do not use it to cool food down.
- It is normal for the fan to operate during the Warm function.
Proof
This feature maintains a warm oven for rising yeast leavened products before baking.
Setting the Proof Function
1 Use rack position 2 or 3 for proofing.
2 Turn the oven mode knob to select Proof.
3 Press Start.
4 Turn the oven mode knob to the Off position when proofing is finished.
NOTE
- To avoid lowering the oven temperature and lengthening proofing time, do not open the oven door unnecessarily. Check bread products early to avoid over proofing.
- Do not use the proofing mode for warming food or keeping food hot. The proofing oven temperature is not hot enough to keep foods at safe temperatures. Use the Warm feature to keep food warm. Proofing does not operate when the oven is above 125 °F. Hot shows in the display.
- It is normal for the fan to operate during the Proof function.
Meat Probe
The meat probe accurately measures the internal temperature of meat, poultry and casseroles. It should not be used during broiling, self clean, warming or proofing. Always unplug and remove the meat probe from the oven when removing food. Before using, insert the probe into the center of the thickest part of the meat or into the inner thigh or breast of poultry, away from fat or bones. Place food in the oven and connect the meat probe to the jack. Keep the probe as far away from heat sources as possible.
Setting the Meat Probe Function (example for Roast 375 °F with probe temp. 160 °F)
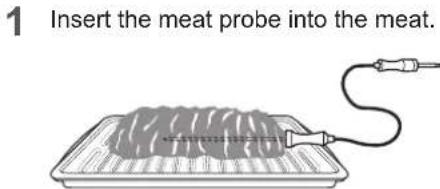
1 Insert the meat probe into the meat.
2 Connect the meat probe to the jack.

natural_image
Three-step diagram showing a device being inserted into a rack with a magnified view of the rack (no text or symbols present)3 The meat probe icon flashes in the display if the meat probe is properly connected.
Method
1 Select cook mode. Turn the oven mode knob to select Conv. Roast.
2 Set the oven temperature: press plus(+) or minus(-) until 375 °F appears in the display.
3 Press Probe.
4 Set the probe temperature: press plus(+) or minus(-) until 160 °F appears in the display.
5 Press Start.
The default probe temperature is 150 °F (65 °C), but can be changed to any temperature between 80 °F (27 °C) and 210 °F (100 °C). The display shows the changing probe temperature. When the set probe temperature is reached, the oven shuts off automatically.
Changing the Probe temperature while cooking
1 Press Probe.
2 Set the probe temperature.
3 Press Start.
IMPORTANT NOTE
Turn the oven mode knob to the Off position to cancel the Meat Probe function at any time. To avoid breaking the probe, make sure food is completely defrosted before inserting.

CAUTION
• Always use an oven mitt to remove the temperature probe. Do not touch the broil element. Failure to obey this caution can result in severe personal injury.
• To avoid damage to the meat probe, Do not use tongs to pull on the probe when removing it.
- Do not store the meat probe in the oven.
Recommended Probe Temperature Chart
| Doneness Probe Temp. | |
| Beef, Lamb and Veal | |
| Rare | 130 °F (54 °C) |
| Medium Rare | 140 °F (60 °C) |
| Medium | 150 °F (66 °C) |
| Well Done | 160 °F (71 °C) |
| Pork | |
| Well Done 170 °F (77 °C) | |
| Poultry | |
| Breast, Well Done | 170 °F (77 °C) |
| Thigh, Well Done | 180 °F (82 °C) |
| Stuffing, Well Done | 165 °F (74 °C) |
Remote Start
If the appliance is registered on a home Wi-Fi network, this function starts preheating and then holds the temperature for up to an hour (including preheating time). If the appliance is not registered on the network, "OFF" appears in the display. Follow the instructions on page 42 to register the appliance on the network.
Set the oven mode knob to the Remote Start position to use the function.

Setting Remote Start
1 Open the oven door to make sure the oven is empty and ready for pre-heating. Close the oven door.
2 When ON appears in the display, the Remote Start function is ready to use.
3 Follow the directions in the smart phone application to set the cook mode, temperature, and run time (preheating time plus holding time).
NOTE
Do not place food in oven before or during Remote Start run time. Remote Start is disconnected in the following situations:
- Remote Start is never set up in the smart phone app.
- The Remote Start status is "OFF" or "door".
- Remote Start experiences a problem during operation.
- The Remote Start function cannot be started when the oven door is open. A beep alerts you to shut the door.
Sabbath Mode
Sabbath mode is used on the Jewish Sabbath and Holidays. While the oven is in Sabbath mode, the temperature cannot be changed and the timer, light, and alarm functions are disabled. If the oven light is on when the oven is put in Sabbath mode, it will remain on. Sabbath mode is only available when oven is in Bake mode.
Setting Sabbath Mode
1 Disconnect the probe. The prove function is not available in Sabbath mode.
2 Turn the oven mode knob to select Bake.
3 Set the desired temperature and cook time.
4 Press Start.
5 Touch and hold Start Time for three seconds. SB appears in the display when the Sabbath mode is activated.
6 To stop Sabbath mode, touch and hold Start Time for three seconds. To cancel the Bake function, set the oven mode knob to the Off position at any time.
NOTE
- If a cook time is set, the oven turns off automatically at the end of the cook time, without chiming. The oven remains in Sabbath mode, but is turned off.
- If no cook time is set, the oven will not automatically turn off.
• After a power failure, the display will turn back on in Sabbath mode, but the oven will be off. - During Sabbath mode, the upper oven functions are blocked and Wi-Fi network cannot be connected. Use the included wok grate to safely support a 12" to 14" round-bottomed wok to stir-fry or saute meats, fish, or vegetables.
- Please always close the oven door first before engaging Sabbath Mode.
Operating the Warming Drawer

natural_image
Line drawing of a drawer with an open lid and handle, no text or symbols presentThe Warming Drawer keeps hot cooked foods at serving temperature.
All food placed in the Warming Drawer should be covered with an oven-safe lid or aluminum foil to maintain quality. Do not place foil on bottom or sides of drawer. Do not use plastic wrap to cover food. Plastic may melt onto the drawer and be very difficult to clean. Use only utensils and cookware recommended for oven use in the Warming Drawer.
Setting the Warming Drawer Control
1 Press Warming Drawer Set/Off. The indicator light will flash. (If no further buttons are pressed within 25 seconds, the display will clear.)
2 Use the plus(+) or minus(-) button to set the power level: ■ for Low, ■ for Medium, and ■ for High.
3 When the food is ready, or to cancel, press Warming Drawer Set/Off.
NOTE
- The Warming Drawer shuts off automatically after three hours.
- Do not heat cold food in the Warming Drawer.
- Do not use pans or utensils with rough finishes in the Warming Drawer. Doing so can leave scratches on the inner drawer surfaces.
Warming Drawer food/power level recommendations
| Setting Type of Food | ||
 | Rolls (Soft)Empty dinner plates | |
Medium | GraviesCasserolesEggsVegetables | BiscuitsRolls (hard)PastriesRoasts |
| [5A07] | BaconHamburger pattiesPoultryPork chops | PizzaFried Foods |
Different types of food may be placed in the warming drawer at the same time. For best results, do not leave food in the warming drawer for more than one hour. Do not leave smaller quantities or heat-sensitive food, such as eggs, in the warming drawer more than 30 minutes. The maximum operating time is three hours.

CAUTION
- Do not use the warming drawer for storage of racks, broiler pans, insert pans, plates, or utensils. The warming drawer contains a heating element which may damage any items not specifically designed to be used with it and should only be used to store cookware specifically supplied by LG with your range.
- Do not put food or foil directly on the surface or base of the warming drawer. This may result in damage to your drawer and may spoil your food.
- Do not place plastic wrap in the warming drawer or use it to cover food being heated in the warming drawer. Plastic may melt onto the drawer or surrounding areas and is very difficult to remove. Use only aluminum foil or cookware that is capable of withstanding baking temperature to heat or cover your food.
- Do not use the warming drawer to heat water or any other liquids. Spilled liquids may cause an electrical short or result in severe personal injury, electric shock or death.
- Never place plastics, paper, canned foods or other combustible material into the warming drawer. These items pose a severe risk of fire, damage and injury.
- In the unlikely event that an item falls behind the warming drawer, always turn the power off and wait for the warming drawer to cool before retrieving the item. Never attempt to retrieve any items that fall behind the warming drawer without first turning the power off and ensuring the warming drawer cavity has cooled off. Failure to do so may result in severe personal injury, electric shock or death.
- Do not touch the surface of the Warming Drawer while it is in operation. Use oven mitts or hot pads when inserting or removing food to avoid burns or other injury.
- Do not leave food in the Warming Drawer for longer than one hour. Eating food which has been heated for too long at low temperatures can lead to food-borne illnesses.
SMART FUNCTIONS
LG ThinQ Application
This feature is only available on models with the 🔊 or 🔒 logo.
The LG ThinQ application allows you to communicate with the appliance using a smartphone.
LG ThinQ Application Features
Cleaning
This function helps you to check the energy efficiency, Usage and guide of EasyClean®.
Smart Diagnosis™
This function provides useful information for diagnosing and solving issues with the appliance based on the pattern of use.
Settings
Allows you to set various options on the oven and in the Application.
Monitoring
This function helps you recognize the current status, remaining time, cook settings and end time on the screen.
Push Alerts
Turn on the Push Alerts to receive appliance status notifications.
The notifications are triggered even if the LG ThinQ application is off.
Timer
You can set the timer from the application.
Firmware Update
Keep the appliance updated.
NOTE
- If you change your wireless router, Internet service provider, or password, delete the registered appliance from the LG ThinQ application and register it again.
- This information is current at the time of publication. The application is subject to change for product improvement purposes without notice to users.
- This feature is only available on some models.
Before Using LG ThinQ Application
1 Use a smartphone to check the strength of the wireless router (Wi-Fi network) near the appliance.
- If the distance between the appliance and the wireless router is too far, the signal becomes weak. It takes long time to register or fails to install the application.
2 Turn off the Mobile data or Cellular Data on your smartphone.

3 Connect your smartphone to the wireless router.

NOTE
- To verify the Wi-Fi connection, check that Wi-Fi icon on the control panel is lit.
- The appliance supports 2.4 GHz Wi-Fi networks only. To check your network frequency, contact your Internet service provider or refer to your wireless router manual.
- LG ThinQ is not responsible for any network connection problems or any faults, malfunctions, or errors caused by network connection.
- The surrounding wireless environment can make the wireless network service run slowly.
- If the appliance is having trouble connecting to the Wi-Fi network, it may be too far from the router. Purchase a Wi-Fi repeater (range extender) to improve the Wi-Fi signal strength.
- The network connection may not work properly depending on the Internet service provider.
- The Wi-Fi connection may not connect or may be interrupted because of the home network environment.
- If the appliance cannot be registered due to problems with the wireless signal transmission, unplug the appliance and wait about a minute before trying again.
- If the firewall on your wireless router is enabled, disable the firewall or add an exception to it.
NOTE
- The wireless network name (SSID) should be a combination of English letters and numbers. (Do not use special characters.)
- Smartphone user interface (UI) may vary depending on the mobile operating system (OS) and the manufacturer.
- If the security protocol of the router is set to WEP, network setup may fail. Change the security protocol (WPA2 is recommended), and register the product again.
Installing the LG ThinQ Application
Search for the LG ThinQ application from the Google Play Store or Apple App Store on a smartphone. Follow instructions to download and install the application.
Open Source Software Notice Information
To obtain the source code under GPL, LGPL, MPL and To obtain the source code under GPL, LGPL, MPL, and other open source licenses, that is contained in this product, please visit http://opensource.lge.com. In addition to the source code, all referred license terms, warranty disclaimers and copyright notices are available for download.
LG Electronics will also provide open source code to you on CD-ROM for a charge covering the cost of performing such distribution (such as the cost of media, shipping, and handling) upon email request to opensource@lge.com. This offer is valid for three (3) years from the date on which you purchased the product.
Wireless LAN Module Specifications
| Frequency Range 241 | 2~2462 MHz |
| Output Power (max.) | < 30 dBm |
FCC Notice (For transmitter module contained in this product)
This equipment has been tested and found to comply with the limits for a Class B digital device, pursuant to Part 15 of the FCC Rules. These limits are designed to provide reasonable protection against harmful interference in a residential installation. This equipment generates, uses, and can radiate radio frequency energy and, if not installed and used in accordance with the instructions, may cause harmful interference to radio communications. However, there is no guarantee that interference will not occur in a particular installation. If this equipment does cause harmful interference to radio or television reception, which can be determined by turning the equipment off and on, the user is encouraged to try to correct the interference by one or more of the following measures:
- Reorient or relocate the receiving antenna.
- Increase the separation between the equipment and the receiver.
- Connect the equipment to an outlet on a circuit different from that to which the receiver is connected.
- Consult the dealer or an experienced radio/TV technician for help.
This device complies with part 15 of the FCC Rules. Operation is subject to the following two conditions:
1) this device may not cause harmful interference and
2) this device must accept any interference received, including interference that may cause undesired operation of the device.
Any changes or modifications in construction of this device which are not expressly approved by the party responsible for compliance could void the user's authority to operate the equipment.
FCC RF Radiation Exposure Statement
This equipment complies with FCC radiation exposure limits set forth for an uncontrolled environment. This transmitter must not be co-located or operating in conjunction with any other antenna or transmitter.
This equipment should be installed and operated with a minimum distance of 20 cm (7.8 inches) between the antenna and your body. Users must follow the specific operating instructions for satisfying RF exposure compliance.
Smart Diagnosis™ Feature
This feature is only available on models with the Ⓧ or Ⓧ icon.
Use this feature to help you diagnose and solve problems with your appliance.
NOTE
- For reasons not attributable to LGE's negligence, the service may not operate due to external factors such as, but not limited to, Wi-Fi unavailability, Wi-Fi disconnection, local app store policy, or app unavailability.
- The feature may be subject to change without prior notice and may have a different form depending on where you are located.
Using LG ThinQ to Diagnose Issues
If you experience a problem with your Wi-Fi equipped appliance, it can transmit troubleshooting data to a smartphone using the LG ThinQ application.
- Launch the LG ThinQ application and select the Smart Diagnosis feature in the menu. Follow the instructions provided in the LG ThinQ application.
Using Audible Diagnosis to Diagnose Issues
Follow the instructions below to use the audible diagnosis method.
- Launch the LG ThinQ application and select the Smart Diagnosis feature in the menu. Follow the instructions for audible diagnosis provided in the LG ThinQ application.
1 Open the LG ThinQ application on the smart phone.
2 In the application, select the appliance from your list of connected appliances and then press the dots at the upper right of the screen.
3 Select Smart Diagnosis, then press the Start Smart Diagnosis button.
NOTE
- If the diagnosis fails several times, use the following instructions.
4 Select the Audible Diagnosis.
5 Follow the instructions on the smart phone.
6 Keep the phone in place until the tone transmission has finished. View the diagnosis on the phone.

NOTE
- For best results, do not move the phone while the tones are being transmitted.
MAINTENANCE

CAUTION
- Do not clean this appliance with bleach.
• To prevent burns, wait until the cooktop has cooled down before touching any of its parts.
• Always wear gloves when cleaning the cooktop.
Gas Surface Burners
Removing and Replacing the Gas Surface Burners
Grates and burner heads/caps can be removed for care and cleaning.

| General burner | |
| Burner cap is properly set. | |
| Burner cap is NOT properly set. |
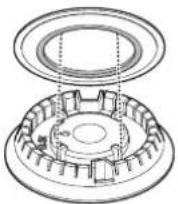

CAUTION
Make sure Burner heads and caps are reinstalled properly. They will be stable and rest flat when correctly installed.
Cleaning Burner Heads/Caps
For even and unhampered flame, the slits in the burner heads must be kept clean at all times. The burner heads and caps (and the oval burner head and cap assembly) can be lifted off. Do not attempt to remove the oval burner cap.
- Wash the burner caps in hot soapy water and rinse with clean water. Run water through the oval burner from the bottom stem to flush out debris.
- Use care when cleaning the cooktop. The pointed metal ends on the electrodes could cause injury. Hitting an electrode with a hard object may damage it.
- To remove burnt-on food, soak the burner heads in a solution of mild liquid detergent and hot water for 20–30 minutes. For stubborn stains, use a toothbrush or wire brush.
- The burners will not operate properly if the burner ports or electrodes are clogged or dirty.
- Burner caps and heads should be cleaned routinely, especially after excessive spillover.
- Burners will not light if the cap is removed.

CAUTION
- Do not hit the electrodes with anything hard. Doing so could damage them.
- Do not use steel wool or scouring powders to clean the burners.
- Do not scratch or gouge the port features of the brass burner bases.
- It is normal for brass burners to become tarnished with use.
NOTE
- To clean the brass burners, use mild abrasive cleaners or liquid cleaners such as Kleen King®, BonAmi® and Wright's®.
- To clean port openings, use a stiff, nylon bristle tooth brush.
- Do not use steel wool or steel bristle brushes as they can scratch the brass burner surface.
After Cleaning the Burner Heads/ Caps
Shake out any excess water and then let them dry thoroughly. Placing the oval burner upside down will allow the water to drain out more easily. Replace the burner heads and caps over the electrodes on the cooktop in the correct locations according to their size. Make sure the hole in the burner head is positioned over the electrode.
Burner Grates
The range consists of three separate professional-style grates. For maximum stability, these grates should only be used when in their proper position. The two side grates can be interchanged from left to right and front to back. The center grate can be interchanged from front to back.

NOTE
Do not operate a burner for an extended period of time without cookware on the grate. The finish on the grate may chip without cookware to absorb the heat.
Cleaning the Burner Grates

CAUTION
- Do not lift the grates out until they have cooled.
- Do not put the grate in the oven during self cleaning mode.
- Grates should be washed regularly and after spillovers.
- Wash the grates in hot, soapy water and rinse with clean water.
• The grates are dishwasher safe.
• After cleaning the grates, let them dry completely and securely position them over the burners.
Cleaning the Cooktop Surface

CAUTION
• To avoid burns, do not clean the cooktop surface until it has cooled.
- Do not lift the cooktop surface. Lifting the cooktop surface can lead to damage and improper operation of the range.
- When water is spilled on the cooktop, wipe up water immediately. If water is left on the cooktop for a long time, discoloration may occur.
Foods with high acid or sugar content may cause a dull spot if allowed to set. Wash and rinse soon after the surface has cooled. For other spills such as oil/ grease spattering, etc., wash with soap and water when the surface has cooled, then rinse and polish with a dry cloth.
Oven Air Vents
Air openings are located at the rear of the cooktop, at the top and bottom of the oven door, and at the bottom of the range.
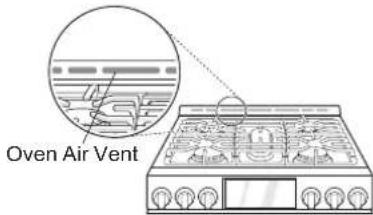

CAUTION
- The edges of the range vent are sharp. Wear gloves when cleaning the range to avoid injury.
- Clean ventilating hoods frequently. Grease should not be allowed to accumulate on the hood or filter.
NOTE
Do not block the vents and air openings of the range. They provide the air inlet and outlet that are necessary for the range to operate properly with correct combustion.
Control Panel
To prevent activating the control panel during cleaning, unplug the range. Clean up splatters with a damp cloth using a glass cleaner. Remove heavier soil with warm, soapy water. Do not use abrasives of any kind.
Front Manifold Panel and Knobs
It is best to clean the manifold panel after each use of the range. For cleaning, use a damp cloth and mild soapy water or a 50/50 solution of vinegar and water. For rinsing, use clean water and polish dry with a soft cloth.
The control knobs may be removed for easy cleaning.
1 To clean the knobs, make sure that they are in the Off position and pull them straight off the stems. Be careful not to lose the knob springs.
2 To replace the knobs, make sure that the knobs have the Off position centered at the top, and slide the knobs directly onto the stem.
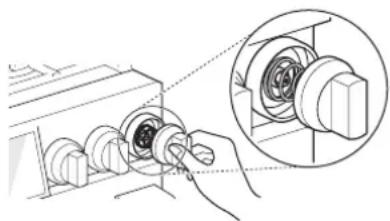
natural_image
Technical illustration of a mechanical assembly with a magnified inset showing internal components (no text or symbols)
CAUTION
- Do not use abrasive cleansers, strong liquid cleaners, plastic scouring pads or oven cleaners on the manifold panel. Doing so will damage the finish.
- Do not try to bend the knobs by pulling them up or down, and do not hang a towel or other objects on them. This can damage the gas valve shaft.
- If you slide the knobs onto the stem without the knob springs, it may cause malfunction.
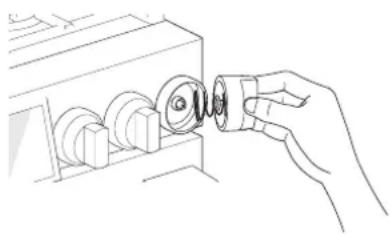
natural_image
Line drawing of a hand inserting a component into a device (no text or symbols)NOTE
To prevent scratching, do not use abrasive cleaners on any of these materials.
Cleaning the Exterior
Painted and Decorative Trim
For general cleaning, use a cloth with hot soapy water. For more difficult soils and built-up grease, apply a liquid detergent directly onto the soil. Leave it on for 30 to 60 minutes. Rinse with a damp cloth and dry. Do not use abrasive cleaners.
Stainless Steel Surfaces
To avoid scratches, do not use steel wool pads.
1 Place a small amount of stainless steel appliance cleaner or polish on a damp cloth or paper towel.
2 Clean a small area, rubbing with the grain of the stainless steel if applicable.
3 Dry and buff with a clean, dry paper towel or soft cloth.
4 Repeat as necessary.
NOTE
- Do not use a steel wool pad; it will scratch the surface.
- To clean the stainless steel surface, use warm sudsy water or a stainless steel cleaner or polish.
• Always wipe in the direction of the metal surface finish. - To purchase stainless steel appliance cleaner or polish, or to locate a dealer near you, call our toll-free customer service number: 1-800-243-0000 (USA), or visit our website at: www.lg.com
Oven Door
- Use soapy water to thoroughly clean the oven door. Rinse well. Do not immerse the door in water.
- You may use a glass cleaner on the outside glass of the oven door. Do not spray water or glass cleaner on the door vents.
- Do not use oven cleaners, cleaning powders, or harsh abrasive cleaning materials on the outside of the oven door.
- Do not clean the oven door gasket. The oven door gasket is made of a woven material that is essential for a good seal. Care should be taken not to rub, damage, or remove this gasket.

CAUTION
Do not use harsh cleaners or harsh abrasive cleaning materials on the outside of the oven door. Doing so can cause damage.
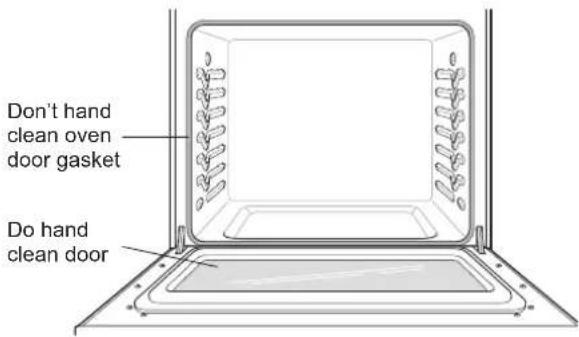
Door Care Instructions
Most oven doors contain glass that can break.

CAUTION
- Do not close the oven door until all the oven racks are fully in place.
- Do not hit the glass with pots, pans, or any other object.
- Scratching, hitting, jarring, or stressing the glass may weaken its structure causing an increased risk of breakage at a later time.
Oven Racks
Remove the oven racks before operating the self clean cycle.
1 Food spilled into the tracks could cause the racks to become stuck. Clean with a mild, abrasive cleaner.
2 Rinse with clean water and dry.
NOTE
If the racks are cleaned using the self clean cycle (not recommended), the color will turn slightly blue and the finish will become dull. After the self clean cycle is complete, and the oven has cooled, rub the sides of the racks with wax paper or a cloth containing a small amount of oil. This will make the racks glide more easily into the rack tracks.
EasyClean®
LG's EasyClean® enamel technology provides two cleaning options for the inside of the range. The EasyClean® feature takes advantage of LG's new enamel to help lift soils without harsh chemicals, and it runs using ONLY WATER for just 10 minutes in low temperatures to help loosen LIGHT soils before hand-cleaning.
While EasyClean® is quick and effective for small and LIGHT soils, the Self Clean feature can be used to remove HEAVY, built up soils. The intensity and high heat of the Self Clean cycle may result in smoke which will require the opening up of windows to provide ventilation. Compared to the more intense Self Clean process, your LG oven gives you the option of cleaning with LESS HEAT, LESS TIME, and virtually NO SMOKE OR FUMES.
When needed, the range still provides the self clean option for longer, more thorough oven cleaning for heavier, built up soils.
Benefits of EasyClean®
• Helps loosen light soils before hand-cleaning
- EasyClean® only uses water; no chemical cleaners
- Makes for a better self-clean experience
- Delays the need for a self-clean cycle
- Minimizes smoke and odors
- Can allow shorter self-clean time
When to Use EasyClean®
| Suggested Cleaning Method | Example of Oven Soiling Soil Pattern | Types of Soils | Common Food Items That Can Soil Your Oven | |
| EasyClean® | Small drops or spots | Cheese or other ingredients | Pizza | |
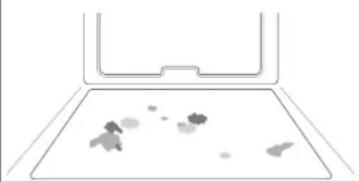 | Light splatter | Fat/grease | Steaks, broiled | |
| Fish, broiled | ||||
| Meat roasted at low temperatures | ||||
| Self Clean* | Medium to heavy splatter | Fat/grease | Meat roasted at high temperatures | |
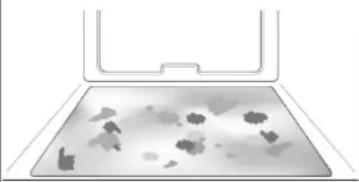 | Drops or spots | Filling or sugar based soils | Pies | |
| Cream or tomato sauce | Casseroles | |||
* The Self Clean cycle can be used for soil that has been built up over time.
Cleaning Tips
- Allow the oven to cool to room temperature before using the EasyClean® cycle. If your oven cavity is above 150 °F (65 °C), Hot will appear in the display, and the EasyClean® cycle will not be activated until the oven cavity cools down.
- A plastic spatula can be used as a scraper to scrape off any chunks or debris before and during oven cleaning.
- Using the rough side of a non-scratch scouring pad may help to take off burnt-on stains better than a soft sponge or towel.
- Certain non-scratch scrubbing sponges, such as those made of melamine foam, available at your local stores, can also help improve cleaning.
- The range should be level to ensure that the bottom surface of the oven cavity is entirely covered by water at the beginning of the EasyClean® cycle.
- For best results, use distilled or filtered water. Tap water may leave mineral deposits on the oven bottom.
- Soil baked on through several cooking cycles will be more difficult to remove with the EasyClean® cycle.
- Do not open the oven door during the EasyClean® cycle. Water will not get hot enough if the door is opened during the cycle.
- For hard to reach areas such as the back surface of the oven, it is better to use the Self Clean cycle.
EasyClean® Instruction Guide
1 Remove oven racks and accessories from the oven.
2 Scrape off and remove any burnt-on debris with a plastic scraper.

Suggested plastic scrapers:
- Hard plastic spatula
- Plastic pan scraper
- Plastic paint scraper
- Old credit card
3 Fill a spray bottle with 1¼ cups (10 oz or 300 ml) of water and use the spray bottle to thoroughly spray the inside surfaces of the oven.
4 Use at least 14 cup (2 oz or 60 ml) of the water to completely saturate the soil on both the walls and in the corners of the oven.

natural_image
Line drawing of a device with a fire extinguisher inside a rectangular enclosure (no text or symbols)50 MAINTENANCE
5 Spray or pour the remaining 1 cup (8 oz or 250 ml) of water onto the bottom center of the oven cavity. The indentation on the oven bottom should be fully covered to submerge all soils. Add water if necessary.
NOTE
Use the "mist" setting on the spray bottle for better coverage. The entire 1 14 cup (10 oz or 300 ml) of water should be used for each oven cavity cleaned. Do not spray water directly on the door. Doing so will result in water dripping to the floor.
6 Close the oven door.
Turn the oven mode knob to select EasyClean®. Press Start.
CAUTION
- Some surfaces may be hot after the EasyClean® cycle. Wear rubber gloves while cleaning to prevent burns.
- During the EasyClean® cycle, the oven becomes hot enough to cause burns. Wait until the cycle is over before wiping the inside surface of the oven. Failure to do so may result in burns.
- Avoid leaning or resting on the oven door glass while cleaning the oven cavity.
7 A tone will sound at the end of the 10 minute cycle. Turn the oven mode knob to the Off position to clear the display and end the tone.
8 After the cleaning cycle and during hand-cleaning, enough water should remain on the oven bottom to completely submerge all soils. Add water if necessary. Place a towel on the floor in front of the oven to capture any water that may spill out during hand-cleaning.
9 Clean the oven cavity immediately after the EasyClean® cycle by scrubbing with a wet, non-scratch scouring sponge or pad. (The scouring side will not scratch the finish.) Some water may spill into the bottom vents while
cleaning, but it will be captured in a pan under the oven cavity and will not hurt the burner.
NOTE
Do not use any steel scouring pads, abrasive pads or cleaners as these materials can permanently damage the oven surface.
10 Once the oven cavity is cleaned, wipe any excess water with a clean dry towel. Replace racks and any other accessories.
11 If some light soils remain, repeat the above steps, making sure to thoroughly soak the soiled areas. If stubborn soils remain after multiple EasyClean® cycles, run the Self Clean cycle. Be sure that the oven cavity is empty of oven racks and other accessories, and that the oven cavity surface is dry before running the Self Clean cycle. Consult the Self Clean section of your owner's manual for further details.
NOTE
- If you forget to saturate the inside of the oven with water before starting EasyClean®, turn the Oven mode knob to the Off position to end the cycle. Wait for the range to cool to room temperature and then spray or pour water into the oven and start another EasyClean® cycle.
- The cavity gasket may be wet when the EasyClean® cycle finishes. This is normal. Do not clean the gasket.
- If mineral deposits remain on the oven bottom after cleaning, use a cloth or sponge soaked in vinegar to remove them.
- It is normal for the fan to operate during the EasyClean® cycle.
Self Clean
The Self Clean cycle uses extremely hot temperatures to clean the oven cavity. While running the Self Clean cycle, you may notice smoking or an odor. This is normal; especially if the oven is heavily soiled.
During Self Clean, the kitchen should be well ventilated to minimize the odors from cleaning.
Before Starting Self Clean
- Remove the oven racks, broiler pan, broiler grid, all cookware, aluminum foil or any other material from the oven.
- The kitchen should be well ventilated to minimize the odors from cleaning.
- Wipe any heavy spillovers on the bottom of the oven.
- Make sure that the oven light bulb cover is in place and the oven light is off.
- The oven light cannot be turned on during a Self Clean cycle. The oven light cannot be turned on until the oven temperature has cooled below 500 °F (260 °C) after a Self Clean cycle is complete.

CAUTION
- Do not leave small children unattended near the appliance. During the Self Clean cycle, the outside of the range can become very hot to the touch.
- If you have pet birds, move them to another well-ventilated room. The health of some birds is extremely sensitive to the fumes given off during the Self Clean cycle of any range.
- Do not line the oven walls, racks, bottom or any other part of the range with aluminum foil or any other material. Doing so will destroy heat distribution, produce poor baking results and cause permanent damage to the oven interior (aluminum foil will melt to the interior surface of the oven).
- Do not force the door open. This can damage the automatic door locking system. Use care when opening the oven door after the Self Clean cycle. Stand to the side of the oven when opening the door to allow hot air or steam to escape. The oven may still be VERY HOT.
During the Self Clean cycle, the cooktop elements and warming drawer cannot be used.
NOTE
- Remove oven racks and accessories before starting the Self Clean cycle.
- If oven racks are left in the oven cavity during the Self Clean cycle, they will discolor and become difficult to slide in and out.
- Clean the frame of the oven and door with hot soapy water. Rinse well.
- Do not clean the gasket. The fiberglass material of the oven door gasket cannot withstand abrasion. It is essential for the gasket to remain intact. If you notice it becoming worn or frayed, replace it.
- Wipe up any heavy spillovers on the oven bottom.
- Make sure that the oven light bulb cover is in place and the oven light is off.
- It is normal for the fan to operate during the Self Clean cycle.
Setting Self Clean
The Self Clean function has cycle times of 2, 3, or 5 hours.
Self Clean Soil Guide
| Soil Level Cycle Setting | |
| Lightly Soiled Oven Cavity 2-Hour | Self Clean |
| Moderately Soiled Oven Cavity 3-Hour | Self Clean |
| Heavily Soiled Oven Cavity 5-Hour | Self Clean |
1 Remove all racks and accessories from the oven.
2 Turn the oven mode knob to select Self Clean. The oven defaults to the recommended three-hour self clean for a moderately soiled oven. Press plus(+) or minus(-) to select a self clean time from 2 to 5 hours.
3 Press Start.
4 Once the self-clean cycle is set, the oven door locks automatically and the lock icon displays. You will not be able to open the oven door until the oven has cooled. The lock releases automatically when the oven has cooled.

CAUTION
Do not force the oven door open when the lock icon is displayed. The oven door remains locked until the oven temperature has cooled. Forcing the door open will damage the door.
Setting Self Clean with a Delayed Start
1 Remove all racks and accessories from the oven.
2 Turn the oven mode knob to select Self Clean. The oven defaults to the recommended three-hour self clean for a moderately soiled oven. Press plus(+) or minus(-) to select a self clean time from 2 to 5 hours.
3 Press Start Time.
4 Press plus(+) or minus(-) to enter the time of day you would like the Self Clean to start.
5 Press Start.
NOTE
It may become necessary to cancel or interrupt a Self Clean cycle due to excessive smoke or fire in the oven. To cancel the Self Clean function, turn the oven mode knob to the Off position.
During Self Clean
- The Self Clean cycle uses extremely hot temperatures to clean the oven cavity. While running the Self Clean cycle, you may notice smoking or an odor. This is normal, especially if the oven is heavily soiled.
- As the oven heats, you may hear sounds of metal parts expanding and contracting. This is normal and will not damage the oven.
- Do not force the oven door open when the lock 🔒 is displayed. The oven door remains locked until the oven temperature has cooled. Forcing the door open will damage the door.
After the Self Clean Cycle
- The oven door remains locked until the oven temperature has cooled.
- You may notice some white ash in the oven. Wipe it off with a damp cloth or a soap-filled steel wool pad after the oven cools. If the oven is not clean after one self-clean cycle, repeat the cycle.
- If oven racks were left in the oven and do not slide smoothly after a self-clean cycle, wipe racks and rack supports with a small amount of vegetable oil to make them glide more easily.
- Fine lines may appear in the porcelain because it went through heating and cooling. This is normal and will not affect performance.
NOTE
- The Self Clean cycle cannot be started if the Lockout feature is active.
- Once the Self Clean cycle is set, the oven door locks automatically. You will not be able to open the oven door until the oven is cooled. The lock releases automatically.
- Once the door has been locked, the lock 📋 indicator light stops flashing and remains on. Allow about 15 seconds for the oven door lock to activate.
- If the clock is set for a 12-hour display (default) the Delayed Self Clean can never be set to start more than 12 hours in advance.
- After the oven is turned off, the convection fan keeps operating until the oven has cooled down.
Changing the Oven Light
The oven light is a standard 40-watt appliance bulb. It turns on when the oven door is open. When the oven door is closed, press Light to turn it on or off.

WARNING
• Make sure that the oven and bulb are cool.
- Disconnect the electrical power to the range at the main fuse or circuit breaker panel. Failure to do so can result in severe personal injury, death, or electrical shock.
1 Unplug the range or disconnect power.
2 Turn the glass bulb cover in the back of the oven counterclockwise to remove.
3 Turn the bulb counterclockwise to remove it from the socket.
4 Insert the new bulb and turn it clockwise.
5 Insert the glass bulb cover and turn it clockwise.
6 Plug in the range or reconnect the power.

natural_image
Line drawing of a hand holding a magnifying glass over a tray with leafy plants (no text or symbols)Removing and Replacing the Lift-Off Oven Doors and Drawer

CAUTION
- Be careful when removing and lifting the door.
- Do not lift the door by the handle. The door is very heavy.
Removing the Door
1 Fully open the door.
2 Unlock the hinge locks, rotating them as far toward the open door frame as they will go.
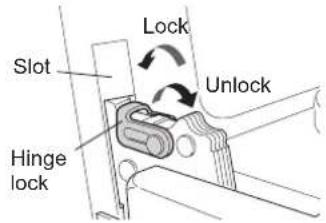
3 Firmly grasp both sides of the door at the top.
4 Close the door to the removal position (approximately five degrees) which is halfway between the broil stop position and fully closed. If the position is correct, the hinge arms will move freely.

5 Lift door up and out until the hinge arms are clear of the slots.
Replacing the Door
1 Firmly grasp both sides of the door at the top.
2 With the door at the same angle as the removal position, seat the indentation of the hinge arms into the bottom edge of the hinge slots. The notch in the hinge arms must be fully seated into the bottom edge of the slots.

3 Open the door fully. If the door will not open fully, the indentation is not seated correctly in the bottom edge of the slots.
4 Lock the hinge locks, rotating them back toward the slots in the oven frame until they lock.

5 Close the oven door.
Removing the Drawer

CAUTION
Disconnect the electrical power to the range at the main fuse or circuit breaker panel. Failure to do so can result in severe personal injury, death, or electrical shock.
Most cleaning can be done with the drawer in place; however, the drawer may be removed if further cleaning is needed. Use warm water to thoroughly clean.
1 Fully open the drawer.
2 Locate the glide lever on each side of the drawer. Push down on the left glide lever and pull up on the right glide lever.

Push down with finger Pull up with finger
3 Pull the drawer away from the range.
Replacing the Drawer
1 Pull the bearing glides to the front of the chassis glide.
2 Align the glide on each side of the drawer with the glide slots on the range.
3 Push the drawer into the range until levers click (approximately 2 inch).
4 Pull the drawer open again to seat bearing glides into position.
TROUBLESHOOTING
FAQs
What types of cookware are recommended for use with the cooktop?
- The pans must have a flat bottom and straight sides.
- Only use heavy-gauge pans.
- The pan size must match the amount of food to be prepared and the size of the surface element.
- Use tight fitting lids.
- Only use flat-bottom woks.
Why do the heating elements appear to be turning ON and OFF during use of the cooktop or oven?
Depending on your cooktop element setting or the temperature selected in your oven it is NORMAL for the cooking elements to cycle on and off.
My new oven doesn't cook like my old one. Is there something wrong with the temperature settings?
No, your oven has been factory tested and calibrated. For the first few uses, follow your recipe times and temperatures carefully. If you still think your new oven is too hot or too cold, you can adjust the oven temperature yourself to meet your specific cooking needs. Refer to the Oven Temperature Adjustment section in this manual for easy instructions on how to adjust your thermostat.
Is it normal to hear a clicking noise coming from the back of my oven when I am using it?
Your new range is designed to maintain a tighter control over your oven's temperature. You may hear your oven's heating elements click on and off more frequently on your new oven. This is NORMAL.
Why is the colon in the clock flashing?
This means that the product has just been plugged in, or that it has experienced a power interruption. To clear the flashing colon in the clock, press any key or reset the clock if needed.
During convection cooking the fan stops when I open the door. Is that normal?
Yes, this is normal. When the door is opened, the convection fan will stop until the door is closed.
Can I use aluminum foil to catch drippings in my oven cavity?
Never use aluminum foil to line the bottom or sides of the oven or the warming drawer. The foil will melt and stick to the bottom surface of the oven and will not be removable. Use a sheet pan placed on a lower oven rack to catch drippings instead. (If foil has already melted onto the bottom of the oven, it will not interfere with the oven's performance.)
Can I use aluminum foil on the racks?
Do not cover racks with aluminum foil. Covering entire racks with foil restricts air flow, leading to poor cooking results. Use a sheet pan lined with foil under fruit pies or other acidic or sugary foods to prevent spillovers from damaging the oven finish.

CAUTION
Foil may be used to wrap food in the oven or warming drawer, but do not allow the foil to come into contact with the exposed heating/broiling elements in the oven. The foil could melt or ignite, causing smoke, fire, or injury.
Can I leave my racks in the oven when running a Self Clean cycle?
No. Although it will not damage the racks, it will discolor them and may make them hard to slide in and out during use. Remove all items from the oven before starting a Self Clean cycle.
What should I do if my racks are sticky and have become hard to slide in and out?
Over time, the racks may become hard to slide in and out. Apply a small amount of olive oil to the ends of the racks. This will work as a lubricant for easier gliding.
What should I do for hard to remove stains on my cooktop?
The cooktop should be cleaned after every use to prevent permanent staining. When cooking foods with high sugar content, such as tomato sauce, clean the stain off with a scraper while the cooktop is still warm. Use an oven mitt when scraping to prevent burns. Refer to the MAINTENANCE section of this owner's manual for further instruction.
Why aren't the function buttons working?
Make sure that the range is not in Lockout mode. The lock ⏻ will show in the display if Lockout is activated. To deactivate Lockout, pressing Probe for three seconds. The unlock melody sounds and Loc appears in the display until the controls are unlocked.
My range is still dirty after running the EasyClean® cycle. What else should I do?
The EasyClean® cycle only helps to loosen light soils in your oven range to assist in hand-cleaning of your oven. It does not automatically remove all soils after the cycle. Some scrubbing of your oven range is required after running the EasyClean® cycle.
I tried scrubbing my oven after running EasyClean®, but some soils still remain. What can I do?
The EasyClean® feature works best when the soils are fully soaked and submerged in water before running the cycle and during hand-cleaning. If soils are not sufficiently soaked in water, it can negatively affect the cleaning performance. Repeat the EasyClean® process using sufficient water. Sugar-based and certain greasy soils are especially hard to clean. If some stubborn soils remain, use the Self Clean feature to thoroughly clean your oven.
Soils on my oven walls are not coming off. How can I get my walls clean?
Soils on the side and rear walls of your oven range may be more difficult to fully soak with water. Try repeating the EasyClean® process with more than the 14 cup (2 oz or 60 ml) spray recommended.
Will EasyClean® get all of the soils and stains out completely?
It depends on the soil type. Sugar-based and certain grease stains are especially hard to clean. Also, if stains are not sufficiently soaked in water, this can negatively affect cleaning performance. If stubborn or built-up stains remain, use the Self Clean feature. Refer to the Self Clean section of your owner's manual.
Are there any tricks to getting some of the stubborn soils out?
Scraping the soils with a plastic scraper before and during hand-cleaning is recommended. Fully saturating soils with water is also recommended. However, certain types of soils are harder to clean than others. For these stubborn soils, the Self Clean cycle is recommended. Consult the Self Clean section of your owner's manual for details.
Is it safe for my convection fan, broil burner or heater element to get wet during EasyClean®?
Yes. The convection fan, broiler burner or heater element may get a little wet during cleaning. However, direct spray onto the broil burner and heater elements is not necessary because these are self-cleaning during regular use.
Do I need to use all 1¼ cups (10 oz or 300 ml) of water for EasyClean®?
Yes. It is highly recommended that 1 cup (8 oz or 250 ml) of water be sprayed or poured on the bottom and an additional 14 cup (2 oz or 60 ml) of water be sprayed on walls and other soiled areas to fully saturate the soils for better cleaning performance.
I see smoke coming out of my oven range's cooktop vents during EasyClean®. Is this normal?
This is normal. This is not smoke. It is actually water vapor (steam) from the water in the oven cavity. As the oven heats briefly during EasyClean®, the water in the cavity evaporates and escapes through the oven vents.
How often should I use EasyClean®?
EasyClean® can be performed as often as you wish. EasyClean® works best when your oven is LIGHTLY soiled from such things as LIGHT grease splatter and small drops of cheese. Please refer to the EasyClean® section in your owner's manual for more information.
What is required for EasyClean®?
A spray bottle filled with 1¼ cups (10 oz or 300 ml) of water, a plastic scraper, a non-scratch scrubbing pad and a towel. You should not use abrasive scrubbers such as heavy-duty scouring pads or steel wool. Except for a towel, all of the materials you need are included in a special cleaning kit with your new range.
Is it safe for water to spill into the oven bottom vents during cleaning?
Some water spillage into the oven bottom vents (gas range) is okay. However, it is recommended to try avoid spilling too much water into the vents.
Before Calling for Service
Before you call for service, review this list. It may save you time and expense. The list includes common occurrences that are not the result of defective workmanship or materials in this appliance.
| Symptoms Possible Cause / Solutions | |
| Top burners do not light or do not burn evenly. | Make sure that the electrical plug is inserted into a live, properly grounded outlet.Remove the burners and clean them. Check the electrode area for burnt on food or grease. See Cleaning Burner Heads/Caps in the MAINTENANCE section.Make sure that the burner parts are installed correctly.See Removing and Replacing the Gas Surface Burners in the MAINTENANCE section. |
| Burner flames are very large or yellow. | If the range is connected to LP gas, contact the technician who installed your range or made the conversion. |
| Surface burners light but the oven does not. | Make sure that the oven gas shut-off valve, located behind the range, is fully open. |
| Food does not bake or roast properly. | Incorrect oven control settings. See Control Panel Overview in the OPERATION section.Incorrect rack position. See Removing and Replacing the Oven Racks in the OPERATION section.Incorrect cookware is being used. See Convection Bake in the OPERATION section.Oven thermostat needs adjustment.See Adjusting the Oven Thermostat in the OPERATION section.The Clock is not set correctly. See Changing Oven Settings in the OPERATION section.Aluminum foil used improperly in the oven. See Removing and Replacing the Oven Racks. |
| Food does not broil properly in the oven. | Incorrect oven control settings. See Control Panel Overview in the OPERATION section.The oven door is not closed. See Broil in the OPERATION section.Aluminum foil used on the broiling pan and grid is not fitted properly. |
| Oven temperature is too hot or too cold. | The oven thermostat needs adjustment. See Adjusting the Oven Thermostat in the OPERATION section. |
| Clock and timer does not work. | Make sure the electrical plug is inserted into a live, properly grounded outlet.Replace the fuse or reset the circuit breaker.Improper oven control settings. See Changing Oven Settings in the OPERATION section. |
| Oven light does not work. | The light bulb is loose or defective. Tighten or replace the bulb.The plug on the range is not completely inserted in the electrical outlet. Make sure the electrical plug is inserted into a live, properly grounded outlet. |
| Self Clean is not working. | The oven temperature is too high to set a self clean operation. Allow the range to cool down to room temperature and reset the controls.Improper oven control settings. See Self Clean in the MAINTENANCE section. |
| “Crackling” or “popping” sound. | This is the sound of the metal heating up and cooling down during both the cooking and cleaning functions. This is normal. |
| Too much smoke during the Self Clean cycle. | Too much soil in the oven. Open the windows to get rid of the smoke from the room. Turn the oven mode knob to select Self Clean. Wait until the light goes off before trying to open the oven door. Wipe up the excess soil and reset the clean cycle. |
| The oven door does not open after a Self Clean cycle. | The oven temperature is too high. Wait up to one hour for it to cool down. |
| The oven door is not clean after a Self Clean cycle. | Incorrect oven control settings. See Self Clean in the MAINTENANCE section.The oven was heavily soiled. Clean up heavy spills before beginning the Self Clean cycle. Heavily soiled ovens may need either a longer Self Clean or two Self Clean cycles. |
| Clean and door flash in the display | The self clean cycle has been selected, but the door is not closed.- Close the oven door. |
| "Loc" message appears when you want to cook. | The oven door is locked because the temperature inside of the oven is too high. Press and holdProbefor three seconds. |
| Oven control beeps and displays an F error code. | Check the main gas shut-off valve or the oven gas shut-off valve and call for service.Remove the power from the range for five minutes and then reconnect the power. If the function error code repeats, call for service. |
| The oven racks were cleaned in a Self Clean cycle. | Apply a small amount of vegetable oil to a paper towel and wipe the edges of the oven racks. Do not use lubricant sprays. |
| Clock is flashing. | Power outage or surge. Reset the clock. If the oven was in use, you must reset it by pressing the oven mode knob to theOffposition. Reset the clock and any cooking function. |
| "Burning" or "oily" odor emitting from the vent. | This is normal in a new oven and will disappear with use. To speed the process, set a Self Clean cycle for a minimum of three hours. See Self Clean in the MAINTENANCE section. |
| Strong odor. | An odor from the insulation around the inside of the oven is normal for the first few times the oven is used. |
| Fan noise | A convection fan may automatically turn on and off.- This is normal. |
| Fan operation | It is normal for the fan to operate periodically throughout a normal bake cycle in the oven. This is to ensure even baking results. |
| Burners are not lighting properly after cleaning the cooktop surface. | Make sure that the burner heads and caps are completely dry and properly positioned. |
| When lighting just one burner, clicking noise is heard from all the burners. | This is normal. Electric spark igniters from the burners cause the clicking noise. All the spark igniters on the cooktop will activate when igniting just one burner. |
| Light can be seen through the oven air vents. | While the Broil function is running, it is normal to see a light between the oven air vents. |


Symptoms Possible Cause / Solutions
| Trouble connecting appliance and smartphone to Wi-Fi network | The password for the Wi-Fi network was entered incorrectly. - Delete your home Wi-Fi network and begin the registration process again. Mobile data for your smartphone is turned on. - Turn off the Mobile data on your smartphone before registering the appliance. The wireless network name (SSID) is set incorrectly. - The wireless network name (SSID) should be a combination of English letters and numbers. (Do not use special characters.) The router frequency is not 2.4 GHz. - Only a 2.4 GHz router frequency is supported. Set the wireless router to 2.4 GHz and connect the appliance to the wireless router. To check the router frequency, check with your Internet service provider or the router manufacturer. The distance between the appliance and the router is too far. - If the appliance is too far from the router, the signal may be weak and the connection may not be configured correctly. Move the router closer to the appliance or purchase and install a Wi-Fi repeater. |
LIMITED WARRANTY (USA)
ARBITRATION NOTICE: THIS LIMITED WARRANTY CONTAINS AN ARBITRATION PROVISION THAT REQUIRES YOU AND LG TO RESOLVE DISPUTES BY BINDING ARBITRATION INSTEAD OF IN COURT, UNLESS YOU CHOOSE TO OPT OUT. IN ARBITRATION, CLASS ACTIONS AND JURY TRIALS ARE NOT PERMITTED. PLEASE SEE THE SECTION TITLED "PROCEDURE FOR RESOLVING DISPUTES" BELOW.
Should your LG Gas Range ("Product") fail due to a defect in materials or workmanship under normal and proper use, during the warranty period set forth below, LG Electronics ("LG") will, at its option, repair or replace the Product. This limited warranty is valid only to the original retail purchaser of the Product and applies only when purchased and used within the United States including U.S. Territories.
| Warranty Period Scope of Warranty HOW SERVICE IS HANDLED | ||
| Two (2) year from date of original retail purchase | Parts and Labor (internal / functional parts only) | LG will provide, free of charge, all labor and in-home service to replace defective part(s). |
- Replacement products and parts are warranted for the remaining portion of the original warranty period or ninety (90) days, whichever is greater.
- Replacement products and parts may be new, reconditioned, refurbished, or otherwise factory remanufactured.
- Proof of original retail purchase specifying the Product model and date of purchase is required to obtain warranty service under this limited warranty.
EXCEPT TO THE EXTENT PROHIBTED BY APPLICABLE LAW, ANY IMPLIED WARRANTY OF MERCHANTABILITY OR FITNESS FOR A PARTICULAR PURPOSE ON THE PRODUCT IS LIMITED IN DURATION TO THE DURATION OF THE ABOVE LIMITED WARRANTY. UNDER NO CIRCUMSTANCES SHALL LG OR ITS U.S. DISTRIBUTORS/DEALERS BE LIABLE FOR ANY INDIRECT, INCIDENTAL, CONSEQUENTIAL, SPECIAL, OR PUNITIVE DAMAGES, INCLUDING, WITHOUT LIMITATION, LOST GOODWILL, LOST REVENUES OR PROFITS, WORK STOPPAGE, IMPAIRMENT OF OTHER GOODS, COST OF REMOVAL AND REINSTALLATION OF THE PRODUCT, LOSS OF USE, OR ANY OTHER DAMAGES WHETHER BASED IN CONTRACT, TORT, OR OTHERWISE. LG'S TOTAL LIABILITY, IF ANY, SHALL NOT EXCEED THE PURCHASE PRICE PAID BY YOU FOR THE PRODUCT.
Some states do not allow the exclusion or limitation of incidental or consequential damages or limitations on how long an implied warranty lasts, so the above exclusions or limitations may not apply to you. This limited warranty gives you specific legal rights and you may also have other rights that vary from state to state.
THIS LIMITED WARRANTY DOES NOT COVER:
- Service trips to deliver, pick up, or install, educate how to operate, correct wiring, or correct unauthorized repairs.
- Damage or failure of the Product to perform during power failures and interrupted or inadequate electrical service.
- Damage or failure resulting from operating the Product in a corrosive atmosphere or contrary to the Product owner's manual.
- Damage or failure to the Product caused by accidents, pests and vermin, lightning, wind, fire, floods, acts of God, or any other causes beyond the control of LG.
- Damage or failure caused by unauthorized modification or alteration, or if used for other than the intended purpose.
- Damage or failure resulting from misuse, abuse, improper installation, repair, or maintenance. Improper repair includes use of parts not authorized by LG. Improper installation or maintenance includes installation or maintenance contrary to the Product owner's manual.
- Damage or failure caused by incorrect electrical current, voltage, or ventilation/plumbing codes.
- Damage or failure caused by transportation and handling, including scratches, dents, chips, and/or other damage to the finish of the Product, unless such damage is reported within one (1) week of delivery.
- Damage or missing items to any display, open box, or discounted Product.
- Refurbished Product or any Product sold "As Is", "Where Is", "With all Faults", or similar disclaimer.
- Products with original serial numbers that have been removed, altered, or cannot be readily determined.
-
Increases in utility costs and additional utility expenses.
-
Any noises associated with normal operation.
- Use of accessories, components, or consumable cleaning products that are not authorized by LG.
- Replacement of light bulbs, filters, fuses or any other consumable parts.
- When Product is used for other than normal and proper household use (e.g. commercial or industrial use, offices, and recreational facilities or vehicles) or contrary to the instructions outlined in the Product's owner's manual.
• Costs associated with removal and reinstallation of your Product for repairs. - Cost of conversion of the Product from natural gas to LP gas or vice versa.
- Shelves, drawers and accessories, except for internal/functional parts covered under this limited warranty.
Not Covered by this Limited Warranty
| Problem Cause Prevention | ||
Burners do not light Clogged or dirty burner ports or electrodes will not allow the burner to operate properly  | Check and clean the gas electrode. | |
Uneven flame 1. Improper burner cap installationBurner cap is properly seated.   2. Burner ports clogged by food residuePorts blocked by dirt Flames uneven 2. Burner ports clogged by food residuePorts blocked by dirt Flames uneven  * Oval burnerTo clean: Release 4 nuts Clean red part with toothbrush * Oval burnerTo clean: Release 4 nuts Clean red part with toothbrush  | Check installation of burner head and capHardened residue should be removed using a toothbrush.Oval burner1) Release 4 nuts2) Clean residue using toothbrush | |
| Burner cap color change and lost shine | ScratchingUse of detergent or abrasive cleansers → →  | Do not use steel wool or abrasive cleansers to clean.To remove burnt-on food, soak the burner heads in hot water for 20–30 minutes. (Do not use detergent) |
Knobs melt Improper usage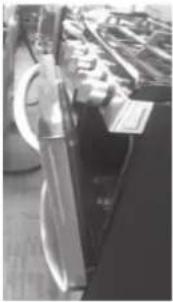  | Do not leave door at stop position during Broil/Bake mode or right after cooking. | |
| Oven or racks are stained after using aluminum foil | Aluminum foil has melted in the oven  | Never cover the oven bottom or cover an entire rack with materials such as aluminum foil.If the foil has already melted onto the oven, it will not affect the performance of the oven. |
| Flame or power is weak | Gas pressure may be weak | Check with gas supplier first |
| Surface is not levelOven is tipping | Range not leveledAnti-tip device not installed correctly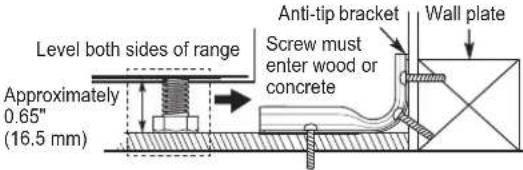  Use carpenter's level to check level. Use carpenter's level to check level. | Check with installer first |
| Oven shows error code (F9, F19) but cooktop burners are working. | The gas pressure regulator valve is closed. Lever's closed position Lever's closed position | Check that the regulator valve is in the open position.If the regulator valve is closed, rotate the lever to open the valve. Lever's closed position Lever's open position Lever's closed position Lever's open position |
| Problem Cause Prevention | ||
| • Flames too bigon converted cooktop (NP→LP) | The installer missed part of the conversion. (Check 3 parts: regulator, cooktop valve, broil/ bake valve.) | |
 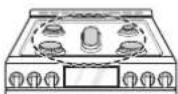 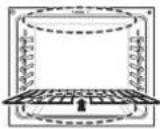 regulator cooktop valve broil/bake valve regulator cooktop valve broil/bake valve | Check with installer firstRefer to installation manual | |
17K/18.5K burner needs choke.  choke choke | Check with installer firstRefer to installation manual | |
| • Flame is too small or too large | 1. Variable gas pressure2. Installer did not check Center adjustment screw Center adjustment screw | Check with installer first |
• Gas smell Improper connectionFlexible Connector Hookup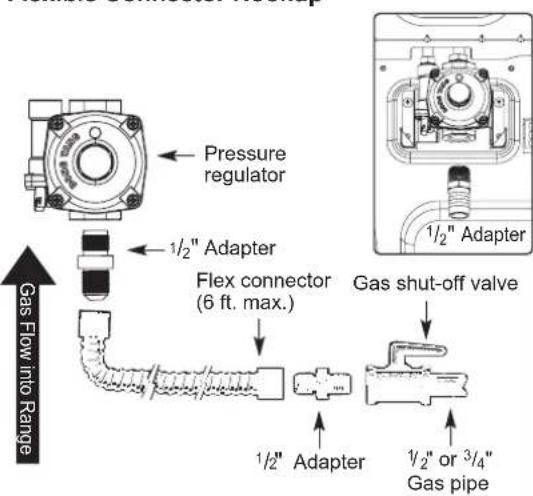 | Check with installer first | |
The cost of repair or replacement under the above excluded circumstances shall be borne by the consumer.
TO OBTAIN WARRANTY SERVICE AND ADDITIONAL INFORMATION
Call 1-800-243-0000 and select the appropriate option from the menu.
Or visit our website at http://www.lg.com
Or by mail: LG Electronics Customer Service P.O. Box 240007 Huntsville, AL 35813 ATTN: CIC
PROCEDURE FOR RESOLVING DISPUTES:
ALL DISPUTES BETWEEN YOU AND LG ARISING OUT OF OR RELATING IN ANY WAY TO THIS LIMITED WARRANTY OR THE PRODUCT SHALL BE RESOLVED EXCLUSIVELY THROUGH BINDING ARBITRATION, AND NOT IN A COURT OF GENERAL JURISDICTION. BINDING ARBITRATION MEANS THAT YOU AND LG ARE EACH WAIVING THE RIGHT TO A JURY TRIAL AND TO BRING OR PARTICIPATE IN A CLASS ACTION.
Definitions. For the purposes of this section, references to “LG” mean LG Electronics U.S.A., Inc., its parents, subsidiaries and affiliates, and each of their officers, directors, employees, agents, beneficiaries, predecessors in interest, successors, assigns and suppliers; references to “dispute” or “claim” shall include any dispute, claim or controversy of any kind whatsoever (whether based in contract, tort, statute, regulation, ordinance, fraud, misrepresentation or any other legal or equitable theory) arising out of or relating in any way to the sale, condition or performance of the product or this Limited Warranty.
Notice of Dispute. In the event you intend to commence an arbitration proceeding, you must first notify LG in writing at least 30 days in advance of initiating the arbitration by sending a letter to LG at LG Electronics, USA, Inc. Attn: Legal Department- Arbitration 1000 Sylvan Ave, Englewood Cliffs 07632. You and LG agree to engage in good faith discussions in an attempt to amicably resolve your claim. The notice must provide your name, address, and telephone number; identify the product that is the subject of the claim; and describe the nature of the claim and the relief being sought. If you and LG are unable to resolve the dispute within 30 days, either party may proceed to file a claim for arbitration.
Agreement to Binding Arbitration and Class Action Waiver. Upon failure to resolve the dispute during the 30 day period after sending written notice to LG, you and LG agree to resolve any claims between us only by binding arbitration on an individual basis, unless you opt out as provided below. Any dispute between you and LG shall not be combined or consolidated with a dispute involving any other person's or entity's product or claim. More specifically, without limitation of the foregoing, any dispute between you and LG shall not under any circumstances proceed as part of a class or representative action. Instead of arbitration, either party may bring an individual action in small claims court, but that small claims court action may not be brought on a class or representative basis.
Arbitration Rules and Procedures. To begin arbitration of a claim, either you or LG must make a written demand for arbitration. The arbitration will be administered by the American Arbitration Association ("AAA") and will be conducted before a single arbitrator under the AAA's Consumer Arbitration Rules that are in effect at the time the arbitration is initiated (referred to as the "AAA Rules") and under the procedures set forth in this section. The AAA Rules are available online at www.adr.org/consumer. Send a copy of your written demand for arbitration, as well as a copy of this provision, to the AAA in the manner described in the AAA Rules. You must also send a copy of your written demand to LG at LG Electronics, USA, Inc. Attn: Legal Department- Arbitration 1000 Sylvan Avenue Englewood Cliffs, NJ 07632. If there is a conflict between the AAA Rules and the rules set forth in this section, the rules set forth in this section will govern. This arbitration provision is governed by the Federal Arbitration Act. Judgment may be entered on the arbitrator's award in any court of competent jurisdiction. All issues are for the arbitrator to decide, except that issues relating to the scope and enforceability of the arbitration provision and to the arbitrability of the dispute are for the court to decide. The arbitrator is bound by the terms of this provision.
Governing Law. The law of the state of your residence shall govern this Limited Warranty and any disputes between us except to the extent that such law is preempted by or inconsistent with applicable federal law.
Fees/Costs. You do not need to pay any fee to begin an arbitration. Upon receipt of your written demand for arbitration, LG will promptly pay all arbitration filing fees to the AAA unless you seek more than \$25,000 in damages, in which case the payment of these fees will be governed by the AAA Rules. Except as otherwise provided for herein, LG will pay all AAA filing, administration and arbitrator fees for any arbitration initiated in accordance with the AAA Rules and this arbitration provision. If you prevail in the arbitration, LG will pay your attorneys' fees and expenses as long as they are reasonable, by considering factors including, but not limited to, the purchase amount and claim amount. Notwithstanding the foregoing, if applicable law allows for an award of reasonable attorneys' fees and expenses, an arbitrator can award them to the same extent that a court would. If the arbitrator finds either the substance of your claim or the relief sought in the demand is frivolous or brought for an improper purpose (as measured by the standards set forth in Federal Rule of Civil Procedure 11(b)), then the payment of all arbitration fees will be governed by the AAA Rules. In such a situation, you agree to reimburse LG for all monies previously disbursed by it that are otherwise your obligation to pay under the AAA Rules. Except as otherwise provided for, LG waives any rights it may have to seek attorneys' fees and expenses from you if LG prevails in the arbitration.
Hearings and Location. If your claim is for \25,000 or less, you may choose to have the arbitration conducted solely on the basis of (1) documents submitted to the arbitrator, (2) through a telephonic hearing, or (3) by an in-person hearing as established by the AAA Rules. If your claim exceeds \25,000, the right to a hearing will be determined by the AAA Rules. Any in-person arbitration hearings will be held at a location within the federal judicial district in which you reside unless we both agree to another location or we agree to a telephonic arbitration.
Opt Out. You may opt out of this dispute resolution procedure. If you opt out, neither you nor LG can require the other to participate in an arbitration proceeding. To opt out, you must send notice to LG no later than 30 calendar days from the date of the first consumer purchaser's purchase of the product by either: (i) sending an e-mail to optout@lge.com, with the subject line: "Arbitration Opt Out" or (ii) calling 1-800-980-2973. You must include in the opt out e-mail or provide by telephone: (a) your name and address; (b) the date on which the product was purchased; (c) the product model name or model number; and (d) the serial number (the serial number can be found (i) on the product; or (ii) online by accessing https://www.lg.com/us/support/repair-service/schedule-repair-continued and clicking on "Find My Model & Serial Number").
You may only opt out of the dispute resolution procedure in the manner described above (that is, by e-mail or telephone); no other form of notice will be effective to opt out of this dispute resolution procedure. Opting out of this dispute resolution procedure will not affect the coverage of the Limited Warranty in any way, and you will continue to enjoy the full benefits of the Limited Warranty. If you keep this product and do not opt out, then you accept all terms and conditions of the arbitration provision described above.
MEMO
MANUAL DEL PROPIETARIO
COCINA DE GAS
30 Start Time Delayed Timed Cook
natural_image
Simple line drawing of a three-cylinder abacus with suspended weights (no text or symbols)natural_image
Simple line drawing of a medical cross symbol with two leaves and a plus sign (no text or labels)natural_image
Simple line drawing of a container with bubbles and stars, no text or symbols presentnatural_image
Line drawing of two people carrying a large appliance, no text or symbols presentnatural_image
Technical line drawing of a mechanical component with an inset close-up view showing a clamping mechanism (no text or symbols)natural_image
Technical line drawing of a mechanical component with no visible text or symbolsnatural_image
Technical line drawing of a vehicle interior with structural elements and a central component (no text or symbols)natural_image
Technical line drawing of a mechanical assembly with a central rotating component (no text or symbols)NOTA
natural_image
Diagram of a door handle with a valve and directional arrow indicating rotation (no text or symbols)
natural_image
Diagram of a door handle mechanism with a knob and arrow indicating rotation (no text or symbols)

PRECAUCIÓN
natural_image
Two simple line drawings of a bowl with handles and a cross symbol, no text or labels present.natural_image
Line drawing of a portable stove with two 'X' marks on the front panel (no text or symbols)32 FUNCIONAMIENTO
Bake (Hornear)
natural_image
Illustration of a soldering iron being heated by a wire, with no text or symbols present.natural_image
Three-step diagram showing a device with a circular component inserted into a rack, then being inserted into a grid of rack-like structures (no text or symbols present)natural_image
Line drawing of a drawer with an open lid and handle, no text or symbols presentNOTA
natural_image
Technical line drawing of a mechanical assembly with a magnified inset showing internal components (no text or symbols)
PRECAUCIÓN
natural_image
Line drawing of a hand inserting a component into a device (no text or symbols)NOTA
natural_image
Line drawing of a fire extinguisher inside a rectangular enclosure with decorative leaf patterns (no text or symbols)50 MANTENIMIENTO
natural_image
Line drawing of a hand holding a magnifying glass over a tray with leafy plants (no text or symbols)Register your product Online!
www.lg.com


- WARNING
- TABLE OF CONTENTS
- TABLE OF CONTENTS
- PRODUCT FEATURES
- IMPORTANT SAFETY INSTRUCTIONS
- PRODUCT OVERVIEW
- INSTALLATION
- OPERATION
- SMART FUNCTIONS
- MAINTENANCE
- TROUBLESHOOTING
- LIMITED WARRANTY
- PRODUCT FEATURES
- Multiple Gas Burner Sizes
- Safe and Convenient Gas Range
- Self Clean & EasyClean®
- IMPORTANT SAFETY INSTRUCTIONS
- ANTI-TIP DEVICE
- IMPORTANT SAFETY NOTICE
- CAUTION
- INSTALLATION SAFETY PRECAUTIONS
- SURFACE BURNERS
- BROILER
- COOK MEAT AND POULTRY THOROUGHLY
- SELF-CLEANING OVEN
- OVEN
- ENERGY SAVING TIPS
- Read all instructions before using the appliance.
- SAVE THESE INSTRUCTIONS
- PRODUCT OVERVIEW
- Accessories
- NOTE
- INSTALLATION
- Product Specifications
- Before Installing the Range
- In the Commonwealth of Massachusetts
- Preparing for Installation
- Tools Needed
- Materials You May Need
- Installing the Range
- Unpacking and Moving the Range
- Choosing the Proper Location
- Dimensions and Clearances
- Installing the Anti-tip Device
- Optional Rear Filler
- Installing the Rear Filler
- Providing Adequate Gas Supply
- Connecting the Range to Gas
- Electrical Connections
- Electrical Requirements
- Grounding
- Sealing the Openings
- Assembling the Surface Burners
- Checking Ignition of the Surface Burners
- Electric Ignition
- Quality of Flames
- Adjusting the Surface Burner to the Low Flame (Simmer) Setting
- Checking Operation of Bake / Broil Burners
- Adjusting Air Shutters (for LP Conversions)
- Leveling the Range
- Engaging the Anti-tip Device
- OPERATION
- Gas Surface Burners
- Before Use
- WHAT TO DO IF YOU SMELL GAS
- Burner Locations
- Medium and Large Burners
- Small Burner
- Extra Large Burner
- Oval Burner
- Using the Gas Surface Burners
- Setting the Flame Size
- In Case of Power Failure
- Using a Wok
- Using the Wok Grate
- Using Stove-Top Grills
- Using the Griddle
- IMPORTANT NOTES
- The Oven
- Control Panel Overview
- ① Smart Diagnosis™
- ② Cook Time / Clock
- ③ Start Time / Setting
- Probe / Lockout
- Timer On/Off / Wi-Fi
- ⑥ Oven Light
- ⑦ Warming Drawer
- - /+
- Start
- Oven Mode Knob
- Flashing Clock
- Changing Oven Settings
- Clock
- Oven Light
- Minimum & Maximum Default Settings
- Timer On/Off
- For example to set 5 minutes
- Cancelling the Timer
- Wi-Fi
- Settings
- Setting the Hour Mode
- Setting Convection Auto Conversion
- Adjusting the Oven Thermostat
- Turning the Preheat Alarm Light On/Off
- Adjusting the Beeper Volume
- Selecting Fahrenheit or Celsius
- Lockout
- Start Time (Delayed Timed Cook)
- Setting a Delayed Timed Cook
- Cook Time (Timed Cook)
- Setting a Timed Cook
- Press Start.
- Changing the Cook Time during Cooking
- Removing and Replacing the Oven Racks
- Removing Racks
- Replacing Racks
- Recommended Baking and Roasting Guide
- Bake
- Setting the Bake Function (example, 375 °F)
- Baking Chart
- Convection Mode
- Convection Bake
- Setting the Conv. Bake Function (example: to Conv. Bake 375 °F)
- Convection Baking Chart
- Cookware for Convection Cooking
- Convection Roast
- Setting the Conv. Roast Function (example: to Conv. Roast 375 °F)
- Broil
- Setting the oven to Broil
- Recommended Broiling Guide
- Pizza
- Setting the Oven for Pizza
- Warm
- Setting the Warm Function
- Proof
- Setting the Proof Function
- Meat Probe
- Setting the Meat Probe Function (example for Roast 375 °F with probe temp. 160 °F)
- Method
- Changing the Probe temperature while cooking
- IMPORTANT NOTE
- Remote Start
- Setting Remote Start
- Sabbath Mode
- Setting Sabbath Mode
- Operating the Warming Drawer
- Setting the Warming Drawer Control
- Warming Drawer food/power level recommendations
- SMART FUNCTIONS
- LG ThinQ Application
- LG ThinQ Application Features
- Cleaning
- Smart Diagnosis™
- Monitoring
- Push Alerts
- Timer
- Firmware Update
- Before Using LG ThinQ Application
- Installing the LG ThinQ Application
- Open Source Software Notice Information
- FCC Notice (For transmitter module contained in this product)
- FCC RF Radiation Exposure Statement
- Smart Diagnosis™ Feature
- Using LG ThinQ to Diagnose Issues
- Using Audible Diagnosis to Diagnose Issues
- MAINTENANCE
- Removing and Replacing the Gas Surface Burners
- Cleaning Burner Heads/Caps
- After Cleaning the Burner Heads/ Caps
- Burner Grates
- Cleaning the Burner Grates
- Cleaning the Cooktop Surface
- Oven Air Vents
- Control Panel
- Front Manifold Panel and Knobs
- Cleaning the Exterior
- Painted and Decorative Trim
- Stainless Steel Surfaces
- Oven Door
- Door Care Instructions
- Oven Racks
- EasyClean®
- Benefits of EasyClean®
- Cleaning Tips
- EasyClean® Instruction Guide
- MAINTENANCE
- Self Clean
- Before Starting Self Clean
- Setting Self Clean
- Setting Self Clean with a Delayed Start
- During Self Clean
- After the Self Clean Cycle
- Changing the Oven Light
- Removing and Replacing the Lift-Off Oven Doors and Drawer
- Removing the Door
- Replacing the Door
- Removing the Drawer
- Replacing the Drawer
- TROUBLESHOOTING
- FAQs
- Why aren't the function buttons working?
- My range is still dirty after running the EasyClean® cycle. What else should I do?
- I tried scrubbing my oven after running EasyClean®, but some soils still remain. What can I do?
- Soils on my oven walls are not coming off. How can I get my walls clean?
- Will EasyClean® get all of the soils and stains out completely?
- Are there any tricks to getting some of the stubborn soils out?
- Is it safe for my convection fan, broil burner or heater element to get wet during EasyClean®?
- Do I need to use all 1¼ cups (10 oz or 300 ml) of water for EasyClean®?
- I see smoke coming out of my oven range's cooktop vents during EasyClean®. Is this normal?
- How often should I use EasyClean®?
- What is required for EasyClean®?
- Is it safe for water to spill into the oven bottom vents during cleaning?
- Before Calling for Service
- LIMITED WARRANTY (USA)
- THIS LIMITED WARRANTY DOES NOT COVER:
- PROCEDURE FOR RESOLVING DISPUTES:
- MEMO
- MANUAL DEL PROPIETARIO
- COCINA DE GAS
- NOTA
- PRECAUCIÓN
- FUNCIONAMIENTO
- Bake (Hornear)
- MANTENIMIENTO
Brand : LG
Model : LSSG3020BD
Category : Unspecified