SC-21.1005-S4 - Heating Scarlett - Free user manual and instructions
Find the device manual for free SC-21.1005-S4 Scarlett in PDF.

User questions about SC-21.1005-S4 Scarlett
0 question about this device. Answer the ones you know or ask your own.
Ask a new question about this device
Download the instructions for your Heating in PDF format for free! Find your manual SC-21.1005-S4 - Scarlett and take your electronic device back in hand. On this page are published all the documents necessary for the use of your device. SC-21.1005-S4 by Scarlett.
USER MANUAL SC-21.1005-S4 Scarlett
natural_image
White portable oil heater with multiple cooling fans and control panel (no visible text or symbols)natural_image
Technical line drawing of a multi-layered mechanical component or housing assembly (no text or symbols visible)Рисунок 2
natural_image
Technical line drawing of a multi-layered mechanical device with no visible text or symbolsРисунок 3
ВНИМАНИЕ!
We thank you for your wise choice and for a purchase of an oil-filled radiator. It will serve you for a long time.
1. IMPORTANT INFORMATION
Please, read this manual before using the device. This manual contains important information regarding your safety, as well as recommendations concerning the correct use and maintenance of this appliance. Keep this manual together with a warranty card, cash register receipt and, if possible, carton and packaging material. This instruction manual describes different types of this device. The device you purchased may differ slightly from the description in the manual, which does not affect the methods of use and operation. The manufacturer reserves the right to make minor changes to the device without additional notice which is not fundamentally affect its safety, performance and functionality. There may be some misprints in text and digital notations in the present manual.
IMPORTANT!
Important safeguards and descriptions contained in this manual do not include all possible situations that you may experience using the device. The manufacturer is not responsible for damage of the appliance or its parts during transportation, as a result of incorrect installation or voltage fluctuations, as well as when any part of the appliance has been changed or modified.
NOTE
There is a label on the device which has all the necessary technical data and other useful information about the device. Use the appliance only for the purpose specified in this manual.
2. SAFEGUARDS
When using an oil-filled radiator, a number of precautions must be observed, to reduce the risk of fire, electric shock, and personal injury. Improper operation by ignoring the safeguards may result in damage to the health of the user and other people, as well as damage to their property.
- Read these instructions carefully before using the appliance to avoid damage during use.
- Before starting up for the first time, check that the specifications on the product comply with the power supply specifications.
IM2021
- Extreme care must be taken when children are playing next to a working radiator, and always when the radiator is operating unattended. Children must be supervised to prevent playing with the appliance.
- Always unplug the device before assembling, disassembling and cleaning, or if you are not using it.
- Do not turn on the radiator if its power cord or plug is damaged. If the power cord or plug is damaged, to avoid danger, it must be replaced by the manufacturer, authorized service center, or similar qualified personnel.
- Do not use the device outdoors or in high humidity areas.
- This radiator is not intended for use in bathrooms, laundries, or other similar high humidity rooms. Never place the radiator in places where it may fall into a bathtub or other container of water.
- Do not lay the appliance's power cord under carpets or press it with furniture. Route the power cord so that it was impossible stumble over it.
- To turn off the radiator, use the power switch. Do not turn the device on or off by connecting or disconnecting electrical power cord.
- Do not put your fingers in and prevent foreign objects from getting into any ventilation, air intake or outlet openings, as this may result in electric shock or damage to the device.
- To prevent a possible fire, do not block the air intake and exhaust openings. Do not hang or dry clothes on the radiator! Do not use the radiator on soft surfaces, such as beds, where openings may be blocked. Use the radiator only on a flat, dry surface.
- The radiator contains hot components inside. Do not use the radiator in places where gasoline, paint or other flammable liquids are used or stored.
- Use only for domestic purposes in accordance with this instruction manual. Any other use not recommended by the manufacturer may result in fire, electric shock, or personal injury. The device is not intended for industrial use.
- In order to avoid overheating and the risk of fire, as well as damage to the internal electrical network, do not change the length of the power cord or connect the device through electrical extension cords. However, if necessary, an extension cord can be used, which should be designed for the minimum power of the device.
• Install and operate the appliance in a strictly upright position. It is forbidden to operate the device in horizontal or inclined positions.
- The device is not intended for use by persons (including children) with reduced physical, sensory or mental abilities or in the absence of their life experience or knowledge, unless they are supervised or instructed on the use of the device by the person responsible for their safety.
- This appliance can be used by children aged from 8 years and above and persons with reduced physical, sensory or mental capabilities or lack of experience and knowledge if they have been given supervision or instruction concerning use of the appliance in a safe way and understand the hazards involved.
- Cleaning and user maintenance shall not be made by children without supervision.
- Children of less than 3 years should be kept away unless continuously supervised.
- Children aged from 3 years and less than 8 years shall only switch on/off the appliance provided that it has been placed or installed in its intended normal operating position and they have been given supervision or instruction concerning use of the appliance in a safe way and understand the
IM2021
hazards involved. Children aged from 3 years and less than 8 years shall not plug in, regulate and clean the appliance or perform user maintenance.
- CAUTION! Some parts of this product can become very hot and cause burns. Particular attention has to be given where children and vulnerable people are present. The radiator heats up to a very high temperature during operation. To avoid burns, do not touch hot surfaces with your hands and other parts of the body. Keep the radiator at least 0.9 m from furniture, pillows, bedding, paper, clothing, curtains, and other combustible items and materials. Allow the radiator to cool down before moving it. Use the built-in handle to move the radiator.
- Make sure that the power cord does not touch sharp edges or hot surfaces.
- If the device was at a temperature below 0^ C for some time, it must be kept at room temperature for at least 2 hours before turning it on.
- Do not attempt to repair the device or change its parts by yourself. To repair the product, contact an authorized service center.
- Do not use accessories that are not supplied.
- When disconnecting the appliance from the mains, do not pull on the power cord, grasp the plug. Do not twist and do not wind it on anything.
- ATTENTION! DO NOT COVER THE DEVICE while it is operating. Do not dry clothes or any other fabrics and materials on it. This can lead to overheating, failure, or significant damage to you and / or your property.
- This heater is filled with a certain amount of special oil. Repairs requiring opening the oil container should only be carried out by the manufacturer or his authorized service representative, who should be contacted in case of an oil leak.
- When disposing of the heater, follow the regulatory requirements for the disposal of oil.
- It is forbidden to install the device directly next to or under an electrical outlet or under a conducted electric cable. This can lead to overheating of them, which will create an emergency situation.
- Explanation of warning signs:

Caution! Hot surface

Attention! Do not cover
3. APPOINTMENT OF THE DEVICE
The electric oil-filled radiator is designed for full or additional heating of air and for creation of comfortable environment indoors during cold seasons (early spring, fall, winter). The radiator is very simple to operate, easy to install, and also has an increased heat transfer and an efficient air flow distribution.
4. SPECIFICATIONS
Specifications of the device are shown in Table 1.
Table 1
| Model | Units | SC21.1005S4 | SC21.1507S4 | SC21.2009S4 | SC21.2311S4 | SC21.1507S4B | SC21.2009S4B | SC21.2311S4B |
| Rated power consumption | W | 1000 | 1500 | 2000 | 2300 | 1500 | 2000 | 2300 |
| Power supply | V/Hz | 220-240~/50 | 220-240~/50 | 220-240~/50 | 220-240~/50 | 220-240~/50 | 220-240~/50 | 220-240~/50 |
| Rated current | A | 4.3 | 6,5 | 8.7 | 10 | 6,5 | 8.7 | 10 |
| Number of fins | - | 5 | 7 | 9 | 11 | 7 | 9 | 11 |
| Heating area | m^2 | 10-15 | 15-18 | 20-23 | 25-28 | 15-18 | 20-23 | 25-28 |
| Net weight | kg | 4.23 | 5,45 | 6,67 | 8,0 | 5,45 | 6,67 | 8,0 |
| Device dimensions | mm | 240x240x630 | 340x290x648 | 410x290x648 | 480x290x648 | 340x290x648 | 410x290x648 | 480x290x648 |
| Moisture protection class | - | Class I | Class I | Class I | Class I | Class I | Class I | Class I |
5. DEVICE DESCRIPTION

text_image
1 2 4 3 6 7 5Fig. 1*
*The appearance of the device may differ from the images in the manual
- Handle for moving
- Operation indicator
- Thermostat knob
- Power mode knob
- Wheels (included in delivery set)
- Front cover
- Radiator sections
6. DELIVERY SET
- Electric oil-filled radiator - 1 pc.
- Roller wheels, assembled - 2 pcs.
- U-shaped bracket - 2 pcs.
- Finger nut - 1 set
-
User manual - 1 pc.
-
Warranty card - 1 pcs.
- Packaging material - 1 pc.
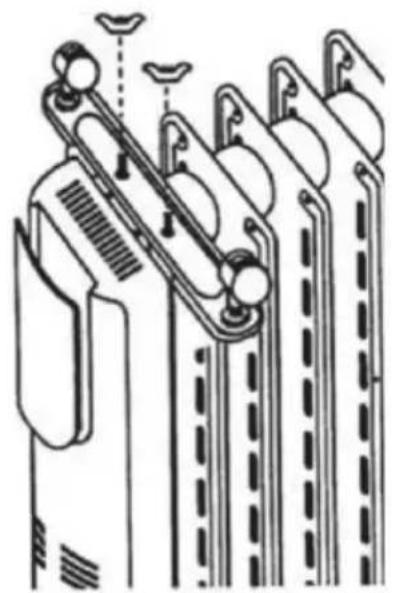
7. ASSEMBLY AND INSTALLATION
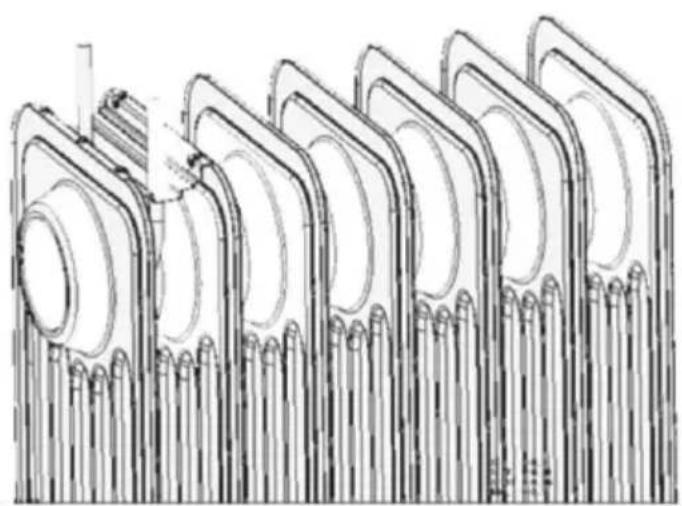
- Unpack the radiator and roller wheels and remove all the packaging material.
- Put the radiator upside down on a carpet or soft surface, to avoid damage to lacquer coating.
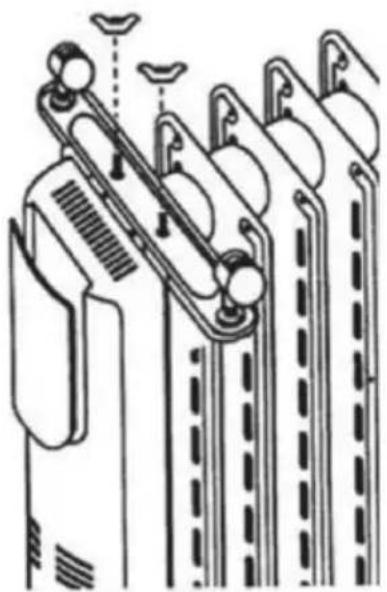
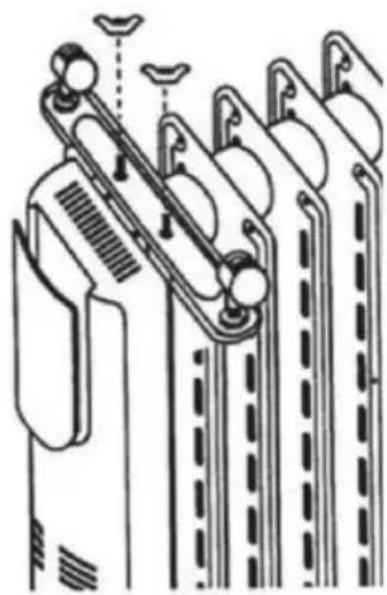
- Install wheel plates on the lower part of radiator sections using U-shaped brackets and finger nuts, into two fixed supports.
- Tighten two finger nuts on one side and two finger nuts on the other – in clamp extensions passed through the wheel plate supports, after making sure that 2 openings in the wheel plate match together with the clamp extensions (see Fig. 3).
- Turn the radiator back on the wheels.
natural_image
Technical line drawing of a multi-layered mechanical component or housing assembly (no text or symbols)Fig. 2
natural_image
Technical line drawing of a multi-layered mechanical or electrical component assembly (no text or symbols)Fig. 3
IMPORTANT!
- Switch on and operate the radiator only when it is in vertical position (with wheels below and control elements above). Any other position may cause a dangerous situation and result in failure of the oil-filled radiator or damage of property. The manufacturer will consider this as a non-warranty case.
- Do not switch the radiator on, if roller wheels are not installed.
- Before starting to use the device read section «Safeguards».
- Connect the unit's power cord to an electric outlet, observing all of the mentioned precautions. Remember that you can connect the unit to electric mains only if the
IM2021
power mode knob is in "0" position, which means the knob should be rotated against the stop counterclockwise.
- It is also preferable to turn the thermostat knob against the stop counterclockwise. Then you can connect the unit to electric outlet.
- Set the unit's power mode knob to position "I", "II" or "III" (low, medium and maximum heating power respectively). Remember that the higher heating power you choose, the faster the unit heats the air. But at a low power you save electric power and reduce the load on your electric mains.
- After you chose operating heating power, you need to choose heating temperature. Turning the thermostat knob clockwise (from MIN position to MAX position), you adjust the temperature you need. After you choose the temperature (and after you chose heating power mode, see 4.) the oil-filled radiator will start to heat.
- During the first minutes of radiator's operation you may fell a slight smell of burning. It may be caused by dust on the unit; it will soon disappear. If necessary, you can clean the unit, following rules in this manual and observing «Safeguards».
- When the room temperature will reach the desired level, you should slowly turn the thermostat knob counterclockwise (towards MIN). You will hear a click of the thermostat turning off, and the light on the control panel will go out. Now the room temperature will be maintained at the chosen level.
- If you need to reduce the room temperature, turn the thermostat knob counterclockwise. Also you can lower the unit's operating power (I or II).
- If you need to increase the room temperature, turn the thermostat knob clockwise (maximum possible position is MAX). Also you can increase the unit's operating power (II or III).
- To turn off the radiator, set the power mode knob to "0" position and disconnect the device from the mains by unplugging the plug from the outlet.
IMPORTANT!
For the correct operation of the unit, the level of voltage in electric mains must be sufficient in strict compliance with the technical parameters indicated on the unit. See the technical label, as well as all labels with special warnings, attached to the unit.
9. CLEANING AND MAINTENANCE OF THE UNIT
- Remember that you must clean the unit regularly to remove dust from the heating sections. Dust and dirt on the unit have a negative effect on the unit's operational efficiency. In some cases a smell of burning dust can cause a headache and nausea, as well as other negative health effects. Also a dirty unit cannot operate 100% effectively, temperature parameters of the room heating can be disrupted.
- Before cleaning of the unit, you must switch off the unit, unplug it from electric mains (see «Safeguards») and let the unit cool down.
-
Clean the unit's sections and other surfaces with a soft, slightly damp duster/cloth. The cloth must not leave fluff on the unit.
-
It is not recommended to use detergents, including materials containing abrasive elements.
- During cleaning, please, do not damage the unit with sharp objects (hard sponge, polishing paper, etc). Scratches on the painted surface can result in rusting.
- Switch on and use the unit again only after reading all «Safeguards»; also make sure that the unit is absolutely dry.
NOTE:
The color change of the sections is not a defect, but is a consequence of the operation of the device in a room with heavily polluted air.
10. TROUBLE SHOOTING
Possible malfunctions and solutions for them are indicated in table 2. If it is impossible to solve these malfunctions with these methods, contact the authorized service center.
Table 2
| Malfunction | Possible cause | Solution |
| The device is connected to the mains, operating mode is set to heating but device isn't working. | No power | Check whether the power supply is disconnected from the device and, if necessary, connect device to power supply |
| Electrical circuit of heating element malfunction | Contact an authorized service center | |
| Malfunction in circuit breaker | Change the circuit breaker | |
| Defective thermostat | Contact an authorized service center | |
| Defective heating element | ||
| Faulty temperature limiter | ||
| Power cord is broken | Contact an authorized service center to fix it | |
| Heating is not good enough | Low voltage in power network | Check power network |
| Low heating temperature is set on thermostat | Set the temperature higher on thermostat | |
| Defective heating element | Contact an authorized service center |
11. STORAGE
IM2021
Make sure that the appliance body and its heating element have cooled down before the appliance is dismantled and packed in its packaging for long-term storage.
Complete all requirements of chapter CLEAN AND CARE.
Reel on the power cord.
When the device is not in use for a long time, store it in a cool, dry place in the original cardboard box.
12. UTILIZATION RULES
After the lifetime of the device expires, it should be recycled in compliance with the laws, rules and methods in region of recycling. Detailed information about the recycling of the device, you can receive from a representative of the local authorities, after providing full information about the device. The manufacturer and authorized organization of the manufacturer do not carry responsibility for the fulfillment by the Buyer of the requirements of legislation on utilization and methods of utilization of the device selected by the Buyer. The lifetime of the device is indicated in the warranty card. Warranty period for the device and warranty terms are specified in the warranty card. The warranty card is an integral part of the documentation supplied with this unit. If there is no warranty card in the delivery set, ask for it from the Seller. The warranty card provided by the Seller must conform to the manufacturer's form.
The manufacturer and the authorized organization of the manufacturer remove responsibility for any possible harm which can be caused to people, animals or property directly or indirectly, if this harm occurred as a result of noncompliance with the rules and operating conditions, installation of the device, intentional or reckless actions of the user- and / or third parties, as well as in situations caused by natural and / or anthropogenic accidents.
Шановний покупець!
natural_image
Technical line drawing of a multi-layered mechanical component or housing assembly (no text or symbols)Малюнок 2

natural_image
Technical line drawing of a mechanical component with multiple grooves and mounting holes (no text or symbols)Малюнок 3
УВАГА!
natural_image
Technical line drawing of a multi-layered mechanical component or housing assembly (no text or symbols)2-cypet
natural_image
Technical line drawing of a multi-layered mechanical device with no visible text or symbols3-cypet