177SS7V - Juicer Avantco - Free user manual and instructions
Find the device manual for free 177SS7V Avantco in PDF.

User questions about 177SS7V Avantco
0 question about this device. Answer the ones you know or ask your own.
Ask a new question about this device
Download the instructions for your Juicer in PDF format for free! Find your manual 177SS7V - Avantco and take your electronic device back in hand. On this page are published all the documents necessary for the use of your device. 177SS7V by Avantco.
USER MANUAL 177SS7V Avantco
natural_image
Line drawing of a vertical industrial press device with a cylindrical chamber and two connected pipes (no text or symbols)Stainless Steel Sausage Stuffers
Models: 177SS7V, 177SS11V, 177SS15V
11/2019
Please read and keep these instructions. Indoor use only.
General Safety Regulations
WARNING: The warnings, cautions, and instructions discussed in this instruction manual cannot cover all possible conditions or situations that could occur. It must be understood by the operator that common sense and caution are factors that cannot be built into this product, but must be supplied by the operator.
Please use this machine according to these cautions. The user should understand all rules. Please carefully read them before you operate the machine. This machine may cause harm to the health of the operator if the user removes or changes equipment in the machine.
We are not responsible for any injuries resulting from improper operation of this machine. Please operate according to "Operation Method" instructions and follow the proper operation procedures while using. Take care while assembling and operating, in order to avoid scratching skin. Please read the instruction manual.
- CHECK FOR DAMAGED PARTS. Before using the stuffer, check that all parts are operating properly and perform the intended functions. Check for binding of moving parts, mounting and any other conditions that may affect the operation.
- The Manufacturer declines any responsibility in the case of improper use of the stuffer. Improper use of the stuffer will VOID the warranty.
- Repair must be done by an authorized dealer. Use only factory original parts and accessories. Modification of the stuffer will VOID the warranty.
- Be sure the stuffer is stable during use.
- NEVER operate the stuffer with the gear housing cover open or removed.
- WEAR EYE PROTECTION! Everyday eye glasses are not safety glasses. Safety glasses conform to ANSI Z87.1 requirement. Note: Approved safety glasses have Z87 printed or stamped on them.
- Do not use outdoors
• SAVE THESE INSTRUCTIONS
Assembly and Installation
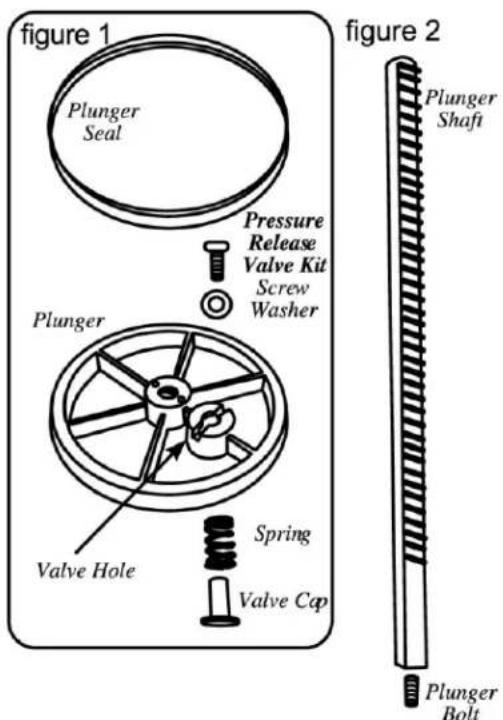
PLUNGER ASSEMBLY
- Slide the Plunger Seal onto the Plunger (figure 1).
- Assemble the Pressure Release Valve Kit onto the Plunger. From the top of the Plunger, place the Washer onto the Valve Hole, then insert the Screw through the Washer and into the Valve Hole. From the underside of the Plunger, place the Spring onto the end of the Screw, then place the Valve Cap onto the end of the Screw and twist to secure.
- Screw the Plunger Bolt onto the Plunger Shaft (figure 2).
- Place the assembled Plunger onto the end of the Plunger Shaft (figure 3).
STUFFER ASSEMBLY
- Attached the Handle by sliding it onto either the Fast or the Slow Gear (figure 4).
- Crank the Handle to bring the Plunger to the top of the Stuffer.
...continued on next page
text_image
figure 1 Plunger Seal Pressure Release Valve Kit Screw Washer Plunger Valve Hole Spring Valve Cap figure 2 Plunger Shaft Plunger Bolt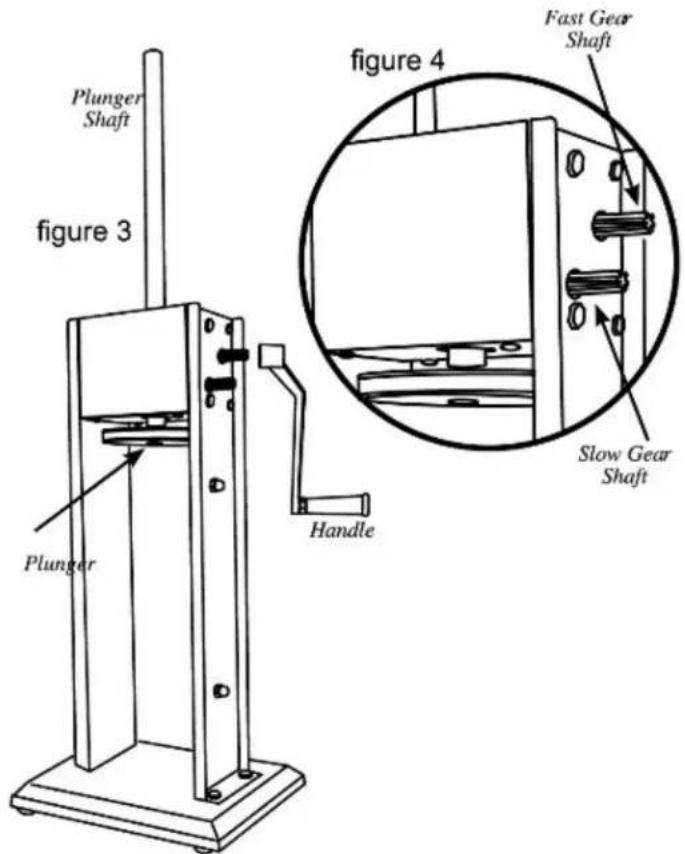
text_image
Plunger Shaft figure 3 Plunger Handle Figure 4 Fast Gear Shaft Slow Gear ShaftUser Manual
AVANTCO EQUIPMENT
STUFFER ASSEMBLY continued
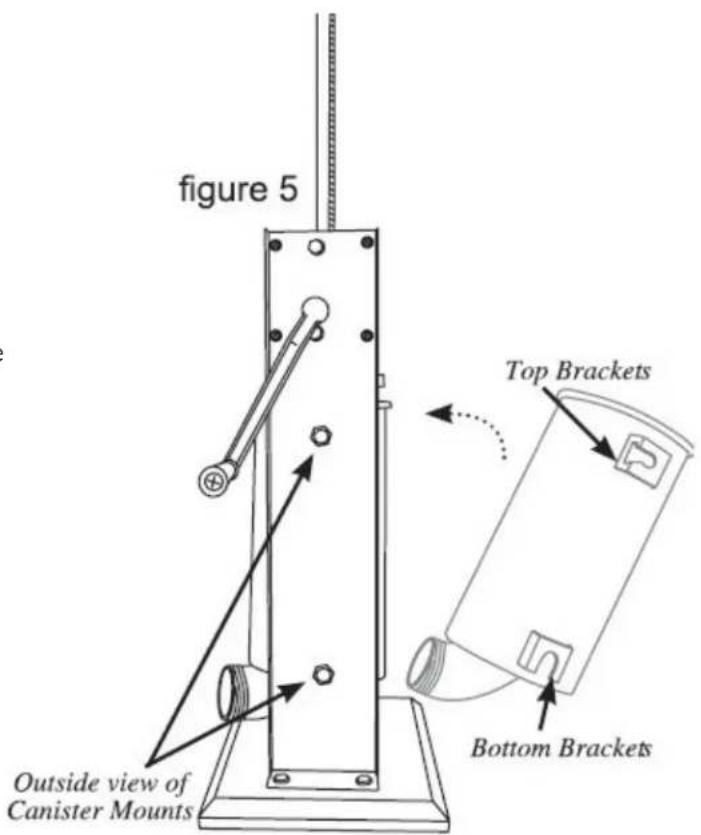
- Rest Canister's Bottom Brackets onto the Canister Mounts inside the Housing of the Stuffer. Pivot the Canister fully into the Stuffer Housing, snapping the Top Brackets into the Canister Mounts (figure 5).
- Insert the Stuffing Funnel of choice through the Front Ring Nut. Screw the Front Ring Nut and Stuffing Funnel onto the mouth of the Canister until snug. DO NOT OVERTIGHTEN the Front Ring Nut, as it may damage the Funnel. (figure 6)
- Thoroughly coat the inside of the Canister with a food-grade lubricant prior to use. (figure 7)
text_image
figure 5 Outside view of Canister Mounts Top Brackets Bottom Brackets
text_image
Figure 6 Front Ring Nut Mouth of the Canister Funnel
text_image
figure 7 U POTATO DRAGON FUSCONE DRAGON DRAGONDisassembly and Cleaning
NOTE: BE SURE TO CLEAN ALL PARTS IMMEDIATELY AFTER USE.
- Remove the Stuffing Funnel by unscrewing the Front Ring Nut, and pulling the Funnel out.
- Tum the Handle until the Plunger comes up and out of the Canister.
- Pivot the Canister outward, then pull the Canister up to remove the Canister from the Stuffer Housing.
- Unscrew the Plunger from the Plunger Shaft.
- Disassemble the pressure release valve from the plunger.
- Remove the plunger seal from the plunger.
- Wash all parts that have come in contact with meat in hot soapy water.
- Rinse and thoroughly dry all parts immediately.
- Sterilize as needed.
- Fully lubricate the Shaft, Canister, Pressure-Release Valve components and the Front Ring Nut with a food-grade lubricant before and after each use.
User Manual
AVANTCO EQUIPMENT
Stuffing Instructions
CAUTION! When the plunger is pulled out of the Canister, RELEASE THE HANDLE SLOWLY! Pressure or gravity could cause the Handle to spin back slightly and cause injury.
NOTE: Apply a food-grade lubricant to the inside of the Canister before filling with the meat mixture.
- Tilt out the Canister
- Fill the Canister with the meat and seasoning mixture (figure 8).
- Press the mixture down into the Canister firmly to release any trapped air.
- Pivot the Canister back into the upright position and snap the Top Brackets onto the Canister Mounts.
- Turn the Handle until the Plunger comes in contact with the meat and the mixture is ready to extrude out the end of the Stuffing Funnel
- Slip a casing on the end of the Stuffing Funnel until the entire casing has slid onto the Funnel.
- Tie, twist or hog ring the end of the casing to seal it.
- Turn the Handle to extrude the mixture into the casing.
- For best results, apply pressure around the casing, close to the end of the Stuffing Funnel. This will hold the casing tight and will cause the mixture to pack firmly into the casing.
- When the end of the casing has been reached, tie, twist or hog ring the end of the casing to seal the contents inside.
STUFFING TIPS:
The following are suggestions to help reduce the resistance when stuffing with the 13 mm Stuffing Funnel.
A. Add up to 1½ cups (400mL) of water per every 5 lb.
(2.3 kg) of seasoned meat.
B. Add ¼ cup (60ml) of vegetable or olive oil per every 5
lb. (2.3 kg) of seasoned meat for better flow.
Fast Gear Shaft
With the Handle attached, turn clockwise to raise the Plunger; counter-clockwise to lower the Plunger

text_image
ached, se the lockwise r Slow Gear Shaft With the HandleSlow Gear Shaft
With the Handle
attached, turn counterclockwise to raise the Plunger; clockwise to lower the Plunger

text_image
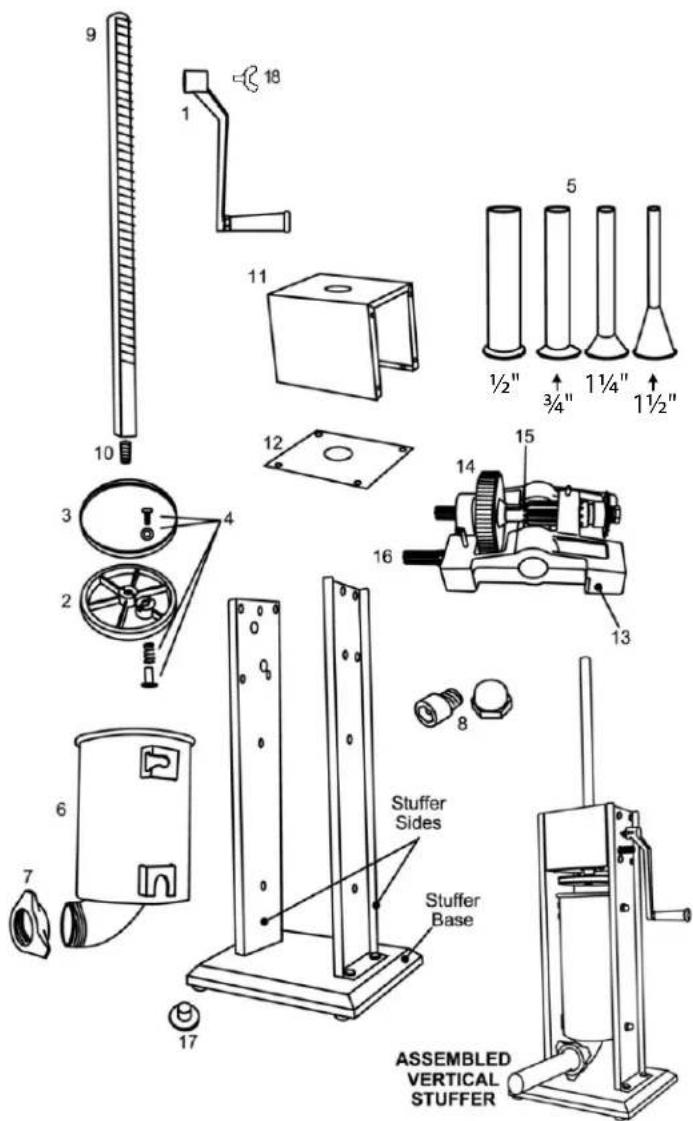
figure 8 CanisterExploded Diagram and Parts List
Part # Description
| 1 Handle | |
| 2 Plunger | |
| 3 Plunger | Seal |
| 4 Pressure | Release Valve (4 Piece Set) |
| 5 Stainless | Steel Funnel Set (4 Funnels) |
| 6 Stainless | Steel Canister |
| 7 Front Ring Nut | |
| 8 Canister | Mounting Hardware Kit (4 Sets) |
| 9 Plunger | Shaft |
| 10 Plunger | Bolt |
| 11 Gear | Housing Cover with Hardware Kit |
| 12 Gear | Housing Cover Bottom Plate with Hardware Kit |
| 13 Gear | Housing with Hardware Kit |
| 14 Main | Driving Gear |
| 15 Slow | Speed Control Gear |
| 16 Fast | Speed Control Gear |
| 17 Rubber | Foot (4 Piece Set) |
| 18 Butterfly | Screw |
text_image
9 18 1 11 10 12 5 1½" 3/4" 1¼" 1½" 16 14 13 8 Stuffer Sides Stuffer Base 7 6 7 17 ASSEMBLED VERTICAL STUFFEREquipment Limited Warranty
Avantco warrants its equipment to be free from defects in material and workmanship for a period of 1 year. This is the sole and exclusive warranty made by Avantco covering your Avantco brand equipment. A claim under this warranty must be made within 1 year from the date of purchase of the equipment. Only the equipment's original purchaser may make a claim under this warranty. Avantco reserves the right to approve or deny the repair or replacement of any part or repair request. The warranty is not transferable. Avantco Equipment installed in/on a food truck or trailer will be limited to a period of 30 days from the original date of purchase.
To Make a Warranty Claim:
For Warranty Inquiries contact the location where you purchased the product:
- WebstaurantStore.com: Contact help@webstaurantstore.com. Please have your order number ready.
- The Restaurant Store: If you purchased this unit from your local store, please contact your store directly.
• TheRestaurantStore.com: Online purchases, call 717-392-7261. Please have your order number ready.
Failure to contact the designated location prior to obtaining equipment service may void your warranty.
Avantco makes no other warranties, express or implied, statutory or otherwise, and HEREBY DISCLAIMS ALL IMPLIED WARRANTIES, INCLUDING THE IMPLIED WARRANTIES OF MERCHANTABILITY AND OF FITNESS FOR A PARTICULAR PURPOSE.
This Limited Warranty does not cover:
• Equipment sold or used outside the Continental United States
- Use of unfiltered water (if applicable)
- Avantco has the sole discretion on wearable parts not covered under warranty
• Equipment not purchased directly from an authorized dealer
• Equipment used for residential or other non-commercial purposes
• Equipment that has been altered, modified, or repaired by anyone other than an authorized service agency
- Equipment where the serial number plate has been removed or altered.
- Damage or failure due to improper installation, improper utility connection or supply, and issues resulting from improper ventilation or airflow.
- Defects and damage due to improper maintenance, wear and tear, misuse, abuse, vandalism, or Act of God.
Any action for breach of this warranty must be commenced within 1 year of the date on which the breach occurred. No modification of this warranty, or waiver of its terms, shall be effective unless approved in a writing signed by the parties. The laws of the Commonwealth of Pennsylvania shall govern this warranty and the parties' rights and duties under it. Avantco shall not under any circumstances be liable for incidental or consequential damages of any kind, including but not limited to loss of profits.