
CMA1L2U - Coffee machine Avantco - Free user manual and instructions
Find the device manual for free CMA1L2U Avantco in PDF.


| Product Type | Commercial Coffee Machine (Decanter Brewer) |
| Brand | Avantco |
| Model | CMA1L2U (177CMA1L2U) |
| Voltage | 120V |
| Wattage | 1650W |
| Number of Warmers | 3 |
| Brew Method | Automatic drip with pour-over capability |
| Control Type | Push-button brew, individual warmer switches |
| Indicator Lights | Filling and Heating |
| Water Connection | Plumbed direct (20-90 psi water pressure) |
| Water Filtration | Recommended (C Pure Oceanloch-L system) |
| Material | Stainless steel |
| Brew Cycle | Automatic, water flows after approximately 30 seconds |
| Cleaning | Daily with Klearly Koffee; deliming every 6 months |
| Spare Parts | Available (see parts list in manual) |
| Warranty | Limited (details in manual) |
| Safety Features | Grounded plug, hot surface warnings, do not immerse |
| Funnel Type | Removable, uses paper coffee filters |
| Intended Use | Commercial indoor only |
Frequently Asked Questions - CMA1L2U Avantco
User questions about CMA1L2U Avantco
0 question about this device. Answer the ones you know or ask your own.
Ask a new question about this device
Download the instructions for your Coffee machine in PDF format for free! Find your manual CMA1L2U - Avantco and take your electronic device back in hand. On this page are published all the documents necessary for the use of your device. CMA1L2U by Avantco.
USER MANUAL CMA1L2U Avantco
natural_image
Exterior view of a Avantco coffee maker with control panel and side-view diagrams (no text or symbols on main body)Automatic Coffee Makers

Intertek
3154156

LISTED
89GF
Models: 177CMA1B, 177CMA2B, 177CMA1L2U, 177CMA3L, 177CMAPADJ
2/2023
Please read and keep these instructions. Indoor use only.
User Manual
AVANTCO ^EQUIPMENT
Index
Important Safety Information.... 3
Installation 4
Operation....5
Cleaning 6
Decanter Brewers Parts Diagrams & List....7-10
177CMAPADJ Parts Diagram & List 11-12
Equipment Limited Warranty.... 13
Important Safety Information
- This appliance is designed for commercial use only.
- This appliance must be placed on a level surface able to adequately support its weight.
- Users should not leave the appliance unattended while it is in operation.
- Never immerse the appliance in water.
- Do not unplug the appliance if your hands are wet.
- Do not unplug the appliance by pulling the cord.
- Do not attempt to repair or replace the power cord if it becomes damaged. Contact a qualified service agent.
- While the appliance is in use, some parts will become very hot. Ensure that the cord does not come in contact with any hot parts.
- Be careful not to touch any hot surfaces.
- Do not allow empty decanters to sit on the hot plate.
- Do not plug in or energize this appliance until installation directions are read and followed.
- Be careful not to touch any hot surfaces. Hot surfaces include, but are not limited to, burners, appliance surfaces, brew chamber, and servers.
- Ensure all operators of the appliance are familiar with all instructions and warnings.
- Brewer must be properly grounded to avoid shock hazard.
- Use appliance only for intended purpose.
- Please keep this manual with appliance.
| 177CMA1B 177CMA2B 177CMA1L2U 177CMA3L 177CMAPADJ | |||||
| Warmers 1 2 3 3 -- | |||||
| Server | decanter | decanter | decanter | decanter | airport |
| Voltage | 120V | 120V | 120V | 120V | 120V |
| Wattage | 1550W | 1650W | 1650W | 1650W | 1450W |
User Manual
AVANTCO ^EQUIPMENT
Installation
As stated in the warranty, poor water quality will void warranty. Whenever installing new plumbed in equipment, water should be tested and new water filtration cartridge/system installed by a certified technician. Avantco recommends item 790OCLOKITL from C Pure
- Position the brewer on a sturdy, level surface.
- Connect the brewer to a water source with a water pressure between 20 and 90 psi using a 12 connection.
- Plug the brewer into a power source with the correct voltage.
- Place empty glass decanter or airport under the funnel.
- Turn the brewer on and press the brew button.
- The filling indicator will light up.
- Hot water should start to flow into the pot after approximately 30 seconds.
- Repeat steps 4-7 twice to clean the internal parts of the brewer before brewing coffee for the first time.
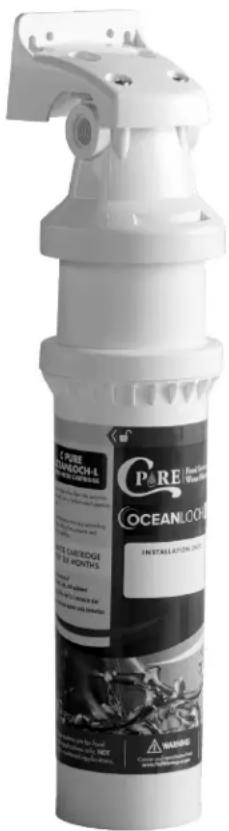
790OCLOKITL
C Pure Oceanloch-L Water Filtration
System - 1 Micron Rating and 1.67 GPM
Operation
Controls
- Power Switch – Controls power to the entire brewer
- Brew Button – Begins brew cycle with one push (177CMAPADJ offers two brew settings)
- Filling Indicator Light – Shows that the tank is filling with water
- Heating Indicator Light – Shows the water is heating in preparation to begin brew cycle
- Warmer Switches – Each switch controls 1 warmer. On/Off setting
Decanter Brewers
- Remove the funnel and insert a paper coffee filter.
- Add the appropriate amount of coffee grounds and level across filter. Return the funnel to its correct position.
- Make sure the empty decanter is positioned correctly under the funnel.
- Turn the power switch on.
- Press the Brew button.
- Coffee will start to flow into the pot in approximately 30 seconds.
- When the Heating indicator turns off, the brew cycle has completed.
- Do not remove the server until the coffee stops flowing.
- Dispose of used coffee grounds and filter.
- Rinse the funnel.
- To brew a second batch wait until filling and heating lights are off and restart from step 1.
Airpot Brewer - 177CMAPADJ
- Remove the funnel and insert a paper coffee filter.
- Add the appropriate amount of coffee grounds and level across filter. Return the funnel to its correct position.
- Make sure the empty airport or server is positioned correctly under the funnel.
- Turn the power switch on.
- Press the brew switch to the desired batch size.
- Coffee will start to flow into the pot in approximately 30 seconds.
- When the Heating indicator turns off, the brew cycle has completed.
- Do not remove the server until the coffee stops flowing.
- Dispose of used coffee grounds and filter.
- Rinse the funnel.
- To brew a second batch wait until filling and heating lights are off and restart from step 1.
Using Pour-over Mode (All models)
- Follow above steps 1-4 (Do not press the brew button or toggle the brew switch).
- Fill pour-over basin with appropriate amount of water.
- Water from the basin will displace the same amount of water from the heated tank. The hot water will go into the brew head and spray over the grounds. Coffee will begin to brew into the below container.
- When the flow and dripping stops, the coffee is ready to serve.
- Follow steps 9-11.
Cleaning
Regular cleaning ensures long life. For dirt or smudges on the brewer's exterior, a damp cloth will suffice. If necessary, a non-corrosive, non-abrasive detergent or cleaner may be used. Be sure to unplug the appliance before cleaning. Check and clean the sprayhead ensuring the holes remain open to provide optimal brewing.

Klearly Koffee is a simple, easy-to-use product that should be used daily to remove or prevent oil residue and mineral build-up, which turns rancid, causing bitter tasting coffee or tea.
Directions for Cleaning Glass Decanters
Use daily for best results
- Shake bottle. Apply 3-4 squirts (approx. 1/4 oz. per 1 gal. of liquid) of Klearly Koffee into the decanters (not included). Add very hot water (not boiling).
- Use a carafe brush for best results on tough stains.
- Empty solution and rinse vessel thoroughly with clean, warm water. Air dry or wipe clean before next use.
The Importance of Deliming
To prolong your coffee brewer's life and maintain a consistent, quality product, regular deliming is recommended. When hard water is heated, minerals are left behind which can inhibit optimum performance. You should perform the following deliming process at least every 6 months. If your water is extremely hard, monthly deliming is recommended.
Deliming Procedure
- Mix 10 oz. of fresh or condensed lemon juice with 32 oz. of water and pour it into the water reservoir.
- Make sure an empty decanter is underneath the funnel, and turn the unit "ON" as if you are brewing a pot of coffee.
- If the brewer has stopped working, the use of a delimming spring (sold separately) may be necessary to loosen lime deposits in the spray head.
- After the brewer has completed its cycle, turn it "OFF" and empty the decanter.
- Run two or three brewing cycles of plain water through the machine to rinse out all traces of the lemon water solution before brewing more coffee.
If the brewer suddenly stops working during a normal brewing cycle, deliming may be necessary.

natural_image
Pure diagram of a coiled wire or filament without any text, numbers, or symbols20" Deliming Spring
This deliming spring fits into the sprayhead opening of pour-over coffee makers to loosen lime deposits. Made of stainless steel. Sold separately.
177CMA1B Parts Diagram


natural_image
Line drawing of a simple electrical device with a top panel and base, connected to a cable (no text or symbols)User Manual
AVANTCO ^EQUIPMENT
177CMA2B Parts Diagram


natural_image
Line drawing of a mechanical device with two circular ports and a central cabinet (no text or symbols)177CMA1L2U Parts Diagram


natural_image
Isometric line drawing of a mechanical device with two circular ports and a central rectangular block (no text or symbols)Decanter Brewers Spare Parts List
| # DESCRIPTION VENDOR # | ||
| 1 | Foot NUB001 | |
| 2 | Bottom Cover NUB002 | |
| 3 | Base Frame NUB003 | |
| 5 | Relay NUB005 | |
| 6 | Relay Holder NUB006 | |
| 7 | Wire Clip NUB007 | |
| 8 | Power Cord + Plug NUB008 | |
| 11 | Inflow Pipe NUB011 | |
| 12 | Boiler Tank NUB012 | |
| 14 | Main Heater NUB014 | |
| 15 | Sealing Ring Of Boiler | NUB015 |
| 16 | Lid Of Boiler Tank | NUB016 |
| 17 | Outflow Pipe | NUB017 |
| 18 | Auto Thermostat | NUB018 |
| 19 | Manual Thermostat | NUB019 |
| 21 | Fever Partition | NUB021 |
| 22 | Mica Warming Plate Holder | NUB022A |
| 23 | Mica Warming Plate | NUB023A |
| 24 | Warming Plate | NUB024 |
| 28 | Lid Of Water Reservoir | NUB028 |
| 29 | Net Of Water Entrance | NUB029 |
| 31 | Upper Cover | NUB031 |
| 32 | Waterproof Panel | NUB032 |
| # DESCRIPTION VENDOR # | ||
| 34 | Water Reservoir | NUB034 |
| 36 | Indicator (Red) | NUB036A |
| 36 | Indicator (Green) | NUB036B |
| 37 | Upper Frame | NUB037 |
| 38 | Screw of Sprinkler | NUB038 |
| 39 | Sealing Ring of Sprinkler | NUB039 |
| 40 | Sprinkler Holder | NUB040 |
| 41 | Sprinkler | NUB041 |
| 42 | Power Switch Single | NUB042A |
| 45 | Body Frame | NUB045 |
| 46 | Rear Cover | NUB046 |
| 47 | SS Filter Bowl | NUB047 |
| 48 | Filter Supporter of Filter Bowl | NUB048 |
| 49 | Upper Panel | NUB049 |
| 50 | Lower Panel | NUB050 |
| 51 | Solenoid Valve | NUB051 |
| 52 | Solenoid Fixer | NUB052 |
| 53 | Level Switch | NUB053 |
| 54 | Elbow in Tank | NUB054 |
| 55 | Inflow Pipe NUB055 | |
| 57 | Push Switch | NUB057 |
| 58 | Solenoid Valve Holder | NUB058 |
| 59 | Double Float Switch | NUB059 |
177CMAPADJ Parts Diagram
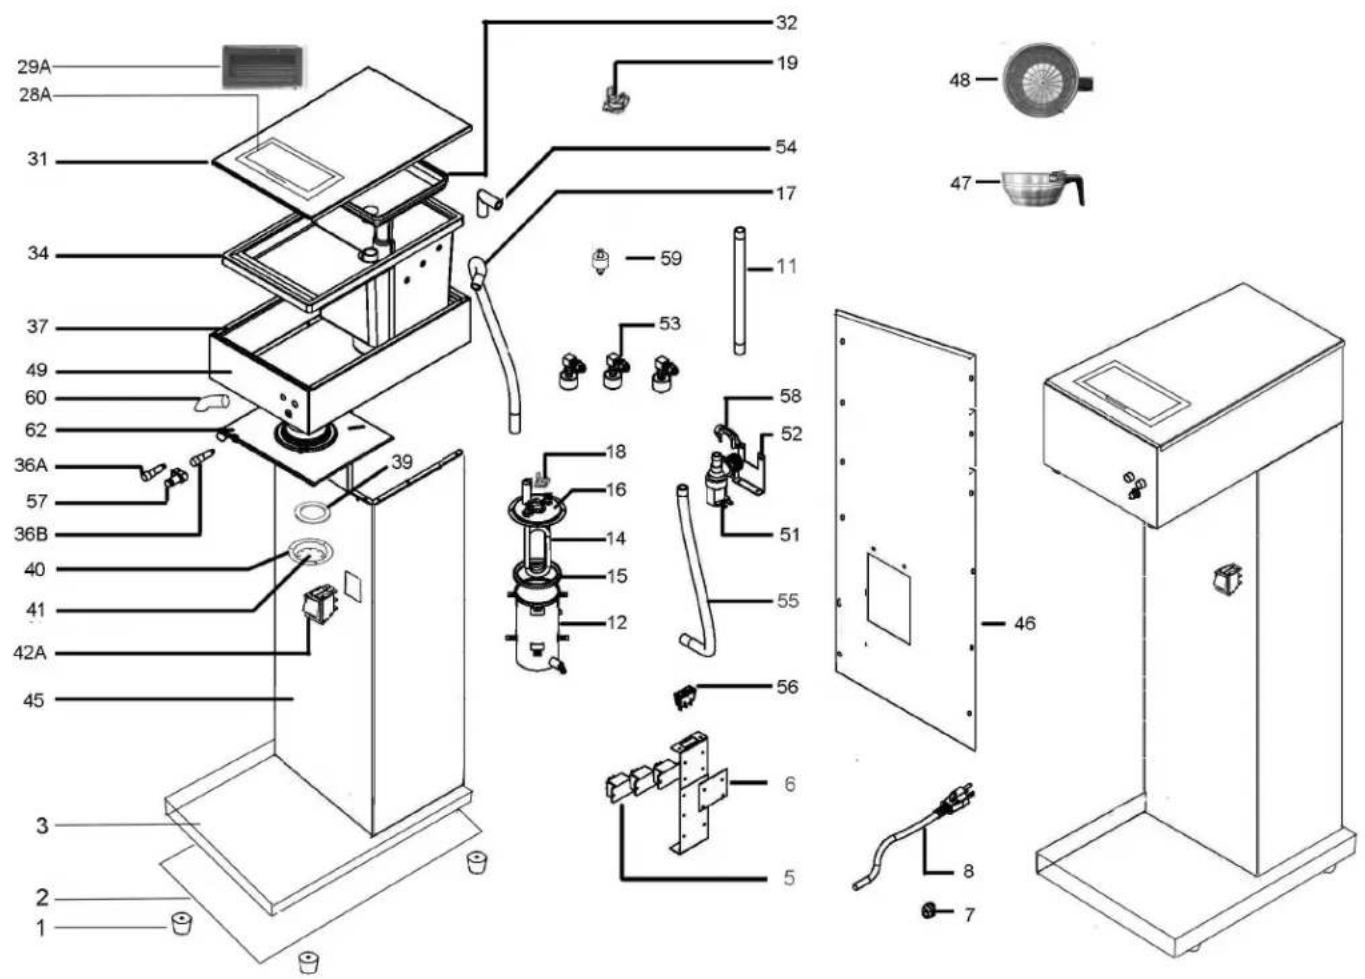
177CMAPADJ Spare Parts List
| # DESCRIPTION VENDOR # | ||
| 1 | Foot NUB001 | |
| 2 | Bottom Cover NUB002 | |
| 3 | Base Frame NUB003 | |
| 5 | Relay NUB005 | |
| 6 | Relay Holder NUB006 | |
| 7 | Wire Clip NUB007 | |
| 8 | Power Cord + Plug NUB008 | |
| 11 | Inflow Pipe 10x15x300mm NUB011 | |
| 12 | Boiler Tank | NUB012 |
| 14 | Main Heater | NUB014 |
| 15 | Sealing Ring Of Boiler | NUB015 |
| 16 | Lid Of Boiler Tank | NUB016 |
| 17 | Outflow Pipe 10x15x375mm | NUB017 |
| 18 | Auto Thermostat 105°C | NUB018 |
| 19 | Manual Thermostat 145°C | NUB019 |
| 28 | Plastic Lid of Water Reservoir | NUB028 |
| 29 | Net Of Water Entrance | NUB029 |
| 31 | Upper Cover NUB031 | |
| 32 | Waterproof Panel (SS) | NUB032 |
| 34 | Plastic Water Reservoir | NUB034 |
| 36 | Indicator (Red) | NUB036A |
| 36 | Indicator (Green) | NUB036B |
| # DESCRIPTION VENDOR # | ||
| 37 | Upper Frame | NUB037 |
| 39 | Sealing Ring of Sprinkler | NUB039 |
| 40 | Sprinkler Holder | NUB040 |
| 41 | Sprinkler | NUB041 |
| 42 | Power Switch Single (black) | NUB042A |
| 45 | Body Frame | NUB045 |
| 46 | Rear Cover | NUB046 |
| 47 | Filter Pan | NUB047 |
| 48 | Spring | NUB048 |
| 49 | Upper Panel | NUB049 |
| 51 | Solenoid Valve | NUB051 |
| 52 | Solenoid Fixer | NUB052 |
| 53 | Level Switch 2.2L/2.5L/2.6L | NUB053 |
| 54 | Elbow in Tank 10x40x40mm | NUB054 |
| 55 | Solenoid Inflow Pipe 10x15x330 | NUB055 |
| 56 | Shift Switch of Capacity | NUB056 |
| 57 | Push Switch | NUB057 |
| 58 | Solenoid Valve Holder | NUB058 |
| 59 | Float Switch | NUB059 |
| 60 | Elbow-out | NUB060 |
| 62 | Sprinkler Cover | NUB062 |

- Automatic Coffee Makers
- User Manual
- AVANTCO EQUIPMENT
- Index
- Important Safety Information
- Installation
- 790OCLOKITL
- Operation
- Controls
- Decanter Brewers
- Airpot Brewer - 177CMAPADJ
- Using Pour-over Mode (All models)
- Cleaning
- Directions for Cleaning Glass Decanters
- Use daily for best results
- The Importance of Deliming
- Deliming Procedure
- 20" Deliming Spring
- 177CMA1B Parts Diagram
- 177CMA1L2U Parts Diagram
- Decanter Brewers Spare Parts List
- 177CMAPADJ Spare Parts List
Brand : Avantco
Model : CMA1L2U
Category : Coffee machine