Envision 16 - Fitness Equipment True - Free user manual and instructions
Find the device manual for free Envision 16 True in PDF.

User questions about Envision 16 True
0 question about this device. Answer the ones you know or ask your own.
Ask a new question about this device
Download the instructions for your Fitness Equipment in PDF format for free! Find your manual Envision 16 - True and take your electronic device back in hand. On this page are published all the documents necessary for the use of your device. Envision 16 by True.
USER MANUAL Envision 16 True
text_image
TRUE QUICK START WORKOUT FINDER COMMON TO Apple Watch NFC CAUTION Less of injury is persistent. To avoid injury, one website cancer should explicitly mention or of all existing issues. Read investigation instead before using. To reduce the risk of injury from missing parts - playing before unskilling. WARNING! What life is something unknown only to the unknowns. One unknown may result in serious injury or death. If you have have step-breaking immaturity. This voluntary training environment is not available for high auxiliary programs. WARNING! Of what proper instruction prior to using this equipment, however, it's important because we think maintaining if you had later, when it's about of problems, there is no need to use. When the equipment, keep time of all missing parts. Failure in the appropriate condition could result in serious injury.All products shown are prototype. Actual product delivered may vary.
Product specifications, features & software are subject to change without notice.
For the most up-to-date owner's manual please visit www.truefitness.com.
For documents in additional languages please visit www.truefitness.com/resources/document-library/
IMPORTANTE:
A MESSAGE TO OUR CUSTOMERS
Frank Trulaske began TRUE Fitness ^® over thirty-five year ago with the simple philosophy of delivering superior fitness products, service, and support. Today, TRUE is the global leader in premium fitness equipment for the commercial and residential markets. Our goal is to be the leader in technology, innovation, performance, safety and style. TRUE has received many awards for its product over the years and remains the benchmark for the industry. Fitness facilities and consumers invest in TRUE products for their durable commercial platforms used in all its products, both commercial and residential alike.
The proud manufacturing tradition of quality and the culture of innovation at TRUE have given rise to a full line of extraordinary cardio and strength equipment. As a result, people all over the world are benefiting from the TRUE experience. Innovation across the full product line has made TRUE successful and is a trademark of the TRUE heritage. TRUE's patented Heart Rate Control technology is just one of the remarkable ways we deliver simple and superior performance every user can enjoy, and most importantly, use to achieve personal health and fitness goals.
At the heart of our success is the relentless and systematic life testing of both our products and their components. We have dedicated employees who understand our philosophy is to deliver the best products in the world.
Our goal is to deliver the world's best premium equipment for our customers' health and fitness solutions.
Chapter 1: Safety Instructions
Safety Instructions....5
Chapter 2: Product Overview
Envision ^16 Overview....9
Touchscreen Introduction....10
Touchscreen Navigation....10
Chapter 3: Programming & Operation
Heart Rate Monitoring 11
Heart Rate Control....12
Workout Program Descriptions....13
Chapter 4: Envision ^16 Touchscreen Console
Touchscreen Navigation 16
TV Controls 23
Incline/Speed Graph 24
Web Browser 25
Outside Interactive Videos....26
Idle Screen 27
Workout Summary......27
TV Cabling Requirements for TRUE Fitness Equipment....28
Samples of Connectivity Ports on TRUE Products....28
TV Solution Options....29
Internet Requirements....30
Broadcastvision TV Preset Programming 30
Maintenance Menus....31
Apple GymKit Technology....39
Console Assembly 40
Chapter 5: Customer Service
Contacting Service 41
Contacting Sales 41
Reporting Freight or Parts Damage 42
Warranty 42
CHAPTER 1: SAFETY INSTRUCTIONS
IMPORTANT SAFETY INSTRUCTIONS
SAVE THESE SAFETY INSTRUCTIONS
This equipment is intended for a commercial or institutional setting. This owner's manual should be accessible to all personal trainers, faculty, and members.

WARNING: ALL EXERCISERS MUST READ ALL INSTRUCTIONS BEFORE USING THE EQUIPMENT.

WARNING: Heart rate monitoring systems may be inaccurate for some individuals. Over-exercising result in serious injury or death. If you feel faint, stop exercising immediately.

WARNING: Equipment should be immediately taken out of use if it fails to work properly or when a ping is presented electronically.
TRUE STRONGLY recommends seeing a physician for a complete medical exam before undertaking an exercise program, particularly if the user has a family history of high blood pressure or heart disease, is over the age of 45, smokes, has high cholesterol, is obese or has not exercised regularly in the past year. Additionally, TRUE recommends consulting a fitness professional on the correct use of this product. If at any time while exercising the user experiences faintness, dizziness, pain or shortness of breath, he or she must stop immediately.

WARNING: To reduce the risk of electrical shock, always unplug this TRUE product before cleaning empting any maintenance activity. Do not handle the plug with wet hands.

WARNING: To reduce the risk of burns, fire, electric shock, or injury, it is imperative to connect each product to a properly grounded 110V electrical outlet. A risk of electrical shock may result from improper connection of the equipment's grounding conductor. Check with a qualified electrician if you are unsure about proper ground techniques. Do not modify the plug provided wiht this product. If it will not fit an electrical outlet, I have a proper outlet installed by a qualified electrician. Your TRUE Fitness product must be properly grounded to reduce risk of shock if the equipment malfunctions. Your equipment is equipped with an electrical cord, which includes an equipment grounding conductor and a grounding plug. The plug must be inserted into an outlet that has been properly installed and grounded in accordance with all local codes and ordinances. A temporary adapter cannot be used to connect this plug to a two-pole receptacle in North America. If a properly grounded 15 amp outlet is not available, a qualified electrician must install one.

WARNING: Do not move the equipment by lifting the console. Do not use the console as a handlebar during a workout.

WARNING: This product contains chemicals known to the state of California to cause cancer and birth defects or other reproductive harm.

WARNING: Keep equipment stable on flat ground.
CHAPTER 1: SAFETY INSTRUCTIONS

WARNING: Replace warning labels that may be worn, damaged, or missing.

WARNING: Replace any non-working or damaged components, remove the unit from service until repair is performed.

WARNING: To reduce the risk of burns, fire, and electric shock or injury to persons, follow these instructions:
• This appliance should never be left unattended when plugged in.
- Do not use any type of extension cord with this product.
- Unplug it from the outlet when not in use and before any servicing.
- Do not operate the equipment while being covered with a blanket, plastic, or anything that insulates or stops airflow.

WARNING: Risk of personal injury-crushing hazard when equipment is in operation - Keep feet, hands, and fingers away from moving parts.

CAUTION:
• Health related injuries may result from incorrect or excessive use of exercise equipment.
- Do not use typing or web surfing features at excessive speeds. Always stabilize yourself by holding a stationary handle when using typing or web surfing features. (Varies by console option)
- Do not use the contact heart rate grips as a handlebar during a workout.
- Any changes or modifications to this equipment could void the product warranty.
• To disconnect, turn power OFF at the ON/OFF switch if applicable, then remove plug from electrical outlet.
- Never operate a TRUE product if it has a damaged power cord or electrical plug, or if it has been dropped, damaged, or even partially immersed in water. Contact TRUE Customer Service for a replacement.
- Use a TRUE AC power cord or AC/DC adapter only.
* Note the plug configuration for the power adapter may vary by country.
- Position this product so the power cord plug is accessible to the user.
- Keep the power cord away from heated surfaces. Do not pull the equipment by the power cord or use the cord as a handle. Do not run the power cord along the side or under the equipment.
- If the electrical supply cord is damaged it must be replaced by the manufacturer, an authorized service agent, or a similarly qualified person to avoid a hazard.
- Do not use this product in areas where aerosol spray products are being used or where oxygen is being administered. Such substances create the danger of combustion and explosion.
• Always follow the console instructions for proper operation.
- Close supervision is necessary when used near children under the age of 15, or disabled persons.
- Do not use this product outdoors, near water, while wet, or in areas of high humidity including extreme temperature changes.
- Never operate a TRUE product with the air openings blocked. Keep air openings free of lint, hair or any obstructing material.
- When mounting the treadmill, ensure the treadmill belt is not running and then proceed with one step at a time to maintain balance using the handrails as needed.
- While the treadmill is in use, proceed at a speed that the user can safely maintain with the ability to immediately engage the safety key to stop the treadmill belt if necessary.
CHAPTER 1: SAFETY INSTRUCTIONS
CAUTION:
- Health related injuries may result from incorrect or excessive use of exercise equipment.
- Never insert objects into any openings in this product. If an object should drop inside, turn off the power, unplug the power cord from the outlet and carefully retrieve it. If the item cannot be reached, contact TRUE Customer Service.
- Never place liquids of any type directly on the unit except in the accessory tray or bottle holders. Containers with lids are recommended.
- Wear shoes with rubber or high traction soles. Do not use shoes with heels, leather soles, cleats or spikes. Make sure no stones are embedded in the soles. Do not use this product in bare feet. Keep all loose clothing, shoelaces and towels away from moving parts.
- Do not reach into or underneath the unit, or tip it on its side during operation.
- Use correct ergonomic positioning while running on equipment.
- Do not allow animals on or near the equipment while in operation.
- Use the side handrails whenever additional stability is required. In case of emergency, such as tripping, the side handrails should be grabbed and the user should place his/her feet on the side platforms. The front handlebars should be used to grasp the heart rate sensors or to rest the hand on while operating the activity zone keys, but not for stability, emergency, or continuous use.
- Do not exceed maximum user weight of 400 lbs (181 kg).
- Do not use if you have a cold or fever.
- When using this exercise machine, basic precautions should always be followed.
- Use this equipment only for its intended use as described in this manual.
- Do not use attachments not recommended by the manufacturer.
- Allow only trained personnel to service this equipment.
- Avoid the possibility of bystanders being struck or caught between moving parts by making sure that they are out of reach of the equipment while it is in motion.
- This appliance can be used by children aged from 8 years and above and persons with reduced physical, sensory or mental capabilities or lack of experience and knowledge if they have been given supervision or instruction concerning use of the appliance in a safe way and understand the hazards involved.
• Children shall not play with the appliance. - Cleaning and user maintenance shall not be made by children without supervision.
- Allow only one person at a time on the equipment while it's operating.
- It is the sole responsibility of the owner/operator to ensure regular and scheduled maintenance is performed.
- To avoid injury stand on the side rails before starting the equipment.
- Avoid exiting equipment while leaving the tread belt in motion.
- Never walk or jog backwards on the equipment.
- Do not change the incline of the equipment by placing objects under it.
- To avoid serious injury, do not touch the incline rack while the equipment is in use.
- To avoid serious injury, do not touch the belt while the equipment is in use.
- Do not operate under blanket or pillow. Excessive heating can occur and cause fire, electric shock, or injury to persons.
• See Grounding Instructions. - On the machine power switch, the “1” means that the machine power is switched “ON” and the “0” means the machine power is switched “OFF”.
- Before servicing the motor area or removing the motor cover, please contact TRUE service.
- Do not place hand near the running belt when the unit is in operation.
- To avoid serious injury, remove and store the power cord when the machine is not in use.
- Noise emission under load is higher than without load.
- A-weighted emission sound pressure level at the trainer's ear: 67dBA.
CHAPTER 1: SAFETY INSTRUCTIONS
IMPORTANT SAFETY INSTRUCTIONS
- Read and understand all instructions and warnings prior to use.
- Obtain a medical exam before beginning any exercise program. If at any time during exercise you feel faint, dizzy, or experience pain, stop and consult your physician.
- Obtain proper instruction prior to use.
- This unit is intended for commercial use only.
- Inspect the unit for incorrect, worn, or loose components and do not use until corrected, replaced, or tightened prior to use.
- Do not wear loose or dangling clothing while using the unit.
- Care should be used when mounting or dismounting the unit.
- Read, understand, and test the emergency stop procedures before use.
- Disconnect all power before servicing the unit.
- Do not exceed maximum user weight of 400 lbs.
- Keep the top side of the moving surface clean and dry.
- Keep children and animals away.
- Use caution when moving and assembling unit.
- All exercise equipment is potentially hazardous. If attention is not paid to the conditions of equipment usage, death, or serious injury could occur.
- Save these instructions.
Basic Guidelines for Setting Up the Equipment:
After removing the equipment from the packaging, place the equipment on a clean, level surface. Make sure the electrical cord easily reaches a grounded three-pronged outlet.
Important Electrical Requirements - 120V:
Your TRUE equipment requires a dedicated 120 volt, alternating current (AC), 20 amp grounded outlet circuit. This means nothing else can be plugged into the same circuit. Most power circuits are rated for this 120V AC 20 amp requirement, but you must ensure the equipment does not share the circuit with anything else.
Important Electrical Requirements - 220V:
Your TRUE equipment requires a dedicated 230 volt, alternating current (AC), 15 amp grounded outlet circuit. This means nothing else can be plugged into the same circuit. Most power circuits are rated for this 230V AC 15 amp requirement, but you must ensure the equipment does not share the circuit with anything else.

DANGER: Do not use an extension cord or ungrounded outlet:
The ground helps prevent electrical damage to your equipment and enhances your safety by helping to prevent shock. Check with a qualified electrician or serviceman if you are in doubt as to whether the equipment is properly grounded. Do not modify the plug provided with the unit if it will not fit the outlet. Have a proper outlet installed by a qualified electrician.
CHAPTER 2: PRODUCT OVERVIEW
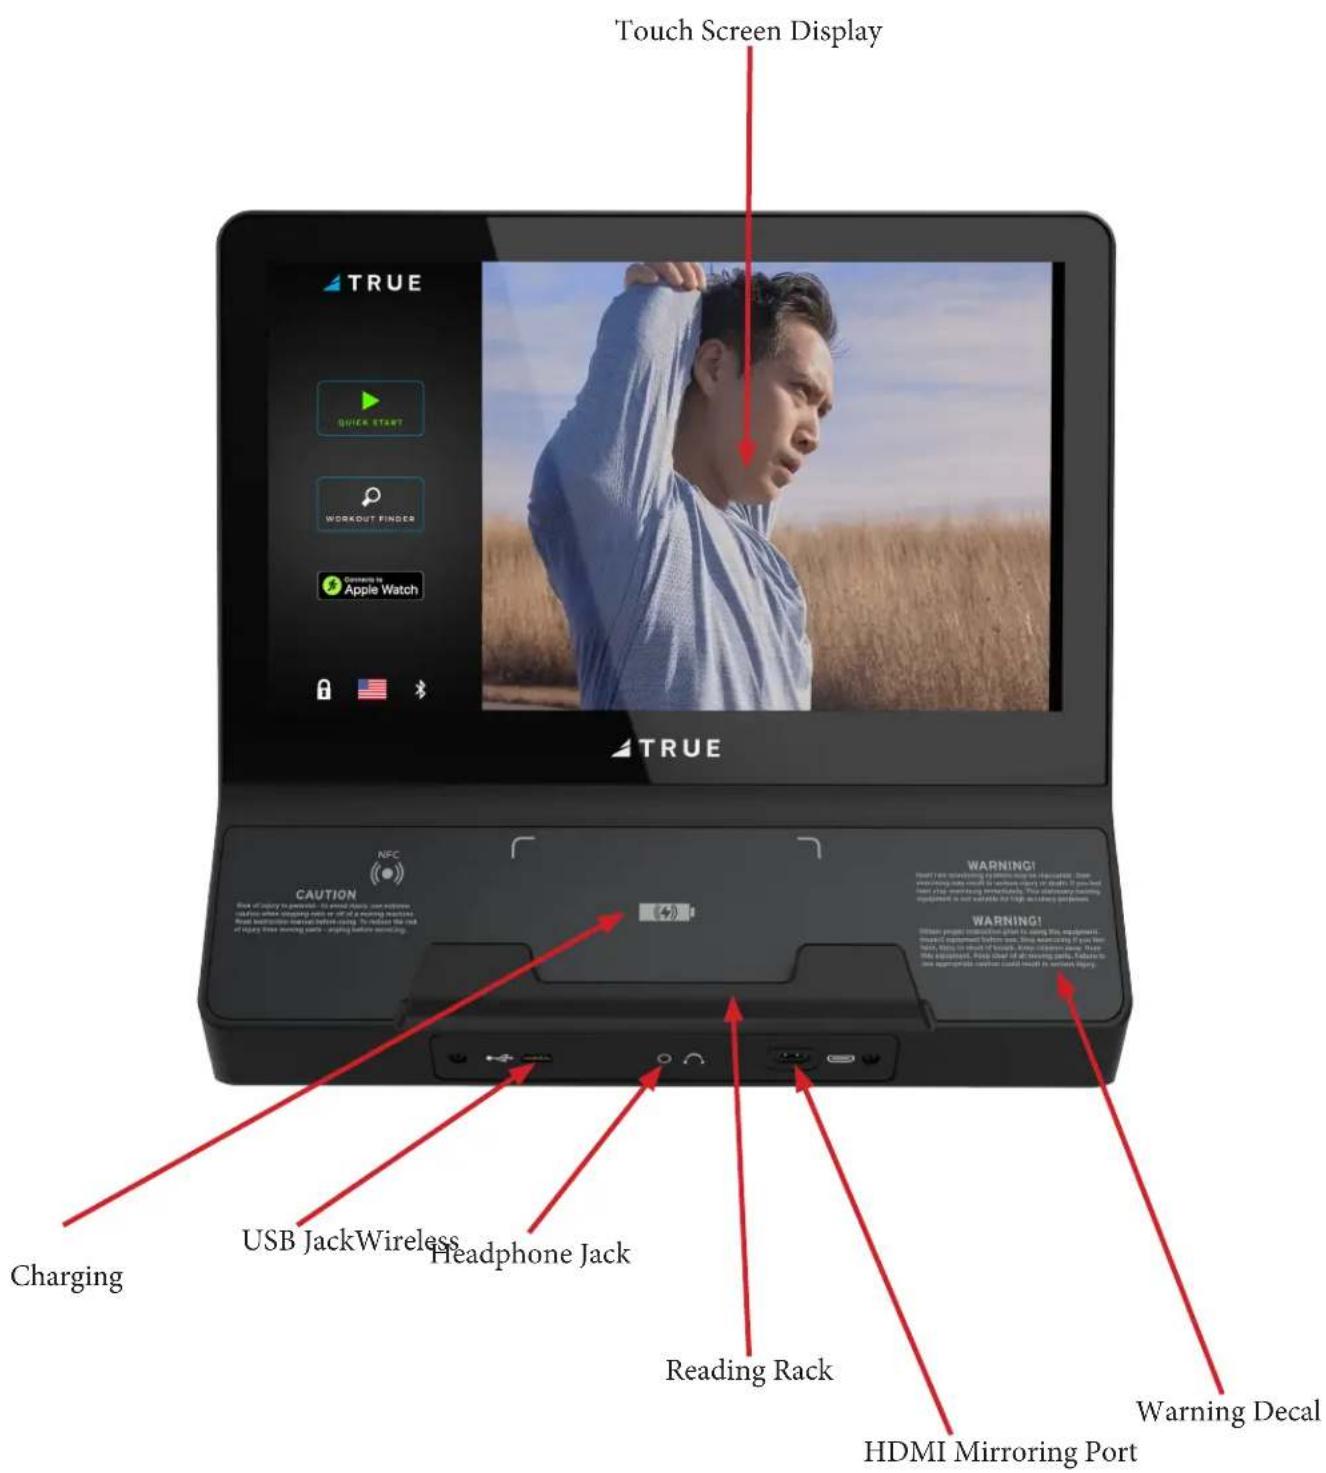
ENVISION ^16 OVERVIEW:
text_image
Touch Screen Display TRUE QUICK START WORKOUT FINDER Serving to Apple Watch N TRUE Caution Charging USB JackWireless Headphone Jack Reading Rack HDMI Mirroring Port Warning Decal WARNING! Warning! Warning! Warning! Warning! Warning! Charging USB JackWireless Headphone Jack Reading Rack HDMI Mirroring PortCHAPTER 2: PRODUCT OVERVIEW
ENVISION ^16 OVERVIEW:
Touchscreen Display:
A capacitive touch screen used for workout control and feature navigation.
Headphone Jack:
Standard 3.5mm audio jack used to connect headphones to the console during media playback.
USB Port:
Used to update console software and charge devices. Note: Confirm charging capability with your electronic device as not all electronic devices are chargeable on the Envision ^16 with Compass console.
Reading Rack:
This ledge on the console can be used to hold a book, magazine, e-reader, or tablet computer during a workout.
Cooling Fan:
Integrated fan that delivers a cooling flow of air during a workout.
Warning Decal:
Important safety information for users to review prior to using the equipment.
TOUCH SCREEN INTRODUCTION:
The Envision ^16 touchscreen console utilizes a fully-integrated capacitive touch screen display and a multi-screen interface to provide a state of the art and user-friendly workout.
Capacitive touch screen technology relies on the conductive properties of the human body to detect when and where on the display the user is touching. Due to this, capacitive touch screens are highly responsive and do not require pressure to register a touch.
TOUCH SCREEN NAVIGATION:
TRUE recommends that users familiarize themselves with the different screens to ensure they are safely taking advantage of all of the features this equipment has to offer.
Icon Character Map:
This console uses several icons to provide users with a simplified and visually appealing workout experience. The character map below is a quick reference of commonly used icons:
 | Fan Icon Speed |  | |
 | Screen Toggle Options |  | |
 | Audio Device Keypad |  | |
 | TV Home |  | |
CHAPTER 3: PROGRAMMING & OPERATION

CAUTION:
The safety key must be in place on the machine, and should be attached to the user's clothing.
HEART RATE MONITORING:
The machine can monitor a user's heart rate using either a Polar® compatible chest strap or the metal grips on the hand rails (called contact heart rate or CHR pads). A chest strap transmits the user's heart rate to the machine via a radio signal, and the CHR pads connect to a special computer circuit to extract the user's heart rate.
Chest Strap Heart Rate Monitoring:
Although this machine functions fine without using the heart rate monitoring feature, this kind of monitoring gives valuable feedback on the user's effort level. Chest strap monitoring also enables users to use Heart Rate Control (HRC), the most advanced exercise control system available.
When users wear a Polar® compatible transmitter strap, the machine will display the user's heart rate as a digital beats-per-minute (bpm) readout.
The transmitter strap should be worn directly against the user's skin, about 1-2 inches below the pectoral muscles/breast line. Women should be careful to place the transmitter below their bra line.
Initially the transmission signal for heart rate may be erratic or non-existent. Some moisture is necessary between the strap and the user's skin for proper transmission. Sweat from exercise works best, but ordinary tap water may be used prior to the workout if desired.
A Note on Chest Strap Heart Rate Monitoring:
The chest strap produces a radio signal that the machine reads and registers as the user's heart rate. The accuracy of a reading may be affected when outside interference is present.
Contact Heart Rate (CHR):
The CHR system will let the user monitor their heart rate without wearing a chest strap. When using the CHR system users should gently grasp the CHR pads with both hands. Within 30 seconds, the user's heart rate should be displayed as a digital bpm readout (during the first 30 seconds the system is analyzing and locking in the user's heart rate). Users should exercise with smooth body motions and breathe regularly. It is best to avoid talking while using the CHR system, as talking will cause unrepresentative heart rate spikes of 5 to 10 bpm. To ensure an accurate reading, the user's hands should be clean, free of both dirt and hand lotions.
Note: For increased safety and accuracy, the CHR system should only be used at speeds of 4 mph or lower (CHR readings are less accurate due to large muscle movements above this speed).
A Note on CHR Accuracy:
CHR monitoring may be less accurate than chest strap monitoring since the heart rate signals are much stronger at the chest. When using a HRC workout, it is best to use a chest strap because of the stronger and more accurate readings.
CAUTION:
Do not use the contact heart rate grips as a handlebar during a workout.
CHAPTER 3: PROGRAMMING & OPERATION
HEART RATE CONTROL (HRC):
Introduction:
You are now the owner of the most sophisticated Heart Rate Control (HRC) workout technology available. TRUE HRC is unique and patented. It accommodates users from rehabilitation to world class athletes, and all those in between. TRUE HRC enables users to do a completely hands-free heart rate controlled workout using speed, incline, or both. By training at a specific target heart rate, users can exercise at a more efficient cardiovascular level.
The TRUE HRC system is unique because users must enter the key parameters of the workout; target heart rate, maximum speed, maximum incline, and time, prior to starting the HRC workout. As users approach their target heart rate, the machine's computer automatically takes over and changes the speed and/or incline automatically to keep them near their target heart rate. This enables for a completely hands-free workout.
Note: A Polar ^® compatible heart rate monitoring chest strap should be worn during HRC workouts. For increased safety and accuracy, contact heart rate monitoring is not recommended for HRC workouts.
Target Heart Rate:
TRUE's HRC workouts let the machine monitor relative exercise intensity by way of the user's heart rate, then automatically adjust the speed and incline to keep the user at their target heart rate and thus their desired exercise intensity. Heart rate is a good measure of the body's exercise stress level. It reflects differences in physical condition, fatigue, the comfort of the workout environment, even diet and emotional state. Users should compare their heart rate with how they feel to ensure safety and comfort.
Consult a Physician to Determine Target Heart Rate:
Using heart rate to control a workout takes the guesswork out of the workout settings. Consult a physician before using heart-rate controlled workouts for advice on selecting a target heart rate range. Also, it is important to use the machine for several workouts in the manual mode while monitoring heart rate. Users should compare their heart rate with how they feel to ensure safety and comfort. After users have spent some time learning how their heart responds to different levels of speed and incline, they will have a better understanding of how to select the maximum speed and maximum incline required for reaching their target heart rate.
Warm Up:
At the beginning of an HRC workout, the machine is in full Manual Control mode. Users should gradually increase the workout intensity to slowly raise their heart rate to within 10 bpm of their target heart rate. The machine will operate as if in manual mode during the warm up stage. Users control both speed and incline. The user may only increase speed and incline to the present maximum values entered. It is important that the user starts at a low level of perceived exertion and gradually increase the workout intensity over several minutes until they approach their target heart rate. This enables the body to adapt to the workout. Increasing the workout intensity gradually will enable the user to enter the HRC stage without overshooting their target, keeping their heart rate within a few bpm of their target.
Note: Warming up too fast may cause the user to overshoot their target. If this occurs it may take several minutes before the computer software can control their heart rate. Users may overshoot and undershoot for several minutes until control is achieved.
Heart Rate Control Stage:
Heart Rate Controlled workouts take control of speed and incline, keeping the user's heart rate within a few bpm of their target. When using the Interval HRC Workout, the machine alternates between work and rest intervals.
Cooldown:
At the end of the workout time or distance, the machine reduces the workout intensity by half and goes back into Manual Control mode, where users directly control their cooldown.
Truefitness.com / 800.426.6570 / 636.272.7100 12 of 42
CHAPTER 3: PROGRAMMING & OPERATION
WORKOUT PROGRAM DESCRIPTIONS:
Quick Start:
A workout in which the user controls all settings. The workout continues until it is ended by the user.
Cardio 360™ Quick Start: (Only Available on the XS1000, XC400, & XC900)
Get right into a pre-set 20-minute workout designed to shape and tone every major muscle group.
Manual:
Users enter their weight, workout time or distance. The user controls both the SPEED and INCLINE of the machine throughout the workout.
Hill Intervals:
Hill Intervals makes changes to the INCLINE in 2-minute segments with the SPEED remaining constant.
Rolling Hills:
Series of gradually increasing and decreasing INCLINE changes that simulate rolling hills.
Single Hill:
INCLINE increases to a maximum at the mid-point of the workout, then decreases to the finish.
Random Hills:
An INCLINE profile that changes to simulate random hills. The INCLINE adjusts at any time during the workout to increase or decrease the intensity of the hills.
Weight Loss Hills:
A walking interval workout with two minutes segments of work and rest. Work segments are at the selected incline level.
Glute Buster:
A changing INCLINE profile simulates hilly terrain to promote intense glute muscle use. Users can make adjustments to the SPEED during the workout.
Calorie Goal:
This workout enables users to choose the number of calories they wish to burn within a specified workout time. The machine will control SPEED and INCLINE within the limits set by the user to attain this goal.
Cardio Challenge:
SPEED and INCLINE increase to a maximum at the mid-point of the workout, then decrease to the finish.
Auto Stride: (Only Available on the XS1000)
The Auto Stride program will automatically adjust the stride length based on the user's speed during your workout. The stride length will automatically increase as the user increases their speed, and automatically decrease the stride length as you slow down.
Stride Intervals: (Only Available on the XS1000)
Users set their own alternating 1 minute work and rest stride lengths; from short stepping to a long stride motion and everything in between.
Pace Intervals: (Only Available on the XS1000, XC400/900, RC400/900, and UC400/900)
This workout suggests PACE (RPM) intervals in 1-minute segments. The PACE SETTER shows the target pace along with the user's actual pace (RPM) throughout the workout.
CHAPTER 3: PROGRAMMING & OPERATION
WORKOUT PROGRAM DESCRIPTIONS:
Pace Ramp: (Only Available on the XC400/900, UC400/900, & RC400/900)
This workout suggests PACE (RPM) increases to a maximum at the mid-point of the workout, then decreases to the finish.
The PACE SETTER shows the user's target pace throughout the workout.
Leg Shaper: (Only Available on the XS1000, XC400/900, RC400/900, and UC400/900)
A workout that suggests PACE changes to work the leg muscles with added intensity. Reverse stride occasionally for an added challenge.
Distance Workouts:
Choose any one of our four common distance workouts: 5k****, 10k****, 2 mile***, or 4 mile***. The user controls both the SPEED and INCLINE of the machine throughout the workout.
Saved Workouts:
Access to previously saved custom workouts.
Custom Incline:
Build a custom INCLINE profile using up to 30 segments. A user-friendly setup screen enables users to create any hill or incline profile.
Custom Ultra:
If users are having trouble finding a workout that fits their specific needs, try setting up the Custom Ultra! This completely customizable workout enables both SPEED and INCLINE control in up to 30 segments.
HRC Cruise Control:
While in any program, Cruise Control enables the user to set the current heart rate as the Target Heart Rate by pressing a single button. The Cruise Control program takes control of SPEED and INCLINE to maintain the user's Target Heart Rate. If bpm exceeds the target heart rate by more than 12 bpm, then the workout will end and Cool Down will begin.
HRC Target:
Users choose their target heart rate. The machine begins in MANUAL control – The user should gradually increase the workout intensity until heart rate is within 10 bpm of their target. At this point, the machine takes over to control SPEED and INCLINE to maintain heart rate within a few beats of the user's target.
HRC Weight Loss:
Based on age, this is a heart-rate controlled workout at 65% of the user's maximum heart rate. This creates efficient fat burning without overtraining. The machine begins in MANUAL control –The user should gradually increase the workout intensity until their heart rate is within 10 bpm of their target. At this point, the machine takes over to control SPEED and INCLINE to maintain heart rate within a few beats of the user's target.
HRC Aerobic:
Based on age, this is a heart-rate controlled workout at 80% of the user's maximum heart rate. This keeps the user in the optimum aerobic training range to improve cardio fitness. The machine begins in MANUAL control - gradually increase the workout intensity until the user's heart rate is within 10 bpm of their target. At this point, the machine takes over to control SPEED and INCLINE to maintain heart rate within a few beats of the user's target.
HRC Intervals:
Intervals of WORK and REST determined by target heart rate. The machine begins in MANUAL control – Users should gradually increase their workout intensity until their heart rate is within 10 bpm of their target. At this point, the machine takes over to control SPEED and INCLINE to maintain the user's heart rate within a few beats of their target. The rest segment will reduce to 65% intensity of work segment.
CHAPTER 3: PROGRAMMING & OPERATION
WORKOUT PROGRAM DESCRIPTIONS:
Custom HRC Intervals:
Set up a custom heart rate interval. Specify WORK and REST targets and let the machine make all the adjustments. The workout begins in MANUAL control - users should gradually increase the workout intensity until the heart rate is within 10 bpm of the user's target heart rate. At this point, the machine takes control to keep the current heart rate within a few bpm of the target heart rate.
HRC Distance Workouts:
4 popular fixed distance workouts(5K, 10K, 2 mile, and 4 mile) that put the machine in control of maintaining the user's target heart rate. The workout begins in MANUAL control – users should gradually increase the workout intensity until the heart rate is within 10 bpm of the user's target heart rate. At this point, the machine takes control.
Fitness Test:
A fitness test uses heart rate to estimate the user's VO2 max. The test increases SPEED and INCLINE gradually every minute and ends at the point where the user's heart rate reaches 85% of the maximum for their age.
Monument Workouts: (Only Available on the TI1000)
Intensify your workout by traveling the world and climbing some famous monuments. You will be able to track your progress as you climb to the top of the St. Louis Arch, Eiffel Tower, Mt. Everest, Mt. Rainier or Kilimanjaro. Your output from the machine will display your percentage of completion of stairs to the top of the monument, or percentage of completion of elevation to the top of the mountain, whichever is applicable.
Cardio 360 ^™ : (Only Available on the XS1000, XC400, & XC900)
If users are looking for variety to make their cardio workout fly, try this random cycle of Cardio360 exercises for a great total-body workout.
Cardio 360™ Video: (Only Available on the XS1000, XC400, & XC900)
Our traditional Cardio 360, total-body workout program with video demonstrations of each exercise so users can easily follow along.
Cardio 360™ Custom: (Only Available on the XS1000, XC400, & XC900)
Users can modify and maximize their workout to its fullest potential. Cardio360 Custom lets users build a personalized routine, choosing their favorite Cardio360™ motions and lengths of time. Then save their set-up for next time.
Quad Burner: (Only Available on the XL1000)
This intense resistance workout is designed to burn calories!
CHAPTER 4: ENVISION ^16 TOUCHSCREEN CONSOLE TOUCH SCREEN NAVIGATION:
Home Screen:
The Home Screen is displayed on the console when there is no workout in progress. From this screen the user is able to select from various options to begin a workout or view media.

text_image
TRUE ALPINE RUNNER A B C D E F QUICK START MONUMENTS WORKOUT FINDERA) Quick Start
Starts a Quick Start workout in which the user controls all settings. The workout continues until it is ended by the user.
B) Monuments
Displays a list of five preset workouts based on international monuments. Monument workouts are only available on the Alpine Runner. For Cardio360 products, this button will display the Cardio360 workout icon. For non-Cardio360 products excluding the Alpine Runner, this button will not appear.
C) Workout Finder
Displays a list of preset workouts.
Displays the Bluetooth connectivity interface before starting a workout to pair Bluetooth wireless technology enabled devices with the Envision ^16 touchscreen console.
E) Language Options
Enables users to choose between 12 language options.
F) Screen Lock
When the screen lock is held for three seconds, the touch screen display will lock for 20 seconds to enable cleaning.
CHAPTER 4: ENVISION ^16 TOUCHSCREEN CONSOLE TOUCH SCREEN NAVIGATION:
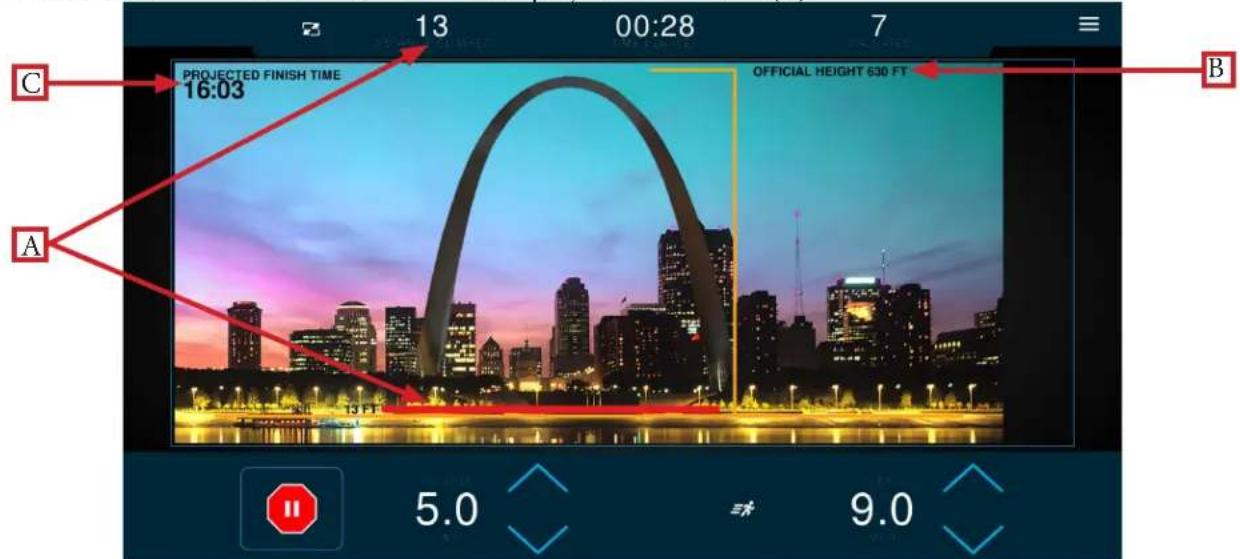
Monuments:
For the Alpine Runner only, the user can select from custom workouts based on international monuments such as the Gateway Arch, Eiffel Tower, and Mount Everest. These custom workouts are based on the height of each monument displaying the current height traveled in real time (A) and total height (B) with the workout automatically ending once the user has reached the top of the monument. The user determines their individual climbing pace by manually entering the INCLINE and SPEED levels, which determines their projected finish time (C).
text_image
PROJECTED FINISH TIME 16:03 OFFICIAL HEIGHT 630 FT C A B 5.0 9.0Selecting a Preset Workout:
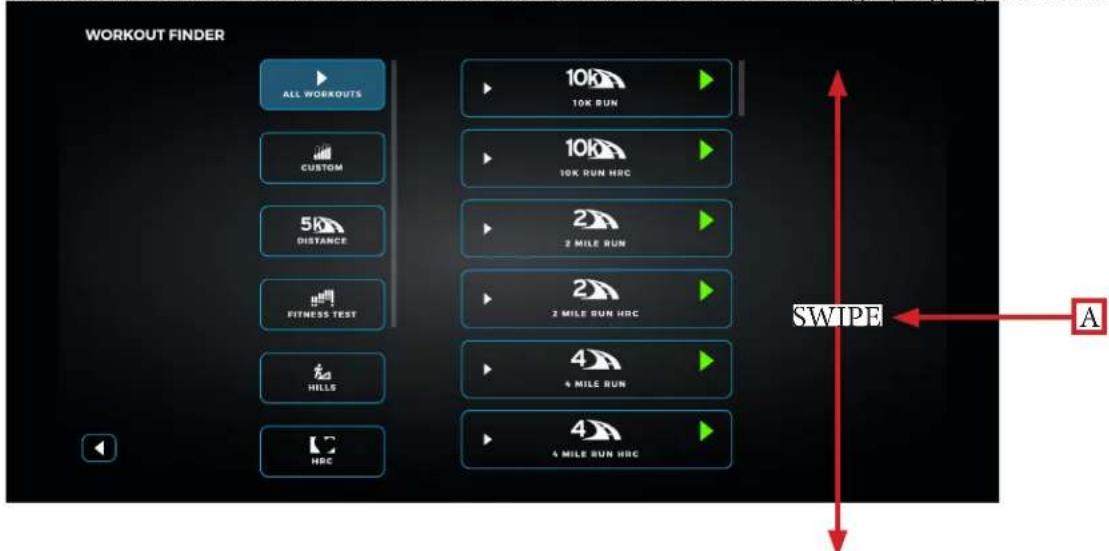
Preset workouts are accessed by selecting the Workout Finder button on the home screen. All available workouts are listed as a default on the right side of the screen, but the user may select from specific workout categories listed on the left side of the screen to view a subset of all available workouts such as HRC workouts. To begin a workout, swipe through the workout list (A) and press anywhere within the red workout bounding box to proceed except the gray arrow that displays a descripiton of the workout.
Note: The image below may differ slightly based on the base unit used.
Note: To return to the default screen where all workouts are listed, deselect the workout category highlighted in red.
text_image
WORKOUT FINDER ALL WORKOUTS CUSTOM 5K DISTANCE FITNESS TEST HILLS HRC 10K 10K RUN 10K 10K RUN HRC 2 2 MILE RUN 2 2 MILE RUN HRC 4 4 MILE RUN 4 4 MILE RUN HRC SWIPE ATruefitness.com / 800.426.6570 / 636.272.7100 17 of 42
CHAPTER 4: ENVISION ^16 TOUCHSCREEN CONSOLE
TOUCH SCREEN NAVIGATION:
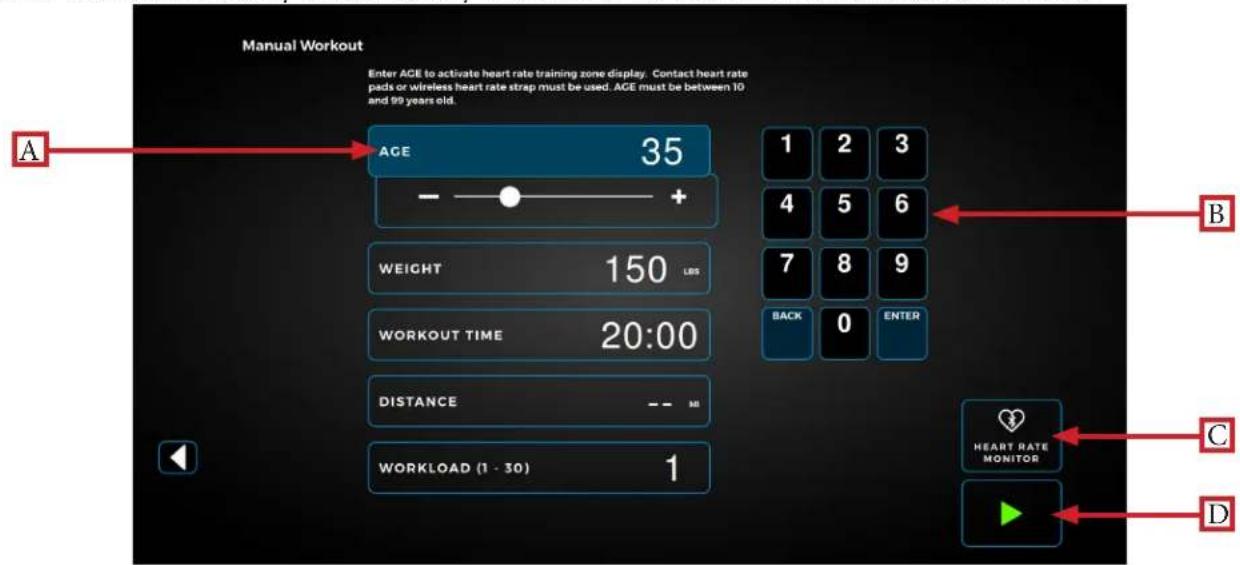
Workout Data Entry Screen:
The Workout Data Entry screen enables the user to input workout parameters specific to the selected workout and the user prior to beginning the workout. To set a value, select the heading (A) of the value and manually enter a value using the keypad (B). Note: Selecting enter on the keypad after entering a value will save the value in that item and then automatically select the next item in the list. Select the Heart Rate Monitor connect button (C) to pair a Bluetooth-enabled heart rate device with the console to wirelessly monitor heart rate data. The Save button (not shown) enables the user to save on-screen workout parameters for future workouts selectable from the Workout Finder main menu via the Saved Workouts button. Note: The Save button is enabled via the Save Workout Enabled button in the Options menu in Maintenance Mode. Select the green arrow (D) to begin the workout.
Note: The Workout Data Entry screen will vary based on the workout selection and base unit attached.
text_image
Manual Workout Enter ACE to activate heart rate training zone display. Contact heart rate pads or wireless heart rate strap must be used. AGE must be between 10 and 99 years old. AGE 35 - + WEIGHT 150 LBS WORKOUT TIME 20:00 DISTANCE -- M8 WORKLOAD (1 - 30) 1 1 2 3 4 5 6 7 8 9 BACK 0 ENTER B C D HEART RATE MONITORCardio360 Workout Screen:
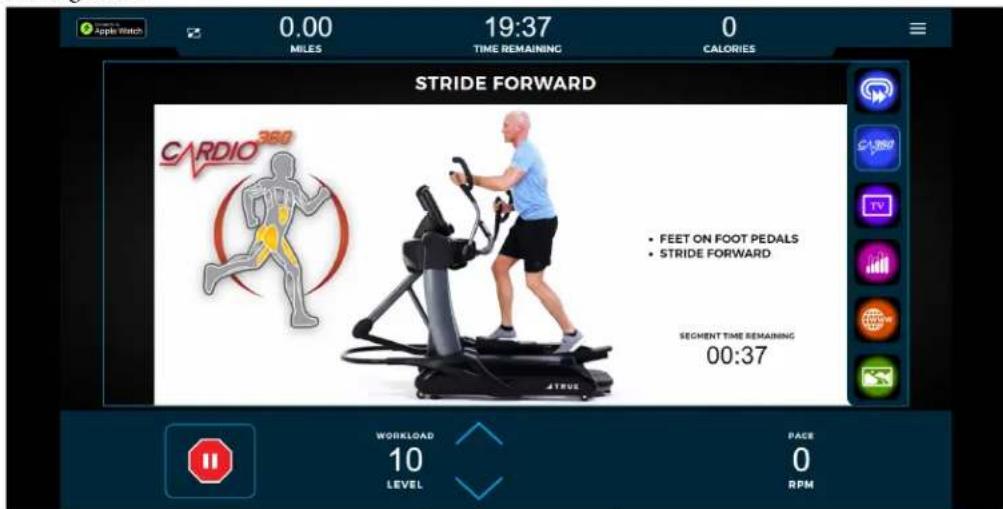
Available only on the XS1000, XC900, and XC400, the Cardio360 workout screen provides the user with pre-recorded video clips and corresponding instructional text prompts cycling through the various segments of a Cardio360 workout. Each Cardio360 workout segment has a time length displayed in the bottom, right corner. Note: The selected Cardio360 workout (Cardio360, Cardio360 Video, or Cardio360 Custom) determines the order, frequency and length of time for each Cardio360 workout segment.
text_image
0.00 MILES 19:37 TIME REMAINING 0 CALORIES STRIDE FORWARD CARDIO 360 FEET ON FOOT PEDALS STRIDE FORWARD SEGMENT TIME REMAINING 00:37 WORKLOAD 10 LEVEL PAGE 0 RPMTruefitness.com/800.426.6570/636.272.7100 18 of 42
CHAPTER 4: ENVISION ^16 TOUCHSCREEN CONSOLE TOUCH SCREEN NAVIGATION:
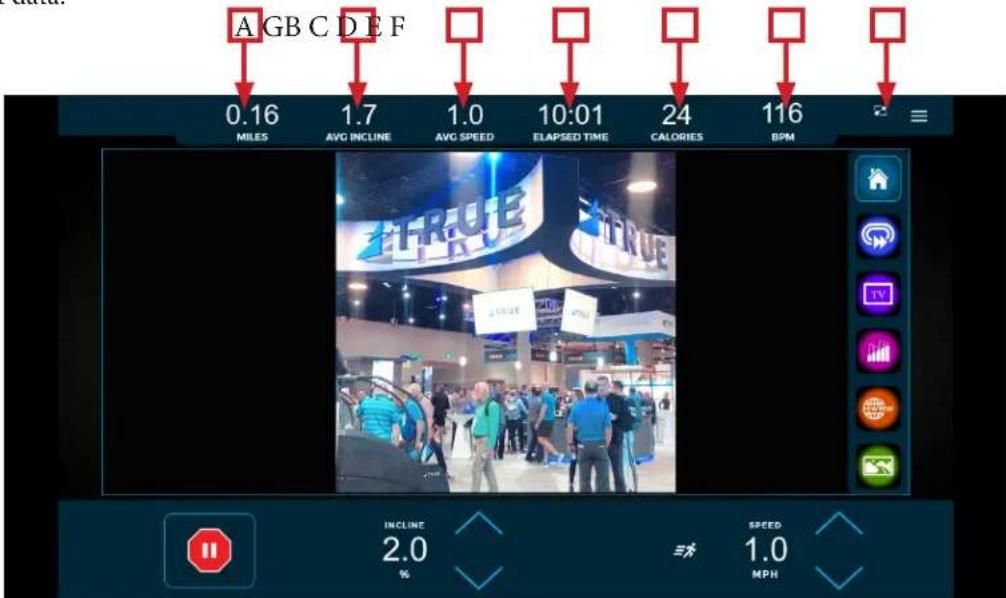
Workout View Screens:
During any workout a Workout View screen will be displayed to give the user a comprehensive visual overview of their current workout data.
text_image
AGB CDEF 0.16 1.7 1.0 10:01 24 116 MILES AVG INCLINE AVG SPEED ELAPSED TIME CALORIES BPM INCLINE 2.0 % 1.0 MPHA) Distance:
Displays the current distance traveled.
B) Incline:
Displays the average incline level.
C) Average Speed:
Displays the average speed since the start of the workout.
D) Time Elapsed:
Displays the time elapsed since the start of the workout.
E) Calories:
Displays the estimated total amount of calories burned since the start of the workout.
F) Heart Rate Information:
When the user is wearing a heart rate chest strap or utilizing the Contact Heart Rate system, their heart rate will be displayed in bpm. Note: If heart rate is not selected to display in the Workout Data menu, it will automatically display while heart rate data is available in addition to deselecting the last non-heart rate data value to display heart rate if six data values have already been selected. If heart rate is selected to display in the Workout Data menu, it will continuously display the selected heart rate data value.
This menu will toggle between data points (six total with a minimum of one) available during a workout. To select which data points are displayed, press the icon identified to open the pop-out window and make the desired selections. Touch anywhere within the pop-out window to minimize it. Note: The above image displays a sampling of available data points.
CHAPTER 4: ENVISION ^16 TOUCHSCREEN CONSOLE TOUCH SCREEN NAVIGATION:
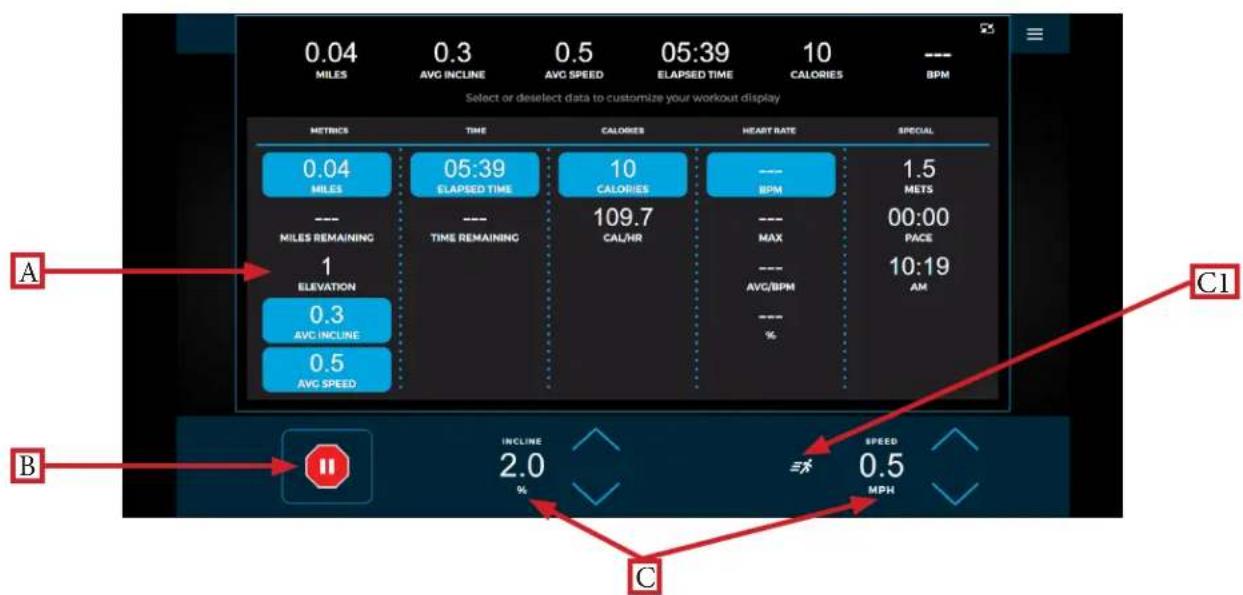
Workout Data Menu:
The Workout Data menu displays workout data metrics during a workout.
text_image
Select or deselect data to customize your workout display 0.04 MILES 0.3 AVG INCLINE 0.5 AVG SPEED 05:39 ELAPSED TIME 10 CALORIES BPM A METRICS TIME CALORIES HEART RATE SPECIAL 0.04 MILES 05:39 ELAPSED TIME 10 CALORIES --- BPM 1.5 METS --- MILES REMAINING --- TIME REMAINING --- 109.7 CAL/HR --- MAX --- 00:00 PACE 1 ELEVATION --- AVG/BPM --- 10:19 AM 0.3 AVG INCLINE --- % 0.5 AVG SPEED C INCLINE 2.0 % SPEED 0.5 MPHThe Workout Data menu enables the user to make selections on what workout data appears in the main workout screen. To select which data points are displayed, press the selection to highlight it in red and enable it to appear on the top toolbar. The default data points displayed are distance, time, and calories, with a minimum display requirement of one data point and maximum display number of six data points. Note: Available workout data fields will vary based on the base unit attached and the workout selected.
B) Stop:
Stops or pauses the current workout.
C) Quick Touch Incline/Speed Keys:
These keys allow the user to quickly adjust the INCLINE levels in increments of 0.5% and SPEED in increments of 0.5 mph. To manually enter a speed or incline increment, press the corresponding numerical readout and a numerical pad will appear to enter your selection.
Note: To select between preset speed increments, press the runner icon (C1). This icon may vary in appearance and functionality across products. Speed presets are 3, 5, and 7 mph respectively.
Note: For non-treadmill base units, the INCLINE data field will display WORKLOAD measured in levels of resistance from 1-30 and the SPEED data field will display PACE measured in revolutions-per-minute (rpm). For the UC400, UC900, RC400, and RC900 models engaged in a Pace workout, the Pacesetter option will display next to the PACE data field providing a target pace for the user based on the type of Pace workout selected.
CHAPTER 4: ENVISION ^16 TOUCHSCREEN CONSOLE TOUCH SCREEN NAVIGATION:
Options Menu:
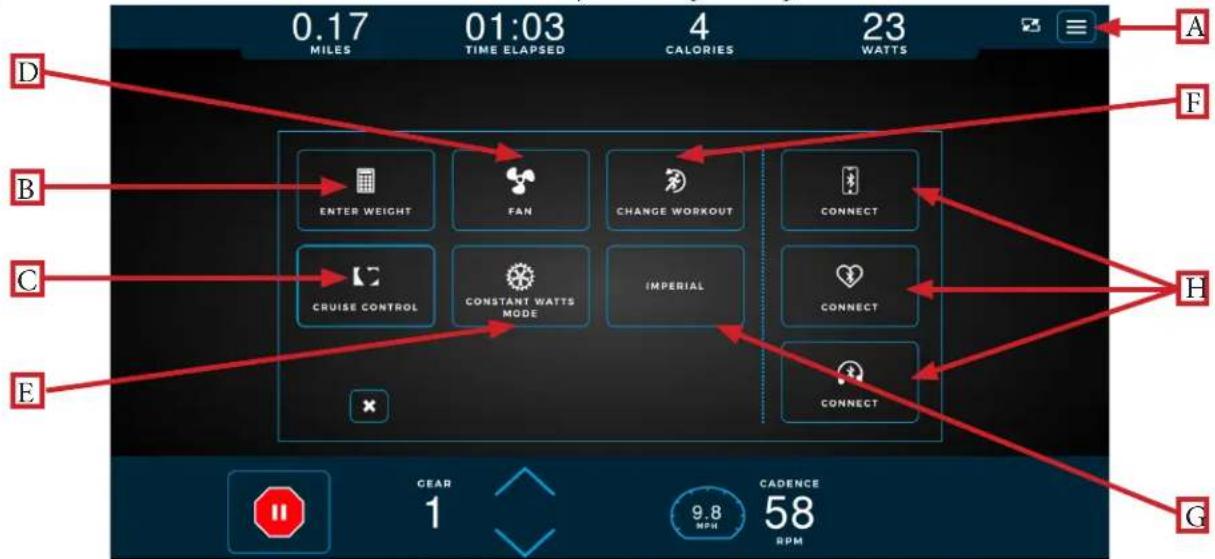
The Options menu contains controls that allow users to adjust settings during their workout.
text_image
0.17 MILES 01:03 TIME ELAPSED 4 CALORIES 23 WATTS D B C E ENTER WEIGHT FAN CHANGE WORKOUT CONNECT CRUISE CONTROL CONSTANT WATTS MODE IMPERIAL CONNECT CONNECT GEAR 1 9.8 MPH 58 RPM A F H GA) Options Menu:
The Options menu enables users to customize their workout experience such as entering their weight for more accurate caloric calculation and display during a workout, adjusting the on/off functionality for the console fan, and pairing Bluetooth wireless technology enabled devices with the console.
B) Enter Weight:
Enables the user to update their weight. Note: If the user is logged into their User Profile on an Envision ^16 touchscreen console, then the user weight autofills based on the weight data entered by the user in their User Profile.
C) Heart Rate Cruise Control:
Sets the current heart rate as the target heart rate with the machine adjusting incline/workload and speed to maintain that target.
D) Fan:
Enables the user to turn the console fan on or off with it automatically defaulting to off after completing the workout.
E) Constant Watts Mode/Autostride:
Constant Watts mode enables the user to switch the resistance to constant torque. Workouts that control watts will always stay in Constant Watts mode. All other workouts will start out in Constant Torque mode with the ability to switch in and out of Constant Watts mode. Note: Constant Watts mode is only available on the RC400, RC900, UC400, and UC900. Autostride automatically adjusts the stride length based on the user's speed during the workout. Note: Autostride is only available on the XS1000.
F) Change Workout:
Enables the user to change their current workout parameters such as time, intensity, and level of the workout.
G) Unit of Measurement:
Enables the user to switch between metric and imperial (US) unit of measurements displayed on the screen.
H) Bluetooth Connectivity:
Allows the user to pair Bluetooth wireless technology enabled devices with the Envision ^16 touchscreen console such as audio devices, heart rate monitors, and headphone devices.
Truefitness.com/800.426.6570/636.272.710021of42
CHAPTER 4: ENVISION ^16 TOUCHSCREEN CONSOLE TOUCH SCREEN NAVIGATION:
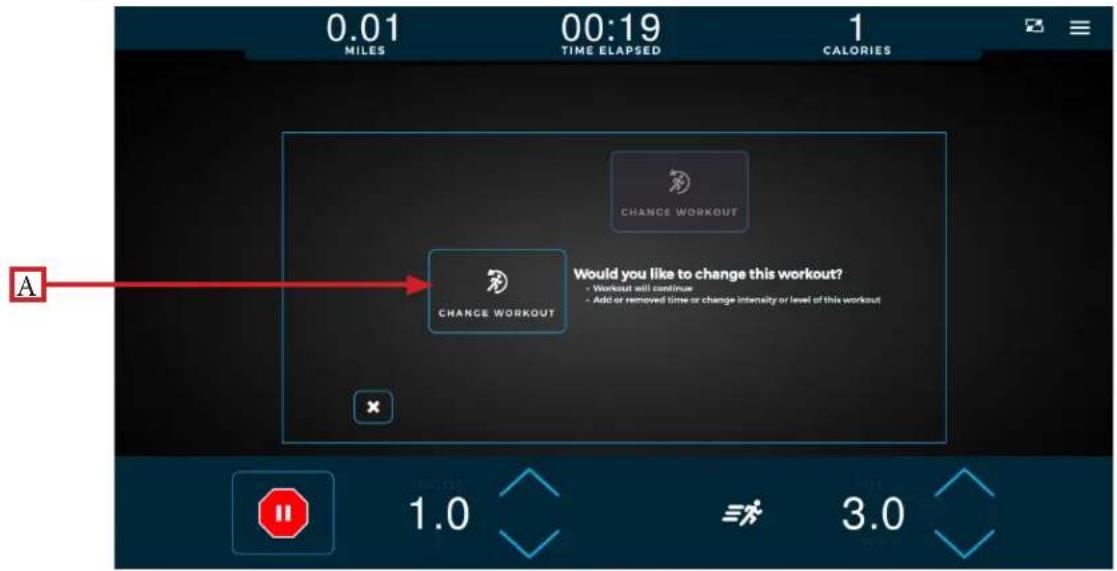
Change Workout:
The Change Workout screen (A) enables the user to update their workout parameters such as time, intensity, and level of workout and then return to the main screen of the current workout with all previous workout data intact. Note: The workout parameters for certain preset workouts such as Quick Start and Fitness Tests are unable to be updated once the workout has begun.
text_image
0.01 MILES 00:19 TIME ELAPSED 1 CALORIES CHANGE WORKOUT A CHANGE WORKOUT Would you like to change this workout? • Workout will continue • Add or removed Time or change Intensity or level of this workout 1.0 3.0Bluetooth Connectivity:
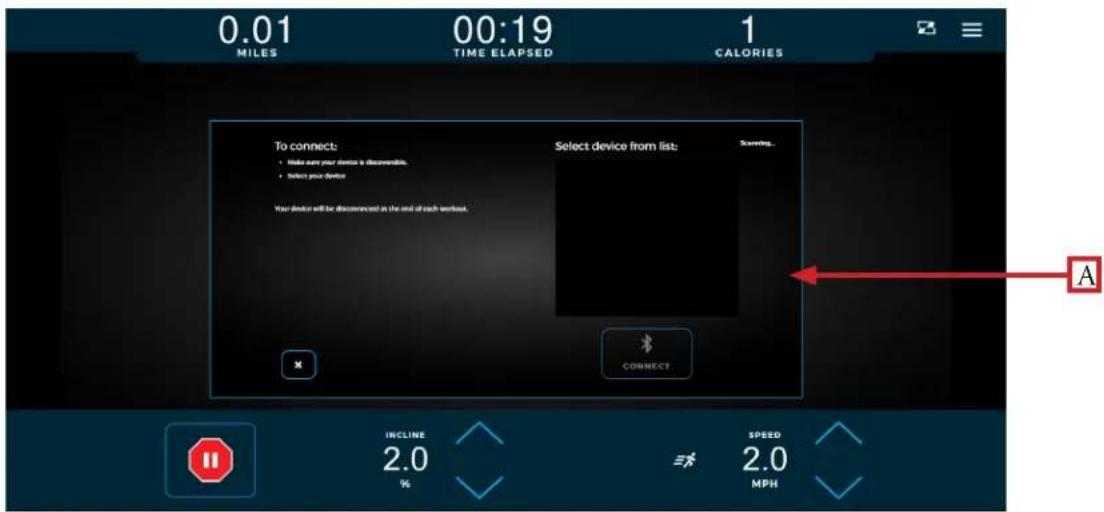
The Bluetooth connectivity screen (A) displays the Bluetooth wireless technology enabled devices available for pairing with the Envision ^16 touchscreen console. Follow the on-screen prompts on the Envision ^16 touchscreen console and the Bluetooth device to complete the pairing process. Once the pairing process is complete, the audio screen will appear where the user can navigate playable audio menus, mute and adjust volume, pause, advance, or replay tracks, and unpair the Envision ^16 touchscreen console and Bluetooth device. Note: The Bluetooth connectivity screen can also be accessed from the console home screen to pair your Bluetooth wireless technology enabled devices with the console before starting a workout.
text_image
0.01 MILES 00:19 TIME ELAPSED 1 CALORIES To connect: • Make any your device is accessible. • Select your device Your device will be disconnected as the end of each workout. Select device from list: Scanning... CONNECT A INCLINE 2.0 % SPEED 2.0 MPHCHAPTER 4: ENVISION ^16 TOUCHSCREEN CONSOLE WALK/RUN TRACK:
The Walk/Run Track screen displays a virtual track with a progress dot representing the user walking and/or running around the track.

text_image
0.01 MILES 00:19 TIME ELAPSED 1 CALORIES A 1 IAP WORKLOAD 5 LEVEL PACE 25 RPMA) Lap Count:
Displays a counter for the number of laps the user has completed around the virtual track.
INCLINE/SPEED GRAPH:
The Incline/Speed screen (A) provides a real-time graphical display of the user's current workout incline or speed data based on the type of workout selected. A horizontal progress bar driven by preset time increments tracks the progress through the current graph bar. Select the Bar Graph icon (B) to navigate to the screen shown below.
Note: Incline and Speed will both be displayed for certain workouts such as Custom Ultra. Incline and Speed will be replaced with Workload and Pace for non-treadmill base units.

text_image
0.01 MILES 00:19 TIME ELAPSED CALORIES 1 A B INCLINE - VOL + VOL INCLINE 2.0 % SPEED 2.0 MPHTruefitness.com / 800.426.6570 / 636.272.7100 23 of 42
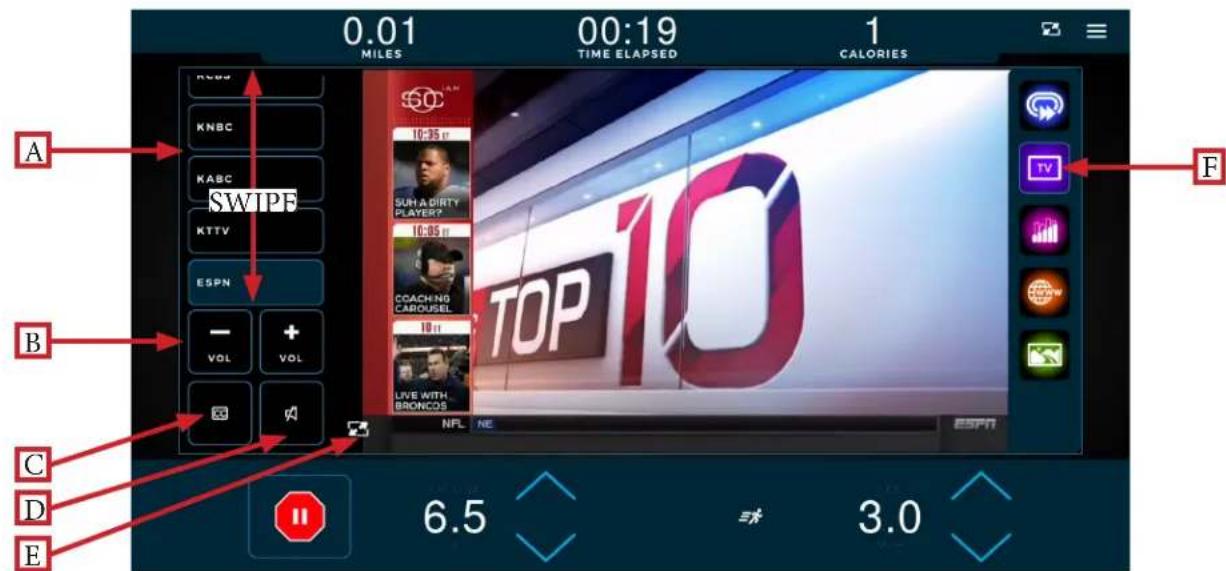
CHAPTER 4: ENVISION ^16 TOUCHSCREEN CONSOLE TV CONTROLS:
This console enables the user to watch live TV programming in crisp, clear high definition. The TV controls are built in to a workout view screen to allow the user to monitor their workout while enjoying their favorite shows.
text_image
0.01 MILES 00:19 TIME ELAPSED 1 CALORIES A KNBC KABC SWIPF KTTV ESPN B - + VOL VOL C E TOP 10 NFL NE ESPN 6.5 3.0A) Channel List:
Scroll through the list of available channels.
B) Volume Controls:
Increases or decreases the audio volume from the TV program.
C) Closed Captioning:
Toggles the closed captioning on or off.
D) Mute Button:
Mutes the audio volume from the TV program.
E) Screen Toggle:
Allows the user to switch back and forth between full screen and regular mode.
F) TV Screen:
Select this icon to navigate to the tv home screen.
Note: For Broadcast Vision CAB System-enabled devices, the left side menu will update to include channel selector buttons and the Closed Captioning (C) button will be replaced with a keypad for entering a channel number along with containing the Closed Captioning (C) button.
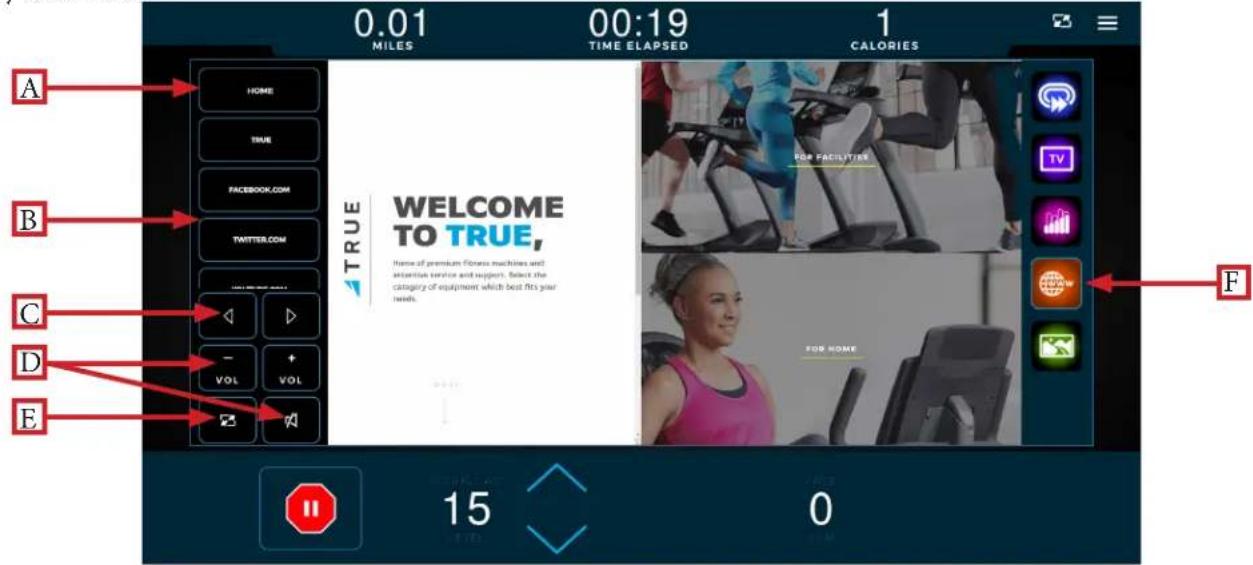
CHAPTER 4: ENVISION ^16 TOUCHSCREEN CONSOLE WEB BROWSER:
When enabled, the integrated web browser allows users to catch up on breaking news, watch sports highlights, check email, and connect with their friends on social media. Having this feature built into a Workout Data Screen allows users to easily multi task.
text_image
0.01 MILES 00:19 TIME ELAPSED 1 CALORIES A HOME B TURIE FACEBOOK.COM TWITTER.COM C TRUE WELCOME TO TRUE, Name of premium flower machines and sensitive service and support. Select the category of equipment which best fits your needs. D VOL E FOR FACILITIES FOR HOME 15 0 FA) Home:
Displays the web browser's home page.
*See the Advanced Console Options section for instructions on setting the default homepage.
B) Website Links List:
Scoll through the list of popular websites with easy navigation during the workout.
C) Navigation Buttons:
Move forward or backward to the previously displayed page.
D) Volume:
Enables the user to adjust the volume of audio generated from the console.
E) Screen Toggle:
Allows the user to switch back and forth between full screen and regular mode.
F) Web Browser Icon:
Select this icon to navigate to the web browser page.
CHAPTER 4: ENVISION ^16 TOUCHSCREEN CONSOLE OUTSIDE INTERACTIVE VIDEOS:
Outside Interactive ^® provides users with a scenic, first-person video to enhance their workout. Scroll through the list of available videos (A) to make your selection. To display the video in full screen mode, select the Screen Toggle button (B); current incline and speed workout selections will appear in full screen mode. Select the Videos icon (C) to navigate to the video screen.
*Content is provided by Outside Interactive® and is subject to change without notice.

text_image
0.00 00:23 1 137 HILLS OF BALI AUSTRALIAN OUTBACK CENTRAL PARK FALMOUTH ROAD RACE NIAGARA FALLS WASHINGTON MALL A B C 0.0 0.5CHAPTER 4: ENVISION ^16 TOUCHSCREEN CONSOLE IDLE SCREEN:
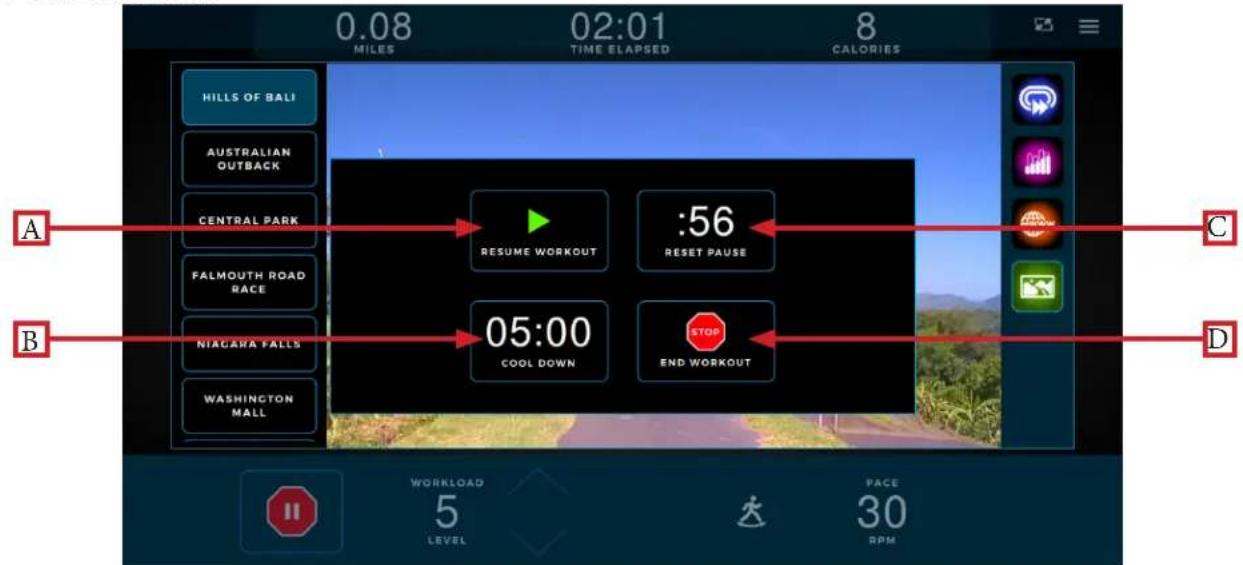
During a workout when the user becomes idle or presses the Stop button on the bottom toolbar, the Idle screen shown below will appear prompting the user to resume their workout (A), start a five minute, low intensity cooldown (B) with the workout ending after that time, reset the Idle Screen Timer (C) to 30 seconds while the user makes their selection, or end the current workout (D) and proceed to the Workout Summary screen.
Note: During the cooldown sequence, the unit is in manual mode where the user directly controls all settings such as SPEED and INCLINE.
Note: The Idle Screen will disable the Resume Workout, Cool Down, and Reset Pause buttons until the belt and incline motors cease movement.
text_image
0.08 MILES 02:01 TIME ELAPSED 8 CALORIES HILLS OF BALI AUSTRALIAN OUTBACK CENTRAL PARK FALMOUTH ROAD RACE NIAGARA FALLS WASHINGTON MALL A C B 05:00 COOL DOWN :56 RESET PAUSE STOP END WORKOUT D WORKLOAD 5 LEVEL PACE 30 RPMWORKOUT SUMMARY:
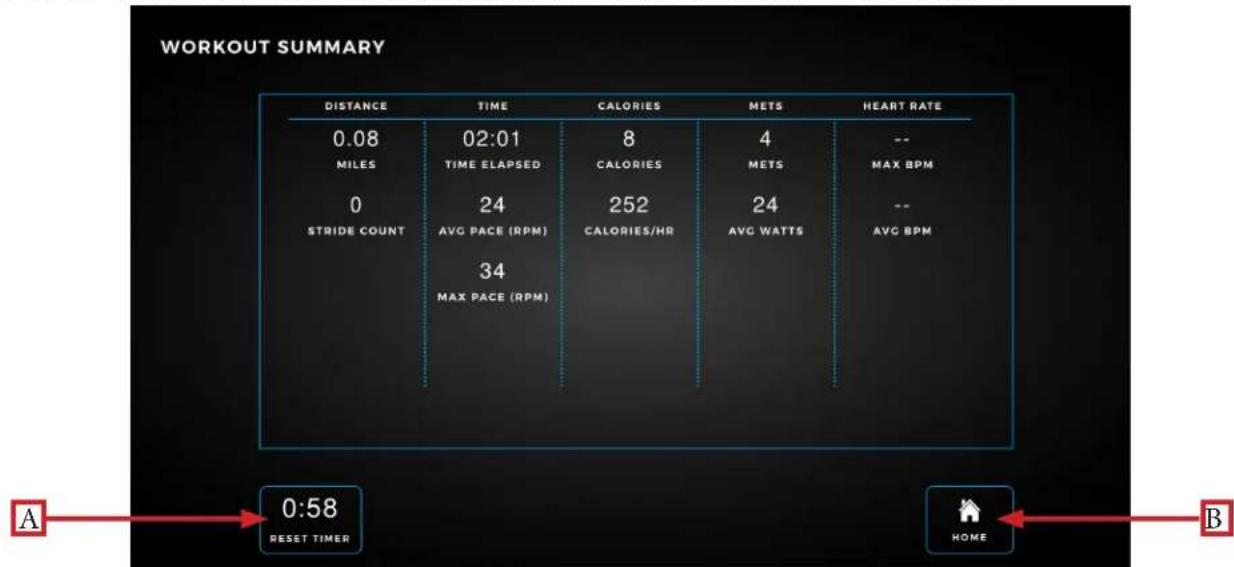
At the end of a workout the Workout Summary screen will display an overview of the workout data. If the user requires more time to view the workout summary, they can press the Reset Timer button (A) to reset the timer back to one minute. Press the Home button (B) to return to the home screen before the reset timer reaches zero seconds. Note: For fitness test workouts, the Workout Summary screen will display additional data such as a fitness test score.
text_image
WORKOUT SUMMARY DISTANCE TIME CALORIES METS HEART RATE 0.08 02:01 8 4 -- MILES TIME ELAPSED CALORIES METS MAX BPM 0 24 252 24 -- STRIDE COUNT AVG PACE (RPM) CALORIES/HR AVG WATTS -- 34 MAX PACE (RPM) A 0:58 RESET TIMER HOME BTruefitness.com/800.426.6570/636.272.710027of42
CHAPTER 4: ENVISION ^16 TOUCHSCREEN CONSOLE TV CABLING REQUIREMENTS FOR TRUE FITNESS EQUIPMENT:
For live television on TRUE Fitness equipment, coaxial cable must be run to the machine. All cabling internal to the TRUE Fitness equipment will be supplied by TRUE Fitness. All other cabling necessary to run from a TV or internet source to the TRUE cardio product must be provided by the facility.
TV Cabling Requirements:
The following TV tuners used in the United States are compatible with TRUE Fitness touchscreen consoles:
• NTSC (analog un-coded) old air broadcast, and un-coded cable TV
• ATSC (digital un-coded) used in current over-the-air broadcasts, and some un-coded cable TV
• QAM (digital cable) used in current un-coded and coded cable TV
The following signal types are supported by TRUE Fitness touchscreen consoles:
• Digital: CQAM, ATSC, DVB-C, DVB-T, DVB-T2, ISDB-T, DMBT
- Analog: NTSC-M, PAL-B, PAL-G, PAL-H, PAL-I, PAL-D, PAL-K, SECAM-B, SECAM-C, SECAM-D, SECAM-G, SECAM-L, SECAM-K
• Signal must be delivered to the equipment unencrypted
- Coaxial cable must be a quad-shielded RG6 cable with an F-Type compression fitting
• Digital signal strength delivered to the equipment: -5dBmV to +10dBmV with a target of +5dBmV - Analog signal strength delivered to the equipment: 0dBmV to +12dBmV with a target of +6dBmV
- Splitters or taps are acceptable for distributing signal, provided that the signal strength delivered to the equipment meets the required levels
- Confirm with your TV provider that the signal strength at each machine is adequate
Some cable TV companies offer a basic package that does not require a set-top box – the signal can be picked up with any cable-ready TV. This type of service works best with TRUE Fitness touchscreen consoles as it utilizes either NTCS or ATCS/QAM Clear. The un-coded signal lets the facility simply connect the coax cable (RG6) to the connector on the TRUE Fitness equipment and scan for channels.
Many cable companies, as well as all satellite (DirecTV, Dish Network, etc.) and internet protocol TV (U-Verse, Verizon, etc.) utilize an encrypted signal to their set-top box will convert the encrypted signal to either NTCS or ATCS/QAM Clear for viewing on the customer's TV.
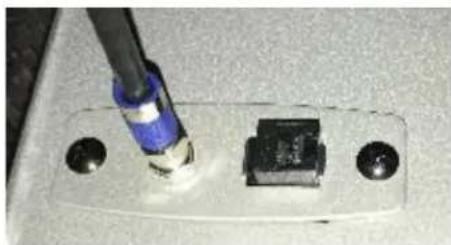
SAMPLES OF CONNECTIVITY PORTS ON TRUE PRODUCTS:

natural_image
Close-up of a metallic electronic device with a cable inserted, showing ports and wiring (no visible text or symbols)
natural_image
Close-up of a black electrical connector with mounting holes and a central socket (no visible text or symbols)
natural_image
Close-up of a mechanical component with wires and a labeled connector (no readable text or symbols)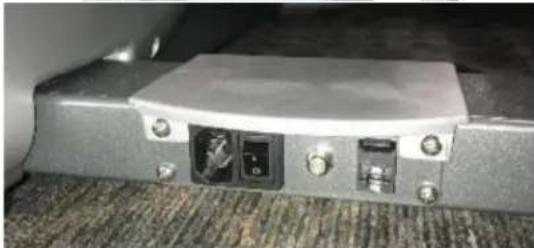
natural_image
Close-up of a gray electronic device with ports and connectors (no visible text or symbols)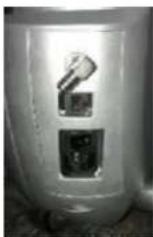
natural_image
Close-up of a screwdriver inserted into a small electronic component on a metal base (no visible text or symbols)Truefitness.com / 800.426.6570 / 636.272.7100 28 of 42
natural_image
Close-up of a mechanical component with a white cable and a labeled switch (no readable text or symbols)
natural_image
Close-up of a gray electronic device with ports and connectors (no visible text or symbols)CHAPTER 4: ENVISION ^16 TOUCHSCREEN CONSOLE TV SOLUTION OPTIONS:
TV Solution Options for TRUE Fitness Equipment:
There are multiple options for presenting TV signal with TRUE Fitness equipment. Here are some options available to your facility.
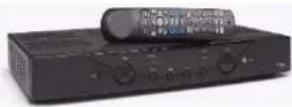
Set-Top Boxes:
With this solution, a small set top box must be installed near each individual piece of TRUE cardio equipment. Your cable company would provide the set-top box. The user would change channels with the remote control, which must be kept near the unit.
Console Adapter Box (C.A.B.) Installation:
A console adapter component redirects TV commands from a TRUE Fitness console to a set-top box without using a remote control. With this solution, a separate component is installed onto the TRUE Fitness console. When a user presses a channel command on the console, the device sends that command directly to the set-top box that is sending TV signal to that machine. Users on the TRUE Fitness equipment will use the channel buttons on the consoles as normal to select their channel.

Includes CAB, 10' IR emitter cable and necessary cables to control (STB) set top box next to cardio equipment or far away. If STB is located far from cardio equipment, customer is responsible for installing unused cat5 or cat6 cable from STB to cardio equipment.
- Enables cardio-console control of ANY cable, satellite or IPTV set-top box. The set-top box can be located next to the cardio equipment or remotely located, back in an A/V closet for instance.
- The CAB is small enough (3" x 1.5" x .75") that it can be hidden on the back of the TV, under the console or in a raceway system.
- The CAB keeps the set top boxes awake so they don't go into sleep mode.
• The CAB allows you to use integrated controls to control set top boxes on popular cardio equipment brands. - The CAB is plug-n-play and does not need to learn IR commands. Unlike some wireless devices that need to learn IR commands in the field, the CAB is pre-programmed prior to shipping and can be easily updated onsite if required.
Satellite Head End System:
With a head end system, a rack is installed in an AV closet. A selection of set-top-boxes is placed on the rack with each box set to a specific channel. The encrypted signal is decrypted and set to the selected channel by each set-top box. This can be digital or analog, depending on the set-top box used. A modulator device takes the signal from all of the boxes and combines it into one, allowing you to send it out to every screen in the facility.
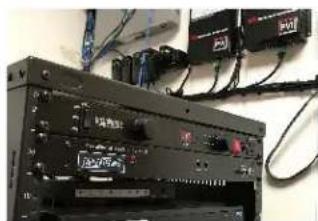
natural_image
Black electronic equipment rack with connected cables and connectors (no visible text or symbols)IPTV:
Another option available for TRUE touchscreen equipment to receive TV signal is an IPTV solution. This requires your facility to have an IP head-end system (example below) in place.
TV signal is then distributed to each console via a Cat5e or Cat6 Ethernet cable with an RJ45 connector and run back to the IPTV head end system. The user controls the TV via on-screen channel control on each individual connected console.

natural_image
Black electronic device with ports and connectors, no visible text or symbolsCHAPTER 4: ENVISION ^16 TOUCHSCREEN CONSOLE INTERNET REQUIREMENTS:
The TRUE Fitness Touchscreen platform supports a wireless internet connection - both wired and wireless internet connections.
If you would like to connect your TRUE Fitness equipment to the internet, you will need at least 1.5Mbps download speed. That amount of bandwidth will allow for any number of TRUE consoles to connect to the internet.
Wireless Internet Requirements:
- A router/gateway and wireless access points must be installed
Wired Internet Requirements:
• A router/gateway must be installed
- Wired connections require a CAT5e or CAT6 cable with RJ45 fittings.
• Bandwidth: TRUE Fitness requires 1.5Mb/s download speed for every four consoles.
- A switch capable of receiving an internet feed from the media gateway and distributing it to all TRUE consoles must be installed.
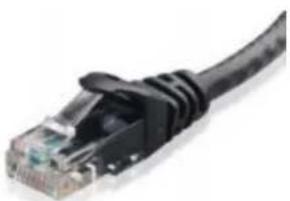
natural_image
Close-up of a black wired Ethernet cable with a network port (no text or symbols visible)
flowchart
graph TD
    A["Wireless Setup"] --> B["Facility Internet"]
    B --> C["Router"]
    D["Wired Setup"] --> E["Facility Internet"]
    E --> F["Router"]
    F --> G["Network Switch"]
    H["Device 1"] --> I["Device 2"]
    J["Device 3"] --> K["Device 4"]
    L["Device 5"] --> M["Device 6"]
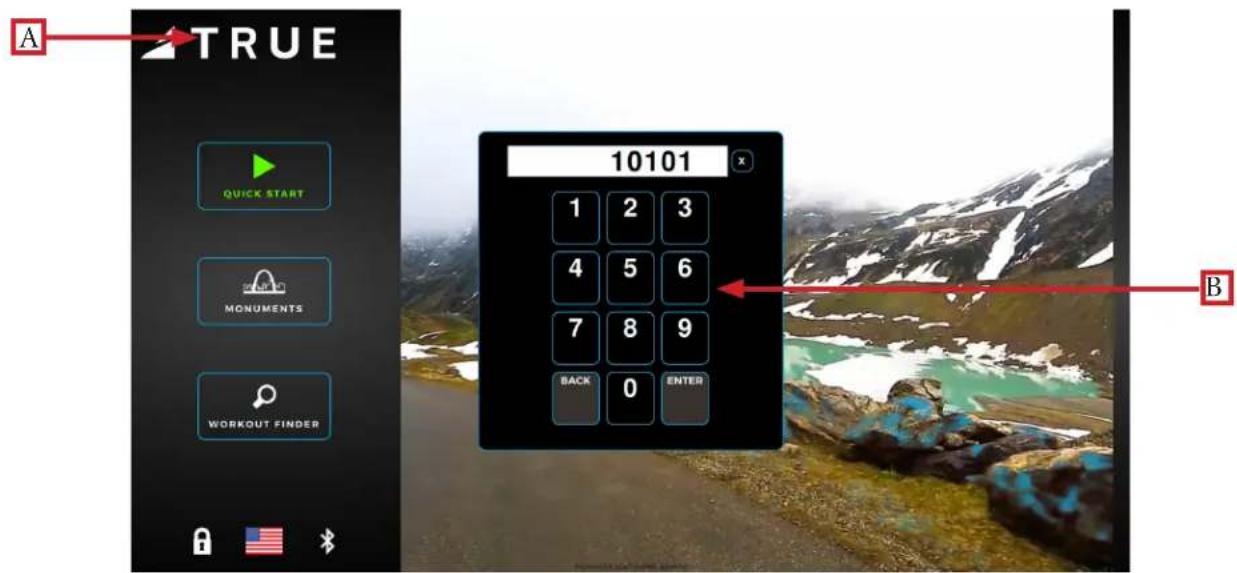
Entering Maintenance Mode:
To enter Maintenance Mode, press and hold the TRUE logo (A) in the upper left corner of the home screen until the Maintenance Mode passcode entry pop-up screen (B) appears. Enter code "10101" to enter Maintenance Mode.
text_image
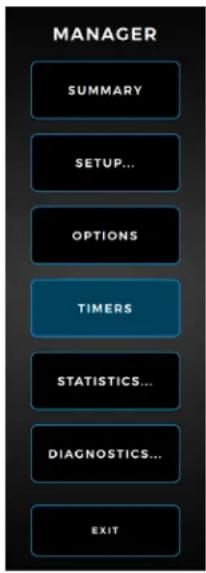
A TRUE QUICK START MONUMENTS WORKOUT FINDER 10101 1 2 3 4 5 6 7 8 9 BACK 0 ENTER BThe Summary Screen will be the first screen displayed after entering service mode. This screen will give a general overview of the unit's setup.
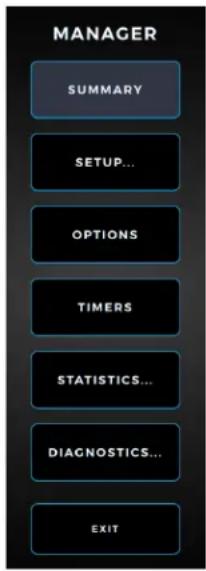
flowchart
graph TD
    A["SUMMARY"] --> B["SETUP..."]
    B --> C["OPTIONS"]
    C --> D["TIMERS"]
    D --> E["STATISTICS..."]
    E --> F["DIAGNOSTICS..."]
    F --> G["EXIT"]
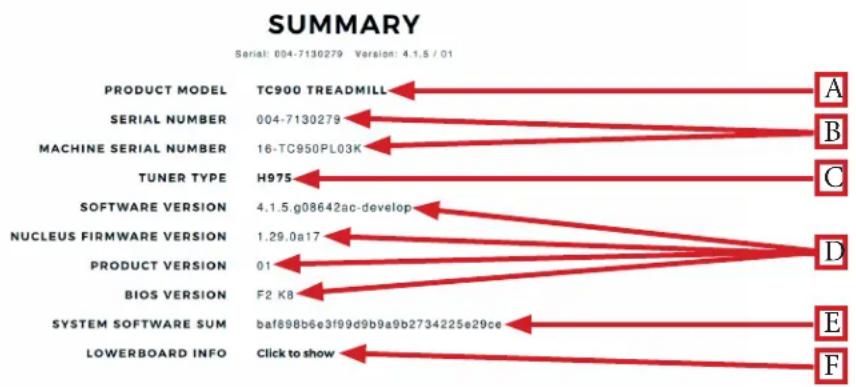
flowchart
graph TD
    A["PRODUCT MODEL"] --> B["TC900 TREADMILL"]
    C["SERIAL NUMBER"] --> D["004-7130279"]
    E["MACHINE SERIAL NUMBER"] --> F["16-TC950PL03K"]
    G["TUNER TYPE"] --> H["H975"]
    I["SOFTWARE VERSION"] --> J["4.1.5.g08642ac-develop"]
    K["NUCLEUS FIRMWARE VERSION"] --> L["1.29.0a17"]
    M["PRODUCT VERSION"] --> N["01"]
    O["BIOS VERSION"] --> P["F2 K8"]
    Q["SYSTEM SOFTWARE SUM"] --> R["baf898b6e3f99d9b9a9b2734225e29ce"]
    S["LOWERBOARD INFO"] --> T["Click to show"]
    U["A"] --> V
    W["B"] --> V
    X["C"] --> V
    Y["D"] --> V
    Z["E"] --> V
    AA["F"] --> V
A) Product Model:
The model number that the console is currently configured to.
B) Serial/Machine Serial Number:
The serial number of the console and serial number of the base unit respectively.
C) Tuner Type:
The type of TV tuner installed in the console.
D) Software Version / Nucleus Firmware Version / Product Version / Bios:
The current versions of software and firmware that are installed on the console.
E) System Software Sum:
Displays OS data that is used in the production of the console.
F) Lowerboard Info:
Displays the model name and version number of the Lowerboard.
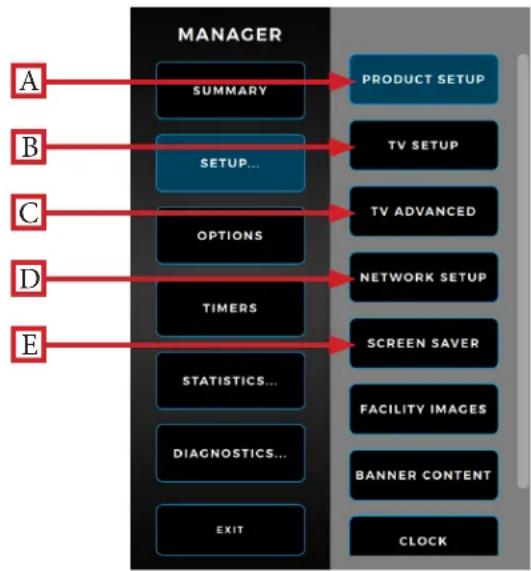
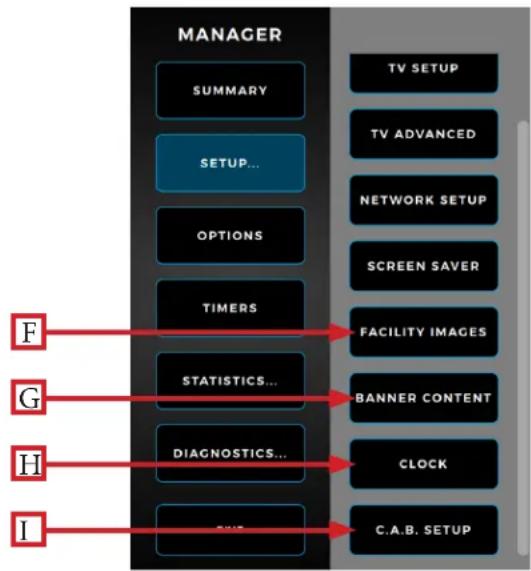
The Setup menu is accessed by selecting the Setup button on the Main menu. The Setup menu is separated into subcategories and enables users to configure the console and set up various functions of the unit.
flowchart
graph LR
    A["A"] --> SUMMARY["SUMMARY"]
    B["B"] --> SETUP["SETUP..."]
    C["C"] --> OPTIONS["OPTIONS"]
    D["D"] --> TIMERS["TIMERS"]
    E["E"] --> STATISTICS["STATISTICS..."]
    STATISTICS --> DIAGNOSTICS["DIAGNOSTICS..."]
    EXIT["EXIT"] --> STATUS["STATUS"]
    STATUS --> TIMERS
    TIMERS --> OPTIONS
    OPTIONS --> TIMERS
    TIMERS --> STATUS
    STATUS --> OUTPUT["PRODUCT SETUP"]
    OUTPUT --> TV_SETUP["TV SETUP"]
    OUTPUT --> TV_ADVANCED["TV ADVANCED"]
    OUTPUT --> NETWORK_SETUP["NETWORK SETUP"]
    OUTPUT --> SCREEN_SAVER["SCREEN SAVER"]
    OUTPUT --> FACILITY_Images["FACILITY IMAGES"]
    OUTPUT --> BANNER_CONTENT["BANNER CONTENT"]
    OUTPUT --> CLOCK["CLOCK"]
natural_image
Product image of a standard tread machine (no visible text or symbols on the device itself)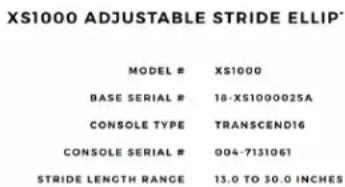
text_image
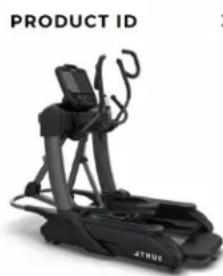
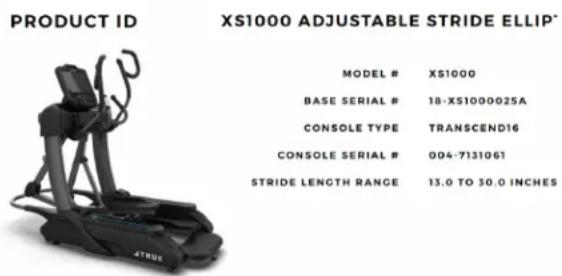
XS1000 ADJUSTABLE STRIDE ELLIP* MODEL # XS1000 BASE SERIAL # 18-XS1000025A CONSOLE TYPE TRANSCEND16 CONSOLE SERIAL # 004-7131061 STRIDE LENGTH RANGE 13.0 TO 30.0 INCHESA) Product Setup:
The Product Setup screen allows users to view the current console configuration. To view the console configuration, select the Product Setup button. Note: If the optional decline kit is installed, select "YES, DECLINE" to enable decline functionality. A power cycle will be required to complete the process.
B) TV Setup:
The Envision ^16 touchscreen console displays live TV programming via an integrated HDTV tuner or IPTV internet protocol if connected to the Internet. Importing and exporting TV setup data can also be done via the TV Setup menu.
C) TV Advanced:
The TV Advanced Menu enables users to fine tune their TV settings by editing channel names, adding analog channels, and removing channels.
D) Network Setup:
The Network Setup screen displays the current network information for the console. This screen also allows users to setup wired or wireless internet connection and enable web browsing.
E) Screen Saver:
Users can upload .JPG and .PNG image files to the console for use as custom screen savers. Images saved as .JPG or .PNG files and placed on a USB drive in a folder named “screen saver” (case sensitive) are selectable in this screen for use. Screen saver time, dim display time, and sleep timer (backlight off) are available customization options in this screen.
The Setup menu is accessed by selecting the Setup button on the Main menu. The Setup menu is separated into subcategories and enables users to configure the console and set up various functions of the unit.
flowchart
graph LR
    A["MANAGER"] --> B["SUMMARY"]
    A --> C["SETUP..."]
    A --> D["OPTIONS"]
    A --> E["TIMERS"]
    A --> F["STATISTICS..."]
    A --> G["DIAGNOSTICS..."]
    A --> H["TIME..."]
    A --> I["TV SETUP"]
    A --> J["TV ADVANCED"]
    A --> K["NETWORK SETUP"]
    A --> L["SCREEN SAVER"]
    A --> M["FACILITY IMAGES"]
    A --> N["BANNER CONTENT"]
    A --> O["CLOCK"]
    A --> P["C.A.B. SETUP"]
text_image
PRODUCT ID XS1000 ADJUSTABLE STRIDE ELLIP* MODEL # XS1000 BASE SERIAL # 18-XS1000025A CONSOLE TYPE TRANSCEND16 CONSOLE SERIAL # 004-7131061 STRIDE LENGTH RANGE 13.0 TO 30.0 INCHESF) Facility Images:
The console supports customizable facility images to help promote specials, events, or endorse a brand. Images saved as .JPG or .PNG files and placed on a USB drive in a folder named “facility” (case sensitive) are selectable in this screen for use.
G) Banner Content:
On the Home screen, users can upload .mov media files to replace the default Home Screen video that appear.
Media files saved as .mpg, .mpeg, .avi, or .mp4 files and placed on a USB drive in a folder named "attract" (case sensitive)
are selectable in this screen for use. Note: Only one video or image file in that folder can be used.
H) Clock:
Setting up the clock ensures all workout data exported by the user is correctly labeled. Correct time is also important for troubleshooting purposes when viewing the system's error log.
I) C.A.B Setup:
This console is compatible with the Broadcast Vision CAB System. These options should remain inactive unless the system has been purchased through Broadcast Vision. Please refer to the instructions that accompanied the CAB system for setup instructions.
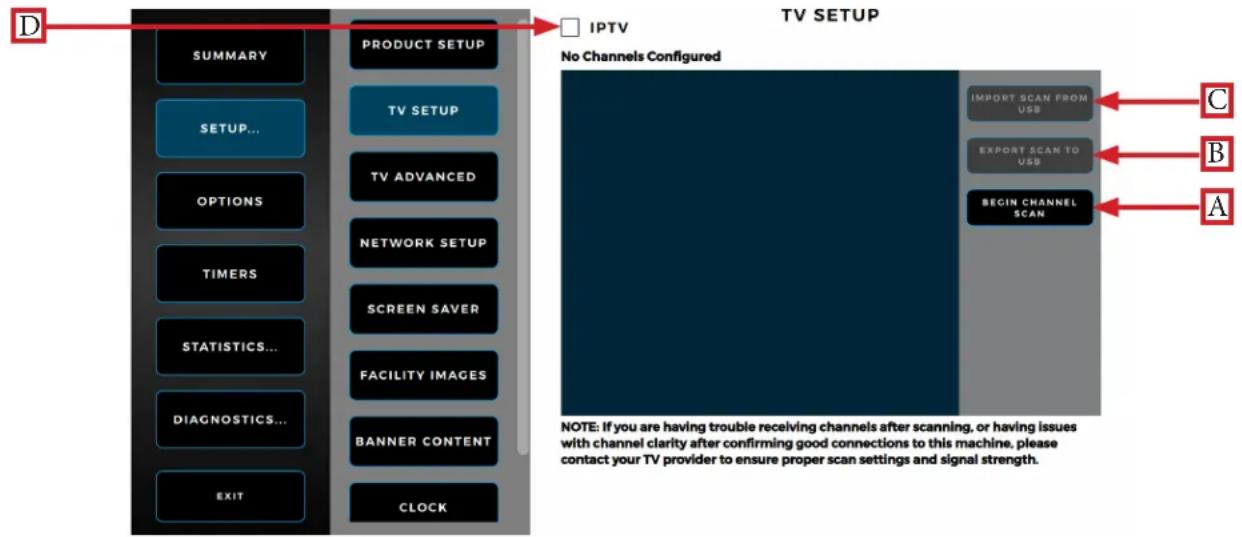
Select the Begin Channel Scan (A) button and follow the on-screen prompts to complete the TV channel scan. The Export Scan to USB (B) button will export TV channel scan settings to an external USB drive connected to the console. The Import Scan from USB (C) button will import TV channel scan settings from an external USB drive connected to the console. Select the IPTV (D) button to enable IPTV and the console will automatically search for IPTV channels
Note: The Envision ^16 touchscreen console is capable of displaying IPTV content, but many IPTV providers require the use of a proprietary set-top box.
Note: The TV icon will not appear in the Workout View Screen menu until the TV setup steps are complete.
flowchart
graph TD
    A["SUMMARY"] --> B["PRODUCT SETUP"]
    C["SETUP..."] --> D["TV SETUP"]
    E["OPTIONS"] --> F["TV ADVANCED"]
    G["TIMERS"] --> H["NETWORK SETUP"]
    I["STATISTICS..."] --> J["SCREEN SAVER"]
    K["DIAGNOSTICS..."] --> L["FACILITY IMAGES"]
    M["EXIT"] --> N["BANNER CONTENT"]
    O["CLOCK"] --> P["CLOCK"]
    Q["IPTV"] --> R["TV SETUP"]
    S["No Channels Configured"] --> T["IMPORT SCAN FROM USB"]
    S --> U["EXPORT SCAN TO USB"]
    S --> V["BEGIN CHANNEL SCAN"]
    W["A"] --> X["B"]
    W --> Y["C"]
    W --> Z["B"]
    W --> AA["C"]
    style A fill:#333,stroke:#fff,color:#fff
    style C fill:#333,stroke:#fff,color:#fff
    style E fill:#333,stroke:#fff,color:#fff
    style G fill:#333,stroke:#fff,color:#fff
    style I fill:#333,stroke:#fff,color:#fff
    style M fill:#333,stroke:#fff,color:#fff
    style O fill:#333,stroke:#fff,color:#fff
    style Q fill:#333,stroke:#fff,color:#fff
    style S fill:#333,stroke:#fff,color:#fff
    style W fill:#333,stroke:#fff,color:#fff
    note right of A: Note: If you are having trouble receiving channels after scanning, or having issues with channel clarity after confirming good connections to this machine, please contact your TV provider to ensure proper scan settings and signal strength.
    note right of A: No Channels Configured
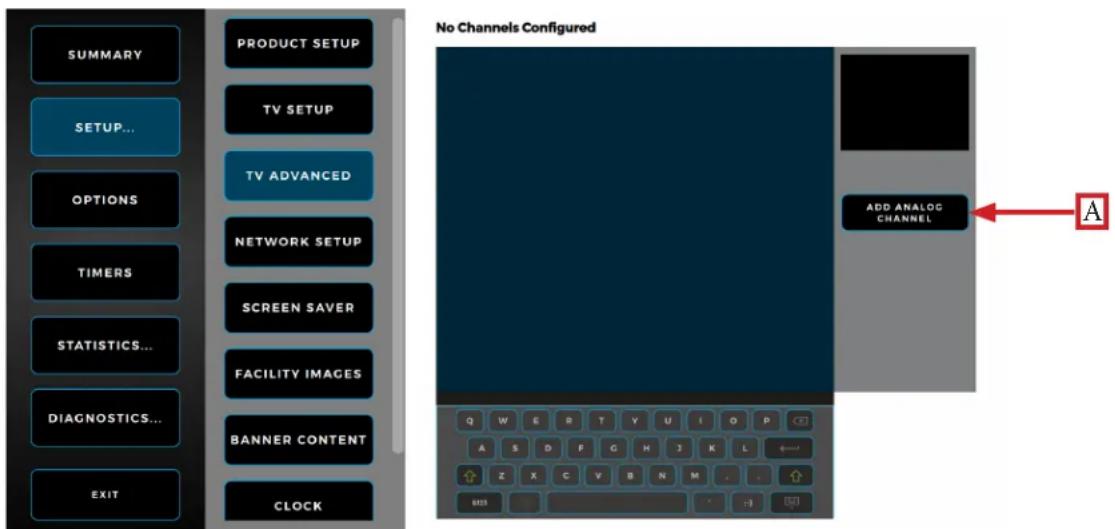
TV Advanced Sub-Menu:
To add a TV channel, select the Add Analog Channel (A) button and enter the corresponding channel data. To delete a channel, select the channel from the available channels and then select the delete channel button (not shown) to delete; the Select Multiple Channels button (not shown) enables users to delete multiple selected channels at once. To change the channel name from the default name of “Service #,” select the corresponding TV icon and edit the name; The on-screen keyboard will appear when the channel name is editable.
text_image
SUMMARY SETUP... OPTIONS TIMERS STATISTICS... DIAGNOSTICS... EXIT PRODUCT SETUP TV SETUP TV ADVANCED NETWORK SETUP SCREEN SAVER FACILITY IMAGES BANNER CONTENT CLOCK No Channels Configured ADD ANALOG CHANNEL ATruefitness.com / 800.426.6570 / 636.272.7100 35 of 42
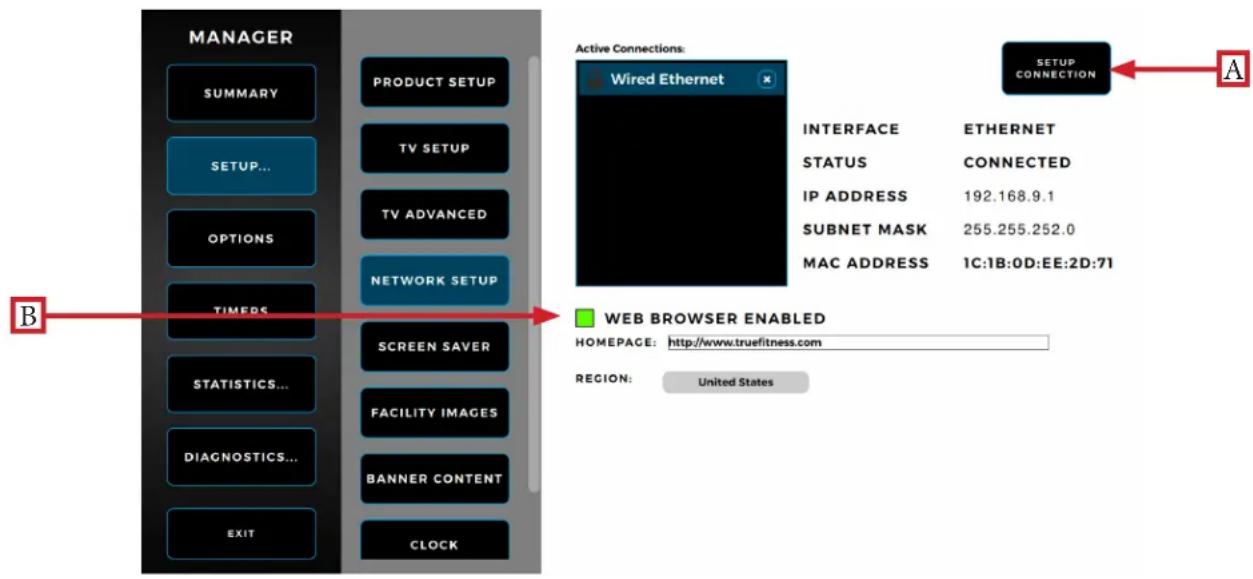
The Network Setup sub-menu displays the current network information for the console. To connect to a network, select the Setup Connection button (A) and follow the on-screen prompts to connect. To enable web browsing during a workout, select the Web Browser Enabled (B) button and enter the default homepage in the Homepage field.
flowchart
graph LR
    A["MANAGER"] --> B["SUMMARY"]
    A --> C["PRODUCT SETUP"]
    A --> D["TV SETUP"]
    A --> E["TV ADVANCED"]
    A --> F["TIMERS"]
    A --> G["NETWORK SETUP"]
    A --> H["SCREEN SAVER"]
    A --> I["FACILITY IMAGES"]
    A --> J["BANNER CONTENT"]
    A --> K["CLOCK"]
    L["ACTIVE CONNECTIONS"] --> M["Wired Ethernet"]
    M --> N["INTERFACE: ETHERNET"]
    M --> O["STATUS: CONNECTED"]
    M --> P["IP ADDRESS: 192.168.9.1"]
    M --> Q["SUBNET MASK: 255.255.252.0"]
    M --> R["MAC ADDRESS: 1C:1B:0D:EE:2D:71"]
    S["WEB BROWSER ENABLED"] --> T["HOMEPAGE: http://www.truefitness.com"]
    U["REGION: United States"] --> V
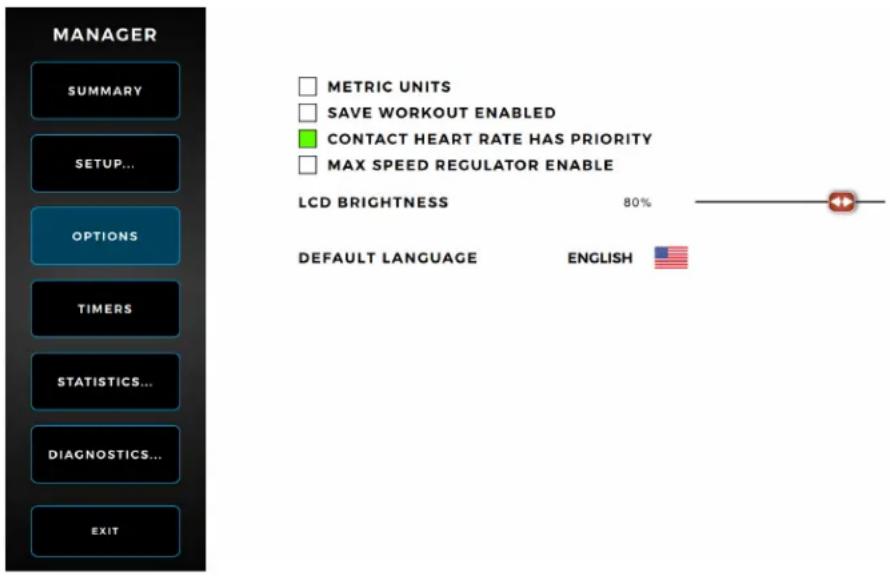
Options Menu:
The Options menu is accessed by selecting the Options button on the Main menu. The Options menu provides various customization options such as adjusting the LCD brightness and setting the default language.
text_image
MANAGER SUMMARY SETUP... OPTIONS TIMERS STATISTICS... DIAGNOSTICS... EXIT □ METRIC UNITS □ SAVE WORKOUT ENABLED ■ CONTACT HEART RATE HAS PRIORITY □ MAX SPEED REGULATOR ENABLE LCD BRIGHTNESS 80% DEFAULT LANGUAGE ENGLISHThe Timers menu is accessed by selecting the Timers button on the Main menu. The Timers menu enables users to adjust various timer settings throughout the console menus such as post-workout cooldown time and maximum workout time.
flowchart
graph TD
    A["SUMMARY"] --> B["SETUP..."]
    B --> C["OPTIONS"]
    C --> D["TIMERS"]
    D --> E["STATISTICS..."]
    E --> F["DIAGNOSTICS..."]
    F --> G["EXIT"]

text_image
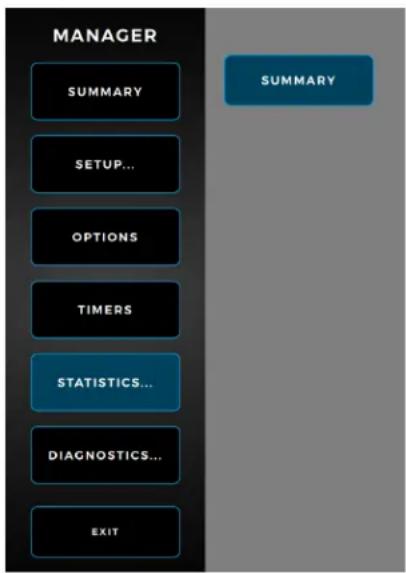
COOLDOWN TIME 05:00 MAXIMUM WORKOUT TIME 60:00 WORKOUT SETUP TIMEOUT 00:45 WORKOUT SUMMARY TIMEOUT 01:00 PAUSE TIMER 01:00Statistics Screen:
The Statistics menu is accessed by selecting the Statistics button on the Main menu. The Statistics menu provides statistical data about belt motor usage.
Note: The specific statistics shown below will vary based on the base unit attached.
flowchart
graph TD
    A["MANAGER"] --> B["SUMMARY"]
    A --> C["SETUP..."]
    A --> D["OPTIONS"]
    A --> E["TIMERS"]
    A --> F["STATISTICS..."]
    A --> G["DIAGNOSTICS..."]
    A --> H["EXIT"]
    I["SUMMARY"] --> J

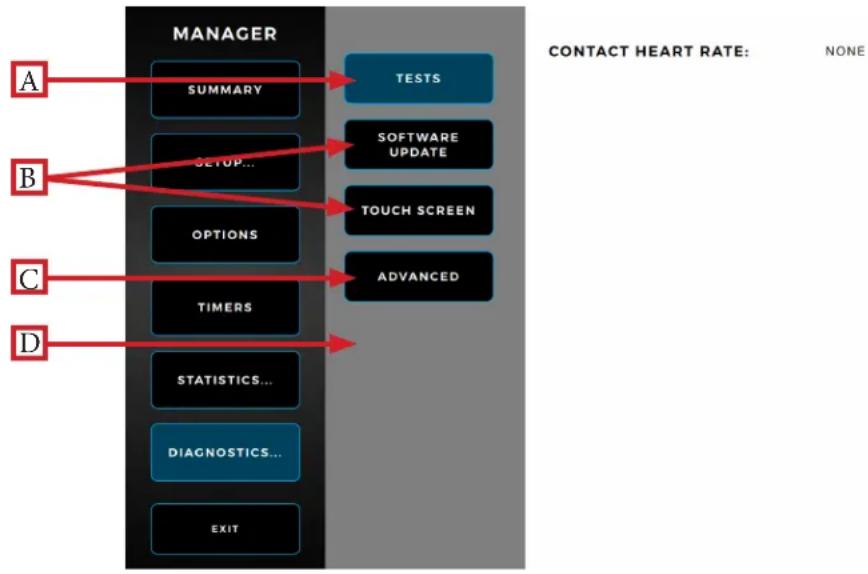
The Diagnostics menu is accessed by selecting the Diagnostics button on the Main menu. The Diagnostics menu enables users to perform various diagnostics on the console to aid in identifying errors and performance issues.
flowchart
graph LR
    A["A"] --> M["SUMMARY"]
    B["B"] --> N["SETUP..."]
    C["C"] --> O["OPTIONS"]
    D["D"] --> P["TIMERS"]
    M --> Q["TESTS"]
    N --> R["SOFTWARE UPDATE"]
    O --> S["TOUCH SCREEN"]
    P --> T["ADVANCED"]
    U["STATISTICS..."] --> V["DIAGNOSTICS..."]
    W["EXIT"] --> X["EXIT"]
A) Tests:
The user may perform tests to diagnose any console or base unit errors.
B) Software/Nucleus Updates:
TRUE may periodically release software and Nucleus updates to enhance the workout experience. Due to the complex nature of this procedure, it is recommended that a TRUE certified service professional performs any software and Nucleus updates.
C) Touch screen:
Touch input calibration for the console touch screen is performed in the Touch Screen menu. Select the Calibrate button on the Touch Screen menu and follow the on-screen prompts to calibrate the touch input using a stylus or finger.
D) Advanced:
The Advanced menu contains multiple tools that are used in the production of the console and for demonstration purposes. It is recommended to leave these settings in their default positions.
CHAPTER 4: ENVISION ^16 TOUCHSCREEN CONSOLE APPLE GYMKIT TECHNOLOGY:
Pairing:
Accurately and efficiently track your cardio workouts by pairing an Apple Watch with the following Apple GymKit-enabled TRUE cardio machines:
Note: The Bluetooth module is separate from the NFC (Near Field Communications) module containing the Apple GymKit functionality as they are housed in different locations within the Envision and Envision with COMPASS consoles. Therefore, an Apple Watch paired via the NFC module and a Bluetooth-enabled device (i.e. mobile device or wireless earbuds) paired via the Bluetooth module all on the same Envision or Envision with COMPASS console can function at the same time.
For more information on Apple GymKit functionality including pairing based on your Apple Watch operating system version, refer to the following link: Use gym equipment with Apple Watch
Note: Apple GymKit functionality on the Envision ^16 console is an optional upgrade.
WIRELESS CHARGING TECHNOLOGY:
Wireless Charging:
For mobile devices capable of wireless charging, the Envision ^16 console can wirelessly charge those devices.
Simply place the mobile device within the wireless charging boundary box on the reading rack and the Envision ^16 console will automatically charge the mobile device.
Contact the mobile device manufacturer for details regarding wireless charging capability on a particular mobile device.
Note: Wirelessly charging a mobile device will not interrupt Bluetooth connectivity or Wi-Fi connectivity. For example, the Envision ^16 console will wirelessly charge an iPhone ^® positioned within the wireless charging boundary box on the reading rack while maintaining the ability to connect to the iPhone via Bluetooth.
Note: Wirelessly charging a mobile device will not interrupt the screen mirroring of a mobile device to the Envision ^6 console connected via a HDMI to lightening conversion cable for iPhone or HDMI to USBc conversion cable for Android.
CHAPTER 4: ENVISION ^16 TOUCHSCREEN CONSOLE CONSOLE ASSEMBLY:
Console Wire Connections:
Connect the Auxiliary Power Supply (A), Coaxial Cable (B), USB Data Cable (C), Ethernet Communication Cable (D), Console Fan (E), and Ground Wire Ring Terminal (F) as shown below. Tuck the CSAFE cable (G) and any excess cord length inside the pedestal.
Note: Ensure the rubber boot is positioned over the coaxial cable connection point after making the connection (B).
Note: Refer to the respective unit manual included with your unit for console mast and rear console cover assembly.
Note: Before connecting the power source and mounting the console to the unit, connect the USB data cable. When removing the console from the base unit, power down the console and remove from the console mast before disconnecting the USB data cable.

text_image
B A C GND GND D E F GCHAPTER 5: CUSTOMER SERVICE
CONTACTING SERVICE:
TRUE Fitness recommends that you gather the serial number, model number, and a brief description of the reason for the request. After information has been gathered you may choose to contact your selling dealer or local service company to set an appointment. (If you are not familiar with who is in your area, you may visit our website at www.truefitness.com and use our dealer locator to obtain the contact information for the closest dealer).
You may also contact TRUE Fitness' customer support team by calling 800.883.8783 or e-mailing us at service@truefitness.com Monday – Friday during normal business hours.
TRUE FITNESS SERVICE DEPARTMENT
865 HOFF ROAD
ST. LOUIS, MO 63366
1.800.883.8783
HOURS OF OPERATION: 8:30 A.M. - 5:00 P.M. CST
E-MAIL: service@truefitness.com
CONTACTING SALES:
Interested in TRUE Products? Please contact us with any sales or product inquires so that we may direct you to the appropriate sales representative to answer your questions.
E-MAIL: sales@truefitness.com
CHAPTER 5: CUSTOMER SERVICE
REPORTING FREIGHT OR PARTS DAMAGE:
Unfortunately, sometimes materials can be damaged during shipment. If materials are damaged during shipment, please follow the guidelines below to determine the appropriate process for you to follow in case of damages.
Severe Damage:
Obvious damage to external packaging / internal product. Please refuse the shipment and it will be returned to TRUE Fitness by the carrier. Contact the TRUE Fitness customer support team by calling 800.883.8783 or sales support team by calling 800.426.6570 Monday-Friday during normal business hours to notify us that the shipment has been refused. Once we have received the damaged shipment, a replacement shipment will be sent to you. Only refuse the damaged piece if the shipment is multiple boxes.
Slight Damage:
The box may have minimal damages and you are not sure if the actual product is damaged or not. You must sign the bill of lading as damaged when accepting the shipment. Once you have opened the box and you have determined something is indeed damaged please gather the serial number, model number, description and photos of damages. Please make sure the photos include the damaged product as well as the damaged box the product arrived in. Contact the TRUE Fitness customer support team by calling 800.883.8783 or sales support team by calling 800.426.6570 Monday-Friday during normal business hours.
Concealed Damage:
You may receive a shipment that looks intact and discover once the box has been opened that there are hidden damages. Please notify the carrier immediately. We will not be able to file a claim if the carrier is not notified in a timely manner. Once you have called the carrier you will need to gather the serial number, model number, description and photos of damages. Contact the TRUE Fitness customer support team by calling 800.883.8783 or sales support team by calling 800.426.6570 Monday-Friday during normal business hours.
WARRANTY:
NOTICE
For unit and console warranty information, refer to the Warranty Information chapter in the unit manual.