KMS2909 - Hi-Fi System Kunft - Free user manual and instructions
Find the device manual for free KMS2909 Kunft in PDF.

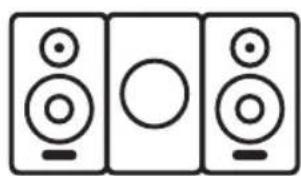
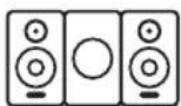
| Product Type | Mini Hi-Fi System |
| Brand | Kunft |
| Model | KMS2909 |
| Output Power (RMS) | 2 x 50W |
| Speaker Drivers | 6.5" x 2 |
| Speaker Frequency Response | 20Hz – 20KHz |
| Bluetooth Version | 2.1 + EDR |
| Bluetooth Range | 10 meters |
| FM Frequency Range | 87.5 – 108 MHz |
| Disc Formats Supported | CD, CD-R, CD-RW, HDCD, MP3, WMA |
| USB Playback | MP3, WMA (FAT16/32) |
| Additional Inputs | AUX IN (3.5 mm), earphone jack |
| Power Supply | AC 100-240V ~ 50/60Hz |
| Player Dimensions (W x D x H) | 215 x 270 x 330 mm |
| Speaker Dimensions (each) | 215 x 230 x 330 mm |
| Product Weight | 9.8 kg |
| Remote Control Battery | 1 x CR2025 (included) |
| CD Ripping | Yes (via USB) |
| Display | LED |
| Warranty | 2 years against manufacturing defects |
| Cleaning Instructions | Use a dry, soft cloth. Unplug before cleaning. |
| Safety Class | Class 1 Laser Product |
Frequently Asked Questions - KMS2909 Kunft
User questions about KMS2909 Kunft
0 question about this device. Answer the ones you know or ask your own.
Ask a new question about this device
Download the instructions for your Hi-Fi System in PDF format for free! Find your manual KMS2909 - Kunft and take your electronic device back in hand. On this page are published all the documents necessary for the use of your device. KMS2909 by Kunft.
USER MANUAL KMS2909 Kunft
natural_image
Three black and silver Kurofti audio modifiers with speaker heads and central hub (no visible text or symbols)
natural_image
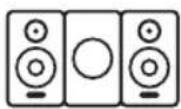
Three identical speaker icons in a row, each with a circular body and base (no text or symbols)mini hi-fi system
is perfectly enough
KMS2909
kunft.®
DECLARATION OF CONFORMITY
DECLARE THAT PRODUCT:
DELARAMOS QUE EL PPRODUCTO:
DECLARAMOS QUE O PRODUTO:
BLUETOOTH BRAND KUNFT MINI HI FI SYSTEM
BLUETOOTH MARCA KUNFT MINICADENA
BLUETOOTH MARCA KUNFT SISTEMA MINI
IS IN CONFORMITY WITH THE FOLLOWING EEC DIRECTIVES,
INCLUDING AMENDMENTS TO THE CORRECT DATE.
ESTÁ EN CONFORMIDAD COM LAS DIRETIVAS EUROPEAS,
INCLUSO LOS RESPETIVOS ADITAMENTOS
DE ATUALIZACIONES.
ESTÁ EM CONFORMIDADE COM AS DIRETIVAS EUROPEIAS,
INCLUINDO OS RESPETIVOS ADITAMENTOS
DE ATUALIZAÇÕES.
DIRECTIVA 2014/53/UE (RTTE)
DIRECTIVE 2014/53/UE (RTTE)
DIRECTIVA 2014/35/UE (LVD)
DIRECTIVE 2014/35/UE (LVD)
DIRECTIVA 2014/30/EU (EMC)
DIRECTIVE 2014/30/EU (EMC)
DIRECTIVA 2011/65/EU (ROHS)
DIRECTIVE 2011/65/EU (ROHS)
2


mini hi-fi system
KMS2909
EN
Dear client,
We thank you for purchasing this product.
This appliance was submitted to several laboratorial tests, which certify its quality. To simplify the use of this appliance, this instruction manual has been provided.
The instructions must ensure a quick and safe use.
Please read carefully the instructions and safety measures described in this manual.
We wish our clients great satisfaction in using their new appliance.
kunft.
INDEX
- SAFETY INSTRUCTIONS .... 5
1.1. Power Supply 6
1.2. Power Cord and Other Cables ..... 7
1.3. Humidity and Water ..... 7
1.4. Cleaning 7
1.5. General Precautions ...... 7
- OPERATING INSTRUCTIONS 12
2.1. Product Description.... 12
2.2. Using the Product ...... 12
2.3. Troubleshooting 24
-
TECHNICAL SPECIFICATIONS 27
-
POST-SALE SERVICE 28
-
ENVIRONMENTAL PROTECTION 28
4

mini hi-fi system
KMS2909
EN
1. SAFETY INSTRUCTIONS
 | WARNING |  |
| Risk of Electric ShockDo Not Open | ||
| Warning: to avoid the risk of electric shock, do not remove the cover.The interior does not contain any parts that can be repaired by the user. Ask for assistance by qualified personnel. | ||
Important Warnings
Before using your appliance read this instructions manual carefully and keep it in a safe place as you may need to consult it in the future.
Before turning on your appliance, and to ensure a safe and correct operation, do not use if:
- It has fallen to the ground;
- You notice any evidence of damage;
- Any anomaly occurs during its operation.
To avoid hazards or deterioration of your appliance through incorrect use it is advisable to read these instructions thoroughly.
Your appliance may not be used for other purposes than the ones intended and solely for household use. Any damage resulting from using the appliance outside this scope, any incorrect use, as well as any ma-
kunft.®
nual modifications to the product will not be covered and automatically voids the warranty.
Assistance
In case of malfunction, take your appliance to a qualified technician for assistance.
This appliance can be used by children from the age of 8 and by people with reduced physical, sensorial or mental capabilities and/or lack of experience and knowledge if they have been given instructions on using the appliance safely and if they understand the hazards involved. Children may not play with the appliance. Cleaning and maintenance must not be carried out by children without supervision.
These instructions are also available at www.suporteworten.pt
1.1. Power Supply
Make sure the main voltage is compatible with the appliance's. If this is not the case please consult the Customer Support Service.

mini hi-fi system
KMS2909
EN
1.2. Power Cord and Other Cables
Do not tangle the cord or pull it to disconnect the appliance. Also, keep the cord away from warm surfaces.
Never use the appliance if it has a damaged cable or socket.
Take it to the Technical Support Service for replacement.
1.3. Humidity and Water
Do not use your appliance in humid places. Do not allow the appliance to become wet under any circumstances as this may be dangerous. To avoid fire hazard or electric shock do not expose your appliance to humidity or water. Furthermore, do not place your appliance under water (e.g. for cleaning).
1.4. Cleaning
Before cleaning, be sure to switch off the appliance and remove the plug from the main power supply. Always allow the unit to cool down before cleaning.
To clean the exterior of the product use a dry soft cloth only.
1.5. General Precautions
- Please follow the instructions in the user manual which help to properly install and operate this product and enjoy its advanced features. Please keep the instructions for future reference.
kunft.®
- Read all instructions before using the product.
- Maintenance and service operations are only to be carried out by authorized professionals.
- Any damage caused by manual modifications to the product is not covered by the warranty.
- If this product is used for other purposes than the ones originally intended, or if it is not correctly connected, the product may become damaged and the warranty will be voided.
- Do not use this appliance near water.
- Clean only with a dry cloth.
- Do not block any ventilation openings. Install in accordance with the manufacturer's instructions.
- Do not install near any heat sources such as radiators, heat registers, stoves, or other appliances (including amplifiers) that produce heat.
- Do not defeat the safety purpose of the polarized or grounding-type plug. A polarized plug has two blades with one wider than the other. A grounding type plug has two blades and a third grounding prong. The wide blade or the third prong is provided for your safety. If the provided plug does not fit into your outlet, consult an electrician for replacement of the obsolete outlet.

mini hi-fi system
KMS2909
EN
- Protect the power cord from being walked on or pinched particularly at plugs, convenience receptacles, and the point where they exit from the appliance.
- Only use attachments/accessories specified by the manufacturer.
- Use only with the cart, stand, tripod, bracket, or table specified by the manufacturer, or sold with the appliance. When a cart is used, use caution when moving the cart/appliance combination to avoid injury from tip-over.
- Unplug this appliance during lightning storms or when unused for a long period of time.
- Refer all servicing to qualified service personnel. Servicing is required when the appliance has been damaged in any way, such as when the power-supply cord or plug is damaged, liquid has been spilled or objects have fallen into the appliance, the appliance has been exposed to rain or moisture, does not operate normally, or has been dropped.
• Damage Requiring Service
Unplug the appliance from the wall outlet and refer to servicing by qualified service personnel under the following conditions:
A. When the power supply cord or plug is damaged,
B. If liquid has been spilled, or objects have fallen into the appliance,
kunft.
C. If the appliance has been exposed to rain or water,
D. If the appliance does not operate normally by following the operating instructions. Adjust only those controls that are covered by the operating instructions as an improper adjustment of other controls that may result in damage and will often require extensive work by a qualified technician to restore the appliance to its normal operation,
E. If the appliance has been dropped or damaged in any way, and
F. When the appliance shows a distinct change in performance, this indicates a need for service.
- Object and Liquid Entry
Never push objects of any kind into the appliance through openings as they may touch dangerous voltage points or short out parts that could result in a risk of fire or electric shock.
The appliance shall not be exposed to dripping or splashing and no objects filled with liquids, such as vases shall be placed on the appliance. Don't put candles or other burning objects on top of this unit.
- Batteries
Always consider the environmental issues and follow local regulations when disposing of batteries.

mini hi-fi system
KMS2909
EN
- If you install the appliance in a built-in installation, such as a bookcase or rack, ensure that there is adequate ventilation.
Leave 20 cm (8") of free space at the top and sides and 10 cm (4") at the rear. The rear edge of the shelf or board above the appliance should be set 10 cm (4") away from the rear panel or wall, creating space for warm air to escape.


kunft.
2. OPERATING INSTRUCTIONS
2.1. Product Description
- 100W power (R.M.S.): 2 x 50W
- Built-in CD / CD-R / CD-RW/ HDCD / MP3 / WMA player
- Bluetooth wireless music streaming
- FM radio with auto-scan and memory
- LED display
- CD ripping
- USB port
- AUX-IN
- Earphone jack
- Remote control
2.2. Using the Product
Precautions
-
Recording Copyright — Unless it's for personal use only, recording copyrighted material is illegal without the permission of the copyright holder.
-
AC Fuse — The AC fuse inside the unit is not user-serviceable. If you cannot turn on the unit, contact your dealer.
-
Care — Occasionally, you should dust the unit with a soft cloth. For stubborn stains, use a soft cloth dampened with a weak solution of mild detergent and water. Dry the unit immediately afterwards with a clean cloth. Do not use abrasive cloths, thinners, alcohol, or other chemical solvents, because they may damage the finish or remove the panel lettering.
4. Power
WARNING
BEFORE PLUGGING IN THE UNIT FOR THE FIRST TIME, READ THE FOLLOWING SECTION CAREFULLY.
Make sure that the voltage in your area meets the voltage requirements printed on the unit's rear panel (e.g., AC 100-240 V, 50/60 Hz).
The power cord plug is used to disconnect this unit from the AC power source. Make sure that the plug is easily accessible at all times.
Pressing the [POWER] button to select the OFF mode does not fully disconnect from the mains. If you do not intend to use the unit for an extended period, remove the power cord from the AC outlet.


mini hi-fi system
KMS2909
EN
5. Preventing Hearing Loss
Caution
Excessive sound pressure from earphones and headphones can cause hearing loss.
6. Batteries and Heat Exposure
Warning
Batteries (battery pack or batteries installed) should not be exposed to excessive heat as sunshine, fire or the like.
- Never Touch this Unit with Wet Hands — Never handle this unit or its power cord while your hands are wet or damp. If water or any other liquid gets inside this unit, have it checked by your dealer.
8. Handling Notes
- If you need to transport this unit, use the original packaging to pack it how it was when you originally purchased it.
- Do not leave rubber or plastic items on this unit for a long time, because they may leave marks on the case.
- This unit's top and rear panels may become warm after prolonged use. This is normal.
- If you do not use this unit for a long time, it may not work properly the next time you turn it on, so be sure to use it occasionally.
- When you've finished using this unit, remove all the discs and turn off the power.
9. Installing this Unit
• Install this unit in a well-ventilated location.
- Ensure that there's adequate ventilation all around this unit, especially if it's installed in an audio rack. If the ventilation is inadequate, the unit may overheat, leading to malfunction.
- Do not expose this unit to direct sunlight or heat sources, because its internal temperature may rise, shortening the life of the optical pickup.
- Avoid damp and dusty places, and places subject to vibrations from loudspeakers. Never place the unit on top of, or directly above a loudspeaker.
- Install this unit horizontally. Never use it on its side or on a sloping surface, because it may cause a malfunction.
- If you install this unit near a TV, radio, or VCR, the picture and sound quality may be affected. If this occurs, move this unit away from the TV, radio, or VCR.
10. Moisture Condensation
Moisture condensation may damage this unit.
Read the following carefully:
Moisture may condense on the lens of the optical pickup, one of the most important parts inside this unit.
kunft.®
- Moisture condensation can occur in the following situations:
- The unit is moved from a cold place to a warm place.
- A heater is turned on, or cool air from an air conditioner is reaching the unit.
- In the summer, when this unit is moved from an air-conditioned room to a hot and humid place.
- The unit is used in a humid place.
- Do not use this unit when there's the possibility of moisture condensation occurring. Doing so may damage your discs and certain parts inside this unit.
If condensation does occur, unplug the power cord and leave the unit for two to three hours in room temperature.
This unit contains a semiconductor laser system and is classified as a "CLASS 1 LASER PRODUCT". So, to use this model properly, read this Instruction Manual carefully. In case of any trouble, please contact the store where you purchased the unit. To prevent being exposed to the laser beam, do not try to open the enclosure.
CAUTION:
CLASS 1M VISIBLE AND INVISIBLE LASER RADIATION WHEN OPEN. DO NOT VIEW DIRECTLY WITH OPTICAL INSTRUMENTS.

THIS PRODUCT EMPLOYS A LASER. USE OF CONTROLS OR ADJUSTMENTS OR PERFORMANCE OF PROCEDURES OTHER THAN THOSE SPECIFIED HEREIN MAY RESULT IN HAZARDOUS RADIATION EXPOSURE.
The label on the right is applied on the rear panel.
-
This unit is a CLASS 1 LASER PRODUCT and employs a laser inside the cabinet.
-
To prevent the laser from being exposed, do not remove the cover. Refer servicing to qualified personnel.
Before Using Your New Speakers
- Place the speakers on sturdy, flat surfaces. Avoid placing them on uneven or unstable surfaces, where they may fall and cause damage and affect the sound quality.
- Do not keep water or other liquids close to the speakers. If a liquid is spilled over them, the woofer and tweeter inside may be damaged.
- Do not handle the speakers with wet or damp hands.
Speaker Precautions
The speakers can handle the specified input power when used for normal music reproduction. If they're fed any of the following signals, even if the input power is within the specified rating, excessive current may flow in the speaker coils, causing burning or wire breakage:
-
Interstation noise from an untuned FM radio.
-
Audio from a cassette that's being fast-forwarded.

mini hi-fi system
KMS2909
EN
- High-pitched sounds generated by an oscillator, electronic musical instrument, and so on.
- Amplifier oscillation.
- Special test tones from audio test CDs and so on.
- Thumps and clicks caused by connecting or disconnecting audio cables (always turn off your amplifier before connecting or disconnecting cables).
- Microphone feedback.
The speakers contain powerful magnets. Do not put metal items, such as screwdrivers, close to the speakers, as they may be attracted toward the magnet, causing injury or damage to the tweeter diaphragm.
Using the Unit Close to a CRT-type TV or Computer
(In the following explanation, "TV" refers to a CRT-type TV.)
TVs and computer monitors are magnetically sensitive devices and are likely to suffer discoloration or picture distortion when conventional speakers are placed nearby. To prevent this, the speakers feature internal magnetic shielding. In some situations, however, discoloration may still be an issue. In this case, turn off your TV or monitor, wait 15 to 30 minutes, and then turn it back on again. This normally activates the degaussing function, which neutralizes the magnetic field, thereby removing any discoloration effects. If discoloration problems persist, try moving the speakers away from your TV or monitor. Note that discoloration can also be caused by a magnet or demagnetizing tool that is too close to your TV or monitor.
Note:
- If the speakers are placed close to a TV or monitor, due to the electromagnetic waves radiated by the TV or monitor, you may hear noise from the speakers even after your amplifier has been turned off. To prevent this, position the speakers away from your TV or monitor.
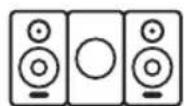
Package Contents
Make sure you have the following items
Main unit
Speakers (left and right)
Remote control
Instruction manual
A/V cable
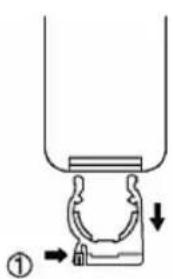
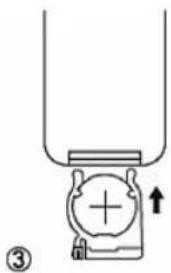
Install Remote Control Battery
For first-time use:
- Remove the protective tab to activate the remote control battery.
To replace the remote control battery:
- Open the battery compartment.
- Insert 1 CR2025 battery with the correct polarity (+/-) as indicated.
- Close the battery compartment.
kunft.

natural_image
Simple line drawing of a mechanical component with an upward arrow, no text or symbols presentCAUTION:
- Risk of explosion! Keep batteries away from heat, sunshine or fire. Never discard batteries in fire.
- Danger of explosion if battery is replaced incorrectly. Replace only with the same or equivalent type.
- Batteries contain chemical substances, they should be disposed of properly.
- If the remote control will not be used for a long time, remove the batteries and place the remote control in a cool and dry place.
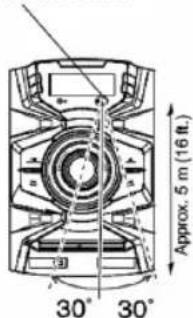
Using the Remote Control
When using the remote control, point it towards the Main unit's remote control sensor, as shown below.
Installation Location
This unit and its remote control might become discolored by ultraviolet or other light components when used under direct sunlight, fluorescent lighting or a germicidal lamp.

Remote control sensor; Approx. 5 m (16 ft.)
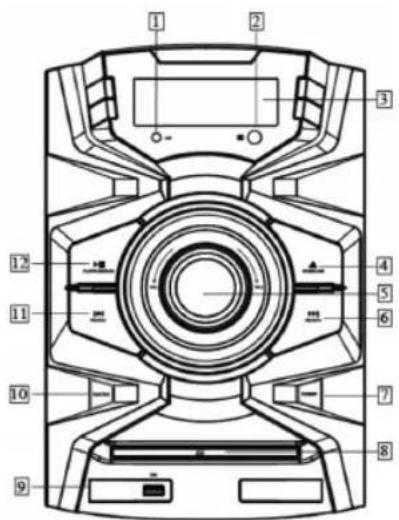
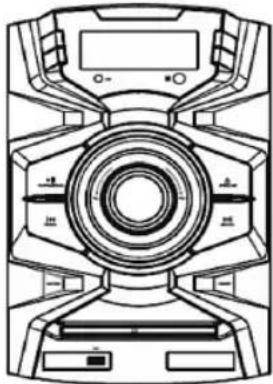
Front Panel
- LED Light Indicator
- Remote Sensor
- Receives remote signal.
-
Display Window
-
▲ Open / Close
- Open/closes the disc tray.
- Volume Dial
• Decreases or increases the volume.
6.
• Skips to the next title, chapter, track, or channel.

mini hi-fi system
KMS2909
EN
- In FM mode, tunes forward when pressed; skips to next channel when being pressed and held for 2 seconds.
7. Standby
- Turns on the system.
• Turns to Standby mode.
8. Disc Tray
9. USB Port
- USB 2.0 port supports playback of stored MP3/WMA music.
10. Function
- Selects mode among CD, FM and AUX in.
11.
• Skips to the previous title, chapter, track, or channel.
- In FM mode, tunes backwards when pressed; skips to previous channel when pressed and held for 2 seconds.
12.
- Plays, pauses or resumes play.
- Starts auto channel search in FM mode.
Rear Panel
1. Power Switch
• Switches the system on/off.
2. SPEAKER terminals
- Connects to the right and left speakers.
3. AC power in
- AC power input: 100-240V \~ 50/60Hz.
4. FM antenna
- Connects wire FM antenna.
5. AUX
- A line-level analog input. Accepts a 3.5 mm phone cable. Used for an instrument or other audio source.
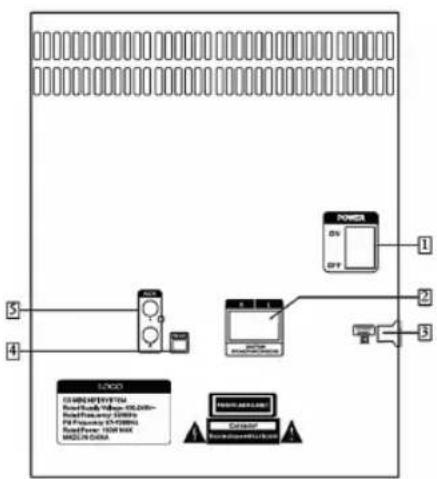
FM antenna
- FM radio reception is affected by distance, physical obstacles and other broadcast signals.
• To improve radio reception, unwind and stretch the FM antenna fully, and adjust its position.
kunft.®
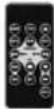
Remote Control
1. STANDBY
- Turns on the system.
- Turns to Standby mode.
2. REPEAT
- Selects repeat mode.
3.
• Skips to the previous title, chapter, or track.
4. MODE
- Selects mode among CD, MP3, USB, Bluetooth and FM.
5.
• Searches backwards at different speeds.
- In FM mode, tunes backwards when pressed; skips to previous channel when pressed and held for 2 seconds.
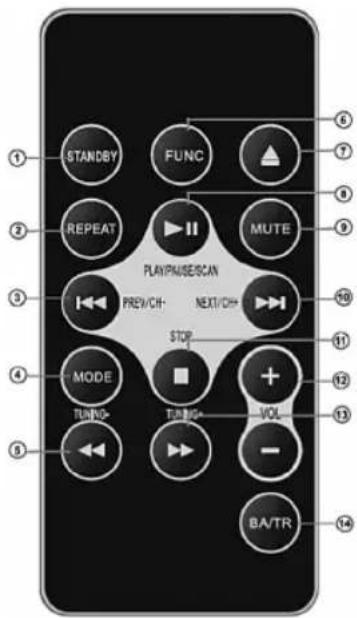
6. FUNCTION
- Selects mode among CD, FM and AUX in.
7.
- Open/close disc tray.
8. ▶||
- Starts, pauses or resumes play.
- Starts auto channel search in FM mode.
9. MUTE
- Turns sound Off/On.
10.▶▶|
• Skips to the next title, chapter, or track.
- In FM mode, tunes forward when pressed; skips to next channel when pressed and held for 2 seconds.
11. STOP
- Stops play.
- Stops auto channel search in FM mode.
12. VOL-/+
• Decreases/Increases volume.
13.
• Searches forward at different speeds.
14. BA/TP
- Adjusts bass/treble level.


mini hi-fi system
KMS2909
EN
Disc and USB Flash Drive (MP3) Notes
Precautions for Playback
Compact discs (CDs) with the following logo on the label surface can be used.


Do not use discs designed for purposes other than audio, such as CD-ROMs for PC use. Abnormal noise could damage the unit and/or speakers.
* The CD receiver supports CD-R and CD-RW discs. Note that some discs may not playback due to disc characteristics, scratches, contamination or the state of the recording. A disc recorded with an audio CD recorder will not playback unless it is finalized.
Never use discs that have a special shape (such as hearts or octagons). These types of discs could damage the unit.


CD Playback with Copy-control Function
Some audio CDs with copy-control function do not comply with official CD standards. These are special discs and cannot be played with the unit.

Playback of MP3 Discs
MP3 files recorded on a CD-R/CD-RW can be played with the unit.
- Use discs that have been recorded following the ISO 9660 Level 2 file system. (The supported directory depth is eight levels, the same as ISO 9660 Level 1)
• Discs must be closed (finalized). - Only MP3 files with the extension ".MP3" or ".mp3" are supported.
- Files recorded using MPEG 1 audio layer 3 at sampling frequencies of 32/44.1/48 kHz and a bit rate of 32 -320 kbps are supported.
Playback from USB Drives or SD cards
- The unit does not support playback from audio player units and smartphones that are not USB mass storage devices.
- MP3 files recorded on a USB flash drive can be played with the unit.
• Supported file systems are FAT16 and FAT32. - Only MP3 files with the extension ".MP3" or ".mp3" are supported.
- Files recorded using MPEG 1 audio layer 3 at sampling frequencies of 32/44.1/48 kHz and a bit rate of 32 - 320 kbps are supported.
• USB hubs are not supported.
Note:
- A disc recorded with a recorder or personal computer may not play in some cases. (Cause: Disc's characteristics, damaged or dirty disc, dirt on player's lens, dew condensation, etc.)
kunft.®
- A disc recorded on a personal computer might not play depending on the application settings or environment. Record the disc in a format supported by the unit.
- A disc with insufficient storage capacity may not playback properly.
- Files are played back in the same order as they are saved in the USB flash drive. However, playback may change if the files or folders in the USB flash drive are deleted or renamed on a computer, etc.
Handling Discs
Hold discs by the edge, or by the center hole and edge. Avoid touching the playback surface (surface with nothing printed on it).
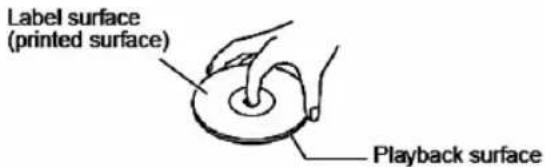
Label surface (printed surface); Playback surface)
Do not attach paper or stickers, or write on the playback or label surface of the disc. Take care not to scratch or damage the disc.

Basic Operations
This manual describes the procedure for using the remote control, unless otherwise specified.
Turning on the unit
Press the STANDBY button.
The unit is turned on, and the display lights up. Press the button again to turn it in Standby mode.
Selecting the Input Mode
You can select CD, MP3, USB, Bluetooth, FM, or AUX IN which can be an external component. To select the input source, use the remote control's FUNCTION and MODE buttons. On the unit press the FUNCTION button repeatedly.
Adjusting the Volume
To adjust the volume, use the VOL [+] / [-] buttons.
You can also use the unit's VOLUME control dial.
Muting the unit
Press the MUTE button.
Press the button to unmute.
Tip:
- You can also unmute the unit by adjusting the volume.
• Alternatively, set the unit to standby, then turn it on again to cancel muting.

mini hi-fi system
KMS2909
EN
Playing CDs
This manual describes the procedure for using the remote control, unless otherwise specified.
Playing CDs
- Press the button ▲ to open the disc tray.
- Place CD into the disc tray with the label-side facing up.
- Change the input mode to CD, then press the ▶|| button.
To change the input mode to CD, press the remote control's FUNCTION or MODE button, or press the FUNCTION button on the main unit repeatedly. Playback will start automatically.
To pause playback:
Press ▶ the button. To resume playback, press the ▶ button again.
To Fast-Forward or Fast-Reverse:
During playback, press the Fast Forward ▶ button repeatedly to fast forward at different speed, or the Fast Reverse button repeatedly to fast reverse at different speed
To stop playback: Press the ■ button.
To remove the DVD or CD:
Press the ▲ button to open the disc tray.

Selecting Tracks
Press the Previous button repeatedly to skip to previous tracks.
Press the Next ▶|| button repeatedly to skip to subsequent tracks.
Press the 0-9 buttons to skip to the corresponding track directly.
Repeat Playback
Press the REPEAT button repeatedly to display "REPEAT ONE", "REPEAT ALL" or "REPEAT OFF".
With "REPEAT ALL" playback, all songs will be played back repeatedly.
With "REPEAT ONE" playback, only one song will be played back repeatedly.
To cancel repeat playback, press the REPEAT button repeatedly until "REPEAT OFF" displayed.
Wireless Playback via Bluetooth
The Hi-Fi system enables you to wirelessly play music from your Bluetooth-enabled smartphone, tablet, mobile music player, or personal computer via Bluetooth. To play back music via Bluetooth, you must first pair the unit with your Bluetooth-enabled device.
Once pairing is established, the pairing information is stored in both devices and you will not need to repeat the pairing process.
However, if you delete the device registration from either device and the pairing information is deleted, you must pair the devices again.
kunft.
Pairing
- Place the Bluetooth device within 1 meter (3 feet) from the system. Turn on "Bluetooth" on your Bluetooth-enabled device.
- Turn on the unit, press MODE button repeatedly to select Bluetooth input mode. The unit engages pairing mode, with LED display "BT".
- Register the unit on your Bluetooth-enabled device When your Bluetooth-enabled device displays a list of detected devices, select "HF-2506." If the device requests a password, enter "1234." Please note that the registering (pairing) process might vary depending on the Bluetooth-enabled device. For more information, refer to the user's manual for the device.
- When pairing is complete, the unit makes sound prompt. When pairing is complete, a Bluetooth connection is established. If a connection is not established, try to connect from the Bluetooth-enabled device.
Note:
- If the pairing fails, turn "Bluetooth" off on the Bluetooth-enabled device, turn it on again, and then try the procedure from step 1.
- If you want to pair other Bluetooth-enabled devices, perform steps 1-4 for each device.
Playing Back Music on Your Bluetooth-enabled Device
- Turn on "Bluetooth" on your Bluetooth-enabled device.
- Turn on the unit, press MODE button repeatedly to select Bluetooth mode.
If a Bluetooth connection is established automatically, skip to step 4.
- Perform the Bluetooth connection steps on the Bluetooth-enabled device to connect to the system.
- Play back audio on your Bluetooth-enabled device.
If the volume level on the Bluetooth-enabled device is low, the playback volume relative to other input sources will be low.
Raise the volume level on the Bluetooth-enabled device to an appropriate level (if necessary, to the maximum).
Note:
- When you press the MODE button to change the input source to Bluetooth, the unit will automatically connect to the Bluetooth-enabled device that was connected last time. If a connection is not established automatically, try to connect from the Bluetooth-enabled device.
- Bluetooth connection will be cut off if you change the input to any source other than Bluetooth or set the unit to standby mode.


mini hi-fi system
KMS2909
EN
- If your Bluetooth-enabled device features a bass boost or equalizer function, disable these functions. Otherwise, the playback sound may be distorted.
Listening to the Radio
This manual describes the procedure for using the remote control, unless otherwise specified.
Presetting FM Stations Automatically (Auto Preset)
Auto Preset Caution
Any existing presets will be deleted when the Auto Preset function is run.
- Press the MODE button to change input source to "FM".
Adjust the position of the FM antenna for the best FM reception.
- Press the ▶|| button.
The Auto Preset function is activated.
Up to 30 stations can be preset and presets are stored in frequency order.
If you want to cancel the Auto Preset process, press the button.
STOP
Note:
Depending on your location, a preset may be stored with no station, and you'll hear only noise when you select it.
Selecting Preset Stations
You must store some presets before you can select them.
-
Press the MODE button to change the input mode to "FM". The preset you selected the last time you listened to the radio will be selected.
-
Use the CH-/CH+ buttons to select a preset.
Playing an External Device
Playing Back from an External Device Connected to the LINE IN Jack
-
Press the FUNCTION button to change the input mode to "LINE-IN."
-
Play back the external device.
Note:
- This adjustment affects only the speaker volume; the headphone volume cannot be adjusted.
- If the volume level of your mobile music player is substantially low, this adjustment may not be sufficient. In such a case, raise the volume level on the mobile music player.
- If the input level is raised excessively, the sound may distort. If this occurs, adjust the input level appropriately.


kunft.®
Playing a USB Flash Drive
This manual describes the procedure for using the remote control, unless otherwise specified.
- Insert a USB flash drive in the USB port.
- Press the DVD/USB button to change the input source to "USB."
- To start playback, press the ▶|| button.
- To stop playback, press the ■ STOP button.
Note:
- Do not connect your USB flash drive via a USB hub.
- When connecting or disconnecting a USB flash drive, use your hand to support the unit so that it does not move.
- For details on the usable formats for a USB flash drive, refer to page 13 "Playback from USB Drives".
- Do not connect the unit's USB port to a USB port on your computer.
natural_image
Technical line drawing of a mechanical device with no visible text or symbols

2.3. Troubleshooting
If you have any trouble using the unit, look for a solution in this section.
Power
Can't turn on the unit.
- Make sure that the power cord is properly plugged into the wall outlet.
- Unplug the power cord from the wall outlet, wait 5 minutes or more, then plug it in again.
The unit turns off unexpectedly.
- If the sleep timer has been set, the unit will turn off automatically after a specified period.
- The unit will automatically enter standby mode when Auto Standby has been set and launches.
Remote Control
The remote control doesn't work properly.
- Replace the battery with a new one.
- The remote control is too far away from the unit, or there's an obstacle between them.
- The unit's remote control sensor is being subjected to bright light (inverter-type fluorescent light or sunlight).
- The unit is located behind the tinted glass doors of an audio rack or cabinet.

mini hi-fi system
KMS2909
EN
Audio
There's no sound.
- Make sure the unit's volume is not set too low.
- Make sure the correct input source is selected.
• Make sure the unit is not muted. - Check all connections and correct as necessary.
- While headphones are connected, the speakers output no sound.
- If there's no sound from an external device connected to LINE IN, check whether the external device's audio output level (volume) might be too low.
The sound quality is not good.
- Make sure all audio connecting plugs are pushed in all the way.
- The sound quality can be affected by strong magnetic fields, such as that from a TV. Try moving any such devices away from the unit.
- If you have any devices that emit high-intensity radio waves near the unit, such as a cellular phone that's being used to make a call, the unit may output noise.
- The unit's precision drive mechanism may emit a faint hissing sound while reading discs during playback or when searching for tracks. You may be able to hear this noise in extremely quiet environments.

Audio output is intermittent when the CD receiver is subjected to vibration.
- The unit is not a portable device. Use it in a location that's not subject to shock or vibration.
- Make sure that the included floor pads are attached to the speakers.
Audio performance.
- Audio performance will be at its best about 10 to 30 minutes or more after the unit has been turned on and had time to warm up.
- Using cable ties to bundle audio cables with speaker or power cables may degrade the sound quality, so don't do it.
CD Playback
The disc will not play.
- Make sure the disc has been loaded correctly, with the label-side facing up.
- Check to see if the surface of the disc is dirty.
- If condensation is suspected, turn on the unit and leave it for 2 to 3 hours before playing any discs.
- Some CD-R/RW discs may not be playable.
It takes a long time for playback to start.
- It may take the unit a while to read CDs that contain many tracks or files.
kunft.
Playback jumps.
- The unit is being subjected to vibration or the disc is scratched or dirty.
• The volume may be too loud. Turn down the volume.
Can't play MP3 Discs.
- Only discs compliant with ISO 9660 Level1/Level 2 or Joliet file system should be used.
• The disc has not been finalized (closed). Finalize (close) the disc. - Check whether the file format is supported (see page 13).
- MP3 files without a ".MP3" or ".mp3" file extension are not recognized.
Bluetooth
Bluetooth pairing fails.
- If there are any other Bluetooth-enabled devices near the unit, turn off the power of those devices and repeat the pairing process.
- Delete the registration information for the system on the Bluetooth-enabled device and repeat the pairing process.
Sound via Bluetooth connection is interrupted.
- There may be a wireless LAN device or microwave oven nearby. If so, move the unit away from those devices.
- The Bluetooth-enabled device may be too far from the unit, or there may be a wall between the devices. If so, use your Bluetooth-enabled device closer to the unit.
Sound via Bluetooth connection is delayed and does not sync to the video.
- Due to Bluetooth transfer characteristics, there may be a certain amount of signal latency. For this reason, you might notice a slight delay in audio output from the unit, in relation to the playback of video on your Bluetooth-enabled device.
USB Flash Drive Playback
Can't access the music files on a USB flash drive.
- The unit supports USB flash drives only. However, this does not necessarily guarantee the performance of all USB flash drives.
• Make sure that the USB flash drive has been formatted as FAT16 or FAT32. - USB hubs are not supported. Be sure to connect a USB flash drive directly to the unit.
• This unit cannot play files other than MP3 files.
The message "No USB" is displayed.
- Try reconnecting your USB flash drive.
Can't play MP3 files.
- MP3 files without a .MP3 or .mp3 file extension are not recognized.
- Check whether the MP3 format is supported (see page 13).


mini hi-fi system
KMS2909
EN
FM Radio
Reception is noisy, or the Auto Preset function does not preset all the stations.
- Check the antenna connections.
- Change the position of the antenna.
- Move the unit away from a nearby TV or computer.
• Cars or airplanes can cause noisy interference.
The unit contains a microcomputer. In very rare situations, severe interference, noise from an external source, or static electricity may cause it to malfunction or lock up. In the unlikely event that this should happen, unplug the power cord, wait at least 5 minutes, and then plug it back in again.
3. TECHNICAL SPECIFICATIONS
- Output: 2 x 50W (R.M.S.)
- Bluetooth:
Version: 2.1+EDR
Operating range: 10M
Frequency: 2.4GHz
- Speaker drivers: 6.5" x 2
- FM Frequency: 87.5\~108MHz
- Speaker frequency response: 20Hz\~20KHz
- Power input: AC 100-240V\~50/60Hz
- Player dimension: W215 x D270 x H330 mm
- Speaker dimension (R/L): W215 x D230 x H330 mm
- Product weight: 9.8 Kgs


kunft.®
4. PoSt-SaLE SErVlcE
KUNFT has designed this appliance in order to guarantee maximum reliability. However, if a problem occurs do not attempt to open the appliance - there is a risk of electrical shock. If you are not able to solve the problem, please contact the Costumer Support Service of any Worten, Modelo or Continente store in order to be assisted. Worten Equipamentos para o Lar provides a 2-year warranty for manufacturing defects from the date of purchase of the appliance.
WARNING: Any attempt to repair the appliance without contacting the manufacturer or seller will void the warranty.
All users must be familiar with these instructions. Knowing what could go wrong can help prevent problems from occurring.
5. ENViroNMENtaL ProtEctIoN


In order to protect the environment we strive to reduce the volume of packaging used, limiting it to three easily sorted materials: cardboard, paper and plastic. The appliance is manufactured using recyclable materials after disassembled by a specialized company. Please comply with local regulations concerning the recycling of all materials.


minicadena
KMS2909
ES

PRECAUCIÓN:
Remote control sensor
Sensor del mando a distancia; Aprox. 5 m (16 pies)
Panel frontal


kunft.®
11.
Label surface (printed surface)

natural_image
Technical line drawing of a mechanical device with no visible text or symbols
Unidad flash USB
ATENÇÃO:
Sensor de controlo remoto; Aprox. 5 m
Painel Frontal

Antena FM
natural_image
Technical line drawing of a mechanical device with concentric circular components and no visible text or symbols
USB flash drive
natural_image
Color palette bar with grayscale shades and a central crosshair symbol (no text or labels)NOTES / NOTAS


kunft®


natural_image
Three identical line-drawn speaker icons in a row, no text or symbols presentmini hi-fi system
is perfectly enough
KMS2909
- mini hi-fi system
- kunft.®
- KMS2909
- kunft.
- INDEX
- SAFETY INSTRUCTIONS
- Important Warnings
- Assistance
- Power Supply
- EN
- Power Cord and Other Cables
- Humidity and Water
- Cleaning
- General Precautions
- OPERATING INSTRUCTIONS
- Product Description
- Using the Product
- Precautions
- Power
- WARNING
- Preventing Hearing Loss
- Caution
- Batteries and Heat Exposure
- Handling Notes
- Installing this Unit
- Moisture Condensation
- CAUTION:
- Before Using Your New Speakers
- Speaker Precautions
- Using the Unit Close to a CRT-type TV or Computer
- Note:
- Package Contents
- Main unit
- Remote control
- A/V cable
- Install Remote Control Battery
- For first-time use:
- To replace the remote control battery:
- Using the Remote Control
- Installation Location
- Front Panel
- Standby
- Disc Tray
- USB Port
- Function
- 11.
- 12.
- Rear Panel
- Power Switch
- SPEAKER terminals
- AC power in
- FM antenna
- AUX
- FM antenna
- STANDBY
- REPEAT
- 3.
- MODE
- 5.
- FUNCTION
- 7.
- ▶||
- MUTE
- 10.▶▶|
- STOP
- VOL-/+
- 13.
- BA/TP
- Disc and USB Flash Drive (MP3) Notes
- Precautions for Playback
- CD Playback with Copy-control Function
- Playback of MP3 Discs
- Playback from USB Drives or SD cards
- Handling Discs
- Basic Operations
- Tip:
- Playing CDs
- To pause playback:
- To Fast-Forward or Fast-Reverse:
- To remove the DVD or CD:
- Selecting Tracks
- Repeat Playback
- Press the REPEAT button repeatedly to display "REPEAT ONE", "REPEAT ALL" or "REPEAT OFF".
- Wireless Playback via Bluetooth
- Pairing
- Playing Back Music on Your Bluetooth-enabled Device
- Listening to the Radio
- Presetting FM Stations Automatically (Auto Preset)
- Auto Preset Caution
- Selecting Preset Stations
- Playing an External Device
- Playing Back from an External Device Connected to the LINE IN Jack
- Playing a USB Flash Drive
- Troubleshooting
- Power
- Can't turn on the unit.
- The unit turns off unexpectedly.
- The remote control doesn't work properly.
- Audio
- There's no sound.
- The sound quality is not good.
- Audio output is intermittent when the CD receiver is subjected to vibration.
- Audio performance.
- CD Playback
- The disc will not play.
- It takes a long time for playback to start.
- Playback jumps.
- Can't play MP3 Discs.
- Bluetooth
- Bluetooth pairing fails.
- Sound via Bluetooth connection is interrupted.
- Sound via Bluetooth connection is delayed and does not sync to the video.
- USB Flash Drive Playback
- Can't access the music files on a USB flash drive.
- The message "No USB" is displayed.
- Can't play MP3 files.
- FM Radio
- TECHNICAL SPECIFICATIONS
- PoSt-SaLE SErVlcE
- ENViroNMENtaL ProtEctIoN
- minicadena
- PRECAUCIÓN:
- Panel frontal
- ATENÇÃO:
- Painel Frontal
- Antena FM
- NOTES / NOTAS
Brand : Kunft
Model : KMS2909
Category : Hi-Fi System