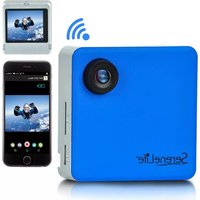
AZSLBCM18BL - Camera SereneLife - Free user manual and instructions
Find the device manual for free AZSLBCM18BL SereneLife in PDF.


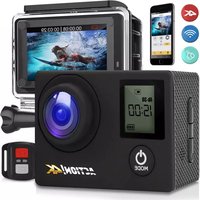
| Product Type | Digital Camera |
| Model | AZSLBCM18BL |
| Brand | SereneLife |
| Dimensions (without lens) | 50.5 x 50.5 x 16 mm |
| Screen | 1.8" TFT |
| Image Sensor | 2 Mega CMOS |
| Lens Angle | 120 degrees (4G+IR) |
| Video Resolution | 1920x1080@30fps, 1280x720@30fps, 848x480@30fps, 640x480@30fps |
| Photo Resolution | 12M, 10M, 8M, 5M, 3M, 2M, 1.3M, VGA |
| File Format | AVI (video), JPG (photo) |
| Battery | Rechargeable Li-ion (3.7V, 430mAh) |
| Memory Support | Micro SD card up to 32GB (Class 10 and above) |
| WiFi | Yes (app control via WSDV SSID) |
| Anti-shake | Yes |
| Loop Recording | Yes (1/2/3/5/10 minutes) |
| PC Camera Mode | Yes |
| White Balance | Auto, Daylight, Cloudy, Tungsten, Fluorescent |
| Exposure Compensation | -2.0 to +2.0 in increments of 1/3 |
| Date Stamp | Yes (on/off) |
| Languages Supported | English, Chinese, French, Spanish, Italian, German, Japanese, Russian, Portuguese, Korean, Arabic |
| Power On/Off | Short press for on, long press for off |
| Charging | Via USB cable, red indicator |
| Important Note | Use Class 10 microSD card; avoid dropping or disassembling |
Frequently Asked Questions - AZSLBCM18BL SereneLife
User questions about AZSLBCM18BL SereneLife
0 question about this device. Answer the ones you know or ask your own.
Ask a new question about this device
Download the instructions for your Camera in PDF format for free! Find your manual AZSLBCM18BL - SereneLife and take your electronic device back in hand. On this page are published all the documents necessary for the use of your device. AZSLBCM18BL by SereneLife.
USER MANUAL AZSLBCM18BL SereneLife
USER MANUAL
Contents
Precaution
Camera Interface
Use securing clip
Button function
Camera Operation
Power on/off
Battery Charging
Video Mode
Normal recording
Loop recording
Picture Mode
Playback Mode
Menu Setting
Install and use WIFI
Playback on PC
Technical specification
Precaution
Please make sure to look through the following guidelines before you use this camera.
- Please refer to the manual instructions to operate the camera correctly. Wrong operation may cause damage to internal components.
- Do not drop or hit the camera, as it may damage the internal components.
- Do not alter or dismantle the camera to avoid damage. ● The temperature rise is normal when the camera is used for a long time.
- Do not touch the lens when recording—it will affect video quality.
- Please use "Class10" and above Micro SD card to ensure proper function.
Camera Interface
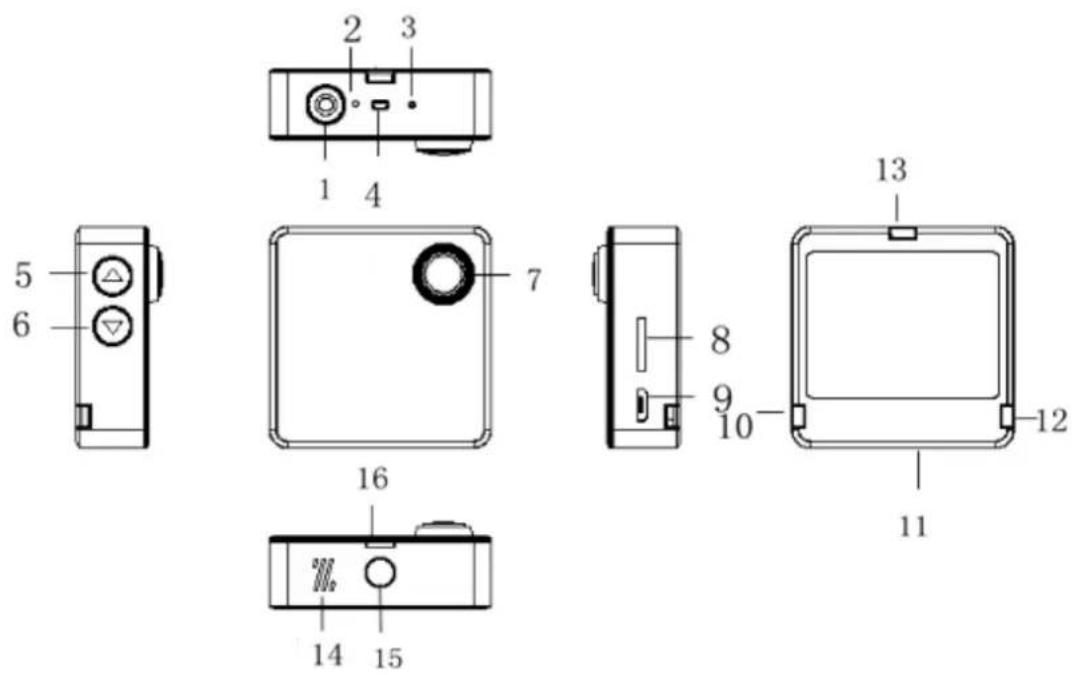
1. Power button 2. Reset button 3. Microphone 4. Working/Charging indicator 5. Up button 6. Down button 7. Lens 8. TF card slot 9. USB port 11. Back shell 10. 12. 13. 16. Buckle 14. Speaker 15. 1/4" screw hole
Engage securing clip:
Make sure the buckles of the securing clip are aligned with the camera.

Remove securing clip:
Hold the top of the camera, push the securing clip up from the bottom, and pull out the first securing clip. For the remaining two securing clips, push the left securing clip from the right side and remove it.
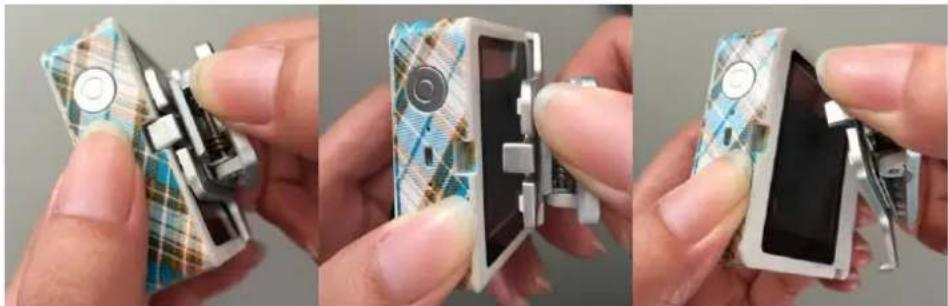
The securing clip is rotatable.

Button Functions
Power button:
Short press to turn on the camera; long press to turn off the camera.
In standby mode, short press to start or stop recording.
In picture mode, short press to take a picture.
In playback mode, short press to start or pause playback.
In menu settings, short press to confirm the menu setting.
Up button:
Short press to switch between Video, Picture, Playback, and Menu modes.
In menu mode, short press to exit the menu.
Down button:
In menu settings or playback mode, scroll down to the next option.
In time setting, adjust the digit.
In standby mode - short press to enter WIFI;
In WIFI mode - short press to exit WIFI.
Camera Operation
Power on/off
Power on: Short press power button, blue working indicators light up, camera enters standby mode.
Power off: When camera is on, long press power button, blue working indicators will be off, camera powers off.
Battery Charging
Connect camera with power charger via USB cable, red charging indicator will light. Turn off machine when charging to charge faster.
VIDEO MODE:
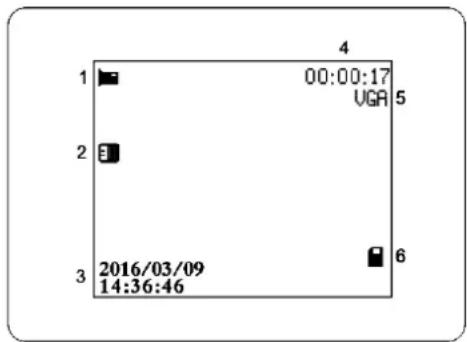
Video interface:
- Record icon
- Exposure compensation
- Year /Month / Day/Time
- Recording time
- Video resolution
- Memory card
Normal recording
Set "loop recording" to OFF in the menu, press the power button, the blue indicator will flash, and the camera starts to record until the memory card is full. Press the power button again to stop recording.
Loop recording (refer to menu setting)
Under standby mode, press the power button to start recording, the blue indicator will flash. When the video has recorded up to the time you set (1 minute/2 minutes/3 minutes/5 minutes/10 minutes), the camera will save the footage automatically and continue recording.
When the TF card is full, the camera will overwrite the first footage in time sequence and continue recording. Press the power button to stop recording; the remaining recording time shows on the LCD screen.
PICTURE MODE
Picture interface:
- Photo icon
2. Exposure
- White balance
4. ISO
5. Sequence icon
6. Remaining photos
- Photo size
- Photo quality
- Memory card
10. Battery icon
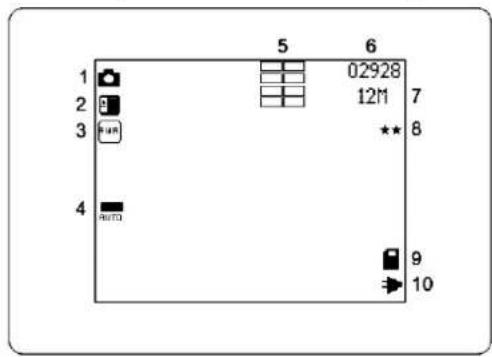
The camera's default setting is Video mode. Press the Up button to enter Picture mode in standby mode. Aim at the object you want to shoot and press the Power button; the camera will save pictures automatically.
Playback Mode
- Playback icon
- File number
- Video resolution/Photo size
- Date stamp
5. Battery icon
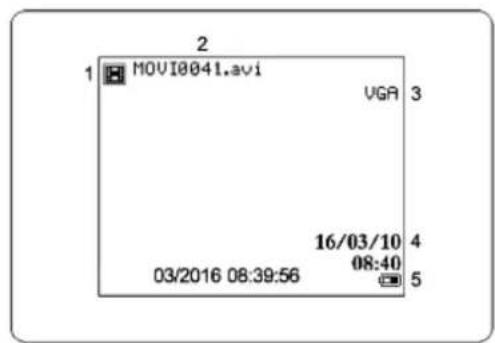
In standby mode, press the Up button to switch to Playback mode, press the Down button to select files, and press the Power button to Preview/Playback and stop playing.
Menu Setting
In standby mode, short press the Up button to enter or exit menu settings. Press the Down button to select and press the Power button to confirm.
Video Size: 1080p 30fps/720p 30fps/WVGA 30fps/VGA 30fps
Loop Recording: OFF / 1 minute / 2 minutes / 3 minutes / 5 minutes / 10 minutes
Exposure: -2.0 -5/3 -4/3 -1.0 -2/3 -1/3 +0.0 +1/3 +2/3 +1.0 +4/3 +5/3 +2.0
Record Audio: Off / On
Date Stamp: Off / On
Image Size: 12M / 10M / 8M / 5M / 3M / 2MHD / 1.3M / VGA
Sequence: Off / On
Quality: Fine / Normal / Economy
Sharpness: Strong / Normal / Soft
White Balance: Auto / Daylight / Cloudy / Tungsten / Fluorescent
ISO: Auto / 100 / 200
Anti-shaking: Off / On
Delete: Delete Current / Delete All
Protect: Lock Current / Unlock Current / Lock All / Unlock All
Date/Time: 2016/05/12 11:11:11
Auto Power Off: Off / 1 minute / 3 minutes
Screen Saver: Off / 3 minutes / 5 minutes / 10 minutes
Language: English / Traditional Chinese / Simplified Chinese / Japanese / German / French / Korean / Italian / Portuguese / Russian / Spanish / Arabic
Frequency: 50Hz / 60Hz
Format: All data will be deleted: Cancel/OK
Default Setting: Return menu setting to defaults: Cancel/OK
Install and use WIFI
- Search "WIFI SDV" in Google Play or APP store and download WIFI APP. ● Install the APP in your smart phone.
- In video mode, short press Down Button to enter WIFI, camera's screen will display "SSID:WSDV-......"
- Find "WSDV-......" in the WIFI list of smart phone, enter password (Default password is 99999999) to connect it.
- Find the APP in smart phone, then you can control camera via smart phone.
- Short press Down Button of camera to exit WIFI setting.
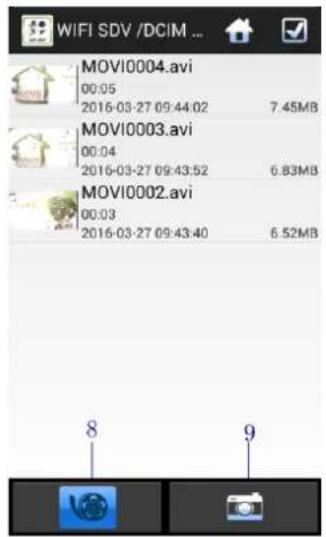
APP interface:
- Menu setting
2.Playback mode
- Start/stop recording
- Picture mode
5. Video mode
- Camera's micro SD card
- Download files on phone
- Video file list
9. Picture file list

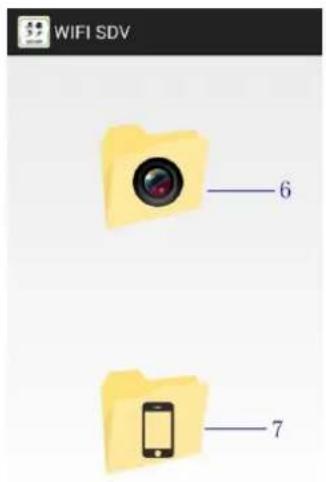
Notes:
- Please make sure that micro SD card is inserted when WIFI will be used.
- The effective distance is influenced by your local environment. The decrease of WIFI signal and operation delay are normal. ● The "Power Saving Mode" in smart phone should be set to "OFF". ● The “Keep WIFI on during sleep” in smart phone should be set to “Always”.
Playback on PC
Connect camera to PC via USB cable, camera will power on automatically, the screen will display: "Mass storage", "PC camera". Press Down button to select options, press Power button to confirm.
Mass Storage: Enter DCIM folder of MSDC to check files.
PC camera: Camera will be worked as a PC camera.
Technical specification
| Dimension | 50.5*50.5*16mm (not include the lens) |
| Lens | 120 degree (4G+IR F=2.6 f=2.3mm) |
| Video Resolution | 1920*1080@30fps/1280*720@30fpsW VGA 848*480@30fps/VGA 640*480@30fps |
| Image size | 12M 10M 8M 5M 3M 2M 1.3M VGA |
| Sensor | 2 Mega CMOS Sensor |
| Screen | 1.8" TFT screen |
| WIFI | Support |
| APP Share | Support |
| Anti-shake | Support |
| PC CAM | Support |
| White balance | Support |
| Loop recording | Optional 1/2/3/5/10 minutes |
| File Format | AVI/JPG |
| Battery | Rechargeable Li-ion battery (3.7V 430mAh) |
| Audio | Built-in Microphone/Speaker |
| Memory size | 4GB to 32GB (Micro SD Card Class10 and Above) |
| Menu Language | Simplified Chinese/Traditional Chinese/English/French/Spanish/Italian/ German/ Japanese/Russian/Portuguese/Korean/Arabic |
Notice: The manufacturer however reserves the right to amend the specifications according to market demand without notice.
- CONTENTS
- PRECAUTION
- CAMERA INTERFACE
- ENGAGE SECURING CLIP
- REMOVE SECURING CLIP
- THE SECURING CLIP IS ROTATABLE
- BUTTON FUNCTIONS
- POWER BUTTON
- UP BUTTON
- DOWN BUTTON
- CAMERA OPERATION
- POWER ON/OFF
- BATTERY CHARGING
- VIDEO MODE
- VIDEO INTERFACE
- NORMAL RECORDING
- LOOP RECORDING (REFER TO MENU SETTING)
- PICTURE MODE
- PICTURE INTERFACE
- PLAYBACK MODE
- MENU SETTING
- INSTALL AND USE WIFI
- APP INTERFACE
- NOTES
- PLAYBACK ON PC
Brand : SereneLife
Model : AZSLBCM18BL
Category : Camera