
SLBCAM20UK - Camera SereneLife - Free user manual and instructions
Find the device manual for free SLBCAM20UK SereneLife in PDF.

| Product Type | Baby Video Monitor |
| Brand | SereneLife |
| Model | SLBCAM20UK |
| Parent Unit Display | 1.54-inch Digital Display |
| Video Resolution | 640 x 480 pixels |
| Image Sensor | CMOS, 0.3 Mega-Pixel |
| Video Transmission | 2.4GHz |
| Wireless Range | Up to 260 meters (850+ ft.) |
| Camera Angle Adjustment | 65° Vertical, 120° Horizontal |
| Night Vision Distance | Up to 5 meters (15 ft.) |
| Minimum Illumination | 0 Lux |
| Temperature Monitoring | Yes, Selectable °F/°C |
| Two-Way Communication | Built-in Microphone and Speaker, PTT |
| Lullabies | Button-Activated Musical Melodies |
| Parent Unit Battery | 3.78V Li-Polymer, 390mAh, Rechargeable |
| Parent Unit Charging | Wireless Charging Dock |
| Power Adapter | 120V (5V Power Adapter) |
| Charge Stand Dimensions | 6.60 x 6.86 x 12.7 cm |
| Camera Dimensions | 6.86 x 7.37 x 13.72 cm |
| Mounting | Wall / Ceiling Mountable |
| Special Features | VOX Mode, Alarm, Multi-Language, Adjustable Backlight, Time Display |
Frequently Asked Questions - SLBCAM20UK SereneLife
User questions about SLBCAM20UK SereneLife
0 question about this device. Answer the ones you know or ask your own.
Ask a new question about this device
Download the instructions for your Camera in PDF format for free! Find your manual SLBCAM20UK - SereneLife and take your electronic device back in hand. On this page are published all the documents necessary for the use of your device. SLBCAM20UK by SereneLife.
USER MANUAL SLBCAM20UK SereneLife
natural_image
Two modern smartwatches displayed side by side, one with a black strap and the other a white base with a black circular camera (no visible text or symbols)
*☆☆☆☆☆☆☆☆☆☆☆☆☆☆☆☆☆☆☆☆☆☆☆☆☆☆☆☆☆☆☆☆☆☆☆☆☆☆☆☆☆☆☆☆☆☆☆☆☆☆☆☆☆☆☆☆☆☆☆☆☆☆☆☆☆☆☆☆☆☆☆☆☆☆☆☆☆☆☆☆☆☆☆☆☆☆☆☆☆☆☆☆☆☆☆☆☆☆☆☆
Smart Stylish Adjustable Viewing Angle Mounted Night Vision Baby Secure Camera Monitor
USER MANUAL
OVERVIEW OF YOUR PARENT UNIT
- LCD display
- Volume +/ up / VOX ON/OFF key
- Volume - / down / PTT key
- Menu key/ OK / Music play ON/OFF key
- Power key/ Return key/ Time display key
- Power wireless connector
- Speaker
- Microphone

OVERVIEW OF YOUR BABY UNIT
- Light sensor
- Camera lens
- Power indicating LED
- Infrared LED
- Speaker
- Pair key
- Microphone
- Power adapter connector
- Temperature sensor
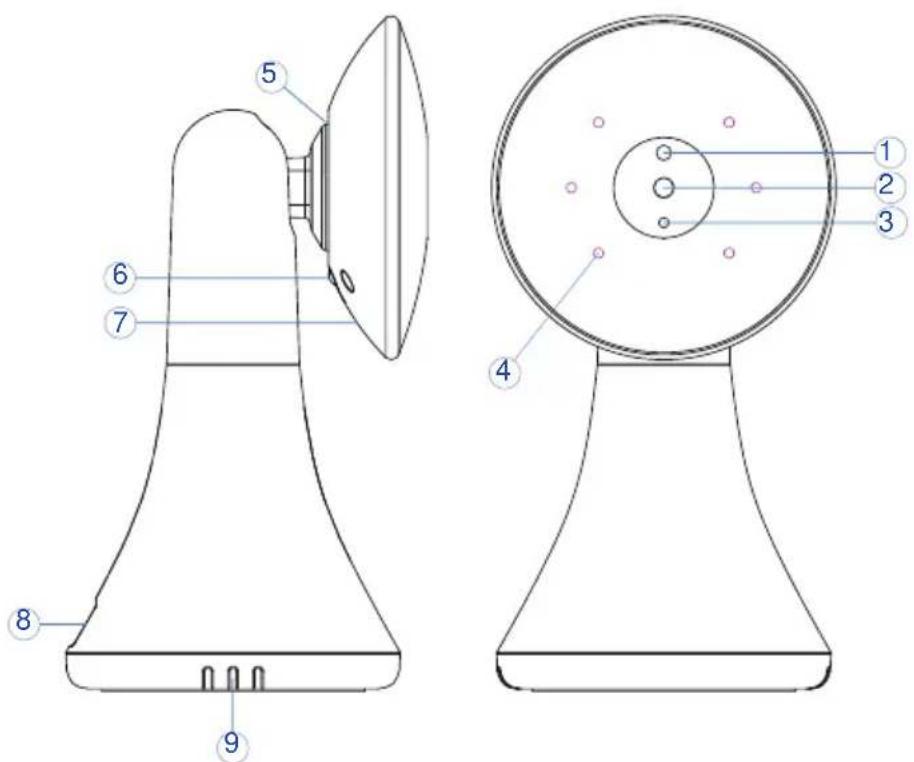
TABLE OF CONTENTS
- Safety Instructions 4
- Overview of the charging stand 5
- Camera's direction adjustable 5
- Parent unit power supply 6
- Baby unit power supply 6
5.1 Setting up 7 - Monitoring screen 8
6.1 Menu options/main menu 8 -
Menu Options 9
7.1 Camera registration 9
7.2 Alarm 9
7.3 Vox 9
7.4 Settings 10
a. Language 10
b. Time and date 10
c. Temperature unit 10
d. Anti-flicker 11
e. LCD backlight 11
f. System info 11 -
Features and Technical Specs 12
SAFETY INSTRUCTIONS
WARNING:
This baby monitor is compliant with all relevant standards regarding electromagnetic fields and is, when handled as described in the User's Guide, safe to use. Therefore, always read the instructions in this User's Guide carefully before suing the device.
- Adult assembly is required.
Keep small parts away from the children when assembling. - This product is not a toy. Do not allow children to play with it.
- This baby monitor is not a substitute for responsible adult supervision.
- Do not place the baby unit or cables in the cot or within arm's reach of the baby (at least 1 meter away).
- Keep the cords out of reach of children.
- Do not use the baby monitor near water or a heat source.
- Only use the power adapters provided.
- Do not touch the plug contacts with sharp or metal objects.
OVERVIEW OF THE CHARGING STAND
- Wireless charging connector for the parent unit
- Power adapter connector

natural_image
Technical line drawing of a handheld device with two views (labeled 1 and 2), no text or symbols present.CAMERA'S DIRECTION ADJUSTABLE

65°up and down rotation
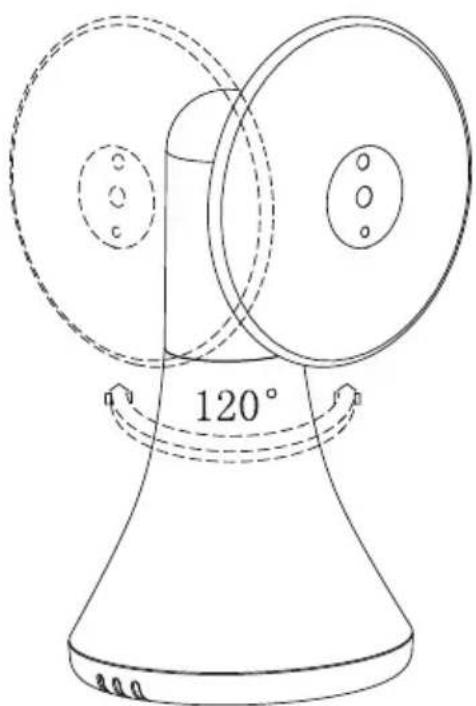
natural_image
Line drawing of a mechanical device with two circular components and a 120° angle label (no text or symbols beyond basic geometry)120°left and right rotation
PARENT UNIT POWER SUPPLY
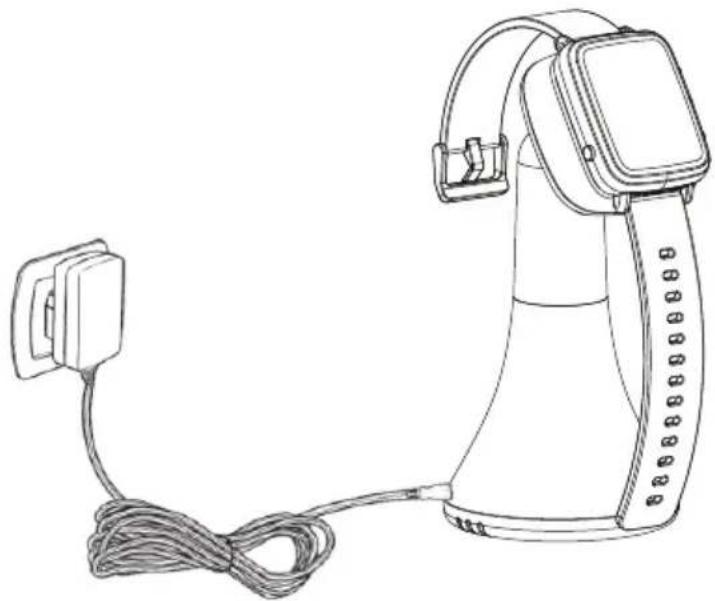
natural_image
Line drawing of a handheld device with cable and power plug (no text or symbols)Charging the parent unit fully before use is recommended.
This will allow the unit to operate battery in the event of a power failure.
- Connect the plug of the power adapter to the charging stand
- Simply place your parent unit to the wireless charging connector
NOTE: Only use the power adapter provided
- The parent unit will display charging icon means the battery starts charging
BABY UNIT POWER SUPPLY
- Connect the small plug of the power adapter to the baby unit and the other end to the mains socket.
NOTE: Only use the power adapter provided
- A blue light led will display indicates the baby unit is working.
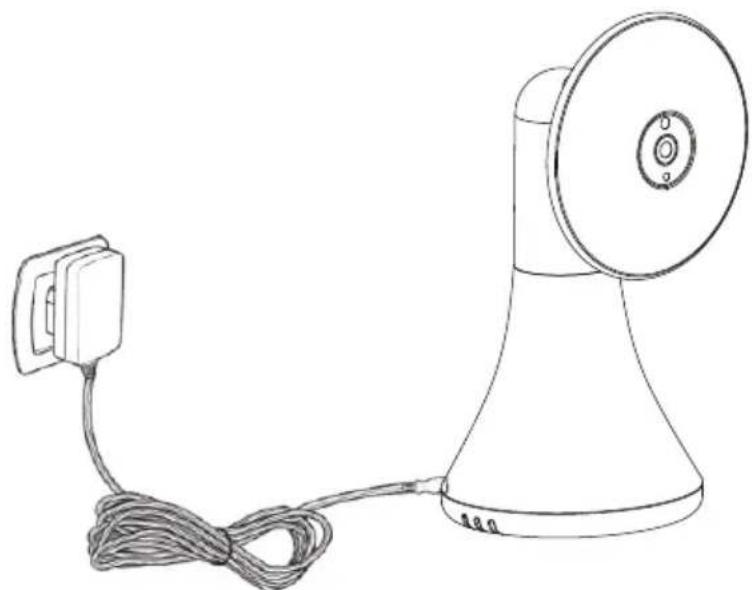
natural_image
Line drawing of a portable megaphone with cord and power plug (no text or symbols)SETTING UP
Place the baby unit in a convenient location (e.g. on a table) or mount the baby unit on the wall, point the camera lens towards the area you want to monitor. Adjust the baby unit until you are satisfied with the image in the parent unit.
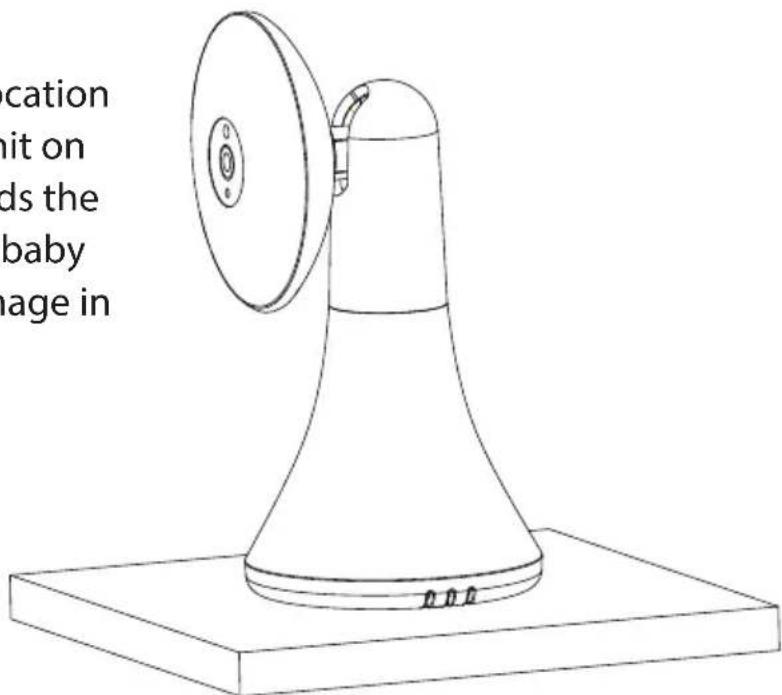
NOTE:
DO NOT place the baby unit within baby's reach!
- If there is interference on the picture or sound, try moving the unit to the different locations, and ensure they are not close to other electrical equipment.
The baby unit can be mounted on the wall
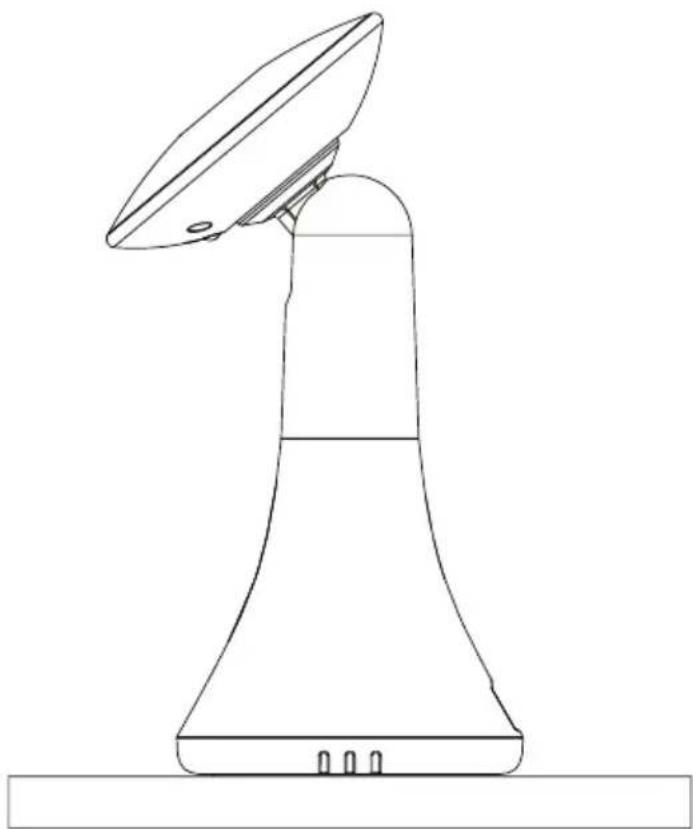
natural_image
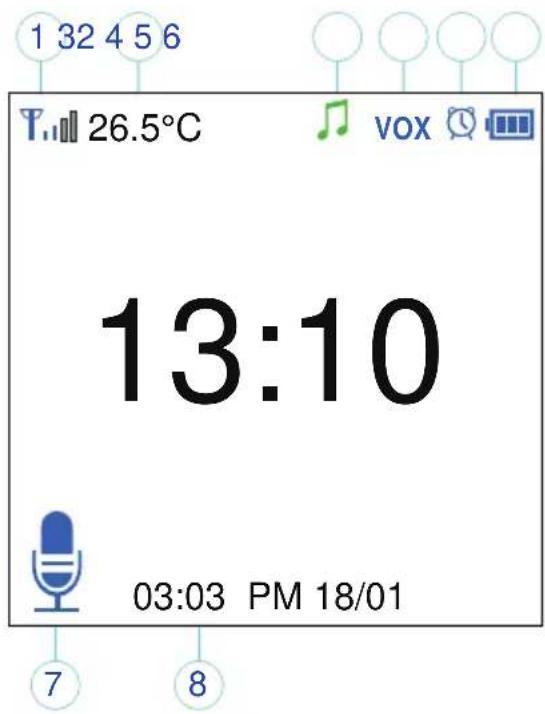
Line drawing of a mechanical device with a flanged top and base, no text or symbols presentMONITORING SCREEN
- Signal strength indicator
- Temperature of the baby's room
- Lullaby is playing
- VOX function activated
- Alarm activated
- Battery indicator
- PTT function activated
- Date and time (HH:MM AM/PM DD/MM)
MENU OPTIONS/MAIN MENU

Press "OK/Menu" Key at monitoring screen will enter the main menu, it contains 4 items:
- Camera
- Alarm
- VOX
- Settings
You can press the "up" Key or "down" Key to move the cursor to select an item and press "Menu" key will enter the sub-menu which you selected.
Press "Return" key will be back to the monitoring screen.
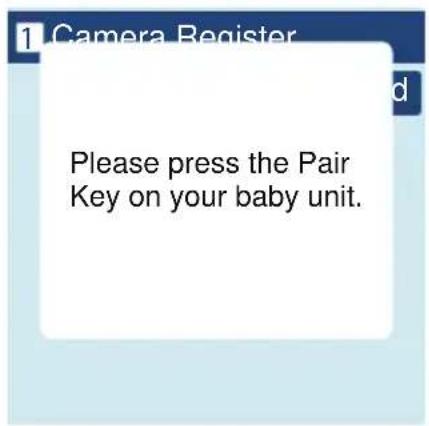
CAMERA REGISTRATION
Press "OK/Menu" key to enter registering screen, then push the "pair" key on the back of baby unit within 10 seconds.


ALARM
Press "down" key to move the cursor and "up" key to change value


VOX
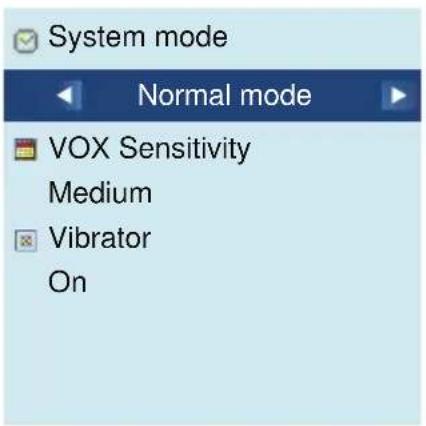
System mode
This menu allows you to choose the working mode from the following:
Normal mode/VOX mode.
VOX Sensitivity
Switch the VOX sensitivity at Low/Medium/High level.
- Vibrator
Press "up" key to choose ON/OFF
LANGUAGE
Language setting menu allows you to choose your language from the following:
English/French/ Spanish /Portuguese/Italian/German/Turkey/Russian
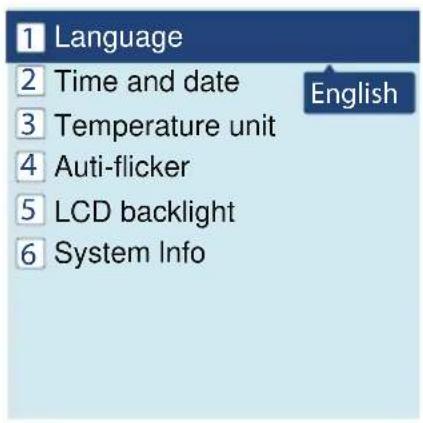

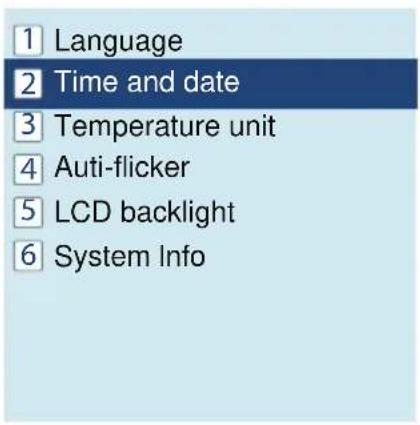
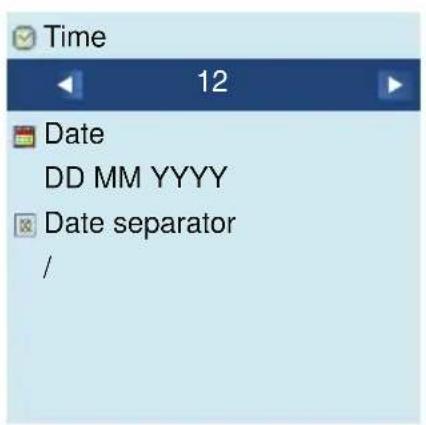
TIME AND DATE
There are 2 items in this menu (Set time/ date & Set format)
Press "down" key to move the cursor and "up" key to change the value.

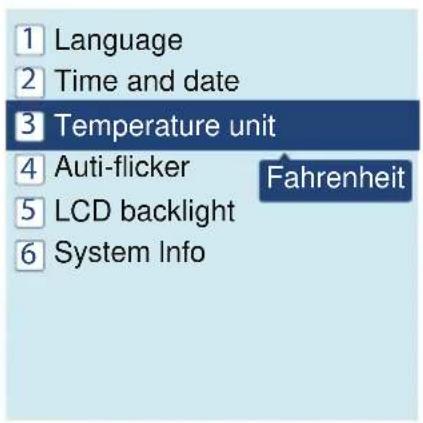
TEMPERATURE UNIT
Switch the unit to Celsius or Fahrenheit.

ANTI-FLICKER
You are able to adjust the frequency of 50/60 HZ to suit your lighting for anti-flicker.


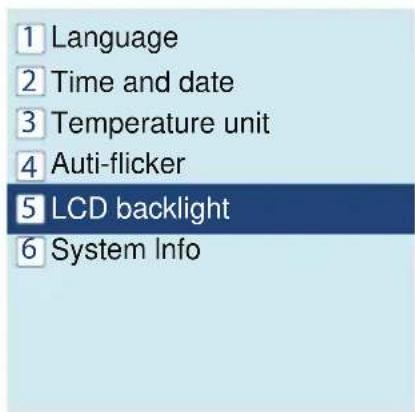
LCD BACKLIGHT
You are able to adjust the brightness of the LCD you are viewing

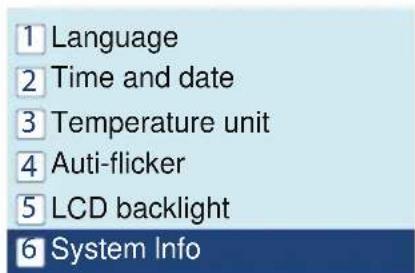
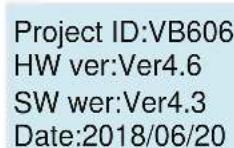
SYSTEM INFO
Contains system information such as Project ID, Hardware version, Software version, build date etc.
SLBCAM550EU - SLBCAM550UK
Adjustable Baby Safeguarding Camera
Smart Stylish Adjustable Viewing Angle Mounted Night Vision
Baby Secure Camera Monitor
Features:
• Professional Home Baby Video Monitor
• Long Lasting, Heavy Duty Baby Monitor System
• Smart Camera Wrist Watch
- Adjustable Camera Viewing Angle
• Wireless Baby Monitoring System
- Convenient, Reliable, Secure
- Portable & Wearable Watch Display Screen for Remote Viewing
• 2.4G Video Transmission for Extended Wireless Range
• Built-in Microphone & Speaker for 2-Way Communication
• User-Friendly Control Interface
• Night Vision Camera Illumination
• Simple Setup & Hassle-Free Operation
• Built-in Thermometer for Room Temperature Monitoring
- Button-Activated Musical Melodies & Lullabies for Soothing Comfort
• Universal Wall / Ceiling Mountable Camera
• Perfect for Baby Crib & Child Play Room Monitoring
What's in the Box:
- Video Smart Watch
- Charging Base
• Baby Monitor Camera
• Wall Power Adapters
Questions? Issues?
We are here to help!
Phone: (1) 718-535-1800
Email: support@pyleusa.com
Smart Watch Monitor:
• Next Generation Stylish Design
• Displays Video via the Mounted Camera
• 1.54" -inch Digital Display Screen
• PTT (Push-to-Talk) for Voice Messaging
• Built-in Rechargeable Battery
• Alarm Clock Reminder Settings
• Room Temperature Display
• Convenient Wireless Charging Dock
• Adjustable Backlight Intensity
• Features Standard Watch Functions (Time + Date)
Technical Specs:
- Wireless Operating Range: Up to 260 meter (850' + ft.)
• Image Processor: Mega-Pix 0.3, CMOS
• Video Resolution: 640 x 480 Pixels
• Video Signal Transmission Protocol: 2.4GHz
• Camera Angle Adjustment: 65° Vertical, 120° Horizontal
• Night Vision Distance: Up to 5 meter (15' ft.)
• Minimum Illumination: 0 Lux
• Temperature Unit Selectable: Fahrenheit / Celsius
• Multi-Language Support
• Watch Battery: 3.78 Li-Polymer, 390mAh
• Power: 120V (5V Power Adapter) - Charge Stand Dimensions (L x W x H): 6.60 x 6.86 x 12.7 cm
- Camera Dimensions (L x W x H): 6.86 x 7.37 x 13.72 cm

WARNING:
This product can expose you to a chemical or group of chemicals, which may include "Nickel Carbonate" which is known in the state of California to cause cancer, birth defects, or other reproductive harm. For more info, go to https://www.p65warnings.ca.gov/.
SereneLife
- OVERVIEW OF YOUR PARENT UNIT
- OVERVIEW OF YOUR BABY UNIT
- TABLE OF CONTENTS
- SAFETY INSTRUCTIONS
- WARNING:
- OVERVIEW OF THE CHARGING STAND
- PARENT UNIT POWER SUPPLY
- Charging the parent unit fully before use is recommended.
- BABY UNIT POWER SUPPLY
- SETTING UP
- NOTE:
- The baby unit can be mounted on the wall
- MONITORING SCREEN
- MENU OPTIONS/MAIN MENU
- CAMERA REGISTRATION
- ALARM
- VOX
- System mode
- VOX Sensitivity
- - Vibrator
- LANGUAGE
- TIME AND DATE
- TEMPERATURE UNIT
- ANTI-FLICKER
- LCD BACKLIGHT
- SYSTEM INFO
- SLBCAM550EU - SLBCAM550UK
- Adjustable Baby Safeguarding Camera
- Smart Stylish Adjustable Viewing Angle Mounted Night Vision
- Baby Secure Camera Monitor
- Features:
- What's in the Box:
- Smart Watch Monitor:
- Technical Specs:
- SereneLife
Brand : SereneLife
Model : SLBCAM20UK
Category : Camera