UA-R560F2 - Security Camera Geovision - Free user manual and instructions
Find the device manual for free UA-R560F2 Geovision in PDF.

User questions about UA-R560F2 Geovision
0 question about this device. Answer the ones you know or ask your own.
Ask a new question about this device
Download the instructions for your Security Camera in PDF format for free! Find your manual UA-R560F2 - Geovision and take your electronic device back in hand. On this page are published all the documents necessary for the use of your device. UA-R560F2 by Geovision.
USER MANUAL UA-R560F2 Geovision
natural_image
Three white USAVision cameras with camera modules and display screens, shown against a blue background (no text or symbols visible on the devices themselves)UA-B580F3
- UA-R500F2
- UA-R560F2
UA-R580F2
UA-R800F2
USAVisionsys
© 2022 USAVision, Inc. All rights reserved.
Under the copyright laws, this manual may not be copied, in whole or in part, without the written consent of USAVision.
Every effort has been made to ensure that the information in this manual is accurate. USAVision makes no expressed or implied warranty of any kind and assumes no responsibility for errors or omissions. No liability is assumed for incidental or consequential damages arising from the use of the information or products contained herein. Features and specifications are subject to change without notice.
USA Vision Systems Inc.
9301 Irvine Blvd,
Irvine, CA 92618, USA
Tel: +1-949-421-5910
Fax: +1-949-583-152
https://www.geovision.com.tw/us/
June 2022
Scan the following QR codes for product warranty and technical support policy:

text_image
QR code image containing encoded data, no visible human-readable text[Warranty]

text_image
QR code image containing encoded data, no visible human-readable text[Technical Support Policy]
Contents
Introduction....1
1. Overview....1
1.1 Range of Application .... 1
1.2 Product Description....2
1.3 Operation Environment ......2
1.4 Camera Overview....3
1.4.1 UA-R500F2 / UA-R560F2 / UA-R580F2 / UA-R800F2 3
1.4.2 UA-B580F3....4
2. Device Connection....5
3. Setting IP address via Device Config Tool 6
4. IE Log in....8
4.1 Access to IPC web port 8
4.2 Initial login....9
4.3 General login 11
4.4 Retrieve password....12
4.4.1 Security Question Verification 12
4.4.2 Key File....13
4.4.3 Super Password....14
4.5 Password Expired....14
5. Plug-in Installation 16
6. Preview 17
6.1 Live 17
6.2 Recording Status....19
7. Playback 20
7.1 General Playback....20
7.2 Playback Searched by Human & Vehicle Detection 22
7.3 PID&LCD 23
8. Remote Setting....24
8.1 Live 24
8.2 Image Control 25
8.3 Video Cover....28
8.4 ROI 29
8.5 Record 30
8.5.1 Encode 30
8.5.2 Record....31
8.6 Event....33
8.6.1 Setup....33
8.6.2 Alarm 35
8.7 AI....38
8.7.1 Setup....38
8.7.2 Alarm 56
8.7.3 Statistics....58
8.8 Network....61
8.8.1 General....61
8.8.2 Email (Email Configuration) 65
8.8.3 FTP 66
8.8.4 RTSP 67
8.8.5 DDNS....68
8.8.6 HTTPS....69
8.8.7 IP Filter....70
8.9 Device....71
8.9.1 Disk 71
8.9.2 Audio 71
8.9.3 Cloud 72
8.10 System....73
8.10.1 General....73
8.10.2 Multi-User 75
8.10.3 Maintenance....78
8.10.4 Information 82
9. Local Settings 83
Introduction
Thank you for using our network camera products. Our network camera products are integrated and developed for network video monitoring. High-performance single SOC chips are used in media processor for audio/video acquisition, compression and transmission/transfer. Standard H.264/H.265 encoding algorithm is applied to ensure clear and smooth video representation and transfer performance. Embedded Web Server offers users access to real-time surveillance and remote control of front-end camera through web browser.
The network cameras are easy to install and operate. The network cameras are applicable to large and medium-size enterprises, governmental projects, large mall, chain supermarkets, intelligent buildings, hotels, Hospitals and schools and other group customers, as well as to applications requiring remote network video transmission and monitoring.
Instructions:
- For purpose of this manual, IP camera means network camera.
● Single click means a single click on the left mouse button.
● Double click means a double-click on the left mouse button.
● The default factory IP address for IP camera is 192.168.1.168. - The default administrator username for IP camera is admin (in lowercase), and there is no default password.
- The default Web port number is 80 and the default media port number is 9000. The ONVIF port number is synchronized with the web port number.
Statement:
Some information contained in this manual may differ from the actual product. For any problems you cannot solve with the use of this manual, please contact our technical support or the authorized dealers. This manual may be subject to change without prior notice.
CAUTION
RISK OF EXPLOSION IF BATTERY IS REPLACED BY AN INCORRECT TYPE DISPOSE OF USED BATTERIES ACCORDING TO THE INSTRUCTIONS
1. Overview
1.1 Range of Application
The network cameras with powerful image processing capacity may be applied at various public places such as mall, supermarket, school, factory and workshop, as well as in environments requiring HD video image such as bank and traffic control system, as shown below:
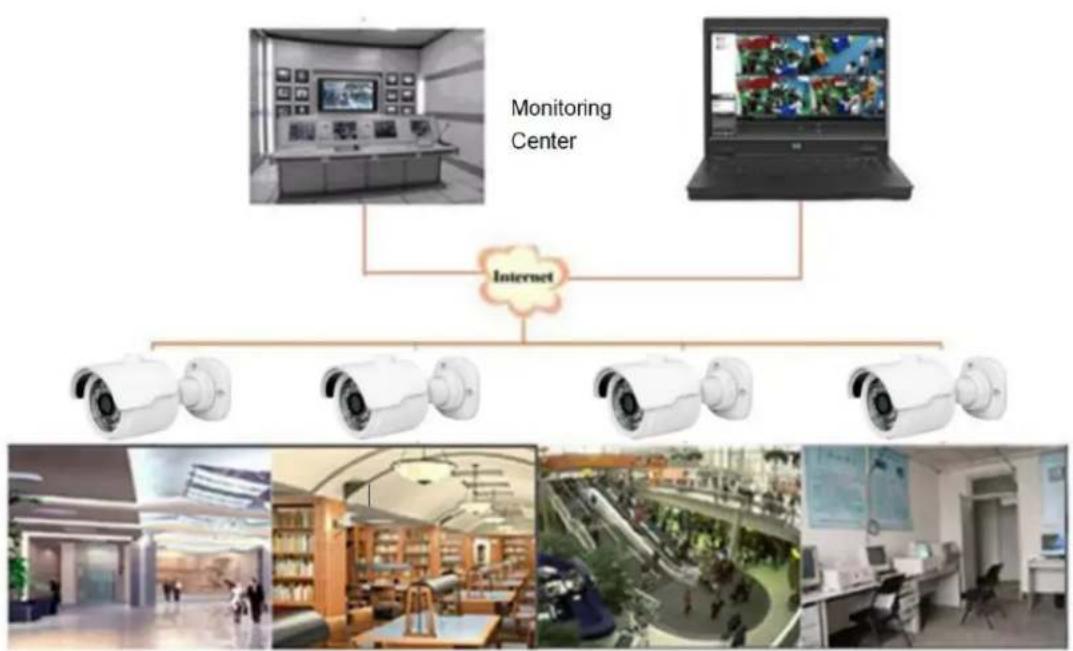
flowchart
graph TD
    A["Monitoring Center"] --> B["Internet"]
    B --> C1["Camera 1"]
    B --> C2["Camera 2"]
    B --> C3["Camera 3"]
    B --> C4["Camera 4"]
    B --> C5["Camera 5"]
1.2 Product Description
An IP camera is a digital online surveillance camera embedded with Web server and capable of independent operation, giving user access to real-time monitoring through web browser or client software from any place across the world.
IP camera is based on the latest digital solution, an integrated media processing platform for audio/video acquisition, compression and network transmission on a single board. It is in compliance with H.264/ H265 High Profile encoding standards. Any remote user can have access to real-time monitoring by entering the IP address or domain name of the IP camera in web browser. This network camera solution is applicable to residential or business environments as well as a wide range of situations requiring remote network video monitoring and transmission. The IP camera products are easy to install and operate.
The IP cameras can be managed by several users with different authorization levels.
IP cameras allows mobile detection, and sends e-mail and snapshot taken in case of emergency and store the image or video snapshot in SD card for retrieval.
1.3 Operation Environment
Operating system: Windows 7/Windows 8/Windows 2008 (32/64-bit),
Windows 2003/Windows XP/Windows 2000 (32-bit)
CPU: Intel Core Duo II dual-core processor or higher
Memory: 1G or more Video memory: 256M or more
Display: 1024 × 768 or higher resolution
IE: IE 10 or higher version
1.4 Camera Overview
1.4.1 UA-R500F2 / UA-R560F2 / UA-R580F2 / UA-R800F2
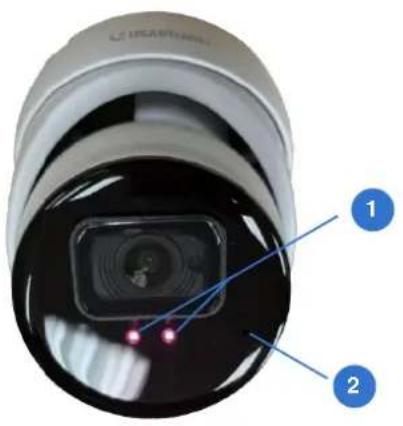
text_image
1 2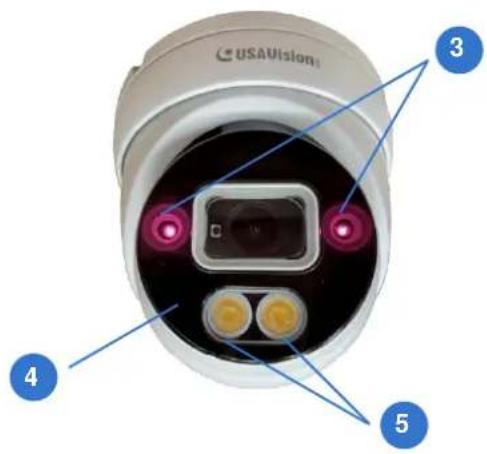
text_image
USAVISION 3 4 5
text_image
6 7 RecE RoHS| No. | Description | No. | Description |
| 1 | IR LED x 2 (For UA-R500F2 / R560F2 / R800F2) | 5 | Warm LED x 2 (For UA-R580F2) |
| 2 | Built-in microphone (For UA-R500F2 / R560F2 / R800F2) | 6 | Default button |
| 3 | IR LED x 2 (For UA-R580F2) | 7 | SD card slot |
| 4 | Built-in microphone (For UA-R580F2) |
Note: Press the default button for 15 seconds to reboot the camera.
1.4.2 UA-B580F3
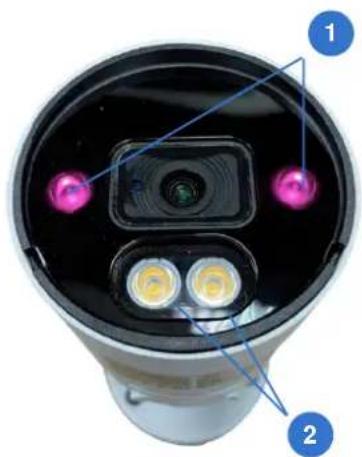
natural_image
Top-down view of a black cylindrical device with two illuminated ports and a central lens (no text or symbols visible)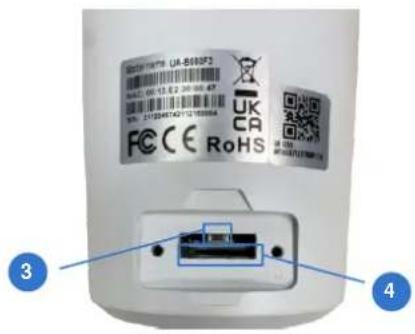
text_image
U.S-5835F3 U.S.A. 0013.2.300000.67 2112044740-12100004 FCC CE RoHS UK CA SP-001 SP-001/FLJ595P18 3 4| No. | Description |
| 1 | IR LED x 2 |
| 2 | Warm LED x 2 |
| 3 | Default button |
| 4 | SD card slot |
Note: Press the default button for 15 seconds to reboot the camera.
2. Device Connection
IP camera can be connected in two ways:
1. Connection to PC
Connect IP camera to PC via straight-through network cable, with power input connected to a DC 12V adaptor, and set the IP addresses of the PC and IP camera in one network segment. The IP camera will communicate with PC within one minute after being powered on if the network operates normally.

text_image
RJ45 Cable2. Connection to router/switch
This is more commonly used in connecting the IP camera to Internet, where the camera and PC are connected to LAN ports of a router/switch, with gateway of the camera set to the IP address of the router.
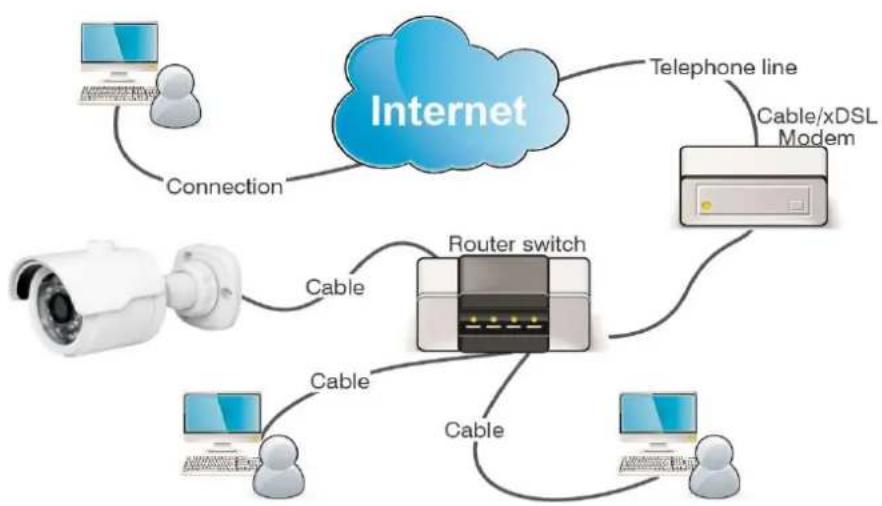
flowchart
graph TD
    A["Internet"] -->|Telephone line| B["Cable"]
    A -->|Connection| C["Computer"]
    A -->|Cable| D["Router switch"]
    A -->|Cable| E["Computer"]
    A -->|Cable| F["Computer"]
    B --> G["Cable/xDSL Modem"]
    C --> H["Computer"]
    D --> I["Computer"]
    E --> J["Computer"]
    F --> K["Computer"]
3. Setting IP address via Device Config Tool
Devices that communicate with each other on the Internet must follow the constraints of the network protocol. For example, the PC and IPC are in the same local area network, and the setting IP of the IPC must be in the same network segment as the IP of the PC in order to communicate normally. Take the camera in factory mode as an example:
Step 1: Obtain the basic setting information of the current network. Open Network on the PC (Win10)→Open Network and Internet Settings→Network Sharing Center→Ethernet→Details to view the setting information of the current network.
Note: If the current network supports DHCP to assign IP, this step can be ignored.
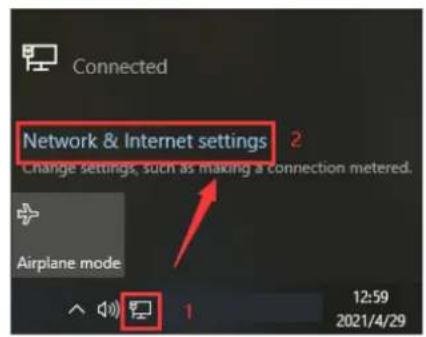
text_image
Connected Network & Internet settings 2 Change settings, such as making a connection metered. Airplane mode 12:59 2021/4/29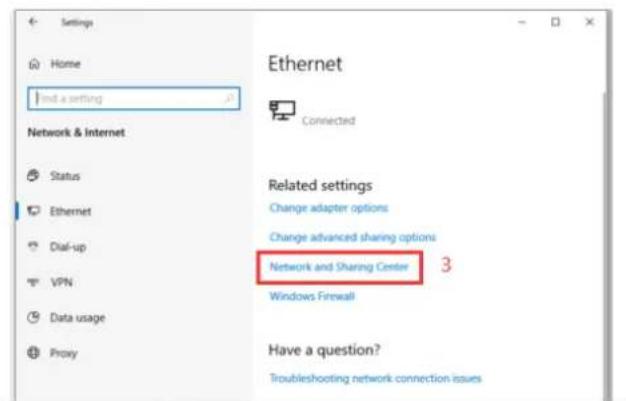
text_image
Settings Home Find a setting Network & Internet Status Ethernet Dial-up VPN Data usage Proxy Ethernet Connected Related settings Change adapter options Change advanced sharing options Network and Sharing Center 3 Windows Firewall Have a question? Troubleshooting network connection issues
text_image
Network and Sharing Center View your basic network information and set up connections View your active networks Change adapter settings Change advanced sharing settings Media streaming options 网络 9 Public network Across/type Connections Internal 4 Change your networking settings Set up a new connection or network Set up a broadband, dial-up, or VPN connection; or set up a router to access point. Troubleshoot problems Diagnose and repair network problems, or get troublobating information. See this Internet Options Windows Definite Firewall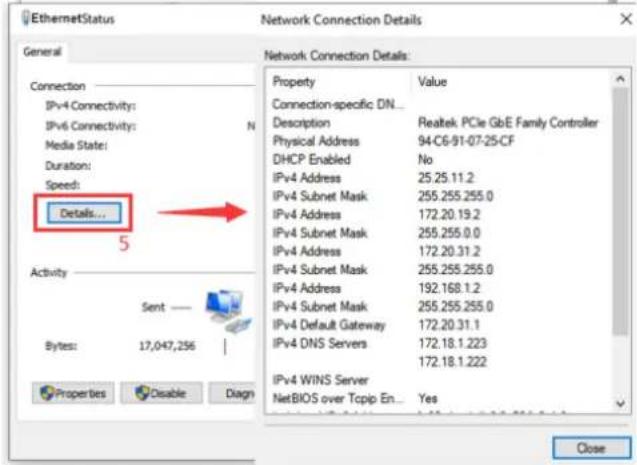
text_image
EthernetStatus Network Connection Details General Network Connection Details: Property Value Connection-specific DN_ Description Realtek PCIe GbE Family Controller Physical Address 94-C6-91-07-25-CF DHCP Enabled No IPv4 Address 25.25.11.2 IPv4 Subnet Mask 255.255.255.0 IPv4 Address 172.20.19.2 IPv4 Subnet Mask 255.255.0.0 IPv4 Address 172.20.31.2 IPv4 Subnet Mask 255.255.255.0 IPv4 Address 192.168.1.2 IPv4 Subnet Mask 255.255.255.0 IPv4 Default Gateway 172.20.31.1 IPv4 DNS Servers 172.18.1.223 IPv4 WINS Server 172.18.1.222 NetBIOS over Tcpip En... Yes Activity Sent Bytes: 17,047,256 Properties Disable Diagn CloseStep 2: Run Device Utility and click Search to get the IPC information as shown in
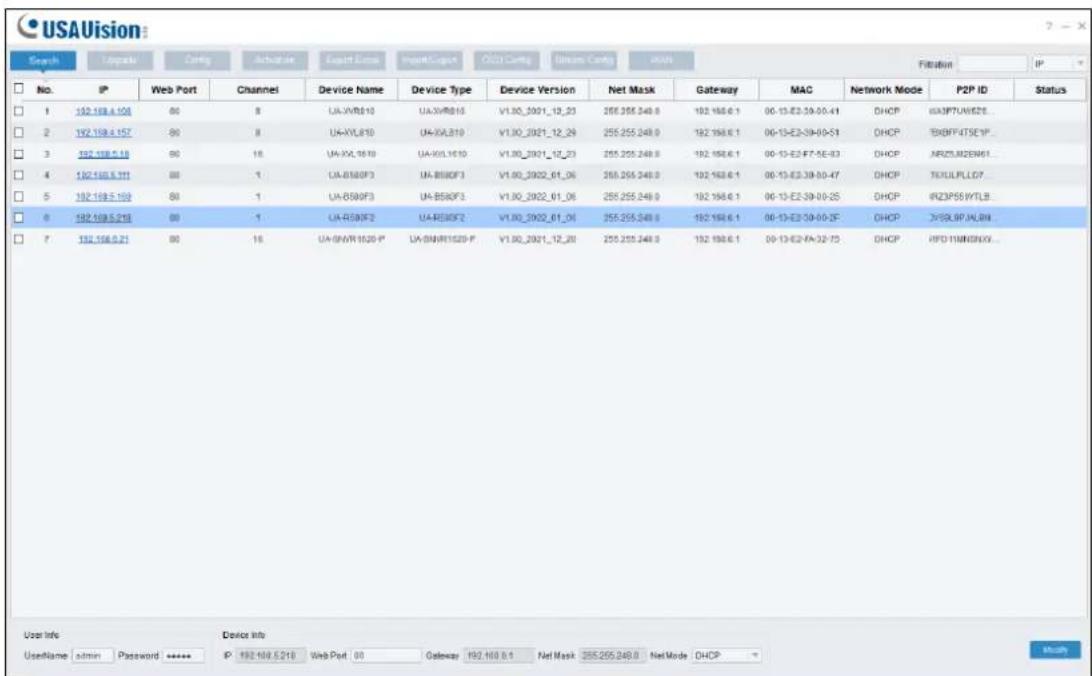
Figure 3.1. The IPC can be located according to the P2P ID or Mac address.

text_image
USAVision Search Upgrade Cancel Access Export/Scale Import/Design USB/Cancel Stream/Cancel Water Fibration IP No. IP Web Port Channel Device Name Device Type Device Version Net Mask Gateway MAC Network Mode P2P ID Status 1 192 168.4.105 80 8 UA-XVRE10 UA-XVRE10 V1.90_2021_12_23 255.255.248.0 192.168.0.1 06-13-E2-30-00-41 DHCP UG3PTLAV5Z... 2 192 168.4.107 80 8 UA-VXLB10 UA-VXLB10 V1.90_2021_12_26 255.255.248.0 192.168.0.1 06-13-E2-30-00-51 DHCP TWBBFF4TSE IP... 3 192 168.5.19 80 16 UA-XVL1610 UA-XVL1610 V1.90_2021_12_23 255.255.248.0 192.168.0.1 06-13-E2-F7-5E-93 DHCP NRZLSJ8EEM1... 4 192 168.5.171 80 1 UA-BB8IF3 UA-BB8IF3 V1.90_2022_01_96 255.255.248.0 192.168.0.1 06-13-E2-30-00-47 DHCP TXMULPLLD7... 5 192 168.5.163 80 1 UA-BB8IF3 UA-BB8IF3 V1.90_2022_01_96 255.255.248.0 192.168.0.1 06-13-E2-30-00-25 DHCP SRZSPS8MYTLB... 6 192 168.5.218 80 1 UA-RS8OF2 UA-RS8OF2 V1.90_2022_01_96 255.255.248.0 192.168.0.1 06-13-E2-30-00-2F DHCP TWSLSJPALBN... 7 192 168.5.27 80 16 UA-SWVRHSQS.P UA-SWVRHSQS.P V1.90_2021_12_26 255.255.248.0 192.168.0.1 30-13-E2-F4-3D-7S DHCP WTOIIMNISNY...Figure 3.1
Note: The default IP of the camera is 192.168.1.168, and the default account is admin.
Step 3: As shown in Figure 3.1, select the corresponding device, enter the account and password, edit the corresponding network information, and click Modify to save the information.
Note: If the current network supports DHCP to distribute network, change Network Mode to DHCP to obtain IP.
4. IE Log in
4.1 Access to IPC web port
Use Device Utility to search the IPC of the current network. Click on the searched IP and log in to the camera with web browser as shown in Figure 4.1.1.
text_image
USAVision Search Upgrade Config Actions Export Error Import/Export OLED Config Devices Config VHAC Fibiation IP No. IP Web Port Channel Device Name Device Type Device Version Net Mask Gateway MAC Network Mode P2P ID Status 1 192.168.4.104 80 8 UA-VWR010 UA-XWR010 V1.00_2021_12_23 255.255.248.8 192.168.6.1 00-13-E2.39-00-41 DHCP UX3PTUWESZS... 2 192.158.4.157 80 8 UA-XYL010 UA-XYL010 V1.00_2021_12_24 255.255.248.8 192.168.6.1 00-13-E2.39-00-51 DHCP TENFFAT5E1P... 3 192.168.5.118 80 16 UA-XKL9610 UA-XKL1610 V1.00_2021_12_23 255.255.248.8 192.168.6.1 00-13-E2.F7-5E-B3 DHCP NRZSLRZEMA1... 4 192.168.5.171 80 1 UA-B5B0F3 UA-B5B0F3 V1.00_2021_01_06 255.255.248.8 192.168.6.1 00-13-E2.39-00-47 DHCP TDULPLLD7... 5 192.168.5.193 80 1 UA-B5B0F3 UA-B5B0F3 V1.00_2021_01_06 255.255.248.8 192.168.6.1 00-13-E2.39-00-25 DHCP RFZ3PSSWTLB... 6 192.168.5.219 80 -1 UA-R5B0F2 UA-R5B0F2 V1.00_2021_01_06 255.255.248.8 192.168.6.1 00-13-E2.39-00-3F- DHCP DWSLRPJALBN... 7 192.168.6.21 80 16 UA-SNVR1629-P* UA-SNVR1629-F* V1.00_2021_12_20 255.255.248.8 192.168.6.1 09-13-E2-YA-32-75 DHCP RFQ-TRMNSNXY... User Info Device Info UserName admin Password **** IP: 192.168.5.218 Web Port 00 Gateway 192.168 0:1 Net Mask 255.255.248.8 NetMode DHCPFigure 4.1.1
You can also directly open the web browser and enter http://ip:web port. Take device shown in Figure 4.1.1 as an example, the IP of the current device to be accessed is 192.168.5.218, the web port is 80, and the combined URL is http://192.168.5.218:80.
Note: In actual use scenario, the http access method will default to port 80.
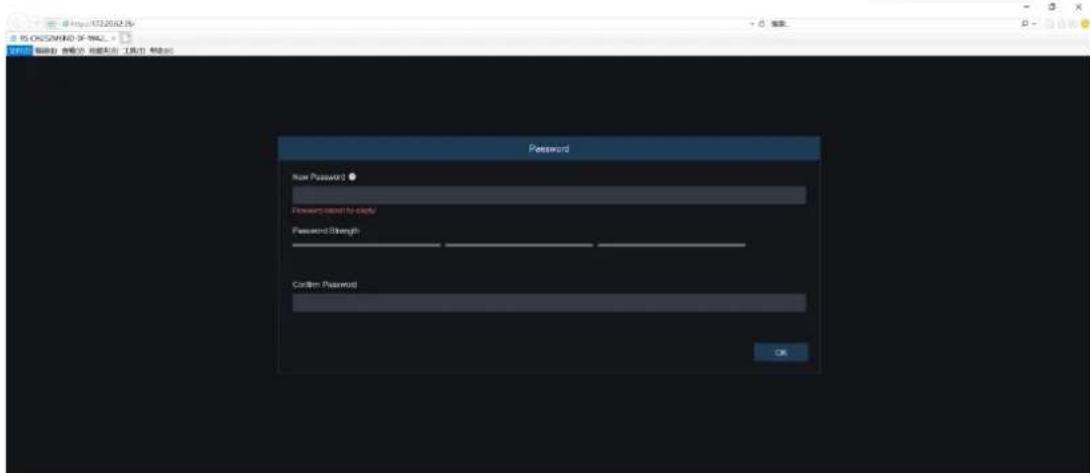
4.2 Initial login
In the first time accessing the web of the camera, the program will remind you to set a more complicated password as the default password of the device is too simple. The
interface as shown in Figure 4.2.1 will be popped up. Click to check password requirements:
The password should be 8-15 characters, including letters, numbers or special characters.
- 8\~9 characters: The combination should consist of at least 3 uppercase letters, lowercase letters, numbers or special characters.
- 10\~15 characters: The combination should consist of at least 2 uppercase letters, lowercase letters, numbers or special characters.
-
It is forbidden to repeat and continuous characters exceeding 4 digits.
-
It is forbidden for the continuous keys of the keyboard pattern to exceed 4 digits.
text_image
New Password Password about to close Password Strength Confirm Password OKFigure 4.2.1
Set a new password, click OK to save, the interface as shown in Figure 4.2.2 will pop up. You can check to choose the corresponding password retrieval method, or cancel the setting directly without checking, and the password retrieval function will not be enabled.

text_image
Recover Password Security Question Configuration Security Question 1 Your failure's error? Approve Security Question 2 Your mother's error? Access Security Question 3 Your head teacher's name in every high school? Access Certificate of authorization Super radioNet recommendations OK CancelFigure 4.2.2
①Security Question Configuration: To modify the main user's password by question verification. After enabling, you need to select 3 of the 15 frequently used questions and set the answer required to retrieve the password. The maximum length of the answer is 64 characters.
②Certificate of authorization: To modify the main user's password by key. After it is enabled, you need to click Export to download the key file namely certificate.txt.
③Super code (Not recommended): Use the super verification code to modify the main user's password. A super verification code can be calculated by current camera's Mac address and the camera system time to modify the main user's password. However, the camera's Mac is broadcast on the network, and the camera system time can be obtained directly when logging in to the Web and using Super code to modify the master user password. There are certain security risks, so it is not recommended for users to turn it on.
Note: When enabling the password retrieval function, please keep the verification information properly.
4.3 General login
To access the camera web interface, the login interface will be entered as shown in Figure 4.3.1. Enter the corresponding account password, then click login, you can access the camera's operating interface. At the same time, you can select the desired language when log in.

text_image
USAVision Login Login PasswordFigure 4.3.1
4.4 Retrieve password
When you forget the login information, you can click Recover Password on the login interface to enter the password retrieval interface. According to the first login settings, it supports three modes: security question verification, key file, and super password.
4.4.1 Security Question Verification
Reset the main user password through the security question and open the password retrieval interface. As shown in Figure 4.4.1, the default interface is to retrieve the password through the problem verification. Fill in the corresponding answer in the security question, you can directly modify the password of the current main user.

text_image
Recover Password Verification Mode Security Question Verification Security Question 1 Your father's name? Answer Security Question 2 Your mother's name? Answer Security Question 3 Your head teacher's name in senior high school? Answer New Password Password Strength Confirm Password OK CancelFigure 4.4.1
4.4.2 Key File
When set up the password authentication questions in initial login, you can turn on the key search and modify password function and prompt to download the key file certificate.txt. Open the password retrieval interface, switch to the Certificate of authorization mode, and the interface is converted as shown in Figure 4.4.2. Click Import to select the key file certificate.txt. After the Import is successful, enter the new password to modify the main user's password.

text_image
Recover Password Verification Mode Certificate of authorization Certificate of authorization Import New Password Password cannot be empty! Password Strength Confirm Password Password cannot be empty! OK Cancel Login Recover PasswordFigure 4.4.2
4.4.3 Super Password
The super password is a very insecure way to retrieve the password. According to the Mac of the camera and the time prompted by the super verification code, the verification code can be calculated based on certain rules. By filling in the verification code, the main user's password can be modified.

text_image
Recover Password Verification Mode Super Code 2021-03-17 16:13:45 Super code New Password Password cannot be empty! Password Strength Confirm Password Password cannot be empty! OK Cancel Recover PasswordFigure 4.4.3
4.5 Password Expired
Using the same password for a long time poses a great security risk. For this reason, the program will record the system time of the last password modification. If the system time of current login is 90 days later than the system time of the last password modification, the user will be reminded to change the password.
When user decides to change the password, the interface jumps to Figure 4.5.1.
According to the interface prompts, user can set a new password by verification with old password.

text_image
Password New Password ? Password cannot be empty! Password Strength Low Confirm Password OK CancelFigure 4.5.1
5. Plug-in Installation
Use IE browser to log in, you need to install the plug-in to preview the image normally. When the prompt in Figure 5.1.1 appears, please download and install the plug-in according to the prompt.

text_image
USAVision Live Playback Remote Setting Local Settings Main Stream SubStream MultiStream Live video can be played only after the player player is installed. Download and install the player. If you have installed the player, make your browser. Allow the player in your browser.Figure 5.1.1
Note: Programs without plug-ins are supported. When using Safari 12 or later, Chrome 57 or later, Firefox 52 or later, Edge 41 and other browsers for web access, the plug-ir installation steps can be ignored.
6. Preview
6.1 Live
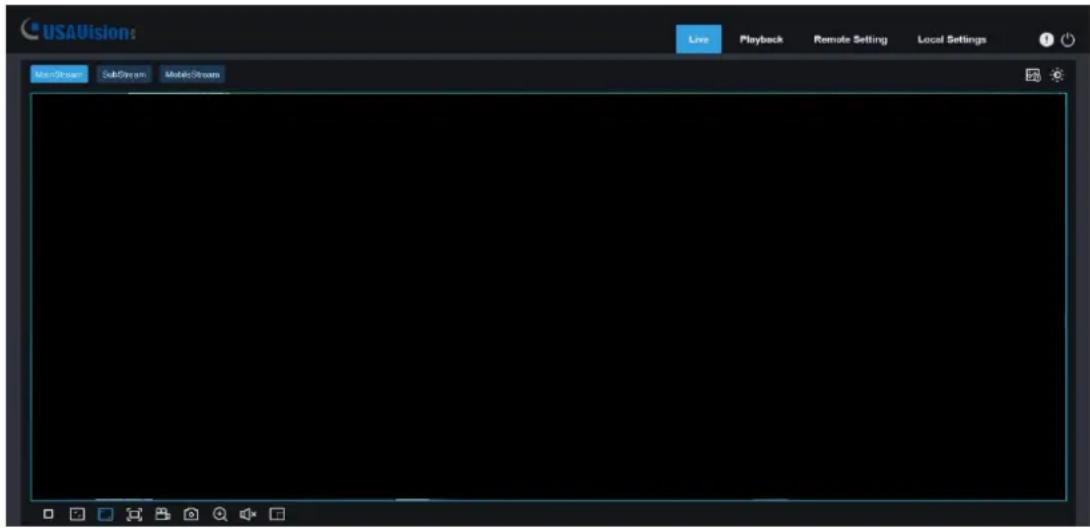
After the login is successful, the web terminal enters the login preview interface, which is shown in the following figure.
Note: The functions of different products are different, please refer to the actual situation.
text_image
USAVision: Live Playback Remote Setting Local Settings Main Stream SubStream Mobile StreamCode stream switching menu: The upper left corner can switch the image quality of the current preview interface:
Main stream: The image is clearer, but the stream bandwidth is large, which requires higher performance on the PC-side interface
Sub stream: Bandwidth and requirements for the PC are moderate, but the image will be worse than the main stream.
Mobile stream: The bandwidth and requirements for the PC are the lowest, but the image is also the worst.
Main menu switching bar: Switch the function interface of the web. The web terminal has 4 menus: Live, Playback, Remote Setting, and Local Settings.
Info: Display the currently logged-in user, web version and plug-in version.
AI alarm: Open the alarm push bar on the right, and push the corresponding picture when performing functions such as face alarm, human and vehicle detection.
Color: Adjust the current image settings, such as image saturation, sharpness, etc.
Exit: Exit the current login.
Recording alarm status: Prompt the alarm and recording status of camera, please refer to section 6.2 for details.
Stop/Play: Open and close the current stream preview.
Original Proportions: Display the current preview image in original proportions.
Stretch: Display the current preview image in a way that fills the display area.
Full Screen: Display the current preview screen in full screen, you can double-click the screen to turn on/off the function, and press Esc to exit the full screen when enabling the function.
Record: Manually record the stream of current preview.
Capture: Manually capture the picture of the current stream.
Digital Zoom: Electronically zoom in on certain area of the display screen.
Audio: turn on/off, adjust the sound in current preview.
Pixel Counter: Select the area by frame to check the pixel size of the area in the code stream.
Bullet box information: When some alarms are triggered, the lower left corner will prompt the current alarm.
6.2 Recording Status
The recording status is a simple reminder from the web to the current alarm of the camera, which can show whether the recording is normal. There can be multiple alarms at the same time. For specific instructions, please refer to the following introduction:
No icon: The SD card of camera is normal, but no video is being recorded.
R : The camera is performing general recording.
Note: When the camera performs alarm recording, the mark will disappear, but general recording will continue.
H : The SD card is in an abnormal state, please check the SD card.
M : The camera is in motion alarm, but motion alarm recording is not enabled.
M : The camera is in motion alarm, and motion alarm recording is performing.
S : The camera is in smart alarm, but the smart alarm recording is not performed.
Note: Intelligent alarms include Human & Vehicle alarm, etc.
S : The camera is in smart alarm and smart alarm recording is performing.
7. Playback
The camera not only needs to allow us to see the real-time image, but also needs to save the image information so that it can be retrieved and viewed when needed.
7.1 General Playback
The playback function is mainly composed of General / Picture / Tag / AI search functions. The following figure shows the video search.

text_image
USAVision General Date: 2022-1-20 Search type All Type Normal Event AI Live Playback Remote Setting Local Settings Search 08:00:00 89.36 42.38 14.95 09.30 30.26 10.69 12.30 14.39 20.36 16.66 20.36 22.29 09.30 Normal Sound Detection Netbreak Union AISearch Mode: Switch the current search mode. As shown in the figure above, the default is General search, and the search information is ordinary video files. You can switch to Picture / Tag / AI search. (Picture search is not applicable to UA-R500F2 / R800F2 while AI search is not applicable to UA-R500F2.)
Date: Set the date to search for the video, click search, it will prompt the date of the video file.
Search Type: Display the search type supported by the camera. You can search and view part of the video according to your demand.
Search: Search and display the videos in the SD card according to the search settings.

Pause/Play: Pause/Play playback stream

Stop: Close the playback stream

Forward by One Frame: Play one frame of image every time you click

Record: Manually record the current preview stream

Capture: Manually capture the picture of the current stream

Download: Download the currently searched video

speed: Playing speed. Support speed adjustment like 1/8, 1/4, 1/2, 1, X2, X4, X8

Audio: Turn on/off, adjust the sound of playback stream
Playback progress bar: The time bar below shows the current playback progress bar in different colors according to the search results.

Digital Zoom: Electronically zoom in on certain area of the display stream

Original Proportions: Display the current preview image in original proportions

Stretch: Display the current preview image in a way that fills the display area

Full Screen: Display the current preview image in full screen, you can double-click screen to turn on/off the function, and press Esc to exit the full screen when enabling function
Playback progress bar zoom in/out: The progress bar defaults to display the progress of 24 hours. By this function, you can more accurately jump to the corresponding playback position. This function also works through the mouse wheel.
7.2 Playback Searched by Human & Vehicle Detection
The camera can distinguish between people or cars, and record them, so as to search for the required records. The interface is shown in the figure below.

text_image
USAVision: Live Playback Remote Setting Local Settings Human & Vehicle Detection Start time 2022-1-20 00:00:00 End time 2022-1-20 23:50:59 Detection Type Human 2 Human Motor Vehicle Non-motorized Vehicle SearchSearch Mode: Switch the search mode. The current search mode is AI-Human & Vehicle Detection.
Start time: Set the start time of search.
End time: Set the end time of search.
Detection Type: Set the captures of human or car to be searched, and you can also search both at the same time.
Search: Search for human & vehicle captures according to the search element settings.
Search Results Display Area: Display the search results. Double-click the picture to enter the playback for a short period of time before and after the detection.
Search results Flip: You can flip the search results in the lower right corner.
7.3 PID&LCD
With the development of technology, AI-PID&LCD is added human & vehicle detection function, can alarm the target of human & vehicle only. Besides, the picture or video is recorded, which is easy to search and view. The interface is shown in the figure below.

text_image
USAVision! PID/LCD Start time 2022-1-20 60 60 60 End time 2022-1-20 23 59 59 Vigilance PID > +1 Detection Type Hausn > +2 Search Live Playback Remote Setting Local Settings 1 / 1Search Mode: Switch the search mode. The current search mode is AI-PID&LCD.
Start time: Set the start time of search.
End time: Set the end time of search.
Vigilance: Set the capture mode of triggering the alarm to PID or LCD, and it can also be set at the same time.
Detection Type: Set the captures of human or car to be searched, and you can also search both at the same time.
Search: Search for human & car captures according to the search element settings.
Search Results Display Area: Display the search results. Double-click the picture to enter the playback for a short period of time before and after the detection.
Search results Flip: You can flip the search results in the lower right corner.
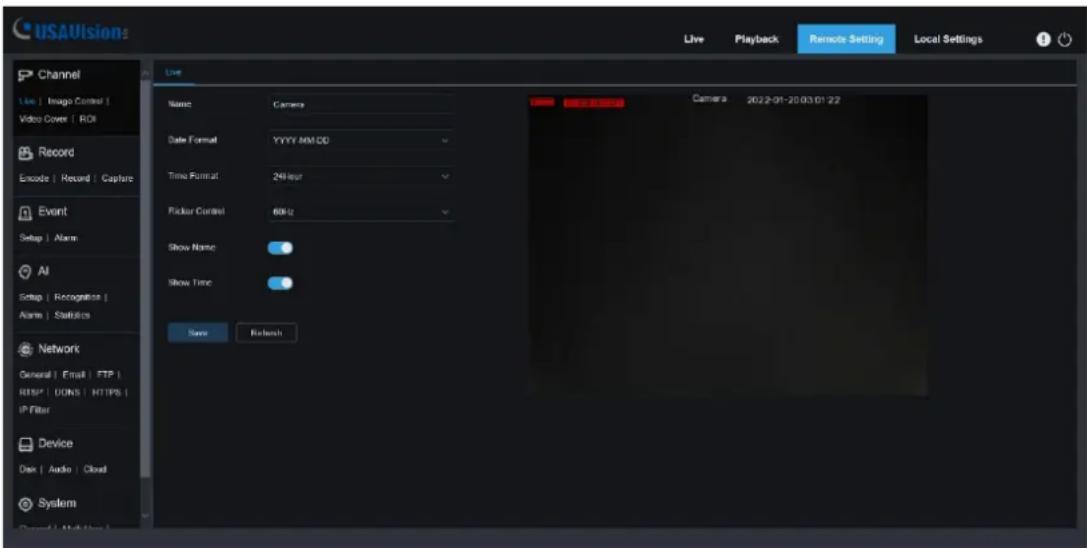
8. Remote Setting
8.1 Live
The Live is to set the location where the channel name, device time, CC and other intelligent function statistics data and the image are superimposed. The interface is shown in the figure below.
text_image
USAVision Live Live Channel Live | Image Control | Video Cover | ROI Record Encode | Record | Capture Event Setup | Alarm AI Setup | Recognition | Alarm | Statistics Network General | Email | FTP | RISP | DONS | HTTPS | IP Filter Device Date | Audio | Cloud System Live Name: Camera Date Format: YYYY/MM/DD Time Format: 24 Hour Picker Control: 60 Hz Show Name: Show Time: Save Refresh Camera: 2022-01-20 03:01:22 Save RefreshName: Set the channel name that camera shown on the OSD.
Date Format: Set OSD date format displaying. There are three types: MM/DD/YYYY, YYYY-MM-DD, and DD/MM/YYYY.
Time Format: Set OSD time format. There are 12 hours and 24 hours optional.
Flicker Control: Set the refresh rate of the image. There are two options of 60Hz and 50Hz, corresponding to N standard and P standard.
Show Name: Set whether to display the channel name in the image.
Show Time: Set whether to show the channel time in the image.
Channel Name Display Position: Set by dragging the channel name on the image.
Time Display Position: Set by dragging the channel time on the image.
Alarm Statistics Display Position: Set by dragging the position of the channel alarm statistics on the image. This setting will only be displayed when the function is enabled.
Save: Save current modification.
Refresh: Re-obtain the current interface parameters.
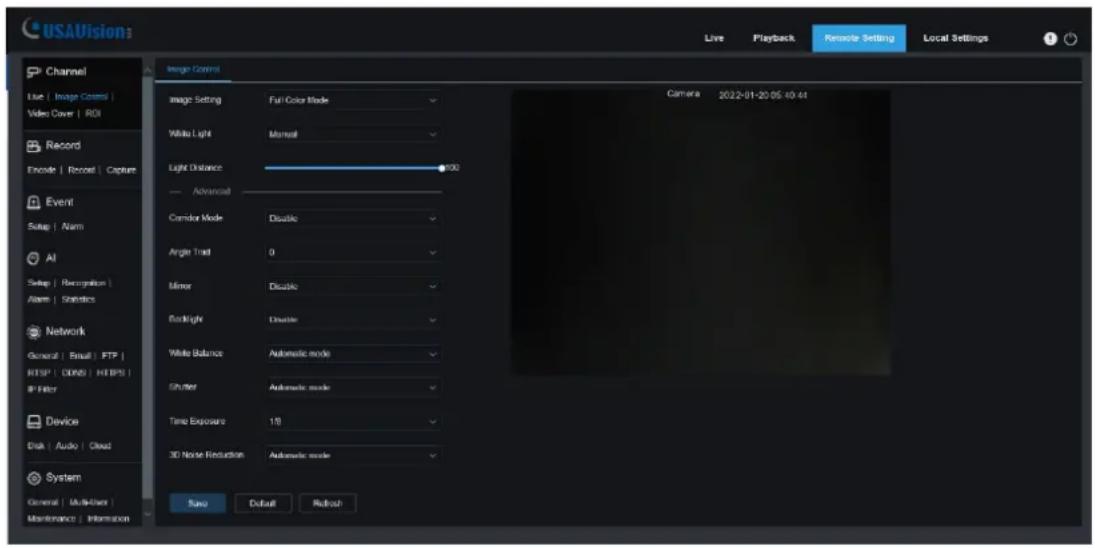
8.2 Image Control
Image control is to directly control and modify graphics parameters, such as color to black mode, wide dynamic, backlight supplement, etc. The interface is shown as below.
text_image
USAVision Live Playback Remote Setting Local Settings Channel Use | Image Control | Video Cover | RDI Record Encode | Record | Capture Event Setup | Alarm All Setup | Recognition | Alarm | Statistics Network General | Email | FTP | FTP | DINS | HTTPS | IP Filter Device Disk | Audio | Cloud System General | Multiplier Maintenance | Information Image Control Camera 2022-01-20 05:40:44 image Setting Full Color Mode Willa Light Mansal Light Distance 90 Advanced Combor Mode Disable Angle Trait 0 Tumor Disable Backlight Disable White Balance Automatic mode Shutter Automatic mode Time Exposure 18 3D Noise Reduction Automatic mode Save Default RefreshIR-CUT Mode: Set the day/night switching mode of the camera, a total of 5 modes. Note that this is only applicable to UA-R500F2 / R560F2 / R800F2.
Automatic mode: Automatically control switching mode. Color switching to black white is controlled by image, black white switching to color is controlled by photosensitive.
Color Mode: Mandatory color mode, do not switch to black white mode.
Black White Mode: Mandatory black white mode, do not switch to color mode.
Image Mode: Similar to the automatic mode, the color-to-black and the black-to-color modes are controlled through the image (supported by some models)
Schedule: Switch between black white and color through the schedule setting. To enable this function, you need to set the start and end time of night vision.
IR-CUT Delay: Automatic mode and Image Mode switch between day and night, the duration of IR-CUT need to be determined. For example, when switching the night vision, the night vision switch will only be performed when the camera is in the dark for the set time. Note that this is only applicable to UA-R500F2 / R560F2 / R800F2.
IR-LED: Set the fill light effect of the camera's IR LED during night vision, there are 2 modes. Note that this is only applicable to UA-R500F2 / R560F2 / R800F2.
SmartIR: Intelligently control the intensity of the IR LED's fill light, and dynamically control the IR LED's fill light according to the focal length and whether the picture is over-exploded.
Manual: Manual mode, fill light with the set brightness of the IR LED.
Angle Trad: Image rotation setting. The camera is inverted from the preset in some scenarios. For example, it is designed to be used upside down, but in practice it is used horizontally. The image can be adjusted by this value.
Mirror: Set the mirror mode to adjust the picture effect, there are 4 modes.
Disable: Turn off the mirror mode.
Vertical: Mirror mode in vertical direction, which makes the images of the screen interactive up and down.
Horizontal: Mirror mode in horizontal direction, which makes images of the screen interactive left and right.
All: Turn on Vertical and Horizontal at the same time, the effect is similar to 180^ rotation, but the realization principle is different.
Backlight: Set the performance of the firmware in backlight, there are 4 modes:
WDR: Wide dynamic mode, according to the set value to make the overall picture in a balanced state, bright and dark areas can be seen clearly.
HLC: Highlight Compensation. Make the objects in the highlighted area clearer in the image. (Supported by some models)
Back Light: Make objects clearer in dark places.
Disable: Turn off Back Light.
White Balance: Use three primary colors of red, green, and blue to generate white after mixing, which is an indicator of color adjustment. There are 2 modes.
Automatic mode: Use the default parameters of the firmware to adjust the white light. Manual: The user actively sets the red, green, and blue gains to synthesize white light.
Shutter: Set the shutter exposure time, there are 2 modes.
Automatic mode: According to the set Time Exposure value, the firmware automatically selects an appropriate exposure time.
Manual: Directly use the time set in Time Exposure.
Time Exposure: Set the camera's exposure time, used in conjunction with Shutter. When the exposure time is long, the image will be overexposed, and when the exposure time is short, the picture will be dark.
3D Noise Reduction: Reduce the noise in the image and make the picture clearer. There are three modes:
Automatic mode: The camera automatically selects the noise reduction according to the algorithm.
OFF: Disable noise reduction.
Manual: Reduce noise manually.
Save: Save parameters.
Default: Restore parameters to the default.
Refresh: Re-obtain parameters.
8.3 Video Cover
In actual use, some areas are not suitable for monitoring and recording. Those areas can be hidden in the video through this function. The interface is shown in the figure below.

text_image
USAVISIONs Live Playback Satelo Setting Local Settings Channel Live | Image Calls | Make Change | ROK Record Encode | House2 Event Setup | Alarm AI Setup | Recognizer | Alarm | Refresh Networks General | Excel | FTP HTTP | DONG | HTTPB IP Files Device Disk | Auto Setting | Cloud System General | Multi-Users | Maintenance | Information Save Refresh DeleteEnable: Switch to turn on the function.
Cover Area: Set the area that needs to be covered on the monitoring screen. When setting, the covering block is red, and the corresponding area of the screen is black when it is enabled. 4 covering blocks can be set.
Delete: Remove the selected covering block.
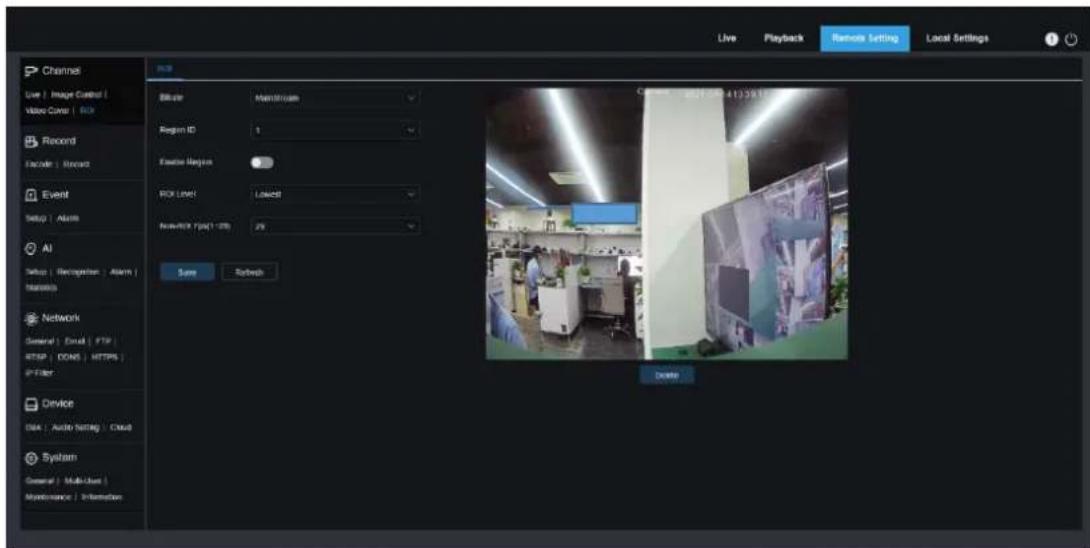
8.4 ROI
ROI allows that you can select an area as an important or sensitive area from the video. This area can be set to a different frame rate and resolution with the non-selected area. Note that this function is not applicable to UA-R500F2.
text_image
Channel Live | Image Control | Video Cover | Box Record Encoder | Record Event Setup | Alarm AI Setup | Recognizer | Alarm | Mainbox Network General | Email | FTP RTSP | DONS | HTTPS | IP-Filter Device Data | Auto Rating | Cloud System General | Multi-User | Maintenance | Infractions Edit Mainstream Region ID 1 Exeter Region BOX Line1: Latest New York Times 29 Save Refresh Cancel: 0025.000 413.38.167.000 DeleteBitrate: Select the bitrate to be set.
Region ID: Select the region ID, up to eight regions can be set.
Enable Region: Turn on.
ROI Level: Set the image quality in the area. The higher the quality is, the higher the resolution and frame rate are.
Non-ROI Fps: Set the frame rate outside the region.
8.5 Record
This menu allows you to configure the preview and recording parameters.
8.5.1 Encode
This menu allows you to configure the image quality of recorded video or network transmission. Generally, the main stream is the quality of the recorded video that will be saved in the SD card; the sub stream is the preview video quality through remote access (such as Web client and CMS). The mobile stream which can be disabled defines the preview quality of the mobile device through remote access.

text_image
USAVision: Live Playback Remote Setting Local Settings Channel Live | Image Control | Video Cover | ROI Record Broods | Record | Capture Event Setup | Alarm AI Setup | Recognise | Alarm | Statistics Network General | Email | FTP | RTSP | DOKS | HTTPS | IP Filter Device Disk | Audio | Cloud System General | Multi-User | Maintenance | Information Audio Save Refresh Audio/Stream SubStream User/Stream Resolution 2800 x 9200 FPS 30 Video Code Type 4,765 Video Code Level Image Profile Bitrate Control VISR Video Quality Medium Bitrate Mode Prolifield Bitrate 4066 Kbps IT Frame Interval 40 (1 - 120) Audio Remote SettingResolution: The resolution of the recorded image.
FPS: The number of frames recorded by IPC.
Video Code Type: Decoding type, there are H.264, H.265, and MJPEG (MJPEG mode only exists in sub-stream mode)
Video Code Level: Video quality level, including Baseline, Main Profile and High Profile (for H.265, only Main Profile is available).
Bitrate Control: Select the bitrate level. For simple scenes, such as gray walls, a constant bit rate (CBR) is suitable. For more complex scenes, such as busy streets, variable bit rate (VBR) is more suitable.
Bitrate Mode: If you want to set the bitrate yourself, please select the "User-defined" mode. If you want to select a preset bitrate, select "Predefined".
Bitrate: The data transmission speed that IPC uses to record. Video with higher bitrate will have better quality.
I Frame Interval: Set the I frame interval, only IPC can be set.
Audio: If you want to record audio and video at the same time, and connect a microphone to the IPC or use a camera with audio capabilities, please select this option.
8.5.2 Record
8.5.2.1 Record
Recording parameters can be set by this menu.

text_image
USAVision: Live | Image Control | Value Cover | RUI Record Encode | Record | Capture Event Setup | Alarm AI Setup | Recognition | Alarm | Statistics Network Gecord | Email | FTP | RTSP | DONS | HTTPS | IP Filter Device Disk | Audio | Cloud System General | Multi-User | Maintenance | Information Live | Playback | Remote Setting | Local Settings Record Schedules Stream Mode: MacStream Record PreRecord Networks Save RefreshStream Mode: The video stream to be saved in the SD card in recording mode. The default is the main stream.
Record: Check to enable recording.
PreRecord: If this option is enabled, the IPC will start recording a few seconds before the alarm event occurs. If your camera's main recording type is based on motion detection or I/O alarm, it is recommended to use this option.
Netbreak: Recording when the network is disconnected.
8.5.2.2 Schedule
This menu allows you to specify when the IPC will record video, which can be set in the recording schedule. Only during the selected time period will the recording be performed. Drag the cursor to mark the area.

text_image
USAVision Live Playback Native Setting Local Settings Record Schedule 0 2 4 6 8 10 12 14 16 18 20 22 24 Scan: Mon Tue Wed Thu Fri Sat Normal Send Retouch Channel Live Image Control Video Cover ROI Record Replace Record Capture Event Setup | Alarm AI Setup | Recognition Alarm | Subtask Network General | Excel | FTP | RESP | DEND | HTTPS | IP Filter Device Disk | Audio | Cloud System General | Multi-Load Maintenance | Information8.6 Event
8.6.1 Setup
8.6.1.1 Motion
This menu allows you to configure motion detection parameters. When motion is detected, a series of alarms are triggered, such as sending an email alert with additional images from the camera (if this option is enabled).

text_image
Channel Live | Image Controls | Video Cover | RGB Record Exonic | Record Event Snap | Alarm AI Setup | Navigation | Alarm | Settings Network General | Email | PDF | APPF | CARD | HTPM IF Print Device Dis | Audio Setting | Cloud System General | Multi-User | Marketset | Information Audio Preview | Sound Dropout Enable Sensitivity Save Networks Live | Playback | Results Setting | Local Settings Color | AllDrag the left mouse button to delimit the detection area in the right window. Only movement in the area will trigger an alarm.
Enable: Enable or disable motion detection.
Sensitivity: Set the sensitivity of motion detection. There is more large value, there is more sensitive.
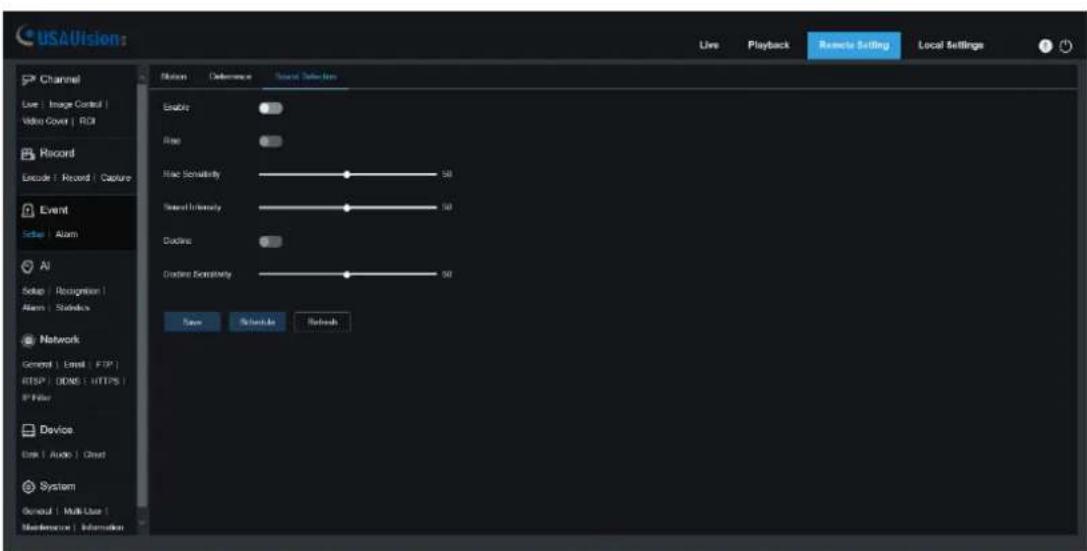
8.6.1.2 Sound Detection
When the camera detects a change in the connected audio and meets the requirements of the alarm detection setting, an alarm will be triggered.
text_image
USAVision Live Playback Remoto Editing Local Settings Channel Live: Image Control Video Cover: RDI Record Encode: Record: Capture Event Setup: Alarm AI Setup: Recognition Alarm: Statistics Network General: Email: FTP RTSP: DNS: HTTPS IP filter Device Disk: Audio: Chust System General: Multi-Use: Maintenance: Information Motion Difference Source Selection Enable Real Noise Sensitivity 50 Sound Intensity 50 Ducting Ostation Sensitivity 50 Save Schedule RefreshEnable: Turn on/off sound detection.
Rise: The alarm will be triggered only when the volume rises steeply.
Rise Sensitivity: Fine-tuning sound rise sensitive detection, and the sensitivity can be set to 1-100. The larger the value the lower the sound detection threshold.
Sound Intensity: Coarse-tuning sound rise sensitive detection, and the sensitivity can be set to 1-100. The larger the value, the higher sound detection threshold. Hard to trigger alarm.
Decline: Turn on the sound drop detection, when the sound suddenly increases and decreases in a short period of time, trigger the sharp drop alarm.
Decline Sensitivity: The decline sensitive can be set to 1-100, and the higher the value is, the higher the sensitivity. Easier to trigger alarm.
Schedule: Set the time schedule of sound detection. It is fully enabled by default. The user can customize the time period of touch sound alarm.

text_image
Schedule Sun. Mon. Tues. Wed. Thur. Fri. Sat. OK Cancel8.6.2 Alarm
8.6.2.1 Motion
This menu can set the actions to be executed when various alarms are triggered.
text_image
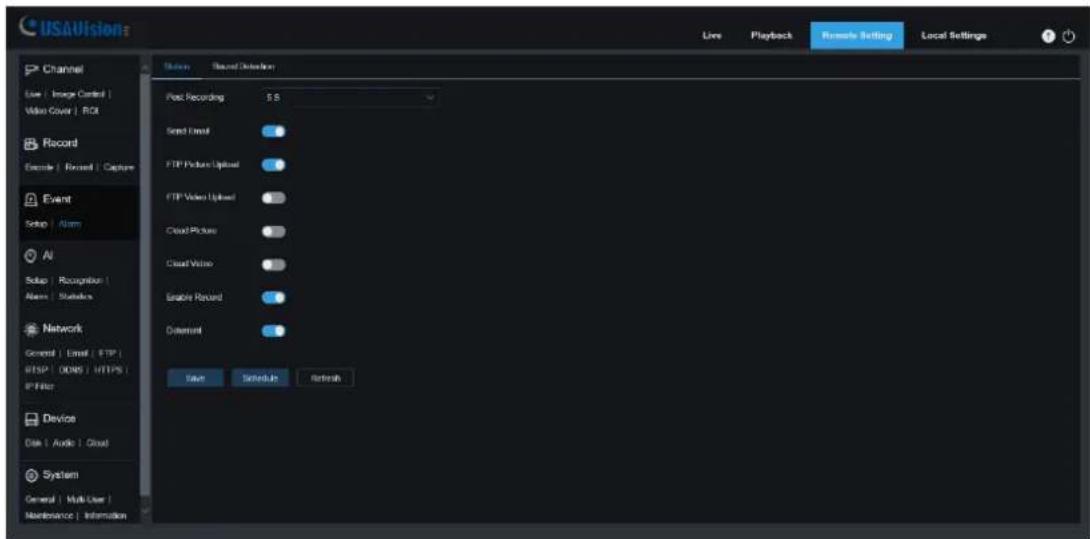
USAVision Live Playback Remate Setting Local Settings Channel Use | Image Control | Video Cover | ROI Record Encode | Record | Capture Event Setup | Alarm AI Setup | Recognizer | Alarm | Statistics Network General | Email | FTP | FTP | ODNS | HTTPS | IP-Filter Device Date | Audio | Cloud System General | Multi-User | Maintenance | Information Status Record Definition Post Recording 5 S Send Email FTP Picture Upload FTP Video Upload Cloud Picture Cloud Value Enable Record Content Save Schedule RefreshPost Recording: Set the duration of the device's recording after the event occurs. There are 5s, 10 s, 20s, and 30s optional. The default recording time is 5s. The max is 30s.
Send Email: Set the camera to send email to your mailbox when it detects motion.
FTP Picture / Video Upload: Upload the alarm picture / video to the FTP server after the alarm is triggered.
Cloud Picture / Video: Upload the alarm picture / video to the cloud server after the alarm is triggered.
Enable Record: When checked, this type of recording will be enabled when an alarm is triggered.
Schedule: Set the scheduled time of each alarm action. A series of alarm actions will be executed within the scheduled time.
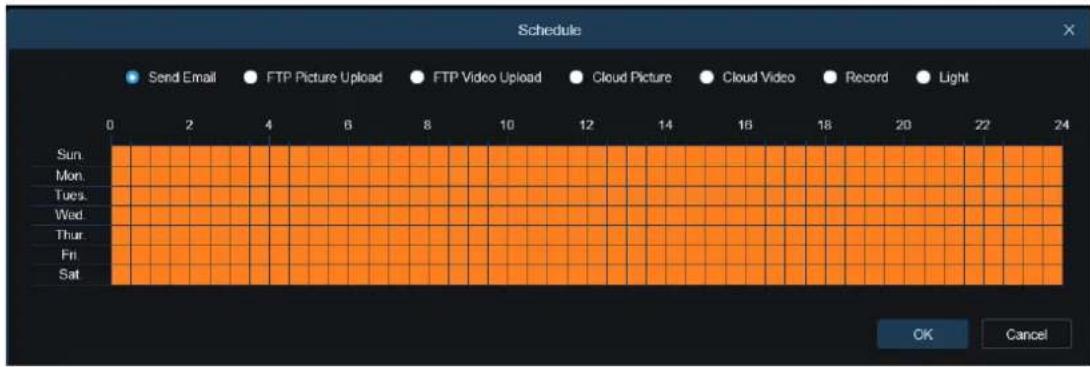
text_image
Schedule Send Email FTP Picture Upload FTP Video Upload Cloud Picture Cloud Video Record Light Sun. Mon. Tues. Wed. Thur. Fri. Sat. OK Cancel8.6.2.2 Sound Detection
text_image
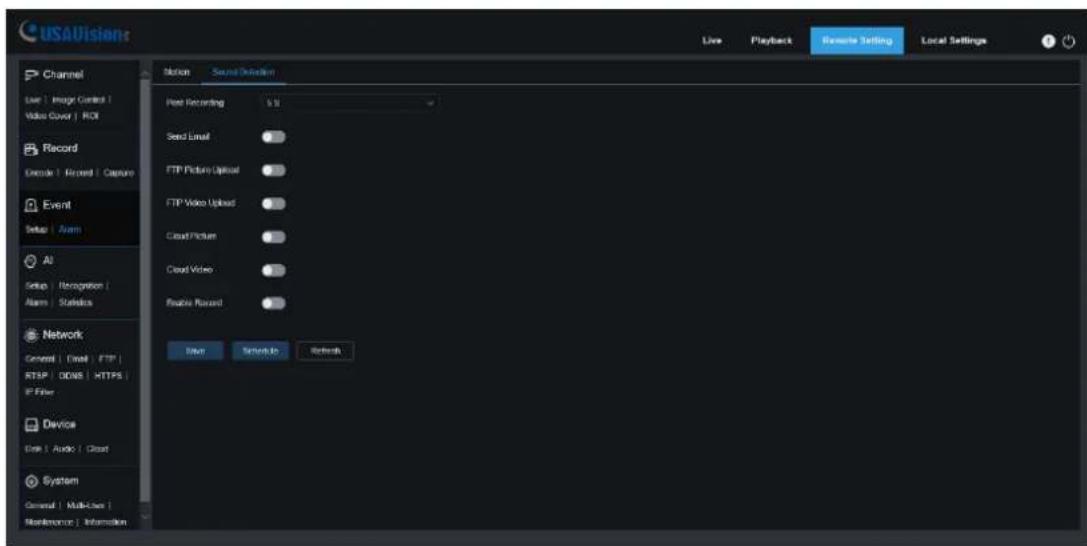
USAVision Live Playback Remere Setting Local Settings Channel Live | Image Control | Video Cover | ROI Record Encode | Record | Capture Event Setup | Alarm AI Setup | Recognition | Alarm | Statistics Network General | Email | FTP | RTSP | DNS | HTTPS | P Filter Device Data | Audio | Cloud System General | Multi-Box | Maintenance | Information Sound Recording 5.0 Send Email FTP Picture Upload FTP Video Upload Cloud Picture Cloud Video Audio Record Enter Screened RefreshPost Recording: Set the duration of the device's recording after the event occurs. There are 5s, 10 s, 20s, and 30s optional. The default recording time is 5s. The max is 30s.
Send Email: Set the camera to send email to your mailbox when it detects sound.
FTP Picture / Video Upload: Upload the alarm picture / video to the FTP server after the alarm is triggered.
Cloud Picture / Video: Upload the alarm picture / video to the cloud server after the alarm is triggered.
Enable Record: When checked, this type of recording will be enabled when an alarm is triggered.
Schedule: Set the scheduled time of each alarm action. A series of alarm actions will be executed within the scheduled time.

text_image
Schedule Send Email FTP Picture Upload FTP Video Upload Cloud Picture Cloud Video Record Light Sun. Mon. Tues. Wed. Thur. Fri. Sat. OK Cancel8.7 AI
8.7.1 Setup
To use AI smart alarm, you need to enable the corresponding alarm function in the Setup menu first. This function requires the computing power of the camera. Due to the limitation of the camera's performance, HM and other functions can be enabled at the same time, whereas PID/LCD/SOD, PD&VD, CC, CD, LPD, and QD cannot be enabled at the same time. Note that AI functions are not applicable to UA-R500F2.
8.7.1.1 FD
By enabling this function, the cameras detect the face target to obtain captures that meet the requirements, then calculate the facial feature data of the captures through the face model algorithm, and compare it with the face database to trigger alarm.

text_image
USAVision Live Playback Remote Setting Local Settings Channel File | Image Control | Video Cover | ROI Record Encode | Record Event Setup | Alarms AI Setup | Alarms | Statistics Network General | Excel | FTP | RTSP | DDM | HTTPS | IP Filter Device Disk | Audio | Cloud System General | Multi-User | Maintenance | Information FB PD/WD PID LOD SOD QC HM C0 QC RSD AI Schedule Enable Dynamic Marking Face Enhance Snap Mode Optimal Mode Apply Mode Frontal View Min Pixel 64 (32 - 1000) Max Pixel 640 (320 - 1000) Detection Mode Static Mode Rule Kind Rect Detection Range Full Screen Save RobushEnable: Turn on/off the function.
Dynamic Marking: Display the detection frame. Enable/disable the detection rule line.
Face Enhance: Increase the capture effect of moving targets. Meanwhile, it also adjusts the brightness of the face closest to the camera to optimize the snapshot effect.
Snap Mode: Set snapshot mode. You can enable the push reception on the preview interface or connect to the NVR to view the push effect. The firmware supports 3 kinds of snapshot modes.
Optimal Mode: The camera detects the target until the target disappears, and only pushes an optimal picture when target disappears.
RealTime Mode: When camera detects the target, it immediately pushes a picture. When the target disappears, it will push the best picture.
Interval Mode: Set the number of snapshots and the interval between snapshots and pushes. Snap Num can be set as: 1, 2, 3 and unlimited.
Snap Frequency: The time range is 1-255 seconds. If set to 5 seconds, a push will be generated at 5, 10, and 15 seconds when the target is detected.
Apply Mode: Filter the captures. That means only the captures meet the angle setting, can the push be generated. There are 3 modes.
Frontal View: Only push the frontal image of the target.
Multi Angle: It can push the image that only detects the side face.
Customize: Customize the angle of the target that can be pushed. Selecting this function, the settings items like Roll Range, Pitch Range, Yaw Range, Picture Quality, as well as Frontal Default and Multi Default buttons will be added.
Roll Range: Set the rotation angle of the capture in 3D model. When the angle does not meet the settings, face detection can be performed but not pushed.
Pitch Range: Set the pitch angle of the capture in 3D model. When the angle does not meet the settings, face detection can be performed but not pushed.
Yaw Range: Set the horizontal deflection angle of the capture in 3D model. When the angle does not meet the settings, face detection can be performed but not pushed.
Picture Quality: It's used to filter out non-face captures that are detected by mistake.
Min Pixel: Based on the resolution of 1080P, face pictures that are less than min pixel will be filtered out. The default resolution is 64×64 pixels, and the setting range is 32\~1080 pixels.
Max Pixel: Based on the resolution of 1080P, face targets that are over max pixel will be filtered out. The default resolution is 640×640 pixels, and the setting range is 32\~1080 pixels.
Detection Mode: Filter the behavior of the target in camera, there are 2 modes:
Static Mode: Detect all faces.
Motion Mode: Filter out static faces, such as the face of portraits and statues.
Rule Kind: There are 2 kinds of detection rule.
Rect: Only detect face targets in the set area.
Line: The face target is tracked after crossing the detection line according to the setting.
Detection Range: Set detection area. There are 2 modes.
Full Screen: Detect all areas that can be monitored by camera.
Customize: Only detect the area selected by the quadrilateral frame.
Rule Type: This setting item is only available when Rule Kind - Line is used. There are two triggering modes: A→B and B→A.
Frontal Default: It is available when select Customize under Apply Mode. Set the push angle value to Roll Range: 30, Pitch Range: 30, Yaw Range: 45, Picture Quality: 100.
Multi Default: It is available when select Customize under Apply Mode. Set the push angle value to Roll Range: 180, Pitch Range: 180, Yaw Range: 180, Picture Quality: 100.
Rule Setting Area: The quadrilateral detection rule or trigger line can be set in this area.
8.7.1.2 PD&VD
Through this function, camera can recognize pedestrian or vehicle in the image, trigger an alarm, and record the corresponding screenshot.

text_image
USAVision Live Playback Remoo Setting Local Settings Channel Live | Image Control | Video Cover | RCI Record Encodes | Record | Capture Event Setup | Alarm AI Setup | Recognition | Alarm | Statistics Network General | Email | FTP | FTPS | DONS | HTTPS | IP Filter Device Disk | Audio | Cloud System General | Multi-User | Maintenance | Information PSAYO PID LCD SOO CC NM CO GD UD All Schedule Enable Sensitivity 00 (0 - 100) Dynamic Marking Snap Mode Default Min Pixel 64 (84 - 1080) Max Pixel 640 (320 - 1090) Detection Type Podstron Motor Vehicle Non-motorized Vehicle Detection Mode Major Mask Detection Range Full Screen Save RetrenchEnable: Enable/disable the function.
Sensitivity: The larger the value is, the more accurate the detection is. But false alarm will also be more.
Dynamic Marking: Display the detection frame. Enable/disable the detection rule line.
Snap Mode: Set snapshot mode. You can enable the push reception on the preview interface or connect to the NVR to view the push effect. The firmware supports 3 kinds of snapshot modes.
Default: Camera detects until the target disappears. One picture relating human or vehicle will be pushed when the target disappears.
RealTime Mode: When camera detects the target, it immediately pushes a capture. When the target disappears, it will push a capture again.
Interval Mode: Set interval to push captures.
Min Pixel: Based on the resolution of 1080P, person or vehicle pictures that are less than min pixel will be filtered out.
Max Pixel: Based on the resolution of 1080P, person or vehicle pictures that are over max pixel will be filtered out.
Detection Type: There are 4 modes, like no detection, Pedestrian, Motor Vehicle, and Non-motorized Vehicle.
Detection Mode: Filter the behavior of the target in camera, there are two modes:
Static Mode: Detect all pedestrians or vehicles.
Motion Mode: Filter out static pedestrians or vehicles.
Detection Range: Set detection area. There are two modes:
Full Screen: The detection area is the camera all cover area.
Customize: Select this mode and a region box will appear on the small window. User can drag or stretch this box to set a region for detection.
Rule Setting Area: When select Customize mode under Detection Range, detection rule can be set in this area.
8.7.1.3 PID
When target enters or leaves the alarming zone, the alarm will be triggered through Perimeter Intrusion Detection (PID) function.

text_image
USAVISION Channel Live | Magic Channel Video Cover | RGB Record Record: Record Event Setup | Alarm All Setup | Recognition | Alarm | Description Network General | Email | FPT | eTime | I/O/D | I/O/OS | IP Filter Device Data - Auto Setting - Cloud System General | Multi-User Maintenance | Information File Power PSI RGB RGB CC MF CD KB Live Playback Remote Setting Local Settings Balance Balance AIEnable: Enable/disable PID.
Sensitivity: If the detected object sensitivity is higher, the moving Object can be detected easily.
Dynamic Marking: Display the detection frame. Enable/disable the detection rule.
Detection Type: Set the objects to be detected. There are four types:
OFF: Detect all objects passing through the line, like carton, pedestrian, vehicle, etc.
Pedestrian: Only detect pedestrian passing through the line.
Motor Vehicle: Only detect vehicle passing through the line.
Non-motorized Vehicle: Only detect pedestrian and vehicle passing through the line.
Rule Number: Choose rule. There are 4 rules can be chosen.
Rule Switch: The switch to enable/disable each rule.
Rule Type: Setup for each rule. A->B means can detect A to B direction moving, B->A means can detect B to A direction moving, A ←→B means can detect two directions moving.
Rule Setting Area: Edited rule can be set or displayed in this area.
Delete: Delete rule.
Delete All: Delete all rules.
8.7.1.4 LCD
When detected target cross the preset line, the alarm will be triggered through Line Crossing Detection (LCD).

text_image
USAVISIONS Live | Playback | Remote Setting | Local Settings Channel Live | Image Control | Video Cloud | Risk Record Encoder | Event Event Setup | Alarm AI Setup | Recognition | Alarm | Conditions Network General | Enset | FTP Response | NONE | HTTPS | SP Filter Device Data | Audio setting | Cloud System General | Multi User | Micro Service | Information Enable Sensitivity Dynamic Marking Direction Type: Perform & Viewed Rate Number: 1 Rate Parameters: Rate Type: A++-G New Refresh Delete Create AllEnable: Enable/disable LCD.
Sensitivity: If the detected object sensitivity is higher, the moving Object can be detected easily.
Dynamic Marking: Display the detection frame. Enable/disable the detection rule.
Detection Type: Set the objects to be detected. There are four types:
OFF: Detect all objects crossing the line, like carton, pedestrian, vehicle, etc.
Pedestrian: Only detect pedestrian crossing the line.
Motor Vehicle: Only detect vehicle crossing the line.
Non-motorized Vehicle: Only detect pedestrian and vehicle crossing the line.
Rule Number: Choose rule. There are 4 rules can be chosen.
Rule Switch: The switch to enable/disable each rule.
Rule Type: Setup for each rule. A→B means can detect A to B direction moving, B→A means can detect B to A direction moving, A ←→B means can detect two directions moving.
Rule Setting Area: Edited rule can be set or displayed in this area.
Delete: Delete rule.
Delete All: Delete all rules.
8.7.1.5 SOD
By this function, alarms are triggered when legacy or lost items is found in monitoring area.
text_image
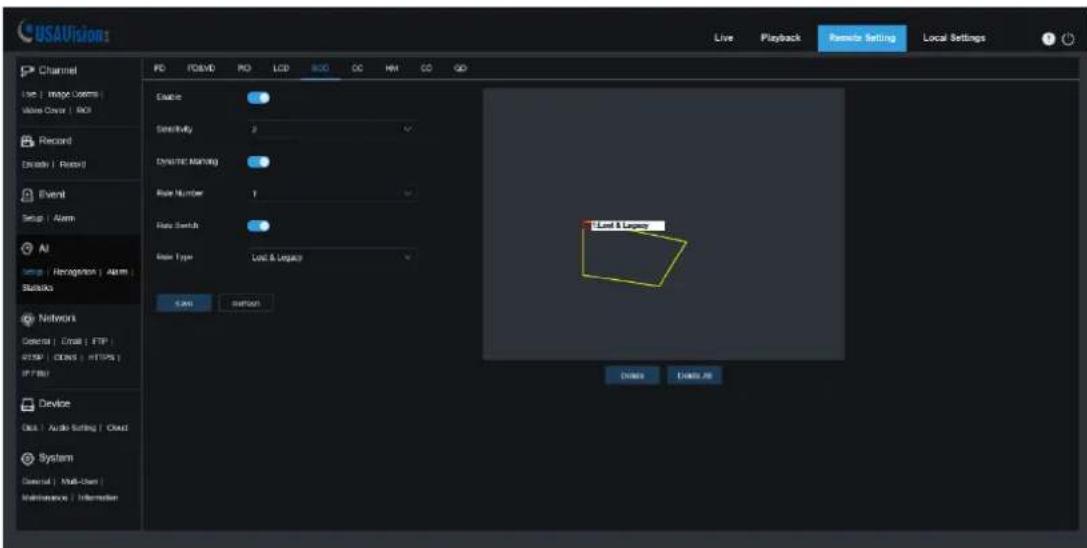
USAVision Live Playback Remo Setting Local Settings Channel Live | Image Colors | Write Color | RGB Record Drawn | Rated Event Setup | Alarm AI Setup | Recognition | Alarm | BuildCo Network General | Email | FTP FTP | ODBC | HTTPS | IP FILE Device Out | Audio Setting | Cloud System General | Multi-User | Maintenance | Information File PCBVD PO LCD RGB CC MM QQ GD Enable Sensitivity 2 Dynamic Many Base Number 1 Base Switch Base Type Lost & Legacy Loss Helpout Lost & Legacy Delete Deno/JPEnable: Enable/disable SOD.
Sensitivity: If the detected object sensitivity is higher, the moving Object can be detected easily.
Dynamic Marking: Display the detection frame. Enable/disable the detection rule.
Rule Number: Choose rule. There are 4 rules can be chosen.
Rule Switch: The switch to enable/disable each rule.
Rule Type: Setup for each rule. There are three rules like Legacy, Lost, and Lost & Legacy.
Rule Setting Area: Edited rule can be set or displayed in this area.
Delete: Delete rule.
Delete All: Delete all rules.
8.7.1.6 CC
Camera can record the specific objects crossing line in monitoring area by Cross Counting (CC) function. Set the crossing line, there are two areas (A and B) on two sides of line. When the rule is A→B. it means object crosses the line from area A to area B. The count in increases by one. When the object enters from area B and cross the line to area A, the count out increases by one. The alarm will only be triggered when the count in minus the count out is greater than or equal to the set Alarm Number count. The interface is as shown in the figure below.

text_image
USAVision: Live Playback Remote Setting Local Settings Channel Live | Image Control | Video Cover | ROI Record Record | Record Event Setup | Alarm AI Setup | Recognition | Alarm | Statistics Network General | Email | FTP | RTSP | DDNS | HTTPS | IP Filter Device DBK | Audio Setting | Cloud System General | Multi User | Maintenance | Information FD POVD RND LCD SOD DC HM CO DD Enable Sensitivity 2 Dynamic Warning Type Mirror Alarm Number 1 (1~250) Start Time 60 60 60 End Time 23 59 66 Rule Number 1 Rule Switch Rule Type A-86 Save Rettoh Road Count Delete Duate AllEnable: Enable/disable CC.
Sensitivity: If the detected object sensitivity is higher, the moving object can be detected easily.
Dynamic Marking: Display the detection frame. Enable/disable the detection rule.
Type: Setup the detected objects type. There are three modes. Switching to save will clear the current count.
Motion: Detect all objects including carton, pedestrian, vehicle, etc.
Pedestrian: Only detect pedestrian.
Motor Vehicle: Only detect vehicle.
Alarm Number: Set the condition of alarm. Camera can update the account. When the count in minus the count out is greater than or equal to the set Alarm Number count, the alarm will be triggered.
Start Time: Set the start time of CC function.
End Time: Set the end time of CC function.
Rule Number: Choose rule. There is only one rule can be chosen.
Rule Switch: The switch to enable/disable rule.
Rule Type: Setup for rule. There are two directions of count in and count out including A→B and B→A. For example, A→B means objects enter from area A and leave from area B, count in will increase. When objects enter from area B and leave from area A, count out will increase.
Reset Count: Clear the displayed count.
Rule Setting Area: Rule can be set in this area.
Count Area: Display the count. You can refer to 8.1 Live to adjust the specific display position.
8.7.1.7 HM
The Heat Map (HM) statistics function uses a logic similar to motion to judge whether there is a change in transmission in each area of the monitoring area, and save and upload the change at 10-minute intervals. Through a large number of statistics, user can view the change in each area in the scene. This function only supports data logging, not alarm.

text_image
USAVISION Live Playback teaase Setting Local Settings Channel Live | Image Control | Video Cover | RCK Record Record | Record Event Setup | Alarm AI Setup | Recognition | Alarm | Networks Network General | Email | FTP FTP | USB | HTTPG | IP Flux Device Disk | Auto Settings | Cloud System Content | Multi-Use | Name/Service : Information File Pass Edit... Route Number 1 Route Switch 1 Save Remove Device Delete AllEnable: Enable/disable HM.
Rule Number: Choose rule. There is only one rule can be chosen.
Rule Switch: The switch to enable/disable rule.
Monitoring Area Setting: Set the preferred area. All areas are selected by default.
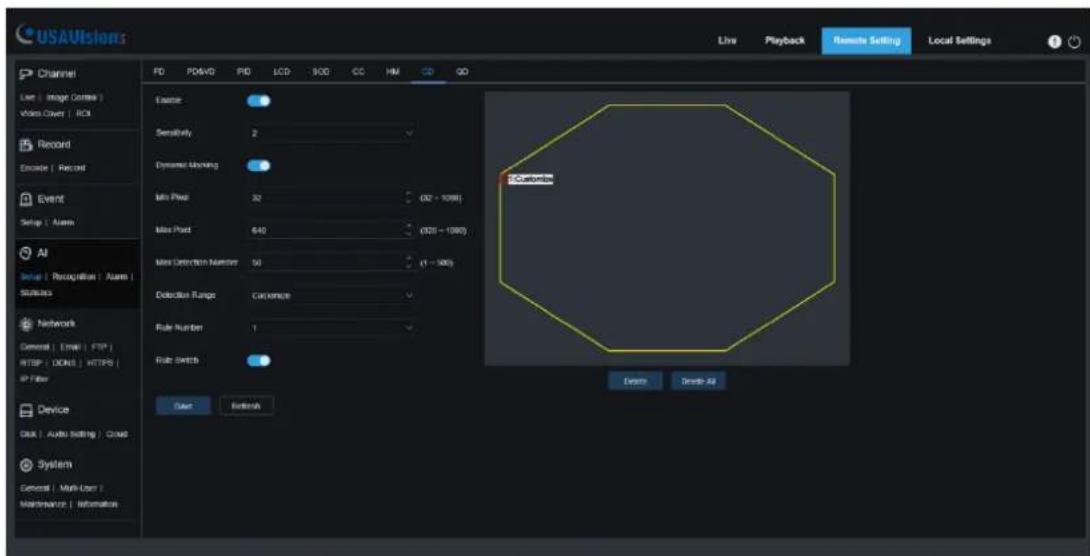
8.7.1.8 CD
Crowd Density (CD) detection, the way of identifying the human head through the human figure recognition function, recognizes the number of people in the monitoring area. The alarm will be triggered when the number of people exceeds the preset value.
text_image
USAUVISIONS Live Playback Remote Setting Local Settings Channel List | Image Conte Video Cover | AOL Record Encode | Record Event Setup | Asam AI Setup | Recognition | Asam | Subscs Network General | Email | FTP | RTSP | DONI | HTTPS | IP Filter Device Disk | Audio Setting | Cloud System General | Multi-User | Maintenance | Information Exonic Sensitivity 2 Dynamic Mapping Min Plot 32 (32 - 1098) Max Plot 640 (320 - 1390) Max Detection Number 50 (1 - 500) Detection Range Customize Rule Number 1 Rule SWETS Start Refresh Customize Event Create AllEnable: Enable/disable CD.
Sensitivity: If the detected object sensitivity is higher, the moving Object can be detected easily.
Dynamic Marking: Display the detection frame. Enable/disable the detection rule.
Min Pixel: Based on the resolution of 1080P, the picture of heads that are less than min pixel will be filtered out.
Max Pixel: Based on the resolution of 1080P, the picture of heads that are over max pixel will be filtered out.
Max Detection Number: The maximum number of heads allowed to be detected in the detection area. If this number is exceeded, an alarm will be triggered.
Detection Range: Set detection area. There are two modes:
Full Screen: The detection area is the camera all cover area.
Customize: Only detect the area selected by the quadrilateral frame
Rule Number: Choose rule. There is only one rule can be chosen. This option is available when Customize mode is selected.
Rule Switch: The switch to enable/disable rule. This option is available when Customize mode is selected.
Detection Range: This option is available when Customize mode is selected. It needs to set an octagonal detection area.
Count Display Area: Display the number of people in monitoring area. You can refer to Chapter 8.1 to adjust the specific display position.
8.7.1.9 QD
When the queue or the waiting time is too long, an alarm will be triggered by Queuing Detection (QD) function.

text_image
Channel Live | Image Control | Video Cover | ROI Record Record Event Setup | Assets AI Series | Recognition | Assets | Selections Network General | Email | FTP FTP | DING | HTTPG | IP Filter Device Desk | Audio Setting | Cloud System General | Multi User | Maintenance | Information File PDAMD PID LOD BOD CC FM CD Editie Sensitivity 2 Dynamic Marking Max Point 37 (31 - 1400) Max Point 540 (308 - 1000) Max Detection Number 90 (1 - 100) Max Pro Time 60 (1 - 3000) Detection Range: Customize Rate Number: 1 Rate Shifts Customize Delete Delete All Addn ReturnEnable: Enable/disable QD.
Sensitivity: If the detected object sensitivity is higher, the moving object can be detected easily.
Dynamic Marking: Display the detection frame. Enable/disable the detection rule.
Min Pixel: Based on the resolution of 1080P, the picture of heads that are less than min pixel will be filtered out.
Max Pixel: Based on the resolution of 1080P, the picture of heads that are over max pixel will be filtered out.
Max Detection Number: The maximum number of heads allowed to be detected in the detection area. If this number is exceeded, an alarm will be triggered.
Max Pro Time: Set the time that allows target leave the detection area. An alarm will be triggered when no one has left the detection area for a long time.
Note: The counting is restarted only when target leaves the detection area. It the target suddenly disappears in the area and it will be ignored. It is only counted when the target is detected in the area.
Detection Range: Set detection area. There are two modes:
Full Screen: The detection area is the camera all cover area.
Customize: Only detect the area selected by the quadrilateral frame
Rule Number: Choose rule. There is only one rule can be chosen. This option is available when Customize mode is selected.
Rule Switch: The switch to enable/disable rule. This option is available when Customize mode is selected.
Detection Range: This option is available when Customize mode is selected. It needs to set an octagonal detection area.
Count Display Area: Display the number of people and waiting time in monitoring area. You can refer to 8.1 Live to adjust the specific display position.
8.7.1.10 RSD (Rare Sound Detection)

text_image
USAVisiens Live Playback Remode Setting Local Settings Channel File | Image Control | Video Cover | RCK Record Encode | Record Event Setup | Alone AI Setup | Alone | Statistics Network General | Email | FTP | RBS* | DONS | HTTPS | IP Filter Device Disk | Audio | Cloud System General | Multi User | Maintenance | Information FD PD&VD FID LCD DOD CC IM CO CQ RSD AI Schedule Enable Sensitivity 60 Deflection Type Baby Drag Sound □ Dog Ranking □ GbnMall Save RefreshEnable: Enable/disable RSD.
Sensitivity: Drag the slider to adjust the sensitivity.
Detection Type: Set the corresponding RSD detection type. There are three types supported: Baby Crying Sound, Dog Barking, and Gunshot. Optionally, you can select all three types at once.
Note: When environmental noise reaches 50 dB, the 3 types of sounds will only be detected when reaching the following noise levels: Dog Barking (70 dB), Baby Crying Sound (80 dB), and Gunshot (90 dB).
8.7.1.11 LPD (License Plate Detection)
text_image
FD PD&VD PID LCD SOD CC HM CD QD LPD RSD AI Schedule Enable Sensitivity 60 (0 ~ 100) Dynamic Marking Snap Mode Default Min Pixel 64 (54 ~ 1080) Max Pixel 640 (320 ~ 1080) Detection Type European license plate Detection Mode Motion Mode Detection Range Customize Save Refresh Camera 2022-01-11 15:16:38 1:CustomizeEnable: Enable/disable LPD.
Sensitivity: If the detected object sensitivity is higher, the license plate can be detected more easily.
Dynamic Marking: Display the detection frame. Enable/disable the detection rule.
Snap Mode: Set snapshot mode. You can enable the push reception on the preview interface or connect to the NVR to view the push effect. Three kinds of snapshot modes are supported.
Default: Camera detects until the target disappears. One picture will be pushed when the target disappears.
RealTime Mode: When camera detects the target, it immediately pushes a capture. When the target disappears, it will push a capture again.
Interval Mode: Set interval to push captures.
Min Pixel: Based on the resolution of 1080P, the picture of heads that are less than min pixel will be filtered out.
Max Pixel: Based on the resolution of 1080P, the picture of heads that are over max pixel will be filtered out.
Detection Type: Detection for numbers and letters on European license plate and American license plate is supported.
Detection Mode: Two modes are supported:
Static Mode: Detect both moving and static targets.
Motion Mode: Only detect moving targets.
Detection Range: Set detection area. There are two modes:
Full Screen: The detection area is the camera all cover area.
Customize: Select this mode and a region box will appear on the small window. User can drag or stretch this box to set a region for detection.
8.7.2 Alarm
The alarm can be realized by camera's AI function. When the camera detects an alarm event, it directly triggers an alarm. Note that LPR is only supported by UA-B580F3, and RSD is only applicable to UA-R800F2.

text_image
USAVision: Live Playback Remote Setting Local Settings Channel Live | Image Control | Video Cover | ROI Record Encode | Record | Capture Event Setup | Alarm AI Setup | Recognition | Alarm | Statistics Network General | Email | FTP | FTP | DONS | HTTPS | IP-Filter Device Disk | Audio | Cloud System General | Multi-User | Maintenance | Information UPR P0/WD PD LCD SOD CC CD GD_UPD Post Recording 5 S Sound Email FTP Picture Upload FTP Video Upload Cloud Picture Cloud Video Enable Record Deteront Save Schedule RefreshPost Recording: The duration of recording after the alarm ends.
Note: At the same time, the effective time is controlled by the schedule.
Send Email: Whether the camera sends an email when it alarms.
Note: At the same time, the effective time is controlled by the schedule.
FTP Picture / Video Upload: The camera sends the picture / video to the associated FTP server when it alarms. When it is triggered continuously, it will be sent in a cycle of 10s until the alarm is end.
Note: At the same time, the effective time is controlled by the schedule. The FTP server needs to be associated first.
Cloud Picture / Video: The camera sends the picture / video to the associated cloud storage server when it alarms. When it is triggered continuously, it will be sent in a cycle of 10s until the alarm is end.
Note: At the same time, the effective time is controlled by the schedule, and the cloud storage server needs to be associated first.
Enable Record: Set the switch to enable.
Deterrent: White light associated switch. When an alarm is triggered, the camera will respond to the alarm according to the setting of Remote Setting-Event-Setup-Deterrence. Specifically, it can be divided into white light response, which is controlled by the schedule. Note that this is only supported by UA-R580F2 / B580F3.
Schedule: Set the schedule of Send Email, FTP Picture / Video Upload, Cloud Picture / Video, Record, Light (Deterrent). Note that the Light schedule is only supported by UA-R580F2 / B580F3.
8.7.3 Statistics
This is AI data statistical analysis function.
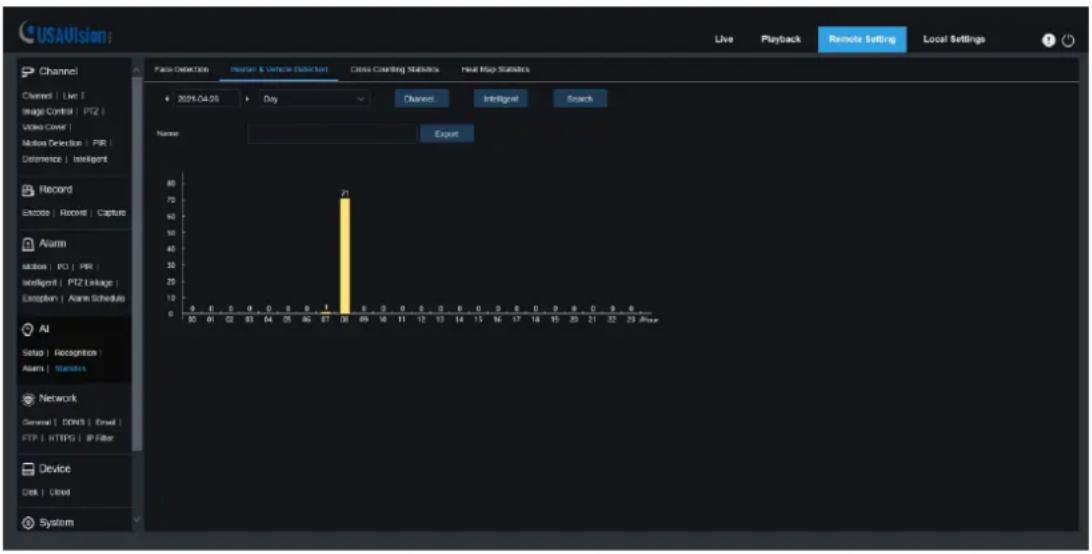
8.7.3.1 Human & Vehicle Detection
Human & Vehicle data statistics includes PD&VD, PID, LCD alarms. The interface of Human & Vehicle data statistics is shown as below.
text_image
USAVision Live Playback Remote Setting Local Settings Channel Charged | Live | Image Control | PTZ | Video Cover | Motion Detection | PIR | Determine | Intelligent Record Encode | Receive | Capture Alarm Motion | PC | PIR | Intelligent | PTZ Linkage | Erosption | Alarm Schedule AI Setup | Recognition Asms | Standards Network General | DOSB | Email | FTP | HTTPS | IP Filter Device Disk | Cred System False Detection Failure & Vehicle Detection Cross Counting Statistics Hist Map Statistics 2024-04-05 Day Channel Intelligent Search Name ExportTime: The reference time of the search mode.
Search Mode: It supports 5 time ranges, such as Day, Week, Month, Quarter and Year Intelligent: Search based on the type of mark when capturing the snapshot. The supported types of snapshots include All, Human, Motor Vehicle, Non-motorized Vehicle, PID[Human], PID[Motor Vehicle], PID[Non-motorized Vehicle], LCD[Human], LCD[Motor Vehicle], LCD[Non-motorized Vehicle].
Search: Search the data again according to the search settings.
Export: Need to add the export file name, and export the search data by Excel file.
Display Area: Display the search results in the form of a chart in below.
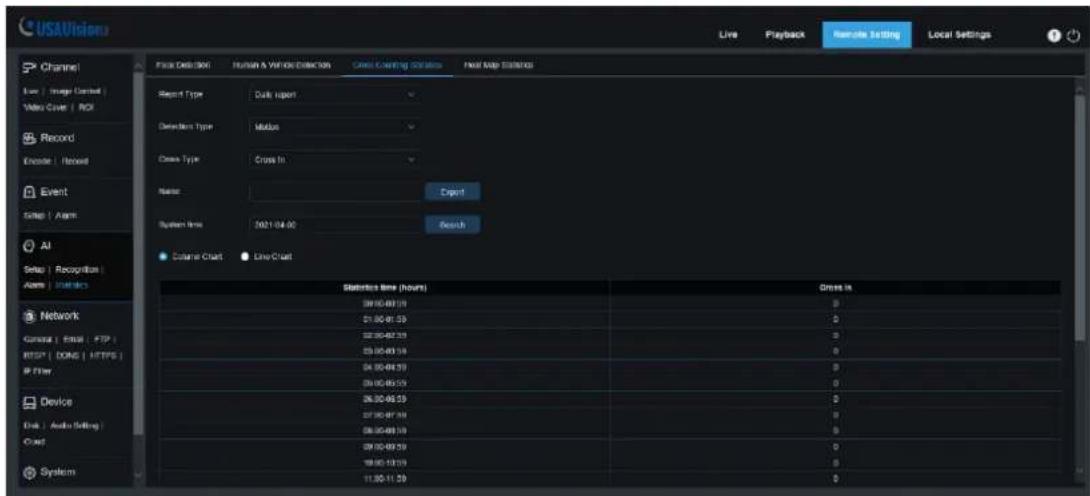
8.7.3.2 Cross Counting Statistics
The interface of Cross Counting Statistics is shown as below.
text_image
USAVision Live Playback-slave setting Local Settings Channel Live | Image Control | Video Cover | ROI Record Encode | Revised Event Setup | Alarm AI Setup | Recognition | Alarm | Statistics Network General | Email | FTP | HTTP* | DONG | HTTPS | IP Filter Device Disk | Audio Setting | Cloud System Face Data Set: Human & Vehicle Detector Cross Counting Options Next Map Settings Report Type Daily Report Default Type Midus Class Type Cross In Name Export System Time: 2021-04-00 Search Database Chart LiveCount Statistics Time (hours) Cross In 38:00-06:39 0 51:00-01:39 0 32:00-07:39 0 03:00-09:39 0 04:00-04:39 0 05:00-05:39 0 26:00-06:39 0 07:00-07:39 0 08:00-09:39 0 09:00-09:39 0 18:00-18:39 0 11:30-11:39 0Report Type: Data search supports four time ranges: Daily report, Weekly report, Monthly report, and Annual report.
Detection Type: Set the corresponding alarm type. There are 4 types supported: Motion, Person, Motor Vehicle, and Non-motorized Vehicle. For example, if the data is from the alarm triggered by Motion, it cannot be searched by other alarm types like Person or Motor Vehicle.
Cross Type: Search data according to the statistical method of crossing the line. There are two types: Cross In and Cross Out.
System time: The reference time of the selected Report Type.
Mode: Choose to display the data as a column chart or a line chart.
Display Area: Display the current search results in the form of graphs.
Search: Search the data again according to the search settings.
8.7.3.3 Heat Map Statistics
The heat map function is to record the changes in the monitoring area in a way similar to motion. Heat Map Statistics displays the data recorded in SD in an image format. The interface is shown in the below figure.
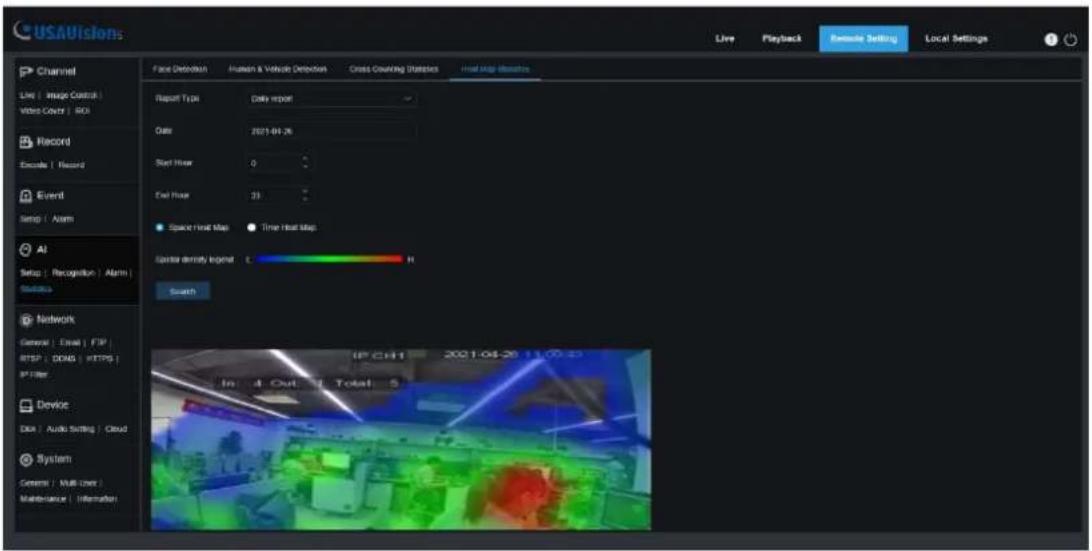
text_image
USAVISIONS Live Playback Remote Setting Local Settings Channel Live | Image Control | Video Cover | ROI Record Escape | Record Event Setup | Alarm AI Setup | Recognition | Alarm | Switches Network General | Email | FTP RTSP | DDM5 | HTTPS | PT Filter Device Disk | Audio Setting | Cloud System General | Multi-User Maintenance | Information Face Detection Human & Vehicle Detection Cross Counting Strategies Heat Map Options Report Type Daily report Date 2021-04-26 Next Hour 0 Exit Hour 23 Space Heat Map.Time Heat Map Operator density output 1 H Search IP CHT 2021-04-26 11:00:25 In 4 Out Total 5Report Type: Data search supports four time ranges: Daily report, Weekly report, Monthly report, and Annual report.
Date: The date that the data search refers to.
Start Hour: Only display when the Daily report is set. Set the specific hour when the search starts.
End Hour: Only displayed when the Daily report is set. Set the specific hour when the search ends.
Mode: Set the display way of the data when searching, there are two ways: Space Heat Map and Time Heat Map.
Display Area: Display the frequency of changes in the monitoring area in the form of graphs, and display the frequency of changes in the monitoring areas in different time periods in the form of tables.
Search: Search data according to the settings.
8.8 Network
This menu allows you to configure network parameters such as PPPoE, DHCP and SNMP. The most common type is DHCP. In most cases, the network type is DHCP unless you manually set a static IP. If you need to authenticate the user name and password to connect to the network, please choose PPPoE.
8.8.1 General
8.8.1.1 General

text_image
USAVisiens Live Playback Network Setting Local Settings Channel Live | Image Control | Wire Cover | ROI Record Extral | Record | Options Eward Snap | Alarm All Snap | Recognition | Alarm | Defaults Network General | Email | FTP | RISP | DONS | HTTPS | IP Filter Device Disk | Audio | Cloud System General | Multi-User | Maintenance | Information General PPPoE SNMP Port Configurations DHCP IP Address 152.160.985.111 Test Subnet Mask 255.256.248.088 Gateway 192.160.866.061 DHCP IPv3 IPv4 address with: 201329 Indes/887b f 64 IPv4 gateway with: 221329 Indes/887b/861 DNS 1 158.095.861.003 DNS 2 803.095.861.008 IPv4 DNS 1 2091.4500.866:8608 IPv4 DNS 2 2091.4500.866:8604 Multiunit Main stream Multiunit Address 259.256.256.256 (224.0.0-230.256.256.256) Save RefreshIf connecting to a router that allows the use of DHCP, check the DHCP box. The router will automatically assign all network parameters to the camera unless you manually set the following parameters for the network:
IP Address: IP address is the identification of IPC in the network. It consists of four groups of numbers between 0 and 255, separated by periods. For example, "192.168.001.100".
Subnet Mask: It is a network parameter that defines the range of IP addresses that can be used in the network. If the IP address is like the street where you live, then the subnet mask is like a community. The subnet address also consists of four sets of numbers, separated by periods. For example, "255.255.000.000"
Gateway: This address allows IPC to access the network. The format of the gateway address is the same as the IP address. For example, "192.168.001.001".
DNS1/DNS2: DNS1 is the primary DNS server, and DNS2 is the backup DNS server. It is usually sufficient to enter the DNS1 server address.
Main Stream: After checking, you can use the main stream for multicast.
Muticast Address: Set the multicast address.
8.8.1.2 PPPoE
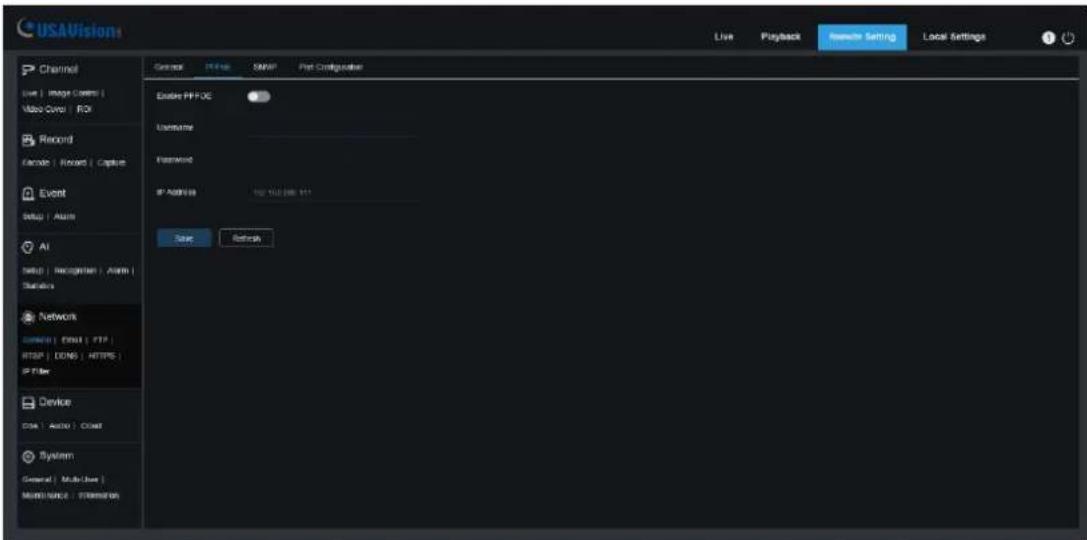
text_image
USAVision Live | Image Cover | Video Cover | ROI Record Encode | Record | Capture Event Setup | Audio AI NATD | Recognizer | Audio | Statistics Network Service | FSN | FTP | FTP | DONG | HTTPS | IP Filter Device GSA | Audio | Coat System General | Multi-Use | Maintenance | Extensions Enable PPP FOC Username Password IP ADDRESS 100 MHz (86.11) Save Settings Live | Playback | Newer Setting | Local SettingsThis is an advanced protocol that allows IPC to connect more directly to the network through a DSL modem.
Check the "Enable PPPOE" box, and then enter the PPPoE username and password.
Click "Apply" to save, and the system will restart to activate the PPPoE settings.
8.8.1.3 SNMP
Simple Network Management Protocol (SNMP), a standard application layer protocol, is specifically designed to manage network nodes (like servers, workstations, routers, switches, and HUBS, etc.) in an IP network.

text_image
USAVision Live | Magic Control | Video Cover | ROI Record Encode | Remove | Capture Event Setup | Alarm AI Setup | Recognition | Alarm | Statistics Network Event | Email | FTP | RESP | OINS | HTTPS | IP Filter Device Data | Audio | Cloud System Gentri | Multi-User | Maintenance | Information General PP06 SNMP Poll Configuration Event#: SNMP Version 1/1.2 SNMP Port 161 (T - 55003) Read Community pync Write Community play:0 Top IP Address 127.0.1 Top Port 162 (T - 55003) Save RefreshEnable: Enable or disable SNMP.
SNMP Version: Set the version of the SNMP server. V1, V2, V1, V2 and V3 are optional.
SNMP Port: Set the port of the SNMP server.
Read Community: Set the Read Community value of the SNMP server.
Write Community: Set the Write Community value of the SNMP server.
Trap IP Address: Set the Trap IP address of the SNMP server.
Trap Port: Set the Trap port of the SNMP server.
8.8.1.4 Port Configuration
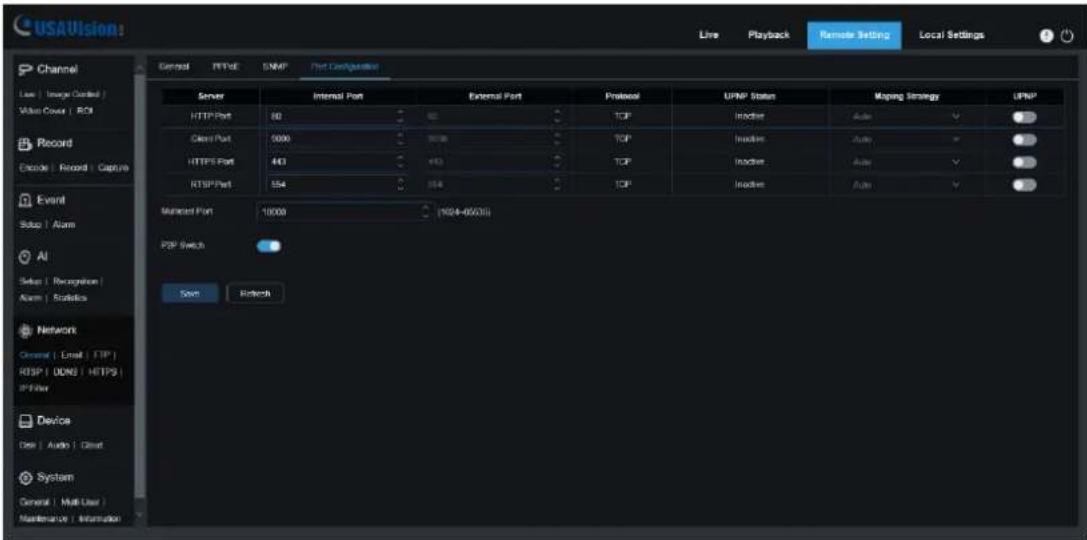
text_image
USAVision Live Playback Remote Setting Local Settings Channel Low Image Covered Video Cover | ROI Record Delete Record Capture Event Setup | Alarm AI Setup | Recognition Alarm | Statistics Network Channel | Email | TCP | RISP | DDR | HTTPS | IPFilter Device Data | Audio | Client System General | Multi-User Maintenance | Information Server Internal Port External Port Protocol UPNP Status Mapping Strategy UPNP HTTP Port 60 12 TCP Inverter Auto ▼ Client Port 5000 9000 TCP Inverter Auto ▼ HTTPS Port 443 443 TCP Inverter Auto ▼ RTSP Port 554 554 TCP Inverter Auto ▼ Member Port 10000 (924-85631) POP Switch Send RetchHTTP Port: This is the port you use to log in to the IPC remotely (for example, using a web client). If other application is already using port 80, please change it.
Client Port: This is the port that IPC will use to send information (for example, using a mobile application). If other applications already use the default port 9000, please change it.
HTTPS Port: It is an HTTP channel for security. On the basis of HTTP, the security of the transmission process is guaranteed through transmission encryption and identity authentication.
RTSP Port: The default value is 554. If other applications have already used the default port 554, please change it.
UPNP: If you want to use Web Client to log in to the device remotely, you need to complete port forwarding on the router. If your router supports UPnP, please enable this option. In this case, you do not need to manually configure port forwarding on the router. If your router does not support UPnP, please manually complete port forwarding on the router.
Multicast Port: Multicast port can be set.
P2P Switch: P2P switch, P2P will not take effect after it is turned off.
8.8.2 Email (Email Configuration)
This menu allows you to configure email settings. If you want to receive notifications via email when an alarm is triggered or the hard drive is full, please complete these settings.

text_image
USAVision Live Playback Remite Setting Local Settings Channel Live | Image Control | Video Cover | QQI Record Encode | Record | Capture Event Setup | Alarm AI Setup | Recognize | Alarm | Statistics Network General | Email | FTP | RTSP | DOS | HTTPS | IP Filter Device Disk | Audio | Cloud System Geens | Multi User | Maintenance | Information Local Configuration Email Encryption CMP SMTP Port 2 (1 - 68530) SMTP Server Username Password Sender Resolver 1 Resolver 2 Resolver 3 Interval Main Save Text RefreshEmail: Check to enable.
Encryption: If your email server requires SSL or TLS authentication, please enable it. If you are not sure, please set to "Automatic mode".
SMTP Port: Enter the SMTP port of the email server.
SMTP Server: Enter the SMTP server address of the e-mail.
Username: Enter your email address.
Password: Enter your email password
Receiver 1\~3: Enter the email address you want to receive event notifications from IPC.
Interval: Configure the time interval between IPC notification emails.
To make sure all settings are correct, click "Test". An email will be sent to your mailbox. If you receive a test email, it shows the configuration parameters are correct.
8.8.3 FTP
Through this menu, you can enable the FTP server to view pictures and videos uploaded from IPC to FTP.

text_image
USAVision: Live Playback Remote Setting Local Settings Channel Live | Image Control | Video Cover | ROI Record Encode | Record | Capture Event Setup | Alarm AI Setup | Recognition | Alarm | Statistics Network General | Email | FTP | RTSP | DONS | HTTPS | IP-Filter Device Disk | Audio | Cloud System General | Multi-User | Maintenance | Information FTP FTP Enable Sener Put 21 (1 - 655A) Username Password Transfer images Transfer video Sens RefreshFTP Enable: Click to enable FTP function.
Server: Enter the IP address or domain name of your FTP server.
Port: Enter the FTP port.
Username/ Password: Enter the username/password of your FTP server.
Transfer images / videos: After checking, the alarm pictures / videos will be uploaded to the FTP server, otherwise only text warnings will be uploaded.
8.8.4 RTSP
RTSP (Real Time Streaming Protocol), RFC2326, is an application layer protocol in the TCP/IP protocol system. This protocol defines how one-to-many applications can effectively transmit multimedia data through an IP network. It allows you to view real-time images through video player.
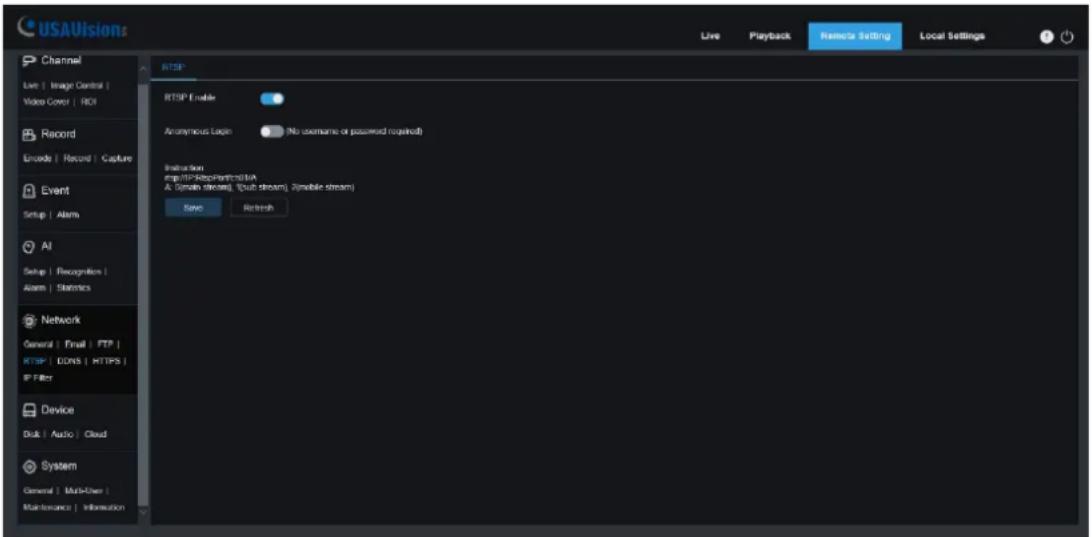
text_image
USAUvisions Live Playback Remcio setting Local Settings Channel Live | Image Control | Video Cover | ROI Record Encode | Record | Capture Event Setup | Alarm AI Setup | Recognition | Alarm | Statistics Network General | Email | FTP | RTSP | DONS | HTTPS | IP Filter Device Disk | Audio | Cloud System General | Multi-User | Maintenance | Information RTSP RTSP Enable Anonymous Login (No username or password received) Instruction mp:RTSP-Residential/NA A: Digital stream, (Sub stream), Zimbabwe stream Save RefreshRTSP Enable: Turn on/off. This protocol can be used only after it is on.
Anonymous Login: Anonymous login. After it is enabled, the protocol can be used without authentication.
8.8.5 DDNS
This menu allows you to set DDNS. DDNS provides a static address to simplify the remote connection with IPC. To use DDNS, you first need to create an account on the webpage of the DDNS service provider.
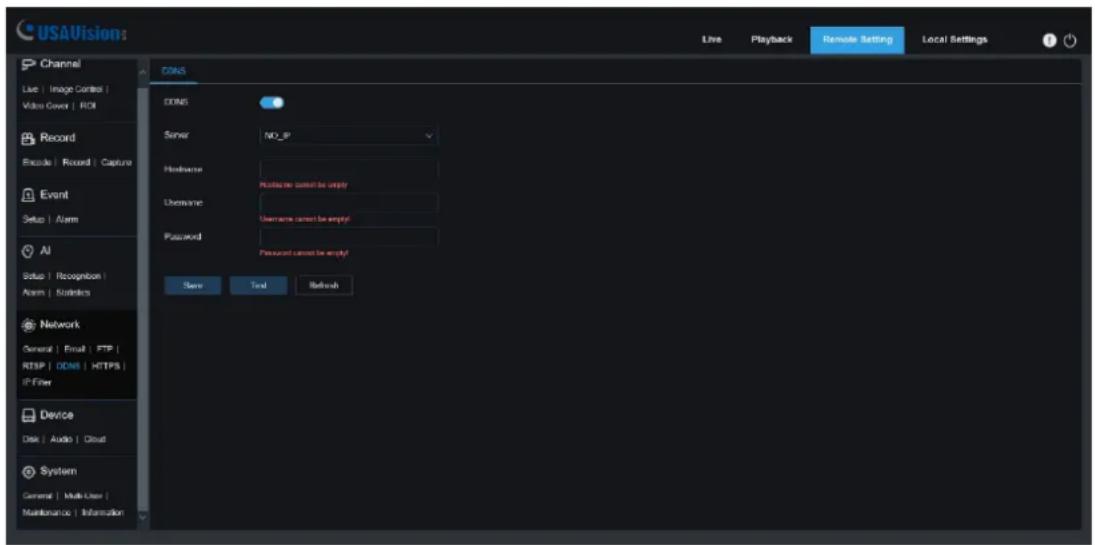
text_image
USAVision: Live Playback Remote Setting Local Settings Channel Live | Image Control | Video Cover | ROI Record Encode | Record | Capture Event Setup | Alarm AI Setup | Recognition | Alarm | Statistics Network General | Email | FTP | RTSP | DDRS | HTTPS | IP Filter Device Disk | Audio | Cloud System General | Multi-User | Maintenance | Information DNS DNS Server NO_IP Hostname Hostname cannot be empty Username Username cannot be empty! Password Password cannot be empty! Save Total RelouchDDNS: Check to enable DDNS.
Server: Select the preferred DDNS server (DDNS_3322, DYNDNS, NO_IP).
Hostname: Enter the domain name you created on the webpage of the DDNS service provider. This is the address you type in the URL box when you want to connect to the IPC remotely via a PC.
Username/Password: Enter the user name and password of the account you created.
After entering all parameters, click "Test" to test the DDNS. If the test result is "Network unreachable or DNS error", please check whether the network is normal or whether the DDNS information is correct.
8.8.6 HTTPS
The camera can be connected via HTTPS protocol, which can be set in this menu.
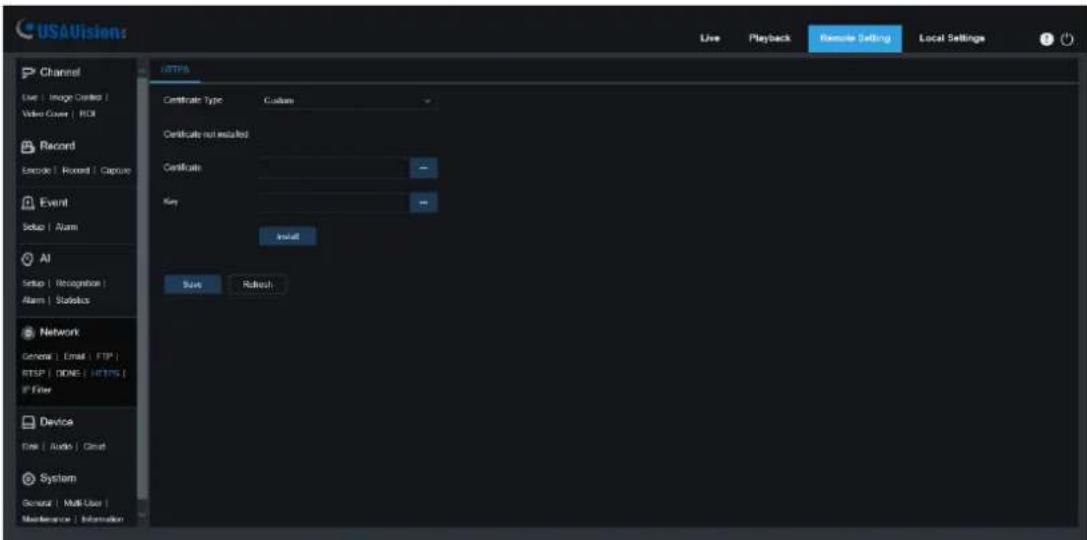
text_image
USAVision Live Playback Remote Setting Local Settings Channel Live | Image Cards | Video Cover | RGB Record Encode | Record | Capture Event Setup | Alarm AI Setup | Recognition | Alarm | Statistics Network General | Email | FTP | NTSP | DONE | HTTPS | IP Filter Device File | Audio | Cloud System General | Multi-User | Maintenance | Information UPDATE Certificate Type Custom Certificate not installed Certificate Key Update Save RailoutCertificate Type: Authentication type. There are two types: default and custom. Custom allows you to use your own certificate to connect to the camera.
Certificate: Under the custom type, a custom certificate must be selected.
Key: Under the custom type, a custom Key file must be selected.
8.8.7 IP Filter
This function can set the allow list and block list of cameras.
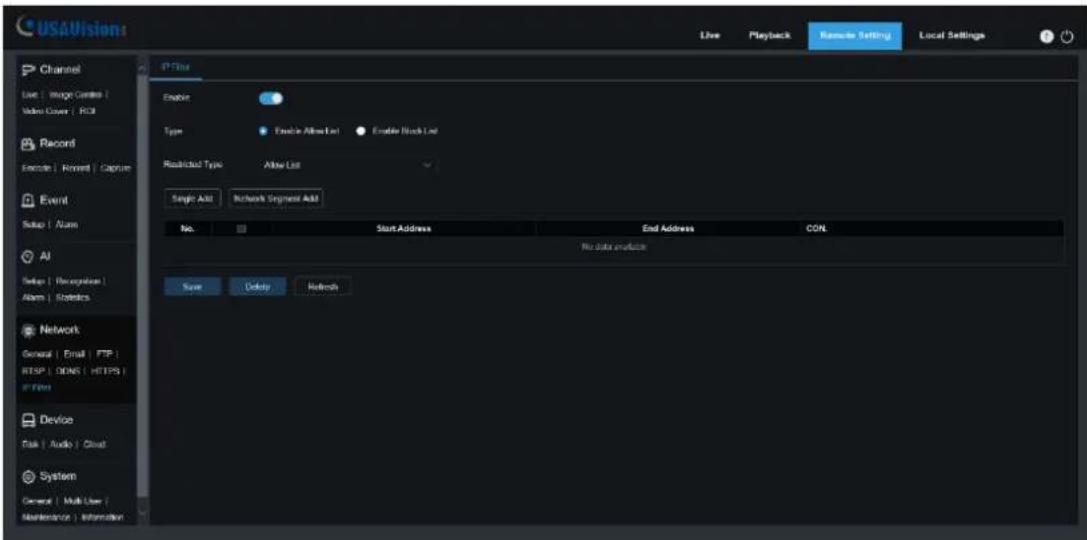
text_image
USAVision Live Playback Remate Setting Local Settings Channel Live | Image Center | Video Cover | RGB Record Enable | Rerent | Capture Event Setup | Alarm AI Setup | Recognition Alarm | Statistics Network General | Email | FTP | RESP | ODNS | HTTPS | IP Film Device Task | Audio | Cloud System General | Multi User | Maintenance | Information IP Filter Enable Type Enable Altex List Enable Track List Restricted Type Allow List Single Altx Network Segment Add No. Start Address End Address CON. No data analysis Save Direct RefreshEnable: Enable or disable filter function. After enabling, allow list and block list are optional.
Restricted Type: Select the list (allow list and block list) to be set.
Start Address: Enter the start address.
End Address: Enter the end address.
8.9 Device
8.9.1 Disk
This menu allows you to check and configure the internal SD card. Formatting is only required for the first access or when replacing a new SD card.
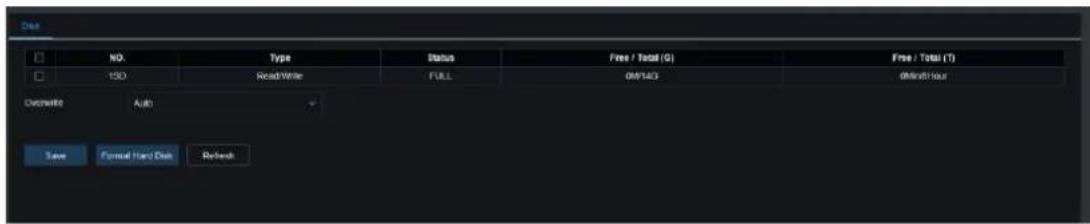
text_image
Data NO. Type Status Free / Total (G) Free / Total (T) 150 Read Write FULL 0M/143 0M/143 Overwrite Auto Save Formal Hard Data RefreshFormat Hard Disk: Select the SD card to be formatted, and then click Format Hard Disk. To start formatting, you need to enter your password, and then click OK.
Overwrite: When SD card is full, use this option to overwrite the old records on the SD card. Select Auto, when the SD card is full, the initial data will be automatically overwritten. If you do not want any old videos to be overwritten, please select OFF. If this function is disabled, please check the SD card status regularly to ensure that the SD card is not full.
8.9.2 Audio
This menu can set the volume of the camera.
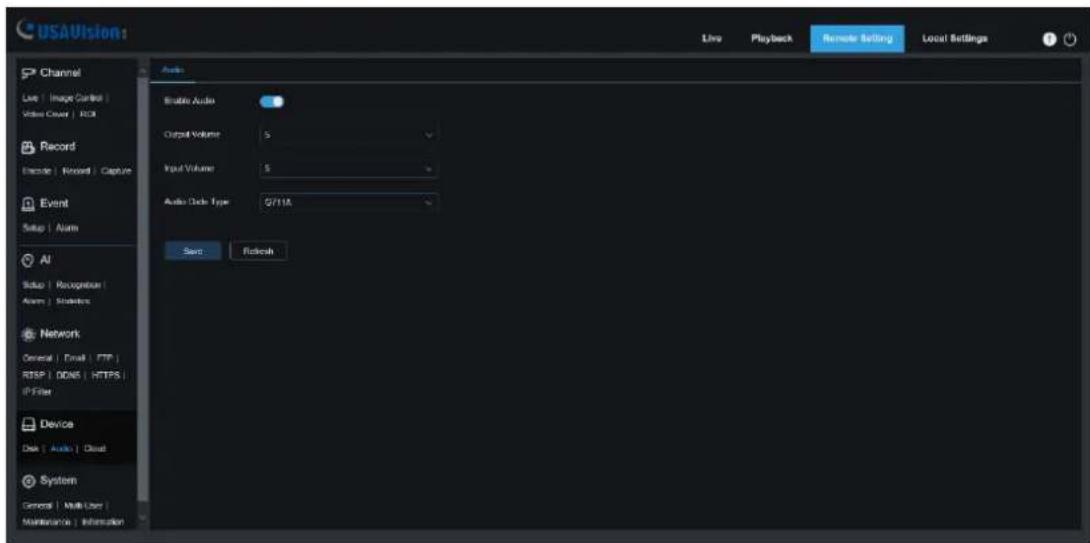
text_image
USAVision Live | Image Control | Video Cover | RGB Record Example | Record | Capture Event Setup | Alarm AI Setup | Recognition | Alarm | Statistics Network General | Email | FTP | RTSP | DDRS | HTTPS | IP-Filter Device Data | Audio | Cloud System General | Multi User | Maintenance | Information Audio Static Audio Output Volume: 5 Input Volume: 5 Audio Code Type: 0/11A Save RefreshEnable Audio: Turn on/off audio.
Output Volume: Set the volume of output audio.
Input Volume: Set the volume of input audio.
Audio Code Type: Set the audio decoding type. G711A and G711U are supported.
8.9.3 Cloud
The camera can upload snapshots or videos to cloud services through Dropbox, which is a free service that allows you to easily store and share pictures.
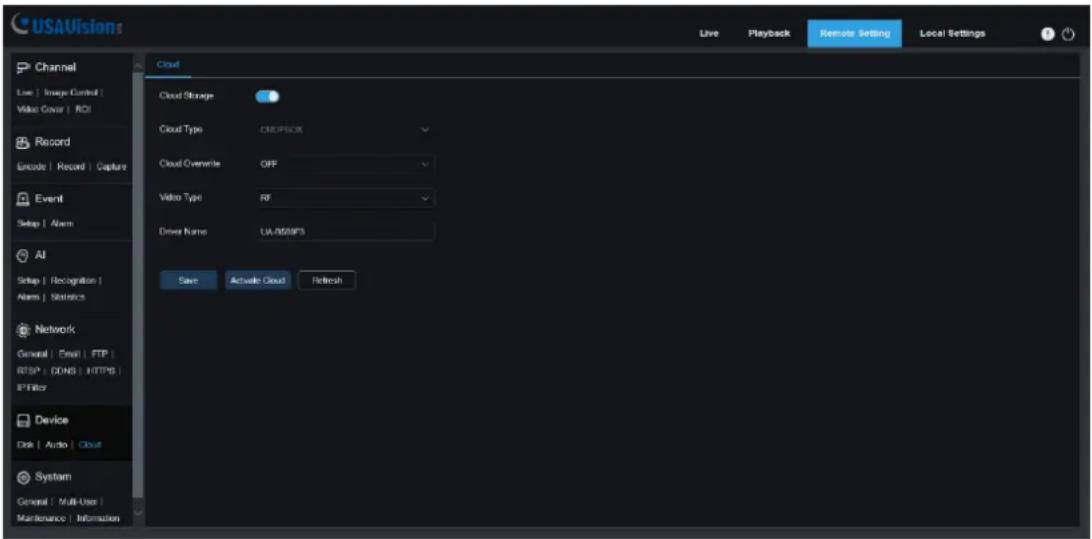
text_image
USAVISIONS Live Playback Remote Setting Local Settings Channel Low | Image Control | Video Cover | ROI Record Encode | Record | Capture Event Setup | Alarm AI Setup | Recognition | Alarm | Statistics Network General | Email | FTP | FTP: (CON) | HTTPS | IPFilter Device Disk | Audio | Cloud System General | Multi-User | Maintenance | Information Cloud Storage Cloud Type CREPSCK Cloud Overwrite OFF Video Type RF Driver Name UA/050AFS Save Active Cloud RefreshBefore enabling the cloud storage function, it is recommended to create a Dropbox account with email username and password. After creation, log in to www.dropbox.com, enter the email address and password, and click the login button after agreeing to the terms.
Cloud Storage: Click to enable this function
Cloud Type: The default is Dropbox.
Activate Cloud: Click to activate this function. After a while, the web page will automatically jump to the associated link of Dropbox. Enter the correct username and password to associate. Note that this function is not supported by IE browser.
8.10 System
It's used to change system information, such as date, time and region, password and permissions, etc.
8.10.1 General
8.10.1.1 Date and Time

text_image
USAVision Live Playback Reboot Setting Local Settings Channel Live | Image Cover | Video Cover | ROI Record Example | Record | Capture Event Setup | Alarm AI Setup | Recognition | Alarm | Software Network General | Email | FTP | RTSP | DONS | HTTPS | IP Filter Device Date | Auth | Cloud System General | Multi User | Maintenance | Information Data and Time Daylight Saving Time Time setting mode: Static NTP server synchronization Data Format: Your Month Data Time Zone: GMT Time format: 24 hour System time: 2023-05-28 06 06 45 Save Synchronization computer time NetworkTime setting mode: Time mode, there are static and NTP server synchronization optional. Static time needs to be set by yourself, while NTP server synchronization will perform time calibration via network.
Date Format: Set the date format.
Time Zone: Select the time zone related to your area or city.
Time Format: Select the preferred time format.
System Time: Click the box to change the date and time.
Synchronize computer time: Synchronize the time to the computer time.
If NTP server synchronization is selected, the time cannot be set manually at this time.
Sever Address: The automatic time calibration website can be chosen.

text_image
USAVision Live Playback Remote Setting Local Settings Channel Use: Image Control View Cover: ROI Record Example: Record | Capture Event Setup | Alarm AI Setup | Recognition Alarm | Statistics Network General | Email | FTP | FTP | DONG | HTTPS | IP video Device Data | Audio | Cloud System General | Multi-User | Maintenance | Information Daylight Saving Time Time setting mode: Static NTP server synchronization Date Format: Your March Day Time /Zone: GMT Time Format: 24 hour System Date: 2012-05-28 08:07:15 Server Address: Into windows.com Save SYSCHULIN COMPUTER TIME Refresh8.10.1.2 Daylight Saving Time (DST)
This function allows you to choose to increase DST in a specific time zone or region.
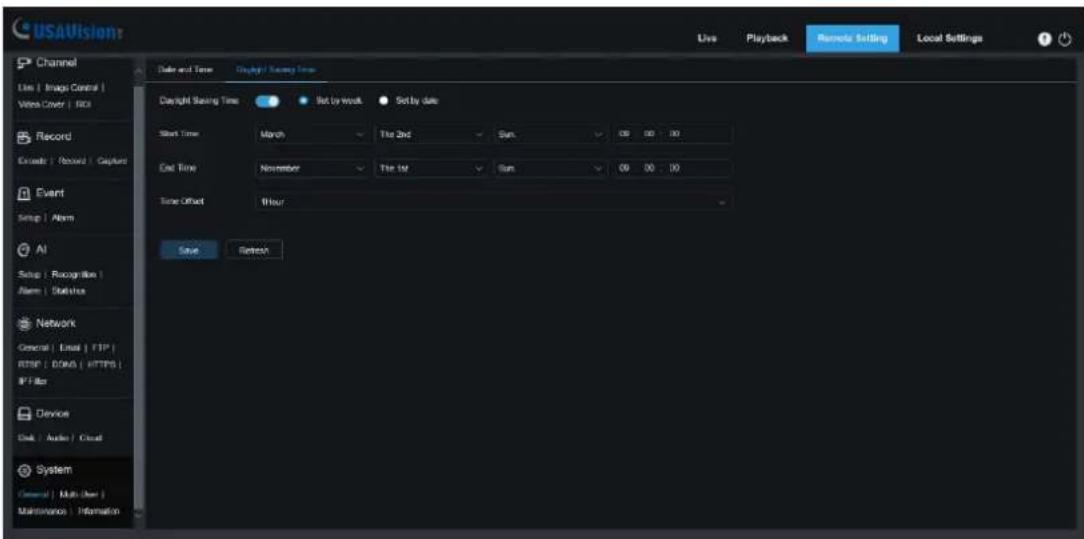
text_image
USAVision Live Playback Remery Setting Local Settings Channel Use | Image Control | Video Cover | RIO Record Encode | Record | Capture Event Setup | Alarm AI Setup | Recognition | Alarm | Statistics Network General | Email | FTP | FTP | COM | HTTPS | IP Filter Device Disk | Audio | Cloud System General | Multi-User | Maintenance | Information Date and Time Daylight / Saving Time Copyright Saving Time ● ● List by week ● Set by date Start Time March The 2nd Sun 00 00 00 End Time November The 1st Sun 00 00 00 Time Offset Hour Save RefreshDaylight Saving Time: If your time zone uses DST, please enable this option.
Set by week: Select the month, specific week and time for DST to start and end. For example, at 2 AM on the first Sunday of a month.
Set by date: Select the start and end date and time of DST.
Start Time / End Time: Set the start time and end time of DST.
Time Offset: Select the time that DST increases in your time zone. This is the difference between Coordinated Universal Time (UTC) and local time.
8.10.2 Multi-User
This menu allows you to configure user name, password and user permissions
The system supports the following user types:
admin — System Administrator: The administrator can fully configure the system, and can change the administrator password and user password, and enable/disable password protection.
user — Ordinary user: The user only has access to preview, search, playback and other functions. You can set up multiple users with different system access permission.
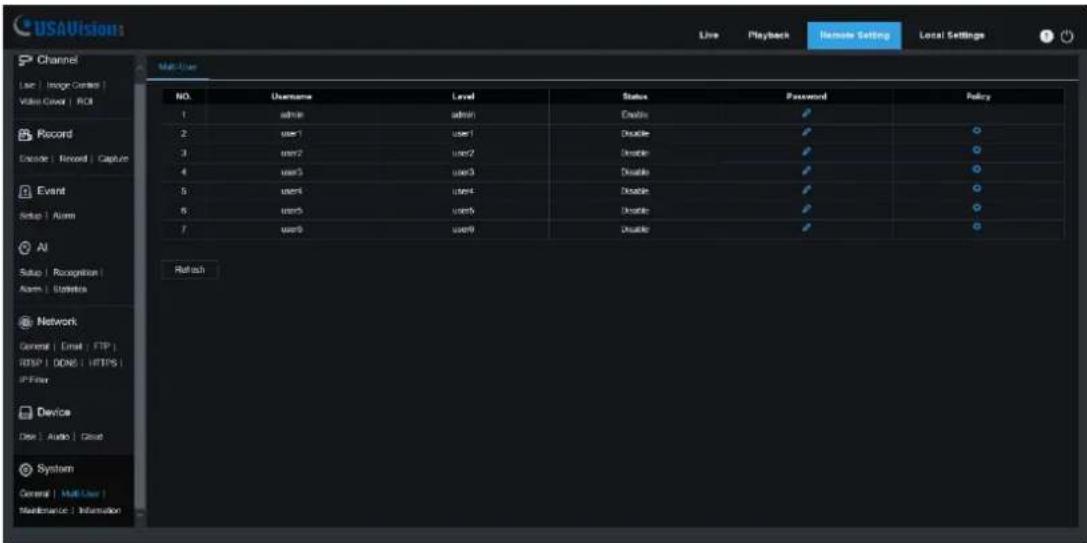
text_image
USAVision: Live Playback Remate Setting Local Settings Channel User | User Center | Video/Cloud | ROI Record Record | Record | Capture Event Setup | Alarm AI Setup | Recognition | Alarm | Options Network General | Email | FTP | RSP | DDRS | HTTPS | IP-Filter Device Data | Audio | Cloud System General | Multi-User | Maintenance | Information Multi-User NO. Username Level Status Password Policy 1 admin admin Enable # 2 user1 user1 Disable # 3 user2 user2 Enable # 4 user3 user3 Disable # 5 user4 user4 Disable # 6 user5 user5 Enable # 7 user6 user6 Disable # Refresh
text_image
Editing Username admin Password Password strength Confirm OK CancelTo change the administrator's or user's password, click the "Editing" icon. The password must be at least 8 to 15 characters and must be composed of numbers, uppercase / lowercase letters and symbols. Enter the new password again to confirm. Save the new password, the system will ask you to enter the old password for authentication.
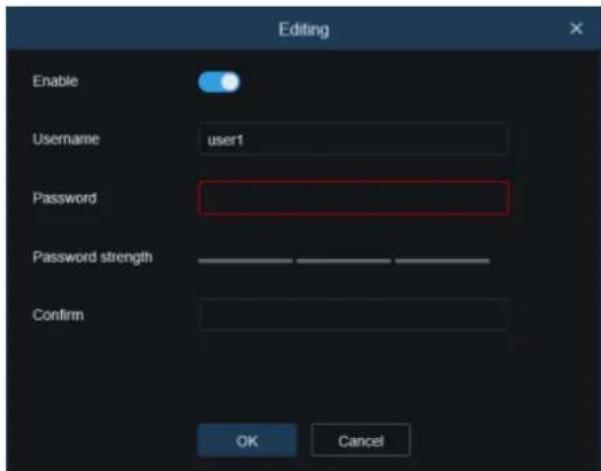
text_image
Editing Enable Username user1 Password Password strength Confirm OK Cancel- Select one of the disabled users and click "Editing" icon.
- Check "Enable" to enable the user.
- Click "Username" to edit user name.
- Click the area next to Password to enter the required password.
- Click the area next to Confirm to re-enter the password.
- Click OK. You need to enter the administrator password for authentication.
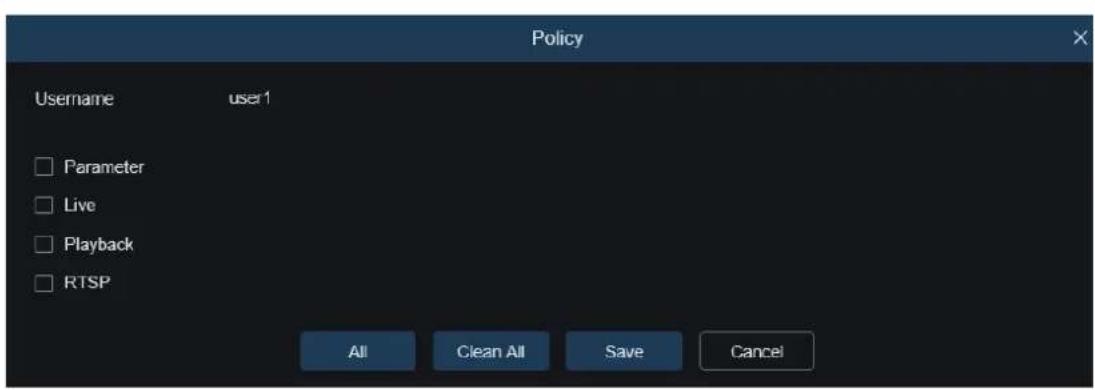
text_image
Policy Username user1 □ Parameter □ Live □ Playback □ RTSP All Clean All Save CancelSet the user's permission and check the box corresponding to the function. Click All to select all boxes. Click Clear to clear all boxes.
8.10.3 Maintenance
In this menu, you will be able to search and view system logs, restore factory settings, upgrade the system, export and import system parameters, and configure system's automatic reboot.
8.10.3.1 Log
The system log shows important system events such as motion alarms and system warnings. You can easily import the system log backup file to the computer within a set period of time.

text_image
USAVISION Log Load Default Upgrade Parameters Management Auto Reboot Log Type Configuration Search Minor Type All Name Start Time 01/20/2022 00 00 00 End Time 01/20/2022 23 69 69 No. Time Log Content Log Info 1 01/20/2022 10:33:50 Network Up 2 01/20/2022 10:33:08 Reboot 3 01/20/2022 10:33:01 System Default 4 01/20/2022 10:31:11 Login 5 01/20/2022 10:30:54 Modify User 6 01/20/2027 10:30:40 Modify User 7 01/20/2022 10:30:25 Middle End In There exists no record 8 01/20/2022 10:37:53 Middle Start In There is unknown as recordedLog search and backup:
- Click the area next to Start Time and select the start date and time from the on-screen calendar.
- Click the area next to End Time and select the end date and time from the on-screen calendar.
-
Select the event type you want to search from the drop-down list next to Log Type, or select All to view the entire system logs for the selected time period. Optional types are: System, Configuration, Alarm, Account, Record, Storage, and Network.
-
Select the type of event to search from the drop-down list next to Minor Type (if ALL is selected for Log Type, there will be no such menu), or select All to view the entire system logs for the selected time period. The optional types are:
-
System: System settings, reboot, automatic reboot, upgrade, time setting and NTP time adjustment.
- Configuration: IPC preview control, privacy zone setting, recording mode setting, recording plan setting, main stream setting, network setting, sub-stream setting, mail setting, color setting, motion detection setting, hard disk setting, multi-user setting, NTP settings, image control, mobile stream settings, RTSP settings, IP filter settings, factory reset, audio settings, video occlusion alarm settings, export settings and import settings.
- Alarm: Motion detection start, motion detection end, PID start, PID end, LCD start, LCD end, SOD start, SOD end, PD&VD start, PD&VD end, FD start, FD end, CC start, CC end, CD start, CD end, QD start, QD end, sound alarm start and sound alarm end.
• Account: Login, logout and switch users.
• Record: Search, playback and backup. -
Storage: Format SD card, SD card is full, and SD card error.
• Network: Offline, online, network error and network mode change. -
Click Search to search.
- Browse the system log from the selected time interval.
- Switch the pages of system log events by such buttons like</< . > >
Enter the export file name in the field next to Name. Click Export to create a backup of system logs.
8.10.3.2 Load Default
Reset camera to factory settings. You can choose to reset all settings at once or reset the specific settings only.
Note: Restoring the default settings will not delete the videos and snapshots saved in the SD card.
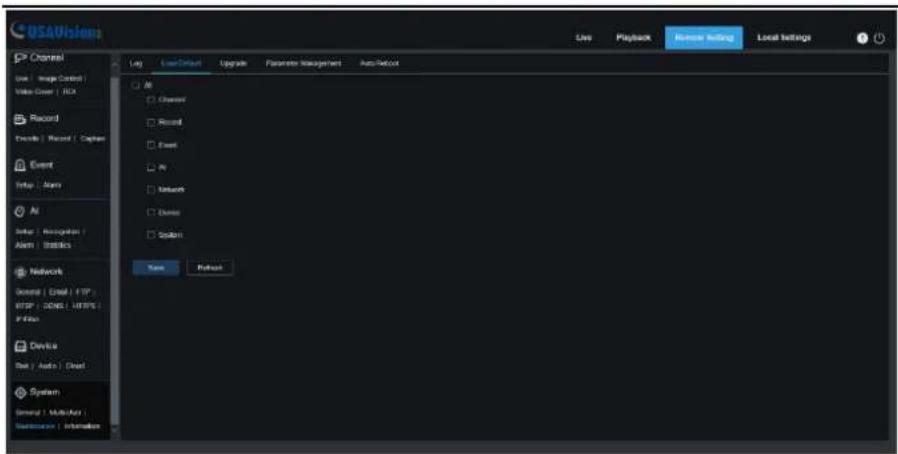
text_image
USSAVisions Local Settings Live Playback Remove setting Channel Use - Image Control Video Cover - HCI Record Delete - Record / Capture Event Setup - Alarm AI Setup - Recognition Alarm - Statistics Network General | Email | FTP | FTP | DONE | HTTP | F-File Device Set | Auto | Direct System General | Multiplier | Maintenance | Information Log User/Default Upgrade Parameter Management Auto/Reboot Air Channel Record Event Air Network Dinner Systems Save ReplaceSelect items to be restored, or click All to select all items. Click "Save" to load the default settings.
8.10.3.3 Upgrade
This menu allows to upgrade camera's firmware.

text_image
USAVISION Live | Image Cadra | Video Cover | Back Record Execute | Record Event Setup | Alarm AI Setup | Alarm | Summary Network General | Event | FTP | FTP | GON | xTPS | IP Filter Device Disk | Audio | Cloud System General | Multi-User | Maintenance | Information Live | Load Defect | Upgrade | Parameters Management | Auto Robust Path Up/Down Load Cloud for the security at low off the power when updating-
Put the firmware file (.sw file) on the computer hard disk.
-
Click "..." beside "Path" and select the firmware file in the computer.
Click Upgrade button to start. The upgrade will last about 5-10 minutes, please do not turn off the power of the camera or close IE during this period.
8.10.3.4 Parameter Management
You can export the configured main menu parameters to the computer, or import the exported settings file from the computer to the camera.
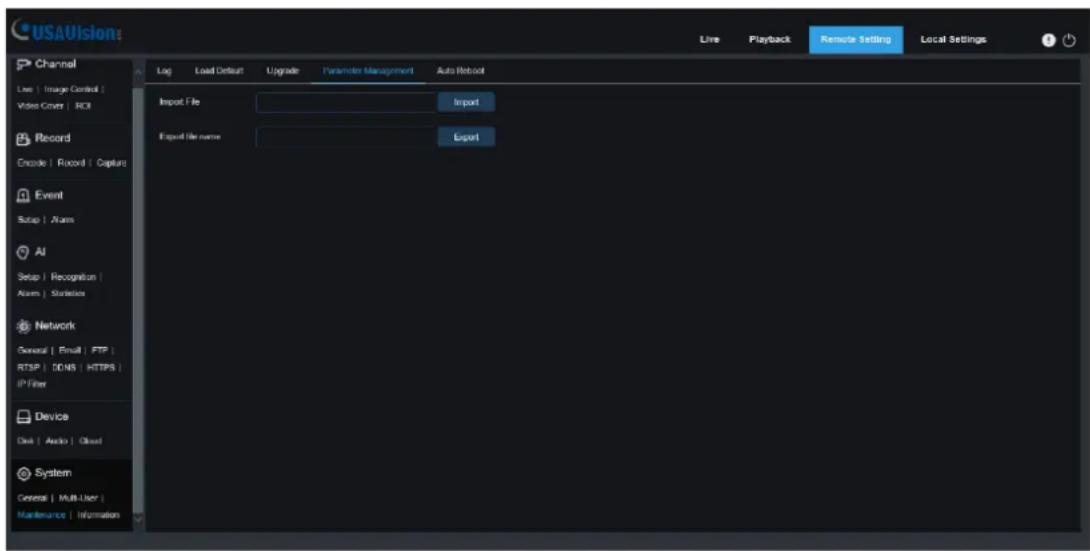
text_image
USAVision Live Playback Remote Setting Local Settings Channel Live | Image Control | Video Cover | ROI Record Encode | Record | Capture Event Setup | Alarm AI Setup | Recognition | Alarm | Statistics Network General | Email | FTP | RTSP | DONS | HTTPS | IP-Filter Device Disk | Audio | Cloud System General | Multi-User | Maintenance | Information Log Load Default Upgrade Parameter Management Auto Roboot Import File Import Export file name ExportImport File: Click the box, and the path window will pop up. After selecting the parameter file, click Import to start importing the parameters.
Export File Name: Click the box to enter the file name of the exported parameters. Click Export to export parameters
8.10.3.5 Auto Reboot
This menu allows the system to automatically reboot periodically. It is recommended to keep this function enabled, because it can maintain the operational stability of the camera.

text_image
USSAVision Live Playback Remate Setting Local Settings Channel Use | Image Control | Video Cover | BOX Record Escode | Record | Captive Event Setup | Alarm AI Setup | Recognition | Alarm | Statistics Network General | Init | FTP KFTP | DOSA | MTOSA ST Filter Device Disk | Audio | Cloud System General | Multi-User | Information Log Load Default Upgrade Parameter Management Puls Release Auto-Record Time Entry Work Sun On Off Send Refresh RebootAuto Reboot: Click to enable.
Time: The IPC can be set to reboot by day, week or month.
8.10.4 Information
This menu allows you to view system information, such as camera ID, model name, MAC address, firmware version, etc.

text_image
USAVision Live Playback Radio SafetyLocal Settings Channel Link | Image Control Video Cover | ROI Record Encode | Round | Center Event Setup | Alarm AI Setup | Recognition | Alarm | Statistics Network General | Fixed | FTP | FTP | DDRS | HTTPS | F-File Device Disk | Audio | Cloud System General | Multi User Maintenance | Hologics Information Privacy Policy & DOPPI About Device ID 000000 Device Name UA70569F3 Device Type UA8569F3 Hardware Version UA8569F3 Software Version V1.08_2022_01_26 Web Version V1.2.1.7_211217 MAC Address DC-54-C2-2046-47 FTP ID MITDAU.PILDTNWP11A RadioGPT9. Local Settings
This menu allows you to set the save path of recording, downloading and snapshot files, as well as the format of recording and snapshot.
Note: Programs without plug-ins are supported. If you use Safari V12.1 or later, Chrome V57 or later, Firefox V52 or later, Edge V79 and other browsers for web access, this menu can be ignored.
