
DPE1 - Battery charger Nitecore - Free user manual and instructions
Find the device manual for free DPE1 Nitecore in PDF.

| Product Type | Drone Power Extender (Battery Charger) |
| Brand | Nitecore |
| Model | DPE1 |
| Compatible Drones | DJI Inspire 2 |
| Compatible Batteries | TB50, TB55 (Main Battery Slots only) |
| Number of Battery Holders | 2 (one pair, left and right) |
| Battery Slots per Holder | 2 (Main and Auxiliary) |
| Total Battery Capacity | Up to 4 batteries (2x TB55 + 2x TB50 or other combinations) |
| Dimensions (one holder) | 135mm x 135mm x 41.3mm (5.31" x 5.31" x 1.63") |
| Weight (both holders) | 203g (7.16oz) |
| Material | CNC machined light aluminum alloy |
| Accessories Included | Battery Fasteners |
| Installation Direction Indicator | "IUP" / "JUP" label on each holder |
| Battery Combination Options | 2x TB50, 4x TB50, 2x TB55, 2x TB55 + 2x TB50 |
| Flying Runtime (lab conditions) | 21 min (2x TB50), 30 min (4x TB50), 31 min (2x TB55), 37 min (2x TB55+2x TB50) |
| Battery Activation | Short press then hold power button on drone for >5 seconds |
| Warranty Period | 12 months (1 year) from date of purchase for repairs; DOA exchange within 15 days |
| After Warranty | Limited warranty covers labor and maintenance, not accessories/replacement parts |
| Manufacturer | SYSMAX Innovations Co., Ltd. |
| Country of Origin | Made in China |
Frequently Asked Questions - DPE1 Nitecore
User questions about DPE1 Nitecore
0 question about this device. Answer the ones you know or ask your own.
Ask a new question about this device
Download the instructions for your Battery charger in PDF format for free! Find your manual DPE1 - Nitecore and take your electronic device back in hand. On this page are published all the documents necessary for the use of your device. DPE1 by Nitecore.
USER MANUAL DPE1 Nitecore
(English) DPE1 User Manual
Brief Introduction
Specially designed for DJI Inspire 2, the DPE1 is a drone power expender to carry batteries twice as the conventional way of flying a drone and an innovative power solution to maximize its flying runtime. It contains one pair of Battery Holders which have 2 Battery Slots each and are set on both sides of the drone. It enables the drone to be inserted with 2 x TB55 / 4 x TB50 / 2 x TB50 + 2 x TB55 batteries at one time. The product is CNC machined with light aluminum alloy with a total weight of only 203q (7.16oz).
Specifications
Compatible Batteries: TB50, TB55 (For Main Battery Slots only)
Dimensions: 135mm×135mm×41.3mm (5.31"×5.31"×1.63") (For one Battery Holder) Weight: 203g (7.16oz) (For both Battery Holders)
Accessories: Battery Fasteners
| Battery Combination | 2 x TBSO Batteries | 4 x TBSO Batteries | 2 x TBS5 Batteries | 2 x TBS5 + 2 x TBSO Batteries |
| Flying Runtime | 21min 30min 31min | 37min | ||
Note: The stated data is measured under laboratory conditions. The data may vary in real world use due to different battery usage or environmental conditions.
Installing Instructions
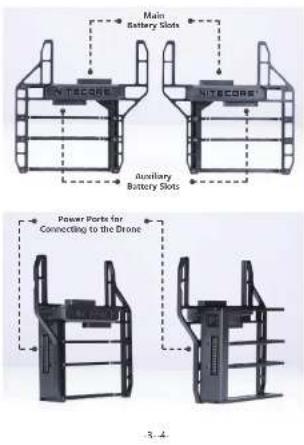
The DPE1 contains one pair of Battery Holders which is set on both sides of the drone. The "IUP" label on each Battery Holder indicates its installing direction. As illustrated, each Battery Holder consists of a Main Battery Slot on the upper part and an Auxiliary Battery Slot on the lower part with a power port for connecting to the drone.

natural_image
Two black rectangular electronic devices with ventilation slots, shown against a plain white background (no text or symbols visible)-1
2
Battery Installation to the DPE1
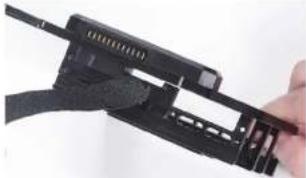
- As illustrated, insert the battery fastener through the DPE1 with the loop side down. (See the picture below)
natural_image
Close-up of a hand holding a black mechanical device with attached brackets (no visible text or symbols)
natural_image
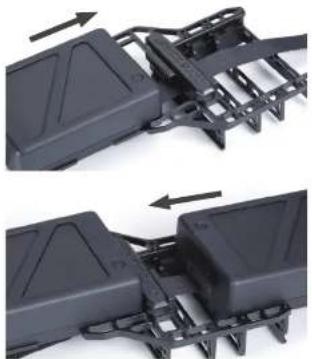
Mechanical component with transparent frame and central shaft (no visible text or symbols)- As illustrated, insert the batteries into the Main Battery Slot and the Auxiliary Battery Slot respectively. Please ensure that the batteries and the DPE1 are well connected via the power port.
natural_image
Two views of a black plastic mechanical component with mounting brackets and internal channels (no text or symbols visible)5.6
- Tighten the battery fastener.

natural_image
Two black rectangular electronic devices with hatching and connectors, no visible text or symbols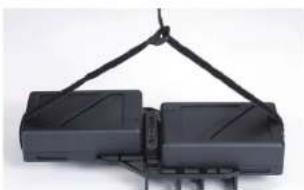
natural_image
Mechanical device with two black blocks suspended by a metal frame (no visible text or symbols)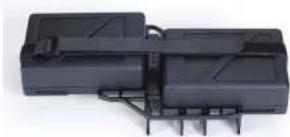
natural_image
Exterior view of a black electronic device chassis with connectors (no visible text or symbols)- Install the batteries to the other Battery Holder with the same procedures.
Note:
(1) The TB55 batteries are restricted to being installed to the Main Battery Slots.
(2) Installing only one TB55 battery to the Battery Holder is also available for normal use.
(3) It is recommended to install the batteries with fewer charge cycles into the Main Battery Slots.
(4) If two batteries with different battery levels are installed, please install the battery with higher battery level to the Main Battery Slot.
Mounting the DPE1 to the Drone
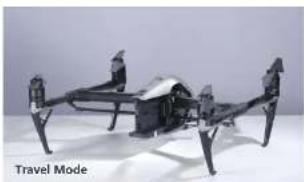
- Unlock the drone to Landing Mode and shut down the drone before dismounting the battery pair.
natural_image
Exterior view of a futuristic drone with visible propellers and structural components (no text or symbols)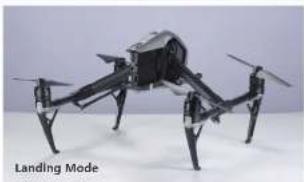
natural_image
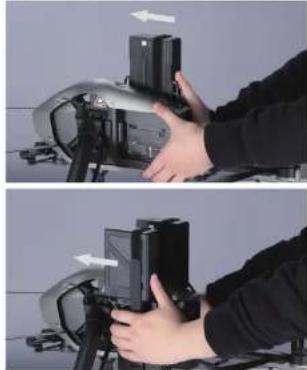
Black-and-white photo of a multi-rotor drone with visible landing gear and propeller (no text or symbols on the drone body)- As illustrated, insert the DPE1 into the battery slots located on both sides of the drone. (Note: Please insert the DPE1 according to the "JUP" labels on each Battery Holder which indicates its installing direction and left/right location.)
natural_image
Two-step photo showing hands operating a device on a tripod, with no visible text or symbols.9 10
- The recovery of the Battery Remove Button will indicate that the installation of the DPE1 is completed. (See the picture below)
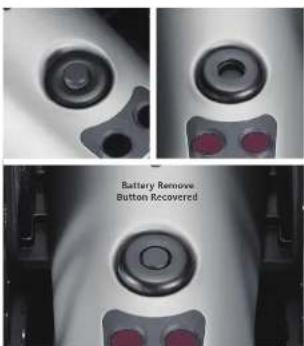

natural_image
3D model of a robotic or mechanical device with articulated legs and control panels (no visible text or symbols)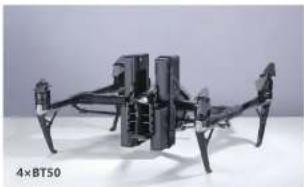
natural_image
Exterior view of a black quadcopter drone with visible structural components (no text or symbols)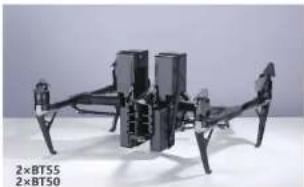
natural_image
Exterior view of a black drone with visible propellers and control panels (no text or symbols on the aircraft body)- After the installation, short press the Power Button on the drone once and then hold the Power Button for more than 5 seconds to activate all the batteries. The Power LED on each battery will be turned on when successfully activated. Please check if all Power LEDs on the batteries are turned on. Otherwise turn off the drone and reactivate the batteries again.
Warranty Details
Our authorized dealers and distributors are responsible for warranty service. Should any problem covered under warranty occurs, customers can contact their dealers or distributors in regards to their warranty claims, as long as the product was purchased from an authorized dealer or distributor. NITECORE's Warranty is provided only for products purchased from an authorized source. This applies to all NITECORE products.
Any DOA / defective product can be exchanged for a replacement through a local distributor/dealer within the 15 days of purchase. After 15 days, all defective / malfunctioning NITECORE® products can be repaired free of charge for a period of 12 months (1 year) from the date of purchase. Beyond 12 months (1 year), a limited warranty applies, covering the cost of labor and maintenance, but not the cost of accessories or replacement parts. The warranty is published if the product is available.
-
broken down, reconstructed and/or modified by unauthorized parties
-
damaged from wrong operations
For the latest information on NITECORE ^® products and services, please contact a local NITECORE ^® distributor or send an email to service@nitecore.com.
The trademarks and product images specified herein this user manual are for reference purpose only. The copyright belongs to their lawful holders.
* All images, text and statements specified herein this user manual are for reference purpose only. Should any discrepancy occur between this manual and information specified on www.nitecore.com, information on our official website shall prevail. SYSMAX Innovations Co., Ltd. reserves the rights to interpret and amend the content of this document at any time without prior notice.
(简体中文) DPE1 说明书
产品概述
natural_image
Two black mechanical device units with vertical connectors and mounting holes, shown against a plain white background (no text or symbols visible)15-16

natural_image
Two views of a black mechanical device with internal components, shown from top and side (no text or symbols visible)17-18
natural_image
Close-up of a black plastic mechanical component with internal brackets and an arrow indicating direction (no text or symbols visible)
natural_image
Close-up of a black plastic enclosure with mounting brackets and a directional arrow indicating movement (no text or symbols visible)- 束紧固定带。

natural_image
Two black rectangular electronic devices with internal circuitry and connectors, no visible text or symbols
natural_image
Two black rectangular electronic devices suspended by a metal frame (no visible text or symbols)19-20

natural_image
Exterior view of a black plastic electronic device with mounting brackets (no visible text or symbols)- 另一边支架电池安装方法相同。
注:
natural_image
Two identical drone models shown from top and bottom views, no text or symbols visible on the aircraft body.21-22
natural_image
Two-step photo showing hands operating a camera module with an arrow indicating left motion (no text or symbols visible)natural_image
3D model of a drone with articulated legs and propeller base (no visible text or symbols)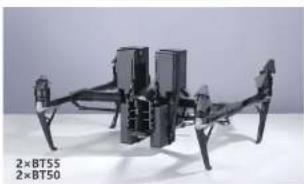
natural_image
Exterior view of a multi-rotor drone with visible propellers and structural arms (no text or symbols)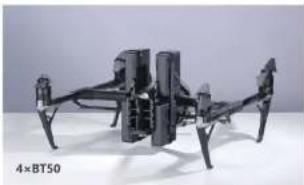
natural_image
Black quadcopter drone with visible structural components and propellers (no text or symbols)Thanks for purchasing NITECORE!
SYSMAX Innovations Co., Ltd.
TEL: +96-20-83962000 FAX: +05-20-83882723
E-mail: info@ritecora.com Web: www.nltacore.com
Address: Rm 2601-06, Central Tower, No.5 Xiencun Road,
Harle District, Changzhou, 510623, Guangdong
Chine
Financials: STSA's POKI Technology, LLC

Made in China
Please find us on facebook: NITECORE photo-
DPL2003119


Brand : Nitecore
Model : DPE1
Category : Battery charger