
PPBCM10 - Security Camera Pyle - Free user manual and instructions
Find the device manual for free PPBCM10 Pyle in PDF.

| Brand | Pyle |
| Model | PPBCM10 |
| Product Type | Body Camera |
| Display | 2.0 inch TFT LCD (960x240) |
| Video Resolution | 1920x1080 @ 30fps, 1440x1080, 1280x720 @ 60fps, 640x480 @ 30fps |
| Video Format | H.264 compressed MP4 |
| Photo Resolution | Up to 16 MP |
| Lens Angle | 120° wide angle |
| Night Vision | Built-in 6 IR LEDs, up to 8m |
| Audio | Built-in microphone and speaker |
| Storage | 32MB internal + 16GB TF card |
| Remote Control | Keychain wireless remote (included) |
| Battery | Rechargeable via USB with LED indicator |
| Dimensions | 2.3" x 1.1" x 2.5" |
| Mounting Clips | 2 mounting clips included |
| Care | Clean with dry cloth; avoid liquids |
| Reset | Use small object to press reset button under HDMI cover |
Frequently Asked Questions - PPBCM10 Pyle
User questions about PPBCM10 Pyle
0 question about this device. Answer the ones you know or ask your own.
Ask a new question about this device
Download the instructions for your Security Camera in PDF format for free! Find your manual PPBCM10 - Pyle and take your electronic device back in hand. On this page are published all the documents necessary for the use of your device. PPBCM10 by Pyle.
USER MANUAL PPBCM10 Pyle
natural_image
Line drawing of a mobile phone receiver with buttons and display panel (no text or symbols)User Manual
Content
Device operaon user manual 3
I Guide for beginners....3
- Structure 3
- Remote control....4
- Instrucon marks on the LCD....5_
- Charging 5
II Basic operaon....6
- Turn on 6
- Turn o....6
- Standby 6
- System settings....6
-
Video recording....7
5.1 Video recording....7
5.2 Snapshot....7 -
Taking pictures ....7
-
Separate sound recording .... 7
-
Automac Infra-Red mode....8
-
Laser light and white light operaon 8
-
AV output/HDMI output 8
10.1 USB & TV output 8
10.2 HDMI output 8
◆ Device operation user manual
Guide for beginners
1. Structure
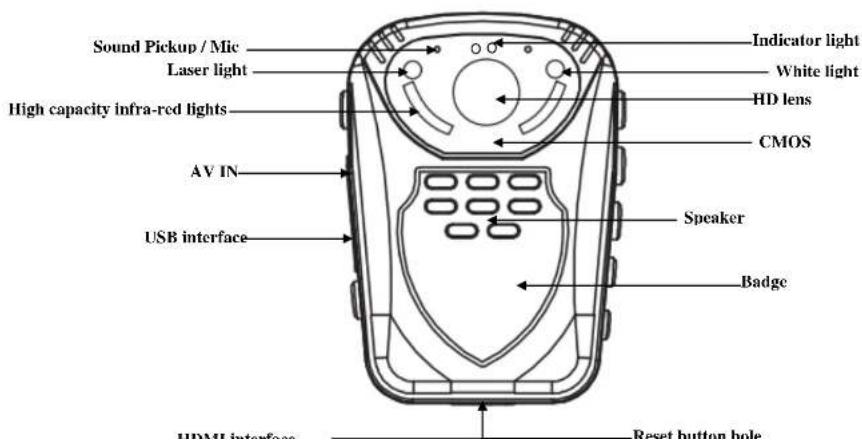

- Remote control

3. LCD Screen

- Memory card recording time remaining
- State icon. In video preview state, it is film mark; in recording state, it is a red dot; in photo preview state, it is a camera mark.
- The ID number of the device and/or the police officer's.
- Displays the memory card identification.
- Battery level icon.
- Display the system date and time.
- Display the remaining storage space of the memory card.
4. Charging
Low battery indication: when the battery voltage is too low, the battery icon in the top right corner of the LCD will turn red and flush; the warning tone will beep and the device will automatically shut down in five minutes. Please charge the device before the time runs out in
1. Turning on
When the device is off, press the power key to power on. A yellow and green light indicator light will flash and the preview screen will appear. If there is no operation for three minutes, the device enters the self-protection mode automatically to save power.
2. Turning off
When the device is powered on, press and hold the power key for two seconds to power off. The LCD will shut down and all light indicators will power off.
3. Standby
If there is no operation for three minutes, the device enters the self-protection mode automatically to save power. The LED light indicator will turn green.
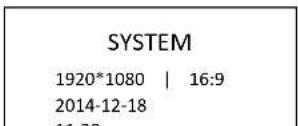
4. System settings
Press and hold the "Menu" key for three seconds, enter "System Setting" option, the LCD will display as following.
- Delay record: press "Up" key or "Down" key to select switch, press "OK" key to confirm the switch selected.
- After the settings are selected and finished, press the "BACK" key to enter boot state and preview it.
5. Video recording
5.1 Video recording
While it is powered on and in the preview screen, press the "Video" key to start recording. In recording mode, the top left corner shows a red LED light indicator; it will begin to flash slowly when it is recording. Press the "video" key again to stop recording (LED light indicator returns to a green color). Video files are saved automatically to your SD memory card. The screen will return back to the preview screen. The name of the video will be the current date and time with "MP4" as the suffix saved on your memory card. Refer to the "Check out/Playback" button to check your recorded video.
5.2 Snapshot
While shooting video, press the "Photo" key [icon] to take photos which will save automatically. Snapshots will not interrupt recording video.
6. Taking pictures
8. Automatic Infra-Red mode
This body camera has automatic infrared-red night vision. When you use the camera in a dark environment, the night vision will be turned on automatically. No need to press any key to start this function
9. Laser light and white light operation
With the device powered on, press the "Power" button to turn the laser light on/off. The device will transmit a red laser beam which will help locate the direction of your recording.
With the device powered on, press and hold the "OK" button to turn the white light on/off. This device will transmit white light (flash) which will provide light in the dark.
10. AV output/HDMI output
10.1 USB & TV output
The device is equipped with TV and USB output functions, a dedicated TV and USB output cable connector. This can connect it to the monitor of the TV; audio and video will play while viewing the playback.
10.2 HDMI output
The device is equipped with HDMI output function a dedicated HDMI output cable.
12. Restart
Because of improper operation or other special reasons which may cause the equipment to crash or stop responding, you may use a small object (toothpick or something similar) to press the reset key in order to restart. After the restart key is pressed, the device will automatically shut down and restart. It will save what you have shot before shutting down. The restart hole is under the bottom of the device. Open the HDMI and you will see a small hole- this is the reset button.
13. Indicator instruction
- With the power on, the preview screen LED is green
• With the power on, while you are recording, the LED is red (blinking slowly) - With the power on, the video recording mode LED is yellow
• In the data connection state, LED indicator is red - In a state of charge, the LED indicator is red. After charging, the LED indicator light goes out.
- With the power on, each press of the "Photo" key will take one photo- the LED indicator flashes red.
14. Remote control operation (optional function)
The machine has an optional remote control, and can provide a more convenient way of shooting photos/videos.
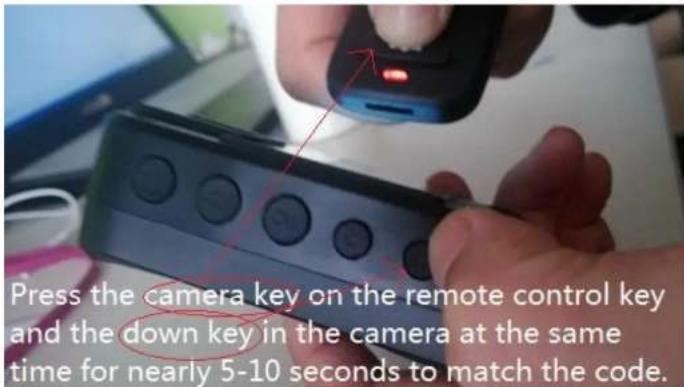
14.1 Code matching
Please kindly refer to the following pictures:
14.2 Remote control key
As instructed below:
【】key: Photo/Camera button. Press once to take a photo. In video mode, press this key to capture a screenshot of what you are recording.
【■◆】key: Video recording button. Press once to shoot a video, press once again to stop shooting and save your files.
【■】key: Sound recording button Press once to start recording press once again to stop
Specifications
| Video Input | Resolution 1920*1080 |
| Display | 2.0 inch 16:9 TFT LCD | 960*240 |
| Lens angle | Built-in Lens: 120° wide angle |
| Focus range | 0.3~∞ |
| CMOS | 1/2" Color CMOS Sensor |
| Body Size | 2.3" × 1.1" × 2.5" (length × width × height) |
| Photo | JPG file format up to 1600 million pixel camera |
| Video Camera | Video Format: H.264 compressed format1920*1080 @ 30fps, 1440*1080 @ 30fps, 1280*720 @ 60fps,640*480 @ 30fps |
| Video Format | MP4 |
| Remote Control | One key operation (professional wireless remote control) |
| Exposure Mode | Auto Exposure |
| IR night vision | Built-in 6 high-power infrared light, night photography and video support, can identify faces in 8 meters |
| Audio | Built-in microphone / speaker |
| Pickup | 64KHZ |
| Memory | Body memory: 32M, Standard 16GB TF memory |
| Shutter / Shutter Speed | Electronic Shutter/1/2-1/2000s |
IV Accessories
- Body Cam
• Keychain Wireless Remote Control
• USB Wall Adapter & Charging Cable
• (2) Mounting Clips
V Troubleshooting and handling
Device will not boot or respond
- Please connect the charger to equipment and charge it for at least 2 hours, then check it again.
- Please check to see if the charger and/or the connecng line is normal.
- Please press the reset key to restore the device to factory sengs, and then check to see if the problem is sill occurring
- If this does not resolve the problem, please contact customer service sta to return it to the
factory for repair.
Device fails to connect computer, and does not enter upload mode
Please contact customer service sta to resolve this problem.

- User Manual
- Content
- ◆ Device operation user manual
- Guide for beginners
- Structure
- LCD Screen
- Charging
- Turning on
- Turning off
- Standby
- System settings
- Video recording
- Video recording
- Snapshot
- Taking pictures
- Automatic Infra-Red mode
- Laser light and white light operation
- AV output/HDMI output
- USB & TV output
- HDMI output
- Restart
- Indicator instruction
- Remote control operation (optional function)
- Code matching
- Remote control key
- IV Accessories
- V Troubleshooting and handling
- Device will not boot or respond
- Device fails to connect computer, and does not enter upload mode
Brand : Pyle
Model : PPBCM10
Category : Security Camera