CR1600PC - Security Camera Costar - Free user manual and instructions
Find the device manual for free CR1600PC Costar in PDF.

User questions about CR1600PC Costar
0 question about this device. Answer the ones you know or ask your own.
Ask a new question about this device
Download the instructions for your Security Camera in PDF format for free! Find your manual CR1600PC - Costar and take your electronic device back in hand. On this page are published all the documents necessary for the use of your device. CR1600PC by Costar.
USER MANUAL CR1600PC Costar
NO USER-SERVICEABLE PARTS INSIDE.
REFER SERVICING TO QUALIFIED
SERVICE PERSONNEL.

The lightning flash with arrowhead symbol, within an equilateral triangle, is intended to alert
the user to the presence of uninsulated "dangerous voltage" within the product's enclosure that may be of sufficient magnitude to constitute a risk of electric shock.

The exclamation point within an equilateral triangle is intended to alert the user to the presence
of important operating and maintenance (servicing) instructions in the literature accompanying the appliance.
COMPLIANCE NOTICE OF FCC:
THIS EQUIPMENT HAS BEEN TESTED AND FOUND TO COMPLY WITH THE LIMITS FOR A CLASS A DIGITAL
DEVICE, PURSUANT TO PART 15 OF THE FCC RULES. THESE LIMITS ARE DESIGNED TO PROVIDE
REASONABLE PROTECTION AGAINST HARMFUL INTERFERENCE WHEN THE EQUIPMENT IS OPERATED IN
A COMMERCIAL ENVIRONMENT. THIS EQUIPMENT GENERATES, USES, AND CAN RADIATE RADIO
FREQUENCY ENERGY AND IF NOT INSTALLED AND USED IN ACCORDANCE WITH THE INSTRUCTION
MANUAL, MAY CAUSE HARMFUL INTERFERENCE TO RADIO COMMUNICATIONS. OPERATION OF THIS
EQUIPMENT IN A RESIDENTIAL AREA IS LIKELY TO CAUSE HARMFUL INTERFERENCE, IN WHICH CASE
USERS WILL BE REQUIRED TO CORRECT THE INTERFERENCE AT THEIR OWN EXPENSE.
WARNING: CHANGES OR MODIFICATIONS NOT EXPRESSLY APPROVED BY THE PARTY RESPONSIBLE
Important Safeguards
| 1. Read Instructions All the safety and operating instructions should be read before the appliance is operated. 2. Keep Instructions The safety and operating instructions should be kept for future reference. 3. Cleaning Unplug this equipment from the wall outlet before cleaning it. Do not use liquid acrosol cleaners. Use a damp soft cloth for cleaning. 4. Attachments Never add any attachments and/or equipment without the approval of the manufacturer as such additions may result in the risk of fire, electric shock or other personal injury. 5. Water and/or Moisture Do not use this equipment near water or in contact with water. 6. Accessories Do not place this equipment on an unstable cart, stand or table. The equipment may fall, causing serious injury to a child or adult, and serious damage to the equipment. Wall or shelf mounting should follow the manufacturer's instructions, and should use a mounting kit approved by the manufacturer. This equipment and cart combination should be moved with care. Quick stops, excessive force, and uneven surfaces may cause the equipment and cart combination to overturn. 7. Ventilators Shots and openings in the cabinet and the back or bottom are provided for ventilators and to ensure reliable operation of the equipment and to protect it from overheating. These openings must not be blocked or covered. Do not block these openings or allow them to be blocked by placing the equipment on a bed, stool, rug, or bookcase. Ensure there is adequate ventilation and that the manufacturer's instructions have been adhered to. 8. Power Sources This equipment should be operated only from the type of power source indicated on the marketing label. If you are not sure of the type of power, please consult your equipment dealer or local power company. You may want to install a UPS (Uninterruptible Power Supply) system for safe operation in order to prevent damage caused by an unexpected power stoppage. Any questions concerning UPS, consult your UPS retailer. 9. Power Cords Operator or installer must remove power and other connections below handling the equipment. 10. Lightning |
Hybrid Digital Video Recorder
WEEE (Waste Electrical & Electronic Equipment)
Correct Disposal of This Product
(Applicable in the European Union and other European countries with separate collection systems)
This marking shown on the product or its literature, indicates that it should not be disposed with other household wastes at the end of its working life. To prevent possible harm to the environment or human health from uncontrolled waste disposal, please separate this from other types of wastes and recycle it responsibly to promote the sustainable reuse of material resources.
Household users should contact either the retailer where they purchased this product, or their local government office, for details of where and how they can take this item for environmentally safe recycling.
Business users should contact their supplier and check the items and conditions of the purchase contract. This product should not be mixed with other commercial wastes for disposal.
User's Manual
Table of Contents
Chapter 1 — Product Information ....1
FEATURES....1
SYSTEM DIAGRAM 1
FRONT PANEL 2
REAR PANEL 2
Chapter 2 — SmartGuard....5
OVERVIEW 5
FEATURES....5
MAIN GUI 6
Screen Group Edit....9
Instant Play....9
PTZ 9
SmartGuard SETUP 10
Setting Up the System 10
Set up General 11
Network 12
System alert 13
Time sync....16
OSD 17
Archive 18
System authority....20
Setting Up the Camera....21
Channel status 23
Assign camera....24
Channel 26
Setting Up the Alert 27
Alarm Out 29
User Define Alarm Out 30
NetCam Alarm Out 31
Email 32
0.11.1
User's Manual
Multi Channel 48
Setting Up the User 50
Chapter 3 — SmartSearch....51
OVERVIEW 51
FEATURES....51
MAIN GUI 52
SEARCH AND PLAYBACK OF RECORDED VIDEO 54
Condition Search....54
Time-Lapse Search 57
SAVING OF RECORDED VIDEO 60
Save As Clip File....60
Clip Player 61
AUDIO PLAYBACK 63
Checking Audio Recording Configuration 63
Playing Recorded Audio....63
External Saving 64
Appendix 1 — Network Setup (LAN)....65
Appendix 2 — WebGuard....67
Appendix 3 — Text-In Query....71
Appendix 4 — Connector Pin Outs....73
Appendix 5 — Troubleshooting ....76
Appendix 6 — Specifications ....77
Chapter 1 — Product Information
FEATURES
- Compatible with color cameras and other standard video sources
• Video input from network cameras (Hybrid model only)
H.264 codec
• Video synchronization not required - Simultaneous recording, multi-screen viewing, playback, remote monitoring and archiving
• Video recording and archiving via cSATA interface - Versatile display formats for convenient user interface
- Main and Spot monitor outputs
- On-screen graphic display including camera title, time and event detection block
• Sequence mode available in all screen formats - Hardware watchdog timer function
- Programmable motion detection for each camera input using graphic user interface
- Various image enhancement functions
- Remote monitoring, playback and control by using a remote program
• User-friendly interface
• 32-channel alarm input and 32-channel alarm output
• Network camera alarm and audio association (32-channel each for input and output) (Hybrid model only)
NOTE: This manual covers the 16- and 32-channel digital video recorders. For simplicity, the illustrations and descriptions in this manual refer to the 32-channel model. Refer to Appendix 6 — Specifications for the system specifications.
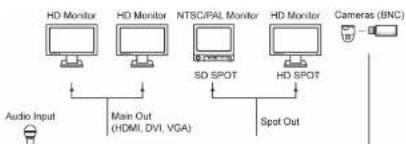
SYSTEM DIAGRAM
Non-Hybrid Model
flowchart
graph LR
    A["Audio Input"] --> B["Main Out (HDMI, DVI, VGA)"]
    B --> C["HD Monitor"]
    C --> D["NTSC/PAL Monitor"]
    D --> E["SD SPOT"]
    E --> F["HD Monitor"]
    F --> G["HD SPOT"]
    G --> H["Spot Out"]
    H --> I["Cameras (BNC)"]
User's Manual
Hybrid Model
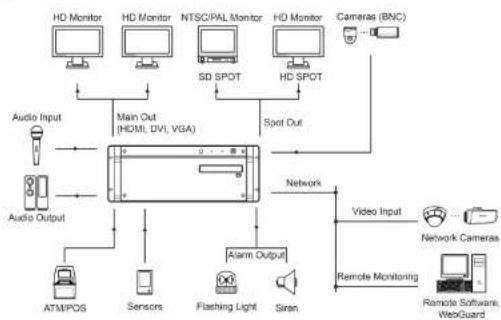
flowchart
graph TD
    A["HD Monitor"] --> B["Main Out (HDMI, DVI, VGA)"]
    C["HD Monitor"] --> B
    D["NTSCPAL Monitor"] --> B
    E["HD Monitor"] --> F["Spot Out"]
    G["Cameras (BNC)"] --> F
    H["SD SPOT"] --> B
    I["HD SPOT"] --> F
    J["Audio Input"] --> K["Main Out (HDMI, DVI, VGA)"]
    L["Audio Output"] --> K
    M["ATMPOS"] --> N["Sensors"]
    O["Flashing Light"] --> P["Siren"]
    Q["Remote Monitoring"] --> R["Video Input"]
    S["Remote Software, WebGuard"] --> T["Network Cameras"]
    U["Network"] --> V["Alarm Output"]
    W["Radio"] --> X["Antenna"]
FRONT PANEL
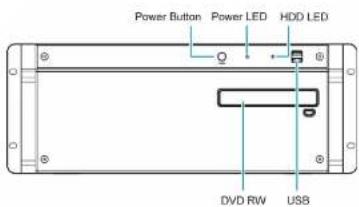
text_image
Power Button Power LED HDD LED DVD RW USB• Power Button: Turn the system on or off.
• Power LED: Is lit when the unit is turned on
• HDD LED: Flickers when the unit accesses to the
hard disk drive.
• DVD RW: Use to export recorded data to the DVD
RW media.
• USB: Connect USB devices such as a mouse,
keyboard, USB storage device or printer.
REAR PANEL
45 Channel Model
Hybrid Digital Video Recorder
32-Channel Model

text_image
Labeled diagram of an electronic device rear panel showing internal components and ports| Power In | Video In (BNC) | Audio In | Alarm In | Alarm Out (Relay) |
| RS232 | RS485 | SD SPOT (BNC, Multi-Channel Display) | Alarm Out (TTL) | |
| HD SPOT (Multi-Channel Display) | SD SPOT (D-Sub 8 BNC, Sequence Display) | |||
| Audio Out | VGA (D-Sub) | DVI | E-SATA | USB |
| HDMI | Network (RJ-45) | |||
• Power In: Connect a power cord.
• Video In (BNC): Connect BNC cameras.
• Audio In: Connect audio sources (Line-in).
• Alarm In: Connect external alarm-in devices
- Alarm Out (Relay): Connect external alarm-out devices such as buzzers or lights.
- RS232: Connect a remote control device for RS232 communication.
• RS485: Connect a remote control device for RS485 communication.
- SD SPOT (BNC, Multi-Channel Display): Connect a spot monitor which supports a BNC interface for the multi-channel display. The multi-channel display settings are available at the SPOT – Multi Channel menu of SmartGuard.
- Alarm Out (TTL): Connect external alarm-out devices such as buzzers or lights.
- HD SPOT (Multi-Channel Display): Connect an HD (high-definition) PC monitor which supports an HDMI interface for the multi-channel display. The multi-channel display settings are available at the SPOT Multi Channel menu of SmartGuard
User's Manual
- USB: Connect USB devices such as a mouse, keyboard, USB storage device or printer.
- Network (RJ-45): Connect a Cat5 cable with an RJ-45 connector. The network settings are available at the SYSTEM Network menu of SmartGuard.
NOTE: SPOT display is not supported for network cameras.
NOTE: The location of ports in slots can be different from the image above. Refer to Appendix 4 — Connector Pin Outs for connection of the ports located in slots.
NOTE: VGA, DVI and HDMI main out supports dual display (SmartGuard on the primary display and SmartSearch on the additional display) and not triple display.
NOTE: Windows may not operate properly when using the USB connectors on the front panel of the DVR, depending on the model type of the USB device. In this case, connect the USB device after Windows boots properly or use the USB connectors located on the rear panel.
NOTE: If the LAN 1 and LAN 2 is connected to the same network, the system may malfunction.
NOTE: When mounting the DVR on a rack, comply with the following instructions.
- Ensure that the rack inside is not sealed.
- Ensure the air is circulated through the inlet/outlet.
- If you pile up DVRs or other rack-mount devices, secure room for ventilation or install a vent.
- For natural air convection, place the inlet at the bottom of the rack and the outlet on top.
- It is strongly recommended that a fan motor is installed at the inlet and the outlet for air circulation and fit a filter at the inlet to screen dust or foreign substances.
- Maintain the temperature inside the rack or surrounding areas between 41°F to 104°F (5°C to 40°C).
TURNING ON THE DVR
Press the power button located on the front panel to turn the system on. The system goes into the SmartGuard mode as soon as it finishes its boot process.
NOTE: Connect a monitor before turning on the system. Video might not be displayed on the monitor when connecting a monitor after turning on the system.
CAUTION: The 16, 32 -channel model requires at least 1280 x 1024 resolution. The SmartGuard program will not run if the monitor does not have the resolution that fits for each model.
TURNING OFF THE DVR
Click the (Menu) button and System Shutdown menu of SmartGuard or press the power button on the front panel to turn the system off.
Chapter 2 — SmartGuard
OVERVIEW
SmartGuard is powerful surveillance software. It provides multiplexer functions, digital time-lapse recording and event-driven recording. SmartGuard also provides motion detection, PTZ control and various image enhancement functions.
NOTE: The first time you turn on the system, it will immediately begin recording. If you have less than 32 cameras, you must disable cameras which are not connected (SYSTEM - Set up General menu of SmartGuard); otherwise, the recording speed might be decreased somewhat.
FEATURES
• Max. 32 channels
- Max. 960 images/see recording (Reference: BNC camera 704 x 480 resolution, network camera 1920 x1080 resolution)
- User-friendly interface
- Scheduling by camera and time
• Time-lapse or event-driven recording
- Panic recording
• Motion detection and object detection function
• Audio recording
- PIZ control
User's Manual
MAIN GUI
16-Channel Model

text_image
Interior photo collage of a modern office or service room with numbered UI elements and interior photos showing furniture, seating, and reception areas.32-Channel Model
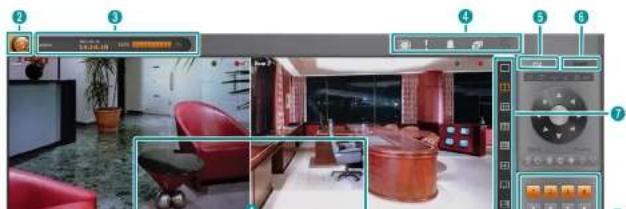
natural_image
Interior view of a modern office with red furniture and digital display panels (no visible text or symbols)• Monitoring Screen: Displays monitoring video.
OSD Display: Go to System OSD menu of SmartGuard, and enable OSD display to display the OSD information.
• / & / : Recording schedule (time-lapse recording / event recording / time-lapse and event recording)
• A motion detection, object detection or video loss event has been detected.
- / : Recording status (time-lapse recording / pre-event recording / event recording)
- PTZ enabled.
- Hover Menu: Controls each camera. Selecting a camera screen displays the button beside the camera title. Clicking the button displays the hover menu.
• (Zoom): Zooms in the image.
• (Color Control): Adjusts the brightness, contrast, saturation and hue of the current video. Clicking the
button cancels the adjustment and reloads the original image.
• / (Audio Out): Controls audio out.
- (Local Microphone): Transmits audio through microphone connected to DVR. This is supported for
network cameras that support two-way audio function.
• (Instant Play): Allows you to play back video on the camera screen. See the Instant Play section (p. 8) for details.
• (PTZ Control): Controls PTZ.
- / (Fit to screen / Original ratio): Changes the image aspect ratio.
- Menu Button: Displays the SmartGuard menu.
- Login/Logout: Logs in or logs out the system. When Use local login is disabled in the SmartGuard program (SYSTEM - System Authority menu), the DVR does not ask login procedure. When you forgot the password, ask your dealer or distributor. When Use password expire is enabled in the SmartGuard program (SYSTEM - System Authority menu), you will be asked whether or not to renew the password when you log in if the password has not been changed during the password expiration period.
- SmartSearch: Runs the SmartSearch program. This function will be disabled during dual display.
- Setup: Displays a SmartGuard Setup screen. It allows you to change the settings of SmartGuard program.
- About: Displays the information of the installed cards, driver, software, hard disk drive, OS and MAC address on the system.
- Help: Displays the electronic file of user's manual.
- Log: Displays system log list.
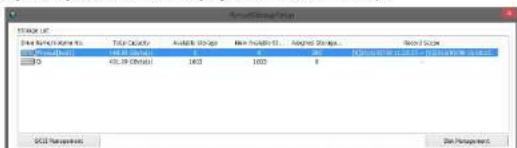
- Record Storage Setup: Click the Recording Storage Setup to add the HDD or change or reset storage settings. Running the record storage setup displays the message that the SmartGuard program will exit. When record storage setup is complete, the SmartGuard program will run automatically.
text_image
Microsoft Group File Selection Default: 10.0 GB Default: 10.0 GB Default: 10.0 GB Default: 10.0 GB Default: 10.0 GB Default: 10.0 GB Default: 10.0 GB Default: 10.0 GB Default: 10.0 GB Default: 10.0 GB Default: 10.0 GB Default: 10.0 GBUser's Manual
- Record Scope: Displays the date and time period of recorded video to be recorded.
- iSCSI Management: Connects an iSCSI device to DVR to use local HDD together. Clicking iSCSI management displays iSCSI screen. When setting an iSCSI setup and registering HDD, the storage list will be updated.
- Disk Management: Clicks the button to format local HDD or to change the settings. Clicking disk
management displays disk related setup screen. When setting is complete, the storage list will be updated.
- Storage Info: Displays a list of connected storage devices that is available for archiving.
- Set up Storage for selected Drive: Set the number of storages to be used for recording in the selected device.
- Storage in use: Displays the total number of storages allocated to all devices in Storage List.
- Set up Storage: Displays the total number of storages to be allocated to all devices in Storage List.
- Total Storage: Displays the total number of storages allocated and to be allocated to all devices in Storage
List.
→ Create/Resize: Clicking the button creates or adds storage depending on the number of storages to be allocated
in the selected
- Format: Clicking the button deletes recorded video saved in the selected device.
- Remove: Clicking the button deletes all storage folders allocated in the selected device. Recorded video will
be deleted when the storage folders are deleted.
→ Exit: Clicking the button closes the setup screen.
NOTE: The Recorded StorageSetup option can be activated only for the user who has a system authority.
NOTE: It supports RAW Volume partition of GPT way. RAW Volume partition is displayed as "Raw[ddd:(number), p:(partition number)]" in the hard disk driver. It is possible to either assign available storage entirely or not to assign. RAW Volume partition exists in storage device but the one that is already assigned as an archive is not displayed in recording setup.
- System shutdown: Shuts down the system.
- System Status: Displays user ID, date and time, the remaining hard disk space and the type of hard disk usage. Clicking the right mouse button allows you to change the time. If you change the time, the SmartGuard program restarts and recording stops during the time.
- Utility Buttons
- (Secondary Live Screen On/Off): Clicking the button displays a camera screen to an additional connected monitor (secondary monitor). This is not supported for the primary monitor that has less than 1920 x 1080. Also it is not supported for secondary monitor that has less than 1024 x 768.
- (Panic Recording): Starts recording video from all cameras regardless of the recording schedule. It may be used when you want to record manually during monitoring. Clicking the button again releases the panic recording. Recording speed for the panic recording is the same as that of the time-lapse recording.
- (Manual Alarm Output): In general, the alarm out is activated automatically when any event is detected if the event is associated with alarm out. However, the user can activate all the alarm out manually by clicking this button while it is released or deactivate all the alarm out by clicking this button while it is pressed.
- (Auto Sequencing): Starts sequencing the cameras in order. Clicking the button again releases the auto sequencing. Clicking the arrow button at the bottom-right allows you to change a sequence dwell time.
(SmartSearch): Runs the SmartSearch program. This function will be disabled during dual display.
Hybrid Digital Video Recorder
Screen Group Edit
You can change the camera arrangement manually for each screen mode. In case of secondary live screen, camera arrangement is maintained even if screen mode is changed.
Changing the location of two channels on the monitoring screen: Clicking a camera screen and dragging it over another camera screen switches the location of the two camera screens.
Changing the location of the channel hidden from the mongering screen: Clicking a camera button of the hidden channel and dragging it over a camera screen on the monitoring screen switches the location of the hidden channel and the previously displayed channel on the camera screen. This is not supported for the secondary live screen.
Instant Play
It allows you to play back video on the camera screen.
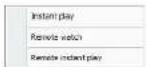
- Instant Play: Allows you to play back recently recorded video if there are any video recorded.
- Instant Remote Watch: Allows you to watch live video of another DVR.
- Instant Remote Play: Allows you to play back recently recorded video of another DVR.
PTZ
The DVR provides transmission functions, and you can control popular PTZ devices and cameras. Clicking the PTZ panel button displays the PTZ control buttons as shown below.
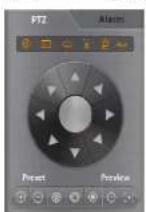
• (Auto Panning, Menu, Wiper, Pump, Light, Aux): Displays the On/Off status of each function. Hovering the mouse cursor over any button displays a setup screen and allows you to enable or disable each function and change the advanced settings of the PTZ camera.
• (Direction Control): Controls the direction of the PTZ camera
- Preset (Set Preset). Preview (View Preset): Saves camera directions as a Preset so that you can move the camera directly to a saved direction.
• (Zoom In/Out): Zooms the camera lens in or out.
• (Iris Close/Open): Closes or opens the iris of the camera lens.
• (Focus Near/Far): Focuses on near or far objects.
• (One Push): Press this button to find the optimum focus automatically. It is recommended to get an approximate focus using the manual focusing button before pressing the one push button for fast and efficient focusing. This button is not supported in the Onvif protocol.
NOTE: Presets can be set, depending on the specification of installed PTZ devices or PTZ cameras. Make sure
User's Manual
SmartGuard SETUP
- Load: Loads a saved setting and apply it to the DVR.
- Save: Saves the current setting.
- Default: Loads the factory default setting and apply it to the DVR.
Setting Up the System

text_image
Server Setup Network System and Time sync OSI Access System authority Server Setup License Company Name Command/roll Recording data range Auto-logies Period 0 Day(s) HDMI range Drive Recycle Remote control Server (Mode: H2.0) E:\Program Files\100% Display: 0 Setup: COMPure Web Network File: 9679 Screen Type Enable OK CancelHybrid Digital Video Recorder
Set up General

text_image
Network Location Compass Name Data range 32 31 30 29 28 27 26 25 24 23 22 21 20 19 18 17 16 15 14 13 12 11 10 9 8 7 6 5 4 3 2 1 0 0 0 0 0 0 0 0 0 0 0 0 0 0 0 0 0 0 0 0 0 0 0 0 0 0 0 0 0 0 0 0 0 0 0 0 0 0 0 0 0 0 0 0 0 0 0 0 0 0 1 2 3 4 5 6 7 8 9 10 11 12 13 14 15 16 17 18 19 20 21 22 23 24 25 26 27 28 29 30 31 32 33 34 35 36 37 38 39 40 41 42 43 44 45 46 47 48 49 50 51 52 53 54 55 56 57 58 59 60 61 62 63 64 65 66 67 68 69 70 71 72 73 74 75 76 77 78 79 80 81 82 83 84 85 86 87 88 89 90 91 92 93 94 95 96 97 98 99 100- Location: Enter a DVR name. If you do not have a keyboard connected to the unit, clicking the keyboard icon will display a virtual keyboard on which you can type by clicking the letters.
- Camera On/Off: Enables or disables the camera by clicking each camera button.
-
Recording data usage
-
Auto deletion: Deletes the video recorded earlier than user-defined period. e.g. If you check the Auto deletion box, and set 30 days in the Period box, the DVR will automatically delete the video which is older than 30 days from the current day.
- HDD usage: When Once is selected, the DVR stops recording when the hard disk drive is full. When Recycle is selected, the DVR continues recording when the hard disk drive is full by overwriting the oldest video.
- Remote Control
- Serial (RS485/RS232): Controls the SmartGuard program with the remote control device connected to the serial.
COM port. Set the connected serial's COM port
User's Manual
Network

text_image
Set up network Transmit Method Frame Rate 1:5 Tips 30 fps Image analysis 157/240 VSL Standard Network Service FEN Server info. Use FEN Use RTSP Set up... Set up... Set up network port Set up... Internet Protocol (TCP/IP) properties [LAN] Ethernet 2 (Connected: 100.0Mbps) [LAN] Ethernet (Connected: 1.0Gbps) ● Obtain an IP address automatically ○ Use the following IP address: IP Address Submit mode Extract gateway ● Obtain DNS server accounts automatically ○ Use the following DNS server addresses: Preferred DNS server Alternate DNS server Set up...• Transmit Method
- Frame Rate, Image resolution: Set the transmit speed and resolution of video to be transferred to remote system from the DVR. Transmit speed is the number of images transferred during one second. The higher the transmit speed is, the more images are transferred. For example, 30 means 30 images will be transferred during one second, and S.m. sent 5 images will be transferred during one second. This is supported for analog covers only.
- SSL: Using the SSL function enhances the security of outgoing data from the DVR by using the SSL (Secure Sockets Layer) protocol when connecting to the DVR remotely. When using the SSL function, the DVR cannot be connected with a program or a system that does not support the SSL function. Selecting Standard does not use the SSL protocol for video and audio data, collecting High mode the SSL protocol for all data.
Hybrid Digital Video Recorder
• Network Service
FEN Server Info.: Clicking the Set up... button allows you to enter the FEN server information.
- Server, Port: Enter the IP address (or domain name) and port number of the FEN server.
- Use FEN: Enables the FEN function. Clicking the Set up... button allows you to register the DVR on the FEN server.

- Name: Enter the DVR's name to be registered on the FEN server. Click the Name Check button to check if the name you entered can be used. Clicking the OK button registers the name as a FEN name of the DVR.
NOTE: The FEN function allows you to connect to the DVR from remote sites using either the dynamic IP addresses or the domain name. For the FEN function to work properly, the DVR's FEN name should be registered on the FEN server, and the FEN server settings should match the settings registered on the FEN server. Any changes on the FEN server might cause improper operation.
NOTE: The FEN registration is limited to only one FEN server. The DVR cannot be registered to multiple FEN servers.
NOTE: When FEN function is enabled, it is not necessary to set up port forwarding manually. However, remote connection to the DVR might not be available depending on the network connection environment of the DVR or remote system when the FEN function is enabled. If it is the case, you should set up port forwarding for the DVR manually in the NAT (Network Address Translation) device to which the DVR is connected.
- Use RTSP: Enables the RTSP service.
- Set up network port: Click the button and set up network port number.
- Internet Protocol (TCP/IP) properties: See Appendix 1 — Network Setup.
System alert
Clicking each tab of S.M.A.R.T., Stop recording and Login Fail (3 times) and enabling each function causes the system alert as follows:
- S.M.A.R.T. tab – Set up alert, S.M.A.R.T. Log: Causes the system alert when S.M.A.R.T. log occurs. This is supported only when the installed hard disk drives support S.M.A.R.T. (Self-Monitoring, Analysis and Reporting Technology) Monitoring program (Internal hard disk drives only)

User's Manual
- S.M.A.R.T. Log: Displays the list of S.M.A.R.T. log.
- Delay time for the first inspection after system starts: Set the standby time until the system performs the first inspection after setting the function.
- Inspection Interval: Set the inspection interval.
- Threshold temperature for alert: Set the threshold temperature of hard disk drives. The DVR leaves S.M.A.R.T.
log when the temperature of hard disk drives exceeds the defined threshold. - Stop recording tab – No recording during specified time: Causes the system alert when panic recording has been stopped by clicking the panic recording button or when recording has not been made during the predefined time.

text_image
SMART: Step recording Local failed (0 times) Set up to which recording steps Enable on record status matching line 1 Hour 0 2 hours- Login Fail (3 times) tab: Causes the system alert when login fails 3 times.

- S.M.A.R.T. / Stop recording / Login Fail (3 times) tab – Action association
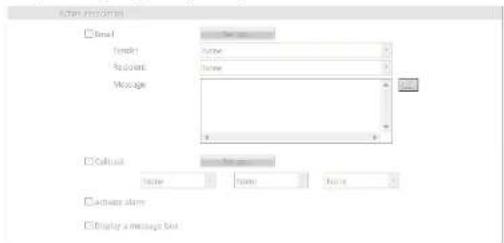
text_image
Send Send: Name Request: Name Message Callout Name: Name: None Active alarm Display a message butHybrid Digital Video Recorder
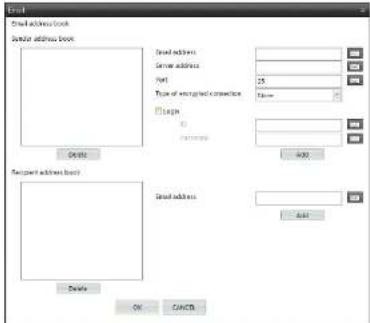
- Email: Sends an email when system alert occurs. Select a sender and recipient from the drop-down menu below the Set up... button and enter the message. If any sender or recipient is not registered, click the Set up... button.
text_image
Email address book Search address book Search address Name Type of encrypted connection Login Password OK Cancel Search address book Search address Add Cancel- Sender address book: Enter the email address and SMTP server address and port number. Select a type if the SMTP server uses the type of encrypted connection. Check the Login box if you want to connect to the SMTP server that requires login procedure, and enter the ID and password for login. Clicking the Add button adds the sender to the sender address book.
- Recipient address book: Enter the email address. Clicking the Add button adds the recipient to the recipient address book.
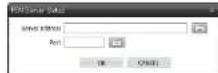
- √ Callback: Sends a message to predefined callback servers when system alert occurs. Select a callback server from the drop-down menu below the Set up... button. If any callback server is not registered, click the Set up... button.

text_image
C:\Users\address\test KEY KEY ADD Create OK CHANGEEnter the IP address of the callback server and click the Add button.
- ☑ Activate alarm: Sounds beep through the connected speaker when system alert occurs.
- √ Display a message box: Displays a message box in SmartGuard when system alert occurs.
User's Manual
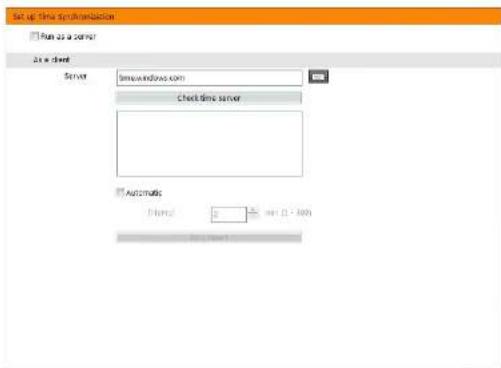
Time sync
In general, each DVR system may have a different time because of the accuracy of its internal clock. The Time Synchronization function synchronizes the time between a DVR and any time server when they are networked. Any DVR can run as a time server. Also you can use a standard time server provided by each country.
CAUTION: The time synchronization might not be done properly depending on the time server or network conditions. Check the time server and network conditions, first.
text_image
Set up time synchronization Run as a server Run data Server timewindows.com check-time server Automatics Plants 0 mm (1 - 200) Play Print- Run as a server: Runs the DVR as a time server.
- As a client: Synchronizes the time between a DVR and a time server when they are networked.
- Server: Enter the IP address (or domain name) of target time server.
- Check Time Server: Tests the synchronization with the time server
- Automatic: Synchronizes the time automatically at the predefined interval.
- Sync now!: Synchronizes the time when you click the button.
NOTE: When setting up time synchronization for the first time, set the time between the DVR and the time server manually because the DVR and the time server might have wide time gap.
OSD
You can set up to display OSD information on the image when monitoring video on a main monitor. OSD (On Screen Display) information includes camera title, time, event detection block, etc.

text_image
Enable usd currency USD Currency USD Currency Description State Access Name Time Term In Check Status Event Show matrix selection result block Show object selection result block- Enable all camera's OSD: Enables OSD display for all cameras. If you disable it, you can enable or disable OSD display for each camera by clicking each camera button.
- Camera OSD: Enables or disables camera OSD display.
- √ Camera Description: Displays a camera name which is set at the Location setting of the CAMERA menu.
- State: Displays the recording schedule, event detection, recording status, and PTZ on or off.
- Hover Menu: Displays the hover menu.
- Time: Displays the recorded time of playback video.
- Text In: Displays text-in data from a POS.
- √ Elevator Status: Displays the elevator status from the outside.
Event: Enables or disables event detection area display. - Show motion detection event block: Displays motion detection area when a motion detection event occurs.
- Show object detection event block: Displays object detection area when an object detection event occurs.
User's Manual
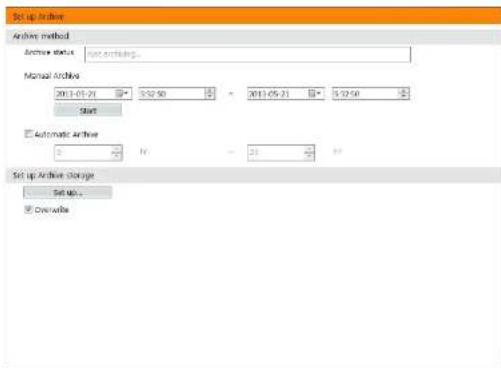
Archive
You can back up recorded video to a hard disk drive and eSATA.
NOTE: Use a hard disk drive formatted beforehand when you back up data to hard disk drives.
text_image
Set up Archive Archive method Archive status: Not archiving... Manual Archive 2013-05-21 5:25:00 2013-05-21 5:25:00 Start Automatic Archive S N Y - 24 Set up Archive storage Set up... Overwrite- Archive method: Manual and automatic archives are supported.
- Archive status: Displays backup status.
- Manual Archive: Set the date and time period of recorded video to back up. Clicking the Start button starts backup manually.
- Automatic Archive: Starts backup automatically at the predefined time.
Automatic Archive. Starts backup automatically at the predefined time.
Set up Archive storage: Click the Set up... button and set up the storage for archiving. Enabling Overwrite makes the DVR continue recording when the hard disk drive is full by overwriting the oldest video. Disabling Overwrite makes the DVR stop recording when the hard disk drive is full.

text_image
Open Web One version here: 10.0000000000000000000000000000000000000000000000000000000000000000000000000000000000000000000 25.1.2.26 (1987) 43.2.2.26 (1987) 43.2.2.26 (1987) 43.2.2.26 (1987) 43.2.2.26 (1987) 43.2.2.26 (1987) 43.2.2.26 (1987) 43.2.2.26 (1986) 43.2.2.26 (1986) 43.2.2.26 (1986) 43.2.2.26 (1986) 43.2.2.26 (1986) 43.2.2.26 (1986) 43.2.2.26 (1986) 43.2.2.27 (1987) 43.2.2.27 (1987) 43.2.2.27 (1987) 43.2.2.27 (1987) 43.2.2.27 (1987) 43.2.2.27 (1987) 43.2.2.27 (1987) 43.2.2.28 (1987) 43.2.2.28 (1987) 43.2.2.28 (1987) 43.2.2.28 (1987) 43.2.2.28 (1987) 43.2.2.28 (1987) 43.2.2.28 (1987) 43.3.1.1 (1987) 43.3.1.1 (1987) 43.3.1.1 (1987) 43.3.1.1 (1987) 43.3.1.1 (1987) 43.3.1.1 (1987) 43.3.1.1 (1987) 43.3.1.1 ( 1987 ) 43.3.1.1 ( 1987 ) 43.3.1.1 ( 1987 ) 43.3.1.1 ( 1987 ) 43.3.1.1 ( 1987 ) 43.3.1 43 43 43 43 43 43 43 43 43 43 43 43 43 43 43 43 43 43 43 43 43 43 43 43 43 43 43 43 43 43 43 43 43 43 43 43 43 43 43 43 43 43 43 43 43 43 43 43 43 43 43 43 43 43 43 43 43 43 43 43 43 43 43 43 43 43 43 43 43 43 43 43 43 43 43 43 43 43 45(1) (1) (1) (1) (1) (1) (1) (1) (1) (1) (1) (1) (1) (1) (1) (1) (1) (1) (1) (1) (1) (1) (1) (1) (1) (1) (1) (1) (1) (1) (1) (1) (1) (1) (I)▲ Total Capacity: Displays the total capacity of the device.
• Available Storage: Displays the number of storages that is available for archiving. The storage is the basic unit of 256MB for the database used by the DVR.
- New Available Storage: Displays the number of storages to be allocated for archiving.
- Assigned Storage Count: Displays the number of storages currently allocated for archiving.
- Scope of Archive: Displays the date and time period of recorded video to be archived.
- Storage Info: Displays a list of connected storage devices that is available for archiving.
- Set up Storage for selected Drive: Set the number of storages to be used for archiving in the selected device.
- Storage in use: Displays the total number of storages allocated to all devices in Storage List.
- Set up Storage: Displays the total number of storages to be allocated to all devices in Storage List.
- Total Storage: Displays the total number of storages allocated and to be allocated to all devices in Storage List.
- Create/Resize: Clicking the button creates or adds storage depending on the number of storages to be allocated in the selected device.
- Format: Clicking the button deletes archived video saved in the selected device.
- Remove: Clicking the button deletes all storage folders allocated in the selected device. Archived video will
be deleted when the storage folders are deleted.
- Exit: Clicking the button closes the setup screen.
NOTE: The user can archive recorded video when the user has an authority for Archive. The Archive option should be selected at the USER menu.
NOTE: It supports RAW Volume partition of GPT way. RAW Volume partition is displayed as "Raw[hdd:(number), p:(partition number)]" in the hard disk driver. It is possible to either assign available storage entirely or not to assign. RAW Volume partition exists in storage device but the one that is already assigned as an archive is not displayed in recording setup.
System authority

text_image
Setup system authority Use local login Monitoring without login Use password expiration Expiration saved 42 months Auto layout 10 20 min 30 min Remote connection timeout Authority level Enable Timeout Reconnection acceptance interval Manager X 5 min 5 min User 1 X 5 min 5 min User 2 X 5 min 5 min User 3 X 5 min 5 min Remote service schedule Day From To- Use local login: Login procedure is required to run SmartGuard program.
- √ Monitoring Without Login: It is allowed to monitor video even while you are logged out.
- Use password expiration: Set the password expiration period. If the password has not been changed during the password expiration period, you will be allowed to change the password after you log on. The changed password will be used from the next login. This function is supported only for the users under the authority level of Administrator (the default user ID is admin and password is 12345678 under the authority level of Administrator).
- Auto logout: Logs out the DVR automatically when there is no keyboard or mouse operation during the
Hybrid Digital Video Recorder
Setting Up the Camera
Non-Hybrid Model
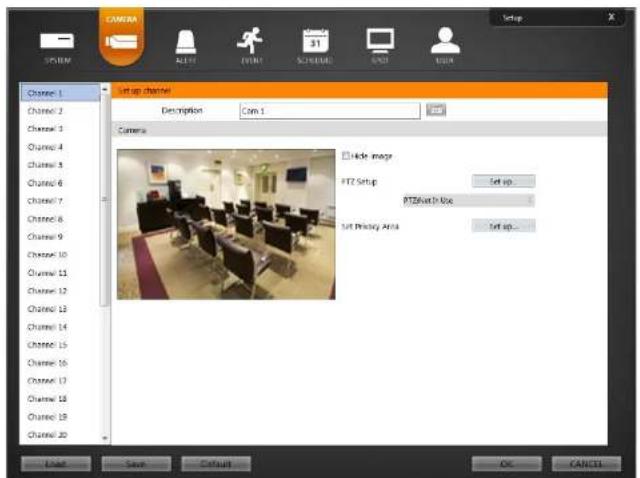
text_image
CAMRAN SET up channel Description Com 1 Camera Hide image PTZ Setup Set up... PTZView In Use Set Privacy Area Set up... Channel 1 Channel 2 Channel 3 Channel 4 Channel 5 Channel 6 Channel 7 Channel 8 Channel 9 Channel 10 Channel 11 Channel 12 Channel 13 Channel 14 Channel 15 Channel 16 Channel 17 Channel 18 Channel 19 Channel 20 Load Save Default OK CANCEL- Channel 1 to Channel 32: Indicates the camera number. or buttons are supported for 32-channel model only.
- Description: Enter a camera name.
- Hide Image: Hides the image of the selected camera on the monitor. The selected cameras will not be displayed on the monitor, however, the images from the camera will be recorded while in the record mode.
- PTZ Setup: Click the Set up... button if the camera is a PTZ camera.

- Device ID: Set the device ID number using the slide bar.
COM port: Select the COM port to use. When using the PS222 port
User's Manual
- Set Privacy Area: Set up the privacy area on the image. The selected area set as Privacy Area will NOT be displayed either in the live mode or playback mode. The DVR will display the selected areas in black, and also does NOT react to events detected within the area set as Privacy Area. Click the Set up... button and then set the privacy area zone.

natural_image
Interior view of a modern office or meeting room with rows of desks, chairs, and wall art (no visible text or symbols)Enable Enable option. The setup screen is made up of a grid. First, click the Draw or Erase radio button and select a tool to use, and then set up the privacy area on the image. Use the tools as follows:
- (Point): Place the cursor on the image and click the left mouse button. A single box appears where the cursor is.
- (Line): This tool can be used to draw irregular shapes. Place the cursor where you want to start the line. Hold down the left mouse button and drag the cursor to where you want the end of the line. Release the mouse button and a group of boxes appears along the line you drew. You can draw lines around shapes by repeating this process
- Rectangle): Hold down the left mouse button and drug the cursor in any direction. A rectangle appears. Once the rectangle is the size you want, release the mouse button and the rectangle fills with boxes.
- (Fill): When using the fill tool, clicking the mouse will fill that area of the image with boxes. If a shape has been drawn with the line tool, clicking inside will fill the area with boxes. Clicking outside the area will fill the outer area with boxes. If no shapes have been drawn, the entire screen will fill with boxes.
Hybrid Digital Video Recorder
Hybrid Model

text_image
CHANNEL SYSTEM START EVENT ECONOMAL SPOT USER Channel status Channel status Assign camera Channel 1 Com 1 2 Com 2 3 Com 3 4 Com 4 5 Com 5 6 Com 6 7 LDM 7 8 Com 8 9 Com 9 10 Com 10 11 Com 11 12 Com 12 13 Com 13 14 Com 14 15 Com 15 16 Com 16 17 Com 17 18 Com 18 C: Name IP Address MAC Address Device Name Video Input type BNC BNC BNC BNC BNC BNC BNC BNC BNC BNC BNC BNC BNC BNC BNC BNC BNC BNC BNC BNC BNC BNC BNC BNC BNC BNC BNC BNC BNC BNC BNC BNC BNC BNCChannel status
It displays camera information such as IP address, video input type, etc.
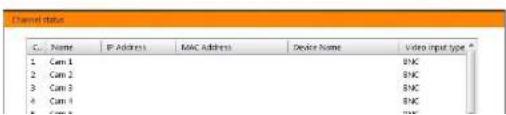
text_image
Channel status C:\ Name IP Address MAC Address Device Name Video input type * 1 Cam 1 BNC 2 Cam 2 BNC 3 Cam 3 BNC 4 Cam 4 BNC 5 Cam 5 BNCUser's Manual
- CH.: Displays a camera number.
- Name: Displays a camera name set in the DVR.
- IP address; Displays a camera's IP address (supported for a network camera only).
- MAC Address: Displays a camera's MAC address (supported for a network camera only).
• Device Name: Displays a camera name set in the camera (supported for a network camera only). - Video input type: Displays a camera's video input type.
Assign camera
It allows you to register network cameras. This is supported for hybrid products only.

text_image
Set up to assign network camera Ch. Device Name Model IP Address May resolution 1 2 3 4 5 6 7 8 9 10 11 12 13 14 15 16 17 18 19 20 21 22 23 Remove Remove all Add network camera- CH.: Displays a camera number.
• Device Name: Displays a camera name set in the camera.
• Model: Displays a camera model name. - IP address: Displays a camera's IP address.
• Max resolution: Displays the maximum resolution of a camera. - ▲ ▼ (Move): Allows you to change the camera number by selecting a camera from the list and clicking the button.
- Remove. Remove All: Cancels the registration of the selected camera by selecting a camera from the list and
Hybrid Digital Video Recorder
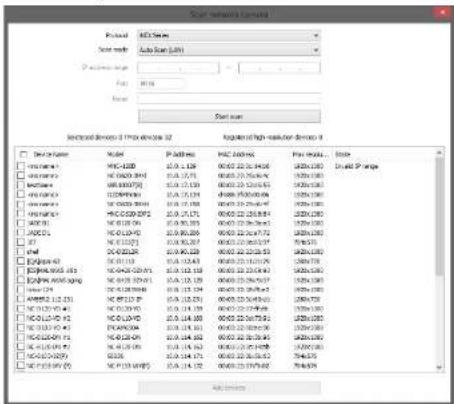
- Scan network camera: Allows you to search for network cameras.
text_image
Standard Deviation 1.1 (Price reference 2) Design Name: Model MFC-1200 NC 04283 NC 04283 NC 04283 NC 04283 NC 04283 NC 04283 NC 04283 NC 04283 NC 04283 NC 04283 NC 04283 NC 04283 NC 04283 NC 16107 NC 16107 NC 16107 NC 16107 NC 16107 NC 16107 NC 16107 NC 16107 NC 16107 NC 16107 NC 16107 NC 16107 NC 16107 NC 25000 NC 25000 NC 25000 NC 25000 NC 25000 NC 25000 NC 25000 NC 25000 NC 25000 NC 25000 NC 25000 NC 25000 NC 25000 NC 35000 NC 35000 NC 35000 NC 35000 NC 35000 NC 35000 NC 35000 NC 35000 NC 35000 NC 35000 NC 35000 NC 35000 NC 35001 NC 35001 NC 35001 NC 35001 NC 35001 NC 35001 NC 35001 NC 35001 NC 35001 NC 35001 NC 35001 NC 35001 NC 35001 NC 45001 NC 45001 NC 45001 NC 45001 NC 45001 NC 45001 NC 45001 NC 45001 NC 45001 NC 45001 NC 45001 NC 45001 NC 45002 NC 45002 NC 45002 NC 45002 NC 45002 NC 45002 NC 45002 NC 45002 NC 45002 NC 45002 NC 45002 NC 45002 NC 45002 NC 65199 NC 65199 NC 65199 NC 65199 NC 65199 NC 65199 NC 65199 NC 65199 NC 65199 NC 65199 NC 65199 NC 65199 NC 65199 NC 75778 NC 75778 NC 75778 NC 75778 NC 75778 NC 75778 NC 75778 NC 75778 NC 75778 NC 75778- Protocol: Select the protocol or manufacturer of the device to scan.
-
Scan mode: Select the scan mode. Clicking the Start scan button displays the results in the list. If the IP address range of the camera is different from that of the DVR, the DVR considers the IP address invalid. In this case, you must change the camera's IP address to register the camera.
-
Auto Scan (LAN): Lists cameras in a LAN environment. If the camera uses the ONVIF™ Conformance protocol, it is recommended that the camera not be networked via DHCP (Dynamic Host Configuration Protocol). If the camera is networked via DHCP, connection to the camera may not be made properly
depending on changes in the external network environment. - IP Address: Searches for a camera with a camera's IP address. Enter the IP address and port number in the IP address range and Port fields. It is possible to search more than one camera at a time by entering a range of IP addresses. It is recommended that the camera not be networked via DIICP (Dynamic Host Configuration Protocol). If the camera is networked via DHCP, connection to the camera may not be made properly depending on changes in the external network environment.
- FEN: Searches for a camera with a FEN name. Enter the camera's FEN name registered on a FEN server if the camera uses the FEN function. Ensure the FEN server information on which the camera is registered is current (SYSTEM Network menu - FEN Server info, ratings). If the FEN server information is not
User's Manual
- Add devices: Select the cameras to register by checking ☑ beside each camera name in the list. Click the Add devices button.

text_image
1.2.11 Network camera authentication Device Name: IP address: ID: Password: Apply to all devices Go Cancel• Device Name, IP Address: Displays the name and IP address of the selected camera. The name will be updated
automatically depending on the settings of the camera.
- ID, Password: Enter the user ID and password which you set in the camera in order to connect to that camera remotely. The connection to the camera is allowed only to the users under the Administrator group of the camera. Selecting Apply to all devices applies the same user ID and password to all selected cameras if you selected more than one camera and the selected cameras have the same user ID and password.
Channel
It allows you to set up cameras.

text_image
Set up / Normal Description Class 1 Device Name Sync Hide Image MPIZ Setup Set up... PTZ/Not in Use Networks network remote setup Set up... Grid remote setup Set up... Set Privacy Area Set up... Force local server data Current non-allocable settings: Show Cancel secret actions Settings are not appliedHybrid Digital Video Recorder
- Transmission resolution for network camera: Set up the transmission resolution. Checking the Highest resolution or Lowest resolution transmits a stream corresponding to the minimum or maximum resolution automatically. Checking the number transmits to the assigned stream automatically. This is supported for the network cameras only.
- Network camera profile: Set up profiles. Assign streams from the camera to each profile. Selecting Automatic makes the DVR assign streams to each profile automatically depending on the resolution, frame rate, and quality of streams. This is supported for network cameras only. If a network camera uses more than one stream, the DVR automatically chooses the proper stream based on the screen mode to reduce system load.
Setting Up the Alert
Non-Hybrid Model
text_image
Setup AVTIM CASHA AVTIM 31 SPOT USB Alarm Out New Call to Alarm Chat Email Clockbox Setup Alarm Out From: 9:00 00:00 2400 To: 25:00 00:00 2400 Double Time: 80:20 1ms 5ms □ User available alertUser's Manual
Hybrid Model

text_image
Alarm Out User Delay to Alarm Out NetCam Alert-Out Email Callback Setup AlarmOut From 00:00 30:00 24:00 To 24:00 30:00 24:00 Send Time 00:00 1sec 30min Use audio alertHybrid Digital Video Recorder
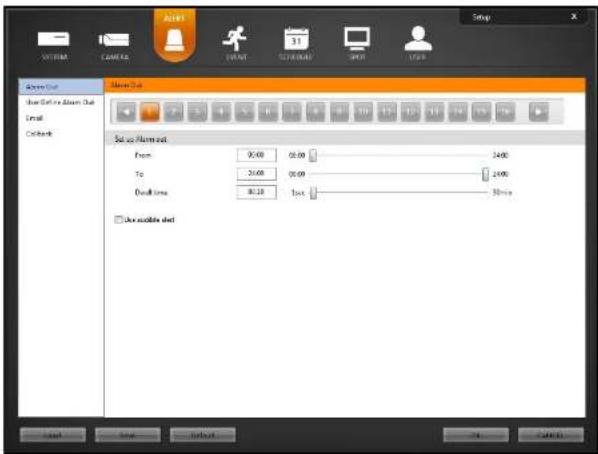
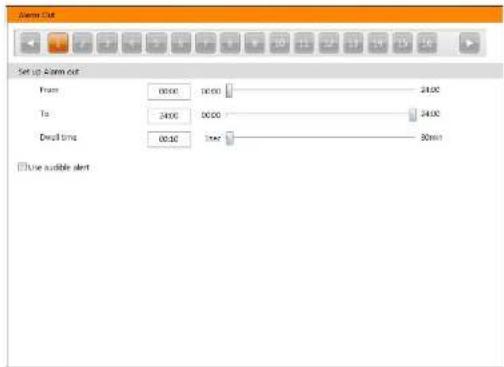
Alarm Out
You can set up the DVR to activate alarm out of the device connected to the DVR's alarm out port.
text_image
Open Cut Set up Open Cut Frame 00:00 10:00 24:00 Time 24:00 00:00 24:00 Draft time 05:30 1sec 80min Use audible alert- 1 to 32: Displays alarm out number. See Appendix 4 — Connector Pin Outs for details about the alarm out number, or buttons are supported for 32-Channel model only.
- From, To: Set alarm out activation period. Alarm out is activated during the period only. If the From time is later than the To time, the alarm out will be not activated. From end time (to time) to start time (to). If you set To: 08:00 and From: 18:00, this means the alarm will be not activated at the from 8 am to 6 pm and be activated at all other times.
- Dwell time: Set the alarm out duration.
- Use audible alert: The DVR sounds beep through the connected speaker during alarm output.
User's Manual
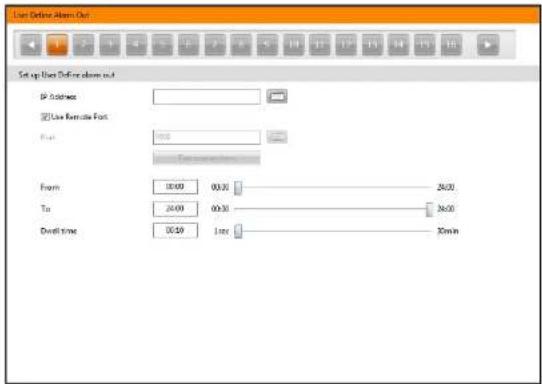
User Define Alarm Out
You can set up the DVR to activate user define alarm out when an event occurs.
text_image
User Offline Address Out Set up User Offline address out IP Address Use Remote Font First From: 20:00 00:30 26:00 To: 20:00 00:30 36:00 Duration: 00:59 Time 30min- 1 to 32: Displays alarm out number. or buttons are supported for 32-Channel model only.
- Use Remote Port: Set the user define alarm out via remote port.
- IP address, Port: Set the IP address and port number of the device connected to the DVR via TCP networking.
Click the Test connections button to test the connection to the device. - From, To: Set user define alarm out activation period. Alarm out is activated during the period only. If the From time is later than the To time, the user define alarm out will be not activated. From end time(to time) to start time(to). If you set To: 08:00 and From: 18:00, this means the alarm will be not activated at the from 8 am to 6 pm and be activated at all other times.
- Dwell Time: Set the user define alarm out activation duration.
Hybrid Digital Video Recorder
NetCam Alarm Out
You can associate alarm out of a network camera with events if the network camera supports alarm out. This is supported for the hybrid model only.

text_image
NetCam Alarm Out Set up NetCam alarm out From 00:00 00:00 24:00 12 24:00 00:00 24:00 Dual time 0:15 1 sec 36min- 1 to 32: Displays the camera number. or buttons are supported for 32-Channel model only.
- From, To: Set alarm out activation period. Alarm out is activated during the period only. If the From time is later than the To time, the alarm out will be not activated From end time(to time) to start time(to). If you set To: 08:00 and From: 18:00, this means the alarm will be not activated at the from 8 am to 6 pm and be activated at all other times.
- Dwell Time: Set the alarm out activation duration. Alarm out activation lasts during the dwell time when an associated event occurs.
User's Manual
You can set up email address book.

text_image
Email address book Sender address book Email address Server address POST type of redemption connection None Login For next Add Recipient address book Email address Add Delete- Sender address book: Enter the email address and SMTP server address and port number. Select a type if the SMTP server uses the type of encrypted connection. Check the Login box if you want to connect to the SMTP server that requires login procedure, and enter the ID and password for login. Clicking the Add button adds the sender to the sender address book.
- Recipient address book: Enter the email address. Clicking the Add button adds the recipient to the recipient address book.
Hybrid Digital Video Recorder
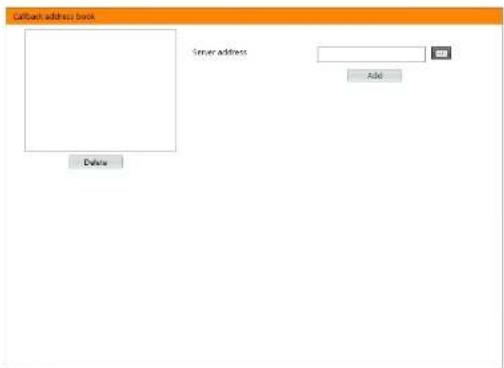
Callback
You can set up callback address book.
text_image
Callback address book Server address Add Delete- Server address: Enter the IP address of the callback server and click the Add button.
User's Manual
Setting Up the Event
Non-Hybrid Model
text_image
Add Options Image View Lines Show In Show Before Show In Text In Add Options Edit View... Select Image Size Line 2 Time: 0.125 Color Mode: 1 1 4 6 7 8 9 10 11 12 13 14 15 16 18 19 20 21 22 23 24 25 26 27 28 29 30 31 32 Add Options Action Enable Subsection Email X Sound Name / Sound Name / None Cabbage X Callback / None / Callback / None Event processing X Good pretraining line / Minimum dual-line line line Move in project XHybrid Digital Video Recorder
Hybrid Model
text_image
OK SYSTEM CAMERA MODE 31 SC-LOGIC PDF USB Setup Audio Applied Video Color Alarm In User Default Alertable Tool In Audio NewCam Alertable Targeting Tripbox Audio duration Audio Time: 2 Max 60ms Audio duration: 2 Max 60ms Audio duration: 2 Max 60ms Audio duration: 2 Max 60ms Audio duration: 2 Max 60ms Audio duration: 2 Max 60ms Audio duration: 2 Max 60ms Audio duration: 2 Max 60ms Audio duration: 2 Max 60ms Audio duration: 2 Max 60ms Audio duration: Action Delete Subtraction Event Listen Audio / Request Name Cutoff Callout/Record/Callout/Record/Callout/Record Event Event Subscription/Record/Record/Record/Record/Record Move to peak- Ignore time to event: Only the first detected event is notified by log, channel association or action association and the same type of other events detected during the dwell time will not be notified.
- Channel association: Records video from multiple cameras when an event occurs at the selected camera or other device.
User's Manual
- Action association: Displays actions to be done when an event occurs. Clicking the Set up... button allows you to change the settings.
Non-Hybrid Model
text_image
Start user installed action Email Contact Name Subcontact Name Settings: All rights for Mailings Contact Contact Name Notes Notes Event monitoring Event name Parameters: 0.0000 (0.0000) Parameters: 0.0000 (0.0000) Message to project Address Above our association 1 2 3 4 5 6 7 8 9 10 11 12 13 14 15 16 17 18 19 20 21 22 23 24 25 26 27 28 29 30 31 32 Does Define above our association 1 2 3 4 5 6 7 8 9 10 11 12 13 14 15 16 17 18 19 20 21 22 23 24 25 26 27 28 29 30 31 32 OK CancelHybrid Model
text_image
Get out and select objects Email Name: Recipient: Password: Password: Password: Password: Password: Password: Password: Password: Password: Password: Password: Password: Password: Password: Password: Password: Password: Password: Password: Password: Password: Password: Password: Password: Password: Password: Password: Password: Password: Password: Password: Password: Password: Password: Password: Password: Password: Password: Password: Password: Password: Password: Password: Password: Password: Password: Password: Password: Password: Password: Authentication Authentication Authentication Authentication Authentication Authentication Authentication Authentication Authentication Authentication Authentication Authentication Authentication Authentication Authentication Authentication Authentication Authentication Authentication Authentication Authentication Authentication Authentication Authentication Authentication Authentication Authentication Authentication Authentication Authentication Authentication Authentication Authentication Authentication Authentication Authentication Authentication Authentication Authentication Authentication Authentication Authentication Authentication Authentication Authentication Authentication Authentication Authentication Authentication Authentication AuthenticationHybrid Digital Video Recorder
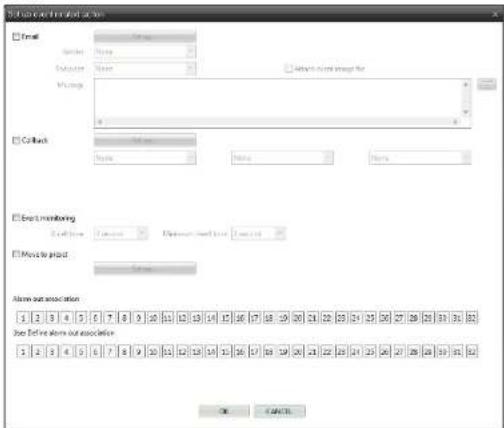
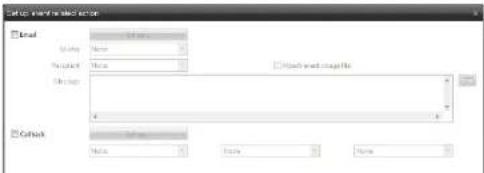
- Email: Sends an email when an event occurs. Select a sender and recipient from the drop-down menu below the Set up... button and enter the message. Enabling Attach the event image file attaches an event detected image file (.JPG) to the email. Clicking the Set up... button loads the email address book set at the ALERT - Email menu.
- Callback: Sends a message to predefined callback servers when an event occurs (not supported for network alarm in events). Select a callback server from the drop-down menu below the Set up... button. Clicking the Set up... button loads the callback address book set at the ALERT - Callback menu.
- Event monitoring: Displays all the camera channels associated with the channels that an event occurs during the dwell time on the monitoring screen.
- Move to preset: Clicking the Set up... button displays the list of saved Preset and you can select a Preset. The PTZ camera moves to the position of the selected Preset when an event occurs. You can save Preset in the PTZ control panel of SmartGuard. This function is supported for the camera that supports the PTZ function.
– Alarm association: Activates selected alarm out when an event occurs. - User define alarm out association: Activates selected user define alarm out when an event occurs.
- NetCam alarm association: Activates selected network camera's alarm out when an event occurs (supported for the hybrid model only).
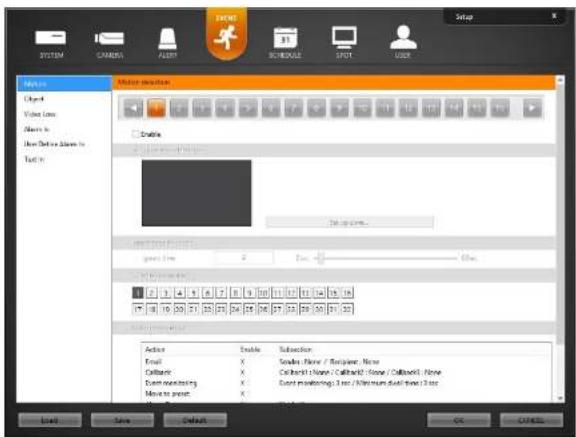
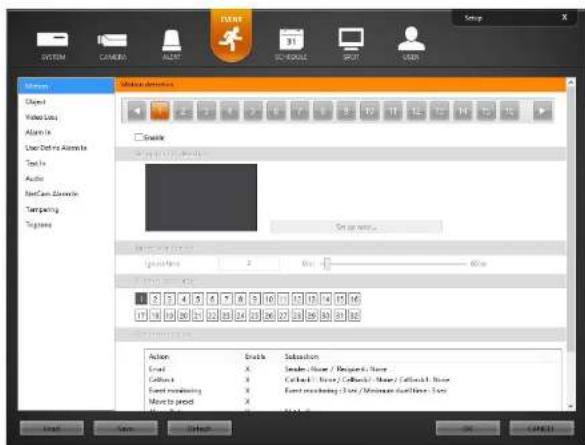
Motion
You can set up motion detection event.
text_image
Active Direction Enable 将自动关闭并退出- 1 to 32: Displays camera number. Clicking each button allows you to change motion detection event settings for each camera. or buttons are supported for 32-Channel model only.
- Enable: Enables motion detection event function. When the DVR detects a motion in a configured motion detection zone, it considers the motion as an event.
User's Manual
- Set up motion detection
- Set up zone...: Set up the motion detection zone. This is not supported for network cameras and the DVR uses the settings of a network camera.

text_image
View as Motion Zone Action 0 fps 0 fps 0 fps 0 fps 0 fps 0 fps 0 fps 0 fps 0 fps 0 fps 0 fps 0 fps 0 fps 0 fps 0 fps 0 fps 0 fps 0 fps 0 fps 0 fps 0 fps 0 fps 0 fps 0 fps 0 fps 0 fps 0 fps 0 fps 0 fps 0 fps 0 fps 0 fps 0 fps 0 fpsThe setup screen is made up of a grid. First, click the Draw or Erase radio button and select a tool to use, and then set up the motion detection area on the image. Using the tools is identical to that of Set Privacy Area at the CAMERA menu.
- Sensitivity: Set the motion detection sensitivity. The higher the number is, the more sensitive it is.
- Min. size: Adjust the minimum number of detection blocks that must be activated in order to be considered as a motion detection event. If you set to 10, the DVR will only react to the motion when it detects motion (activity) in at least 10 connected blocks within the selected detection zone. The minimum number of blocks (Min. size) should not exceed the selected block numbers for detection. When selecting multiple detection area groups, the minimum number of blocks (Min. size) should not exceed the block numbers of the smallest detection area.
- Max. size: Set the maximum number of blocks (no less than the Min. size block). If you set the Max. size value to 100, the DVR will ignore the motion which is detected in more than 100 blocks.
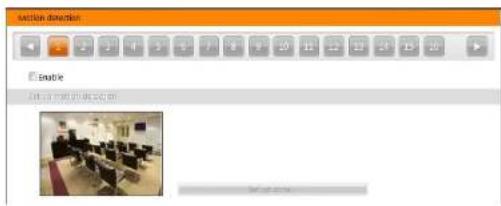
Object
You can set up object detection event.
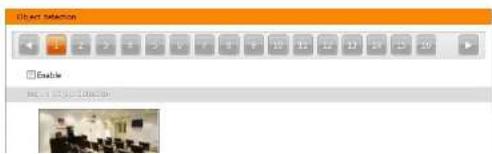
text_image
Object Selection Enable View 100% View Selection- Set up object detection
- Set up zone...: Set up the object detection zone. This is not supported for network cameras and the DVR uses the settings of a network camera.
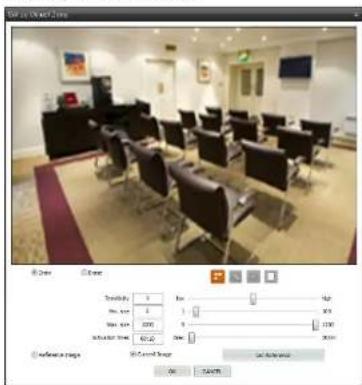
text_image
View at: Outlet Zone R View Out View Transparency 0 Size 1 Size size 2000 Adder time 60.45 Size High Low 30% 0 1100 30% Reference stage W/Event Range On STARTThe setup screen is made up of a grid. First, click the Draw or Erase radio button and select a tool to use, and then set up the object detection area on the image. Using the tools is identical to that of Set Privacy Area at the CAMERA menu.
- Sensitivity: Set the object detection sensitivity. The higher the number is, the more sensitive it is.
- Min. size: Adjust the minimum number of detection blocks that must be activated in order to be considered as a object detection event. If you set to 10, the DVR will only react to the changes when it detects changes (activity) in at least 10 connected blocks within the selected detection zone. The minimum number of blocks (Min. size) should not exceed the selected block numbers for detection. When selecting multiple detection area groups, the minimum number of blocks (Min. size) should not exceed the block numbers of the smallest detection area.
- Max. size: Set the maximum number of blocks (no less than the Min. size block). If you set the Max. size value to 100, the DVR will ignore the changes which are detected in more than 100 blocks.
- Activation times: Set the dwell time to detect changes. The DVR will detect the change only when the change lasts over the preset dwell time.
▲ Reference Image: Shows the reference image. - Current Image, Get Reference: Shows the current image. Clicking Get Reference button sets the current image as a reference image.
Video Loss
You can set up video loss event. This is not supported for network cameras and the DVR uses the settings of a network camera.

User's Manual
- Detect Flare: The DVR checks the brightness of the lens and considers the flare on the images as a video loss event (for example, light is flashed at the lens). Set the flare level by holding down and dragging the pointer. The higher the percentage, the more sensitive it is.
Alarm In
You can set up alarm in event.

text_image
Enter In ■ Enable OK: 100% OK □ Selectify Open □ Remove OK □ Import OK ■ Import Status ■ Import Status Open ■ Import Status Closed ■ Import Status Open- 1 to 32: Displays alarm in device number. Clicking each button allows you to change alarm in event settings for each camera, or buttons are supported for 32-Channel model only.
- Enable: Enables alarm in event function. When the DVR detects alarm in from the device connected to the DVR's alarm in port, it considers it as an event.
- Set up alarm in – Description: Enter an alarm in device name.
- Alarm in type: Enter a signal type of the alarm in device. If the signal type of the alarm in device is NC (Normally Closed), select Normally open. If the signal type is NO (Normally Open), select Normally closed.
User Define Alarm In
You can set up user define alarm in event.

text_image
Use Offline Sample Enable Form: All Files Save Asfile 1 Set List Summary Data Page: 100%- 1 to 32: Displays network alarm in device number. Clicking each button allows you to change network alarm in
Hybrid Digital Video Recorder
Text In
You can set up text in event.

text_image
Logic Balance For 10% V8.0 (12:45): Name: Data Name: Section: Case Summary Transitions Start Auto character Transitions End Main Line Keyframe Key String End Line Display Color Line Color Other Transactions General OK Finish- 1: Displays text-in device number. Up to 16 text-in channels are available when connecting the WIBU key (USB 2.0 port). Ask your dealer or distributor about purchasing the WIBU key and details about it. Clicking each button allows you to change text in event settings for each camera.
- Enable: Enables text-in event function. When the DVR detects text-in data from a text in device, it considers it as an event.
- For Each Text-in Controller: Click the Select Text-In System button and select the text-in product from the list. - Syntax
Case Sensitive: Text strings are case sensitive. Refer to the text-in product manufacturer's user manual to determine if the text strings are case sensitive. If the text-in product distinguishes between upper and lower case letters, make certain this is enabled.
- Transaction Start: Enter the transaction start text string. The DVR considers that a transaction starts when the start text string is entered. If Any character is enabled, you will not be able to enter a text string, and the DVR considers that a transaction starts when any text string is entered.
- Transaction End: Enter the transaction end text string. The DVR considers that a transaction ends when the end text string is entered. Enter the number of additional text lines to be displayed after the end of the transaction in the More Lines option.
- Line Delimiter: Enter the character(s) that the text-in product uses to indicate the end of a line. Special characters can be created using ^A and a capital letter:e.g., ^A for NL (New Line). ^A M for CR (Carriage Return). Refer to the
User's Manual
Audio Detection
You can use the audio detection event of the network camera in the DVR if the network camera supports the audio detection event. This is supported for hybrid products only.

text_image
Audio Detection OK- 1 to 32: Displays the camera number. Clicking each button allows you to set up the audio detection event in the DVR for each network camera, or buttons are supported for 32-Channel model only.
- Enable: Enables the audio detection event function. When the network camera detects an audio detection event, the DVR also considers it as an event.
NetCam Alarm In
You can use the alarm in event of the network camera in the DVR if the network camera supports the alarm in event. This is supported for hybrid products only.

- 1 to 32: Displays the camera number. Clicking each button allows you to set up the alarm in event in the DVR for each network camera, or buttons are supported for 32-Channel model only.
- Enable: Enables the netteam alarm in event function. When the network camera detects an netteam alarm in event, the DVR also considers it as an event.
Tampering
You can use the tampering event of the network camera in the DVR if the network camera supports the tampering event. This is supported for hybrid products only.

Hybrid Digital Video Recorder
- 1 to 32: Displays the camera number. Clicking each button allows you to set up the tripzone event in the DVR for each network camera, or, buttons are supported for 32-Channel model only.
- Enable: Enables the tripzone event function. When the network camera detects a tripzone event, the DVR also considers it as an event.
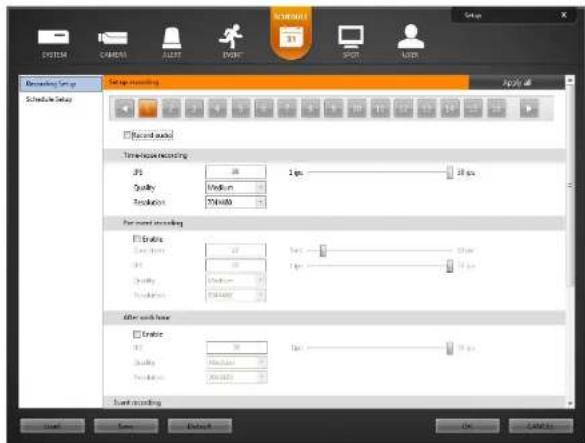
Setting Up the Schedule
text_image
Decoding Setup Schedule Setup Record audio Time-resolved recording JIS 20 30 ns Quality Medium Resolution 500000 For record recording Enable 10 20 30 ns Quality Medium Resolution 500000 After record level Enable 10 20 30 ns Quality Medium Resolution 500000 Start recording OK CancelIf a BNC camera is selected, clicking Apply all applies the settings to all BNC cameras identically. If a network camera is selected, clicking Apply all applies the settings to all network cameras identically.
User's Manual
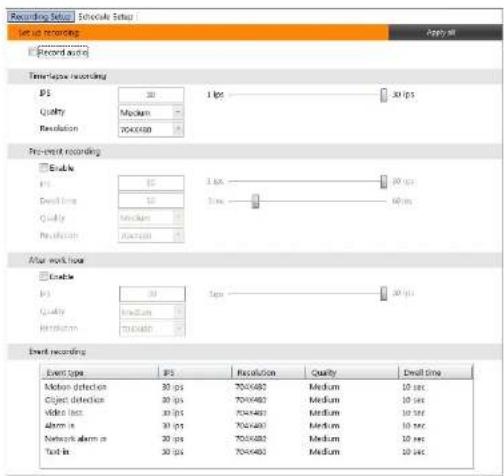
Recording Setup
You can set up recording for each camera.
BNC Cameras
text_image
Recording Setup Record Setup Set up recording Record audio Time-series recording PS 30 1 fps 30 fps Quality Medium Resolution 7040680 Pre-event recording Enable PS 30 1 sec 30 fps Event time 10 Time 40 fps Quality Medium Resolution 20000 After work time Enable PS 30 1 sec 30 fps Quality Medium Resolution 50000 Event recording Event type PS Resolution Quality Email time Motion detection 30 fps 7040680 Medium 10 sec Object detection 30 fps 7040680 Medium 10 sec Video loss 30 fps 7040680 Medium 10 sec Alarm in 30 fps 7040680 Medium 10 sec Network alarm in 20 fps 7040680 Medium 10 sec Test in 30 fps 7040680 Medium 10 secHybrid Digital Video Recorder
Network Cameras
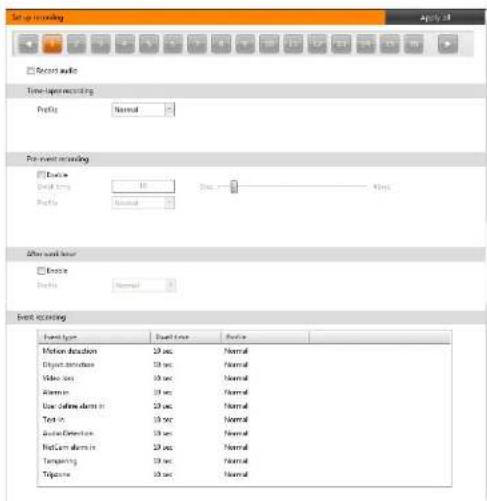
text_image
Start recording Apply all Record audio Time-seconds recording Profile: Normal For event recording Device: Detail time: 10 Profile: Normal After work hour Device: Profile: Normal Event recording Event type: Double time Profile Motion duration: 25 sec Normal Object duration: 25 sec Normal Video loss: 25 sec Normal Alarm in: 25 sec Normal Use offline data in: 25 sec Normal Text in: 25 sec Normal Audio Direction: 25 sec Normal NetCam alarm in: 25 sec Normal Temping: 25 sec Normal Typine: 25 sec Normal- Record audio: Records audio while the DVR records video. The DVR provides two types of audio input, microphone and Line-in. Microphone is for an unamplified source while Line-in is for an amplified source.
- Time-lapse recording: Records video in time-lapse recording mode. In time-lapse recording mode, DVR records continuously based on this setting for the scheduled time.
- IPS: Sets recording speed (not supported for network cameras). When the recording speed is set to lower than 2 ips, recorded audio will NOT be played. Recording speed is the number of images recorded during one second. The higher the recording speed is, the more images are recorded. For example, 30 means 30 images will be recorded during one second, and 5 means 5 images will be recorded during one second.
- Quality: Sale the record image quality that connected for network cumenact. Higher quality images require more
User's Manual
- After hour: Sets the after hour recording schedule. The DVR records video with different settings during the hours.
- Enable: Enables after hour recording.
- IPS: See the explanation of Time lapse recording (not supported for network cameras).
– Quality: See the explanation of Time lapse recording (not supported for network cameras).
- Resolution: See the explanation of Time lapse recording (not supported for network cameras).
- Profile: Select one of the preset profiles (supported for network cameras only). Higher resolution, frame rate, and quality of the stream assigned to the profile require more storage space and will reduce the recording capacity of the hard disk drive.
Event recording: Records video when predefined events are detected.
- Event type: Displays the list of event types. The DVR detects events according to the each event setting at
EVENT menu.
- IPS: See the explanation of Time lapse recording (not supported for network cameras).
- Resolution: See the explanation of Time lapse recording (not supported for network cameras).
- Quality: See the explanation of Time lapse recording (not supported for network cameras).
- Dwell time: Sets the duration of recording. The DVR records video for the duration from the time an event is detected.
- Profile: Select one of the preset profiles (supported for network cameras only). Higher resolution, frame rate, and quality of the stream assigned to the profile require more storage space and will reduce the recording capacity of the hard disk drive.
NOTE: Make certain you comply with all local and federal laws and regulations when recording audio.
NOTE: Ma The recording speed of the network camera might decrease depending on the network condition.
Schedule Setup
You can set up recording schedule for each camera.

text_image
Subprime Setup View only (1) Time Setup (5) 00-01 01-02 02-03 03-04 04-05 05-06 06-07 07-08 08-09 09-10Hybrid Digital Video Recorder
- Event recording: Enable or disable event recording. When the event recording is enabled, the event type is displayed in the timetable below (m: motion detection, o: object detection, v: video loss, a: alarm in, u: user define alarm in, n: network alarm in or NetCam alarm in, t: text in, d: audio detection, p: tampering, z: tripzone, E: all events).
- (Motion Detection): Enables motion detection event recording.
- (Object Detection): Enables object detection event recording.
- (Video Loss): Enables video loss event recording.
- Alarm In): Enables alarm in event recording.
- (User Define Alarm In): Enables user define alarm in event recording.
- (Text In): Enables text in event recording.
– (Audio Detection): Enables audio detection event recording. - NetCam Alarm In): EnablesNetCam alarm in event recording.
- (Tampering): Enables tampering event recording.
- (a) Tripzone): Enables tripzone event recording
- (All Events): Enables all events recording.
- Work hour, After hour: Enable or disable after hour recording by clicking the button. When the after hour recording is enabled, the DVR records video according to the after hour recording setting.
- Set up holiday: Set up holidays. The DVR records video according to the after hour recording setting.
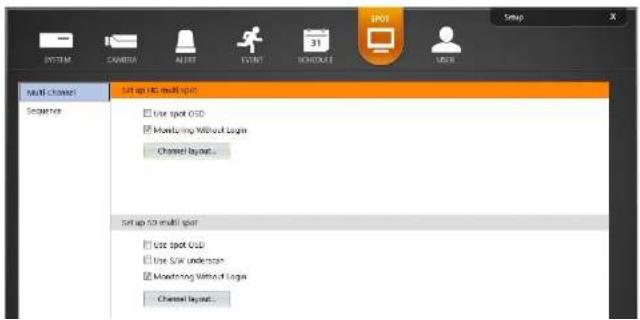
Setting Up the SPOT
NOTE: This is not supported for network cameras.
text_image
Multi Channel Set up to multi spor Sequence Use spot OSD Monitoring Without Login Channel layout... Set up to multi spor Use spot OSD Use S/W indicators Monitoring Without Login Channel layout...User's Manual
Multi Channel
You can set up the multi-channel SPOT display. The DVR displays video sequentially or displays monitoring video of SmartGuard.

text_image
Set up 50 multi spot □ Use spot DSO ☑ Monitoring Without Login Channel layout... Set up 50 multi spot □ Use spot DSO □ Use Site Anderson ☑ Monitoring Without Login Channel layout...- Set up HD multi spot: Set the display on the monitor connected to the HD SPOT (Multi-Channel Display) port of the DVR rear panel.
- Set up SD multi spot: Set the display on the monitor connected to the SD SPOT (Multi-Channel Display) port of the DVR rear panel.
- Use spot OSD: Displays OSD.
- Use S/W underscan: Reduces the image size to fit images within the monitor screen size when the image size is bigger than the monitor screen size and some parts of the image is cropped.
- Monitoring Without Login: Displays video even while you are logged out.
- Assign channel: Monitors the video by arranging cameras manually at the desired location of the monitoring
screen.

Click the camera button and drag the desired location on the screen. You can change screen
Hybrid Digital Video Recorder
Sequence
You can set up the sequence SPOT display. The DVR displays video sequentially.
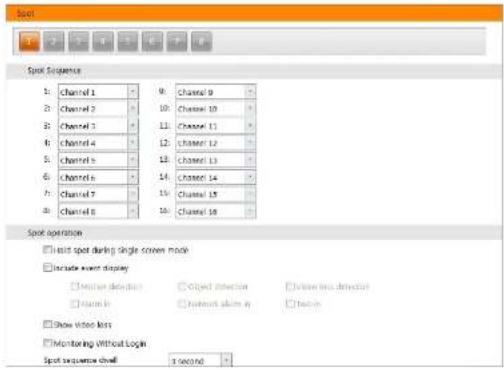
text_image
Spot Spot Sequence 1: Channel 1 2: Channel 2 3: Channel 3 4: Channel 4 5: Channel 5 6: Channel 6 7: Channel 7 8: Channel 8 9: Channel 9 10: Channel 10 11: Channel 11 12: Channel 12 13: Channel 13 14: Channel 14 15: Channel 15 16: Channel 16 Spot operation ■ Isist spot during single screen mode ■ Include event display □ Event detection □ Object detection □ View live detection □ Image in □ Network image in □ Text in □ Show video loss □ Monitoring Without Login Spot sequence shell 3x20/50- 1 \~8: Displays the number of monitors connected to the SD SPOT (Sequence Display) port of the DVR rear panel. Clicking each button allows you to change the settings of sequence display on the monitors.
- Spot Sequence: Set the sequence order on each monitor.
- Spot operation
- Hold spot during single-screen mode: Video is not sequenced while the screen mode of SmartGuard is set to the single-screen mode.
- Include event display: Displays event detected image in the single-screen mode when an event occurs.
- Show video loss: Displays video of the camera that video loss event is detected.
- √ Monitoring Without Login: Displays video even while you are logged out.
- Spot sequence dwell: Set the sequence dwell.
User's Manual
Setting Up the User
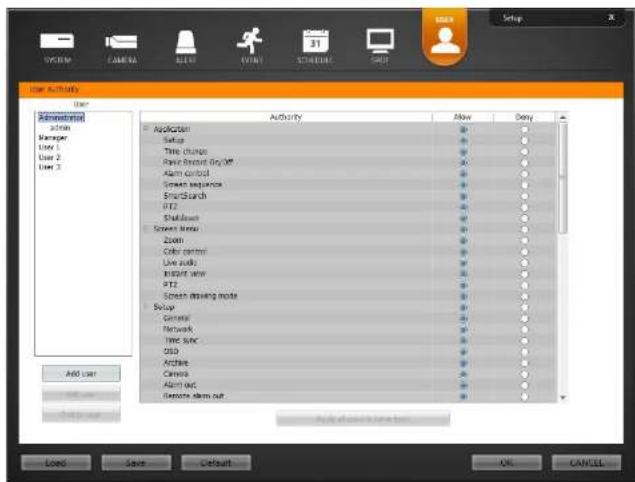
text_image
user Activity User Administrator Action Manager User 1 User 2 User 3 Add user Save Default Help Setup Action Setup Time change Raw Recent DryOff Alarm control Screen sequence EmsignSearch PT2 Shutdown Screen Status Zoom Color control Live audio Instant view PT2 Screen drawing mode Setup General Network Time sync QSD Archive Camera Alerted Remote Alert out Apply to access to home from Load Save Default OK CANCEL- Add user, Edit user: Allows you to add or edit user information. Only the administrator level user can edit the user's information and their authority setup.
- User ID, Password, Confirm password: Set the user ID and password. - Authority level: Select the authority level. Only the administrator level user can edit the user's information and their authority setup. The authority setup of the Administrator cannot be edited.
Chapter 3 — SmartSearch
OVERVIEW
SmartSearch is a powerful tool for SmartGuard. It features playback and search functions for recorded data and consists of Playback Screen, Timetable, Status Window and Utility Buttons. Each area displays or controls recorded information. Click the (Menu) button and SmartSearch menu of SmartGuard to get into the SmartSearch mode. To return to the SmartGuard mode, click the (Menu) button and SmartGuard menu of SmartSearch.
FEATURES
• Searches by camera and time
- Provides recording status table
- Various search functions
- Zoom in/out function
- Print function
- Remote playback function
- Bookmark function
- Saves to video file
- Audio playback
NOTE: The play speed is controlled by the system resource. The play speed can be slowed down for the efficient use of the system.
User's Manual
MAIN GUI
16-Channel Model

text_image
Screenshot of a digital dashboard interface with numbered UI elements and interior photos, likely for video or audio processing.32-Channel Model

text_image
Interior photo of a modern living room with numbered UI elements and labeled furniture sections- Playback Screen: Displays the current playback image. Selecting a camera screen displays the button beside
the camera title. Clicking the button displays the camera screen menu.
- (7.00m): 7.00ms in the image.
- (Audio Playback): Plays back audio.
- (Aspect Ratio): Changes the image aspect ratio.
- Menu Button: Displays the SmartSearch menu.
- Login/Logout: Logs in or logs out the system. When Use local login is disabled in the SmartGuard program (SYSTEM - System Authority menu), the DVR does not ask login procedure. When you forgot the password, ask your dealer or distributor.
- SmartGuard: Runs the SmartGuard program. This function will be disabled during dual display.
- About: Displays the information of the days of recorded dates, software version, etc.
- Help: Displays the electronic file of user's manual.
- Exit: Finishes the system.
System Status: Displays user ID and the recorded time of playback video.
Playback Panel: Displays the current playback image.
Panorama Playback Panel: Displays the panorama playback image. It displays images from one camera image by image in multi-screen mode.
Event Search Panel: Allows you to set up search condition for event search.
Utility Buttons
- (Save Image): Saves the images currently displayed on the screen as an image file. The image can be saved
only under the C:\IDR-Series\temp directory or on the USB storage.
- (Print Image): Prints the images currently displayed on the screen.
- (External Saving): Saves the recorded data on the CD or DVD using the CD/DVD burning program. Refer to the Saving of Recorded Video section (p. 57) for details.
(SmartGuard): Runs the SmartGuard program. This function will be disabled during dual display.
Data Source: Selects the data source to be searched.
- Local: Searches video saved in the current DVR.
- Remote: Searches video saved in the other DVR.
- Archive: Searches video saved in the archive storage set up in the SmartGuard program (SYSTEM - Archive menu).
Jog Shuttle: You can adjust the playback direction and speed by using the jog shuttle. The icon in the jog shuttle indicates the current playback direction and speed. Video is played backward when the icon is to the left of center and video is played back forward when the icon is to the right of center. The farther the position is from the center, the faster video is played back. Clicking the icon and dragging it to the desired position on the jog shuttle and holding it plays video at a constant speed. Releasing the mouse button causes the icon to return to the center position. Clicking the Play button plays video at normal speed. Clicking the (Shuttle Lock) button and dragging and dropping the icon to a desired position fixes the icon in that position.
Playback Buttons: Controls playback of recorded video.
Go to First Image Rewind One Image Play
User's Manual
- Search Buttons
- (Go To): Displays a time setup window. Entering a specific time moves to the image for that time.
- (Export Video File): Saves recorded video as a clip file (.exc). Refer to the Saving of Recorded Video
section (p. 57) for details - Partial Delete): Deletes recorded data for a specific period.
- (Reload): Reloads data.
- Timetable: The timetable window consists of a record timetable, camera label. Various functions of the timetable window enable fast searches.
SEARCH AND PLAYBACK OF RECORDED VIDEO
Condition Search
Select the Event Search Event search tab. The following setup screen appears. Designate the find range and set up the search condition in the Motion Detection, Event, Text-In, Alarm-In tab or User Define Alarm In
text_image
02:00:00 Find Find Find Find Find Find Find Find Find Find Find Find Find Find Find Find Find Find Find Find Find Find Find Find Find Find Find Find Find Find Find Find Find Find Find Find Find Find Find Find Find Find Find Find Find Find Find Find Find Find Fold- Motion Detection / Event / Text-In / Alarm-In / User Define Alarm In: Set up the search condition. Refer to the Motion Detection, Event, Text-In, Alarm-In and User Define Alarm In sections for details.
A. 150. A. 1.0. 2. 1. 1.0. 3. 1.37. 6. 1.0. 4. 1.0.
Motion Detection
Select the Motion Detection tab and then a camera number in the Channel buttons below. Clicking the (Find) button after setting up the search condition displays the list of recorded video of the selected camera.

text_image
Motion Detection Event Text in Aram in User Det. Channel 13 18 19 20 21 22 23 24 25 26 27 28 29 30 31 32 Draw Erase Find method Change Object Sensitivity: 2.0 Min. Blocks: 22- Channel: Select a camera number.
- Motion Detection Zone: Set up the detection zone using the area setup icons. First, click the Draw or Erase radio button and select one of four tools □ ▼ □ to use, and then set up the detection area on the video screen. Use the tools as follows:
- (Point): Place the cursor on the image and click the left mouse button. A single box appears where the cursor is.
-
(Line): This tool can be used to draw irregular shapes. Place the cursor where you want to start the line. Hold down the left mouse button and drag the cursor to where you want the end of the line. Release the mouse button and a group of boxes appears along the line you drew. You can draw lines around shapes by repeating this process.
-
(Rectangle): Hold down the left mouse button and drag the cursor in any direction. A rectangle appears. Once the rectangle is the size you want, release the mouse button and the rectangle fills with boxes.
- (Fill): When using the fill tool, clicking the mouse will fill that area of the image with boxes. If a shape has been drawn with the line tool, clicking inside will fill the area with boxes. Clicking outside the area will fill the outer area with boxes. If no shapes have been drawn, the entire screen will fill with boxes.
• Find Method: Select either Change or Object.
- Change: Detects changes at the user-defined motion detection zone between two consecutive images which are usually motion. For example, if you want to detect if anyone passes through a door, you can draw a Change
detection around the door. The system will search through recorded data for any motion in the doorway.
- Object: Detects changes at the user-defined motion detection zone as compared with the image displayed currently on the Video Screen when an object is removed or moved in an area where there is normally motion. For example, you can draw a box around a painting hanging in a hallway. People walking by the painting will not be listed as an event. However, if the painting is removed, this will be listed as an event.
- Sensitivity: Set the sensitivity of the motion detection by holding down and dragging the pointer.
- Min. Blocks: Set the minimum number of blocks.
NOTE: The number of minimum blocks should be set less than the number of blocks within the motion detection zone. If the user draws a rectangle with 25 blocks and sets the minimum blocks to 30, nothing will be detected even though there is motion
User's Manual
Event
Select the Event tab and then a camera number in the Channel buttons below. Clicking the (Find) button after setting up the search condition displays the list of event recorded video of the selected camera. Netcam alarm in, audio detection, tampering and tripzone is supported for hybrid products only.

text_image
Motion... Event Text In Alarm In User Def... Channel: 1 2 3 4 5 6 7 8 9 10 11 12 13 14 15 16 All Device All Motion NetCam Alarm In Object Audio Detection Video Icon Tampering Detect observation/Detect flare Tripzone- Channel: Select a camera number.
• Target Event: Select a desired event type.
Text-In
Select the Text-In tab and then a device number in the Channel buttons below. Clicking the (Find) button after setting up the search condition displays the list of recorded video which are associated with the selected text-in device.
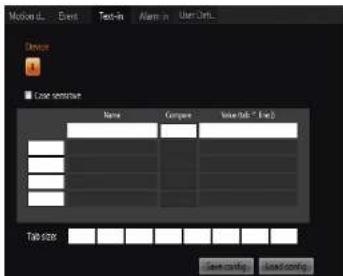
text_image
Device Case sensitive Name Compare ValueTab * Error Tab size Save config Load config- Channel: Select a text-in device number.
- Case Sensitive: Distinguishes between capital letter and small letters entered in the Name box.
• Name: Enter the text to find.
• Comp: Enter the comparison operator. - Value: Enter the comparison value.
NOTE: The tab and line can be used for more specific search of the text-in data. Use a symbol 'A' indicating the location of each individual category, and 'J' indicating the line where the category is located. Refer to Appendix 3 — Text-In Query for details.
- Tab size: Enter the tab size. Up to eight tabs can be set.
- Save Confirm: Save the current text.in related
Hybrid Digital Video Recorder
Alarm-In
Select the Alarm-In tab and then a device number in the Channel buttons below. Clicking the 📄 (Find) button after setting up the search condition displays the list of recorded video which are associated with the selected alarm-in device.
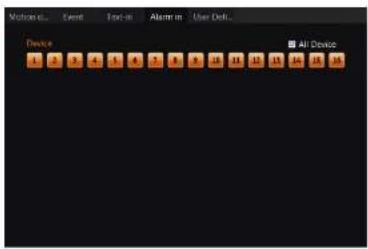
text_image
Motion 0... Event Text-in Alarm in User Defk... Device All Device 1 2 3 4 5 6 7 8 9 10 11 12 13 14 15 16- Channel: Select an alarm-in device number.
User Define Alarm In
Select the User Define Alarm In tab and then a device number in the Channel buttons below. Clicking the (Find) button after setting up the search condition displays the list of recorded video which are associated with the selected user define alarm in device.

text_image
Motion 0... Event Tools in Atom in User Dell... Device 1 2 3 4 5 6 7 8 9 10 11 12 13 14 15 All Devices- Channel: Select a user define alarm in device number.
User's Manual

text_image
07:12 08:00 09:00 10:00 11:00 12:00 13:00 14:00 15:00 16:00 17:00 18:00 19:00 20:00 21:00 22:00 23:00 24:00 25:00 26:00 27:00 28:00 29:00 30:00 31:00 32:00 33:00 34:00 35:00 36:00 37:00 38:00 39:00 40:00 41:00 42:00 43:00 44:00 45:00 46:00 47:00 48:00 49:00 50:00 51:00 52:00 53:00 54:00 55:00 56:00 57:00 58:00 59:00 60:00 61:00 62:00 63:00 64:00 65:00 66:00 67:00 68:00 69:00 70:00 71:00 72:00 73:00 74:00 75:00 76:00 77:00 78:00 79:00 80:00 81:00 82:00 83:00 84:00 85:00 86:00 87:00 88:00 89:00 90:00 91:00 92:00 93:00 94:00 95:00 96:00 97:00 98:00 99:00○ Current Playback Date/Time: Indicates the video time for the current playback location on the timetable.
Recorded Period: Displays the date and time period of the recorded data. Clicking anywhere in the empty space and dragging it to the left or right moves to the earlier or later date or time. Every clicking the right mouse button on the timetable zooms the record timetable in with three levels; one time in the first level, four times in the second level, and eight times in the third level.
① Camera Title: Displays the camera title.
④ Recorded Data: Displays the recorded data by time in one minute segments.
- Red vertical line: Indicates the current playback location of video on the timetable. Clicking the mouse on the desired time displays the first image recorded within the time.
- Yellow separation line: Separates segments when time overlap occurs. In this case, the recorded data in the time range located after the separation line is the latest.
Hybrid Digital Video Recorder
• The color of the bar: Indicates different recording modes (sky blue (R,G,B: 41,144,229) for time-lapse, violet (R,G,B: 203,41,229) for Pre-event, black (R,G,B: 0,0,0) for audio detection, red (R,G,B: 255,0,0) for alarm-in, dark violet (R,G,B: 129,0,229) for motion, limegreen (R,G,B: 49,183,42) for object detection, lime (R,G,B: 0,255,0) for video analytics, dark gray (R,G,B: 50,67,89) for tex-in, blue (R,G,B: 0,0,255) for network alarm in or NetCam alarm in, maroon (R,G,B: 171,24,0) for video loss on, brown (R,G,B: 146,79,21) for video loss off, dim gray (R,G,B: 105,99,93) for video blind, crimson (R,G,B: 218,26,75) for panic recording, orange red (R,G,B: 255,96,0) for tampering, light gray (R,G,B: 209,209,209) for trip zone, and forest green (R,G,B: 19,91,0) for audio detect).
Go To Search
Clicking the Go To) button displays the following screen.
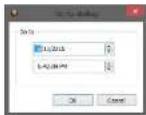
Enter the date and time of video to search for and click the OK button. The video of the date and time will be displayed on the playback screen.
Calendar Search
Clicking a date in the Calendar panel displays video of the date on the playback screen.

Clicking the or Button moves to the previous or next month. The date with recorded video will be displayed in black color, and the date currently displayed on the timetable will be displayed in orange color.
Bookmark Search
Bookmarking a specific time in the Bookmark panel makes it easier to search for video of the specific time in the future.

Clicking the button allows you to bookmark the current playback time and clicking the
User's Manual
SAVING OF RECORDED VIDEO
NOTE: The user can save recorded video when the user has an authority with External Save. The External Save option should be selected during the SmartGuard – USER menu. Refer to Chapter 2 — SmartGuard, Setting Up the User for details.
Clicking the Export Video File) button in the right of the timetable displays the following menu.

text_image
07:41:08 GPI 1 GPI 2 GPI 3 GPI 4 GPI 5
- A-B Export Clip File: Sets up the section of video to be exported by using the timetable. Select A-B Export Video File from the export menu. Click the starting point in the timetable and drag to the ending point. The Export Video File window appears and allows you to export video of the selected period as a clip file (.exe). The user can save recorded video when the user has an authority for External Save. The External Save option should be selected at the USER menu.
- Export Clip File: Saves recorded video as a clip file (.exe). The user can save recorded video when the user has an authority for External Save. The External Save option should be selected at the USER menu.
NOTE: The video file can be saved only under the "C:\MDR-Series\temp" directory or on the removable disk including CD-RW, DVD RW and USB storage.
NOTE: If you save video in C:, it must have 5GB or more free space excluding the video file size. For example, it must have 8GB or more free space when you save a 3GB video file.
NOTE: When the total file size reaches 4GB, you will be asked to continue saving by creating multiple files in 4GB units. If you click the OK button, the system will continue saving by creating multiple files in 4GB units.
Save As Clip File
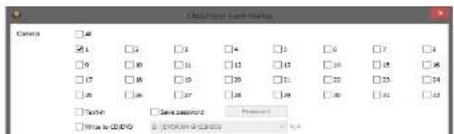
text_image
D:\Users\Land\Status Name: □4 □5 □6 □7 □8 □9 □10 □11 □12 □13 □14 □15 □16 □17 □18 □19 □20 □21 □22 □23 □24 □25 □26 □27 □28 □29 □30 □31 □32 □33 □34 □35 □36 □37 □38 □39 □40 □41 □42 □43 □44 □45 □46 □47 □48 □49 □50 □51 □52 □53 □54 □55 □56 □57 □58 □59 □60 □61 □62 □63 □64 □65 □66 □67 □68 □69 □70 □71 □72 □73 □74 □75 □76 □77 □78 □79 □80 □81 □82 □83 □84 □85 □86 □87 □88 □89 □90 □91 □92 □93 □94 □95 □96 □97 □98 □99 ▢00Hybrid Digital Video Recorder
Clicking the Start button starts saving.
NOTE: Refer to the Clip Player section (p. 58) for playing back the saved video.
Clip Player
You do not need to install any special software on your personal computer to play back saved video. The file contains a Player program. Double-clicking the target file starts the Player program.
NOTE: It is suggested that the computer used for the Player program has at least an 800MHz Pentium III (Intel Pentium Dual Core 2.2GHz recommended). If your CPU is slower than this, saved video recorded at maximum speed with very high image quality will be played back slowly.
NOTE: You will be asked to enter the password to initiate the Clip Player program if you select Save Password option when saving recorded video.

natural_image
Four-panel collage showing interior views of a modern office or service center with red armchairs, a glass table, and a wooden counter (no visible text or symbols)NOTE: Proper image display depends on the display settings of your PC. If you are experiencing display problems, click the right mouse button on the background screen and select Properties → Settings then set the Color quality to "32 bit". Then select Advanced → Troubleshoot, and then set the Hardware Acceleration to "Full". Please make sure that DirectX version 9.0 or higher has been installed if the display problem continues. To check the version of DirectX, click Start → RUN and type "dxdiag" then hit the enter key which will display DirectX Diagnostic Tool dialog box. Then move to the Display tab and make sure DirectDraw Acceleration is set to "Enabled". Test DirectDraw by selecting the DirectDraw Test button. Please check the driver version of the video card and update it to the latest version available. If you still have display problems after changing all display settings as described above, try replacing the video card. Video cards with an ATI chipset are
User's Manual
- Sets up the Clip Player properties.
| Frame InfoImage ProcessingPlay Speed Control | |
| Drawing ModeScreen SizeAspect RatioOSO Setup...Enable AudioActiating ScreenShow Tool-In | - Print: Prints the current image.- Frame Info: Displays Channel, Title, Time, Type, Size and Resolution information about the image.- Image Processing: Controls brightness, blur and sharpness of playback images. (Single Screen Mode and Pause Mode Only)- Play Speed Control: Changes the playback speed (Play) or fast forward/backward playback speed (FF/RW).- Drawing Mode: Selects the draw mode level. If you are not sure about the best draw mode level for your system, try each level until the image displays properly.- Screen Size: Changes the Clip Player screen size.- Aspect Ratio: Changes the image aspect ratio displayed on each camera screen. |
- OSD Setup...: Selects options to display on the screen. - Enable Audio: Plays audio while playing back recorded video that has recorded audio. (Single Screen Mode Only)
- Anti-Aliasing Screen: Enhances image display quality on the screen by smoothing stair-stepping (aliasing) effects in the enlarged image. If video plays slow because of your CPU's slow speed, releasing the Anti-Aliasing Screen option might improve playback speed.
- Show Text-In: Displays video with text-in data if the video was recorded with text-in data. (Single Screen Mode Only)
- Saves images.
| Save as ImageSave as Image (Actual Size) |
| Save as Clip-CopySave as Video |
| Clip-Copy Log |
- Save as Image: Saves the current image as a bitmap or JPEG file.
- Save as Image (Actual Size): Saves the current video frame as a bitmap or JPEG file in its actual size. (Single Screen Mode Only)
- Save as Clip-Copy: Saves video of desired time range as an executable file.
- Save as Video: Saves video of desired time range as an AVI file.
- Clip-Copy Log: Saves the clip copy log information as a text file. The user information about Save As Clip Copy will be logged as "Internal-Copy."
• ☐: Select from Normal and Double screen views (Single Screen Mode Only). You can move the enlarged image by clicking the left mouse button and dragging.
• Displays the image full screen.
Encryption icons display in the bottom-right corner. 📷 displays when the clip file has not been tampered with, and 🔒 displays and playback stops when the system has detected tampering.
NOTE: If the VGA card or monitor does not support 800x600 video resolution, Full Screen might not display properly. If this happens, press the ESC key on your PC keyboard to return to the normal screen mode.
Click the slider bar and move it left or right to move through the video clip.
Placing the mouse cursor on an image and clicking will cause that image to display full frame.
Hybrid Digital Video Recorder
AUDIO PLAYBACK
Checking Audio Recording Configuration
- Click the SCHEDULE menu on the main GUI of SmartGuard.
- Click Recording Setup tab.
- Check that Record Audio is enabled for each camera.
Playing Recorded Audio
- Selecting a camera screen in the playback screen displays the button beside the camera title.
- Clicking the button displays the camera screen menu.
- Click the (Audio Playback) button.
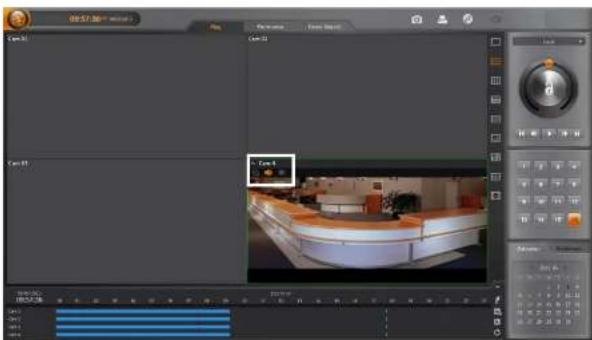
text_image
00:57.36" video Scene 1 Scene 2 Scene 3 Scene 4 Scene 5 Scene 6 Scene 7 Scene 8 Scene 9 Scene 10 Scene 11 Scene 12 Scene 13 Scene 14 Scene 15 Scene 16 Scene 17 Scene 18 Scene 19 Scene 20 Scene 21 Scene 22 Scene 23 Scene 24 Scene 25 Scene 26 Scene 27 Scene 28 Scene 29 Scene 30 Scene 31 Scene 32 Scene 33 Scene 34 Scene 35 Scene 36 Scene 37 Scene 38 Scene 39 Scene 40 Scene 41 Scene 42 Scene 43 Scene 44 Scene 45 Scene 46 Scene 47 Scene 48 Scene 49 Scene 50 Scene 51 Scene 52 Scene 53 Scene 54 Scene 55 Scene 56 Scene 57 Scene 58 Scene 59 Scene 60 Scene 61 Scene 62 Scene 63 Scene 64 Scene 65 Scene 66 Scene 67 Scene 68 Scene 69 Scene 70 Scene 71 Scene 72 Scene 73 Scene 74 Scene 75 Scene 76 Scene 77 Scene 78 Scene 79 Scene 80 Scene 81 Scene 82 Scene 83 Scene 84 Scene 85 Scene 86 Scene 87 Scene 88 Scene 89 Scene 90 Scene 91 Scene 92 Scene 93 Scene 94 Scene 95 Scene 96 Scene 97 Scene 98 Scene 99 Scene 100NOTE: Audio of one camera at a time is played back.
NOTE: Audio will NOT be played when the target camera was recorded less than 2 ips of recording speed.
User's Manual
External Saving
Click the (External Saving) button at the top right of the SmartSearch.
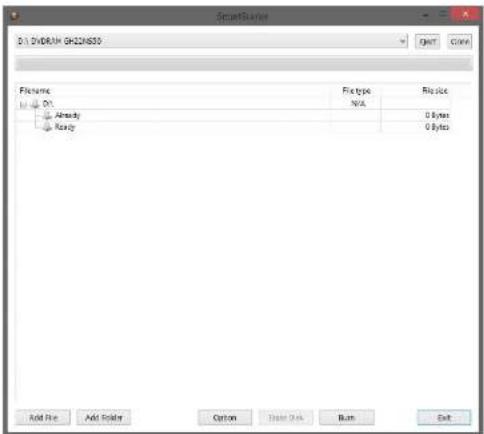
text_image
SmartBox D:\ DVD31M GH224650 FileName Empty Ready Filetype N/A Copy 0 Bytes 0 Bytes Add File Add Folder Cotton Paste Dots Run Exit- Eject, Close: Ejects the disk from the drive or closes the drive door.
- Add File, Add Folder: Adds a file or folder to burn on the CD/DVD.
- Option: Sets options.
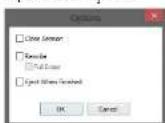
- √ Session Close: Completes the burning on the CD/DVD. - √ Rewrite: Deletes previously saved files and burns newly added files only. Enabling Quick Erase deletes previously saved files more quickly.
- Eject When Finished: Ejects the CD/DVD automatically after completing burning or crasing.
Hybrid Digital Video Recorder
Appendix 1 — Network Setup (LAN)
Run the SmartGuard program and click the (Menu) button → Setup menu → SYSTEM - Network menu on the main GUI.
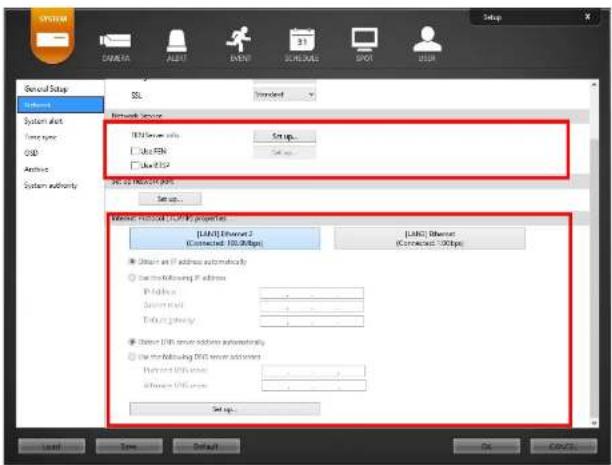
text_image
Setup General Setup System dial System type CPU Archive System authority SSL Network server USB Server info Sub FEN Sub FSP Set up... Set up... Web: 32.10000 (42) Server manual setting properties [USB] Ethernet 2 (Connected: 100.00bps) [USB] Ethernet (Connected: 100bps) ● Select an IP address automatically ○ Create Following IP address IP address: Automatic Termination: ● Select USB server address automatically ○ Use the following WGS server accounts Provider IP address: Address: USB server Set up... Load Save Default OK CancelSetting Internet Protocol (TCP/IP) Properties
- Select Obtain an IP address automatically or Use the following IP address depending on your network environment.
- When selecting Obtain an IP address automatically, the DNS server address is set up automatically. - When selecting Use the following IP address, enter the IP address, Subnet mask, Default gateway and DNS
User's Manual
Setting FEN Function
When FEN function is enabled, it is not necessary to set up port forwarding manually. However, remote connection to the DVR might not be available depending on the network connection environment of the DVR or remote system when the FEN function is enabled. If it is the case, you should set up port forwarding for the DVR manually in the NAT (Network Address Translation) device to which the DVR is connected.
- Enter the FEN server information.
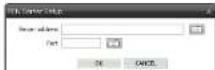
- Server, Port: Enter the IP address (or domain name) and port number of the FEN server.
- Enable Use FEN function in the Network Service setting and click the Set up... button.

- Name: Enter the DVR's name to be registered on the FEN server. Click the Name Check button to check if the name you entered can be used. Clicking the OK button registers the name as a FEN name of the DVR.
NOTE: The FEN function allows you to connect to the DVR from remote sites using either the dynamic IP addresses or the domain name. For the FEN function to work properly, the DVR's FEN name should be registered on the FEN server, and the FEN server settings should match the settings registered on the FEN server. Any changes on the FEN server might cause improper operation.
NOTE: The FEN registration is limited to only one FEN server. The DVR cannot be registered to multiple FEN servers.
Appendix 2 — WebGuard
WebGuard allows you to access a remote DVR, monitor live video images and search recorded video using Internet Explorer web browser anytime from virtually anywhere.
Computer system requirements for using the WebGuard program are:
- Operating System: Microsoft® Windows® XP (Service Pack 3), Microsoft® Windows® Vista (Service Pack 1),
Microsoft® Windows® 7 (Home Premium, Professional, Ultimate) or Microsoft® Windows® 8 (Pro, Enterprise)
• CPU: Intel Pentium III (Celeron) 600MHz or faster
• RAM: 128MB or higher
• VGA: 8MB or higher (1024x768, 24bpp or higher)
- Internet Explorer: Version 6.0 or later 32-bit
Start Internet Explorer on your local PC. You can run the WebGuard program by entering the following information in the address field.
- "http://IP address" (The DVR IP address)
- Or, "http://DVRNS server address/DVR name" (The DVRNS server address and the DVR name registered on the DVRNS server)
- Or, "http://www.dvronline.net" (Entering the DVR IP address or the DVR name will be required when logging in)
NOTE: You will need to get the appropriate IP address for the DVR you want to connect from your network administrator.
NOTE: WebGuard only works with Microsoft Internet Explorer and will NOT work with Netscape or other web browsers.
NOTE: WebGuard does not work with Microsoft® Windows® 8 metro UI.

Select between the WEBWATCH (Web monitoring) and WEBSEARCH (Web search) modes. Enter ID and PASSWORD and click the [LOGIN] button.
You will need to enter the DVR IP address in the DVR ADDRESS field when running the WebGuard program by catering http://www.dvronline.net. Selecting the Use DVRNS option allows you to enter the DVR name registered on the DVRNS server instead of the IP address. It is required to enter the DVRNS server address and port
User's Manual
NOTE: When running WebGuard in the Microsoft Windows Vista or later operating system, it is recommended to start Internet Explorer with elevated administrator permissions. Click the right mouse button on the Internet Explorer icon and select the Run as administrator option from the context menu. Otherwise, some functions of the WebGuard might be limited to use.
NOTE: There might be a problem with screen display or screen update due to low image transmission speed when using the Microsoft Windows Vista or later operating system. In this situation, it is recommended that you disable the Auto Tuning capability of your computer.
Run the Command Prompt with elevated administrator permissions (Go to the Start Menu and Accessories,
and then Command Prompt → Click the right mouse button and select the Run as administrator option). Then enter "netsh int tcp set global autotuninglevel=disable" and press the enter key. Restart your computer to apply the changes.
If you want to enable the Auto Tuning capability again, enter "netsh int tcp set global autotuninglevel=normal" after running the Command Prompt with elevated administrator permissions. Restart your computer to apply the changes.
Web Monitoring Mode
WebWatch is a remote web monitoring program that allows you to monitor live video transmitted in real-time from the remote DVR.

text_image
Screenshot of a surveillance camera interface displaying multiple surveillance feeds and a grid of real-time photos with Chinese labels.Hybrid Digital Video Recorder

Zoom Out / Zoom In Focus Near / Focus Far

Iris Close / Iris Open
Set Preset / Go to Preset
- Click to set up the image drawing mode and OSD display. You can adjust the display speed by changing the image drawing mode, and select OSD information to be displayed on the screen.
- Click to save the current image as a bitmap or JPEG file format.
- The event status window at the bottom displays a list of events that were detected from the remote site.
① Selecting a camera on the screen and clicking the right mouse button displays the text menu screen.
| Change Camera Title |
| Enable Audio |
| Aspect Ratio |
| Anti-Alasing Screen |
- Change Camera Title: Changes the camera name.
- Enable Audio: Enables audio communication with the remote site. When the audio control panel displays, click the button to send audio to the connected remote site and click the button again to stop sending audio. Click the button to monitor live audio from the connected remote site through the attached speaker and click the button again stop monitoring live audio. Clicking both button and button allows two-way communication. Clicking the button disables audio communication.
- Aspect Ratio: Changes the image aspect ratio.
- Anti-Aliasing Screen: Enhances image display quality by eliminating stair stepping (aliasing) effects in the enlarged image.
NOTE: A camera name change in the Web Watch mode does not affect the camera name set up on the remote site. Leaving the Camera Title blank causes the camera name set up on the remote site to display.
Web Search Mode
WebSearch is a remote web search program that allows you to search recorded video on the remote DVR.
NOTE: The remote site connection on the Web Search screen will automatically be disconnected if there is no activity for 30 minutes.

text_image
Screenshot of a video surveillance system interface showing multiple video thumbnails and control panels with Chinese labels.User's Manual
- Click to access to the web monitoring mode.
- Position the mouse pointer on the WebSearch logo to see the version of the WebGuard program.
The DVR Info. window displays the time information of recorded data on the remote DVR and login information of WebGuard.
- Click to blur, sharpen, equalize and interpolate playback images.
: Click to zoom out or zooms in the recorded image. : Click to adjust the brightness of the recorded images.
NOTE: Image processing works only in the pause mode.

The playback function buttons include fast backward, pause, play, fast forward, go to the first image, go to the previous image, go to the next image, and got to the last image.
⑦ Click the screen format to select the desired display mode.
: Click to enter the time-lapse search mode which allows you to search for recorded data by time and then play back images found within the time parameters. The Timetable window located at the bottom displays the time information for the image of the date selected on the calendar. Clicking a specific time displays the image recorded at that time on the screen. Selecting follows you to display an image from a specific time.
- Click to enter the event search mode which allows you to search for event log entries using specific conditions and play back the images associated with those event entries.
- Click to set up the image drawing mode and OSD display. You can adjust the display speed by changing the image drawing mode, and select OSD information to be displayed on the screen.
op E: Click to save any video clip of recorded data as an executable file.
Φ Click to save the current image in a bitmap or JPEG file format.
① Click to print the current image on a printer connected to your computer.
e Click to reload the recording data.
^6 The Timetable displays recorded data of the selected camera by time (in hour segments).
⑤ Selecting a camera on the screen and clicking the right mouse button displays the text menu screen.
| Change Camera TitleEnable AudioAspect RatioAnti-Aliasing Screen | · Change Camera Title: Changes the camera name.· Aspect Ratio: Changes the image aspect ratio.· Anti-Aliasing Screen: Enhances image display quality by eliminating stair stepping (aliasing) effects in the enlarged image. |
NOTE: A camera name change in the Web Search mode does not affect the camera name set up on the remote site. Leaving the Camera Title blank causes the camera name set up on the remote site to display.
Hybrid Digital Video Recorder
Appendix 3 — Text-In Query
text_image
Motion o... Event Text in Alarm in User OKI... Design Case sensitive Name Company Table tab * 1 inch Tab size: Save range Save widthSet up the find condition of text-in.
- Case Sensitive: Distinguishes between capital letter and small letters entered in the Name box.
• Name: Enter the text to find.
• Comp: Enter the comparison operator.
• Value: Enter the comparison value.
NOTE: The tab and line can be used for more specific search of the text-in data. Use a symbol “A” indicating the location of each individual category, and [J] indicating the line where the category is located. See the following examples for details.
- Tab size: Enter the tab size. Up to eight tabs can be set.
Query Example I
| 1 | 2 | 3 | 4 | 5 | 6 |
| 1234567890 | 1234567890 | 1234567890 | 1234567890 | 1234567890 | 1234567890 |
| Item | Unit price | Qty | amount |
| Coke | 2.20 | 1(s) | 2.20 |
| Fanta | 2.20 | 1(s) | 2.20 |
| Hotdog | 3.50 | 3(s) | 10.50 |
| Pepsi | 1.95 | 1(s) | 1.95 |
User's Manual
Query Example II
| 1 | 2 | 3 | 4 | 5 | 6 |
| 123456789012345678901234567890123456789012345678901234567890 | |||||
| Item | Unit price | Qty | amount | ||
| Coke | | | 2.20 | | 1(s) | 2.20 | |
| Fanta | | | 2.20 | | 1(s) | 2.20 | |
| Hotdog | | | 3.50 | | 3(s) | 10.50 | |
| Fepsi | | | 1.95 | | 1(s) | 1.95 | |
| total : $ | 16.85 | ||||
Thank you\~\~
In the above text-in data, you can find that the comparison value is located at 17 (Unit price, \$ mark will be ignored automatically), 28th (Qty) and 40th (amount) characters (including spaces) from the left, but the value of amount category is located at the different line from Item. In this case, you can enter "17", "28" and "40" in each Tab size box, and enter the tab symbol "^^" and line symbol "["] in the Value box (^ for Unit price, ^^ for Qty, and ^^^ for amount /] for the next line).
For example, if you want to search for Coke with a Qty(Quantity) of more than 1 and Hotdog with an amount totaling over \$8, the following find condition can be set.
Coke > ^^1 and Hotdog > ]^^^8
Appendix 4 — Connector Pin Outs
SPOT Monitor Output (Sequence Display)
Alarm Input
16-Channel Model

| No. | Connector No. | Connector | |
| 1 | S1 (Sensor 1) | 9 S9 (Sensor 0) | |
| 2 | S2 (Sensor 2) | 10 S10 (Sensor 10) | |
| 3 | S3 (Sensor 3) | 11 S11 (Sensor 11) | |
| 4 | S4 (Sensor 4) | 12 S12 (Sensor 12) | |
| 0 | G (Ground) | 0 G (Ground) | |
| 5 | S5 (Sensor 5) | 13 S13 (Sensor 13) | |
| 6 | S6 (Sensor 6) | 14 S14 (Sensor 14) | |
| 7 | S7 (Sensor 7) | 15 S15 (Sensor 15) | |
| 8 | S8 (Sensor 8) | 16 S16 (Sensor 16) | |
| 0 | G (Ground) | G G (Ground) |
32-Channel Model

| No. | Connector | No. | Connector | |
| 1 | S1 (Sensor 1) | 17 | S17 (Sensor 17) | |
| 2 | S2 (Sensor 2) | 18 | S18 (Sensor 18) | |
| 3 | S3 (Sensor 3) | 19 | S19 (Sensor 19) | |
| 4 | S4 (Sensor 4) | 20 | S20 (Sensor 20) | |
| 5 | S5 (Sensor 5) | 21 | S21 (Sensor 21) | |
| 6 | S6 (Sensor 6) | 22 | S22 (Sensor 22) | |
| 7 | S7 (Sensor 7) | 23 | S23 (Sensor 23) | |
| 8 | S8 (Sensor 8) | 24 | S24 (Sensor 24) |
User's Manual
Alarm Output
Relay Output
16-Channel Model 32-Channel Model

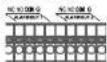
| No. | Connector |
| NC | NC (Normal Close) |
| NO | NO (Normal Open) |
| COM | COM (Common) |
| G | GND (Ground) |
TTL Output
16-Channel Model

| No. | Connector No. | Connector | ||
| 1 | AOUT1 (Alarm Out 1) | 14 AOUT2 | (Alarm Out 2) | |
| 2 | AOUT3 (Alarm Out 3) | 15 AOUT4 | (Aarm Out 4) | |
| 3 | AOUT5 (Alarm Out 5) | 16 AOUT6 | (Aarm Out 6) | |
| 4 | AOUT7 (Alarm Out 7) | 17 AOUT8 | (Aarm Out 8) | |
| 5 | GND (Ground) | 18 GND (Ground) | ||
| 6 | AOUT9 (Alarm Out 9) | 19 AOUT10 | (Alarm Out 10) | |
| 7 | AOUT11 (Alarm Out 11) | 20 AOUT12 | (Alarm Out 12) | |
| 8 | AOUT13 (Alarm Out 13) | 21 AOUT14 | (Alarm Out 14) | |
| 9 | AOUT15 (Alarm Out 15) | 22 AOUT16 | (Alarm Out 16) | |
| 10 | GND (Ground) | 23 GND (Ground) | ||
| 11 | DO NOT CONNECT | 24 DO NOT CONNECT | ||
| 12 | DO NOT CONNECT | 25 DO NOT CONNECT | ||
| 13 | GND (Ground) |
Hybrid Digital Video Recorder
32-Channel Model
| No. | Connector No. | Connector | ||
| 1 | AOUT1 (Alarm Out 1) | 14 AOUT2 | (Airm Out 2) | |
| 2 | AOUT3 (Alarm Out 3) | 15 AOUT4 | (Aarm Out 4) | |
| 3 | AOUT5 (Alarm Out 5) | 16 AOUT6 | (Aarm Out 6) | |
| 4 | AOUT7 (Alarm Out 7) | 17 AOUT8 | (Aarm Out 8) | |
| 5 | GND (Ground) | 18 GND (Ground) | ||
| 6 | AOUT9 (Alarm Out 9) | 19 AOUT10 | (Arm Out 10) | |
| 7 | AOUT11 (Alarm Out 11) | 20 AOUT12 | (Alarm Out 12) | |
| 8 | AOUT13 (Alarm Out 13) | 21 AOUT14 | (Alarm Out 14) | |
| 9 | AOUT15 (Alarm Out 15) | 22 AOUT16 | (Alarm Out 16) | |
| 10 | GND (Ground) | 23 GND (Ground) | ||
| 11 | DO NOT CONNECT | 24 DO NOT CONNECT | ||
| 12 | DO NOT CONNECT | 25 DO NOT CONNECT | ||
| 13 | GND (Ground) |
| No. | Connector No. | Connector | ||
| 1 | AOUT1 (Alarm Out 17) | 14 AOUT2 (Alarm Out 18) | ||
| 2 | AOUT3 (Alarm Out 19) | 15 AOUT4 (Alarm Out 20) | ||
| 3 | AOUT5 (Alarm Out 21) | 16 AOUT6 (Alarm Out 22) | ||
| 4 | AOUT7 (Alarm Out 23) | 17 AOUT8 (Alarm Out 24) | ||
| 5 | GND (Ground) | 18 GND (Ground) | ||
| 6 | AOUTB (Alarm Out 25) | 19 AOUT10 (Alarm Out 26) | ||
| 7 | AOUT11 (Alarm Out 27) | 20 AOUT12 (Alarm Out 28) | ||
| 8 | AOUT13 (Alarm Out 29) | 21 AOUT14 (Alarm Out 30) | ||
| 9 | AOUT15 (Alarm Out 31) | 22 AOUT16 (Alarm Out 32) | ||
| 10 | GND (Ground) | 23 GND (Ground) | ||
| 11 | DO NOT CONNECT | 24 DO NOT CONNECT | ||
| 12 | DO NOT CONNECT | 25 DO NOT CONNECT | ||
| 13 | GND (Ground) |
Remote Control Device (RS-485)

| No. | Connector |
| + | TRX- |
| - | TRX- |
| 12 | GND (Ground) |
Appendix 5 — Troubleshooting
Following are some frequent problems and solutions related to the DVR. Read this section before calling the dealer or installer.
Problem: There is no image on the screen.
Solution: Check the camera cables. If the Viden Loss image is displayed, something is wrong with the camera cable or power.
Solution: Video might not be displayed on the monitor when connecting a monitor after turning on the system. Reboot the DVR.
Problem: How do I access Windows?
Solution: To protect unnecessary system crashes, Windows is blocked. Ask your dealer or distributor.
Problem: The logo appears and then freezes. Sometimes the screen is black.
Solution: There is a problem with the Main Board. Reboot the DVR. If it happens often, call your dealer or installer.
Problem: The USB-serial converter has been connected to the DVR for the POS installation,
however, the dialog box asking the device driver appears.
Solution: When connecting the POS device to the DVR using the USB-serial converter, connect the converter while the DVR is operating. If not, the converter driver may not be operating properly and display the dialog box asking the device driver during the system boot. However, it does not have any effect on the DVR operation. Remove the converter, and reboot the DVR and then connect the converter again.
Appendix 6 — Specifications
16-Channel Model
| VIDEO | |
| Signal Format NTSC or PAL (programmable) | |
| Video Input | Composite: 1 Vp-p, 16 looping, auto-terminatingNetwork camera: max. 16 channels (Hybrid model only) |
| Monitor Outputs One HDMI, One DVI, One VGA, 10 SPOT (One HD SPOT, 9 SD SPOT) | |
| Recording Resolution | 704x480 (4CIF), 704x240 (2CIF), 352x240 (CIF) (704x576, 704x288, 352x288 for PAMax. 1920x1080 (Full IID) for network cameras of hybrid model only |
| Decompression | RNC cameras: H.264Network cameras: H.264, M-JPEG |
| Display / Record Speed(images per second) | max. 480ips @ CIF / 480ips @ 4CIF (400ips / 400ips for PAL)max. 480ips @ Full IID / 480ips @ Full IID (for network cameras of hybrid model only) |
^1 VGA, DVI and HDMI main out supports dual display (SmartGuard on the primary display and SmartSearch on the additional display) and not triple display.
| INPUTS/OUTPUTS | |
| Alarm Input | 16 TTL, NC/NO programmable |
| Network camera alarm in: max. 16 channels (for network cameras of hybrid model only) | |
| Network alarm in: max. 16 channels (for non-hybrid model only) | |
| Alarm Output | 1 relay, 1A@5V |
| 16 TTL, 25mA@5V | |
| Network camera alarm out: max. 16 channels (for network cameras of hybrid model on) | |
| Network alarm out: max. 16 channels (for non-hybrid model only) | |
| Audio Input | 16, "line in", 1 Vp-p |
| Network camera audio in: max. 16 channels (for network cameras of hybrid model only) | |
| Audio Output | One, "line" |
| Network camera audio out: max. 16 channels (for network cameras of hybrid model on) | |
| CONNECTORS | |
| Video Input | Composite: 16 BNCNetwork camera: max. 16 channels (Hybrid model only) |
| Monitor Output: 1 HIDMI, 1 DVI, 1 VGA, 10 SPOT (1 IID SPOT; 9 SD SPOT) | |
| Audio In | Line in: 16 RCANetwork camera audio in: max. 16 channels (for network cameras of hybrid model only) |
| Audio Out | Line out |
User's Manual
| STORAGE | |
| Primary Storage SATA hard disk drive (Expandable up to 5) | |
| Secondary Storage eSATA IIDD | |
| Backup Storage DVD RW |
| GENERAL | |
| Dimensions (W x H x D) | 17.3" x 7.0" x 18.2" (440mm x 177mm x 462mm) |
| Unit Weight .38.1 lbs. (17.3kg) | |
| Shipping Weight 46.1 lbs. (20.9kg) | |
| Shipping Dimensions(W x H x D) | 23.2" x 13.7" x 27.6" (590mm x 350mm x 700mm) |
| Operating Temperature 4)°T to 104°T (5°C to 40°C) | |
| Operating Humidity 0% in 90% | |
| Power AC | 100-240V-, 50/60 Hz, 3.0-1.5A |
| Approvals FCC, CF, CB, UI. | |
^ii CAUTION. Risk of Explosion if Battery is replaced by an Incorrect Type. Dispose of Used Batteries According to the Instructions. This equipment is indoor use and all the communication wiring are limited to inside of the building.
Specifications are subject to change without notice.
32-Channel Model
| VIDEO | |
| Signal Format NTSC or PAL (programmable) | |
| Video Input | Composite: 1 Vp-p, 32 auto-terminatingNetwork camera: max. 32 channels (Hybrid model only) |
| Monitor Outputs One HDMI, One DVI, One VGA, 12 SPOT (2 HD SPOT, 10 SD SPOT) | |
| Recording Resolution | 704x480 (4CIF), 704x240 (2CIF), 352x240 (CIF) (704x576, 704x288, 352x288 for PA)Max. 1920x1080 (Full HD) for network cameras of hybrid model only |
| Decompression | BNC cameras: II.264Network cameras: H.264, M-JPEG |
| Display / Record Speed(images per second) | max. 960ips @ CIF / 960ips @ 4CIF (800ips / 800ips for PAL)max. 960ips @ Full HD / 960ips @ Full HDfor network cameras of hybrid model only) |
^1 VGA, IDVI and HDMI main out supports dual display (SmartGuard on the primary display and SmartSearch on the additional display) and not triple display.
| INPUTS/OUTPUTS | |
| Alarm Input | 32 TTL, NC/NO programmable |
| Network camera alarm in: max. 32 channels (for network cameras of hybrid model only) | |
| Network alarm in: max. 16 channels (for non-hybrid model only) | |
| Alarm Output | 2 relay, 1A@5V |
| 32 TTL, 25mA@5V | |
| Network camera alarm out: max. 32 channels (for network cameras of hybrid model only) | |
| Network alarm out: max. 16 channels (for non-hybrid model only) | |
| Audio Input | 32, "line in", 1 Vp-p |
| Network camera audio in: max. 32 channels (for network cameras of hybrid model only) | |
| Audio Output | One, "line" |
| Network camera audio out: max. 32 channels (for network cameras of hybrid model only) | |
| CONNECTORS | |
| Video Input | Composite: 32 BNC |
| Network camera: max. 32 channels (Hybrid model only) | |
| Monitor Output1 IIDML | 1 DVI, 1 VGA, 12 SPOT (2 IID SPOT, 10 SD SPOT) |
| Audio In | Line in: 32 RCA |
| Network camera audio in: max. 32 channels (for network cameras of hybrid model only) | |
| Audio Out | Line out |
| Network camera audio out: max. 32 channels (for network cameras of hybrid model only) | |
| Alarms | Terminal block |
| Network camera alarms: max. 32 channels each for input and output | |
User's Manual
| STORAGE | |
| Primary Storage SATA hard disk drive (Expandable up to 5) | |
| Secondary Storage eSATA IIDD | |
| Backup Storage DVD RW |
| GENERAL | |
| Dimensions (W x H x D) | 17.3" x 7.0" x 18.2" (440mm x 177mm x 462mm) |
| Unit Weight .38.1 lbs. (17.3kg) | |
| Shipping Weight 46.1 lbs. (20.9kg) | |
| Shipping Dimensions(W x H x D) | 23.2" x 13.7" x 27.6" (590mm x 350mm x 700mm) |
| Operating Temperature 4)°T to 104°T (5°C to 40°C) | |
| Operating Humidity 0% in 90% | |
| Power AC | 100-240V-, 50/60 Hz, 3.0-1.5A |
| Approvals FCC, CF, CB, UI. | |
^ii CAUTION: Risk of Explosion if Battery is replaced by an Incorrect Type. Dispose of Used Batteries According to the Instructions. This equipment is indoor use and all the communication wiring are limited to inside of the building.
Specifications are subject to change without notice.