UMC5165AS - Microwaves KITCHENAID - Free user manual and instructions
Find the device manual for free UMC5165AS KITCHENAID in PDF.

User questions about UMC5165AS KITCHENAID
0 question about this device. Answer the ones you know or ask your own.
Ask a new question about this device
Download the instructions for your Microwaves in PDF format for free! Find your manual UMC5165AS - KITCHENAID and take your electronic device back in hand. On this page are published all the documents necessary for the use of your device. UMC5165AS by KITCHENAID.
USER MANUAL UMC5165AS KITCHENAID
For questions about features, operation/performance, parts, accessories or service.
cell: 1-800-253-1301
or visit our brand website at...
www.whirlpool.com
Table of Contents 2
TABLE OF CONTENTS
MICROWAVE OVEN SAFETY....3
INSTALLATION INSTRUCTIONS....5
Unpacking 5
Location Requirements....5
Electrical Requirements 5
PARTS AND FEATURES....6
Turntable 6
Food Characteristics....8
Cooking Guidelines....8
Cookware and Dinnerware 9
Aluminum Foil and Metal 9
Microwave Cooking Power....9
Manual Cooking 10
Cooking in Stages....10
Favorite....10
Sensor Cooking....10
Quick Touch Menu (sensor and non-sensor) 11
Weight Defrost / Timed Defrost 12
General Cleaning....13
TROUBLESHOOTING 13
ASSISTANCE OR SERVICE....14
Replacement Parts....15
Built-In Kits....15
WARRANTY 15
Your safety and the safety of others are very important.
We have provided many important safety messages in this manual and on your appliance. Always read and obey all safety messages.

This is the safety alert symbol.
This symbol alerts you to potential hazards that can kill or hurt you and others.
All safety messages will follow the safety alert symbol and either the word "DANGER" or "WARNING."
These words mean:
DANGER
WARNING
You can be killed or seriously injured if you don't immediately follow instructions.
You can be killed or seriously injured if you don't follow instructions.
All safety messages will tell you what the potential hazard is, tell you how to reduce the chance of injury, and tell you what can happen if the instructions are not followed.
IMPORTANT SAFETY INSTRUCTIONS
When using electrical appliances basic safety precautions should be followed, including the following:
WARNING: To reduce the risk of burns, electric shock, fire, injury to persons, or exposure to excessive microwave energy:
■ Read all instructions before using the microwave oven.
- Read and follow the specific "PRECAUTIONS TO AVOID POSSIBLE EXPOSURE TO EXCESSIVE MICROWAVE ENERGY" found in this section.
■ The microwave oven must be grounded. Connect only to properly grounded outlet. See "GROUNDING INSTRUCTIONS" found in the "INSTALLATION INSTRUCTIONS" section.
■ Install or locate the microwave oven only in accordance with the provided Installation Instructions.
■ The microwave oven should be serviced only by qualified service personnel. Call an authorized service company for examination, repair, or adjustment.
- Do not cover or block any openings on the microwave oven.
- Do not store this microwave oven outdoors. Do not use the microwave oven near water - for example, near a kitchen sink, in a wet basement, near a swimming pool, or similar locations.
■ Do not immerse cord or plug in water.
- Keep cord away from heated surfaces.
■ Do not let cord hang over edge of table or counter.
■ See door surface cleaning instructions in the "Microwave Oven Care" section.
IMPORTANT SAFETY INSTRUCTIONS
- Liquids, such as water, coffee, or tea are able to be overheated beyond the boiling point without appearing to be boiling. Visible bubbling or boiling when the container is removed from the microwave oven is not always present. THIS COULD RESULT IN VERY HOT LIQUIDS SUDDENLY BOILING OVER WHEN THE CONTAINER IS DISTURBED OR A SPOON OR OTHER UTENSIL IS INSERTED INTO THE LIQUID.
To reduce the risk of injury to persons:
- Do not overheat the liquid.
- Stir the liquid both before and halfway through heating it.
- Do not use straight-sided containers with narrow necks.
- After heating, allow the container to stand in the microwave oven for a short time before removing the container.
- Use extreme care when inserting a spoon or other utensil into the container.
■ Do not mount over a sink.
■ Do not store anything directly on top of the microwave oven when the microwave oven is in operation.
SAVE THESE INSTRUCTIONS
PRECAUTIONS TO AVOID POSSIBLE EXPOSURE TO EXCESSIVE MICROWAVE ENERGY
(a) Do not attempt to operate this oven with the door open since open-door operation can result in harmful exposure to microwave energy. It is important not to defeat or tamper with the safety interlocks.
(b) Do not place any object between the oven front face and the door or allow soil or cleaner residue to accumulate on sealing surfaces.
(c) Do not operate the oven if it is damaged. It is particularly important that the oven door close properly and that there is no damage to the:
(1) Door (bent),
(2) Hinges and latches (broken or loosened),
(3) Door seals and sealing surfaces.
(d) The oven should not be adjusted or repaired by anyone except properly qualified service personnel.
This device complies with Part 18 of the FCC Rules.
INSTALLATION INSTRUCTIONS
Unpacking
- Empty the microwave oven of any packing materials.
- Clean the inside with a soft, damp cloth.
- Check for damage, such as:
■ a door that is not lined up correctly
■ damage around the door, or
■ dents on the interior or exterior of the microwave oven.
If there is any damage, do not operate the microwave oven until a designated service technician has checked it and made any needed repairs.
NOTE: To avoid damage to the microwave oven, do not remove microwave inlet cover. See "Parts and Features."
Location Requirements
WARNING
Excessive Weight Hazard
Use two or more people to move and install microwave oven.
Failure to do so can result in back or other injury.
IMPORTANT: The control side of the microwave oven is the heavy side. Handle the microwave oven gently. The weight of the microwave oven is over 35 lbs (15.9 kg).
■ Place the microwave oven on a cart, counter, table or shelf that is strong enough to hold the microwave oven and the food and utensils you place inside it.
■ The microwave oven should be at a temperature above 50^ F ( 10^ C) for proper operation.
NOTE: Some models can be built into a wall or cabinet by using one of the trim kits listed in the "Assistance or Service" section.
■ Do not block the exhaust vents or air intake openings. Allow
Electrical Requirements
WARNING

Electrical Shock Hazard
Plug into a grounded 3 prong outlet.
Do not remove ground prong.
Do not use an adapter.
Do not use an extension cord.
Failure to follow these instructions can result in death, fire, or electrical shock.
Observe all governing codes and ordinances.
Required:
■ A 120 volt, 60 Hz, AC only, 15- or 20-amp electrical supply with a fuse or circuit breaker.
Recommended:
■ A time-delay fuse or time-delay circuit breaker.
■ A separate circuit serving only this microwave oven.
GROUNDING INSTRUCTIONS
■ For all cord connected appliances:
The microwave oven must be grounded. In the event of an electrical short circuit, grounding reduces the risk of electric shock by providing an escape wire for the electric current. The microwave oven is equipped with a cord having a grounding wire with a grounding plug. The plug must be plugged into an outlet that is properly installed
PARTS AND FEATURES
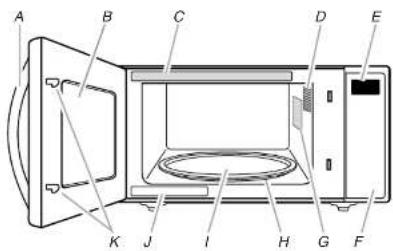
This manual may cover several different models. The model you have purchased may have some or all of the features shown here. The appearance of your particular model may differ slightly from the illustrations in this manual.
text_image
A B C D E K J I H G FA. Door handle (on models without push button open)
B. Window
C. Cooking guide label
D. Microwave oven light
E. Display
F. Control panel
G. Microwave inlet cover
H. Removable tumtable support
1. Glass turntable
J. Model and serial number plate
K. Door lock system

text_image
Turntable A B C| popcorn | dinner plate | pizza reheat |
| frozen entree | beverage | soup |
| fresh vegetables | frozen vegetables | potato |
| weight defrost | timed defrost | favorite |
| cook time | power level |
| 1 | 2 | 3 |
| 4 | 5 | 6 |
| 7 | 8 | 9 |
| clock | 0 | kitchentimeron/off |
Display
When power is first supplied to the microwave oven, "0:00" will appear in the display. If the "0:00" appears in the display at any other time, a power failure has occurred. Reset the clock if needed. See "Clock."
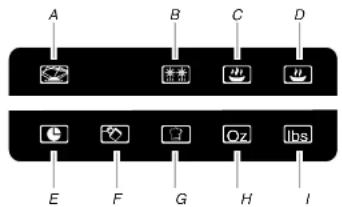
Function Icons
text_image
A B C D E F G H IA. Microwaves
B. Defrost
C. Power (high)
D. Power (low to mid)
E. Time
F. Control book
G. Menu Program
H. Ounces
- Pounds
The icons light up in the display while their specific functions are being programmed. While the set function is operating, the icons flash until the program is over. The control lock icon remains lit – not flashing – while the control is locked.
When the microwave oven is in use, the display will show cook time remaining, and the function icons will flash. When the microwave oven is not in use, the display will show the time of day (if the clock is set) or Timer countdown (if the Timer is set).
Start/Enter
The START/ENTER control begins any function. If cooking is interrupted by opening the door, touching START/ENTER will resume the cycle.
NOTE: To avoid unintentional operation of the microwave oven, a cooking function cannot be started if the microwave oven door has been closed for about 5 minutes. The word "door" will appear in the display until the door is opened and closed.
Add 30 Seconds
Tones
Tones are audible signals that cannot be turned off. These tones indicate the following:
One tone
■ Valid entry
■ Control lock activated or deactivated
Two tones
■ End of stage in multistage cooking
■ Invalid entry
Three tones
■ End of Timer countdown
Five tones
■End of cycle
Clock
This is a standard 12-hour clock (12:00-11:59). The Clock cannot be erased. If the Clock is not set, "0:00" will remain in the display when the microwave oven is not in use.
To Set:
The microwave oven and Timer must be off.
-
Touch CLOCK
-
Touch number pads to enter correct time of day.
-
Touch CLOCK
Kitchen Timer
The Kitchen Timer can be set in minutes and seconds, up to
99 minutes 99 seconds, and counts down the set time.
NOTE: The Kitchen Timer does not start or stop the microwave oven.
Cook functions may be used while the Kitchen Timer is counting down. When the cook function is active in the display, touch KITCHEN TIMER ON/OFF to see the Kitchen Timer count down for about 5 seconds.
MICROWAVE OVEN USE
A magnetron in the microwave oven produces microwaves which reflect off the metal floor, walls and ceiling and pass through the turntable and appropriate cookware to the food. Microwaves are attracted to and absorbed by fat, sugar and water molecules in the food, causing them to move, producing friction and heat which cooks the food.
■ To avoid damage to the microwave oven, do not lean on or allow children to swing on the microwave oven door.
■ To avoid damage to the microwave oven, do not operate microwave oven when it is empty.
■ Baby bottles and baby food jars should not be heated in microwave oven.
■ Clothes, flowers, fruit, herbs, wood, gourds, paper, including brown paper bags and newspaper, should not be dried in microwave oven.
■ Paraffin wax will not melt in the microwave oven because it does not absorb microwaves.
■ Use oven mitts or pot holders when removing containers from microwave oven.
■ Do not overcook potatoes. At the end of the recommended cook time, potatoes should be slightly firm. Let potatoes stand for 5 minutes. They will finish cooking while standing.
- Do not cook or reheat whole eggs inside the shell. Steam buildup in whole eggs may cause them to burst, requiring significant cleanup of microwave oven cavity. Cover poached eggs and allow a standing time.
Food Characteristics
When microwave cooking, the amount, size and shape, starting temperature, composition and density of the food affect cooking results.
Amount of Food
The more food heated at once, the longer the cook time needed. Check for doneness and add small increments of time if necessary.
Size and Shape
Cooking Guidelines
Covering
Covering food helps retain moisture, shorten cook time and reduce spattering. Use the lid supplied with cookware. If a lid is not available, wax paper, paper towels or plastic wrap approved for microwave ovens may be used. Plastic wrap should be turned back at one corner to provide an opening to vent steam. Condensation on the door and cavity surfaces is normal during heavy cooking.
Stirring and Turning
Stirring and turning redistribute heat evenly to avoid overcooking the outer edges of food. Stir from outside to center. If possible, turn food over from bottom to top.
Arranging
If heating irregularly shaped or different sized foods, arrange the thinner parts and smaller sized items toward the center. If cooking several items of the same size and shape, place them in a ring pattern, leaving the center of the ring empty.
Piercing
Before heating, use a fork or small knife to pierce or prick foods that have a skin or membrane, such as potatoes, egg yolks, chicken livers, hot dogs, and sausage. Prick in several places to allow steam to vent.
Shielding
Use small, flat pieces of aluminum foil to shield the thin pieces of irregularly shaped foods, bones and foods such as chicken wings, leg tips and fish tail. See "Aluminum Foil and Metal" first.
Standing Time
Food will continue to cook by the natural conduction of heat even after the microwave cooking cycle ends. The length of standing time depends on the volume and density of the food.
Cookware and Dinnerware
Cookware and dinnerware must fit on the tumtable. Always use oven milts or pot holders when handling because any dish may become hot from heat transferred from the food. Do not use cookware and dinnerware with gold or silver trim. Use the following chart as a guide, then test before using.
MATERIAL RECOMMENDATIONS
| Aluminum Foil, Metal | See “Aluminum Foil and Metal” section. |
| Browning Dish Bottom must be at least 3/16" (5 mm) above the turntable. Follow manufacturer's recommendations. | |
| Ceramic Glass, Glass | Acceptable for use. |
| China, Earthenware | Follow manufacturer's recommendations. |
| Melamine Follow manufacturer's recommendations. | |
| Paper: Towels, Dinnerware, Napkins | Use nonrecycled and those approved by the manufacturer for microwave oven use. |
| Plastic: Wraps, Bags, Covers, Dinnerware, Containers | Use those approved by the manufacturer for microwave oven use. |
| Pottery and Clay Follow manufacturer's recommendations. | |
| Silicone Bakeware | Follow manufacturer's recommendations. |
| Straw, Wicker, Wooden Containers | Do not use in microwave oven. |
| Wax Paper Acceptable for use. | |
To Test Cookware or Dinnerware for Microwave Use:
-
Place cookware or dinnerware in microwave oven with 1 cup (250 mL) of water beside it.
-
Cook at 100% cooking power for 1 minute.
Do Not Use
Metal cookware and bakeware, gold, silver, pewter, non-approved meat thermometers, skewers, twist ties, foil liners such as sandwich wrappers, staples and objects with gold or silver trim or a metallic glaze should not be used in the microwave oven.
Microwave Cooking Power
Many recipes for microwave cooking specify which cooking power to use by percent or name. For example, PL7=70%=Medium-High.
One of the power icons (see "Function Icons" in the "Display" section) will flash during manual cooking, depending on the power level of the cycle. To see the exact power level during a cooking cycle, touch POWER LEVEL. The display will briefly show the current power level, then will return to the cooking countdown.
Use the following chart as a general guide for the suggested cooking power of specific foods.
PERCENT/NAME USE
| 100%, High, PL10 (default setting) | Quick heating convenience foods and foods with high water content, such as soups, beverages and most vegetables. |
| 90%, PL9 Cooking small, tender pieces of meat, ground meat, poultry pieces and fish fillets. Heating cream soups. | |
| 80%, PL8 Heating rice, pasta or stirrable casseroles. Cooking and heating foods that need a cook power lower than high. For example, whole fish and meat loaf. | |
| 70%, Medium-High, PL7 | Reheating a single serving of food. |
| 60%, PL6 Cooking sensitive foods such as cheese and egg dishes, pudding and custards. Cooking non-stirrable casseroles, such as lasagna. | |
| 50%, Medium, | Cooking ham, whole poultry and pot |
Manual Cooking
NOTE: To cook at 100% power, begin by touching number pads to enter cook time, then touch START/ENTER.
To Use:
-
Place food on the turntable and close the door.
-
Touch COOK TIME.
"00:00" will appear in the display. Enter the length of time to cook. If cooking with 100% power, skip Step 3.
- Touch POWER LEVEL.
The default power level PL10 will appear in the display. Enter the desired power level. See "Microwave Cooking Power."
- Touch START/ENTER.
When the cycle ends, "End" will appear in the display, and the end-of-cycle tones will sound.
- Touch OFF/CANCEL or open the door to clear the display.
Cooking in Stages
The microwave oven can be set to cook at different cooking powers for various lengths of time, up to 2 stages, which may include a defrosting stage. See "Weight Defrost/Timed Defrost" to set defrosting stage.
NOTE: If a defrosting stage is programmed, it will cycle first.
To Cook in Stages:
- Place food on the turntable, and close the door.
- Touch COOK TIME.
"00:00" will appear in the display. Enter the length of time to cook during the first stage.
- Touch POWER LEVEL, then enter the desired cooking power for the first stage. See "Microwave Cooking Power."
- Repeat steps 2 and 3 for the second stage.
- Touch START/ENTER.
Two tones will sound between stages.
When the cycle ends, "End" will appear in the display, and the end-of-cycle tones will sound.
Favorite
Use the FAVORITE control to program, store and recall the top 3 most frequently used manual cook programs. Each Favorite may have 1 or 2 stages (see "Cooking in Stages" section). In the event of a power failure, the saved Favorites will have to be reprogrammed.
To Set FAVORITE:
- Touch FAVORITE
“1” will appear in the display. Touch FAVORITE repeatedly to scroll through “2” and “3,” until the desired Favorite program number is displayed. - Touch COOK TIME, then enter the cook time.
- Touch POWER LEVEL, then enter the power level. If programming a second stage, enter the cook time and power level for that stage (see "Cooking in Stages" section).
- Touch FAVORITE to save program
Touch START/ENTER to begin the programmed cycle. The program will also be saved.
To Use FAVORITE:
- Place food on the turntable, and close the door.
-
Touch FAVORITE repeatedly until desired program number appears in the display.
-
Touch START/ENTER.
When the cycle ends, "End" will appear in the display, and the end-of-cycle tones will sound. - Touch OFF/CANCEL or open the door to clear the display.
Sensor Cooking
A sensor in the microwave oven detects humidity released from the food as it heats, and adjusts the cook time accordingly.
Many sensor cycles require the covering of foods. Microwave-safe containers or steamers with loose-fitting lids are recommended. The loose-fitting lid allows enough steam to escape to be detected by the sensor. When covering foods with plastic wrap, be sure to leave a large enough vent opening to allow the steam to escape.
Quick Touch Menu (sensor and non-sensor)
The following menu items are preprogrammed for quick and easy cooking/reheating.
For added convenience, the available/recommended amounts shown in the following chart are included on the Cooking Guide label
(see "Parts and Features" for its location).
MENU ITEM SERVING SIZE INSTRUCTIONS
| POPCORN(non-sensor) | 3.5 oz (99 g)3.0 oz (85 g)1.75 oz (50 g) | ■ To avoid damage to the microwave oven, do not use regular paper bags or glassware.■ Pop only one package of popcorn at a time.■ Follow manufacturer's instructions when using a microwave popcorn popper.■ For best cooking results, do not try to pop unpopped kernels.■ Use fresh bags of popcorn for optimal results.■ Cooking results may vary by brand and fat content. For bag sizes not listed in this section, follow directions on the package.NOTE: During Popcorn function, as with all microwave cooking functions, the microwave oven should be attended at all times. Listen for popping to slow to 1 pop every 1 or 2 seconds, then stop the cycle. |
| PIZZA REHEAT(non-sensor) | 1 to 3 slices, 3 oz (85 g) each, refrigerated | Place pizza slices on a paper towel-lined microwave-safe plate in the center of the turntable. |
| FROZEN ENTREE(non-sensor) | 10 oz or 20 oz (283 g or 567 g) | Remove from package. Loosen cover on 3 sides. If entrée is not in microwave-safe container, place on plate, cover with plastic wrap, and vent. Let stand 2-3 minutes after cooking. |
| BEVERAGE (non-sensor, reheat) | 1 or 2 cups, 8 oz (250 mL) each | Do not cover. The diameter of the cup's opening will affect how the liquid heats. Beverages in cups with smaller openings may heat faster. |
| SOUP (non-sensor) | 1 to 4 cups (250 mL to 1 L) | Place in microwave-safe container. Cover with plastic wrap, and vent. Stir and let stand 2-3 minutes after heating. |
| POTATO (non-sensor) | 1 to 4 potatoes, 10 oz (283 g) each | Pierce each one several times with a fork. Place on paper towel, around turntable edges, at least 1" (2.5 cm) apart. Place a single potato to the side of the turntable. Let stand 5 minutes after cooking. |
| DINNER PLATE(sensor, reheat) | 10-16 oz (283-454 g), refrigerated | Place food on microwave-safe plate. Cover with plastic wrap, and vent". Let stand 2-3 minutes after heating. |
| FRESH VEGETABLES(sensor) | 1 to 4 cups (250 mL to 1 L) | Place in microwave-safe container, and add 2-4 tbs (30-60 mL) water. Cover with plastic wrap, and vent". Stir and let stand 2-3 minutes after cooking. |
| FROZEN VEGETABLES(sensor) | 1 to 4 cups (250 mL to 1 L) | Place in microwave-safe container. Cover with plastic wrap, and vent". Stir and let stand 2-3 minutes after cooking. |
Weight Defrost / Timed Defrost
The Weight Defrost feature's preset programs can be used, the Timed Defrost feature can be used, or the microwave oven can be manually set to defrost.
■ Unwrap foods and remove lids (for example, from fruit juice containers) before defrosting.
■ Shallow packages will defrost more quickly than deep blocks.
■ Separate food pieces as soon as possible during or at the end of the cycle for more even defrosting.
■ Use small pieces of aluminum foil to shield parts of food such as chicken wings, leg tips and fish tails. See "Aluminum Foil and Metal" first.
Weight Defrost
| The Weight Defrost feature has preset times and cook powers for 3 categories: Meat, Poultry and Fish. It should not be used for food that has been left outside the freezer for more than 20 minutes, or for frozen ready-made food. |
DEFROST - FOODS INSTRUCTIONS
| DEF1 - Meat(By weight)Beef (ground, steaks, roast, stew)Lamb (stew and chops)Pork (chops, ribs, roasts, sausage) | The narrow or fatty areas of irregular shaped cuts should be shielded with foil before defrostling.Do not defrost less than 1/4 lb (113 g) or two 4 oz (113 g) patties.Place all meats in microwave-safe baking dish. Do not cover. |
| DEF2 - Poultry(By weight)Chicken (whole and cut up)Comish hensTurkey breast | Place in microwave-safe baking dish, chicken breast side up. Do not cover. |
| DEF3 - Fish(By weight)FilletsSteaksWhole shellfish | Place in microwave-safe baking dish. Do not cover. |
To Use Weight Defrost:
- Place food, uncovered, on the turntable and close the door.
- Touch WEIGHT DEFROST.
"dEF1" will appear in the display. Touch WEIGHT DEFROST a second time for "dEF2," or a third time for "dEF3," if defrosting poultry or fish. See chart.
To select your desired program, touch START or wait 5 seconds, and the prompt for entering weight will appear in the display.
- Enter the weight.
Weight can be set from 0.3 lb to 6.3 lbs (136 g to 2.86 kg). - Touch START/ENTER.
The display will count down the defrost time.
The cycle may be interrupted briefly to turn food, if necessary, by opening the door. Close the door and touch START/ENTER to resume the cycle.
When the cycle ends, "End" will appear in the display, and the end-of-cycle tones will sound.
- Touch OFF/CANCEL or open the door to clear the display.
Timed Defrost
Timed Defrost does not have a preset program, but uses only 30% (PL3) cooking power.
To Use Timed Defrost:
- Place food, uncovered, on the turntable and close the door.
- Touch TIMED DEFROST.
"00:00" will appear in the display.
- Enter the time in minutes and seconds.
- Touch START/ENTER.
The display will count down the defrost time.
The cycle may be interrupted briefly to turn food, if necessary, by opening the door. Close the door and touch START/INTED to remove the cycle
MICROWAVE OVEN CARE
General Cleaning
IMPORTANT: Before cleaning, make sure all controls are off and the microwave oven is cool. Always follow label instructions on cleaning products.
Soap, water and a soft cloth or sponge are suggested unless otherwise noted.
To avoid damage to the microwave oven cavity, do not use soap-filled scouring pads, abrasive cleaners, steel-wool pads, gritty washcloths or some recycled paper towels.
To avoid damage to stainless steel models, rub in direction of grain.
The area where the microwave oven door and frame touch when closed should be kept clean.
Average soil
■ Mild, nonabrasive soaps and detergents:
Rinse with clean water and dry with soft, lint-free cloth.
Heavy soil
■ Mild, nonabrasive soaps and detergents:
Heat 1 cup (250 mL) of water for 2 to 5 minutes in microwave oven. Steam will soften soil. Rinse with clean water and dry with soft, lint-free cloth.
Odors
■ Lemon juice or vinegar:
Heat 1 cup (250 mL) of water with 1 tbs (15 mL) of either lemon juice or vinegar for 2 to 5 minutes in microwave oven.
Microwave Inlet Cover
To avoid arcing and microwave oven damage, the microwave inlet cover (see "Parts and Features") should be kept clean.
■ Wipe with wet cloth.
MICROWAVE OVEN DOOR AND EXTERIOR
The area where the microwave oven door and frame touch when closed should be kept clean.
■ Mild. nonabrasive soaps and detergents:
■ Glass cleaner and paper towels or nonabrasive plastic
scrubbing pad:
Apply glass cleaner to towel, not directly to surface.
Stainless Steel (on some models)
To avoid damage to microwave oven door and exterior, do not use soap-filled scouring pads, abrasive cleaners, steel-wool pads, gritty washcloths or some paper towels. Rub in direction of grain.
■ Stainless Steel Cleaner and Polish (not included):
See "Assistance or Service" section to order.
■ Liquid detergent or all-purpose cleaner:
Rinse with clean water and dry with soft, lint-free cloth.
■Vinegar for hard water spots
CONTROL PANEL
■ Sponge or soft cloth and water:
Dampen sponge with water and wipe panel. Dry with soft cloth.
■ To avoid damage to the control panel, do not use chemical or abrasive cleansers.
TURNTABLE
Replace turntable immediately after cleaning. Do not operate the microwave oven without the turntable in place.
■ Mild cleanser and scouring pad
■ Dishwasher
Microwave oven makes humming noise
■ This is normal and occurs when the power supply in the magnetron cycles on.
Microwave oven door looks wavy
■ This is normal and will not affect performance.
Turntable will not operate
■Is the turntable properly in place? Make sure turntable is correct side up and is sitting securely on the turntable support. See "Turntable" section.
■Is the turntable support operating properly? Remove turntable. Remove and clean turntable hub, support and rollers. Replace hub, support and turntable. Place 1 cup (250 mL) of water on the turntable, then restart microwave oven. If it still is not working, call for service. See "Assistance or Service" section. Do not operate the microwave oven without turntable and turntable support working properly.
Turntable alternates rotation directions
■ This is normal and depends on motor rotation at beginning of cycle.
Display shows messages
■Is the display showing "0:00"? There has been a power failure or the Clock time has been turned off. See "Display" section to clear display. See "Clock" section to reset or turn on Clock.
Display shows time countdown, but the microwave oven is not operating
■Is the Timer in use? See "Timer" section.
Cooking times seem too long
■ Is the cooking power set properly? See "Microwave Cooking Power" section.
■ Are large amounts of food being heated? Larger amounts of food need longer cooking times.
Is the incoming voltage less than that specified in "Electrical Requirements?" Have a qualified electrician check the electrical system in the home.
Interference with radio, TV, cordless phone, etc.
■Is the microwave oven plugged into the same outlet? Try a different outlet for the electronic device.
■Is the radio or TV receiver near the microwave oven? Move the receiver away from the microwave oven, or adjust the radio or TV antenna.
■ Are the microwave oven door and sealing surfaces clean? Make sure these areas are clean.
■ Is the cordless phone frequency 2.4 GHz? Some 2.4 GHz-based cordless phones and home wireless networks may experience static or noise while the microwave oven is on. Use a corded phone or a different frequency cordless phone, or avoid using these items during microwave oven operation.
ASSISTANCE OR SERVICE
Before calling for assistance or service, please check "Troubleshooting." It may save you the cost of a service call. If you still need help, follow the instructions below.
When calling, please know the purchase date and the complete model and serial number of your appliance. This information will help us to better respect to your request.
In the U.S.A.
Call the Customer eXperience Center toll free: 1-800-253-1301.
Our consultants provide assistance with:
| Replacement Parts | Built-In Kits | |
| Glass TumtablePart Number W10451786Tumtable Support and RollersPart Number W10451792 | Turntable HubPart Number W10451789 | This countertop microwave oven can be built in by using one of the following trim kits*. These kits are available from the dealer or can be ordered by kit model number. See "Assistance or Service" section for the toll-free number. |
| Cleaning Supplies | KIT SIZE KIT MODEL NUMBERS/COLORS | |
| affreshTM Kitchen ApplianceCleanerPart Number W10355010affreshTM Stainless Steel CleanerPart Number W10355016 | affreshTM Stainless Steel WipesPart Number W10355049Heavy Duty DegreaserPart Number 31552A | 27* (68.6 cm) MK2167AW / WhiteMK2167AB / BlackMK2167AS / Stainless |
| 30* (76.2 cm) MK2160AW / WhiteMK2160AB / BlackMK2160AS / Stainless | ||
| *The built-in trim kits can be installed over any (electric or gas) built-in wall oven, up to 30* (76.2 cm). | ||
WHIRLPOOL CORPORATION COUNTERTOP MICROWAVE LIMITED WARRANTY
ONE YEAR LIMITED WARRANTY
For one year from the original date of purchase, when this microwave is installed, operated and maintained according to instructions attached to or furnished with the product, Whirlpool Corporation or Whirlpool Canada LP (hereafter "Whirlpool") will, at its sole option, either pay for factory specified parts and repair labor to correct defects in materials or workmanship or replace the product. If replaced, the unit will be covered by the remaining one-year limited warranty of the original unit. See service instructions below.
YOUR SOLE AND EXCLUSIVE REMEDY UNDER THE LIMITED WARRANTY SHALL BE PRODUCT REPAIR OR REPLACEMENT AT OUR DISCRETION AS PROVIDED HEREIN. Service must be provided by a Whirlpool designated service company. This limited warranty is valid in the United States or Canada and applies only when the microwave is used in the country in which it was purchased. This limited warranty is effective from the date of the original consumer purchase. Proof of original purchase date is required to obtain service or replacement under this limited warranty.
ITEMS EXCLUDED FROM WARRANTY
- Service calls to correct the installation of your microwave, to instruct you how to use your product, to replace or repair house fuses, reset circuit breakers or to correct house wiring or plumbing.
- Service calls to repair or replace light bulbs. Consumable parts are excluded from warranty coverage.
- In-home service. Your microwave must be shipped to a Whirlpool designated service company.
If you reside in the United States and your Whirlpool Countertop Microwave should cease to operate within the first year of ownership:
-
Call our Customer eXperience Center at 1-800-253-1301 (toll-free).
-
Give the consultant your model, serial number and shipping address.
-
The consultant will advise whether the microwave qualifies for repair or replacement.
-
In the event of repair, you may be directed to forward the product to a Whirlpool designated service center. You are responsible for insurance and freight to the designated service center. Please include your name and address on a piece of paper, along with a copy of the proof of purchase (register receipt, charge slip, etc.). The microwave should be properly packaged to avoid damage in transit as we will not be responsible for any such damage.
-
Whirlpool will return the repaired unit or, at our option, an identical or comparable microwave to your door free of charge.
DISCLAIMER OF IMPLIED WARRANTIES
IMPLIED WARRANTIES, INCLUDING ANY IMPLIED WARRANTY OF MERCHANTABILITY OR IMPLIED WARRANTY OF FITNESS FOR A PARTICULAR PURPOSE, ARE LIMITED TO ONE YEAR OR THE SHORTEST PERIOD ALLOWED BY LAW. Some states and provinces do not allow limitations on the duration of implied warranties of merchantability or fitness, so this limitation may not apply to you. This warranty gives you specific legal rights, and you also may have other rights that vary from state to state or province to province.
LIMITATION OF REMEDIES; EXCLUSION OF INCIDENTAL AND CONSEQUENTIAL DAMAGES
YOUR SOLE AND EXCLUSIVE REMEDY UNDER THE LIMITED WARRANTY SHALL BE PRODUCT REPAIR OR REPLACEMENT AT OUR DISCRETION AS PROVIDED HEREIN. WHIRLPOOL SHALL NOT BE LIABLE FOR INCIDENTAL OR CONSEQUENTIAL DAMAGES. Some states and provinces do not allow the exclusion or limitation of incidental or consequential damages, so these limitations may not apply to you. This warranty gives you specific legal rights, and you also may have other rights that vary from state to state or province to province.
Outside the 50 United States and Canada, this warranty does not apply. Contact your authorized Whirlpool dealer to determine if another warranty applies.
If you need service, first see the "Troubleshooting" section of the Use & Care Guide. Additional help can be found by checking the "Assistance or Service" section or by calling Whirlpool. In the U.S.A call 1-800-253-1301. In Canada call 1-800-807-6777. 6/10
Keep this book and your sales slip together for future reference. You must provide proof of purchase or installation date for in-warranty service.
Write down the following information about your major appliance to better help you obtain assistance or service if you ever need it. You will need to know your complete model number and serial number. You can find this information on the model and serial number label located on the product.
Dealer name
Address
Phone number
Model number
Serial number
Purchase date