VTM-LCD193P - Monitor Vitek - Free user manual and instructions
Find the device manual for free VTM-LCD193P Vitek in PDF.

User questions about VTM-LCD193P Vitek
0 question about this device. Answer the ones you know or ask your own.
Ask a new question about this device
Download the instructions for your Monitor in PDF format for free! Find your manual VTM-LCD193P - Vitek and take your electronic device back in hand. On this page are published all the documents necessary for the use of your device. VTM-LCD193P by Vitek.
USER MANUAL VTM-LCD193P Vitek
natural_image
Two VITEK computer monitors displaying black-and-white landscape photos, one with a reflective lake and forested hills in the background (no text or symbols visible on screens)• 17" or 19" LCD Display Panel
- VGA, Dual Looping BNC Composite, S-Video, and Component Video Inputs with Video A/B Switch
• Resolution up to 1280 X 1024
• Contrast Ratio of 700:1
- Front Panel Controls
- OSD Menu Programming
• Built-In Speakers
• VESA Standard Mounting 100
SAFETY WARNING
Thank you for purchasing our product.
Please read this user's manual thoroughly and understand it before operating the monitor. Also, please keep this manual handy so you can always make quick references.
Please observe the following safety warnings.
- Do not open the cabinet and external cover.
The high voltage inside of this product may cause the electric shock.
-
Do not attempt to disassemble or alter any part of the equipment that is not expressly described in this guide. Disassembly or alteration may result in high voltage electrical shock. Internal inspections, alterations and repairs should be conducted by qualified service personnel authorized by the distributor or the customer help desk.
-
Do not insert or drop any foreign materials such as metals or flammable object through the ventilation.
-
It may cause fire, electric shock or breakdown.
-
If any foreign material is inserted inside of this product, turn off the power, unplug from the power socket and contact the service desk.
-
Do not place any vase, potted plant, cup, medication and any container with any liquid on this product. In case of a spill, it may short the circuit boards, resulting in electric shock or fire.
-
Do not allow the equipment come into contact with, or become immersed in, water or other liquids. Do not allow liquids to enter the interior. The unit has not been waterproofed. If the exterior comes into contact with liquids or salt air, wipe it dry with a soft, absorbent cloth. In the event that the water or other foreign substances enter the interior, immediately turn the unit's Power off or unplug the power cord from the power outlet. Continued use of the equipment may result in fire or electrical shock. Please consult the with the customer help desk.
- Never touch the antenna lie or power plug during a lightening storm. It may cause an electric shock.
- The internal parts may fall out of place or break off when the unit is struck, or an object is dropped on the unit, thus causing malfunctions. Furthermore, loose parts may be the cause of fire, electric shock or breakdown.
- Wipe the dust off of the power cable and power plug periodically.
Dusty power plug may cause the poor insulation and collect moisture, thus creating a fire hazard.
- Do not cut, damage, alter or place heavy items on the power cord. Any of these actions may cause an electrical short circuit, which may lead to fire or electrical shock.
- Do not handle the unit or power cord if the hands are wet. Handling it with wet hands may lead to electrical shock. When unplugging the cord, ensure that you hold the solid portion of the
plug. Pulling on the flexible portion of the cord may damage or expose the wire and insulation, creating the potential for fires or electrical shocks.
- Plug the power cord in firmly into the wall socket. A loose plug may cause electric shock or become a fire hazard by the heat generated by the electric current.
- Do not overload the power socket by connecting the recommended number of devices. The use of devices such as power strips and splitters in combination with a non-rated power socket may cause fire.
- Stop operating the unit immediately if it emits smoke or noxious fumes. Failure to do so may result in fire or electrical shock. Immediately turn the unit's power off, remove the power cable from the power outlet. Confirm that smoke and fume emissions have ceased. Please consult with the customer help desk.
- Do not cover the ventilation opening or slots on the outer casing. To prevent the unit from overheating, provide at least four inches of air space around the vent and the slots.
- Do not place the unit at an unstable location such as on a hanging prop or tilted place. Damages may incur if the unit is tilted over or fall off the prop.
- Do not place the unit at a place with moisture, dust or poisonous gas. It may cause the fire.
- Avoid Strong Magnetic Fields. Never place the unit in close proximity to electric motors or other equipment generating strong electromagnetic fields. Exposures to strong magnetic fields may cause malfunctions or corrupt images.
- Avoid using, placing or storing the unit in places subject to strong sunlight or high temperatures, such as the greenhouse or trunk of a car. Exposure to intense sunlight and heat may cause unit to overheat, resulting in fire, burns or other injuries. High temperatures may also cause deformation of the casing. Ensure that there is good ventilation when using the unit.
- Use only the recommended power accessories. Use of power sources not expressly recommended for this unit may lead to overheating, distortion of the equipment, fire, electrical shock or other hazards.
- Do not use substances containing alcohol, benzene, thinners or other flammable substances to clean or maintain the unit. The use of these substances may lead to fire. Use a dry cloth on a regular periodic basis and wipe away the dust and dirt that collects on the device. In dusty, humid or greasy environments, the dust that collects around the ventilation or the slots on the outer casing over long periods of time may become saturated with humidity and short-circuit, leading to fire.
TABLE OF CONTENTS
SAFETY WARNING .... 1
I. MONITOR LAYOUT 3
1.1 FRONT 3
1.2 REAR......5
II. PROGRAMMING THE MONITOR....7
Press this button to navigate down in the menu. This button also decreases the value of a selected item.
3. SELECT UP
Press this button to navigate up in the menu. This button also increases the value of a selected item.
4. VOLUME DOWN
Press this button in the main screen to decrease the audio volume.
5. VOLUME UP
Press this button in the main screen to increase the audio volume. In the menu screen, this button selects the highlighted item.
6. VIDEO 1
Press this button to select video input 1. If VIDEO 1 is selected, then the button will remain lit.
7. VIDEO 2
Press this button to select video input 2. If VIDEO 2 is selected, then the button will remain lit.
8. S-VIDEO
Press this button to select S-VIDEO input. If S-VIDEO is selected, then the button will remain lit.
9. PC
Press this button to select the D-SUB VGA input. If PC is selected then the button will remain lit.
10. STATUS LED
Displays the status of the monitor:
① Constant Green: the monitor is powered on and the video signal is present.
② Flashing Green (PC only): the monitor is powered on, but the video signal is absent or it's in power save mode.
③ Off: the monitor is off.
11. POWER BUTTON
This button powers on or off the monitor.
1.2 REAR
VTM-LCD173P
text_image
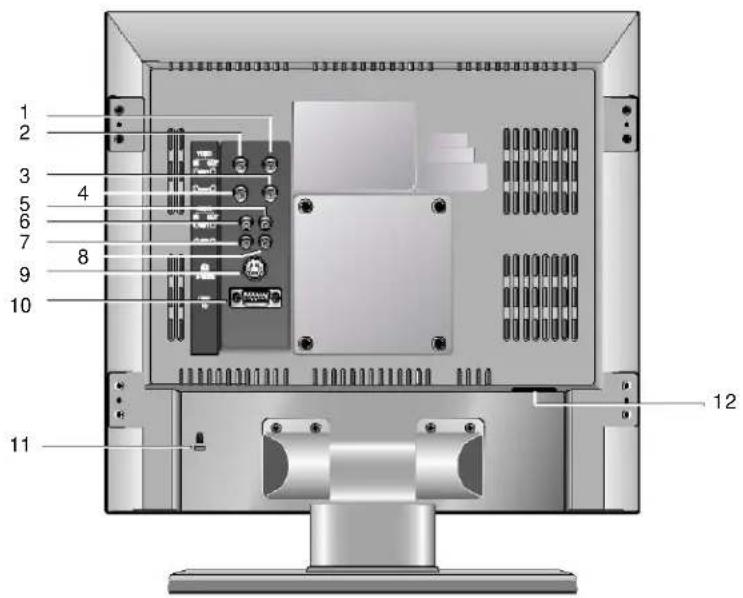
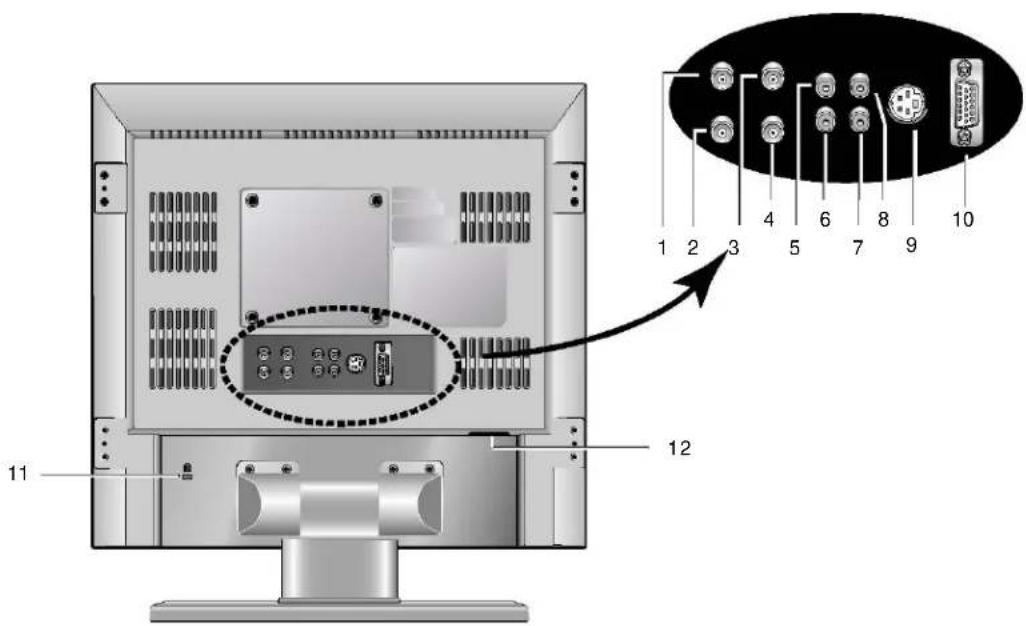
1 2 3 4 5 6 7 8 9 10 11 12VTM-LCD193P
text_image
Diagram of a computer monitor rear panel with labeled ports and an inset showing internal components numbered 1 to 10.- VIDEO 1 LOOP OUT Composite BNC video output 75 Ohms
- VIDEO 1 INPUT Composite BNC video input 75 Ohms.
- VIDEO 2 LOOP OUT Composite BNC video output 75 Ohms.
- VIDEO 2 INPUT Composite BNC video Input 75 Ohms.
- AUDIO 1 LOOP OUT RCA audio output.
- AUDIO 1 INPUT RCA audio input.
- AUDIO 2 INPUT RCA audio input.
- AUDIO 2 LOOP OUT RCA audio output.
- S-VIDEO INPUT 4-pin S-VIDEO input.
- D-SUB VGA INPUT 15-pin VGA input.
- KENSINGTON LOCKHOLE Anti-theft lock mechanism compatible with Kensington Locks.
- AC POWER INPUT 100VAC \~ 240VAC (50/60Hz) power input.
II. PROGRAMMING THE MONITOR
Select the color temperature of the monitor. 9300 offers more of a blue tint compared to the 6500.
2.1.1.2 Contrast
Adjust the contrast of the picture.
2.1.1.3 Brightness
Adjust the brightness of the picture.
2.1.1.4 Color
Adjust the color saturation of the picture.
2.1.1.5 Sharpness
Adjust the sharpness of the picture.
2.1.1.6 Tint
Adjust the hue of the picture.
2.1.2 UTILITY
2.1.2.1 All Blue
Force the screen to have a blue tint.
2.1.2.2 Overscan
Expand the screen size in the increments 5%, from of 0% to 10%.
2.1.3 OSD (On Screen Display)
2.1.3.1 OSD Timeout
Select the duration of the menu display time before it automatically exits from 5 to 60 seconds.
2.1.3.2 OSD Transparency
Select the transparency of the menu in the increments of 20% from MIN to MAX.
2.1.4 LANGUAGE
Select from English, Francais, Deutsch, Espanol, Danish and Italiano.
2.2 PC
text_image
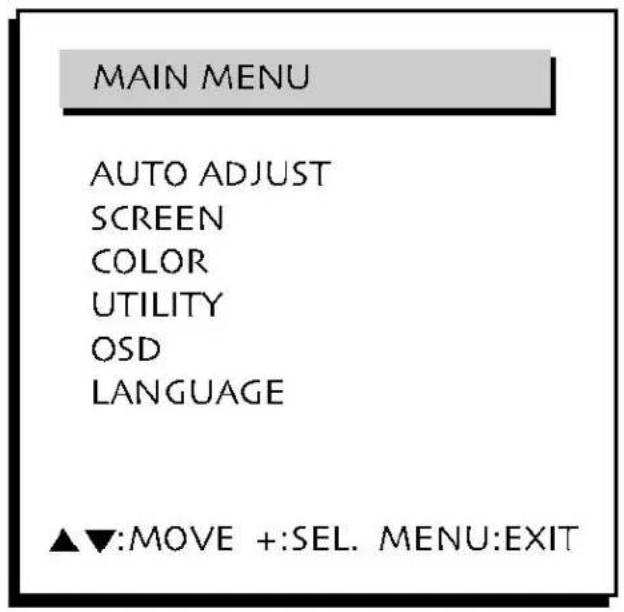
MAIN MENU AUTO ADJUST SCREEN COLOR UTILITY OSD LANGUAGE ▲▼:MOVE +:SEL. MENU:EXIT2.2.1 AUTO ADJUST
The screen is adjusted automatically to its optimal settings based on the VGA signal.
2.2.2 SCREEN
2.2.2.1 Brightness
Adjust the brightness of the picture.
2.2.2.2 Contrast
Adjust the contrast of the picture
2.2.2.3 H. Position
Adjust the horizontal position of the picture
2.2.2.4 V. Position
Adjust the vertical position of the picture.
2.2.2.5 Phase Adjust
Adjust the phase of the picture.
2.2.2.6 Clock Adjust
Adjust the spread of the horizontal size through increasing or decreasing the number of pixels.
2.2.3 COLOR
2.2.3.1 Color Temp
Select the color temperature of the monitor. 9300 offers more of a blue tint compared to the 6500. The USER reflects the values adjusted from the RED, GREEN and BLUE tint adjustments.
2.2.4 UTILITY
2.2.4.1 Recall
Reset all monitor settings back to factory default.
2.2.4.2 Full Auto
Optimize the screen by recalibrating the color values.
2.2.5 OSD (On Screen Display)
Please see 2.1.3
2.2.6 LANGUAGE
Please See 2.1.4
III. SPECIFICATIONS
| VTM-LCD173P VTM-LCD193P | ||
| Dot Pitch 0.264 0.294 | ||
| Maximum Resolution | SXGA (1280 x 1024) | |
| Sound Input 0.5W | ||
| Speaker Max 2W. 8 Ohm 30 x 70 mm | ||
| Power Source AC 100V ~ 240V 50/60Hz | ||
| Power Consumption 33 Watts 37 Watts | ||
| Brightness 300 cd/m | ^2 300 cd/m | ^2 |
| Dimensions 15.35 x 16.73 x 7.08 inches 16.92 x 17.56 x 8.66 inches | ||
| Without Stand 15.35 x 16.73 x 2.55 inches 16.92 x 17.56 x 2.71 inches | ||
| Weight | 13.23 lbs | 15.43 lbs |
| Without Stand | 10 lbs | 11.25 lbs |
| Terminals | Video Channel 1, 2 In/Out | |
| Audio Channel 1, 2 In/Out | ||
| S-Video In | ||
| PC In | ||