Sono-Pod - Subwoofer Select Increments - Free user manual and instructions
Find the device manual for free Sono-Pod Select Increments in PDF.

User questions about Sono-Pod Select Increments
0 question about this device. Answer the ones you know or ask your own.
Ask a new question about this device
Download the instructions for your Subwoofer in PDF format for free! Find your manual Sono-Pod - Select Increments and take your electronic device back in hand. On this page are published all the documents necessary for the use of your device. Sono-Pod by Select Increments.
USER MANUAL Sono-Pod Select Increments
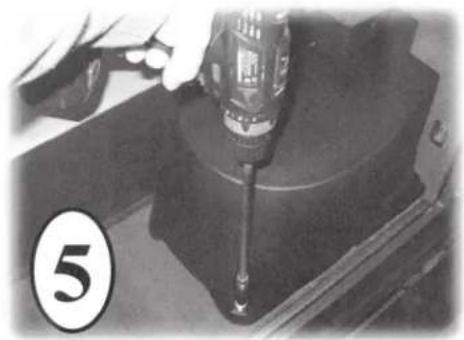
Probably the most important thing for installing the Sono-Pod is that you know the sheet metal is very thin on your Jeep's floor. When you screw down the pod to the floor, start with a drill and hex bit, but finish tightening by hand. As soon as the pod feels snug to the floor, stop.
TIPS & F.A.Q.
1) The self-tapping screws are for attaching the pod to the vehicle. The black phillips-head screws are for mounting the subwoofer.
2) Using an amplifier to power the pod is a must (either mono or 2-channel bridgeable). Amplifier can be mounted under the rear seat.
3) YOUR RADIO IS ABSOLUTELY THE MOST IMPORTANT COMPONENT IN YOUR AUDIO SYSTEM! Speakers and amplifiers can only replicate the signal they receive. If your radio is just average, then the quality of sound coming from your speakers will be greatly compromised. Using a radio with low-level inputs (RCA's) of 4 volts or more will send a super-clean signal to your amplifier(s) and speakers. If your radio has a "sub" level output RCA, use that for the pod.
4) When you're conducting sound tests, check your FM sound as well as your CD, MP3, etc. sound. The same song played on FM sounds even better on CD, smartphone, etc. since the signal is produced internally versus pulling it out of the air.
5) The best place to run an amplifier power wire through the firewall and to your Jeep's battery is on the bottom right-hand corner of the firewall on the passenger's side, far right, where the firewall meets the side of the Jeep. Where the metal starts to go vertical, there's a little usable spot and that's where to drill a hole through the firewall and feed the power wire through. Mount the fuse block in the engine compartment, near your battery. Drill two pilot holes in the firewall and run two screws through the fuse block and into the firewall.
6) The ground wire for the amplifier should be as short as possible. For best results, mount it by way of a ring terminal to one of the rear seat bolts that mounts the seat to the floor. Remove the seat bracket and scrape some paint out of the way to expose bare metal on the floor board for the ring terminal to rest on. FOLLOWING THIS METHOD WILL ENSURE A GREAT GROUND! We also recommend that you ground your radio at the same place as the amplifier. This can be accomplished by cutting the ground wire at the back of the radio and attaching it to a new wire, which is run from your radio to the amplifier's ground location. This method will reduce all ground loops between your radio and amplifier, reducing the risk of alternator 'whine'.
7) You may have to cut the subwoofer hole larger to accept your particular sub; easily done with a rotary cut-out tool and either a spiral drill bit or even a sanding drum such as used with a Dremel® rotary tool. (The pre-cut hole is about 9" diameter so it can work with subs that need smaller cutout diameters).
8) Plug remaining air space where the speaker wires go through the grommet hole on the pod with a glue gun, wax, etc. to seal the chamber. If air can escape it can result in a vibration and/or whistling sound.
When conducting sound tests, be sure to use CD, MP3, Phone, etc. and not just FM stations (see #4 on page 1). If purchase #63092KL fully loaded Sono-Pod, you'll find that the remote bass level controller is extremely useful and that you'll use it all the time to vary the amount of bass from song to song.
natural_image
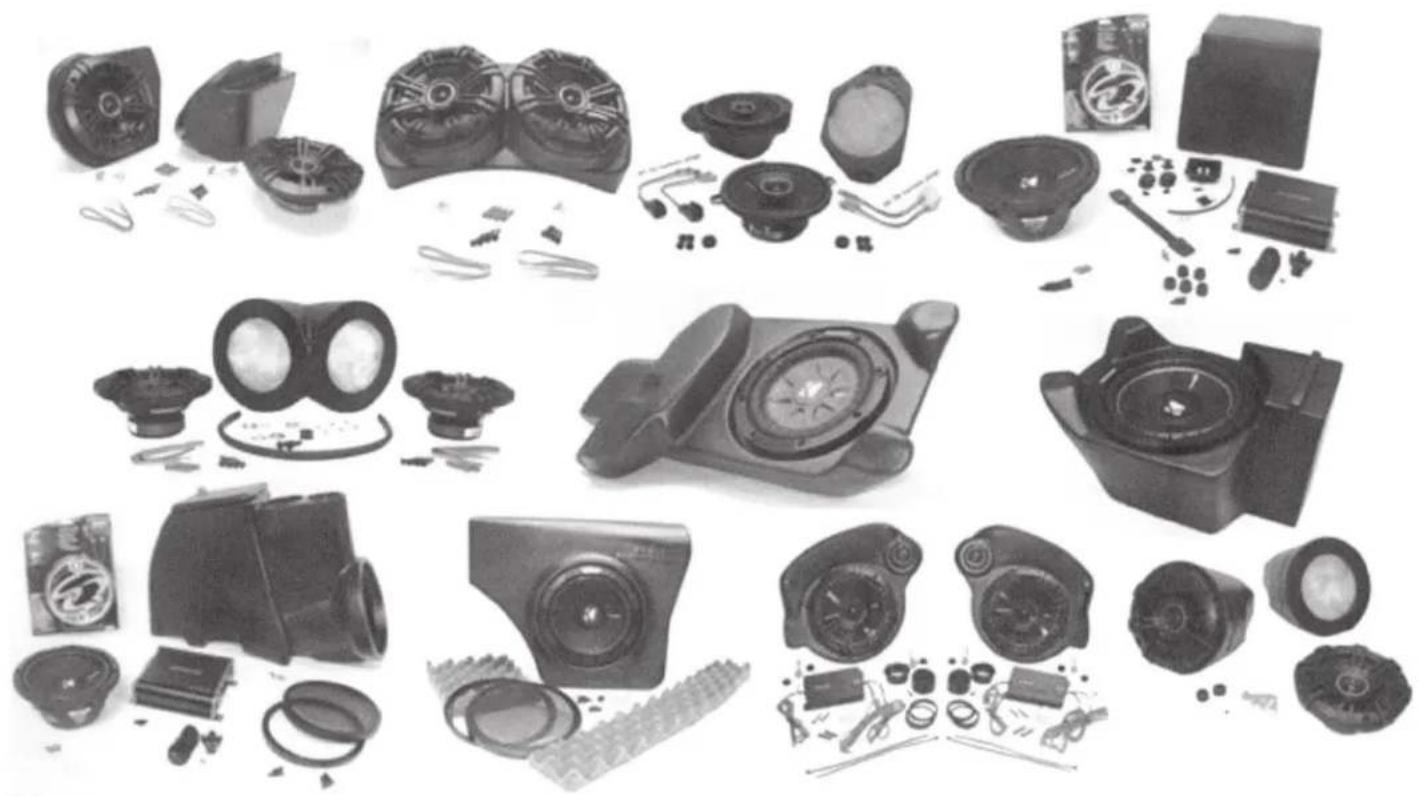
Collection of various electronic devices and accessories, including speakers, cameras, and display units (no visible text or labels)Installation Guide
The Sono-Pod fits older Jeeps, namely CJ7, YJ and TJ Wranglers, so most installs are going to involve aftermarket head units, speakers, etc. The most common install will be in a Jeep with an aftermarket radio, speakers in the dash, and a sound bar. Therefore, these instructions will be based on adding the Sono-Pod to such a system. They're also geared toward adding the fully loaded Sono-Pod #63092KL with Kicker amp, sub, etc. included. Still, they serve as a general guide even if you're setup is different and you're using your own audio equipment, etc.
PART 1 - Wiring:
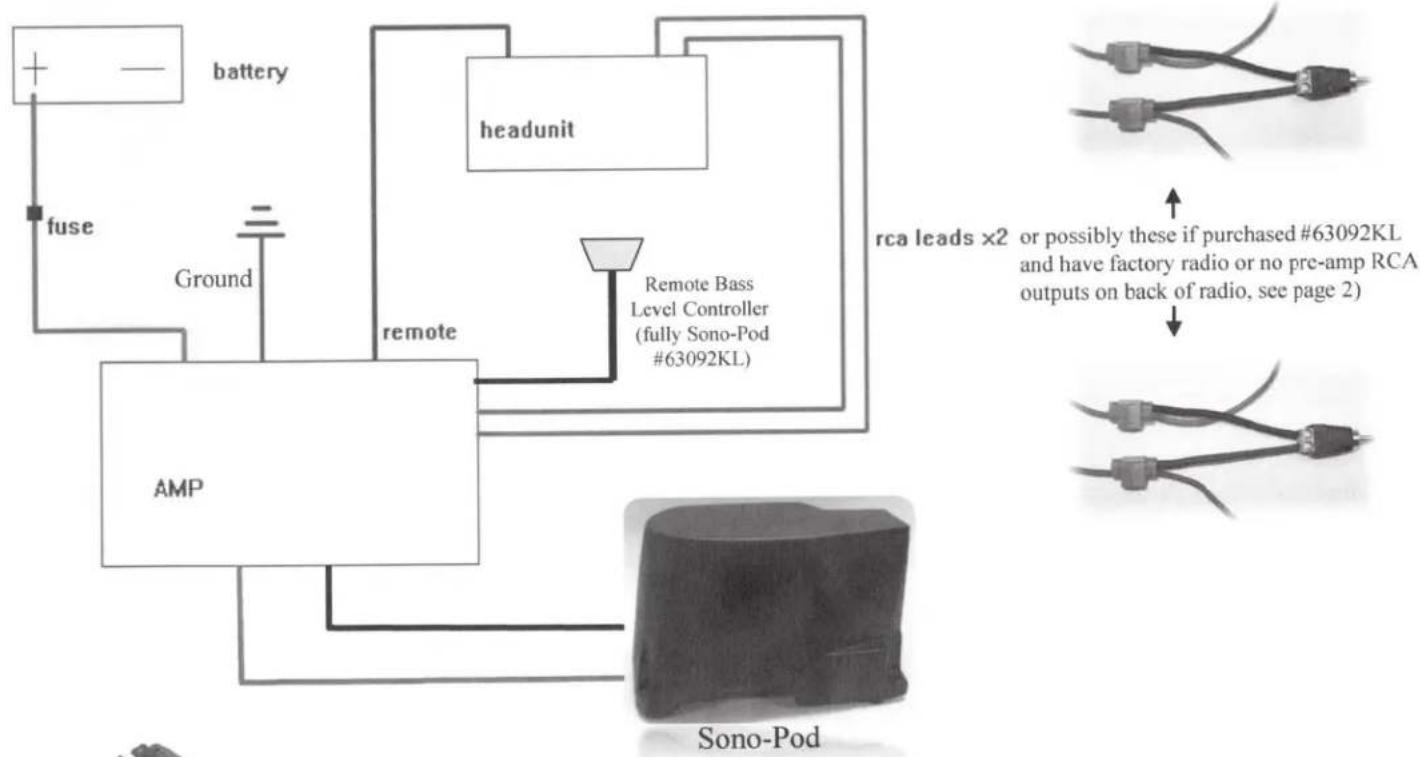
If your radio has low level (RCA) outputs on the back, use the “SUB” outputs (or the REAR outputs if your radio doesn’t have the SUB output). This is the preferred method of connecting your amp to your radio. Try not to run these RCA lines next to the amp power wire because it can sometimes cause sound interference. Running the RCA lines down one side of the Jeep and the amp power wire down the other side is a good idea.
This section is if your radio has no low level RCA's on the back or it's still the factory radio:
You can tap into your sound bar or other rear speaker wires for signal. If using your own amp, follow manufacturer's instructions on wiring your particular amp.
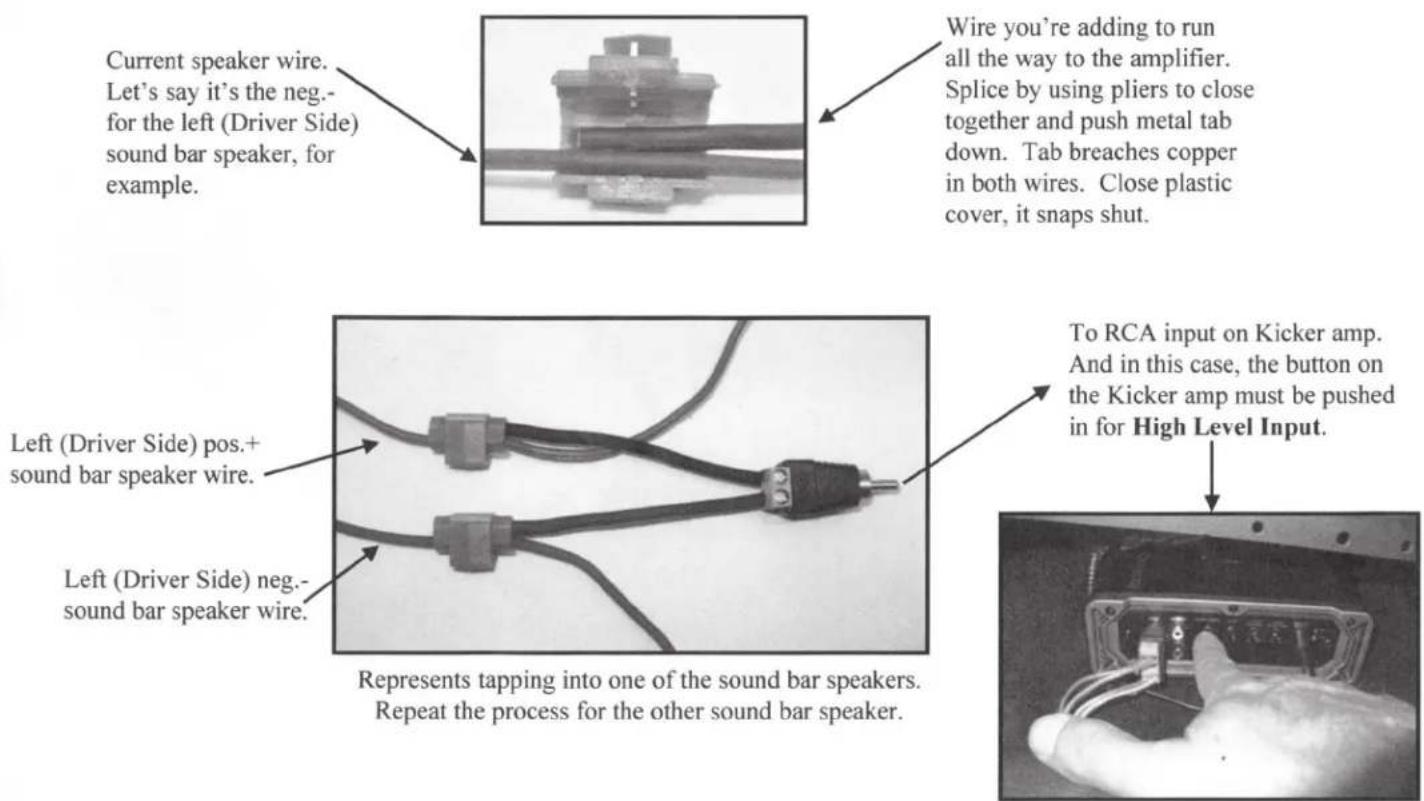
Included with the fully loaded #63092KL Sono-Pod is a Kicker mono amp along with some other necessary connectors for wiring that amp to a radio that has no low level RCA outputs. Lock-wire connectors are included to tap into your sound bar or other rear speaker wires for signal. You'll need to figure out which color wires are the pos.+ and neg.- for the left and right rear speakers. Wire colors vary greatly with the variety of different sound bars, etc. out there. At some point along the run of speaker wire from your radio to the sound bar or rear speakers, pick a good spot to tap into them - somewhere you won't see these blue lock wire connectors, somewhere they can be hidden. 4 of the 5 included blue lock-wire connectors are used for this. Here are some photos to help out if you've never used these before. (Wire length obviously shortened from lock-wire connector to RCA adapter to fit into photo).
text_image
Current speaker wire. Let's say it's the neg.- for the left (Driver Side) sound bar speaker, for example. Wire you're adding to run all the way to the amplifier. Splice by using pliers to close together and push metal tab down. Tab breaches copper in both wires. Close plastic cover, it snaps shut. Left (Driver Side) pos.+ sound bar speaker wire. Left (Driver Side) neg.- sound bar speaker wire. To RCA input on Kicker amp. And in this case, the button on the Kicker amp must be pushed in for High Level Input. Represents tapping into one of the sound bar speakers. Repeat the process for the other sound bar speaker.Amplifier ground wire: should be kept as short as possible and should be connected and grounded before ever connecting the amp power and amp remote wire. If you send power to the amp without having the ground wire connected and grounded, you could damage the amp! Rear seat bolt is a good place to connect the amp ground wire (see #6 on page 1).
Amplifier Power wire: best place to break through to engine bay is the same spot on CJ7's, YJ's and TJ's (see #5 on page 1). And try to keep this wire away from the RCA-related (signal) wires - the power wire run alongside RCA or speaker wires can cause interference and compromise sound quality.
Amplifier Remote Wire: You want a 12v switched wire such as the pos.+ on a TJ cigarette lighter, or your aftermarket head unit likely already has a remote wire you can tap into for this. “Switched” meaning the wire only has power when the Key is turned on in the ignition. (If you purchased the fully loaded #63092KL version, use the 5 ^th and final blue lock-wire connector for tapping into this 12v switched wire if using cig. lighter).
Speaker wire from Amp to Sono-Pod: Fully loaded #63092KL version Sono-Pod includes amp wire kit with plenty of speaker wire for this. Run only one pos.+ and one neg.- from amp to pod – see Kicker amp sheet for more info.
Kicker Remote Bass Level Controller: (#63092KL fully loaded Sono-Pod). Just need to find a nice home for it somewhere you like on your dash, console, etc. Somewhere it's easy to reach for because it's awesome and you'll use it often!
flowchart
graph TD
    A["+ Battery"] --> B["fuse"]
    B --> C["Ground"]
    C --> D["AMP"]
    D --> E["Sono-Pod"]
    E --> F["headunit"]
    F --> G["remote"]
    G --> H["Remote Bass Level Controller (fully Sono-Pod #63092KL)"]
    H --> I["Sono-Pod"]
    style A fill:#f9f,stroke:#333
    style B fill:#ccf,stroke:#333
    style C fill:#cfc,stroke:#333
    style D fill:#fcc,stroke:#333
    style E fill:#cff,stroke:#333
    style F fill:#ffc,stroke:#333
    style G fill:#fcf,stroke:#333
    style H fill:#cff,stroke:#333
    style I fill:#ffc,stroke:#333

natural_image
Top-down grayscale illustration of a vehicle with multiple wheels and a trunk (no text or symbols)Select Increments 4WD AUDIO
www.selectincrements.com Email: admin@selectincrements.com 610-345-9044 landline, no texts.
PART 2 – Sono-Pod Installation:
natural_image
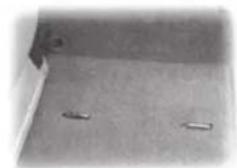
Plain floor with two small rectangular objects on the ground (no text or symbols visible)The Sono-Pod installs right over your existing cargo footman loops on your floor, no need to remove.
natural_image
Close-up of a hand using a tool to press or install a mechanical component (no visible text or symbols)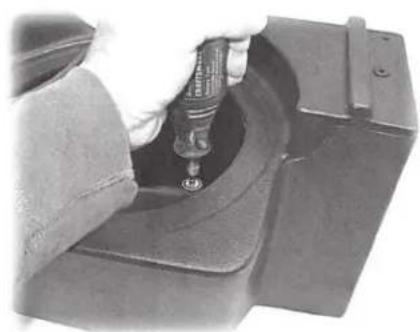
natural_image
Close-up of a mechanical component with a tool inserted into a housing (no visible text or symbols)You may have to cut the subwoofer hole larger to accept your particular sub; easily done with a rotary cut-out tool and either a spiral drill bit or even a sanding drum such as used with a Dremel® rotary tool. (The pre-cut hole is about 9" diameter so it can work with subs that need smaller cutout diameters).
natural_image
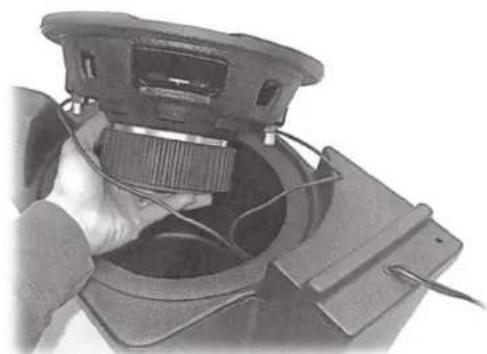
Close-up of a hand inserting a component into a device housing (no visible text or symbols)Install rubber grommet in underside hole and run speaker wires through to connect to your subwoofer.
Place sub in pod and gently pull any excess speaker wire back through the grommet. This may take a few attempts... you want it slightly loose but excess wire could vibrate if it's touching the pod walls.
natural_image
Close-up of a mechanical component with a curved pipe inserted, showing textured surface (no visible text or symbols)Use a glue gun (or similar medium) to plug any remaining air space around speaker wires as they exit the grommet to ensure an air-tight seal (air escaping could make a whistling noise on bass notes.
natural_image
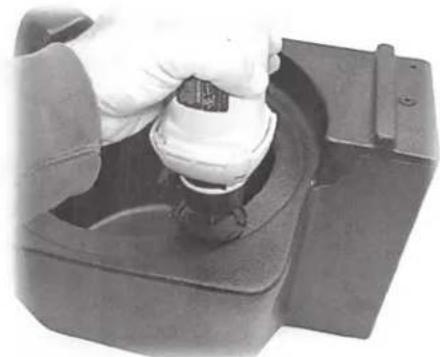
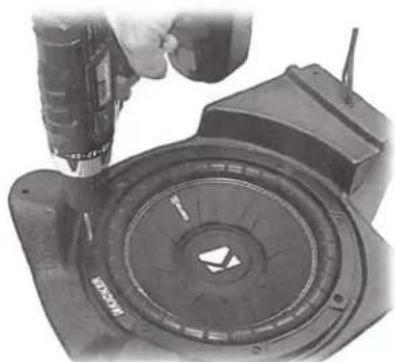
Close-up of a hand using a drill to press a mechanical component with a circular dial (no visible text or symbols)Use (8) provided black subwoofer screws to affix sub to pod, starting with a drill w/phillips bit....
natural_image
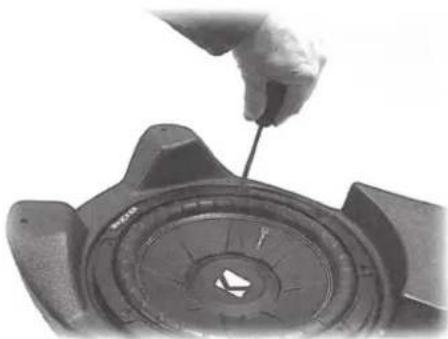
Close-up of a hand using a tool to adjust or install a mechanical component (no visible text or symbols)...but it's a good idea to finish tightening by hand to avoid stripping the plastic in case you have a pretty powerful drill. 😊


natural_image
Close-up of mechanical components with visible cracks and a numbered label (1) in the corner, no readable text or symbols present.Place the pod in cargo area passenger side (we'll fine tune exact positioning later) and start to tuck speaker wire under carpet. Pop wires up through carpet at your amplifier (a small slit in the carpet at the appropriate are will do) and connect wires to amp.

natural_image
Close-up of a metal bracket with a white rod inserted, placed on textured fabric (no text or symbols visible)Pod should be about 12 " to 5/8" away from passenger side wheel-well. (Note Insta-Trunk wall in photo – if you have one, make sure the pod doesn't touch the wall or its assembly bolts).
natural_image
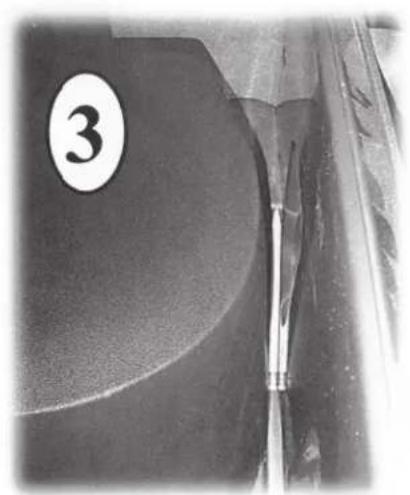
Close-up of a mechanical component with a numbered label '3' on the left side (no readable text or symbols beyond the number)Close tailgate. Note pencil in photo. The pod installs quite close to the tailgate (in TJ's) and the lower section where the subwoofer is is the point that comes closest to the tailgate. Photo is in a TJ. Earlier CJ7 and YJ Jeeps have a slightly larger cargo area so the pod won't be as close to the tailgate as this. Once the pod is exactly where you want it, open the tailgate to begin attaching pod to floor.

natural_image
Mechanical assembly diagram showing a tool inserted into a housing component and a drill bit being inserted (no text or symbols present)Ideally, you'll want an extension for your drill like the one pictured (left) to attach to your 3/8" hex bit. Otherwise the drill chuck can hit the pod (see arrow, right) when it spins and can mar the pod.
natural_image
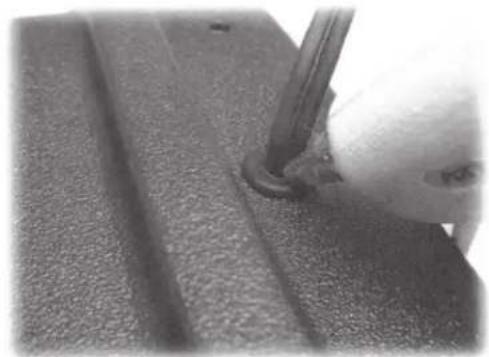
Close-up of a hand using a screwdriver to work on a mechanical component (no visible text or symbols)This screw first. Hold pod firmly in place when running screw through carpet and into floor.
natural_image
Close-up of a pipette dispensing liquid into a bowl (no text or symbols visible)This screw next. Note Intsa-trunk wall in photo. Drill extension would contact it, but no need to remove the wall if you have one.

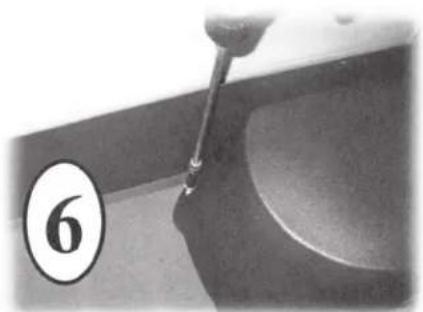
natural_image
Close-up of a mechanical component with a numbered label (7) and a tool inserted, no readable text or symbols present.This screw last. Then push the black screw caps included over top of each screw. Time for sound tests and adjustments of your radio and amp settings. (See first page).