Stealth-Pod - Subwoofer Select Increments - Free user manual and instructions
Find the device manual for free Stealth-Pod Select Increments in PDF.

User questions about Stealth-Pod Select Increments
0 question about this device. Answer the ones you know or ask your own.
Ask a new question about this device
Download the instructions for your Subwoofer in PDF format for free! Find your manual Stealth-Pod - Select Increments and take your electronic device back in hand. On this page are published all the documents necessary for the use of your device. Stealth-Pod by Select Increments.
USER MANUAL Stealth-Pod Select Increments
Questions? Call us at 610-345-9044 or email us at admin@selectincrements.com
CAUTION:
1) Don't let the banana plug prongs touch any metal when the pod is unhooked, you could damage your amplifier.
2) Never place objects on top of the pod, you may break the hangers.
3) Keep heavy, shifting cargo away from the pod; objects hitting the pod may break the hangers.
4) Make sure the subwoofer is screwed in with all eight screws and the foam gasket is between the woofer and the pod for an air-tight seal. If you're using your own subwoofer and it only has screw holes in the 12, 3, 6 and 9 o'clock positions, add 4 more screw holes between each of the existing holes.
5) Screw the subwoofer screws in tightly, but don't strip the plastic of the pod by screwing them in too tightly.
6) Hand-tighten the knobs to the tailgate carefully so as not to crack the plastic!
7) Make sure you plug in the pod correctly every time (i.e. pos+ to pos.+ and neg.- to neg.- You might want to mark it as such to avoid damaging your amplifier and subwoofer.
8) Speaker Hole Cut-Out: From the factory, the hole must be made to accommodate subwoofers that require smaller mounting holes, so you may have to cut the hole larger to accommodate a particular subwoofer. Easily done with a jig-saw or rotary cut-out tool, just use caution and take your time.
Troubleshooting:
Rattling/Vibration – Make sure the subwoofer is screwed in tightly and that air is not escaping from the pod, causing the vibration. Sometimes when conducting a sound check, the vibration you hear will not be detectable when driving the vehicle. CJ owners check to make sure all the metal snaps for your soft-top are screwed in tightly. All models, check that all hardware attached to the tailgate is fastened tightly; all screws are tight and not stripped, etc. Every vehicle is a little different and if something is vibrating, you may have to get creative: locate it and figure a way to isolate it. If you are throwing enormous amounts of power to the subwoofer, the metal of the tailgate itself may rattle. There are two ways to fix this: 1) Less Power. 2) Applying Dynamat® to the tailgate (the interior panel of the tailgate that the pod rests on).
Tools: Measuring tape, drill, wire strippers/crimper, various sized phillips screwdrivers, very small flat-head screwdriver, level, hammer, pick, pencil, masking tape.

natural_image
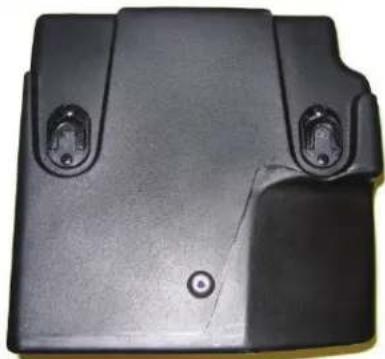
Black plastic electronic device with two side buttons and a circular base (no visible text or symbols)Install hangers and bumper as shown by using the tiny dimples in the pod as starting points for the screws
natural_image
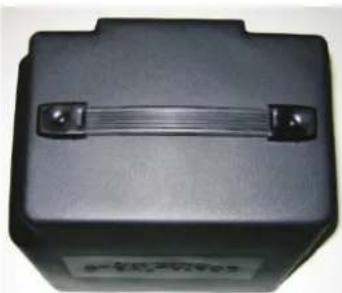
Black rectangular electronic device with a strap and two metallic buttons (no visible text or symbols)
natural_image
Close-up of a black rectangular electronic device with a metallic cable or connector attached (no visible text or symbols)Install handle as shown so that it lays flat, but can pull up like the photos.

natural_image
Close-up of a black electronic component with wires, labeled 'TO SUBWOOFER' (no other text or symbols visible)Strip ends of included wire. Attach crimp terminals to one end and connect to terminal cup as shown.

text_image
Install rubber feet in corners as shown
natural_image
Close-up of a black plastic electronic device with a circular port and a small inset component (no visible text or symbols)Install terminal cup as shown. Note: some may wish to install on an angle for ease of connecting/disconnecting.

text_image
Select Increments www.selectincrements.com Email: admin@selectincrements.com Phone: 610-345-9044STEALTH POD INSTALLATION: Find the section for your particular model year and look at the picture for mounting points.
1976-2002 CJ, YJ and TJ Wrangler:
Your tailgate looks something like this:

natural_image
Exterior view of a white car door with black trim and side panels, parked outdoors (no visible text or symbols)Some models have these, some some don't, they won't interfere with your installation.
CJ owners have a tailgate that flips down on hinges, while the YJ and '97-'02 TJ owners have a tailgate that has the same appearance as the CJ's, but swings out on hinges as in the above photo. Earlier model YJ owners may have the tailgate catch device shown below and will need to remove it to install the Stealth-Pod on this side of the tailgate:
If your particular model has this, it will need to be removed to install the Stealth-Pod on this side. It's simply a matter of removing the screws. The carpet can be left in place, but it may make the install a little more difficult.

natural_image
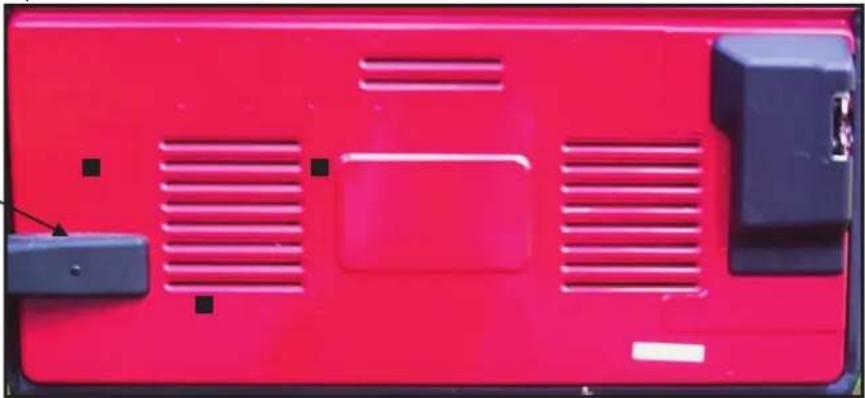
Exterior view of a vehicle's front wheel compartment showing material and structural details (no text or symbols visible)This particular photo represents '76-'02 models and this close-up has three black squares representing the approximate positions that the knob pieces for the hangers will install and where the rubber bumper rests:

text_image
Make sure the pod is far enough to the right that it is not touching this piece in any way.First, you want to find the exact point to mount the knobs. The magic number is 8 ^3/4 ", which is the distance you want from the center of one knob to the center of the other knob when they're installed on the tailgate. First, by using the photo above along with a pair of 1" square pieces of masking tape that both have a dot in the exact center, lightly put the tape squares on the tailgate where the center of the knob pieces should install, making sure that the centers of the tape pieces are 8 ^3/4 " apart. Now, put the knobs in the hangers and hold the pod up to the tailgate and find its 'final installed' position by checking for clearance with you hard or soft top AND making sure that the pod and it's handle swing out uninterrupted when you open the tailgate with your hard or soft-top on. Make sure that the pod's rubber feet will clear the floor of the vehicle. Also make sure the wire plug isn't jammed up against the wheel-well when the gate is closed. The lower bumper on the pod should rest just below the indent in the metal, or even slightly hanging over the indent. Next, adjust the tape pieces as necessary (this may take several attempts until you get the tape squares position correctly). Make sure that, not only the knob centers are 8 ^3/4 " apart, but also that the tape squares are going to be level with each other vertically. (You don't have to mark where the lower rubber bumper rests, just make sure it's not resting in the metal indentation). Once you are sure that the tape squares are exactly where they need to be to install the knobs, place one knob on top one of the masking tape squares as accurately as possible. Now, put a pencil in each of the screw holes and mark on the tape where the four screw holes are located. Put the knob aside. You're going to drill next, but you may want to use a pick or even a nail and hammer, and, with pinpoint accuracy, strike where the center of the screws will go so your drill bit has an indent to start in and doesn't wander. Now, drill out the four holes with the 3/32" drill bit, taking care to not drill through the outer side of the tailgate! Repeat the process for the other knob. Next, remove what's left of the tape. Now use the eight included smaller #4 screws and, with the rubber gasket between the knob base and the tailgate, screw one knob into place by hand so you can feel the tension; make sure it's tight, but don't crack the plastic! Repeat the process for the other knob. If you haven't already, you'll screw the subwoofer into the pod, making sure that the small length of included speaker wire has the positive (pos.+) of the subwoofer connected to the positive (pos.+) of the terminal cup and the negative (neg.-) of the subwoofer connected to the negative (neg.-) of the terminal cup on the side of the pod. Use the included crimp connectors to clip the wires to the cup. Now you're ready to slide the Stealth-Pod onto its hangers. The pod should slide relatively easily on and off the knobs. Hopefully you've got everything lined up just the way it should be!
After you have mounted your amplifier in a place of your choosing and have ran all wires and ran the RCA lines from the back of the radio to it, run the positive and negative speaker wires out of the amplifier, under the carpet, and back to the Stealth-Pod. Be sure to leave enough extra wire where the Stealth-Pod mounts so there's no tension when you fully swing open the tailgate with the pod still installed. Remove some of the insulation at the end of the wires and run them in to the supplied banana plug, making sure to connect the negative wire to the side of the plug with the tiny tab on it that says GRD and the positive wire to the other side. Using a small flathead screwdriver, tighten the screws in the banana plug to hold the wires in place. Now, all you have to do is plug it in to the terminal cup on the side of the pod, making sure that you're connecting positive to positive and negative to negative. Please make sure to do this every time you plug in the pod. If you have properly wired the terminal cup, the black terminal should connect to the GRD side of the banana plug. Next, it's time to fine-tune your subwoofer. This may take several adjustments, listening to a variety of music and finding the best overall settings on your amplifier and radio for bass, treble, etc. You may also want to test and adjust after driving the vehicle with the top down!
2003-2006 TJ Wrangler:
Your tailgate looks like this:

natural_image
Red off-road vehicle backrest with grassy background (no visible text or symbols)The close-up photo below has three black squares representing the approximate positions that the knob pieces for the hangers will install and where the rubber bumper rests:
Make sure the pod is far enough to the right that it is not touching this piece in any way.
natural_image
Red plastic door panel with ventilation slots and black buttons, no visible text or symbolsFirst, you want to find the exact point to mount the knobs. The magic number is 8 ^3/4 ", which is the distance you want from the center of one knob to the center of the other knob when they're installed on the tailgate. First, by using the photo above along with a pair of 1" square pieces of masking tape that both have a dot in the exact center, lightly put the tape squares on the tailgate where the center of the knob pieces should install, making sure that the centers of the tape pieces are 8 ^3/4 " apart. Now, put the knobs in the hangers and hold the pod up to the tailgate and find its 'final installed' position by checking for clearance with you hard or soft top AND making sure that the pod and it's handle swing out uninterrupted when you open the tailgate with your hard or soft-top on. Make sure the pod's rubber feet will clear the vehicle floor. Also, make sure the wire plug isn't jammed up against the wheel-well when the gate is closed. The lower bumper on the pod should rest just below the indent in the metal. Next, adjust the tape pieces as necessary (this may take several attempts until you get the tape squares position correctly). Make sure that, not only the knob centers are 8 ^3/4 " apart, but also that the tape squares are going to be level with each other vertically. (You don't have to mark where the lower rubber bumper rests). Once you are sure that the tape squares are exactly where they need to be to install the knobs, place one knob on top one of the masking tape squares as accurately as possible. Now, put a pencil in each of the screw holes and mark on the tape where the four screw holes are located. Put the knob aside. You're going to drill next, but you may want to use a pick or even a nail and hammer, and, with pinpoint accuracy, strike where the center of the screws will go so your drill bit has an indent to start in and doesn't wander. Now, drill out the four holes with the 3/32" drill bit, taking care to not drill through the outer side of the tailgate! Repeat the process for the other knob. Next, remove what's left of the tape. Now use the eight included smaller #4 screws and, with the rubber gasket between the knob base and the tailgate, screw one knob into place by hand so you can feel the tension; make sure it's tight, but don't crack the plastic! Repeat the process for the other knob. If you haven't already, you'll screw the subwoofer into the pod, making sure that the small length of included speaker wire has the positive (pos.+) of the subwoofer connected to the positive (pos.+) of the terminal cup and the negative (neg.-) of the subwoofer connected to the negative (neg.-) of the terminal cup on the side of the pod. Use the included crimp connectors to clip the wires to the cup. Now you're ready to slide the Stealth-Pod onto its hangers. The pod should slide relatively easily on and off the knobs. Hopefully you've got everything lined up just the way it should be!
After you have mounted your amplifier in a place of your choosing and have ran all wires and ran the RCA lines from the back of the radio to it, run the positive and negative speaker wires out of the amplifier, under the carpet, and back to the Stealth-Pod. Be sure to leave enough extra wire where the Stealth-Pod mounts so there's no tension when you fully swing open the tailgate with the pod still installed. Remove some of the insulation at the end of the wires and run them in to the supplied banana plug, making sure to connect the negative wire to the side of the plug with the tiny tab on it that says GRD and the positive wire to the other side. Using a small flathead screwdriver, tighten the screws in the banana plug to hold the wires in place. Now, all you have to do is plug it in to the terminal cup on the side of the pod, making sure that you're connecting positive to positive and negative to negative. Please make sure to do this every time you plug in the pod. If you have properly wired the terminal cup, the black terminal should connect to the GRD side of the banana plug. Next, it's time to fine-tune your subwoofer. This may take several adjustments, listening to a variety of music and finding the best overall settings on your amplifier and radio for bass, treble, etc. You may also want to test and adjust after driving the vehicle with the top down!
2007 & Up JK Wrangler:
Your tailgate looks like this:
natural_image
Front view of a black electronic device with ventilation grilles and buttons, mounted on a purple vehicle (no visible text or symbols)Below: The close-up photo has three black squares representing the approximate positions that the knob pieces for the hangers will install and where the rubber bumper rests:
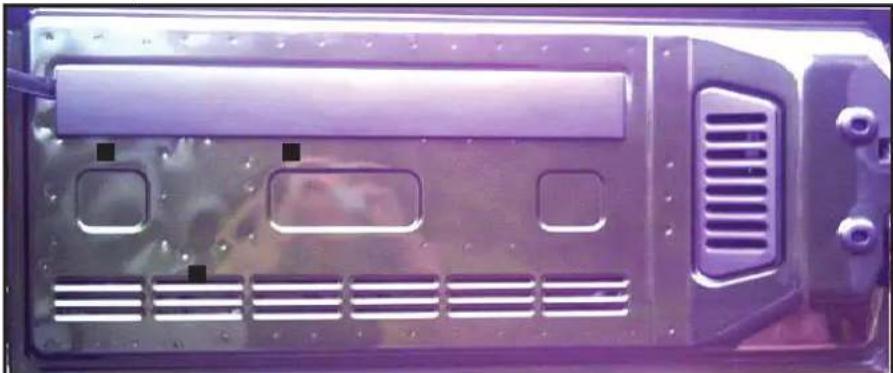
natural_image
Close-up of a black electronic device casing with ventilation grilles and mounting holes (no visible text or symbols)First, you want to find the exact point to mount the knobs. The magic number is 8 ^3/4 ", which is the distance you want from the center of one knob to the center of the other knob when they're installed on the tailgate. First, by using the photo above along with a pair of 1" square pieces of masking tape that both have a dot in the exact center, lightly put the tape squares on the tailgate where the center of the knob pieces should install, making sure that the centers of the tape pieces are 8 ^3/4 " apart. The key to correct placement on JK's is that the knob bases are vertically right between 1) the plastic cover that stretches across the top of the tailgate and 2) the indents in the metal. Now, put the knobs in the hangers and hold the pod up to the tailgate and find its 'final installed' position by checking for clearance with you hard or soft top AND making sure that the pod and it's handle swing out uninterrupted when you open the tailgate with your hard or soft-top on. Make sure the pod's rubber feet will clear the vehicle floor. Also, make sure the wire plug isn't jammed up against the wheel-well when the gate is closed. The lower bumper on the pod should rest just below the vents in the metal, or even slightly hanging over the first vent. Next, adjust the tape pieces as necessary (this may take several attempts until you get the tape squares position correctly). Make sure that, not only the knob centers are 8 ^3/4 " apart, but also that the tape squares are going to be level with each other from top to bottom. (You don't have to mark where the lower rubber bumper rests). Once you are sure that the tape squares are exactly where they need to be to install the knobs, place one knob on top one masking tape square as accurately as possible. Now, put a pencil in each of the screw holes and mark on the tape where the four screw holes are located. Put the knob aside. You're going to drill next, but you may want to use a pick or even a nail and hammer, and, with pinpoint accuracy, strike where the center of the screws will go so your drill bit has an indent to start in and doesn't wander. Now, drill out the four holes with the 3/32" drill bit, taking care to not drill through the outer side of the tailgate! Repeat the process for the other knob. Next, remove what's left of the tape. Now use the eight included smaller #4 screws and, with the rubber gasket between the knob base and the tailgate, screw one knob into place by hand so you can feel the tension; make sure it's tight, but don't crack the plastic! Repeat the process for the other knob. If you haven't already, you'll screw the subwoofer into the pod, making sure that the small length of included speaker wire has the positive (pos.+) of the subwoofer connected to the positive (pos.+) of the terminal cup and the negative (neg.-) of the subwoofer connected to the negative (neg.-) of the terminal cup on the side of the pod. Use the included crimp connectors to clip the wires to the cup. Now you're ready to slide the Stealth-Pod onto its hangers. The pod should slide relatively easily on and off the knobs. Hopefully you've got everything lined up the way it should be!
After you have mounted your amplifier in a place of your choosing and have ran all wires and ran the RCA lines from the back of the radio to it, run the positive and negative speaker wires out of the amplifier, under the carpet, and back to the Stealth-Pod. Be sure to leave enough extra wire where the Stealth-Pod mounts so there's no tension when you fully swing open the tailgate with the pod still installed. Remove some of the insulation at the end of the wires and run them in to the supplied banana plug, making sure to connect the negative wire to the side of the plug with the tiny tab on it that says GRD and the positive wire to the other side. Using a small flathead screwdriver, tighten the screws in the banana plug to hold the wires in place. Now, all you have to do is plug it in to the terminal cup on the side of the pod, making sure that you're connecting positive to positive and negative to negative. Please make sure to do this every time you plug in the pod. If you have properly wired the terminal cup, the black terminal should connect to the GRD side of the banana plug. Next, it's time to fine-tune your subwoofer. This may take several adjustments, listening to a variety of music and finding the best overall settings on your amplifier and radio for bass, treble, etc. You may also want to test and adjust after driving the vehicle with the top down!