
ARV43MP - Rear Camera Gator - Free user manual and instructions
Find the device manual for free ARV43MP Gator in PDF.


| Product Type | Rear View Camera System |
| Brand | Gator |
| Model | ARV43MP |
| Installation Methods | Wired and Wireless (Dual Tech) |
| Wireless Signal | Video transmitted wirelessly to monitor |
| Wired Signal | Via RCA cable from camera to monitor |
| Camera Power | From reversing tail light wire (+12V) |
| Camera Ground (Wireless) | Transmitter black wire to vehicle chassis |
| Camera Ground (Wired) | Through RCA lead; no separate ground wire |
| Monitor Power (Wired) | Red wire to accessory +12V, black wire to ground |
| Mounting Location | Above license plate |
| Mounting Method | Adhesive strip on bracket, secured with license plate bolts |
| Cable Routing (Wired) | RCA cable from boot through cabin to dash |
| Voltage Requirement | +12V; minimum +11V for wireless transmitter, +12V for camera |
| LED/Computer Lighting Compatibility | May require relay if voltage insufficient |
| Activation | Automatic upon engaging reverse gear |
| Video Display | On mirror mount monitor |
| Installation Difficulty | DIY with basic wiring skills |
| Tools Required | Wire strippers, crimp connectors, drill, screwdriver, silicone |
Frequently Asked Questions - ARV43MP Gator
User questions about ARV43MP Gator
0 question about this device. Answer the ones you know or ask your own.
Ask a new question about this device
Download the instructions for your Rear Camera in PDF format for free! Find your manual ARV43MP - Gator and take your electronic device back in hand. On this page are published all the documents necessary for the use of your device. ARV43MP by Gator.
USER MANUAL ARV43MP Gator
In terms of the wiring of the camera system, the Gator ARV43M can be electrically installed in 2 different ways, wired or wireless. We call this versatility Dual Tech.
WIRELESS INSTALLATION:
Wireless installation refers to the connection of the video signal to the monitor. In a wireless installation there is no need to run a video cable through the passenger compartment which can be difficult for some DIY installers. Instead, the signal is sent wirelessly to the monitor. This feature means that the time and difficulty of installing the cameras system is greatly reduced.
At the rear of the car the Camera is connected to a wireless transmitter which is powered from the reverse tail light wire.
In the event that you live and drive in an area were RF interference is a problem (Poor video signal), you may need to change your installation to wired.

WIRED INSTALLATION:
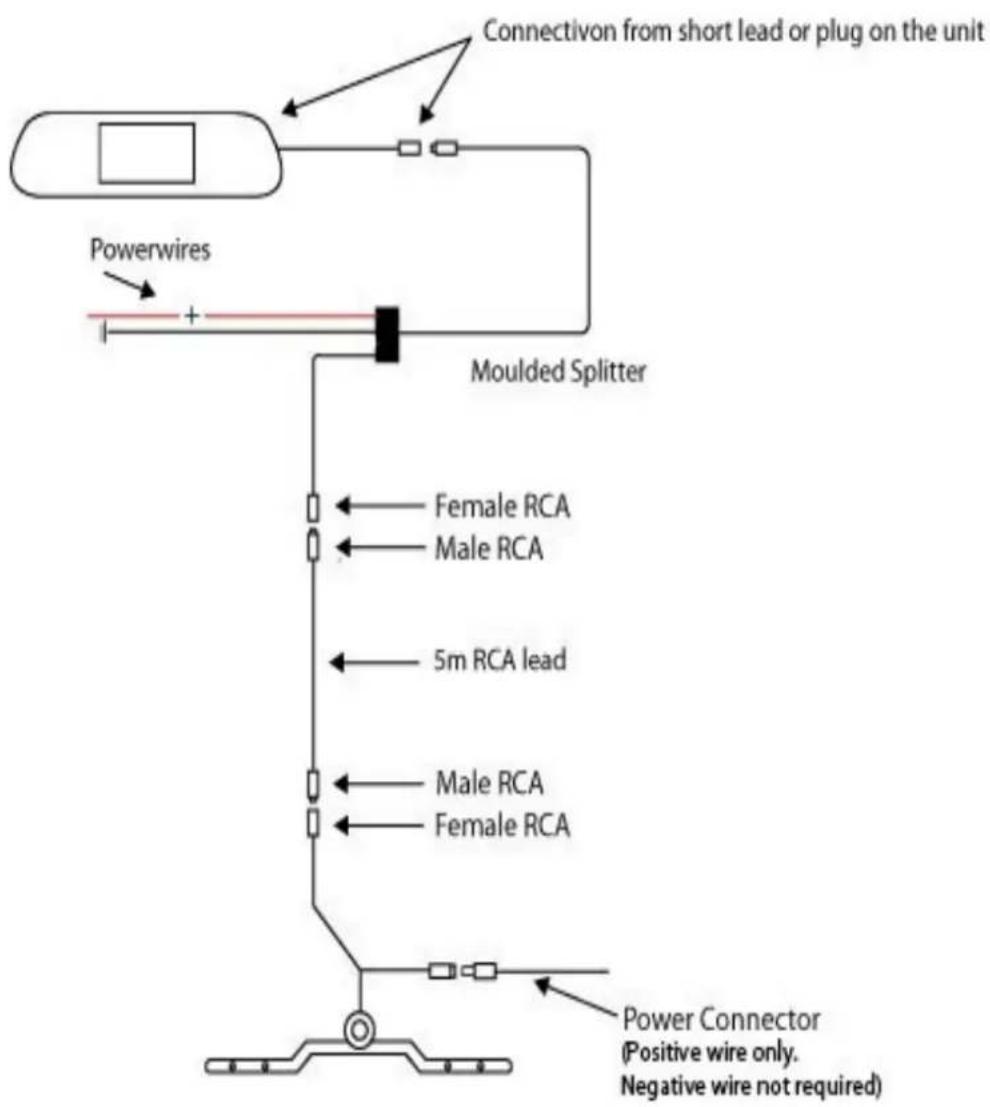
The video signal is transferred from the camera to the monitor via an RCA cable that will need to be run from the boot through the passenger compartment to the monitors wired loom run under the dash. From there the power and video signals are sent directly to the monitor.
At the rear of the car the camera is powered directly from the reversing tail light.
INSTALLING THE CAMERA ( Wired installation or Wireless)
In most instances, the camera is best mounted above the vehicles license plate as shown here.

Where this is not possible there are other camera combinations that will suit your individual application. When mounting the camera, make sure that the camera does not cover any part of the license plate. Choose a position that does not impede the access / operation of the boot release or tailgate latch.
- Remove the rear license plate from the vehicle by undoing the bolts / screws.
- Remove the wax paper from the adhesive strip on the back of the camera mounting bracket to expose the adhesive surface. Carefully align the brackets arm so that the top edge of the arms align to the top edge of where the license plate would sit and stick it in place making sure that 2 holes in the mounting bracket align with the mounting holes of the license plate.
- With the license plate off, check if there are pre-existing holes through which the cables from the camera can be passed through to the boot of the vehicle as in Fig. 2. If there are no pre-existing holes carefully drill a hole of sufficient diameter to allow the cables to be passed into the interior of the vehicle (through a rubber grommet) and seal the hole with silicone to avoid water leakage.
- Refit the license plate over the camera bracket using the original bolts/screws.
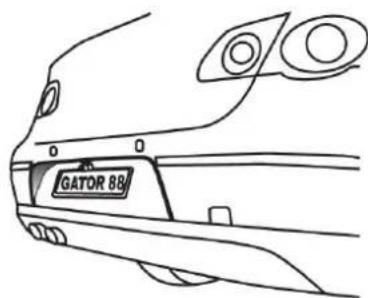
Fig.1

Fig. 2
WIRELESS INSTALLATION.
- Connect the RED wire of the wireless video transmitter to the wire that supplies power to the reversing light (this is the wire that is energized when the vehicle is put into reverse). Please measure the voltage on this wire to make sure that it is +12V when it is energized. Use a suitable splicing/crimp connector (Scotch lock type) or strip back the insulation and solder the connection making sure to insulate the connection with electrical tape or shrink tubing after the join is made.
- Connect the BLACK wire of the transmitter to a suitable ground such as the metal body of the vehicle. To attach, find a suitable metal panel making sure that there are no wires and electronics behind this panel. Drill a small 1/8th hole. Attach an "O" ring terminal at the end of the BLACK wire, then secure the wire to the chassis using a suitable self-tapping screw. To ensure a better earth connection, scrape away the paint around the hole before screwing the terminal into the hole.
- Plug the other connections of the transmitter cable into the corresponding sockets of the cameras harness.
NOTE:
Some cars that Run LED or Computer controlled lighting systems may not deliver enough voltage to the transmitter. If the voltage at the reversing wire light is less than +1 1 volts it may be necessary to use a relay to supply power to the transmitter from the accessory wiring in the front of the car. In this case the reversing light wire only needs to trigger the relay.
Make sure that you do not drill holes in the panels that have an opposite face that is visible outside the car for example guard panels. In fact, whenever drilling holes in the bodywork of a vehicle, always see what is on the other side ;–).
WIRED INSTALLATION.
- Connect the RED wire of the Camera's Power Harness to the wire that supplies power to the reversing light globe (the wire that is energized only when the car is put into reverse). Before making the electrical connection, temporarily disconnect the camera from the power plug whilst making the connection to the back up light. Use a suitable splicing/crimp connector (Scotch lock type) or strip connector. This connection can also be soldered, making sure to insulate the joint with electrical insulation when done.
The camera has only one wire to connect (positive (+)). There is no need to hook up a ground wire as the camera gets its earth through the RCA lead. Hooking up the earth may cause a ground loop. In this case horizontal lines will appear in the image.
- After you have insulated the join you can connect the power harness to the camera. NOTE:
Some cars that run LED or computer controlled lighting systems may not deliver enough voltage to run the camera. If the voltage at the reversing wire light is less than +12 volts it may be necessary to use a relay to supply power to the transmitter harness from the wiring in the front of the car. In this case the reversing light only needs to trigger the relay.
Make sure that you do not drill holes in the panels that have an opposite face that is visible outside the car, for example guard panels. In fact, whenever drilling holes in the bodywork of a vehicle, always see what is on the other side.
- Connect one end of the supplied RCA video lead to the RCA lead coming from the camera, then run the RCA lead to the front underside of the driver side dashboard (this is where the monitor's loom will be located). To do this you will need to remove the rear seat to pass the cable into the cabin area, and you will need to remove the door scuff plates to run the wire along the side of the vehicle. The RCA cable will be hidden when you replace the scuff plates. When the cable is at the front of the vehicle, the RCA cable needs to be run from the scuff plate area to the underside of the dash behind the kick trim (remove to run cable).
- The Mirror mount monitor has two power wires to be connected. Connect the Red wire (Accessories +12V) to a wire that is energized when the accessories position on the key is active (When the radio is on) and the black wire to a ground wire or you can connect the black wire to the body of the car using the steel of the car's body behind the kick trim as an earth. In this case drill a small 1/8 inch hole and connect the wire using a suitable O ring terminal. Scrape off the car's paint around the hole to ensure a good earth.
- Connect the RCA lead to the RCA Connector from the Monitor's loom.
TESTING THE REVERSE CAMERA FUNCTION
- Engage the park brake and turn the ignition key to the on position. DO NOT start the vehicle.
- Select reverse gear with the gear shift. The Monitor will sense the Video signal from camera automatically and image should start broadcasting the image of the rear of the vehicle.


Brand : Gator
Model : ARV43MP
Category : Rear Camera