
AE1610P13 - Unspecified OpenVox - Free user manual and instructions
Find the device manual for free AE1610P13 OpenVox in PDF.

| Product Type | Modular Analog Telephony Interface PCI Card |
| Model | AE1610P13 (equivalent to AE1610E) |
| Number of Channels | 16 (4 modules, each with 4 ports via splitter) |
| Interface | PCI (32-bit, 33 MHz) |
| Power Supply | 12V DC external power adapter |
| Supported Software | Asterisk PBX, DAHDI drivers (Linux) |
| Voice Protocols | FXO (for PSTN lines) and FXS (for analog phones) |
| Echo Cancellation | Optional on AE1610E models (EC module) |
| Connectors | 4 RJ45 ports (each divided into 4 phone lines via included splitter) |
| Dimensions (Card) | Standard PCI card (approx. 175 x 107 mm) |
| Weight | Approx. 150 g |
| Operating Systems | Linux (CentOS, Elastix, AsteriskNow, etc.) |
| Country Configuration | Adjustable loadzone and defaultzone (e.g., cn for China) |
| Interrupt Management | Adjustable IRQ per millisecond (1-16 ms) for performance tuning |
| Compliance | FCC, CE (estimated) |
Frequently Asked Questions - AE1610P13 OpenVox
User questions about AE1610P13 OpenVox
0 question about this device. Answer the ones you know or ask your own.
Ask a new question about this device
Download the instructions for your Unspecified in PDF format for free! Find your manual AE1610P13 - OpenVox and take your electronic device back in hand. On this page are published all the documents necessary for the use of your device. AE1610P13 by OpenVox.
USER MANUAL AE1610P13 OpenVox
natural_image
Close-up of a green OpenVox PCI board with multiple circuit boards and connectors (no readable text or symbols)AE1610E
Date: 19/07/2011
Version: 1.0
OpenVox
深圳开源通信有限公司
OpenVox-Best Cost Effective Asterisk Cards
OpenVox Communication Co.Ltd.
Address: F/3, Block No.127, Jindi Industrial Zone,
Shazui Road, Futian district, Shenzhen, Guangdong 518048, China
Tel:+86-755-82535461, 82535095, 82535362, Fax:+86-755-82535174
E-Mail: sales@openvox.cn support@openvox.cn
M for Technical Support: support@openvox.cn
Business Hours: 9:00AM-18:00PM from Monday to Friday
URL: www.openvox.cn
Thank You for Choosing OpenVox Products!
Content
1. Overview....4
1.1 What is A1610E 4
1.2 What is asterisk....4
2. Hardware setup....5
3. Software installation and configuration 6
3.1 Download....6
3.2 Installation 6
3.3 Configuration 7
3.4 Call test 11
4. Reference 15
Test environments
CentOS-5.6
Kernel version: 2.6.18-238.12.1.el5
DAHDI: dahdi-linux-complete-2.4.0+2.4.0
Asterisk: 1.8.4.4
Elastix 2.0.4
Hardware: OpenVox A1610E/AE1610E
1. Overview
1.1 What is A1610E/AE1610E
A1610E is an independent research and development modular analog telephony interface product by OpenVox Communication Co. LTD, AE1610E is A1610E with an EC module. They are designed to build SMB PBX. A1610E/AE1610E must be made up with FXO-400 and FXS-400 together to build a workable system.
1.2 What is asterisk
The Definition of Asterisk is described as follows:
Asterisk is a complete PBX in software. It runs on Linux, BSD, Windows (emulated) and provides all of the features you would expect from a PBX and more. Asterisk does voice over IP in four protocols, and can interoperate with almost all standards-based telephony equipment using relatively inexpensive hardware. Asterisk provides Voicemail services with Directory, Call Conferencing, Interactive Voice Response, Call Queuing. It has support for three-way calling, caller ID services, ADSI, IAX, SIP, H323 (as both client and gateway), MGCP (call manager only) and SCCP/Skinny (voip-info.org).

flowchart
graph TD
    A["Telecom"] --> B["Asterisk VOIP PBX"]
    C["PC+SoftPhone"] --> B
    D["SIP Phone"] --> B
    E["Analog Phone"] --> B
    F["Analog Card"] --> G["BRI Card"]
    F --> H["PRI Card"]
    F --> I["GSM Card"]
    F --> J["V100 Card"]
    K["Operating System Linux and HeadSD"] --> A
    L["Open Source Drivers: Anemak®, Zipid, Brdhaft, mESPN and SSDN/ESO Protocols SIP, IAX, SST, MGC2, HDMI, R2 and more... Application: TVI, CRM, Fast email, CallComer, Billing and you application."] --> B
    B -->|Arrow| F
    B -->|Switch| C
Figure 1 Topology
2. Hardware setup
The following matters need your attention before using A1610E/AE1610E, please check that: 1. Power supply: Plug 12V power line into the connector according to figure showed.

flowchart
graph TD
    A["OpenMax"] --> B["Module 1"]
    A --> C["Module 2"]
    A --> D["Module 3"]
    A --> E["Module 4"]
    A --> F["Channel 1 to channel 4"]
    A --> G["Channel 5 to channel 8"]
    A --> H["Channel 9 to channel 12"]
    A --> I["Channel 13 to channel 16"]
    A --> J["Power Supply (12V)"]
    K["SMEC V1.2"] --> L["InputDC12V"]
Figure 2 Hardware setup
- Pin assignment: There are up to 4 FXS-400/FXO-400 modules on every A1610E/AE1610E board, a module corresponds to a RJ45 port which A1610E takes 2 of 8 pins for a pair connect to your 2-wire telephone line, so each RJ45 socket is divided into 4 telephone lines by a splitter.

Figure 3 Pin assignment
- A1610E/AE1610E splitter: It can divide RJ45 port into four ordinary telephone lines, please plug PSTN line into FXO port and normal telephone line corresponds to FXS port.

natural_image
Close-up of a black electronic device with attached cable and connector (no visible text or symbols)Figure 4 A1610E splitter
3. Software installation and configuration
A1610E/AE1610E supports DAHDI software device driver on Linux. To make full use of A1610E/AE1610E, you should download, compile, install and configure DAHDI and asterisk.
3.1 Download
Download DAHDI package to the directory of /usr/src/ from openvox official website http://downloads.openvox.cn/pub/drivers/dahdi-linux-complete/openvox_dahdi-linux-complete-current.tar.gz
# wget http://downloads.opengvox.cn/pub/drivers/dahdi-linux-complete/openvox_dahdi-linux-complete-current.tar.gz
tar -xvzf openvox\_dahdi-linux-complete-current.tar.gz
3.2 Installation
- Detect hardware by execute command: lspci -vvvv
Check the outcome and confirm your system has recognized A1610E. If identified, outputs are like that:
01:02.0 Communication controller: Device 1b74:1610 (rev 01)
Subsystem: Device 1b74:0001
Control: I/O+ Mem+ BusMaster+ SpecCycle- MemWINV+ VGASnoop- ParErr- Stepping- SERR-
FastB2B- DisINTx-
Status: Cap- 66MHz- UDF- FastB2B- ParErr- DEVSEL=slow >TAbort- <TAbort- <MAbort-
>SERR- <PERR- INTx-
Latency: 64, Cache Line Size: 16 bytes
Interrupt: pin A routed to IRQ 225
Region 0: Memory at ded80000 (32-bit, non-prefetchable) [size=512K]
Kernel driver in use: opvxa24xx
Kernel modules: opvxa24xx
Figure 5 Hardware detection
2. Modify the environment variables
Edit the file named modules under /etc/dahdi/.You are able to comment out drivers unnecessary to load, add opvxa24xx.
<h1 id="x100p-single-port-fxo-interface">X100P - Single port FXO interface</h1>
<h1 id="x101p-single-port-fxo-interface">X101P - Single port FXO interface</h1>
#opvxa1200    #comment out the unnecessary driver
#ystdm8xx
#ystdm16xx
... ...
<h1 id="rhino-481224-channel-analog-pci-interface-card">Rhino 4/8/12/24 Channel Analog PCI Interface Card</h1>
#rcbfx
Opvxa24xx    #add opvxa24xx driver
Figure 6 Modules modification
3. Compile
Unzip and change directory to dahdi-linux-complete-XX, perform command below one by one.
<h1 id="cd-usrsrcdahdi-linux-complete-xx">cd /usr/src/dahdi-linux-complete-XX</h1>
<h1 id="make">make</h1>
<h1 id="make-install">make install</h1>
<h1 id="make-config">make config</h1>
If there is something wrong after “make”, please refer to http://bbs.openvox.cn/viewthread.php?tid=1557&extra=page%3D1 Then run “make” again, if successfully, reboot your PC please.
3.3 Configuration
- Load opvxa24xx driver
<h1 id="modprobe-dahdi">modprobe dahdi</h1>
<h1 id="modprobe-r-opvxa24xx">modprobe -r opvxa24xx</h1>
<h1 id="modprobe-opvxa24xx-opermodechina">modprobe opvxa24xx opermode=CHINA</h1>
openvox_dahdi-linux-complete 2.2.0 or higher versions allow users to adjust IRQ per
millisecond. You are able to modify IRQ by the following way:
# modprobe opvxa24xx opermode=CHINA ms\_per\_irq=2
ms_per_irq=2 means every 2 milliseconds initiate once IRQ. You may select a valid value of ms_per_irq from 1, 2, 4, 8, 16 according to requirement, the default value is 1. While you download DAHDI from digium official website:
http://downloads.asterisk.org/pub/telephony
DAHDI version above dahdi-linux-complete-2.4.0+2.4.0 supports IRQ adjustment function, and the same method to modify interrupt as described before. After IRQ adjustment, please execute command “dmesg” to check whether you have made the EC module worked. The following figure means EC module has been detected.
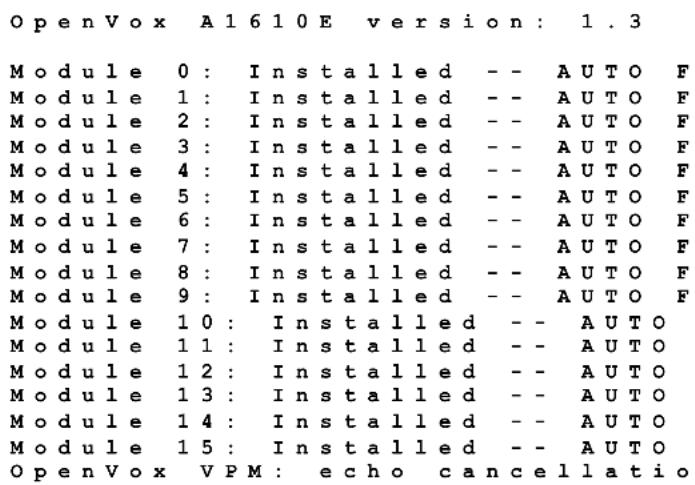
Figure 7 EC module detection
2. Check configuration files
Run command "vim /etc/dahdi/genconf_parameters". If the hardware is AE1610E, please set echo_can to none as following:
echo_can none
While it is A1610E, just ignore that step and keep default.
Execute those commands:
# dahdi_genconf
# dahdi_cfg -vvvv
[root@localhost ~]# dahdi_cfg -vvvv
DAHDI Tools Version - 2.4.0
DAHDI Version: 2.4.0
Echo Canceller(s):
Configuration
====================

Channel map:
Channel 01: FXO Kewlstart (Default) (Echo Canceler: none) (Slaves: 01)
Channel 02: FXO Kewlstart (Default) (Echo Canceler: none) (Slaves: 02)
Channel 03: FXO Kewlstart (Default) (Echo Canceler: none) (Slaves: 03)
Channel 04: FXO Kewlstart (Default) (Echo Canceler: none) (Slaves: 04)

...
Channel 13: FXS Kewlstart (Default) (Echo Canceler: none) (Slaves: 13)
Channel 14: FXS Kewlstart (Default) (Echo Canceler: none) (Slaves: 14)
Channel 15: FXS Kewlstart (Default) (Echo Canceler: none) (Slaves: 15)
Channel 16: FXS Kewlstart (Default) (Echo Canceler: none) (Slaves: 16)

16 channels to configure.

Setting echocan for channel 1 to none
Setting echocan for channel 2 to none
Setting echocan for channel 3 to none
Setting echocan for channel 4 to none
Setting echocan for channel 5 to none

...
Setting echocan for channel 12 to none
Setting echocan for channel 13 to none
Setting echocan for channel 14 to none
Setting echocan for channel 15 to none
Setting echocan for channel 16 to none
Figure 8 Channel map
The command dahdi_genconf will automatically generate files /etc/dahdi/system.conf and /etc/asterisk/dahdi-channels.conf. Confirm dahdi-channels.conf is included in chan_dahdi.conf, otherwise, run command:
# echo "#include dahdi-channels.conf" >> /etc/asterisk/chan_dahdi.conf
FXO ports use FXS signaling, while FXS ports adopt FXO signaling. A part of system.conf, which is the basic channel configuration file, is displayed.
<h1 id="span-1-opvxa24xx16-openvox-a1610e-board-25-master">Span 1: OPVXA24XX/16 "OpenVox A1610E Board 25" (MASTER)</h1>
Fxoks=1
fxoks=2
fxoks=3
fxoks=4
...
fxks=13
fxks=14
fxks=15
fxks=16

<h1 id="global-data">Global data</h1>

Loadzone= us
defaultzone= us
Figure 9 A part of system.conf
In order to match your country pattern, you need to change parameters loadzone and defaultzone to your country. For example, your system is in CHINA, then, you would like them change to:
loadzone = cn
defaultzone = cn
Meanwhile, you also need to modify another parameter, which is in file /etc/asterisk/indications.conf:
country=cn
A part of file /etc/asterisk/dahdi-channels.conf is showed as below. (Modification, if it is not agree with the hardware setup)
; Span 1: OPVXA24XX/24"OpenVox A1610 Board 25" (MASTER)
;; line="1 OPVXA24XX/24/0 FXOKS"
signalling=fxo_ks    //FXS ports use FXO signaling
callerid="Channel 1" <4001>
mailbox=4001
group=5
context=from-internal
channel => 1
callerid=
group=
context=default

;; line="2 OPVXA24XX/24/1 FXOKS"
signalling=fxo_ks
callerid="Channel 2" <4002>
mailbox=4002
group=5
context=from-internal
channel => 2
callerid=
group=
context=default

......

;; line="13 OPVXA24XX/24/12"
signalling=fxs_ks    //FXO ports use FXS signaling
callerid=asreceived
group=0
context=from-pstn
channel => 13
callerid=
group=
context=default

;; line="14 OPVXA24XX/24/13"
signalling=fxs_ks
callerid=asreceived
group=0
context=from-pstn
channel => 14
callerid=
group=
context=default
Figure 10 A part of dahdi-channels.conf
Check automatically generated files information is agree with your hardware setup, if not, you should modify to your requirements.
After you done works above, reboot your PC please.
3. Start asterisk by executing command: asterisk -vvvvvvvvgc
If asterisk is already activate, run "asterisk -r" instead.
After entering CLI, run command "dahdi show channels". If DAHDI channels are found, it means dahdi channels have been loaded into asterisk.
3.4 Call test
1. Log in Elastix
Type IP address of Elastix operation system in browser, next come to “Welcome to Elastix” interface, and type your username and password. Elastix login interface is like that

Figure 11 Elastix login interface

Figure 12 Elastix interface
2. Hardware detection
Click “system” option, then you will see “hardware detection”, choose it you will see the following outcome.

Figure 13 A1610E hardware detection
3. Add SIP extensions
1) Click PBX, extension, choose Generic SIP Device, and finally submit it. You also can refer to the following figure.

Figure 14 Add a SIP
2) Configure "User Extension", "Display Name", "Secret" these three options, keep others default, and submit your configurations.

Figure 15 SIP extension parameters
3) After successfully adding, click "Apply Configuration Changes Here" button to take your configurations effect. Also you are able to add another SIP by click "Add Extension".
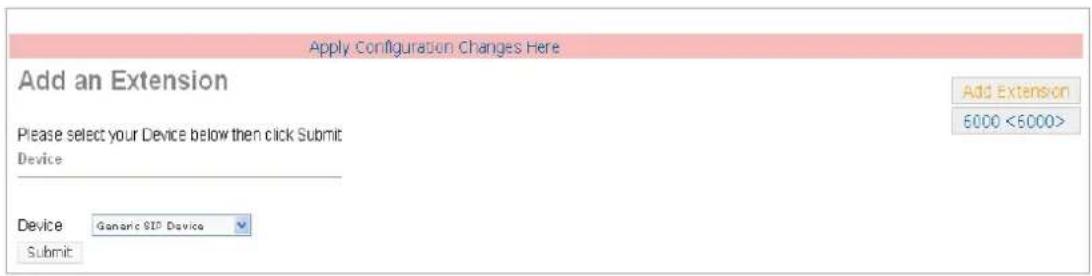
Figure 16 SIP Apply Configuration
Once add two or more SIP phones, make them effective and registered, you are able to make the soft phones call each other fluently and conveniently.
4. Add analog phones
1) The way to add an analog phone is similar to SIP phone. The figure below will make you clear.

Figure 17 Add analog phones
2) After finishing works above, interface will come to "Add DAHDI Extension", please configure "User Extension", "Display Name", "channel" these three items, and keep others default, finally click the left bottom "submit".

Figure 18 Analog extension configurations
3) Click “Add Extension” button to add more phones, and select device type by your requirement. Do not forget to click “Apply Configuration Changes here” to make your configurations effective.
Once add two or more analog phones, make them effective and registered, you are able to make calls fluently and conveniently.
5. Configure inbound routes
Click "Inbound Routes", you may like to fill in "Description" which is optional, and then choose "Extensions" in "Set Destination". After submitting settings, you are also able to select an extension number you need, submit again, finally "Apply Configuration Changes Here".

Figure 19 Inbound routes settings
6. Set outbound routes
Click “Outbound Routes”, set “Route name”, “Dialplan pattern”, “Trunk sequence” these three items to meet your requirements, finally submit changes. The following settings mean all outbound calls through g0 which is an exterior line.
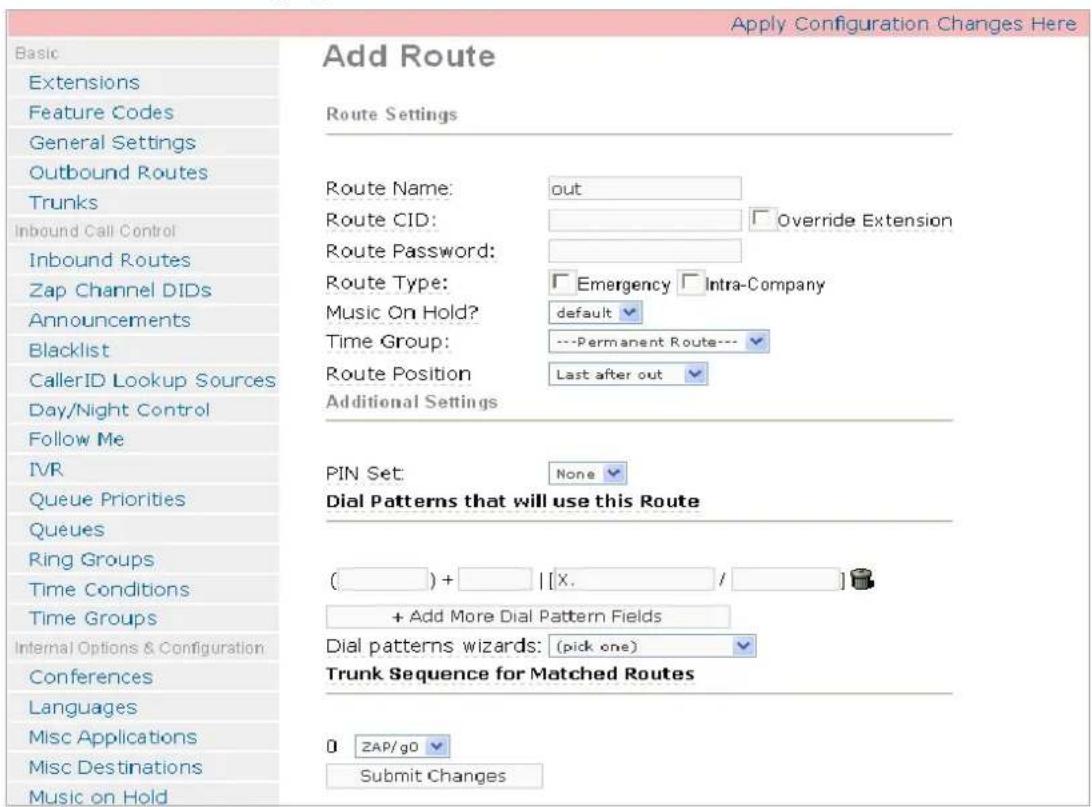
Figure 20 Outbound routes configurations
Additional function
Users should run command “cat /proc/interrupts” to check A1610E has independent interrupt. If A1610E shares interrupt with other device, it may cause some problems even cannot work normally. While A1610E allows users to modify interrupt pin during firmware upgrade for avoid conflict, please visit the following link for details:
http://downloads.openvox.cn/pub/misc/opvx-update%20user%20manual.pdf
4. Reference
www.openvox.cn
www.digium.com
www.asterisk.org
www.voip-info.org
www.asteriskguru.com
www.elastix.org
Tips
Any questions during installation and usage, please consult in our forum or look up for answers from the following websites:
http://bbs.openvox.cn/


- OpenVox
- 深圳开源通信有限公司
- OpenVox-Best Cost Effective Asterisk Cards
- Content
- Overview....4
- Hardware setup....5
- Software installation and configuration 6
- Reference 15
- Test environments
- Overview
- What is A1610E/AE1610E
- What is asterisk
- Hardware setup
- Software installation and configuration
- Download
- tar -xvzf openvox\_dahdi-linux-complete-current.tar.gz
- Installation
- Modify the environment variables
- Compile
- Configuration
- # modprobe opvxa24xx opermode=CHINA ms\_per\_irq=2
- Check configuration files
- Start asterisk by executing command: asterisk -vvvvvvvvgc
- Call test
- Log in Elastix
- Hardware detection
- Add SIP extensions
- Add analog phones
- Configure inbound routes
- Set outbound routes
- Additional function
- Reference
- Tips
Brand : OpenVox
Model : AE1610P13
Category : Unspecified