CE-H23J11-S1 - Power strip Siig - Free user manual and instructions
Find the device manual for free CE-H23J11-S1 Siig in PDF.

User questions about CE-H23J11-S1 Siig
0 question about this device. Answer the ones you know or ask your own.
Ask a new question about this device
Download the instructions for your Power strip in PDF format for free! Find your manual CE-H23J11-S1 - Siig and take your electronic device back in hand. On this page are published all the documents necessary for the use of your device. CE-H23J11-S1 by Siig.
USER MANUAL CE-H23J11-S1 Siig
natural_image
Red circular logo with a white stylized 'S' line (no text or symbols)SIIG®
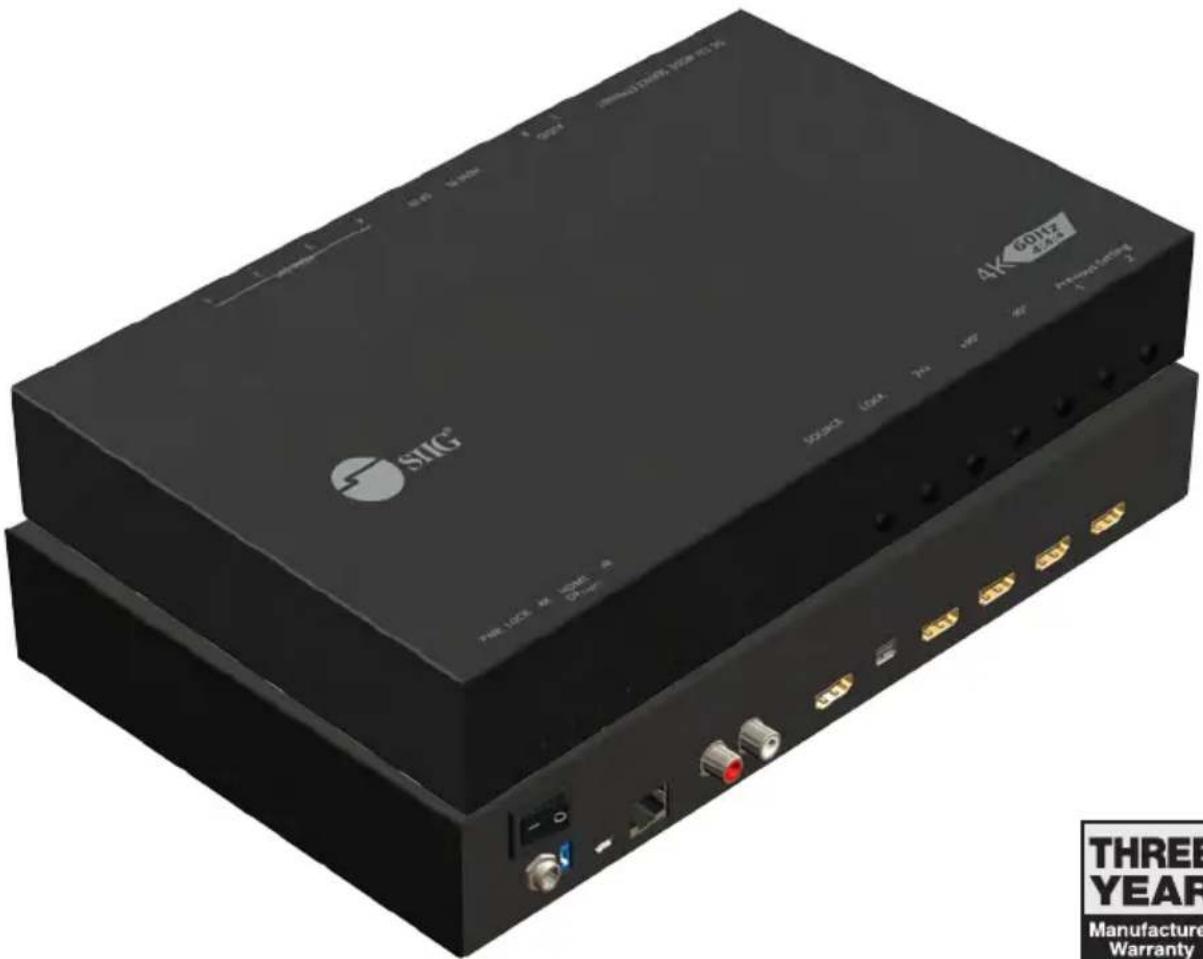
HDMI 2.0 4-Display Video Wall Processor
User Manual
text_image
SIMC 4K 60147 HAN 锁 38.2006 SOMA THREE YEAR Manufacture Warranty
Safety and Notice
The HDMI 2.0 4-Display Video Wall Processor has been tested for conformance to safety regulations and requirements, and has been certified for international use. However, like all electronic equipment, the HDMI 2.0 4-Display Video Wall Processor should be used with care. Please read and follow the safety instructions to protect yourself from possible injury and to minimize the risk of damage to the unit.
- Follow all instructions and warnings marked on this unit.
- Do not attempt to service this unit yourself, except where explained in this manual.
- Provide proper ventilation and air circulation and do not use near water.
- Keep objects that might damage the device and assure that the placement of this unit is on a stable surface.
- Use only the power adapter and power cords and connection cables designed for this unit.
- Do not use liquid or aerosol cleaners to clean this unit.
• Always unplug the power to the device before cleaning.

text_image
Warning sign depicting a hand holding a device against a yellow triangular background, with an exclamation mark above.ESD CAUTION

Thank You for your purchase!
Features
• DisplayPort 1.2a & HDMI 2.0a compliant
- HDCP compliant
• Four HDMI outputs from 640x480 to 1920x1200
- Supports HDMI and DisplayPort input from 640x480 to 4K2K@60 (YUV 4:4:4), interlaced or progressive
- Image parameters and layouts are automatically saved in flash memory of the device and can be recalled for later use
- Several image parameters and layouts can be saved in computers and can be loaded for later use
- Firmware upgradable for new features and technology enhancements
- The video wall processor can control by USB, push button,Ethernet, IR remote control and cloud control
- Cloud support is thru an encrypted communication to provide the best private protection when using device
- Resize, position, zoom for each HDMI output video
- User-selectable output settings, up to 1920x1200
- Supports remote control to switch 1x1, 2x2, 1x3 rotate, and 1x4 rotate mode
• Supports independent input rotation at the resolution up to 1080p
- 4K2K60 (YUV 4:4:4) can be divided and displayed onto four 1080p60 TV (2x2 layout only)
• Supports individual propagation delay on each display to have the best visual perception
Package contents
• HDMI 2.0 4-Display Video Wall Processor
• Power adapter DC 12V / 1A
- IR Remote control
- Rack-mounting ear set
- User Manual
SPECIFICATIONS
| Technical | ||
| Role of usage Video Wall | Processor | |
| HDCP compliance Yes | ||
| Video bandwidth | Input - Single link 600MHz [18Gbps]Output -Single-link 225MHz [6.75Gbps] | |
| Video support | Input - 4K2K@60 (4:2:2 8bits) / 4K2K@60 (4:4:4 8bits)Output - 1920x1080@60 / 1920x1200@60 | |
| Video Format Support H | DMI / DisplayPort | |
| Audio support PCM 2ch | ||
| ESD protection | Human body model — ±15kV [air-gap discharge]& ±8kV [contact discharge] | |
| Input 1x HDMI + 1x Dis | layPort + 1x USB + 1xRJ45 | |
| Output 4x HDMI + 1x Stereo | ||
| Control IR remote control / Ethernet / USB / Front Panel / Cloud Control | ||
| Input TMDS signal 1.2 Volts [peak-to-peak] | ||
| HDMI connector Type A | [19-pin female] | |
| Mini-USB connector Type A | ||
| RJ-45 connector WE/SS 8P8C | ||
| Mechanical | ||
| Enclosure Metal case | ||
| Dimensions(L x W x H) | Model 290 x 180 x 44mm [11.4" x 7" x 1.7"] | |
| Package 376 x 240 x 112mm [1'2" x 9.4" x 4.4"] | ||
| Carton 590 x 510 x 405mm [1'9" x 1'7" x 1'3"] | ||
| Weight | Model 1427g [3.2lbs] | |
| Package | 2077g [4.6lbs] | |
| Fixedness | 1U rack-mount with ears and Wall hanging holes | |
| Power supply | 12V DC | |
| Power Consumption | 12W | |
| Operation temperature | 0~40°C [32~104°F] | |
| Storage temperature | -20~60°C [-4~140°F] | |
| Relative humidity | 20~90% RH [no condensation] | |
Layout
Front Panel

text_image
1 2 31. LED indicator:
PWR - Power indicator LED
LOCK - When device status is locked, it will shine
4K - If source resolution is 4K, the LED indicator will shine
Source – When source from HDMI, the LED indicator will shine Source from DisplayPort, the LED indicator will blink
- IR SENSOR: IR sensor for receiving the IR commands from IR remote
3. Control buttons:
Button 1 (Source) – Source setting (HDMI or DisplayPort)
Button 2 (LOCK) - Press button for 3 seconds will enable/disable device locked
Button 3 (2x2) - Fast switch to 1x1 and 2x2
Button 4 (+90°) - Fast switch to 3x1 90° and 4x1 90°
Button 5 (-90°) - Fast switch to 3x1 -90° and 4x1 -90°
Button 6 (Preset 1)
Button 7 (Preset 2)
Rear Panel
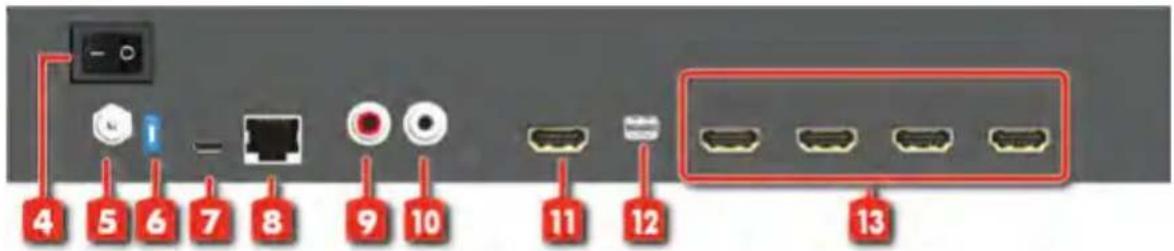
text_image
Diagram showing labeled ports and connectors on a device panel, with numbered red labels pointing to specific ports.- Power Switch: Power ON/OFF switch
- +12V DC: 12V DC power jack
- Dip Switch: On for normal use
Off for F/W upgrade
- USB virtual COM
- Ethernet: Ethernet control port
- Stereo audio output - L
- Stereo audio output - R
- HDMI INPUT
- DisplayPort INPUT
- Output 1-4: HDMI outputs
SUPPORTED RESOLUTION
| Input resolution Output resolution | |
| 720x480@60Hz | 640x480@60Hz |
| 720x576@50Hz | 720x480@60Hz |
| 1280x720@60Hz | 720x576@60Hz |
| 1920x1080@30Hz | 800x600@60Hz |
| 1920x1080@60Hz | 1024x768@60Hz |
| 4K2K@30Hz | 1280x720@60Hz |
| 4K2K@60Hz (4:2:2 8bits) | 1280x768@60Hz |
| 4K2K@60Hz (4:4:4 8bits) | 1280x960@60Hz |
| 1280x1024@60Hz | |
| 1366x768@60Hz | |
| 1440x900@60Hz | |
| 1600x1200@60Hz | |
| 1680x1050@60Hz | |
| 1920x1080@60Hz | |
| 1920x1200@60Hz | |
Application

text_image
HDMI CABLE Router WWW. OR PC HDMI CABLE Blu-ray PlayerOperation Approach
Method A: Software Operation
System Requirement and Precautions
-
Whenever power off HDMI 2.0 4-Display Video Wall Processor, please stay unpowered at least 5 to 10 seconds to allow power capacitors to discharge.
-
The HDMI 2.0 4-Display Video Wall Processor provides software control program which runs under Microsoft Windows 7, 8.1, 10 through the interface of USB virtual com control.
-
Before you click on the icon of the software, make sure you have secured the connection between your computer USB port and the HDMI 2.0 4-Display Video Wall Processor.
Start the software control program
Executing the control software, the following dialog will pop up. It has two ways to control the HDMI 2.0 4-Display Video Wall Processor device (under Microsoft Windows 7, please run as administrator).
- USB Connection: Use USB to connect the port on device and computer. Select correct virtual COM port and click the OK button.
- Ethernet Connection: Enter the device IP address and click the OK button.

text_image
ReConnectForm USB Com Port: CON1 Ethernet IP: 192 168 10 142After the software control setting is accomplished, it will enter directly to the control interface.

text_image
Video Wall 4K60 ASSC RESET IP CONFIGURE INFO REFRESH EDID 4K2K Step1 Step2 Step2_1 Step2_2 Step2_3 Step3 Rotation None Clockwise Counterclockwise Start End Horizontal 0 to 3840 Vertical 0 to 2160 Preset 1 Apply Save1. Connection Status:
Show the connect information and status. If you use USB control Mode to connect device, the graph is . F P control, the graph of Ethernet is

2. Quick Selection:
\*Quick Selection function is not available when the input resolution is 4K2K@60Hz
In this part, you can set up the screen resolution, screen coordinate and split screen. Firstly, you should select the TV picture and you can set up the corresponding function. The different colors of frame represent the different output TVs. The information of coordinate shows the position of output TV. We also provides 8 preset spaces to save the frequently used scenarios into the device
text_image
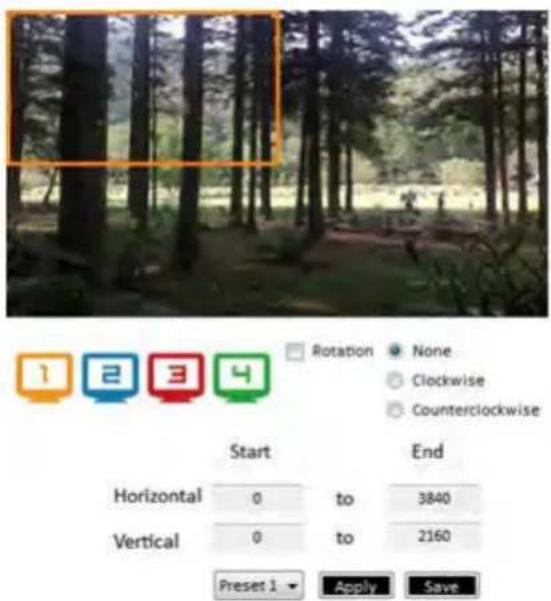
Rotation None Clockwise Counterclockwise Start End Horizontal 0,to 3840 Vertical 0,to 2160 Preset 1 Apply SaveRotation: \*only at input is 1080p resolution
Use the software for independent rotation for each input. You can select clockwise or counterclockwise to rotate the screen.
Output Selection and Resolution:
(1)Step 1: check input resolution and choose output resolution
Set the output resolution. You can choose the design display icon to select the output port and setup resolution. When setting the different resolution, the coordinate of output will also be changed.
In this part, you also can select input source (HDMI or DisplayPort) or lock/unlock the device.
*Note that when you select the Synchronize function, all windows need to be set up at the same resolution, otherwise the output will be abnormal.
*If you lock the device, only factory reset function can work.

text_image
Video Wall 4K60 ASSC RESET IP CONFIGURE INFO REFRESH EDID 4K2X CONNECTED Step1 Input Resolution: 1920x1080@60 Synchronize Output Resolution: 1920x1080@60 HDMI Apply UNLOCK Step2 Step2_1 Step2_2 Step2_3 Step3 Rotation None Clockwise Counterclockwise Start End Horizontal 0 to 1920 Vertical 0 to 1080 Preset 1 Apply Save(2) Step 2: output setting
It has three modes to set up the output TV resolution, position, size and split screen. The details of different mode are described in step 2-1, 2-2 and 2-3.
*Note that when you want to change to another mode, you need to go back to the step 2.
- Quick Selection 2. From file 3. Custom define
(3) Step 2-1: quick selection

text_image
Step2_1 Quick Selection 3x1 3x1 4x1 4x1 1x1 2x2 1x6 4x1 Rotation None Clockwise Counterclockwise H Start: 0 Width: 640 preview V Start: 0 Height: 1080 Apply Preset 1 Apply SaveIf you choose the Quick Selection mode in step 2, this window will automatically pop up. In this mode, you can select default screen split and rotate screen (rotate screen only at 1080p resolution).
3x1: This mode will divide the screen into 3 parts and rotate the figure. The remaining part shows the full screen.
4x1: The mode will divide the screen into 4 parts and rotate the figure.
When select the 3x1 or 4x1 mode, the picture in the right part of control interface will show a red circle. You can slide this white circle to resize the output screen. In addition, you also can input the number to adjust the coordinate.
*4k2k60 (YUV 4:4:4) only can be displayed as an 2x2 layout (1080p60 for each output)
(4) Step 2-2: configuration from file
You can load and read configuration from the existing file on your PC/laptop.

text_image
Step2_2 Load From File Apply(5) Step 2-3: custom define

text_image
Step2_3 Horizontal cut: 1 Vertical cut: 1 Number: 1 Coordinate start end Horizontal: 0 1920 Vertical: 0 1080In Custom define mode, you can define how to cut in both directions and the part you want to show on output TV. If you want to know or estimate which parts you select, you can click the Grid button to show grid on the graph. After the setting, please click the "SAVE AS" button. Besides, you also can click the "SAVE AS" button to save the configuration for future usage. You can adjust the output position by setting coordinates.
(6) Step 3: adjust image
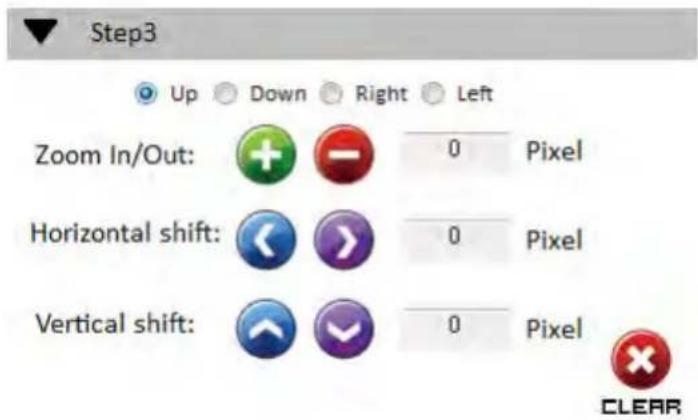
text_image
Step3 Up Down Right Left Zoom In/Out: + - 0 Pixel Horizontal shift: < > 0 Pixel Vertical shift: ↑ ↓ 0 Pixel CLEARZoom In/Out: You can change pixel size from the edge of image by clicking "+" and "-" button (the edge of image has four directions). After adjusting the image, the rest of this image will be auto-scaled to fulfill the screen.
Horizontal shift/ Vertical shift: You can arbitrarily move the image on each screen in horizontal direction or vertical direction. Move one pixel at a time.
3. EDID (Extended Display Identification Data)

text_image
Video Wall 4K50 ABC RESET IP CONFIGURE INFO REFRESH CONNECTED EDID ACC Learn EDID From Default 1.Full-HD(1080p@60)-24bit 2D & 2ch To Input1 Learn From Display 1.Output1 To Input1 Learn From File To Input1 Load View EDID From Input1 View Save as... EDIO Description:4. Advanced Setting

text_image
Video Wall 4K60 Machine Name: Host Name: New Host Name: (Max lenght: 8) Change Graph Load Graph FACTORY RESET5. 4K2K Setting
When input is 4K2K@60Hz Resolution, the output display will be forced to 2x2 layout (other layout cannot set) and only can set up the output position. We also provide 8 preset spaces to save the frequently used scenarios into the device.

text_image
Video Wall 4K60 MASC RESET IP CONFIGURE INFO REFRESH EDID 4K2X CONNECTED Preset 1 Apply Save H Start: 0 Width: 1920 V Start: 0 Height: 1080 Preview Apply6. Cloud setting-Association Code
Clicking "ASSC" button to get an "association code". The device can use this code to pair with a cloud server. After a successful pairing, you can reset cloud.
*Please pair device to cloud within 2 minutes when you get an association code.
7. IP Configure
You can also use the Ethernet to control the software program. First, you should click the "IP CONFIGURE" button to setup network. Next, read the Ethernet setting from your device and manually set to the device or click the DHCP button to automatically get the IP address. After the step of IP configuration, please restart the machine.

text_image
NetWork NetWork IP 192 . 168 . 1 . 38 Mask 255 . 255 . 255 . 0 Gateway 192 . 168 . 1 . 1 DHCP Read from device Write to device NetWork IP 192 . 168 . 1 . 38 Mask Gateway DHCP Read from device Write to device8. Info
Read the software and firmware version.

text_image
Software version: 1x4C_SW_01 Firmware version: 1X4_FW_00_01 確定9. Refresh
This function can not only refresh the information of the setting but also reconnect this device. You can click "REFRESH" button to update the control connection. A "ReConnectForm" window will pop up for you to select the approach to connect this device.
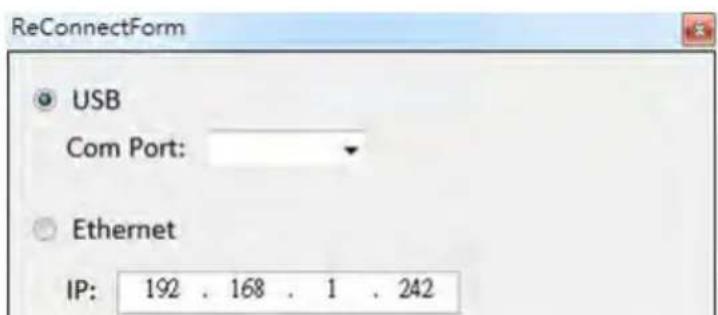
text_image
ReConnectForm USB Com Port: Ethernet IP: 192 . 168 . 1 . 242Method B: Firmware Update through mini-USB Port
- Please ensure the file of new firmware file is in the root directory of USB Flash Drive. The file name should be "firmware.bin".
- Use mini-USB to female USB type A cable to connect the USB interface of device and USB Flash Drive.
- Switch dip switch on F/W mode.
- Power cycle the device and it will automatically start the FW update process (The process will take about 10 seconds).
Method C: Control through "intricloud" on Internet Create Account
The first time to use the intriCloud service, please create a new account.
- Access intriCloud (www.intri.cloud) and click "Create new account".

text_image
Account Enter your account Password Enter your password Login Create new account Forgot password- The Registration page will pop up and please fill in your email and password information to create your private account.

text_image
Creat new account Enter an available email as account example@gmail ... Please enter your password 1234XXX Please enter your password again please enter your password again Cancel ApplyAdd Device to intriCloud
- Firstly, please make sure the device is connected to the Ethernet. Then please execute the software from the device to get the association code (Note: the status of software is connected).

text_image
Video Wall 4K60 ASSC RESET IP CONFIGURE INFO REFRESH EDID 4K2K Step1 Step2 Step2_1 Step2_2 Step2_3 Step3 Rotation None Clockwise Counterclockwise Start End Horizontal 0 to 3840 Vertical 0 to 2160 Preset 1 Apply Save- Access intriCloud (www.intri.cloud) or download IntriCloud APP, and then log in your account on the right top corner. Click Add device to add the device which you just got its association code.
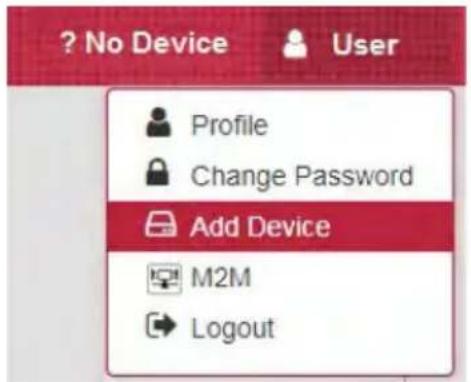
text_image
? No Device User Profile Change Password Add Device M2M Logout- Enter the Installer Email for online support in the future, and the Association Code for pairing with your device.
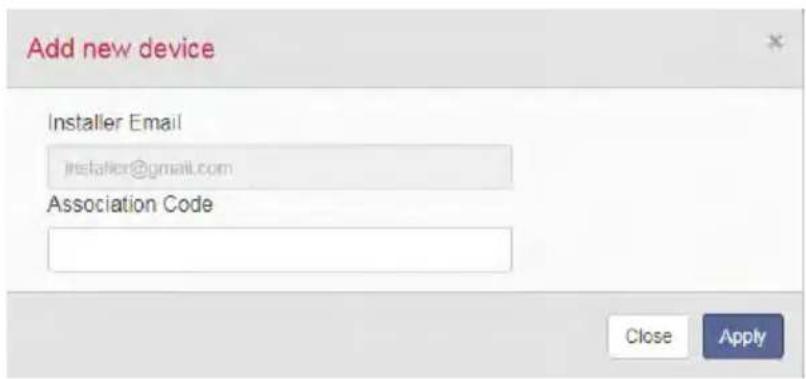
text_image
Add new device Installer Email jstelfler@gmail.com Association Code Close Apply- After adding the device, the list of device related to your account will show on the right top corner. You can click the button to switch device for control.

text_image
IntriCloud MENU SIIG VideoWall User VideoWallEDID Learning
The EDID learning function is only necessary whenever you encounter any display on the HDMI output port that cannot play audio and video properly. Because the HDMI sources and displays may have various level of capability in playing audio and video, the general principle is that the source will output the lowest standards in terms of audio format and video resolutions to be commonly acceptable among all HDMI displays. In this case, a 720p stereo HDMI signal output would be probably the safest choice. Nevertheless, the user can force the matrix to learn the EDID of the lowest capable HDMI display among others to make sure all displays are capable to play the HDMI signals normally.
The method on doing EDID learning please refer to the software operation section.
There are five embedded default EDIDs as below,
- Full-HD(1080p@60)-24bit 2D & 2ch
- HD(1080i 720p@60)-24bit 2D & 2ch
- 4K2K@60-24bit 2D & 2ch
- 4K2K@30-3D-PCM2CH
- 4K2K@60-420-3D-PCM2CH(2ch)
Support
For more info or tech support http://www.siig.com/support
Sep, 2018 Copyright © 2018 by SIIG, Inc. All rights reserved.