CE-H24M11-S1 - Power strip Siig - Free user manual and instructions
Find the device manual for free CE-H24M11-S1 Siig in PDF.

| Product Type | Power strip with surge protection |
| Model | CE-H24M11-S1 |
| Number of Outlets | 6 |
| Input Voltage | 230 V AC, 50 Hz |
| Maximum Load | 3680 W (16 A) |
| Surge Protection | Yes, protection up to 6000 V |
| Overload Protection | Automatic circuit breaker |
| Child Safety Shutters | Yes |
| Power Cord Length | 1.8 m |
| Dimensions (W x H x D) | 30.0 x 4.5 x 5.0 cm |
| Weight | 0.45 kg |
| Material | Flame-retardant ABS plastic |
| Main Functions | Power distribution, surge and overload protection, on/off switch with indicator |
| Maintenance | Unplug before cleaning; wipe with a dry cloth; do not use liquids |
| Safety Notes | Do not exceed rated load; keep away from water and heat; use in dry indoor areas |
| Spare Parts | No user-serviceable parts; replace the entire unit if damaged |
| Repairability | Non-repairable by user; contact manufacturer for warranty service |
| Warranty | 2 years |
| Compliance | CE, RoHS |
Frequently Asked Questions - CE-H24M11-S1 Siig
User questions about CE-H24M11-S1 Siig
0 question about this device. Answer the ones you know or ask your own.
Ask a new question about this device
Download the instructions for your Power strip in PDF format for free! Find your manual CE-H24M11-S1 - Siig and take your electronic device back in hand. On this page are published all the documents necessary for the use of your device. CE-H24M11-S1 by Siig.
USER MANUAL CE-H24M11-S1 Siig
natural_image
Red circular logo with a white stylized 'S' line (no text or symbols)SIIG®
HDMI 2.0 4K HDR 1x2 Splitter HDBaseT Extender with Auto-scaling
User Manual

natural_image
Exterior view of a black SIIG 4K HDR device with mounting flanges and ventilation slots (no readable text or symbols beyond branding)
Safety and Notice
The device has been tested for conformance to safety regulations and requirements, and has been certified for international use. However, like all electronic equipment, the device should be used with care. Please read and follow the safety instructions to protect yourself from possible injury and to minimize the risk of damage to the unit.
- Follow all instructions and warnings marked on this unit.
- Do not attempt to service this unit yourself, except where explained in this manual.
- Provide proper ventilation and air circulation and do not use near water.
- Keep objects that might damage the device and assure that the placement of this unit is on a stable surface.
- Use only the power adapter and power cords and connection cables designed for this unit.
- Do not use liquid or aerosol cleaners to clean this unit.
• Always unplug the power to the device before cleaning.

text_image
Warning sign with yellow triangle and black lightning bolt symbol, indicating danger or hazardESD CAUTION

Package contents
• HDMI 2.0 4K HDR 1x2 Splitter HDBaseT Extender
- Receiver x2
• Power adapter DC 12V / 3.3A
• IR blaster x1 / IR Receiver x2
- Terminal block x3
- Mounting kit
- User Manual
Thank You for your purchase!
Features
- HDMI 2.0a compliant
• Supports 4K2K@60 4:4:4 8bits
• Supports HDR which is 4K2K@60 4:2:0 10bits - Extends HDMI signal up to 198ft from the HDMI source at Full HD 1080p 36-bit, 114ft at 4K2K@60 444 (4K-HDR Technology)
• Supports PoC(Power over Cable)
• Supports two HDMI loopout - HDCP bypass
• Supports EDID management
• Supports resolution downscaling from 4K2K to 1080P
• Bi-directional IR pass-though -
Pure unaltered uncompressed 7.1ch digital HDMI over Cat.5/5e/6
• Supports 7.1 channel digital audio
• Supports full frequency IR signal from 30KHz to 56KHz
• RS-232 Pass-Thru: Up to 115,200bps -
NOT supports
(1) Resolution downscaling from 4K2K@60 4:2:2 to 1080P
(2) Frame rate conversion
(3) 4K2K@60 4:2:2 to 4K2K@60 4:2:0 - Splitter can bypass 4K HDR data content, but can NOT process it and make HDR content 100% fit into 1080p
- The length depends on the characteristics and quality of the cables. Higher resolutions and longer transmission distances require low skew cables (<25ns/100m) for best performance. Unshielded CAT6 with metal RJ45 connectors is recommended.
Layout
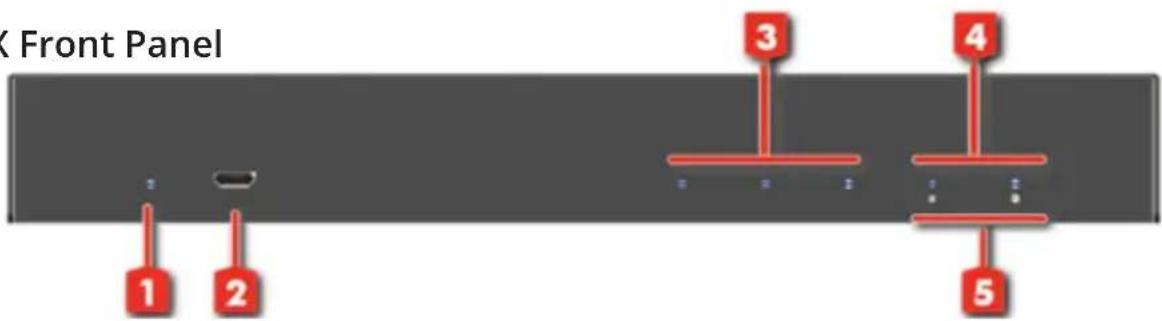
TX Front Panel
text_image
K Front Panel 1 2 3 4 5- Power LED:
- Micro-USB: For technical support only [firmware update]
- HDMI Signal LED: Input signal LED indicator (From the left side to the right is Loopout #1signal LED indicator and Loopout #2 signal LED indicator)
- Link Receiver LED: Link LED indicator 1-2
- HDMI Signal LED: Output signal LED indicator 1-2
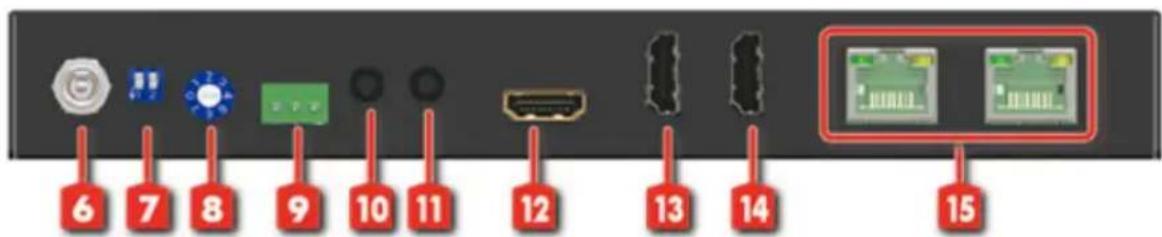
Rear Panel
text_image
6 7 8 9 10 11 12 13 14 15- Power jack: Connect to the DC 12V/3.3A power supply unit
- 2-PIN Dip Switch: For firmware update
- EDID Management Rotary control:
- RS-232(terminal block format): The order of RS-232 pin are TX, RX, GND (from the left side to the right)
- IR Blaster: Plugging in the extension cable of IR blaster
- IR Receiver: Plugging in the extension cable of IR receiver
- HDMI IN: Connect to a HDMI input source
- HDMI LOOPOUT #1: Connect to a HDMI display
- HDMI LOOPOUT #2: Connect to a HDMI display
- HDMI Signal OUT1-2: Link to each HDMI display via a Cat-5/5e/6 cable with a HDMI over Cat.X receiver.
RX Panel

text_image
1 2 3 4 5 6 7- LED: Power LED, Link LED, Signal LED
(1)Power LED: Power indicator LED
(2)Link LED: Link indicator LED
(3)Signal LED: When receiving unit receive the HDMI signal, the LED light will shine
-
RJ45: Plug in a Cat5e/6 cable that needs to be linked to the TX
-
IR Receiver: Plugging in the extension cable of IR receiver
-
IR Blaster: Plugging in the extension cable of IR blaster
-
RS-232(terminal block format): The order of RS-232 pin are TX, RX, GND (from the left side to the right)
-
Dip Switch: [ON] F/W update Mode; [OFF] Normal Mode
-
HDMI OUT: Connects to a HDMI display
NOTICE:
While connecting a new monitor to the splitter, experiencing a short period of time without display might be expected. The splitter will do Automatic EDID learning which analyzes the newly connected monitor to see if the EDID for the HDMI input is necessary to update!
Dip Switch / EDID Switch
| Position Description | ||||
| PIN#1 PIN#2 | OFF[↑] | OFF[↑] | Working Mode & Input F/W Update | |
| OFF[↑] | ON[↓] | Reserved | ||
| ON[↓] | OFF[↑] | Output 1 F/W Update | ||
| ON[↓] | ON[↓] | Output 2 F/W Update | ||
| MODE 0 Ultra HD(4K2K@60) - 8/10/12bit 3D HDR video & 7.1ch audio |
| MODE 1 Ultra HD(4K2K@60) - 8/10/12bit 3D HDR video & 2ch audio |
| MODE 2 Ultra HD(4K2K@30)(4K2K@60 420) - 8/10/12bit 3D HDR video & 7.1ch audio |
| MODE 3 Ultra HD(4K2K@30)(4K2K@60 420) - 8/10/12bit 3D HDR video & 2ch audio |
| MODE 4 Full-HD(1080p@60) - 12bit 3D video & 7.1ch audio |
| MODE 5 Full HD(1080p@60) - 8bit 2D video & 2ch audio |
| MODE 6 Learning EDID from loopout #1 |
| MODE 7 Auto EDID analysis learning mode* |
Application

flowchart
graph TD
    A["Blu-ray Player"] -->|HDMI CABLE x 2| B["Device 1"]
    A -->|HDMI CABLE x 2| C["Device 2"]
    D["Device 1"] -->|CAT 5/5e/6| E["Device 2"]
    F["Device 2"] -->|IR (outgoing)| G["Device 1"]
    H["Device 1"] -->|IR (outgoing)| I["Device 2"]
    J["Device 2"] -->|IR (outgoing)| K["Device 1"]
Firmware update
System firmware update
- Save the firmware file (.bin) & software in the same folder.
- Please try to adjust dip switch [pin1, pin 2]=[ ↑-↑]
- Connect the Micro-USB cable between PC and device
- Open firmware update software and then device will start to update firmware automatically.
- After update process is done, software will show "Success" message and then be closed automatically.
- Power cycle the device

text_image
Firmware Update Initialization ...Output 1/2 firmware update
- Please adjust dip switch [pin1, pin 2] = [ ↓-↑] for output1, [↓-↓] for output2
- Connect the Micro-USB cable between PC and device
- Open the firmware update software
- Set the correct COM port and baud rate (57600 is recommended)
- Click the FILE button to load firmware file (.hex or .bin file)
- Device power on then press Program MCU symbol to do firmware update
- Once update process is done, please power cycle the device and set the dip switch [pin 1, pin 2] to [ ↑-↑]
- Power cycle the device

text_image
4 57600 BANK 0 FILE CHAR HEXSupport
For more info or tech support http://www.siig.com/support